Documents: Go to download!
User Manual
- User Manual - (English)
- ENERGY GUIDE - (English)
- Specification Sheet - (English)
- Installation Instructions - (English)
- FEATURES AT A GLANCE
- DOOR REMOVAL/REVERSAL INSTRUCTIONS
- CONTROLS
- OPTIONAL FEATURES
- NORMAL OPERATING SOUNDS AND SIGHTS
- CARE & CLEANING
- BEFORE YOU CALL
Table of contents
USER MANUAL
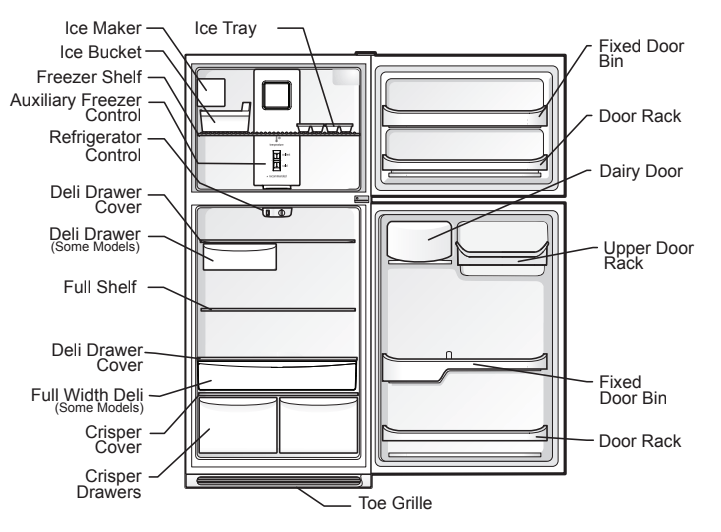
FEATURES AT A GLANCE
Features may vary according to model
DOOR REMOVAL/REVERSAL INSTRUCTIONS
Door removal and reversal instructions:
1.Remove toe grille.
2.Remove top hinge cover. Trace around the hinge with a soft lead pencil. This makes reinstallation easier. Remove top hinge and lift door off center hinge pin. Set door aside.
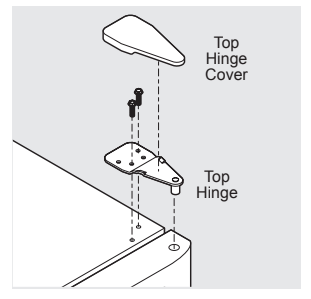
3.Unscrew center hinge pin using adjustable wrench and save for reassembly. Ensure plastic washer stays on hinge pin.
4.Lift refrigerator door off of bottom hinge and set aside.
5.Remove center hinge and shim by removing inside screw and loosening two outside screws enough to allow hinge and shim to slide out. Tighten screws.
6.Loosen two outside screws on opposite side of refrigerator, remove inside screw and install center hinge.
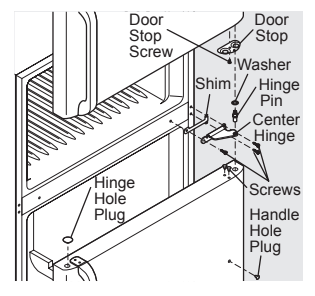
7.Remove two screws on bottom hinge with 3⁄8” socket wrench.
8.Install bottom hinge on opposite side with the two screws removed from step 7.
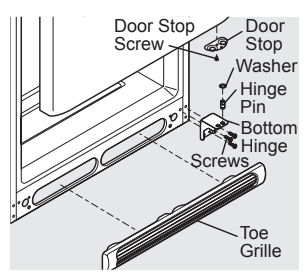
9.Unscrew bottom hinge pin using adjustable wrench. Move hinge pin to other hole in hinge and tighten with adjustable wrench.
10.Reverse door handles (see instruction on next page).
11.Move freezer and refrigerator door stops to opposite side. Before starting screws, use an awl to puncture the foam.
12.Position refrigerator door onto bottom hinge pin and screw center hinge pin through center hinge into top of door. Close refrigerator door to help align hinge hole.
13.Tighten center hinge pin with adjustable wrench.
14.Remove cabinet and hinge hole plugs and move to opposite side.
15.Lower freezer door onto center hinge pin.
16.Close freezer door. Lift up on handle side of door and grasp the thinnest part of the top hinge cover (which was removed in Step 2) and insert the thickest part between the doors on the handle side approximately 3 inches from the outside edge. This will ensure proper spacing.
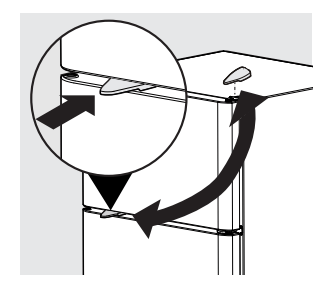
17Tighten the top hinge screws and check door gasket for open seal condition (gap between gasket and cabinet flange).
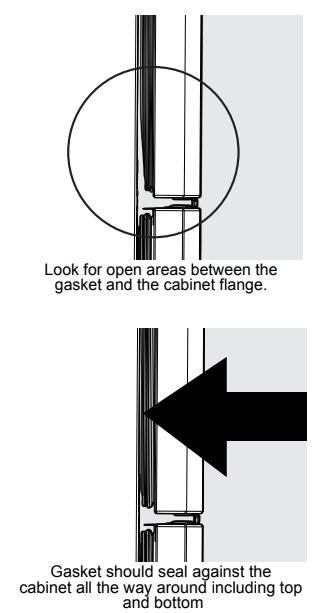
18.Should open seal condition exist, try to massage the gasket to make sure it is seated into the channel.
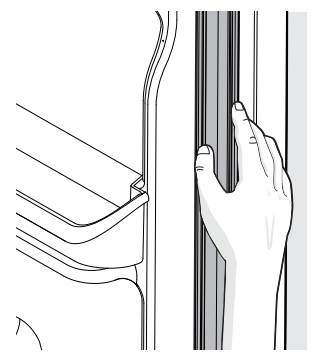
19.If the open seal condition still exists, it may be necessary to flip the gasket. In this case, remove the gasket from the door by pulling it out. Rotate the gasket half a turn (180 degrees). Reinstall the gasket by inserting the corners first then work towards the middle assuring that it is fully seated in the channel.
20.Flip toe grille and reinstall.
21.Plug in electrical power cord and turn refrigerator temperature control to center position. Adjust setting as necessary.
CONTROLS
Cool Down Period
To ensure safe food storage, allow the refrigerator to operate with the doors closed for at least 8 hours before loading it with food.
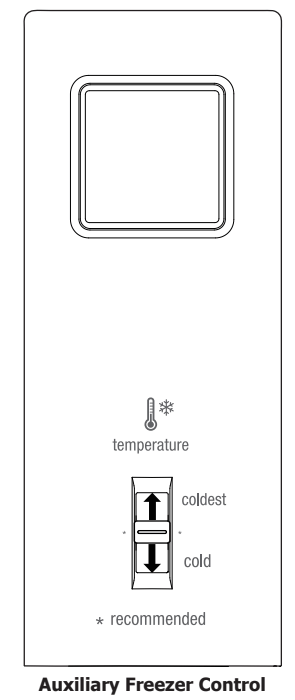
Refrigerator & Freezer Controls
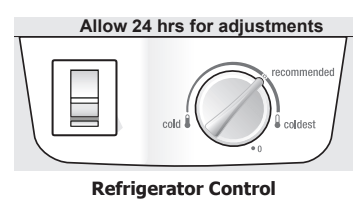
Temperature Adjustment
- Adjust temperature gradually: adjust the knob in small increments, allowing the temperature to stabilize.
- For colder temperatures, adjust the knob towards coldest.
- For warmer temperatures, adjust the knob towards cold.
Adjusting the refrigerator control will change temperatures in both compartments. The auxiliary freezer control can be left at the factory pre-set (mid position) or adjusted as desired; it has no effect on electrical power to the refrigerator.
To maintain temperatures, a fan circulates air in the refrigerator and freezer compartments.
For good circulation, do not block cold air vents with food items.
OPTIONAL FEATURES
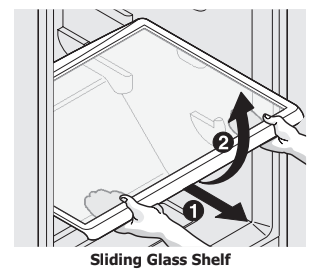
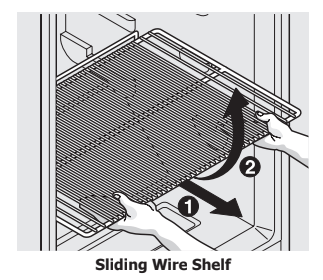
Shelf Adjustment
Refrigerator shelves are easily adjusted to suit individual needs. Before adjusting the shelves, remove all food.
To adjust sliding shelves:
- Remove shelf by pulling forward to stop position.
- Lift front edge up and pull out.
To replace shelf, rest side edges on any pair of shelf rails and carefully push shelf back into position.
Door storage
Door bins, shelves, and racks are provided for convenient storage of jars, bottles, and cans.
Frequently used items can be quickly selected.
The dairy compartment, which is warmer than the general food storage section, is intended for short term storage of cheese, spreads, or butter.
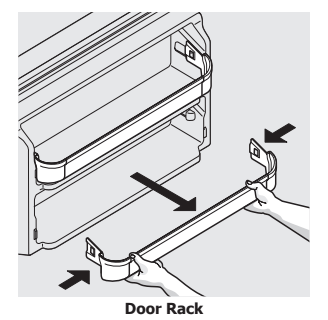
Door rack
Some models have door racks or bins that can accommodate gallon-sized plastic drink containers and economy-sized jars and containers.
To remove door rack:
- Push on rack sides to release from locking tabs.
- Pull straight out.
To install door rack:
- Push rack straight ahead.
- You will hear the sides lock into the tabs.
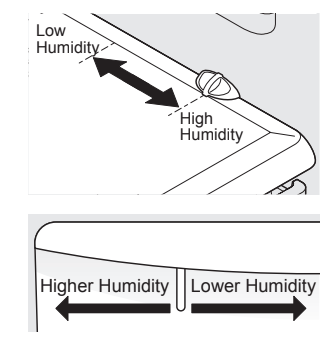
Crisper Humidity Control (some models)
The crisper humidity control, present on the crisper drawers of some models, allows you to adjust the humidity within the crisper. This can extend the life of fresh vegetables that keep best in high humidity.
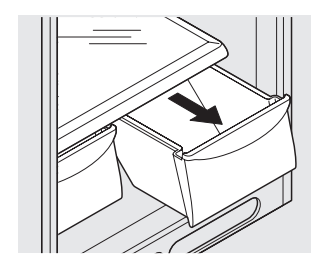
Crispers (some models)
The crispers, located under the bottom refrigerator shelf, are designed for storing fruits, vegetables, and other fresh produce.
Wash items in clear water and remove excess water before placing them in the crispers.
Items with strong odors or high moisture content should be wrapped before storing.
NORMAL OPERATING SOUNDS AND SIGHTS
Understanding the sounds you may hear
Your new, high-efficiency refrigerator may introduce unfamiliar sounds. These sounds normally indicate your refrigerator is operating correctly. Some surfaces on floors, walls, and kitchen cabinets may make these sounds more noticeable.
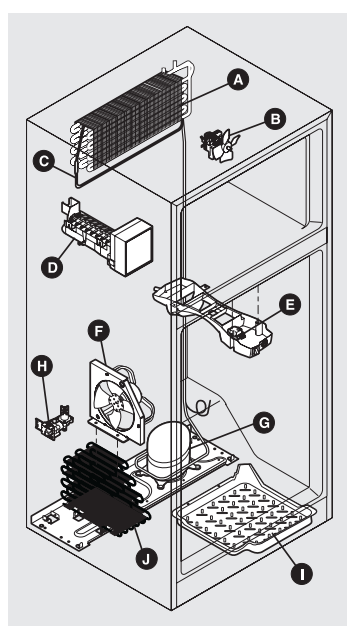
Following is a list of major components in your refrigerator and the sounds they can cause:
A Evaporator Refrigerant through the evaporator may create a boiling or gurgling sound.
B Evaporator fan You may hear air being forced through the refrigerator by the evaporator fan.
C Defrost heater During defrost cycles, water dripping onto the defrost heater may cause a hissing or sizzling sound.
After defrosting, a popping sound may occur.
D Automatic ice maker When ice has been produced, you will hear ice cubes falling into the ice bin.
E Automatic Defrost control These parts can produce a snapping or clicking sound when turning the cooling system on and off.
F Condenser fan You may hear air being forced through the condenser.
G Compressor Modern, high-efficiency compressors run much faster than in the past. The compressor may have a high- pitched hum or pulsating sound.
H Water valve If your refrigerator is equipped with an automatic ice maker, you will hear a buzzing sound as the water valve opens to fill the ice maker during each cycle.
I Drain pan (not removable) You may hear water dripping into the drain pan during the defrost cycle.
J Condenser May create minimal sounds from forced air.
CARE & CLEANING
Protecting your investment
Keeping your refrigerator clean maintains appearance and prevents odor build-up. Wipe up any spills immediately and clean the freezer and fresh food compartments at least twice a year. When cleaning, take the following precautions:
- Never use CHLORIDE or cleaners with bleach to clean stainless steel.
- Do not wash any removable parts in a dishwasher.
- Always unplug the electrical power cord from the wall outlet before cleaning.
- Remove adhesive labels by hand. Do not use razor blades or other sharp instruments which can scratch the appliance surface.
- Do not remove the serial plate.
Do not use abrasive cleaners such as window sprays, scouring cleansers, brushes, flammable fluids, cleaning waxes, concentrated detergents, bleaches or cleansers containing petroleum products on plastic parts, interior doors, gaskets or cabinet liners. Do not use paper towels, metallic scouring pads, or other abrasive cleaning materials or strong alkaline solutions.
Care & Cleaning Tips
Part | What To Use | Tips and Precautions |
| Interior & Door Liners | • Soap and water • Baking soda and water | Use 2 tablespoons of baking soda in 1 quart of warm water. Be sure to wring excess water out of sponge or cloth before cleaning around controls, light bulb or any electrical part. |
| Door Gaskets | • Soap and water | Wipe gaskets with a clean soft cloth. |
| Drawers & Bins | • Soap and water | Use a soft cloth to clean drawer runners and tracks. |
| Glass Shelves | • Soap and water • Glass cleaner • Mild liquid sprays | Allow glass to warm to room temperature before immersing in warm water. |
| Toe Grille | • Soap and water • Mild liquid sprays • Vacuum attachment | Vacuum dust from front of toe grille. Remove toe grille (see Installation Instructions). Vacuum backside, wipe with sudsy cloth or sponge. Rinse and dry. |
| Exterior & Handles | • Soap and water • Non Abrasive Glass Cleaner | Do not use commercial household cleaners containing ammonia, bleach or alcohol to clean handles. Use a soft cloth to clean smooth handles. DO NOT use a dry cloth to clean smooth doors. |
| Exterior & Handles (Stainless Steel Models Only) | • Soap and water • Stainless Steel Cleaners | Never use CHLORIDE or cleaners with bleach to Clean stainless steel front and handles with non- |
| Replacing Light Bulbs | • Unplug refrigerator • Wear gloves • Remove light cover (some models) • Replace old bulb • Replace light cover (some models) • Plug in the refrigerator | CAUTION: Wear gloves when replacing light bulbs to avoid getting cut. Use same wattage when replacing bulb |
BEFORE YOU CALL
Common Occurrences | Before calling for service, review this list. It may save you time and expense. This list includes common occurrences that are not the result of defective workmanship or materials in this appliance. |
| Refrigerator does not run. | • Ensure plug is tightly pushed into electrical outlet. • Check/replace fuse with a 15 amp time-delay fuse. Reset circuit breaker. • The refrigerator/freezer control is turned to “0” • Refrigerator may be in defrost cycle. Wait 20 minutes and check again. |
| Freezer temperature is colder than preferred. Refrigerator temperature is satisfactory. | • Set auxiliary freezer control to a warmer setting until freezer temperature is satisfactory. Allow 24 hours for the temperature to stabilize. |
| Refrigerator temperature is too cold. Freezer temperature is satisfactory. | • Set refrigerator/freezer control to a warmer setting. Allow 24 hours for temperature to stabilize. Then check freezer temperatures and adjust as needed. |
| Freezer temperature is warmer than preferred. Refrigerator temperature is satisfactory. | • Set auxiliary freezer control to a colder setting until freezer temperature is satisfactory. Allow 24 hours for the temperature to stabilize. |
| Refrigerator temperature is too warm. Freezer temperature is satisfactory. | Set refrigerator/freezer control to a colder setting. Allow 24 hours for temperature to stabilize. Then check refrigerator temperatures and adjust as needed. |
| Refrigerator is noisy or vibrates. | • The cabinet is not level. • Floor is weak. • See Normal Operating Sounds and Sights section. |
| Odors in refrigerator. | • Interior needs to be cleaned. • Foods that produce odors should be covered or wrapped. |
| Cabinet light not working. | • Replace light bulb. • Ensure plug is tightly pushed into electrical outlet. |
| Automatic ice maker not working (some models) | • Ensure the wire signal arm is not in UP position. • Ice maker should produce 2.5 to 3 pounds of ice in a 24 hour period. • Water supply is turned off. • Water pressure is too low. • The freezer is not cold enough. |
See other models: FFTR1814TW FFET1022QW FCRS181RQB FFPS3122QM FGTR1837TF
