Loading ...
Loading ...
Loading ...
16
17
DE
KAPITEL 5
INBETRIEBNAHME
INSTALLA
TION
Gerät ohne
Verpackungsunterteil in die
Nähe des Aufstellungsortes
bringen.
Schneiden Sie das
Kunststoffband der
Schlauchbefestigung durch.
Achten Sie darauf, den
Schlauch und das Kabel
nicht zu beschädigen.
Schrauben Sie die 3
Schrauben (A) auf der
Rückseite ab und entfernen
Sie die 3 Distanzstücke (B).
Entfernen Sie die Schraube
(C).
Dadurch fällt aus dem
Inneren des Gerätes ein
Distanzstück ab.
Lehnen Sie das Gerät nach
vorne und ziehen Sie das
Distanzstück heraus.
Schließen Sie die 4
Öffnungen mit den im
Beipack mitgelieferten
Stöpseln.
ACHTUNG:
DIE VERPACKUNG IST IN
DEN HÄNDEN VON
KINDERN EINE
GEFAHRENQUELLE. BITTE
ENTSORGEN SIE DAS
VERPACKUNGS-
MATERIAL
ORDNUNGSGEMÄß.
EN
CHAPTER 5
SETTING UP
INSTALLA
TION
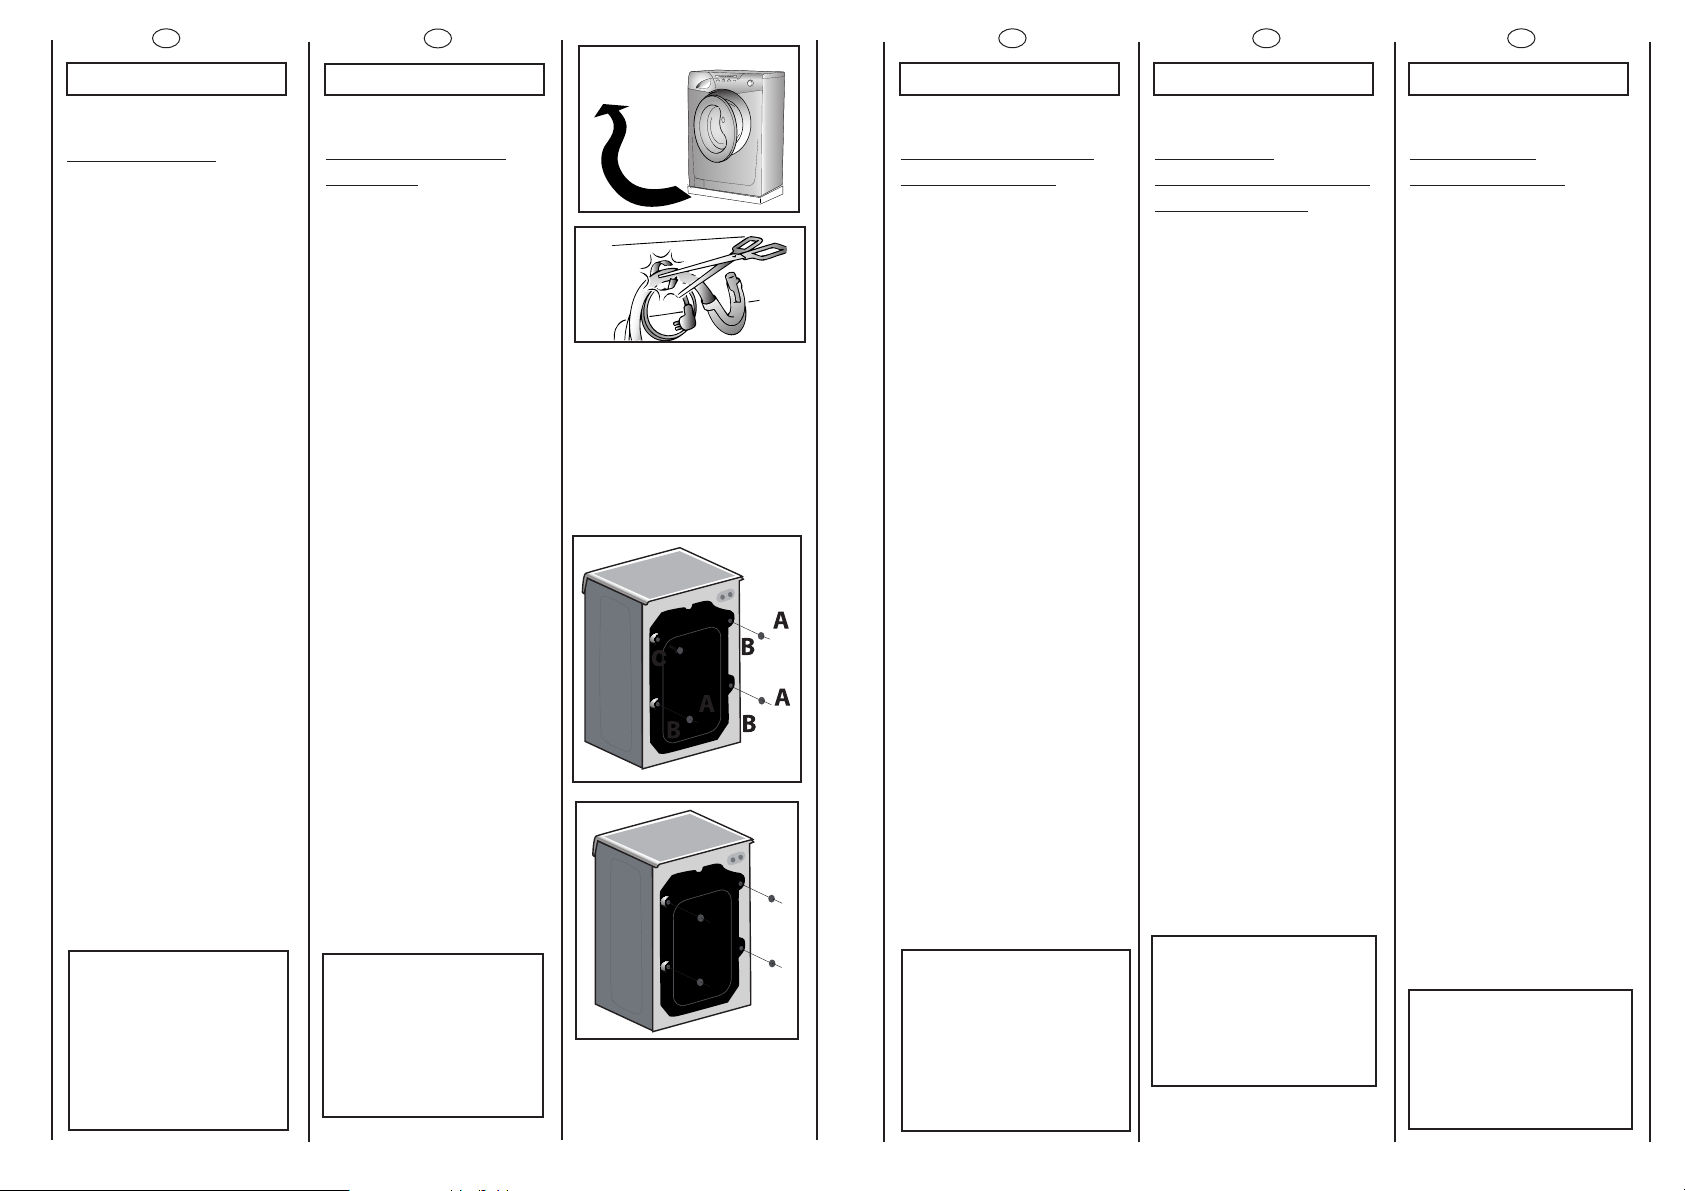
Move the machine near its
permanent position without
the packaging base.
Carefully cut the securing
strap that holds the main
cord and the drain hose.
Remove the 3 fixing screws
marked (A) and remove the
3 spacers marked (B)
Remove the screw (C).
A spacer will fall inside the
machine.
By tilting the machine,
remove the above
mentioned spacer.
Cover the 4 holes using the
caps provided in the
instruction booklet pack.
WARNING:
DO NOT LEAVE THE
PACKAGING IN THE
REACH OF CHILDREN
AS IT IS A POTENTIAL
SOURCE OF DANGER.
PT
CAPÍTULO 5
INSTALAÇÃO
Coloque a máquina, sem a
base da embalagem, perto
do local onde vai ficar
permanentemente
instalada.
Corte cuidadosamente a
correia de segurança que
segura o fio principal e o
tubo da mangueira.
Remova os 3 parafusos
fixadores assinalados e as 3
porcas assinaladas.
Retire o parafuso (C).
Um espaço cairá dentro da
máquina.
Ao inclinar a máquina, retire
o espaço em cima
mencionado.
Tape os 4 buracos utilizando
as tampas que vêm no
pack do manual de
instruções.
ATENÇÃO:
NÃO DEIXE A
EMBALAGEM DA
MÁQUINA OU OS SEUS
COMPONENTES AO
ALCANCE DE
CRIANÇAS: ELA É UMA
POTENCIAL FONTE DE
PERIGO.
EL
K 5
.
K
.
3 (A)
(B).
(C).
.
K ,
.
K 4
.
:
K K
XOMENO
TH YKEYAIA
IOTI MOPEI
NA AOTEEEI
MEITO KYNINO.
ES
CAPÍTULO 5
PUESTA EN
FUNCIONAMIENTO
INSTALACIÓN
Ponga la máquina cerca
del lugar de uso sin la base
del embalaje.
Cortar las cintas que rodean
el tubo, prestando atención
de no dañar el mismo ni el
cable electrico.
Destornille los 3 tornillos (A)
del lado posterior y extraer
los 3 distanciales (B)
Desenrroscar el tornillo (C).
De esta manera caerá en el
interior de la máquina un
distancial.
Inclinar hacia delante la
máquina y extraer el
distancial arriba descrito.
Tapar los 4 orificios utilizando
los tapones contenidos en
la bolsa de instrucciones.
ATENCIÓN:
NO DEJE AL ALCANCE
DE LOS NIÑOS LOS
ELEMENTOS DE
EMBALAJE YA QUE
PUEDEN SER
PELIGROSOS.
Loading ...
Loading ...
Loading ...