Delonghi DCH7992ER Ceramic Fan Heater
Product's Documents
Below are documents related to this product, you can read online or download:
- Owner's manual - (English) Read Online | Download pdf
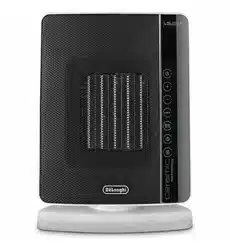
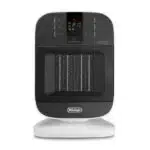
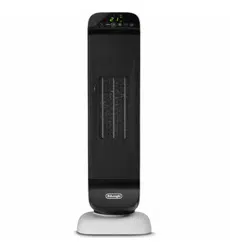
(see fig.1)
A ON/STAND-BY button
B +/- adjustment buttons
C MODE button (selects the operating mode)
D “ECO plus" button
E Timer button
F Swing button
G Remote control receiver
H Remote control
I Indicator light
J Air intake grille
K Filter
The appliance can be used on any horizontal surface.
Do not overload the electrical circuit. Avoid using the same socket for other appliances.


Please note: Room temperature can be displayed in either °C or °F. To change the unit of measurement for the temperature, press the + button for a few seconds, then release.
The “ECO plus"function is available in Heating 1,2 and 3 modes only. To activate the function, press the “ECO plus"button (D). When this function is active the appliance automatically sets the most appropriate power level to guarantee optimum comfort while reducing energy consumption.
While the “ECO plus" function is active, the appliance may switch automatically to a lower heating power than the one displayed. This may happen a number of times in an hour.
Swing button
To distribute the air flow over a wider surface, press the swing button (F)  . The appliance starts swinging to the right and left. To stop the appliance in the desired position, simply press the swing button (F) again.
Digital 24 h timer
This function can be activated from any operating mode. Auto-start: with the appliance in STAND-BY, press the timer button  (E). The symbol is displayed together with the time remaining before the appliance comes on.
To adjust the timer, use the adjustment buttons + and - (B), then wait a few seconds for the setting to be memorised. The stand-by light (I) is displayed together with the symbol, indicating that the timer has been set.
When the programmed time is reached, the appliance comes on with the settings used during the previous period of operation.
Auto-off: with the appliance on, press the timer button (E). The symbol is displayed together with the time remaining before the appliance goes off.
To set the timer, use the adjustment buttons + and - (B), then wait a few seconds for the setting to be memorised.
The current settings are displayed again, together with the symbol indicating that the timer has been set.
When the programmed time is reached, the appliance goes off automatically. To go back to operation without the timer, press the timer button (E) twice.
The timer symbol disappears from the display.
The functions on the remote control are the same as those on the appliance control panel.
For a description of the functions, see the “Operation and use” section on the previous page.

PROBLEM | CAUSE | SOLUTION |
PF display and emits a beep | Temperature sensor is not working properly | Please contact Customer Service |
Product doesn't turn on | Check that the plug is connected to the outlet Auto-start is on Room temperature reaches the set temperature | Plug in Wait till time elapsed or press the button (E) twice to cancel the auto-start and push the button (A) Use the “+” button to increase the set temperature |
The appliance goes off unexpectedly | Check that the plug is connected to the outlet The set temperature has been reached or the time set on the timer has elapsed | Plug in |
A dot is flashing and unit is off | The tip-over switch has been activated | Make sure the appliance is standing upright on a flat surface. If the appliance doesn't work please contact Customer Service |
The display shows "Ht" blinking | The internal temperature is too high. The air intake or outlet grille is obstructed | Check the appliance is correctly positioned respecting the minum distances from the wall, or objects, as indicated on the instruction manual, if not, position the appliance correctly Remove the obstruction Disconnect the plug from the outlet and let the appliance cool down. After few minutes plug the appliance again. If the appliance doesn't work please contact Customer Service |