De’Longhi Appliances via Seitz, 47 31100 Treviso Italia www.delonghi.com
5711413771_01_0419
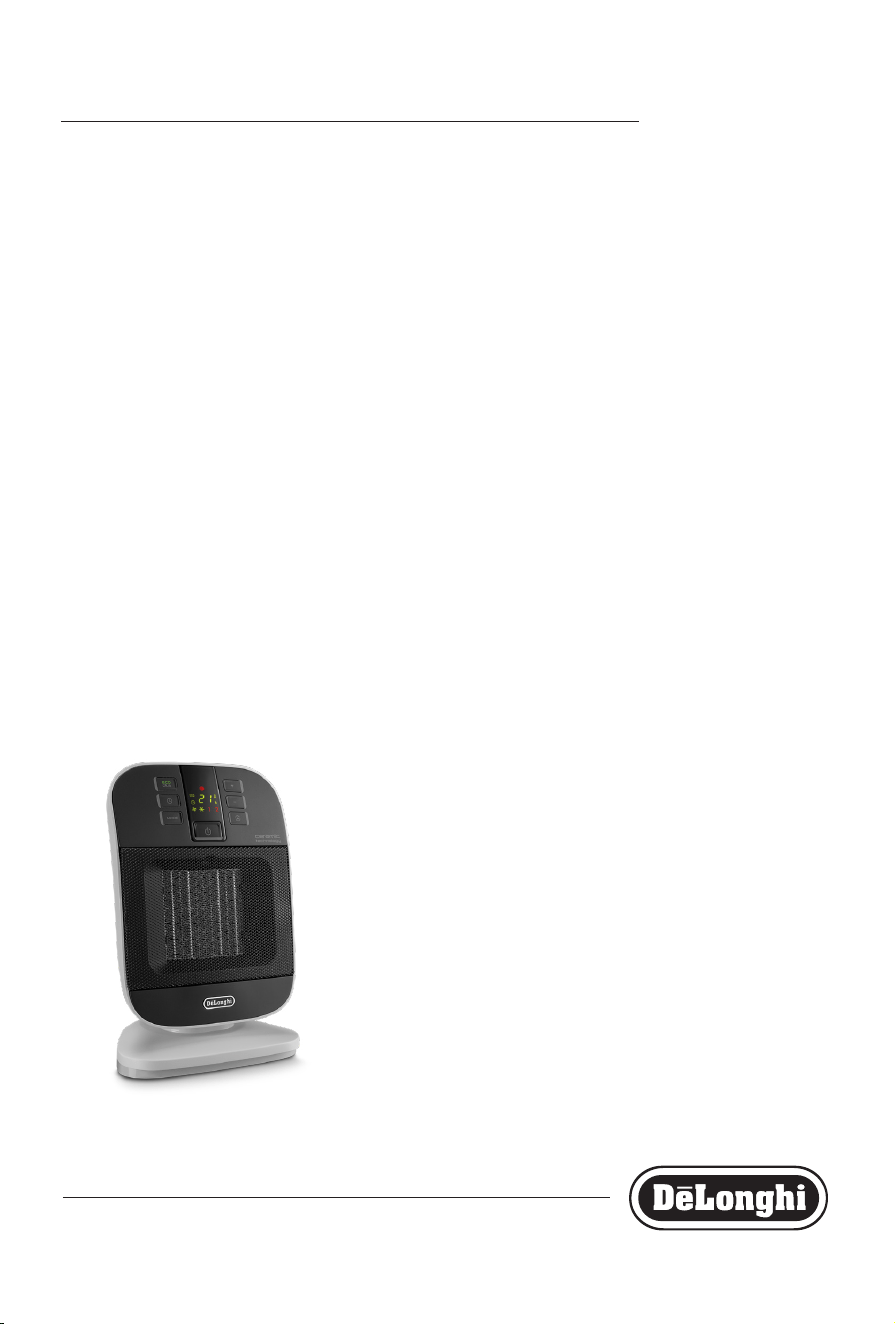
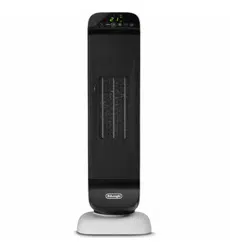
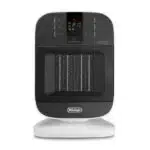
HFX60 Series
CERAMIC FAN HEATER
Instructions for use
This product is only suitable for well insulated spaces or occasional use
2
3
G
D
E
F
B
C
A
I
H
A
B
C
D
E
F
3
IMPORTANT WARNINGS
Safety warnings
Danger!
Failure to observe the warning may result in life threatening
injury by electric shock.
- The appliance must not be placed im-
mediately under a xed power socket.
- Do not use the appliance near show-
ers, bathtubs, sinks, swimming pools,
etc.
- If the power cable is damaged, it must
be replaced by the manufacturer, an
authorised service centre or a qualied
electrician in order to eliminate all risk.
Important!
Failure to observe the warning could result in injury or dam-
age to the appliance.
- This appliance can be used by children
aged from 8 years and above and per-
sons with reduced physical, sensory or
mental capabilities or lack of experi-
ence and knowledge if they have been
given supervision or instruction con-
cerning use of the appliance in a safe
way and understand the hazards in-
volved. Children shall not play with the
appliance. Cleaning and user mainte-
nance shall not be made by children
without supervision.
- Children of less than 3 years should be
kept away unless continuously super-
vised.
- Children aged from 3 years and less
than 8 years shall only switch on/o
the appliance provided that it has been
placed or installed in its intended nor-
mal operating position and they have
been given supervision or instruction
concerning use of the appliance in a
safe way and understand the hazards
involved. Children aged from 3 years
and less than 8 years shall not plug
in, regulate and clean the appliance or
perform user maintenance.
CAUTION — Some parts of this
product can become very hot and
cause burns. Particular attention
has to be given where children
and vulnerable people are pres-
ent.
- CAUTION: To avoid the safety system
resetting accidentally, this appliance
must not be powered through an ex-
ternal on/o device such as a timer, or
connected to a circuit which is turned
o and on regularly by the energy sup-
plier.
- WARNING: Do not use this heater in
small rooms when they are occupied
by persons not capable of leaving the
room on their own, unless constant
supervision is provided.
Danger of burns!!
Failure to observe the warning could result in burns or scalds.
- WARNING: To avoid overheat-
ing, never under any circum-
stances cover the appliance
during operation as this would lead to
a dangerous rise in temperature.
- WARNING: to reduce the risk of re,
keep textiles, curtains, or any other
ammable material a minimum dis-
tance of 1 m from the air outlet.
Safety functions
- Safety device: the appliance is tted
with a safety device which switches it
o in the event of accidental overheat-
ing (e.g. obstruction of air intake and
outlet grilles, motor turning slowly or
4
5
not at all).
To reset, unplug the appliance from
the mains socket for a few minutes,
remove the cause of overheating then
plug in again. If the appliance doesn’t
work please contact the De’Longhi
Customer Service.
- Tip over safety device: Certain mod-
els are tted with a tip-over switch
which turns the appliance o if it falls
over. To restart the appliance, simply
place it upright again.
Please note:
This symbol indicates recommendations and important infor-
mation for the user.
- Use this heater on a horizontal and sta-
ble surface.
- Always use the appliance in an upright
position.
- Do not use this heater if it has been
dropped.
- Do not use if there are visible signs of
damage to the heater.
- The use of extension leads is not rec-
ommended.
However if they cannot be avoided,
follow the instructions accompanying
the extension lead and never exceed
the power limit marked on the exten-
sion.
- Do not use the appliance near walls,
furniture, curtains, etc.
- Do not use the appliance in rooms with
a oor area of less than 4m
2
.
- Before putting the appliance away,
make sure it is completely o and un-
plugged from the mains socket.
Do not store in dusty atmospheres.
- Do not rest anything on the appliance.
- Do not use the appliance to dry laun-
dry. Do not obstruct the air intake and
outlet area (danger of overheating).
- The appliance must not be hung.
- Some models are supplied with a de-
vice which delays of few seconds the
fan shut o.
Important!
- WARNING - KEEP BATTERIES OUT OF
REACH OF CHILDREN.
- Swallowing may lead to serious injury
in as little as 2 hours or death, due to
chemical burns and potential perfora-
tion of the oesophagus.
- Examine devices and make sure the
battery compartment is correctly se-
cured. Do not use if compartment is
not secure.
- Dispose of used button batteries im-
mediately and safely. Flat batteries can
still be dangerous.
For non-EU countries only:
This appliance is not intended for use by
persons (including children) with reduced
physical, sensory or mental capabilities, or
lack of experience and knowledge, unless
they have been given supervision or in-
struction concerning use of the appliance
by a person responsible for their safety.
Children should be supervised to ensure
that they do not play with the appliance.
Disposing of the appliance
The appliance must not be disposed
of with household waste, but taken
to an authorised waste separation
and recycling centre.
5
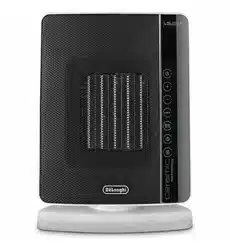
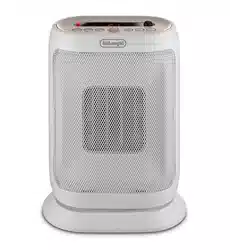
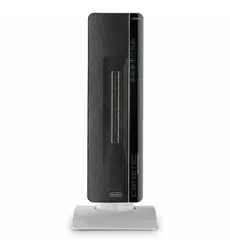
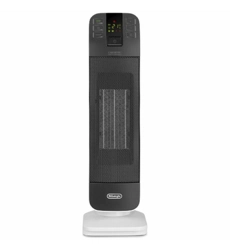
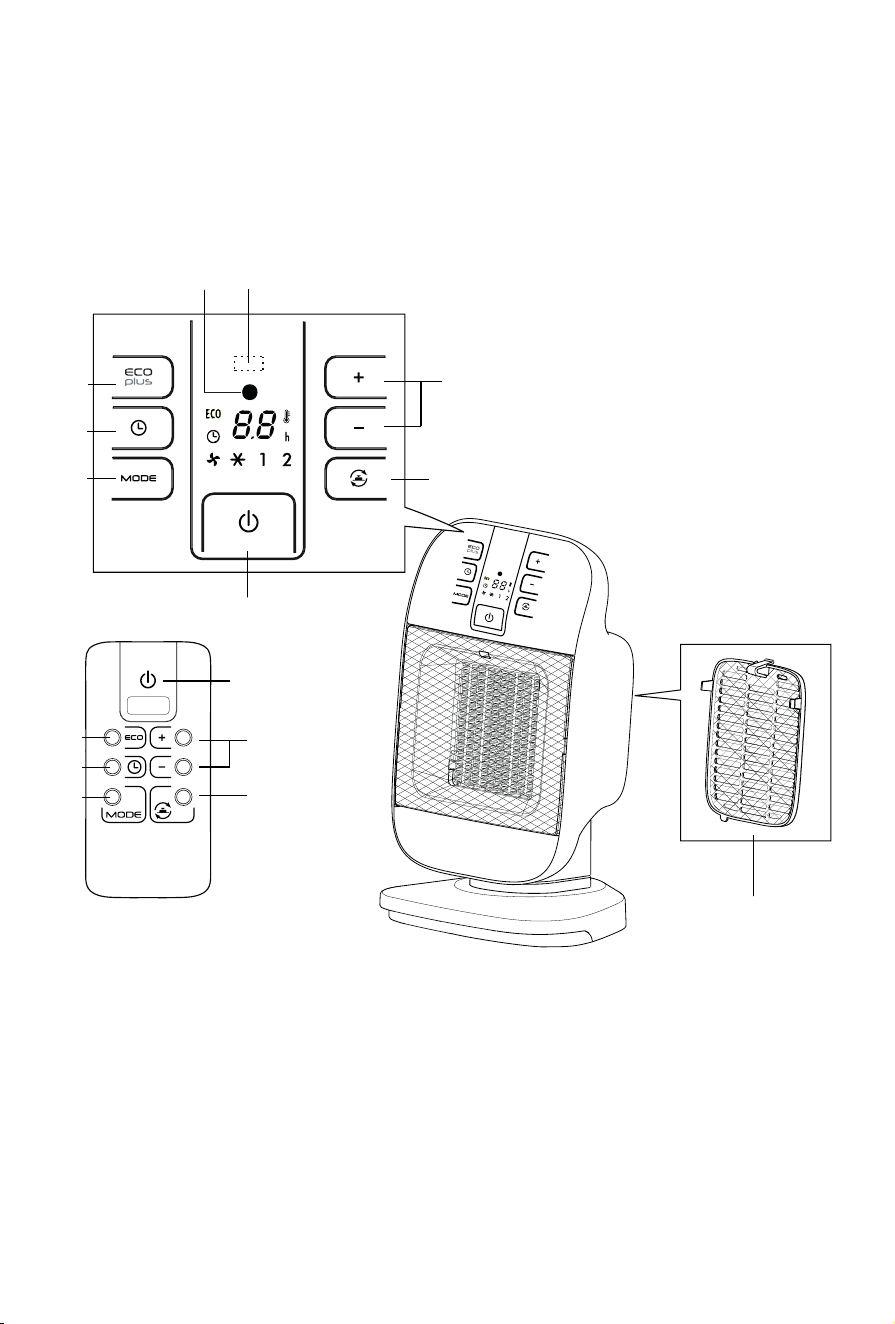
DESCRIPTION
A ON/STAND-BY button
B +/- Adjustment buttons
C Oscillation button
D “ECO PLUS” function button
E Timer button
F MODE button (for selecting the operating mode)
G Power indicator light
H Back cover with lter
I Receiver for remote control (certain models only)
USE
Installation
The appliance can be used on any horizontal surface.
Do not overload the electrical circuit. Avoid using the same
socket for other appliances.
Electrical connection
Before plugging the appliance into the mains socket, check
that the mains power supply corresponds to the value
indicated on the rating plate and that the mains power
supply is adequate for the load.
Operation and use
- Connect the appliance to the power outlet.
- The appliance emits a beep and the power indicator
light (G) also comes on and remains lit while power to
the appliance is on. The appliance goes into STAND-BY.
- Press the ON/STAND-BY button (A) to turn on the
appliance. It will begin to heat with the predened
settings.
- Press the MODE button (F) to select one of the following
functions available:
l
Ventilation
In this operating mode only the fan operates, so the
appliance does not heat the room.
l
Anti-freeze
In this operating mode the appliance keeps the room at
a temperature of 7°C to prevent freezing temperatures.
l
Heating 1 and Heating 2
In this operating mode you can set the desired
temperature by pressing the + and - adjustment
buttons (B).
- Heating 1 (minimum power level):
The appliance operates at the minimum power, reducing
noise and energy consumption to the minimum.
- Heating 2 (maximum power level):
The appliance operates at the maximum power for rapid
heating of the room.
- To turn o the appliance press button ON/STAND-BY
(A). The display could show the count down for about
6 seconds. To completely turn o the appliance, remove
the plug from the socket.
Please note: The display can show the temperature in
both °C and °F. To change the temperature scale, press and
hold the + key for few seconds, then release.
ECO PLUS function
In this operating mode the appliance will automatically set
the power level to guarantee the best comfort reducing the
energy consumption.
The maximum temperature setting is 26 °C. To activate this
function, press the ECO PLUS button (D).
Oscillation button
If you want the appliance to distribute the airow over a
larger area, press the oscillation button (C) . The appliance
will then oscillate right and left. To stop the oscillation in the
desired position, just press oscillation button (C) again.
24-HOUR DIGITAL TIMER
This function can be activated from any operating mode.
Delayed switch-on: with the appliance in the STAND-BY
position, press the timer button (E) .
The display shows the symbol and the time remaining
before switch-on. To set the timer, use the + and - adjustment
buttons (B), then wait a few seconds for the programming to
be set. The display returns to show for stand-by and the
symbol to indicate you have set the timer.
When the programmed time has been reached, the appliance
turns on with the same settings it had during the previous
operation.
Delayed shut-o: With the appliance on, press the timer
button (E) .
The display shows the symbol and the time remaining
before shut-o. To set the timer, use the + and – adjustment
buttons (B), then wait a few seconds for the programming to
be set. The display returns to show the current settings and
the symbol to indicate you have set the timer.
When the programmed time as been reached the appliance
shuts o automatically. If you want to go back to operation
without the timer, press the timer button (E) twice.
The timer symbol disappears from the display.
Using the remote control (certain models only)
The remote control functions correspond to those on the
control panel. See the section “Operation and Use" on the
6
7
previous page for a description of the functions.
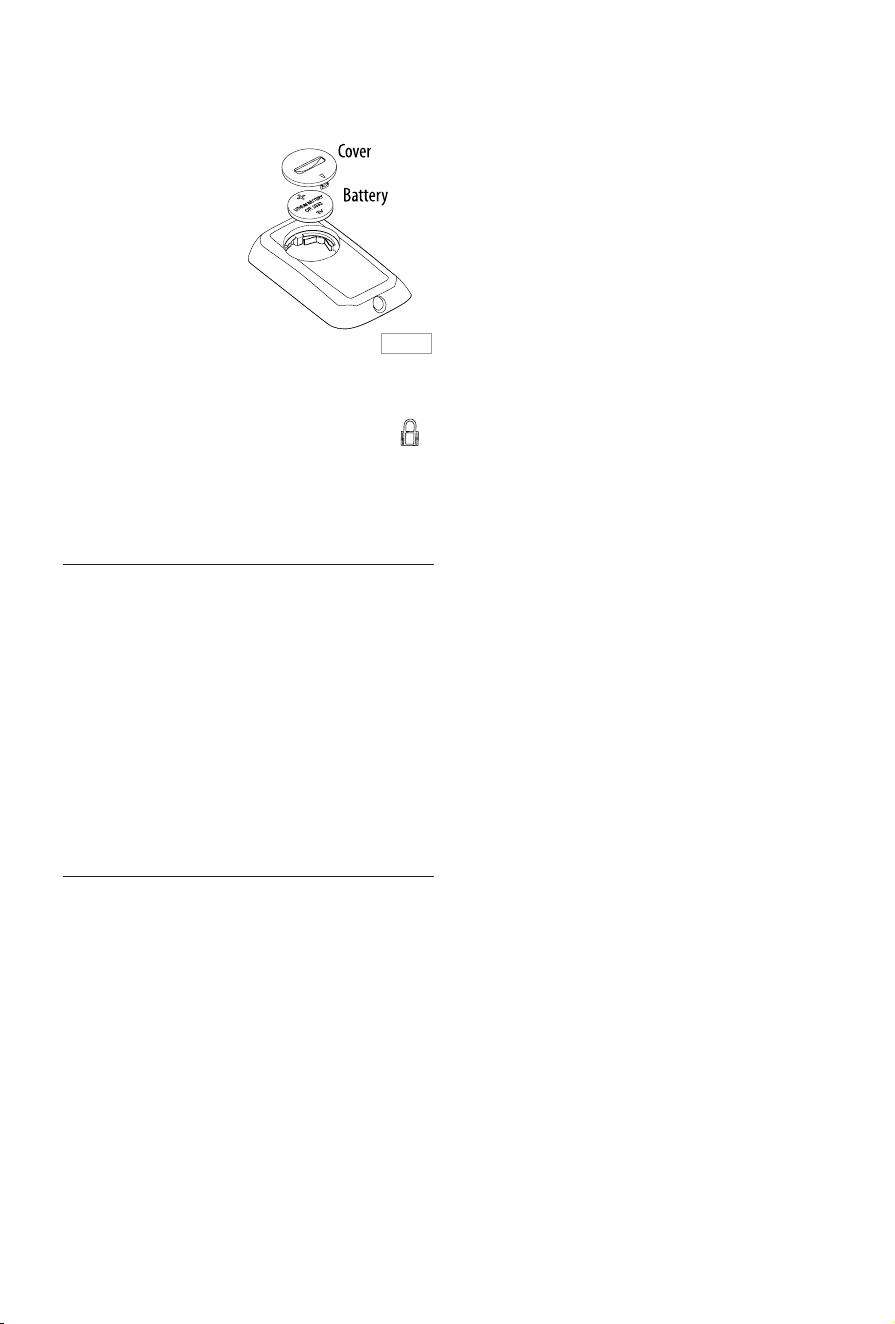
Inserting or replacing the batteries
- The remote control is
provided with a lithium
battery CR2032. To let
the appliance function,
remove the battery
cover strip, by pulling it.
- To replace the batteries,
remove the battery
cover by rotating it.
Replace the battery
paying attention to respect the right polarity as shown
in gure 1.
- Replace the cover rotating it towards the position .
- Old batteries must be removed and disposed o in
accordance with current legislation as they are harmful
to the environment.
MAINTENANCE
- Before carrying out any maintenance, always unplug
from the mains socket.
- During the season when the appliance is in use, clean
the air intake and outlet grilles regularly using a vacuum
cleaner.
- Never use abrasive powders or solvents to clean the
appliance.
- The dust lter which retains impurities in the air, It is
integrated in the removable back cover. To clean the
lter, remove the grille by pulling outward. Blow it
lightly, then replace it into the appliance.
TECHNICAL CHARACTERISTICS
Supply voltage See rating plate
Absorbed power “
Fig. 1
7
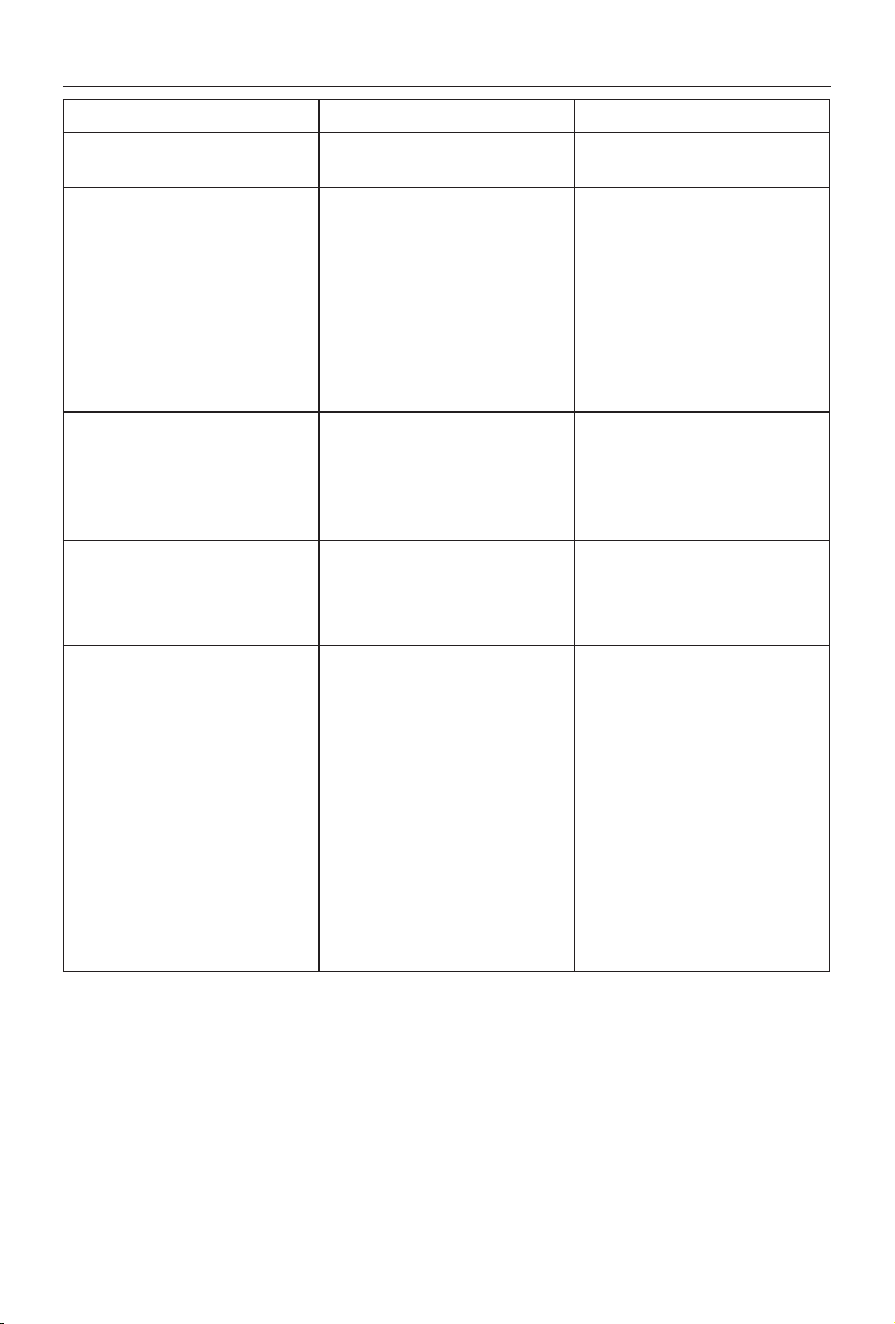
PROBLEM CAUSE SOLUTION
PF display and emits a beep
Temperature sensor is not working
properly
Please contact Customer Service
Product doesn’t turn on Check that the plug is connected to the
outlet
Auto-start is on
Room temperature reaches the set
temperature
Plug in
Wait till time elapsed or press the but-
ton (E) twice to cancel the auto-start
and push the button (A)
Use the “+” button to increase the set
temperature
The appliance goes o unexpectedly Check that the plug is connected to the
outlet
The set temperature has been reached
or the time set on the timer has elapsed
Plug in
A green dot is ashing and unit is o The tip-over switch has been activated Make sure the appliance is standing
upright on a at surface.
If the appli-
ance doesn’t work please contact Cus-
tomer Service
The display shows "Ht" blinking
The internal temperature is too high.
The air intake or outlet grille is
obstructed
Check the appliance is correctly
positioned respecting the minum
distances from the wall, or objects, as
indicated on the instruction manual,
if not, position the appliance correctly
Remove the obstruction
Disconnect the plug from the outlet
and let the appliance cool down. After
few minutes plug the appliance again.
If the appliance doesn't work
please
contact Customer Service
TROUBLESHOOTING