WEEE Number
: 80133970
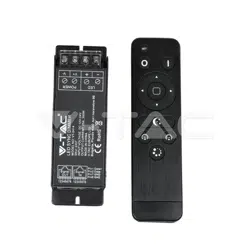
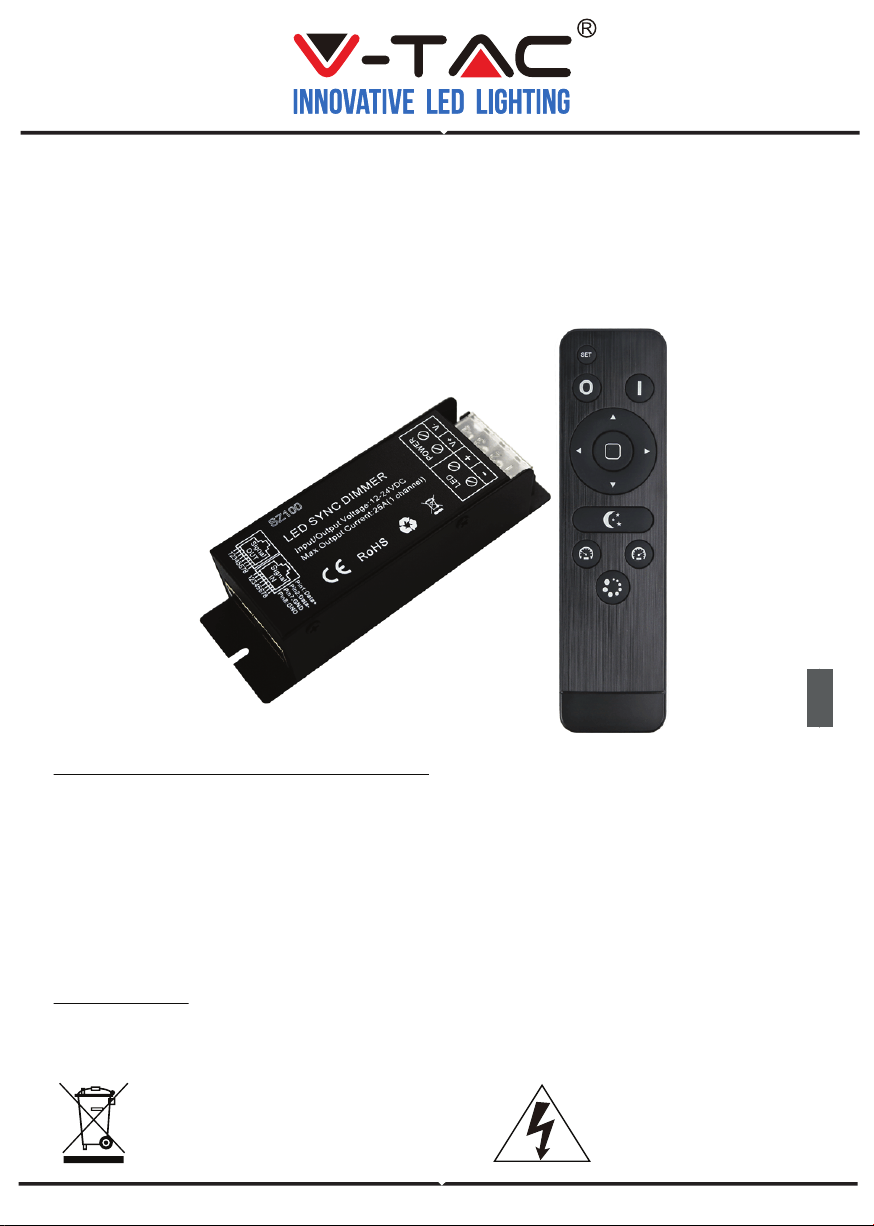
INSTALLATION INSTRUCTION
LED SYNC DIMMER WITH
RF BUTTON REMOTE
IN CASE OF ANY QUERY/ISSUE WITH THE PRODUCT, PLEASE REACH OUT TO US AT: SUPPORT@V-TAC.EU FOR MORE PRODUCTS RANGE,
INQUIRY PLEASE CONTACT OUR DISTRIBUTOR OR NEAREST DEALERS. V-TAC EUROPE LTD. BULGARIA, PLOVDIV 4000, BUL.L.KARAVELOW 9B
INTRODUCTION & WARRANTY
Thank you for selecting and buying V-TAC product. V-TAC will serve you the best. Please read
these instructions carefully before starting the installing and keep this manual handy for future
reference. If you have any another query, please contact our dealer or local vendor from whom
you have purchased the product. They are trained and ready to serve you at the best. The
warranty is valid for 3 years from the date of purchase. The warranty does not apply to damage
caused by incorrect installation or abnormal wear and tear. The company gives no warranty
against damage to any surface due to incorrect removal and installation of the product. The
products are suitable for 10-12 Hours Daily operation. Usage of product for 24 Hours a day would
void the warranty. This product is warranted for manufacturing defects only.
3
YEARS
WARRANTY
*
This marking indicates that this product
should not be disposed of with other
household wastes.
Caution, risk of electric shock.
WARNING!
1. Please make sure to turn off the power before starting the installation.
2. Install only by certified Electrician.
PRODUCT FEATURE
• Designed for single color constant voltage LED lights, Working voltage DC12-24V.
• High watt output design, up to 1*25A/ 300W.
• Memory function, each time power-on reserve the mode which stop in the last power-down.
• Easy connection to achieve multiple dimmers sync-work by RJ45 terminal.
• Adopts RF 14keys remote control with fashion appearance, no need line-of-sight. Control range up
to 20 meters.
• Long-press the brightness and speed key can get the fast adjustment, convenient for operation.
Working temperature -20-60
℃
Supply voltage DC12V-24V
Static power consumption <1W Mode 3
Grayscale 256 levels Speed stage 100 grade
External dimension L127*W41*H32 (mm) Packing size L138*W131*H35 (mm)
Net weight 160g Gross weight 185g
Output 1 channel Max. Output current 25A
Output power 300W RF distance ≤20m
RF frequency 433.92Mhz Memory function support
Max. Output power
12V:<300W;24V:<600W
TECHNICAL PARAMETERS
INTERFACE SPECIFICATIONS
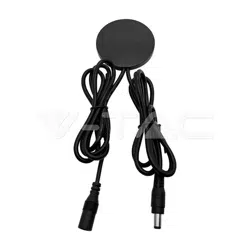
CONTROLLER
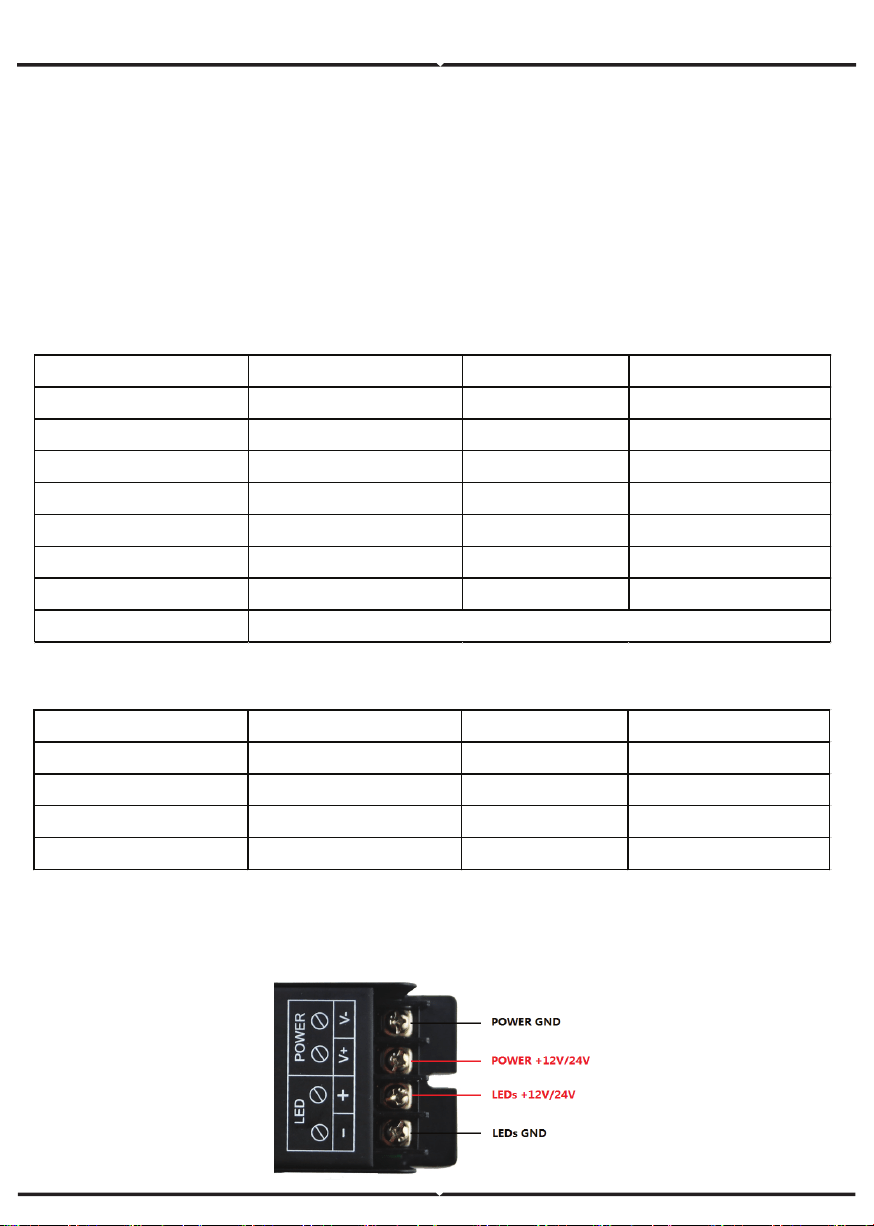
1.POWER AND LOAD INTERFACE
REMOTE CONTROL
Working temperature -20℃~60℃ Supply voltage DC3V(AAA*2)
Standby current <18Ua Working current <25mA
Standby power 54uW Working power 75mW
Net weight 65g RF frequency 433.92Mhz
External dimension L150*W40*H20 mm RF distance ≤20m
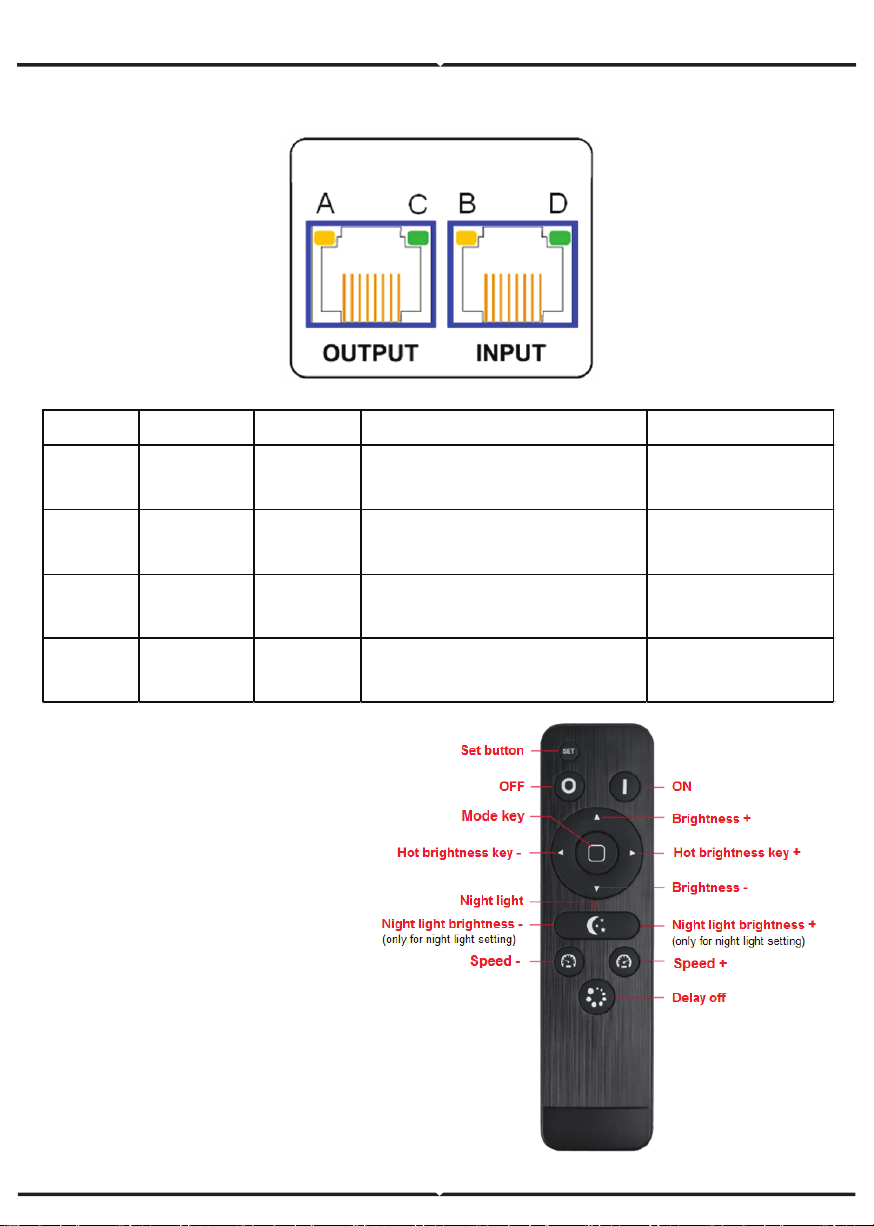
2.RJ45 SYNCHRONIZATION INTERFACE
DIRECTION FOR USE
• Connect the load wire at first, followed
by the power wire; Please ensure short
circuit can not occur between wires
before turning on the power;
• Adopts RF remote technology, 14
buttons in total.
REMOTE FUNCTION OF BUTTONS
Indicator Mark Light on Light flash Light off
Yellow
(A) MCU/RF
MCU/softw
are is clear
Receive the RF signal from
remote
MCU/software error
Yellow
(B)
Power Clear \ Power input error
Green
(C)
SYNC-signal
out
Clear
Signal error: 1)Insert he crystal
tightly; or 2) the cable with
problem need to replace.
Green(D)
SYNC-signal
in
Clear
Signal error: 1)Insert he crystal
tightly; or 2) the cable with
problem need to replace.
Name Description
Set button
For setting the night light and matching code with receiver. Under night light mode, press “Set
button” and hold on for 10 seconds will go into the night light setting. Press the set button
again to save the setting and quit out.
ON Turn on
OFF Turn off
Brightness + The brightness will add 1 level after each time press. Long-press can get fast adjusting.
Brightness - The brightness will reduce 1 level after each time press. Long-press can get fast adjusting.
Hot
brightness
key +
4 levels brightness (10%、30%、70%、100% ) hot selection key, lights will go to next one
after each pressing.
Hot
brightness
key -
4 levels brightness (10%、30%、70%、100% ) hot selection key, lights will go to last one
after each pressing.
Mode key 3 modes in total: 100% static, flash, breathe
Night light
Press the button go to night light mode
(
night light Setting
:
Under night light mode, press
“Set button” and hold on for 10 seconds will go into the night light setting, press the left button
to down the brightness, press the right button to up the brightness. Adjustable range: 1%-
10%.
)
Speed + Add the speed of dynamic mode. Long-press can get fast adjusting.
Speed - Reduce the speed of dynamic mode. Long-press can get fast adjusting.
Delay button The light will be delay off in 30 seconds.
Tips: Receiver can be controlled by any one the same remote as factory default; RF BT remote
control delivered with unique RF code as factory default; if unique-control is needed, please
matching the code before installation and using.
Matching code operation
If unique-control or new-coded-remote is needed, pairing the remote and the receiver as below
operation instruction before using:
Step 1: Pressing key “set” and hold on, power on the controller, the load LEDs will be 50%
brightness white as responding.
Step 2: Continuously to press the key “Mode key“ for 3 times within 5 seconds after step 1 ,the
brightness of LEDs will change from 25% -10% -flashes 3 times and return to the initial state.
Step 3: Code learning successfully, the LEDs will be back to the status before the power off, and
the receiver only can be control by the remote.
Step 4: If not, please re-operate from step 1 to 2.
Clear code operation
Back to factory default, wall-panel can be controlled by any one the same remote control.
Step 1: Pressing key “set” and hold on, power on the controller, the load LEDs will be 50%
brightness white as responding.
Step 2: Continuously to press “Delay button“ 3 times within 5 seconds after step 1 ,the bright-
ness of LEDs will change from 25% -10% -flashes 3 times and return to the initial state.
Step 3: Code clearing successfully, the LEDs will be back to the status before the power off, and
the receiver can be controlled by any remote control(any one the same remote control can be
used to clear the code).
Step 4: If not, please re-operate from step 1 to 2.
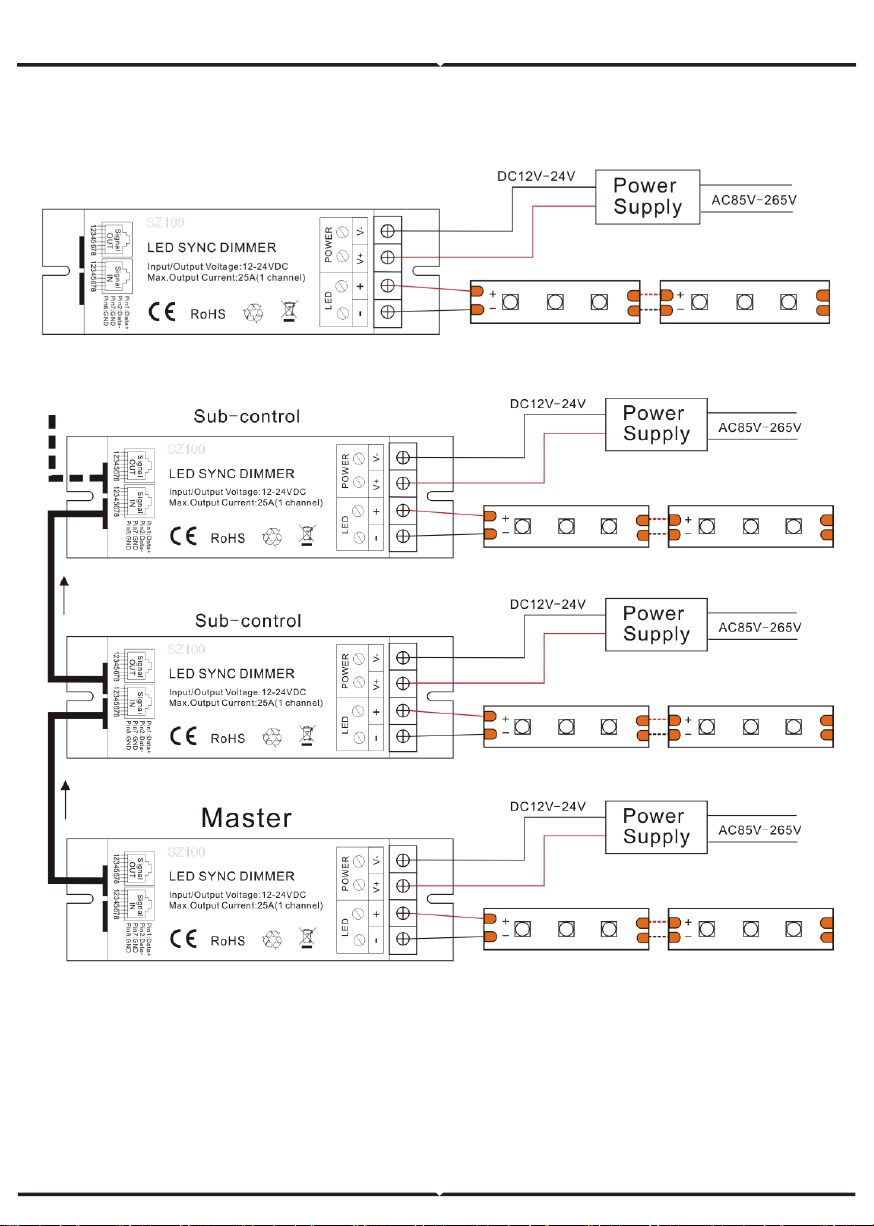
Application Circuit1:
TYPICAL APPLICATIONS
Application Circuit2:(Synchronization function with network Line)
Warning
1. Supply voltage of this product is DC12-24V, never connect to other voltage.
2. Before power on, please make sure the wires are connected correctly according to connecting
diagram. Or (like: short-circuit connection, positive-negative reverse) will damage the device.
3. Warranty of this product is three years, but exclude the artificial situation of damaged or
overload working.