V1.8
2015.01
User Manual
PHANTOM 2 VISION
+
2
©
2015 DJI. All Rights Reserved.
Phantom 2 Vision
+
User Manual
2015.01
Please read this manual carefully before using the product.
Using This Manual
Key
Warning Important Hints and Tips References or Denitions
Important
Except when specically stated, all descriptions in this manual are for Phantom mode, not Naza-M mode.
Before Flight
The following tutorials and manuals have been produced to ensure you to make full use of your Phantom 2 Vision+.
(1) Disclaimer
(2) Phantom 2 Vision+ Quick Start Guide
(3) Phantom 2 Vision+ User Manual
(4) Phantom Pilot Training Guide
Watching all the tutorial videos and reading the Disclaimer before ight is recommended. Afterwards, prepare your rst
ight using the Phantom 2 Vision+ Quick Start Guide. Improve your ying skills in subsequent ights using the Phantom
Pilot Training Guide. Refer to this manual for more comprehensive information. Experienced users, particularly those with
DJI Phantom 2 Vision experience should skip to the Phantom 2 Vision+ Quick Start Guide to begin preparing for ight.
Watch the Tutorial Videos
Please watch the tutorial videos below to learn how to use Phantom 2 Vision+
correctly and safely.
http://www.dji.com/phantom2visionplus/training/
Phantom 2 Vision+ ofcial tutorial videos
Download DJI VISION App
Download and install the DJI VISION App. Choose one of the download methods below.
Search "DJI VISION" on the App Store then follow instructions for iOS version.
Search "DJI VISION" on Google Play then follow instructions for Android version.
Important Safety Notice
Use your Phantom carefully. It contains sensitive electronic components and may be damaged when dropped, crashed
or exposed to water. Never y a damaged Phantom.
Maintenance
Do not open or attempt to repair Phantom by yourself as doing so may cause damage to the Phantom or cause injury. If
the Phantom is not operating normally or has come into contact with liquid, contact a DJI authorized dealer or DJI customer
service. Learn more at www.dji.com/support
Battery
Never disassemble, pinch, crush, burn, drop or tread on the DJI smart ight battery. Never short or allow the metal contacts
on the battery terminal to touch. Do not expose batteries to extreme temperatures. Always use the DJI approved charger to
charge the battery. Keep the DJI battery away from children and store it in a cool, dry place.
Please read the Disclaimer before using your Phantom 2 Vision+.
iOS6.1 or above
Android 4.0 or above
V1.8

©
2015 DJI. All Rights Reserved.
3
Contents
Important Safety Notice
2
Using This Manual
Key
2
Important
2
Before Flight
2
Watch the Tutorial Videos
2
Download DJI VISION App
2
Overview
1 In the Box
5
2 Introduction
6
Assembly and Use
1 Removing Gimbal Clamp
7
2 Preparing the Battery
7
2.1 DJI Smart Flight Battery 7
2.2 Usages 8
2.3 Charging the Flight Battery 9
2.4 Battery Installation 10
2.5 Correct Battery Usage Notes 10
3 Preparing the Phantom 2 Vision+
11
3.1 Introduction 11
3.2 Built-in Flight Control System 11
FC Assistant Port 11
3.3 LED Flight Indicator Descriptions 12
3.4 3-axial Stabilized Gimbal 12
Anti-drop Kit 13
Micro-SD Slot 13
Gimbal Error Warnings 13
3.5 Camera 14
Lens cap removal 14
Camera Function Buttons 14
Camera Data Port 14
Camera LED Indicator 15
4 Attaching the Propellers
15
4.1 Introduction 15
4.2 Assembly 15
4.3 Removing the Propellers 16
4.4 Notes 16
5 Preparing the Remote Controller
16
5.1 The Remote Controller 17
5.2 Power on the Remote Controller 17
5.3 Remote Controller Power LED Status
Information 17
5.4 Battery Level Indicator 17
5.5 Antenna Orientation 17
5.6 Remote Controller Operation 18
5.7 Linking the Remote Controller and
Receiver 19
Linking Procedures 19
Link Indicator 19
5.8 Compliance Version Conguration 19
6 Preparing the Range Extender
20
6.1 Introduction 20
SYSTEM Indicator 20
POWER Indicator 20
Binding Reset Button 20
6.2 Using Range Extender 20
Charging the Range Extender 20
Powering on the Range Extender 21
Checking the Battery Level 21
6.3 Rename Range Extender SSID 21
6.4 Binding the Phantom 2 Vision+ and
Range Extender 21
7 Downloading and Installing the
DJI VISION App
22
7.1 Download and Install 22
7.2 Register and Login 23
[
1
]
Register 23
[
2
]
Login 23
[
3
]
Usage tips 23
8 Connecting the Camera
24
8.1 Connecting Procedures 24
Wi-Fi Computer Connection Status
Description 24
Flight
Flight Environment Requirements 25
Preight Checklist 25
1 Calibrating the Compass
25
1.1Calibration Procedures 25

4
©
2015 DJI. All Rights Reserved.
1.2 When to Recalibrate 26
2 Starting/Stopping the Motors
26
2.1 Starting Motors 26
2.2 Stopping Motors 26
3 Flight Test
26
3.1Take off/Landing Procedures 26
3.2 Video Suggestions and Tips 27
4 Failsafe Function
27
4.1 When Will Failsafe Activate? 27
4.2 Failsafe Procedure 27
Failsafe on the DJI VISION App 28
4.3 Regaining Control During Failsafe
Procedures 28
5 Low Battery Level Warning Function
28
Low Battery Level Warning on the DJI
VISION App 29
6 Flight Limits
30
6.1 Max Height & Radius Limits 30
6.2 Flight Restriction of Restricted Areas 30
6.3 Conditions of Flight Limits 32
6.4 Disclaimer 32
DJI VISION App Usage
1 DJI VISION App Main Menu
32
2 Camera Page
33
[
1
]
Return 33
[
2
]
Camera Pitch Control 33
Normal Mode 33
Accelerometer Sensor Mode 33
[
3
]
Flight Attitude and Radar Function 34
[
4
]
Flight Parameters 34
[
5
]
Wi-Fi Signal Strength 34
[
6
]
Flight Battery Level 34
[
7
]
Aircraft GPS Status 34
[
8
]
Micro-SD Card Status 34
[
9
]
Range Extender Battery Level 34
[
10
]
Remaining Shots 34
[
11
]
Shutter Button 35
[
12
]
Video Recording Button 35
[
13
]
Camera Settings 35
[
14
]
Hide or Show Flight Parameters 35
[15] Rear LED Flight Indicator Status 35
3 Camera Settings
35
[
1
]
Capture Mode 35
[
2
]
Photo Size 36
[
3
]
Video Resolution 36
[
4
]
Photo Format 36
[
5
]
Selectable ISO 36
[
6
]
White Balance 36
[
7
]
Exposure Metering 36
[
8
]
Exposure Compensation 37
[
9
]
Sharpness 37
[
10
]
Anti-icker 37
[
11
]
Restore Defaults 37
[
12
]
Format Micro-SD Card 37
4 Album Page
37
4.1 SD Card Album 37
4.2 Mobile Device Photo Album 38
5 News Page
39
6 Settings Page
39
7 Ground Station
42
7.1 Ground Station GUI 42
7.2 Using Ground Station 43
PC / MAC Assistant
1 Installing Driver and Phantom 2 Vision+
Assistant
45
1.1 Installing and Running on Windows 45
1.2 Installing and Running on Mac OS X 45
2 Using Assistant
46
2.1 Using the Phantom 2 Vision+ Assistant 46
2.2
Firmware Upgrade of the Phantom 2 Vision+
46
2.3 Using the Phantom RC Assistant 47
Appendix
1 Rear LED Flight Indicator Status
48
2 Specications
48
3 Troubleshooting (FAQ)
49
©
2015 DJI. All Rights Reserved.
5
Overview
The Phantom 2 Vision+ is the next evolution of the Phantom 2 Vision. It features the same App enabled First Person View
(FPV), high performance camera, remote camera control and in-ight content sharing, but adds to it a high performance
3- axial camera stabilization system. It is ideal for aerial creativity whether photo or video. In addition, it provides ground
station function which allows users to plan the ight mission and enables aircraft to ight automatically.
FPV: First Person View, see the world from the perspective of the craft and feel a true ying experience.
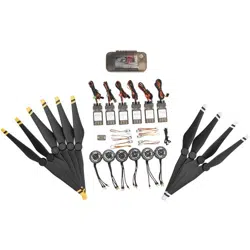
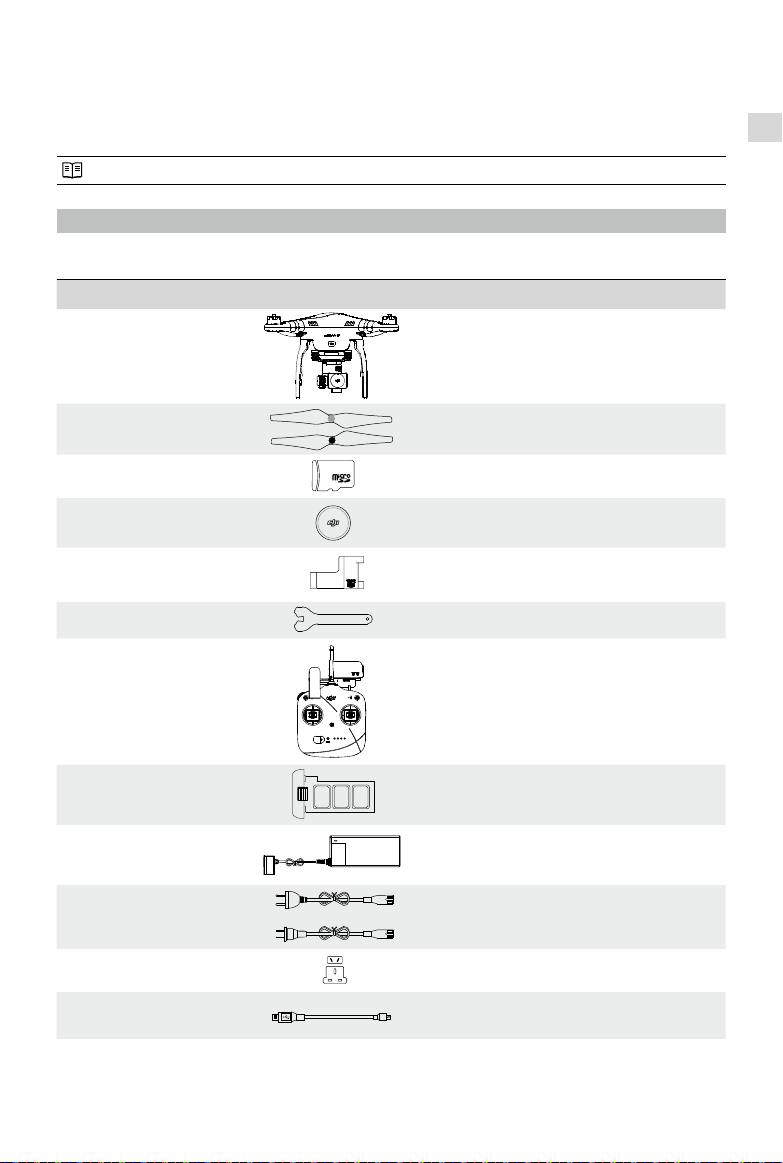
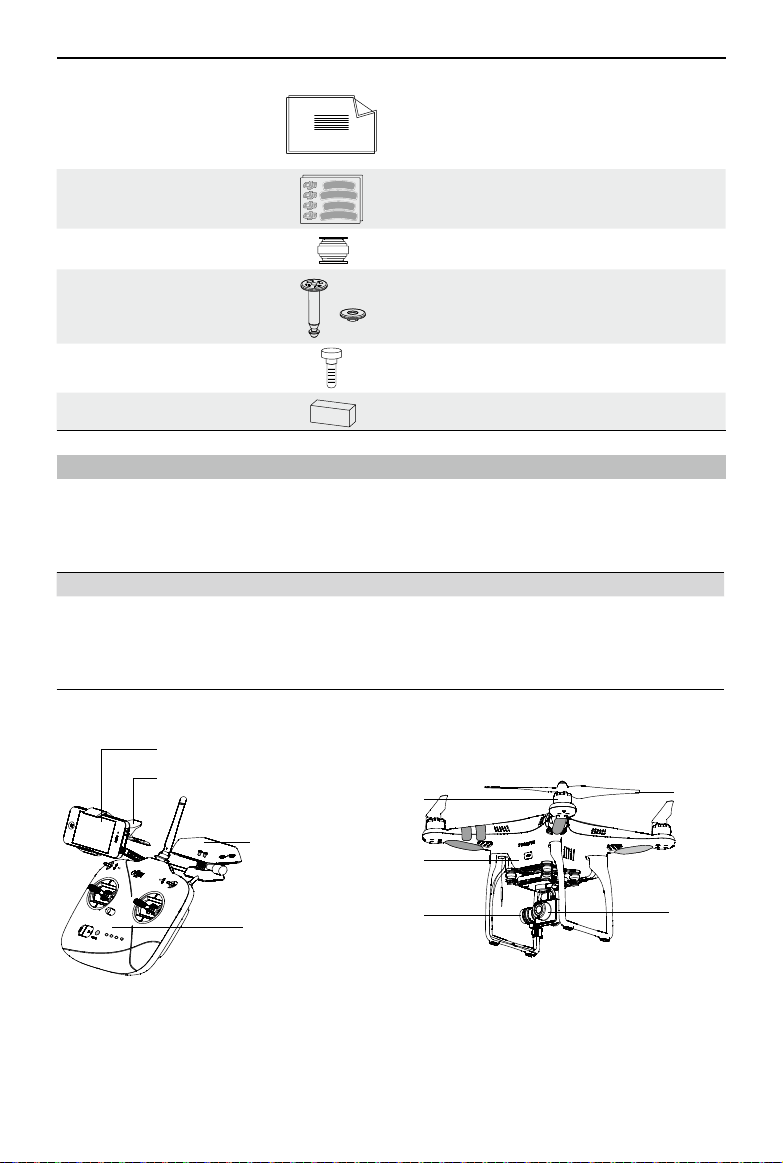
1 In the Box
Check that all of the following items have been included in your package before use. If anything is missing, please
contact your local dealer.
NO. Name Picture Qty. Remarks
1 Aircraft
1 Integrated gimbal and camera
2 Propeller Pairs
4 4 with black nut, 4 with grey
3 Micro-SD Card
1 Inserted in aircraft Micro-SD slot
4 Lens Cap 1 Fixed to camera lens
5 Gimbal Clamp
1 Attached to the gimbal
6 Prop Wrench
1 In maintenance packet
7 Remote Controller 1
Includes attached Phone Holder and
Range Extender
8
DJI Smart Flight
Battery
1 Inside aircraft
9 Charger
1 110-240V Adaptive
10 Power Cables
2 GB & CE
11 Plug Adaptors
2 SAA & BS
12 Micro-USB Cable
1
For range extender charging and
rmware upgrade
In the Box
6
©
2015 DJI. All Rights Reserved.
Overview
13 Manuals 4
Including: Disclaimer, Phantom Pilot
Training Guide, Phantom 2 Vision+ Quick
Start Guide, User Manual
14 Stickers
2 Colors: Pink, Blue
15 Vibration Absorber
4 In maintenance packet
16 Anti-drop Kit
2 In maintenance packet
17 Spare Screws
11
In maintenance packet M3X5(6pcs);
M3X8(5pcs)
18 Landing Pad
4 In maintenance packet
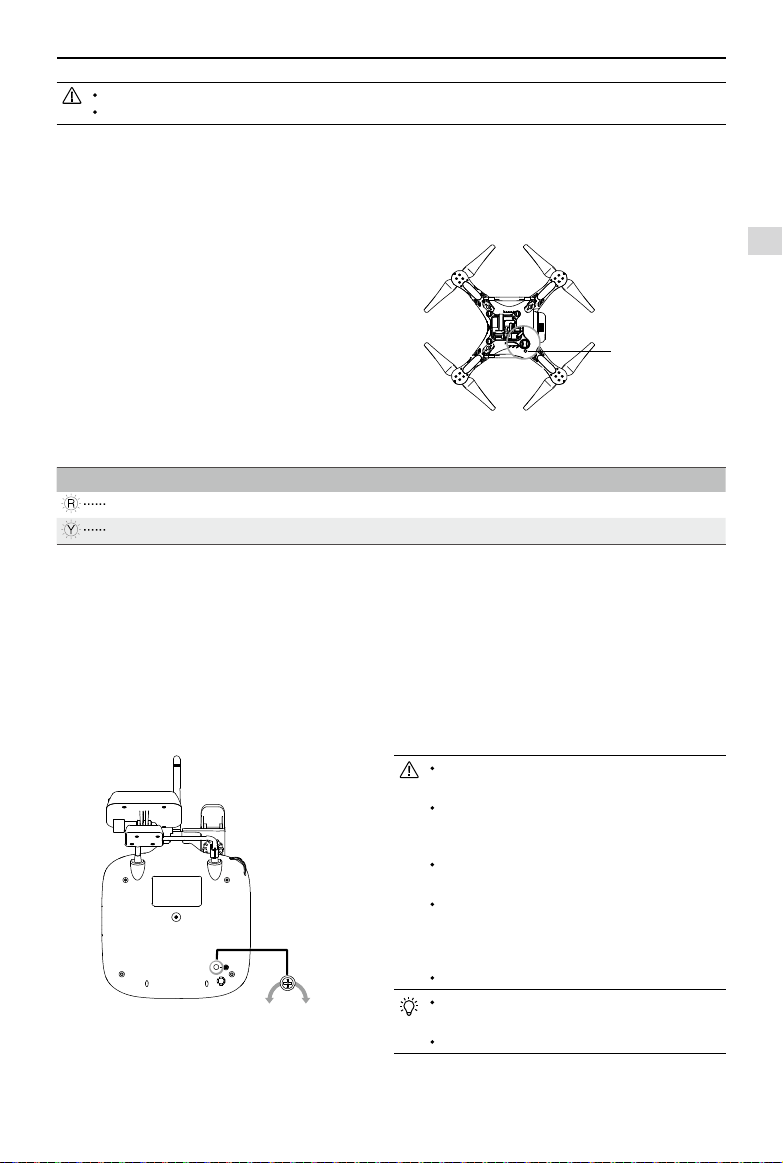
2 Introduction
The Phantom 2 Vision+ package includes: Phantom, Camera, Gimbal, Propulsion System, Flight Control System,
Remote Controller and Wi-Fi Communication System. 5.8 GHz Remote Controller Receiver, Flight Control System and 2.4
GHz Wi-Fi Module are inside the Phantom.
Remote Controller Outside Working Modes Inside
5.8GHz
2 sticks, 7 channels
3-axial Stabilized Gimbal
Camera
Motors and Props
Phantom-Ready to Fly and Ready
to Fly(non-GPS)
NAZA-M-GPS, ATTI, Manual and
Failsafe
Flight Control System
2.4GHz Wi-Fi Module
5.8GHz Receiver
Electronic Speed
Controls(ESCs)
Mobile Device,
with DJI VISION App
Mobile Device Holder
Range Extender
Remote Controller
Aircraft
Motor
Gimbal
Propeller
Camera
Figure 1
Assembly and Use
©
2015 DJI. All Rights Reserved.
7
Choose between Phantom and Naza-M working modes using Phantom 2 Vision+ Assistant. If using Naza-M
mode, please refer to the NAZA-M V2 Quick Start Manual for related instructions.
Phantom: Flight settings will be selected automatically depending on whether 6 or more satellites have been
found. This mode allows users to congure the Remote Controller and gain values, and use Failsafe and battery
level warnings.
Naza-M: Flight settings will be identical to the Naza-M V2. Users can choose between GPS, Attitude, or Manual
mode. They can also access advanced settings including Intelligent Orientation Control (IOC). Rear LED Flight
Indicators will display the ight status according to the Naza-M indicator.
Ready to Fly: When 6 or more GPS satellites have been found, the Flight Control System will lock its home point
and Rear LED Flight Indicators will blink a slow green (
). This mode is ideal for beginners.
Ready to Fly (non-GPS): When less than 6 GPS satellites have been found, the Flight Control System will
stabilize itself less than in full Ready to Fly mode and will require more skilled ying. Rear LED Flight Indicators
will blink a slow yellow (
).
Assembly and Use
Follow the below instructions to prepare for ight.
1 Removing Gimbal Clamp
Pull gimbal clamp in the direction indicated to remove.
Figure 2
2 Preparing the Battery
Ensure all related devices are fully charged before ying the Phantom 2 Vision+.
Device Power supply
Remote Controller 2000mAh
rechargeable LiPo battery
Range Extender
Charge fully through Micro-USB slot. See Charging the Range
Extender (Page 20) for details.
Aircraft (including gimbal and camera) DJI Smart Flight Battery.
Mobile Device Fully charge before using the DJI VISION App.
2.1 DJI Smart Flight Battery
This battery has been specially designed for the Phantom 2 series. It has a battery capacity of 5200mAh, voltage of
11.1V and charge-discharge management functionality. It can only be charged with a DJI charger or Phantom 2 Car
Charger.
To avoid damage to the gimbal, remove Gimbal Clamp
before powering up the Phantom.
Attach the Gimbal Clamp during transportation or long
term storage to avoid damage.
Smart Flight Battery DJI Charger
Removing Gimbal Clamp / Preparing the Battery
Figure 3 Figure 4
Assembly and Use
8
©
2015 DJI. All Rights Reserved.
DJI Smart Flight Battery Functions
(1) Balance Charging Automatically balances the voltage of each battery cell during charging.
(2) Capacity Display Displays current battery levels.
(3) Communication Communicates with Flight Controller about battery voltage, capacity, current and
other relevant information.
(4) Overcharge Protection Charging stops automatically when battery voltage reaches 12.8V to prevent
overcharge damage.
(5) Over Discharge Protection Discharging stops automatically when battery voltage reaches 8.4V to prevent
over discharge damage.
(6) Short Circuit Protection Automatically cuts power supply when a short circuit is detected.
(7) Sleep Protection Sleep mode is entered after 10 minutes of inactivity to save power.
(8) Charging Temperature Detection The battery will charge only when the temperature is between 0℃ (32°F) and
40℃ (104°F).
Battery Specications
Type LiPo
Capacity 11.1V, 5200mAh
Charging Environment Temperature 0°C~40°C
Discharging Environment Temperature - 20°C~50°C
Charging/Discharging Environment Relative Humidity <80%
Please read the user manual, disclaimer, and battery warnings before use. Users take full responsibility for all
operations and usage.
2.2 Usages
Powering on/off
Powering on: Press Circular Power Button once, then press again and hold for 2 seconds to power on. Power Light will
go red and Battery Level Indicators will show the current battery level.
Powering off: Press Circular Power Button once, then press again and hold for 2 seconds to turn off. Battery Level
Indicators will all go out.
Checking the battery level
When the battery is powered off, press the Circular Power Button once. Battery Level Indicators will light up to show
battery level. See below for details.
Battery Level Indicators will show the current battery level during charging and discharging. The indicators are
dened below.
LED is on LED blinks
LED is off
Figure 5
LED2
LED1
Battery Level Indicators
LED3
LED4
Circular Power Button
(Built-in Power Light)
Preparing the Battery
Assembly and Use
©
2015 DJI. All Rights Reserved.
9
Discharging process
LED1 LED2 LED3 LED4 Current battery level
87.5%~100%
75%~87.5%
62.5%~75%
50%~62.5%
37.5%~50%
25%~37.5%
12.5%~25%
0%~12.5%
<0%
Battery life
When the battery is powered off, press and hold the Circular Power Button for 5 seconds to check battery life. Battery
Level Indicators will show light up and the Battery Power Indicators will blink for 10 seconds. All lights will then turn off.
For details, please see below.
Battery life
LED1 LED2 LED3 LED4 Current battery life
90%~100%
80%~90%
70%~80%
60%~70%
50%~60%
40%~50%
30%~40%
20%~30%
Less than 20%
When batter life reaches 0, it is no longer operational.
More battery information is available in the battery tab of the Phantom 2 Vision+ Assistant.
2.3 Charging the Flight Battery
(1) Connect charger to wall socket (100-240V, 50/60Hz, using the Plug Adaptors if necessary).
(2) Connect battery to charger. If the current capacity of the battery is over 75%, you should turn it on before beginning
to charge.
(3) Battery Level Indicators will display current capacity level as the battery charges.
(4) Battery is fully charged when Battery Level indicator lights are off. Disconnect the charger and battery when charging
is complete.
Preparing the Battery
Figure 6

Assembly and Use
10
©
2015 DJI. All Rights Reserved.
Charging process
LED1 LED2 LED3 LED4 Current battery level
0%~25%
25%~50%
50%~75%
75%~100%
Fully charged
The Smart Flight Battery can be charged using an optional Phantom 2 Car Charger. This can charge the battery
in-car or through 3S-6S Li-Po batteries. Contact your authorized dealer or DJI customer service for details.
Battery should only be charged with the charger provided by DJI. DJI does not take any responsibility for
damage caused by third party chargers.
If current battery level is over 75%, the battery should be turned on before charging.
2.4 Battery Installation
Push battery into battery compartment according to the below diagram. When you hear a click, the battery has been
properly installed.
2.5 Correct Battery Usage Notes
(1) When the battery is turned on, do not connect it to or disconnect it from the Phantom.
(2) Charge and discharge the battery completely once every 20 charge/discharge cycles. Discharge the battery until
there is less than 8% power or until it can no longer be turned on, then recharge it to maximum capacity. This power
cycling procedure will optimize the battery.
(3) For long term storage, place the battery with only a 40~50% charge in a strong battery box. Discharge and charge
the battery once every 3 months to keep it in good condition. Charge amount should be varied in these maintenance
charges - (40%~50%)—0%—100%—(40%~50%).
(4) Purchase a new battery after your current battery has been discharged over 300 times. Completely discharge a
battery prior to disposal. Please dispose of batteries properly.
(5) Purchase a new battery if your current battery swells up or is damaged in any way.
(6) Never recharge or y with a battery that is swollen or damaged in any way.
(7) Never charge batteries unattended. Always charge batteries on a non-ammable surface such as concrete and
never near any ammable materials.
(8) Safety is extremely important. For more information, please see the Disclaimer.
Discharging methods:
Slow: Place battery in Phantom and turn on. Leave on until there is less than 8% of power left or until the battery
can no longer be turned on. See DJI VISION App for battery levels. Motors do not need to be turned on,
reducing wear.
Fast: Fly the Phantom outdoors until there is less than 8% of power left or until the battery can no longer be
turned on.
Figure 7
An incorrectly installed battery may cause
Bad contact,
Unavailable battery information,
Unsafe ight,
Inability to take off.
Assembly and Use
©
2015 DJI. All Rights Reserved.
11
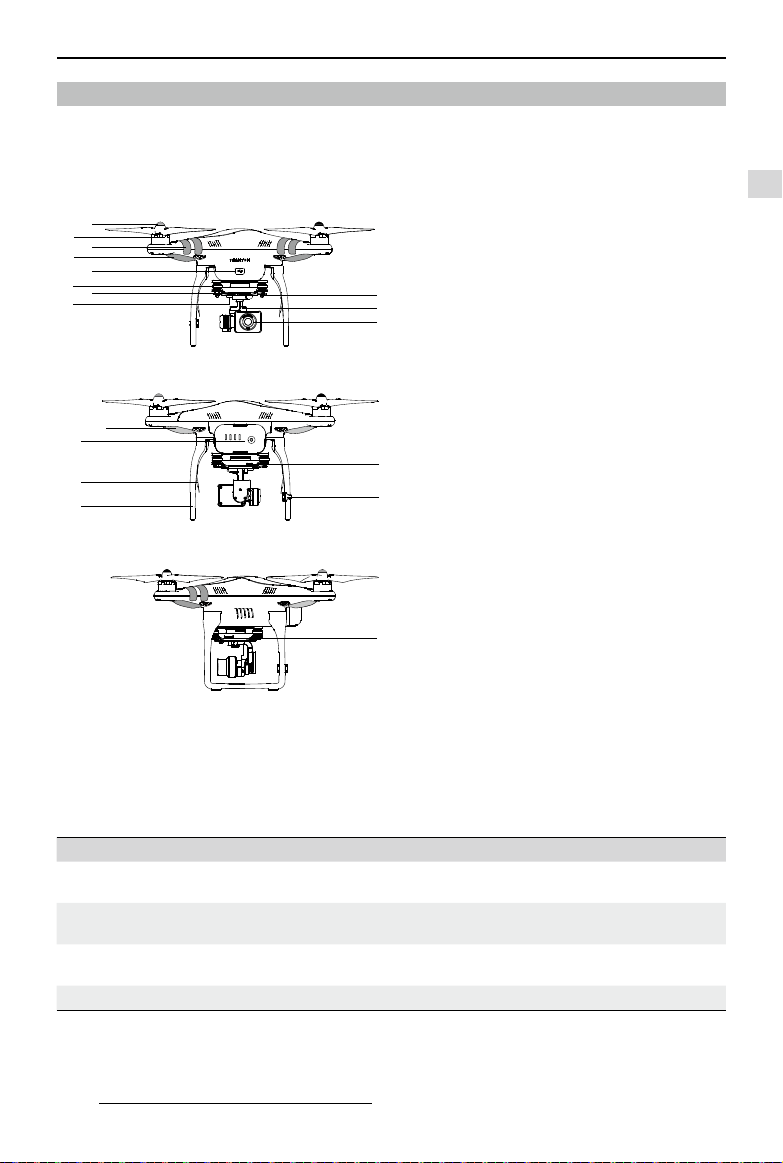
3 Preparing the Phantom 2 Vision+
The Phantom 2 Vision+ is a quadrotor with a built-in Flight Control System with integrated gimbal and camera. It features
an FC Assistant Port, Camera Data Port and a specialized battery compartment for its ight battery. All these features
make the Phantom 2 Vision+ easy to assemble and congure.
3.1 Introduction
3.2 Built-in Flight Control System
The Phantom 2 Vision+ is equipped with a DJI Naza-M V2 Flight Control System. This provides incredible ease of use
and stability. Pilots can control the Phantom’s movements in many directions, including pitch (forwards and backwards),
roll (left and right), elevator (up and down) and yaw (turn left or right). The ight control system also can provide IOC,
Failsafe and battery level warnings.
Modules Functions
Flight Controller
Acts as the brains of the complete flight control system, responsible for connecting and
controlling all the modules together.
IMU
Has a built-in inertial sensor and a barometric altimeter that measures both attitude and
altitude.
GPS & Compass
The compass reads geomagnetic information and assists the GPS (Global Position System)
to accurately calculate the position and height of the aircraft.
LED Flight Indicators Indicates the status of ight control system.
FC Assistant Port
The ight control system communicates with the PC Assistant through a Micro-USB cable between the Phantom FC
Assistant Port and the PC. Users can use Assistant to congure the aircraft and upgrade the Phantom rmware. Please
refer to Using the Phantom 2 Vision+ Assistant (Page 46) for details.
[1]
[
2
]
[
3
]
[
4
]
[
5
]
[
6
]
[
7
]
[
8
]
[
9
]
[
10
]
[
11
]
[
12
]
[
13
]
[
14
]
[
15
]
[
16
]
[
17
]
[
18
]
Propeller (P15)
Motor
Front Sticker
Front LED (P12)
FC Assistant Port (Micro-USB slot) (P46)
Vibration Absorber
Camera LED Indicator (P15)
Camera Function Button (P14)
Anti-drop Kit (P13)
3-axial Stabilized Gimbal (P12)
Camera Lens (P14)
Rear LED Flight Indicator (P12)
DJI Smart Flight Battery (P7)
Receiver Antenna (P17)
Landing Gear
Camera Data Port (Micro-USB slot) (P14)
Compass (P25)
Micro-SD Slot (P13)
[
12
]
[
13
]
[
14
]
[
15
]
[
1
]
[
2
]
[
3
]
[
4
]
[
5
]
[
6
]
[
7
]
[
8
]
Figure 10
Figure 8
Figure 9
[
16
]
[
17
]
[
18
]
[
11
]
[
10
]
[
9
]
Preparing the Phantom 2 Vision+
Assembly and Use
12
©
2015 DJI. All Rights Reserved.
Figure 11 Figure 12
Rear LED Flight Indicators Normal Notes
Red, Green, Yellow
ashing in turn
Power On Self-Test
Yellow,Green ashing in turn Warming Up Aircraft cannot take off.
Slow Green ashing Ready to Fly More than 6 GPS satellites are found.
Slow Yellow ashing Ready to Fly (non-GPS) Less than 6 GPS satellites are found.
Rear LED Flight Indicators Abnormal Notes
Quick Yellow ashing Remote Controller Signal Lost
Refer to Failsafe Function (Page27) for
details.
Slow Red ashing Low Battery Level Warning
DJI VISION App will also show warning
message.
Quick Red ashing
Critical Low Battery Level
Warning
DJI VISION App will show warning
message.
Three Red ashing off and on
Not Stationary or Sensor Bias is
too big
Keep aircraft stationary or perform IMU
calibration.
—
Solid red Error Cannot y.
Red, Yellow ashing in turn Compass Needs Calibration
Refer to Calibrating the Compass
(Page25) to get details.
If a solid red LED indicator appears, connect to the Phantom 2 Vision+ Assistant for details and resolution.
This may be caused by:
IMU calibration required: Recalibrate IMU using Assistant.
IMU is abnormal: Repair required.
Compass is abnormal: Repair required.
Remote Controller mid-point is set abnormally: Refer to How to solve large margin(s) mid-point error? (Page 49)
3.4 3-axial Stabilized Gimbal
The 3-axial stabilized gimbal of the Phantom 2 Vision+
will power on and self-check each time the ight battery
is installed and powered on. Its pitch can be controlled
using the DJI VISION App. This gimbal has two working
modes, Non-FPV mode and FPV mode, with the Non-FPV
mode set as default. This can be congured in Phantom 2
Vision+ Assistant or the DJI VISION App.
3.3 LED Flight Indicator Descriptions
LED ight indicators are found at the front and the rear of the Phantom. Front LEDs are for indicating where the nose of
the aircraft is. They light up solid red after motors have started spinning. Rear LED Flight Indicators light up to show the
aircraft’s current ight status once the ight battery is powered on. For details, please see the below table.
Front LEDs
Rear LED
Flight Indicators
Preparing the Phantom 2 Vision+
Figure 13
Assembly and Use
©
2015 DJI. All Rights Reserved.
13
Figure 14
Gimbal specications
Control accuracy ±0.03°
Controllable range Pitch : -90°~0°
Maximum angular velocity Pitch : 90°/s
Non-FPV Mode: the gimbal will stabilize across 3-axial for smooth aerial creativity.
FPV Mode (First Person View Mode): Gimbal will lock to the movements of the Phantom for a FPV experience.
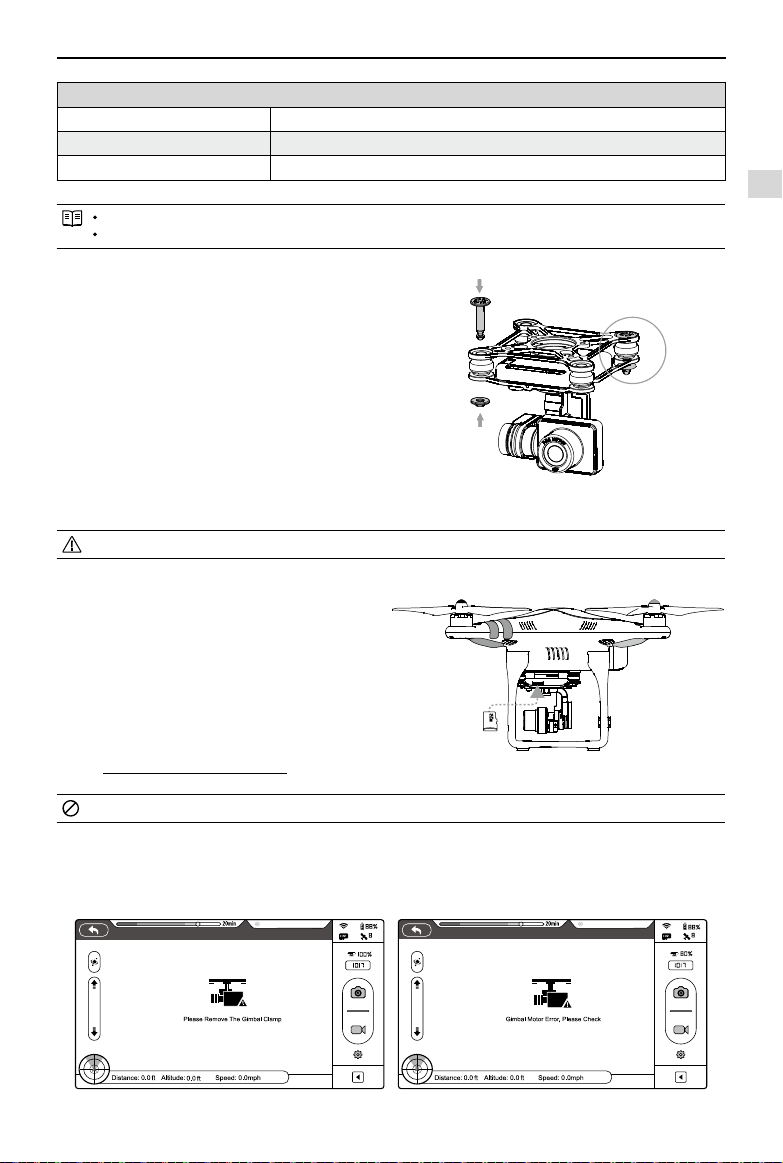
Anti-drop Kit
The Anti-drop Kit helps keep the gimbal and camera
connected to the aircraft. Two have been mounted on
delivery. If new ones are required, take the gimbal and
press part
[
1
]
through the center hole of the Vibration
Absorber the center hole of part
[
2
]
. Lock them together
as shown in
[
3
]
. Mounting the Anti-drop Kit diagonally is
recommended.
Once part
[
1
]
and part
[
2
]
are connected, the Anti-drop Kit cannot be disconnected and reused.
Micro-SD Slot
With ight battery powered off, make sure the Micro-SD
card is inserted correctly into the Micro-SD Slot before
taking any photos or recording any video.
The Phantom 2 Vision+ comes with a 4GB Micro-SD card
and can support cards up to 32GB. The DJI VISION App
may not be able to read some Micro-SD cards. Using
the DJI VISION App to reformat new Micro-SD cards is
recommended.
Refer to Format Micro-SD Card (Page 37) for details.
Do not insert or remove Micro-SD card when ight battery is powered on.
Gimbal Error Warnings
Before the aircraft takes off, if a gimbal motor error is detected or the gimbal clamp is not removed, there will be a
warning prompt on the camera page of the DJI VISION App. This will disappear after the problem is resolved.
Figure 15
Figure 16 Figure 17
[
2
]
[
1
]
[
3
]
Preparing the Phantom 2 Vision+
Ready to Fly
Ready to Fly
Assembly and Use
14
©
2015 DJI. All Rights Reserved.
Figure 18
Figure 19
Photos and videos can only be copied when the ight battery is powered on.
Remove gimbal clamp before powering on ight battery.
Gimbal motor error may occur in these situations: (1) Gimbal is placed on uneven ground. (2) Gimbal has
received an excessive external force, e.g. a collision. Please take off from at, open ground and protect the
gimbal after powering up.
Flying in heavy fog or cloud may make the gimbal wet, leading to a temporary failure. The gimbal will recover
when it dries out.
3.5 Camera
The Phantom 2 Vision+ camera powers up when the ight battery has been installed and switched on. Photos and
videos can be shot by pressing either the onboard button or the DJI VISION App. For aerial photography it supports
burst shots, continuous capture and timed capture, and exports to both Adobe DNG Raw and JPEG. For aerial video, it
shoots in full HD at (1080p30/1080i60) and can even shoot 720p60 for internet ready slow motion.
Camera specications
Sensor Size 1/2.3”
Pixels 14 Megapixels
Resolution 4384×3288
HD Recording 1080p30 /1080i60/720p60
Recording FOV 110° / 85°
Lens cap removal
Remove lens cap before use and replace it when
shooting is complete to protect the camera lens.
Camera Function Buttons
Capture: Press (hold less than 2 seconds) to take a single
capture.
Record: Press (hold more than 2 seconds) to begin
recording. Press again to stop.
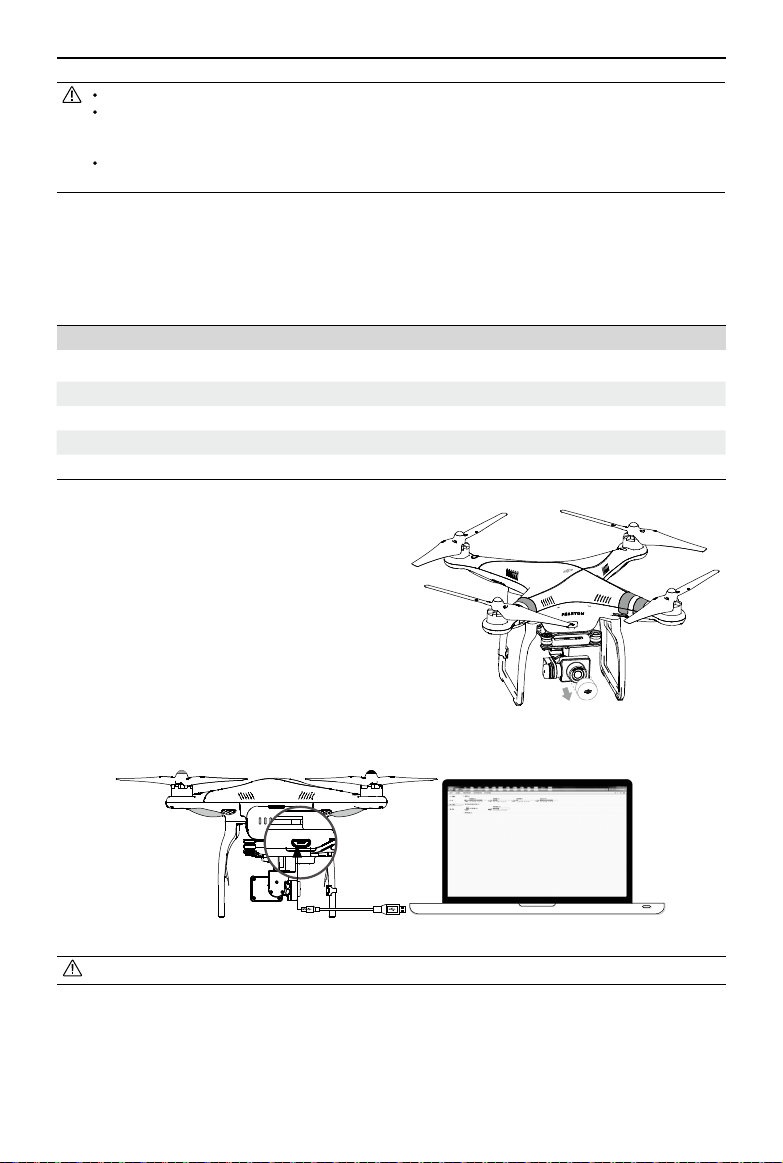
Camera Data Port
Connect the Camera Data Port to a PC using a Micro-USB
cable to copy les to a PC.
Assembly and Use
©
2015 DJI. All Rights Reserved.
15
Camera LED Indicator
Camera LED Indicator lights up after the ight battery is powered on. It provides information on the working status of the
camera.
Camera LED Indicator Wi-Fi status Camera status
Green Solid OFF Power On; Idle
Slow Green Blink (0.2s on, 1.8s off) ON Idle
Green Blink(0.1s on, 0.3s off, 0.1s on, 1.8s off) ON Micro-SD card connected to PC
Fast Green Blink (0.1s on, 0.3s off) ON Synchronizing
Orange Solid OFF Recording
Orange Blink Once (0.2s on, 0.3s off) ON / OFF Taking a single picture.
Orange Blink 3 Times(0.1s on, 0.1s off) ON / OFF Taking 3 or 5 photos per shot
Orange Fast Blink (0.1s on, 0.3s off) ON / OFF Firmware Upgrading
Green, Orange (0.2s green, 1.8s orange) ON Recording
Red Solid ON / OFF Critical error
Slow Red Blink (0.2s on, 1.8s off) ON / OFF CMOS sensor error
Red Blink Once (0.2s on, 0.3s off) ON / OFF Operation failed
Red Blink 3 Times(0.1s on, 0.1s off) ON / OFF Micro-SD card error
Fast Red Blinks (0.1s on, 0.3s off) ON / OFF Upgrade error
Fast Green, Orange and Red Blink
(0.1s on, 0.3s off)
ON / OFF Overheated Camera
4 Attaching the Propellers
Always use original 9-inch propellers, classied by the color of each central nut.
4.1 Introduction
Propellers Grey Nut (9450) Black Nut (9450 R)
Diagram
Assembly Location Attach to motor without black dot. Attach to motor with black dot.
Fastening/
Un-fastening
Instructions
Lock: Tighten propeller in this direction.
Unlock: Loosen propeller in this direction.
4.2 Assembly
(1) (Figure 20) Remove warning cards from motors after you have read them.
(2) (Figure 21) Spin grey marked propellers clockwise onto unmarked motors and black marked propellers anti-
clockwise for black marked motors.
Figure 20 Figure 21
Attaching the Propellers
Assembly and Use
16
©
2015 DJI. All Rights Reserved.
Propellers self tighten during ight. DO NOT use thread locker.
Always match marked props with the corresponding motor.
Protective gloves are recommended during propeller assembly and removal.
4.3 Removing the Propellers
(Figure 22) Prevent motor rotation using the included wrench or a
hand, then remove propeller according to the un-fastening instructions.
4.4 Notes
(1) Check that propellers and motors are installed correctly and rmly
before every ight.
(2) Ensure that all propellers are in good condition before each ight.
DO NOT use any ageing, chipped, or broken propellers.
(3) To avoid injury, STAND CLEAR of and DO NOT touch propellers or
motors when they are spinning.
(4) ONLY use original DJI propellers for a better and safer ight experience.
For beginner yers, Phantom 2 Prop Guards are recommended. Contact your authorized dealer or DJI customer
service to purchase if necessary.
5 Preparing the Remote Controller
The Phantom 2 Vision+ Remote Controller is a wireless communication device using the 5.8GHz frequency band.
Remote Controller and Phantom are paired before delivery.
For upgraded remote controller (models: NPVT581, NDJ6 or NRC900), select “Upgrade Version” in Phantom Assistant.
For basic remote controller (models: PVT581, DJ6 or RC900), select “Basic Version” in Phantom Assistant.
The Remote Controller is set to Mode 2 by default. This can be adjusted in the PHANTOM RC Assistant. See Using the
PHANTOM RC Assistant (Page 47) for details. You can also adjust the power of your Remote Controller according to
national regulations. Please refer to Compliance Version Conguration (Page 19).
Compliance Version: The Phantom 2 Vision+ Remote Controller is compliant with CE and FCC (see the FCC ID)
regulations.
Operating Mode: Mode 1 and Mode 2 refer to different channel mappings.
Mode 1: The right stick controls throttle.
Mode 2: The left stick controls throttle.
The Range Extender and Phone Holder are already mounted on the Remote Controller. Twist the Mobile Device
Holder to face outwards and x it in position for mobile device installation.
Large smartphones and tablets are not recommended for the Phone Holder as they do not t.
Preparing the Remote Controller
Figure 22
Figure 23
Assembly and Use
©
2015 DJI. All Rights Reserved.
17
5.1 The Remote Controller
[
1
]
[
2
]
[
3
]
[
4
]
[
5
]
[
6
]
[
7
]
[
8
]
[
9
]
[
10
]
[
11
]
[
12
]
Antenna
Left Dial
Switch S1
Switch S2 (Reserved)
Right Stick: J1, Roll [left & right],
J2, Pitch [front & back]
Left Stick: J3, Throttle [up & down],
J4, Yaw [rotation]
Neck Strap Attachment
Power Switch
Power Indicator
Battery Level Indicator
Battery Charge & RC Assistant Port (use the supplied micro-
USB cable to charge or upgrade the remote controller)
Training Port (on back)
5.2 Power on the Remote Controller
(1) Set S1 and S2 switches to the upper most position and place all sticks in the mid-point.
(2) Toggle power switch to the right to switch on.
(3) There will be a power on indicator beep. If the remote controller is set to be CE compliant, then
there will be one beep, while the FCC compliant version will emit two beeps. The battery level
indicator displays the current battery level. The indicator will blink green quickly, indicating the
remote controller and receiver are linking. Once fully linked, the power indicator will change to
a solid green.
If the low voltage warning alert sounds (refer to Remote Controller Power LED Status Information (Page 17) for
details), please recharge the battery as soon as possible.
Using the incorrect type of charging cable may cause damage.
Following long term storage, recharge the battery before use.
5.3 Remote Controller Power LED Status Information
Power LED Indicator Sound Remote Controller Status
— Solid Green None Functioning normally.
— Solid Red None Charging( remote controller is powered off)
— Solid Yellow None Remote controller joysticks calibration error, need to be re-calibrate.
— Solid Red BB---BB---BB Low voltage (from 3.5V-3.53V), recharge the remote controller.
Quick Red ashing B-B-B......
Critical low voltage (from 3.45V-3.5V). Recharge the remote
controller immediately.
Slow Green ashing B--B--B......
Alert will sound after 15 minutes of inactivity. It will stop once you
start using the remote controller.
Preparing the Remote Controller
Figure 24
[
1
]
[
2
]
[
3
]
[
4
]
[
5
]
[
6
]
[
7
]
[
8
]
[
9
]
[
10
]
[
11
]
[
12
]
J3
J4
J2
J1
5.4 Battery Level Indicator
Built-in LiPo Battery: The remote controller includes a rechargeable LiPo battery with
a capacity of 2000mAh. You can monitor the current battery level using the LED
indicators on the front panel of the remote controller as the gure shown:
The remote controller will show a blinking LED and sound an alert when the voltage drops below 3.45V, then
automatically power off after 3 seconds. This process will repeat even if you power cycle the remote controller. If
this low voltage warning occurs during ight, the remote controller will automatically power off, causing the aircraft
to enter Failsafe mode, which cannot be interrupted (refer to Failsafe Function (Page27) for details). It is strongly
recommended that you recharge the battery immediately when the 3.45V-3.5V low voltage warning occurs.
5.5 Antenna Orientation
Keep the antennas pointing skyward, perpendicular to the ground for maximum remote controller range during ight.
Battery Level Indicator
25% 50% 75% 100%
Assembly and Use
18
©
2015 DJI. All Rights Reserved.
Preparing the Remote Controller
5.6 Remote Controller Operation
The Remote Controller is set to Mode 2 by default.
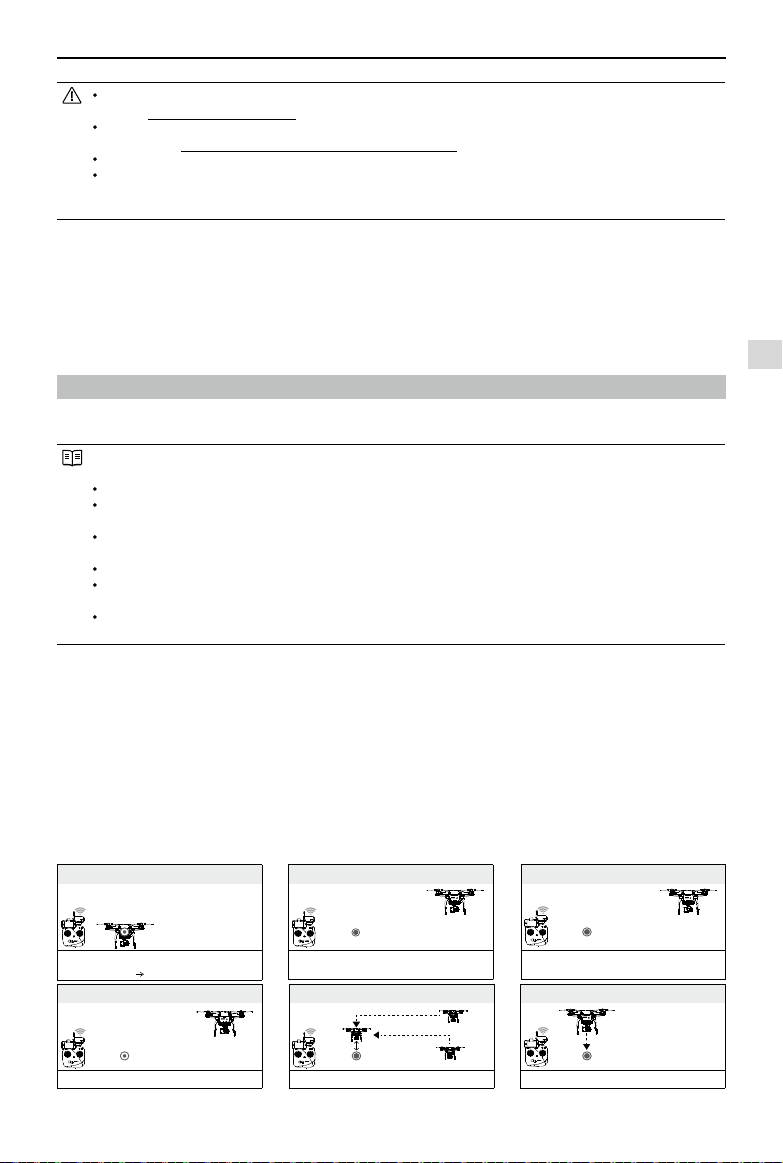
Stick Neutral/ mid point: Control sticks of the Remote Controller are placed at the central position.
Move the Stick: The control stick is pushed away from the central position.
Remote Controller
(Mode 2)
Aircraft
(
indicates nose direction)
Operation details
Vertical movements on the left stick control elevation.
Push the stick up to ascend and down to descend.
When both sticks are centered the Phantom will hover in place.
Push the throttle stick upward beyond the centered
(neutral) position to take off. Push the throttle gently to
prevent sudden and unexpected elevation.
Horizontal movements on the left stick control the rudder.
Push left to rotate counter clock-wise and right for
clockwise. If the stick is centered, the Phantom will fly
straight.
The more the stick is moved, the faster the Phantom will
rotate.
Vertical movements on the right stick control forward and
backward pitch.
Push up to fly forward and down to fly backward. The
Phantom will hover in place if the stick is centered.
Push the stick further for a larger pitch angle (maximum
35˚) and faster ight.
Horizontal movements on the right stick control left and
right pitch.
Push left to y left and right to y right. The Phantom will
hover in place if the stick is centered.
Push the stick further for a larger pitch angle (maximum
35˚) and faster ight.
Left Dial: Turn the dial to the right, and the camera will
shift to point upwards.Turn the dial to the left, and the
camera will shift to point downwards. The camera will
keep its current position if the dial is static.
Position 1 Position 2 Position 3
The S1 switch is used for compass calibration. Toggle the
S1 from position 1 to position 3 and back approximately 5
times to enter into compass calibration mode.
In Naza-M mode, the S1 switch is used to switch
between control modes and enter compass calibration.
Position 1 Position 2 Position 3
S2 is used to record a Home point manually. After a Home
point has been recorded automatically, flipping S2 from
position 1 to position 3 and back 5 times (or more) rapidly
will move the Home point to the Phantom’s current location.
In addition, you can enable Dynamic Home Point feature
in DJI VISION App.
In Naza-M working mode, S2 is be used for IOC.
For maximum range and reliability, Remote Controller antenna
should point skywards with no obstructions between it and the
Phantom. Obstacles may cause Return to Home to trigger. Phone
Holder and Range Extender should not block the antenna.
Figure 25
Assembly and Use
©
2015 DJI. All Rights Reserved.
19
Preparing the Remote Controller
Linking Procedures
(1) Power off the Remote Controller, power on the aircraft.
You will see the link indicator blinking red.
(2) Press the link button with a thin object and hold
until the link indicator blinks yellow. Release the link
button.
(3) Power on the Remote Controller. Link indicator will
switch off, showing that a link has been successfully
established.
Figure 27
Link Indicator
Link Indicator Description Next Operation
Red ashing No signal received. Switch on the Remote Controller or perform a link procedure.
Yellow ashing Ready to link. Switch on the Remote Controller.
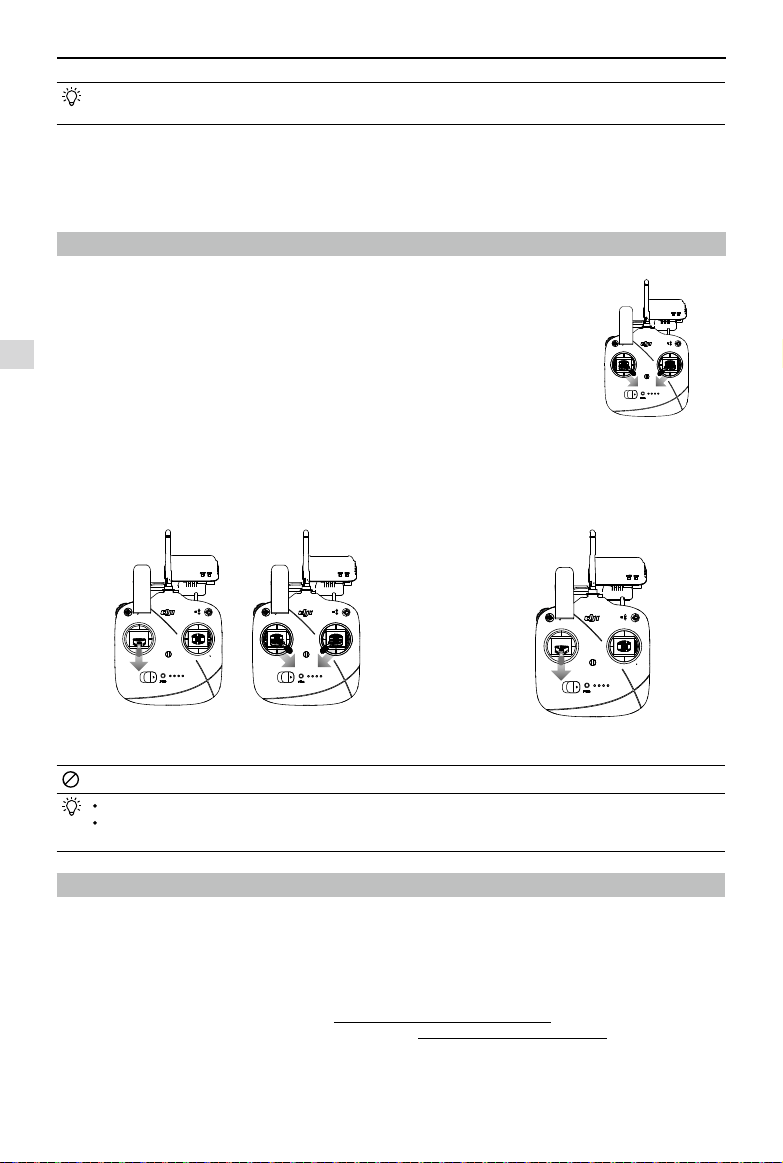
5.8 Compliance Version Conguration
As power levels vary between regulators, the Phantom Remote Controller’s power output can be adjusted by twisting the
CE/FCC Control Knob (Figure 27) on the back of the Remote Controller using a athead screwdriver. For CE compliance,
set the Remote Controller to CE with a full counterclockwise turn. For FCC compliance, set the Remote Controller to FCC
with a full clockwise turn. Be sure to follow relevant local regulations.
Compliance can be congured using the PHANTOM RC Assistant. Select CE compliance version in Assistant to set it, or
do the same with FCC compliance version.
5.7 Linking the Remote Controller and Receiver
A 5.8G receiver is built in to the Phantom 2 Vision+. Its link button and indicator are located on the underside of the
phantom, as shown in Figure 26.
The Remote Controller and the receiver are paired before delivery. Only use this button if you have replaced your
Remote Controller or receiver.
Turn the CE/FCC Control Knob gently to avoid
damage.
CE compliant devices have an effective remote
controller range of 400 meters in open spaces due
to power limitations.
FCC compliant devices have an effective range of
800 meters in open spaces.
Watch your flight distance as the Phantom 2
Vision+ will enter Failsafe mode (auto-landing or
go home and land) if it ies beyond the relevant
range limits.
Always follow local laws and regulations.
It is recommended to use a Φ2.4mm flathead
screwdriver for adjustments.
There is another potentiometer for reserved use.
CE FCC
Figure 26
Link Button & Link
Indicator
In ‘Ready to Fly’ mode, the Phantom will hover when all sticks are released.
In ‘Ready to Fly (non-GPS)’ the Phantom will lock its altitude but will not have horizontal positioning.
Assembly and Use
20
©
2015 DJI. All Rights Reserved.
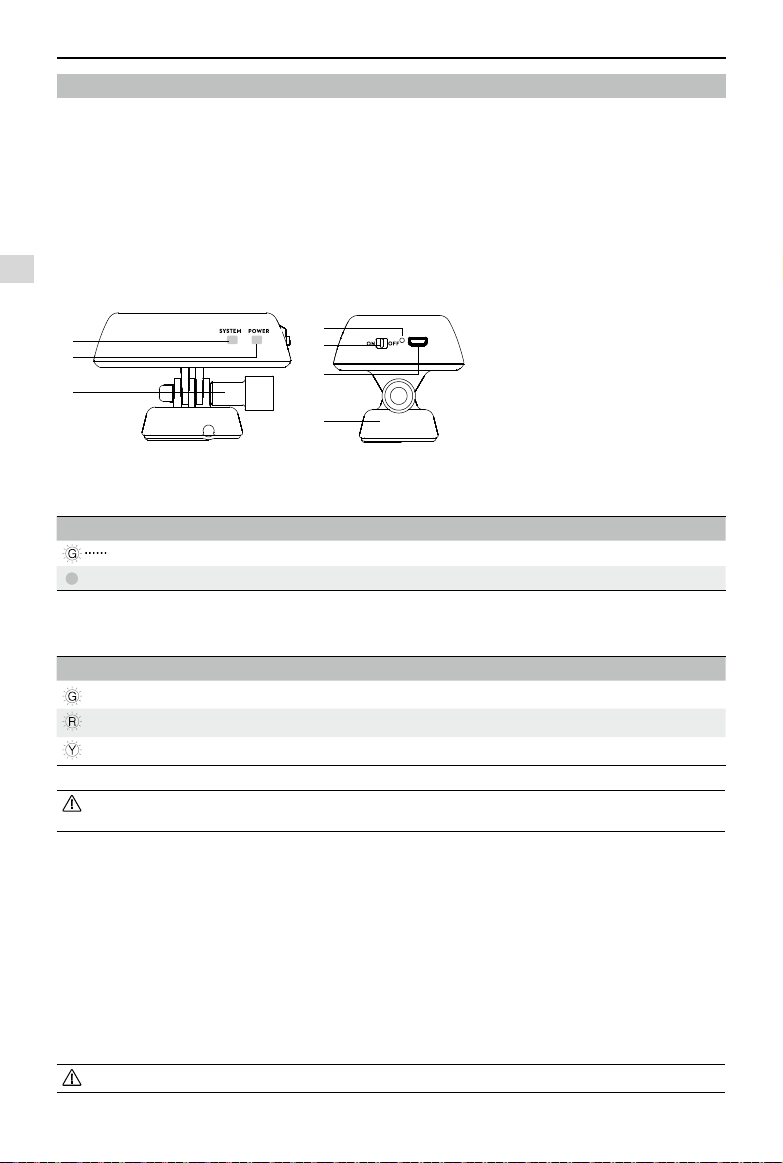
6 Preparing the Range Extender
The Phantom 2 Vision+ Range Extender is a wireless communication device that operates within the 2.4 GHz frequency
band. It is used to extending the effective range of communication between a Smartphone and the Phantom 2 Vision+.
In an open, unobstructed area, the transmission distance can reach up to 700 meters. This can be reduced by trees,
buildings and other sources of the same frequency. Before every ight, it is suggested that you ensure the Range
Extender is functioning properly; otherwise communication issues between the mobile device and the Phantom 2
Vision+ may occur.
Each Range Extender has a unique MAC address and network name (SSID), details of which are printed on the label as
‘Phantom_XXXXXX’. The ‘XXXXXX’ represents the last 6 letters or numbers of the MAC address for the Range Extender.
This can be renamed in the DJI VISION App.
6.1 Introduction
[
1
]
[
2
]
[
3
]
[
4
]
[
5
]
[
6
]
[
7
]
SYSTEM Indicator
POWER Indicator
Locking Screw
Binding Reset Button
Power Switch
Charging Port(Micro-USB slot)
Mounting Bracket
SYSTEM Indicator
Shows Wi-Fi status of the Range Extender.
SYSTEM Indicator Description
Green ashing The Wi-Fi network is functioning normally.
Off The Wi-Fi network is functioning abnormally.
POWER Indicator
Shows power levels of the Range Extender.
POWER Indicator Description
Solid green Fully charged.
Solid red Low voltage alert, re-charge required.
Solid Yellow Charging.
If the power indicator is a solid red light, the Ranger Extender may stop working at any moment. Land and
recharge as soon as possible.
Binding Reset Button
When the Binding Reset Button is pressed, it will reset and restart the Range Extender. You will need to bind it with the
Phantom 2 Vision+ again to recreate its Wi-Fi network. Failure to do so will cause the DJI VISION App to fail to connect
with the camera.
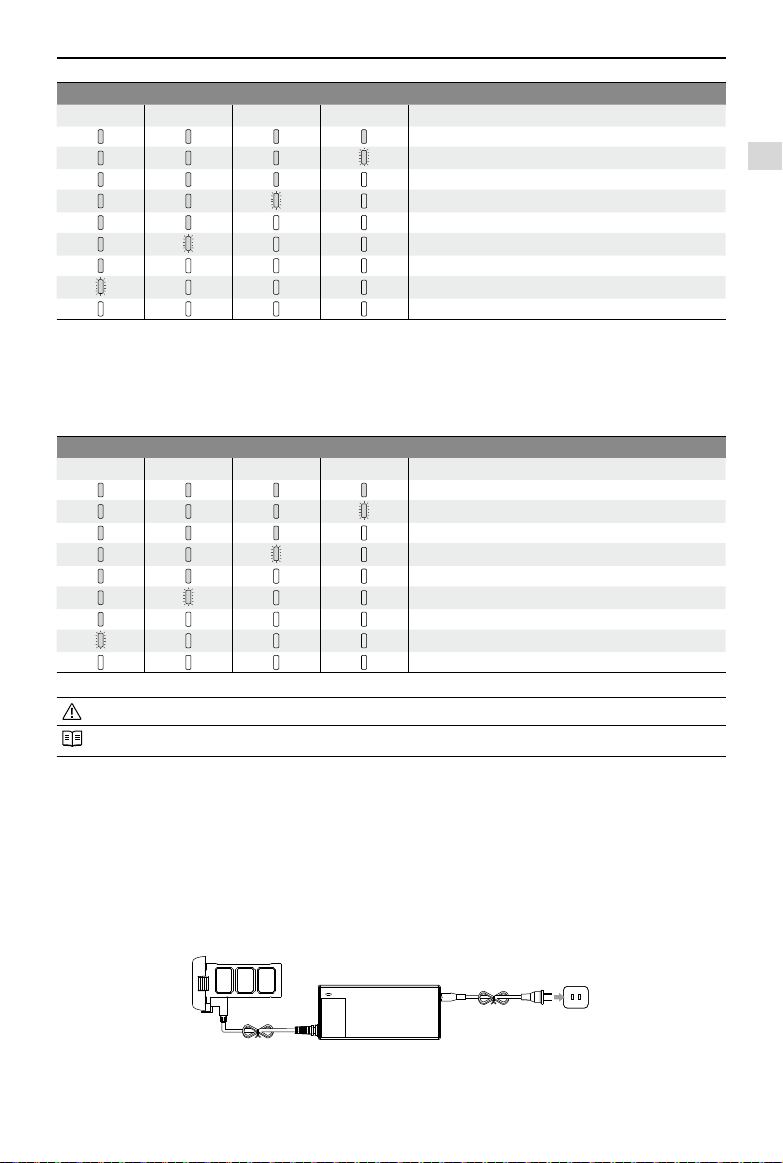
6.2 Using Range Extender
Charging the Range Extender
Charge the Range Extender by connecting the charging port to a power supply device such as a PC or a USB charger
using a Micro-USB cable. Make sure to charge the Range Extender completely before using it for the rst time. This
takes 3~4 hours depending on USB power output.
Make sure the Range Extender has enough power before each use.
Figure 28 Figure 29
[
1
]
[
2
]
[
3
]
[
5
]
[
4
]
[
6
]
[
7
]
Preparing the Range Extender
Assembly and Use
©
2015 DJI. All Rights Reserved.
21
Ready to Fly
Ready to Fly
Ready to Fly
Ready to Fly
Powering on the Range Extender
(1) Flick the power switch to the ON position.
(2) Wait for approximately 30 seconds. The Wi-Fi signal indicator will blink green indicating the Range Extender is
communicating properly.
(3) Keep the Range Extender facing the aircraft during ight for the best communication link.
Power off the Range Extender after every ight to avoid discharging the battery.
Checking the Battery Level
The battery level of the Range Extender can be checked in the camera page of the DJI VISION App as shown below.
When the battery level drops to 20% or lower, the battery level icon will go red as a charging reminder.
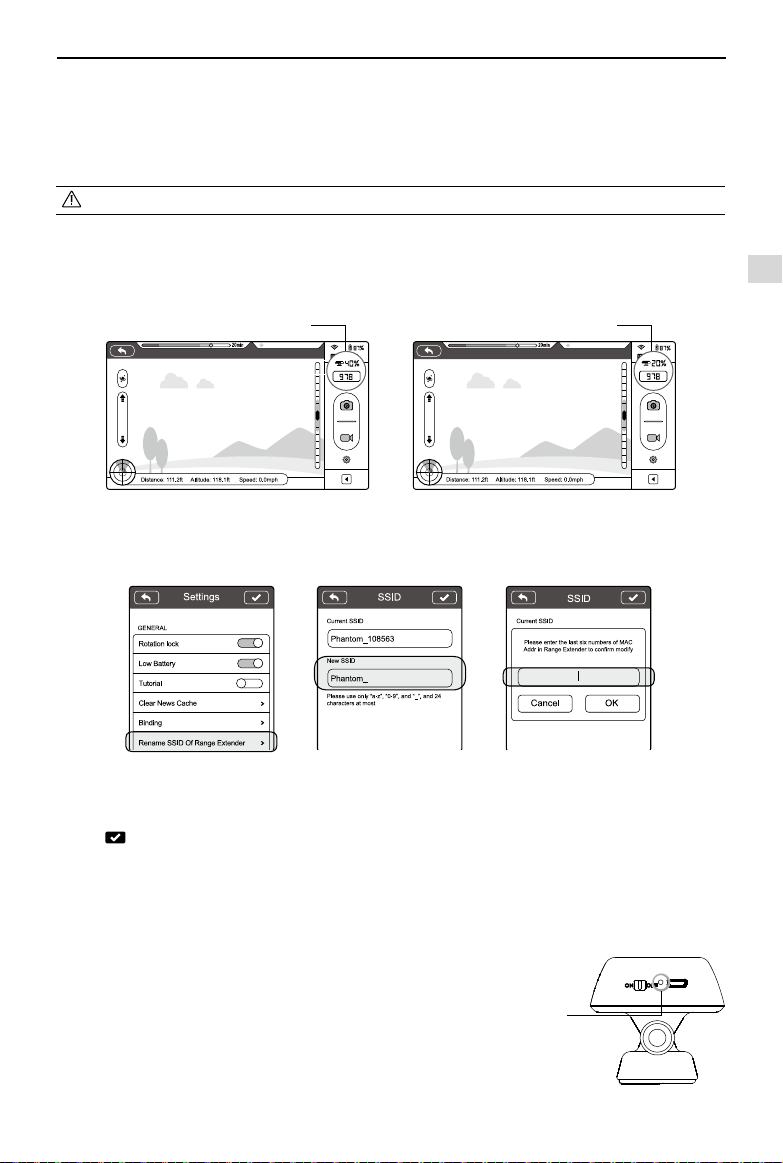
6.3 Rename Range Extender SSID
Make your Range Extender SSID easier to remember by changing its name.
(1) Tap “Rename SSID of Range Extender” in the Settings page. Enter a new SSID name (e.g. Phantom_Tom) in the
textbox.
(2) Tap
and you will be asked to enter the last six characters of your MAC address on the Range Extender to
conrm the change. The MAC address can be found on the sticker on your Range Extender. If your MAC address is
60:60:1F:60:41:E7, then enter 6041E7.
(3) Tap “OK” to conrm the change. The Range Extender will automatically restart and the App will return to the settings
page. Approximately 30 seconds later, the new network name can be found in the Wi-Fi list of your mobile device.
Select and connect the renamed network to use the DJI VISION App.
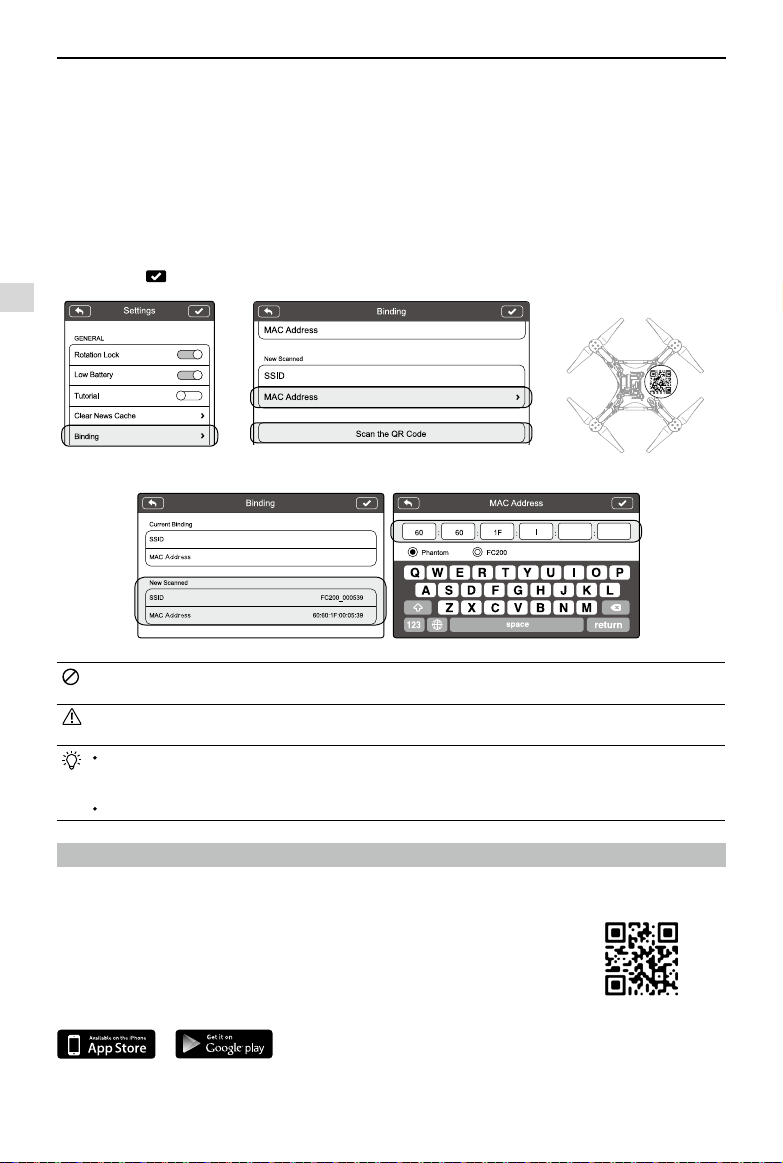
6.4 Binding the Phantom 2 Vision+ and Range Extender
If the connection between the Phantom 2 Vision+ and the Range
Extender fails, or one of them needs to be repaired or replaced, a
camera and Range Extender binding will need to be performed through
the DJI VISION App.
Binding Reset
Button
Figure 30
Preparing the Range Extender
battery level under 20%,icon goes redbattery level above 20%, icon is blue
Figure 31
Figure 32 Figure 33 Figure 34
Figure 35
Ready to Fly
Ready to Fly
Ready to Fly
Ready to Fly
Assembly and Use
22
©
2015 DJI. All Rights Reserved.
(1) Power on the camera and Range Extender.
(2) Approximately 30 seconds later, press the Binding Reset Button on the Range Extender with a pin until the SYSTEM
Indicator turns off. The Range Extender will then restart automatically.
(3) Approximately 30 seconds later, the SYSTEM Indicator will start to blink green, indicating that the Range Extender is
ready for binding.
(4) Enable Wi-Fi on your mobile device then select “Phantom_XXXXXX” the (SSIDof your Range Extender) from theWi-Fi
network list.
(5) Run the DJI VISION App then tap -> Settings -> General -> Binding (Figure 36). Select 'Scan QR Code' to scan
the camera QR code on the bottom of aircraft (Figure 37). Get the camera SSID (E.g. FC200_xxxxxx) and the MAC
address (Figure 38). You can also skip the scan and enter the camera MAC address directly (Figure 39). The MAC
address can be found on the camera label.
(6) Tap the tick
in the top right corner. The Range Extender should automatically restart. Binding is now complete.
Figure 38 Figure 39
DO NOT push the Binding Reset Button of the Range Extender unless you are ready to rebind the Range
Extender and the camera. This will unbind your camera so you must follow the steps above for rebinding.
If both the Phantom 2 Vision+ and the Range Extender are powered on and working normally, you will be able
to nd the SSID on the Wi-Fi list of your mobile device.
The QR code is located on the bottom cover of the Phantom 2 Vision+. If you cannot nd the QR code, please
contact DJI customer service and provide your camera serial number (printed on the label of the camera) so
they can generate a new QR code for you.
Photographing and saving the QR code is recommended to prevent loss.
7 Downloading and Installing the DJI VISION App
7.1 Download and Install
Download DJI VISION App
Download and install the DJI VISION App. Choose one of the download methods below.
Search "DJI VISION" on the App Store then follow instructions for iOS version.
Search "DJI VISION" on Google Play then follow instructions for Android version.
iOS6.1 or above Android 4.0 or above
Downloading and Installing the DJI VISION App
Figure 36 Figure 37 Scan the camera QR code on
the bottom of aircraft
Assembly and Use
©
2015 DJI. All Rights Reserved.
23
Supported mobile devices
iOS (iOS6.1 or above) Recommended: iPhone4S, iPhone5, iPhone5S, iPhone5C,iPhone6, iPhone6 Plus, iPod Touch4,
iPod Touch5; Available but not recommended: iPad3, iPad4, iPad mini, iPad Air.
Android (4.0 or above): Samsung Galaxy S3, S4, Note2, Note3 or mobile devices of similar conguration.
DJI continues to support many mobile devices and any information from users are welcome. Please send any
questions or queries to the following mailbox: [email protected].
The DJI website is regularly updated. Check back often for latest App updates.
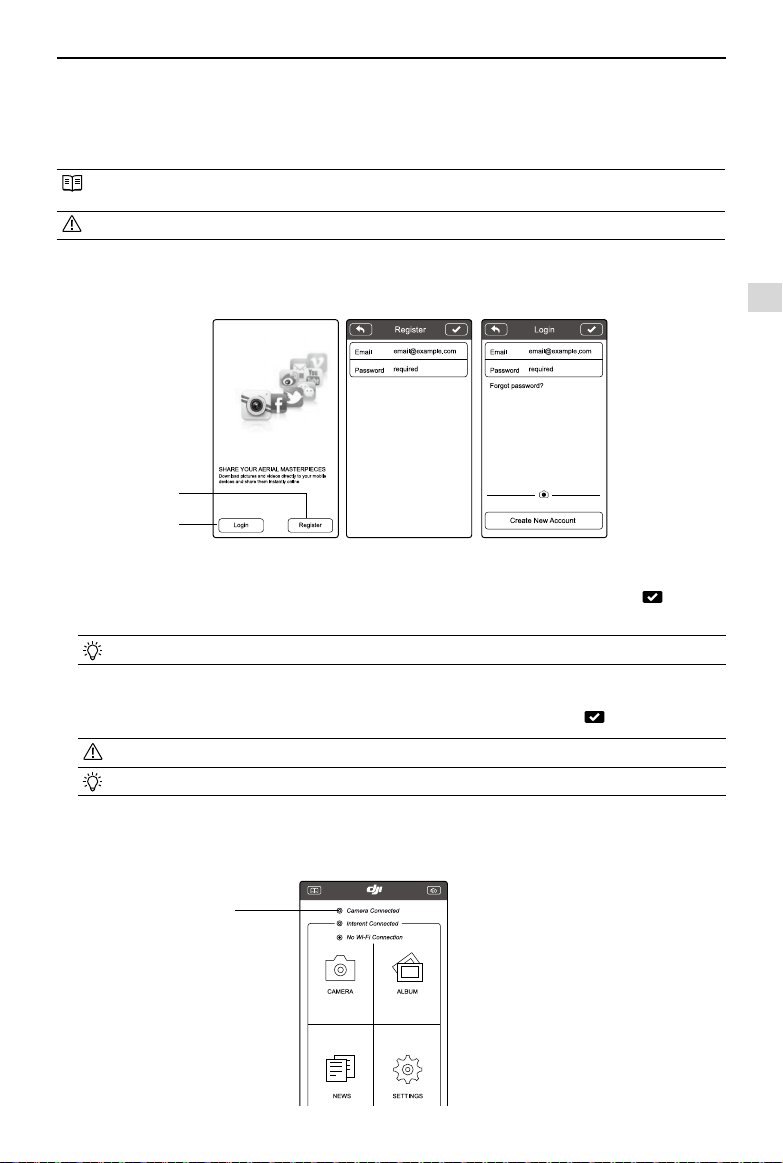
7.2 Register and Login
Access the Internet to register and login.
Figure 40 Figure 41 Figure 42
[
2
]
[
1
]
[
1
]
Register
Tap ‘Register’ to enter the registration page. Fill in your Email and Password information and then tap to create a
new account.
The DJI account works with all DJI Assistant and Apps.
[
2
]
Login
Tap ‘Login’ to enter the login page. Fill in your registered Email and Password and then tap to login.
Log in to your account the rst time you use the DJI VISION App.
Tap “Forgot Password” if you have forgotten your login details.
[
3
]
Usage tips
Useful tips will display when you enter the welcome page. Tap the screen to display the next tip.
Downloading and Installing the DJI VISION App
Figure 43
[
3
]
Assembly and Use
24
©
2015 DJI. All Rights Reserved.
Ready to Fly
8 Connecting the Camera
Before ight, always connect your smartphone to the Phantom’s Wi-Fi network. This is required for the camera control
and FPV.
8.1 Connecting Procedures
Follow these instructions to connect a mobile device to the Phantom 2 Vision+ camera.
(1) Power on the Remote Controller and the Range Extender.
(2) Power on the Phantom 2 Vision+.
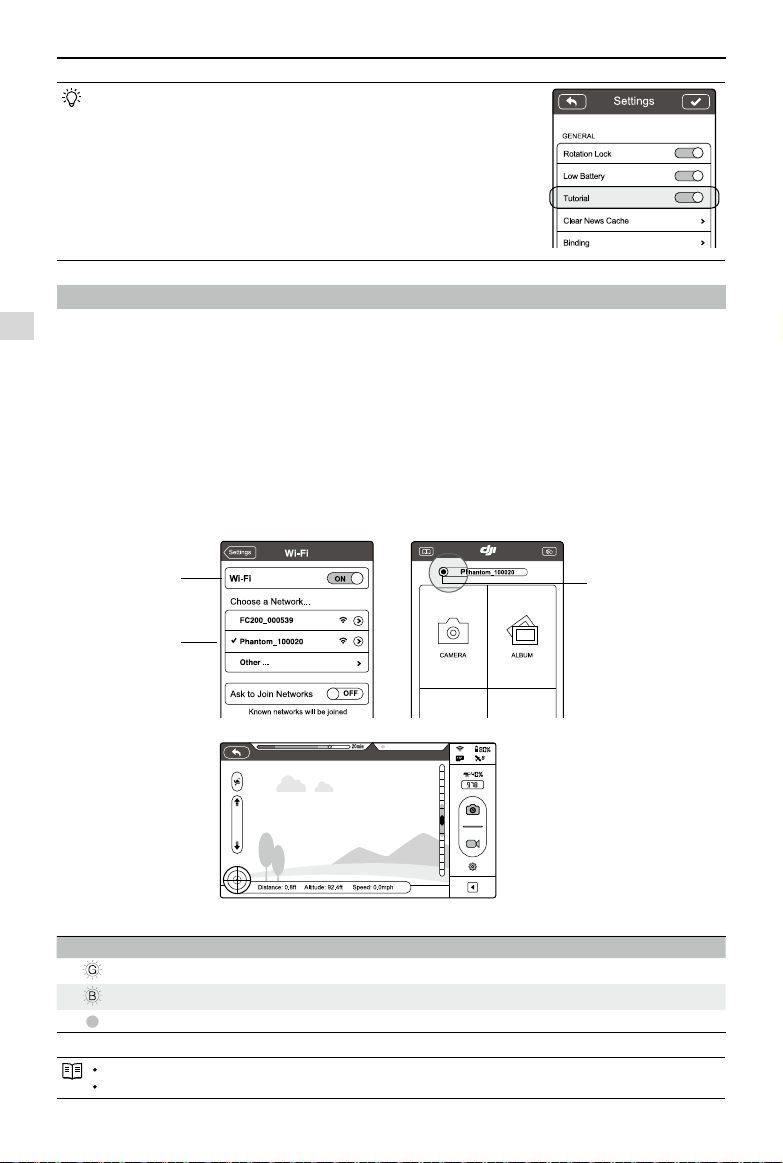
(3) Enable the Wi-Fi on your mobile device; wait for about 30 seconds, and then select “Phantom_XXXXXX” from theWi-
Fi network list (Figure45).
(4) Run the DJI VISION App on your mobile device. When the Wi-Fi Computer Connection status on the App main menu
goes green, the connection is good (Figure46).
(5) Tap the “CAMERA” icon and the DJI VISION App will begin a live camera preview (Figure47). This means everything
is functioning normally.
Wi-Fi Computer Connection Status Description
Icon Description
Solid green Wi-Fi is connected to the Phantom 2 Vision+.
Solid blue Wi-Fi is connected to another Wi-Fi network, not to the Phantom 2 Vision+.
Off No Wi-Fi connection.
The SSID is unique for each Phantom 2 Vision+ It will appear as Phantom_XXXXXX in your Wi-Fi list.
Android users can tap the SSID button on the main page to mobile device Wi-Fi settings directly.
Enable the “Tutorial” switch in the Settings page to get
hints and tips the rst time you use the DJI VISION App.
Figure 44
Connecting the Camera
Figure 45 Figure 46
Wi-Fi Computer
Connection status
Enable Wi-Fi
Select
Phantom_XXXXXX
Figure 47
©
2015 DJI. All Rights Reserved.
25
Flight
Once pre-ight preparation is complete, it is recommended to carry out the tasks in the Phantom Pilot Training Guide
to prepare for more complex ight maneuvers and learn to y safely. Ensure that all ights are carried out in a suitable
location.
Flight Environment Requirements
(1) Do not use the aircraft in severe weather conditions. These include wind speed exceeding category 4, snow, rain
and smog.
(2) Fly in open elds as high buildings or steel structures may affect the accuracy of the onboard compass.
(3) Keep the Phantom away from obstacles, crowds, high voltage power lines, trees or bodies of water when in ight.
(4) Reduce the chance of electromagnetic interference by not ying in areas with high levels of electromagnetism,
including base stations or radio transmission towers.
(5) The Phantom cannot operate within the polar areas.
(6) Do not y the aircraft within no-y zones specied by local laws and regulations.
Preight Checklist
(1) Remote Controller, smart battery, Range Extender and smartphone are fully charged.
(2) Propellers are mounted correctly.
(3) Gimbal clamp has been removed.
(4) Damping absorbers are in good condition, not broken or worn.
(5) Anti-drop kits have been mounted correctly.
(6) Camera lens cap has been removed.
(7) Micro-SD card has been inserted if necessary.
(8) Gimbal is functioning as normal.
(9) Motors can start and are functioning as normal.
(10) DJI VISION App can connect to the camera.
1 Calibrating the Compass
IMPORTANT: Make sure to calibrate the compass in every new flight location. The compass is very sensitive to
electromagnetic interference, which can cause abnormal compass data leading to poor ight performance or even ight
failure. Regular calibration is required for optimum performance.
DO NOT calibrate your compass where there is a chance of strong magnetic interference, such as magnetite,
parking structures, and steel reinforcements underground.
DO NOT carry ferromagnetic materials with you during calibration such as keys or cellular phones.
DO NOT calibrate beside massive metal objects.
1.1Calibration Procedures
Choose an open space to carry out the following procedures. Watch the Phantom 2 Vision+ quick start video for more
details.
Figure 48
Start cali.
LED Flight
Indicator
Position-1
Position-3
Positon-1->Positon-3
->Positon1 Flip once
Start horizontal calibration
LED Flight Indicator
Solid Yellow
Start vertical calibration
LED Flight Indicator
Solid Green
Succeed
Normal LED
Fail
Red, Yellow
ashing in turn
360°Rotate the aircraft
horizontally
360°Rotate the aircraft
vertically (Nose downward)
Quickly ip the switch S1
Position-1
Position-3
Position-1->Position-3->Position1
Flip 5 times or above, or tap
"Compass Calibration" in DJI
VISION APP
Calibrating the Compass
Re-calibrate
Flight
26
©
2015 DJI. All Rights Reserved.
If compass calibration is needed before ight, a prompt will appear on the DJI VISON App’s camera page. It will
disappear after successful calibration.
1.2 When to Recalibrate
(1) When compass data is abnormal, the rear LED ight indicator will blink red and yellow.
(2) Flying in different location to last ight.
(3) Mechanical structure of the Phantom has changed, i.e. changed mounting position of the compass.
(4) Severe drifting occurs in ight, i.e. Phantom does not y in straight lines.
2 Starting/Stopping the Motors
2.1 Starting Motors
A Combination Stick Command (CSC) is used to start the motors instead of
simply pushing the stick up. Push both sticks to their bottom corners to start the
motors. Once the motors have spun up, release both sticks simultaneously.
2.2 Stopping Motors
There are two methods to stop the motors.
Method 1: When the Phantom has landed, push the throttle down, then conduct CSC. Motors will stop immediately.
Release both sticks once motors stop.
Method 2: When the aircraft has landed, push the throttle down and hold. Motors will stop after 3 seconds.
Figure 49
Figure 50 Figure 51
[
1
] [
2
]
Do not execute CSC during normal ight. This will stop the motors and cause the aircraft to drop without control.
Conduct the CSC as neatly as you can. Release the sticks once motors start/stop.
Pull down the throttle stick to descend. The stick will lock into place and the aircraft will descend steadily. Push
the throttle stick upward to release throttle lock.
3 Flight Test
3.1Take off/Landing Procedures
(1) Place the Phantom 2 Vision+ on open at ground with battery indicators facing towards you.
(2) Power on the Remote Controller and Range Extender, then the Smart Flight Battery.
(3) Launch the DJI VISION App and start bind it with your smartphone then enter the camera preview page.
(4) Wait until the Rear LED Flight Indicator blinks green. This means it has initialized and is Ready to Fly. If it ashes yellow,
it is in Ready to Fly (non-GPS) mode and will require more careful ight. Execute the CSC command to start motors.
(5) Push the throttle up slowly to take off. Refer to Remote Controller Operation (Page 18) for more details.
(6) Shoot photos and videos using the DJI VISION App. Refer to DJI VISION App Usage (Page 32) for more details.
(7) To land, hover over a level surface and gently pull down on the throttle gently to descend.
(8) After landing, execute the CSC command or hold the throttle at its lowest position for 3 seconds or more until the
motors stop.
(9) Turn off the smart battery, Range Extender and Remote Controller.
Starting/Stopping the Motors / Flight Test
Flight
©
2015 DJI. All Rights Reserved.
27
When the Rear LED Flight Indicator blinks yellow rapidly during ight, the aircraft has entered Failsafe mode.
Refer to Failsafe Function(Page 27) for details.
A low battery level warning is indicated by the Rear LED Flight Indicator blinking red slowly or rapidly during
ight. Refer to the Low Battery Level Warning Function(Page 28) for details.
View tutorials about ight for more ight information:www.dji.com/phantom2visionplus/training.
Aircraft and battery performance is subject to environmental factors such as air density and temperature. Be
very careful when ying 3000 meters (9800 feet) or more above sea level, as battery and aircraft performance
may be reduced.
3.2 Video Suggestions and Tips
(1) Work through the check list before each ight.
(2) Set the gimbal working mode to Stabilized.
(3) Aim to shoot when ying in Ready to Fly only.
(4) Always y in good weather, such as sunny or windless days.
(5) Change camera settings to suit you. These include FOV, photo format and exposure compensation.
(6) Take ight tests to establish ight routes and scenes.
(7) Push the sticks gently to make aircraft movements stable and smooth.
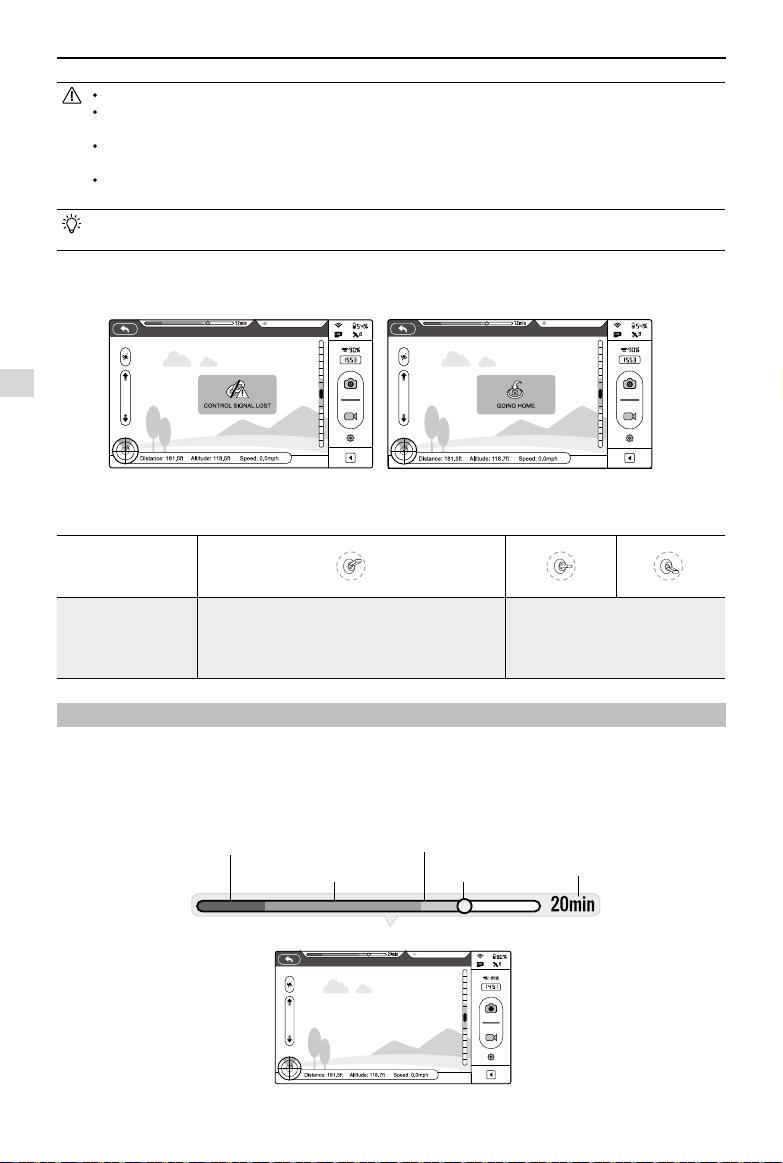
4 Failsafe Function
The Phantom will enter Failsafe mode when its connection to the Remote Controller is lost. The Flight Control System will
automatically control the aircraft to return to home and land to prevent injury or damage.
Home Point: When the Phantom enters ‘Ready to Fly’ from the ‘Ready to Fly status (non-GPS)’, the GPS
coordinates will be recorded and set as the home point.
When Remote Controller signal is lost, the aircraft will return to the recorded home point coordinates and land.
Home point coordinates are used to calculate the horizontal distance of the aircraft (shown as “Distance” on the
GUI of the DJI VISION App).
After successfully record the home point, rear LED ight indicators blink fast green.
Dynamic Home Point: The Home point will be reset to position of the mobile device at specic time intervals.
Enable dynamic home point in DJI Vision app or Phantom 2 Assistant.
Dynamic home point is only available to the GPS-enabled mobile device. Turn on GPS and data service to
obtain higher accuracy of the mobile device position.
Dynamic home point is useful in situations when you are in motion and require a Home point that is different
from the takeoff point.
4.1 When Will Failsafe Activate?
(1) The Remote Controller is powered off.
(2) The Phantom has own out of effective remote controller range.
(3) The signal between the Remote Controller and the Phantom has been blocked.
(4) There is interference causing a signal problem with the Remote Controller.
4.2 Failsafe Procedure
Initiating the Failsafe mode from different ying statuses will results in different landing processes.
Ready to Fly(non-GPS)
-
Automatic landing
The Flight Control System will keep the aircraft level during descent and landing. It may be drift during the descent and landing process.
Ready to Fly
-
Automatic go home and land
The Flight Control System will automatically control the aircraft to y back to the home point and land.
Failsafe Function
5 Fly back to home point
LED Flight Indicator Yellow ashing
4 Signal lost lasts 3s, begin to go home
LED Flight Indicator Yellow ashing
2 Flying
LED Flight Indicator Green ashing
3 Remote Controller signal lost
LED Flight Indicator Yellow ashing
6 Landing after hovering 15s
LED Flight Indicator Yellow ashing
Figure 52
Height over home point>20m
Elevate to 20m
Height over home point<=20m
20m
1 Record Home Point
LED Flight Indicator
Yellow ashing
Green ashing
Flight
28
©
2015 DJI. All Rights Reserved.
Low Battery Level Warning Function
Figure 55
Ready to Fly
To ensure the aircraft successful return to home after Failsafe activation, aim to only y in Ready to Fly mode.
The Phantom will automatically descend during the Failsafe process if there are less than 6 GPS satellites
detected for more than 20 seconds.
When the aircraft is landing automatically, users can control the aircraft’s position and altitude if the remote
controller signal is recovered.
Aircraft cannot navigate around vertical obstacles on its return home course during Failsafe. However, you can set
return home altitude value in Phantom Assistant to avoid hitting vertical obstacles through DJI Phantom Assistant.
Quickly ipping the S2 switch of the Remote Controller from top to bottom 5 times or more will reset the current
aircraft position as a new home point. Rear LED ight indicators will blink green rapidly when successful.
Battery level indicator
Critical Low
battery level
warning(Red)
Low battery
level warning(Yellow)
Sufcient battery
level(Green)
Estimated
remaining
ight time
Current
battery level
Failsafe on the DJI VISION App
The DJI VISION App will provide information during Failsafe.
Figure 53 Figure 54
4.3 Regaining Control During Failsafe Procedures
Position of Switch S1
Position-1 Position-2 Position-3
How to regain control
When the S1 switch is switched to Position-1, toggle
the S1 switch to any other position once to regain
control. If the Remote Controller signal is recovered,
control is returned to the pilot.
Regain control as soon as signal is
recovered.
5 Low Battery Level Warning Function
If the DJI smart battery is depleted to a point that may affect the safe return of the aircraft, the low battery level warning
noties users to take action. Users are advised to land the aircraft immediately when they observe these warnings. The
thresholds for these warnings are automatically determined based on the current aircraft altitude and its distance from
the Home point. Details of the battery level warning are listed below:
RC Signal Lost
RC Signal Lost

Flight
©
2015 DJI. All Rights Reserved.
29
Low Battery Level Warning Function
Battery Level
Warning
Remark
Rear LED
Flight Indicator
DJI VISION App Flight Instructions
Sufficient battery
level
Sufcient battery
level
Green LED blinks
slowly
No message prompts
Operating normally, no
specic action needed
Low battery
level warning
The battery
power is low.
Please land the
aircraft.
Red LED blinks
slowly.
When “Go-Home” is
selected in the Phantom
Assistant, this message
will appear:
If you cancel, there may not be enough
battery power to return to the home
point!
Cancel
Go Home
Go Home In 10 Seconds
Tap “Go-home” to have
the aircraft return to the
Home point and land
automatically, or “Cancel”
to resume normal ight.
If no action is taken, the
aircraft will automatically
go home and land after 10
seconds.
Fly the Phantom 2
Vision+ back and land
it as soon as possible,
then stop the motors
and replace the battery.
Critical Low
battery level
warning
The aircraft
must land
immediately.
Red LED blinks
quickly.
The DJI Vision App screen
will ash red and aircraft
starts to descend.
The Phantom 2 Vision+
will begin to descend
and land automatically.
Estimated
remaining ight
time
Estimated
remaining ight
based on current
battery level.
N/A N/A N/A
Color zones on the battery level indicator reect estimated remaining
ight time and are adjusted automatically, according to the aircraft’s current status.
When the critical battery level warning activates and the aircraft is descending to land automatically, you may
push the throttle upward to hover the aircraft and navigate it to a more appropriate location for landing.
When these warnings are triggered, please bring the aircraft back to the Home point or land to avoid losing
power during ight.
Low Battery Level Warning on the DJI VISION App
Battery level warnings will show on the camera page of the DJI VISION App when the battery level is low.
(1) A red light will ash along the edges of the app screen.
(2) Audible alarm. Make sure sound is turned on and volume is turned up on your mobile device.
(3) The aircraft battery icon will turn red.
Figure 56
Critically Low Battery
The aircraft battery
icon will turn red
Critically Low Battery
Flight
30
©
2015 DJI. All Rights Reserved.
Figure 57 Figure 58
6 Flight Limits
All unmanned aerial vehicle (UAV) operators should abide by all regulations from such organizations as the ICAO
(International Civil Aviation Organization) and their own national airspace regulations. For safety reasons, the ight limits
function is enabled by default to help users use this product safely and legally. The ight limits function includes height,
distance limits and No Fly Zones.
In Ready to Fly mode, height, distance limits and No Fly Zones work together to manage ight. In Ready to Fly (non-GPS)
status, only height limits work and ights cannot go higher than 120m.
Default parameters in Assistant are compliant within the denitions of class G ruled by ICAO. (Refer to Airspace
Denition to get more details). As each country has its own rules, make sure to congure these parameters to
comply with these rules before ying.
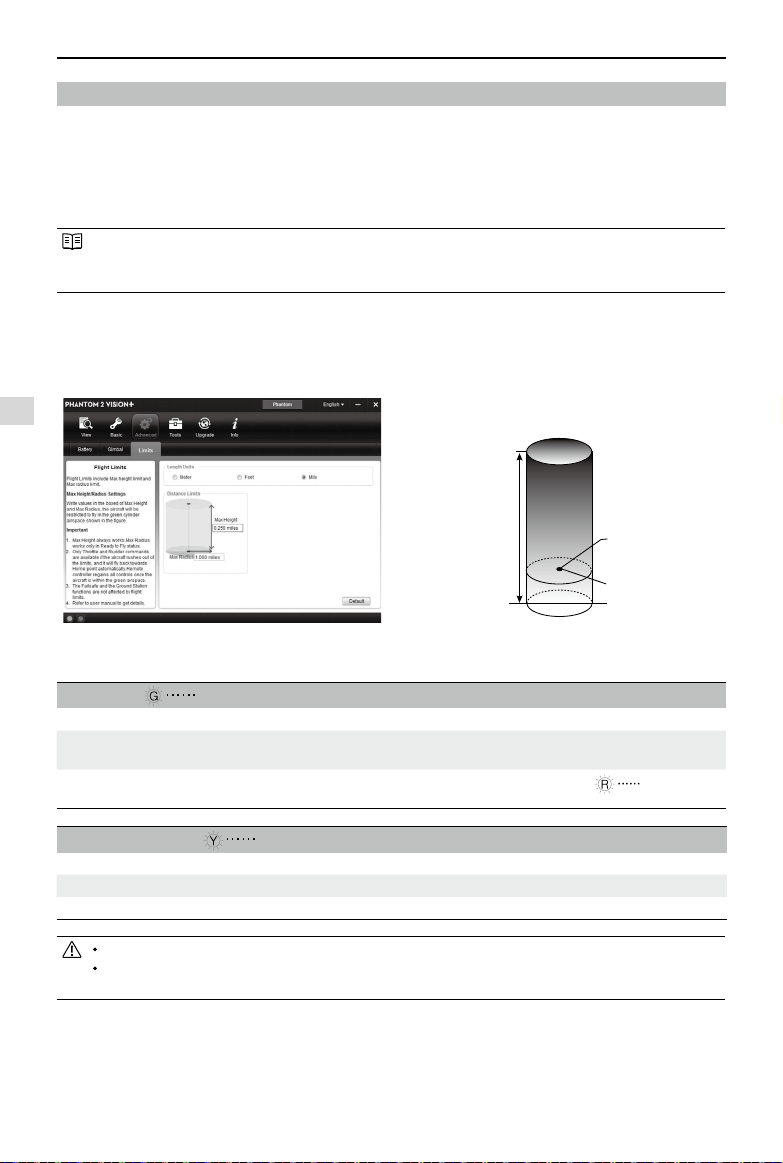
6.1 Max Height & Radius Limits
Max Height & Radius limits ying height and distance. Conguration can be done in the Phantom 2 Vision+ Assistant
(Figure 57). Once complete, your Phantom will y in a restricted cylinder (Figure 58).
Max Height
Max Radius
Home Point
Ready to Fly Green ashing
Limits DJI VISION App Rear LED ight indicator
Max Height
Flight height must be under
the set height.
Warning: Height limit
reached.
None.
Max Radius
Flight distance must be within
the max radius.
Warning: Distance limit
reached.
Rapid red ashing
when close to
the max radius limit.
Ready to Fly(non-GPS) Yellow ashing
Flight Limits DJI VISION App Rear LED ight indicator
Max Height Flight height restricted to 120m and under. Warning: Height limit reached. None.
Max Radius No limits
If you y out of the limit, you can still control the Phantom, but cannot y it further.
If the Phantom flies out of the max radius in Ready to Fly (non-GPS) mode, it will fly back within range
automatically.
Height of aircraft
when powered on
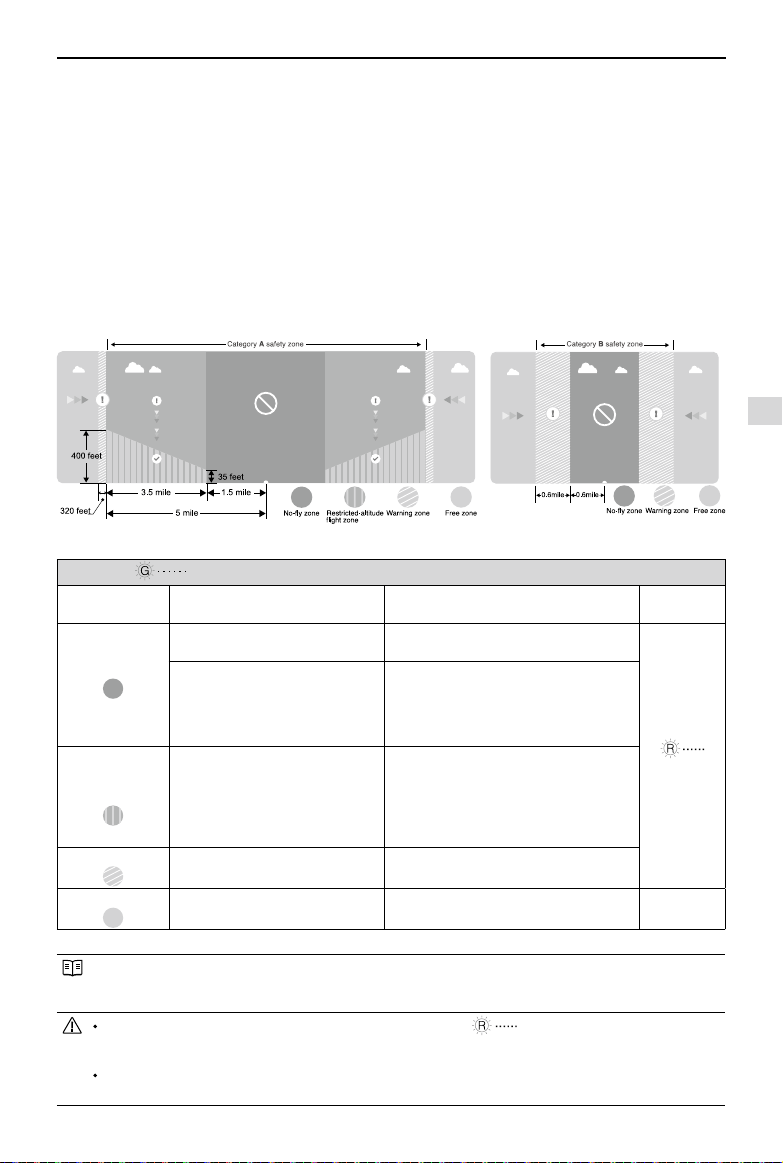
6.2 Flight Restriction of Restricted Areas
Restricted areas include airports worldwide. All restricted areas are listed on the DJI ofcial website at http://www.dji.
com/y-safe/category-mc. Restricted areas are divided into category A and category B. Category A areas cover major
international airport such as LAX and Heathrow, while category B areas includes smaller airports.
Flight Limits
Flight
©
2015 DJI. All Rights Reserved.
31
Ready to Fly Green ashing
Zone Restriction DJI VISION App Notication
Rear LED
Flight Indicator
No-y Zone
Motors will not start.
Warning: You are in a No-y zone. Take off
prohibited.
Red ashing
If the Phantom enters the restricted
area in Ready to Fly (non-GPS) mode
but Ready to Fly mode activates, the
Phantom will automatically descend to
land then stop its motors after landing.
Warning: You are in a No-y zone, automatic
landing has begun. (If you are within 1.5 mile
radius)
Restricted-altitude
ight zone
If the Phantom enters a restricted area
in Ready to Fly (non-GPS) mode and
Ready to Fly mode activates, it will
descend to a safe altitude and hover 15
feet below the safe altitude.
Warning: You are in a restricted zone.
Descending to safe altitude. (If you are between
the range of 1.5 mile and 5 mile radius)
Warning: You are in a restricted zone. Max ight
height restricted to between 10.5m and 120m.
Fly Cautiously.
Warning zone
No flight restriction applies, but there
will be warning message.
Warning: You are approaching a restricted
zone, Fly Cautiously.
Free zone
No restrictions. None. None.
Semi-automatic descent: All stick commands are available except the throttle stick command during the
descent and landing process. Motors will stop automatically after landing. Users will regain control once the
motors have stopped. There is no need to toggle the S1 switch.
When ying in the safety zone, LED ight indicators will blink red quickly and continue for 3 seconds,
then switch to indicate current ying status and continue for 5 seconds at which point it will switch back to red
blinking.
For safety reasons, please do not y close to airports, highways, railway stations, railway lines, city centers and
other special areas. Try to ensure the aircraft is visible.
Figure 59:Category A Figure 60: Category B
Category A Safety Zone
(1) The category A “safety zone” is comprised of a small “no-y zone” and a range of “restricted-altitude zones”. Flight
is prevented in the “no-y zone” but can continue with height restrictions in the restricted-altitude zone.
(2) 1.5 miles (2.4 km) around a designated safety zone is a no-y zone, inside which takeoff is prevented.
(3) 1.5 miles (2.4 km) to 5 miles (8 km) around restricted areas are altitude restricted, with maximum altitude going from
35 feet (10.5 m) at 1.5 miles (2.4 km) to 400 feet (120 m) at 5 miles (8 km).
(4) A “warning zone” has been set around the safety zone. When you y within 320 feet (100m) of the safety zone, a
warning message will appear on the DJI Vision app.
Category B Safety Zone
(1) Category B “safety zone” is comprised of a “no-y zone” and a “warning zone”.
(2) 0.6 miles (1 km) around the safety zone is a designated “no-y zone”.
(3) A “warning zone” has been set around the safety zone. When you y within 0.6 miles (1Km) of this zone, a warning
will appear on the DJI Vision app.
Flight Limits

DJI VISION App Usage
32
©
2015 DJI. All Rights Reserved.
Icons Description
Camera Tap to enter the Camera view screen
Album Tap to enter your Album of photos and videos
News Tap to read the latest DJI News
Settings Tap to change and view app Settings
Manuals Tap to view and download manuals
Checklist Tap to enter the preight checklist
When using the camera and the SD card album (Page 37), connect your
mobile device to the Phantom 2 Vision+ Wi-Fi network.
Internet access is required for sharing photos, videos and reading DJI news.
If you receive a phone call during a ight, the live camera preview screen may
be interrupted. It's recommended to ignore the call and pay attention to your
ight.
6.3 Conditions of Flight Limits
In different working modes and ight modes, ight limits will differ according to number of GPS satellites found. The
following table demonstrates all the cases(√: available; ×:unavailable).
All ights are restricted by height, distance and special areas simultaneously.
Phantom mode
Flight Status Limits of Special Area Max Height Max Radius
Ready to Fly √ √ √
Ready to Fly (non-GPS) × √ ×
Naza-M mode
Control Mode number of GPS found Limits of Special Area Max Height Max Radius
GPS
≥6 √ √ √
<6 × √ ×
ATTI.
≥6 √ √ ×
<6 × √ ×
Manual
≥6 × × ×
<6 × × ×
6.4 Disclaimer
Please ensure that you are up to date with international and domestic airspace rules and regulations before using
this product. By using this product, you hereby agree to this disclaimer and signify that you have read this fully. You
agree that you are responsible for your own conduct and content while using this product, and for any direct or indirect
consequences caused by not following this manual, violating or disregarding other applicable local laws, administrative
rules and social habits thereof.
DJI VISION App Usage
The DJI VISION App controls the Phantom 2 Vision+ camera including capture, recording, settings and pitch angle. It
also displays essential ight information including ight parameters and battery level.
1 DJI VISION App Main Menu
After logging in you will see the VISION App home screen. This shows current Wi-Fi connection status and the four main
features of the App.
Figure 61
DJI VISION App Main Menu
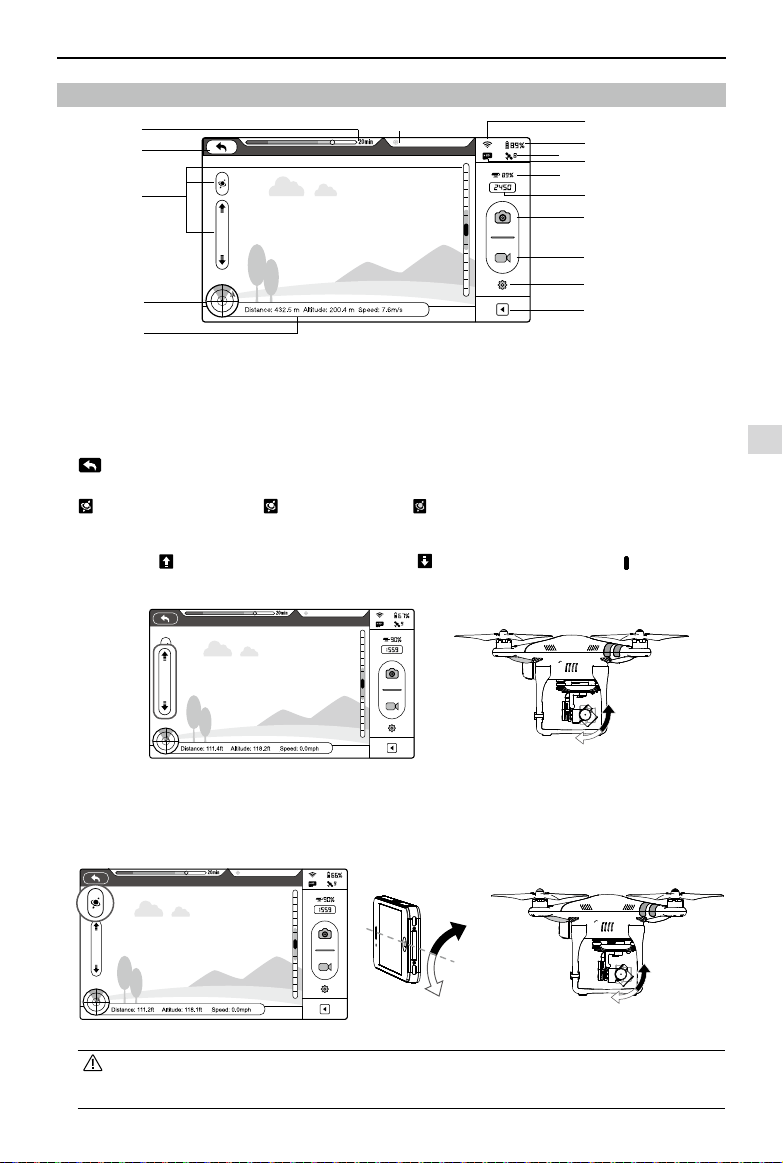
DJI VISION App Usage
©
2015 DJI. All Rights Reserved.
33
Ready to Fly
2
Camera Page
[
1
]
Return
[
2
]
Camera Pitch Control
[
3
]
Flight Attitude and Radar Function
[
4
]
Flight Parameters
[
5
]
Wi-Fi Signal Strength
[
6
]
Flight Battery Level
[
7
]
Aircraft GPS Status
[
8
]
Micro-SD Card Status
[
9
]
Range Extender Battery Level
[
10
]
Remaining
Shots
[
11
]
Shutter Button
[
12
]
Video Recording Button
[
13
]
Camera Settings
[
14
]
Hide or Show Flight Parameters
[
15
]
Rear LED Flight Indicator Status
[
1
]
Return
-Return to the preview page
[
2
]
Camera Pitch Control
-Pitch Control switch is white tap once to highlight it and enter Accelerometer Sensor Mode. Tap again to
return to normal.
Normal Mode
Tap up arrow to pitch camera upwards and down arrow to pitch downwards. Green slider indicates current
camera pitch.
Gimbal pitch movementGimbal pitch control (Normal Mode)
Accelerometer Sensor Mode
The gimbal pitch movement is controlled by moving your mobile device. Pitch forward to pitch camera down and
backward to pitch camera up.
Gimbal pitch control (Accelerometer Sensor Mode) Gimbal pitch movement
In Accelerometer Sensor Mode, the pitch angle indicator will show a grey area. When the green pitch indicator
is inside the grey area, the camera will move according to pitch gestures. When the indicator reaches the
boundary of the grey area, pitch gestures will control the camera’s pitch speed at a constant rate.
Figure 62
Figure 63 Figure 64
Figure 65 Figure 66 Figure 67
Camera Page
[1]
[6]
[2]
[11]
[12]
[13]
[14]
[3]
[4]
[10]
Ready to Fly
Ready to Fly
Ready to Fly
Ready to Fly
[15]
[5]
[7]
[6]
[8]
[9]
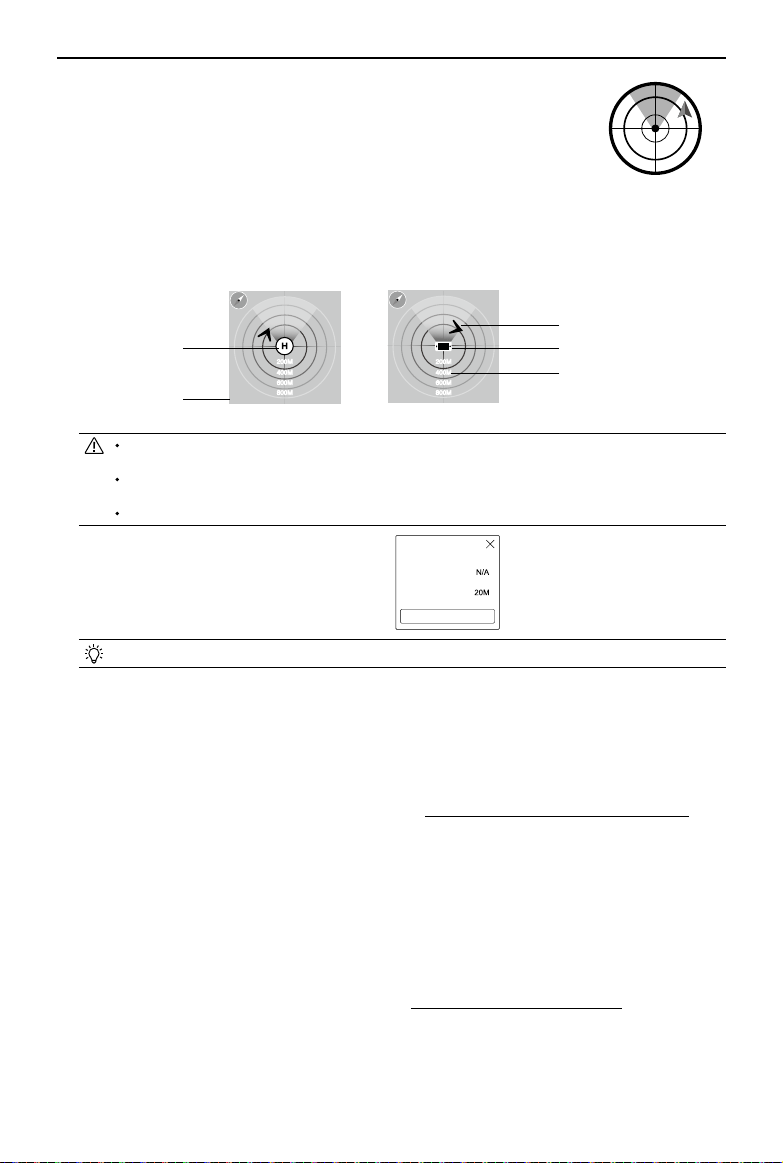
DJI VISION App Usage
34
©
2015 DJI. All Rights Reserved.
[
3
]
Flight Attitude and Radar Function
Flight attitude is indicated by the ight attitude icon.
(1) The red arrow shows which direction the Phantom 2 Vision+ is facing.
(2) Light blue and dark blue areas indicate pitch.
(3) Pitching of the boundary between light blue and dark blue area shows roll angle.
(4) An orange circle around the radar indicates that the dynamic home point is not available.
A green circle around the radar indicates that the dynamic home point is available and
a new home point has been set.
Tap ight attitude icon to turn on the radar function. Home in the center of the radar and the red icon indicates the
Phantom 2 Vision+’s current heading, direction, and approximate distance from home. Tap ight attitude icon again
to disable the radar.The current longitude and latitude of the aircraft is displayed on the bottom of the radar.
By default, the center of the radar indicates the home point recorded by the Phantom 2 Vision+. Tap the
center of the radar to switch the center to your mobile device's current location.
If your mobile device contains a compass, the top portion of the Radar is the direction you are pointing. If
not, the radar will be oriented due north.
Distance units are metric in Figure 69 and Figure 70. Users can switch the unit to imperial in the settings page.
[
4
]
Flight Parameters
Tap to set return home (RTH) altitude.
Distance: Horizontal distance from home point.
Altitude: Vertical distance from home point.
Speed: Horizontal ying speed.
Distance value will show as N/A if the Phantom 2 Vision+ is not in “Ready to Fly” mode.
[
5
]
Wi-Fi Signal Strength
Indicates camera is connected to your mobile device and Wi-Fi is working normally.
The connection between the camera and mobile device may fail if Wi-Fi signal strength is low. Refer to Phantom 2
Vision+ CONNECTION BROKEN for more information.
[
6
]
Flight Battery Level
Show current ight battery level. When battery level is low and the battery icon turns red it is recommended to y the
aircraft back and land it as soon as possible. Please refer to Low Battery Level Warning Function (Page 28) to get
more details.
[
7
]
Aircraft GPS Status
GPS status icon display the number of satellites found by the aircraft. The icon is highlighted when more than 6
satellites are found, allow the Phantom to y in “Ready to Fly” mode.
[
8
]
Micro-SD Card Status
Displays Micro-SD Card Status. Icon is highlighted when a valid Micro-SD card is inserted. If there is no Micro-SD
card present, it is grayed out.
[
9
]
Range Extender Battery Level
Shows current battery level of the Range Extender. Refer to Checking the Battery Level (Page 21) for more details.
[
10
]
Remaining Shots
Displays estimated shots remaining, based on the current photo size setting and storage capacity of the Micro-SD
card. This shows ‘0’ if:
(1) Micro-SD card is not inserted.
(2) Micro-SD card is full.
Figure 69 Figure 70
113.94717E 113.94717E22.54053N 22.54053N
200M
400M
600M
800M
200M
400M
600M
800M
Home Point
Longitude & Latitude
Aircraft Position
Mobile Device Position
Distance
Figure 68
Go-Home Setting
Current Altitude
New Altitude
Set New Altitude
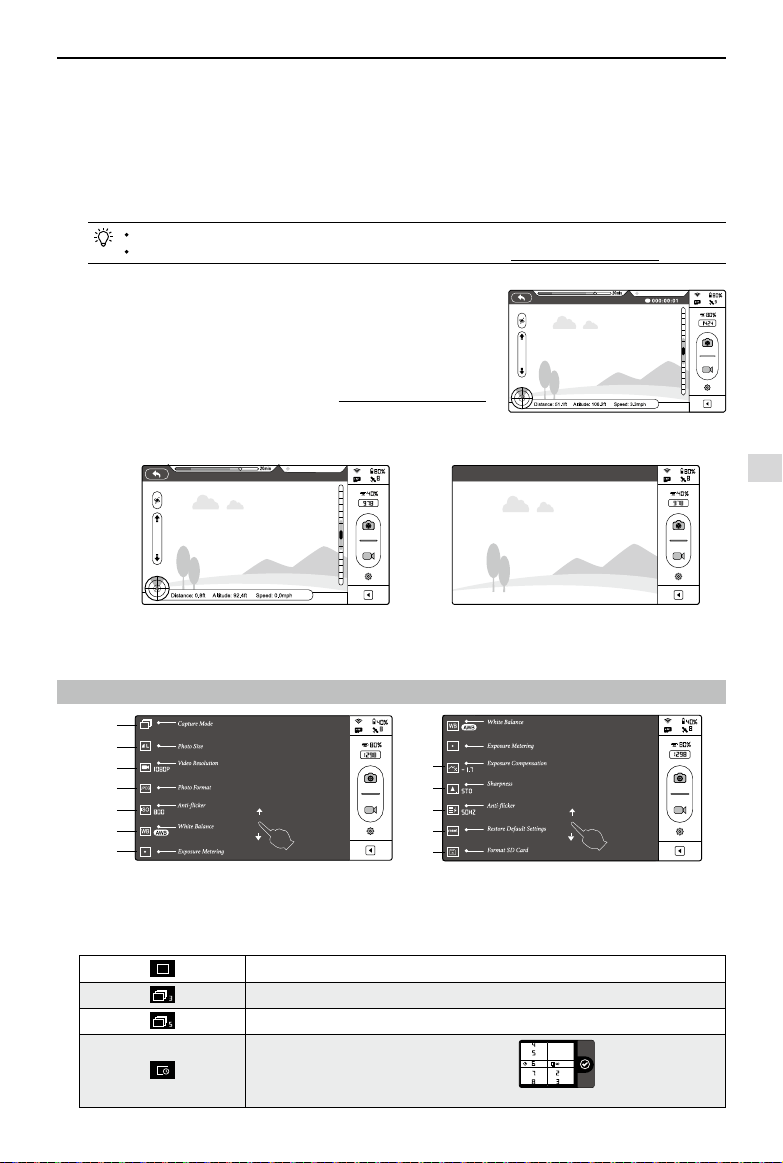
DJI VISION App Usage
©
2015 DJI. All Rights Reserved.
35
(3) Micro-SD card is damaged.
(4) Connection between the DJI VISION App and camera is broken.
[
11
]
Shutter Button
Tap to take photos.
Single capture: press once for a single capture.
Continuous capture: press once for 3 or 5 captures.
Timed capture: press once to begin a timed capture, press again to stop.
Shutter button is disabled during video recording.
Capture modes can be recongured in camera settings; refer to the Camera Settings (Page35).
[
12
]
Video Recording Button
Start and stop video recording. Tap once to start recording. A red dot will
blink to indicate recording is in progress and a time code will appear in
the top right corner of the preview screen. Press again to stop recording.
[
13
]
Camera Settings
Tap to open the camera settings menu, refer to Camera Settings (Page 35).
[
14
]
Hide or Show Flight Parameters
Tap to hide ight parameters. Tap again to show.
Figure 71
3 Camera Settings
Figure 74 Figure 75
[
1
]
Capture Mode
[
2
]
Photo Size
[
3
]
Video Resolution
[
4
]
Photo Format
[
5
]
ISO
[
6
]
White Balance
[
7
]
Exposure Metering
[
8
]
Exposure Compensation
[
9
]
Sharpness
[
10
]
Anti-icker
[
11
]
Restore Defaults
[
12
]
Format Micro-SD Card
[
1
]
Capture Mode
Single capture.
3 captures.
5 captures.
Congurable timed capture:
a) Interval between shots (3~60 s)
b) Number of shots
(2~254, or number of picture is subject to the capacity of the memory card.)
Camera Settings
[
3
]
[
9
]
[
6
]
[
12
]
[
1
]
[
4
]
[
10
]
[
7
]
[
2
]
[
8
]
[
5
]
[
11
]
Ready to Fly
Figure 72 Figure 73
Ready to Fly
[15] Rear LED Flight Indicator Status
Displays the aircraft’s current ight status. Tap for details.
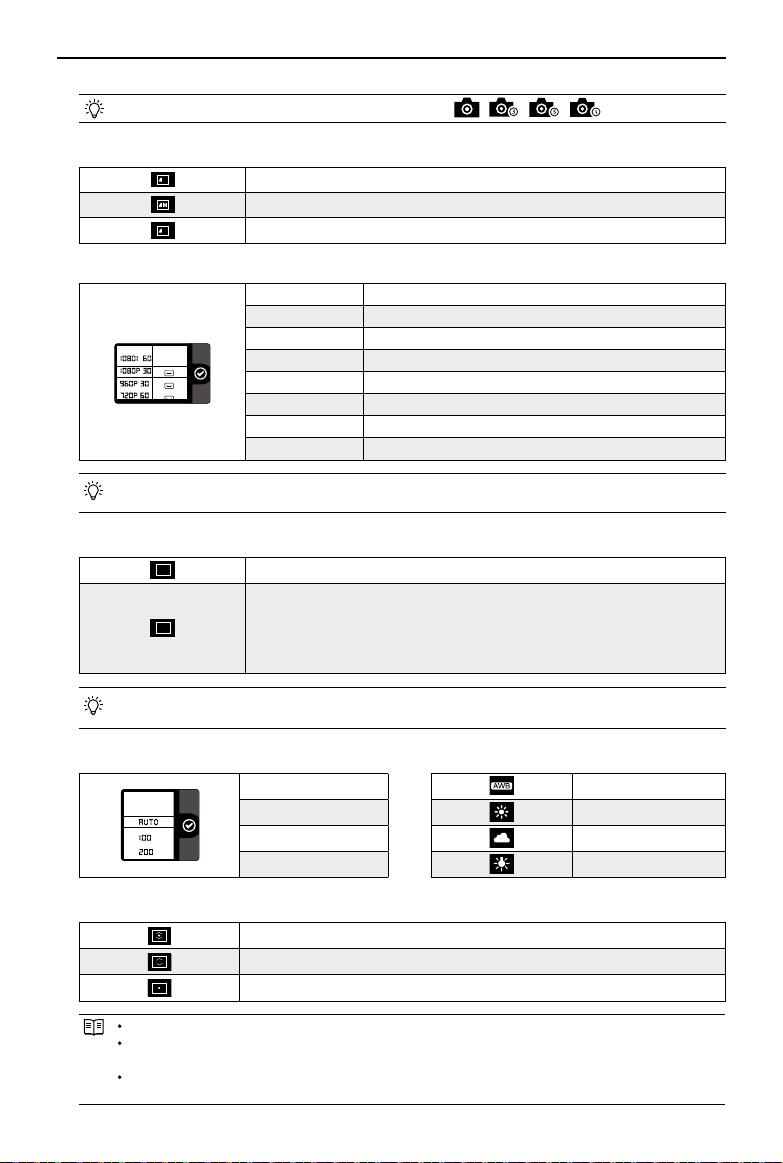
DJI VISION App Usage
36
©
2015 DJI. All Rights Reserved.
Capture Button will change according to the mode selected , , ,
[
2
]
Photo Size
L
Large: 4384 x 3288, 4:3, 14.4MP
Medium: 4384 x 2922, 3:2, 12.8MP
S
Small: 4384 x 2466, 16:9, 10.8MP
[
3
]
Video Resolution
1920x1080 60i, 16 : 9
1920x1080 30p, 16 : 9
1920x1080 25p, 16 : 9
1280x960 30p, 4 : 3
1280x960 25p, 4 : 3
1280x720 60p, 16 : 9
1280x720 30p, 16 : 9
640x480 30p, 4 : 3(VGA)
Three Field of View (FOV) options are supported when shooting in 1920x1080 60i, 1920x1080 30p and
1920x1080 25p: Medium (110°) and Narrow (85°).
[
4
]
Photo Format
JPEG
JPEG
RAW
RAW
The Phantom 2 Vision+ camera shoots in JPEG and RAW le formats simultaneously
when this option is selected. See the following table for detailed specications.
JPEG photo size: 4384×3288, 4384×2922, 4384×2466
RAWphoto size: 4384×3288, 4384×2920, 4384×2464
RAW can be edited using the most recent versions of Adobe Camera Raw for Photoshop and Adobe
Lightroom.
[
5
]
Selectable ISO
[
6
]
White Balance
AUTO AWB (auto white balance)
100
Sunny
200
Cloudy
400
Incandescent lamp
[
7
]
Exposure Metering
Center
Average
Spot
Center: The meter concentrates most on the center of the scene.
Average: Averages out the light levels for the entire image. This mode is used when the scene has no
signicant light difference.
Spot: Measures a small area in the center of the scene. This mode is used in a high contrast scene where
the subject must be accurately exposed.
DJI VISION App Usage
©
2015 DJI. All Rights Reserved.
37
[
1
]
[
2
]
[
3
]
[
4
]
[
8
]
Exposure Compensation
-2.0(EV) 2.0(EV)
-1.7(EV) 1.7(EV)
-1.3(EV) 1.3(EV)
-1.0(EV) 1.0(EV)
-0.7(EV) 0.7(EV)
-0.3(EV) 0.3(EV)
0(EV)
[
9
]
Sharpness
[
10
]
Anti-icker
Standard Anti-icker
Hard 50Hz
Soft 60Hz
[
11
]
Restore Defaults
Restores all default camera settings. Flight battery restart is needed to allow restoration to take effect.
[
12
]
Format Micro-SD Card
Format the Micro-SD card. All data stored in the Micro-SD card will be lost after formatting. Remember to backup
before formatting.
4 Album Page
The DJI VISION App has an SD Card album and a Mobile Device Photo Album. Images and videos on the SD Card
album can be synchronized to the Mobile Device Photo Album.
In the DJI VISION App, tap to enter into the SD Card album and tap to enter into Mobile Device Photo Album.
Figure 76
SD Card album is accessible when the mobile device is connected to Phantom 2 Vision+ Wi-Fi.
4.1 SD Card Album
Pictures stored in the camera are presented using Thumbnails.
Tap the corresponding thumbnail to view the picture.
[
1
]
Photos and videos are listed and grouped by date.
[
2
]
All photos and videos that have been synced to your mobile
device are marked with
.
[
3
]
Tap any thumbnail for single view mode. Tap a Photo thumbnail
that hasn’t been synchronized to the mobile device to view the
photo. Swipe left or right to view the previous or next photo.
Tap on a video thumbnail to play it and view the video length.
A progress bar will appear at the bottom of the screen. Tap
to enter single synchronization mode to synchronize a
single photo or video, or to synchronize and play a video at the
same time.
Figure 77
SD CARD Album
Mobile Device Photo Album
Album Page
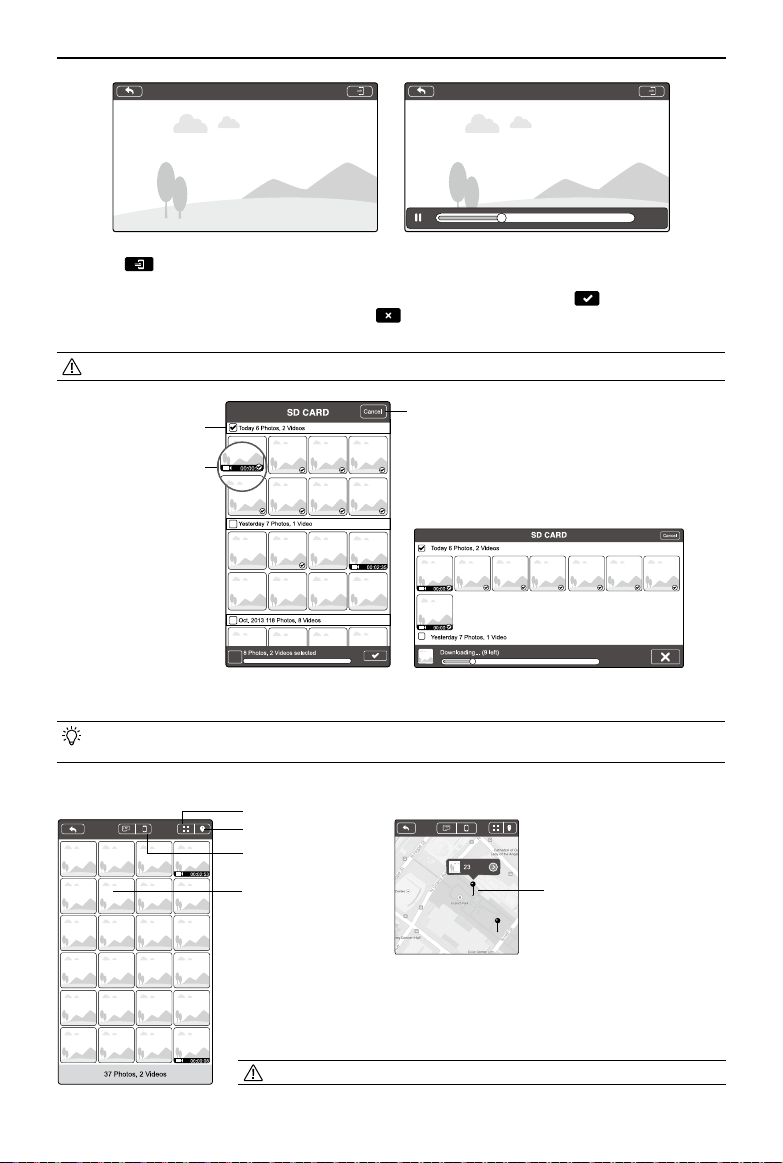
DJI VISION App Usage
38
©
2015 DJI. All Rights Reserved.
Items
1/74 1/74
00:00:07
00:00:22
Figure 78 Figure 79
[4] Tap the
button to enter multiple synchronization mode (as shown in the following diagram). Tap thumbnails to
select photos or videos to synchronize to your mobile device (selected thumbnails are marked with a tick). Select
one or more groups to be synchronized by checking the box before the group, then tap
to start synchronizing.
During the synchronization process, users can tap
to cancel synchronization. Photos and videos that have
been synchronized to the mobile device will remain.
Some mobile devices cannot support the synchronization of 1080i60 video les.
[
5
]
Tap “Cancel” or “Finished” to exit multiple synchronization mode and return to the SD Card page.
Connect camera data port to a PC via a Micro-USB cable to copy photos or videos on the SD card album from
the Micro-SD card to the PC conveniently.
4.2 Mobile Device Photo Album
[
1
]
Browse all synchronized photos and videos in the album. Tap to view selected
photos or videos.
[
2
]
Photos and videos are displayed using thumbnails and sorted by capture time.
[
3
]
Pictures and videos are sorted by captured/recorded geo-tagged locations.
Internet access is required for map downloads.
Select a group
Figure 80 Figure 81
[
5
]
Figure 82
[
1
]
[
4
]
[
3
]
[
2
]
Figure 83
Geo-tagged
locations
Select a single
photo or video
DJI VISION App Usage
©
2015 DJI. All Rights Reserved.
39
47/54
67/81
00:00:05
00:00:08
[
4
]
Tap any thumbnail for single view; you can slide left or right to view the previous or next photo. Tap a video thumbnail
to play a single video.
Figure 84 Figure 85
[
5
]
Tap
to share your photos and videos to social networks.
Access to the Internet is required for photo and video sharing.
5 News Page
View the latest DJI news. (Internet access is required.)
6 Settings Page
Figure 88 Figure 90
Figure 86 Figure 87
News Page / Settings Page
[
3
]
[
17
]
[
6
]
[
7
]
[
20
]
[
1
]
[
4
]
[
18
]
[
21
]
[
2
]
[
5
]
[
19
]
[
23
]
[
24
]
[
22
]
[
8
]
[
9
]
[
15
]
Figure 89
[
12
]
[
13
]
[
14
]
[
10
]
[
11
] [
16
]
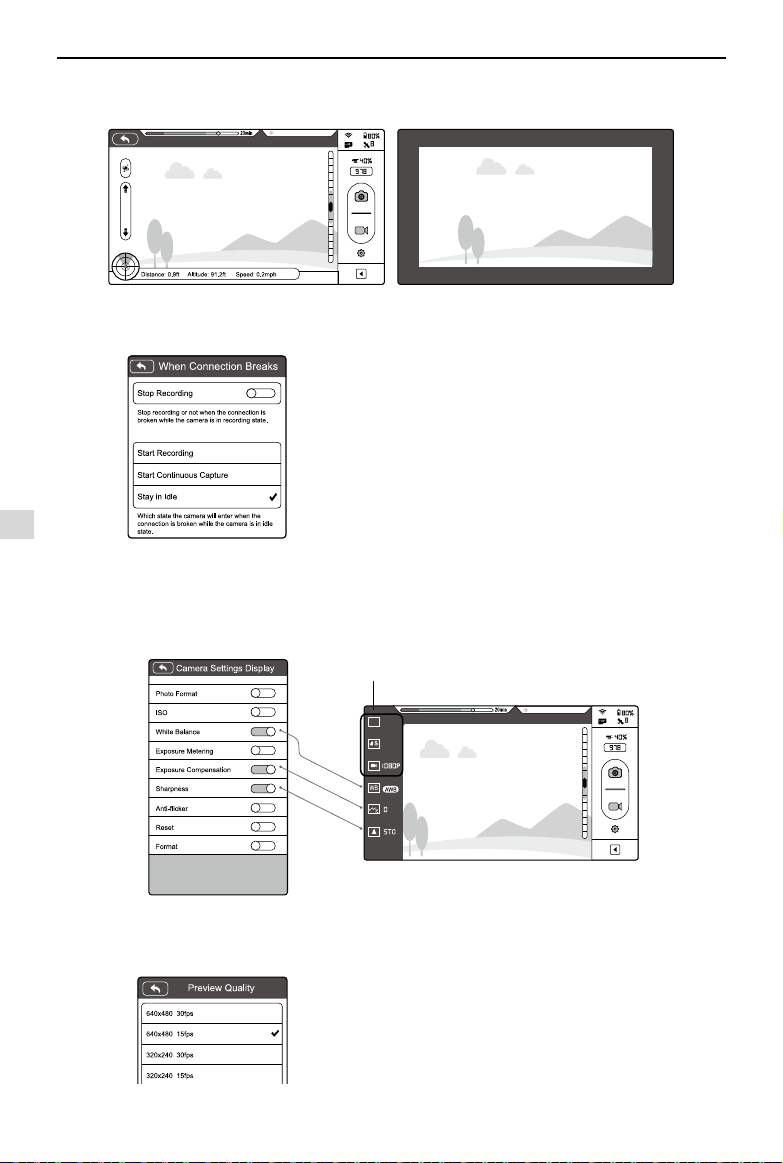
DJI VISION App Usage
40
©
2015 DJI. All Rights Reserved.
Ready to Fly
Ready to Fly
[
1
]
Toolbar Auto Hide
Slide the switch from left to right to enable this function. Toolbar will auto hide on the camera page.
Figure 91: Toolbar Auto Hide Disabled Figure 92: Toolbar Auto Hide Enabled
[
2
]
When Connection Breaks
Figure 93
[
3
]
Camera Settings Display
iOS users will see an enabled item display in the camera settings toolbar and disabled items will be hidden.
This feature is not available on Android.
3 items displayed
by default
Figure 94 Figure 95
[
4
]
Preview Quality
Figure 96
High: 640 x 480@30fps
Medium: 640 x 480@15fps
Medium: 320 x 240@30fps
Low: 320 x 240@15fps (Recommended when there is a lot of interference.)
Stop Recording:
Enabled: Stop recording if the Wi-Fi connection between the
mobile device and the camera breaks while the camera is
recording.
Disabled: Keeps recording if the Wi-Fi connection between
the mobile device and the camera breaks while the camera is
recording.
Select the state the camera will enter in the event of a Wi-Fi
Connection break between the mobile device and the camera.
Use this function to ensure your recording is uninterrupted
during the ight.
Settings Page
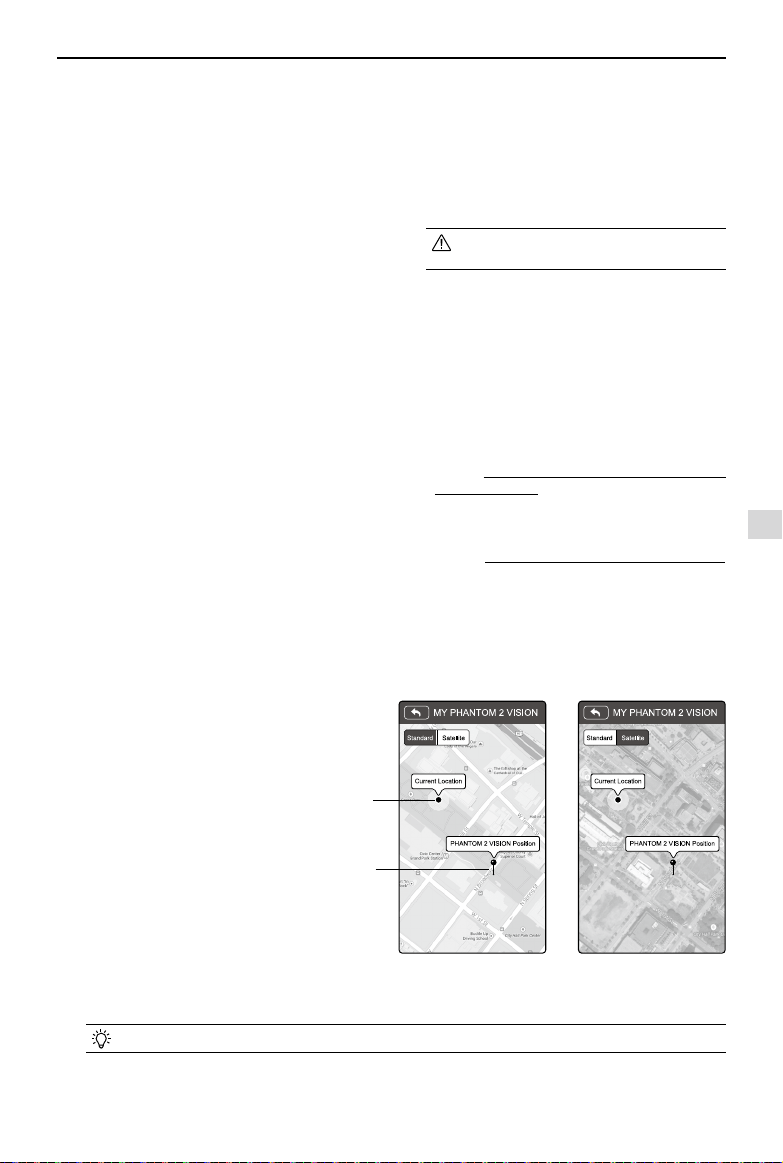
DJI VISION App Usage
©
2015 DJI. All Rights Reserved.
41
[
5
]
Parameter Unit
Select imperial or metric units of measurement.
[
6
]
Ground Station
Slide to the right to enable ground station feature.
[
7
]
Compass Calibration
Tap to calibrate the compass. Do not calibrate the
compass during ight.
[
8
]
Low Battery Auto Go Home
Enable or disable auto go home feature when battery
is low.
[9] Dynamic Home Point
When activated, the Home point will be reset to your
current position at specic time intervals. The aircraft
will return to the latest Home point as required.
[10] Current RTH Altitude
Default RTH altitude set to 20m. Raising the RTH
altitude above 120m is not recommended.
[11] Battery History Info
Show the battery history warning records.
[12] GPS Signal Notice
If enabled, the DJI VISION App will display a pop-
up tip when attempting to takeoff without a sufcient
GPS signal.
[
13
]
FPV Mode
Switched on, the gimbal will work in FPV mode.
Switched off, the gimbal will work in Stabilize mode.
[
22
]
Account
Tap to see user account information.
[
23
]
Rate
Tap to rate the DJI VISION App. Internet access required.
Android App does not include rating.
[
24
]
About
Tap to see the current version of the DJI VISION App and contact information.
Figure 97 Figure 98
My location
Phantom 2 Vision's
location
Settings Page
[
14
]
Rotation Lock
The user interface of the DJI VISION App will rotate
if rotation lock is enabled (for iOS device only).
[
15
]
Low Battery Warning
If enabled, an alarm will sound when the battery
level is too low.
We recommended adjusting the mobile
device volume to the highest level.
[
16
]
Tutorial
Hints and Tips
[
17
]
Clear News Cache
Tap to ush news cache.
[
18
]
Binding
In the event that camera and Range Extender binding
is lost or an item has been repaired or replaced,
binding must be performed using the DJI VISION App.
Refer to Binding the Phantom 2 Vision+ and Range
Extender (Page 21) for details.
[
19
]
Rename Range Extender SSID
Tap to rename the SSID of the Range Extender.
Refer to Rename Range Extender SSID (Page 21)
for details.
[20] Upgrade Range Extender
When upgraded, it is possible to use a mobile
device’s data network to access internet functions
while connected to the Phantom.
This feature is not available on Android.
[
21
]
Find My PHANTOM 2 VISION
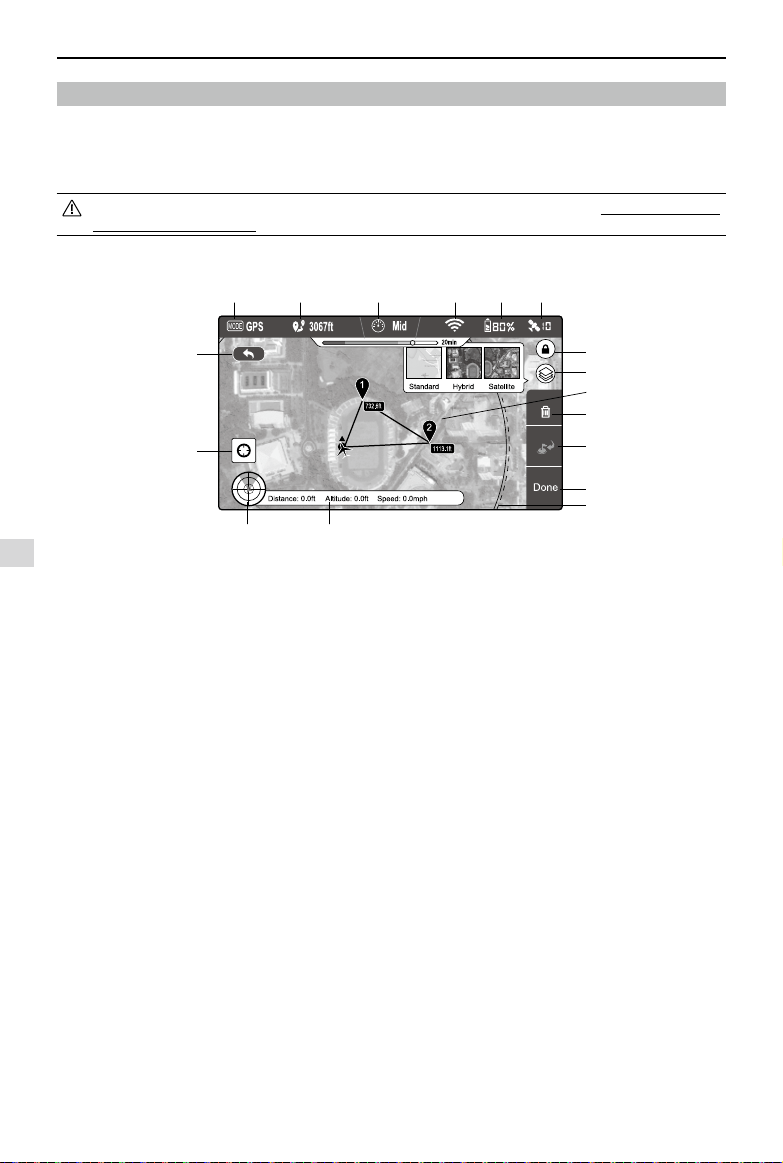
DJI VISION App Usage
42
©
2015 DJI. All Rights Reserved.
Figure 99
7 Ground Station
The DJI Vision app features an integrated ground station function. Using it you can create ight missions by placing
waypoints and setting waypoint altitude and overall speed. When ight plan has been created, simply tap “GO” and
your aircraft will execute the ight mission automatically. You may also abort the ight mission and bring aircraft home by
activating ”GoHome” feature.
Upgrade Phantom rmware to the latest version to enable ground station feature. Refer to “Firmware Upgrade of
the Phantom 2 Vision+” (P46) for more information about how to upgrade the rmware.
7.1 Ground Station GUI
[
1
]
MODE
Modes include
Hover: Hovering
Waypoint: Mission in progress
GoHome: Returning to home point
Take off: Taking off
Landing: Landing
GPS: GPS ight
Atti.: Atti. ight
Manual: Manual ight
[
2
]
Approximated Flight Mission Distance
Planned mission distance. To achieve optimum battery
performance, max mission distance is 5km(3miles).
[
3
]
Speed
For flight safety concern, only three gears of
flight speed are available. Choose from Fast (8m/
s), Mid(4m/s) and Slow (2m/s) for flight speeds.
Estimated 10 minutes flight is achievable when the
aircraft travels in “Fast” gear.
[
4
]
Wi-Fi Signal Strength
Wi-Fi signal strength display. Refer to [5] in “Using the
DJI Vision App” for details.
[
5
]
Battery Level
Battery level display. Refer to [6] in “Using the DJI
Vision app” for details.
[6] GPS
Number of satellites connected. Refer to [7] in “Using
the DJI Vision app” for details.
[
7
]
Flight Attitude and Radar
Attitude and Radar display. Refer to [3] in “Using the
DJI Vision app” for details.
[
8
]
Flight Parameters
Flight information display. Refer to [4] in “Using the
DJI Vision app” for details.
[9] Back
Return to camera GUI.
[10] Home Point Locator
Locate your Home point.
[11] Orientation Lock
Unlock to sync map orientation with aircraft movement.
[12] Map View
Select map view from standard, hybrid or satellite.
[13] Waypoint
Tap each waypoint to set altitude.
[14] Delete
Delete current waypoint.
[15] Go Home
Abort mission, return home and land.
[16] Done
Hit “Done” then tap “GO” to begin mission.
[17] Flight Area
The aircraft can fly in this area and return to the
home point with the current battery level. This area
is dependent on the current state of the aircraft and
will be refreshed at specic time intervals.
Ground Station
[
1
] [
2
] [
3
] [
4
] [
5
] [
6
]
[
7
] [
8
]
[
9
]
[
10
]
[
11
]
[
12
]
[
13
]
[
14
]
[
15
]
[
16
]
[
17
]
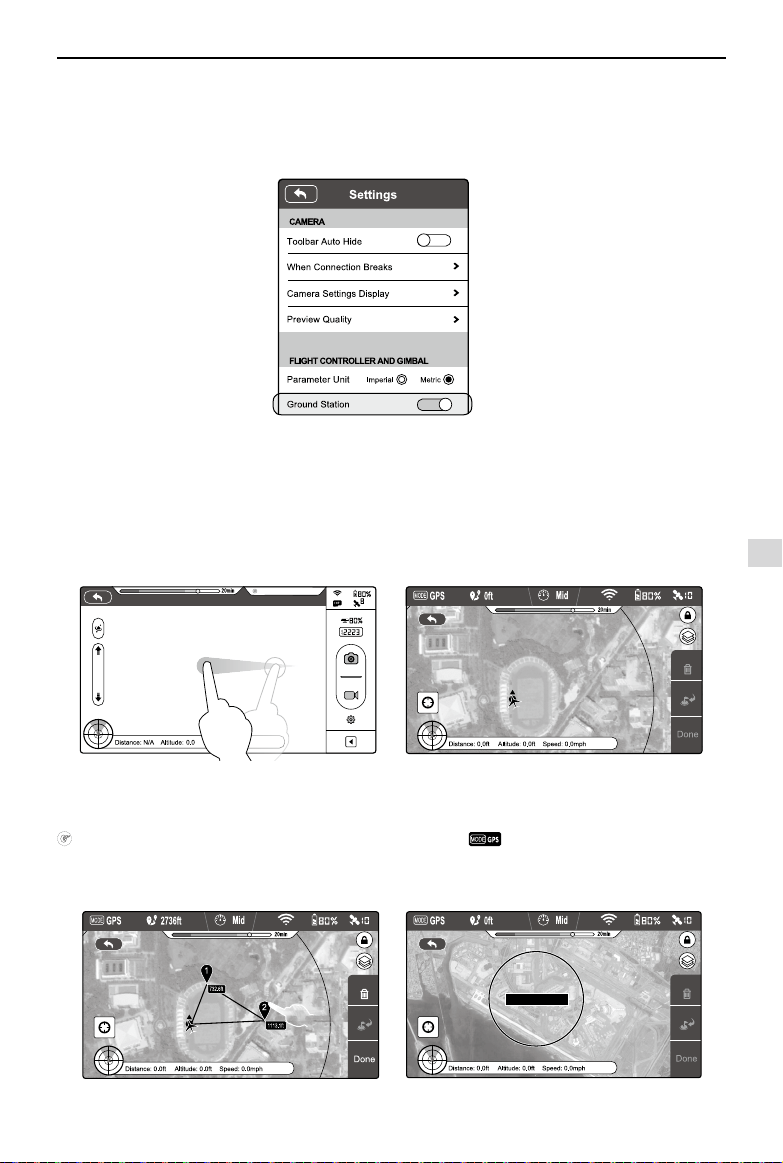
DJI VISION App Usage
©
2015 DJI. All Rights Reserved.
43
ftft
Ready to Fly
7.2 Using Ground Station
Step 1 Launching Ground Station:
Enable ground station in the Settings section of the DJI Vision app. A disclaimer for Ground Station will appear. Read
this thoroughly before using Ground Station.
Ensure your mobile device has access to the Internet. Due to the map data required, Wi-Fi connection is recommended.
Internet access is required to cache the ground station map, if Wi-Fi is unavailable, mobile data service is required. Open
the DJI Vision app camera GUI and swipe left to launch ground station(see Figure 101). DJI Vision app cannot connect
to your aircraft while it is accessing the Internet. Hence, you may prompt with the warning message such as “Connection
to Phantom Failed”. This message will not appear when your aircraft is re-connected to DJI Vision app. Map data of your
current location will load. You can then drag the map to cache nearby areas for future use(see Figure 102).
Step 2 Setting a Waypoint:
Disconnect from the Internet and connect the DJI Vision app to your aircraft. Check that remote controller S1 switch is in
position (position-1) and the upper left corner in ground station display and wait for the aircraft to enter “Ready-
to-Fly” mode (LED indicator blinking green) before swiping left into ground station. Tap on the map to place a waypoint.
You can place up to 16 waypoints including the Home point. Waypoints cannot be placed beyond 500m from the Home
point or inside No Waypoint Areas.
Figure 100
Figure 101 Figure 102
Figure 103
Figure 104
Ground Station
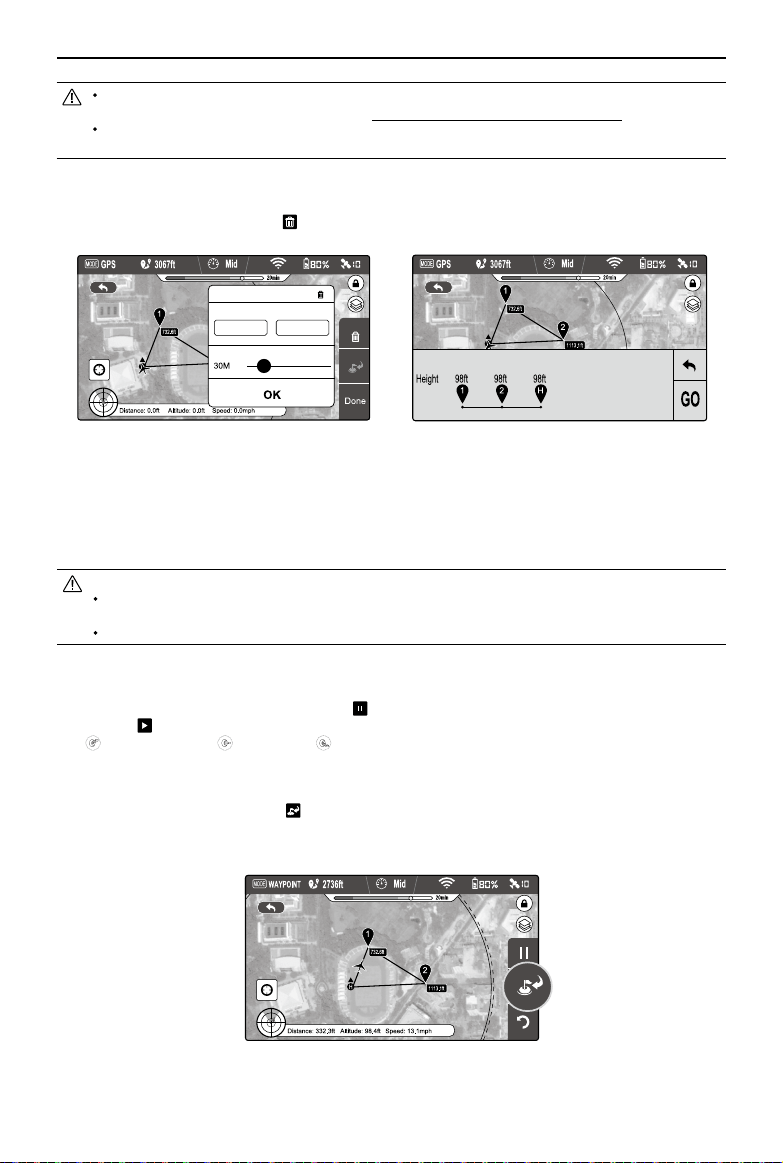
DJI VISION App Usage
44
©
2015 DJI. All Rights Reserved.
A circle on the map, as shown in Figure 104, indicates a restricted, No Waypoint area. Waypoints cannot be
placed in this area. For more information, refer to “6.2 Flight Restriction of Restricted Areas (P30)”.
To achieve the optimal video transmission quality, the aircraft is set to operate within a 500m-radius area from
Home point.
Tap on a waypoint to open a waypoint properties window. Slide the white dot right to adjust waypoint altitude. The
default altitude is set to 98 feet (30 m) and can be adjusted from 0 to 650 feet (200 m). Tap “OK” to save waypoint
settings. To delete current waypoint, tap
. Modify longitude and latitude value using the input box.
Step 3 Preview a Mission:
Tap “Done” to preview the mission when all waypoints are set. A prompt similar to the one below will appear.
This prompt lists all waypoints and their altitudes. The aircraft will y to each waypoint listed. If there is a difference in
altitude between waypoints, the aircraft will adjust its altitude as it ies between points. When ready, tap “GO” to begin
mission.
Figure 107
Aircraft reacts differently to the “GO” command:
If aircraft is on the ground, the aircraft takes off automatically and ascend 16 feet (5m) then fly to the first
waypoint.
If aircraft is in the air, the aircraft ies to the rst waypoint.
Step 4 Executing Flight Mission
The aircraft ies to each waypoint in numerical order. As it ies, swipe back into the DJI Vision app camera GUI to
control camera tilt and capture photos or video. Tap
to pause the mission during the ight, and aircraft will then start
hovering. Tap
to resume mission. If you wish to regain control of the aircraft, toggle the S1 switch on remote controller
from
(Position-1) to either (Position-2) or (Position-3) to discontinue the current mission.
Step 5 Landing
When all waypoints have been visited, the aircraft will return to its Home point and hover. Regain control of the aircraft
and land it manually. You may also tap
button to initiate “Go Home” procedure. Aircraft will abort current mission,
return to Home point and auto land. When the aircraft is landing automatically, users can control the aircraft’s position
and altitude. Users can start the motors to take off immediately after the motors have stopped following auto landing.
Figure 105
113.94984 22.54074
waypoint1
Longitude
Height
Latitude
Figure 106

©
2015 DJI. All Rights Reserved.
45
PC / MAC Assistant
For better use of the Phantom 2 Vision+, Phantom 2 Vision+ Assistant and Phantom RC Assistant are required. Both run
on Windows or Mac OS X operating systems.
1 Installing Driver and Phantom 2 Vision+ Assistant
1.1 Installing and Running on Windows
(1) Download the driver installer and Assistant installer (.EXE) from the Phantom 2 Vision+ download page.
(2) Connect the Phantom 2 Vision+ to a PC using a Micro-USB cable.
(3) Run the driver installer and follow the prompts to nish installation.
(4) Run the Assistant installer and follow the prompts to nish installation.
(5) Double click the Phantom 2 Vision+ icon on your desktop to launch Assistant.
Supports Windows XP, Windows 7 and Windows 8 (32 or 64 bit).
1.2 Installing and Running on Mac OS X
(1) Download the Assistant installer (
.
DMG) format from the Phantom 2 Vision+ download page.
(2) Run the installer and follow the prompts to nish installation.
(3) When launching for the rst time, if using Launchpad to run the Phantom 2 Vision+ Assistant, Launchpad will not
allow access because Assistant has not been reviewed by the Mac App Store.
(4) Locate the Phantom 2 Vision+ icon in Finder, press Control then click the icon (or right-click the icon using a mouse).
Choose Open from the shortcut menu, then click Open in the prompt dialog box to launch.
(5) After the first successful launch, double click the Phantom 2 Vision+ icon as normal to launch using Finder or
Launchpad.
Figure 108
Figure 109
Figure 110
Installing Driver and Phantom 2 Vision+ Assistant
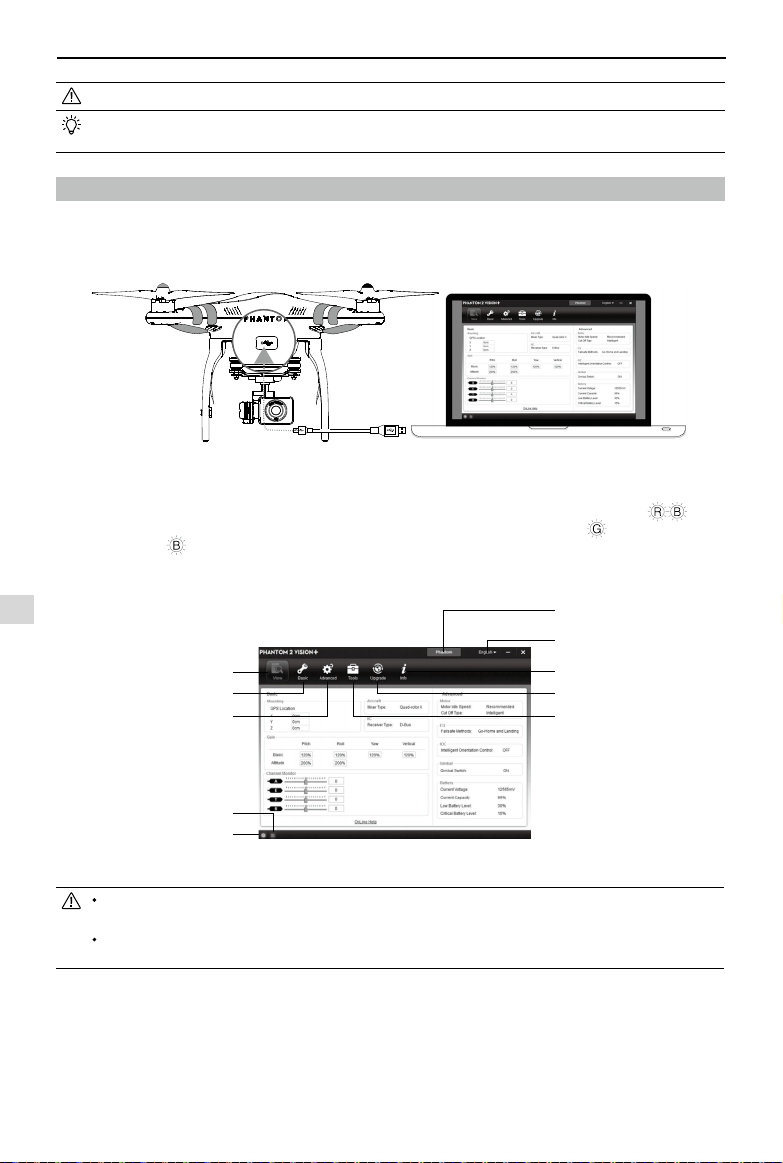
PC / MAC Assistant
46
©
2015 DJI. All Rights Reserved.
DMG installer supports Mac OS X 10.9 or above.
Phantom 2 Vision+ Assistant on Mac OS X and Windows are the same. Assistant pages shown in this manual
are from the Windows version.
2 Using Assistant
The Phantom 2 Vision+ Assistant is used to congure the ight control system and upgrade rmware. The Phantom RC
Assistant is used to congure the Remote Controller and upgrade its rmware.
2.1 Using the Phantom 2 Vision+ Assistant
Figure 111
(1) Power on the PC and the Phantom 2 Vision+. Connect the Phantom 2 Vision+ to the PC with a Micro-USB cable. DO
NOT disconnect until conguration is nished.
(2) Run Phantom 2 Vision+ Assistant and wait for the Phantom 2 Vision+ to connect. Watch the indicators
on the
bottom of the screen. When connected successfully, the Computer Connection status is
and Data Exchange
Indicator blinks
.
(3) Choose [Basic] or [Advanced] conguration pages.
(4) View and check the current conguration in the [View] page.
View congurations
RC, Gain
Gimbal, Battery, Flight Limits
Data Exchange Indicator
Computer Connection status
Function switch between Phantom
and Naza-M working modo
Language swap
Account, software version
Firmware upgrade
IMU calibration
* This image is for reference
only. Please refer to the
actual user interface.
Figure 112
Do not enable Naza-M mode before finishing “Advanced Flight Maneuvers” in the "Phantom Pilot Training
Guide”.
Enable Phantom mode by tapping the same button if Naza-M mode is enabled. Once changed to Phantom
working mode, all parameters will return to factory settings.
2.2 Firmware Upgrade of the Phantom 2 Vision+
(1) Click [Upgrade] icon to check the current rmware version and whether the installed rmware is the latest version. If
not, click links to upgrade.
(2) Wait until the Assistant shows “nished”. Click OK and power cycle the Phantom 2 Vision+ after 5 seconds. Once
complete, rmware is up to date.
Using Assistant
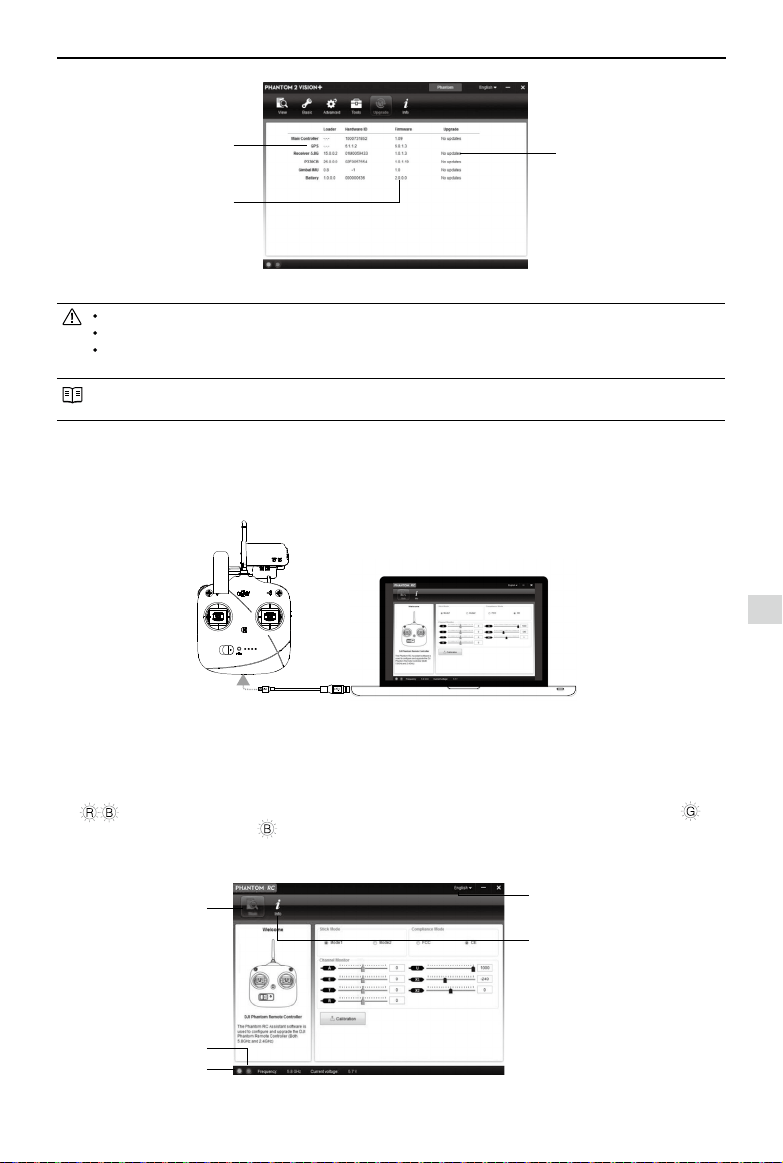
PC / MAC Assistant
©
2015 DJI. All Rights Reserved.
47
An internet connection is required to upgrade the Phantom 2 Vision+ rmware.
DO NOT power off until the upgrade is nished.
If the rmware upgrade fails, the Flight Controller will enter a waiting for rmware upgrade status automatically.
If this happens, repeat the above procedures.
Firmware upgradable items: (1)Flight Controller (2)GPS (3)5.8G Receiver (4) Main Board (P330CB) (5)Battery (6)
Gimbal IMU
2.3 Using the Phantom RC Assistant
Use the Phantom 2 Vision+ Assistant to install PHANTOM RC Assistant on your Windows PC or Mac, and then follow the
below steps to congure the Remote Controller.
Firmware upgradable items
Current rmware version
Upgrade link
* This image is for reference
only. Please refer to the
actual user interface.
Figure 113
Figure 114
(1) Turn off the Remote Controller and nd its Micro-USB slot.
(2) Power on PC and Remote Controller then connect Remote Controller to the PC with a Micro-USB cable. DO NOT
disconnect until conguration is nished.
(3) Run the PHANTOM RC Assistant and wait for the Remote Controller to connect to Assistant. Watch the indicators
on the bottom left of the screen. When connected successfully, the Computer Connection status is and
Data Exchange Indicator blinks
.
(4) Finish conguration in the [Main] page.
(5) Finish upgrade in the [Info] page if necessary.
Main page
Data Exchange Indicator
Computer Connection status
Language swap
Firmware upgrade,
Account, Software version
*This image is for reference only.
Please refer to the actual user
interface.
Figure 115
Using Assistant
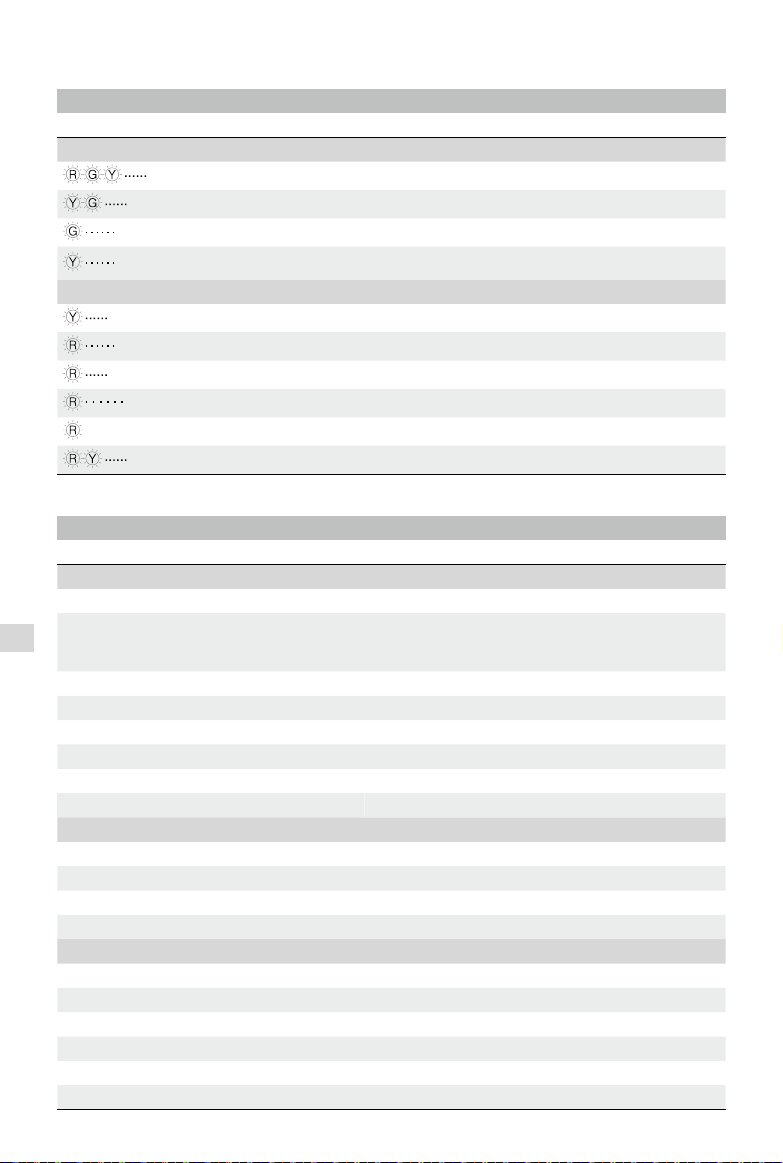
48
©
2015 DJI. All Rights Reserved.
Appendix
1 Rear LED Flight Indicator Status
Rear LED Flight Indicators Normal status
(Red, Green, Yellow ashes in turn) Power On Self-Test
(Green, Yellow ashes in turn) Warming Up
(Slow Green ashes) Ready to Fly
(Slow Yellow ashes) Ready to Fly (non-GPS)
Rear LED Flight Indicators Abnormal status
(Quick Yellow ashes) Remote Controller Signal Lost
(Slow Red ashes) Low Battery Level Warning
(Quick Red ashes) Critical Low Battery Level Warning
(Three Red ashes off and on) Not Stationary or Sensor Bias is too big
—— (Solid red) Error*
(Red, Yellow ashes in turn) Compass Needs Calibration
*You can learn more about error by connecting the Phantom 2 Vision+ to the Assistant.
2 Specications
Aircraft
Supported Battery DJI 5200mAh Li-Po Battery
Weight (Battery & Propellers included)
Recommend payload
Maximum payload
1242g
≤1300g
1350g
Hovering Accuracy (Ready to Fly) Vertical: 0.8m; Horizontal: 2.5m
Max Yaw Angular Velocity 200°/s
Max Tiltable Angle 35°
Max Ascent / Descent Speed Ascent: 6m/s; Descent: 2m/s
Max Flight Speed 15m/s (Not Recommended)
Motor Diagonal Length 350mm
3-axial stabilized Gimbal
Working Current Static : 750mA; Dynamic : 900mA
Control Accuracy ±0.03°
Controllable Range Pitch :
-
90° - 0°
Maximum Angular Speed Pitch : 90°/s
Camera
Operating Environment Temperature 0℃ - 40℃
Sensor Size 1/2.3”
Effective Pixels 14 Megapixels
Resolution 4384×3288
HD Recording 1080p30 /1080i60
Recording FOV 110° / 85°
Appendix

Appendix
©
2015 DJI. All Rights Reserved.
49
Remote Controller
Operating Frequency 5.728 GHz - 5.85 GHz
Communication Distance (open area) CE Compliance: 400m; FCC Compliance: 800m
Receiver Sensitivity (1%PER) -93dBm
Transmitting Power (EIRP) CE Compliance: 25mW; FCC Compliance: 100mW
Working Current/Voltage [email protected]
Battery 2000mAh rechargeable LiPo battery
Range Extender
Operating Frequency 2412MHz - 2462MHz
Communication Distance (open area) 500m - 700m
Transmitting Power 20dBm
Power Consumption 2W
3 Troubleshooting (FAQ)
3.1 How to solve large margin(s) mid-point error?
If the Remote Controller stick(s) mid-point margin of error is too big, the motors will fail to start when you execute the
CSC and the Phantom will not take off. The below are some possible xes for this.
(1) One of the Remote Controller’s stick positions (except the throttle stick) is not centered when powering on the
Phantom 2 Vision+.
Solution: Place all Remote Controller sticks at their mid-point positions and then power cycle the Phantom 2 Vision+
to re-record the mid-point.
(2) The Remote Controller sticks have been trimmed, leading to a deviation in the mid-point position.
Solution: Use Assistant to perform a Remote Controller calibration.
a) Connect to Assistant, tap Basic -> RC -> Command Sticks Calibration and push all Remote Controller sticks
through their complete travel range to see if any stick cannot reach its outermost position.
b) Power cycle the Phantom 2 Vision+. Power cycling is required.
c) Re-attempt Remote Controller calibration in Assistant.
If the above solutions do not solve your issue, please send your Remote Controller to DJI Customer service for repair.
3.2 How to restore a video le if power is turned off during a recording session?
Solution: Keep or place the Micro-SD card back into the camera. Power cycle the camera and wait about 30 seconds for
the video le to be restored.
3.3 Failure to acquire the SSID.
Solution: Double check whether both the camera and Range Extender are powered on and the power switch of the
camera is switched to “Wi-Fi ON.”
3.4 What to do if Phantom 2 Vision+ is out of sight and the Wi-Fi connections is lost?
Solution: Turn off the Remote Controller to trigger the Failsafe mode and the aircraft will start to y back, descend, and
land at the Home point. Please make sure there are no obstacles between the Phantom and the home point and that you
are familiar with the procedure for regaining control.
3.5 Wi-Fi connection fails all the time.
Solution: Double check the current Wi-Fi connection status of the mobile device. The mobile device may be connecting
to other Wi-Fi networks after a connection breaks with the Phantom 2 Vision+.
3.6 Files fail to synchronize.
Solution: Video les that are too large (le sizes close to 4GB) cannot be synchronized to the mobile device. Some
mobile devices do not support the synchronization of the 1080i60 video les.
Appendix
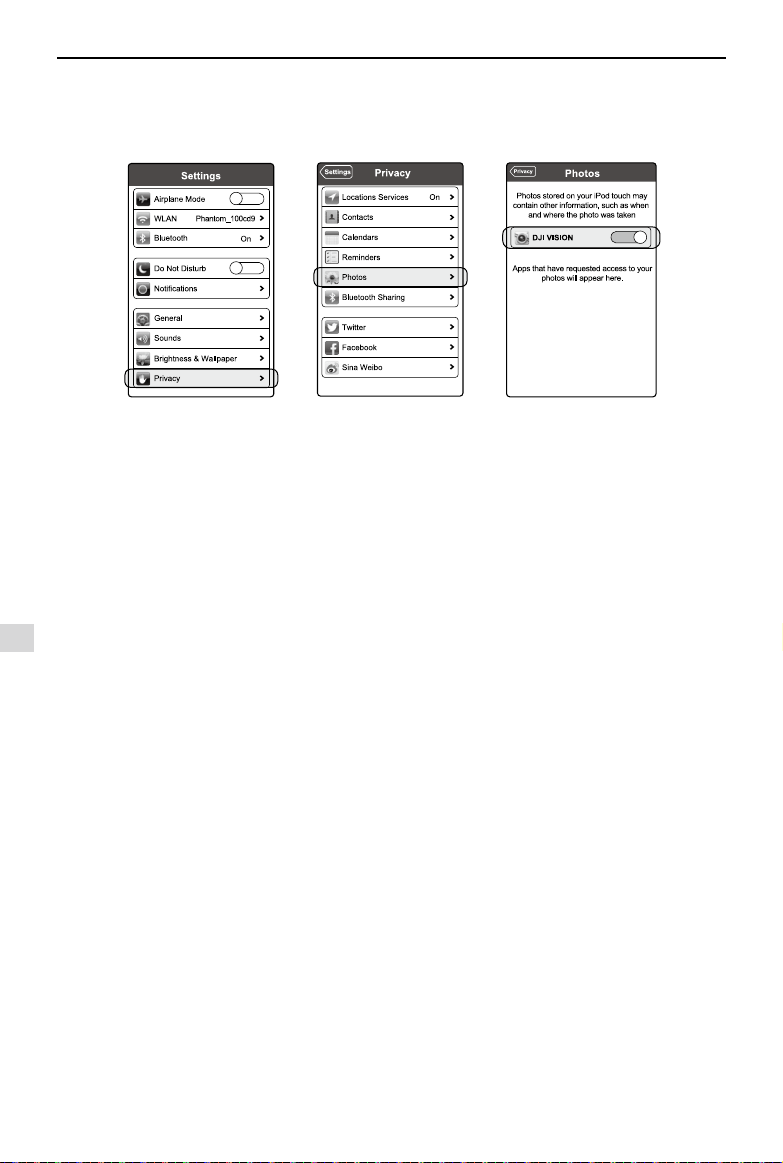
Appendix
50
©
2015 DJI. All Rights Reserved.
3.8 Failure to share.
Solution: Make sure your mobile device has access to the Internet.
3.9 Some Android devices have a problem connecting to the Phantom 2 Vision+ Wi-Fi Extender.
Solution: Some Android devices do not allow for both a Wi-Fi connection and a mobile data connection at the same time.
When trying to connect to the Phantom 2 Vision+ Wi-Fi network, most devices will check whether an Internet connection
has a certain Wi-Fi setting enabled, e.g. Auto network switch or Test for Internet connection. If no Internet connection
is found because the Phantom 2 Vision+ creates a non-routable connection it will drop the Phantom 2 Vision+ Wi-
Fi network connection and scan for the next available connection. Example: For the Samsung Note 3, carry out the
following procedures to solve this issue. Tap Settings -> Wi-Fi, and then tap the “Menu” button. Select “Advanced”
then uncheck the “Auto network switch”. You might see a warning that indicates the Internet connection is unstable this
message can be ignored.
3.10 App tips for mobile devices.
Solution: If using the App on multiple mobile devices turn off the App on the rst mobile device then turn it on the second
one to ensure normal functions on the second mobile device.
3.11 How to land the aircraft more smoothly?
Solution: First pull the throttle stick position down to lower than 5%, then execute the CSC command to stop the motors.
3.12 Why is the discharge time of a battery not zero when unused?
Solution: A battery aging test is performed prior to delivery which affects the discharge time of the new battery. This is
why the discharge time of a new battery is not zero. The battery is okay to use.
3.13 Do I need extra hardware to utilize ground station?
Solution: No extra hardware is required.
3.14 Does ground station support caching map data ofine?
Solution: Yes, user can cache map data in ground station for future use.
3.15 What if I accidently exit DJI Vision App in ground station mode?
If DJI Vision App is closed when aircraft is executing ight mission, aircraft continues with the remaining ight mission.
If DJI Vision App is closed and failed to re-connect with aircraft within 1 minute, aircraft returns home point automatically.
3.7 iOS Albums fail to synchronize.
Solution: Reset the settings of your mobile device as illustrated below. Enable the Settings -> Private -> Photos -> DJI
VISION. Otherwise Albums will fail to synchronize with your mobile device.
Figure 116
Figure 117
Figure 118
Appendix


The content is subject to change.
Download the latest version from
http://www.dji.com/product/phantom-2-vision-plus
©
2015 DJI. All Rights Reserved.