USER GUIDE & SUPPORT
Lavalier Mic Kit


TABLE OF CONTENTS
4
PARTS GUIDE
MIC PLACEMENT
FUZZY WINDSCREEN
SMARTPHONES WITH 3.5MM EARPHONE PORT
IPHONE - MIC RECORDING SETUP
ANDROID - MIC RECORDING SETUP
ANDROID - MIC NOT RECOGNIZED
IPAD - MIC RECORDING SETUP
TABLET - MIC RECORDING SETUP
GOPRO - MIC RECORDING SETUP
DSLR - MIC RECORDING SETUP
ZOOM [H1N / H2N / H4N / H5 / H6] - MIC SETUP
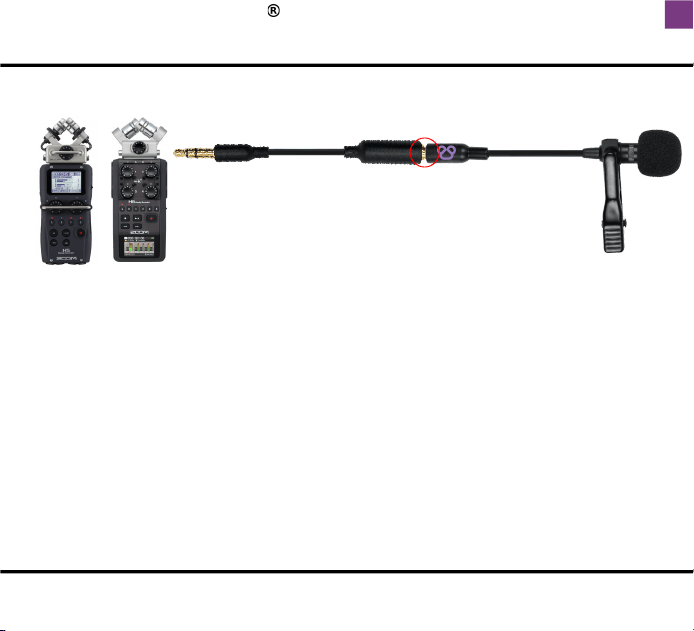
TASCAM - MIC SETUP / OTHER AUDIO RECORDERS
TROUBLESHOOTING
CONTACT US / NEED MORE HELP?
SPECIFICATIONS
1
2
3
4
5
6
7-8
9
10
11
12
13 -14
15-16
17-19
20
21
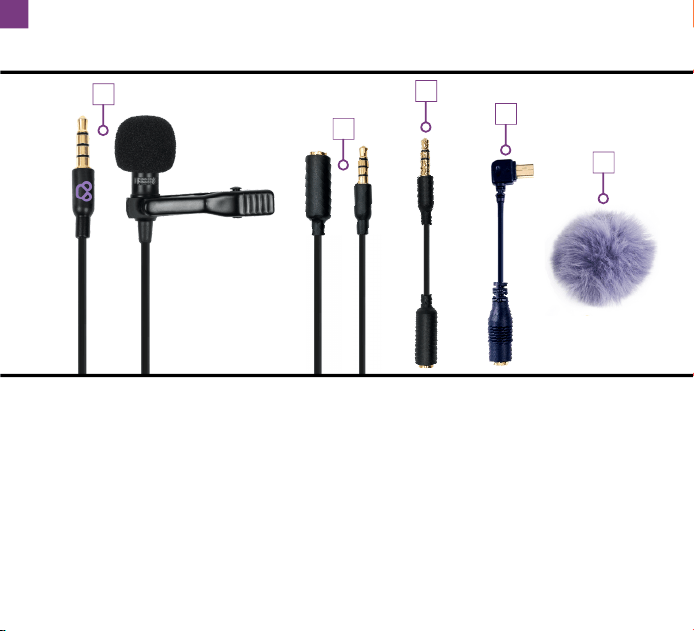
Microphone with TRRS Connector
9.8ft (3m) Extension Cord with TRRS Connector
TRS (2-Ring) Adapter
Mini USB Adapter
Fuzzy Windscreen for Windy Environments
1.
2.
3.
4.
5.
1
2
3
4
5
PARTS GUIDE
1

MIC PLACEMENT
2
The microphone should be positioned directly underneath the
speaker's mouth (as close as possible), without being subject to
clothing rustle. When attaching the microphone, please ensure
the microphone is pointed towards the speaker's mouth.

FUZZY WINDSCREEN
3
The fuzzy windscreen is ideally used for windy environments to
prevent wind noise from distorting the audio quality of the
microphone. For increased wind protection, add the fuzzy
windscreen when recording outdoors by sliding it over the
microphone and ensuring the fur is fluffed up in all directions for
best results. Please remove the foam windscreen on the
microphone first before attaching the fuzzy windscreen.
1
2
INSERT
RECORD
"CLICK"
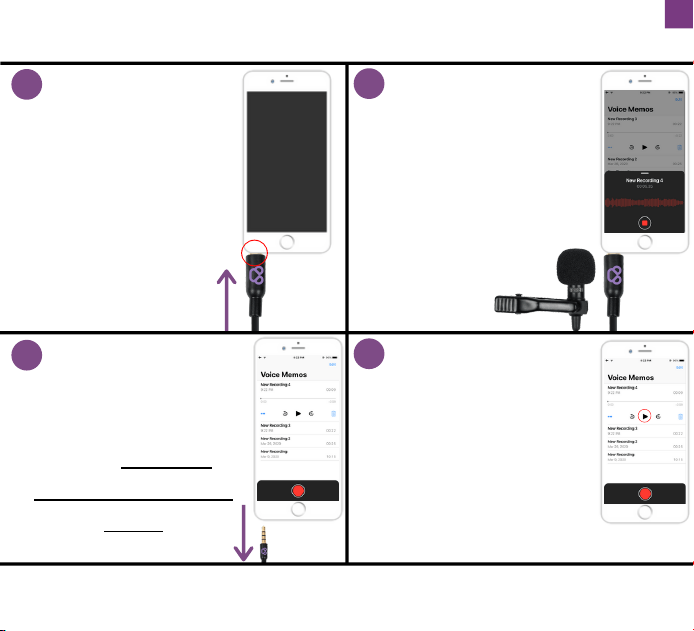
CONNECT THE
MICROPHONE PLUG
FIRMLY INTO THE
EARPHONE PORT OF
YOUR SMARTPHONE
3
UNPLUG
4
PLAY
PRESS THE "PLAY"
ICON TO LISTEN TO
YOUR RECORDING
AFTER UNPLUGGING
THE MICROPHONE
ATTACH THE MIC TO
YOUR SHIRT AND
START RECORDING
USING THE PHONE'S
RECORDING APP
TO LISTEN TO YOUR
RECORDING YOU
MUST UNPLUG
THEMICROPHONE
FIRST
4
RECORDING ON SMARTPHONES WITH 3.5MM
EARPHONE PORT
FOR DEVICES WITHOUT A 3.5MM EARPHONE PORT, READ
FURTHER INSTRUCTIONS
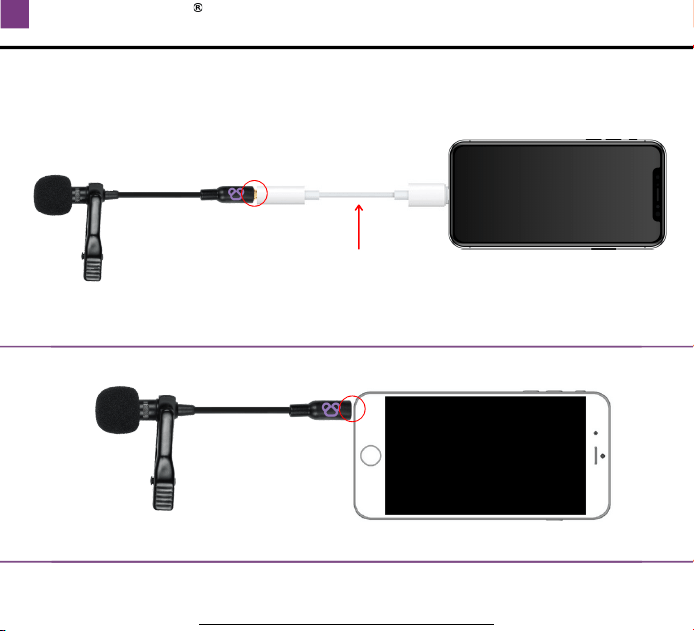
IPHONE - MIC RECORDING SETUP
IMPORTANT: TO LISTEN TO YOUR RECORDING YOU MUST
UNPLUG THE MICROPHONE
5
NOT INCLUDED: LIGHTNING TO 3.5 MM
HEADPHONE JACK ADAPTER REQUIRED
Newer iPhone models require "Lightning to 3.5mm Headphone Jack
Adapter" - Sold Separately by Apple. It is recommended that it's
bought directly from Apple in order to guarantee quality.
iPhone SE (2016) and older models
CONNECT THE MIC PLUG FIRMLY UNTIL YOU HEAR A “CLICK”
CONNECT THE MIC PLUG FIRMLY UNTIL YOU HEAR A “CLICK”
SMARTPHONES WITHOUT AN EARPHONE PORT REQUIRE A
USB-C TO 3.5MM ADAPTER: NOT INCLUDED
SOLD SEPARATELY BY THE PHONE COMPANY (EG. SAMSUNG)
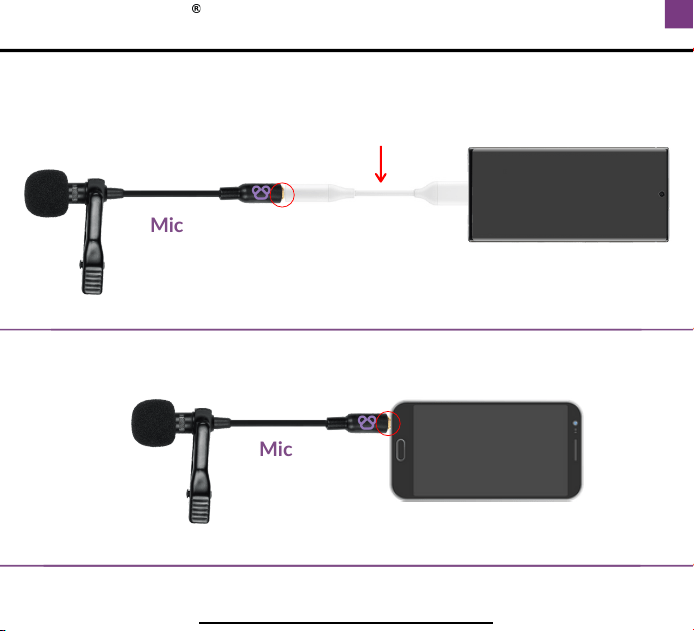
ANDROID - MIC RECORDING SETUP
IMPORTANT: TO LISTEN TO YOUR RECORDING YOU MUST
UNPLUG THE MICROPHONE
Mic
6
Mic
CONNECT THE MIC PLUG FIRMLY UNTIL YOU HEAR A “CLICK”
CONNECT THE MIC PLUG FIRMLY UNTIL YOU HEAR A “CLICK”
USE THE FOLLOWING CONNECTION FOR ANDROID SMARTPHONES
WITH A 3.5MM EARPHONE PORT
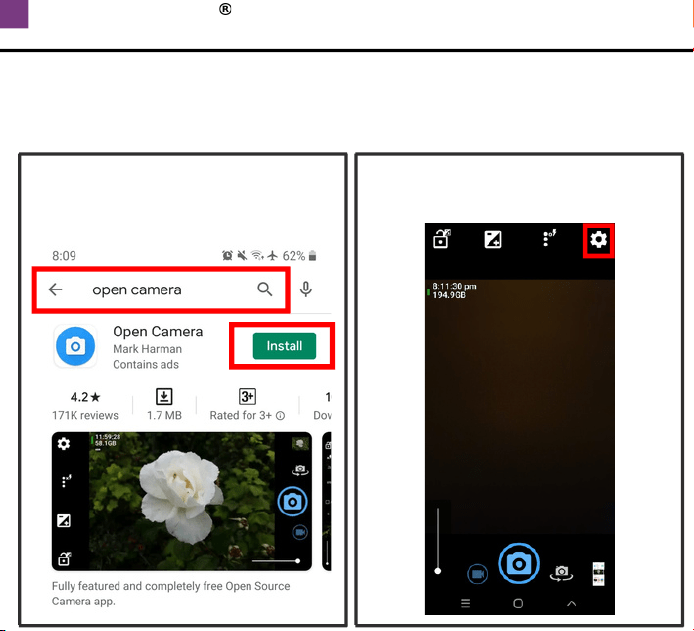
ANDROID - MIC NOT RECOGNIZED
7
SOME ANDROID PHONES REQUIRE AN EXTERNAL APP FOR THE
MIC TO WORK. DOWNLOADING THE OPEN CAMERA APP WOULD
BE AN EASY FIX, PLEASE TAKE THE FOLLOWING STEPS:
1. Launch the Play Store and
search for "Open Camera" then
press on "Install"
2. Launch the Open Camera app
then press on the settings icon
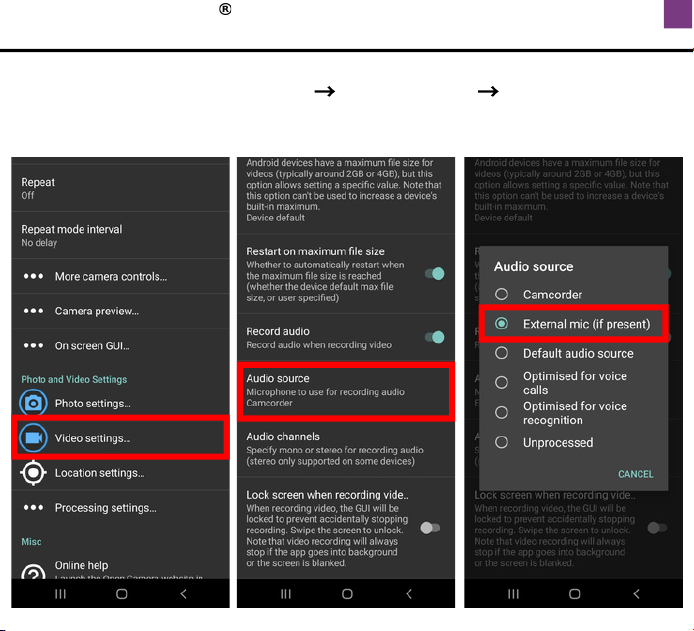
ANDROID - MIC NOT RECOGNIZED
3. Select Video Settings... Audio Source External Mic
Then create your video recording using the Open Camera app
8
IMPORTANT: TO LISTEN TO YOUR RECORDING YOU MUST
UNPLUG THEMICROPHONE
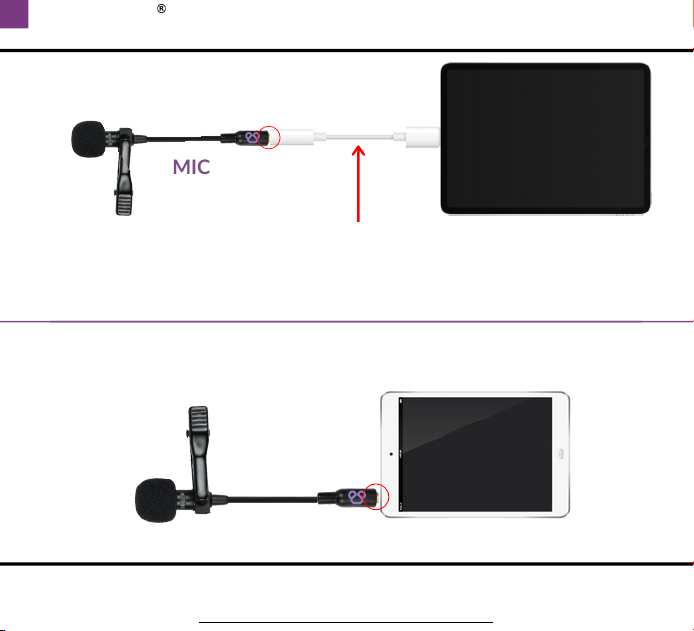
NEWER MODELS (12.9‐INCH IPAD PRO, 11‐INCH IPAD PRO, ETC.)
REQUIRE THE USB-C TO 3.5MM ADAPTER: NOT INCLUDED
SOLD SEPARATELY BY APPLE
CONNECT THE MIC PLUG FIRMLY
UNTIL YOU HEAR A “CLICK”
MIC
MIC
CONNECT THE MIC PLUG FIRMLY UNTIL YOU HEAR A “CLICK”
9
IPAD - MIC RECORDING SETUP
FOR MODELS WITH A 3.5MM EARPHONE PORT (IPAD AIR, IPAD MINI,
AND CLASSIC IPAD), CONNECT THE MIC PLUG DIRECTLY INTO IPAD
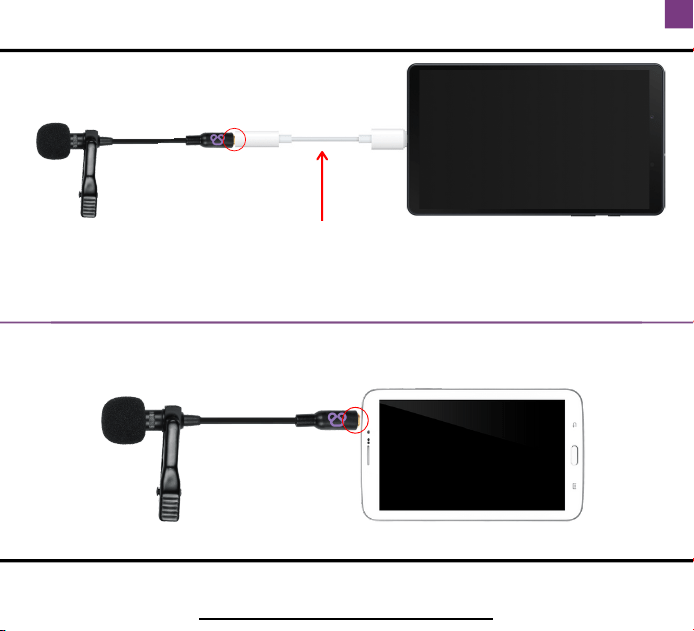
IMPORTANT: TO LISTEN TO YOUR RECORDING YOU MUST
UNPLUG THEMICROPHONE
FOR MODELS WITH A 3.5MM EARPHONE PORT CONNECT THE
MIC PLUG DIRECTLY INTO THE TABLET
TABLETS WITHOUT AN EARPHONE PORT REQUIRE A
USB-C TO 3.5MM ADAPTER: NOT INCLUDED
SOLD SEPARATELY BY THE TABLET COMPANY (EG. SAMSUNG)
MIC
CONNECT THE MIC PLUG FIRMLY
UNTIL YOU HEAR A “CLICK”
MIC
CONNECT THE MIC PLUG FIRMLY UNTIL YOU HEAR A “CLICK”
10
TABLET - MIC RECORDING SETUP
11
Hero 4
Hero 7
Hero 6
Hero 3
Hero 5
Hero 2
Hero 3+
Hero 8
Hero 10
Hero 9
'GOPRO CAMERA MEDIA MOD'
OR
'GOPRO PRO 3.5MM MIC ADAPTER'
IS REQUIRED - NOT INCLUDED
SOLD SEPARATELY BY GOPRO
MIC
TRS ADAPTER
TRS ADAPTER
MIC
TRS ADAPTER
MINI USB
ADAPTER
MIC
GOPRO - MIC RECORDING SETUP
CONNECT ALL PLUGS FIRMLY UNTIL YOU HEAR A “CLICK”
CONNECT ALL PLUGS FIRMLY UNTIL
YOU HEAR A “CLICK”
CONNECT ALL PLUGS FIRMLY UNTIL YOU HEAR A “CLICK”
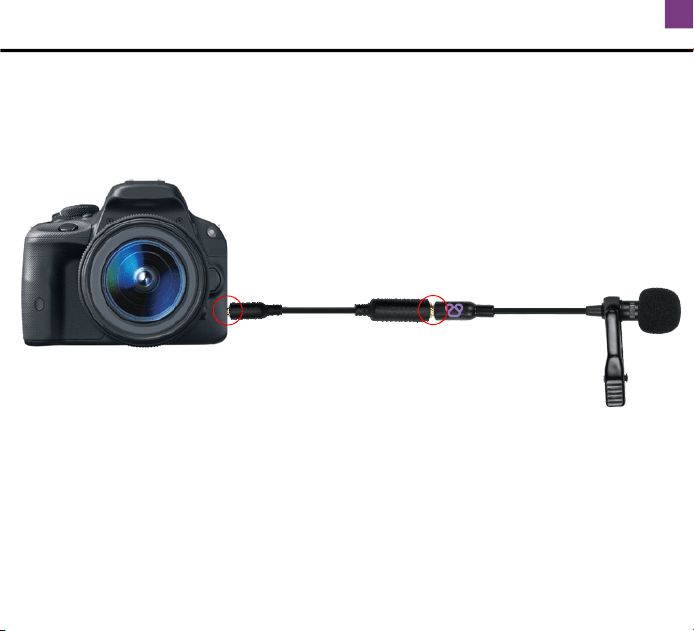
DSLR - MIC RECORDING SETUP
Connect the Microphone Plug into the TRS adapter
firmly until you hear a “CLICK”
Plug the TRS adapter firmly into the DSLR port
1.
2.
TRS ADAPTER
MIC
CONNECTION FOR ALL DSLR MODELS:
12
CONNECT ALL PLUGS FIRMLY
UNTIL YOU HEAR A “CLICK”
IMPORTANT: “PLUG-IN POWER” MUST BE TURNED ON ON YOUR
DEVICE FOR THE MIC TO WORK
ZOOM H1n / ZOOM H2n / ZOOM H4n
ZOOM - MIC SETUP
H4n: Go to “Menu” > “Input” > “PLUG-IN” > ON
H2n: Go to “Menu” > “Input” > “Plug-in Power” > ON
H1n: Plug-in power is turned on automatically
CONNECT FIRMLY UNTIL YOU
HEAR A “CLICK”
.
4. Adjust the input level as desired on the Zoom recorder and
record
13
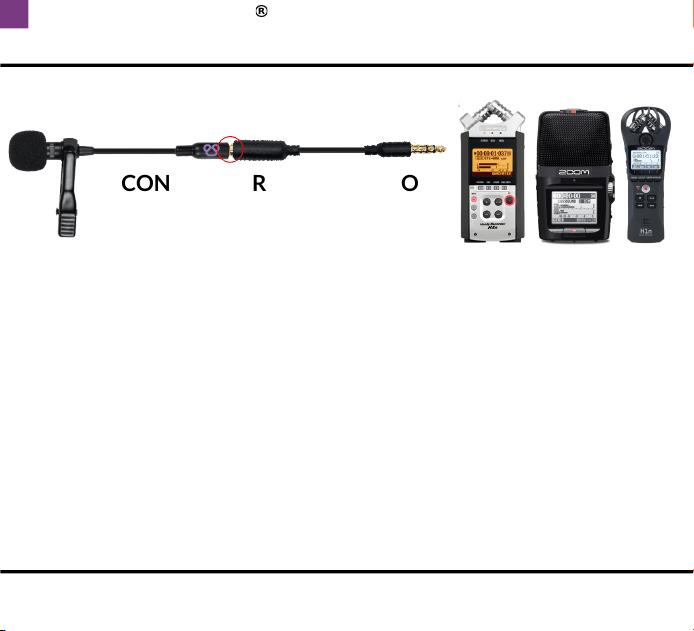
Connect the Microphone Plug into the TRS adapter tightly
until you hear a “CLICK”
Plug the TRS adapter tightly into the “LINE IN” jack on the
Zoom recorder
Turn ON “Plug-in Power” from Zoom recorder settings
1.
2.
3.
MIC
TRS ADAPTER
ZOOM - MIC SETUP
IMPORTANT: “PLUG-IN POWER” MUST BE TURNED ON ON YOUR
DEVICE FOR THE MIC TO WORK
ZOOM H5 / ZOOM H6
H6: Go to “Menu” > “Input & Output” > “Plugin Power” > ON
TRS ADAPTER
MIC
CONNECT FIRMLY UNTIL YOU
HEAR A “CLICK”
H5: Go to “Menu” > “IN/OUT” > “PLUGIN POWER” > ON
4. Adjust the input level as desired on the Zoom recorder and
record
Connect the Microphone Plug into the TRS adapter tightly
until you hear a “CLICK”
Plug the TRS adapter tightly into the “LINE IN” jack found on
the X/Y Mic Capsule
Turn ON “Plug-in Power” from Zoom recorder settings
1.
2.
3.
14
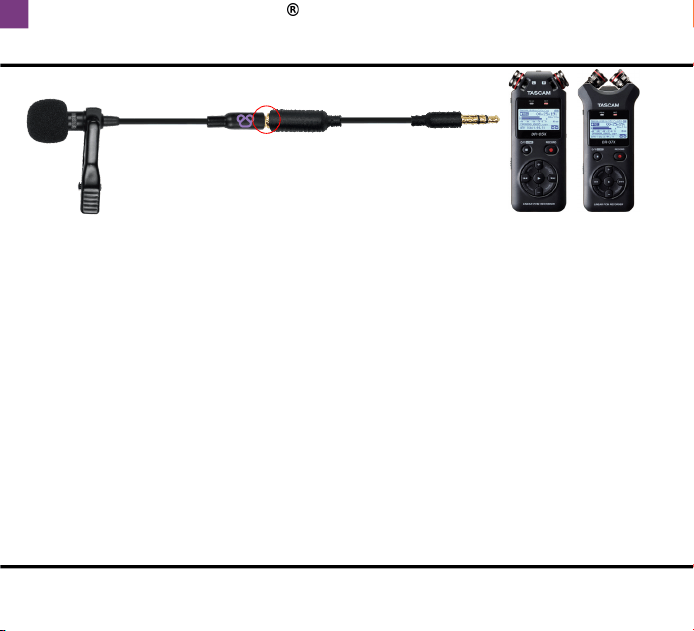
TASCAM - MIC SETUP
Connect the Microphone Plug into the TRS adapter tightly
until you hear a “CLICK”
Plug the TRS adapter into the “MIC/EXT IN” jack on the
TASCAM recorder
Turn ON “MIC POWER” from TASCAM recording settings
1.
2.
3.
CONNECT FIRMLY UNTIL YOU
HEAR A “CLICK”
TASCAM DR05: Go to “Menu” > Rec Setting > Mic Power > ON
For other models: Refer to TASCAM device manual for
instructions to turn on mic power setting
IMPORTANT: “MIC POWER” MUST BE TURNED ON ON YOUR
DEVICE FOR THE MIC TO WORK
4. Adjust the input level as desired on the TASCAM recorder
and record
15
MIC TRS ADAPTER
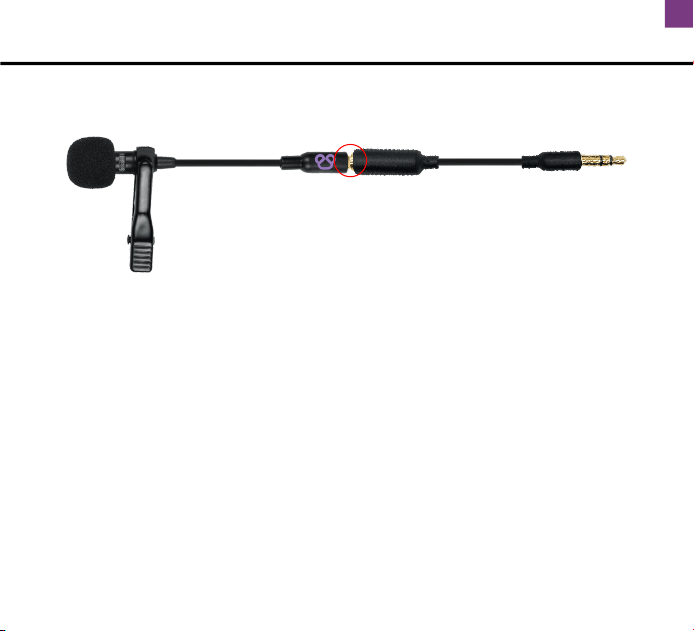
OTHER AUDIO RECORDERS
CONNECT FIRMLY UNTIL YOU
HEAR A “CLICK”
IMPORTANT: “MIC POWER” MAY NEED TO BE TURNED ON ON
YOUR DEVICE FOR THE MIC TO WORK
AUDIO RECORDERS OTHER THAN ZOOM AND TASCAM MAY
OR MAY NOT BE COMPATIBLE
PLEASE FOLLOW THE ZOOM INSTRUCTIONS (PAGE 13-14)
16
MIC TRS ADAPTER
TROUBLESHOOTING
Record an audio recording (preferably with a smartphone)
while scratching the foam windscreen on the mic. Unplug the
mic and listen to the recording, if the mic is working, the
scratching sound should be loud which means the mic is active.
HOW TO TEST IF YOUR MIC IS WORKING:
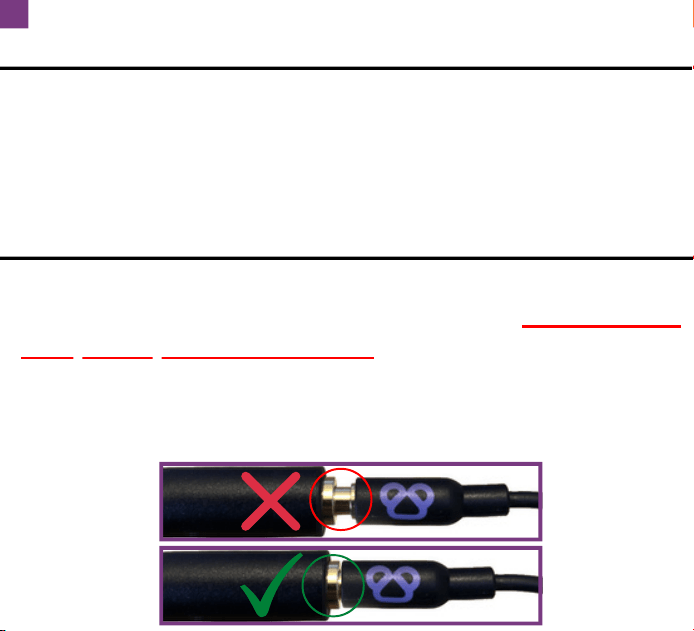
When connecting adapters to each other, connect them
firmly until you hear a “CLICK”. Many issues happen due to
the adapters not being connected properly. Make sure you are
using the correct combination of adapters for your device by
referring to the instructions in this guide.
IMPORTANT:
17

TROUBLESHOOTING
1. When connecting adapters to each other, connect
them firmly until you hear a “CLICK”. Many issues
happen due to the adapters not being connected
properly. Make sure you are using the correct
combination of adapters for your device by referring to
the instructions in this guide.
BUZZING NOISES IN RECORDING?
2. Ensure that Bluetooth and NFC (near field
communication) are turned off on the device, and you are
not next to a WiFi Router.
3. Check if the microphone cable or extension cables are
crossing other cables that are causing electrical
interference. This is especially possible close to power
cables.
18

TROUBLESHOOTING
4. Check if the microphone cable or extension cables
are close to or wrapped around other electrical devices
(including the one you are recording with).
BUZZING NOISES IN RECORDING?
5. Try the microphone with a smartphone to ensure
there is not a problem with the microphone itself. If you
are trying to use any of the adapters, ensure that they
are plugged in firmly (until you hear a click - see image
on page 17) and that the correct combination of
adapters is being used.
19

WE’RE ALWAYS HERE TO HELP, YOUR
SATISFACTION IS OUR BIGGEST PRIORITY
YOU HAVE A 1-YEAR WARRANTY
NEED MORE HELP?
EMAIL US AT:
20

SPECIFICATIONS
Capsule Diameter
Polar Pattern
Sensitivity (±4dB)
Frequency Range
S/N Ratio
Power Source
Operating
Temperature
7.9mm
Omnidirectional
-40 ±3dB
40Hz~16kHz
55dB
1.8~5V
-20°~+50°
Output Connection TRRS / TRS / Mini USB
21