Mic Pro User Manual
User Manual

Mic Pro User Manual
Contents
1. Product Overview......................................................................................................................1
Transmitter (TX).................................................................................................................................1
Receiver (RX) .....................................................................................................................................3
Charging Case..................................................................................................................................4
In the Box & Accessories..............................................................................................................5
Transmitter Indicators...................................................................................................................7
Transmitter Buttons......................................................................................................................10
Receiver Buttons............................................................................................................................. 12
2. Basic Usage.............................................................................................................................. 13
Power On/Off.....................................................................................................................................13
Wearing the Transmitter............................................................................................................13
Charging..............................................................................................................................................15
Install the Windshield...................................................................................................................18
Storage.................................................................................................................................................19
3. Pairing..........................................................................................................................................20
Basic Pairing (Devices In-Box)..............................................................................................20
Multi-Transmitter Pairing (Multi-Transmitter Mode)................................................21
Multi-Receiver Pairing (Multi-Receiver Mode)............................................................22
Device Management.................................................................................................................. 23
4. Connect to Devices........................................................................................................... 24
Connect to Insta360 Device...................................................................................................24
Connect to Digital Camera.....................................................................................................28
Connect to Phone.........................................................................................................................30
Connect to Computer................................................................................................................33

Mic Pro User Manual
5. Receiver Usage.....................................................................................................................35
Main Interface.................................................................................................................................35
Swipe down - Control Center................................................................................................38
Swipe Up - Transmitter Control Page.............................................................................. 46
6. Transmitter Internal Recording.................................................................................48
Overview.............................................................................................................................................48
Preparatory Work..........................................................................................................................48
Start/Stop Internal Recording...............................................................................................48
Export Internal Recording File................................................................................................50
Related Settings.............................................................................................................................50
7. Timecode....................................................................................................................................51
Overview..............................................................................................................................................51
Usage Scenarios.............................................................................................................................51
Operating Instructions...............................................................................................................52
8. Using the Insta360 App...................................................................................................54
Download...........................................................................................................................................54
Connecting Your Device...........................................................................................................54
Firmware Updates........................................................................................................................55
Customizable E-Ink Display....................................................................................................59
Remote Control and Adjustments.......................................................................................61
9. Maintenance and Care...................................................................................................62
Finding the Serial Number (SN)............................................................................................62
Storage and Maintenance......................................................................................................64
10. Safety Information............................................................................................................64
11. Specifications........................................................................................................................65
Mic Pro User Manual
1
1. Product Overview
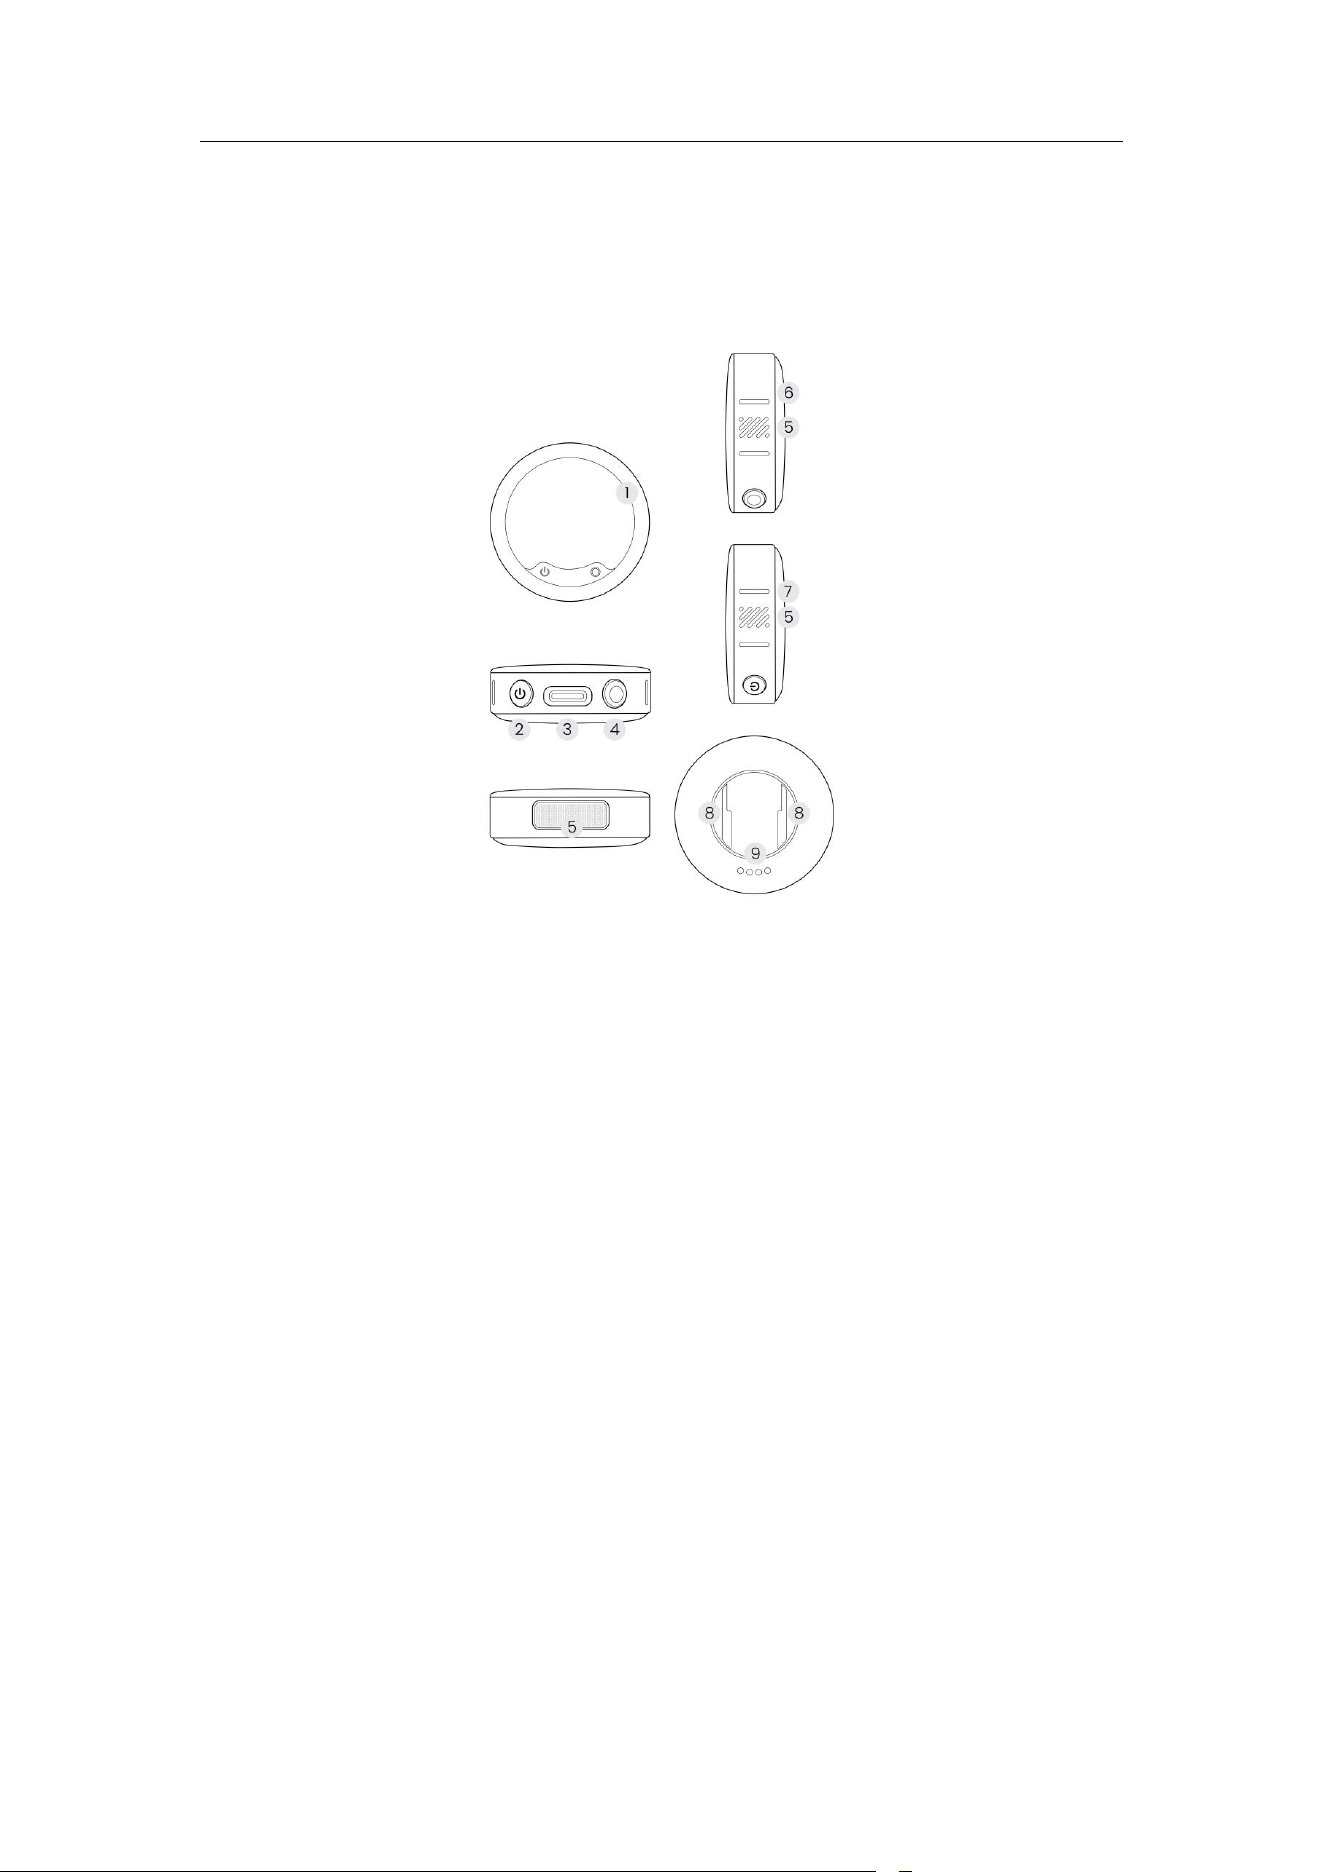
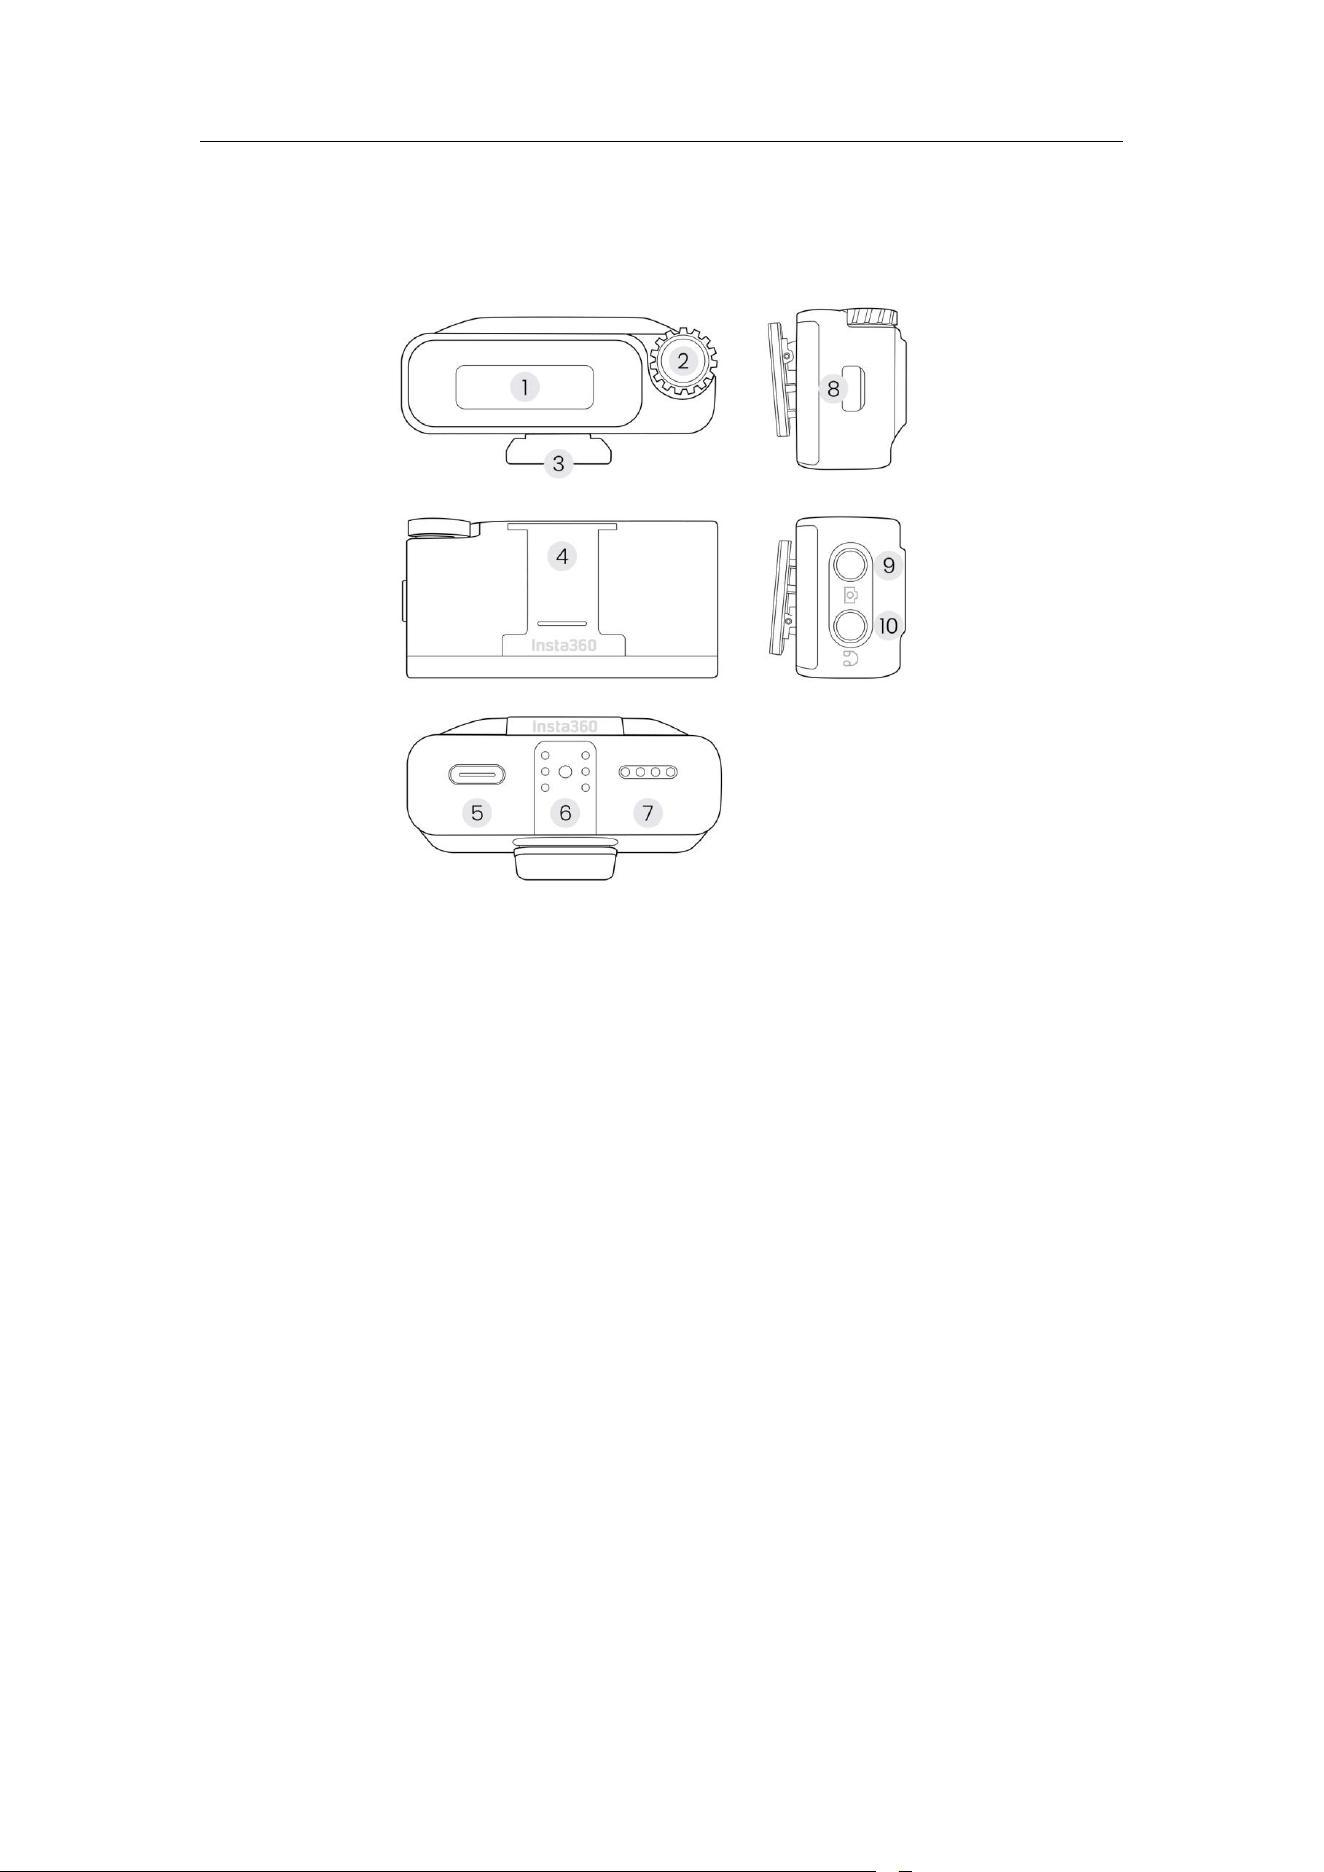
Transmitter (TX)
1. E-Ink Screen: Displays custom
patterns.
2. Power Button: Performs
operations such as power on/off,
pairing, start/end recording*, turn
on/off Noise Canceling, etc. For
details, please refer to the
"Transmitter Buttons" section.
3. USB-C Port: Used for charging,
connecting to a computer to
copy internally recorded audio
files, or connecting an external
lavalier microphone via a USB-C
to 3.5mm adapter.
4. Internal Recording Button: Press
once to start/stop recording using
the Transmitter.
6. Recording Status Indicator:
Indicates whether the mic is in
an internal recording** state. For
specific indicators, please refer
to the "Transmitter Indicators"
section.
7. Function Indicator: Indicates
whether the mic is using Noise
Canceling, pairing, etc. For
specific indicators, please refer
to the "Transmitter Indicators"
section.
8. Back clip slot: Used to secure the
back clip, allowing the
Transmitter to be fixed on
clothing. The area between the
two slots is a magnetic area,

Mic Pro User Manual
2
5. Microphone: Three-Microphone
Array, with a wider pickup range,
delivering higher-quality sound
pickup.
which can secure the button
magnet. For specific operations,
please refer to the "Wearing the
Transmitter" section.
9. Charging Contacts: Used for
charging when connected to the
Charging Case.
* When the Mic Pro Transmitter is connected to an Insta360 camera via
Bluetooth, or the Receiver is connected to a mobile phone via an adapter,
the Power Button can control shooting; when connected to a digital
camera using a 3.5mm audio cable, it does not support controlling
shooting.
** Internal recording of the Transmitter: Refers to the Transmitter storing
recorded audio files locally without the need to connect to a Receiver or
other devices. This is suggested as an alternative when conditions are
unstable (e.g., the distance between the Transmitter and Receiver is too far,
there are obstacles between the Transmitter and Receiver, or the wireless
channel at the recording site is interfered with by other devices, etc.).
Mic Pro User Manual
3
Receiver (RX)
1. Touchscreen: Displays
information such as the
connection status with the
Transmitter, volume level, gain
adjustment, battery level of the
Receiver and Transmitter (if any),
etc.
2. Dial: Rotating the dial allows for
convenient operation of the
device and quick adjustment of
parameters. For specific
operations, please refer to the
"Dial" section.
3. Back Clip: Fix the Receiver to the
camera hot shoe.
6. Expansion Interface: A USB-C
adapter can be inserted to allow
the Receiver to connect to a
mobile phone for audio input.
7. Charging Contacts: Used for
charging when connected to the
Charging Case.
8. Power Button: Long press to turn
the device on/off, press to
lock/unlock the screen, or enter
Pairing Mode. For specific
operations, please refer to the
"Receiver Buttons" section.
9. Output Interface: Outputs the
recorded audio to the camera.
Mic Pro User Manual
4
4. Slot and protective cover: Above
the Receiver, it can secure a
shotgun microphone or a
Transmitter.
5. USB-C port: Used to connect a
charging cable for charging.
10. Monitoring Interface: Insert a
3.5mm headphone to monitor
the sound picked up by the
Transmitter.
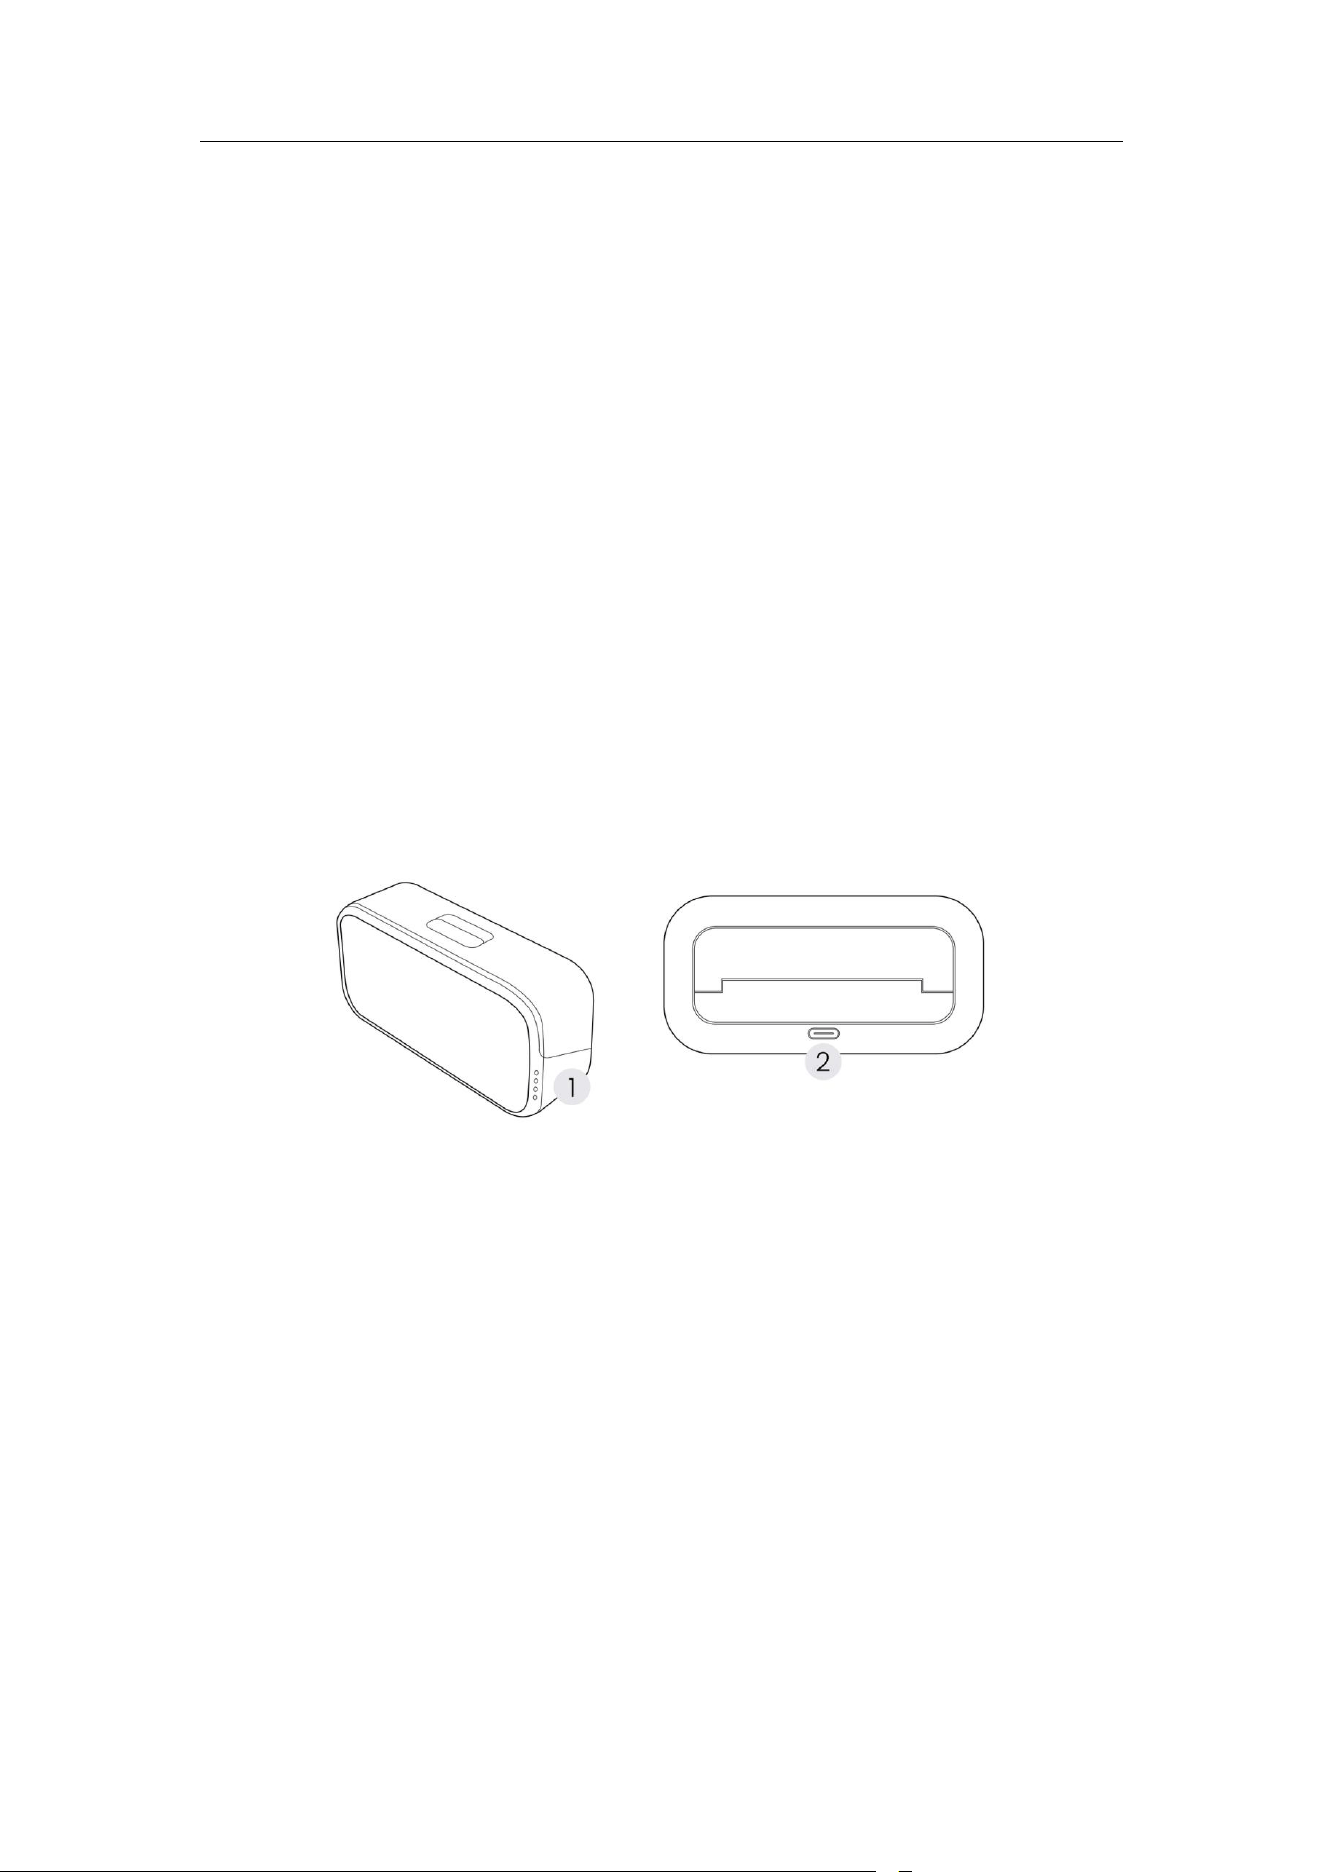
Charging Case
1. Battery Indicator: Displays
the battery level of the
Charging Case. It remains
off under normal conditions
and lights up when the
Charging Case lid is opened
or closed.
2. USB-C port: Used to connect a
charging cable for charging.

Mic Pro User Manual
5
In the Box & Accessories
Package Contents
Depending on your purchased bundle, the accessories included in the
package will vary. Please refer to the following table:
Two Transmitters, One Receiver
One Transmitter, One Receiver
Transmitter
Transmitter x2
Transmitter
Transmitter
Receiver
Receiver
-
Charging Case
-
-
Mobile Phone Adapter
(USB-C)
Mobile Phone Adapter
(USB-C)
-
Button Magnet x2
Button Magnet
Button
Magnet
Back Clip x2
Back Clip
Back Clip
Windshield x2
Windshield
Windshield
Carry Pouch
Carry Pouch
Carry Pouch
3.5mm Camera Audio Cable
3.5mm Camera Audio Cable
-
USB-C Cable
USB-C Cable
USB-C Cable
Product Document Bundle
Product Document Bundle
Product
Document
Bundle
Warranty Card
Warranty Card
Warranty
Card

Mic Pro User Manual
6
Accessories
Various accessories are available to enhance sound quality and adapt
your device to more scenarios.
Accessories
Description
Optional
Mobile Phone Adapter
(Lightning)
Connects the Receiver to mobile
devices equipped with a Lightning
port.
Camera Adapter
Connects the Receiver directly to
a Sony camera's hot shoe,
enabling 4-channel audio
recording.
Lavalier Mic
Compact design, ideal for
business interviews, livestreams,
and more. USB-C to 3.5mm Jack
Adapter is required for
Transmitter.
USB-C to 3.5mm Jack Adapter
Connects external lavalier mic to
a Transmitter.
Included
Receiver
Users who have a need for multi-
camera shooting can purchase
extra Receivers (to enable
multiple Receivers to receive
signals simultaneously).
Charging Case
Stores and provides additional
power supply for the Transmitter
and Receiver.
Mobile Phone Adapter
(USB-C)
Connects the Receiver to mobile
devices equipped with a USB-C
port (applicable to Android
phones, iPads, etc.).
Button Magnet
Securely attaches the Transmitter
to a collar, chest, or other
positions using magnetic
mounting (for a discreet setup).

Mic Pro User Manual
7
Back Clip
Securely attaches the Transmitter
to a collar, chest, or other
positions using a clip mount.
Windshield
Used with the Transmitter to
reduce wind noise and other
disturbances, making it perfect for
outdoor conditions and close-to-
mouth recording.
Carry Pouch
Designed to store the Charging
Case and various accessories.
Transmitter Indicators
The left and right sides are distinguished based on the orientation when the
E-Ink screen faces the user.
• The left indicator mainly displays mic mode status, such as current
connection, Noise Canceling, mute status, battery level, and pairing.
• The right indicator mainly shows info related to recording (internal
recording).

Mic Pro User Manual
8
Function Indicator (Left)
Status
Color
Indicator Status
Power Off
Not Charging
Off
-
Charging (<100%)
Orange
On
Charging (100%)
Green
On
Unable to turn on
(low battery)
Orange
Flashes 3 times
Power On
Noise Canceling Off -
Connected
Blue
On
Noise Canceling off -
Not connected
Blue
Breathing
Noise Canceling Off -
Pairing
Blue
Fast blinking
Noise Canceling enabled -
Connected
Green
On
Noise Canceling enabled -
Not connected
Green
Breathing
Noise Canceling On -
Pairing
Green
Fast blinking
Mute
Yellow
On
Low battery (<10%)
Orange
Flashes 3 times every 5
seconds
(original color remains
between flashes)
Pairing - Found
Purple
On
Pairing - Identified
(tap the corresponding
Transmitter name entry on
the "Pairing" page)
Purple
Flashes 3 times
Firmware Updating
Blue
Flashes alternately with
the recording indicator

Mic Pro User Manual
9
Recording Status Indicator (Right)
Status
Color
Indicator Status
Power Off
Off
-
Power On
Not recording
Off
-
Recording in progress
Red
On
Memory is full, resulting in
failure to start internal
recording
Red
Flash 3 times
(non-looping)
Firmware Updating
Red
Flashes alternately
with the function
indicator

Mic Pro User Manual
10
Transmitter Buttons
The Transmitter has a Power Button on the left and an Internal Recording
Button on the right, supporting multiple controls (single press, double press,
triple press, long press, etc.), which allow for power on/off, Noise Canceling,
camera recording, internal recording, pairing, etc. The following table
explains actions you may perform.
Notes:
• All operations are based on paired cameras or Receivers.
• Subsequent firmware updates will add a quick internal recording
feature (press to power on and immediately start internal recording in
the off state).
Power Button (Left)
Status
Button
Operation
Connection
Status
Transmitter
Status
Insta360 Camera
Status (Paired)
Trigger
Event
Power
Off
Press and
hold for 2
seconds
-
-
-
Transmitter
powered on
Press and
hold for 2
seconds
Paired but
not
connected
with
camera
-
Powered off,
Bluetooth Wake-
Up enabled*
The
Transmitter
powers on
and wakes
up the
camera
Power
On
Press
Camera
Connected
-
Powered on, not
shooting
Start taking
photos /
Start
recording
Press
Camera
Connected
-
Power On,
Recording
End
Recording
Press
Paired but
not
connected
with
camera
-
Power off,
Bluetooth Wake-
Up enabled*
Wake up the
camera

Mic Pro User Manual
11
Press
Paired but
not
connected
with
camera
-
Power off,
Bluetooth Wake-
Up not enabled*
No event
Double
Press
-
Noise
Canceling
not enabled
-
Turn on
Noise
Canceling
Double
Press
-
Noise
Canceling
has been
enabled
-
Turn off
Noise
Canceling
Triple Press
-
-
-
Enter Pairing
Mode
Press and
hold for 2
seconds
-
-
-
Power off
Transmitter
Long press
for 8–10
seconds
On/off state
-
-
Hard reset
(force
restart the
device)
*Only some cameras support Bluetooth Wake-Up.
Right Internal Recording Button (Right)
Button Operation
Transmitter Status
Trigger Event
Power off
-
-
No response
Power On
Press
Not in internal
recording
Start internal
recording
Press
Internal recording in
progress
End internal
recording

Mic Pro User Manual
12
Receiver Buttons
Dial
The Receiver's dial has three interaction modes: single press, double press,
and rotation.
Operation
Mode
Device
Status
Function
Description
Remarks
Press
-
Confirm selection /
Enter submenu
-
Double Press
-
Return to the
previous level /
Cancel operation
-
Rotate
-
Switch options /
Adjust value
Clockwise: Next
item/Increase value
Counterclockwise:
Previous item/Decrease
value
Power Button
Operation Mode
Device Status
Function Description
Press
Screen Unlocked
Lock Screen
Press
Screen locked
Unlock Screen
Triple press
Power-on state
Enter Pairing Mode
Press and hold for 2 seconds
Power off state
Power On
Press and hold for 2 seconds
Power-on state
Power off
Notes
• The dial supports 360° rotation, allowing for quick menu browsing or
easy parameter adjustment.
• The lock screen function can prevent accidental touches and is
recommended to be enabled during shooting.
• After entering pairing, please complete it quickly, otherwise the process
will timeout and you will need to start again.

Mic Pro User Manual
13
2. Basic Usage
Power On/Off
When used standalone: Press and hold the Power Button for 2 seconds to
turn on the device.
When placed inside the Charging Case: Toggle the Charging Case switch
to unlock, flip open the Charging Case lid backward, and the Receiver
and/or Transmitter will automatically power on.
Wearing the Transmitter
Using Button Magnet
Steps
1. Place the magnet on the inside of the clothing.
2. Adjust to the appropriate position.
3. Bring the back of the Transmitter close to the magnet.
4. They will magnetically snap together and secure in place.
Mic Pro User Manual
14
Precautions
Do not place button magnets near medical electronic devices such as
pacemakers to avoid device failure or abnormal operation, which can be
dangerous. It is recommended to use the magent on thinner clothing such
as short-sleeved shirts and T-shirts. When clothing is too thick (such as
cotton-padded jackets or down jackets), the magnetic force may weaken,
which could cause damage to the Transmitter if it were to fall.
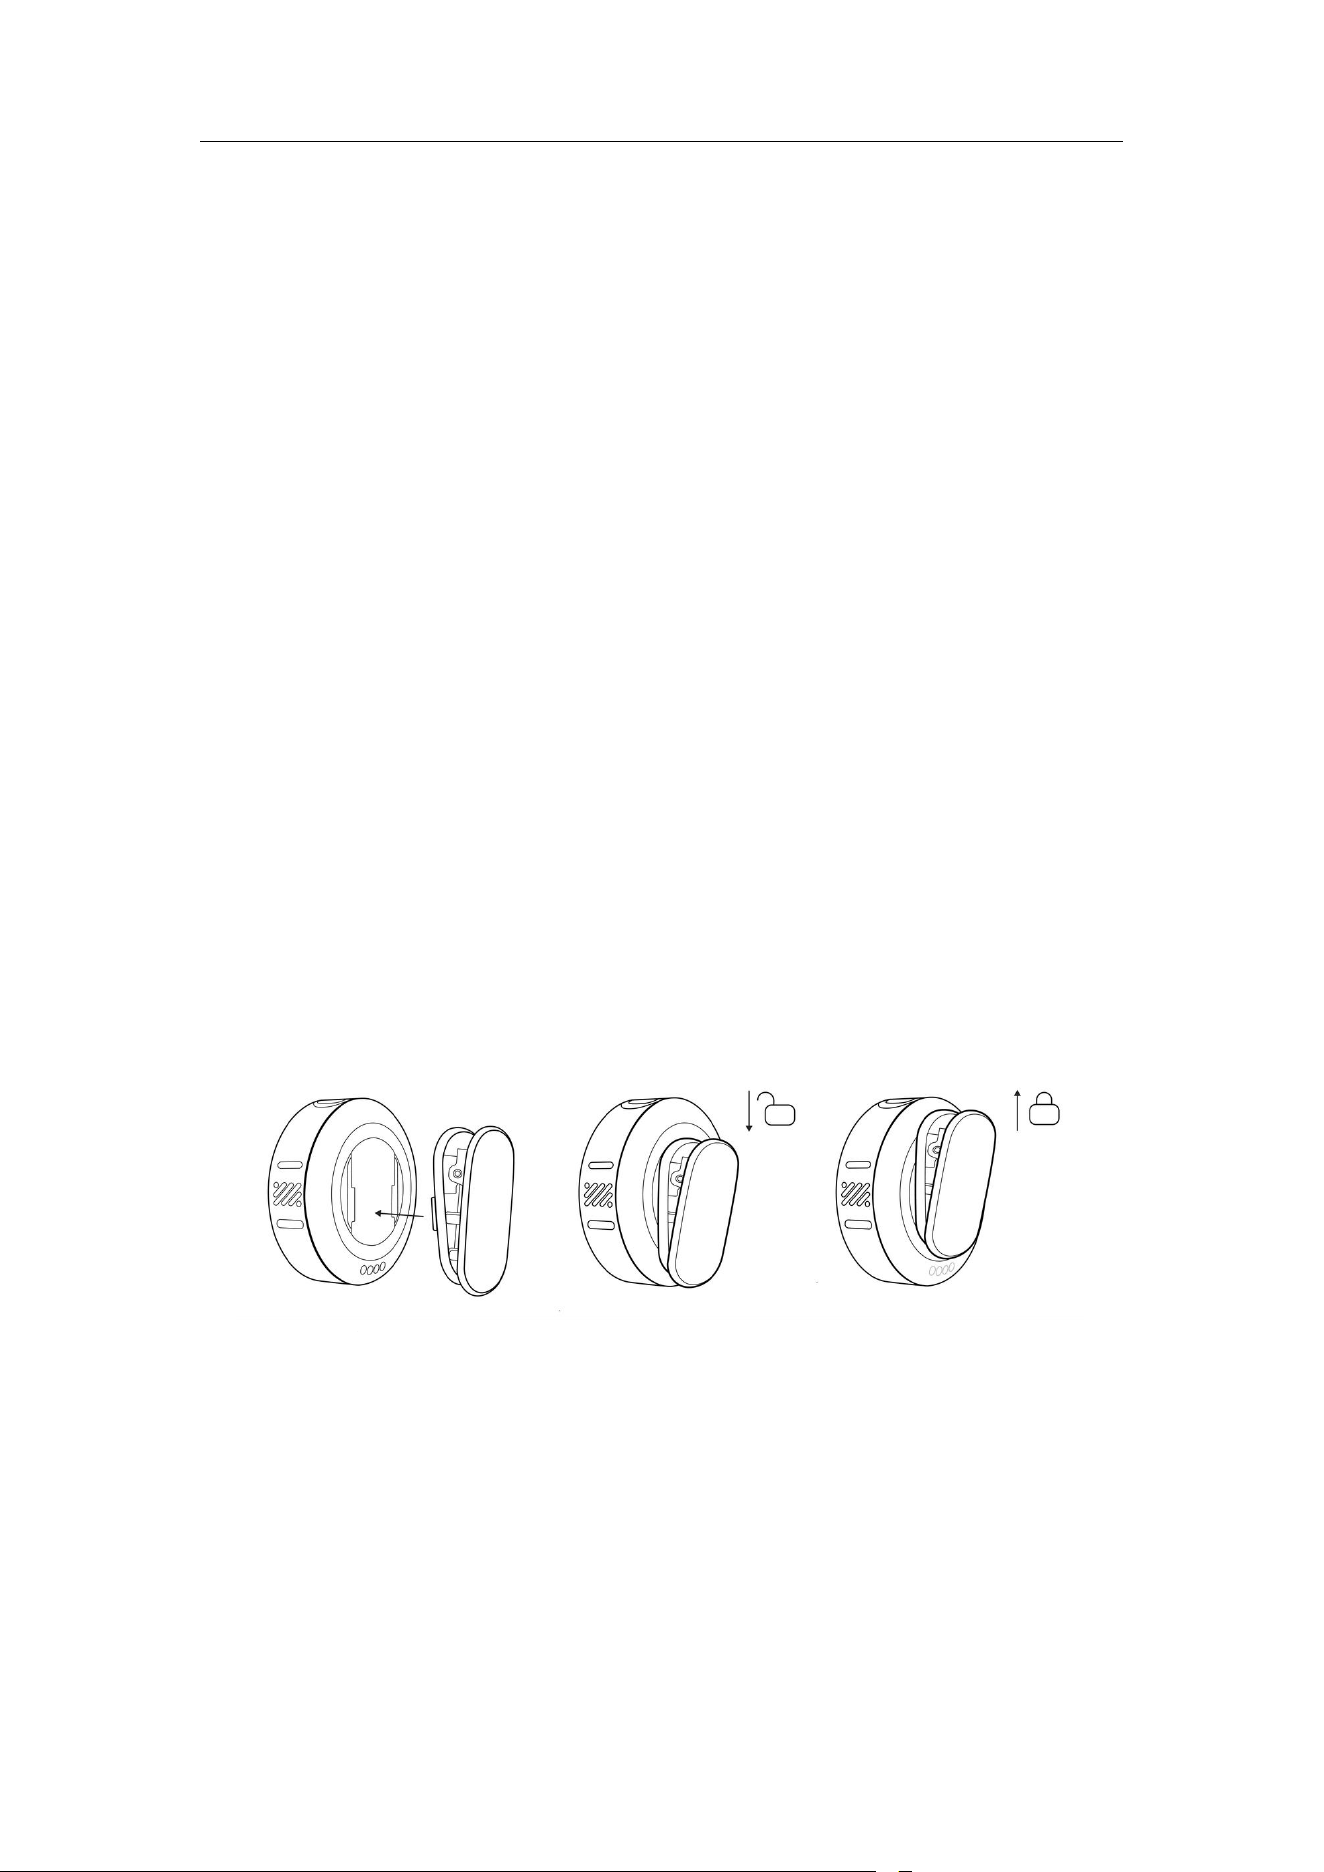
Use the Back Clip
Steps
1. Align the buckles on both sides of the back clip with the slots on the
Transmitter and attach them.
2. Insert the back clip into the notch on the back of the Transmitter and
push it in until it is fully locked and secured.
3. Clip the Transmitter onto the collar or a suitable position to use it.
Note: The back clip features a detachable design, allowing it to be flexibly
clipped onto different parts of clothing. The three-microphone array design
ensures clear and high-quality sound pickup even when worn sideways.
Mic Pro User Manual
15
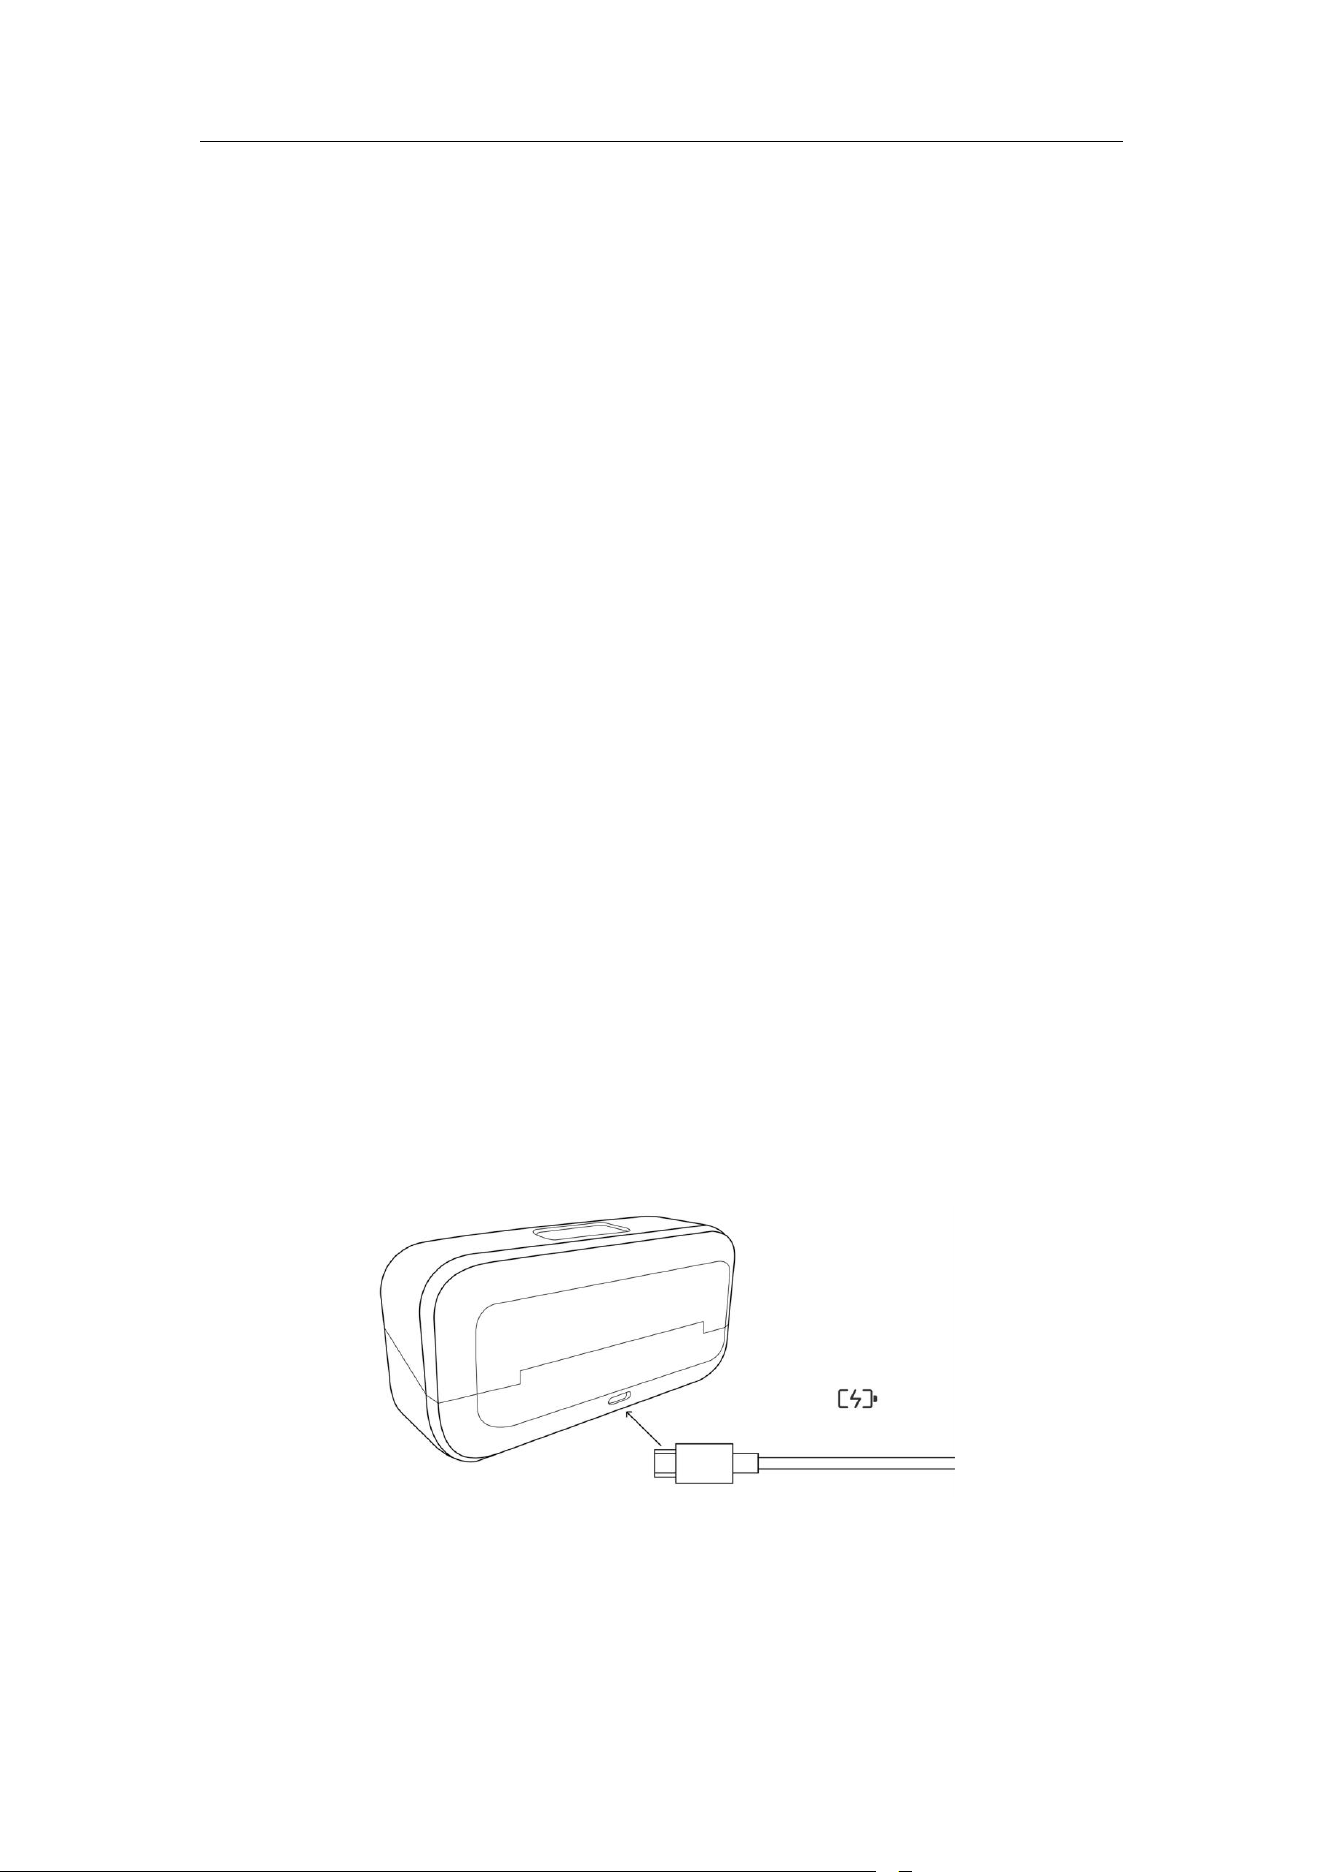
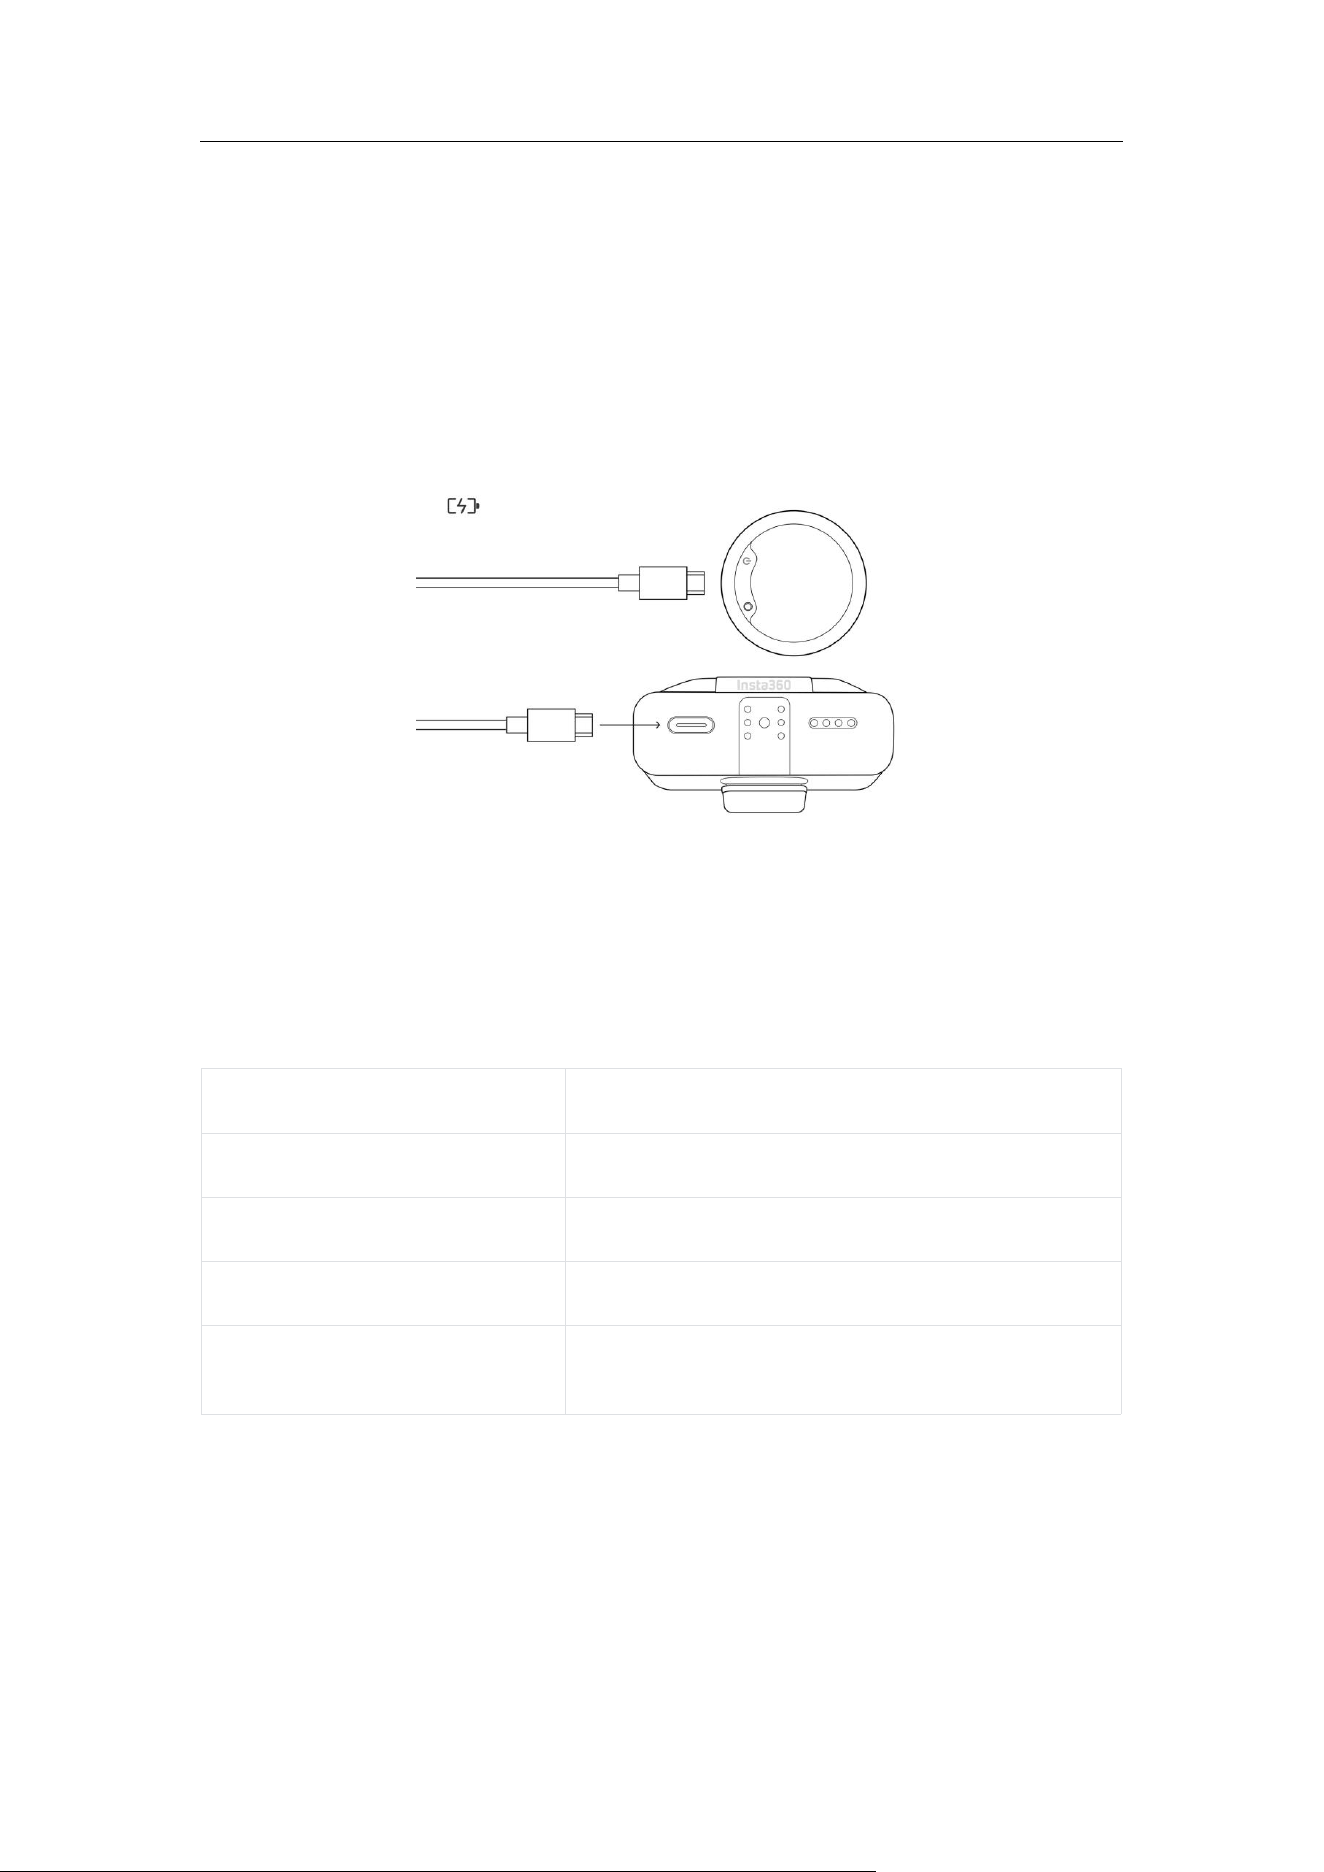
Charging
Users can choose to place the Transmitter and Receiver in the Charging
Case for charging, or directly use the charging cable to charge the device.
Inside the Charging Case
1. Before charging, please ensure that the charging contacts on the
Transmitter and Receiver are fully aligned with the contacts on the
Charging Case (there will be an obvious magnetic attraction effect
after alignment).
2. Place the Transmitter and Receiver correctly into the Charging Case,
and charging will start.
3. It is recommended to use the standard USB-C data cable for charging.
To achieve faster charging speed, please use a charger with 5V/3A or
higher power to supply power to the Charging Case.
4. After opening the Charging Case lid, the Transmitter and Receiver will
automatically power on. The Receiver screen will display the battery
level of the itself and the Transmitter, as well as the remaining available
internal recording time of the Transmitter.
5. The charging status can be checked via the battery indicator light on
the Charging Case.

Mic Pro User Manual
16
Battery Indicator Description
Charging Status
When charging, the LED lights light up and flash sequentially, indicating the
current charging progress:
• ●●●● (4 solid) → 97–100%
•
●●●●
(3 solid, 1 blinking)
→
76–96%
• ●●●○ (2 solid, 1 blinking) → 51–75%
• ●●○○ (1 solid, 1 blinking) → 26–50%
•
●○○○
(1st blinking, last 3 off)
→
≤ 25%
Non-charging state (during normal operation or standby)
When not charging, the LED light shows the remaining battery level:
• ●●●● (4 solid) → 76–100%
•
●●●○
(3 solid)
→
51–75%
• ●●○○ (2 solid) → 26–50%
• ●○○○ (1 solid) → 11–25%
•
●○○○
(1 blinking)
→
≤ 10% (Extremely low battery, immediate
charging is recommended)
• Four LED indicators flash cyclically: Firmware update is in progress
Notes:
• When the battery level is below 10%, all battery indicator lights will turn
off, and the device may not start up or record properly.
• If the LED blinks abnormally or does not light up, please check whether
the charging cable and the contacts of the Charging Case are clean,
or try restarting the device.
• The actual power display may vary slightly due to temperature and
usage environment.
Mic Pro User Manual
17
Using Charging Cable
Both the Transmitter and Receiver support fast charging.
The following data is based on 5V / 3A charger, tested at room
temperature of 25°C:
• Transmitter (TX) : Approximately 24 minutes to charge to 80%
• Receiver (RX) : Approximately 27 minutes to charge to 80%
Charging Time
Device
Full charge time (starting from 0% battery)
Transmitter
Approximately 56 minutes
Receiver
Approximately 1 hour and 17 minutes
Charging Case (No Load)
Approximately 2 hours and 8 minutes
Charging Case + Two
Transmitters + One Receiver
Approximately 2 hours and 28 minutes
Charge for 5 minutes to get over 1 hour of battery life:
• Charging the Transmitter for 5 minutes: Battery life is approximately 1
hour 27 minutes to 1 hour 52 minutes.
• Receiver charging for 5 minutes: Battery life is approximately 1 hour 20
minutes to 1 hour 33 minutes.

Mic Pro User Manual
18
Notes:
• Actual charging time may vary slightly depending on ambient
temperature, charger power, and usage.
• To maintain battery activity, it is recommended to fully charge the
device approximately every 3 months. Batteries left idle for a long time
may affect performance and even cause permanent damage.
Install the Windshield
In outdoor or windy environments, it is recommended to install a
Windshield, which can effectively reduce wind noise and improve recording
clarity.
Steps
1. Slip the windshield over the top of the Transmitter, aligning the noise-
reducing muff with the microphone directly above the Transmitter.
2. Align the buckles at both ends of the windshield with the alignment
slots at both ends of the Transmitter.
3. Gently press down until you hear a "click", indicating that it is installed in
place.
Note: Before use, please check whether the Windshield is firmly fixed to
avoid accidental detachment.

Mic Pro User Manual
19
Storage
Users can place the Transmitter and Receiver in the included carry pouch
to protect the devices from scratches and damage.
If you have purchased a set with two Transmitters and one Receiver, you
can neatly store all devices and accessories in the Charging Case. The
Charging Case has dedicated storage slots. Please note:
• The Receiver, Transmitter, and all accessories need to be aligned with
their corresponding positions.
• Ensure that the contacts are aligned, the magnetic position is correct,
and orientation is correct.
• After fully inserting, close the lid to prevent the devices from
accidentally falling out or scratching each other during movement or
transportation.

Mic Pro User Manual
20
3. Pairing
Basic Pairing (Devices In-Box)
Auto Pairing
All devices are already paired at the time of factory shipment, for a faster
out-of-the-box experience.
Steps
1. Put the Transmitter and Receiver that need to be paired together into
the Charging Case.
2. If the Charging Case detects an unpaired Transmitter, the Receiver
screen will display a pairing prompt. Tap "Pair" to complete pairing.
Manual Pairing
Steps
1. Triple-press the Power Button on the Transmitter to be paired to enter
Pairing Mode (the function indicator light flashes rapidly).
2. On the main interface of the Receiver, swipe down to enter the Control
Center → select "Connection" → "Pair".
3. The Receiver will automatically search for nearby Transmitters in
Pairing Mode. After a successful search, press on the Transmitter name
entry on the screen (the purple indicator light of the corresponding
Transmitter will flash rapidly for easy identification).
4. Press the "OK" button on the right side of the screen. After successful
pairing, the function indicator of the Transmitter will remain constantly
on, and the device name will be displayed on the Receiver screen.
5. If you need to unbind, simply press the delete button next to the device
name.

21
Multi-Transmitter Pairing (Multi-
Transmitter Mode
Mic Pro User Manual
Note: The color of the Transmitter indicator will vary depending on whether
the Noise Canceling function is enabled or not.
)
In Multi-Transmitter Mode, Mic Pro supports expanding to more
Transmitters. One Receiver can connect up to 4 Transmitters (four audio
sources).
Method 1: Automatic pairing of the Charging Case
1. Refer to the pairing steps in the "Auto Pairing" section.
2. Repeat the above steps to add more Transmitters one by one.
Method 2: Manual Pairing
1. Refer to the pairing steps in the "Manual Pairing" section.
2. New Transmitters can be added while retaining existing paired
Transmitters. If a re-pairing operation is performed, all current existing
pairing records will be cleared.
Note: Only Multi-Transmitter Mode allows adding extra Transmitters. In
Multi-Receiver Mode, re-pairing is required.

Mic Pro User Manual
22
Multi-Receiver Pairing (Multi-Receiver Mode)
Mic Pro supports Multi-Receiver Mode (up to 2 Transmitters +
4 Receivers) suitable for scenarios where multiple Receivers need to be
connected to the same set of Transmitters simultaneously (such as multi-
camera synchronized audio recording).
Steps
1. On one of the Receivers (designated as the main Receiver A), swipe
down on the main interface to enter the control center, select
"Connection" → "Pairing Mode", and switch to "Multi-RX" mode (the
default mode is "Multi-TX", and after switching, all paired devices will be
unpaired and need to be re-paired).
2. On the main Receiver A, select "Connection" → "Pair".
3. Triple-press the Power Button on all Receivers (such as B, C, D, etc.) and
Transmitters to be paired to enter Pairing Mode.
4. On the "Pair" page of the main Receiver A, find the device entries of the
Receiver and Transmitter to be paired, and press "OK".
5. Complete the pairing of the Transmitter and Receiver.
After successful pairing, all Receivers will simultaneously receive the audio
signal from the Transmitters and automatically follow the settings of the
main Receiver (timecode, Noise Canceling, gain, etc.).
Notes:
• In Multi-Receiver Mode, you can freely choose to pair up to 4 Receivers
(supporting up to 2 Transmitters simultaneously) according to actual
needs.
• In Multi-Receiver Mode, a Transmitter must participate in the pairing
process simultaneously, as pairing cannot be completed solely
between multiple Receivers.

Mic Pro User Manual
23
Device Management
Slide down on the main interface of the Receiver to enter the Control Center
→
"Connection"
→
"Pair" to view/operate:
• The serial numbers of all TX and RX within the group.
• Delete unnecessary devices (press on the device entry → "Unpair").
Notes:
• Before expansion, ensure that all devices have sufficient battery power,
the firmware is the latest version, and there are no obstructions within 5
meters.
• If pairing fails, restart the device or try again.
• In Multi-Receiver Mode, both Receivers have identical control over the
Transmitter (except for the timecode function).
If you need to view a demonstration, click to watch our tutorial video.

Mic Pro User Manual
24
4. Connect to Devices
Connect to Insta360 Device
Connect to X5/X4 Air/Ace Pro 2/GO Ultra
By directly connecting to an Insta360 camera via Bluetooth, the Transmitter
can serve as an external microphone to achieve high-quality wireless
audio recording, while also supporting quick control of the camera's power
on/off and start/end of recording through the Transmitter buttons. This
method is simple and convenient to operate, and supports connecting
one Transmitter.
Applicable Devices: Insta360 X5, X4 Air, Ace Pro 2, GO Ultra
After connection, the camera will automatically use Mic Pro as an external
microphone, with clear recording effects and extremely low latency. The
camera firmware needs to be updated to the latest version. The operation
instructions in this section take Insta360 X5 as an example; please refer to
the actual model and the latest interface.
Transmitter Bluetooth Connection
Insta360 Mic Pro supports direct connection of one Transmitter to the
camera (no Receiver required). Directly connect the Transmitter to
Insta360 X5, X4 Air, Ace Pro 2, and GO Ultra cameras via Bluetooth to
achieve wireless recording. This method is convenient and fast, and
supports connecting one Transmitter.
Preparatory Work
1. Ensure that the Mic Pro Transmitter has sufficient power.
2. X5 is powered on and the firmware is the latest version (recommended
to update via the Insta360 app).
3. The Transmitter and X5 are within 10 meters in an unobstructed
environment.

Mic Pro User Manual
25
Initial Pairing
1. On the X5 touchscreen, swipe down from the top to enter the shortcut
page → "Bluetooth" → "Bluetooth Headset/microphone", and after
pressing, it will search for Bluetooth devices.
2. Triple-press the Power Button of the Transmitter, the left indicator light
will flash rapidly, and at this time the Transmitter enters Bluetooth
Pairing Mode.
Complete Connection
1. "Insta360 Mic Pro TX xxxxx" will appear in the search list. Press to connect.
2. After successful connection: The function indicator on the left side of
the Transmitter becomes solid (meaning connected); the X5 screen
displays a connected prompt, and the microphone is enabled.
3. After successful pairing, the Mic Pro Transmitter and X5 will
automatically connect when powered on next time, eliminating the
need for repeated operations.
Disconnect
If you need to disconnect, you can unpair the Transmitter in the X5
Bluetooth menu or long-press the Power Button on the Transmitter to turn it
off.
Unable to find Mic Pro?
1. Restart X5 and the Transmitter.
2. Ensure that the Transmitter is not connected to other devices and has
entered Pairing Mode.
3. Remove other connected Bluetooth devices (such as GPS remote) from
X5.
Mic Pro User Manual
26
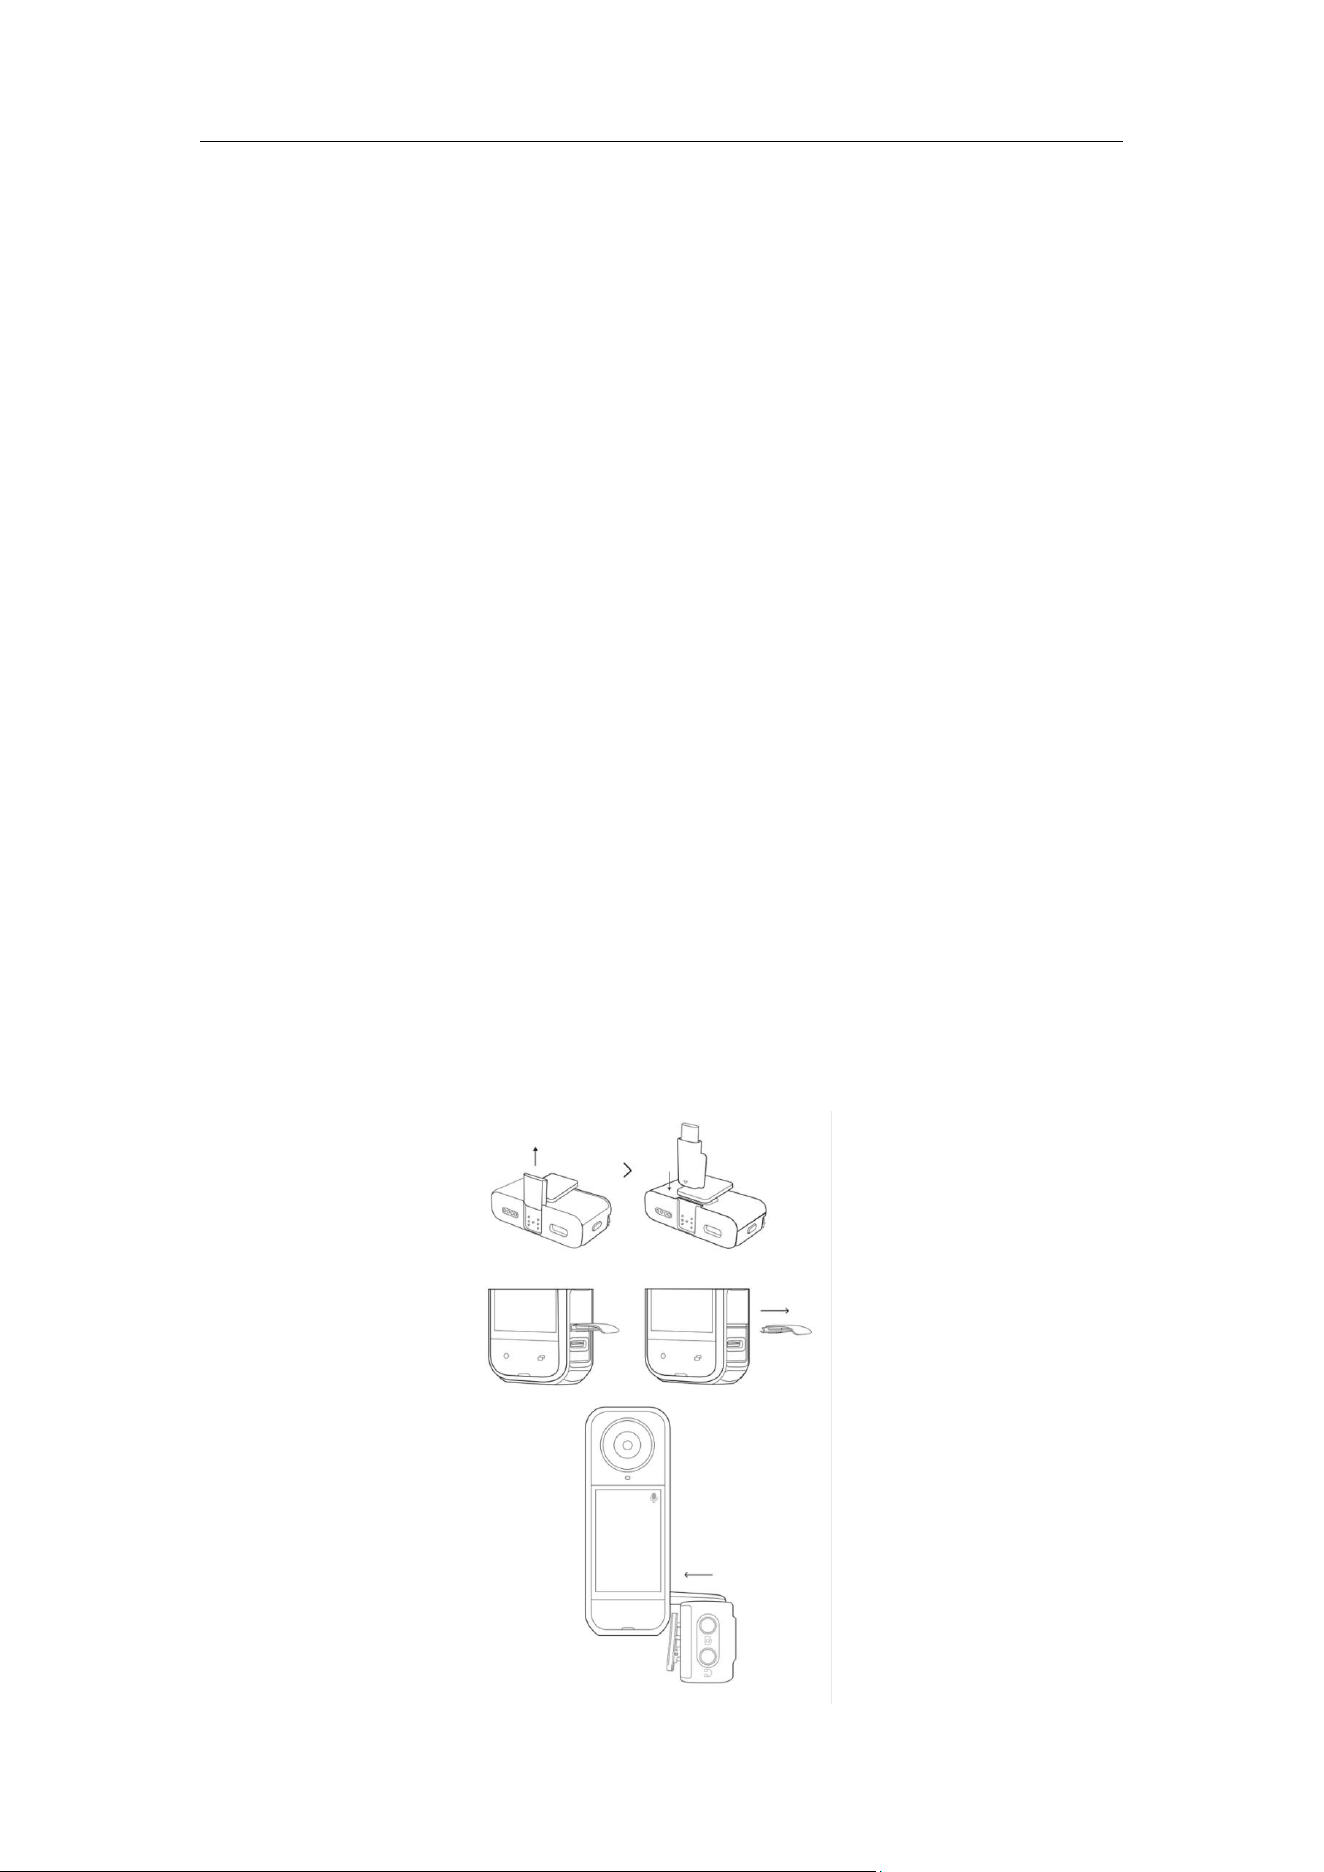
Connect via the Receiver
In addition to direct Bluetooth connection, you can also use an adapter to
connect the Mic Pro Receiver to the X5 camera. This method supports
multiple transmitters to pick up sound simultaneously.
Steps
1. Open the USB port cover on the side of the X5 camera and pull out the
protective cover.
2. Install the USB-C adapter to the Mic Pro Receiver, and confirm that it is
correctly inserted into the contacts on the back of the Receiver.
3. Directly insert the Mic Pro Receiver into the USB-C port of the X5 (the
port will automatically recognize it after insertion, no additional settings
required).
4. After a successful connection, a microphone icon will be displayed in
the upper right corner of the X5 screen, and the audio input will
automatically switch to the external microphone.
Note: The color of the indicator will vary depending on the state of the
Transmitter. If the Transmitter has not enabled Noise Canceling, the left
function indicator light will be blue; if Noise Canceling has been enabled, it
will be green.

Mic Pro User Manual
27
Post-connection Settings
On the X5 touchscreen, swipe down to open the shortcut menu →
"Bluetooth" → "Bluetooth Headset/Microphone", select the connected Mic
Pro Transmitter. The following adjustments can be made.
• Noise Canceling (Turn Off / On - Weak / On - Strong)
• Pickup Mode (Omnidirectional / Cardioid / Figure-8)
• Voice Preset (Standard / Rich / Bright)
• TX Auto Gain (Turn off / Auto / Dynamic)
• Internal recording related settings (32-bit float, stereo internal
recording , record with internal audio, loop internal recording, etc.)
• Child Lock function (prevents accidental operation)
• Other functions (button functions, vibration alert, auto power off, LED
indicator, etc.)
Notes:
• After successfully connecting to the X5 camera, parameters such as
audio gain can be adjusted on the "Audio Settings" page of the X5.
• In direct connection mode, the Mic Pro Transmitter still supports
independent internal recording as a safety backup in case of wireless
signal interruption. For detailed internal recording operations, please
refer to the "Transmitter Internal Recording" section.
If you need to view a demonstration, click to watch our tutorial video.
Mic Pro User Manual
28
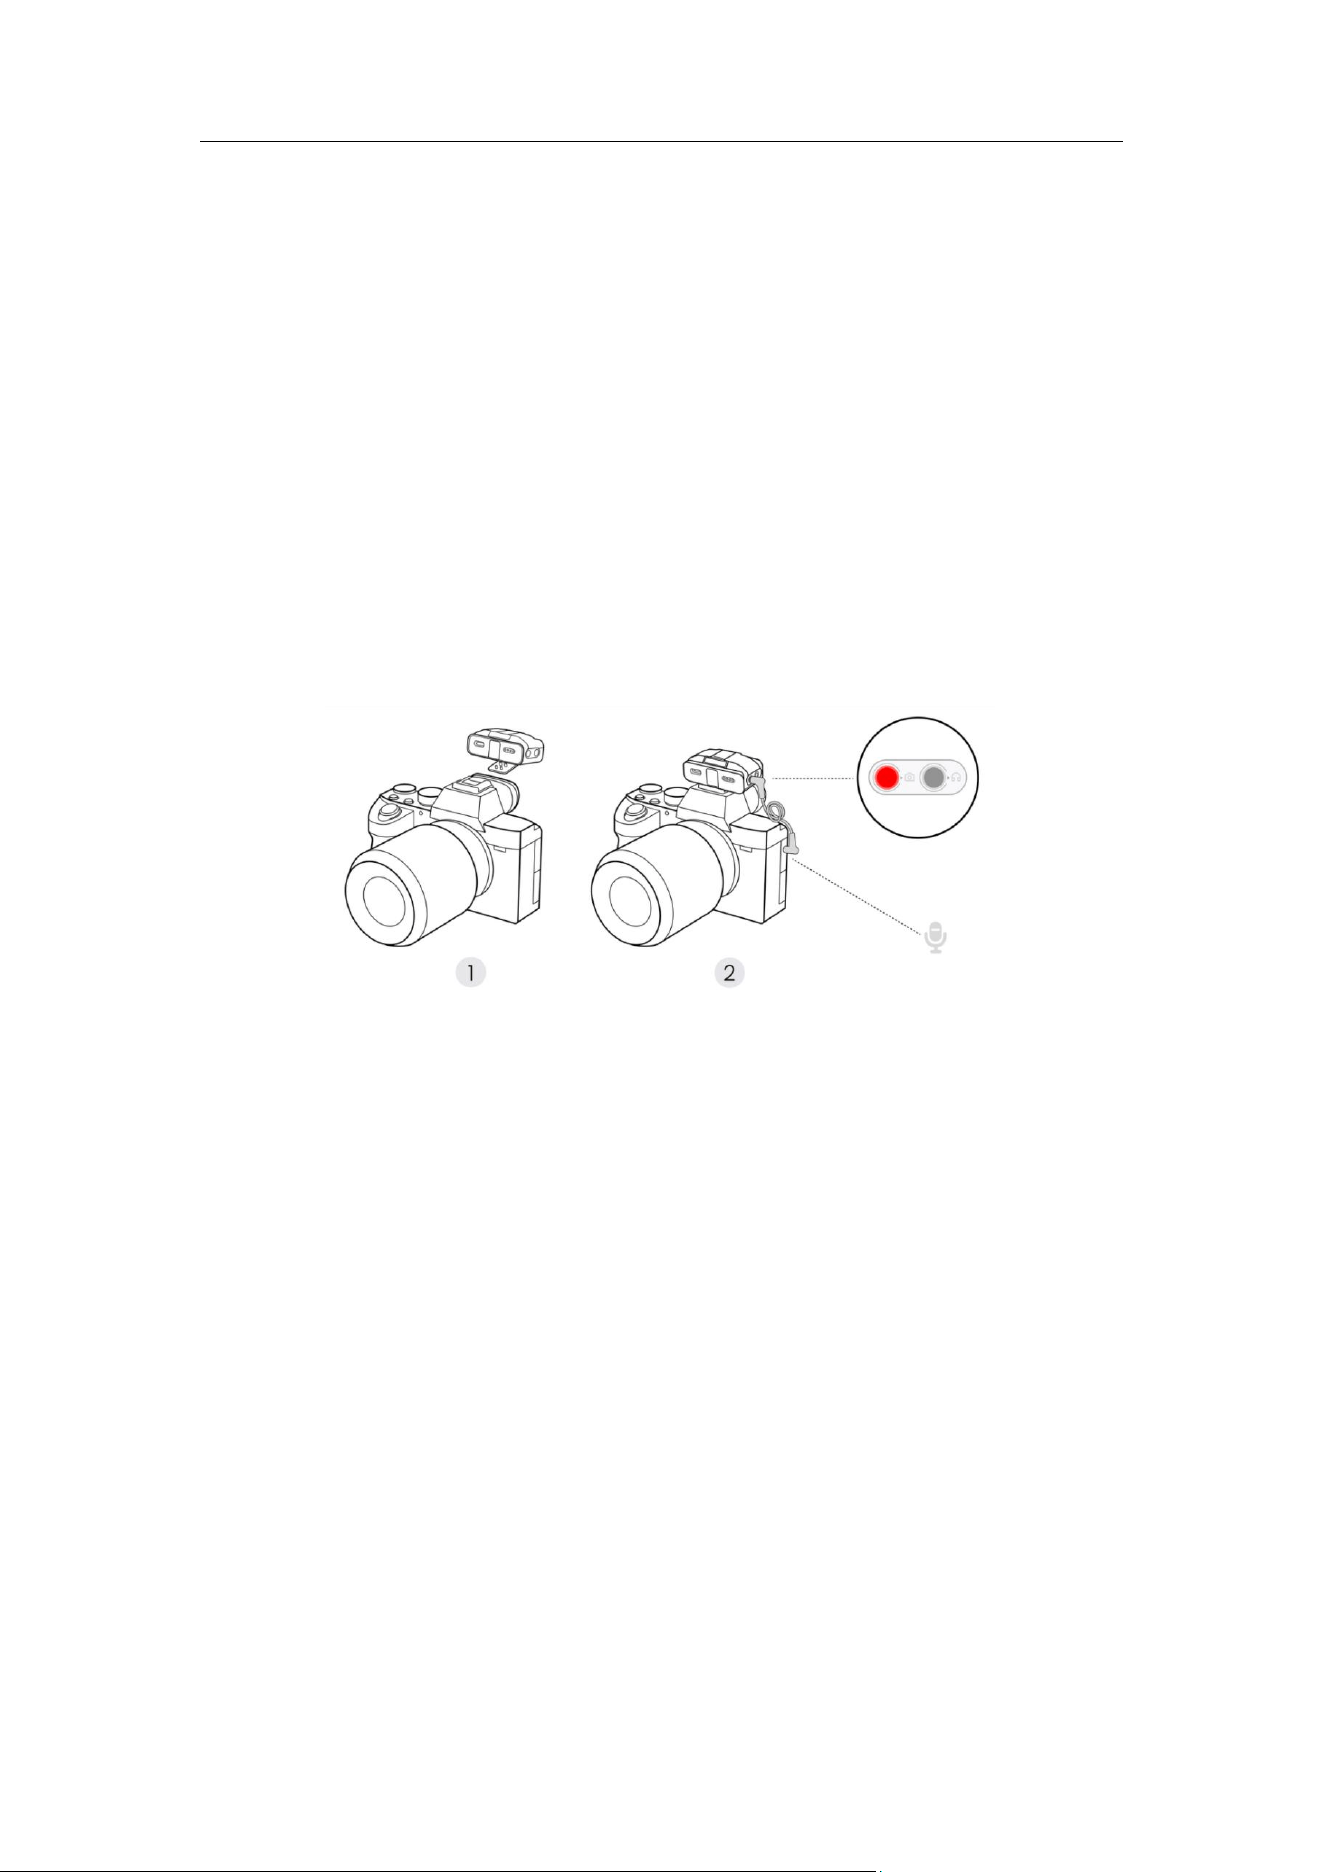
Connect to Digital Camera
Via a 3.5mm cable
Wireless audio recording can be achieved by mounting the Receiver to the
camera hot shoe or body using the back clip and connecting the Receiver
to the camera's audio input port with the included 3.5mm TRS cable.
Note: Please ensure that the 3.5mm cable is fully inserted into the audio
output interface of the Receiver (marked with a red circle) and the audio
input interface of the camera (usually marked with a microphone symbol).
Incorrect connection will result in failure to pick up sound.
Via Camera Adapter
Connects the Receiver directly to a Sony camera's hot shoe, enabling 4-
channel audio recording.
Steps:
1. Unfold the adapter.
2. Insert the adapter into the contacts on the back of the Receiver.
3. Directly insert the Receiver into the MI hot shoe interface of the Sony
camera and secure it.
Mic Pro User Manual
29
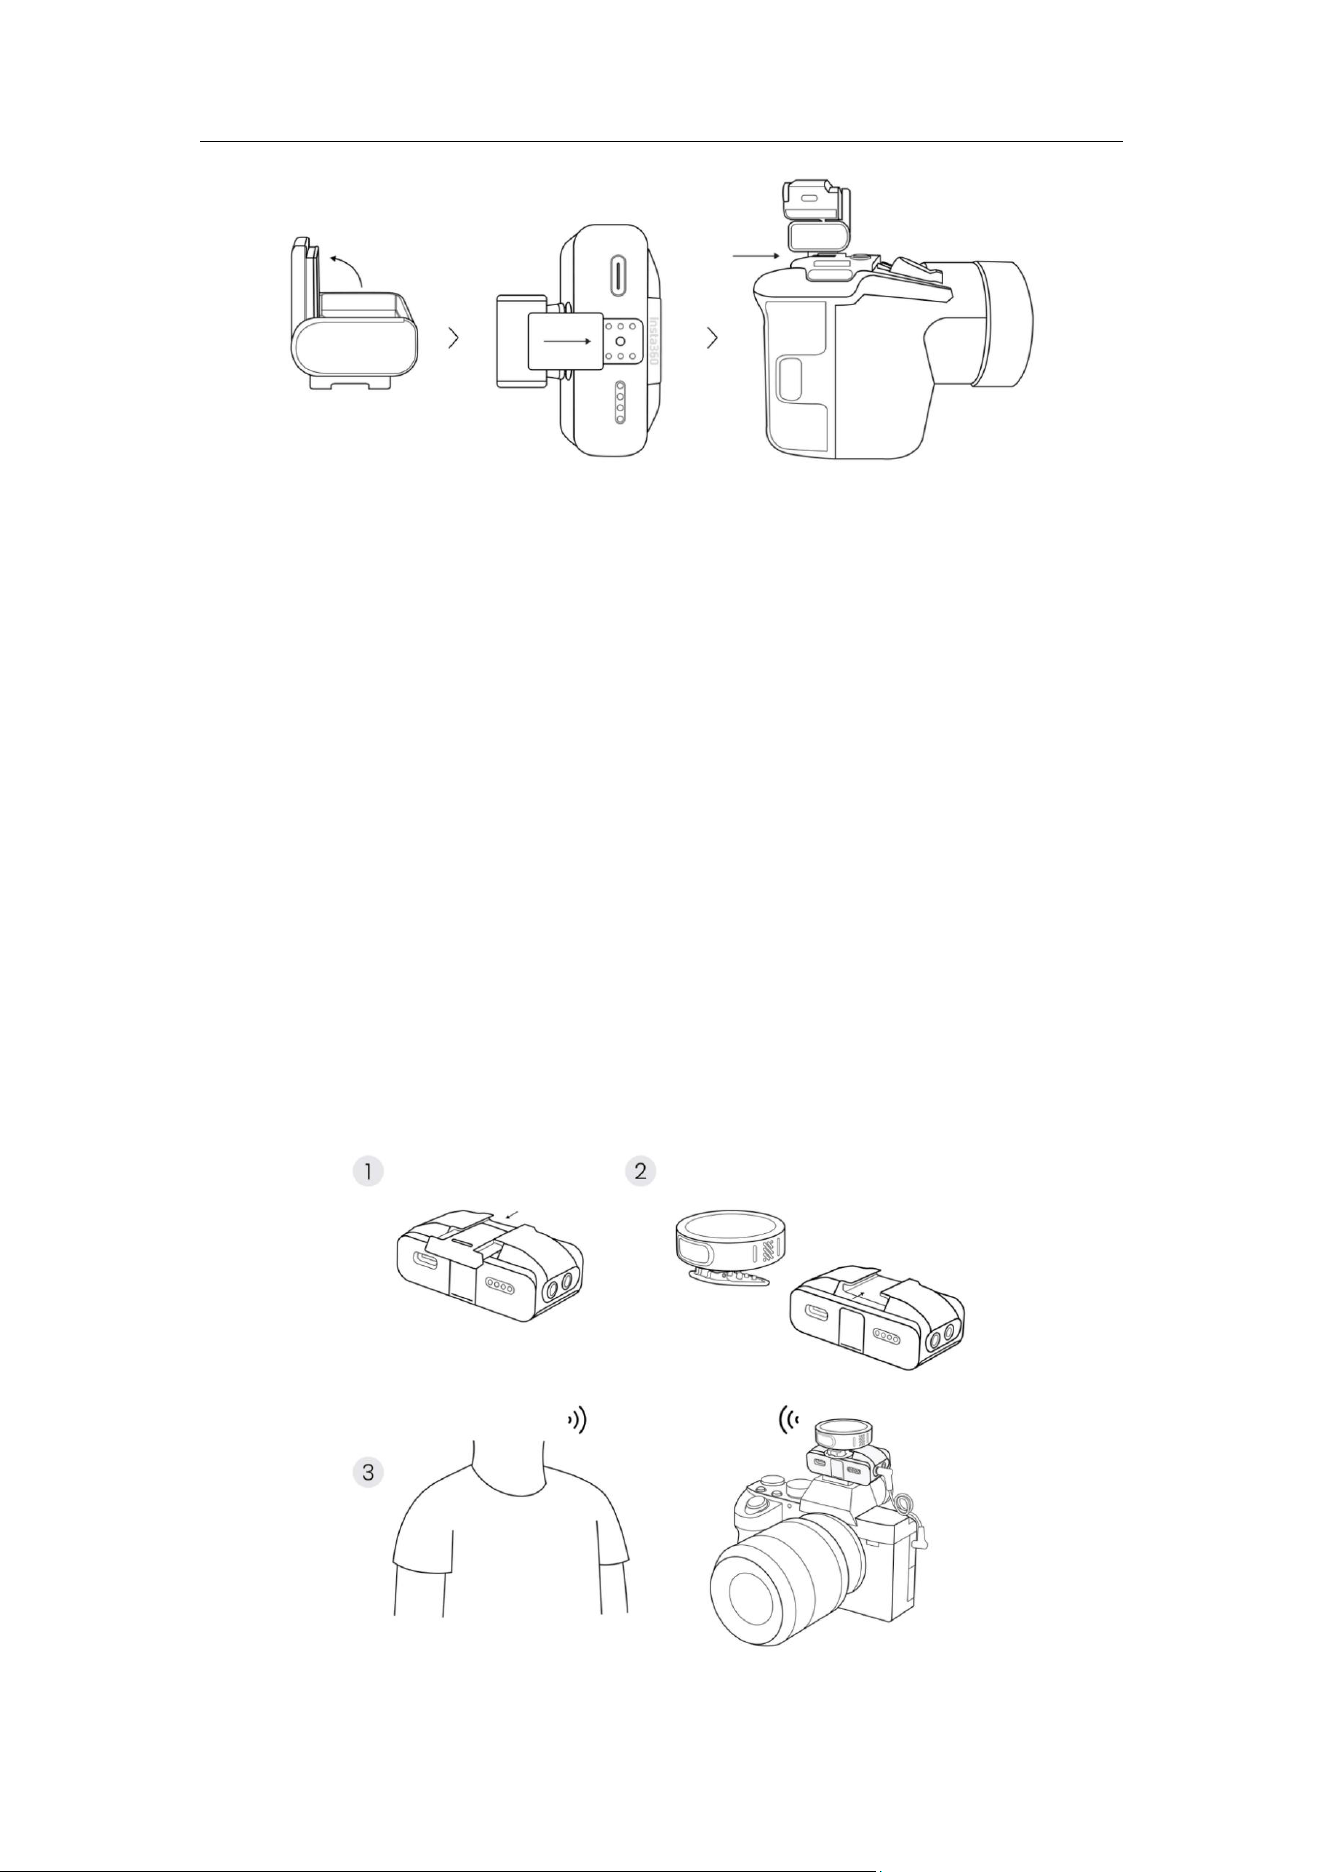
Using Transmitter as a Mounted Microphone
The Transmitter can be directly installed above the Receiver, suitable for
scenarios such as solo Vlogs, documentaries, and breaking news that
require rapid deployment and high mobility.
Steps:
1. Remove the protective cover above the Receiver.
2. Install the back clip on the Transmitter properly. Clip the Transmitter
back clip onto the slot above the Receiver until it is securely in place.

Mic Pro User Manual
30
Sync Camera Power
The "Sync Camera Power" function is enabled by default. This function
allows the Receiver and the camera to automatically synchronize power
on/off.
• When the camera is turned on, the Receiver will automatically turn on;
• When the camera is turned off, the Receiver will automatically shut
down.
Compatible Camera
It is mainly applicable to traditional cameras (such as DSLR cameras,
mirrorless cameras, etc.) connected via a 3.5mm TRS audio cable.
Operation Method
Slide down on the main interface of the Receiver
→
Control Center
→
"RX
Settings" → "Sync Camera Power" → "ON".
Note: The camera must be in video mode for this function to work properly.
Connect to Phone
Via Mobile Phone Adapter (USB-C)
1. Install the phone adapter onto the Receiver until it is in place. A
successful installation prompt will be displayed on the screen.
2. Insert the adapter into the USB-C port of the phone.
3. Wireless audio recording can be achieved by attaching the pre-paired
Transmitter to clothing using a back clip or magnet.

Mic Pro User Manual
31
Quick Operation
Short press the Power Button on the Transmitter to directly control the
start/stop of recording. (This function is only applicable to apps that
support volume button control for shooting, such as the native camera or
compatible third-party shooting apps like the Insta360 app.)
Recommendations for long-duration shooting
It is recommended to use a phone adapter to securely attach the Receiver
to the phone:
• When shooting for a long time or during livestreams/broadcasts, use a
USB-C charging cable to power the Receiver.
• In this case, the charging cable can simultaneously charge the phone,
enabling charging while recording and preventing shooting
interruption due to battery depletion.
Note: Mobile Phone Adapter (Lightning), which is sold separately is required
for iPhone 14 and earlier models.
Mic Pro User Manual
32
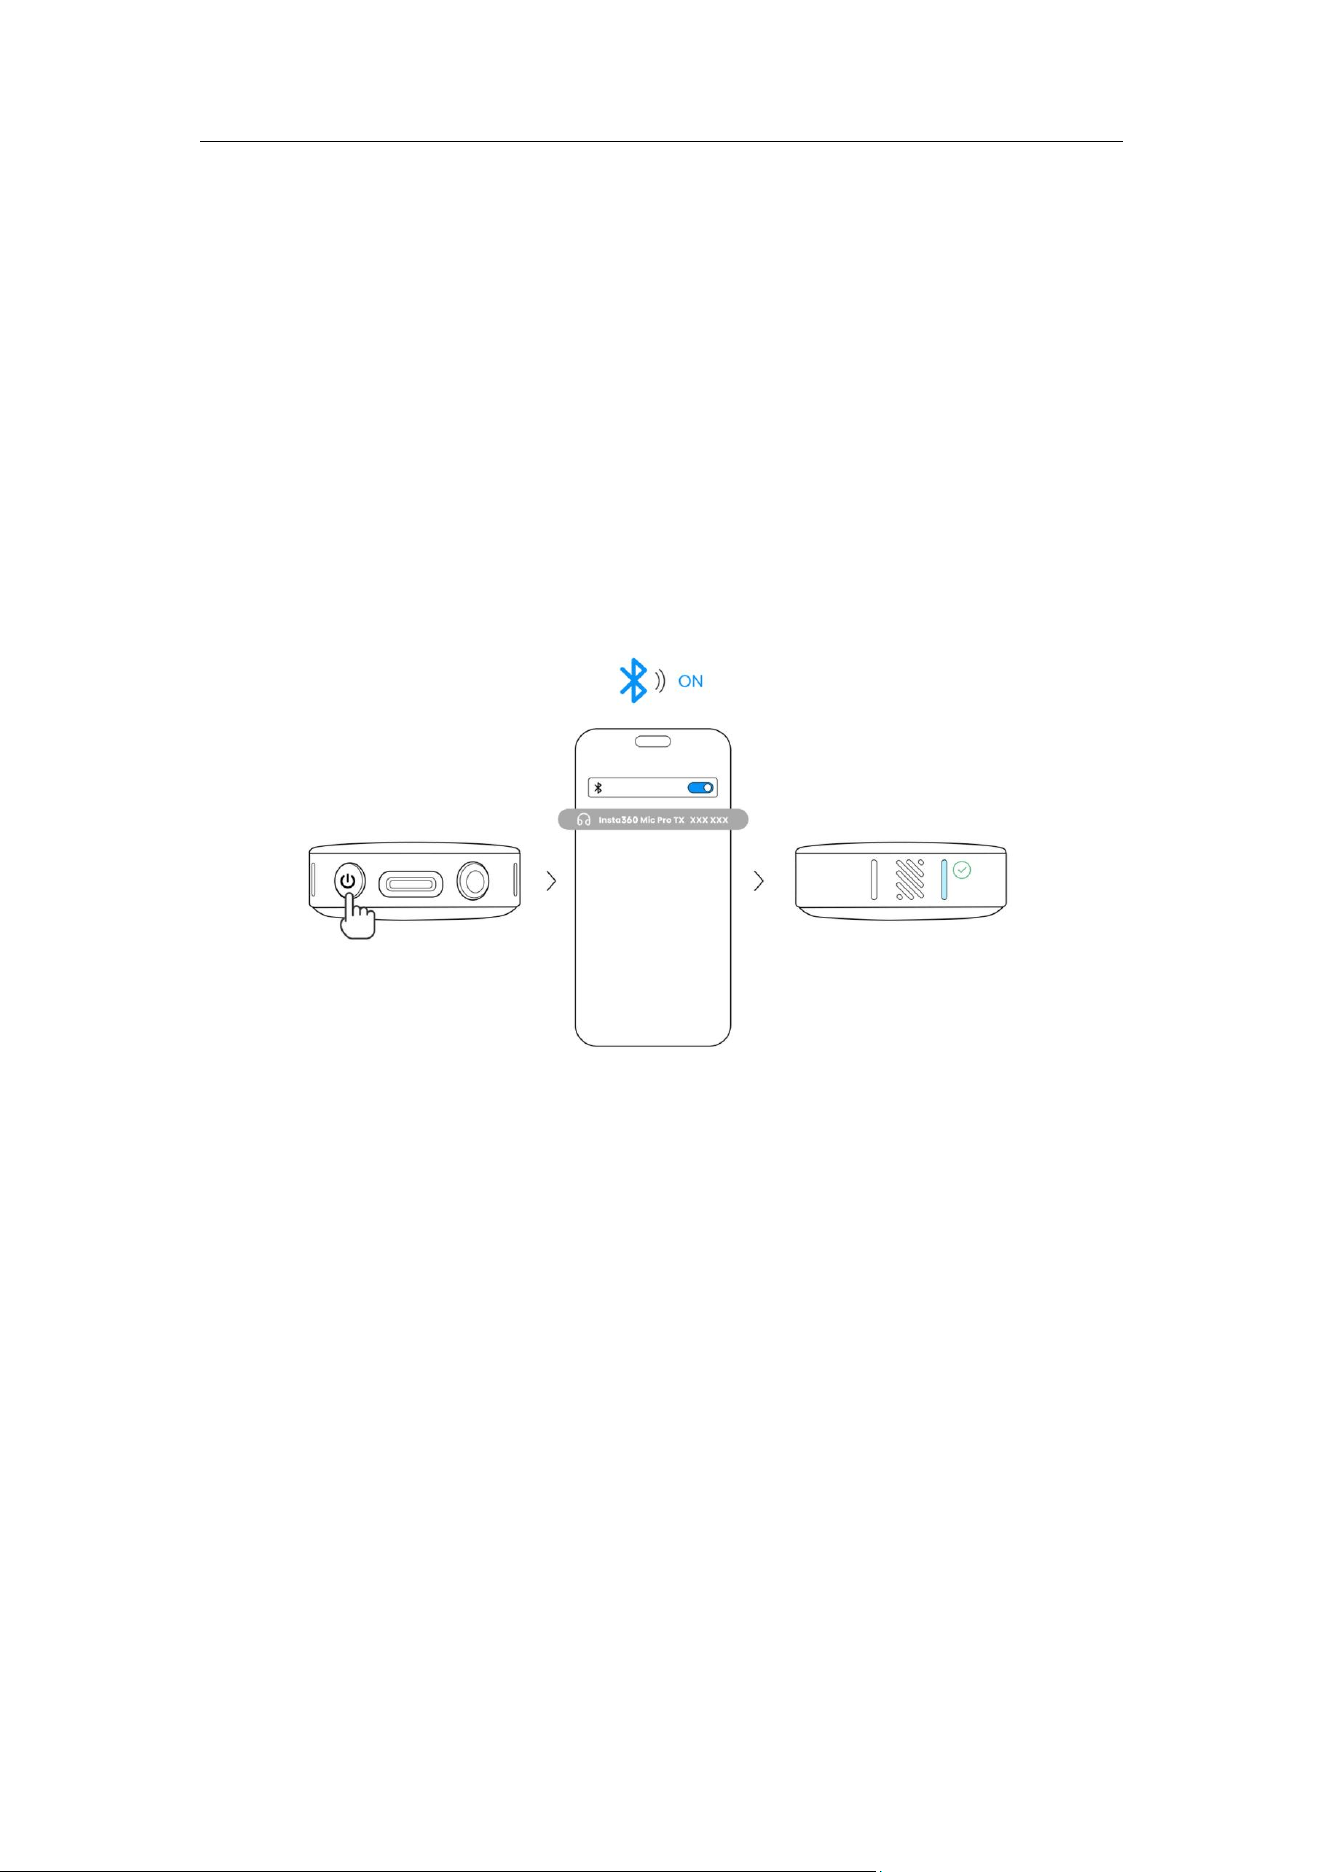
Connect directly via Bluetooth
1. Turn on Bluetooth on your phone.
2. Triple press the Power Button on the Transmitter, the function indicator
will flash rapidly, and it will enter Bluetooth Pairing Mode.
3. Find and tap the Transmitter name in the phone's Bluetooth list to
connect.
4. After successful connection, the function indicator light will remain
constantly on. At this time, the Transmitter can serve as a sound input
device to pick up sound for third-party shooting or LIVE streaming apps
(native camera on mobile phone is not supported).
Note: The native camera of mobile phones and some apps have limited
support or poor compatibility with Bluetooth microphones, which may
result in high background noise or poor audio quality. It is recommended to
prioritize using the adapter for better recording quality.
Mic Pro User Manual
33
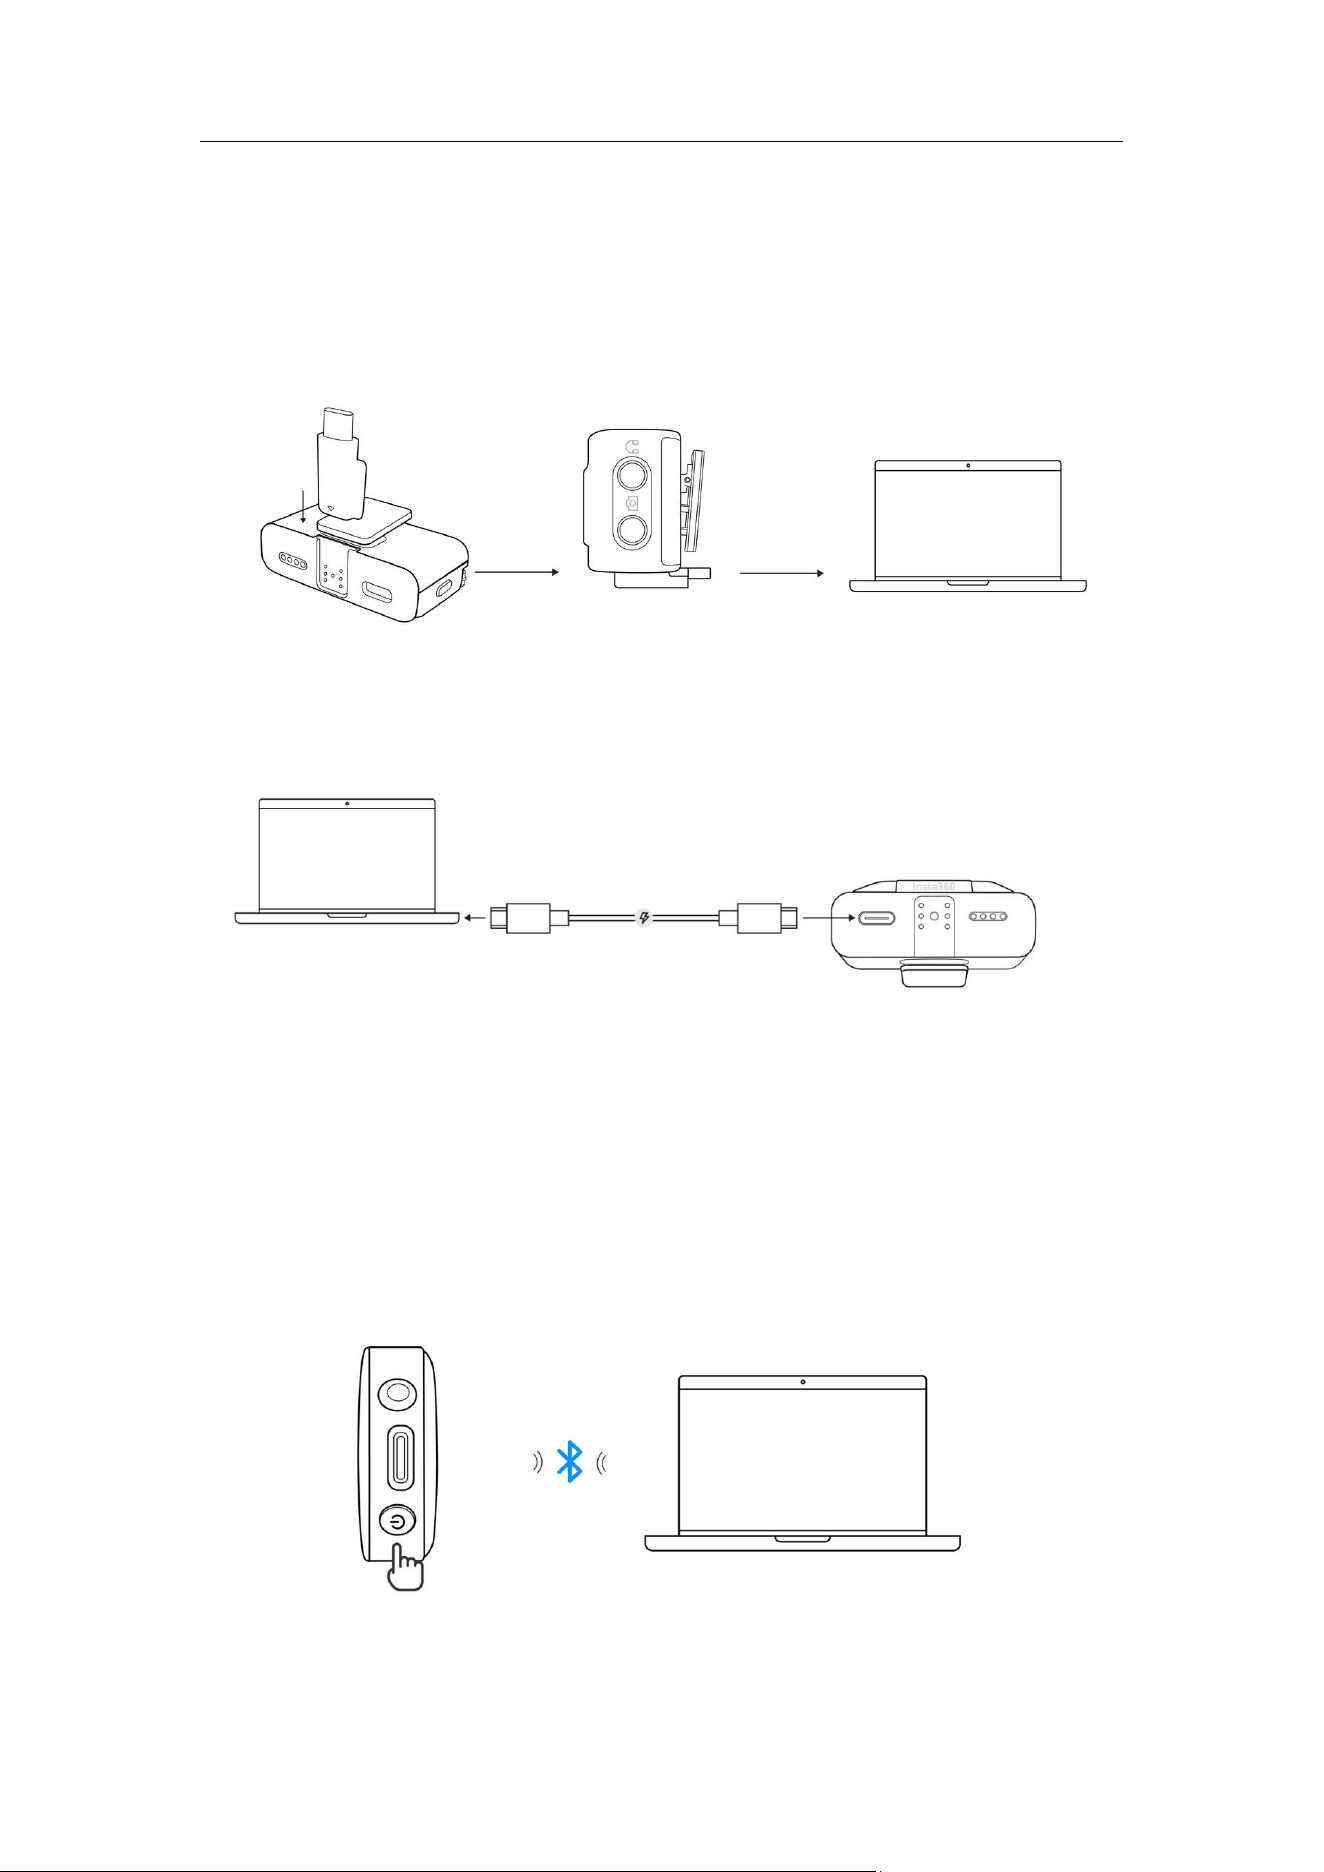
Connect to Computer
Mic Pro can be connected to a computer in the following ways:
• Use the USB-C adapter to connect the Receiver to the computer.
• Use the included USB-C cable to connect the Receiver to the computer.
• Pair the Transmitter with the computer via Bluetooth.
For specific operating steps, please refer to the "Connect to Phone" section.
After successful connection, set Mic Pro as the audio input device in your
computer's audio settings, which can be directly used in scenarios such as
video conferencing, LIVE, recording, or voice input.

Mic Pro User Manual
34
Notes:
• When connecting via Bluetooth, please ensure that the computer's
Bluetooth is turned on.
• When starting to record audio, please check and select the correct Mic
Pro device as the input source.
• The Transmitter cannot be connected to a computer via a data cable
for audio input and can only be connected for file transfer.
Mic Pro User Manual
35
5. Receiver Usage
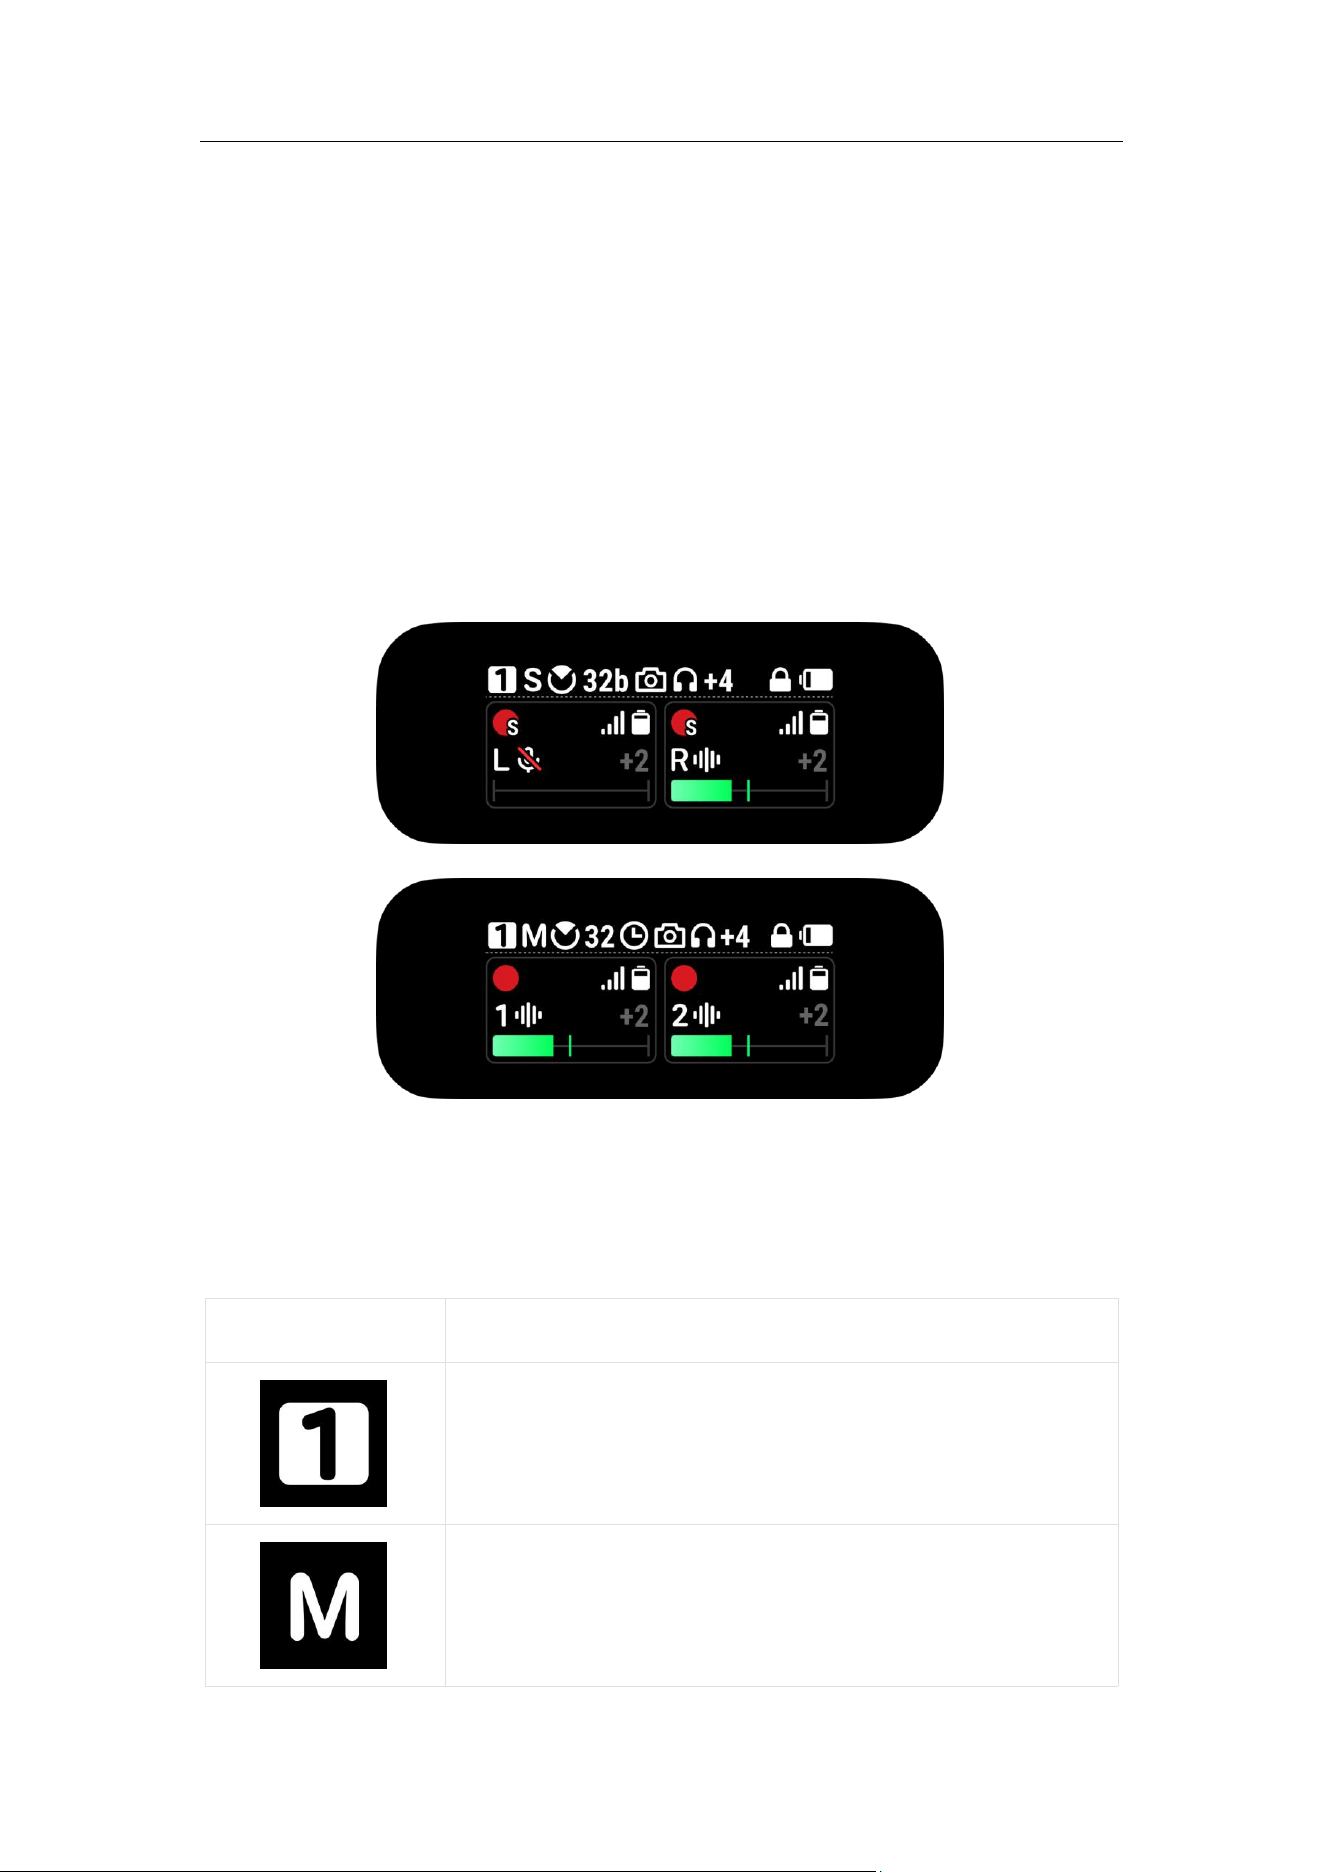
Main Interface
When connecting to different numbers of Transmitters and in different
states, the display of the main interface of the Receiver's touch screen will
vary. Please refer to the actual display.
The following content shows two Transmitters being used as an example.
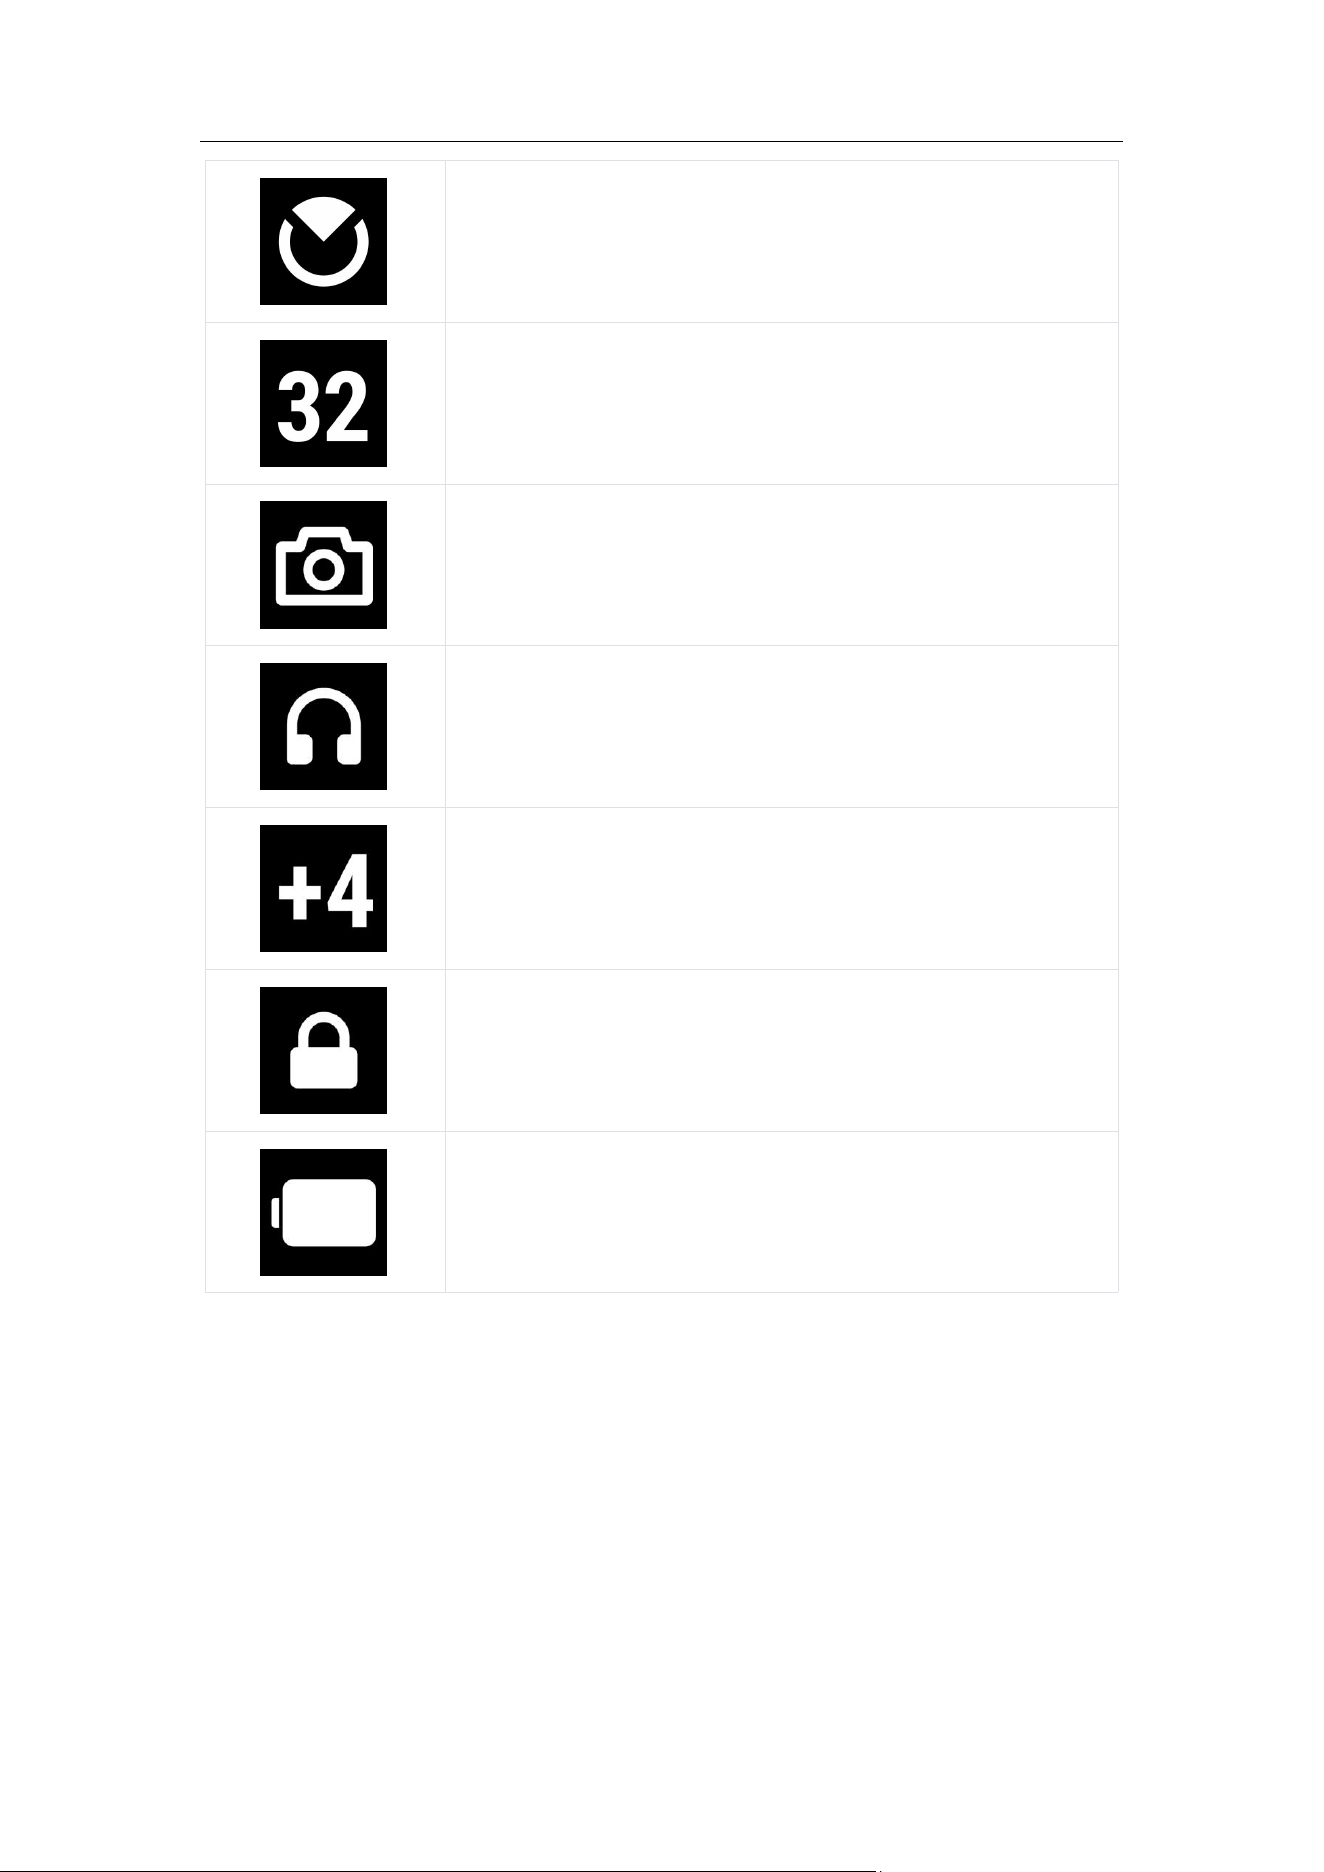
1. RX Status
Icon
Description
When in Multi-RX mode, displays the RX ID of this
device.
Channel Mode
Mic Pro User Manual
36
Directional Pickup Mode
32-bit float enabled (may be displayed as 32b or 32
depending on the number of displayed icons)
Receiver connected to a camera via a 3.5mm cable
or hot shoe
Monitoring headphones connected
Receiver Gain
Receiver screen locked
Receiver Battery
Mic Pro User Manual
37
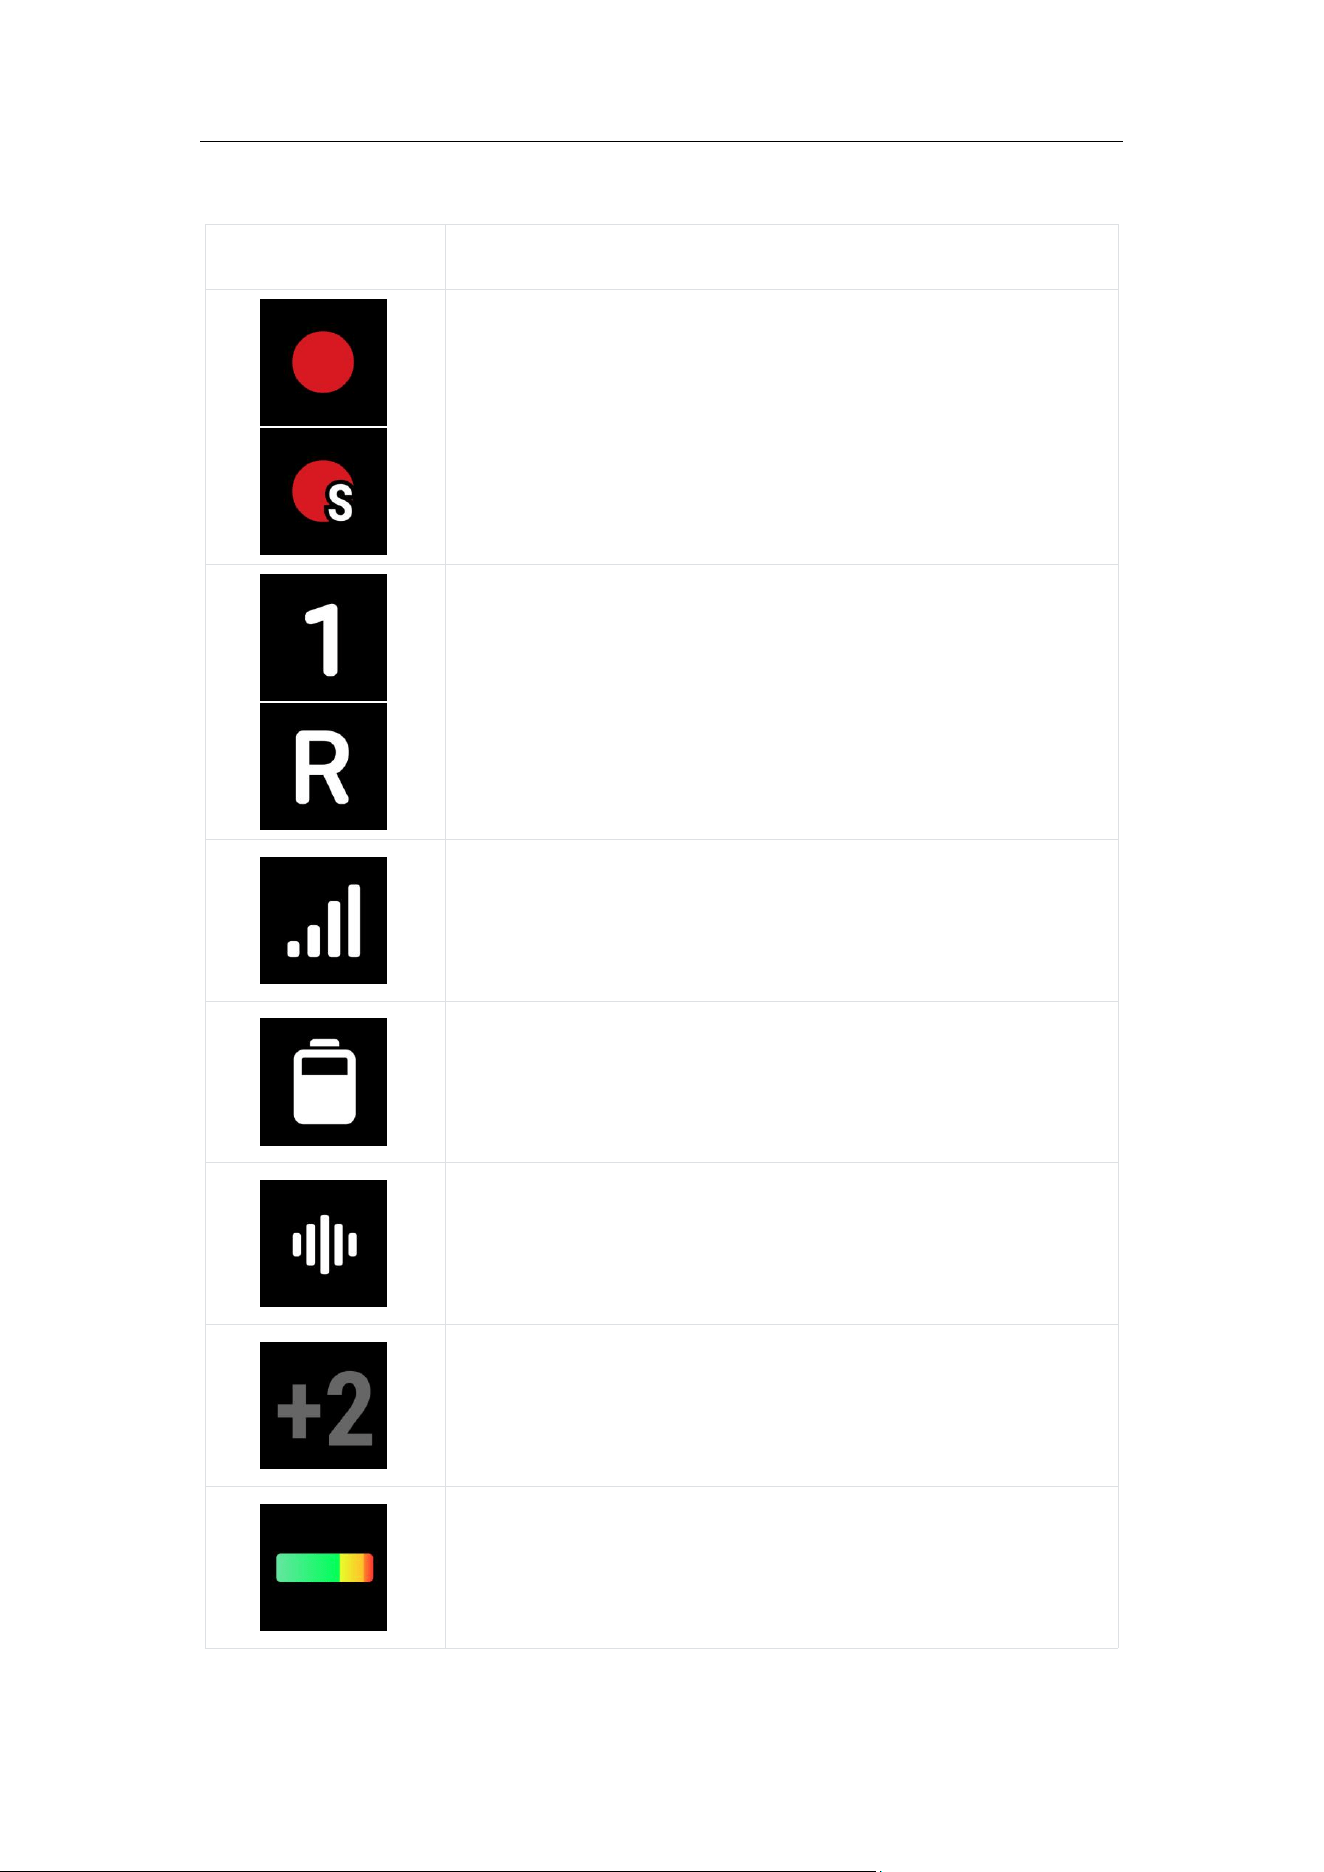
2. TX Status
Icon
Description
Recording Mode
• Normal Internal Recording
• Stereo Internal Recording
Transmitter ID
• In Mono / Safety Track / Quadraphonic Mode:
Displays number
• In Stereo Mode: Displays "L"(Left) or "R"(Right)
Signal strength between the Receiver and the
Transmitter
Transmitter Battery Level
Noise Canceling Mode
Transmitter Gain
Level information, showing the volume level

Mic Pro User Manual
38
Swipe down - Control Center
Swipe down on the touch screen of the Receiver to enter the control center.
Operation Mode:
• Rotate the dial or swipe left or right on the screen: Switch the selected
options.
• Press the dial or tap the screen: Enter the currently selected option.
• Double-press the dial or press the back button: Return to the previous
menu level.
RX Settings
Function
Options
Explanation
Usage Scenarios /
Note
Channel
Mode
Stereo
The left and right channels
correspond to the sounds of
Transmitter 1 and
Transmitter 2 respectively,
providing a sense of space
and directionality. It is
convenient to adjust the
volume, reduce noise, or
replace audio content
separately.
Two-person
conversations, vlogs,
ambient sounds, music,
and scenes requiring a
sense of direction and
three-dimensionality.
Mono
The left and right channel
outputs are exactly the
same, with all audio
merged into a single
channel. Suitable for quick
video production.
Interviews, speeches,
monologues, podcasts.

Mic Pro User Manual
39
Quadraphonic
Audio from each of the four
Transmitters is recorded
independently onto four
separate channels.
Multi-person interviews,
roundtable discussions,
talk shows, multi-person
recordings that require
separate post-
processing.
Safety Track
Similar to mono, the right
channel gain is 6dB lower
than the left channel,
serving as a backup anti-
overexposure soundtrack.
Critical recordings
requiring high reliability,
such as concerts, live
speeches, and corporate
interviews.
RX Gain
-12 dB to +12 dB
(manual
adjustment)
Used to adjust the volume
of the wireless audio signal
received by the Receiver
and determine the level
ultimately output to the
camera or mobile phone.
Adjusting the RX gain
properly can keep the
volume received by the
camera/phone within the
optimal range, avoiding
input clipping (distortion)
at the camera end.
Sync
Camera
Power
On / Off
When the Receiver is
connected to the camera
via a 3.5mm cable, it can be
synchronized with the
camera for power on/off.
When the camera is turned
off or the shooting is not
activated, the Receiver
automatically shuts down;
when the camera is turned
on, the Receiver
automatically powers on.
Using this feature helps
save microphone power.
Auto
Power Off
On / Off
When the Transmitter has
not been connected to a
device and has not
recorded within 15 minutes,
it can automatically shut
down to save power.
-

Mic Pro User Manual
40
TX Settings
Function
Options
Explanation
Usage Scenarios /
Note
Low Cut
On / Off
When activated, it
automatically filters low-
frequency sounds at 100Hz
and below, effectively
reducing low-frequency
noises such as wind noise,
air conditioning noise, and
footsteps, making human
voices cleaner and clearer.
When activated, the mic
automatically cuts off
frequencies at 100Hz and
below. This effectively
attenuates low-
frequency ambient noise,
such as wind, air
conditioning, and
footsteps, ensuring
cleaner and more
intelligible vocals.
TX Gain
-12 dB to +12 dB
(manual
adjustment)
Adjust the amplification
factor of the Transmitter for
the sound signal. Increasing
it makes the volume louder
but may introduce more
background noise;
decreasing it has the
opposite effect.
Manual fine-tuning is
suitable for fixed-
distance shooting; avoid
extreme values to
prevent noise floor or
clipping.
TX Auto
Gain
Off
-
-
Prevent Audio
Clipping
Prevents audio clipping and
maintains a consistent
output volume.
Motorcycles, sharp noise
environments.
Dynamic
Control
Balance fluctuating volume
and maintain a consistent
output volume.
Two-person and multi-
person conversations.
Directiona
l Pickup
Mode
Omnidirectional
Default mode, captures
360° ambient sound.
Suitable for scenarios
that require a natural
sound field and spatial
sound. Ideal for daily
vlogs.

Mic Pro User Manual
41
Voice Focus
(Super-
directional)
It focuses on picking up the
target human voice within a
60° fan-shaped area
directly in front, while
intelligently suppressing
point-like interference
sounds from the side and
rear (such as voices of
bystanders, horn sounds),
retaining more ambient
sounds from a distance
(such as wind noise, air
conditioning noise),
resulting in a natural and
comfortable listening
experience.
Suitable for relatively
noisy scenarios such as
street interviews, street
photography Vlogs,
outdoor follow-up
shooting, etc.
Cardioid
Captures sound directly in
front of the microphone and
reduces sound from the
sides and rear.
Suitable for scenarios
such as ASMR creation,
podcasts, livestreams,
outdoor shooting, etc.
Figure-8
Captures sound from the
front and back of the
microphone while reducing
sound from the sides.
Suitable for scenarios
such as musical
instrument playing and
singing, two-person
face-to-face interviews,
and stereo recording.
Voice
Tone
Preset
Standard
Clearly and evenly captures
sound.
Each tone preset is a
combination of reverb,
compression, equalizer
(EQ), and other audio
effects. The standard
preset is suitable for most
situations.
Rich
Enhances bass for a solid
sound without feeling
muddy.
Enhances vocal thickness
and richness.
Bright
Elevates highs for a crisp,
transparent feel while
staying smooth and non-
harsh.
For a crisp, clear, and
transparent sound.

Mic Pro User Manual
42
32bit Float
On / Off
Avoid distortion/clipping
when recording sounds with
extremely wide dynamic
range, and small signals
can be significantly
boosted during post-
production without
introducing noticeable
noise.
Highly recommended for
professional post-
production, high-SPL
(Sound Pressure Level)
environments, or
scenarios requiring
maximum dynamic
range. When enabled, the
duration that the
Transmitter can record
will become shorter.
Stereo
Internal
Recording
On / Off
Achieve single-Transmitter
stereo internal recording
based on a three-
microphone array, similar to
the stereo recording of a
tape recorder.
Ideal for ASMR and
ambient sound recording.
When enabled, internal
recordings are captured
in stereo, and the file type
is restricted to "Original"
only.
Auto
Internal
Recording
Low Battery
Automatically starts internal
recording when the battery
is low.
Ideal for long-duration
shoots, unstable signal
environments, or
scenarios where battery
life is a concern.
Low Signal
Automatically starts internal
recording when the signal is
weak.
Loop
Recording
(usually used in
conjunction
with internal
recording)
Locally records in cycles
with automatic file splitting.
Once storage is full, the
oldest files are overwritten
to ensure continuous,
uninterrupted recording.
Ideal for 24/7 monitoring
and long-term
unattended recording.
Please ensure this feature
is correctly configured to
prevent important
content from being
overwritten.
Recording
File
Format
Original
Preserves lossless original
audio to provide maximum
flexibility for post-
production.
Ideal for creators
pursuing the highest
fidelity who prefer to
handle their own post-
production.
Processed
Files include built-in
processing such as low cut,
Noise Canceling, directional
pickup, tone, and auto gain
for instant, ready-to-use
audio.
Optimized for quick
editing and maximum
workflow efficiency.

Mic Pro User Manual
43
Storage
-
Displays the remaining
recordable duration of the
paired Transmitter.
Check before recording
to avoid running out of
memory midway.
Power
Button
Function
Mode 1: Single
press to shoot.
Double press to
turn Noise
Cancelation
on/off
Mode 2: Single
press to turn
Noise
Cancelation
on/off. Double
press to mute.
Customize the single
press/double press function
of the Power Button.
Select according to
personal operating
habits; avoid conflicts
with camera/phone
shortcuts.
Child Lock
On / Off
Can only be enabled when
the Transmitter’s battery is
above 20%. This feature only
takes effect while the
device is connected (e.g.,
when directly connected to
an X5 camera). The lock will
automatically release, and
Transmitter buttons will
return to normal operation
once disconnected.
Recommended to turn on
when the device is fixed
in place or tucked into a
pocket to prevent
accidental operation.
Vibration
Alert
On / Off
Provides haptic feedback
during function switching or
status changes.
Enable for tactile status
awareness in silent
environments; disable for
scenarios requiring
absolute silence.
LED
Indicator
On / Off
Control the display of the
indicator lights on both
sides of the Transmitter.
Disable to reduce light
exposure for a more
concealed look; enable
for quick visual status
checks. Indicators will
automatically turn on if
the Receiver or camera is
disconnected.
Auto
Power off
On / Off
The device automatically
shuts down after 15 minutes
of inactivity if no device is
connected and internal
recording is not active.
Enable to prevent battery
drain from forgetting to
power down; disable for
scenarios requiring
constant standby
readiness.

Mic Pro User Manual
44
Monitoring Settings
Function
Options
Explanation
Usage Scenarios /
Note
Monitor
Volume
-12dB to +12dB
Adjusts the playback
volume for real-time
monitoring.
Ideal for monitoring in
noisy environments. This
setting does not affect
the actual recording
levels or the final audio
file.
Monitoring
Range
Paired
Transmitters
Select which specific
Transmitter(s) to monitor
based on your needs.
Only successfully
connected Transmitters
will be displayed as
available options.
Note: When monitoring, make sure to insert the headphones correctly.
Adjusting the monitoring volume does not affect the actual recording
volume.
Connection
Function
Options
Explanation
Usage Scenarios /
Note
Pair
Connected
Transmitters
and available
slots.
View, manage, or unbind
currently connected
Transmitters. You can also
scan for and pair with new
Transmitters that are in
Pairing Mode.
Manage existing
connections or expand
your setup by searching
for new devices.

Mic Pro User Manual
45
Pairing
Mode
Multi-TX/ Multi-
RX
Multi-TX Mode: Supports 1
Receiver connecting to up
to 4 Transmitters.
Multi-RX Mode: Supports up
to 2 Transmitters
transmitting to 4 Receivers.
Multi-TX Mode is ideal for
recording multiple
speakers simultaneously
(e.g., panel discussions).
Multi-RX Mode is ideal for
professional shoots
where 1 or 2 speakers
need to be monitored by
multiple devices at once.
Switching connection
modes will unbind all
currently paired devices
and restart the unit.
Timecode
For detailed instructions, please refer to the "Timecode" chapter.
App Connection
This feature utilizes a Bluetooth connection. Once activated, the Receiver
will connect exclusively to the Insta360 app, and all currently paired
Transmitters and Receivers will be automatically disconnected.
General
Adjust screen brightness, language, and date/time. This section also allows
for factory resets and provides access to device information and
compliance details.

Mic Pro User Manual
46
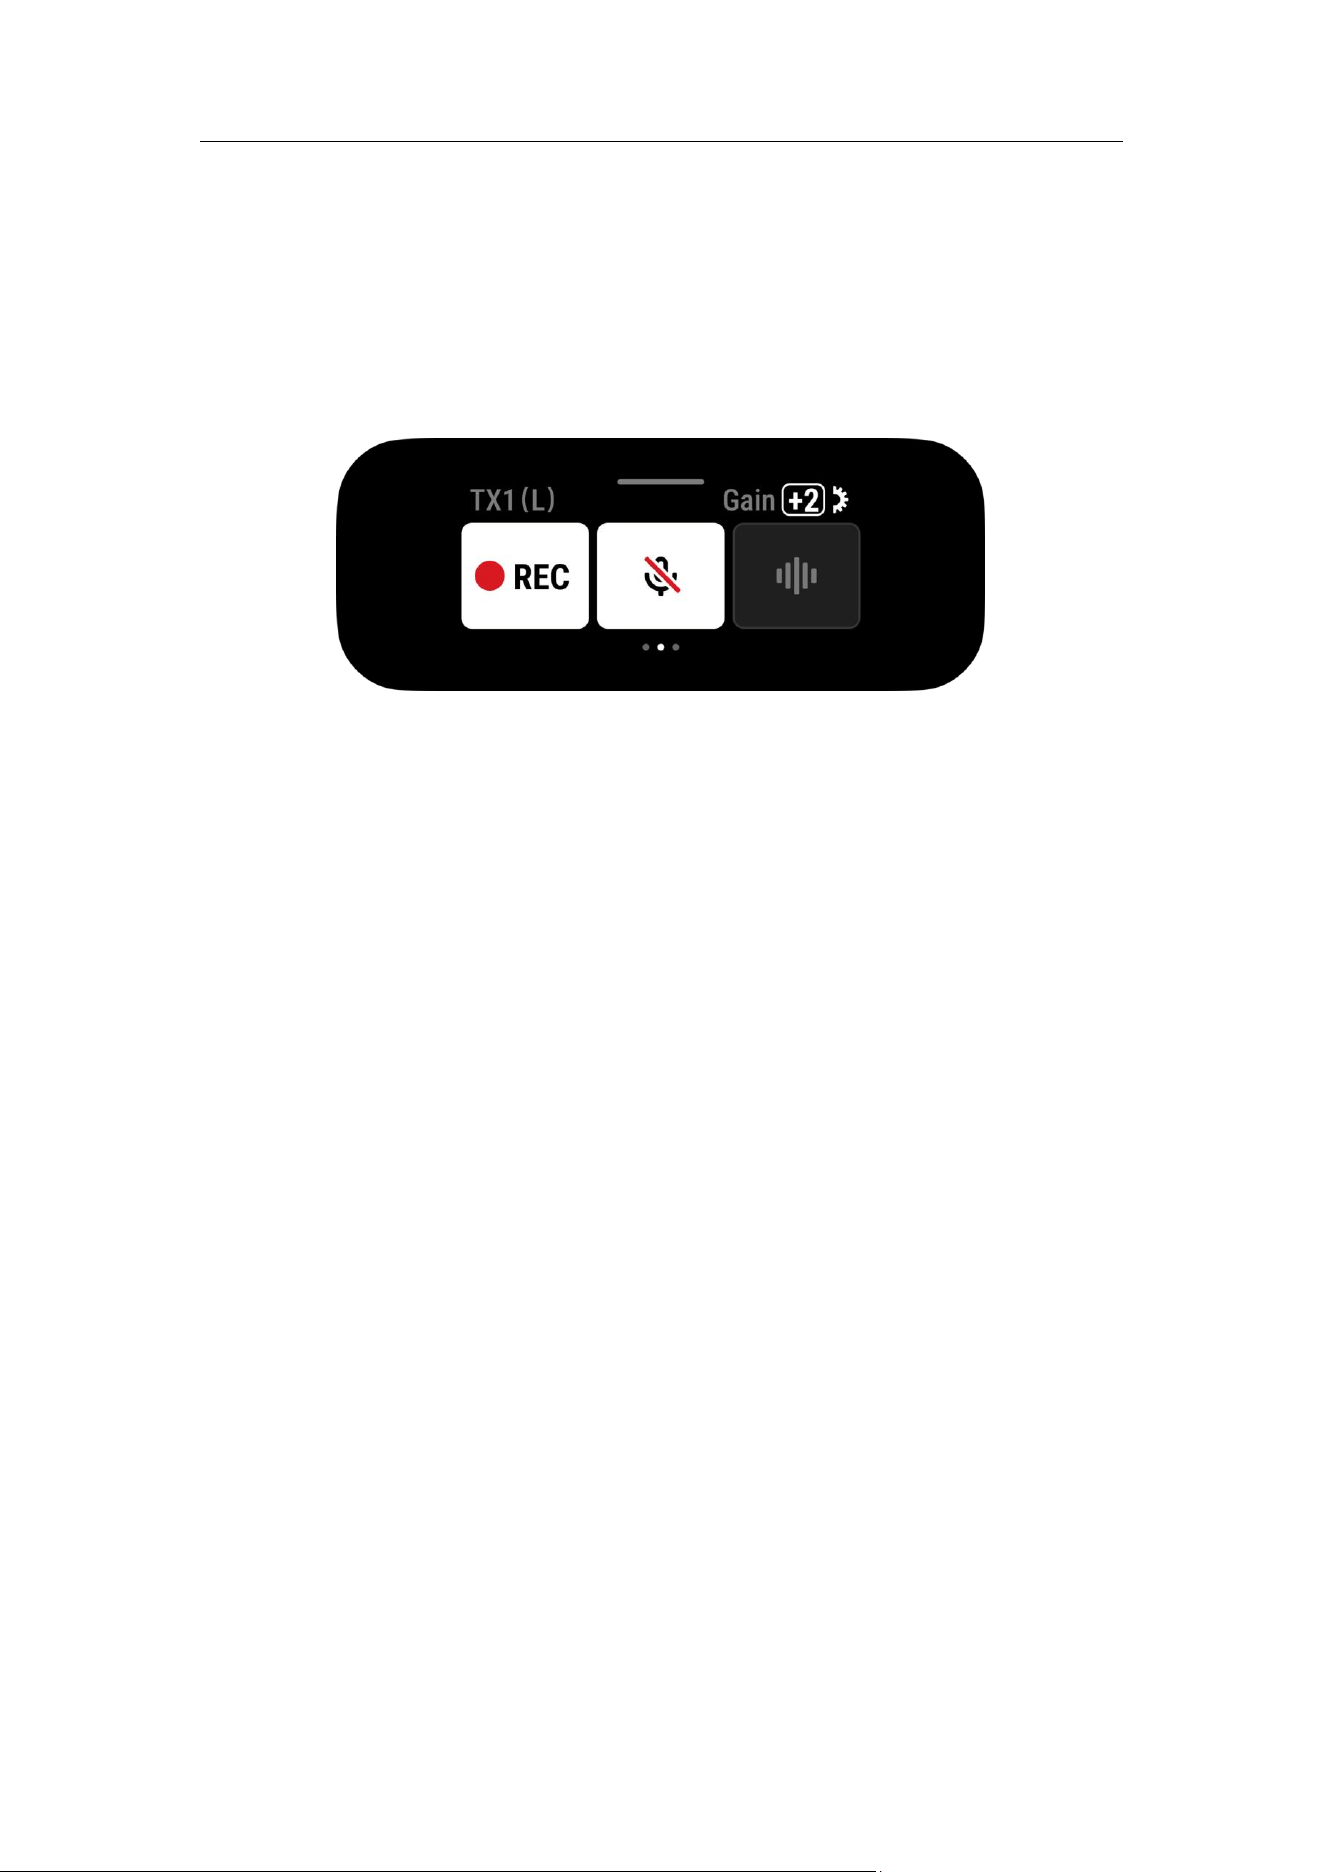
Swipe Up - Transmitter Control Page
When one or more Transmitters are connected, swipe up on the
touchscreen to access the Transmitter Control Page.
Transmitter Group Control
If the Receiver has successfully connected to multiple Transmitters, you can
swipe up on the main interface of the Receiver to enter the group control
page. At this time, the screen displays the "ALL" label (applicable to all
Transmitters). You can simultaneously control all connected Transmitters
and uniformly perform the following operations:
• Start/Stop Internal Recording (REC)
• Toggle mute on or off.
• Switch between weak, strong, or off to adjust the level of Noise
Cancelation.
Single Transmitter Control
If you need to adjust a specific Transmitter individually, you can swipe right
on the control page to find the status bar of the corresponding Transmitter.
The Transmitter number is marked in the upper left corner, such as TX1, TX2,
etc. Enter the corresponding control page of the Transmitter, where you can
perform precise adjustments for that specific unit:
Mic Pro User Manual
47
• Adjust Gain
• Start/Stop Internal Recording (REC)
• Toggle mute on or off.
• Switch between weak, strong, or Off to adjust the level of Noise
Cancelation.

Mic Pro User Manual
48
6. Transmitter Internal Recording
Overview
Internal Recording refers to the Transmitter directly recording audio files in
its built-in storage, enabling independent backup of high-quality audio
even when the wireless signal is interrupted, the Receiver is not connected,
or the device is powered off. As a safety backup, it supports features such
as 32-bit float, stereo recording, and auto gain, significantly enhancing
recording reliability and post-production flexibility.
Preparatory Work
• Ensure the Transmitter has sufficient power.
• Pair and connect with the Transmitter via the Receiver or the Insta360
app for setup.
• Before shooting, check the remaining recordable duration in the
"Storage" interface of the Transmitter or in the app. The internal
recording duration depends on the settings and will be slightly shorter
when 32-bit float is enabled.
Start/Stop Internal Recording
The Mic Pro Transmitter supports the following three methods to start/stop
internal recording:
1. Manual Operation
• Short press the internal recording button on the Transmitter to
start/stop internal recording;
• Or tap the "REC" button on the Transmitter control page of the Receiver
screen to start/stop.

Mic Pro User Manual
49
2. Synchronize with camera recording
(Insta360 cameras only)
After enabling the "Record with Internal Audio" feature on Insta360 cameras
such as X5:
• Camera starts recording
→
Transmitter automatically starts internal
recording;
• When the camera stops recording, the Transmitter automatically stops
internal recording.
This feature enables complete synchronization between the camera and
the internal recording of the Transmitter, making operation easier.
3. Auto Recording
Turning on "Auto Internal Recording" at the Receiver control center allows
the Transmitter to automatically start internal recording when the battery is
low or the wireless signal is weak.
Recording Status Indicator
When internal recording starts, the recording status indicator on the right
side of the Transmitter shows steady red.

Mic Pro User Manual
50
Export Internal Recording File
• Connect the Transmitter to your computer using a data cable.
• Open the Transmitter's storage in your computer's file manager to
access and copy the .WAV files.
○ Original Files: Identified by "orig" in the filename (e.g.,
audio_260228_102059_24bit_orig).
○ Processed Files: Identified by "processed" in the filename (e.g.,
audio_260330_231255_24bit_processed).
• Note: The Transmitter's USB port is for file export only and does not
support real-time USB audio digital output. To format the storage,
please use the Receiver or via the App.
Related Settings
On the main interface of the Receiver, swipe down to enter the Control
Center
→
"TX Settings", where you can adjust the detailed parameters of
the Transmitter.
The main related settings are as follows:
• TX Auto Gain
• Directional Pickup Mode
• 32bit Float
• Stereo Internal Recording
• Auto Internal Recording
• Loop Recording
• Recording File Format
•
Storage
Note: For detailed explanations, applicable scenarios, and notes regarding
the above settings, please refer to the "Swipe Down - Control Center"
section of this manual.

Mic Pro User Manual
51
7. Timecode
Overview
Timecode (LTC - Linear Timecode) is a professional synchronization tool
provided by Mic Pro. It embeds precise timestamps into audio signals to
help quickly align footage from multiple cameras and audio sources
during post-production. It is ideal for multi-camera shoots, interviews, and
film production requiring frame-accurate sync.
Usage Scenarios
• Multi-Camera Sync: Output timecode from Mic Pro to digital cameras.
In post-production software like DaVinci Resolve or CapCut, audio and
video tracks can be aligned automatically, saving time on manual
waveform matching.
• Internal Recording Backup: Once Timecode is enabled on the Receiver
and connected to Transmitters, subsequent internal recording files will
automatically sync timecode metadata and include an LTC audio track
on the left channel. This ensures precise matching with primary
footage even if the wireless signal drops.
• Professional Workflow: Supports LTC input/output and is compatible
with external timecode generators (e.g., Deity TC-1) to enhance
cinema-grade post-production efficiency.
• Drift Prevention: Timecode prevents clock drift during long recording
sessions, ensuring all devices remain perfectly synchronized.

Mic Pro User Manual
52
Operating Instructions
Mic Pro supports professional-grade Linear Timecode (LTC / Audio-TC),
enabling precise synchronization across multiple cameras and audio
sources. By outputting timecode as an audio signal, it allows post-
production software to automatically align footage, significantly enhancing
workflow efficiency for film, interviews, and live broadcasting.
Enabling Timecode
Swipe down from the top of the Receiver home screen to enter the Control
Center. Tap the Timecode icon; if it displays OFF, tap it to switch to ON. Once
activated, the timecode will start running. Tap the refresh icon on the right
to reset and restart the timer.
Timecode Sync Modes
Once Timecode is activated, four sync mode options are available:
• N/A
The Receiver acts as an independent clock source for internal timing only,
with no external input or output. In this mode, timecode synchronization
only applies to connected Transmitters—ideal for internal recording when
external camera sync is not required.
• L-IN(Line In)
Used to receive an LTC signal from an external timecode generator (e.g.,
Tentacle Sync, Deity TC-1) to perform a Jam Sync. The Receiver will
automatically detect and synchronize with the external master timecode.
• L-OUT(Line Out)
The Receiver outputs a Linear Timecode (LTC) signal to external devices.

Mic Pro User Manual
53
• A-OUT(Audio Out)
The Receiver outputs timecode in Audio-TC (ATC) format.
Notes:
• The timecode signal occupies the Left Channel, while the Right Channel
preserves standard audio (vocals/ambient). These tracks can be
separated for processing in software such as DaVinci Resolve.
• Use a 3.5mm TRS cable to connect the Receiver’s 3.5mm output to the
camera’s microphone input (digital cameras may require a Mic
Adapter). L-OUT mode is generally recommended.
Frame Rate Settings
1. Select a frame rate that matches your camera’s actual recording
settings.
For multi-camera synchronization, the frame rate on all recording devices
must be identical to ensure successful alignment in post-production.
2. After saving the settings, the Receiver will automatically output the
timecode as an LTC audio signal.
Caution: Since timecode occupies one audio channel, always perform a
short test recording to ensure your vocal tracks are captured correctly.
Notes:
• Ensure your Receiver is running the latest firmware (update via the
Insta360 app).
• We recommend recording a 10–30 second test clip before every shoot
to verify that the timecode is correctly embedded in the audio track.
• If your camera does not support native LTC metadata, you can still
achieve synchronization using the recorded audio track in post-
production software.
If you need to view a demonstration, click to watch our tutorial video.
Mic Pro User Manual
54
8. Using the Insta360 App
Download
Visit the Insta360 official website and go to Downloads to get the latest
version. Alternatively, simply scan the QR code on the Quick Start Guide
included in the package for a fast download and installation.
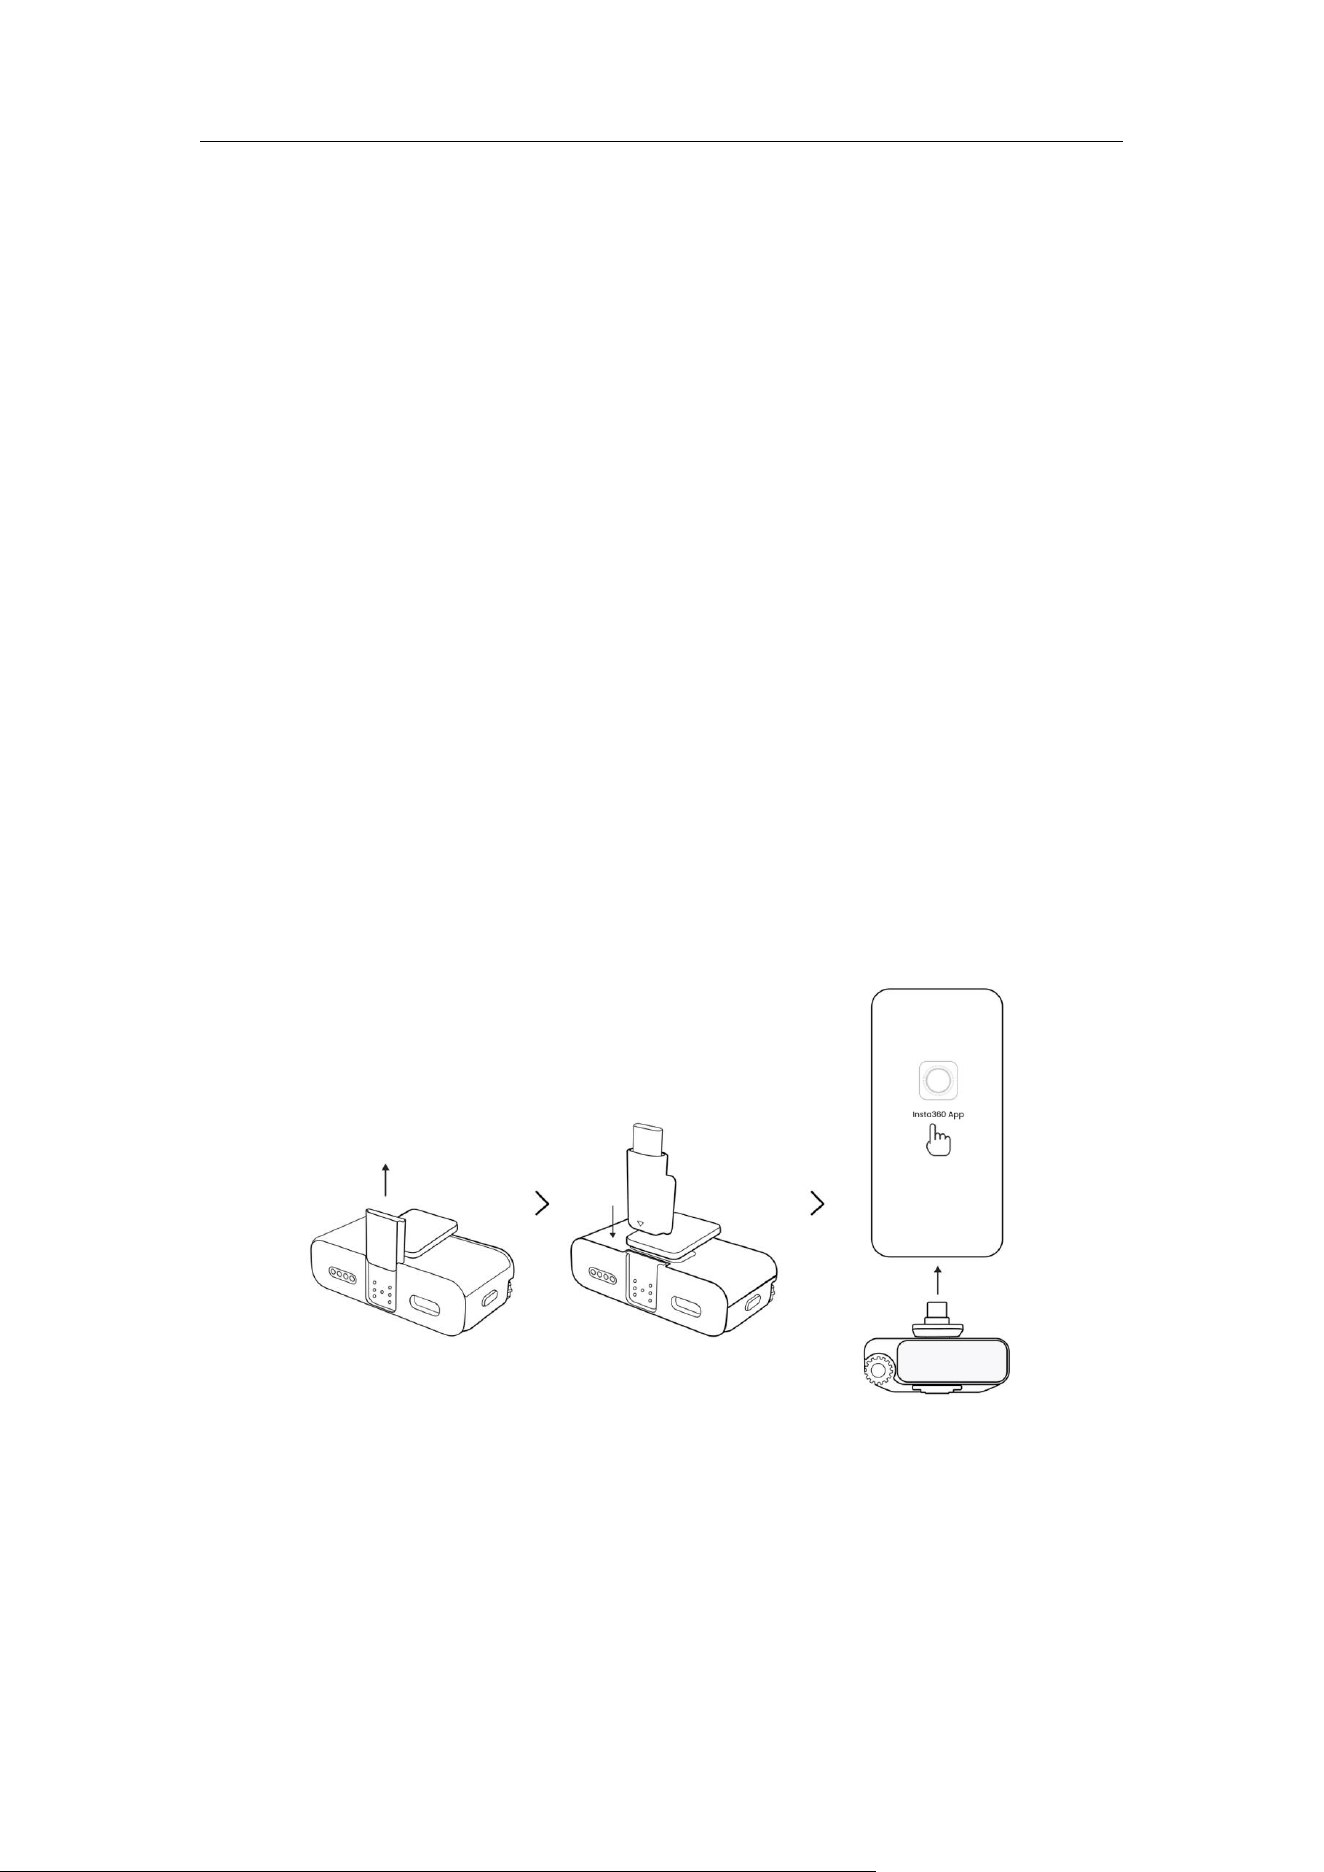
Connecting Your Device
Via Mobile Phone Adapter
1. Insert the Receiver into your phone’s USB-C port using the USB-C
adapter (use the Lightning adapter for compatible iPhone models).
2. Launch the Insta360 app; it will automatically recognize and connect to
the device.
Notes:
• This method allows the app to manage settings and firmware updates
for both the Receiver and all paired Transmitters simultaneously.
• Transmitters can also connect individually via Bluetooth.

Mic Pro User Manual
55
Via Bluetooth
1. Enable Bluetooth on your phone.
2. Enter Pairing Mode:
○ Receiver: Tap "Connection App" in the Control Center.
○
Transmitter: Triple-press the Power Button.
3. Launch the Insta360 app. For first-time use, the app will search for
nearby devices; select your device name from the list.
4. Confirm Connection: Press the Power Button once on the Transmitter, or
tap "Confirm" on the Receiver screen.
5. Subsequent Connections: Set the device to Pairing Mode and tap the
device icon at the bottom of the App homepage, or go to "Me"
→
"Device Settings" → "Connect Device".
Note: Bluetooth only supports one device connection at a time. To manage
multiple transmitters simultaneously, pair them with the Receiver first, then
connect the Receiver to your phone via the adapter.
Firmware Updates
Regularly updating your Mic Pro firmware ensures optimal audio quality,
stable connectivity, enhanced Noise Canceling, and access to new features
or bug fixes. Mic Pro supports three update methods: via Receiver + App,
direct Bluetooth connection to the App, or manual update via computer.
Update via Receiver + App (Recommended)
Best for full sets (1TX+1RX or 2TX+1RX). This is the most efficient way to
update the Receiver and all paired Transmitters at once.

Mic Pro User Manual
56
Steps
1. Ensure the Receiver and all Transmitters are successfully connected.
Connect the Receiver to your phone using the phone adapter.
2. Launch the Insta360 app (please ensure the App is updated to the
latest version).
3. The App will automatically detect the Receiver and display a "New
firmware found" prompt. Alternatively, you can manually check for
updates by going to "Me" → "Device Settings" → "Device Firmware info".
Once the new firmware is found, tap "Update Now".
4. The App will scan all connected Transmitters and Receivers, displaying
the available version numbers and update details.
5. Ensure your phone has sufficient battery and a stable network; the
update will proceed automatically. During the process, devices will
restart, and the Transmitter's indicator lights will flash alternately. The
Receiver screen will display the update status, allowing for a
simultaneous update of the Receiver and all paired Transmitters.
6. Upon completion, the devices will automatically restart and will need to
be reconnected to the App.
Notes
• Do not disconnect or power off the devices during the update process.
• Updating multiple Transmitters simultaneously may take some time;
please wait patiently.
Update via Bluetooth
Ideal for updating a single device or when an adapter is unavailable. Both
Receivers and Transmitters can be updated directly via a Bluetooth
connection to the Insta360 app.

Mic Pro User Manual
57
Steps:
1. Enter Pairing Mode:
○
Receiver: Tap "Connection App" in the Control Center.
○ Transmitter: Triple-press the Power Button.
2. Enable Bluetooth on your phone and launch the latest version of the
Insta360 app.
3. Detect Firmware:
○ The App will automatically detect the device and prompt if a new
firmware is available.
○ Alternatively, go to "Me" → "Device Settings" → "Device Firmware
info" to check manually.
4. Start Update:
○ During the update, the Transmitter's indicator lights will flash
alternately.
○
Once complete, the device will automatically restart and will need
to be re-paired with the app.
Notes:
Before updating, please ensure:
• Bluetooth is enabled and the device is within 1 meter of your phone.
• Do not operate the device or close the app during an update.
• Only one device can be updated at a time; please update multiple
devices sequentially.

Mic Pro User Manual
58
Manual Update via Computer
Suitable for users who purchased a single Transmitter or when the App
connection is unavailable. This method applies to both Transmitters and
Receivers (collectively referred to as "the device").
Steps:
1. Visit the Insta360 Download Page
(https://www.insta360.com/download), search for your model, and
download the latest firmware file.
2. Connect the device directly to your computer using a USB-C cable.
3. The computer will recognize the device as a USB drive (or file transfer
mode).
4. Copy the downloaded firmware file (do not rename) to the root
directory of the device.
5. Safely eject the device and disconnect the USB cable.
6. The device will automatically recognize the firmware file and begin the
update (indicator lights will flash alternately).
7. Once the update is complete, the device will restart and the indicator
lights will return to a solid state.
Notes:
• Ensure the device battery is above 25% before updating.
• Keep the firmware filename exactly as it is—do not rename or unzip the
file, as this may cause the update to fail.
• The update takes approximately 2–5 minutes; do not disconnect the
power, unplug cables, or operate the device during this time.

Mic Pro User Manual
59
Customizable E-Ink Display
Connecting to the Insta360 app
The Transmitter can be connected to the Insta360 app via the Receiver
(using an adapter) or directly via Bluetooth. For detailed steps, please refer
to the "Firmware Updates" chapter.
Customizing E-Ink Wallpaper
Connection via Receiver
Once connected to the Insta360 app, tap the microphone icon at the
bottom of the homepage. Select the connected Transmitter under the TX
settings bar. Tap to access "Custom Wallpaper" and "Label Settings" to
customize your E-Ink display.
Direct Bluetooth Connection
Once connected to the Insta360 app, tap the microphone icon at the
bottom of the homepage to enter the Screen Display & Device Information
page. Here, you can customize the E-Ink wallpaper for personalized
identification.
Custom Wallpaper
• Tap "Custom Wallpaper".
• Choose from a variety of preset patterns and designs;
• Or, upload your own: Select images from your phone album, or add
wallpapers via a share code or QR code.

Mic Pro User Manual
60
Label Settings
Tap "Label Settings" to customize the following for different wallpapers:
• Label Content
• Label Color
• Display Label: Toggle whether the label is visible on the wallpaper.
• Label Position
This helps you quickly identify and distinguish between multiple
Transmitters.
Clearing Screen Ghosting
This feature is enabled by default. When the device is idle and charging,
and the E-Ink screen has not refreshed for an extended period, the system
will automatically refresh the screen to clear any minor ghosting caused by
static images.
Users can manually select "Deep Clear Ghosting" for a high-intensity
refresh. This effectively eliminates persistent ghosting and restores the
display to its optimal quality.
Sharing Wallpapers
For Custom Wallpaper, select a wallpaper and tap the share button in the
bottom-left corner.
The app will generate a QR code or share code. Friends can scan the QR
code or enter the share code to instantly apply the same wallpaper.
Note: The E-Ink screen offers low power consumption, zero glare, and high
clarity. However, due to the nature of E-Ink technology, color saturation is
limited, and the display may not fully replicate the colors of the original
image. We recommend selecting images based on how they appear on
the device itself.

Mic Pro User Manual
61
Remote Control and Adjustments
The Insta360 app allows you to control and adjust your Mic Pro settings
with ease. The app enables you to manage most common settings for both
Transmitters and Receivers (available features may vary by app version).
Key Features:
• Check device status and battery levels.
• Adjust device parameters.
• Perform firmware updates.
• Customize the E-Ink display.
Note: Full support for certain advanced settings may require future
firmware updates. We recommend keeping both the app and device
firmware updated to the latest versions for the best experience.
Mic Pro User Manual
62
9. Maintenance and Care
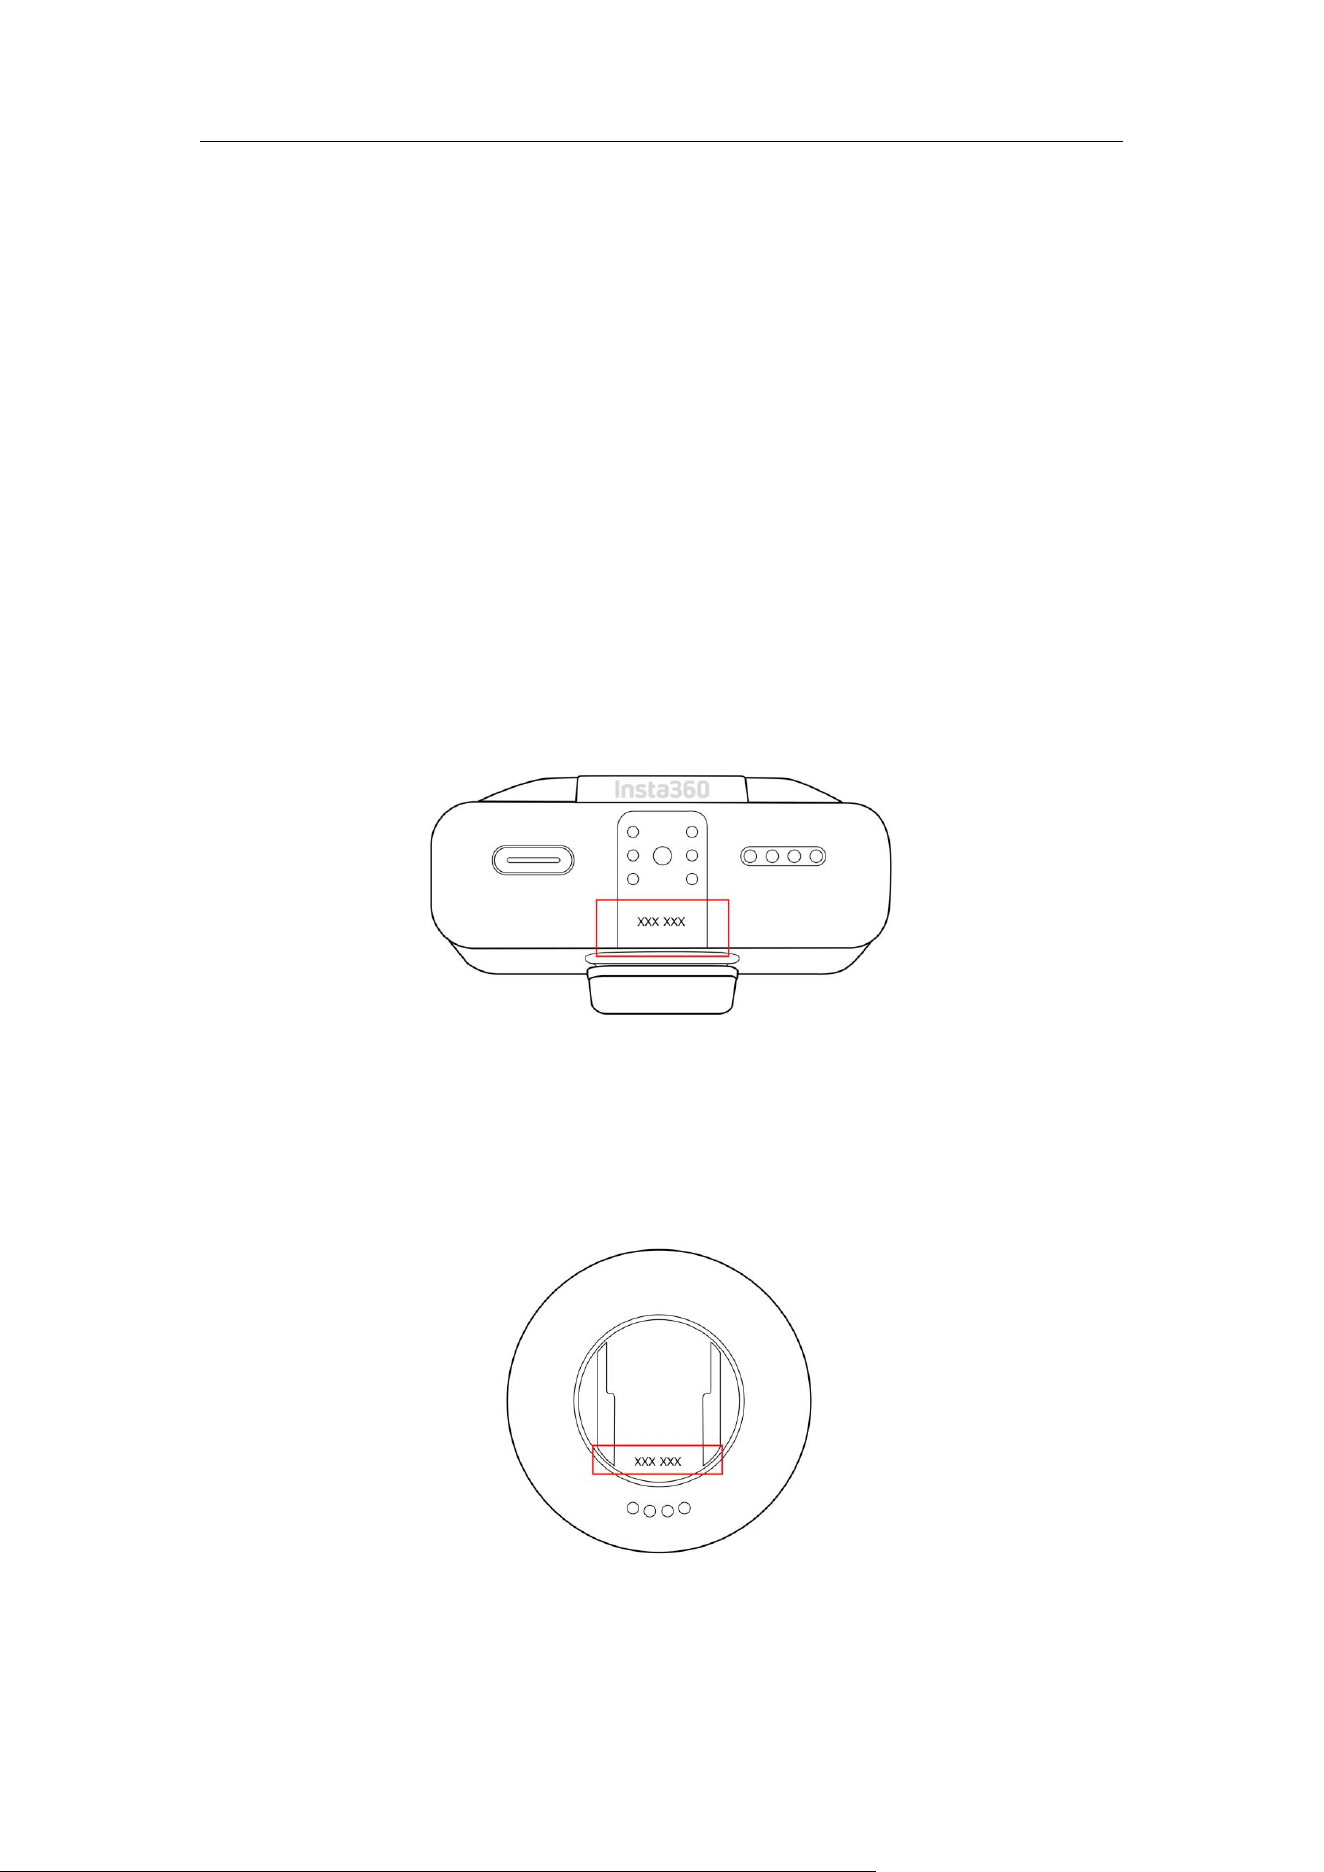
Finding the Serial Number (SN)
On the Packaging
The serial number is located on the back of the packaging box.
On the Device
• Receiver: The SN is printed on the back of the device.
• Transmitter: The SN is printed on the back of the device.
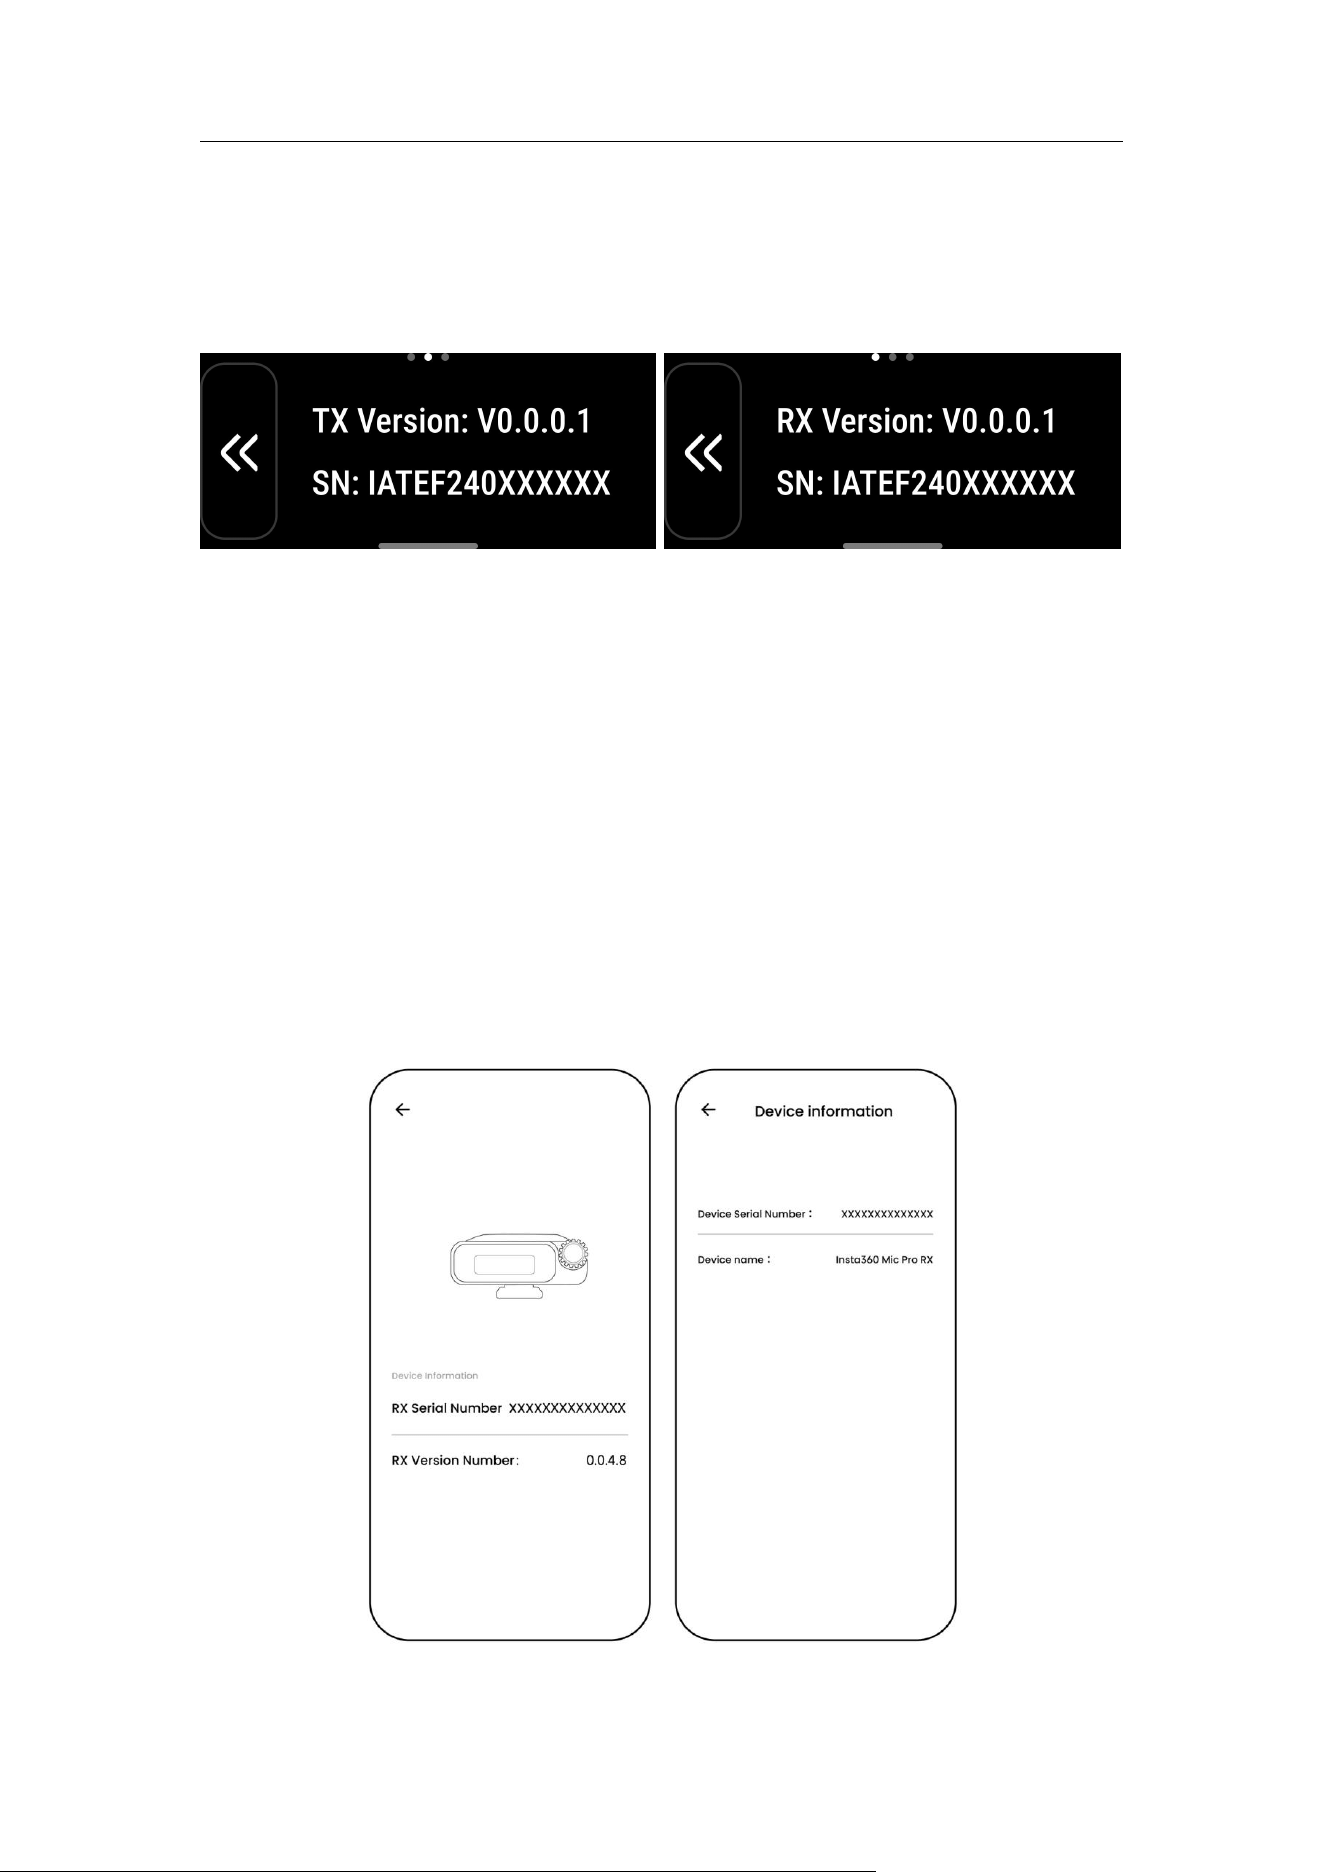
Mic Pro User Manual
63
Via the Control Center
On the Receiver’s control page, go to "General" → "About Device" to view the
serial numbers for the Receiver and all connected Transmitters.
Via the App
• Tap the microphone icon at the bottom of the homepage to view the
SN of the connected device.
• Alternatively, go to "Me"
→
"Device Settings"
→
"Device Information" to
view the SN.

Mic Pro User Manual
64
Storage and Maintenance
1. Do not use or store this product in extreme temperatures. Excessive
heat or cold may reduce battery life.
2. If unused for an extended period (e.g., 3 months), the battery may
discharge. Charge before use.
3. Keep the product clean and dry. If the USB-C port gets dirty, wipe with a
clean, dry cloth.
4. Do not use liquid cleaners or detergents on the product or charging
points. Clean only with a soft, dry cloth.
10. Safety Information
Disclaimer
By using this product, you acknowledge and agree to this disclaimer.
Inspect the product before each use, and do not use it if damaged. Except
for defects covered by applicable law, you are solely responsible for your
actions and any consequences arising from the use of this product. To the
extent permitted by law, Insta360 reserves the right to interpret and amend
this disclaimer.
Important
1. This product contains magnets. Keep away from pacemakers and
other devices to avoid interference.
2. Do not drop, strike, crush, or place heavy objects on the product.
3. Keep away from heat sources and open flames. Avoid storing in direct
sunlight.
4. Do not disassemble or attempt to repair the product.
5. Do not use or store this product in extreme temperatures. Excessive

Mic Pro User Manual
65
heat or cold may reduce battery life.
6. Keep the product dry. Do not use in rain or wet conditions. Liquids
entering the USB-C port may cause malfunction.
7. If the battery leaks, avoid skin or eye contact. If contact occurs, rinse
with plenty of water and seek medical advice if needed.
Notes
1. If unused for an extended period (e.g., 3 months), the battery may
discharge. Charge before use.
2. If using a power bank, ensure it meets applicable safety standards.
3. Keep the product clean and dry. If the USB-C port gets dirty, wipe with a
clean, dry cloth.
4. Keep chemicals (e.g., perfumes, cosmetics) away from the charging
points to prevent corrosion and performance issues.
5. Do not use liquid cleaners or detergents on the product or charging
points. Clean only with a soft, dry cloth.
6. Packaging may contain small parts. Keep out of reach of children to
prevent accidental swallowing.
7. Dispose of products and batteries in accordance with local
environmental regulations.
11. Specifications
For more technical specifications, please visit:
https://www.Insta360.com/specs/mic-pro