
ENGLISHFRANÇAISESPAÑOL
IMPORTANT : Please read this operation manual before starting operating the equipment.
IMPORTANTE : Lea este manual de operación antes de comenzar a operar el equipo.
LIQUID
CRYSTAL
TELEVISION
TELEVISOR CON PANTALLA
DE CRISTAL LÍQUIDO
OPERATION MANUAL
MANUAL DE
OPERACIÓN
ENGLISHFRANÇAIS ENGLISHESPAÑOL
LC-40LE550U

OPERATION MANUAL
IMPORTANT:
To aid reporting in case of loss or theft, please
record the TV's model and serial numbers in the
space provided. The numbers are located at the
rear of the TV.
Model No.:
Serial No.:
LIQUID CRYSTAL TELEVISION
ENGLISH
IMPORTANT INFORMATION
WARNING: TO REDUCE THE RISK OF FIRE OR ELECTRIC SHOCK, DO NOT
EXPOSE THIS PRODUCT TO RAIN OR MOISTURE.
CAUTION
RISK OF ELECTRIC SHOCK
DO NOT OPEN
CAUTION: TO REDUCE THE RISK OF ELECTRIC SHOCK,
DO NOT REMOVE COVER (OR BACK).
NO USER-SERVICEABLE PARTS INSIDE.
REFER SERVICING TO QUALIFIED SERVICE
PERSONNEL.
The lightning flash with arrow-head
symbol,within an equilateral triangle,is
intended to alert the user to the presence
of uninsulated“dangerous voltage“within
the product’s enclosure that may be of
sufficient magnitude to constitute a risk of
electric shock to persons.
The exclamation point within a triangle
presence of important operating and
maintenance(servicing)instruction in the
literature accompanying the product .
ENGLISH
1
LC-40LE550U
IMPORTANT INFORMATION
2
TRADEMARKS
INFORMATION:
This equipment has been tested and found to comply with the limits for a Class B digital device,
pursuant to Part 15 of the FCC Rules. These limits are designed to provide reasonable protection
against harmful interference in a residential installation. This equipment generates, uses and can
radiate radio frequency energy and, if not installed and used in accordance with the instructions,
may cause harmful interference to radio communications. However, there is no guarantee
that interference will not occur in a particular installation. If this equipment does cause harmful
interference to radio or television reception, which can be determined by turning the equipment off
and on, the user is encouraged to try to correct the interference by one or more of the following
measures:
— Reorient or relocate the receiving antenna.
— Increase the separation between the equipment and receiver.
— Connect the equipment into an outlet on a circuit different from that to which the receiver is
connected.
— Consult the dealer or an experienced radio/TV technician for help.
Note to CATV system installer: This reminder is provided to call the CATV system installer’s
attention to Article 820 of the National Electrical Code that provides guidelines for proper
grounding and, in particular, specifies that the cable ground shall be connected to the grounding
system of the building, as close to the point of cable entry as practical.
• The terms HDMI and HDMI High-Definition Multimedia Interface, and the HDMI Logo
are trademarks or registered trademarks of HDMI Licensing LLC in the United States
and other countries.
• Manufactured under license from Dolby Laboratories.Dolby and the double-D
symbol are trademarks of Dolby Laboratories.
WARNING: FCC Regulations state that any unauthorized changes or modifications to this
equipment not expressly approved by the manufacturer could void the user’s authority to operate
this equipment.
CAUTION:
This product satisfies FCC regulations when shielded cables and connectors are used to connect
the unit to other equipment. To prevent electromagnetic interference with electric appliances such
as radios and televisions, use shielded cables and connectors for connections.
CAUTION: TO PREVENT ELECTRIC SHOCK,MATCH WIDE BLADE OF PLUG TO WIDE SLOT,
FULLY INSERT.
DECLARATION OF CONFORMITY:
SHARP LIQUID CRYSTAL TELEVISION, MODEL LC-40LE550U
This device complies with Part 15 of the FCC Rules. Operation is subject to the
following two conditions: (1) This device may not cause harmful interference, and (2) this device
must accept any interference received, including interference that may cause undesired operation.
RESPONSIBLE PARTY:
SHARP ELECTRONICS CORPORATION
Sharp Plaza, Mahwah, New Jersey 07495-1163
TEL: 1-800-BE-SHARP
For Business Customers: URL http://www.sharpusa.com
This product qualifies for ENERGY STAR when "Home" is selected for "TV Location".
Setting "TV Location" to "Home" allows the TV to achieve an energy-saving status for household
use.
3
IMPORTANT SAFETY INSTRUCTIONS
1) Read these instructions.
2) Keep these instructions.
3) Heed all warnings.
4) Follow all instructions.
5) Do not use this apparatus near water.
6) Clean only with dry cloth.
7) Do not block any ventilation openings. Install in accordance with the manufacturer's
instructions.
8) Do not install near any heat sources such as radiators, heat registers, stoves, or other
apparatus (including amplifiers) that produce heat.
9) Protect the power cord from being walked on or pinched particularly at plugs, convenience
receptacles, and the point where they exit from the apparatus.
10) Only use attachments/accessories specified by the manufacturer.
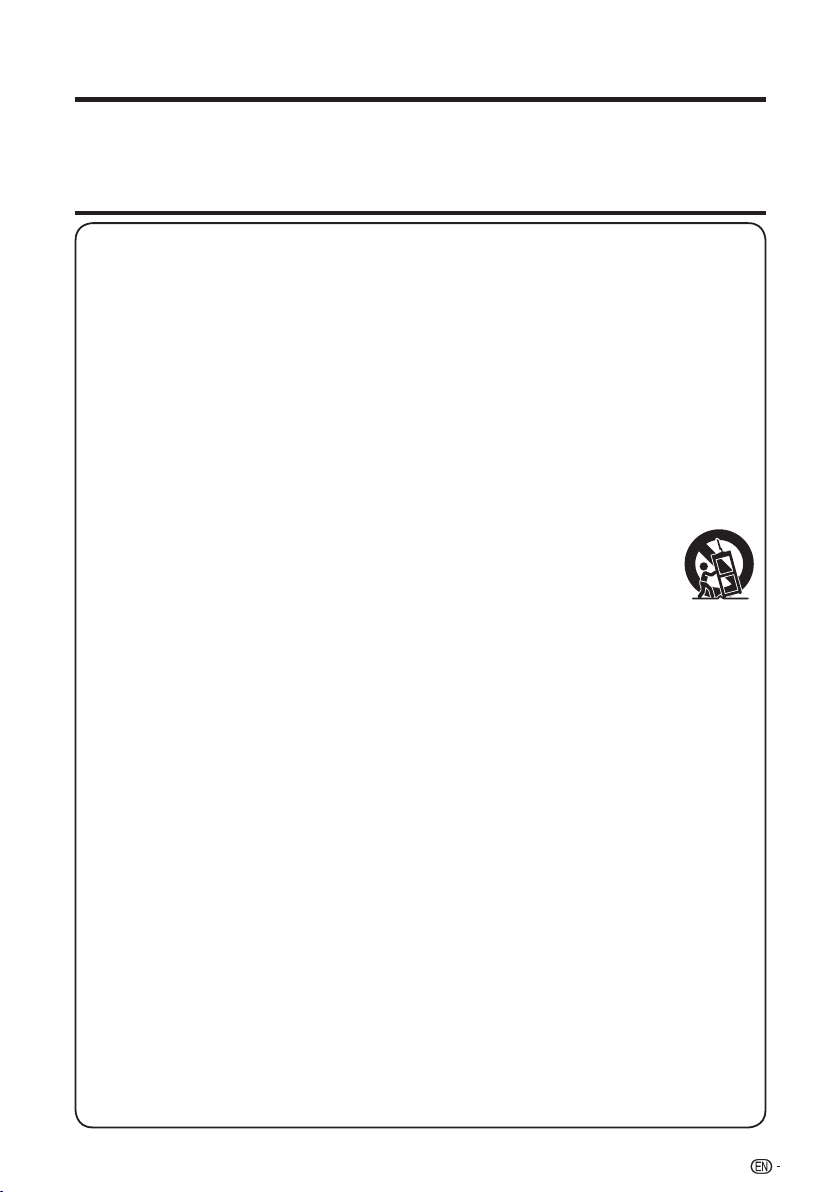
11) Use only with the cart, stand, tripod, bracket, or table specified by the manufacturer, or
sold with the apparatus. When a cart is used, use caution when moving the cart/apparatus
combination to avoid injury from tip-over.
12) Unplug this apparatus during lightning storms or when unused for long periods of time.
13) Refer all servicing to qualified service personnel. Servicing is required when
the apparatus has been damaged in any way, such as power-supply cord
or plug is damaged, liquid has been spilled or objects have fallen into the
apparatus, the apparatus has been exposed to rain or moisture, does not
operate normally, or has been dropped.
14) WARNING: To reduce the risk of fire or electric shock, do not expose this apparatus to rain
or moisture.
15) Where the MAINS plug or an appliance coupler is used as the disconnect device, the
disconnect device shall remain readily operable.
16) The apparatus shall not be exposed to dripping or splashing and that no objects filled with
liquids, suchas vases, shall be placed on the apparatus.
Additional Safety Information
17) Power Sources—This product should be operated only from the type of power source
indicated on the marking label. If you are not sure of the type of power supply to your
home, consult your product dealer or local power company. For products intended to
operate from battery power, or other sources, refer to the operating instructions.
18) Overloading—Do not overload wall outlets, extension cords, or integral convenience
receptacles as this can result in a risk of fire or electric shock.
19) Object and Liquid Entry—Never push objects of any kind into this product through
openings as they may touch dangerous voltage points or short-out parts that could result
in a fire or electric shock. Never spill liquid of any kind on the product.
20) Damage Requiring Service—Unplug this product from the wall outlet and refer servicing to
qualified service personnel under the following conditions:
a) When the AC cord or plug is damaged,
b) If liquid has been spilled, or objects have fallen into the product,
c) If the product has been exposed to rain or water,
d) If the product does not operate normally by following the operating instructions.
Adjust only those controls that are covered by the operating instructions as an improper
adjustment of other controls may result in damage and will often require extensive work
by a qualified technician to restore the product to its normal operation,
e) If the product has been dropped or damaged in any way, and
f) When the product exhibits a distinct change in performance - this indicates a need for
service.
Thank you for your purchase of the Sharp Liquid Crystal Television. To ensure safety and
many years of trouble-free operation of your product, please read the Important Safety
Instructions carefully before using this product.
DEAR SHARP CUSTOMER
IMPORTANT SAFETY INSTRUCTIONS
21) Replacement Parts—When replacement parts are required, be sure the service technician
has used replacement parts specified by the manufacturer or have the same
characteristics as the original part. Unauthorized substitutions may result in fire, electric
shock, or other hazards.
22) Safety Check—Upon completion of any service or repairs to this product, ask the service
technician to perform safety checks to determine that the product is in proper operating
condition.
23) Wall or ceiling mounting—Use a wall mount bracket that has been listed by an
independent laboratory (such as UL, CSA, ETL).
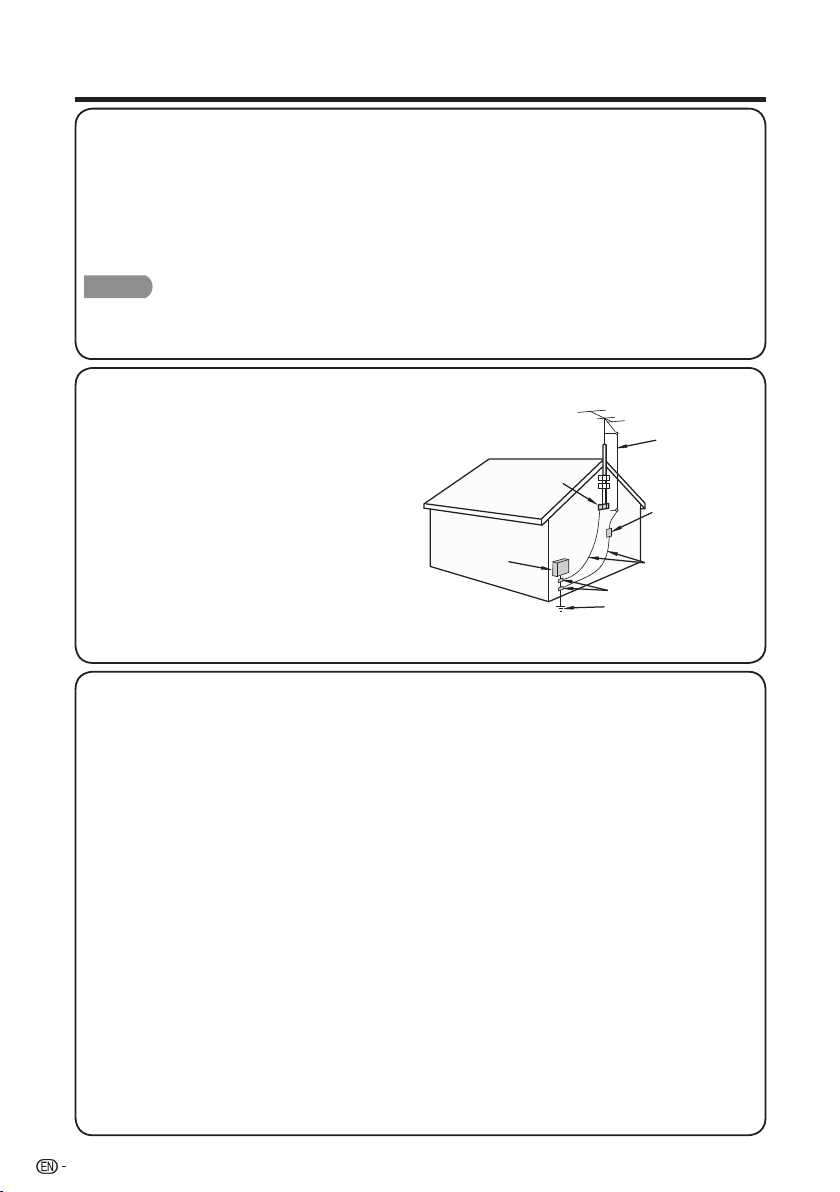
EXAMPLE OF ANTENNA GROUNDING AS PER
NATIONAL ELECTRICAL CODE, ANSI/NFPA 70
ANTENNA
LEAD IN WIRE
GROUND
CLAMP
NEC — NATIONAL ELECTRICAL CODE
GROUNDING
CONDUCTORS
(NEC SECTION 810-21)
GROUND CLAMPS
POWER SERVICE GROUNDING
ELECTRODE SYSTEM
(NEC ART 250)
ELECTRIC
SERVICE
EQUIPMENT
ANTENNA
DISCHARGE UNIT
(NEC SECTION 810-20)
CAUTION
4
• These servicing instructions are for use by qualified service personnel only. To reduce the risk of electric
shock do not perform any servicing other than that contained in the operating instructions unless you are
qualified to do so.
• Outdoor Antenna Grounding — If an outside
antenna is connected to the television
equipment, be sure the antenna system is
grounded so as to provide some protection
against voltage surges and built-up static
charges.
Article 810 of the National Electrical Code,
ANSI/NFPA 70, provides information with
regard to proper grounding of the mast
and supporting structure, grounding of the
lead-in wire to an antenna discharge unit,
size of grounding conductors, location
of antenna-discharge unit, connection to
grounding electrodes, and requirements for
the grounding electrode.
• Warning statement indicating that Class I apparatus shall be connected to a mains socket outlet
with a protective earthing connection.
• Statement indicating that when the mains plug or appliance coupler shall remain readily operable.
• Where the MAINS plug or an appliance coupler is used as the disconnect device, the disconnect
device shall remain readily operable.
• Where an all-pole MAINS SWITCH is used as the disconnect device, the location on the
apparatus and the function of the switch shall be described, and the switch shall remain readily
operable.
• Water and Moisture — Do not use this product near water - for example, near a bath tub, wash
bowl, kitchen sink, or laundry tub; in a wet basement; or near a swimming pool; and the like.
• Stand — Do not place the product on an unstable cart, stand, tripod or table. Placing the product
on an unstable base can cause the product to fall, resulting in serious personal injuries as well as
damage to the product. Use only a cart, stand, tripod, bracket or table recommended by the
manufacturer or sold with the product. When mounting the product on a wall, be sure to follow
the manufacturer’s instructions. Use only the mounting hardware recommended by the
manufacturer.
• Selecting the location — Select a place with no direct sunlight and good ventilation.
• Ventilation — The vents and other openings in the cabinet are designed for ventilation. Do not
cover or block these vents and openings since insufficient ventilation can cause overheating and/
or shorten the life of the product. Do not place the product on a bed, sofa, rug or other similar
surface, since they can block ventilation openings. This product is not designed for built-in
installation; do not place the product in an enclosed place such as a bookcase or rack, unless
proper ventilation is provided or the manufacturer’s instructions are followed.
• The Liquid Crystal panel used in this product is made of glass. Therefore, it can break when the
product is dropped or applied with impact. Be careful not to be injured by broken glass pieces
in case the panel breaks.
IMPORTANT SAFETY INSTRUCTIONS
5
• Heat — The product should be situated away from heat sources such as radiators, heat registers,
stoves, or other products (including amplifiers) that produce heat.
• The Liquid Crystal panel is a very high technology product with 2,073,600 pixels , giving you fine
picture details. Occasionally, a few non-active pixels may appear on the screen as a fixed point
of blue, green or red. Please note that this does not affect the performance of your product.
• Lightning — For added protection for this television equipment during a lightning storm, or when
it is left unattended and unused for long periods of time, unplug it from the wall outlet and
disconnect the antenna. This will prevent damage to the equipment due to lightning and
power-line surges.
• Power Lines — An outside antenna system should not be located in the vicinity of overhead
power lines or other electric light or power circuits, or where it can fall into such power lines or
circuits. When installing an outside antenna system, extreme care should be taken to keep
from touching such power lines or circuits as contact with them might be fatal.
• To prevent fire, never place any type of candle or flames on the top or near the TV set.
• To prevent fire or shock hazard, do not place the AC cord under the TV set or other heavy items.
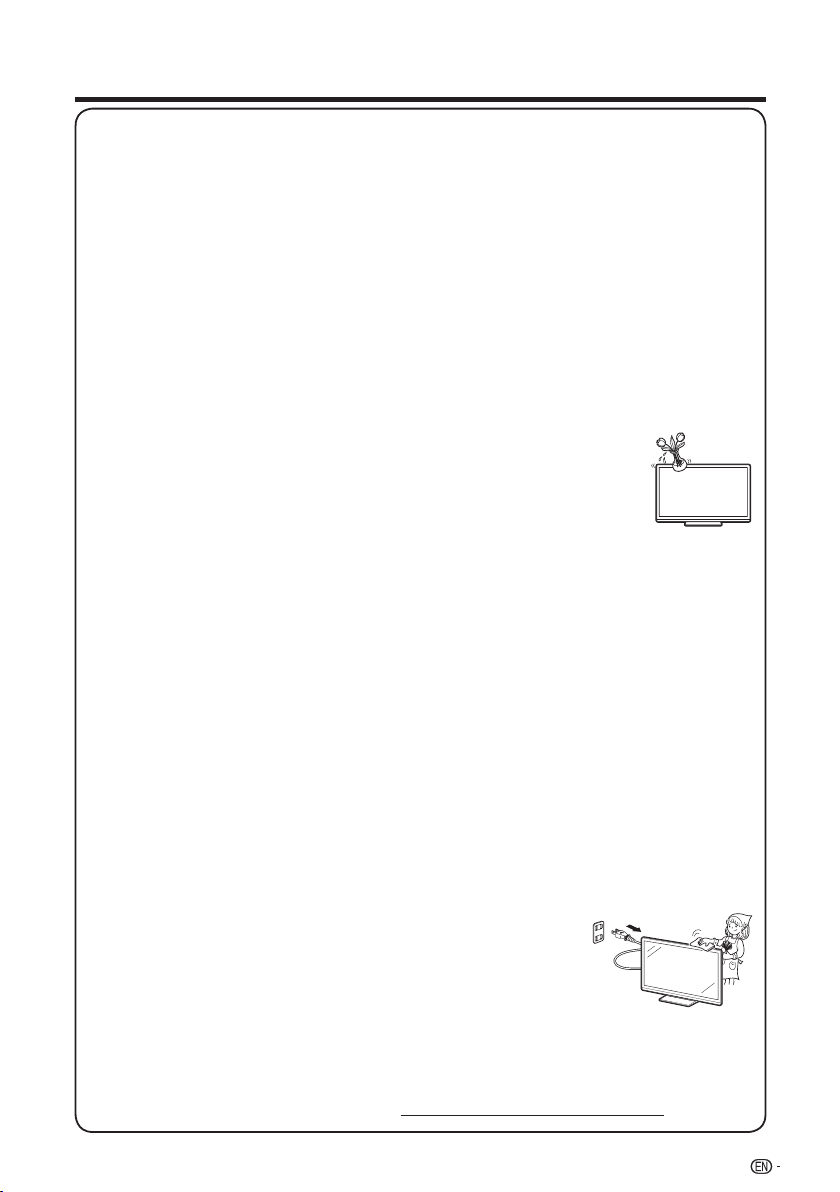
• Do not display a still picture for a long time, as this could cause an afterimage to remain.
• To prevent fire or shock hazard, do not expose this product to dripping or
splashing.
No objects filled with liquids, such as vases, should be placed on the product.
• Do not insert foreign objects into the product. Inserting objects in the air
vents or other openings may result in fire or electric shock. Exercise special
caution when using the product around children.
Precautions when transporting the TV
• When transporting the TV, never carry it by holding or otherwise putting pressure onto the display.
Be sure to always carry the TV by two people holding it with two hands — one hand on each side
of the TV.
Caring for the Cabinet
• Use a soft cloth (cotton, flannel, etc.) and gently wipe the surface of the cabinet.
• Using a chemical cloth (wet/dry sheet type cloth, etc.) may deform the components of the main
unit cabinet or cause cracking.
• Wiping with a hard cloth or using strong force may scratch the surface of the cabinet.
• If the cabinet is very dirty, wipe with a soft cloth (cotton, flannel, etc.) soaked in neutral detergent
diluted with water and thoroughly wrung out, and then wipe with a soft dry cloth.
• The cabinet is primarily made of plastic. Avoid using benzene, thinner, and other solvents, as
these may deform the cabinet and cause the paint to peel off.
• Do not apply insecticides or other volatile liquids.
Also, do not allow the cabinet to remain in contact with rubber or vinyl products for a long period
of time. Plasticizers inside the plastic may cause the cabinet to deform and cause the paint to
peel off.
Caring for the Liquid Crystal panel
• Turn off the main power and unplug the AC cord from the wall outlet before handling.
• Gently wipe the surface of the display panel with a soft cloth (cotton, flannel, etc.).
To protect the display panel, do not use a dirty cloth, liquid cleaners,
or a chemical cloth (wet/ dry sheet type cloth, etc.). This may damage
the surface of the display panel.
• Wiping with a hard cloth or using strong force may scratch the surface
of the display panel.
• Use a soft damp cloth to gently wipe the display panel when it is really
dirty. (It may scratch the surface of the display panel when wiped strongly.)
• If the display panel is dusty, use an anti-static brush, which is commercially available, to clean it.
• To avoid scratching the frame or screen, please use a soft, lint free cloth for cleaning. Approved
cleaning cloths are available directly from Sharp in single (00Z-LCD-CLOTH) or triple (00Z-LCD-
CLOTH-3) packs.
Call 1-800-BE-SHARP for ordering, or VISIT http://www.sharpusa.com/SharpDirect.
IMPORTANT SAFETY INSTRUCTIONS
CHILD SAFETY:
PROPER TELEVISION PLACEMENT MATTERS
THE CONSUMER ELECTRONICS INDUSTRY CARES
• Manufacturers, retailers and the rest of the consumer electronics industry are committed
to making home entertainment safe and enjoyable.
• As you enjoy your television, please note that all televisions – new and old- must be
supported on proper stands or installed according to the manufacturer’s
recommendations. Televisions that are inappropriately situated on dressers,bookcases,
shelves, desks, speakers, chests, carts, etc., may fall over, resulting in injury.
TUNE IN TO SAFETY
• ALWAYS follow the manufacturer’s recommendations for the safe installation of your
television.
• ALWAYS read and follow all instructions for proper use of your television.
• NEVER allow children to climb on or play on the television or the furniture on which the
television is placed.
• NEVER place the television on furniture that can easily be used as steps, such as a
chest of drawers.
• ALWAYS install the television where it cannot be pushed, pulled over or knocked down.
• ALWAYS route cords and cables connected to the television so that they cannot be
tripped over, pulled or grabbed.
WALL OR CEILING MOUNT YOUR TELEVISION
• ALWAYS contact your retailer about professional installation if you have any doubts
about your ability to safely mount your television.
• ALWAYS use a mount that has been recommended by the television manufacturer and
has a safety certifi cation by an independent laboratory (such as UL, CSA, ETL).
• ALWAYS follow all instructions supplied by the television and mount manufacturers.
• ALWAYS make sure that the wall or ceiling where you are mounting the television is
appropriate.
Some mounts are not designed to be mounted to walls and ceilings with steel studs or
cinder block construction. If you are unsure, contact a professional installer.
• Televisions can be heavy. A minimum of two people is required for a wall or ceiling mount
installation.
MOVING AN OLDER TELEVISION TO A NEW PLACE IN YOUR HOME
• Many new television buyers move their older CRT televisions into a secondary
room after the purchase of a fl at-panel television. Special care should be made
in the placement of older CRT televisions.
• ALWAYS place your older CRT television on furniture that is sturdy and
appropriate for its size and weight.
• NEVER place your older CRT television on a dresser where children may be
tempted to use the drawers to climb.
• ALWAYS make sure your older CRT television does not hang over the edge of
your furniture.
CE.org/safety
6
QUICK REFERENCE
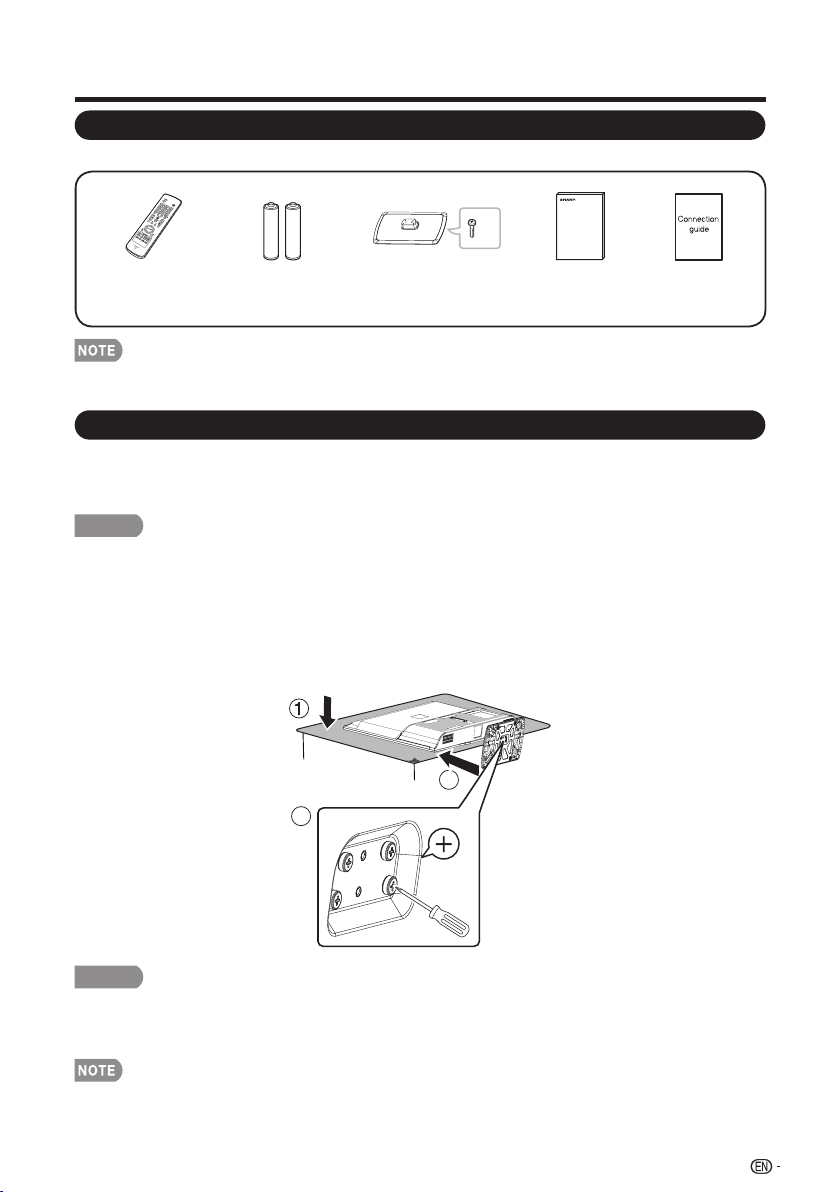
• Always use the AC cord supplied with the TV.
• The illustrations above are for explanation purposes and may vary slightly from the actual accessories.
Make sure the following accessories are provided with the product.
CAUTION
• Do not push too hard or put excessive pressure to the stand neck to avoid the damages
• When you are going to assemble or disassemble it,you need to take hold of it tightly in case of drop.
when you turn the TV for the most comfortable viewing angle.
• To detach the stand, perform the steps in reverse order.
Remote control unit
( X 1)
Page 8
“AAA” size battery
( X 2)
Page 10
Stand ( X 1)
with Screws
Page 7
Operation manual
( X 1) ( X 1)
x4
Attaching/Detaching the Stand
• Before attaching (or detaching) the stand, unplug the AC cord from the AC INPUT terminal.
• Before performing work spread cushioning over the base area to lay the TV on. This will prevent it
from being damaged.
CAUTION
• Attach the stand in the correct direction.
• Be sure to follow the instructions. Incorrect installation of the stand may result in the TV
falling over.
1. Put the TV face down on a safe surface that is covered by a soft and smooth cloth.
2. Adjust the TV stand to the bottom of the TV.
3. Fasten the screws by using a cross-head screwdriver (Not supplied).
7
3
2
Connection guide
Supplied Accessories

Quick Installation Tips
Using the Remote Control Unit
4.
Insert the batteries into the remote control
unit. (See page 10.)
QUICK REFERENCE
1. Attach your antenna to the back of the
television. (See page 9.)
2. Connect the AC plug for the television into
the AC outlet.
• Place the TV close to the AC outlet, and keep the power
plug within reach.
• This product must only be connected to a 120V, 60Hz
AC outlet. Connecting it to any other kind of outlet will
damage the product and invalidate the warranty.
• TO PREVENT RISK OF ELECTRIC SHOCK, DO NOT
TOUCH UN-INSULATED PARTS OF ANY CABLES
WITH THE AC CORD CONNECTED.
3.
How to turn on the television for the first
time.
A) Press POWER on the television.
B) The POWER indicator on the front of
the television lights Green.
POWER
indicator
8
POWER
Use the remote control unit by pointing it towar
ds the remote control sensor on the TV. Objects
between the remote control unit and the remote
control sensor may prevent proper operation.
IMPORTANT:
IF THE UNIT DOES NOT POWER ON - UNPLUG THE
TELEVISION FROM THE OUTLET AND REPEAT THE
INSTALLATION STEPS.
IF YOU STILL ENCOUNTER NO POWER, PLEASE
CONTACT US AT 1-800-BE-SHARP.
■ Cautions regarding the remote control
unit
• Do not expose the remote control unit to shock. In addition,
do not expose the remote control unit to liquids, and do not
place in an area with high humidity.
• Do not install or place the remote control unit under direct
sunlight. The heat may cause deformation of the remote
control unit.
• The remote control unit may not work properly if the remote
control sensor on the TV is under direct sunlight or strong
lighting. In such cases, change the angle of the lighting or the
TV, or operate the remote control unit closer to the remote
control sensor.
• Speakers cannot be detached from the TV.
30
30
30
30
17´ (5 m)
Remote control sensor
The angle is 22 when the stand is attached.
*
*

Antennas
1. A 75-ohm system is generally a round cable
with F-type connector that can easily be
attached to a terminal without tools
(Commercially available).
2. A 300-ohm system is a flat “twin-lead” cable
that can be attached to a 75-ohm terminal
through a 300/75-ohm adapter (Commercially
available).
Preparation
Connecting Antenna Cable
Connect the antenna cable to the TV using one of the methods in the illustration as •
shown ( , , or ).
F-type connector
300-ohm twin-lead cable (flat)
F-type connector
75-ohm coaxial cable
(round)
75-ohm coaxial cable
300-ohm twin-lead cable
75-ohm coaxial cable (round)
75-ohm coaxial cable
IN OUT
300-ohm
twin-lead cable
VHF
ANTENNA
UHF
ANTENNA
Combiner
(commercially available)
300/75-ohm adapter
(commercially available)
300-ohm twin-lead cable (flat)
75-ohm coaxial cable (round)
Cable TV lead-In
Cable without a CATV converter1
Coaxial cable
(commercially available)
Coaxial cable
(commercially available)
Home Antenna
terminal (75-ohm)
Home Antenna
terminal (75-ohm)
or
or
VHF/UHF antenna2
Combination VHF/UHF antenna3
Separate VHF/UHF antenna4
To TV antenna terminal
1 2 3 4
To enjoy a clearer picture, use an outdoor antenna. The following is a brief explanation of the types
of connections that are used for a coaxial cable. If your outdoor antenna uses a 75-ohm coaxial
cable with an F-type connector, plug it into the antenna terminal at the rear of the TV set.
When connecting the RF cable to the TV set, do not tighten
F-type connector with tools. If tools are used, it may cause
damage to your TV set.
(The breaking of internal circuit, etc.)
9
ANT./CABLE

Installing Batteries in the Remote Control Unit
CAUTION
Improper use of batteries can result in chemical leakage or explosion. Be sure to follow the instructions below.
• Do not mix batteries of different types. Different types of batteries have different characteristics.
• Do not mix old and new batteries. Mixing old and new batteries can shorten the life of new batteries or cause chemical leakage in
old batteries.
• Remove batteries as soon as they are worn out. Chemicals that leak from batteries come in contact with skin can cause a rash. If
you find any chemical leakage, wipe thoroughly with a cloth.
• The batteries supplied with this product may have a shorter life expectancy due to storage conditions.
• If you will not be using the remote control unit for an extended period of time, remove batteries from it.
• The batteries (batteries installed) shall not be exposed to excessive heat such as sunshine, fire or the like.
1 Open the battery cover.
Place the batteries with their terminals •
corresponding to the ( ) and ( )
indications in the battery compartment.
2 Insert two “AAA” size batteries (supplied
with the product).
3 Close the battery cover.
If the remote control fails to operate TV functions, replace the batteries in the remote control unit.
Preparation
10

Contents
11
IMPORTANT INFORMATION ..................................................................................................... 1
TRADEMARKS ............................................................................................................................ 2
IMPORTANT SAFETY INSTRUCTIONS ..................................................................................... 3
QUICK REFERENCE ................................................................................................................... 7
Supplied Accessories ............................................................................................................ 7
Attaching/Detaching the Stand .............................................................................................. 7
Quick Installation Tips ............................................................................................................ 8
Using the Remote Control Unit .............................................................................................. 8
Antennas ............................................................................................................................... 9
Connecting Antenna Cable .................................................................................................... 9
Installing Batteries in the Remote Control Unit ........................................................................ 10
Contents ...................................................................................................................................... 11
Part Names ................................................................................................................................. 12
TV (Front) ............................................................................................................................... 12
TV (Side/Rear) ....................................................................................................................... 12
Remote Control Unit .............................................................................................................. 13
Introduction to Connections ..................................................................................................... 14
Watching TV ................................................................................................................................ 19
Turning On/Off the Power ...................................................................................................... 19
Experiencing HD Images ....................................................................................................... 14
Types of Connection ............................................................................................................. 14
Connecting to External Equipment .......................................................................................... 15
Connecting a Blu-ray Disc/DVD Player or HD Cable/Satellite Set-top Box ............................. 15
Connecting a Game Console, VCR, Camcorder or Cable/Satellite Set-top Box ..................... 16
Connecting an Audio Amplifier ............................................................................................... 17
Connecting an AV Amplifier ................................................................................................... 17
Connecting a PC ................................................................................................................... 18
EZ Setup ............................................................................................................................... 19
Direct Button Operation ............................................................................................................ 21
On-Screen Display Menu .......................................................................................................... 24
Menu Items ........................................................................................................................... 24
On-Screen Display Menu Operation ...................................................................................... 25
Menu Operation Button ......................................................................................................... 26
Picture Settings ..................................................................................................................... 26
Audio Settings ....................................................................................................................... 28
Power Control ....................................................................................................................... 28
System Options ..................................................................................................................... 29
Initial Setup ............................................................................................................................ 31
Information ............................................................................................................................ 34
Enjoying Photo/Music/Video Playback .................................................................................... 35
Appendix ..................................................................................................................................... 38
Troubleshooting .................................................................................................................... 38
Specifications ........................................................................................................................ 39
PC Compatibility Chart .......................................................................................................... 40
RS232 Port Specifications ..................................................................................................... 41
Calling for Service ...................................................................................................................... 43
Legal notices ......................................................................................................................... 42
Dimensional Drawings
• The dimensional drawings for the LCD TV set are shown on the inside back cover.
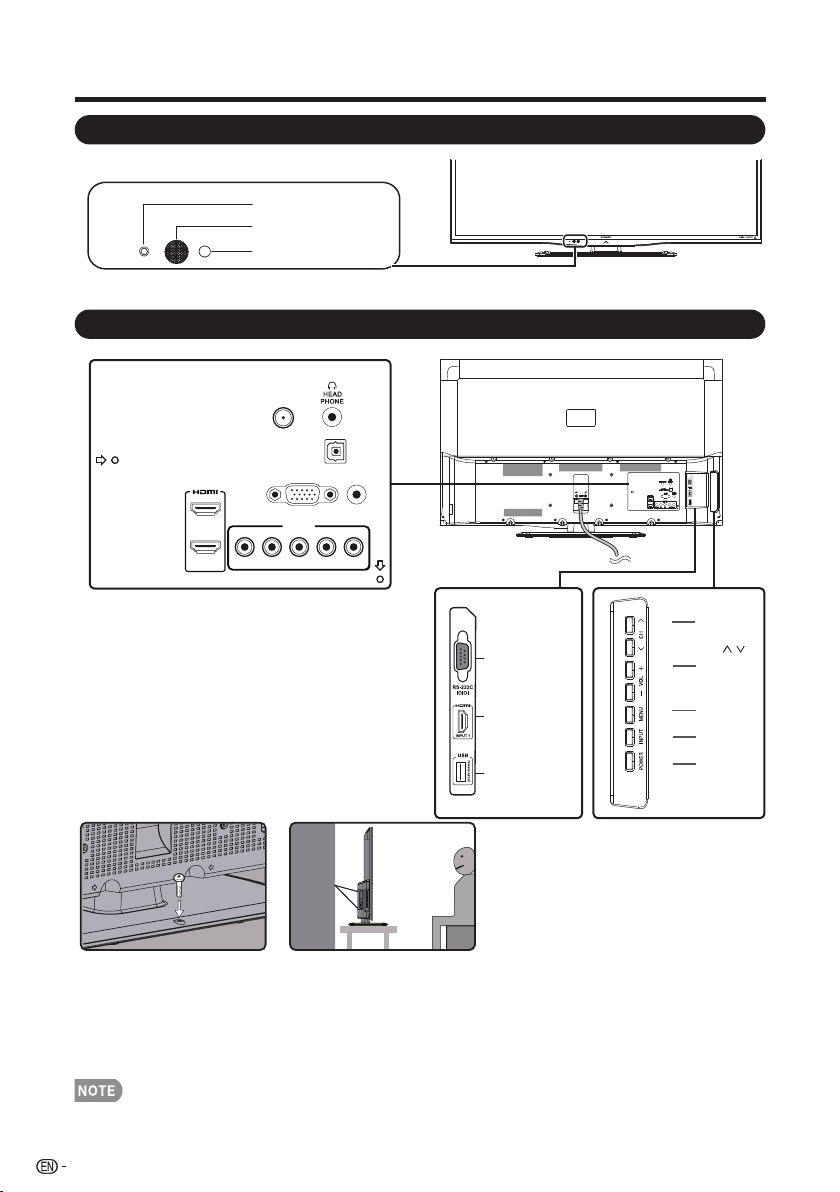
Part Names
*1: See pages 14 to 18 and 35 for external equipment connection.
*1: Optical Picture Control (See Page 27)
*2: See page 14, 19 and 26 for button operations.
• The illustrations in this operation manual are for explanation purposes and may vary slightly from the actual operations.
POWER indicator
OPC sensor
Remote control sensor
12
*1
TV (Front)
TV (Side/Rear)
*2
POWER
button
MENU
button
INPUT
button
Volume
buttons
(VOL
+
/
_
Channel
buttons
(CH
/
)
)
*1
DIGITAL
AUDIO OUTPUT
PC IN
AUDIO
PC/HDMI
INPUT 4
Y/VIDEO PB
PR
L-AUDIO-R
ANT./CABLE
INPUT 2
INPUT 3
*1
USB
RS-232C IOIOI
INPUT 1
Terminal (HDMI)
Anti-tip Auxiliary Screw Hole:
1. In the event of failure to fasten the screws on the table, please use another two bolts( recommended size: T4*22) to fasten the
screws on the wall mount hole and fix the LCD Display to the wall with a wire for safety. (Fig.
Fig. 1 Fig. 2
1)
2. In case that the table on which you place your LCD Display cannot be locked withscrews, use two additional screws (the
recommended size: M6 x 16) to mount the LCD Display via the wall mounting hole in the rear and fasten with a steel wire (Fig. 2)
to ensure safety.
Part Names
1
INPUT
3
4
5
6
7
8
9
0
ENT
1
2
DI S P LAY FRE E Z E
FLASHBACK
MUT E
SU R ROUN D
TV US B
PC
MENU
FAV ORITE CH
SLEE P CC VIEWMODEAV MODE
AUDIO
VOL CH
+
NRUTERTIXE
LCDTV
GJ221
A B C D
ENTER
2
3
4
5
6
7
8
9
10
11
12
13
14
15
16
17
18
19
20
21
22
23
24
25
26
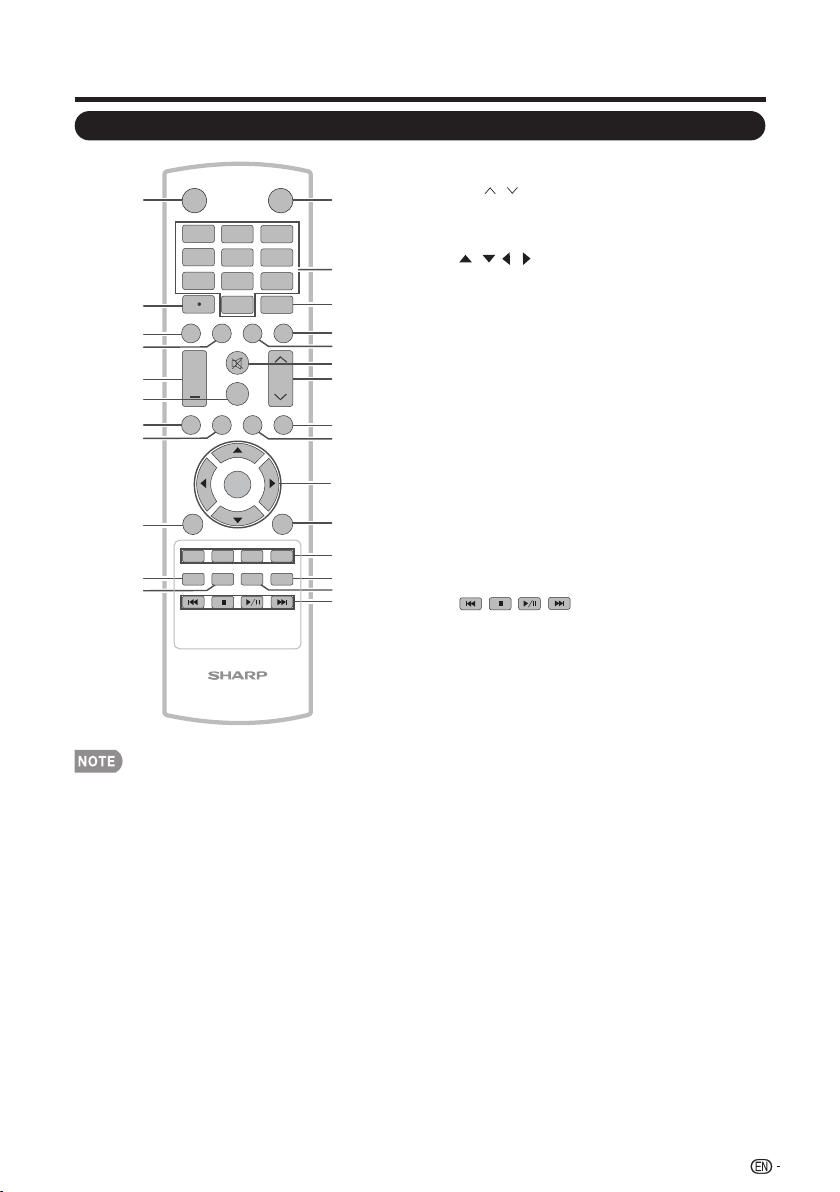
POWER
• When using the remote control unit, point it at
the TV.
1. INPUT: Select a TV input source.
(See page 21.)
2. 0–9: Set the channel.
3. ENT: Jumps to a channel after selecting with
the 0-9 buttons.
4. FLASHBACK: Press to switch to the
previously tuned channel or external input
mode. Press again to switch back to the
currently tuned channel or external input
mode.
5. AUDIO: Display the MTS/SAP setting menu.
(See page 22.)
6. MUTE: Mute the sound. (See page 21.)
7. CH / : Select the channel. (See page 21.)
8. MENU: Display the menu screen.
9. PC: Direct switch PC source.
10. / / / , ENTER: Select a desired item on
the screen. (See page 26.)
11. RETURN: Return to the previous menu
screen.
12. FAVORITE CH:
A,B,C,D: Selects preset favorite channels in
four different categories. While watching, you
can toggle the selected channels by pressing
A, B, C and D. The every key of the favorite
can select the many channels.
13. AV MODE: Select an adjusted picture
settings. User, Standard, Movie,Game, PC,
Dynamic, Dynamic(Fixed). (See page 22.)
14. VIEW MODE: Select the Picture Mode.
(See page 23.)
15. : Only for USB.
16. POWER:
Switch the power on or enters
standby mode. (See page 19.)
17. • (DOT): (See page 21.)
18. DISPLAY: Display the current channel (or
input source) information on the screen.
19. FREEZE:
Set the still image. Press again to
return to normal screen.
20. VOL +/- : Set the volume. (See page 21.)
21. SURROUND:
Display the surround setting
menu. (See page 21.)
22. TV: Direct switch TV source.
23. USB: Direct switch USB source.
24. EXIT: Turn off the menu screen.
25. SLEEP:
Allows you to set a time when the TV
automatically switches to standby. This display
will disappear after a few seconds, and the
sleep timer automatically starts counting down.
(See page 21.)
26. CC: Display captions during closed-caption
source.(See page 22.)
13
Remote Control Unit
Introduction to Connections
An HDTV without an HD source is just an ordinary TV.
To enjoy HD images on the TV, you should get HD programming from the following:
• Over-the-air broadcasting via HD quality antenna
• HD cable/satellite subscription
• HD compatible external equipment
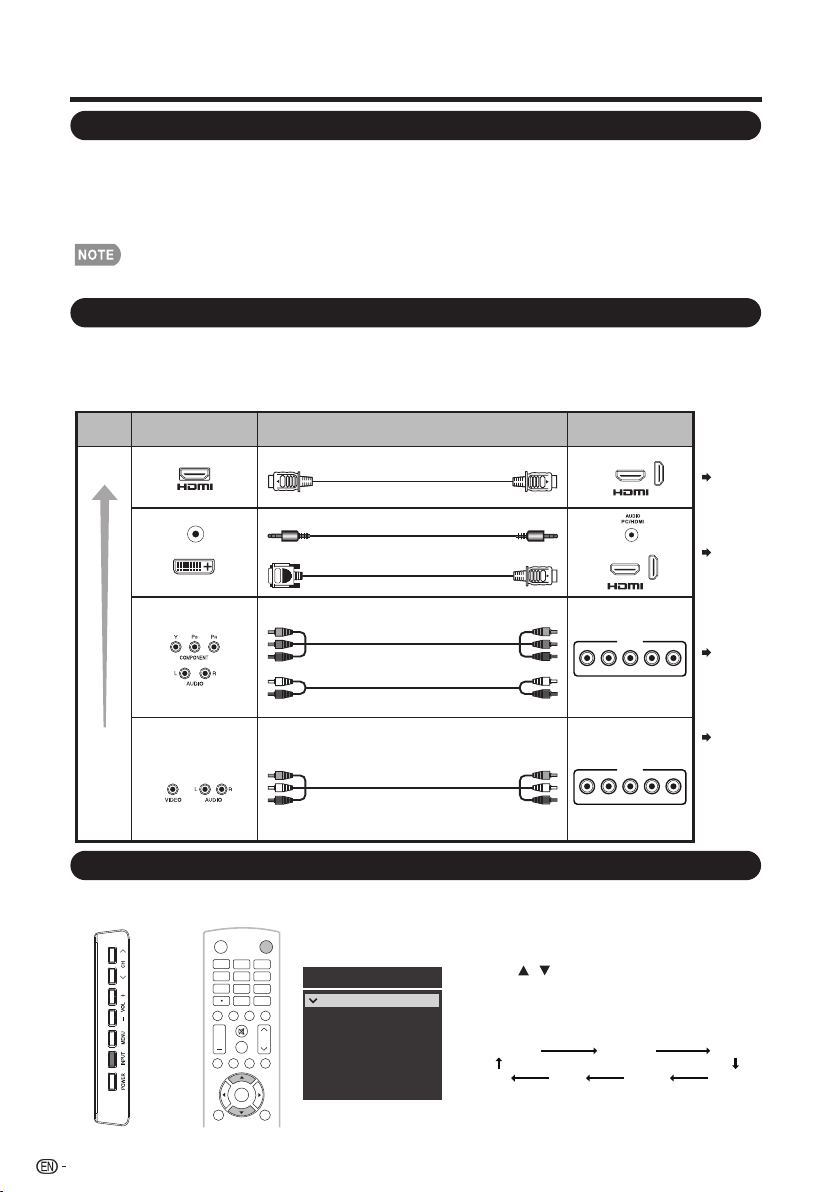
Types of Connection
• For information on updating to HD programming, ask your cable/satellite service provider.
HD
Quality
Standard
Quality
Terminal
on the TV
Cable
Terminal on external
equipment
Image
Quality
Component video cable(commercially
available)
Audio cable(commercially available)
HDMI-certified cable
Ø 3.5 mm stereo minijack cable
AUDIO
DVI OUT
DVI-HDMI conversion cable
AV cable (commercially available)
INPUT 1, 2, 3
Page 15
Page 15
Page 16
Page 16
INPUT 1, 2, 3
Displaying an External Equipment Image Display
To view external source images, select the input source by pressing INPUT on the remote control
unit or on the TV.
Image quality differs depending on the terminal used. To enjoy clearer images, check the output
terminals of your external equipment and use its appropriate terminals for higher quality images.
For connecting the TV to external equipment, use commercially available cables.
• The illustrations of the terminals are for explanation purposes and may vary slightly from the actual products.
Example
INPUT
3
4
5
6
7
8
9
0
E N T
1
2
DIS PL AY F REE ZE
FLASHBACK
MUT E
SU RROUN D
TV US B
PC
ME NU
AUDIO
VOL CH
+
POWER
RETURNEXIT
ENTER
INPUT1
INPUT2
INPUT3
INPUT4
PC IN
Input Source
HDMI1
HDMI2
HDMI3
COMP/AV
USB
TV
1. Press INPUT.
• The Input source list screen displays.
2. Press / to select the input source.
• You can also select the input source by
pressing INPUT. Each time INPUT is
pressed, the input source toggles.
INPUT4TV USB PC IN
INPUT1 INPUT2 INPUT3
• An image from the selected source
automatically displays.
14
Experiencing HD Images
INPUT 4
Y/VIDEO PB
PR
L-AUDIO-R
INPUT 4
Y/VIDEO PB
PR
L-AUDIO-R
You can connect many types of external equipment to your TV. To view external source images,
select the input source from INPUT on the remote control unit or on the TV. (See pages 13 and 21.)
For connecting the TV to external equipment, use commercially available cables.
CAUTION
• To protect equipment, always turn off the TV before connecting any external equipment.
• Please read the relevant operation manual (Blu-ray disc player, etc.) carefully before making connections.
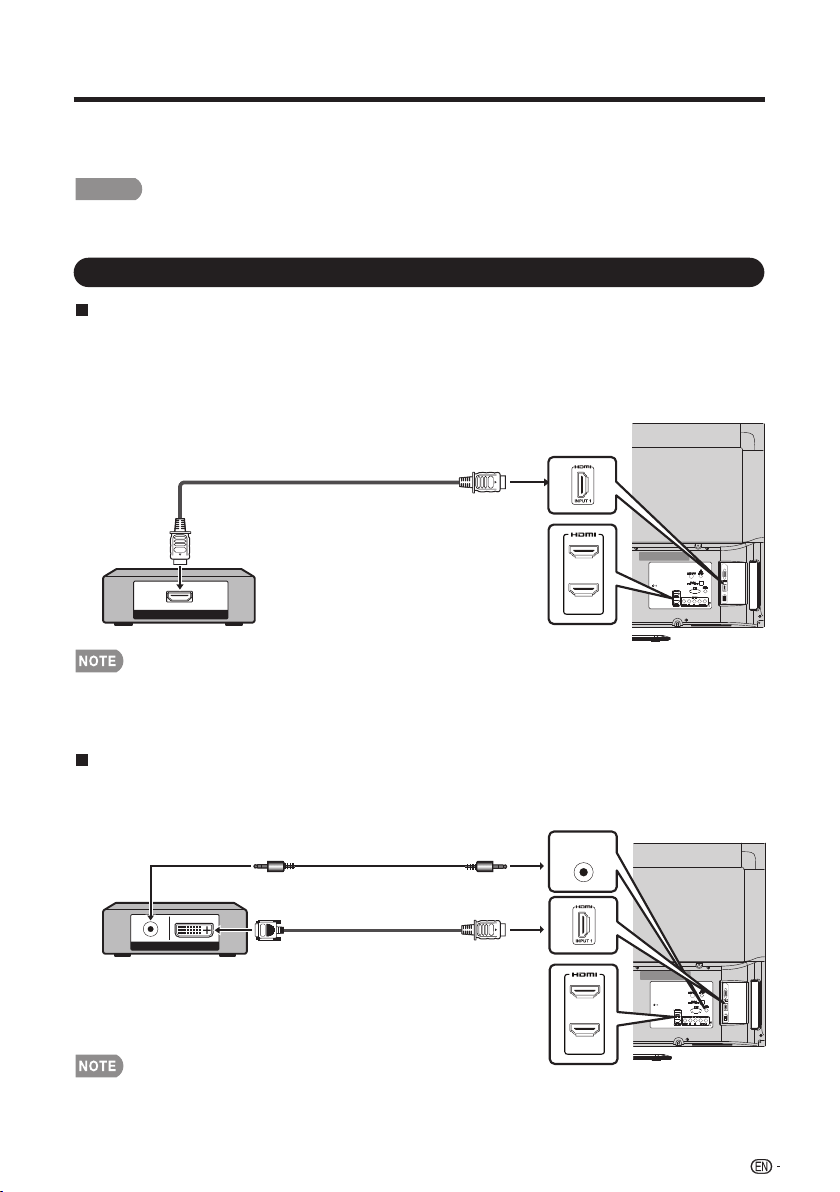
Connecting a Blu-ray Disc/DVD Player or HD Cable/Satellite Set-top Box
When using HDMI cable (INPUT 1, 2, or 3):
The HDMI (High Definition Multimedia Interface) terminal is an audio-video interface that enables a
connection for audio and video signals using a single cable. The HDMI terminal supports
high-resolution video input.
• Blu-ray disc player • DVD player
• HD cable/satellite set-top box
When using DVI-HDMI conversion cable (INPUT 1, 2, or 3):
• Blu-ray disc player • DVD player
• HD cable/satellite set-top box
• When using a DVI-HDMI conversion cable, you should make an analog audio connection. In this case, in addition to connecting
a DVI-HDMI conversion cable to the INPUT 1,2,3 (HDMI) terminal, connect a Ø 3.5 mm stereo minijack cable to the AUDIO PC/HDMI
terminal.
Connecting to External Equipment
HDMI OUT
HDMI-certified cable
AUDIO DVI OUT
Ø 3.5 mm stereo minijack cable
DVI-HDMI conversion cable
15
• Depending on the connected equipment, audio will not output from the DIGITAL AUDIO OUTPUT terminal in HDMI connection.
In this case, set the audio formats of the connected equipment to PCM, 32/44.1/48 kHz.
• Optical digital audio will be output in 2-ch stereo when it is from the external equipment connected to the TV using an HDMI
cable
INPUT 2
INPUT 3
AUDIO
PC/HDMI
INPUT 2
INPUT 3
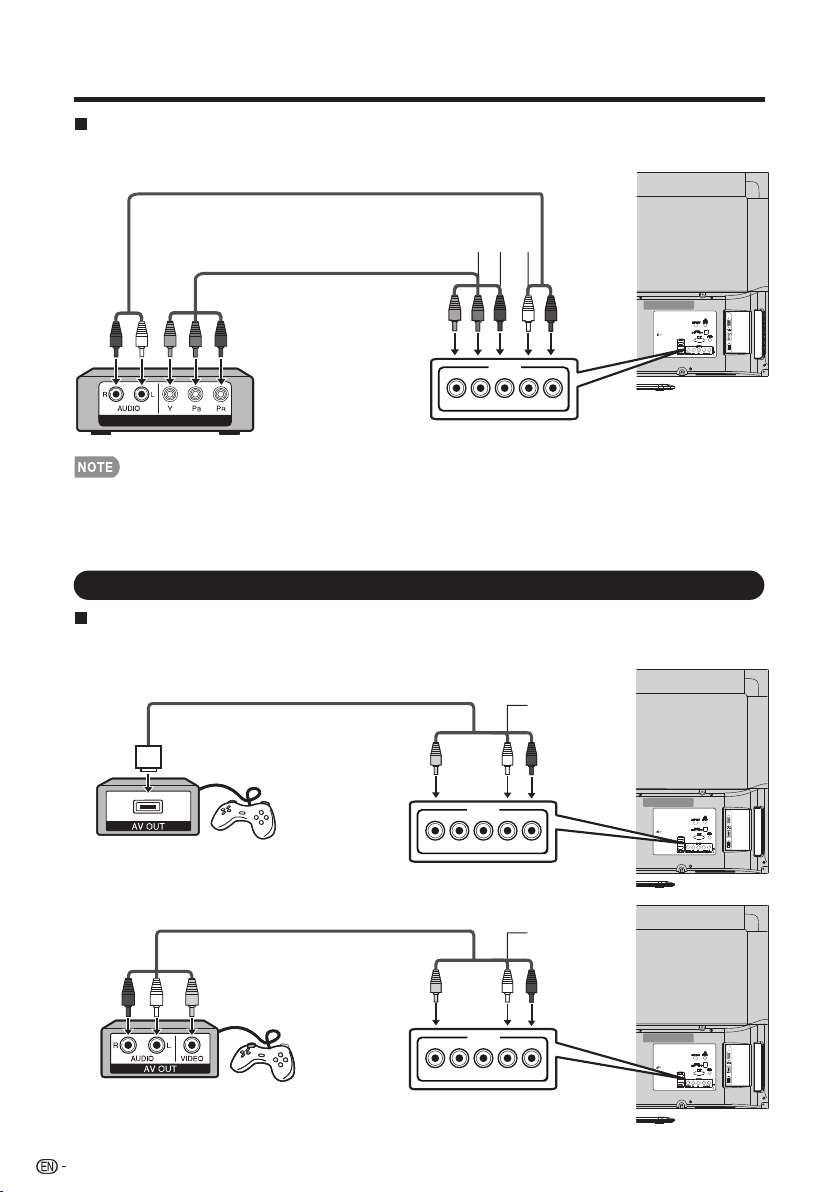
When using Component cable (INPUT 4):
• Blu-ray disc player • DVD player
• HD cable/satellite set-top box
• To enjoy 1080p display capability, connect your external equipment using an HDMI-certified cable or a component cable and set the
equipment to 1080p output.
• See page 15 for connecting a Blu-ray disc player, DVD player or an HD cable/satellite set-top box to the HDMI terminal.
Connecting a Game Console, VCR, Camcorder or Cable/Satellite Set-top Box
When using Composite cable (INPUT 4):
• Game console • VCR
• Camcorder • Cable/Satellite set-top box
16
Connecting to External Equipment
COMPONENT OUTCOMPONENT OUT
Component video cable
Y (Green)
P
B
(Blue)
P
R
(Red)
AUDIO-R (Red)
AUDIO-L
(White)
Audio cable
AUDIO-R (Red)
AUDIO-L (White)
VIDEO (Yellow)
AV cable
AV cable
INPUT 4
Y/VIDEO PB
PR
L-AUDIO-R
AUDIO-R (Red)
AUDIO-L (White)
VIDEO (Yellow)
INPUT 4
Y/VIDEO PB
PR
L-AUDIO-R
INPUT 4
Y/VIDEO PB
PR
L-AUDIO-R
17
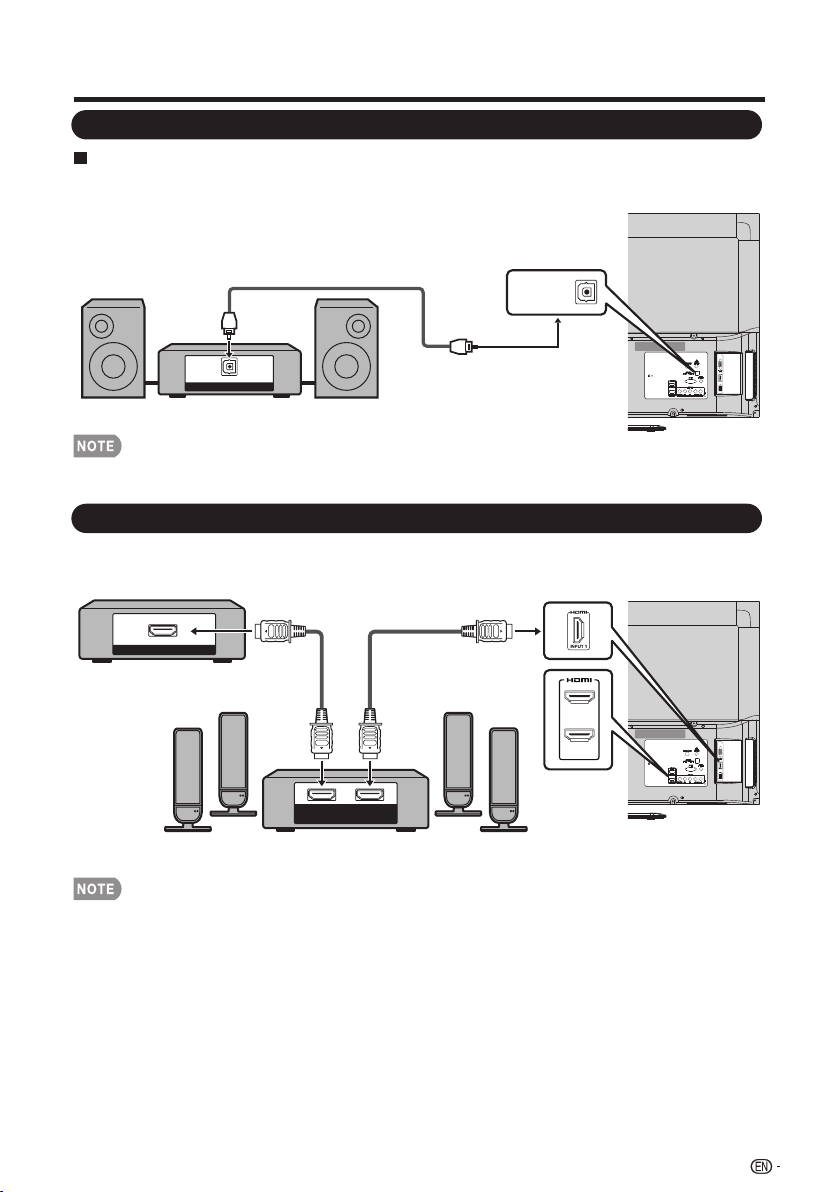
Connecting an Audio Amplifier
Connecting an AV Amplifier
HDMI OUT
HDMI
IN
HDMI
OUT
HDMI-certified cable
HD Cable/Satellite set-top box
Connecting to External Equipment
DIGITAL AUDIO INPUT
OPTICAL
Coaxial Cable
When using coaxial cable:
It is possible to output audio through the DIGITAL AUDIO terminal. PCM audio outputs from the
terminal.
• Digital Audio output is not available when using an HDMI input.
• If the image is not in sync with the audio, check the settings of the connected surround system.
• Letting the TV output the audio to an AV amplifier.
INPUT 2
INPUT 3
DIGITAL
AUDIO OUTPUT
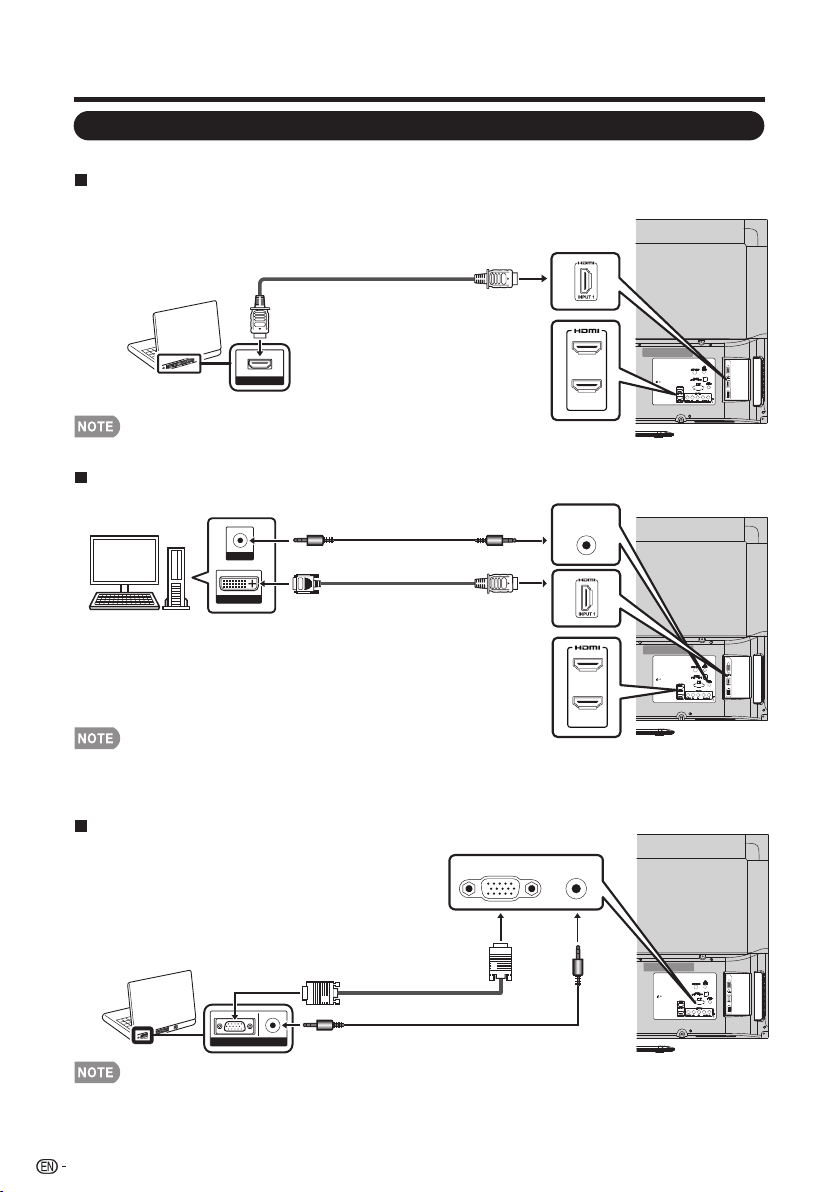
Connecting a PC
Refer to page 41 for a list of PC signals compatible with the TV.
When using HDMI cable (INPUT 1, 2 or 3):
• The HDMI terminals only support digital signal.
When using DVI-HDMI conversion cable (INPUT 1,2,3):
• When using a DVI-HDMI conversion cable, you should make an analog audio connection. In this case, in addition to connecting a
DVI-HDMI conversion cable to the INPUT 1,2,3 (HDMI) terminal, connect
a Ø 3.5 mm stereo minijack cable
to the AUDIO PC/HDMI
terminal.
When using analog RGB cable (PC IN):
18
Connecting to External Equipment
HDMI OUT
HDMI-certified cable
DVI OUT
AUDIO
DVI-HDMI conversion cable
Ø 3.5 mm stereo minijack cable
• When using an analog RGB cable, input the audio signal to the AUDIO PC/HDMI terminal of PC IN.
AUDIORGB
Analog RGB cable
(D-sub 15-pin cable or VGA cable)
Ø 3.5 mm stereo minijack cable
INPUT 2
INPUT 3
INPUT 2
INPUT 3
AUDIO
PC/HDMI
PC IN
AUDIO
PC/HDMI
Turning On/Off the Power
EZ Setup
Watching TV
Press POWER on the TV, or POWER on the remote control
unit to turn the power on.
• POWER indicator: Power on, Green; Power off, red.
• If you are not going to use this TV for a long period of time, be sure to remove the
AC cord from the AC outlet.
• Small amount of electric power is still consumed even when the TV is turned off.
• If there is no signal input for 15 minutes, the power will turn to standby mode
automatically.
19
POWER
INPUT
3
1
2
POWER
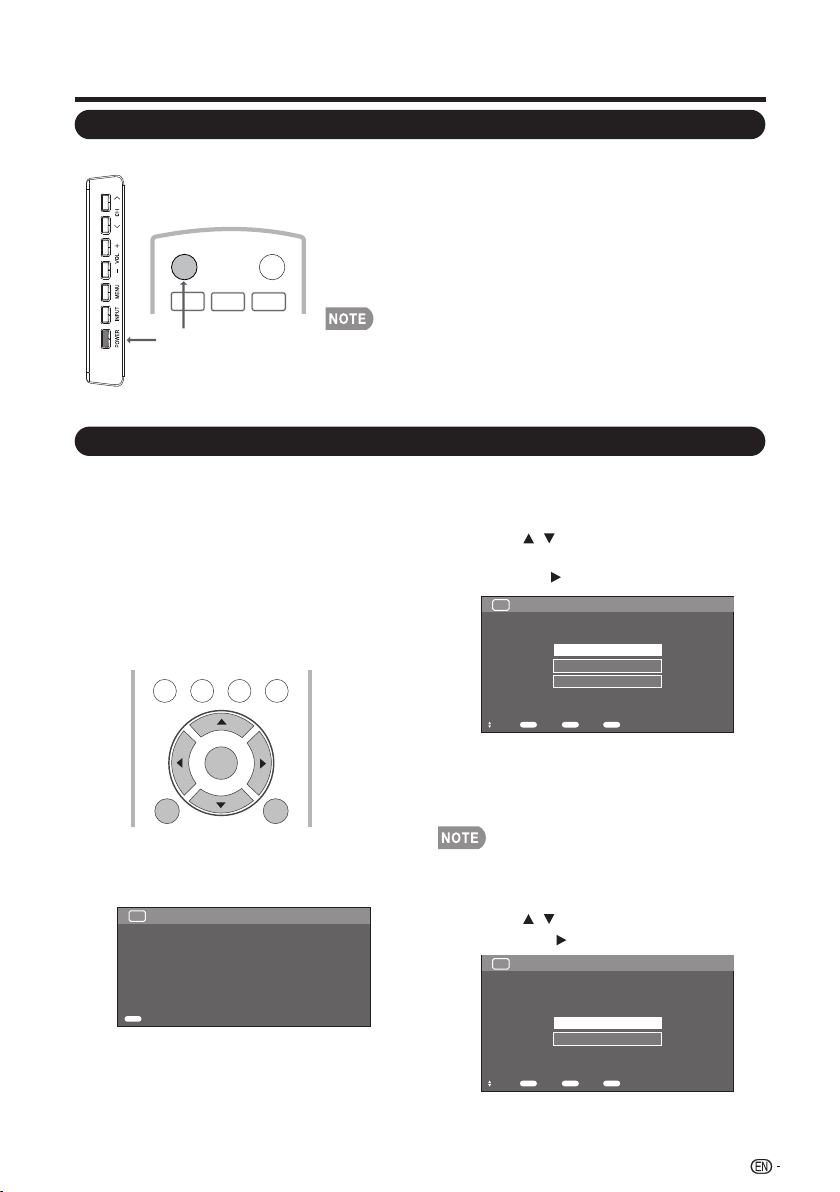
When you turn on the TV for the first time, the
Initial Setup will guide you through the setup
process. Perform the following steps before
you press POWER on the remote control unit.
1. Insert the batteries into the remote control
unit. (See page 10.)
2. Connect the antenna cable to the TV. (See
page 9.)
3. Plug in the AC cord to the AC outlet. (See
page 8.)
1. Initial Setup
• The Initial Setup screen display at the first
use. Press ENTER to start the EZ setup.
2. Language setting
TV US B
PC
MENU
NRUTERTIXE
ENTER
Thank You for Your Purchase of our SHARP Liquid Crystal Television
Please press [Enter] to start the Wizard.
TV
EZ Setup Welcome
Enter
Enter
TV Location
Select "Home" or "Store" for the location where
you plan to install the TV.
This product qualifi es for
3. Location setting
• Press / to select “Home” or “Store”
and press to the next step.
• Select the OSD menu language from
English, Spanish, or French.
• Press / to select the desired
language listed on the screen, and then
press the to the next step.
Language
TV
EZ Setup
Set the on-screen display language
English
Français
Español
Select Enter Back Exit
Enter Return EXIT
Language
TV EZ Setup
Select where the TV will be placed.
The picture will be optimized for
that location.
Home
Store
Select Enter Back Exit
Enter Return EXIT
TV Location
• ENERGY STAR qualifi cation is based on AV MODE
"STANDARD".
ENERGY STAR in Home mode default setting.
Press POWER on the TV, or POWER on the remote control
unit again to turn the power off.
• The TV enters standby and the image on the screen
disappears.
Watching TV
20
Home: “Power Saving” is set to "On", and AV MODE
is set to "STANDARD".
Store: “Power Saving” is set to "Off" and AV MODE is
set to "DYNAMIC (Fixed)".
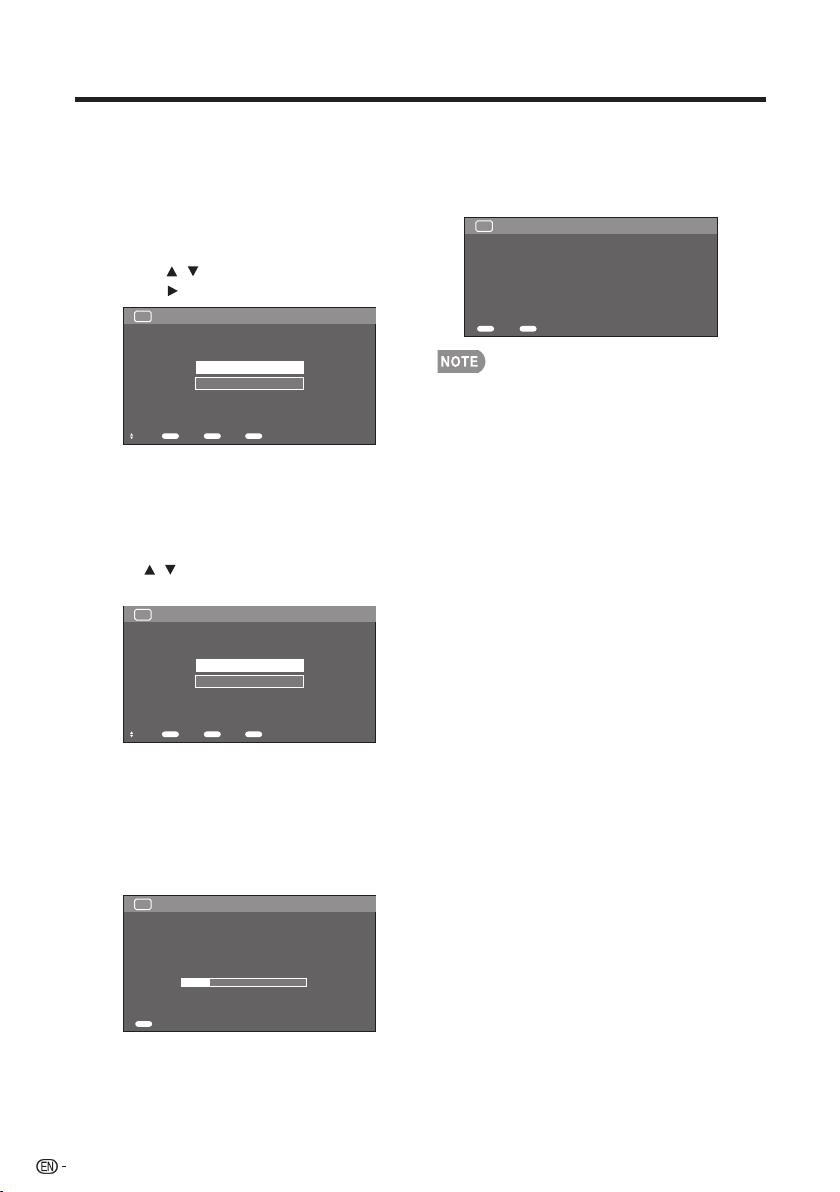
4. Air/Cable(Antenna setting)
• Make sure what kind of connection is
made with your TV when selecting “Air”
or “Cable”.
• Press / to select “Air” or “Cable” and
press to the next step.
TV EZ Setup Air/Cable
Selecting Air/Cable channels
Air
Cable
Select Enter Back Exit
Enter Return EXIT
CH Search (Channel search)
Channel auto search makes the TV look for all
channels viewable in the set area.
5. When "Air" or "Cable" is selected
in Antenna setting:
Press / to select "Start", and then
press ENTER.
TV EZ Setup CH Search
Searching receivable channels
Start
Cancel
Select Enter Back Exit
Enter Return EXIT
6. Start channel searching
• Wait until the channel scan to complete.
• If you press EXIT, the process will return
to the previous step.
• If you skip this step, the channel search
can be performed in the TV Menu. (See
page 32.)
TV EZ Setup CH Search
Searching receivable channels.
Now tuning Channels automatically..
Analog: 0
Digital: 0
22%
Cancel
EXIT
7. Completed
After setting complete, the screen will
show "EZ Setup Completed", press
ENTER to finish the EZ Setup. The TV will
then switch to the first channel found.
TV EZ Setup Completed
EZ Setup Completed
Exit
Enter
Back
Return
• Auto programming may take 20+ minutes to complete.
Please wait until you see the Auto programming complete
message.
Direct Button Operation
21
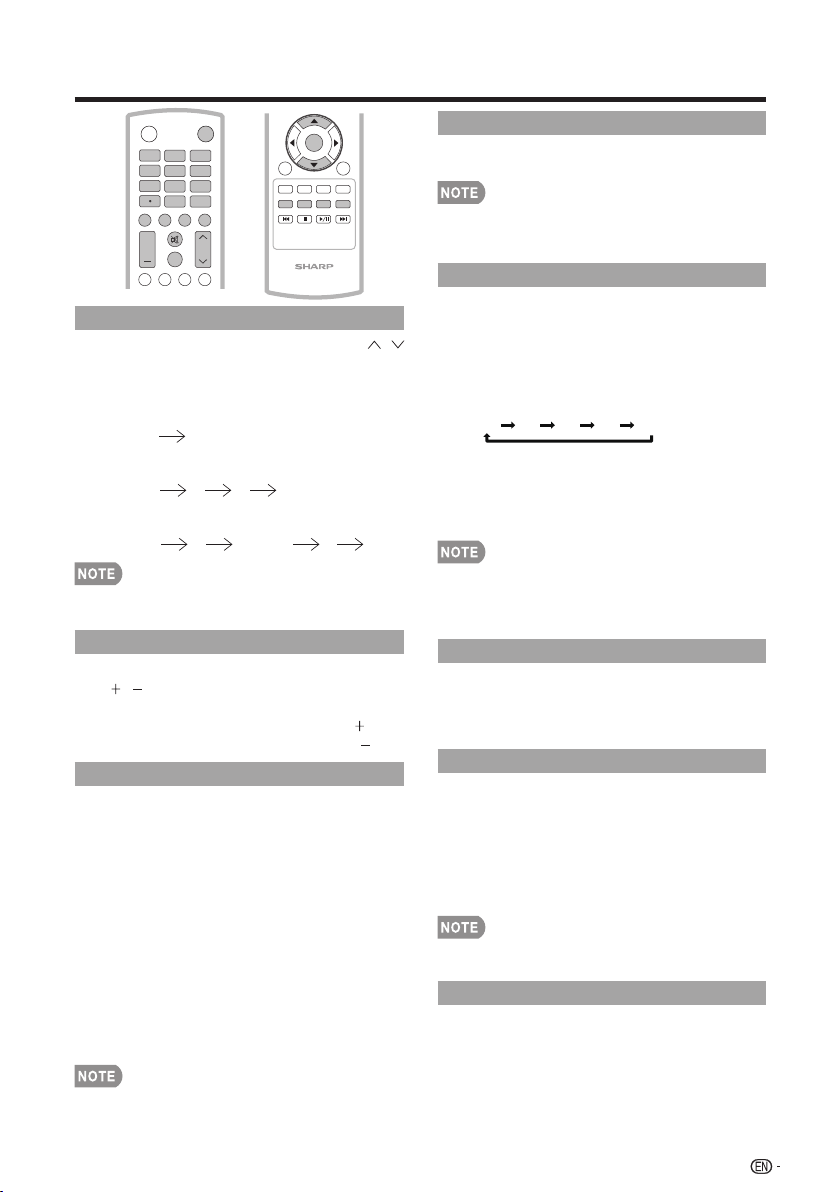
MUTE
Mutes the current sound output.
Press MUTE.
• Mute can be canceled by using the method below. Mute will
be canceled if you press VOL + / - or MUTE.
SLEEP
Allows you to set a time when the TV
automatically switches to standby.
Press SLEEP.
• The remaining time displays when the
sleep timer has been set.
• Each time you press SLEEP, the remaining
time switches as shown below.
Off 30 60 90 120
• When set, the time automatically starts
counting down.
• If you want to adjust the sleep timer, you
can press SLEEP twice then change the
time setting.
• Select "Off" by pressing SLEEP to cancel the sleep timer.
• The TV will enter standby mode (power indicator lights red)
when the remaining time reaches zero.
Changing Channels
You can change channels by pressing CH /
or 0-9, or • (DOT).
Examples:
To select a 1 or 2-digit channel number
(e. g., Channel 5):
Press 5
ENT.
To select a 3-digit channel number
(e. g., Channel 115):
Press 1
1 5 ENT.
To select a 4-digit channel number
(e. g., Channel 22.1):
Press 2
2 • (DOT) 1
ENT.
• When selecting a 1-digit channel number, it is not necessary
to press 0 before the number.
Changing Volume
You can change the volume by pressing
VOL / on the TV or on the remote control
unit.
• To increase the volume, press VOL .
• To decrease the volume, press VOL .
INPUT
To view external source images, select the input
source using INPUT on the remote control unit
or INPUT on the TV.
1. Press
INPUT.
• A list of selectable sources appears.
2. Press
INPUT
again to select the input
source.
• An image from the selected source
automatically displays.
• Each time INPUT is pressed, the input
source toggles.
• If you press ▲/▼ to select the input
source, press ENTER to confirm your
selection.
INPUT
3
4
5
6
7
8
9
0
ENT
1
2
DI SP L AY FRE E ZE
FLASHBACK
MU TE
SU RR OU ND
TV US B
PC
ME NU
AUDIO
VOL CH
+
POWER
FAV OR IT E C H
SL E E P CC VIEW MODEAV MODE
NRUTERTIXE
LCD T V
GJ221
A B C D
ENTER
• See page 14-18 for external equipment connection.
FLASHBACK
Press FLASHBACK to switch to the previously
tuned channel or input.
• Press FLASHBACK again to switch back
to the currently tuned channel or input.
SURROUND
The surround function produces Surround effect
from the speakers. Each time you press
SURROUND, the mode changes between On
and Off.
• On: Makes it possible to enjoy natural,
realistic surround sound.
• Off: Outputs the normal sound.
• You can have the same settings by choosing “Surround” on the
menu items. (See page 28.)
FREEZE
Allows you to capture and freeze a moving
image that you are watching.
Press FREEZE.
• A moving image is captured.
• Press FREEZE again to cancel the
function.
Direct Button Operation
22
AV MODE
AV MODE gives you several viewing options to
choose from to best match the surrounding
environment of the TV, which can vary due to
factors like room brightness, type of program
watched or the type of image input from
external equipment.
Press AV MODE. Current AV MODE displays.
AUDIO
■ MTS/SAP stereo mode
The TV has a feature that allows reception of
sound other than the main audio for the
program. This feature is called Multi-channel
Television Sound (MTS). The TV with MTS can
receive mono sound, stereo sound and
Secondary Audio Programs (SAP). The SAP
feature allows a TV station to broadcast other
information, which could be audio in another
language or something completely different like
weather information.
You can enjoy Hi-Fi stereo sound or SAP
broadcasts when available.
• Stereo broadcasts: View programs like live
sporting events, shows and concerts in
dynamic stereo sound.
• SAP broadcasts: Receive TV broadcasts in
either MAIN or SAP sound.
MAIN sound: The normal program soundtrack
(either in mono or stereo).
SAP sound: Listen to a second language,
supplementary commentary or other information.
(SAP is mono sound.)
If stereo sound is difficult to hear.
• Obtain a clearer sound by manually switching
to fixed mono-sound mode.
You can change MTS as shown below to match the
television broadcast signal.
Press AUDIO to toggle between audio modes.
Examples: when receiving MTS and SAP
MAIN + SAP mode: MAIN SAP
MONO mode: MONO
■ Digital broadcasting audio mode
The types of audio transmitted in a digital
broadcast include SURROUND as well as
MONO and STEREO. In addition, it is possible
for multiple audio tracks to accompany a single
video track.
Press MTS/SAP to toggle between audio
modes.
Example: when receiving Digital broadcasting
STEREO (Audio1) STEREO (Audio2)
SURROUND (Audio3)
• MTS only operates while in TV mode.
Closed Captions (CC)
Your TV is equipped with an internal Closed
Caption decoder. It allows you to view
conversations, narration and sound effects as
subtitles on your TV. Closed Captions are
available on some TV programs and on some
VHS home video tapes at the discretion of the
program provider.
Digital Closed Caption service is a new caption
service available only on digital TV programs
(also at the discretion of the service provider). It
is a more flexible system than the original
Closed Caption system, because it allows for a
variety of caption sizes and font styles. When
the Digital Closed Caption service is in use, it
will be indicated by the appearance of a 3-letter
abbreviation that also indicates the language of
the Digital Closed Captions: ENG (English), SPA
(Spanish), FRA (French) or other language
codes.
Not all programs and VHS videotapes offer
closed captions.
In the Closed Caption system, there can be
more than one caption service provided. Each
is identified by its own number. The “CC1” to
“CC4” services display subtitles of TV programs
superimposed over the program's picture.
In the Closed Caption system, the “TEXT1” to
“TEXT4” services display text that is unrelated
to the program being viewed (e.g., weather or
news). These services are also superimposed
over the program currently being viewed.
1. Press CC.
• This will display the current Closed Caption
information. Press CC to turn the Closed
Caption on or off.
• Caption Display will not work when viewing a 480i, 480p, 720p,
1080i or 1080p input via the COMPONENT: Y-PbPr or HDMI
inputs.
• This feature is only available in TV,AV and component mode.
• Closed Captions and Digital Captions availability and content
depends on the broadcaster. Closed Caption are available
when the Closed Caption icon is displayed on screen.
Example:
Analog:
CC1 CC2 CC3 CC4 TT1
-- TT4 TT3 TT2
Digital:
CC1 CC2 CC3 CC4 TT1 TT2 TT3 TT4
-- CS6 CS5 CS4 CS3 CS2 CS1
• You can have the same settings by choosing "AV MODE"
on the menu items. (See page 27.)
• Press AV MODE again before the mode displayed on the
screen disappears.
VIEW MODE
Direct Button Operation
23
SURRO UN D
TV USB
PC
ME N U
FAV O RI T E C H
S L E E P CC VIEW MODEAV MODE
VOL CH
+
NRUTERTIXE
A B C D
ENTER
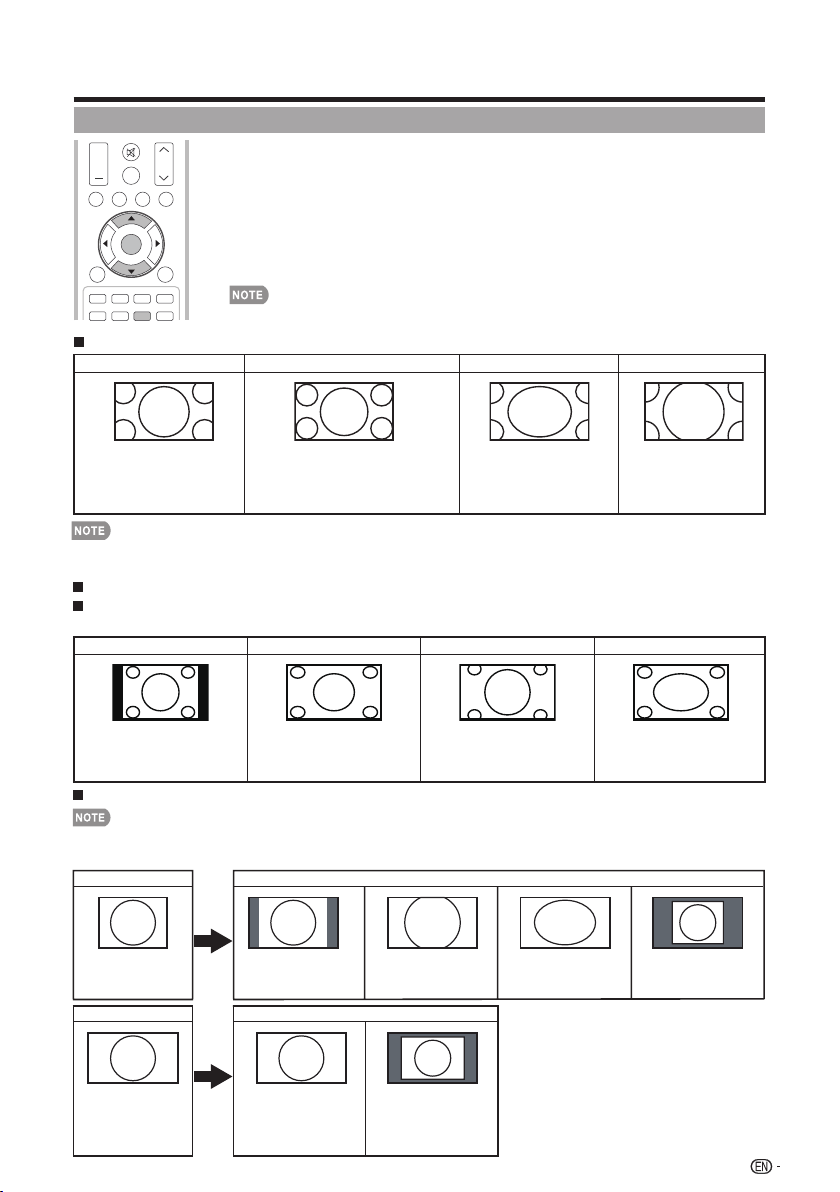
You can select the screen size.
1
Press VIEW MODE.
•
The View Mode menu displays.
•
The menu lists the View Mode options selectable for the type of video signal currently
being received.
2
Press VIEW MODE or
a
/
b
while the View Mode menu is displayed to select a
desired item on the menu.
• You can sequentially select a View Mode that has its own aspect ratio.
•
You can have the same settings by choosing "View Mode" on the menu items. (See page 29.)
For PC input mode
Connect the PC before making adjustments.
• Selectable screen size may vary with input signal type.
Example: Screen size images
•
Input signalNormal Cinema
4:3
Keeps the original aspect
ratio in a full screen display.
For viewing widescreen
programs. The top and
bottom of the image is
cropped.
An image fully fills the screen.
Detects the resolution of the
signal and displays an image
with the same number of
pixels on the screen.
Input signal
16:9 An image fully fills the
screen.
Detects the resolution of the
signal and displays an image
with the same number of
pixels on the screen.
Full Screen Dot by Dot
Dot by Dot
Normal
For 4:3 programs
For USB-Video
Example: Screen size images
hctertSmooZ)hcterts tramS( hctertS.SNormal
Suitable for viewing conventional 4:3
programs in their normal format.
Suitable for stretching 4:3 programs
to fi ll the screen.
Suitable for viewing wide-screen
2.35:1 anamorphic DVDs in full
screen.
This mode is useful for 1.78:1 DVDs.
When viewing 1.85:1 DVDs, stretch
mode will still show very thin black
bands at the top and bottom of the
screen.
For HD programs
Stretch Dot by Dot (Full Screen) S.Stretch (Smart stretch) Zoom
Suitable for viewing wide-screen
1.78:1 aspect ratio program, stretch
mode will still show very thin black
bands at the top and bottom of the
screen.
Dot by Dot (1080i/p only): Detects the
resolution of the signal and displays an image
with the same number of pixels on the screen.
Full Screen (720p only): You can select
"Full Screen" only when receiving a 720p signal.
Suitable for stretching 4:3
programs to fi ll the screen.
Suitable for viewing wide-screen
2.35:1 aspect-ratio programs in
full screen.
When using Dot by Dot or Full Screen, it is possible to see noise or bars around different outer portions of the screen. Please
change view mode to correct this.

For TV Mode
• Some menu items may not be displayed depending on the selected input source.
On-Screen Display Menu
Menu Items
24
Reset ......................................................................32
Individual Setup .......................................................32
Secret No. .......................................................32
Parental CTRL (Parental Control Setting) ..........32
Status ........................................................32
V-Chip .......................................................33
V-Chip(DTV Only) .......................................32
Information ...........................................................34
Identification ............................................................34
Connecting a USB Memory Device/
USB Hard Drive ....................................................35
Playing Back Files on a USB Memory Device ...35
Select the Files to Play Back ..............................35
Photo Mode ............................................................35
Music Mode ............................................................38
Video Mode .............................................................37
USB Device Compatibility ........................................37
Viewing Thumbnails .........................................35
Viewing Individual Photos .................................36
Slide Show ......................................................36
Picture Settings ....................................................26
AV MODE (Changing Pic.Quality) .............................27
OPC ........................................................................27
Backlight .................................................................26
Contrast ..................................................................26
Advanced ...............................................................27
Color Temp. (Color Temperature) .....................27
Active Contrast .................................................27
Dl Film Mode ....................................................27
Digital Noise Reduction ....................................27
Audio Settings ......................................................28
Treble .....................................................................28
Bass .......................................................................28
Balance ..................................................................28
Surround .................................................................28
Power Control ......................................................28
View Mode .......................................................29
Freeze ..............................................................29
Change Audio ..................................................29
Audio Language .........................................29
MTS ...........................................................29
Change CC ......................................................29
Analog Closed Caption ...............................30
Digital Closed Caption ................................30
Audio Setup .....................................................30
Auto Sync. (for Analog PC Input Mode Only) ....30
Fine Sync. ..................................................30
Input Terminal Setting ..............................................30
PC Input ...........................................................30
Audio Select .....................................................30
HDMI Setup .....................................................31
Speaker ...........................................................31
Caption Setup .........................................................31
Power Saving ..........................................................28
No Signal Off ...........................................................28
CH Setup .........................................................32
Favorite CH (Favorite Channel Setting) .............32
Initial Setup ...........................................................31
EZ Setup .................................................................31
Broadcasting Setup ................................................32
Language ................................................................32
System Options ....................................................29
View Option .............................................................29
Brightness ...............................................................26
Sharpness ...............................................................26
Color .......................................................................26
Tint .........................................................................26
On-Screen Display Menu
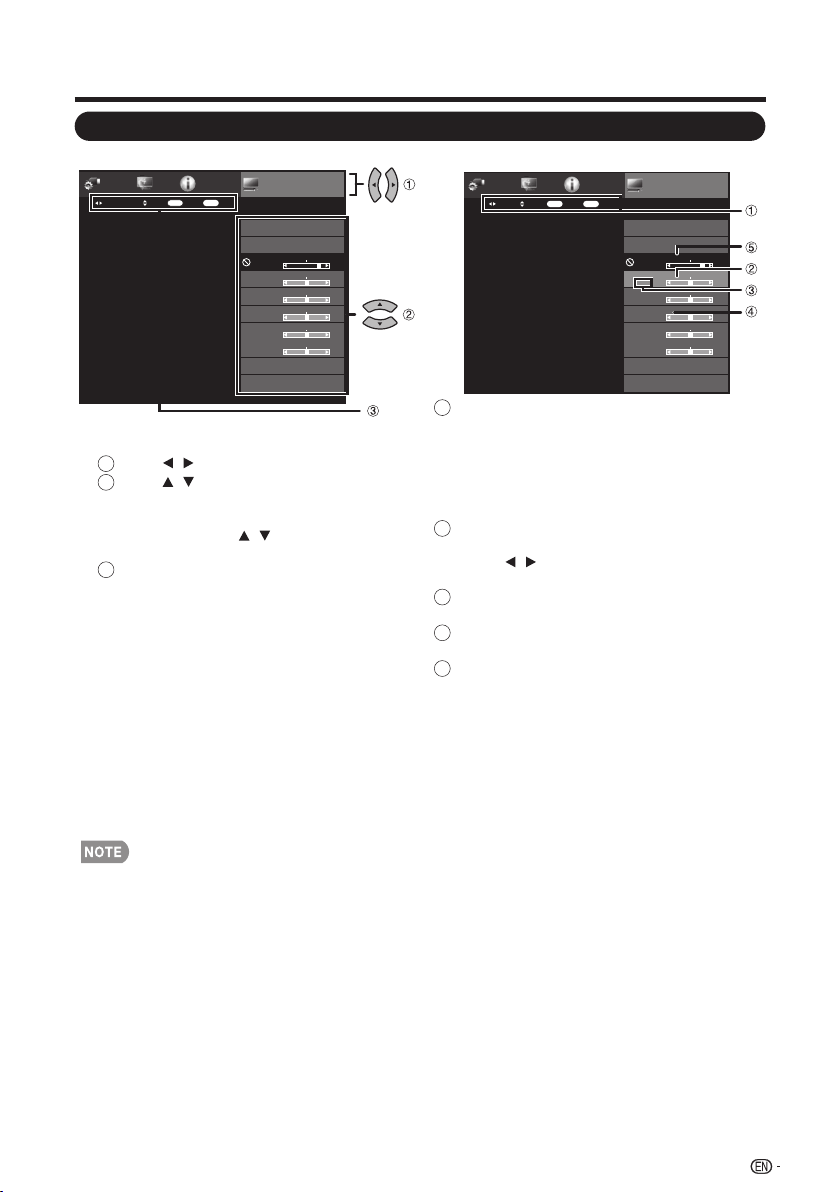
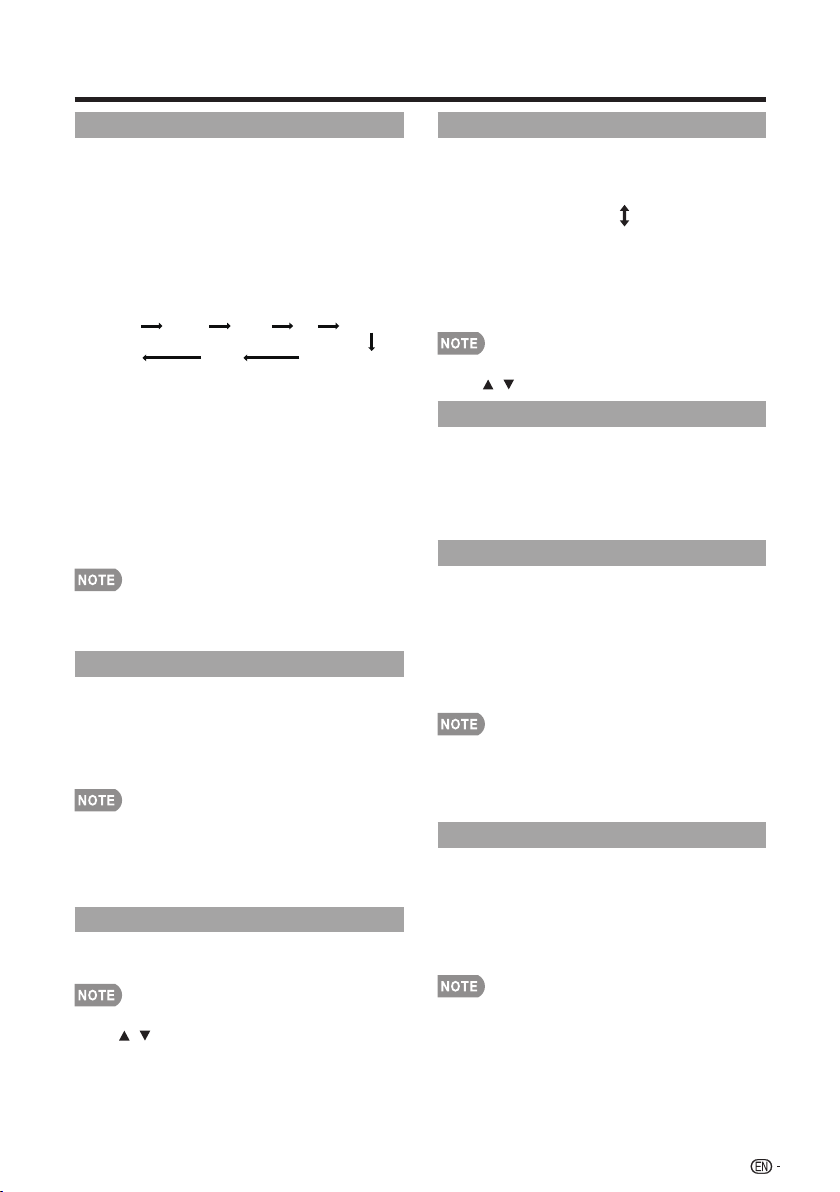
On-Screen Display Menu Operation
1. Press MENU to display the MENU screen.
2.
Press / to select the desired menu.
Press / to select a specific
adjustment item,
and then press ENTER.
• Additional related adjustment items may be
displayed. Press / to select the desired
item.
Adjust the item while referring to the
guide display.
• Operations vary depending on the function
or item. Refer to the guide display
corresponding to the menu setting screen
for button operations.
3. Press MENU to exit.
1
2
3
Guide display
• This indicates the buttons that can be operated
on the displayed screen. The guide display varies
depending on the menu setting screen.
•
The operations for some selected items may be
displayed in the operational guide bar at the
bottom of the screen.
Item displayed in blue
• This indicates the item currently selected.
•
Press / to go to the adjustment screen for
this item.
Item in brackets
• This indicates the current setting for the item.
Item displayed in gray
• This indicates that the item can be selected.
Item displayed in black
• This indicates that the item cannot be selected.
There are various reasons why the items cannot
be selected, but the main reasons are as follows:
—Nothing is connected to the selected input
terminal.
—
The function is not compatible with the current
input signal.
Example
1
2
3
4
5
Menu
Information
Initial
Setup
System
Options
Picture
Settings
Picture Settings
ENTER
Adjust Select Enter
RETURN
Back
• Menu options differ in the selected input modes, but the operating procedures are the same.
• The screens in the operation manual are for explanation purposes (some are enlarged, others cropped) and may vary slightly from the
actual screens.
• The order of explanations for each menu item in the following pages is not necessarily in accordance with the alignment of the items
on the screen.
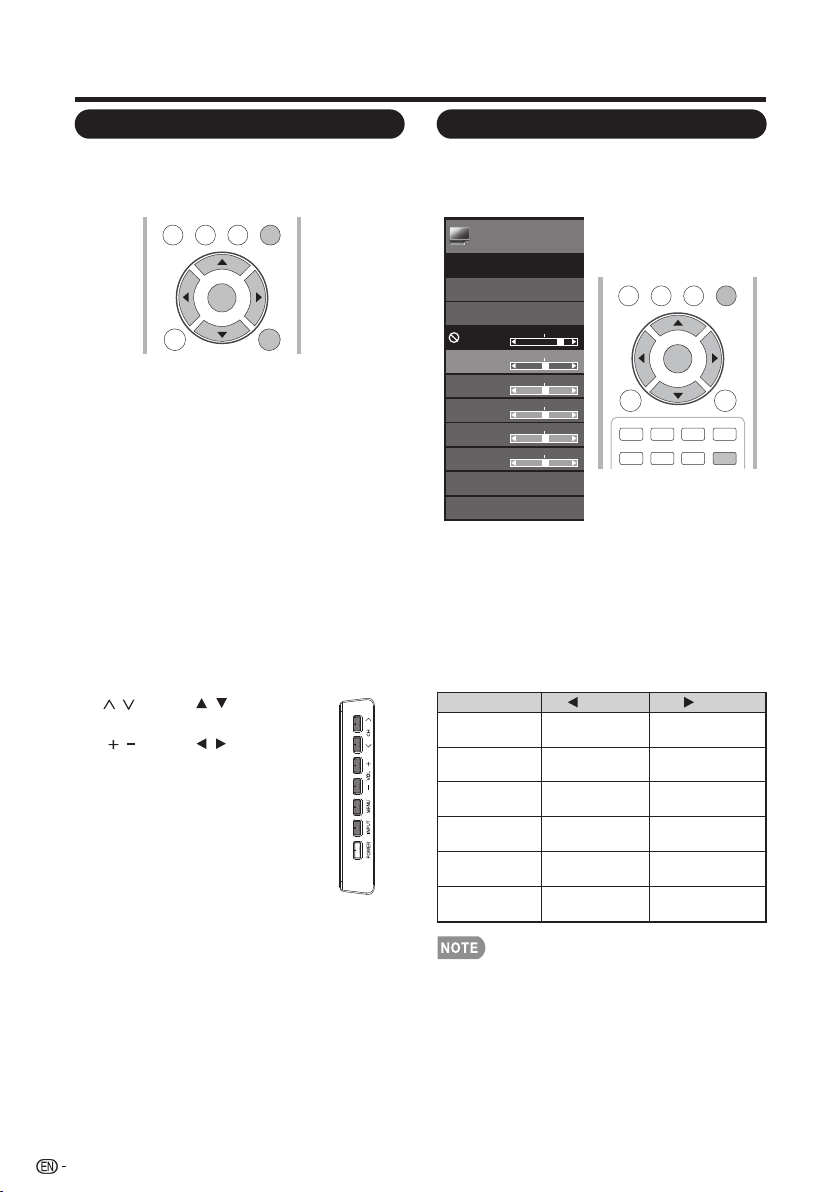
AV MODE
[STANDARD]
STANDARD
OPC
[On]
Contrast
[ 51
Backlight
[ 82]
Brightness
[ 50]
Color
[ 50]
Tint
[ 0]
Sharpness
[ 10]
Advanced
Reset
Example
Menu
Information
Initial
Setup
System
Options
Picture
Settings
AV MODE
[STANDARD]
STANDARD
OPC
[On]
Contrast
[ 51]
Backlight
[ 82]
Brightness
[ 50]
Color
[ 50]
Tint
[ 0]
Sharpness
[ 10]
Advanced
Reset
Picture Settings
ENTER
SelectSelect Menu
RETURN
Exit
25
Enter
On-Screen Display Menu
Menu Operation Button
Example
TV US B
PC
MENU
NRUTERTIXE
ENTER
MENU :
Press to open or close the menu
screen.
Press to select a desired item on
the screen or adjust a selected
item.
ENTER: Press to go to the next step or
complete the setting.
RETURN: Press to return to the previous
step.
Using the control panel of the main unit
You can also operate the menu with the control
panel of the main unit.
Button operations on the control panel
correspond to the ones on the remote control
as shown below.
/▼/▲
◄/►:
Using the remote control
Use the following buttons on the remote control
to operate the menu.
MENU on the remote
control or EXIT on the
remote control while OSD
menu is on.
MENU:
INPUT: ENTER on the remote
control.
CH
/ : Cursor / on the remote
control.
VOL / : Cursor / on the remote
control.
Menu
Picture
Settings
AV MODE
[STANDARD]
STANDARD
OPC
[On]
Contrast
[ 50]
Brightness
[ 50]
Color
[ 50]
Tint
[ 0]
Sharpness
[ 10]
Advanced
Reset
Picture Settings
Backlight
[ 80]
1. Press MENU to display the MENU screen,
and then press ◄/► to select "Picture
Settings" and press ENTER or ▼ to enter it.
2. Press ▲/▼ to select a specific adjustment
item and press ENTER or ► to enter the
setting.
3. Press ◄/► to adjust the setting.
4. Press MENU to exit.
• Backlight control is disabled when OPC is “On”.
Selected item button button
Backlight The screen
brightens
The screen
dims
Contrast For less
contrast
For more
contrast
Brightness For less
brightness
For more
brightness
Color For less color
intensity
For more color
intensity
Tint Skin tones
become reddish
Skin tones
become greenish
Sharpness For less
sharpness
For more
sharpness
Picture Settings
Adjusts the picture to your preference with the
following picture settings.
26
TV US B
PC
MENU
RETURNEXIT
ENTER
FAV ORIT E CH
SLE E P CC VIEW MODEAV MODE
A B C D
On-Screen Display Menu
AV MODE (Changing Pic.Quality)
OPC
Advanced
The audio and video settings can be changed
to suit the program or input content being
watched.
Select from the following AV modes.
USER/STANDARD/MOVIE/GAME/PC/
DYNAMIC/DYNAMIC (Fixed)
VGAActive Contrast
• You can select AV MODE by pressing AV MODE on the
remote control unit. See page 22 for details of AV MODE
settings.
Automatically adjusts the brightness of the
screen.
Off: The brightness is fixed at the value set in
"Backlight".
On: Automatically adjusts.
• When set to "On", the Optical Picture Control (OPC)
senses the surrounding light and automatically
adjusts the backlight brightness. Make sure nothing
obstructs the OPC sensor, which could affect its
ability to sense surrounding light.
This TV provides various advanced functions
for optimizing the picture quality.
• For resetting all adjustment items to the factory preset values,
press / to select "Reset", and then press ENTER.
• For resetting all adjustment items to the factory preset values,
press / to select "Reset", and then press ENTER.
Automatically adjusts the image contrast
according to the scene.
On: Automatically adjusts the image
contrast.
Off: No adjustment.
VGADl Film Mode
VGADigital Noise Reduction
Automatically detects a film-based source
(originally encoded at 24 frames/second),
analyzes it then recreates each still film frame
for high-definition picture quality.
Auto: Detects, analyzes, converts film
source.
Off: Normal viewing mode.
• "DI Film Mode" does not function depending on input signal
type.
• "Auto" does not function when channel display shows an input
signal resolution of 480p, 720p, or 1080p.
• "DI Film Mode" is not available during PC format input.
Produces a clearer video image.
Auto: Automatically adjusts the level of
noise reduction.
High/Medium/Low: Select a desired level
for viewing a clearer video image.
Off: No adjustment.
• "Digital Noise Reduction" is not available when you set PC format
is being input.
• This feature is only available in ATV,AV and component mode.
27
Color Temp. (Color Temperature)
For a better white balance, use color
temperature correction.
Warm:
White with reddish tone
Standard:
Cool:
White with bluish tone
User:
White balance can be adjusted manually through
the R/G/B Gain between a maximum of 255 and a
minimum of 0 for each color temperature.
Example:
When the input source is TV, COMPONET/AV,
PC IN or HDMI 1 to 4
STANDARD:
For a highly defi ned image in a normal lighting.
MOVIE: For a movie.
GAME: Lowers image brightness for easier viewing.
PC: For PC.
USER: Allows the user to customize settings as desired.
You can set the mode for each input source.
DYNAMIC: For a clear-cut image emphasizing high
contrast, useful for sports viewing.
DYNAMIC (Fixed): Changes the image and sound
settings to the factory preset values.No adjustments are
allowed.
DYNAMIC
DYNAMIC (Fixed)
USER
STANDARD MOVIE GAME PC
STANDARD
On-Screen Display Menu
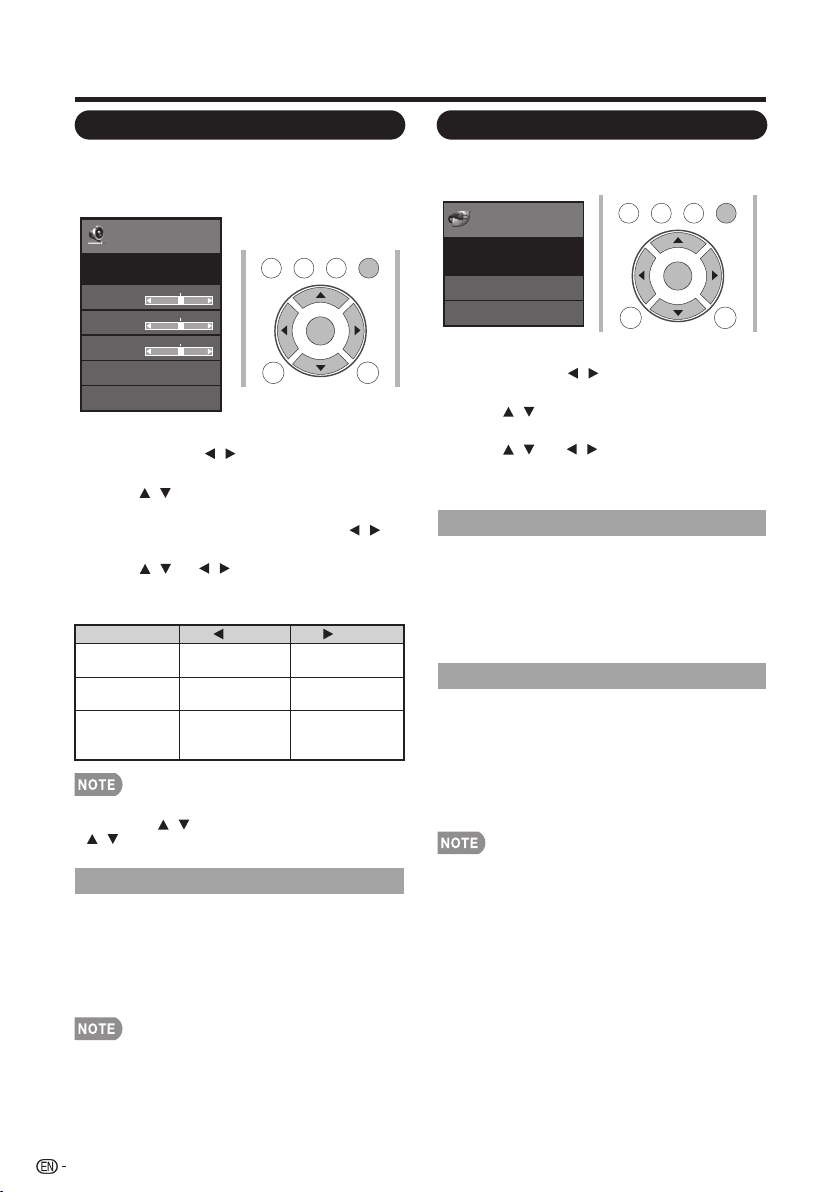
Audio Settings
You can adjust the sound quality to your
preference with the following settings.
Example
1. Press MENU to display the MENU screen,
and then press / to select "Audio
Settings".
2. Press / to select a specific adjustment
item.
• Select "Surround" and then press /
to set.
3. Press / (or / ) to select the desired
setting, and then press ENTER.
4. Press MENU to exit.
• For resetting Audio adjustment items to the factory preset
values, press / to select "Reset", press ENTER, press
/ to select "Yes", and then press ENTER.
Menu
Audio
Settings
Bass
[ 50]
Treble
[ 50]
Balance
[ 0]
Surround
[Off]
STANDARD
Reset
Audio Settings
TV US B
PC
MENU
RETURNEXIT
ENTER
The surround function produces Surround
effect from the speakers.
On: Makes it possible to enjoy natural,
realistic surround sound.
Off: Outputs the normal sound.
• For some discs, setup may be required on your DVD/BD player.
In this case, please refer to the operation manual of your
DVD/BD player.
Selected item button button
Treble For weaker
treble
Bass For weaker
bass
For stronger
treble
For stronger
bass
Balance Decrease audio
from the right
speaker
Decrease audio
from the left
speaker
Surround
Power control setting allows you to save energy.
Power
Control
Menu
No Signal Off
Power Saving
[On]
[Enable]
Power Control
Example
1. Press MENU to display the MENU screen,
and then press / to select "Power
Control".
2. Press / to select a specific adjustment
item, and then press ENTER.
3. Press / ( or / ) to select the desired
setting, and then press ENTER.
4. Press MENU to exit.
TV US B
PC
MENU
RETURNEXIT
ENTER
This function allows the TV to automatically shut
the power down when there is no signal
received.
Enable: The power will automatically shut
down if there is no signal for 15 minutes.
Disable: This function does not work.
Power Control
No Signal Off
This function allows you to set the Power
Saving level in order to decrease the power
consumption and increase the backlight
lifespan.
On: Optimizes power reduction based upon
video content.
Off: This function does not work.
• "Power Saving" does not function when you set AV
MODE to DYNAMIC (Fixed)".
• You cannot select a different Power Saving item for
each AV MODE.
Power Saving
28
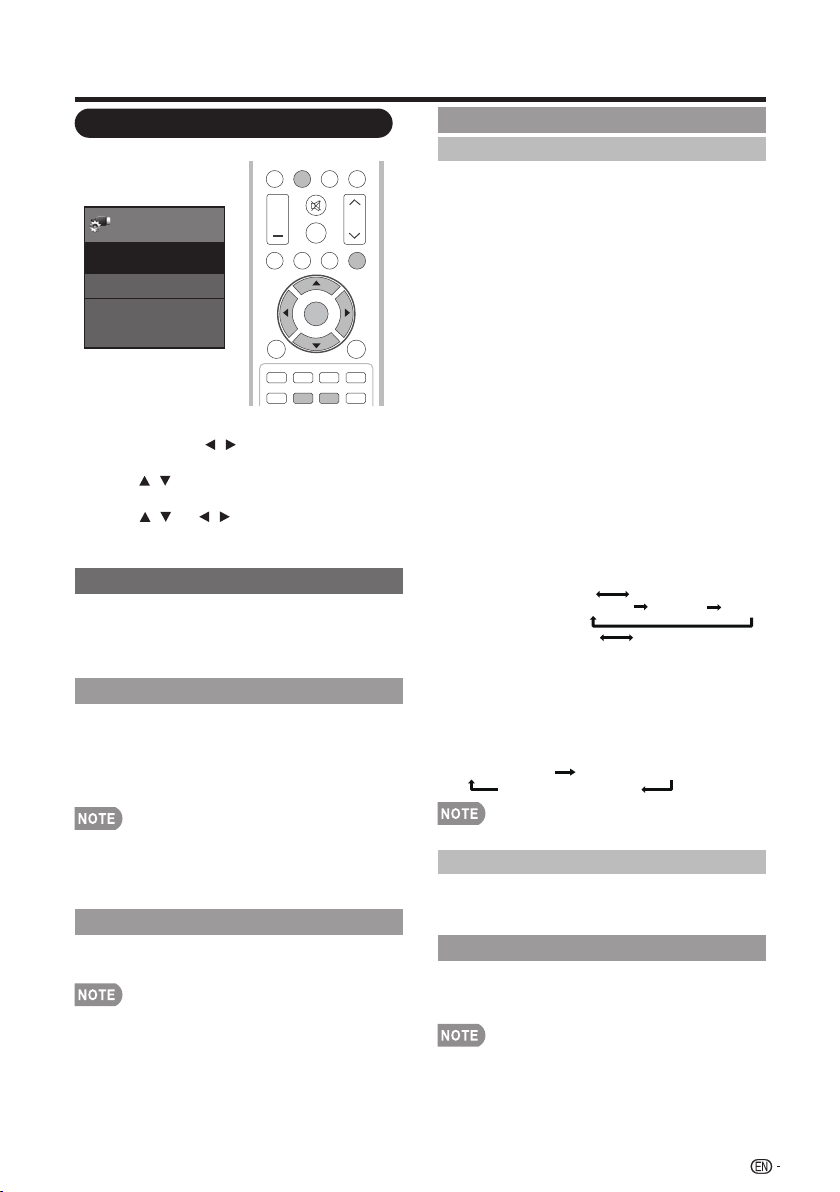
On-Screen Display Menu
View Option
View Mode
Freeze
MTS
Change Audio
These functions are useful for adjusting the
audio and video settings. The View Option
functions can be operated with the remote
control unit.
This function changes the screen size.
Select "View Option" on the menu to display
the View Mode menu screen.
The View Mode menu varies depending on the
input source.
• You can select View Mode by pressing VIEW MODE on the
remote control unit. See page 23 for adjusting the video being
input from a TV, PC, other audiovisual equipment, USB-Video.
Allows you to capture and freeze a moving
image that you are watching.
• You can select Freeze by pressing FREEZE on the remote
control unit. See page 21 for details of Freeze function.
Menu
View Option
System Options
Caption Setup
Input Terminal Setting
System
Options
1. Press MENU to display the MENU screen,
and then press / to select "System
Options".
2. Press / to select a specific adjustment
item and then press ENTER.
3. Press / (or / ) to select the desired
setting, and then press ENTER.
4. Press MENU to exit.
System Options
Example
The TV has a feature that allows reception of
sound other than the main audio for the program.
This feature is called Multi-channel Television
Sound (MTS). The TV with MTS can receive
mono sound, stereo sound and Secondary
Audio Programs (SAP). The SAP feature allows a
TV station to broadcast other information, which
could be audio in another language or something
completely different like weather information.
You can enjoy Hi-Fi stereo sound or SAP
broadcasts where available.
• Stereo broadcasts: View programs like live
sporting events, shows and concerts in dynamic
stereo sound.
• SAP broadcasts: Receive TV broadcasts in either
MAIN or SAP sound.
MAIN sound: The normal program soundtrack
(either in mono or stereo).
SAP sound: Listen to a second language,
supplementary commentary or other information.
(SAP is mono sound.)
If stereo sound is difficult to hear.
• Obtain a clearer sound by manually switching to
fixed mono-sound mode.
You can change MTS as shown below to match the
television broadcast signal.
Press ENTER to toggle between audio modes.
Examples: when receiving MTS and SAP
STEREO mode: STEREO MONO
STEREO + SAP mode: ST(SAP) SAP(ST) MONO
MAIN + SAP mode: MAIN SAP
MONO mode: MONO
Digital broadcasting audio mode
The types of audio transmitted in a digital broadcast
include SURROUND as well as MONO and STEREO.
In addition,it is possible for multiple audio tracks to
accompany a single video track.
Press ENTER to toggle between audio modes.
Example: when receiving Digital broadcasting
STEREO (Audio 1) STEREO (Audio 2)
SURROUND (Audio 3)
• MTS only operates while in TV mode.
Change CC
Allows you to change the Closed Caption
display. Select "Change CC" on the menu to
display the Closed Caption information.
Audio Language
Gives you the possibility to swap between main
and alternative language, when it is available in
digital channel.
• You can change Closed Caption by pressing CC on the remote
control unit. See page 22 for details of Closed Caption function.
29
DI S P L AY FRE EZ E
FLASHBACK
MU T E
SUR R O UND
TV US B
PC
ME NU
FAV O RITE C H
SL E EP CC VIEWMODEAV MODE
AUDIO
VOL CH
+
NRUTERTIXE
A B C D
ENTER
On-Screen Display Menu
PC Input
Audio Select
Auto Sync. (for Analog PC Input Mode Only)
Fine Sync.
This allows you to configure the way you
choose to view digital captioning. Select one of
the digital service channels made available by
the caption provider. There are six standard
services. Service 1 is designated as the Primary
Caption Service. This service contains the
verbatim, or near-verbatim captions for the
primary language being spoken in the
accompanying program audio. Service 2 is
designated as the Secondary Language Service.
This service contains captions in a secondary
language, which is a translation of the captions
in the primary Caption Service. The other
service sub channels are not pre-assigned. It is
up to the discretion of the individual caption
provider to utilize the remaining service
channels.
You can output digital audio to an AV amplifi er
or similar device whose DIGITAL AUDIO INPUT
terminal is connected to the DIGITAL AUDIO
OUTPUT terminal on the TV. Please select an
audio output format compatible with the audio
format of the program you are watching and
the equipment connected.
PCM: The optical output terminal outputs
audio signal in PCM form. If your digital
audio system does not support Dolby
Digital, select "PCM".
Digital Closed Caption
Audio Setup
Input Terminal Setting
The Auto Sync. is only available when the input
source is PC and your TV is receiving a
computer signal. Select Auto Sync. for
adjusting the settings automatically.
• Be sure to connect the PC to the TV and switch it
on before starting "Auto Sync.".
Ordinarily you can easily adjust the picture as
necessary to change image position using
"Auto Sync.". In some cases, however, manual
adjustment is needed to optimize the image.
H-Pos.: Centers the image by moving it to
the left or right.
V-Pos.: Centers the image by moving it up
or down.
Clock: Adjust when the image flickers with
vertical stripes.
Phase: Adjust when characters have low
contrast or when the image flickers.
This function sets the terminal to output the
computer audio.
The adjustment items vary depending on the
input source. Select the input source
corresponding to the terminal connected to the
PC and then adjust the desired item.
• The default cursor position may not be in the center, because
the screen position variable ranges may be asymmetrical.
• The screen position variable ranges depend on the View Mode
or the signal type. The ranges can be seen on the position
-setting screen.
Analog Closed Caption
This allows you to select the Closed Captions
service levels of analog broadcasting to be
displayed. Closed captioning allows you to read
the voice content of television programs on the
TV screen. Designed to help the hearing
impaired, this feature uses on-screen “text
boxes“ to show dialogues and conversations
while the TV program is in progress. Captions
will appear on the screen during captioned
broadcasts.
• CC1, 2, 3, or 4
Dialogues (and descriptions) for the action on the
captioned TV program shows on screen. Usually
CC1 is the most used. CC2 can be used for
alternate languages if they are being transmitted.
• TEXT1, 2, 3, or 4
Often used for channel guide, schedules, bulletin
board information for Closed captions programs,
news, weather information, or stock market reports.
Not all Caption services are necessarily being used
by a TV channel during the transmission of a Closed
Caption program.
Dolby Digital: The optical output terminal
outputs audio signal in Dolby Digital form. It
reproduces sound from surround program
of digital.
Off: Disables digital audio output.
30

On-Screen Display Menu
HDMI Setup
Speaker
Choose to turn on or off the TV internal speaker.
The audio output signals will not be turned off
even though the TV speaker is off. The default
setting is On.
Caption Setup
This function allows you to adjust the closed
caption screen appearance to suit your
preference. You can adjust 8 items:
HDMI Mode only shows and is available when
HDMI device is connected. Select from Auto,
Graphic or Video.
Auto: The HDMI input timing is set to Video mode or
Graphic mode automatically.
Graphic: HDMI input timing set to Graphic mode (PC).
The image is full scan.
Video: HDMI input timing set to Video mode. The
image is over scan.
• HDMI Mode is only workable for HDMI Video & Progressive
timing as followed: 1920x1080p,1280x720p, 720x480p,
720x576p.
PC IN
Video: Select this when the TV and PC are
connected using an analog RGB cable and the
audio is not input.
Video+Audio: Select this when the TV and PC
are connected using an analog RGB cable and
the audio is input via a Ø 3.5 mm stereo minijack.
HDMI IN
Auto: Audio path is set to HDMI or PC line in
automatically.
HDMI(Digital): Select this when the TV and PC
are connected using an HDMI-certified cable and
audio is input via the same cable.
HDMI+Analog: Select this when the TV and PC
are connected using a DVI-HDMI conversion
cable and the audio is input via a Ø 3.5 mm
stereo minijack.
• When "Audio Select" is set to "HDMI(Digital)", sound will not
be produced if you use only an HDMI-certified cable to
connect HDMI-compatible equipment. To produce sound,
you should make an analog audio connection.
• If you want to connect HDMI-compatible equipment using
only an HDMI-certified cable, set "Audio Select" to
"HDMI(Digital)".
Initial Setup
Example
You can run EZ Setup again, even after setting
up the preset channels.
Language: Select from among 3 languages
(English, French and Spanish).
TV Location: Select "Home" or "Store" for the
location where you plan to install the TV.
Home: “Power Saving” is set to "On", and AV MODE is set
to "STANDARD".
Store: “Power Saving” is set to "Off" and AV MODE is set
to "DYNAMIC (Fixed)".
1. Press MENU to display the MENU screen,
and then press / to select "Initial Setup".
2. Press / to select a specific adjustment
item, and then press ENTER.
• When you select Individual Setup, you can
enter the 4-digit secret number here. See
page 32 for setting a secret number.
3. Press / (or / ) to select the desired
setting, and then press ENTER.
4. Press MENU to exit.
Menu
EZ Setup
Language
Broadcasting Setup
Individual Setup
Reset
Initial Setup
Initial
Setup
[English]
TV US B
PC
MENU
RETURNEXIT
ENTER
EZ Setup
• Caption Style: Set to As Default or Custom mode.
If Custom mode is selected, user can modify the
detail styles described below. The setting result will
be shown immediately on the bottom of the
submenu OSD.
Note : This feature is only available in TV, AV and
component mode.
• Caption Size: Selects this option to choose a
caption display size according to your own
preference. Select “Small”, “standard”, or “Large”.
• Foreground Color: Choose the caption display
text color.
• Foreground Opacity: Select the text opacity.
• Background Color: Choose one of the background
color.
• Background Opacity: Choose one of the
background opacity options.
• Window Color: Choose one of the display
windows color.
• Window Opacity: Select one of the display window
opacity options.
31
• ENERGY STAR qualifi cation is based on AV MODE
"STANDARD".
On-Screen Display Menu
Reset
Individual Setup
Secret No.
Parental CTRL (Parental Control Setting)
Status
V-Chip(DTV Only)
You can also select a language from the Initial
Setup menu. Select from among 3 languages:
English, French and Spanish.
Language
If complex adjustments are made and the
settings cannot be restored to normal, you can
reset the settings to the factory preset values.
• The Channel Setup settings will not be changed.
• The Language settings will not be changed.
• The Secret number settings will not be changed.
• The TV Location settings will not be changed.
Allows you to use a secret number to protect
certain settings from being accidentally changed.
New Secret No. :
Enter a 4-digit Secret No. with the number
buttons on the remote control to change your
secret No. .
Confirm Secret No. :
Enter your new 4-digit Secret No. again to
confirm.
Before entering the Individual Setup, user has to
key in the Secret No. first.Enter a 4-digit Secret
No. with the number buttons on the remote
control. The default Secret No. is 0000.
• As a precautionary measure, make a note of your secret
number and keep it in a familiar place.
Used to enable or disable the parental control
function. This function will not be selectable
from the menu if you do not fi rst confi gure your
secret number.
Yes: Enables Parental CTRL.
No: Disables Parental CTRL.
The “V-Chip (DTV Only)” will only be selectable
when a new rating system can be downloaded
via digita broadcasting in the U.S.
If Initial Installation does not memorize all the
channels in your region, follow the instructions
below to manually memorize the channels.
Air/Cable: Make sure what kind of connection
is made with your TV when selecting "Air" or
"Cable".
CH Search: Channel auto search makes the
TV look for all channels viewable in the set area.
CH Memory: You can select the channels to
skip in each ANALOG (Air), ANALOG (Cable),
DIGITAL (Air) and DIGITAL (Cable).
• If no channel is found, confirm the type of connection made
with your TV and try channel search again.
• If you press ENTER after CH search finish, CH search is
re-start.
This function allows you to program 4 favorite
channels, in 4 different categories. By setting
the favorite channels in advance, you can select
your favorite channels easily.
To register your favorite channel:
1.
Press MENU on the remote control and select
“Initial Setup”/“Broadcasting Setup”/
“Favorite CH”.
2. Press / to select the category that you want to
store your favorite channel.
3. Press / to select your desired channel and
press ENTER button to confirm.
To delete your favorite channel
1.
Press MENU on the remote control and select
“Initial Setup”/“Broadcasting Setup”/
“Favorite CH”.
2. Press / to select “All data clear” and press
ENTER to start clearing all favorite channel data.
Broadcasting Setup
CH Setup
Favorite CH (Favorite Channel Setting)
• While watching, you can toggle the selected channels by
pressing the A,B,C, and D button on the remote control.
Air/Cable: Make sure what kind of connection is
made with your TV when selecting "Air" or "Cable".
CH Search: Channel auto search makes the TV
look for all channels viewable in the set area.
• If "Cable" is selected for Antenna setting, scrambled
channels are removed after the Channel search has
been completed.
Completed: The settings confirmation screen is
displayed. Confirm the information displayed on
the screen.
•
See
EZ Setup
on pages 19 to 20 for setting each item.
• If no channel is found, confirm the type of connection made
with your TV and try "EZ Setup" again.
32
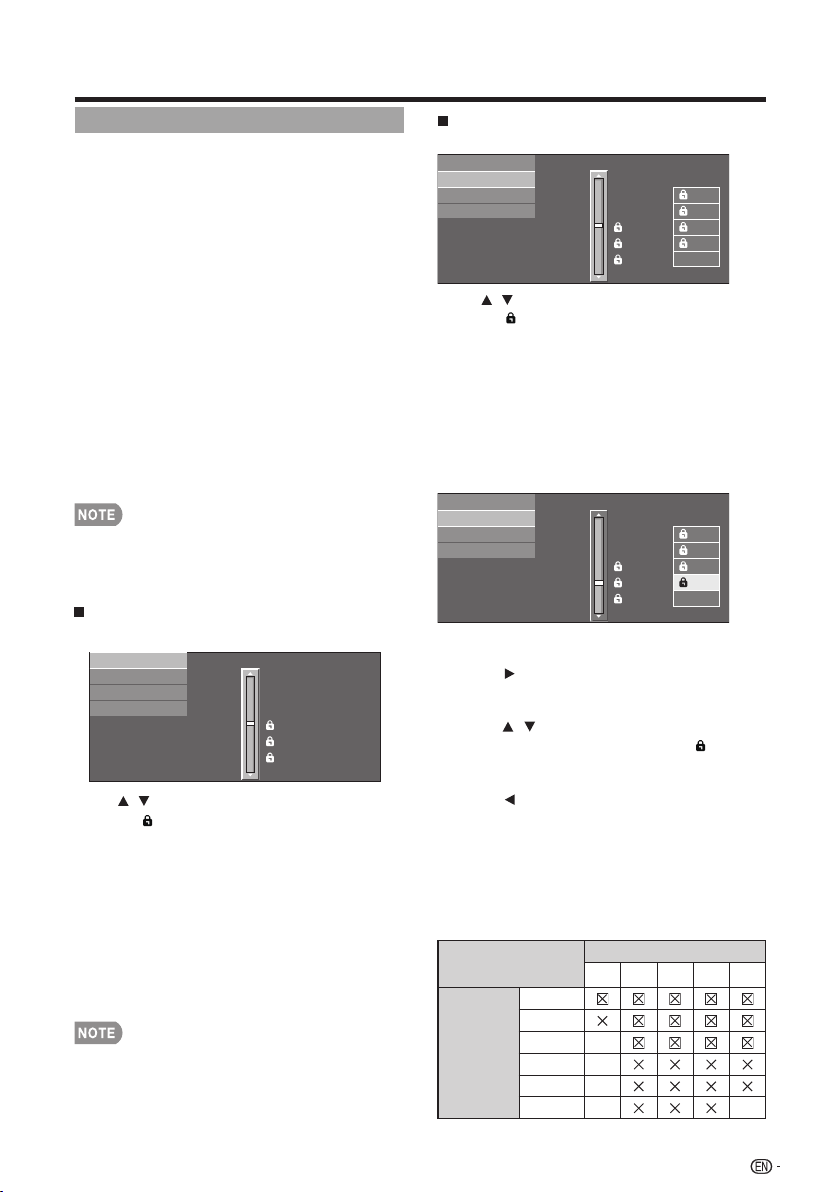
On-Screen Display Menu
V-Chip
V-CHIP is an electronic filtering device built into
your TV. This tool gives parents a great degree
of control over broadcasts accessed by their
children. It allows parents to select programs
judged suitable for child viewing while blocking
ones judged not suitable. It does so
automatically once you activate the V-CHIP
feature in your TV. "V-Chip" and "Status" will
not be selectable from the menu if you do not
first configure your secret number.
• The U.S. has two rating systems for viewing content:
TV Parental Guidelines and movie ratings.
• The TV Parental Guidelines work in conjunction with
the V-CHIP to help parents screen out inappropriate
television shows from their children.
• Movie ratings are used for original movies rated by
the Motion Picture Association of America (MPAA)
as watched on cable TV and not edited for
television. The V-CHIP can also be set to block
MPAA-rated movies.
• The setting automatically enters "Block" for any ratings below
your selection.
• If Status is not set to "On", the confi guration settings will not
work.
MPAA (Voluntary movie rating system)
Example
MPAA
TV Guidelines
Can. English Ratings
Can. French Ratings
PG-13
R
NC-17
X
NONE
PG
G
• Voluntary movie rating system only uses an age-based
rating.
Press / to adjust the item to your desired
position." " indicates the item is blocked.
Press MENU to exit.
G: General audiences. All ages admitted.
PG: Parental guidance suggested. Some material may
not be suitable for children.
PG-13: Parents strongly cautioned. Some material
may be inappropriate for children under 13.
R: Restricted. Under 17 requires accompanying parent
or adult guardian (age varies in some jurisdictions).
NC-17: No one 17 and under admitted.
X: X is an older rating that is unifi ed with NC-17 but
may be encoded in the data of older movies.
TV Parental Guidelines
Example
MPAA
TV Guidelines
Can. English Ratings
Can. French Ratings
TV-G
TV-PG
TV-14
TV-MA
NONE
TV-Y7
TV-Y
L
S
V
FV
D
Example
MPAA
TV Guidelines
Can. English Ratings
Can. French Ratings
TV-G
TV-PG
TV-14
TV-MA
NONE
TV-Y7
TV-Y
L
S
V
FV
D
When setting an individual content-based rating
item:
1. Press or ENTER to access blocked
content items from the currently selected
age-based rating item.
2. Press / to select an individual item, and
then press ENTER to unblock it (" " is
removed). Repeat the same steps for the
other items.
3. Press or RETURN to register after all
individual content rating items are set.
Content
FV: Fantasy violence.
V: Violence.
S: Sexual situation.
L: Adult language.
D: Sexually suggestive dialog.
Rating
Content
FV V S L
D
Suggested
age
TV-Y
TV-Y7
TV-G
TV-PG
TV-14
TV-MA
Press / to adjust the item to your desired
position." " indicates the item is blocked.
Press MENU to exit.
Suggested age
TV-Y: All children.
TV-Y7: Directed to older children.
TV-G: General audience.
TV-PG: Parental Guidance suggested.
TV-14: Parents strongly cautioned.
TV-MA: Mature audience only.
33
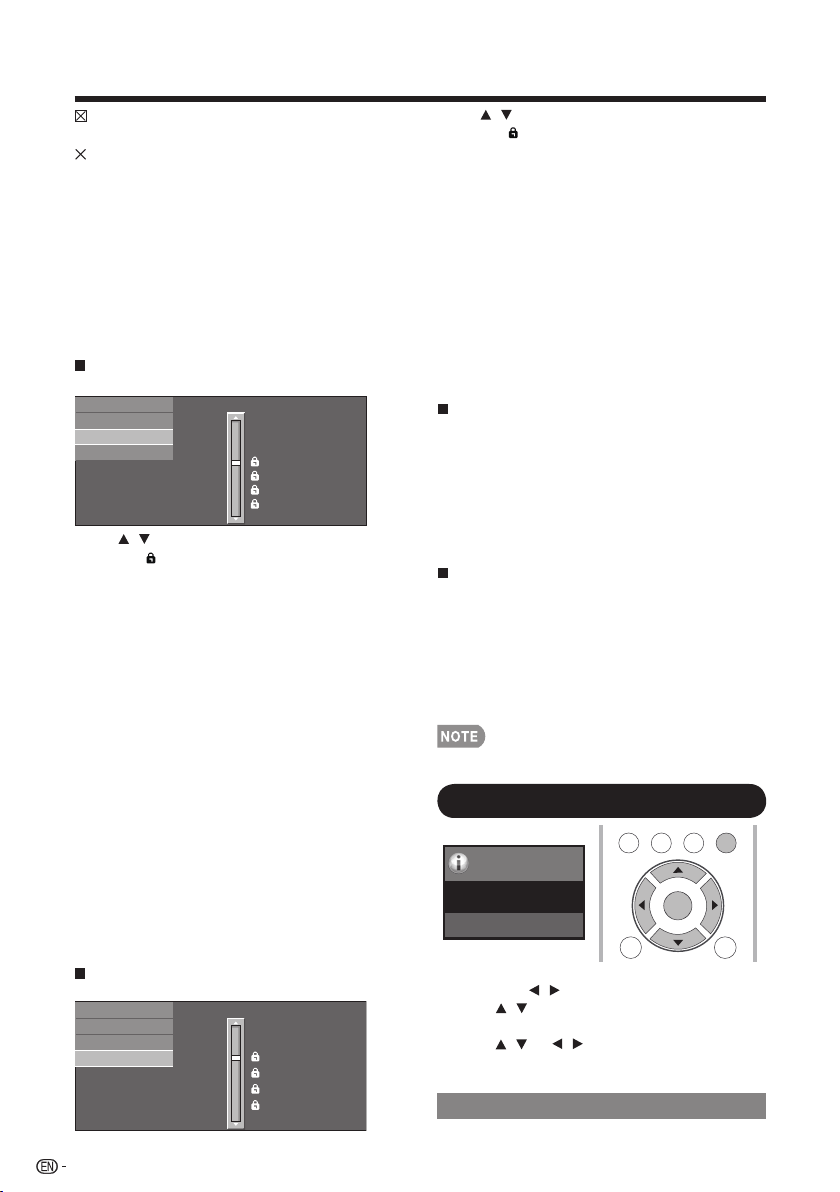
On-Screen Display Menu
: The content rating can be set, but this
rating is not normally broadcast by TV stations.
: Content rating can be set.
Canadian Rating Systems (Canadian English
ratings and Canadian French ratings)
• The TV rating systems in Canada are based on the
Canadian Radio-Television and Telecommunications
Commission (CRTC) policy on violence in television
programming.
• While violence is the most important content
element to be rated, the structure developed takes
into consideration other program content like
language, nudity, sexuality and mature themes.
• When setting the V-CHIP on the Canadian system
you can choose either the Canadian English ratings
or the Canadian French ratings.
Canadian English Ratings
Example
MPAA
TV Guidelines
Can. French Ratings
E
C
C8+
G
PG
14+
18+
NONE
Can. English Ratings
Press / to adjust the item to your desired
position. " " indicates the item is blocked.
Press MENU to exit.
E: Exempt: Includes news, sports, documentaries and
other information programming; talk shows, music
videos, and variety programming.
C: Children: Intended for younger children under the
age of 8 years. Pays careful attention to themes that
could threaten their sense of security and well-being.
C8+: Children over 8 years old: Contains no portrayal
of violence as the preferred, acceptable, or only way
to resolve confl ict; nor encourage children to imitate
dangerous acts which they may see on the screen.
G: General: Considered acceptable for all age groups.
Appropriate viewing for the entire family, contains
very little violence, physical, verbal or emotional.
PG: Parental Guidance: Intended for a general
audience, but may not be suitable for younger
children (under the age of 8) because it could
contain controversial themes or issues.
14+: Over 14 years: Could contain themes where
violence is one of the dominant elements of the
storyline, but it must be integral to the development of
plot or character. Language usage could be profane
and nudity present within the context of the theme.
18+: Adults: Intended for viewers 18 years and older and
might contain depictions of violence, which while
related to the development of plot, character or
themes, are intended for adult viewing. Could contain
graphic language and portrayals of sex and nudity.
Reactivating the temporarily released
V-CHIP BLOCK
You can reactivate the temporarily released
V-CHIP BLOCK as shown below.
• Select "Status" setting from the Parental CTRL menu to
reactivate BLOCK. (See page 32.)
• Select "V-Chip" setting ("MPAA", "TV Guidelines", "Can.
English Ratings" or "Can. French Ratings") from the
Parental CTRL to reactivate BLOCK. (See pages 33 to 34.)
• Switch off the TV power.
• Performing any of the three above will activate the V-CHIP BLOCK.
1. Press MENU to display the MENU screen, and
then press / to select "Information".
2. Press / to select a specific adjustment item,
and then press ENTER.
3. Press / (or / ) to select the desired
setting, and then press ENTER.
4. Press MENU to exit.
Press / to adjust the item to your desired
position. " " indicates the item is blocked. Press
MENU to exit.
E: Exempt programming.
G: General: All ages and children, contains minimal
direct violence, but may be integrated into the plot
in a humorous or unrealistic manner.
8ans+: General but inadvisable for young children:
May be viewed by a wide public audience, but could
contain scenes disturbing to children under 8 who
cannot distinguish between imaginary and real
situations. Recommended for viewing with parent.
13ans+: Over 13 years: Could contain scenes of
frequent violent scenes and therefore recommended
for viewing with parent.
16ans+: Over 16 years: Could contain frequent violent
scenes and intense violence.
18ans+: Over 18 years: Only for adult viewing. Could
contain frequent violent scenes and extreme
violence.
How to temporarily release the V-CHIP
BLOCK
When the V-CHIP BLOCK is working and
censors a broadcast, "V-CHIP HAS BEEN
ACTIVATED." displays.
1. Press ENTER while the V-CHIP is working, and
then the secret number setting menu displays.
2. Input the 4-digit secret number by using 0–9.
At this time V-CHIP BLOCK temporarily releases.
Information
Example
Menu
Identification
Information
Information
The current version of the TV software is displayed.
TV US B
PC
MENU
RETURNEXIT
ENTER
Canadian French Ratings
Example
MPAA
TV Guidelines
Can. French Ratings
Can. English Ratings
8ans+
13ans+
16ans+
18ans+
NONE
G
E
Identification
34
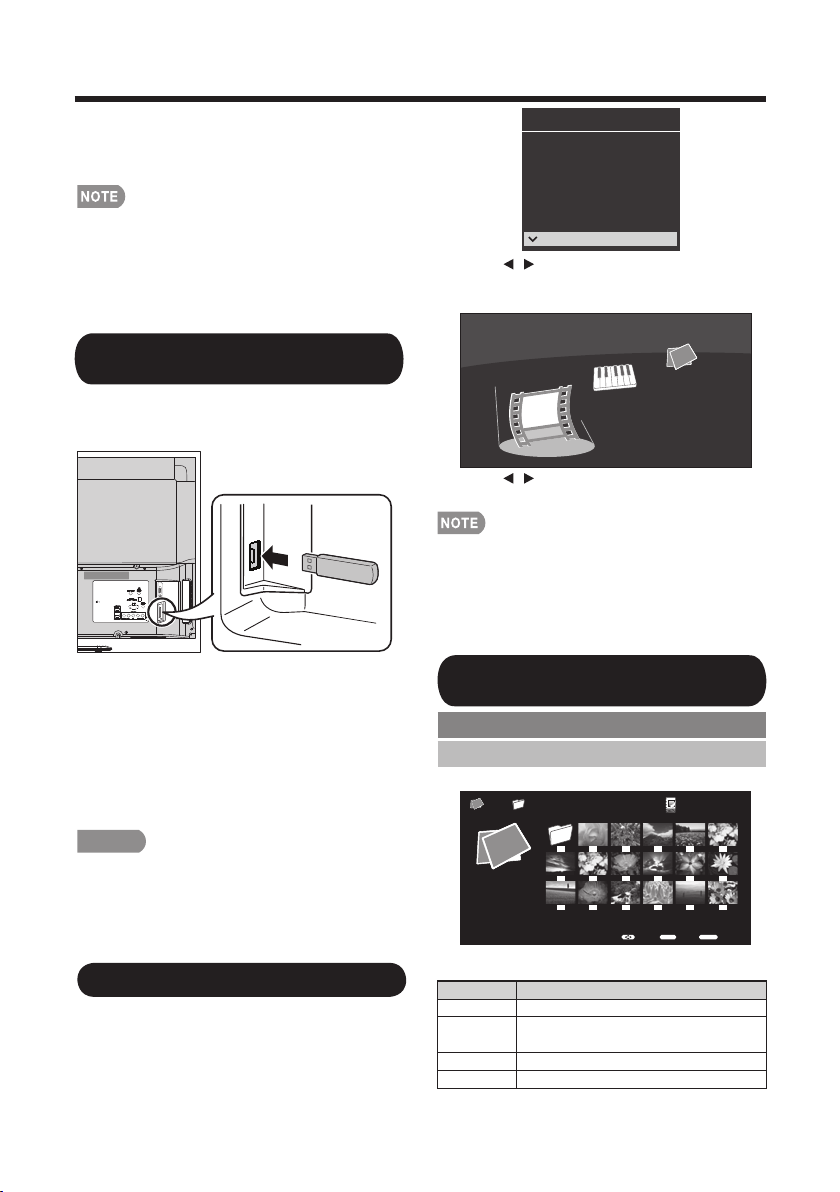
35
Enjoying Photo/Music/Video Playback
You can connect the TV to a USB memory
device, USB hard drive to enjoy viewing
pictures, listening to music, and watching
videos.
Connecting a USB Memory Device/
USB Hard Drive
• Depending on the USB memory device/USB hard drive, the
TV may not be able to recognize the recorded data.
• It may take time to read the recorded data if the USB
memory device/USB hard drive contains many files or folders.
• Use only alphanumeric characters for naming files.
• File names over 80 characters (may vary depending on
character set) may not be displayed.
Insert the USB memory device with recorded
photos, music or videos into the USB terminal
on the TV.
• When connecting a USB hard drive, be sure to use
a hard drive with an AC adapter.
• Do not remove a USB memory device or memory
card from the TV while transferring files, using the
slide show function, or switching screens, or before
you exit "USB" from the INPUT list.
• Do not insert and remove a USB memory device/
USB hard drive to and from the TV repeatedly.
• When using a card reader, be sure to insert Memory
first before using the card reader.
CAUTION
• Do not use a USB extension cable when
connecting a USB memory device to the USB
terminal on the TV.
• Using a USB extension cable with the USB
memory device may prevent the TV from
performing correctly.
2. Press / to select "Photo", "Music" or
"Video", and then press ENTER.
Music
Photo
Video
Example
3. Press / to select the desired folder,
and then press ENTER.
• 16GB is the maximum number of USB drives that can be
displayed.
• "VIEW MODE" is fixed during the Photo or Music mode.
During "Video mode", is depending on the type of video
signal currently being received.(see page 25)
• The key guide display disappears automatically after a set
time. To display the key guide display again, press DISPLAY.
INPUT1
INPUT2
INPUT3
INPUT4
TV
PC IN
Input Source
HDMI1
HDMI2
HDMI3
COMP/AV
USB
Playing Back Files on a USB
Memory Device
Example
Photo Mode
Viewing Thumbnails
1. Press INPUT to select USB from the input
list or press USB direct button to enter it.
Select the Files to Play Back
Buttons for thumbnails operations
Buttons Description
Select a desired item.
RETURN
Return to the previous process.
Menu
Sub Menu
ENTER
When selecting a folder icon: Enter this directory.
When selecting a photo thumbnail: Slide show.
▲/▼/
▲
▲
/
USB MediaPhoto
01/02\Photo
EnterSelect
Back
ENTER RETURN
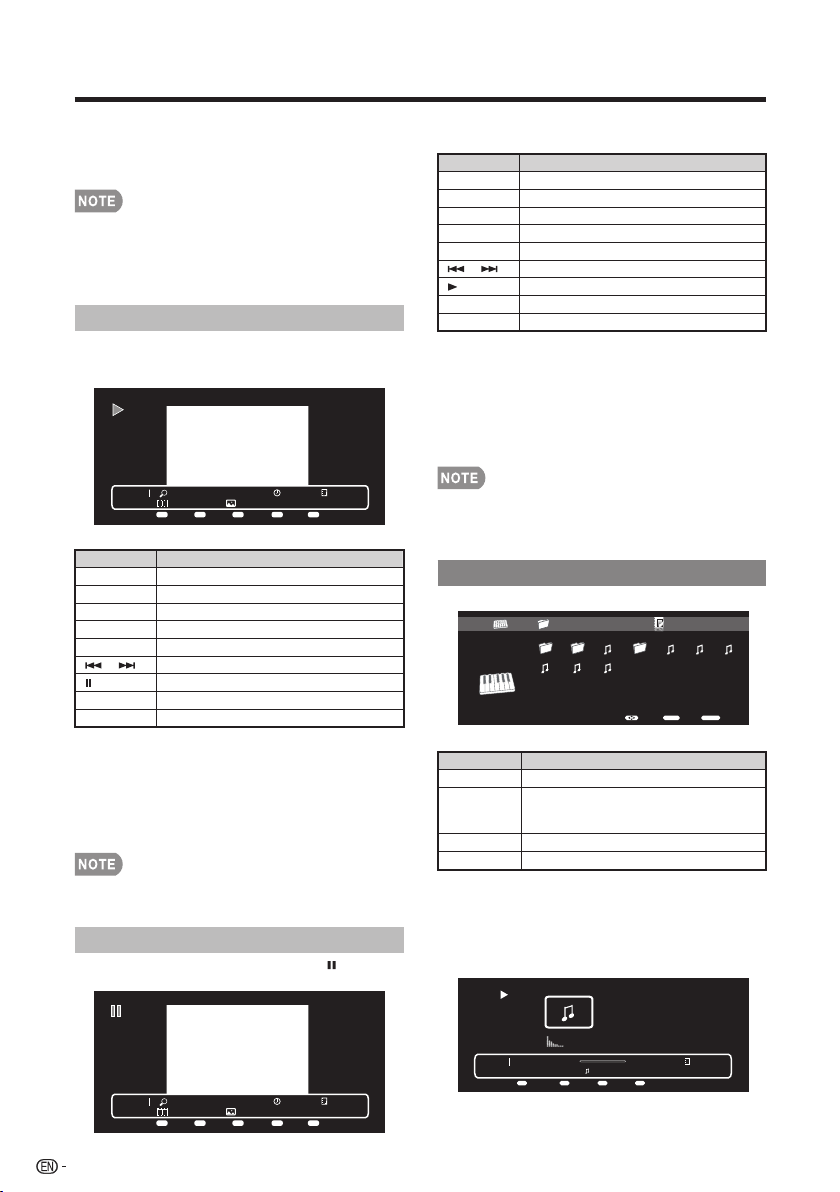
Enjoying Photo/Music/Video Playback
36
Press MENU to display the sub-menu. You can
select the following options to display the photos.
• Pause
• Repeat
• Shuffle
• Duration
• Effect
• Show Info
Music Mode
Slide Show
Buttons for slide show operation
Photo 1x
IMG_9690.jpgNone
Short 1/29
Menu Repeat Duration Effect ShuffleMenu A B C D
Buttons Description
EXIT Return to the thumbnail selection screen.
Menu Sub Menu.
DISPLAY Display the information.
A (red) Repeat one / Repeat all.
B (green) Select slider show interval.
C (blue) Select slide show effect.
D (yellow) Play the photo in random order.
Go to the previous/next photo.
Viewing individual photo.
Buttons for viewing Individual Photos
operation
Buttons Description
EXIT Return to the thumbnail selection screen.
Menu Sub Menu
DISPLAY Display the information.
A (red) Repeat one / Repeat all
B (green) Rotate the photo by 90 degrees to the right.
C (blue) Zoom photo.
D (yellow) Play the photo in random order.
Go to the previous/next photo.
Slider show.
The photo selected on the thumbnail selection
screen by press ENTER.
Example
Example
Example
Example
Buttons for music mode
Press MENU to display the sub-menu. You can
browse the files by the following options.
• Sort
• Media Type
• Thumbnail size
Buttons Description
When selecting a folder icon: Enter this
directory.
When selecting a music file: Play music.
Select a desired item.
ENTER
Return to the previous process.
RETURN
Sub Menu
Menu
Press MENU to display the sub-menu. You can
select the following options to display the photos.
• Play
• Repeat
• Shuffle
• Rotate
• Zoom
• Show Info
Press MENU to display the sub-menu. You can
browse the files by the following options.
• Sort
• Media Type
• Thumbnail size
• When there are invalid photo files, the X mark will be display
for the file.
• You can see the file name, shooting date, file size and pixel
size of the selected photo in the top-left corner of the screen
(shooting date is only available in the EXIF file format).
• The key guide display disappears automatically after a set time.
To display the key guide display again, press DISPLAY.
The photo in slide show by pressing .
/
Photo 1x
G%25C3%2592TIC-DESCANSANT.jpgNone
Short 5/29
Menu
Repeat Rotate Zoom Shuffle
Menu A B C D
Viewing Individual Photos
/
• The key guide display disappears automatically after a set time.
To display the key guide display again, press DISPLAY.
• Rotating photos only applies to the temporarily selected item
and this setting is not saved.
▲/▼/
▲
▲
/
Music 00:00:03 00:04:49
2.mp3
3/8
Menu
Repeat Shuffle
Menu
A B
Show Info
D
USB Media01/02
\Music
Music
2011-05-27 001 3pm.43pm.33pm.23pm.1100 003
5.mp3 6.mp3 7.mp3
EnterSelect
Back
ENTER RETURN
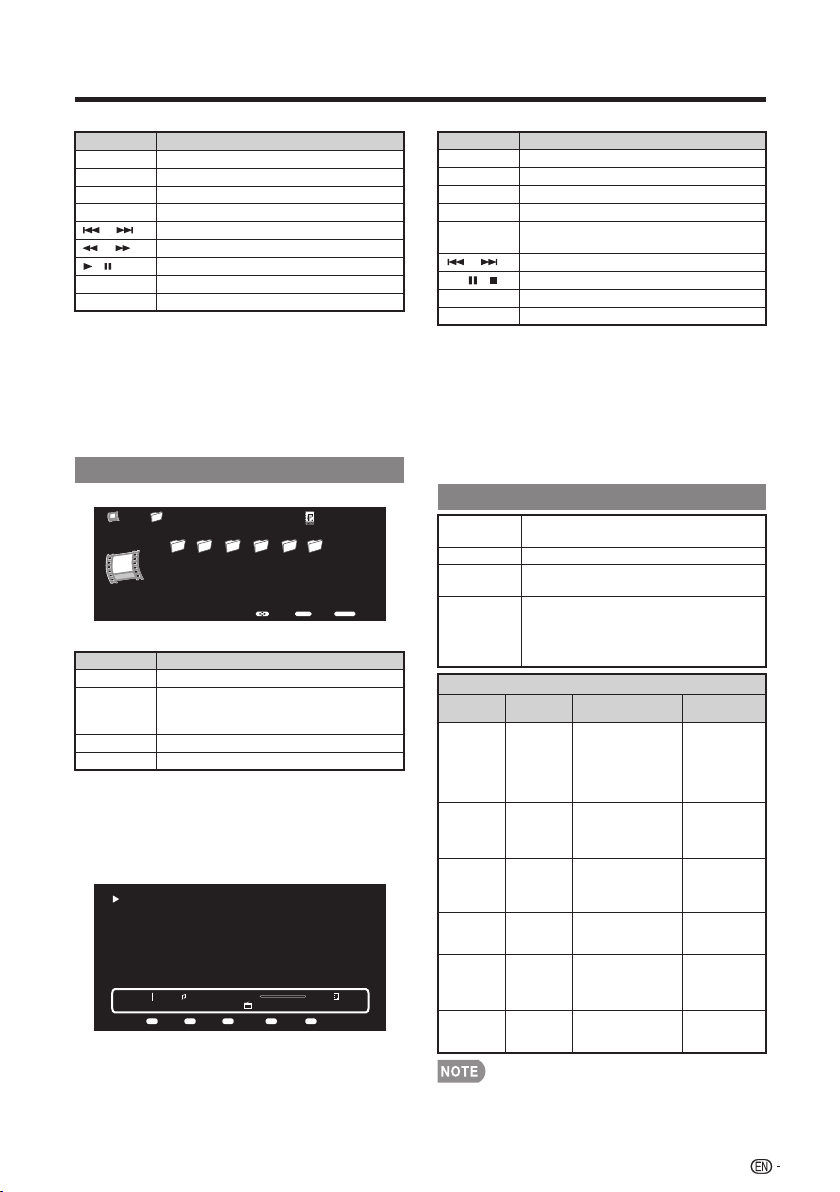
Enjoying Photo/Music/Video Playback
37
Example
Example
Video Mode
Buttons for Video mode
Buttons for playing VideoButtons for playing music
Press MENU to display the sub-menu. You can
browse the files by the following options.
• Sort
• Media Type
• Thumbnail size
Buttons Description
When selecting a folder icon: Enter this
directory.
When selecting a video file: Play video.
Select a desired item.
ENTER
Return to the previous process.
RETURN
Sub Menu
Menu
Buttons Description
Return to the thumbnail selection screen.
EXIT
Repeat one / Repeat all
A(red)
Backward
B(green)
Forward
C (blue)
Repeat AB. Select the part you want to
play repeatedly.
D (yellow)
Sub Menu
Display the information.
Play/Pause/Stop.
Go to the next/previous video.
Menu
USB Device Compatibility
• Operation using USB hubs is not guaranteed.
• Some video file formats may not be played depending on the file.
• Some images may not be displayed in the appropriate aspect
ratio depending on the file format.
USB device USB Memory, USB card reader (Mass
Storage class), USB hard drive
FAT/FAT32/NTFS (USB hard drive only)File system
Photo file
format
JPEG (.jpg .jpeg) Progressive JPEG
(.jpg .jpeg) BMP (.bmp) PNG (.png)
Music file
format
MP3 (.mp3)
Bitrate: 32k, 40k, 48k, 56k, 64k, 80k,
96k, 112k, 128k, 160k, 192k, 224k,
256k, 320kbps
Sampling frequency: 32k, 44.1k, 48kHz
Video file format
File
extension
Container Video Audio
.avi AVI
XviD
H.264
MPEG4
Motion Jpeg
MPEG2
MPEG1
MP3
AC3
LPCM
ADPCM
.mkv MKV
XviD
H.264
MPEG4
MPEG2
MP3
AC3
LPCM
ADPCM
.asf
ASF
XviD
H.264
MP3
AC3
LPCM
ADPCM
.mp4
MP4
(SMP4)
XviD
H.264
MPEG4
MP3
AAC-LC/
HEAAC
.mov
MP4
(SMP4)
XviD
H.264
MPEG4
Motion Jpeg
MP3
AAC-LC/
HEAAC
.mpg
.mpeg
PS
MPEG2
MPEG1
AC3
LPCM
MPEG
Press MENU to display the sub-menu. You can
select the following options to play the musics.
• Pause
• Repeat
• Shuffle On
• Show Info
• Hide Spectrum
• Lyric options
/
/
/
Buttons Description
Return to the thumbnail selection screen.
EXIT
Repeat one / Repeat all
A(red)
Play the music in random order.
Go to the next/previous photo.
Forward/Backward.
Play/Pause.
B(green)
Display the information.
D(yellow)
Sub Menu
Menu
Display the information.
DISPLAY
▲/▼/
▲
▲
/
Press MENU to display the sub-menu. You can
follow the options to play the videos.
• Pause
• Repeat
• Program
• Show Info
• AV Mode
• Title
• Edition
• Chapter
• View Mode
DISPLAY
/
/ /
▲
Menu Repeat Backward Forward Repeat ABMenu A B C D
Vedio 1/1
OK. You know, most of the collection here was put together during the Ching dynasty.
So, what did you think?
I was impressed with the landscape paintings, and all the jade carvings.
That jadecabbage just can't be beat!
Some of the bronze pieces go back to the 17th century B.C., but the collection itself was
set up by the first emperor of the Sung dynasty over a thousand years ago.
That's the same style roof as on the Chiang Kai-shek Memorial and the
Concert Hall, right? It seems like I've seen it before.
1/1
00:00:08 00:19:23
_ _Epic-Putin paws women voters_-1
EnterSelect
Back
ENTER RETURN
USB Media\ 01/02Video
menu2 Microsoft GIF... images_169 Araxis Merge v... Music Photo _Epic_puti..
OK.Youknow,mostofthecollectionherewasputtogetherduringtheChing dynasty.
So,whatdidyouthink?
Iwasimpressedwiththelandscapepaintings,andallthejadecarvings.
Thatjadecabbagejustcan'tbebeat!
Someofthebronzepiecesgobacktothe17thcenturyB.C.,butthecollectionitselfwas
setupbythefirstemperoroftheSungdynastyoverathousandyearsago.
That'sthesamestyleroofasontheChiangKai-shekMemorialandthe
ConcertHall,right?ItseemslikeI'veseenitbefore.
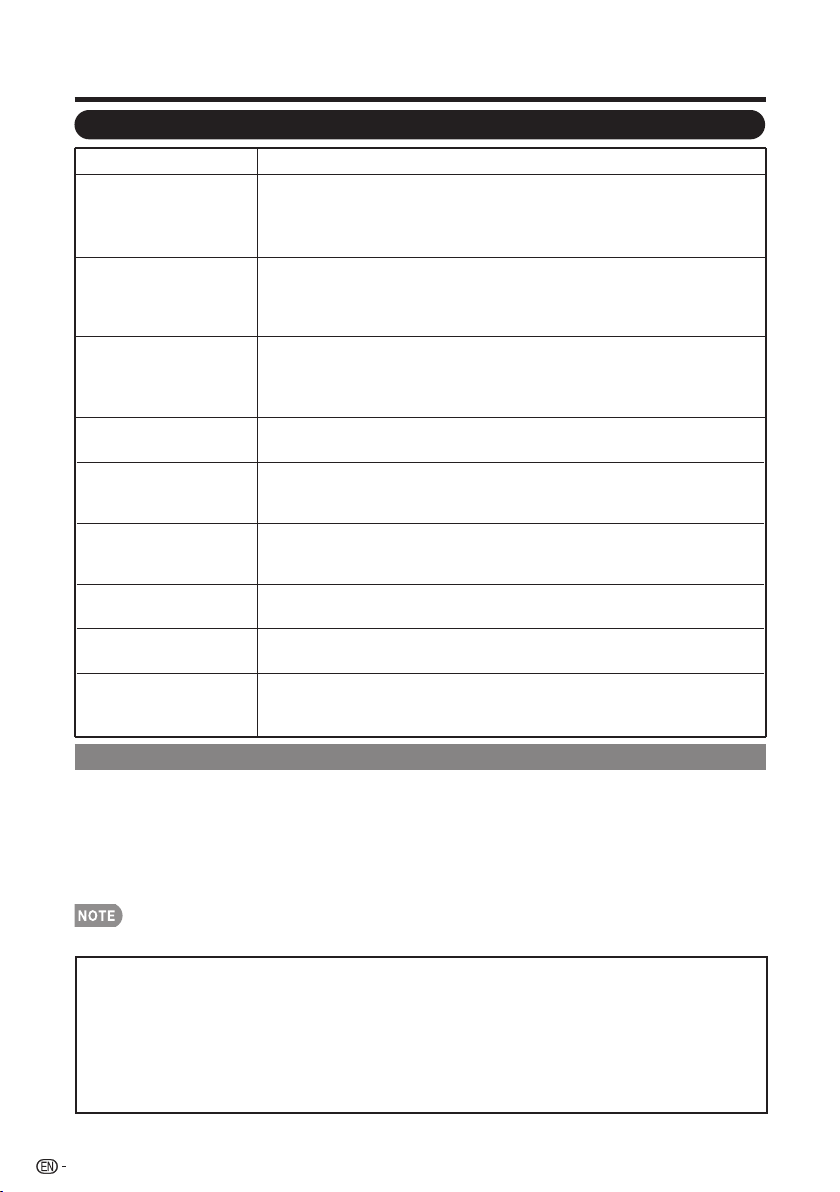
Appendix
38
Troubleshooting
Possible SolutionProblem
• No power
• Check if you pressed POWER on the remote control unit. (See page
19.) If the indicator on the TV is still red, press POWER on the TV.
• Is the AC cord disconnected? (See page 8.)
• Has the power been turned on? (See page 19.)
• Unit cannot be
operated.
• External influences such as lightning, static electricity, may cause
improper operation. In this case, operate the unit after first turning
off the power of the TV or unplugging the AC cord and re-plugging
it after 1 or 2 minutes.
• Remote control unit
does not operate.
• Are batteries inserted with polarity ( +, - ) aligned? (See page 10.)
• Are batteries worn out? (Replace with new batteries.)
• Are you using it under strong or fluorescent lighting?
• Is a fluorescent light illuminated near the remote control sensor?
• Picture is cut off/with
sidebar screen.
• Are screen mode adjustments such as picture size made correctly?
(See page 23.)
• Strange color, light
color, or color
misalignment.
• Power is suddenly
turned off.
• No picture
• No sound
• The TV sometimes
makes a cracking
sound.
• This is not a malfunction. This happens when the cabinet slightly
expands and contracts according to change in temperature. This
does not affect the TV’s performance.
Cautions regarding use in high and low temperature environments
• When the unit is used in a low temperature space (e.g. room, office), the picture may leave
trails or appear slightly delayed. This is not a malfunction, and the unit will recover when the
temperature returns to normal.
• Do not leave the unit in a hot or cold location. Also, do not leave the unit in a location exposed
to direct sunlight or near a heater, as this may cause the cabinet to deform and the Liquid
Crystal panel to malfunction.
Storage temperature: -4°F to +140°F (-20°C to +60°C)
• Adjust the picture tone. (See page 26 and 27.)
• Is the room too bright? The picture may look dark in a room that
is too bright.
• Is the sleep timer set? (See page 21.)
• The unit’s internal temperature has increased. Remove any
objects blocking vent.
• Is connection to other components correct? (See page 16.)
• Is the correct input selected? (See page 14.)
• Is the volume too low? (See page 21.)
• Have you pressed MUTE on the remote control unit? (See page 21.)
CLEARING THE MASTER PASSWORD
If you forgot the password number, reset the secret number by following the procedures below:
1. Press MENU
2. Select "InitialSetup", press "ENTER"
3. Select "Individual Setup", press "ENTER"
4. Press number 7071
5. Select "Secret No."
6. Enter new password
• As a precautionary measure, make a note of your secret number above, cut it from this manual, and keep it in a safe place.
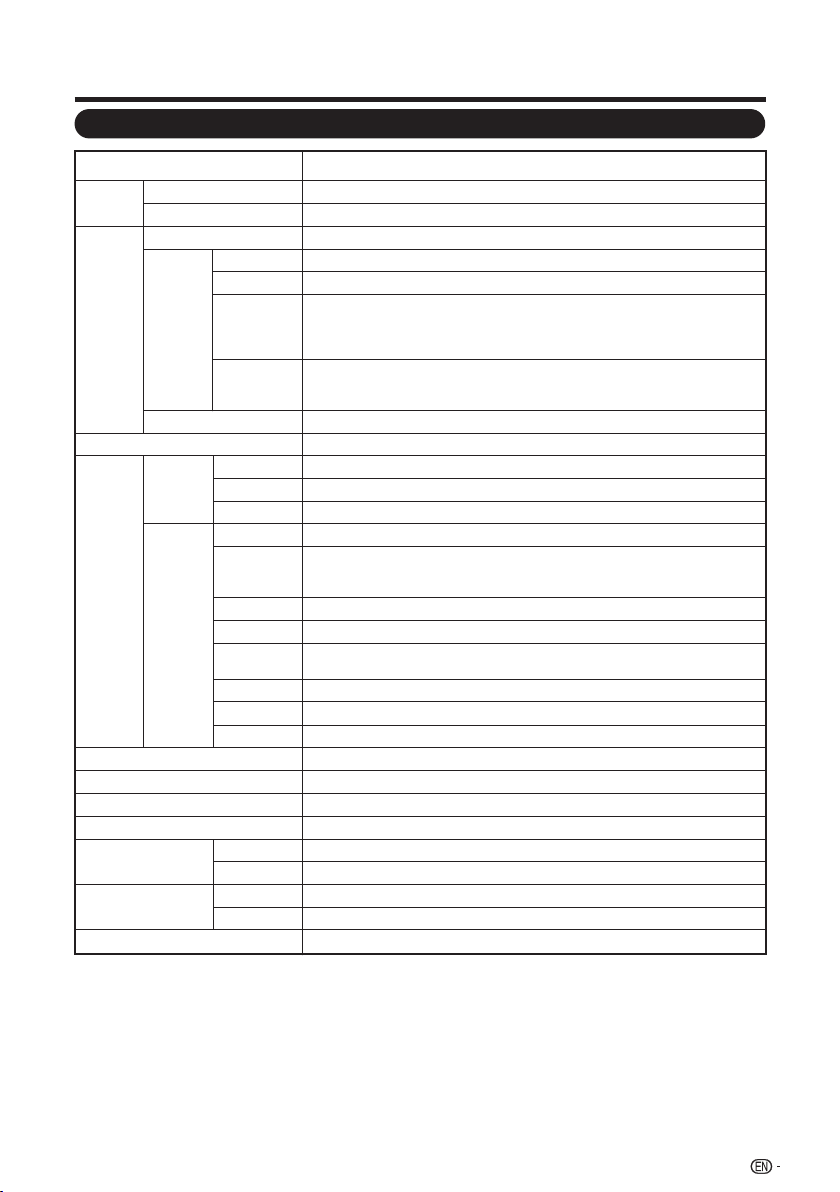
Specifications
Appendix
39
Model: LC-40LE550U
Item
LCD
panel
Size
Resolution 2,073,600 pixels (1,920 x 1080)
TV
Function
TV-standard (CCIR) American TV Standard ATSC/NTSC System
Receiving
Channel
VHF/UHF VHF 2-13ch, UHF 14-69ch
CATV 1-135ch (non-scrambled channel only)
Digital
Terrestrial
Broadcast
(8VSB)
2-69ch
Digital cable
(64/256
QAM)
*1
1-135ch (non-scrambled channel only)
Audio multiplex BTSC System
10 W x 2Audio out
Terminals
Side
INPUT 4
RS-232C 9-pin D-sub male connector
Rear
COMPONENT/ AV in
PC IN
AUDIO
PC/HDMI
ANALOG RGB (PC) in (15-pin mini D-sub female connector)
Audio in (Ø 3.5 mm jack)
ANT/CABLE
75Ω Unbalance, F Type x 1 for Analog And Digital (VHF/ UHF/ CATV)
DIGITAL
AUDIO
OUTPUT
Optical Digital audio output x 1 (PCM/Dolby Digital)
English/French/SpanishOSD language
AC 120V, 60Hz
50W
Power Requirement
89W (0.5W Standby with AC 120V)Power Consumption
ON MODE POWER
Weight
TV + stand 20.5 lbs. / 9.3 kg
TV only 18.5 lbs. / 8.4 kg
Dimension
(W x H x D)
TV + stand
TV only
Operating temperature +32°F to +104°F (0°C to +40°C)
INPUT 1 HDMI in with HDCP, Audio in (Ø 3.5 mm stereo jack)
INPUT 2 HDMI in with HDCP, Audio in (Ø 3.5 mm stereo jack)
INPUT 3 HDMI in with HDCP, Audio in (Ø 3.5 mm stereo jack)
USB Photo/Music/Video mode, Software update
Headphone Headphone out
• As part of policy of continuous improvement, SHARP reserves the right to make design and specification changes for product
improvement without prior notice. The performance specification figures indicated are nominal values of production units.
There may be some deviations from these values in individual units.
*1
Emergency alert messages via Cable are unreceivable.
*2 The dimensional drawings are shown on the inside back cover.
*2
36
5
/
16
x 23
3
/
64
x 9
7
/
64
inch
36
5
/
16
x x 3
19
/
32
21
47
/
64
inch
40 40
o
Class ( o Diagonal )
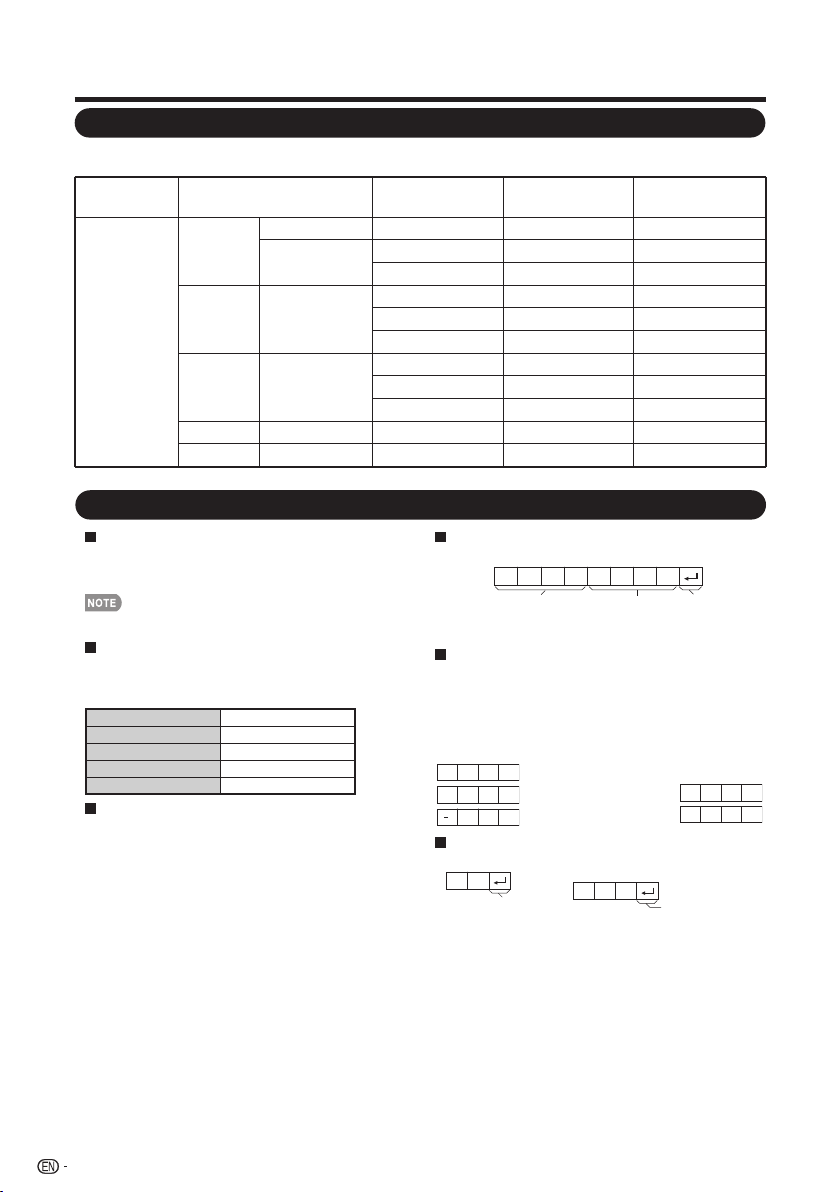
PC Compatibility Chart
Appendix
It is necessary to set the PC correctly to display XGA and WXGA signal.
PC Resolution
Horizontal
Frequency
Vertical
Frequency
VESA Standard
PC
VGA
720 x 400 31.46 kHz 70.08 Hz —
640 x 480
31.47 kHz 59.94 Hz O
37.50 kHz 75.00 Hz O
SVGA 800 x 600
37.88 kHz 60.32 Hz O
48.08 kHz 72.19 Hz O
46.88 kHz 75.00 Hz O
XGA 1024 x 768
48.36 kHz 60.00 Hz O
56.48 kHz 70.07 Hz O
60.02 kHz 75.03 Hz O
WUXGA 1920 x 1080 66.58 kHz 59.94 Hz O
WXGA 1366 x 768 47.71 kHz 59.79 Hz O
40
RS232 Port Specifications
PC control of the TV
• Attach an RS-232C cable cross-type (commercially
available) to the supplied Din/D-Sub RS-232C for the
connections.
This operation system should be used by a person who is
accustomed to using computers.
Communication conditions
Set the RS-232C communication settings on the PC to
match the TV's communication conditions.
The TV's communication settings are as follows:
•
Communication procedure
Send the control commands from the PC via the RS-
232C connector.
The TV operates according to the received command
and sends a response message to the PC.
Do not send multiple commands at the same time.
Wait until the PC receives the OK response before
sending the next command.
Parameter
Input the parameter values, aligning left, and fi ll with
blank(s) for the remainder. (Be sure that 4 values are
input for the parameter.)
When the input parameter is not within an adjustable
range, “ERR” returns. (Refer to “Response code format”.)
Any numerical value can replace the “x” on the table.
3 0
0 0 0 9
0
? ? ? ?
?
When “?” is input for some
commands, the
present setting
value responds.
Command format
Eight ASCII codes
+
CR
Command 4-digits
Parameter 4-digits
Return code
C1 C2 C3 C4 P1 P2 P3 P4
Command 4-digits: Command. The text of four characters.
Parameter 4-digits: Parameter 0–9, x, blank, ?
Baud rate: 9,600 bps
Data length: 8 bits
Parity bit: None
Stop bit: 1 bit
Flow control: None
Response code format
Normal response
Return code (0DH)
Return code (0DH)
Problem response (communication
error or incorrect command)
O K
E R R
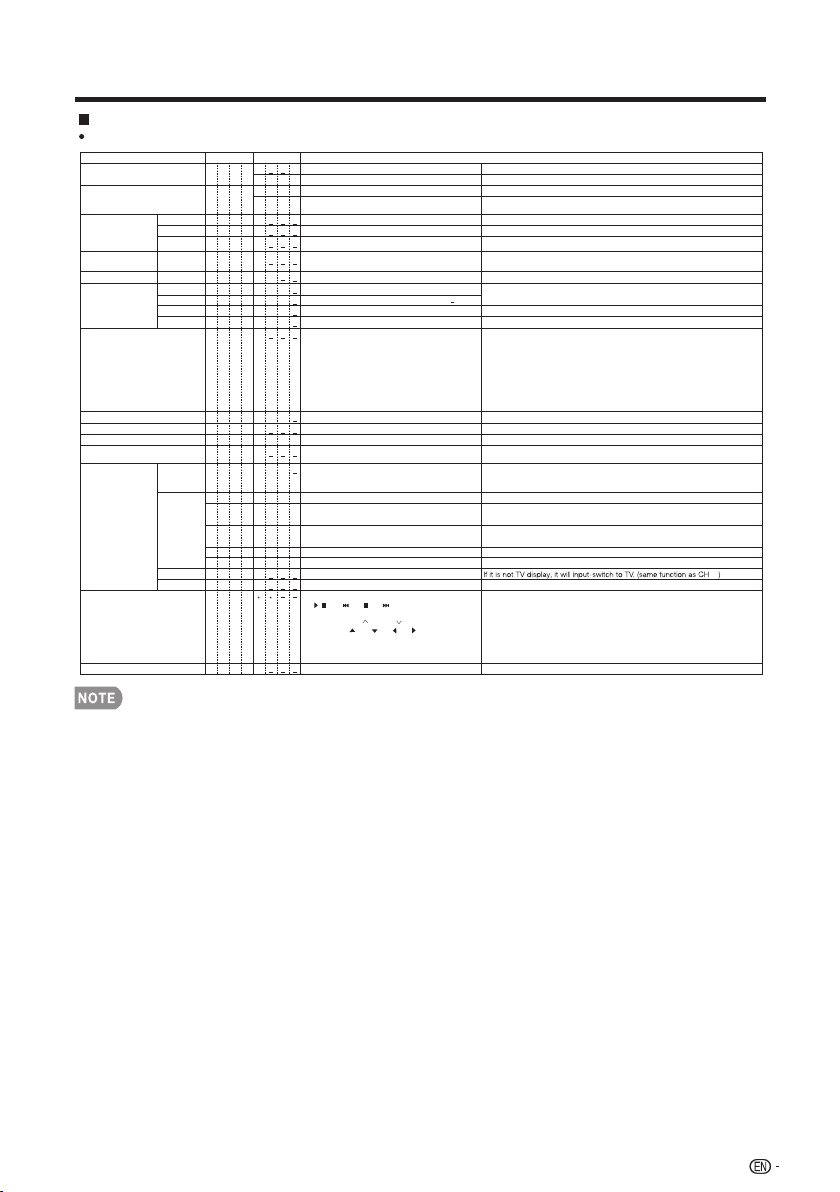
D C 1 0 * * * *
Appendix
Command table
Commands not indicated here are not guaranteed to operate.
CONTROL ITEM COMMAND PARAMETER
CONTROL CONTENTS
POWER ON COMMAND SETTING
POWER SETTING
The Power On command rejected.
It input-switches by the toggle. (It is the same as an input change key)
It input-switches to TV. (A channel remains as it is. (Last memory))
It input-switches to INPUT1~INPUT6.
Although it can choose now, it is toggle operation in inside.
The screen position variable ranges depend on the View Mode or the
signal type. The ranges can be seen on the position-setting screen.
(Toggle)
Input terminal number (1–6)
An input change is included if it is not TV display.
In Air, 2–69ch is effective.
In Cable, 1–135ch is effective.
0: (Toggle), 1: On, 2: Off
0: Off, 1: OFF TIMER – 30 MIN., 2: OFF TIMER – 60 MIN.,
3: OFF TIMER – 90 MIN., 4: OFF TIMER – 120 MIN.
The channel number of TV
The channel number of TV +1
The channel number of TV –1
(1–135)
R S P W
I T G D
I T V D
I A V D
INPUT SELECTION A
AV MODE SELECTION
VOLUME
POSITION
VIEW MODE
SURROUND
SLEEP TIMER
CHANNEL
REMOTE CONTROL BUTTONS
DIRECT
(ANALOG)
(DIGITAL)
CH UP
CH DOWN
CHANNEL
H-POSITION
V-POSITION
CLOCK
PHASE
A V M D
V O L M
H P O S
V P O S
C L C K
P H S E
A C S U
O F T M
D C C H
C H U P
R C K Y
0-9: 0-9, 10: dot, 11: ENT, 12: POWER, 13: DISPLAY,
16: / ,19: ,20: ,21: , 24: SLEEP, 27: CC,
28: AV MODE, 30: FLASHBACK, 31: MUTE, 32: VOL - ,
33: VOL + , 34: CH , 35: CH , 36: INPUT, 38: MENU,
40:ENTER, 41: , 42: , 43 ,44: , 45: RETURN,
46: EXIT, 48:SURROUND, 49: AUDIO, 50: A (red),
51: B (green), 52: C (blue), 53: D (yellow), 54: FREEZE,
60: TV, 61:USB, 62: PC.
C H D W
W I D
0
x
0
*
*
*
*
*
*
*
*
*
*
x
x
*
*
*
*
*
*
*
*
*
*
*
*
DIGITAL Air (Two-Part numbers, 2-digit plus 2-digit)(0100-9999)
(1-999)
(0-999)
(0-9999)
(0-6383)
DIGITAL Cable (Two-Part numbers, 3-digit plus 3-digit)
DIGITAL Cable (Two-Part numbers, 3-digit plus 3-digit)
Front half of DIGITAL CABLE CHANNEL NO. (Designate major channel)
Rear half of DIGITAL CABLE CHANNEL NO. (Designate minor channel)
DIRECT
CHANNEL
D A 2 P * * * *
D C 2 U * * * _
D C 2 L * * * _
DIGITAL Cable (One-Part numbers, 5-digit, less than 10,000)
DIGITAL Cable (One-Part numbers, 5-digit, more than 10,000)
D C 1 1 * * * *
Toggle operation of a closed caption.(Toggle)
CC
C L C P
x
(Toggle)
AUDIO SELECTION
A C H A x _ _ _
0: (Toggle), 1: On, 2: Off
MUTE
M U T E * _ _
_ Off
The Power On command accepted.1 _ _ _ On
The Power On Command must be waited until system is completely Power Off (LED power
indicator turns to be Red)
1 _ _ _ Power On
It shifts to standby.P O W R 0 _ _ _ Power Off
TV
INPUT1-6
If an underbar (_) appears in the parameter column, enter a space.
•
If an asterisk (*) appears, enter a value in the range indicated in brackets under CONTROL CONTENTS.
•
Any numerical value can replace the “x” on the table.
•
<
<
If it is not TV display, it will input-switch to TV. (same function as CH )
0: Although it can choose now, it is toggle operation in available items.
1: Available in [AV] SD timing and [PC] except some timing (*1)
2,3,4: Only available when [AV] signal is being input.
5: Available in [AV] 720p and [PC] except 1280x720, 1920x1080 timing.
6: Available in [AV] 1080i and 1080p timing and [PC] except 1600x1200, 1280x1024(LC-32SV40U)
and 1400x1050(LC-32SV40U).
7: Only available in [PC] except some timing(*2)
(*1)1360x768, 1366x768, 1280x1024, 1400x1050, 1600x1200, 1920x1080
(*2)1360x768, 1366x768, 1280x720, 1920x1080
Only PC mode. (0–40,menu display range+/-20)
Only PC mode. (0–180,menu display range+/-90)
Only PC mode. (0–40,menu display range+/20)
Only PC mode. (0–100,menu disolay range+/-50)
Volume (0–100)
0:(Toggle) 1:Normal 2:S.Stretch 3:Stretch 4:Zoom
5:Full Screen 6:Dot by Dot 7:Cinema)
0:(TOGGLE) ,1:STANDARD,2:MOVIE,3:GAME,4:PC,
5:DYNAMIC,6:DYNAMIC(FIXED),7:USER
TOGGLE
41
E

Legal notices
■
FCC Part 15
This device complies with Part 15 of the FCC Rules. Operation of this product is subject to the
following two conditions: (1) this device may not cause harmful interference, and (2) this device must
accept any interference received, including interference that may cause undesired operation.
This equipment has been tested and found to comply within the limits for a class B digital device,
pursuant to Part 15 of the FCC Rules. These limits are designed to provide reasonable protection
against harmful interference in a residential installation.
This equipment generates, uses, and can radiate radio frequency energy and, if not installed and
used in accordance with the instructions, may cause harmful interference to radio communications.
However, there is no guarantee that interference will not occur in a particular installation. If this
equipment does cause harmful interference to radio or television reception, which can be determined
by turning the equipment off and on, the user is encouraged to try to correct the interference by one
or more of the following measures:
• Reorient or relocate the receiving antenna.
• Increase the separation between the equipment and receiver.
• Connect the equipment into an outlet on a circuit different from that to which the receiver is
connected.
• Consult the dealer or an experienced radio/TV technician for help.
■
FCC warning
Changes or modifications not expressly approved by the party responsible for compliance with the
FCC Rules could void the user’s authority to operate this equipment.
■
Cables
Connections to this device must be made with shielded cables with metallic RF/EMI connector
hoods to maintain compliance with FCC Rules and Regulations.
Appendix
42

For location of the nearest Sharp Authorized Service, or to obtain product literature,
accessories, supplies, or customer assistance, please call 1-800-BE-SHARP.
LIMITED WARRANTY
Calling for Service
CONSUMER LIMITED WARRANTY
SHARP ELECTRONICS CORPORATION warrants to the first consumer purchaser that this Sharp brand Liquid Crystal Display product (the
“Product”), when shipped in its original container, will be free from defective workmanship and materials, and agrees that it will, at its option, either
repair the defect or replace the defective Product or part thereof with a new or remanufactured equivalent at no charge to the purchaser for parts or
labor for the period(s) set forth below.
This warranty does not apply to any appearance items of the Product or if the serial number or model number affixed to the Product has been
removed, defaced, changed, altered or tampered with. This warranty does not cover installation or signal reception problems. This limited warranty
will not apply if the Product has been or is being used in a commercial setting or application; this warranty is meant solely for the non-commercial,
household use of the Product by consumers in their home or residence. If you intend to or already use this Product for commercial purposes or in a
commercial setting, there are warranties available to cover your use of this Product, the terms of which may vary. Please contact 1-800-BE-SHARP
for further information.
In order to enforce your rights under this limited warranty, you should follow the steps set forth below. You must be able to provide proof of
purchase to the servicer, which proof must include the date of purchase.
To the extent permitted by applicable state law, the warranties set forth are in lieu of, and exclusive of, all other warranties, express or implied.
Specifically ALL OTHER WARRANTIES OTHER THAN THOSE SET FORTH ABOVE ARE EXCLUDED, ALL EXPRESS AND IMPLIED WARRANTIES
INCLUDING THE WARRANTIES OF MERCHANTABILITY, FITNESS FOR USE, AND FITNESS FOR A PARTICULAR PURPOSE ARE SPECIFICALLY
EXCLUDED. IF, UNDER APPLICABLE STATE LAW, IMPLIED WARRANTIES MAY NOT VALIDLY BE DISCLAIMED OR EXCLUDED, THE DURATION
OF SUCH IMPLIED WARRANTIES IS LIMITED TO THE PERIOD(S) FROM THE DATE OF PURCHASE SET FORTH BELOW. THIS WARRANTY
GIVES YOU SPECIFIC LEGAL RIGHTS. YOU MAY ALSO HAVE OTHER RIGHTS WHICH VARY FROM STATE TO STATE.
The warranties given herein shall be the sole and exclusive warranties granted by Sharp and shall be the sole and exclusive remedy available to the
purchaser and only for the time periods set forth herein. No other representations or promises made by anyone are permitted. Correction of
defects, in the manner and for the period of time described herein, shall constitute complete fulfillment of all liabilities and responsibilities of Sharp
to the purchaser with respect to the Product, and shall constitute full satisfaction of all claims, whether based on contract, negligence, strict liability
or otherwise. Sharp does not warrant nor shall Sharp be liable, or in any way responsible, for Products which have been subject to abuse
(including, but not limited to, improper voltage), accident, misuse, negligence, lack of reasonable care, alteration, modification, tampering, misuse,
improper operation or maintenance or any damages or defects in the Product which were caused by repairs or attempted repairs performed by
anyone other than a Sharp authorized servicer. Nor shall Sharp be liable or in any way responsible for any incidental or consequential economic or
property damage. Some states do not allow limits on warranties or on remedies for breach in certain transactions; in such states, the limits herein
may not apply.
THIS LIMITED WARRANTY IS VALID ONLY IN THE FIFTY (50) UNITED STATES, THE DISTRICT OF COLUMBIA. AND PUERTO RICO
TO OBTAIN PRODUCT INFORMATION OR PURCHASE ACCESSORIES, CALL 1-800-BE-SHARP OR VISIT www.sharpusa.com
SHARP ELECTRONICS CORPORATION
Sharp Plaza, Mahwah, New Jersey 07495-1163
SHARP CORPORATION
Model Specific Section
What to do to Obtain Service:
Additional Exclusions from
Warranty Period for this Product:
Your Product Model Number & Description:
Warranty Coverage (if any):
LC-40LE550U LCD Color Television
(Be sure to have this information and Proof of Purchase available when you
need service for your Product.)
One (1) year parts and labor from date of purchase.
Image Retention resulting from a fixed image being displayed for long periods of
time is not covered by this Limited Warranty (see Operation Manual on how to
prevent this).
Service is provided by a Sharp Authorized Service Center in the United States. To
find the location of the nearest Sharp Authorized Service Center, call Sharp toll
free at 1-800-BE-SHARP. Sharp will provide instructions on service options
available for your Product.
If it is deemed the Product is to be shipped for servicing, be sure it is insured and
packaged securely. Please use two persons to carry the Product, transport it in
original packaging or packaging that provides comparable protection of the
Product, and ensure that the Product is covered to avoid scratches and damage.
Sharp shall not be responsible for lost, stolen or misdirected mail or for damage to
the product incurred during shipping.
For Products that are deemed in home service, a servicer will come to your
location. If necessary, the servicer may remove the unit for repair at the service
facility and return it once completed. In home service is not available in all areas
and Sharp may, at our option, elect to provide transportation of the Product to and
from an Authorized Service Center in those areas.
43

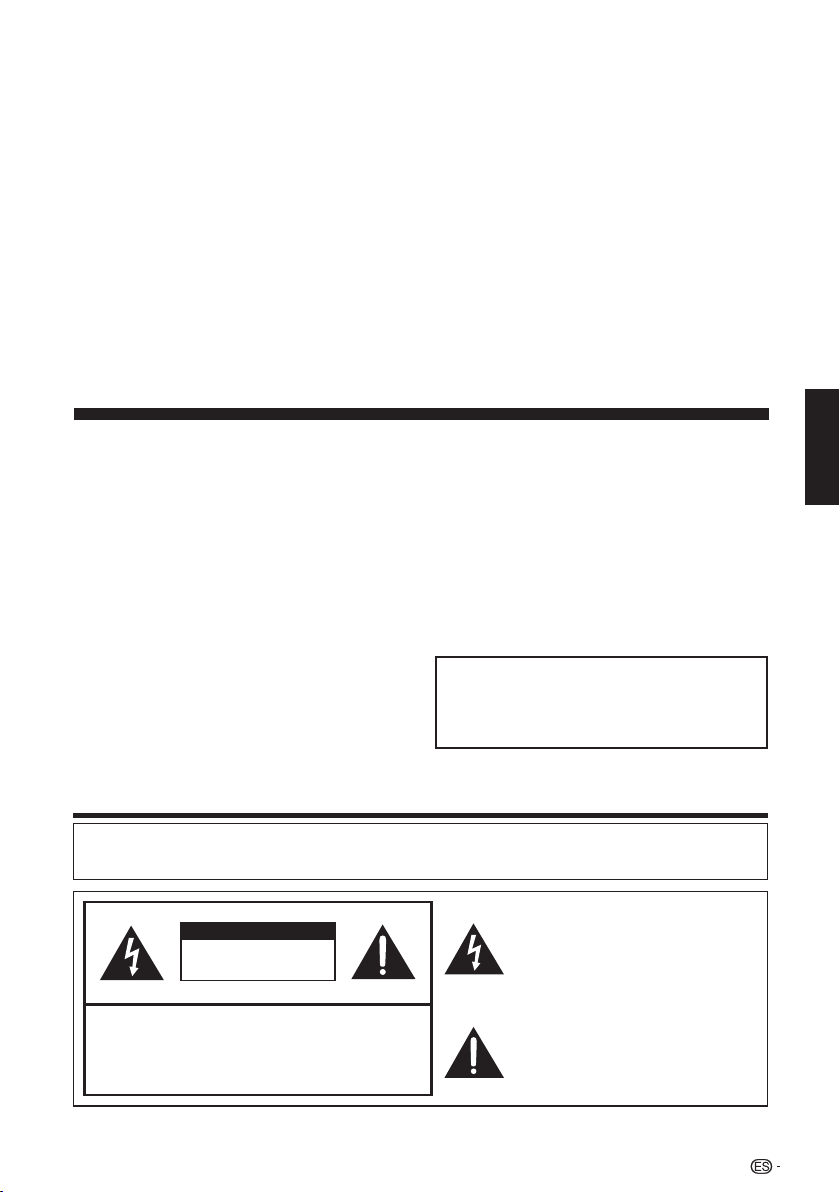
MANUAL DE FUNCIONAMIENTO
IMPORTANTE:
Para facilitar la realización de informes en
caso de pérdida o robo, registre el modelo
y el número de serie de la TV en el espacio
proporcionado. Estos números están ubicados
en la parte posterior de la TV.
Núm. de modelo:
Núm. de serie:
TV DE CRISTAL LÍQUIDO
ESPAÑOL
INFORMACIÓN IMPORTANTE
ADVERTENCIA: PARA REDUCIR EL RIESGO DE INCENDIO O DESCARGA
ELÉCTRICA, NO EXPONGA ESTE PRODUCTO A LA LLUVIA O HUMEDAD.
PRECAUCIÓN
RIESGO DE DESCARGA
ELÉCTRICA
NO ABRIR
PRECAUCIÓN: PARA REDUCIR EL RIESGO DE DESCARGA
ELÉCTRICA, NO RETIRE LA CUBIERTA (O LA PARTE TRASERA).
NO HAY PARTES INTERNAS PARA SERVICIO POR PARTE DEL
USUARIO.
DEJE EL SERVICIO A PERSONAL SERVICIO CUALIFICADO.
El símbolo de rayo dentro de un triángulo
equilátero pretende alertar al usuario de la
existencia de voltaje peligroso no aislado en
el interior del producto, cuya magnitud
puede ser lo suficientemente grande como
para constituir un riesgo de descarga
eléctrica.
El signo de exclamación dentro de un
triángulo indica la presencia de
instrucciones de funcionamiento y
mantenimiento en la documentación que
acompaña al producto.
1
ESPAÑOL
LC-40LE550U
2
INFORMACIÓN IMPORTANTE
Nota al instalador del sistema de CATV: El instalador del sistema debe recordar el Articulo 820 del
Código Nacional Eléctrico que contiene las pautas básicas y, en particular, especifica que el cable
a tierra debe ser conectado al sistema de toma de tierra del edificio, lo más cerca posible al punto
de entrada del cable como sea práctico.
• Los términos HDMI y HDMI High-Definition Multimedia Interface y el logotipo de HDMI son
marcas registradas de HDMI Licensing LLC en EE. UU. y otros países.
MARCAS COMERCIALES
Este producto cumple los requisitos del programa ENERGY STAR cuando se selecciona “Casa”
para “Ubicación TV”.La configuración “Ubicación TV” en “Casa” permite que el televisor funcione
en condiciones de ahorro energético para uso doméstico.
PRECAUCIÓN: PARA EVITAR DESCARGAS ELÉCTRICAS, HAGA COINCIDIR LA CLAVIJA MÁS
ANCHA DEL ENCHUFE CON LA RANURA MÁS ANCHA E INSERTE POR COMPLETO
.
ADVERTENCIA: Las regulaciones de la FCC señalan que cualquier cambio o modificación no
autorizado en este equipo que no hayan sido expresamente aprobados por el fabricante podría
anular la autorización del usuario para utilizar este equipo.
PRECAUCIÓN:
Este producto satisface los reglamentos de la FCC cuando se utilizan conectores y cables
blindados para conectar la unidad a otro equipo. Para impedir las interferencias electromagnéticas
con aparatos eléctricos tales como radios y TV, utilice conectores y cables blindados para hacer
las conexiones.
DECLARACIÓN DE CONFORMIDAD:
SHARP ELECTRONICS CORPORATION
Sharp Plaza, Mahwah, New Jersey 07495-1163
TEL: 1-800-BE-SHARP
Para clientes de negocios: URL http://www.sharpusa.com
TELEVISOR DE CRISTAL LÍQUIDO SHARP, MODELO LC-40LE550U
Este dispositivo cumple con el Apartado 15 de las Normas FCC.
Su funcionamiento está sujeto a las dos condiciones siguientes: (1) Este dispositivo no deberá
causar interferencias perjudiciales, y (2) deberá aceptar cualquier interferencia que reciba, incluy
endo interferencias que puedan causar un funcionamiento no deseado. PARTE RESPONSABLE:
INFORMACIÓN:
Este equipo ha sido probado y ha demostrado cumplir con los límites establecidos para los
aparatos digitales de la Clase B, de conformidad con el Apartado 15 de las Normas de la FCC.
Estos límites han sido designados para proporcionar una protección razonable contra la
interferencia perjudicial en una instalación residencial. Este equipo genera, utiliza y puede radiar
energía radioeléctrica, y, si no se instala y utiliza de acuerdo con las instrucciones, puede causar
una interferencia perjudicial en las comunicaciones por radio. Sin embargo, no hay ninguna
garantía de que no se produzcan interferencias en una instalación particular. Si este equipo causa
interferencias perjudiciales en las recepciones de radio o televisión, lo que puede determinarse
fácilmente apagando y encendiendo el equipo, al usuario se le recomienda corregir la interferencia
tomando una o más de las medidas siguientes:
— Cambie la orientación o el lugar de instalación de la antena receptora.
— Aumente la separación entre el equipo y el receptor.
— Conecte el equipo a una toma de corriente de un circuito diferente del aquel al que está
conectado el receptor.
— Consulte al distribuidor o técnico de radio/TV calificado para solicitar su ayuda.
• Fabricado bajo licencia de Dolby Laboratories. Dolby y el símbolo de la doble "D" son marcas
comerciales de Dolby Laboratories.
ESTIMADO CLIENTE DE SHARP
3
Gracias por adquirir la TV de cristal líquido Sharp. Para garantizar la seguridad y muchos
años de funcionamiento sin problemas del producto, lea detenidamente la sección
INTRUCCIONES IMPORTANTES DE SEGURIDAD antes de utilizar el producto.
INSTRUCCIONES IMPORTANTES DE SEGURIDAD
1) Lea estas instrucciones.
2) Guarde estas instrucciones.
3) Preste atención a todas las advertencias.
4) Siga todas las instrucciones.
5) No utilice este aparato cerca del agua.
6) Límpielo solamente con un paño seco.
7) No tape las aberturas de ventilación. Instale el aparato de acuerdo con las instrucciones del
fabricante.
8) No instale el aparato cerca de ninguna fuente de calor como, por ejemplo, radiadores, salidas de
aire caliente, estufas u otros aparatos (incluyendo amplificadores) que produzcan calor.
9) Proteja el cable de alimentación para que nadie lo pise ni quede aplastado, especialmente en las
clavijas, tomas de corriente y puntos por donde sale del aparato.
10) Utilice solamente los accesorios suministrados por el fabricante.
11) Utilice el aparato solamente con el carrito, soporte, trípode, ménsula o mesa especificado por el
fabricante, o vendido con el propio aparato. Cuando utilice un carrito, tenga cuidado cuando
mueva la combinación del carrito y el aparato para evitar que se caigan y se estropeen.
12) Desenchufe este aparato durante las tormentas eléctricas o cuando no
lo utilice durante largos periodos de tiempo.
13) Solicite todos los trabajos de reparación al personal cualificado solamente. Las
reparaciones serán necesarias cuando se haya dañado el aparato de cualquier forma:
cuando se haya estropeado el cable o la clavija de alimentación, se hayan derramado
líquidos o hayan caído objetos en el interior del aparato, cuando éste haya estado expuesto
a la lluvia o a la humedad, cuando no funcione normalmente o cuando se haya caído.
14) ADVERTENCIA: Para reducir el riesgo de incendio o descarga eléctrica, no exponga este
producto a la lluvia o humedad.
15) En aquellos casos donde se utiliza el enchufe de alimentación eléctrica o el conector del producto
como el dispositivo de desconexión, éste deberá permanecer en óptimas condiciones de
funcionamiento.
16) No se deberá exponer el producto a salpicaduras y no se deberán colocar sobre el producto
objetos con líquidos, como jarrones.
Información de seguridad adicional
17) Fuentes de energía — Este producto deberá utilizarse solamente con el tipo de fuente de energía
indicado en la etiqueta de especificaciones. Si no está seguro del tipo de suministro de energía
de su casa, consulte a su distribuidor o a la compañía de electricidad de su localidad. Para los
productos diseñados para funcionar con pilas u otra fuente de energía, consulte las instrucciones
de operación.
18) Sobrecarga — No sobrecargue las tomas de corriente, los cables de prolongación o los
receptáculos de conveniencia integrales porque se puede correr el riesgo de causar un incendio
o recibir una descarga eléctrica.
19) Entrada de objetos y líquidos — No meta nunca objetos de ninguna clase en este producto a
través de las aberturas porque pueden tocar puntos de alto voltaje peligrosos o cortocircuitar
partes que podrían causar un incendio o una descarga eléctrica. No derrame nunca líquidos de
ningún tipo sobre el producto.
20) Daños que necesitan ser reparados—Desenchufe este producto de la toma de corriente y solicite
las reparaciones al personal de servicio cualificado cuando se den las condiciones siguientes:
a) Cuando el cable o la clavija de CA está dañado.
b) Si se ha derramado algún líquido o han caído objetos en el interior del producto.
c) Si el producto ha sido expuesto a la lluvia o al agua.
d) Si el producto no funciona normalmente siguiendo las instrucciones de operación. Ajuste
solamente aquellos controles descritos en las instrucciones de operación, ya que un ajuste
incorrecto de otros controles podrá causar daños que a menudo requieren un arduo trabajo
de ajuste por parte de un técnico cualificado para que el producto pueda volver a funcionar
normalmente.
e) Si el producto se ha caído o dañado de cualquier forma.
f) Cuando el producto muestra un cambio notable en su rendimiento, lo que indica que necesita
ser reparado.

INSTRUCCIONES IMPORTANTES DE SEGURIDAD
4
21) Piezas de repuesto—Cuando se necesiten piezas de repuesto, asegúrese de que el técnico de
servicio utilice las piezas de repuesto especificadas por el fabricante u otras cuyas características
sean similares a las de las piezas originales. El uso de piezas no autorizadas puede causar
incendios, descargas eléctricas u otros peligros.
22) Verificación de seguridad — Una vez completado cualquier trabajo de mantenimiento o
reparación en este producto, pida al técnico de servicio que realice verificaciones de seguridad
para determinar si el producto está en condiciones de funcionamiento apropiadas.
23) Montaje en pared o techo: Utilice un soporte montaje en pared aprobado por un laboratorio
independiente (como UL, CSA, ETL).
• Sólo el personal de servicio técnico calificado deberá usar estas instrucciones de servicio técnico. Para
reducir el riesgo de que ocurra una descarga eléctrica, no realice ningún tipo de mantenimiento que no esté
en las instrucciones de funcionamiento, a menos que esté calificado para hacerlo.
• Conexión a tierra de la antena exterior: Si se
conecta una antena exterior a la TV, asegúrese
de que el sistema de antena esté conectado
a tierra para obtener cierta protección ante los
aumentos de voltaje y la acumulación de cargas
estáticas.
El artículo 810 del Código Eléctrico Nacional,
ANSI/NFPA 70, proporciona información
relacionada con la conexión a tierra correcta
del poste y la estructura de apoyo, la conexión
a tierra del cable de entrada a una unidad de
descarga, el tamaño de los conductores de
conexión a tierra, la ubicación de la unidad de
descarga de antena, la conexión a los electrodos
de conexión a tierra y los requisitos para el
electrodo de conexión a tierra.
EJEMPLO DE CONEXIÓN A TIERRA DE LA ANTENA SEGÚN
EL CÓDIGO ELÉCTRICO NACIONAL, ANSI/NFPA 70
CABLE DE ENTRADA
DE ANTENA
ABRAZADERAS DE
CONEXIÓN A TIERRA
NEC — CÓDIGO ELÉCTRICO NACIONAL
CONDUCTORES
DE CONEXIÓN A TIERRA
(NEC SECCIÓN 810-21)
ABRAZADERAS DE CONEXIÓN A TIERRA
SISTEMA DE ELECTRODOS DE CONEXIÓN
A TIERRA DEL SERVICIO ELÉCTRICO
(NEC ART. 250)
EQUIPO DE
SERVICIO
ELÉCTRICO
UNIDAD DE
DESCARGA DE ANTENA
(NEC SECCIÓN 810-20)
• La advertencia indica que los aparatos de Clase I deberán conectarse a un tomacorriente que cuente
con un conductor de conexión a tierra de protección.
• Declaración que indica que el enchufe de alimentación de corriente o el acoplador del producto
deberá estar siempre listo para usar.
• El enchufe de alimentación de corriente o el acoplador del aparato son dispositivos de desconexión;
el dispositivo de desconexión deberá estar siempre listo para usar.
• Cuando se utilice el INTERRUPTOR PRINCIPAL DE CORRIENTE omnipolar como el dispositivo de
desconexión, se deberá describir la ubicación del producto y el funcionamiento del interruptor, y el
interruptor deberá estar siempre listo para usar.
• Agua y humedad — No utilice este producto cerca del agua como, por ejemplo, una bañera,
palangana, fregadero de cocina o lavadora; en un sótano húmedo; cerca de una piscina o un lugar
similar.
• Soporte—No coloque el producto en un carrito, soporte, trípode o mesa inestable. La colocación del
producto en una base inestable puede ser la causa de que el producto se caiga, lo que podrá causar
lesiones graves a personas y también daños al producto. Utilice solamente un carrito, soporte,
trípode, ménsula o mesa recomendado por el fabricante o vendido junto con el producto. Cuando
coloque el producto en una pared, asegúrese de seguir las instrucciones del fabricante. Utilice
solamente el hardware de montaje recomendado por el fabricante.
• Elección de la ubicación—Elija un lugar no expuesto a la luz solar directa y con buena ventilación.
• Ventilación—Los orificios de ventilación y otras aberturas de la cubierta han sido diseñados para
ventilar el producto. No cubra ni bloquee estos orificios de ventilación y aberturas porque la falta de
ventilación puede causar recalentamiento y/o reducir la duración del producto. No coloque el
producto en una cama, sofá, alfombra u otra superficie similar porque las aberturas de ventilación
podrán quedar bloqueadas. Este producto no ha sido diseñado para ser empotrado; no lo coloque
en un lugar cerrado como, por ejemplo, un mueble librería o estantería a menos que disponga de la
ventilación apropiada o se sigan las instrucciones del fabricante.
• La pantalla de cristal líquido utilizada en este producto está hecha de cristal. Por lo tanto, podrá
romperse si el producto se cae o recibe un impacto fuerte. En el caso de que se rompa la pantalla de
cristal líquido, tenga cuidado para que no le hieran las piezas de cristal roto.
INSTRUCCIONES IMPORTANTES DE SEGURIDAD
5
• Calor — El producto deberá colocarse alejado de las fuentes de calor como, por ejemplo, radiadores,
salidas de aire caliente, estufas u otros productos (incluyendo amplificadores) que produzcan calor.
• La pantalla de cristal líquido es un producto de alta tecnología que tiene 2.073.600 píxeles,
lo que le proporciona una imagen fina muy detallada. De vez en
cuando puede que aparezcan algunos píxeles no activos en la pantalla
a modo de puntos fijos de color azul, verde o rojo. Tenga en cuenta que esto no afecta para nada al
funcionamiento de su producto.
• Tormentas eléctricas — Para una mayor protección de la TV durante una tormenta eléctrica o cuando
se deja descuidada y sin usar durante largos períodos de tiempo, desenchúfela de la toma de
corriente de la pared y desconecte la antena. Esto evitará daños al TV debidos a rayos y subidas de
tensión.
• Cables de electricidad — No deberá ubicarse un sistema de antena exterior cercano a cables de
electricidad que pasen por encima de éste u otras luces eléctricas o circuitos de alimentación, o
donde pueda caer sobre tales cables de electricidad o circuitos. Cuando instale un sistema de antena
exterior, deberá tomar un cuidado extremo para evitar tocar tales cables de electricidad o circuitos,
pues el contacto con ellos podría resultar fatal.
• Para evitar un incendio, no ponga nunca ningún tipo de vela o llama al descubierto encima o cerca de
la TV.
• Para evitar un incendio o una descarga eléctrica, no ponga el cable de CA debajo de la TV u otros
objetos pesados.
• No muestre una imagen fija durante mucho tiempo, ya que esto podrá ser la
causa de que quede una imagen residual en la pantalla.
• Para evitar un incendio o una descarga eléctrica, no exponga este producto a
goteo ni a las salpicaduras.
Tampoco deberán ponerse encima del producto objetos llenos de líquidos
como, por ejemplo, floreros.
• No introduzca ningún tipo de objeto en el producto. Introducir objetos por las aberturas de ventilación
o por otras aberturaspuede ser causa de incendio o de descarga eléctrica. Tome especiales
precauciones al utilizar el producto con niños en las proximidades.
Precauciones al transportar la TV
• Cuando transporte la TV, nunca la lleve colgando ni ejerciendo presión sobre la pantalla. Asegúrese
de que el traslado de la TV lo realicen siempre dos personas y que sujeten el producto con ambas
manos, es decir, una de cada lado de la unidad.
Cuidado de la cubierta
• Utilice un paño suave (algodón, franela, etc.) y limpie suavemente la superficie de la cubierta.
• Utilizar un paño con químicos (paño tipo hoja seco/húmedo) podría deformar los componentes de la
cubierta de la unidad principal y provocar grietas.
• La limpieza con un paño duro o utilizando demasiada fuerza podría rayar la superficie de la cubierta.
• Si la cubierta está sumamente sucia, realice la limpieza con un paño suave (algodón, franela, etc.)
humedecido en detergente neutro diluido en agua y retuérzalo por completo. Luego, limpie con un
paño suave seco.
• La cubierta está fabricada principalmente con plástico. Evite utilizar benceno, diluyente u otros
solventes, ya que podrían deformar la cubierta y causar un desprendimiento de la pintura.
• No rocíe con insecticidas u otros líquidos volátiles.
Además, tampoco permita que la cubierta entre en contacto con productos de goma o vinilo durante
períodos extensos de tiempo. Los plastificantes que forman parte del plástico podrían hacer que la
cubierta se deforme y la pintura se desprenda.
Cuidado del panel de cristal líquido
• Apague el producto y desenchufe el cable de CA del toma de corriente antes de la manipulación.
• Limpie suavemente la superficie del panel de la pantalla con un paño
suave (algodón, franela, etc.).
Para proteger el panel de la pantalla, no utilice un paño sucio, limpiadores
líquidos o paños con químicos (paño tipo hoja seco / húmedo, etc.). Esto
podría dañar la superficie del panel de la pantalla.
• La limpieza con un paño duro o utilizando demasiada fuerza podría rayar
la superficie del panel de la pantalla.
• Cuando el panel de la pantalla esté muy sucio, utilice un paño suave humedecido para limpiarlo.
(Tenga cuidado al pasar el paño porque si lo hace con fuerza puede dañar el panel de la pantalla).
• Si el panel de la pantalla tiene polvo, utilice un cepillo contra la electricidad estática (disponible en
comercios) para limpiarlo.
• Para evitar rayar el marco o la pantalla, utilice un paño suave y sin pelusas para la limpieza. Los paños
de limpieza aprobados están disponible de forma directa a través de Sharp en kits de un paño
(00Z-LCD-CLOTH) o tres paños (00Z-LCD-CLOTH-3). Comuníquese al 1-800-BE-SHARP para
realizar su pedido o visite http://www.sharpusa.com/SharpDirect.
INSTRUCCIONES DE SEGURIDAD IMPORTANTES
SEGURIDAD DE LOS NIÑOS:
ASUNTOS RELACIONADOS CON LA CORRECTA COLOCACIÓN DEL TELEVISOR
A LA INDUSTRIA DE LOS ARTÍCULOS ELECTRÓNICOS DE
CONSUMO LE IMPORTA
• Los fabricantes, los minoristas y el resto de la industria de los artículos electrónicos de consumo
el compromiso de lograr que el entretenimiento en el hogar sea seguro y se pueda disfrutar.
• Cuando disfrute de su televisor, tenga en cuenta que todos los televisores —ya sean nuevos o
viejos—deben estar colocados sobre un soporte adecuado o instalados según las
recomendaciones del fabricante. Los televisores que se colocan en forma inadecuada sobre
tocadores, bibliotecas, estantes,escritorios, parlantes, cajoneras, carros, etc. pueden caer y
provocar lesiones.
SINTONICE LA SEGURIDAD
• SIEMPRE siga las recomendaciones del fabricante para instalar el televisor de manera segura.
• SIEMPRE lea y siga todas las instrucciones para el uso adecuado del televisor.
• NUNCA permita que los niños trepen o jueguen sobre el televisor o sobre el mueble en el que
se encuentra ubicado el televisor.
• NUNCA coloque el televisor sobre un mueble que se pueda usar fácilmente como escalera;
por ejemplo, una cajonera.
• SIEMPRE instale el televisor donde no se pueda empujar, ni sea posible tirar de él o voltearlo.
• SIEMPRE acomode los cables conectados al televisor de manera tal que nadie pueda tropezar
con ellos ni tirar de ellos.
INSTALACIÓN DEL TELEVISOR EN LA PARED O EN EL CIELO RASO
• SIEMPRE comuníquese con su vendedor para consultarle acerca de un instalador profesional
si tiene dudas con respecto a su capacidad de instalar el televisor de manera segura.
• SIEMPRE utilice un soporte recomendado por el fabricante de televisores que tenga una
certifi cación de seguridad de un laboratorio independiente (como UL,
CSA, ETL).
• SIEMPRE siga todas las instrucciones proporcionadas por los fabricantes del televisor y
del soporte.
• SIEMPRE asegúrese de que la pared o el cielo raso sobre el que instala el televisor sea
adecuado. Ciertos soportes no están diseñados para ser instalados en paredes o cielo rasos
con travesaños de acero o construcciones con bloques de cemento prefabricados. Si no está
seguro al respecto,comuníquese con un instalador profesional.
• Los televisores pueden ser pesados. Se requieren como mínimo dos personas para instalar un
televisor en la pared o el cielo raso.
CÓMO REUBICAR UN TELEVISOR VIEJO EN EL HOGAR
• Muchas personas llevan sus viejos televisores CRT a una habitación secundaria de la casa
cuando compran un televisor de pantalla plana. Se debe prestar especial atención a la ubicación
de los viejos televisores CRT.
• SIEMPRE coloque su viejo televisor CRT sobre un mueble resistente que resulte adecuado
para su tamaño y su peso.
• NUNCA coloque su viejo televisor CRT sobre un tocador en el que los niños puedan usar los
cajones para trepar.
• SIEMPRE asegúrese de que su viejo televisor CRT no sobresalga por los bordes del mueble.
CE.org/safety
6
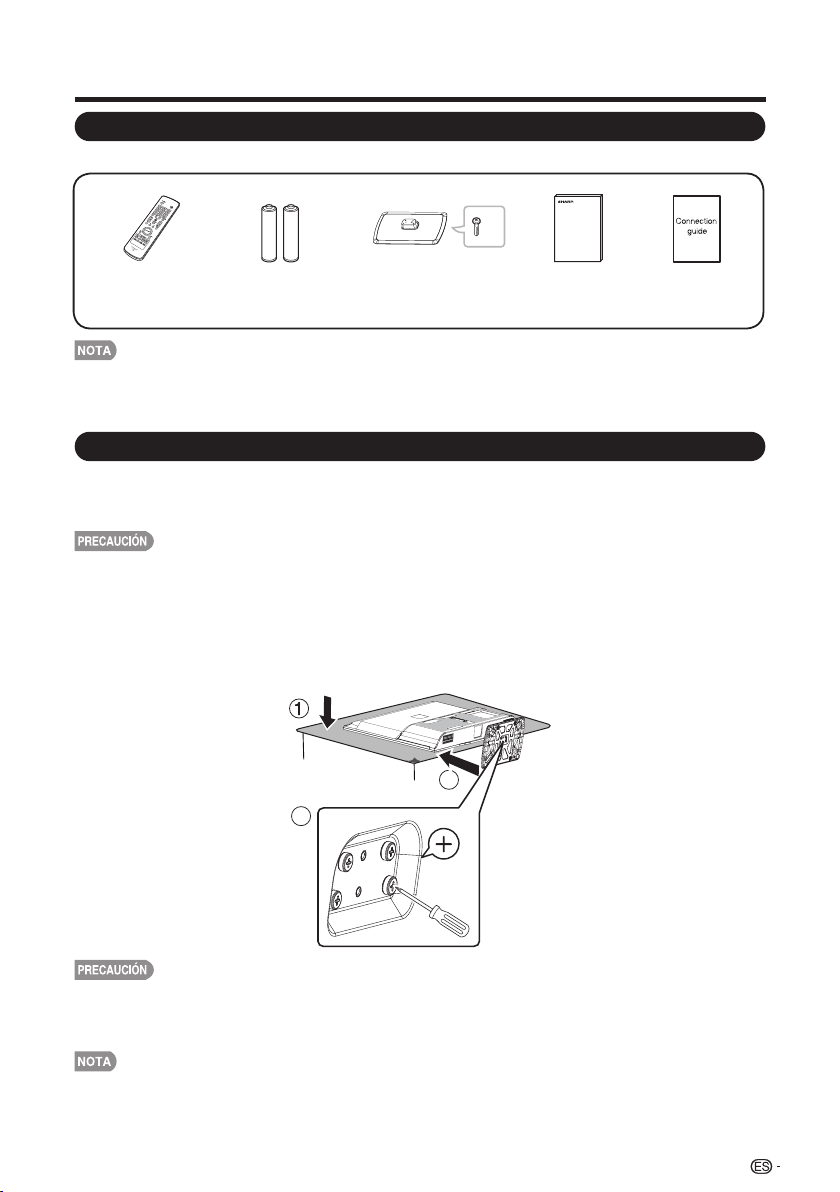
REFERENCIA RÁPIDA
Accesorios suministrados
• Utilice siempre el cable de alimentación de CA suministrado con la TV.
• Las ilustraciones que aparecen anteriormente poseen sólo fines explicativos y pueden variar ligeramente de los accesorios reales.
Asegúrese de que los siguientes accesorios estén incluidos con el producto.
Colocación/extracción de la base
• Antes de colocar (o extraer) la base, desenchufe el cable de CA del terminal ENTRADA DE CA.
• Antes de realizar cualquier trabajo, coloque una protección sobre el área de la base a fin de
poder apoyar la TV en este lugar. Esto permitirá evitar que la TV sufra daños.
• Coloque la base en la dirección correcta.
• Asegúrese de seguir las instrucciones. La instalación incorrecta de la base podría
causar una caída de la TV.
1. Coloque la TV boca abajo sobre una superficie segura que esté cubierta por un paño suave.
2. Ajuste la base de la TV en la parte inferior de la TV.
3. Coloque los tornillos con un destornillador de cabeza en forma de cruz (no suministrado).
• Para extraer la base, realice los pasos en orden inverso.
• No empuje con demasiada fuerza ni aplique presión excesiva sobre el cuello de la base
• Al armar o desarmar, debe sujetarla correctamente para evitar caídas.
a fin de evitar daños al adaptar la TV al ángulo de visualización más adecuado.
7
( X 1)( X 1)
x4
Control remoto
( X 1)
Página 8
Pila de tamaño “AAA”
( X 2)
Página 10
Base ( X 1)
con tornillos
Página 7
Manual de
funcionamiento
Guía de Conexión
3
2
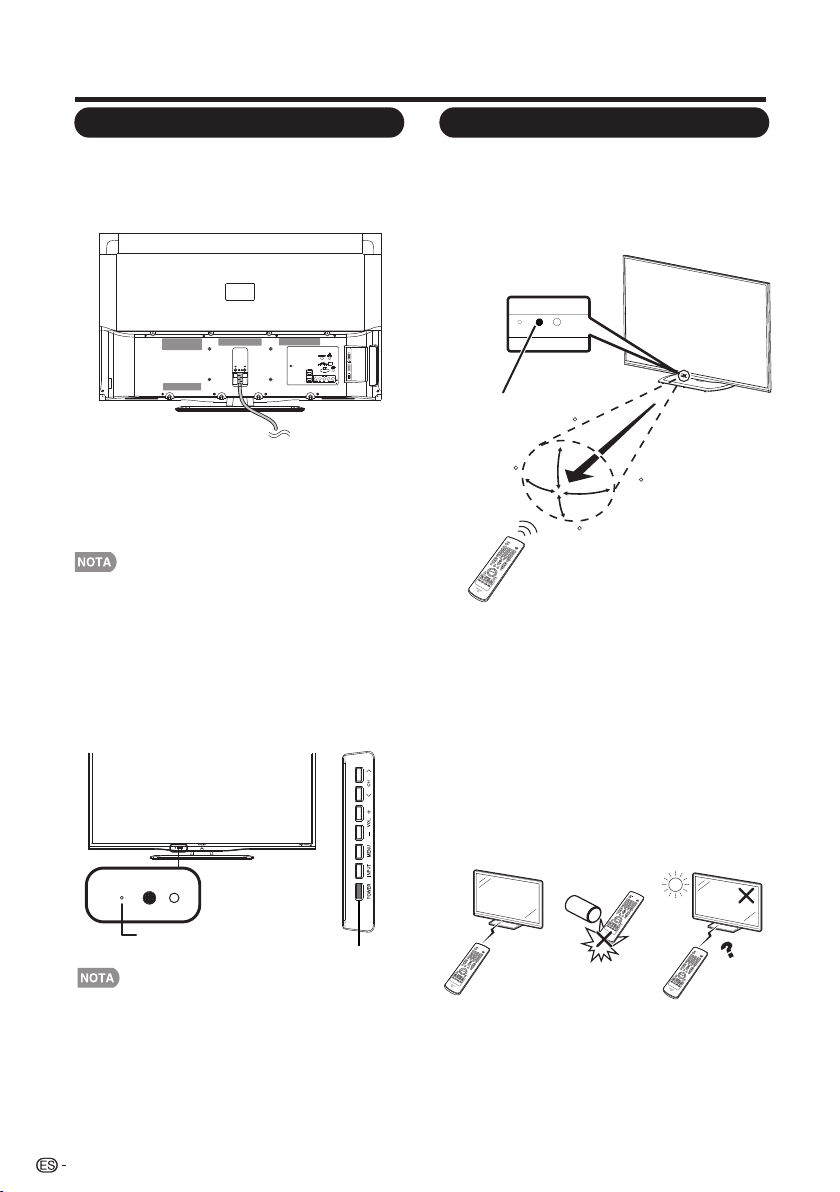
REFERENCIA RÁPIDA
• No es posible desmontar los altavoces de la TV.
• Coloque la TV cerca de un tomacorriente de CA que posea
un fácil acceso.
• Sólo se deberá conectar este producto a un tomacorriente
de CA de 120 V, 60 Hz. La conexión del producto a otro
tipo de tomacorriente podría dañar el producto yanular la
garantía.
• PARA EVITAR UN RIESGO DE DESCARGA ELÉCTRICA,
NO TOQUE LAS PARTES SIN AISLACIÓN DE LOS
CABLES CON EL CABLE DE ALIMENTACIÓN DE CA
ENCHUFADO.
1. Coloque la antena en la parte posterior de la
TV. (Consulte la página 9).
2. Conecte el enchufe de CA de la TV en un
tomacorriente de CA.
3. Encendido de la TV por primera vez.
A) Presione POWER (ENCENDIDO/
APAGADO) en la TV.
B) El indicador POWER (ENCENDIDO/
APAGADO) ubicado en la parte frontal
de la TV se apaga.
4.
Inserte las pilas en el control remoto.
(consulte la página 10).
Utilice el control remoto apuntando hacia el
sensor del control remoto ubicado en la TV.
Los objetos que se encuentren entre el control
remoto y su sensor podrían no permitir un
funcionamiento correcto.
■ Precauciones relacionadas con el control
remoto
• No exponga el control remoto a impactos. Además, no
exponga el control remoto a líquidos ni lo coloque en lugares
con gran porcentaje de humedad.
• No instale ni coloque el control remoto bajo la luz solar
directa. El calor podría causar una deformación del control
remoto.
• El control remoto podría no funcionar de forma correcta si
su sensor ubicado en la TV está ubicado debajo de luz solar
directa o iluminación intensa. En estos casos, cambie el
ángulo de iluminación o la ubicación de la TV, o utilice el
control remoto más cercano a su sensor.
IMPORTANTE:
SI LA UNIDAD NO SE ENCIENDE, DESENCHUFE LA
TV DEL TOMACORRIENTE Y REPITA LOS PASOS
DEINSTALACIÓN. SI SIGUE SIN PODER ENCENDER
LA TV, CONTÁCTENOS TELEFÓNICAMENTE AL
1-800-BE- SHARP.
ENCENDIDO
/APAGADO
Indicador de
ENCENDIDO/
APAGADO
8
Utilización del control remoto
Sugerencias para la instalación rápida
30
30
30
30
17´ (5 m)
Remote control sensor
El ángulo es de 22 º, cuando la stang se adjunta.
*
*
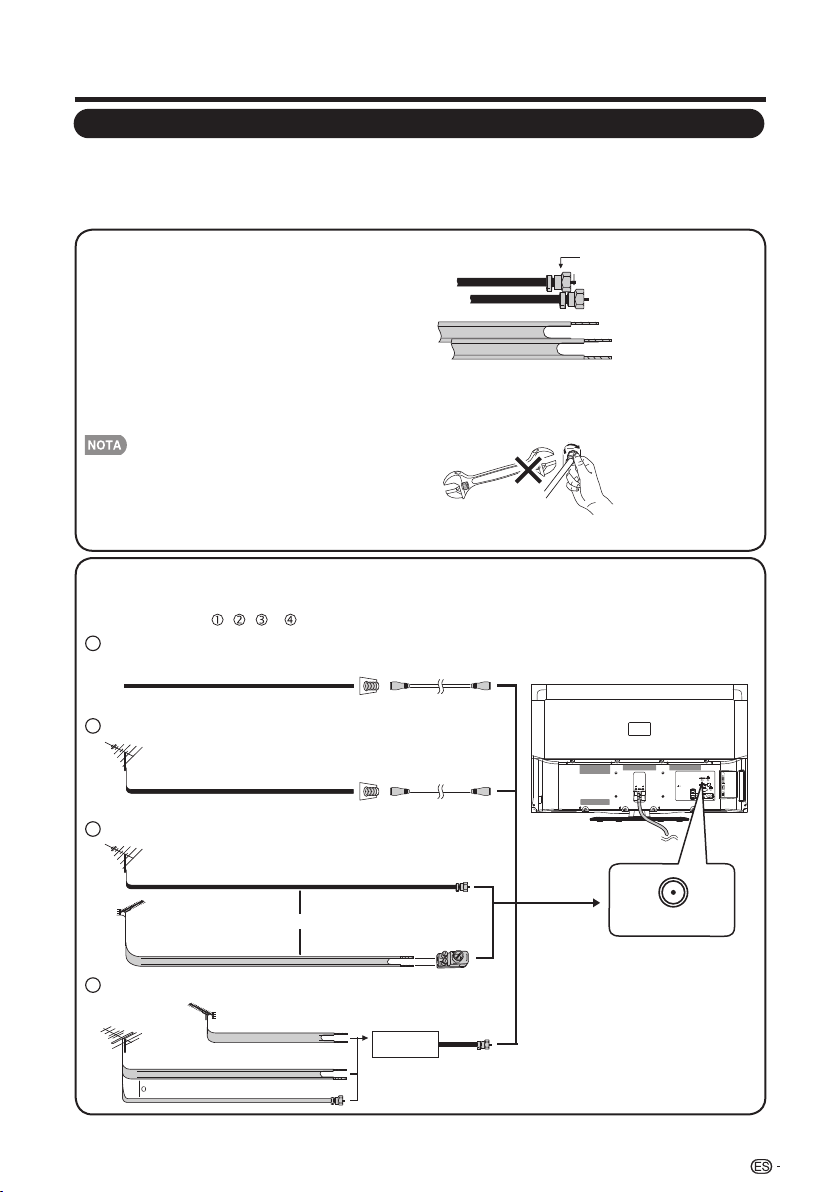
Preparación
Antenas
Para disfrutar de una imagen más nítida, utilice una antena exterior. A continuación, se realiza una
explicación breve sobre los tipos de conexiones utilizados para un cable coaxial. Si la antena
exterior utiliza un cable coaxial de 75 ohmios con un conector tipo F, conéctelo en el terminal de
antena ubicado en la parte posterior de la TV.
1. Generalmente, un sistema de 75 ohmios
es un cable redondo con un conector tipo
F que puede conectarse fácilmente al
terminal sin la utilización de herramientas
(disponible en comercios).
2. Un sistema de 300 ohmios es un cable
plano de “doble conductor” que puede
conectarse a un terminal de 75 ohmios
a través de un adaptador de 300/75
ohmios (disponible en comercios).
Al conectar el cable RF a la TV, no apriete el conector
tipo F con herramientas. Si se utilizan herramientas,
podría dañarse la TV. (Avería del circuito interno, etc.)
Conexión de cable de antena
• Conecte el cable de la antena a la TV utilizando uno de los métodos que aparecen en
la ilustración ( , , o )
Conector tipo F
Cable de doble conductor de
300 ohmios (plano)
Conector tipo F
Cable coaxial de
75 ohmios (redondo)
Cable coaxial de 75 ohmios
Cable de doble conductor de 300 ohmios
Cable coaxial de 75 ohmios (redondo)
Cable coaxial de 75 ohmios
IN OUT
Cable de doble conductor
de 300 ohmios
ANTENA
VHF
ANTENA
UHF
Combinador
(disponible en comercios)
Adaptador de 300/75 ohmios
(disponible en comercios)
Cable de doble conductor de
300 ohmios (plano)
Cable coaxial de 75 ohmios (redondo)
Cable de entrada de TV por cable
Cable sin conversor de CATV1
Cable coaxial
(disponible en comercios)
Terminal de antena
hogareña (75 ohmios)
Cable coaxial
(disponible en comercios)
Terminal de antena
hogareña (75 ohmios)
o
Antena VHF/UHF2
Combinación de antena VHF/UHF3
Antena VHF/UHF por separado4
Al terminal de la antena de la TV
9
ANT./CABLE
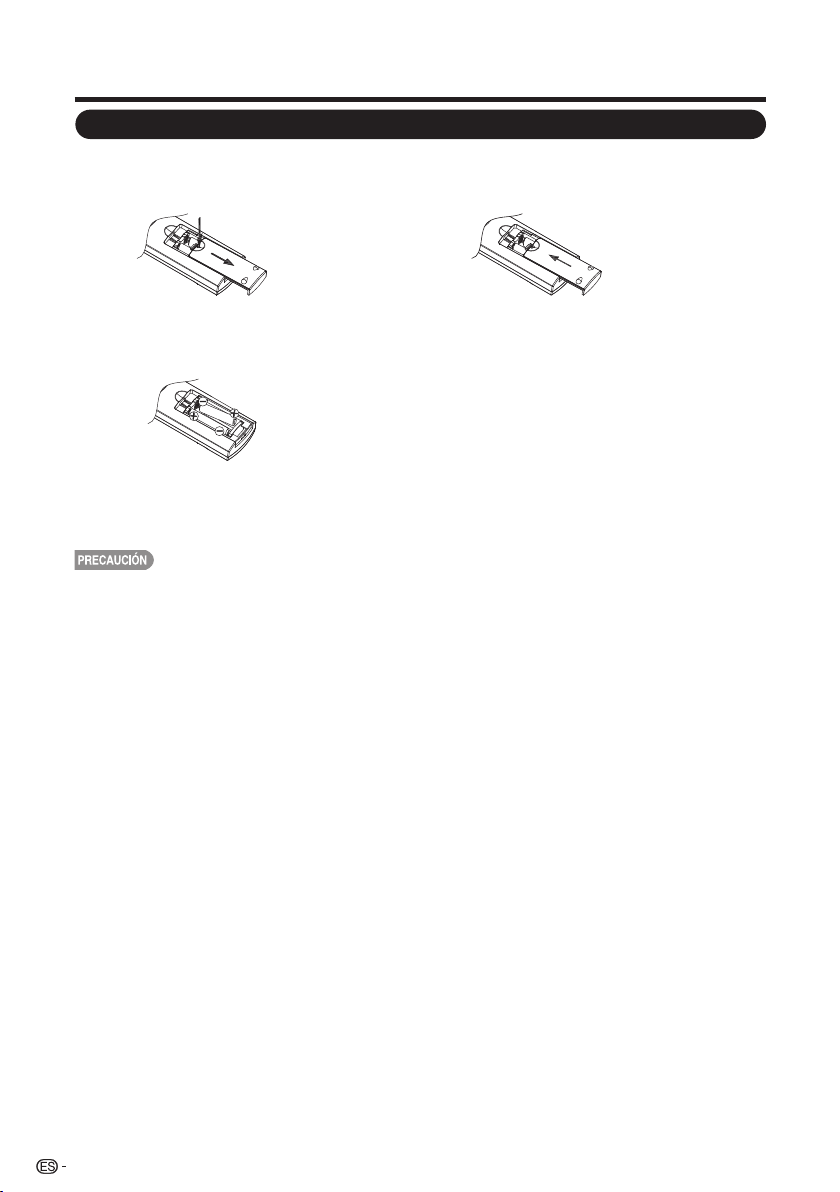
Preparación
Instalación de las pilas en el control remoto
La utilización incorrecta de las pilas podría derivar en fugas químicas o explosiones.
Asegúrese de seguir las instrucciones que aparecen a continuación.
• No mezcle pilas de diferentes tipos. Los diferentes tipos de pilas poseen diferentes características.
• No mezcle pilas usadas con nuevas. Mezclar pilas usadas con nuevas podría acortar la vida útil
de las pilas nuevas o causar una fuga química en las pilas usadas.
• Extraiga las pilas ni bien están agotadas. Los químicos que podrían filtrarse desde las pilas y
entrar en contacto con la piel pueden causar un sarpullido. Si existe alguna fuga de químicos,
limpie meticulosamente con un paño.
• Las pilas suministradas con este producto podrían tener una expectativa de vida útil más corta en
función de las condiciones de almacenamiento.
• Si no utilizará el control remoto durante un período de tiempo extenso, extraiga las pilas.
• No exponga las pilas (pilas instaladas) a un calor excesivo, tales como los rayos directos del sol,
fuego o condiciones similares.
1 Abra la tapa de las pilas.
• Coloque las pilas según las indicaciones
de polaridad ( + ) y ( - ) del compartimiento
de las pilas.
2 Inserte las pilas de tamaño “AAA”
(incluidas con el producto).
3 Cierre la tapa de las pilas.
Si el control remoto no puede realizar las funciones de la TV, reemplace las pilas del control remoto.
10

Contenido
11
Ilustraciones dimensionales
• Las ilustraciones dimensionales para la TV LCD aparecen en la contratapa interior.
INFORMACIÓN IMPORTANTE ................................................................................................ 1
MARCAS COMERCIALES ........................................................................................................ 2
INSTRUCCIONES IMPORTANTES DE SEGURIDAD ............................................................. 3
REFERENCIA RÁPIDA .............................................................................................................. 7
Accesorios suministrados .................................................................................................... 7
Colocación/extracción de la base ........................................................................................ 7
Sugerencias para la instalación rápida ................................................................................. 8
Utilización del control remoto ............................................................................................... 8
Antenas ............................................................................................................................... 9
Conexión de cable de antena ............................................................................................... 9
Instalación de las pilas en el control remoto ......................................................................... 10
Contenido .................................................................................................................................. 11
Nombres de las partes ............................................................................................................ 12
TV (parte frontal) .................................................................................................................. 12
TV (parte lateral/posterior) .................................................................................................... 12
Control remoto .................................................................................................................... 13
Conexión de los equipos externos ........................................................................................... 15
Conexión de un reproductor de Blu-ray Disc/DVD o sintonizador de
TV por cable/satelital de alta definición
.................................................................................
15
Conexión de una consola de videojuegos, videograbadora,
videocámara o sintonizador de TV por cable/satelital
..........................................................
16
Conexión de un amplificador de audio ................................................................................. 17
Conexión de un amplificador de audio/video ....................................................................... 17
Conexión de una PC ............................................................................................................ 18
Experiencia con imágenes en alta definición ........................................................................ 14
Tipos de conexión ................................................................................................................ 14
Introducción a las conexiones ................................................................................................ 14
Visualización de la TV .............................................................................................................. 19
Encendido/apagado
............................................................................................................. 19
Configuración inicial ............................................................................................................. 19
Utilización directa de los botones .......................................................................................... 21
Menú de visualización en pantalla.......................................................................................... 24
Elementos del menú ............................................................................................................ 24
Funcionamiento del menú de visualización en pantalla
......................................................... 25
Botones para la navegación por el menú ............................................................................. 26
Ajustes de Imagen ............................................................................................................... 26
Ajustes de audio .................................................................................................................. 28
Control de Energía ............................................................................................................... 28
Opciones de Sistema .......................................................................................................... 29
Configuración Inicial ............................................................................................................. 31
Información ......................................................................................................................... 34
Apéndice ................................................................................................................................... 38
Disfrute con la reproducción de fotos/música/vídeo ........................................................... 35
Solución de problemas ........................................................................................................ 38
Especificaciones ................................................................................................................. 39
Tabla de compatibilidad con PC .......................................................................................... 40
Especifi caciones del puerto RS232 ..................................................................................... 41
Avisos legales ...................................................................................................................... 42
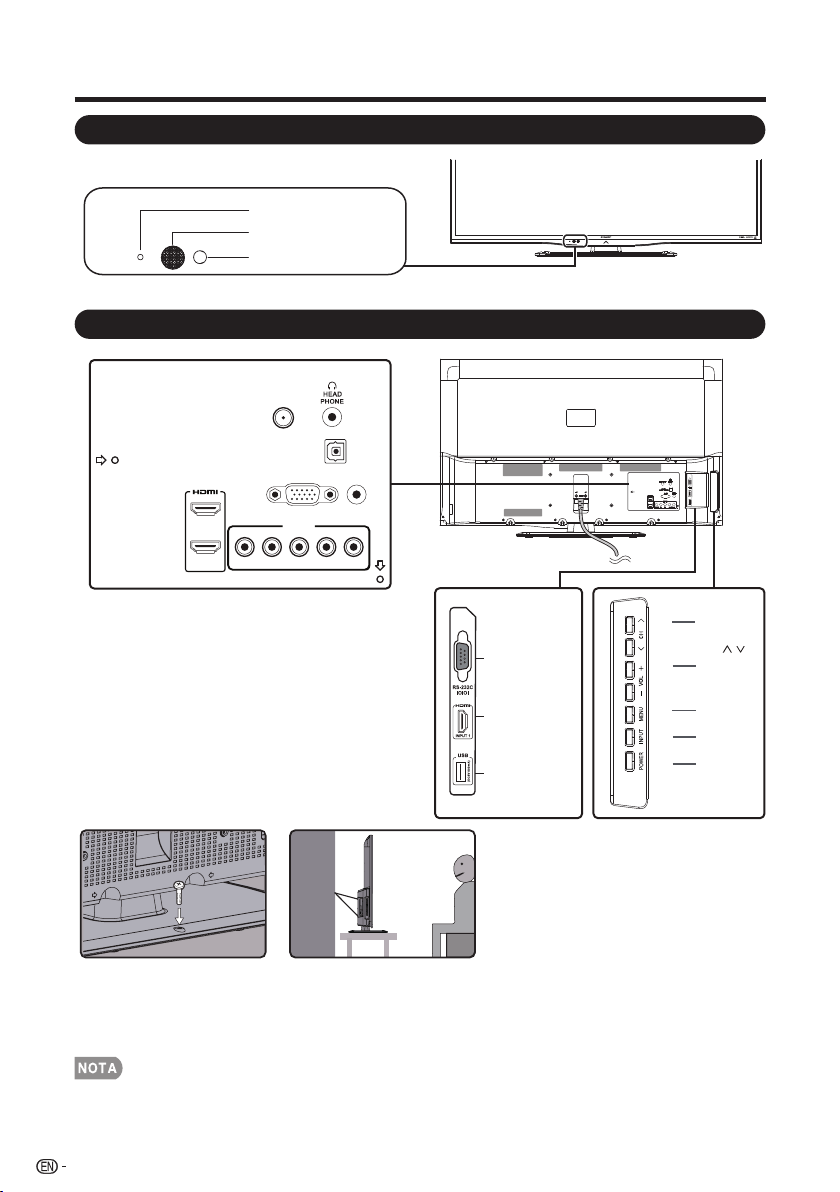
Nombres de las partes
*1: Consulte las páginas 14,16,17,18 y 35 para la conexión de
equipos externos.
*2: Consulte la página 14, 19, y 26 para obtener información
sobre el funcionamiento de los botones.
• Las ilustraciones de este manual de funcionamiento poseen sólo fines explicativos y pueden ser diferentes de las funciones reales.
12
TV (parte frontal)
TV (parte lateral/posterior)
*2
POWER
button
MENU
button
INPUT
button
Volume
buttons
(VOL
+
/
_
Channel
buttons
(CH
/
)
)
*1
DIGITAL
AUDIO OUTPUT
PC IN
AUDIO
PC/HDMI
INPUT 4
Y/VIDEO PB
PR
L-AUDIO-R
ANT./CABLE
INPUT 2
INPUT 3
*1
USB
RS-232C IOIOI
INPUT 1
Terminal (HDMI)
Orificio de tornillo auxiliar para prevención de volcado:
1. Antes de la utilización de la TV, sujete la TV a la mesa estable con el tornillo (tamaño recomendado: T4 x 22) (Fig. 1).
2. En caso de que no sea posible sujetar los tornillos a la mesa, utilice otros dos pernos (tamaño recomendado: M6 x 16) para
sujetar los tornillos al orificio de montaje en pared y sujetar la TV a la pared con un alambre para mayor seguridad. (Fig. 2)
Indicador de
ENCENDIDO/APAGADO
OPC
Sensor del control remoto
*
* OPC: Control de imagen óptica (Consulte la página 27).
Fig. 1 Fig. 2
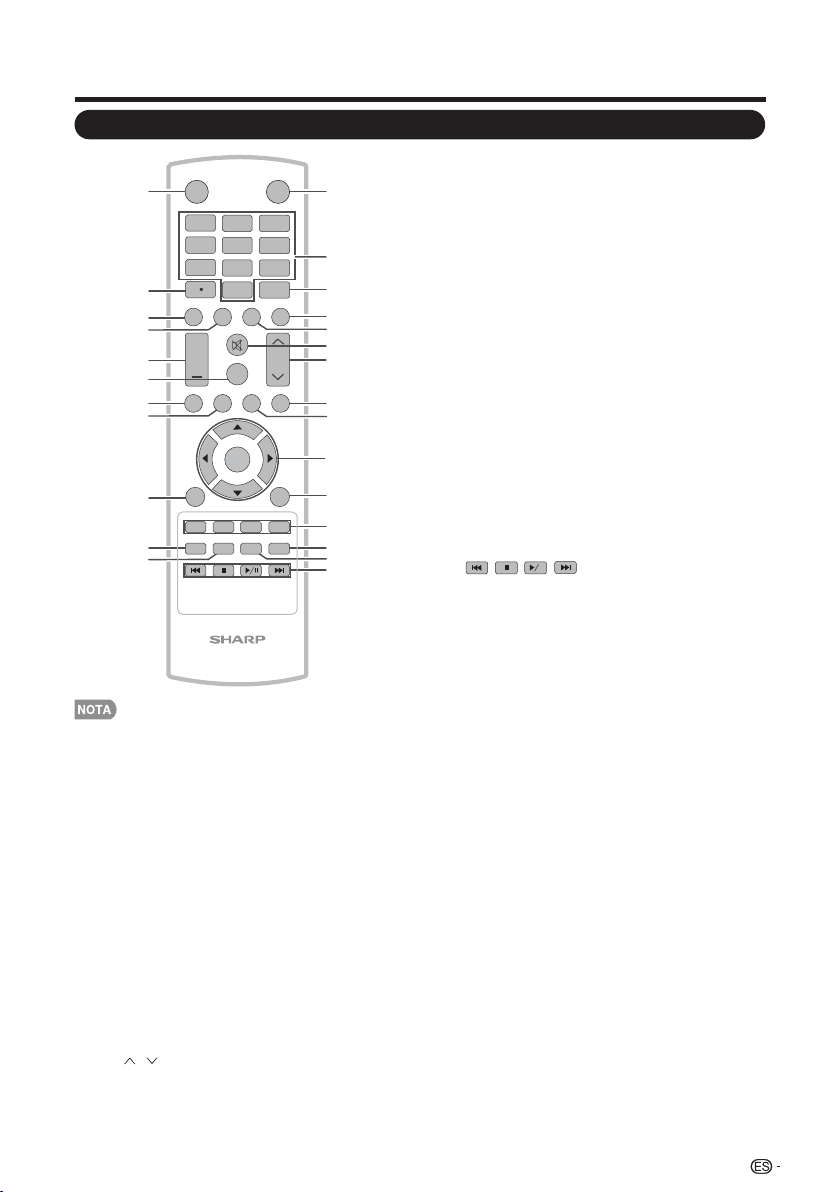
Nombres de las partes
Control remoto
• Al utilizar el control remoto, apunte hacia la
TV.
1. INPUT (ENTRADA): Permite seleccionar
una fuente de entrada de la TV. (Consulte la
página 21).
2. 0–9: Permite seleccionar el canal.
3. ENT (IR): Se dirige a un canal luego de
seleccionarlo con los botones 0–9.
4. FLASHBACK (CANAL ANTERIOR):
Presione este botón para regresar al canal o
modo de entrada externa sintonizado
previamente. Presione nuevamente este
botón para regresar al canal o modo de
entrada externa sintonizada actualmente.
5. AUDIO: Muestra el menú de configuración
de MTS/SAP. (Consulte la página 22).
6. MUTE (SILENCIAR): Permite silenciar el
sonido. (Consulte la página 21).
7. CH / : Permite seleccionar el canal.
(Consulte la página 21).
8. MENU (MENÚ): Muestra la pantalla de
menú.
9. PC: Permite cambiar directamente a la
fuente PC.
10. ▲/▼/◄/►, ENTER (ACEPTAR): Permite
seleccionar un elemento deseado en la
pantalla. (Consulte la página 26).
11. RETURN (REGRESAR): Permite regresar
a la pantalla de menú anterior.
12. FAVORITE CH (CANALES FAVORITOS):
A, B, C, D: Permite preestablecer canales
favoritos en 4 categorías diferentes. Al
visualizar la TV, puede cambiar entre los
canales seleccionados presionando A, B, C
y D. Cada tecla de favoritos permite
seleccionar varios canales.
13. AV MODE (MODO DE A/V): Permite
seleccionar una configuración de imagen
ajustada. User (Usuario), Standard
(Estándar), Movie (Cine), Game (Juegos),
PC, Dynamic (Dinámico), Dynamic (Fixed)
(Dinámico (Fijo)). (Consulte la página 22).
14. VIEW MODE (MODO DEVISUALIZACIÓN):
Permite seleccionar el modo de imagen.
(Consulte la página 23).
15. : Sólo para USB.
16. POWER (ENCENDIDO/APAGADO):
Permite encender la TV o colocarla en el
modo de espera. (Consulte la página 19).
17. • (PUNTO): (Consulte la página 21).
18. DISPLAY (VISUALIZAR): Permite visualizar
la información sobre el canal actual (o fuente
de entrada) en la pantalla.
19. FREEZE (CONGELAR): Permite congelar
la imagen. Presione nuevamente este botón
para regresar a la pantalla normal.
20. VOL + / - : Permite establecer el volumen.
(Consulte la página 21).
21. SURROUND (SONIDO ENVOLVENTE):
Muestra el menú de configuración de sonido
envolvente. (Consulte la página 21).
22. TV: Permite cambiar directamente a la
fuente TV.
23. USB: Permite cambiar directamente a la
fuente USB.
24. EXIT (SALIR): Permite salir de la pantalla
de menú.
25. SLEEP (TEMPORIZADOR): Permite
establecer un tiempo luego del que la TV
ingresará automáti-camente en el modo de
espera. Esta pantalla desaparecerá luego
de algunos segundos y el temporizador
comenzará automáticamente la cuenta
regresiva. (Consulte la página 21).
26. CC: Permite visualizar los subtítulos en la
fuente de subtítulos ocultos. (Consulte la
página 22).
1
INPUT
3
4
5
6
7
8
9
0
ENT
1
2
DI S P L AY FRE EZ E
FLASHBACK
M U T E
SUR ROU ND
TV US B
PC
ME NU
FAV ORIT E CH
SLEE P CC VIEW MODEAV MODE
AUDIO
V OL CH
+
NRUTERTIXE
LCDTV
GJ221
A B C D
ENTER
2
3
4
5
6
7
8
9
10
11
12
13
14
15
16
17
18
19
20
21
22
23
24
25
26
POWER
13
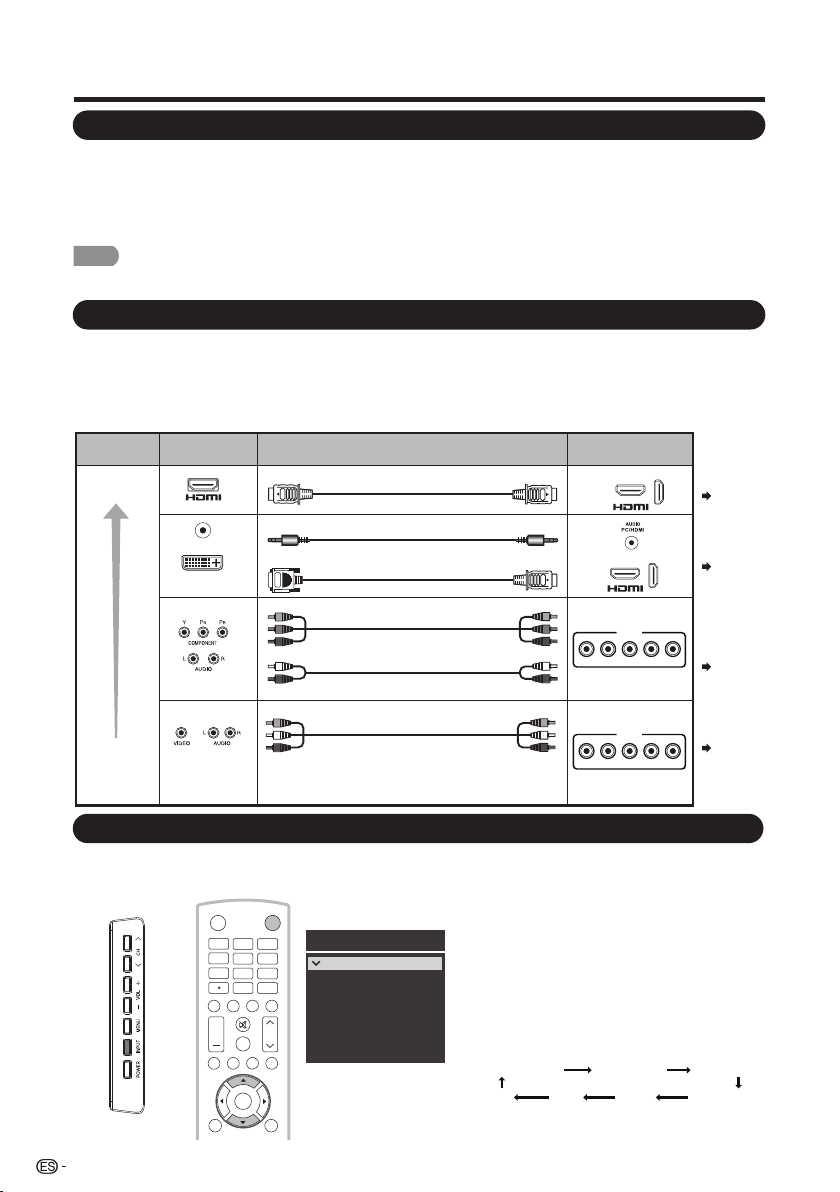
Introducción a las conexiones
Una TV de alta definición sin una fuente de alta definición es simplemente una TV normal.
Para disfrutar imágenes en alta definición, deberá obtener una programación de alta
definición a partir de las siguientes fuentes:
• Transmisión por aire a través de una antena con calidad de alta definición
• Suscripción a TV satelital/cable de alta definición
• Equipo externo compatible con alta definición
Experiencia con imágenes en alta definición
• Para obtener información sobre cómo actualizar a la programación en alta definición, consulte a su proveedor de servicios de TV
satelital o por cable.
La calidad de la imagen varía en función del terminal utilizado. Para disfrutar de imágenes más
nítidas, compruebe los terminales de salida del equipo externo y utilice sus terminales apropiados
para lograr imágenes de mayor calidad.
Para la conexión de la TV con equipos externos, utilice cables disponibles en comercios.
• Las ilustraciones de los terminales poseen sólo fines explicativos y pueden variar ligeramente de
los productos reales.
NOTA
Tipos de conexión
Calidad de
la imagen
Calidad
estándar
Terminal de la TV
Cable
Terminal del
equipo externo
Calidad de
alta definición
Cable de video componente
(disponible en comercios)
Cable de audio (disponible en comercios)
Cable HDMI certificado
Cable minijack estéreo de Ø 3,5 mm
AUDIO
DVI OUT
Cable de conversión DVI-HDMI
Cable de A/V (disponible en comercios)
ENTRADA 1, 2, 3
Page 15
Page 15
Page 16
Page 16
ENTRADA 1, 2, 3
Visualización de la imagen de un equipo externo
Para visualizar imágenes de fuentes externas, seleccion e la fuente de entrada presionando el botón
INPUT (ENTRADA) en el control remoto o en la TV.
Ejemplo
INPUT
3
4
5
6
7
8 9
0
E N T
1
2
DIS PL AY FR EE ZE
FLASHBACK
MU TE
SU RROU ND
TV US B
PC
ME NU
AUDIO
VOL CH
+
POWER
RETURNEXIT
ENTER
INPUT1
INPUT2
INPUT3
INPUT4
PC IN
Fuente de entrada
HDMI1
HDMI2
HDMI3
COMP/AV
USB
TV
1. Presione el botón INPUT (ENTRADA).
• Aparecerá la pantalla CH List (Lista de
canales).
2. Presione el botón ▲/▼ para seleccionar
la fuente de entrada.
• También puede seleccionar la fuente de
entrada presionando el botón
ENTRADA. Cada vez que se presione
el botón ENTRADA, se cambiará la
fuente de entrada.
ENTRADA4TV USB PC IN
ENTRADA1 ENTRADA2 ENTRADA3
• Aparecerá automáticamente la imagen
de la fuente seleccionada.
14
INPUT 4
Y/VIDEO PB
PR
L-AUDIO-R
INPUT 4
Y/VIDEO PB
PR
L-AUDIO-R
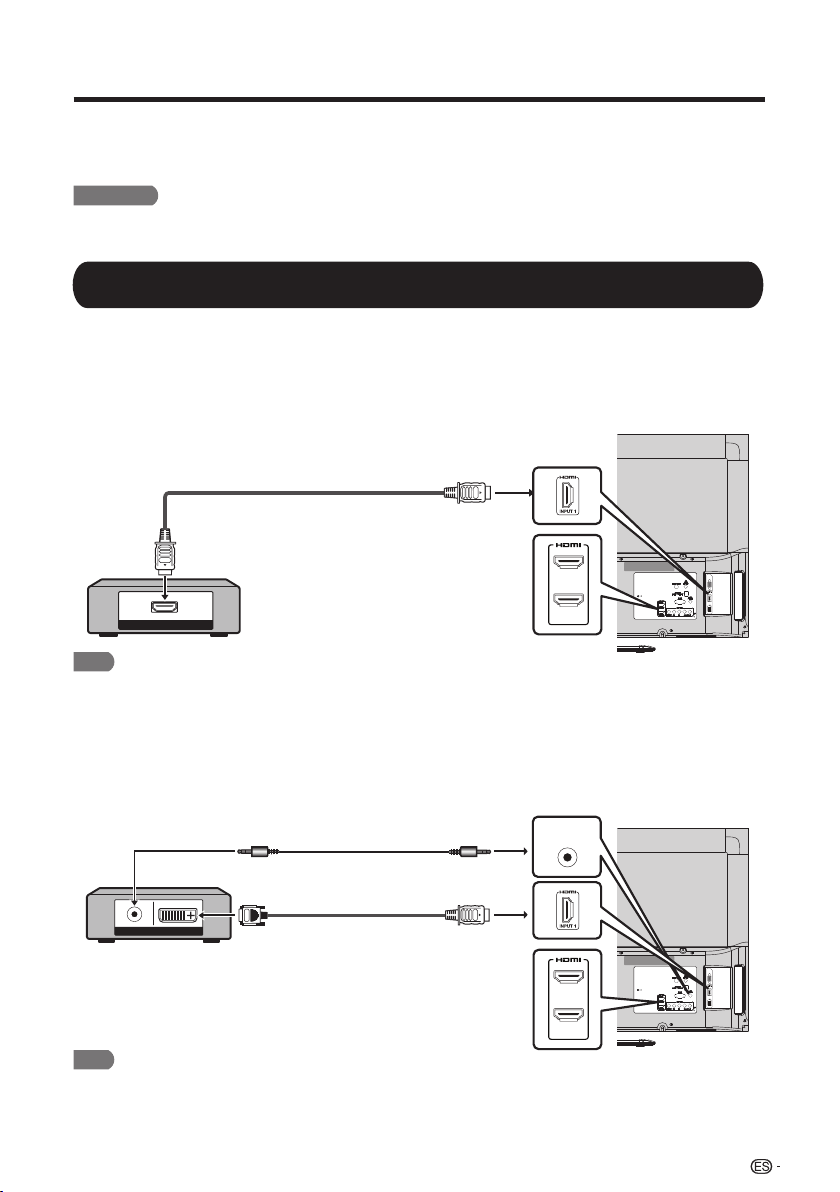
15
Conexión de los equipos externos
• Para proteger los equipos, apague siempre la TV antes de conectar cualquier equipo externo.
• Lea detenidamente el manual de funcionamiento pertinente (reproductor de Blu-ray Disc, etc.) antes de realizar
las conexiones.
Puede conectar varios tipos de equipos externos en la TV.Para visualizar imágenes de fuentes
externas, seleccione la fuente de entrada utilizando el botón entrada en el control remoto o el botón
INPUT (ENTRADA) en la TV. (Consulte las páginas 13 y 21).Para la conexión de la TV con equipos
externos, utilice cables disponibles en comercios.
PRECAUCIÓN
• Al utilizar un cable de conversión DVI-HDMI, deberá realizar una conexión de audio analógica. En este caso, además de conectar
un cable de conversión DVI-HDMI al terminal INPUT 1, 2 o 3 (HDMI) (ENTRADA 1, 2 o 3), conecte un cable minijack estéreo de
ø 3,5 mm al terminal AUDIO PC/HDMI.
■ Al utilizar el cable HDMI (INPUT (ENTRADA) 1, 2 o 3):
El terminal HDMI (Interfaz Multimedia de Alta Definición) es una interfaz de audio/video que permite
la conexión de las señales de audio y video a través de un solo cable. El terminal HDMI admite una
entrada de video de alta resolución.
• Reproductor de Blu-ray Disc • Reproductor de DVD
• Sintonizador de TV por cable/satelital de alta definición
■ Al utilizar un cable de conversión DVI-HDMI (INPUT (ENTRADA) 1, 2 o 3):
• Reproductor de Blu-ray Disc • Reproductor de DVD
• Sintonizador de TV por cable/satelital de alta definición
NOTA
NOTA
Conexión de un reproductor de Blu-ray Disc/DVD o sintonizador de
TV por cable/satelital de alta definición
•
este caso, establezca los formatos de audio del equipo conectado en PCM, 32/44,1/48 kHz.
•
Se emitirá audio digital óptico en estéreo de 2 canales cuando procede del equipo externo conectado al televisor mediante un
cable HDMI.
Dependiendo del equipo conectado, no se emitirá audio desde el terminal DIGITAL AUDIO OUTPUT en la conexión HDMI. En
Cable HDMI certificado
HDMI OUT
INPUT 2
INPUT 3
Cable minijack estéreo de Ø 3,5 mm
Cable de conversión DVI-HDMI
AUDIO DVI OUT
INPUT 2
INPUT 3
AUDIO
PC/HDMI
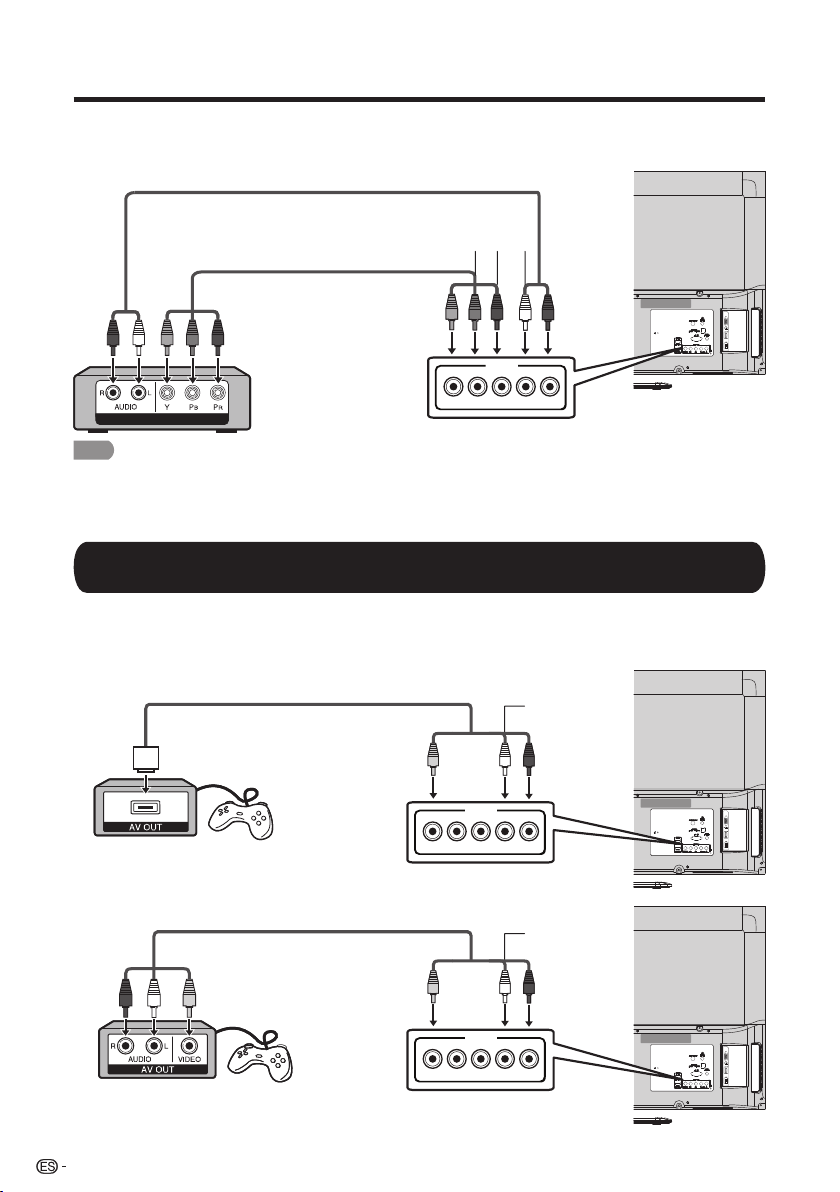
16
Conexión de los equipos externos
■ Al utilizar el cable de video componente (INPUT (ENTRADA) 4):
• Reproductor de Blu-ray Disc • Reproductor de DVD
• Sintonizador de TV por cable/satelital de alta definición
• Para disfrutar de una visualización 1080p, conecte el equipo externo utilizando un cable HDMI certificado o un cable de video
componente y configure el equipo en la salida 1080p.
• Consulte la página 15 para obtener información sobre la conexión de un reproductor de Blu-ray Disc, reproductor de DVD o
sintonizador de TV por cable/satelital de alta definición al terminal HDMI.
■ Al utilizar el cable de video compuesto (INPUT (ENTRADA) 4):
• Consola de videojuegos • Videograbadora
• Videocámara • Sintonizador de TV por cable/satelital
NOTA
Conexión de una consola de videojuegos, videograbadora,
videocámara o sintonizador de TV por cable/satelital
Câble de composante vidéo
Cable de audio
COMPONENT OUTCOMPONENT OUT
INPUT 4
Y/VIDEO PB
PR
L-AUDIO-R
Cable de AV
Cable de AV
AUDIO-R (Red)
AUDIO-L (White)
VIDEO (Yellow)
INPUT 4
Y/VIDEO PB
PR
L-AUDIO-R
AUDIO-R (Red)
AUDIO-L (White)
VIDEO (Yellow)
INPUT 4
Y/VIDEO PB
PR
L-AUDIO-R
Y (Green)
P
B
(Blue)
P
R
(Red)
AUDIO-R (Red)
AUDIO-L
(White)
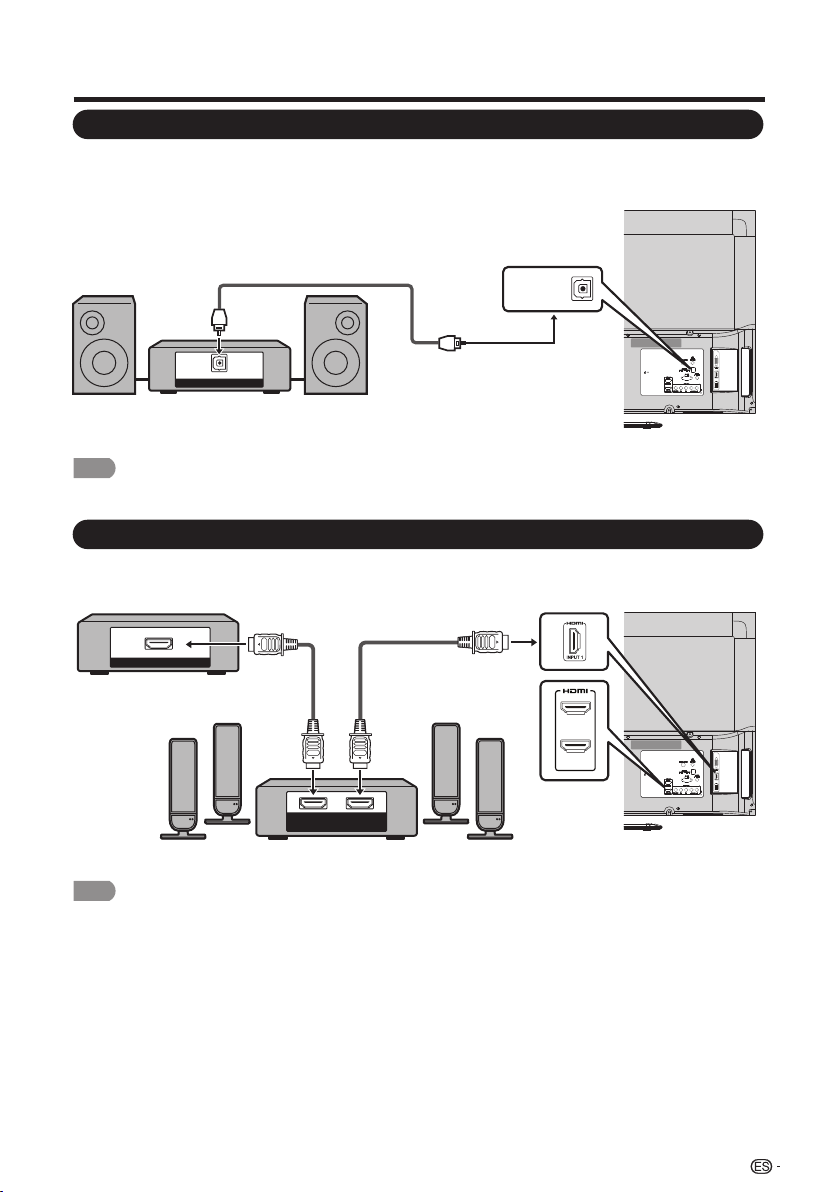
■ Al utilizar un cable coaxial:
17
Conexión de un amplificador de audio
Es posible transmitir audio a través del terminal DIGITAL AUDIO (AUDIO DIGITAL). Se emite audio
PCM desde el terminal.
• La salida de audio digital no está disponible al util izar la entrada HDMI.
• Si la imagen no está sincronizada con el audio, verifique la configuración del sistema de sonido envolvente conectado.
• Salida del audio de la TV a través de un amplificador de A/V:
NOTA
NOTA
Conexión de un amplificador de audio/video
Conexión de los equipos externos
DIGITAL AUDIO INPUT
OPTICAL
Cable coaxial
HDMI OUT
HDMI
IN
HDMI
OUT
Sintonizador de TV por cable/
satelital de alta definición
Cable HDMI certificado
INPUT 2
INPUT 3
DIGITAL
AUDIO OUTPUT
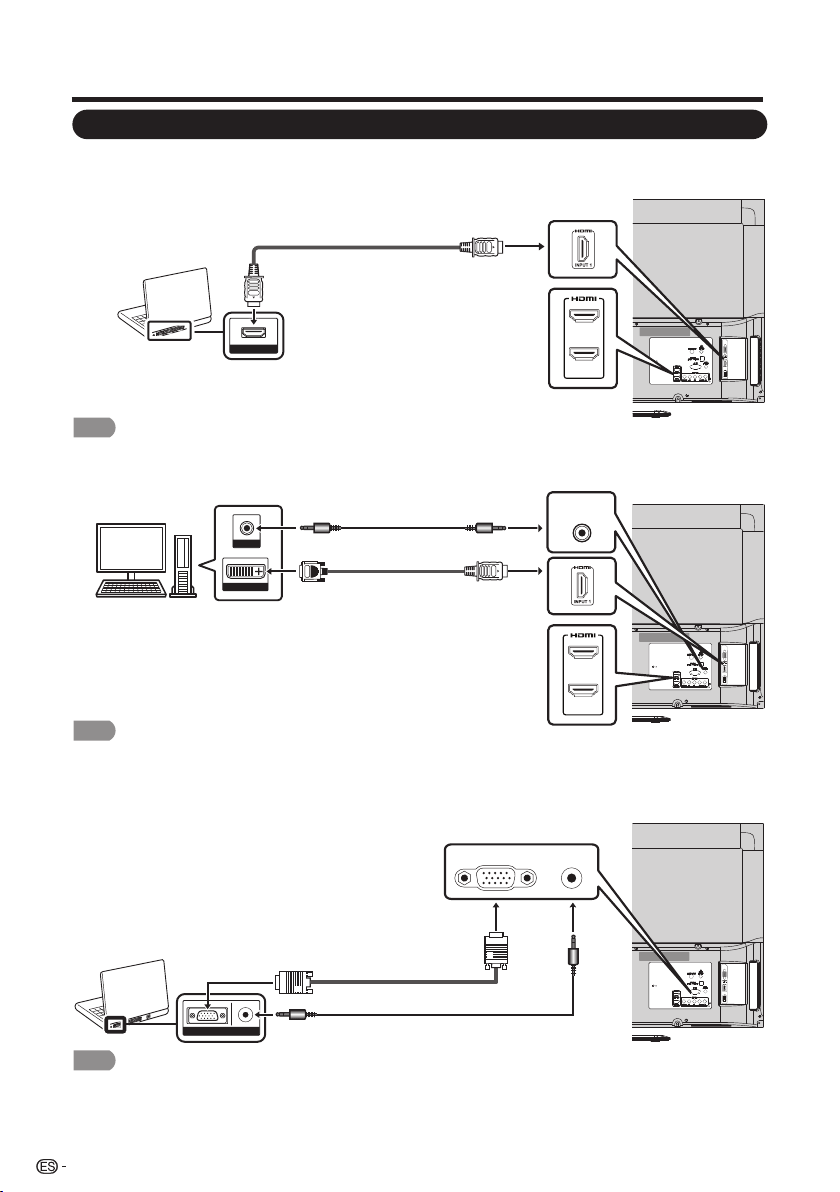
18
Conexión de los equipos externos
Conexión de una PC
Consulte la página 40 para obtener una lista de las señales de PC compatibles con la TV.
■ Al utilizar el cable HDMI (INPUT (ENTRADA) 1, 2 o 3):
• Los terminales HDMI sólo admiten señales digitales.
■ Al utilizar un cable de conversión DVI-HDMI (INPUT (ENTRADA) 1, 2 o 3):
• Al utilizar un cable de conversión DVI-HDMI, deberá realizar una conexión de audio analógica. En este caso, además de
conectar un cable de conversió n DVI-HDMI al terminal INPUT 1, 2 o 3 (HDMI) (ENTRADA 1, 2 o 3), conecte un cable minijack
estéreo de ø 3,5 mm al termin al AUDIO PC/HDMI.
■ Al utilizar un cable RGB analógico (PC IN (ENTRADA DE PC)):
• Al utilizar un cable RGB analógico, conecte la señal de audio en el terminal AUDIO PC/HDMI de PC IN (ENTRADA DE PC).
NOTA
NOTA
NOTA
HDMI OUT
Cable HDMI certificado
DVI OUT
AUDIO
Cable minijack estéreo de Ø 3,5 mm
Cable de conversión DVI-HDMI
INPUT 2
INPUT 3
INPUT 2
INPUT 3
AUDIO
PC/HDMI
Cable RGB analógico
(cable D-sub de 15 clavijas o cable VGA)
Cable minijack estéreo de Ø 3,5 mm
AUDIORGB
PC IN
AUDIO
PC/HDMI
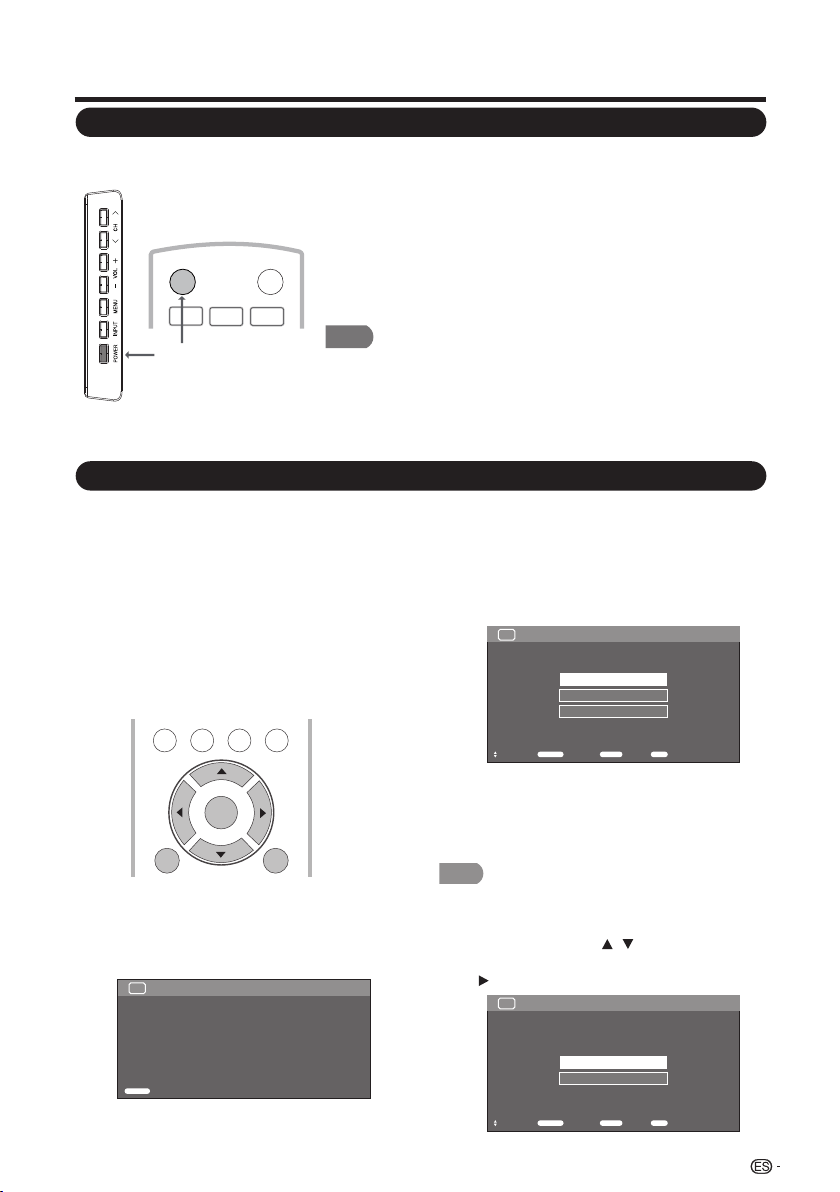
Visualización de la TV
19
Encendido/apagado
Configuración inicial
Cuando encienda la TV por primera vez,
Configuración inicial lo guiará por el proceso de
configuración. Realice los siguientes pasos
antes de presionar POWER (ENCENDIDO/
APAGADO) en el control remoto.
1. Inserte las pilas en el control remoto.
(Consulte la página 10).
2. Conecte el cable de la antena a la TV.
(Consulte la página 9).
3. Enchufe el cable de alimentación de CA en
un tomacorriente de CA. (Consulte la
página 8).
1. Configuración inicial
• Aparecerá la pantalla Configuración inicial
la primera vez que encienda la TV.
Presione el botón ENTER (ACEPTAR)
para comenzar con la configuración EZ.
2. Configuración de idioma
• Seleccione el idioma del menú OSD entre
English, Español o Français.
• Presione ▲/▼ para seleccionar el idioma
deseado que aparece en la pantalla y, a
continuación, presione ► para avanzar al
próximo paso.
Presione POWER (ENCENDIDO/APAGADO) en la TV o
POWER (ENCENDIDO/APAGADO) en el control remoto para
encender la TV.
• Indicador POWER (ENCENDIDO/APAGADO): Encendido:
verde; apagado: rojo.
Presione POWER (ENCENDIDO/APAGADO) en la TV o
POWER (ENCENDIDO/APAGADO) en el control remoto
nuevamente para apagar la TV.
• La TV ingresa en el modo de espera y desaparece la imagen
en la pantalla.
• Si no utilizará la TV durante un período de tiempo extenso, asegúrese de
desenchufar el cable de alimentación de CA del tomacorriente de CA.
• Existeun pequeño consumo de energía eléctrica incluso cuando la TV se encuentra
apagada.
• Si no existe ninguna señal de entrada durante 5 minutos, la TV ingresará
automáticamente en el modo de espera.
NOTA
TV US B
PC
MENU
NRUTERTIXE
ENTER
Gracias por adquirir el televisor de cristal líquido SHARP.
Presione [Entrar] para iniciar el asistente.
TV
Autoinstalación Bienvenido
Introducir
Introducir
Ubicación TV
Seleccione “Casa” o “Tienda” según el lugar en
el que va a instalar el televisor. Este producto
cumple con ENERGY STAR en modo predeterminado
de ajuste para Casa.
TV Autoinstalación
Ajustando el idioma de visualización\nen pantalla
English
Français
Español
Seleccionar Introducir précéd. Fin
Introducir Retorno Fin
Idioma
TV Autoinstalación
Seleccionar Introducir précéd. Fin
Introducir Retorno Fin
Seleccione dónde se colocará el televisor.
La imagen se optimizará para
esa ubicación.
Casa
Tienda
Ubicación TV
NOTA
• La calificación ENERGY STAR está basada en el MODO
AV “Estándar”.
3. Configuración de ubicación
• Presione el botón / para seleccionar
“Inicio” o “Almacenar” y presione el botón
para avanzar al próximo paso.
POWER
INPUT
3
1
2
POWER
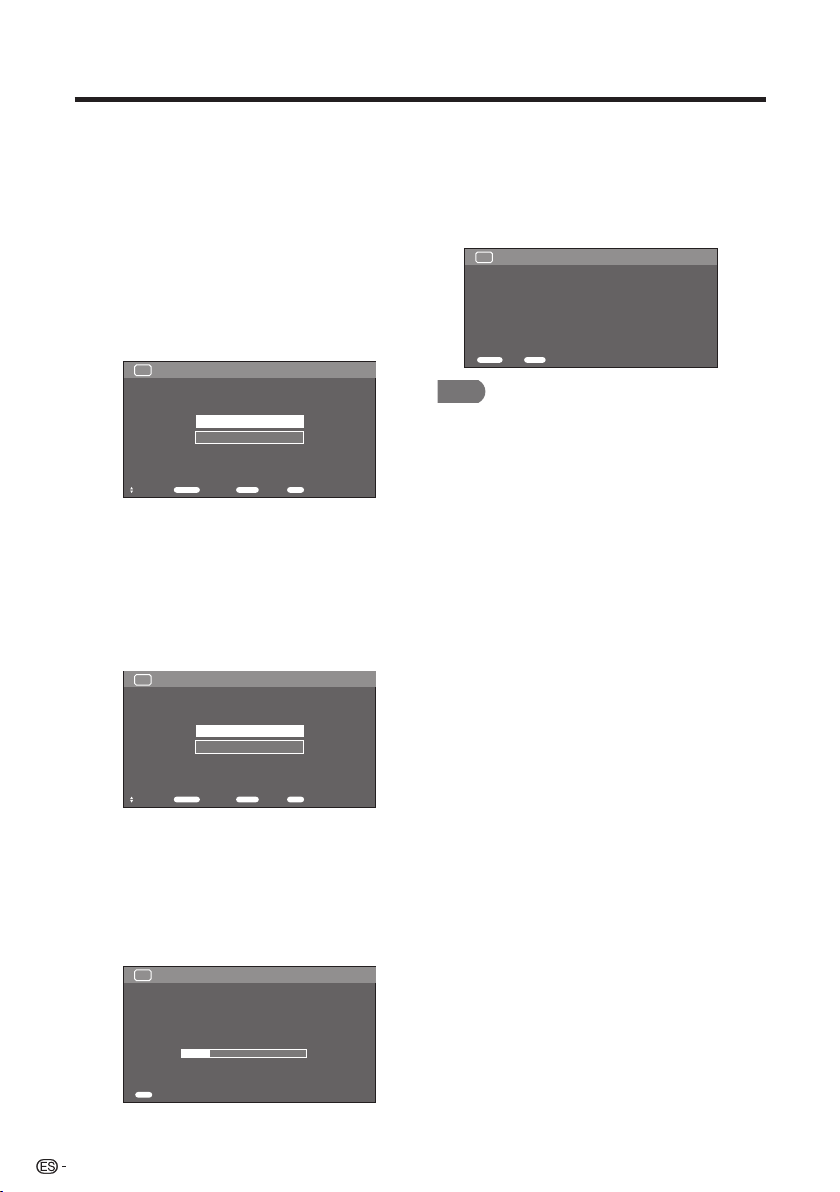
Visualización de la TV
20
Busq. Canal (Búsqueda de canales)
La búsqueda automática de canales hace que
el televisor busque todos los canales que
puedan verse en la zona establecida.
5. Cuando se selecciona "Air" ("Aire) o
"Cable" en la configuración Antenna
(Antena):
Pulse ▲/▼ para seleccionar “Inicio”, y luego
pulse ENTER.
6. Inicio de la búsqueda de canales
• Espere a que finalice la búsqueda de
canales.
• Si presiona EXIT (SALIR), el proceso
regresará al paso anterior.
• Si omite este paso, es posible realizar la
búsqueda de canales desde el menú TV.
(Consulte la página 32).
7. Completado
Después de que se complete la
configuración, la pantalla mostrará "EZ
Setup Completed" ("Configuración EZ
completada"), presione ENTER (ACEPTAR)
para finalizar la configuración EZ. La TV
cambiará al primer canal encontrado.
• La programación automática requerirá 20 minutos o más en
completarse. Espere hasta que aparezca el mensaje
"Programación automática completada".
Home (Hogar): “Power Saving” ("Ahorro de energía)
está establecido en "On" ("Activado") y AV MODE
(MODO DE A/V) está establecido en "STANDARD"
("ESTÁNDAR").
Tienda: “Ahorro de energía” se establece en
“Apagado” y MODO AV se establece en “DINÁMICO
(Fijo)”. Se puede establecer Reiniciar Imagen y Demo.
4. Ant./Cable (Ajuste de antena)
• Asegúrese qué tipo de conexión se está
realizando con la TV al seleccionar “Aire”
o “Cable”.
• Presione el botón ▲/▼ para seleccionar
“Aire” o “Cable” y presione el botón ►
para avanzar al próximo paso.
NOTA
TV Autoinstalación Ant./Cable
Seleccionando canales\ndel ant./cable
Antena
Cable
TV Autoinstalación Busq. Canal
Buscando canales que pueden recibirse.
Inicio
Cancelar
TV Autoinstalación Busq. Canal
Buscando canales disponibles.
Sintonizando canales automáticamente.
Analógicos: 0
Digitales: 0
22%
Cancelar
Fin
TV Autoinstalación Completado
Ajuste EZ Setup Completado
Fin
Introducir
précéd.
Retorno
Seleccionar Introducir précéd. Fin
Introducir Retorno Fin
Seleccionar Introducir précéd. Fin
Introducir Retorno Fin
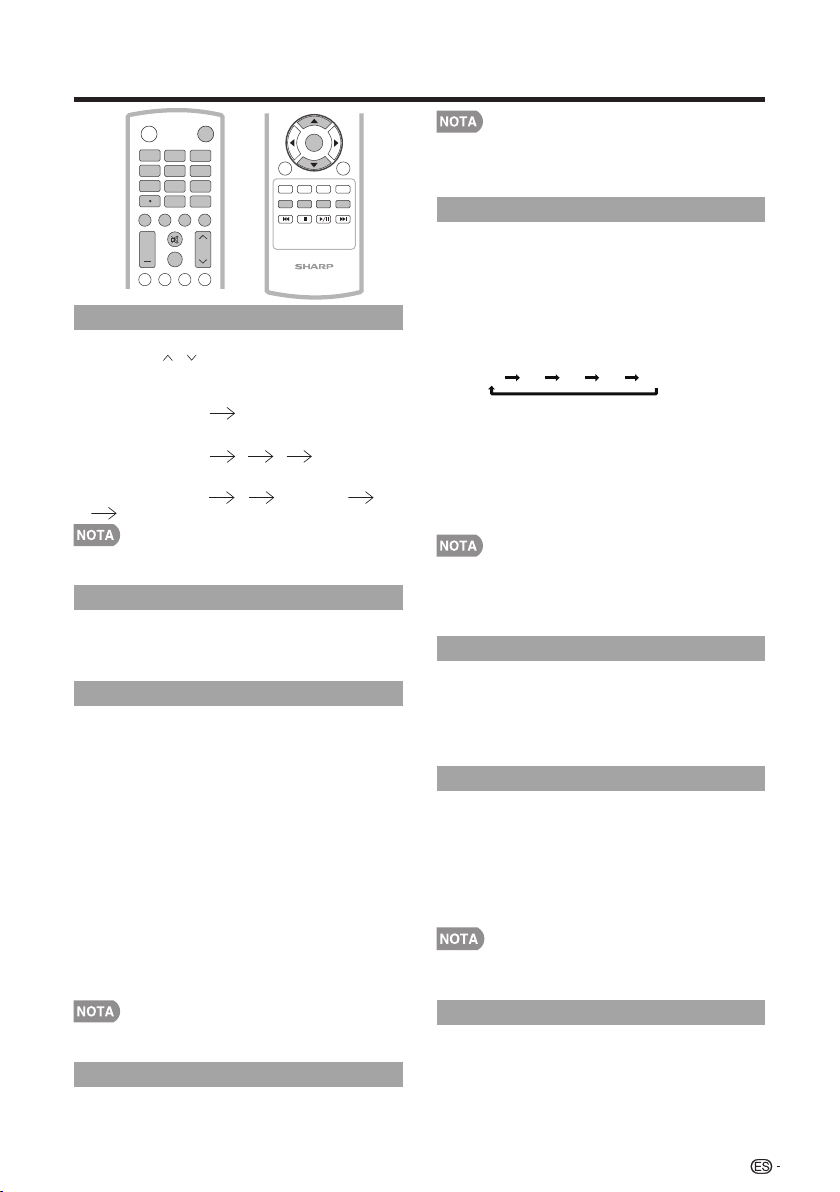
21
Utilización directa de los botones
Cambio de los canales
Puede cambiar los canales presionando los
botones CH / o 0-9 o • (PUNTO).
Ejemplos:
Para seleccionar un número de canal de 1 ó 2
dígitos (por ejemplo, el canal 5):
Presione el botón 5 IR.
Para seleccionar un número de canal de 3
dígitos (por ejemplo, el canal 115):
Presione el botón 1 1 5 IR.
Para seleccionar un número de canal de 4
dígitos (por ejemplo, el canal 22.1):
Presione el botón 2 2 • (PUNTO) 1
IR.
• Al seleccionar un número de canal de 1 dígito, no es necesari
o presionar 0 antes del número.
Cambio del volumen
Puede cambiar el volumen presionando
VOL +/- en la TV o en el control remoto.
• Para subir el volumen, presione VOL +.
• Para bajar el volumen, presione VOL -.
ENTRADA
Para visualizar imágenes de fuentes externas,
seleccione la fuente de entrada utilizando el
botón INPUT (ENTRADA) en el control remoto
o el botón INPUT (ENTRADA) en la TV.
1. Presione el botón INPUT (ENTRADA).
• Aparecerá una lista de todas las fuentes
seleccionables.
2. Presione INPUT (ENTRADA) nuevamente
para seleccionar la fuente de entrada.
• Aparecerá automáticamente la imagen de
la fuente seleccionada.
• Cada vez que se presione el botón INPUT
(ENTRADA), se cambiará la fuente de
entrada.
• Si presiona el botón ▲/▼ para
seleccionar la fuente de entrada, presione
el botón INTRO para confirmar la
selección.
INPUT
3
4
5
6
7
8
9
0
ENT
1
2
DI SP L AY F RE E Z E
FLASHBACK
MU TE
SU RR OU ND
TV US B
PC
ME NU
AUDIO
VOL CH
+
POWER
FAV OR IT E C H
SL E E P CC VIEW MODEAV MODE
NRUTERTIXE
LCD T V
GJ221
A B C D
ENTER
• Consulte la página 14-18 para la conexión de los equipos
externos.
• Se puede cancelar el silencio utilizando el método que
aparece a continuación.
- Se cancelará el silencio si presiona VOL +/- o MUTE
(SILENCIAR)
TEMPORIZADOR
Permite establecer un tiempo luego del que la
TV ingresará automáticamente en el modo de
espera.
Presione el botón SLEEP (TEMPORIZADOR).
• Aparecerá el tiempo restante cuando
se haya establecido el temporizador.
• Cada vez que presione el botón SLEEP
(TEMPORIZADOR), el tiempo restante
cambiará como se muestra a continuación:
Des 30 60 90 120
• Cuando el temporizador esté establecido,
se iniciará automáticamente la cuenta
regresiva.
• Si desea ajustar el temporizador, puede
presionar el botón SLEEP
(TEMPORIZADOR) dos veces y, a
continuación, cambiar la configuración del
tiempo.
• Seleccione "OFF" (Non) y presione el botón SLEEP
(TEMPORIZADOR) para cancelar el temporizador.
• La TV ingresará en el modo de espera (el indicador
encendido/apagado se encenderá de color rojo) cuando el
tiempo restante llegue a cero.
CANAL ANTERIOR
Presione el Presione el botón FLASHBACK
(CANAL ANTERIOR) para cambiar al canal o
entrada sintonizada previamente.
• Presione nuevamente el botón FLASHBACK
(CANAL ANTERIOR) paracambiar al canal o
entrada sintonizado actualmente.
SONIDO ENVOLVENTE
La función de sonido envolvente otorga un
efecto de sonido envolvente desde los
altavoces. Cada vez que presione el botón
SURROUND (SONIDO ENVOLVENTE), este
modo cambiará entre Activado y Desactivado.
• Act: Permite disfrutar de un sonido envolvente
natural y realista.
• Des: Se emite el sonido normal.
• Puede acceder a la misma configuración si selecciona
“Sonido envolvente” en los elementos del menú.
(Consulte la página 28).
Permite silenciar la salida de sonido actual.
Presione el botón MUTE (SILENCIAR).
SILENCIAR
CONGELAR
Permite capturar y congelar una imagen en
movimiento que esté visualizando.
Presione el botón FREEZE (CONGELAR).
• Se captura una imagen en movimiento.
• Presione el botón FREEZE (CONGELAR)
nuevamente para cancelar esta función.
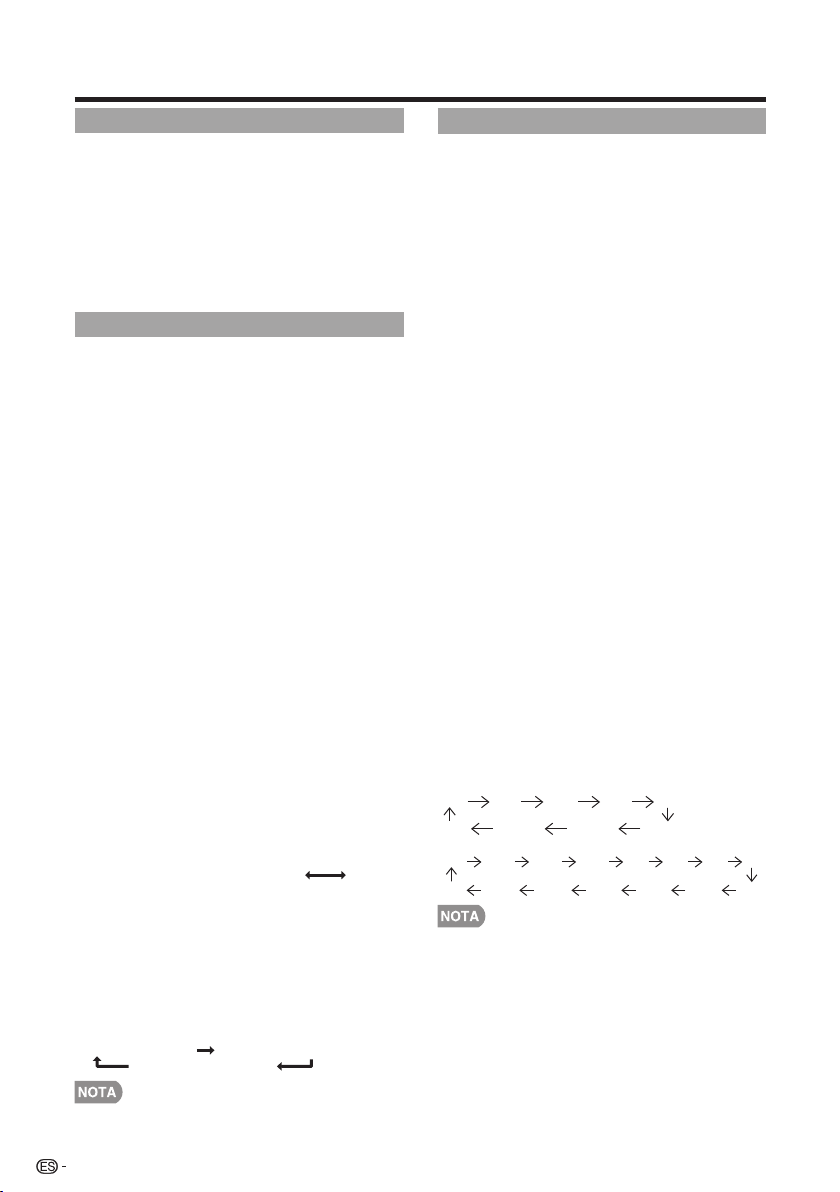
Utilización directa de los botones
22
Modo AV
MODO DE A/V le otorga varias opciones de
visualización seleccionables para adaptarse
mejor a los entornos de la TV, que pueden
variar debido a factores como el brillo de la sala,
el tipo de programa visualizado o el tipo de
entrada de imagen de los equipos externos.
• Presione el botón AV MODE (MODO DE A/V).
Aparecerá el MODO DE A/V actual.
• Puede tener los mismos ajustes eligiendo
“Congelar” en los elementos del menú.
(Consulte la página 27.)
AUDIO
■ Modo estéreo MTS/SAP
La TV posee una función que permite la
recepción de sonido además del audio principal
del programa. Esta función se llama Sonido
Multicanal de Televisión (MTS). La TV con MTS
puede recibir sonido mono, sonido estéreo y
programas de audio secundarios (SAP, por sus
siglas en inglés). La función SAP permite que
una estación de TV transmita otra información,
que podría ser audio en otro idioma o algo
completamente diferente, como información
sobre el clima.
Puede disfrutar de sonido estéreo de alta
definición o transmisiones SAP, cuando esté
disponible.
• Transmisiones estéreo: Visualice programas
como eventos deportivos, shows y conciertos en
vivo con sonido estéreo dinámico.
• Transmisiones SAP: Reciba transmisiones de TV
con sonido PRINCIPAL o SAP.
Sonido PRINCIPAL: Sonido normal del programa
(ya sea en mono o estéreo).
Sonido SAP: Escuche un segundo idioma,
comentarios complementarios u otra información.
(SAP es sonido mono).
Si es difícil escuchar sonido estéreo.
• Obtenga un sonido más nítido cambiando
manualmente al modo de sonido mono.
Puede cambiar el MTS como se muestra a
continuación para ajustarlo a la señal de
transmisión de televisión.
Presione el botón AUDIO para cambiar entre
los modos de audio.
Ejemplos: al recibir MTS y SAP
Modo PRINCIPAL + SAP: PRINCIPAL SAP
Modo MONO: MONO
■ Modo de audio de transmisión digital
Los tipos de audio transmitidos en una
transmisión digital incluyen ENVOLVENTE,
MONO y ESTÉREO. Además, es posible que
varias pistas de audio acompañen a una sola
pista de video.
Presione MTS/SAP para cambiar entre los
modos de audio.
Ejemplo: al recibir transmisiones digitales
ESTÉREO (Audio1) ESTÉREO (Audio2)
ENVOLVENTE (Audio3)
• MTS sólo funciona en el modo TV.
Subtítulos ocultos (CC)
La TV posee un decodificador interno de
subtítulos ocultos. Permite visualizar como
subtítulos en la TV conversaciones, narraciones
y efectos de sonido. Los subtítulos ocultos
están disponibles en algunos programas de TV
y en algunas cintas de video hogareñas VHS, a
discreción del encargado del programa.
El servicio de subtítulos ocultos digitales es un
nuevo servicio de subtítulos disponible sólo en
programas de TV digital (también a discreción
del proveedor del servicio). Es un sistema más
flexible que el sistema de subtítulos ocultos
original, debido a que permite diferentes
tamaños y estilos de fuentes para los subtítulos.
Cuando se utiliza el servicio de subtítulos
ocultos digitales, aparecerá una abreviatura de
3 letras que también indica el idioma de los
subtítulos ocultos digitales: ENG (inglés), SPA
(español), FRA (francés) u otros códigos de
idioma.
No todos los programas y cintas de video VHS
ofrecen el servicio de subtítulos ocultos.
En el sistema de subtítulos ocultos, existe más
de un servicio de subtítulos proporcionado.
Cada uno está identificado con un número. Los
servicios “CC1” a “CC4” muestran subtítulos de
los programas de TV superpuestos sobre la
imagen del programa.
En el sistema de subtítulos ocultos, los servicios
“TEXTO 1 o “TEXTO 4 muestran texto que no
está relacionado con el programa que se está
visualizando (por ejemplo, el clima o noticias).
Estos servicios también están superpuestos
sobre el programa que se está visualizando.
1. Presione el botón CC (subtítulos ocultos).
• Se abrirá la pantalla actual de información
de subtítulos ocultos. Presione el botón
CC para activar o desactivar la función de
subtítulos ocultos.
• La visualización de subtítulos ocultos no funcionará al
visualizar una entrada 480i, 480p, 720p, 1080i o 1080p a
través de VIDEO COMPONENTE: entradas Y-PbPr o HDMI.
• La disponibilidad y el contenido de los subtítulos ocultos
dependen del proveedor del programa. Los subtítulos ocultos
están disponibles cuando aparece el icono de subtítulos
ocultos en la pantalla.
• La disponibilidad y el contenido de los subtítulos ocultos y
subtítulos ocultos digitales dependen del proveedor del
programa. Los subtítulos ocultos están disponibles cuando
aparece el icono de subtítulos ocultos en la pantalla.
Ejemplo:
Analógica:
CC1 CC2 CC3 CC4 TT1
-- TT4 TT3 TT2
Digital:
CC1 CC2 CC3 CC4 TT1 TT2 TT3 TT4
-- CS6 CS5 CS4 CS3 CS2 CS1
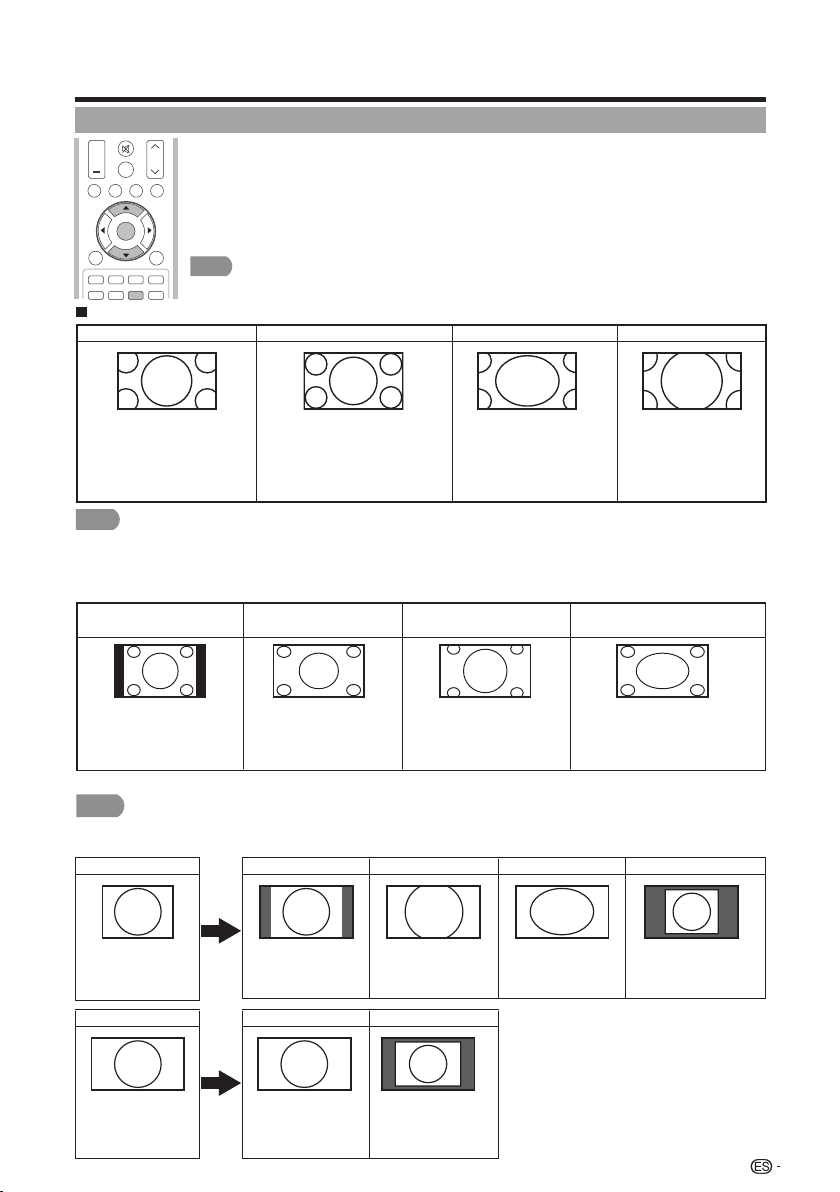
MODO DE VISUALIZACIÓN
Puede seleccionar el tamaño de la pantalla.
■
Para programas en 4:3
Ejemplo: imágenes de los tamaños de pantalla
Punto de Dot
Punto de Dot
La imagen cubre
toda la pantalla.
Detecta la resolución de
la señal y muestra la
imagen con la misma
cantidad de píxeles en
la pantalla.
Utilización directa de los botones
1 Presione el botón VIEW MODE (MODO DE VISUALIZACIÓN).
• Aparecerá el menú Modo de vista.
• Este menú muestra las opciones de Modo de vista que se pueden seleccionar para el tipo
de señal de video que se está recibiendo actualmente.
2 Presione el botón VIEW MODE (MODO DE VISTA) o ▲/▼ cuando aparezca el
menú Modo de vista para seleccionar el elemento deseado en el menú.
■ Para el modo de entrada de PC
• Conecte la PC antes de realizar ajustes.
• El tamaño de pantalla seleccionable puede variar según el tipo de señal de entrada.
AumentoZoom
Este modo es de suma utilidad para DVD
en 1,78:1. Al visualizar DVD en 1,85:1, el
modo de expansión mostrará franjas
negras delgadas en la parte superior
e inferior de la pantalla.
Ideal para la visualización de
programas en 4:3 convencionales
en su formato normal.
Ideal para la visualización de DVD
anamórficos en 2,35:1 de pantalla
panorámica en pantalla completa.
Ideal para expandir programas
en 4:3 y cubrir toda la pantalla.
Alarga. S
(aumento inteligente)
Normal
Normal
NOTA
NOTA
4:3
Mantiene la relación de
aspecto original en una
visualización de pantalla
completa.
Ideal para la visualización
en pantalla panorámica.
Se recorta la parte superior
e inferior de la imagen.
La imagen cubre toda la
pantalla.
Detecta la resolución de la
señal y muestra la imagen
con la misma cantidad de
píxeles en la pantalla.
16:9
Full Screen
Full Screen
Señal de entrada
Señal de entrada
23
■
Para USB-Video
SU RR OU ND
TV US B
PC
ME N U
FAV O RI TE C H
SL E E P CC VIEW MODE AV MODE
VOL CH
+
NRUTERTIXE
A B C D
ENTER
• Puede tener los mismos ajustes eligiendo “Modo de Vista” en los elementos del menú. (Consulte la página 29.)
Para programas HD
Alarga.
Punto m punto (Pantalla Completa)
Alarga. S (Ampliación inteligente)
Zoom
Adecuado para ver programas con una
relación de aspecto de 1,78:1 de
pantalla panorámica. El modo de
ampliación todavía mostrará franjas
negras muy fi nas en la parte superior e
inferior de la pantalla.
Puntom punto (solamente 1080i/p):
Detecta la resolución de la señal y
visualiza una imagen con el mismo número
de píxeles en la pantalla.
Pantalla Completa (solamente 720p):
Puede seleccionar “Pantalla Completa”
solamente cuando reciba una señal 720p.
Sirve para ampliar programas 4:3 de
forma que llenen la pantalla.
Adecuado para ver programas
con una relación de aspecto de
2,35:1 de pantalla panorámica
en toda
NOTA
• Cuando utilice la función Puntogpunto o Pantalla Completa es posible que se vean barras o ruido alrededor de partes
exteriores diferentes de la pantalla. Cambie el modo de vista para corregir esto.
Cine

Para el modo TV
• Algunos elementos del menú podrían no aparecen en función de la fuente de entrada seleccionada.
Menú de visualización en pantalla
Elementos del menú
24
Reiniciar ..................................................................32
Ajuste Individual .......................................................32
No. secreto ......................................................32
Control de los padres ......................................32
Estado .......................................................32
V-Chip .......................................................33
V-Chip (sólo DTV) .......................................32
Información ..........................................................34
Identificación ...........................................................34
Conectar al dispositivo de memoria USB/
disco duro USB ....................................................35
Reproducir archivos de un dispositivo
de memoria USB ...........................................35
Seleccionar los archivos que deben
reproducirse ........................................................35
Modo de fotos ........................................................35
Modo de música .....................................................36
Modo Video ............................................................37
Compatibilidad del dispositivo USB .........................37
Visualización de vistas miniaturizadas ...............35
Visualización de una fotografía individual ..........36
Presentación de diapositivas ............................36
Ajustes de Imagen ...............................................26
Modo AV .................................................................27
Ajuste de OPC ........................................................27
Luz de fondo ...........................................................26
Contraste ................................................................26
Avanzado ................................................................27
Temperatura del color ......................................27
Contraste activo ...............................................27
Modo de película Dl ..........................................27
Reducción ruido ...............................................27
Ajustes de audio ...................................................28
Agudos ...................................................................28
Graves ....................................................................28
Balance ..................................................................28
Sonido surround .....................................................28
Control de Energía ...............................................28
Modo de Vista .................................................29
Congelar ..........................................................29
Cambiar Audio .................................................29
Lenguaje del Audio ....................................29
MTS ...........................................................29
Cambiar CC .....................................................29
Subtítulos Análogos ....................................30
Subtítulos Digitales .....................................30
Ajuste de audio ................................................30
Ajuste de sincronización automática (para modo
de entrada de PC analógica solamente)
...........30
Ajuste de sincronización fina .......................30
Ajustes de Terminales de Entrada ............................30
Entrada PC .......................................................30
Selección Audio ................................................30
Configuración HDMI .........................................31
Altavoces .........................................................31
Ajuste de subtítulos .................................................31
Ahorro de energía ....................................................28
Apagado sin señal ...................................................28
Ajuste de Canal ................................................32
Canal favorito (Ajuste de los canales favoritos) ..32
Configuración Inicial ............................................31
Autoinstalación .......................................................31
Ajuste de Transmisión .............................................32
Idioma .....................................................................32
Opciones de Sistema ...........................................29
Opciones de Vista ...................................................29
Brillo ........................................................................26
Nitidez .....................................................................26
Color .......................................................................26
Matiz .......................................................................26

Menú de visualización en pantalla
• Las opciones del menú son diferentes según los modos de entrada seleccionados, pero los procedimientos de ajuste son los mismos.
• Las pantallas en el manual de operación se ofrecen con fi nes explicativos (algunas ampliadas, otras recortadas) y pueden ser un
poco diferentes de las pantallas reales.
• El orden de las explicaciones para cada elemento del menú en las siguientes páginas no necesariamente está de acuerdo con la
alineación de los elementos en pantalla.
Funcionamiento del menú de visualización en pantalla
1. Pulse MENU para visualizar la pantalla
MENÚ.
Pulse ◄/► para seleccionar el menú
deseado.
Pulse ▼/▲ para seleccionar un elemento
de ajuste específico, y luego pulse
ENTER.
• Es posible que se presenten elementos
adicionales de ajuste que estén
relacionados. Pulse ▼/▲ para
seleccionar el elemento deseado.
Ajuste el elemento al consultar la pantalla
guía.
• Las operaciones varían según la
función o elemento. Consulte la
pantalla guía correspondiente a la
pantalla de ajuste del menú para
operaciones con botones.
2.
3. Pulse MENU para salir.
Pantalla guía
• Esto indica los botones que se pueden
operar en la pantalla exhibida. La pantalla
guía varía según la pantalla de ajuste de
menú.
• Las operaciones para algunos elementos
seleccionados se pueden presentar en la
barra de guía de operación de la parte
inferior de la pantalla.
Elemento visualizado en azul
• Esto indica el elemento actualmente
seleccionado.
• Pulse ◄/► para pasar a la pantalla de
ajuste para este elemento.
Elemento entre corchetes
• Esto indica el ajuste actual para el
elemento.
Elemento visualizado en gris
• Esto indica que el elemento puede ser
seleccionado.
Elemento de color negro
• Esto indica que el elemento no puede ser
seleccionado.
Hay varias razones por las cuales los
elementos no pueden ser seleccionados,
pero las razones principales son las
siguientes:
—No hay nada conectado al terminal de
entrada seleccionado.
—La función no es compatible con la señal
de entrada actual.
NOTA
Ejemplo
Menu
Información
Configuración
Inicial
Opciones
de Sistema
Ajustes de
Imagen
Ajustes de Imagen
Introducir
Ajustar Seleccionar Introducir
Retorno
précéd.
Modo AV
[ESTANDAR]
ESTANDAR
OPC
[Encendido]
Contraste
[ 51
Luz trasera
[ 82]
Brillo
[ 50]
Color
[ 50]
Matiz
[ 0]
Nitidez
[ 10]
Avanzado
Reiniciar
Ejemplo
Menu
Información
Configuración
Inicial
Opciones
de Sistema
Ajustes de
Imagen
Modo AV
[ESTANDAR]
ESTANDAR
OPC
[Encendido]
Contraste
[ 51]
Luz trasera
[ 82]
Brillo
[ 50]
Color
[ 50]
Matiz
[ 0]
Nitidez
[ 10]
Avanzado
Reiniciar
Ajustes de Imagen
Introducir
SeleccionarSeleccionar Menu
Retorno
Fin
Introducir
1
2
3
1
2
3
4
5
25

Menú de visualización en pantalla
CH / : Cursor ▼/▲ en el control
remoto.
VOL + / - : Cursor ◄/► en el control
remoto.
MENU (MENÚ): MENU (MENÚ)
en el control remoto o EXIT
(SALIR) en el control remoto cuando
el menú OSD se encuentra abierto.
INPUT (ENTRADA): Intro en el
control remoto.
Utilización del panel de control de la
unidad principal
También puede navegar por el menú con
el panel de control de la unidad principal.
El funcionamiento de los botones del panel
de control concuerda con aquel del control
remoto, tal como se muestra a continuación.
MENU (MENÚ):
Presione este botón para abrir
o cerrar la pantalla del menú.
▼/▲/◄/►: Presione estos botones para
seleccionar un elemento
deseado en la pantalla o
ajustar el elemento
seleccionado.
Intro: Presione este botón para
avanzar al próximo paso o
para completar la
configuración.
RETURN
(REGRESAR):
Presione este botón para
regresar al paso anterior.
1. Presione MENU (MENÚ) para visualizar la
pantalla MENU (MENÚ) y, a continuación,
presione ◄/► para seleccionar "Picture
Settings" ("Configuración de imagen") y
presione ENTER (ACEPTAR) o ▼ para
ingresar.
2. Presione ▼/▲ para seleccionar un elemento
de ajuste específico y presione Intro o ►
para ingresar en la configuración.
3. Presione ◄/► para ajustar la configuración.
4. Presione el botón MENU (MENÚ) para salir.
NOTA
• El control de retroiluminación aparecerá deshabilitado cuando
la función OPC está establecida en “On” ("Activado").
<
<
Elemento
seleccionado
Botón ◄ Botón ►
Luz de fondo
La pantalla se
obscurece
La pantalla se
ilumina
Brillo
Para reducir
el brillo
Para aumentar
el brillo
Contraste
Para reducir
el contraste
Para aumentar
el contraste
Color
Para reducir la
intensidad de
color
Para aumentar
la intensidad
de color
Matiz
Los tonos de la
piel se rojizos
Para reducir la
nitidez
Paraaumentar
la nitidez
Los tonos de la
piel se vuelven
más verdosos
Nitidez
Botones para la navegación por
el menú
Ajustes de Imagen
Utilización del control remoto
Utilice los siguientes botones en el control
remoto para navegar por el menú.
Permite ajustar la imagen a su preferencia a
través de las siguientes configuraciones de
imagen.
TV US B
PC
MENU
NRUTERTIXE
ENTER
Menu
Ajustes de
Imagen
Modo AV
[ESTANDAR]
ESTANDAR
OPC
[Encendido]
Contraste
[ 50]
Brillo
[ 50]
Color
[ 50]
Matiz
[ 0]
Nitidez
[ 10]
Avanzado
Reiniciar
Ajustes de Imagen
Luz trasera
[ 80]
TV US B
PC
MENU
RETURNEXIT
ENTER
FAV ORIT E CH
SLE E P CC VIEW MODEAV MODE
A B C D
26

Menú de visualización en pantalla
Modo AV
Se pueden cambiar los ajustes de audio y vídeo
para adecuarse al programa o contenido de
entrada que se está mirando.
Seleccione de los siguientes modos de AV.
USER (USUARIO)/STANDARD (ESTÁNDAR)/
MOVIE (CINE)/GAME (JUEGOS)/PC/DYNAMIC
(DINÁMICO)/DYNAMIC (Fixed) (DINÁMICO (Fijo))
• Puede seleccionar MODO AV pulsando
AV MODE
en el
control remoto. Consulte la página 22 para detalles de los
ajustes de MODO AV.
Ajuste de OPC
Ajusta automáticamente el brillo de la pantalla.
Apagado:
El brillo se fija con el valor
establecido en “Luz trasera”.
Encendido:
Ajuste automático
• Cuando se pone en “Encendido”, el control de imagen óptica
(OPC) capta la luz ambiental y ajusta automáticamente el
brillo de la luz de fondo.
Asegúrese de que nada tape el sensor OPC, lo que
podría afectar a su habilidad para sentir la luz
ambiental.
Avanzado
Este televisor proporciona varias funciones
avanzadas para optimizar la calidad de la
imagen.
Temperatura del color
Para un mejor balance de blancos, utilice la
corrección de la temperatura de color.
Cálida: Blanco con tonos rojizos
Estándar:
Fría: Blanco con tonos azulados
• Usuario: Se puede ajustar manualmente el
balance de blancos a través de la ganancia
de rojo, verde y azul entre un máximo de 255
y un mínimo de 0 para la temperatura de
cada color.
• Para reponer todos los elementos de ajuste a los valores de
fábrica, pulse ▲/▼ para seleccionar “Reiniciar”, y luego pulse
ENTER
.
• Para reponer todos los elementos de ajuste a los
valores de fábrica, pulse ▲/▼ para seleccionar
“Reiniciar”, y luego pulse
ENTER
.
• “DI Film Mode" ("Modo de película DI") no funciona según
el tipo de señal de entrada.
• “Auto" ("Automático") no funciona cuando el canal posee
una resolución de señal de entrada 480p, 720p o 1080p.
• “DI Film Mode" ("Modo de película DI") no está disponible en
la entrada de formato de PC.
27
Contraste activo
Automáticamente ajusta el contraste de la
imagen de acuerdo a la escena.
Encendido:
Automáticamente ajusta el
contraste de la imagen.
Apagado:
Sin ajuste
Modo de película Dl
Detecta automáticamente una fuente de película
(codificada originalmente a 24 fotogramas/
segundo), la analiza y luego recrea cada
fotograma fijo para ofrecer una calidad de
imagen de alta definición.
Automático:
Detecta, analiza y convierte la
fuente de película.
Apagado:
Modo de vista normal.
• "Digital Noise Reduction" ("Reducción de ruidos digitales") no
está disponible cuando se utiliza la señal de formato de PC.
Reducción ruido
Produce una imagen más clara.
Auto:
Ajusta automáticamente el nivel de
reducción de ruido.
Alta/Medio/Baja:
Seleccione un nivel
deseado para ver una imagen de vídeo más
clara.
Apagado:
Sin ajuste.
Ejemplo: Cuando la fuente de entrada es TV,
COMPONENTES, PC IN o HDMI 1 a 4
Estándar: Para una imagen altamente defi nida en una
iluminación normal.
PELÍCULA: Para una película.
JUEGO: Reduce el brillo para ver más fácilmente las imágenes.
PC: Para PC.
USUARIO: Permite al usuario personalizar los ajustes que
desee. Puede ajustar el modo para cada una de las fuentes
de entrada.
DINÁMICO: Para una imagen nítida que realza el contraste,
útil para ver programas deportivos.
DINÁMICO (Fijo): Cambia las opciones de imagen y sonido
a los valores preajustados en la fábrica. No se permite hacer
ajustes.
PC
DINÁMICO
DINÁMICO (Fijo)
USUARIO [TV]
Estándar PELÍCULA JUEGO
Estándar
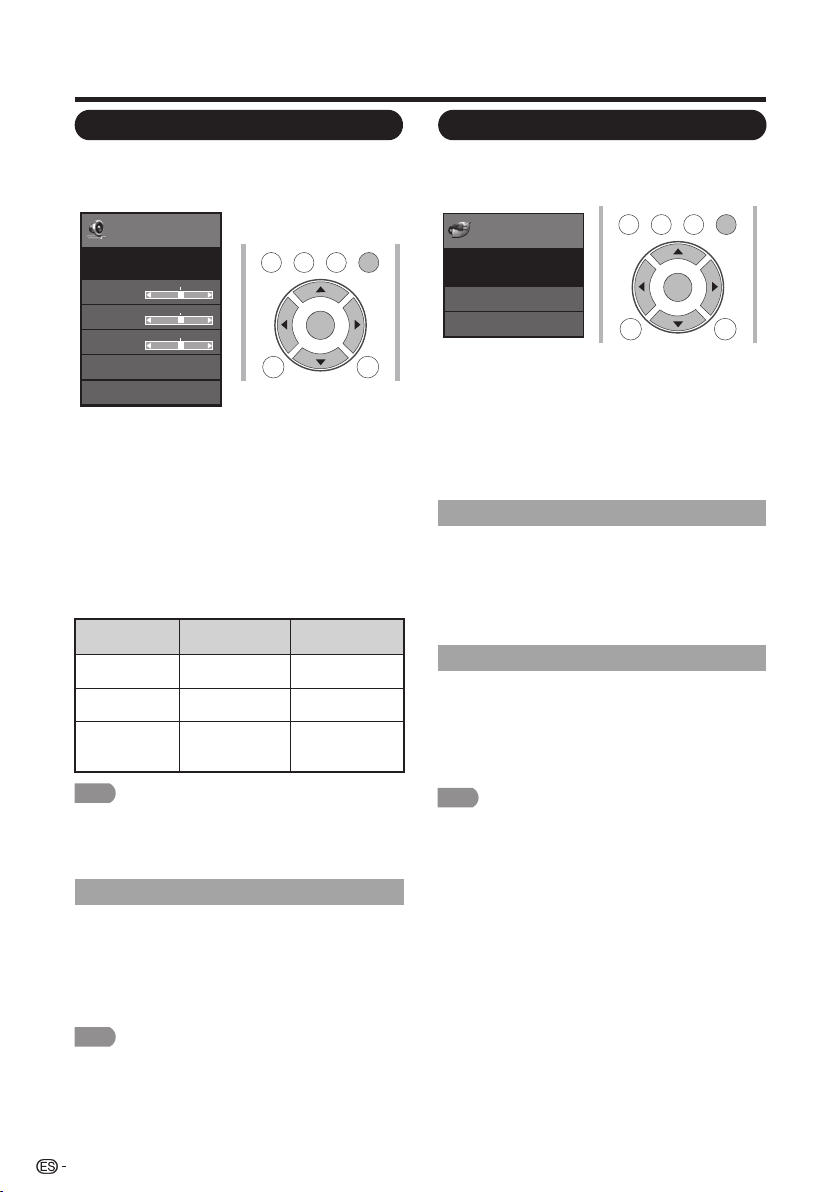
Menú de visualización en pantalla
Ajustes de audio
Puede ajustar la calidad del sonido según sus
preferencias empleando los ajustes siguientes.
El ajuste de control de la alimentación le
permite ahorrar energía.
1. Pulse MENU para visualizar la pantalla
MENÚ, y luego pulse ◄/► para seleccionar
“Ajustes de audio”.
2. Pulse ▲/▼ para seleccionar un elemento de
ajuste específico.
• Seleccione "Surround" ("Envolvente") y
presione ◄/► para ajustar.
3. Pulse ▲/▼ (o ◄/►) para seleccionar el
ajuste deseado, y luego pulse ENTER.
4. Presione el botón MENU (MENÚ)
para salir.
Ejemplo
28
Menu
Ajustes de
Audio
Graves
[ 50]
Agudos
[ 50]
Balance
[ 0]
Sonido Envolvente
[Apagado]
ESTANDAR
Reiniciar
Ajustes de Audio
TV US B
PC
MENU
RETURNEXIT
ENTER
Elemento
seleccionado
Botón ◄ Botón ►
Agudos
Para agudos
más débiles
Graves
Para graves
más débiles
Para agudos
más fuertes
Para graves
más fuertes
Balance
Reduce el audio
del altavoz
derecho
Reduce el audio
del altavoz
izquierdo
NOTA
• Para reponer los elementos de ajustes de audio a los valores
preajustados de fábrica, pulse ▲/▼ para seleccionar
“Reiniciar”, pulse ENTER, pulse ▲/▼ para seleccionar “Sí”,
y luego pulse ENTER.
NOTA
• Para algunos discos tal vez sea necesario hacer la
preparación en su reproductor DVD/BD. En este caso,
consulte el manual de operación de su reproductor DVD/BD.
Sonido surround
La función de sonido envolvente otorga un
efecto de sonido envolvente desde los
altavoces.
Act: Permite disfrutar de un sonido
envolvente natural y realista.
Des: Se emite el sonido normal.
Apagado sin señal
Control de Energía
Control de
Energía
Menu
Apa. sin señal
Ahorro de energía
[Encendido]
[Activar]
Control de Energía
Ejemplo
TV US B
PC
MENU
RETURNEXIT
ENTER
1. Pulse MENU para visualizar la pantalla
MENÚ, y luego pulse ◄/► para seleccionar
“Control de Energía”.
2. Pulse ▲/▼ para seleccionar el elemento de
ajuste específico, y luego pulse ENTER.
3. Pulse ▲/▼ (o ◄/►) para seleccionar el
ajuste deseado, y luego pulse ENTER.
4. Pulse MENU para salir.
NOTA
• "Power Saving" ("Ahorro de energía") no funciona cuando se
establece AV MODE (MODO DE A/V) en DYNAMIC (Fixed)
DINÁMICO (Fijo)).
• No puede seleccionar un elemento de Ahorro de energía
diferente para cada MODO AV.
Esta función permite que el televisor se apague
automáticamente cuando no se recibe señal.
Activar: La alimentación se desconectará
automáticamente cuando no se reciba señal
durante 15 minutos.
Desactivado: No se realiza esta función.
Ahorro de energía
Esta función permite establecer el nivel de
Ahorro de energía para reducir el consumo de
energía y aumentar la vida útil de la luz trasera.
Act: Optimiza el consumo de energía para
vídeo.
Des: No se realiza esta función.
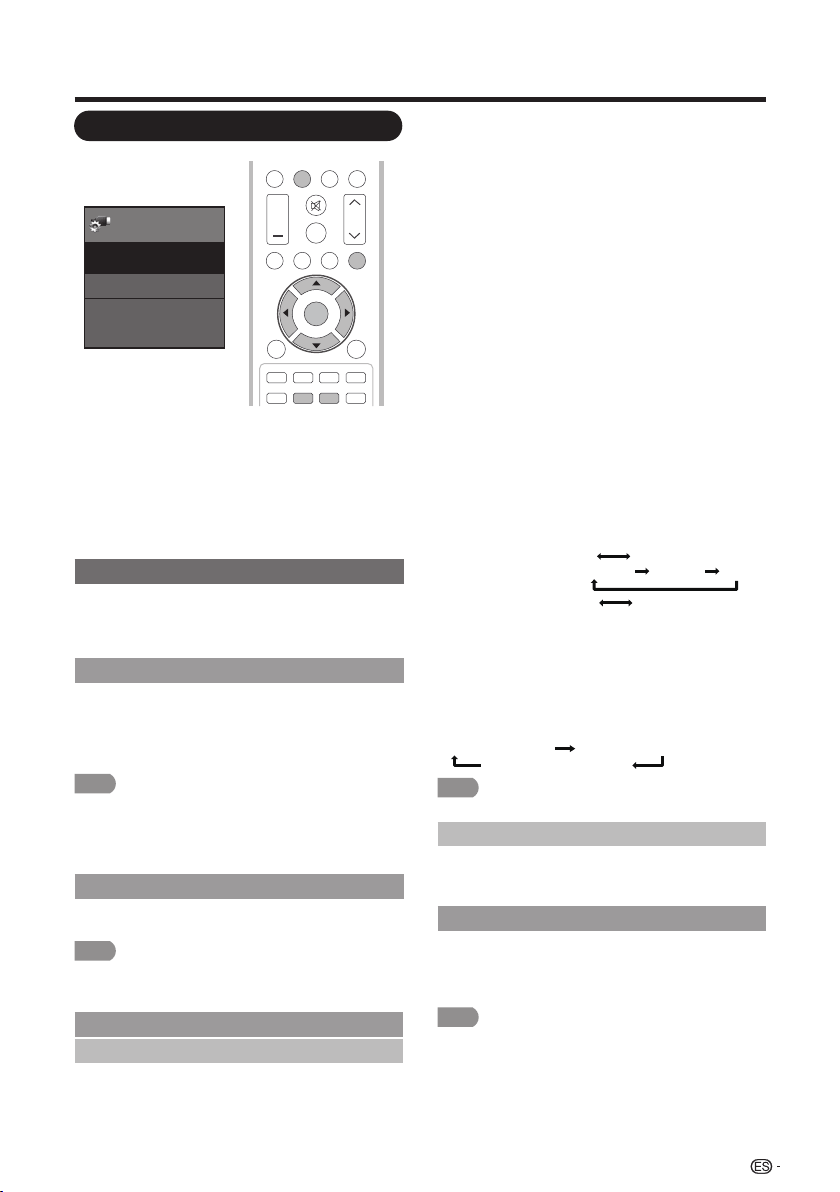
Menú de visualización en pantalla
Opciones de Sistema
NOTA
29
Menu
Opciones de Vista
Opciones de Sistema
Ajuste de subtítulos
Ajustes de Terminales de Entrada
Opciones
de Sistema
Ejemplo
DI S P L AY FRE EZ E
FLASHBACK
MU T E
SUR R O UND
TV US B
PC
ME NU
FAV O RITE C H
SL E EP CC VIEWMODEAV MODE
AUDIO
VOL CH
+
NRUTERTIXE
A B C D
ENTER
1. Pulse MENU para visualizar la pantalla
MENÚ, y luego pulse ◄/► para seleccionar
“Opciones de Sistema”.
2. Pulse ▲/▼ para seleccionar un elemento de
ajuste específi co, y luego pulse ENTER.
3. Pulse ▲/▼ (o ◄/►) para seleccionar el
ajuste deseado, y luego pulse ENTER.
4. Pulse MENU para salir.
Opciones de Vista
Estas funciones son útiles para ajustar los
ajustes de audio y vídeo. Las funciones de
Opciones de Vista se pueden operar con el
control remoto.
Esta función cambia el tamaño de la pantalla.
Seleccione “Opciones de Vista” en el menú para
visualizar la pantalla de menú Modo de Vista.
El menú Modo de Vista varía según la fuente de
entrada.
Modo de Vista
• Puede seleccionar Modo de Vista pulsando VIEW MODE en
el control remoto. Consulte la página 23 para el ajuste del
video que se está transmitiendo desde una TV, PC, otro
dispositivo audiovisual, video USB.
NOTA
Le permite capturar y congelar una imagen en
movimiento que esté mirando.
• Puede seleccionar Congelar pulsando FREEZE en el control
remoto. Consulte la página 21 para detalles de la función de
congelación.
Congelar
Cambiar Audio
MTS
El televisor tiene una función que permite recibir
sonido diferente del audio principal para el
programa. A esta función se le llama sonido de
televisión multicanal (MTS).
El televisor con MTS puede recibir sonido mono,
sonido estéreo y programas de audio
secundarios (SAP). La función SAP permite que
una emisora de TV pueda emitir otra información,
que bien puede ser audio en otro idioma o algo
completamente diferente como, por ejemplo,
información relacionada con el tiempo
meteorológico.
Podrá disfrutar de sonido estéreo de Hi-Fi o de
emisiones SAP donde se encuentren disponibles.
• Emisiones estéreo: Vea programas como
acontecimientos deportivos, espectáculos y
conciertos con un sonido estéreo dinámico.
• Emisiones SAP: Reciba emisiones de TV con
sonido MAIN o SAP.
Sonido MAIN: Pista de sonido de programa normal
(mono o estéreo).
Sonido SAP: Escuche un segundo idioma, un
comentario suplementario y otra información. (SAP
es sonido mono.)
Si el sonido estéreo se oye con dificultad.
• Obtenga un sonido más claro cambiando
manualmente al modo de sonido mono fijo.
Puede cambiar MTS como se muestra abajo para que
concuerde con la señal de emisión de televisión.
Pulse ENTER para cambiar entre los modos de audio.
Ejemplos: cuando se reciben MTS y SAP
Modo STEREO: STEREO MONO
Modo STEREO + SAP: ST(SAP) SAP(ST) MONO
Modo MAIN + SAP: MAIN SAP
Modo MONO: MONO
Modo de audio de emisión digital
Los tipos de audio transmitidos en una emisión digital
incluyen AMBIENTAL, MONO y STEREO. Además, es
posible que múltiples pistas de audio acompañen a
una sola pista de vídeo.
Pulse ENTER para cambiar entre los modos de audio.
Ejemplo: cuando se recibe una emisión digital
STEREO (Audio1) STEREO (Audio2)
AMBIENTAL (Audio3)
NOTA
• MTS sólo funciona en el modo TV.
NOTA
• Puede seleccionar los subtítulos ocultos pulsando CC en el
control remoto. Consulte la página 22 para detalles de la
función de los subtítulos ocultos.
Lenguaje del Audio
Le otorga la posibilidad de cambiar entre el
idioma principal y alternativo, cuando está
disponible en el canal digital.
Le permite cambiar la visualización de los
subtítulos ocultos. Seleccione “Cambiar CC” en
el menú para visualizar la información de los
subtítulos ocultos.
Cambiar CC
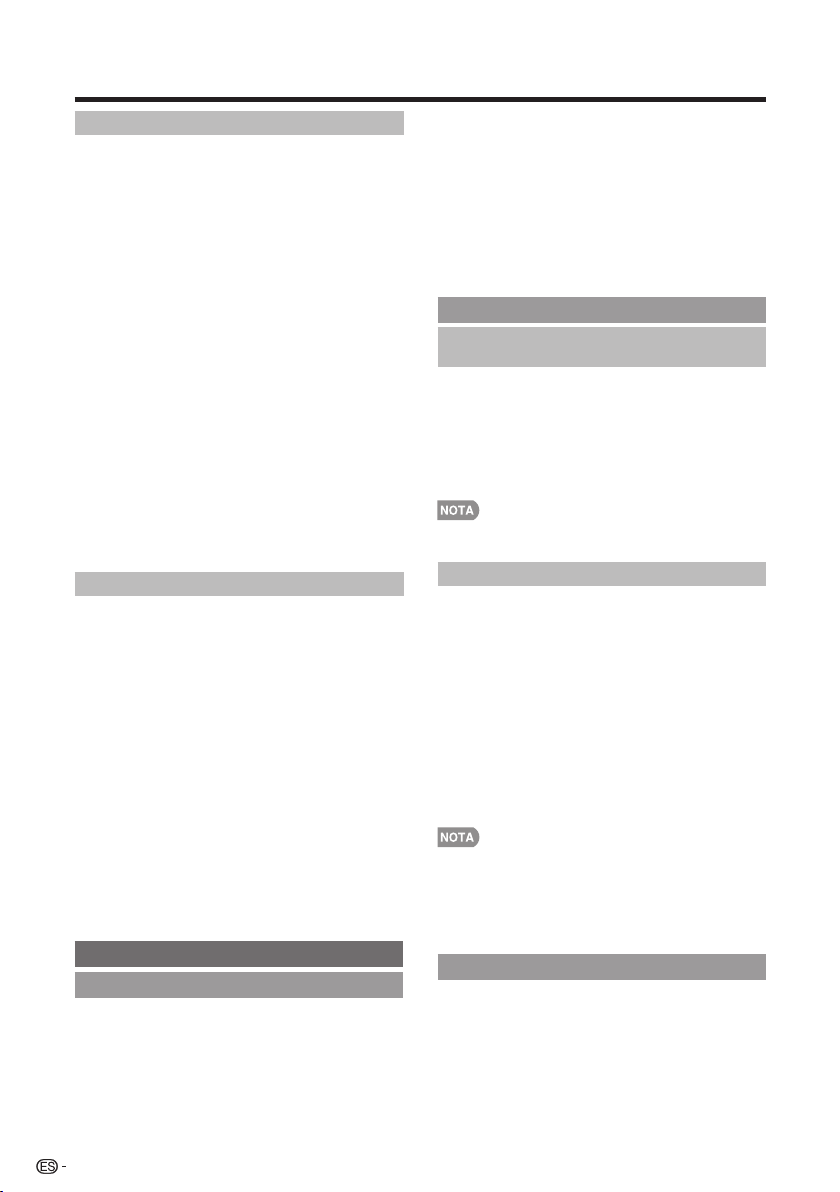
Menú de visualización en pantalla
30
Subtítulos Análogos
Permite seleccionar los niveles de servicio de
subtítulos ocultos de las transmisiones
analógicas que se visualizarán.
Los subtítulos ocultos permiten leer en la
pantalla de la TV el contenido de voz de los
programas de televisión. Diseñado para ayudar
a las personasconproblemas auditivos, este
servicio utiliza “cuadros de texto“ en pantalla
para mostrar diálogos y conversaciones durante
el transcurso del programa de TV. Los
subtítulos aparecerán en la pantalla durante las
transmisiones con subtítulos.
• CC1, 2, 3 o 4
Aparecerán en la pantalla los diálogos (y
descripciones) para la acción del programa de TV
con subtítulos. Generalmente, CC1 es la opción
más utilizada. CC2 puede utilizarse para idiomas
alternativos, siempre y cuando se los esté
transmitiendo.
• TEXTO1, 2, 3 o 4
Generalmente utilizado para guías de canales,
programaciones, carteles de anuncios sobre
programas con subtítulos ocultos, noticias,
información sobre el clima e informes sobre los
mercados bursátiles. Durante la transmisión de un
programa con subtítulos ocultos, no se utilizan
necesariamente todos los servicios de subtítulos.
Permite configurar la forma en la que desea
visualizar los subtítulos ocultos digitales.
Seleccione uno de los canales de servicio digital
proporcionados por el proveedor de los
subtítulos ocultos. Existen seis servicios
estándares. Servicio 1 está designado como el
servicio de subtítulos ocultos principal. Este
servicio contiene subtítulos ocultos palabra por
palabra o casi palabra por palabra del idioma
principal que se está reproduciendo en el
programa. Servicio 2 está designado como el
servicio de idioma secundario. Este servicio
contiene subtítulos ocultos en un idioma
secundario, que es una traducción de los
subtítulos ocultos del servicio de subtítulos
ocultos principal. Los otros subcanales de
servicio no están asignados previamente.
Queda a voluntad del proveedor de los
subtítulos ocultos utilizar los canales de servicio
restantes.
Puede dar salida a audio digital a un
amplificador AV u otro dispositivo similar cuyo
terminal DIGITAL AUDIO INPUT esté conectado
al terminal DIGITAL AUDIO OUTPUT del
televisor. Seleccione un formato de salida de
audio compatible con el formato de audio del
programa que usted está viendo y con el
equipo conectado.
Subtítulos Digitales
Ajuste de audio
Ajustes de Terminales de Entrada
PCM: El terminal de salida óptica da salida a
señales de audio en formato PCM. Si su
sistema de audio digital no es compatible
con Dolby Digital, seleccione “PCM”.
Dolby Digital: El terminal de salida óptica da
salida a señales de audio en formato Dolby
Digital. Reproduce sonido de programa
ambiental digital.
Desactivado: Desactiva la salida de audio
digital.
Para ajustar automáticamente la imagen de PC.
Auto Sync (Sincronización automática) se
encuentra sólo disponible cuando la fuente de
entrada es PC y la TV está recibiendo una señal
de la computadora. Seleccione Auto Sync
(Sincronización automática) para el ajuste
automático de la configuración.
Normalmente, utilizando “Sinc. auto.”, usted
puede ajustar fácilmente la imagen según sea
necesario para cambiar su posición. Sin
embargo, en algunos casos, para optimizar la
imagen será necesario hacer el ajuste manual.
Pos. H.: Centra la imagen moviéndola hacia
la derecha o hacia la izquierda.
Pos. V.: Centra la imagen moviéndola hacia
arriba o hacia abajo.
Reloj: Ajuste cuando la imagen parpadea
con franjas verticales.
Fase: Ajuste cuando los caracteres tienen un
contraste bajo o cuando la imagen parpadea.
• Asegúrese de conectar el PC al televisor y encenderlo antes
de iniciar “Sinc. auto.”.
Entrada PC
Ajuste de sincronización automática (para
modo de entrada de PC analógica solamente)
• La posición predeterminada del cursor podría no ser en el
centro debido a que la gama variable de la posición de la
pantalla podría ser asimétrica.
• Los rangos variables de posición de la pantalla dependen del
Modo de Vista o del tipo de señal. Los rangos pueden
visualizarse en la pantalla de ajuste de posición.
Ajuste de sincronización fina
Selección Audio
Esta función establece el terminal que va dar
salida al audio del computador.
Los elementos de ajuste varían según la fuente
de entrada. Seleccione la fuente de entrada
correspondiente al terminal conectado al PC y
luego ajuste el elemento deseado.
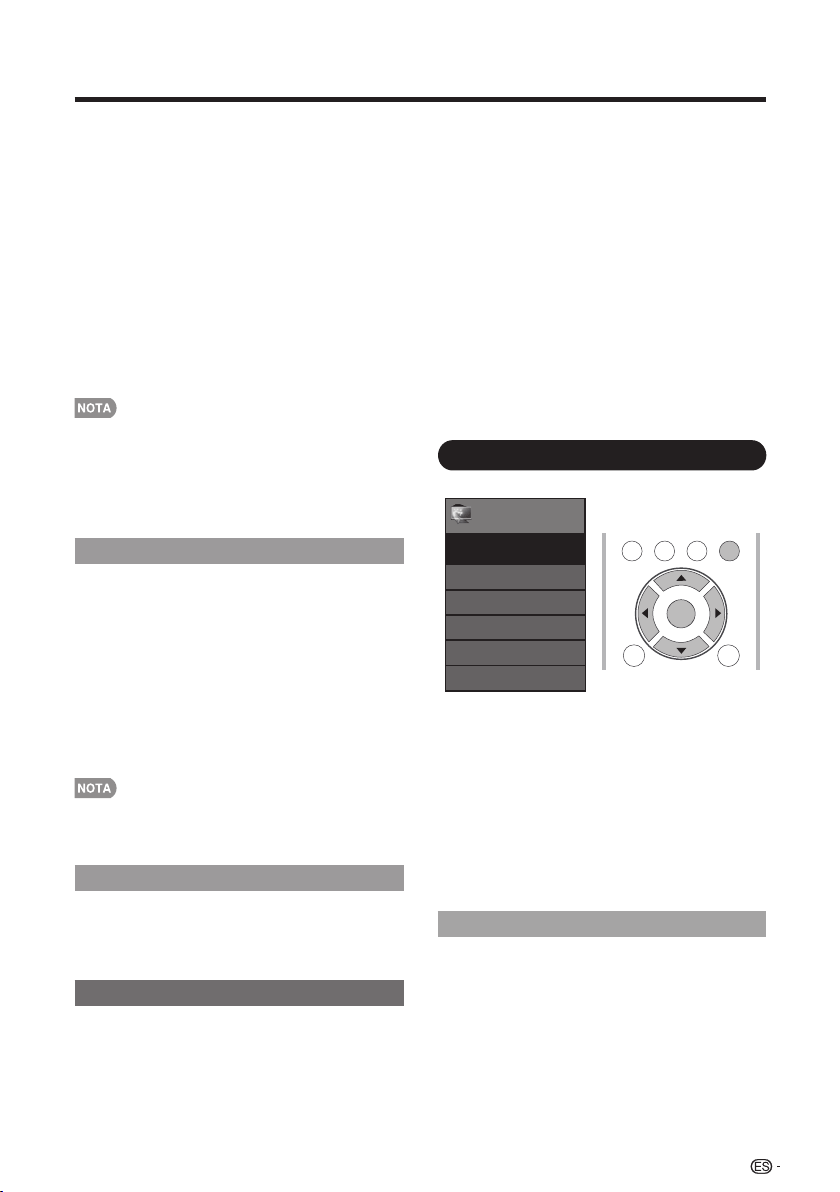
Menú de visualización en pantalla
31
■ PC IN
Video: Seleccione esto cuando el TV y el PC están
conectados usando un cable analógico RGB y no
hay entrada de audio.
Video+Audio: Seleccione esto cuando el TV y el PC
están conectados usando un cable analógico RGB y
la entrada de audio se realiza por medio de un
miniconector estéreo de Ø 3,5 mm.
■ HDMI IN
Auto (Automático): La ruta de audio se establece
automáticamente en HDMI o entrada de línea de PC.
HDMI(Digital): Seleccione esto cuando el TV y el
PC están conectados usando un cable certificado
HDMI y la entrada de audio se realiza por medio del
mismo cable.
HDMI + Análogo: Seleccione esto cuando el TV y
el PC están conectados usando un cable de
conversión de DVI-HDMI y la entrada de audio se
realiza por medio de un miniconector estéreo de
Ø 3,5 mm.
• Cuando “Selección Audio” se establece en “HDMI (Digital)”,
no se obtendrá sonido si solo utiliza un cable certificado
HDMI para conectar con el equipo compatible con HDMI.
Para obtener sonido debe realizar una conexión analógica
de audio.
• Si desea conectar un equipo compatible con HDMI
utilizando solo un cable certificado HDMI,
establezca “Selección Audio” en “HDMI(Digital)”.
Configuración HDMI
HDMI Mode (Modo HDMI) sólo aparece y está
disponible cuando se conecta un dispositivo
HDMI.
Puede seleccionar entre Auto (Automático),
Graphic (Gráficos) o Video.
Auto (Automático): Se establece automáticamente la
sincronización de la entrada HDMI en el modo Video o
Graphic (Gráficos).
Graphic (Gráficos): Se establece la sincronización de
la entrada HDMI en el modo Graphic (Gráficos) (PC).
La imagen posee un escaneo completo.
Video: Se establece la sincronización de la entrada
HDMI en el modo Video. La imagen posee un
sobreescaneo.
• HDMI Mode (Modo HDMI) sólo funciona para la sincronización
de video HDMI y sincronización progresiva en las siguientes
resoluciones:
1920x1080p, 1280x720p, 720x480p y 720x576p.
Altavoces
Permite activar/desactivar los altavoces internos
de la TV. Las señales de salida de audio no se
desactivarán incluso si se desactivan los
altavoces de la TV. La configuración
predeterminada es On (Activado).
Ajuste de subtítulos
Esta función le permite ajustar la apariencia en
la pantalla de los subtítulos ocultos de forma
que se ajusten a su preferencia.Puede ajustar 8
elementos:
• Estilo de subtítulos: Permite establecer esta
opción en el modo Default (Predeterminado) o
Custom (Personalizado).Si se selecciona el modo
Custom (Personalizado), el usuario puede modificar
los estilos de detalle que se describen a
continuación.
El resultado de la configuración
aparecerá inmediatamente en la parte inferior del
submenú OSD.
Nota: Esta función está sólo disponible en el modo
de TV, A/V y video componente.
• Tamaño de subtítulos: Seleccione esta opción
para elegir un tamaño de visualización de subtítulos
ocultos en función de sus preferencias. Seleccione
“Small” (“Pequeño”), “Standard” ("Estándar") o
“Large” (“Grande”).
• Color de primer plano: Permite seleccionar el
color del texto para la visualización de los subtítulos
ocultos.
• Opacidad de primer plano: Permite seleccionar la
opacidad del texto.
• Color de fondo: Permite seleccionar una de las
opciones de color de fondo.
• Opacidad de fondo: Permite seleccionar una de
las opciones de opacidad de fondo.
• Color de ventana: Permite seleccionar uno de los
colores para la ventana.
• Opacidad de ventana): Permite seleccionar una
de las opciones de opacidad de ventana.
Configuración Inicial
Ejemplo
Menu
Autoinstalación
Idioma
Ajuste de Transmisión
Ajuste Individual
Reiniciar
Configuración Inicial
Configuración
Inicial
[Español]
TV US B
PC
MENU
RETURNEXIT
ENTER
1. Pulse MENU para visualizar la pantalla
MENÚ, y luego pulse ◄/► para seleccionar
“Configuración Inicial”.
2. Pulse ▲/▼ para seleccionar el elemento de
ajuste específico, y luego pulse ENTER.
• Cuando seleccione Individual Setup
(Configuración individual), puede ingresar
aquí el número secreto de 4 dígitos.
Consulte la página 32 para configurar un
número secreto.
3. Pulse ▲/▼ (o ◄/►) para seleccionar el
ajuste deseado, y luego pulse ENTER.
4. Pulse MENU para salir.
Autoinstalación
Podrá volver a realizar la autoinstalación incluso
después de confi gurar los canales preajustados.
Idioma: Seleccione entre 3 idiomas (Inglés, Francés
y Español).
Ubicación TV: Seleccione “Casa” o “Tienda” según el lugar
en el que va a instalar el televisor.
Hogar: “Power Saving” ("Ahorro de energía) está establecido
en "On" ("Activado") y AV MODE (MODO DE A/V) está
establecido en "STANDARD" ("ESTÁNDAR").
Tienda: “Ahorro de energía” se establece en “Apagado” y
MODO AV se establece en “DINÁMICO (Fijo)”. Se puede
establecer Reiniciar Imagen y Demo.
• La califi cación ENERGY STAR está basada en el MODO
AV “Estándar”.
Menú de visualización en pantalla
32
Ant./Cable: Asegúrese de la clase de conexión que
se hace con su televisor cuando se selecciona
“Antena” o “Cable”.
Busq. Canal: La búsqueda automática de canales
hace que el televisor busque todos los canales que
puedan verse en la zona establecida.
• Si seleccione “Cable” para la configuración de la
antena, los canales codificados se eliminarán
una vez que se haya completado la búsqueda de
canales.
Completado: Se visualiza la pantalla de
confirmación de los ajustes. Confirme la información
que se visualiza en la pantalla.
• Consulte Configuración EZ en las páginas 19 y 20 para la
configuración de cada elemento.
• Si no se encuentra ningún canal, asegúrese de la clase de
conexión que se ha hecho con su televisor e intente de
nuevo “Autoinstalación”.
Ajuste de Transmisión
Ajuste de canales
Si la preparación inicial no memoriza todos los
canales de su región, siga las instrucciones de
abajo para memorizar manualmente los canales.
Ant./Cable: Asegúrese de la clase de conexión
que se hace con su televisor cuando se
selecciona “Antena” o “Cable”.
Busq. Canal: La búsqueda automática de
canales hace que el televisor busque todos los
canales que puedan verse en la zona establecida.
Mem. Canal: Puede seleccionar los canales
que quiere omitir para cada uno de los tipos de
señal, ANALOG (Ant.), ANALOG (Cable),
DIGITAL (Ant.) y DIGITAL (Cable).
• Si no se encuentra ningún canal, asegúrese de la clase de
conexión que se ha hecho con su televisor e intente de
nuevo la búsqueda de canal.
• Si presiona ENTER (ACEPTAR) después finalizar la
búsqueda de canales, se vuelve a realizar la búsqueda de
canales.
Canal favorito (Ajuste de los canales
favoritos)
Esta función le permite programar 4 canales
favoritos en 4 categorías diferentes.
Estableciendo de antemano los canales favoritos,
usted podrá seleccionarlos luego fácilmente.
Para almacenar su canal favorito:
1. Presione MENÚ en el control remoto y seleccione
"Configuración inicial"/"Configuración de
transmisión"/ "Canales favoritos".
2. Presione ▲/▼ para seleccionar la categoría en la
que desea almacenar su canal favorito.
3. Presione ▲/▼ para seleccionar el canal deseado y
presione el botón ENTER (ACEPTAR) para
confirmar.
Para borrar su canal favorito:
1. Presione MENÚ en el control remoto y seleccione
"Configuración inicial"/"Configuración de
transmisión"/ "Canales favoritos".
2. Presione ▲/▼ para seleccionar “All data clear
(Borrado de todos los datos) ” y presione ENTER
(ACEPTAR) para comenzar a borrar todos los
datos de canales favoritos.
• Al visualizar, puede cambiar los canales seleccionados
presionando el botón A, B, C y D en el control remoto.
Idioma
También puede seleccionar un idioma desde el
menú Configuración Inicial. Seleccione entre 3
idiomas: Inglés, Francés y Español.
Si se hacen ajustes complejos y no es posible
restaurar los elementos de ajuste a los valores
normales, puede reponer todos los elementos
de ajuste a los valores de fábrica.
Reiniciar
• Los elementos de ajuste de canales no cambiarán.
• Los elementos de ajuste de idioma no cambiarán.
• Los ajustes del número secreto no cambiarán.
• Los elementos de ajuste de la ubicación de la TV no
cambiarán.
Ajuste Individual
Antes de ingresar en Individual Setup
(Configuración individual), el usuario debe
ingresar en primer lugar el número secreto.
Ingrese el número secreto de 4 dígitos con los
botones numéricos del control remoto. El
número secreto predeterminado es 0000.
Le permite utilizar un número secreto para
proteger ciertos ajustes y evitar que sean
cambiados por accidente.
Núm. secreto nuevo:
Ingrese un número secreto de 4 dígitos con los
botones numéricos del control remoto para cambiar el
número secreto.
Confirme el número secreto:
Vuelva a ingresar el número secreto de 4 dígitos para
confirmar.
No. secreto
• Como medida de precaución, anote su número secreto y
guárdelo en un lugar donde no lo pierda.
Se utiliza para activar o desactivar la función de
control parental. No se puede seleccionar esta
función en el menú a menos que se configure
primero el número secreto.
Sí: Activa control parental.
No: Desactiva control parental.
“V-Chip (DTV Only)” ("V-Chip (sólo DTV)") sólo
estará disponible cuando se pueda descargar
un nuevo sistema de clasificación a través de la
transmisión digital en Estados Unidos.
Control de los padres
Estado
V-Chip (sólo DTV)
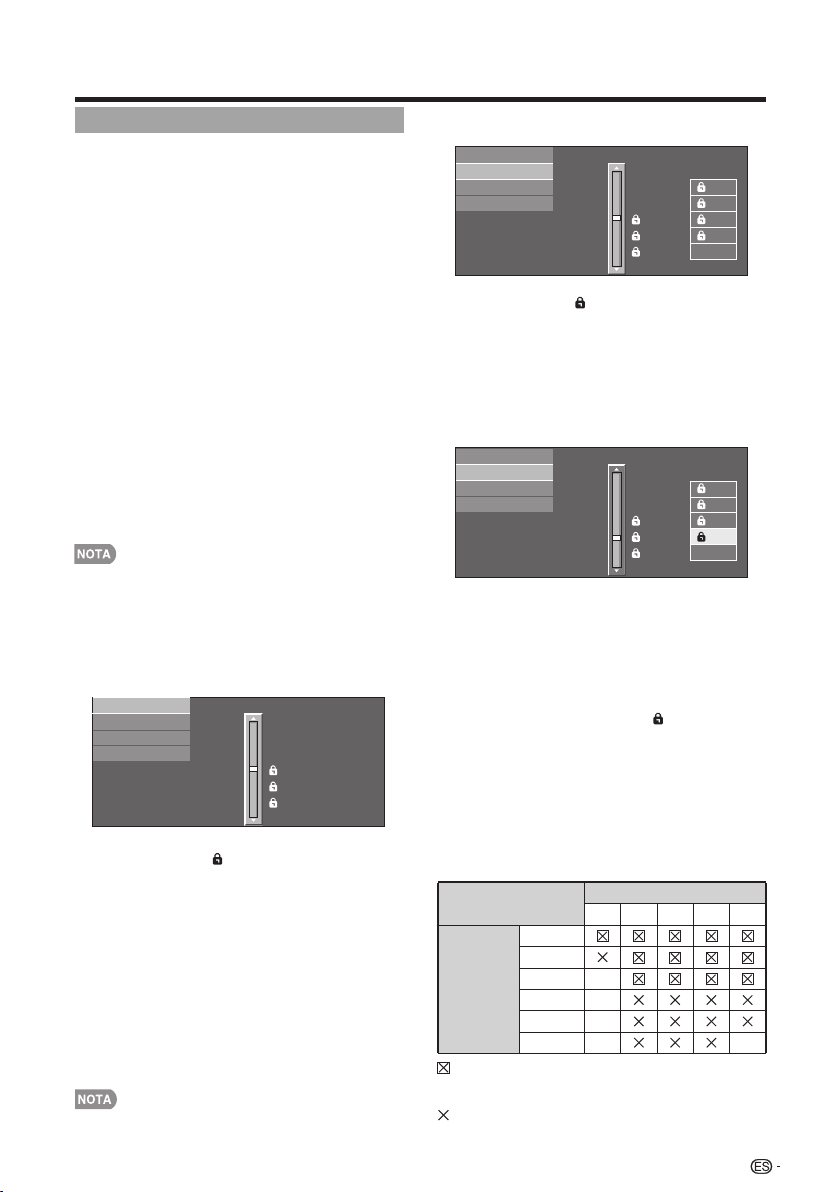
Menú de visualización en pantalla
33
V-Chip
V-CHIP es un dispositivo electrónico de filtración
incorporado en su televisor. Esta herramienta
permite que los padres controlen
considerablemente las emisiones a las que
puedan acceder sus hijos. Los padres pueden
elegir programas que consideren adecuados
para sus hijos y bloquear aquellos que no
juzguen adecuados. Lo hace automáticamente
una vez que usted activa la función V-CHIP en
su televisor.“V-Chip” y “Estado” no se
seleccionarán desde el menú si usted no
configura primero su número secreto.
• En los EE.UU. hay dos sistemas de calificación para
ver imágenes reproducidas: consejos de TV para
los padres y calificaciones de películas.
• Los consejos de TV para los padres funcionan en
combinación con el V-CHIP para que los padres
puedan evitar que sus hijos vean programas de
televisión inapropiados para ellos.
• Las calificaciones de películas se utilizan para las
películas originales calificadas por la Asociación
Cinematográfica de América (MPAA) para ser vistas
por TV por cable y que no han sido editadas para
ver por televisión. El V-CHIP también se puede
ajustar para bloquear las películas calificadas por la
MPAA.
• El ajuste entra automáticamente en “Bloqueo” para
cualquier calificación inferior a la que usted ha
elegido.
• Si Estado no se pone en “Encendido”, los ajustes
de configuración no se activarán.
■ MPAA (Sistema de calificación voluntaria
para películas)
Ejemplo
Pulse ▲/▼ para ajustar el elemento en su
posición deseada. “ ” indica que el elemento
está bloqueado. Pulse MENU para salir.
G: Público en general. Todas las edades admitidas.
PG: Se sugiere la presencia de los padres. Puede que
algo del material no sea adecuado para los niños.
PG-13: Se recomienda la presencia de los padres.
Puede que algo del material no sea adecuado para
niños de menos de 13 años.
R: Restringido. Los menores de 17 años deben ir
acompañados por los padres o un adulto encargado
de ellos (la edad cambia en algunas jurisdicciones).
NC-17: No se admite a nadie menor de 17 años.
X: La clasificación X es una categoría antigua que se
encuentra unificada con NC-17, pero todavía puede
encontrarse codificada en los datos de películas
antiguas.
• El sistema de calificación voluntaria para películas
sólo utiliza una calificación basada en la edad.
■ Consejos de TV para los padres
Ejemplo
Pulse ▲/▼ para ajustar el elemento en su
posición deseada. “ ” indica que el elemento
está bloqueado. Pulse MENU para salir.
Edad sugerida
TV-Y : Todos los niños
TV-Y7 : Dirigida a los niños mayores.
TV-G : Público en general.
TV-PG : Se sugiere la presencia de los padres.
TV-14 : Se recomienda la presencia de los padres.
TV-MA : Para público adulto solamente.
Ejemplo
Cuando ajuste un elemento individual de
calificación basado en el contenido:
1. Pulse ► o ENTER para acceder a los
elementos del contenido bloqueado desde el
elemento de calificación basado en la edad
actualmente seleccionado.
2. Pulse ▲/▼ para seleccionar un elemento
individual, y luego pulse ENTER para
desbloquearlo (desaparece “ ”). Repita los
mismos pasos para los otros elementos.
3. Pulse ◄ o RETURN para registrar una vez
establecidos todos los elementos individuales
de la calificación basada en el contenido.
Contenido
FV : Violencia fantástica.
V : Violencia.
S : Actos sexuales.
L : Lenguaje de adultos.
D : Diálogo con sugerencias sexuales.
: Se puede establecer la califi cación del
contenido, pero normalmente los canales de
televisión no la emiten.
: Se puede establecer la calificación del
contenido.
Califi cación
Contenido
FV V S L
D
Edad
sugerida
TV-Y
TV-Y7
TV-G
TV-PG
TV-14
TV-MA
MPAA
TV Guidelines
Califi. Ing. Canadá
Califi. Fra. Canadá
PG-13
R
NC-17
X
NINGUNA
PG
G
MPAA
TV Guidelines
Califi. Ing. Canadá
Califi. Fra. Canadá
TV-G
TV-PG
TV-14
TV-MA
NINGUNA
TV-Y7
TV-Y
L
S
V
FV
D
TV-G
TV-PG
TV-14
TV-MA
NINGUNA
TV-Y7
TV-Y
L
S
V
FV
D
MPAA
TV Guidelines
Califi. Ing. Canadá
Califi. Fra. Canadá
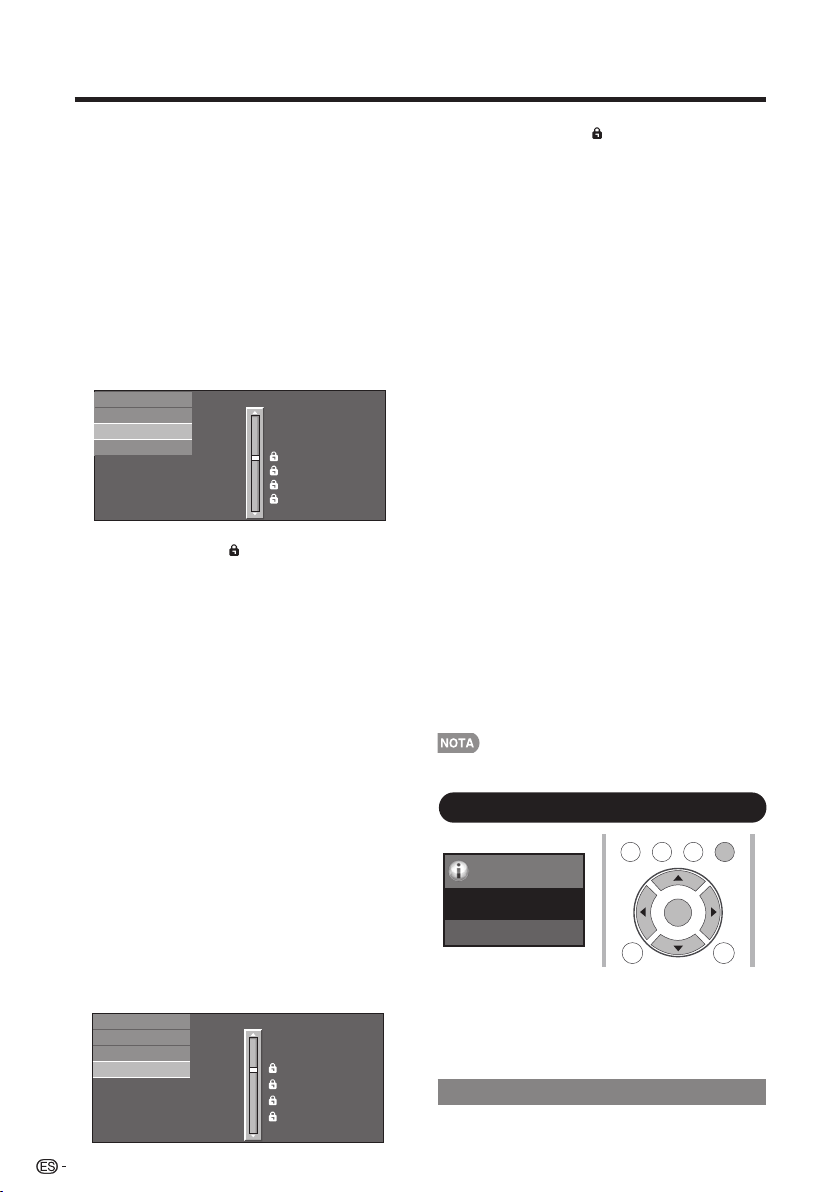
Menú de visualización en pantalla
34
Sistemas de calificación canadienses
(calificaciones para el inglés canadiense y para
el francés canadiense)
• Los sistemas de calificación de TV en Canadá se
basan en la política de la Comisión Canadiense de
Radiotelevisión y Telecomunicaciones (CRTC)
relacionada con la violencia en los programas de
televisión.
• Aunque la violencia es el elemento más importante
que debe calificarse, la estructura desarrollada tiene
en consideración otros contenidos de los programas
como, por ejemplo, el lenguaje, los desnudos, la
sexualidad y los temas de madurez.
• Cuando se ajuste el V-CHIP en el sistema
canadiense usted podrá elegir entre las
calificaciones para el inglés canadiense o las
calificaciones para el francés canadiense.
■ Calificaciones para el inglés canadiense
Ejemplo
Pulse ▲/▼ para ajustar el elemento en
suposición deseada. “ ” indica que el elemento
está bloqueado. Pulse MENU para salir.
E: Exento: Incluye programas de noticias, deportes,
documentales y otros programas de información;
programas de entrevistas, videos musicales y programas
de variedades.
C: Niños: Para los niños pequeños de menos de 8 años.
Pone mucho cuidado con los temas que puedan
amenazar su sentido de seguridad y bienestar.
C8+: Niños de más de 8 años: Programas que no
contienen violencia como forma preferida, aceptable o
única para resolver conflictos; tampoco incita a los niños
a imitar actos peligrosos que éstos puedan ver en la
pantalla.
G: General: Considerado como aceptable para todos los
públicos. Apropiado para verlo toda la familia; contiene
muy poca violencia física, verbal o emocional.
PG: Acompañamiento de los padres: Para el público en
general, pero tal vez no sea adecuado para los niños
más pequeños (menos de 8 años) porque puede
contener temas controvertidos.
14+: Más de 14 años: Puede contener temas en los que
la violencia es uno de los elementos dominantes de la
historia, pero ésta debe ser esencial para el desarrollo de
la trama o el carácter. El lenguaje puede ser profano y
haber desnudos en el tema.
18+: Adultos: Para espectadores de 18 años en adelante.
Puede contener escenas violentas que, aunque estén
relacionadas con el desarrollo de la trama, los caracteres
o los temas, han sido filmadas para que las vean los
adultos. Pueden tener un lenguaje soez y escenas de
sexo y desnudos.
■ Calificaciones para el francés canadiense
Ejemplo
Pulse ▲/▼ para ajustar el elemento en
suposición deseada. “ ” indica que el elemento
está bloqueado. Pulse MENU para salir.
E: Programación exenta.
G: General: Para todos los públicos, contiene el mínimo
de violencia directa, pero puede estar integrada en la
trama de una manera humorosa o poco realista.
8ans+: General pero no recomendado para los niños
pequeños: Lo puede ver la mayoría del público, pero
puede tener escenas que molesten a los niños de menos
de 8 años incapaces de distinguir entre las situaciones
reales e imaginarias. Recomendado para ser visto en
compañía de los padres.
13ans+: Más de 13 años: Puede contener escenas de
violencia frecuente y, por lo tanto, se recomienda verlo
en compañía de los padres.
16ans+: Más de 16 años: Puede contener escenas de
violencia frecuente y de intensa violencia.
18ans+: Más de 18 años: Sólo para adultos. Puede
contener escenas de violencia frecuente y de intensa
violencia.
■ Cancelación temporal del V-CHIP BLOCK
El V-CHIP BLOCK funciona para censurar una
emisión, y en ese caso se visualiza “V-CHIP HA
SIDO ACTIVADO”.
1. Pulse ENTER mientras está activada la función
V-CHIP y luego se visualizará el menú de ajuste
del número secreto.
2. Introduzca el número secreto de 4 dígitos
utilizando 0–9. Ahora se cancela temporalmente
V-CHIP BLOCK.
■ Reactivación del V-CHIP BLOCK
cancelado temporalmente
Puede reactivar el V-CHIP BLOCK cancelado
temporalmente como se muestra a continuación.
• Seleccione el ajuste de “Estado” desde el menú
Control de los padres para reactivar BLOCK.
(Consulte la página 32.)
• Seleccione el ajuste “V-Chip” (“MPAA”, “TV Guidelines”,
“Califi. Ing. Canadá” o “Califi. Fra. Canadá”) desde
Control de los padres para reactivar BLOCK. (Consulte
las páginas 33 a 34.)
• Desconecte la alimentación del televisor.
• El V-CHIP BLOCK se activará al ejecutar uno cualquiera de
los tres métodos de arriba.
Información
Ejemplo
Menu
Identificación
Información
Información
TV US B
PC
MENU
RETURNEXIT
ENTER
Se muestra la versión actual del software del
televisor.
Identificación
1. Pulse MENU para visualizar la pantalla MENÚ, y
luego pulse ◄/► para seleccionar “Información”.
2. Pulse ▲/▼ para seleccionar el elemento de
ajuste específi co, y luego pulse ENTER.
3. Pulse ▲/▼ (o ◄/►) para seleccionar el ajuste
deseado, y luego pulse ENTER.
4. Pulse MENU para salir.
MPAA
TV Guidelines
Califi. Fra. Canadá
E
C
C8+
G
PG
14+
18+
NINGUNA
Califi. Ing. Canadá
MPAA
TV Guidelines
Califi. Fra. Canadá
Califi. Ing. Canadá
8ans+
13ans+
16ans+
18ans+
NINGUNA
G
E
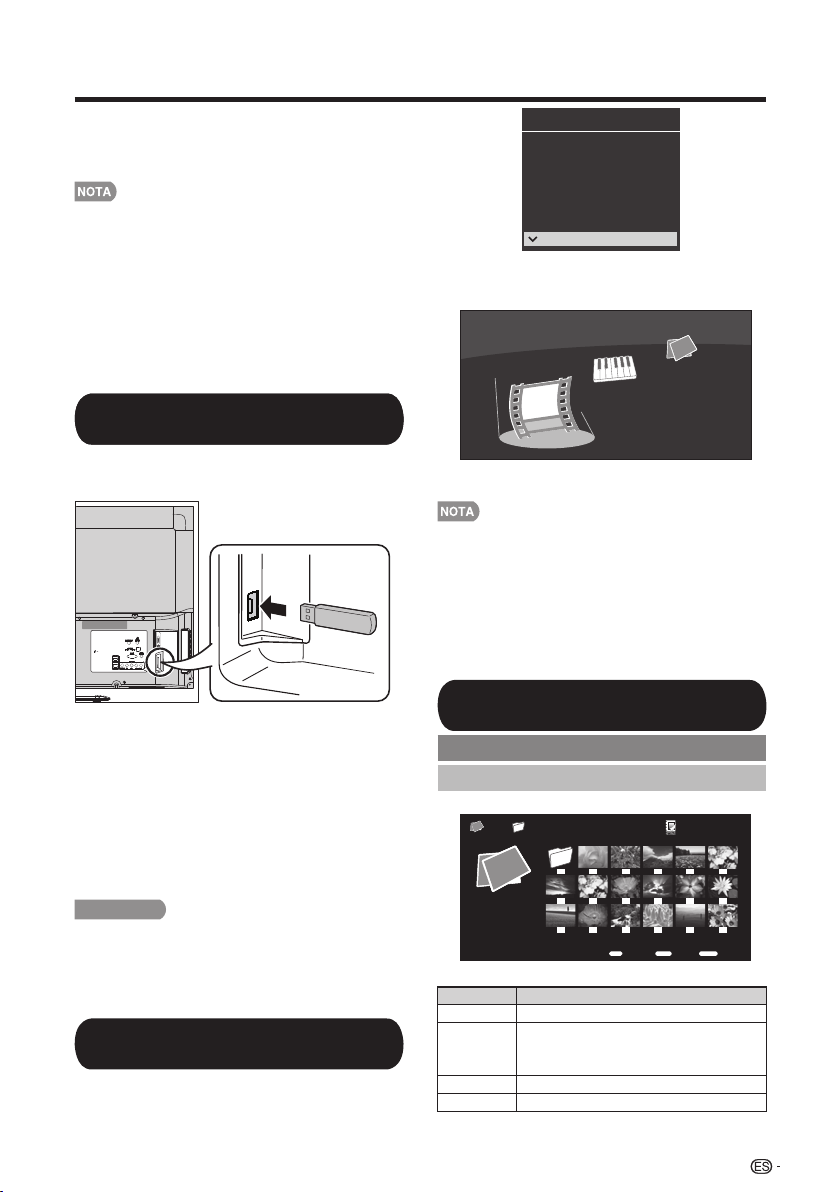
Disfrute con la reproducción de fotos/música/vídeo
Puede conectar la TV a un dispositivo de
memoria USB o disco duro USB para disfrutar
de la visualización de imágenes, reproducción
de música y visualización de videos.
• En función del dispositivo de memoria USB o disco duro
USB, es posible que la TV no pueda reconocer los datos
almacenados.
• Es posible que se demore algunos minutos la lectura de los
datos almacenados si el dispositivo de memoria USB/disco
duro USB posee demasiados archivos o carpetas.
• Use solamente caracteres alfanuméricos para poner nombre
a sus archivos.
• Los nombres de archivos de más de 80 caracteres (esto
podría variar dependiendo del conjunto de caracteres)
podrían no ser desplegados.
Inserte el dispositivo de memoria USB con las
fotografías, música o videos almacenados en el
terminal USB de la TV.
Conectar al dispositivo de
memoria USB/disco duro USB
• Al conectar un disco duro USB, asegúrese de
utilizar un adaptador CA.
• No remueva un dispositivo de memoria USB o
tarjeta de memoria del televisor mientras se estén
transfiriendo archivos, usando la función de
exhibición de diapositivas o cambiando de pantallas
o antes de salir de “USB” desde la Lista de entradas.
• No inserte y remueva un dispositivo de memoria
USB/disco duro USB al o del televisor repetidamente.
• Cuando use un lector de tarjetas, asegúrese de
insertar la Memoria primero antes de usar el lector
de tarjetas.
PRECAUCIÓN
• No utilice un cable USB alargador cuando
conecte un dispositivo de memoria USB al
terminal USB del televisor.
• El utilizar un alargador USB con el dispositivo
de memoria USB puede provocar que el
televisor no funcione correctamente.
Seleccionar los archivos que
deben reproducirse
1. Presione INPUT (ENTRADA) para
seleccionar USB desde la lista de entradas o
presione el botón directo USB para ingresar.
35
INPUT1
INPUT2
INPUT3
INPUT4
TV
PC IN
Fuente de entrada
HDMI1
HDMI2
HDMI3
COMP/AV
USB
2. Pulse ◄/► para seleccionar “Foto”,
“Música” o “Video”, y luego pulse ENTER.
3. Pulse ◄/► para seleccionar la carpeta
deseada, y luego pulse ENTER.
Música
Foto
Video
Ejemplo
• 16 GB es la capacidad máxima de unidades USB que se
admiten.
• "VIEW MODE" ("MODO DE VISUALIZACIÓN") es una
configuración fija durante el modo Photo (Fotografías) o
Music (Música). Durante el modo "Video", esto depende del
tipo de señal de video que se está recibiendo actualmente
(consulte la página 23).
• La pantalla de guía de teclas desaparece automáticamente
transcurrido un determinado tiempo. Para que aparezca de
nuevo, pulse DISPLAY.
Reproducir archivos de un
dispositivo de memoria USB
Modo de fotos
Visualización de vistas miniaturizadas
Botones para visualización de vistas miniaturizadas
Botones Descripción
Seleccionar el elemento deseado.
RETURN
Retornar al proceso anterior.
Menú
Submenú
ACEPTAR
Al seleccionar un icono de carpeta: Ingresa
en este directorio.
Al seleccionar una vista en miniatura de una
fotografía: Inicio de presentación.
▲/▼/◄/►
Ejemplo
USB MediaFoto
01/02\Foto
IntroducirSeleccionar
précéd.
Introducir
Retorno
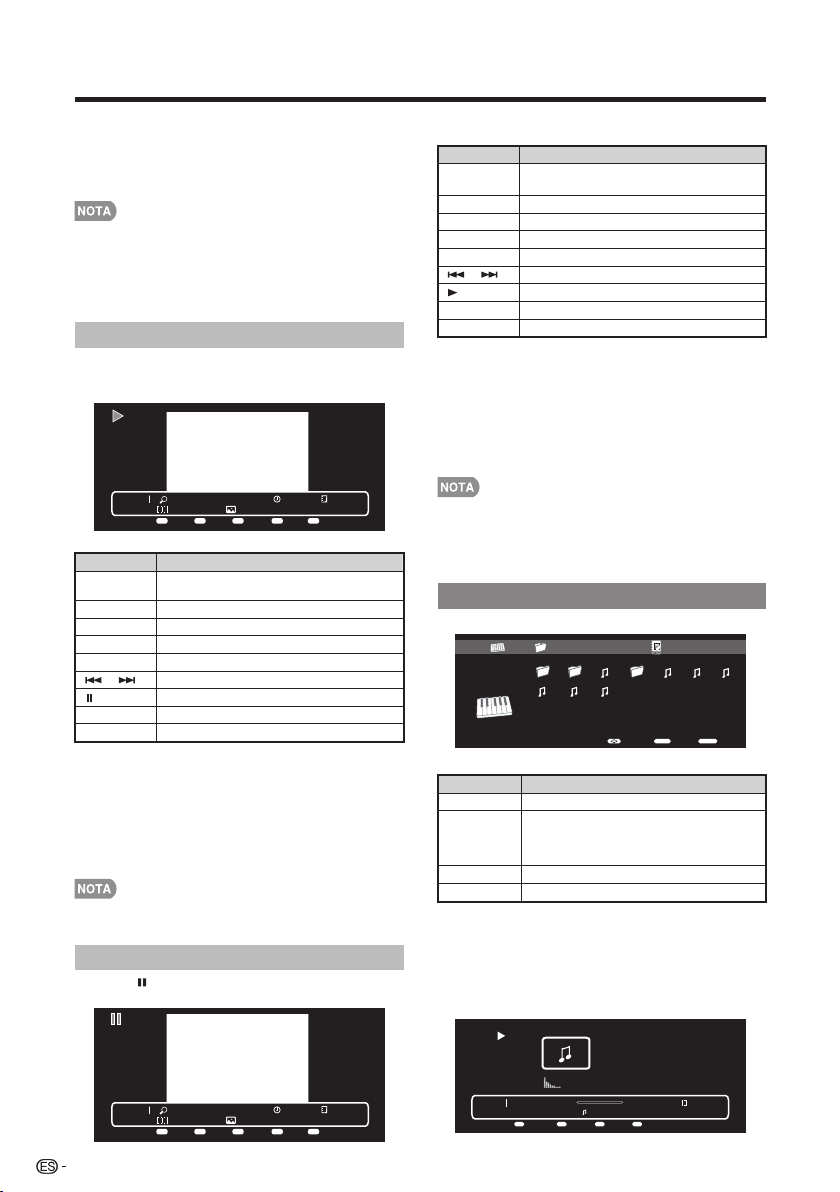
36
Disfrute con la reproducción de fotos/música/vídeo
Presione MENU (MENÚ) para visualizar el
submenú. Puede examinar los archivos a través
de las siguientes opciones.
• Ordenar
• Tipo de medio
• Tamaño de vista en miniatura
• Cuando existan archivos de fotografía inválidos, aparecerá la
marca X para el archivo.
• Puede visualizar el nombre del archivo, la fecha de captura,
el tamaño de archivo y el tamaño en píxeles de la fotografía
seleccionada en la esquina superior izquierda de la pantalla
(la fecha de captura se encuentra sólo en el formato de
archivo EXIF).
Presentación
Presentación de diapositivas
Foto 1x
IMG_9690.jpgNone
Short 1/29
Menu Repetir Duración Efecto AleatorioMenu A B C D
La fotografía seleccionada en la pantalla de selección
de vistas en miniatura al presionar ENTER (ACEPTAR).
Ejemplo
Botones Descripción
SALIR Retornar a la pantalla de selección de vistas
miniaturizadas.
Menú Submenú
VISUALIZAR Muestra la información.
A (rojo) Repetir una vez/repetir todo.
B (verde) Seleccione el intervalo de la presentación.
C (azul) Seleccione el efecto de la presentación.
D (amarillo)
Reproducción de la fotografías en orden aleatorio.
Fotografía anterior/fotografía siguiente.
Visualización de una fotografía.
/
Presione MENU (MENÚ) para visualizar el
submenú. Puede seleccionar las siguientes
opciones para la visualización de fotografías.
• Pausar
• Repetir
• Aleatorio
• Duración
• Efecto
• Mostrar información
• La pantalla de guía de teclas desaparece automáticamente
transcurrido un determinado tiempo. Para que aparezca de
nuevo, pulse DISPLAY.
Ejemplo
Presione en la presentación de la fotografía.
Foto 1x
G%25C3%2592TIC-DESCANSANT.jpgNone
Short 5/29
Menu
Repetir Girar Zoom Aleatorio
Menu A B C D
Visualización de una fotografía individual
Botones para la visualización de fotografías
individuales
Botones Descripción
SALIR Regresa a la pantalla de selección de vistas
en miniatura.
Menú Submenú
VISUALIZAR Muestra la información.
A (rojo) Repetir una vez/repetir todo.
B (verde) Gire la fotografía 90 grados hacia la derecha.
C (azul) Zoom de la fotografía.
D (amarillo)
Reproducción de la fotografías en orden aleatorio.
Fotografía anterior/fotografía siguiente.
Presentación.
/
Presione MENU (MENÚ) para visualizar el
submenú. Puede seleccionar las siguientes
opciones para la visualización de fotografías.
• Reproducir
• Repetir
• Aleatorio
• Girar
• Zoom
• Mostrar información
• La pantalla de guía de teclas desaparece automáticamente
transcurrido un determinado tiempo. Para que aparezca de
nuevo, pulse DISPLAY.
• La rotación de fotos solo se aplica al elemento seleccionado
temporalmente y esta configuración no es guardada.
Modo de música
Ejemplo
Ejemplo
Botones para el modo de música
Presione MENU (MENÚ) para visualizar el
submenú. Puede examinar los archivos a través
de las siguientes opciones.
• Ordenar
• Tipo de medio
• Tamaño de vista en miniatura
Botones Descripción
Pour sélectionner une icône de dossier:
Entrez dans ce directoire.
Pour sélectionner un fichier musique: Lecture
de la musique.
Seleccionar el elemento deseado.
ENTER
Retornar al proceso anterior.
RETURN
Submenú
Menú
▲/▼/◄/►
Música 00:00:03 00:04:49
2.mp3
3/8
Menu
Repetir Aleatorio
Menu
A B
Mostrar información
D
USB Media01/02
\Música
Música
2011-05-27 001 3pm.43pm.33pm.23pm.1100 003
5.mp3 6.mp3 7.mp3
IntroducirSeleccionar
précéd.
Introducir
Retorno
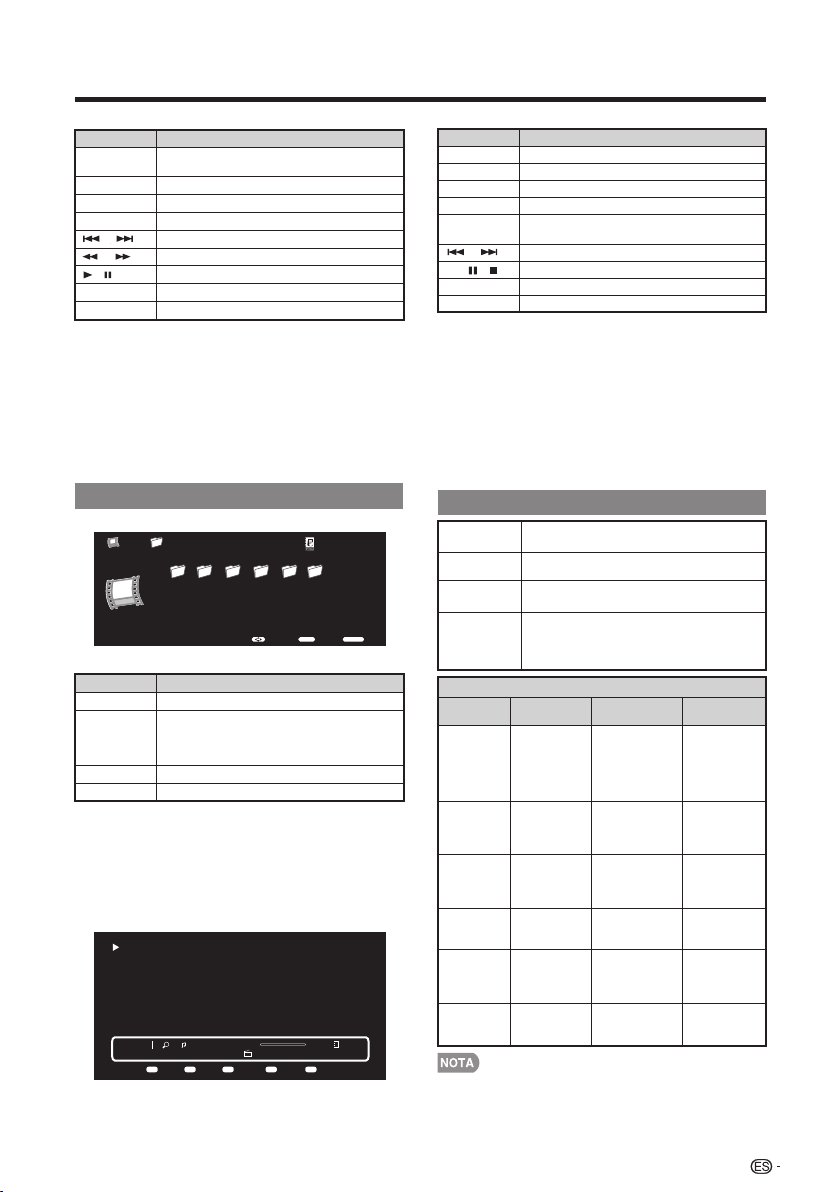
37
Disfrute con la reproducción de fotos/música/vídeo
Botones para la reproducción de música
Botones Descripción
Regresa a la pantalla de selección de vistas
en miniatura.
SALIR
Repetir una vez/repetir todo.
A (rojo)
Reproducción de la música en orden aleatorio.
Fotografía anterior/fotografía siguiente.
Avance/retroceso
Reproducción/pausa.
B (verde)
Muestra la información.
D (amarillo)
Submenú
Menú
Muestra la información.
VISUALIZAR
/
/
/
Presione MENU (MENÚ) para visualizar el
submenú. Puede seleccionar las siguientes
opciones para la reproducción de música.
• Pausar
• Repetir
• Aleatorio activado
• Mostrar información
• Ocultar espectro
• Opciones de letras
Presione MENU (MENÚ) para visualizar el
submenú. Puede examinar los archivos a través
de las siguientes opciones.
• Ordenar
• Tipo de medio
• Tamaño de vista en miniatura
Ejemplo
Modo Video
IntroducirSeleccionar
Back
Introducir
Retorno
USB Media\ 01/02Video
menu2 Microsoft GIF... images_169 Araxis Merge v... Music Photo _Epic_puti..
OK.Youknow,mostofthecollectionherewasputtogetherduringtheChing dynasty.
So,whatdidyouthink?
Iwasimpressedwiththelandscapepaintings,andallthejadecarvings.
Thatjadecabbagejustcan'tbebeat!
Someofthebronzepiecesgobacktothe17thcenturyB.C.,butthecollectionitselfwas
setupbythefirstemperoroftheSungdynastyoverathousandyearsago.
That'sthesamestyleroofasontheChiangKai-shekMemorialandthe
ConcertHall,right?ItseemslikeI'veseenitbefore.
Botones para el modo Video
Botones Descripción
Al seleccionar un icono de carpeta: Ingresa
en este directorio.
Al seleccionar un archivo de video:
Reproducción del video.
Selección de un elemento deseado.
ACEPTAR
Regresa al proceso anterior.
RETURN
Submenú
Menu
▲/▼/◄/►
Ejemplo
Botones para la reproducción de videos
Menu Repetir Retroceso Avance Repetición ABMenu A B C D
Vedio 1x 1/1
OK. You know, most of the collection here was put together during the Ching dynasty.
So, what did you think?
I was impressed with the landscape paintings, and all the jade carvings.
That jadecabbage just can't be beat!
Some of the bronze pieces go back to the 17th century B.C., but the collection itself was
set up by the first emperor of the Sung dynasty over a thousand years ago.
That's the same style roof as on the Chiang Kai-shek Memorial and the
Concert Hall, right? It seems like I've seen it before.
1/1
00:00:08 00:19:23
_ _Epic-Putin paws women voters_-1
Botones Descripción
Regresa a la pantalla de selección de vistas en miniatura.
SALIR
Repetir una vez/repetir todo.
A (rojo)
retroceso
B (verde)
Avance
C (azul)
Repetición AB. Seleccione la parte que
desea reproducir de forma repetitiva.
D (amarillo)
Submenú
Muestra la información.
Reproducción/pausa/detención.
Video siguiente/video anterior.
Menú
VISUALIZAR
/
/ /
▲
Presione MENU (MENÚ) para visualizar el
submenú. Puede seleccionar las siguientes
opciones para la reproducción de videos.
• Pausar
• Repetir
• Programa
• Mostrar información
• Modo A/V
• Título
• Edición
• Capítulo
• Modo de visualización
Compatibilidad del dispositivo USB
• No se garantiza la operación cuando se usan concentradores
USB.
• Es posible que algunos formatos de archivo de vídeo no
puedan reproducirse.
• Es posible que algunas imágenes no se muestren con la
proporción dimensional adecuada dependiendo del formato
del archivo.
Dispositivo
USB
Memoria USB, lector de tarjetas USB (Clase de
Almacenamiento Masivo), disco duro USB
FAT/FAT32/NTFS (sólo disco duro USB)
Sistema de
archivos
Formato de
archivos de
fotografías
JPEG (.jpg .jpeg), JPEG progresivo (.jpg
.jpeg), BMP (.bmp) y PNG (.png)
Formato de
archivo de
música
MP3 (.mp3) Velocidad binaria: 32k, 40k, 48k,
56k, 64k, 80k, 96k, 112k, 128k, 160k, 192k,
224k, 256k, 320kbpsFrecuencia de
muestreo: 32k, 44,1k, 48kHz
Formato de archivo de vídeo
Extensión
del archivo
Contenedor Vídeo Audio
.avi AVI
XviD
H.264
MPEG4
Motion Jpeg
MPEG2
MPEG1
MP3
AC3
LPCM
ADPCM
.mkv MKV
XviD
H.264
MPEG4
MPEG2
MP3
AC3
LPCM
ADPCM
.asf
ASF
XviD
H.264
MP3
AC3
LPCM
ADPCM
.mp4
MP4
(SMP4)
XviD
H.264
MPEG4
MP3
AAC-LC/
HEAAC
.mov
MP4
(SMP4)
XviD
H.264
MPEG4
Motion Jpeg
MP3
AAC-LC/
HEAAC
.mpg
.mpeg
PS
MPEG2
MPEG1
AC3
LPCM
MPEG
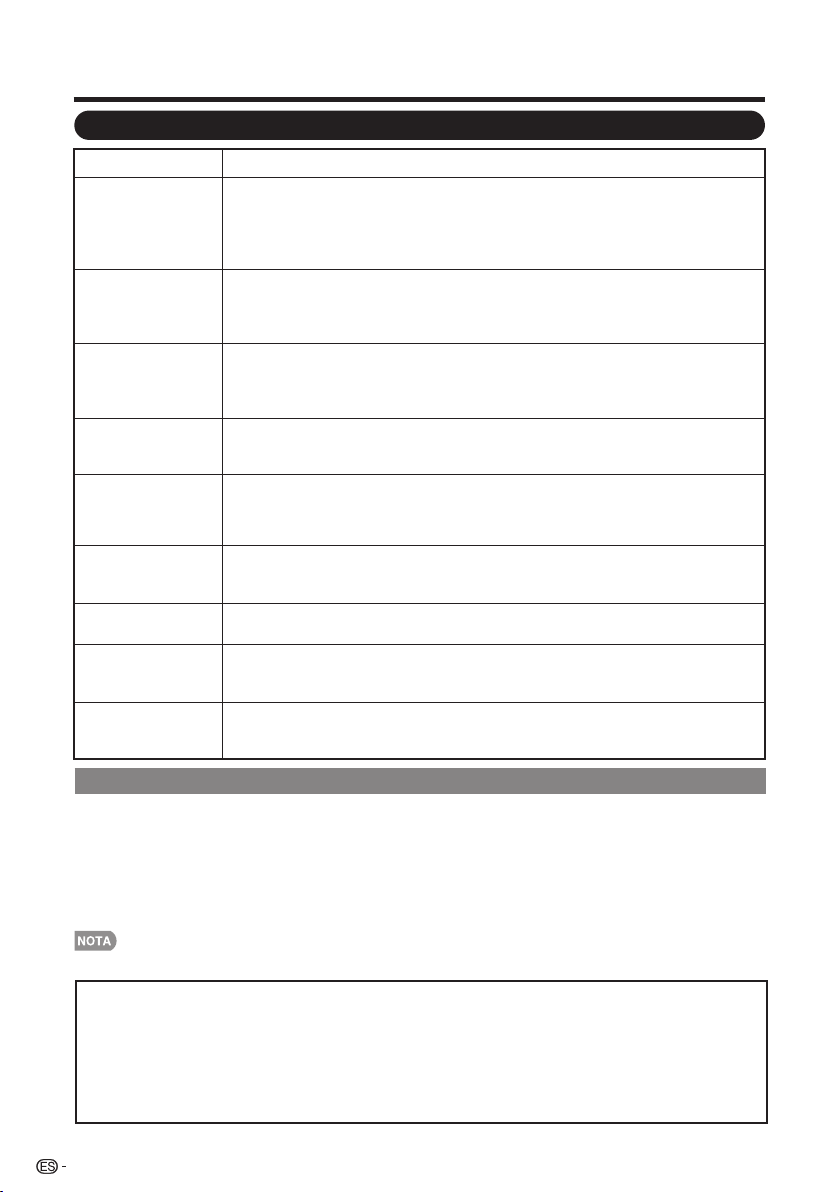
38
Resolución de problemas
Apéndice
Precauciones relacionadas con la utilización de la TV en entornos de temperaturas altas y bajas
• Cuando se utiliza la TV en ambientes de baja temperatura (por ejemplo, una habitación u oficina), la
imagen podría dejar rastros o mostrarse ligeramente retrasada. Esto no representa un funcionamiento
defectuoso. La TV se recuperará cuando la temperatura regrese a un valor normal.
• Tampoco deje la TV en una ubicación expuesta a la luz solar directa o cerca de un calentador, debido
a que esto podría causar que la cubierta se deforme y provocar un funcionamiento defectuoso del
panel de cristal líquido.
Temperatura para guardar la unidad: -4°F a +140°F (-20°C a +60°C)
• La TV no
enciende
• Verifique si presionó el botón POWER (ENCENDIDO/APAGADO) en el control
remoto. (Consulte la página 19). Si el indicador de la TV sigue de color rojo,
presione el botón POWER (ENCENDIDO/APAGADO) en la TV.
• ¿El cable de alimentación de CA está desenchufado? (Consulte la página 8).
• ¿Se encendió la TV? (Consulte la página 19).
• No se puede
utilizar la TV.
• Las influencias externas, como los rayos o la electricidad estática, pueden causar
un funcionamiento defectuoso. En este caso, utilice la TV luego de apagarla o
desenchufar el cable de alimentación de CA y volviéndola a enchufar al cabo de 1
ó 2 minutos.
• El control remoto
no funciona.
• ¿Están colocadas las pilas con la polaridad (+ , -) correcta? (Consulte la página 10).
• ¿Están agotadas las pilas? (Reemplace con pilas nuevas).
• ¿Está utilizando la TV debajo de una iluminación intensa o fluorescente?
• ¿Hay una luz fluorescente encendida cerca del sensor del control remoto?
• La imagen se corta
con franjas a los
lados.
• ¿Se realizaron correctamente los ajustes del modo de pantalla, tales como el
tamaño de imagen? (Consulte la página 23).
• Colores extraños,
colores claros o
colores mal
alineados
• Ajuste el tono de la imagen. (Consulte las páginas 26 a 27.)
• ¿Está demasiado brillante la habitación? La imagen puede aparecer oscura en
una habitación que está demasiado brillante.
• La TV se apaga
repentinamente.
• ¿Está ajustado el temporizador de apagado? (Consulte la página 21).
• La temperatura interna de la unidad ha aumentado. Extraiga cualquier objeto
que esté obstruyendo la ventilación.
• No hay imagen
• ¿Es correcta la conexión a otros componentes? (Consulte la página 16).
• ¿Se ha seleccionado la entrada correcta? (Consulte la página 14).
• No hay sonido.
• ¿Está el volumen demasiado bajo? (Consulte la página 21).
• ¿Presionó el botón MUTE (SILENCIAR) en el control remoto?
(Consulte la página 21).
• La TV en
ocasiones hace un
sonido crujiente.
• Esto no es un mal funcionamiento. Esto ocurre cuando la caja se expande y
contrae ligeramente de acuerdo a los cambios de temperatura. Esto no afecta
el funcionamiento de la TV.
Problema Posible solución
BORRADO DE LA CONTASEÑA MAESTRA
Si olvida la contraseña, restablezca el número secreto siguiendo los procedimientos que se detallan
a continuación:
1. Presione MENÚ.
2. Seleccione "Configuración inicial" y presione "ACEPTAR".
3. Seleccione "Configuración individual" y presione "ACEPTAR".
4. Presione el número 7071.
5. Seleccione "Núm. secreto".
6. Ingrese la contraseña nueva.
• Como medida de precaución, anote más arriba su número secreto, córtelo de este manual y guárdelo en un lugar seguro.
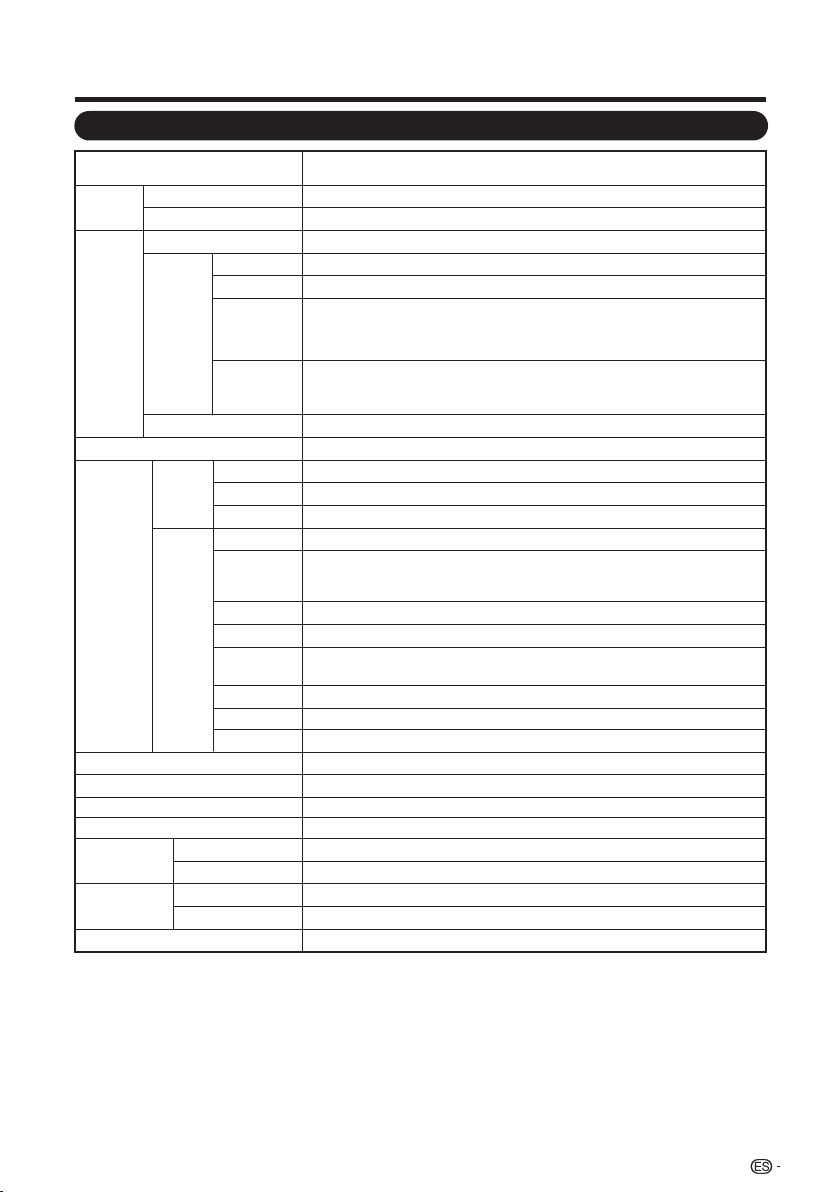
39
Especificaciones
Apéndice
Modelo: LC-40LE550U
Elemento
Panel
LCD
Clase 40
o ( 40 o Diagonal) Tamaño
Resolución 2,073,600 píxeles (1,920 x 1080)
Función
de TV
TV estándar (CCIR) Sistema ATSC/NTSC, estándar de la TV norteamericana
Canal de
recepción
VHF/UHF Canales de VHF 2-13, canales de UHF 14-69
CATV Canales 1-135 (solamente canal no codificado)
Emisión
terrestre
digital (8VSB)
Canales 2-69
Cable digital
(64/256
QAM)
*1
Canales 1-135 (solamente canal no codificado)
Audio múltiplex Sistema BTSC
10 W x 2Salida de audio
Terminales
Parte
lateral
USB Modo de fotos/música/vídeo, Actualización de software
Auriculares
ENTRADA 4
RS-232C Conector macho D-sub de 9 conectos
Parte
posterior
COMPONENT/ Entrada AV
PC IN Entrada ANALOG RGB (PC) (Conector hembra mini D-sub de 15 contactos)
AUDIO
PC/HDMI
Entrada de audio (conector de φ3,5 mm)
ANT/CABLE
75Ω desequilibrada, tipo F x 1 para Analógica y Digital (VHF/ UHF/ CATV)
DIGITAL
AUDIO
OUTPUT
Salida audio digital óptica x 1 (PCM/Dolby Digital)
Inglés / francés / españolIdioma OSD
CA 120V , 60Hz
50W
Alimentación
89W (0.5W en espera con 120V CA)Consumo
On Mode Power
Peso
Televisor + soporte
Televisor solamente
Dimensiones
(An x Al x Pr)
*2
Televisor + soporte
Televisor solamente
Temperatura de funcionamiento +32°F a +104°F (0°C a +40°C)
ENTRADA 1 Entrada HDMI con HDCP, entrada de audio (toma mini estéreo de ø 3,5 mm)
ENTRADA 2 Entrada HDMI con HDCP, entrada de audio (toma mini estéreo de ø 3,5 mm)
ENTRADA 3 Entrada HDMI con HDCP, entrada de audio (toma mini estéreo de ø 3,5 mm)
Salida para auriculares
• SHARP sigue una política de mejoras continuas, por lo tanto, se reserva el derecho de hacer cambios en el diseño y en las
especificaciones, para mejorar el producto, sin previo aviso. Las cifras de las especificaciones del rendimiento indicadas son
valores nominales de las unidades de producción. Es posible que los valores de algunas unidades individuales sean algo
diferentes de los valores indicados en esta tabla.
*1 No pueden recibirse mensajes de alerta de emergencia vía cable.
*2 Los “Dimensional Drawings” (Dibujos acotados) se muestran en la cubierta trasera interior.
20.5 lbs./ 9.3 kg
18.5 lbs./ 8.4 kg
pulgada
pulgada
36
5
/
16
x 23
3
/
64
x 9
7
/
64
36
5
/
16
x x 3
19
/
32
21
47
/
64
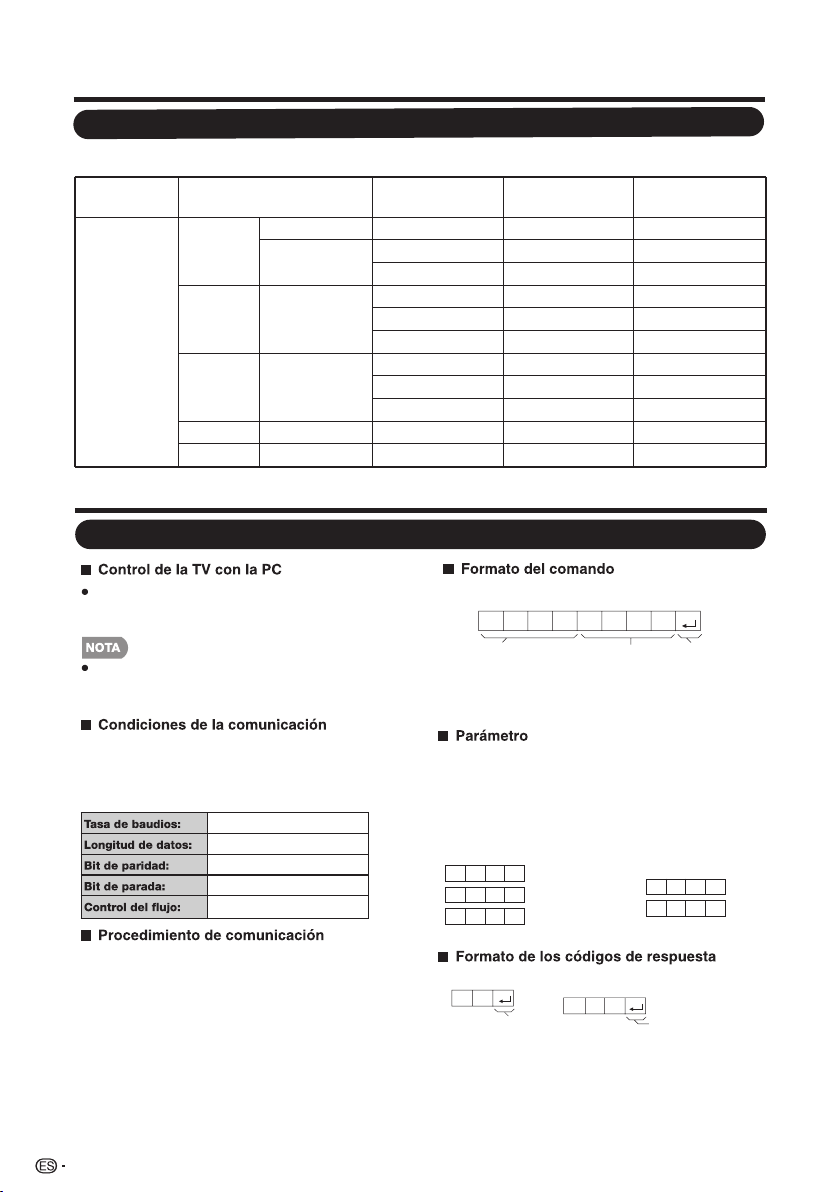
Es necesario ajustar correctamente el PC para visualizar señal XGA y WXGA.
Tabla de compatibilidad con PC
Apéndice
40
PC Resolución
Horizontal
Frecuencia
Frecuencia
vertical
Estándar VESA
PC
VGA
720 x 400 31.46 kHz 70.08 Hz —
640 x 480
31.47 kHz 59.94 Hz O
37.50 kHz 75.00 Hz O
SVGA 800 x 600
37.88 kHz 60.32 Hz O
48.08 kHz 72.19 Hz O
46.88 kHz 75.00 Hz O
XGA 1024 x 768
48.36 kHz 60.00 Hz O
56.48 kHz 70.07 Hz O
60.02 kHz 75.03 Hz O
WUXGA 1920 x 1080 66.58 kHz 59.94 Hz O
WXGA 1366 x 768 47.71 kHz 59.79 Hz O
Problema de la respuesta (error de
comunicación o comando incorrecto)
Ocho códigos ASCII + CR
Comando de 4 dígitos: comando. Texto de los cuatro
caracteres.
Parámetro de 4 dígitos: parámetro 0–9, x, vacío, ?
Ingrese los valores del parámetro, alineando hacia la
izquierda, y complete con campos vacíos para el resto.
(Asegúrese de ingresar 4 valores para el parámetro).
Cuando el parámetro ingresado no se encuentre dentro de
un rango ajustable, se devolverá “ERR”. (Consulte “Formato
de los códigos de respuesta”). Cualquier valor numérico
puede reemplazar a “x” en la tabla.
Respuesta norm al
Conecte un cable RS-232C de tipo cruzado
(disponible en comercios) al Din/D-Sub RS-232C sum-
inistrado para efectuar las conexiones.
Sólo aquellas personas acostumbradas a utilizar
computadoras deberán emplear este sistema de
operación.
Ajuste la configuración de comunicación RS-232C en la PC
para que coincida con los ajustes de comunicación de la TV.
A continuación, se detalla la configuración de comunicación
de la TV:
9.600 bps
8 bits
Ninguno
1 bit
Ninguno
Envíe los comandos de control desde la PC a través del
conector RS-232C.
La TV ejecuta una función de acuerdo con el comando
recibido y envía un mensaje de respuesta a la PC.
No envíe varios comandos al mismo tiempo.
Espere a que la PC reciba la respuesta "OK" antes de enviar
el siguiente comando.
0 0 0 9
- 3 0
0
Cuando se envía “?” para
algunos
comandos,
el valor de
configuración enviado
previamente responde.
C1 C2 C3 C4 P1 P2 P3 P4
Comando de 4 dígitos Parámetro de 4 dígitos Código de devolución
?
? ? ? ?
E
R R
O
K
Código de devolución
(0DH)
Código de devolución
(0DH)
Apéndice
Especifi caciones del puerto RS232
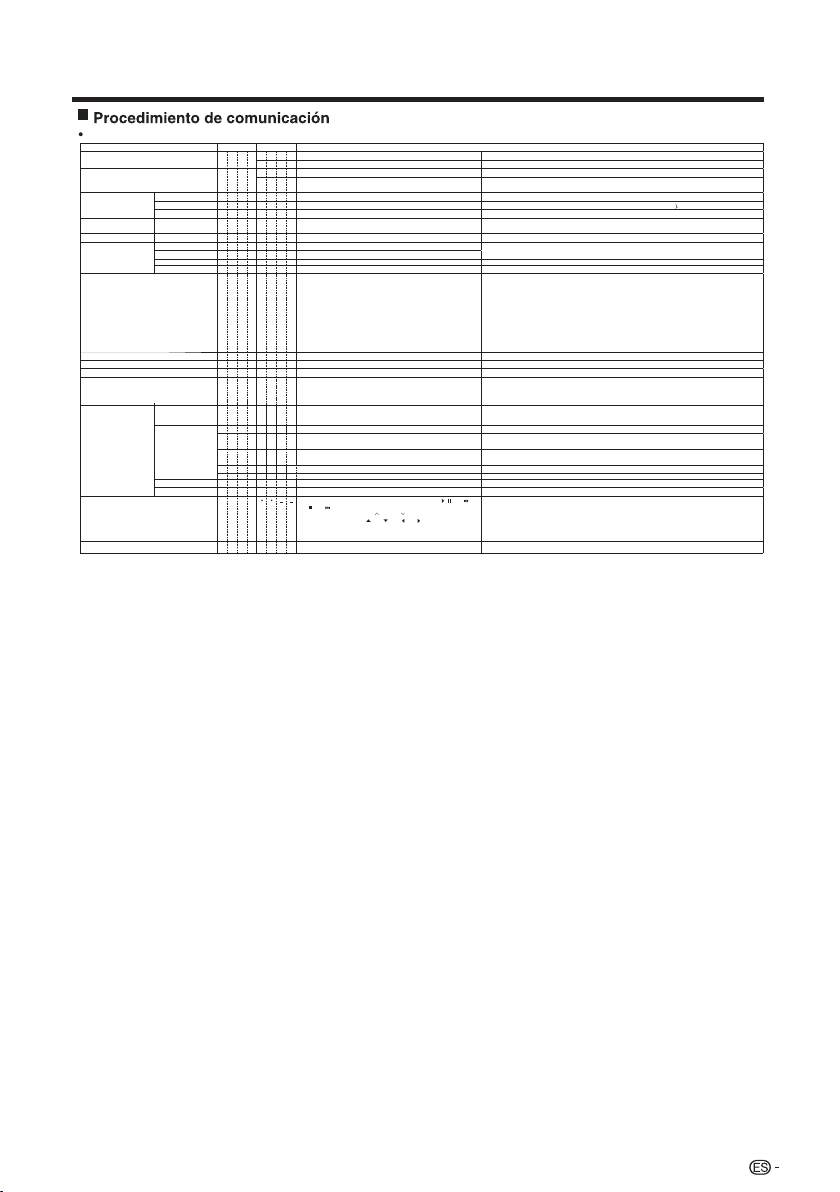
SELORTNOC SOL ED SODINETNOCORTEMÁRAPODNAMOCLORTNOC ED OTNEMELE
CONFIGURACIÓN DEL COMANDO "ENCENDER" R S P W
.odazahcer "rednecnE" odnamoCodavitcaseD___0
.odatpeca "rednecnE" odnamoCodidnecnE___1
CONFIGURACIÓN DE ENCENDIDO/APAGADO P O W R
.arepse ed odom la aibmaCodagapA___0
1 _ _ _ Encendido
Se deberá esperar para ejecutar el comando "Encender" hasta que el sistema esté apagado por
completo (el indicador LED de encendido/apagado deberá estar encendido de color rojo).
SELECCIÓN DE
ENTRADA A
.)adartne ed oibmac ed nótob le euq otneimanoicnuf omsim le eesoP( .sadartne sal ertne aibmaC)ratumnoC(___XDGTIRATUMNOC
___0DVTIVT Cambia la entrada a TV. (El canal A permanece sin cambios. (Última memoria)
.6ADARTNE~1ADARTNE al a aibmaC)6-1( adartne ed lanimret led oremúN___*DVAI6-1 ADARTNE
___*DMVAVA ODOM LED NÓICCELES
0:(CAMBIAR), 1:ESTÁNDAR, 2:CINE, 3:JUEGOS, 4:PC, 5:DINÁMICO,
6:DINÁMICO (FIJO), 7:USUARIO
A pesar de que se puede elegir ahora, corresponde a una operación de conmutación entre los modos.
)001-0( nemuloV__**MLOVNEMULOV
POSICIÓN
POSICIÓN HORIZONTAL
H P O S * * * _ Sólo en el modo PC. (0–100, rango de visualización del menú +/- 50)
Los rangos variables de posición de la pantalla dependen del modo de visualización o el tipo de señal. Se pueden
visualizar los rangos en la pantalla de configuración de posición.
POSICIÓN VERTICAL V P O S * * * _ Sólo en el modo PC. (0–40, rango de visualización del menú +/- 20)
RELOJ C L C K * * * _ Sólo en el modo PC. (0–180, rango de visualización del menú +/- 90)
FASE P H S E * * * _ Sólo en el modo PC. (0–40, rango de visualización del menú +/- 20)
___*EDIW
NÓICAZILAUSIV ED ODOM
0:(Conmutar) 1:Normal 2:Alargamiento inteligente 3:Alargamiento
4:Aumento
5:Pantalla completa 6:Punto por punto 7:Cine)
0: A pesar de que se puede elegir ahora, corresponde a una operación de conmutación entre los elementos
disponibles.
1: Disponible en la resolución de definición estándar [AV (A/V)] y [PC], excepto algunas resoluciones (*1).
2,3,4: Disponible sólo cuando se transmite la señal [AV (A/V)].
5: Disponible en la resolución de 720p [AV (A/V)] y [PC], excepto la resolución 1280x720, 1920x1080.
6: Disponible en la resolución de 1080i y 1080p [AV (A/V)] y [PC], excepto la resolución 1600x1200,
1280x1024(LC-32SV40U) y 1400x1050(LC-32SV40U).
7: Sólo disponible en [PC], excepto algunas resoluciones (*2).
(*1)1360x768, 1366x768, 1280x1024, 1400x1050, 1600x1200, 1920x1080
(*2)1360x768, 1366x768, 1280x720, 1920x1080
odavitcaseD :2 ,odavitcA :1 ,)ratumnoC( :0___*ETUMRAICNELIS
odavitcaseD :2 ,odavitcA :1 ,)ratumnoC( :0___*USCAETNEVLOVNE ODINOS
)ratumnoC(___XAHCAOIDUA ED NÓICCELES
___*MTFORODAZIROPMET
0: Desactivado, 1: TEMPORIZADOR DE APAGADO – 30 MIN., 2:
TEMPORIZADOR DE APAGADO – 60 MIN.,
3: TEMPORIZADOR DE APAGADO – 90 MIN., 4: TEMPORIZADOR DE
APAGADO – 120 MIN.
CANALES
CANALES DIRECTOS
(ANALÓGICOS)
D C C H * * * _
Número de canal de TV
(1-135)
Se incluye un cambio de entrada si no está seleccionada la visualización de la entrada TV.
En Aire, son válidos los canales 2 a 69.
En Cable, son válidos los canales 1 a 135.
CANALES DIRECTOS
(DIGITALES)
D A 2 P * * * * Aire DIGITAL (número de dos partes, 2 dígitos más 2 dígitos)
D C 2 U * * * _
Cable DIGITAL (número de dos partes, 3 dígitos más 3 dígitos)
Mitad delantera de NÚM. DE CANAL DE CABLE DIGITAL (designación de canal menor)
D C 2 L * * * _
Cable DIGITAL (número de dos partes, 3 dígitos más 3 dígitos)
Mitad trasera de NÚM. DE CANAL DE CABLE DIGITAL (designación de canal menor)
D C 1 0 * * * * Cable DIGITAL (número de una parte, 5 dígitos, inferior a 10.000)
D C 1 1 * * * * Cable DIGITAL (número de una parte, 5 dígitos, superior a 10.000)
) HC euq nóicnuf amsim( .adartne atse a áraibmac es ,adanoicceles átse on VT iS 1+ VT ed lanac ed oremúN___XPUHCLANAC RIBUS
) HC euq nóicnuf amsim( .adartne atse a áraibmac es ,adanoicceles átse on VT iS 1- VT ed lanac ed oremúN___XNDHCLANAC RAJAB
___XPCLC
CC .sotluco solutítbus sol ed nóicatumnoc ed nóicarepO)ratumnoC(
•
Si aparece un guión bajo (_) en la columna del parámetro, ingrese un espacio.
•
Si aparece un asterisco (*), ingrese un valor en el rango indicado entre paréntesis dentro de CONTENIDOS DE LOS
CONTROLES.
•
Cualquier valor numérico puede reemplazar a “x” en la tabla.
No se garantiza el funcionamiento de aquellos comandos no incluidos.
Apéndice
41
REMOTE CONTROL BUTTONS
R C K Y
0-9: 0-9, 10: dot, 11: ENT, 12: POWER, 13: DISPLAY,16: / ,19: ,
20: , 21: , 24: SLEEP, 27: CC, 28: AV MODE, 30: FLASHBACK,
31: MUTE, 32: VOL - ,33: VOL + , 34: CH , 35: CH , 36: INPUT,
38: MENU, 40:ENTER, 41: , 42: , 43: ,44: , 45: RETURN,
46: EXIT, 48:SURROUND, 49: AUDIO, 50: A (red), 51: B (green),
52: C (blue), 53: D (yellow), 54: FREEZE, 60: TV, 61:USB, 62: PC.

■ Apartado 15 de la FCC
■ Advertencia relacionada con la normativa FCC
■ Cables
Este dispositivo cumple con el Apartado 15 de las Normas FCC. Su funcionamiento está sujeto
a las dos condiciones siguientes: (1) Este dispositivo no deberá causar interferencias
perjudiciales y (2) este dispositivo deberá aceptar cualquier interferencia que reciba, incluidas
interferencias que puedan causar un funcionamiento no deseado.
Este equipo ha sido probado y ha demostrado cumplir con los límites establecidos para los
dispositivos digitales clase B, de conformidad con el Apartado 15 de las Normas de la FCC.
Estos límites han sido designados para proporcionar una protección razonable contra la
interferencia perjudicial en una instalación residencial. Este equipo genera, utiliza y puede radiar
energía radioeléctrica, y, si no se instala y utiliza de acuerdo con las instrucciones, puede
causar una interferencia perjudicial en las comunicaciones por radio. Sin embargo, no hay
ninguna garantía de que no se produzcan interferencias en una instalación particular. Si este
equipo causa interferencias perjudiciales en las recepciones de radio o televisión, lo que puede
determinarse fácilmente apagando y encendiendo el equipo, al usuario se le recomienda
corregir la interferencia tomando una o más de las medidas siguientes:
• Cambie la orientación o el lugar de instalación de la antena receptora.
• Aumente la separación entre el equipo y el receptor.
• Conecte el equipo a un tomacorriente de un circuito diferente de aquel al que está
conectado el receptor.
• Consulte al distribuidor o técnico de radio/TV calificado para solicitar su ayuda.
Los cambios o modificaciones no aprobados de forma explícita por la parte responsable del
cumplimiento con las Normas de la FCC podrían anular la autoridad del usuario para utilizar
este equipo.
Las conexiones con este dispositivo deberán realizarse con cables blindados con
recubrimiento de conectores RF/EMI metálicos para mantener el cumplimiento con las
Normas y Regulaciones de la FCC.
42
Apéndice
Avisos legales
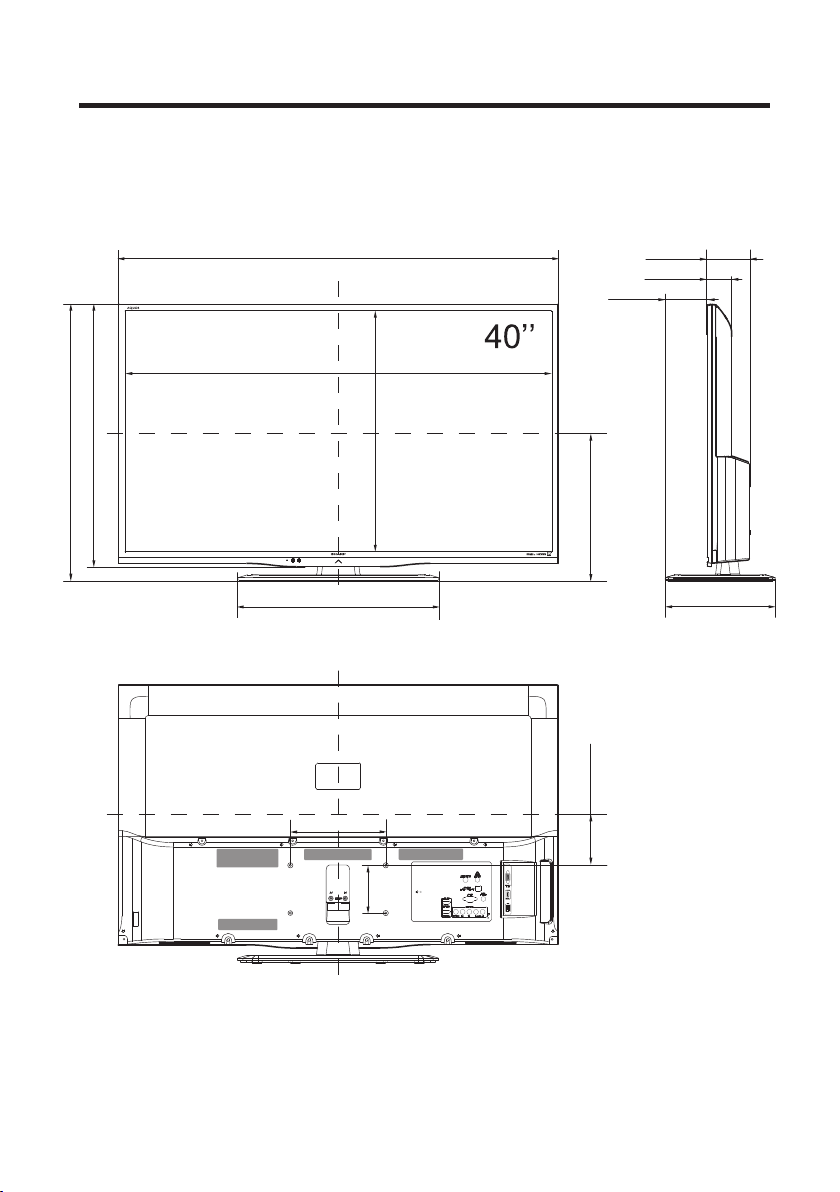
Dimensional Drawings
Unit: inch (mm)
Unité: pouce (mm)
Unidad: pulgada (mm)
LC-40LE550U
*1
Active area/Área activa/Zone active
35
7
/
64
(891.6)
36
5
/
16
(922)
2
1
/
16
(52)
3
19
/
32
(91)
16
35
/
64
(420)
9
7
/
64
(231)
8
7
/
8
(200)
3
15
/
16
(
100)
3
15
/
32
(88)
19
25
/
32
(502.15)
12
17
/
32
(318 )
21
47
/
64
(552 )
23
3
/
64
(585)
*1
*1
4
29
/
64
(113)


SHARP ELECTRONICS CORPORATION
Sharp Plaza, Mahwah, New Jersey 07495-1163
SHARP CORPORATION
Printed in China
Impreso en China
083-0001-2265 XXX
Maker Code