TINSEB778MRR0 OCT 15, 2025
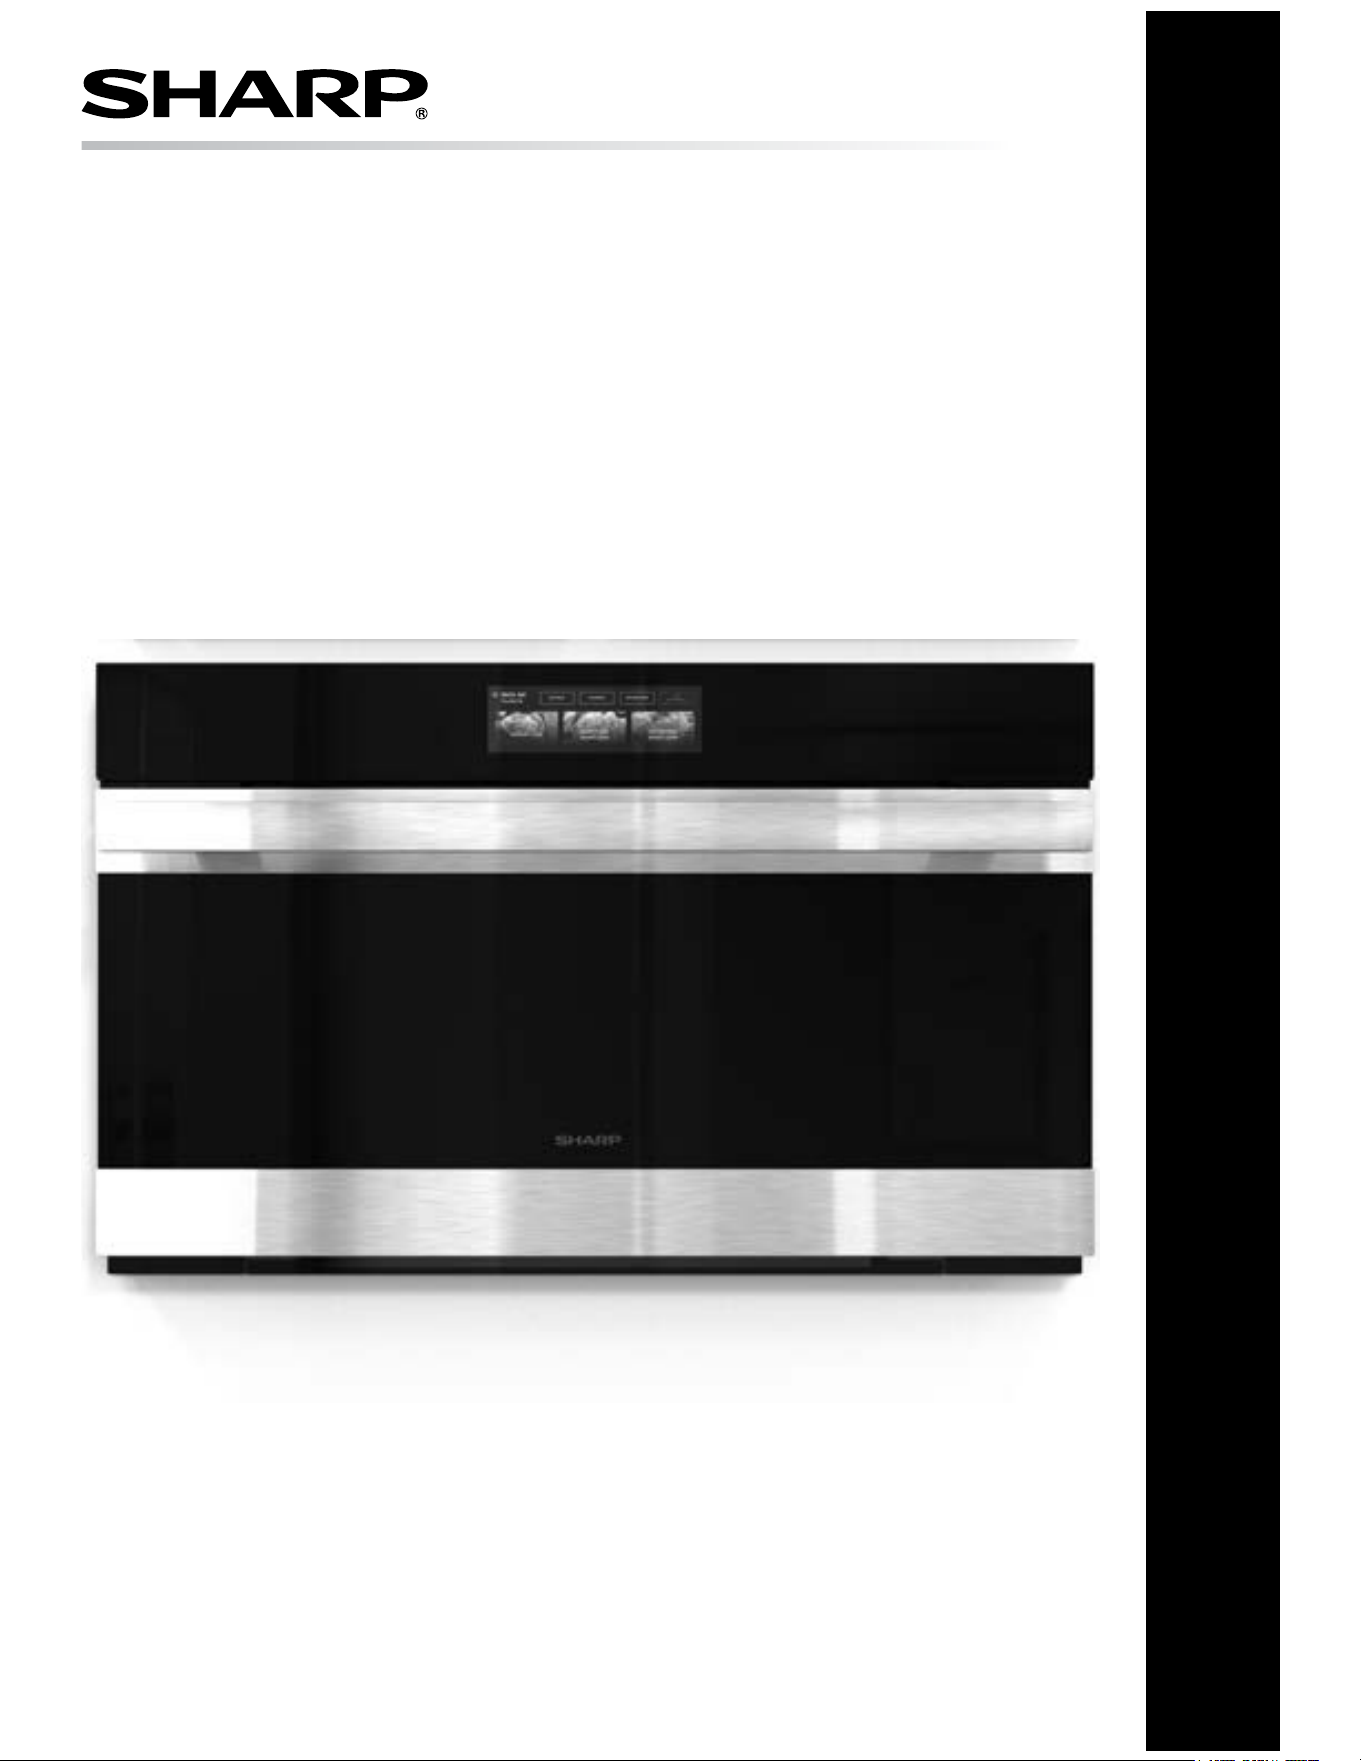
SHARP CELERITY
™
HIGH-SPEED OVEN: MODEL SWA3099MS
OPERATION MANUAL
SHARP CELERITY
™
HIGH-SPEED OVEN
MODEL : SWA3099MS

E
E
E
E
E
E E E E E E E E E E E E E E E E E E
E E E E E E E E E E E E E E E E E E
2E
CONTENTS
PRECAUTIONS TO AVOID POSSIBLE EXPOSURE TO EXCESSIVE
MICROWAVE ENERGY ................................................ 2
CUSTOMER ASSISTANCE (US 0NLY) ............................... 3
CUSTOMER ASSISTANCE (CANADA 0NLY) ........................ 4
US CONSUMER LIMITED WARRANTY ............................. 5
CANADA CONSUMER LIMITED WARRANTY ....................... 6
OVEN SAFETY ......................................................... 7
IMPORTANT INFORMATION ......................................... 8
IMPORTANT SAFETY INSTRUCTIONS .......................... 9-10
FOOD SAFETY ....................................................................... 10
USDA RECOMMENDED TEMPERATURE ............................... 10
INSTALLATION INFORMATION .................................11-13
UTENSILS AND COVERINGS ........................................14
PARTS AND FEATURES..........................................15-16
TOUCH SCREEN CONTROL .....................................17-18
BEFORE OPERATING ............................................................. 18
TO SET THE CLOCK ............................................................... 18
HOME .................................................................................... 18
SETTINGS ............................................................................. 18
TEMPERATURE ................................................................. 18
DISPLAY ........................................................................... 18
SOUND .............................................................................. 18
WI-FI ................................................................................. 18
SYSTEM INFO ................................................................... 18
STEAM CLEAN .................................................................. 18
CONTROL LOCK .................................................................... 18
OVEN LIGHT ......................................................................... 18
FAVORITES ............................................................................ 18
KITCHEN TIMER .................................................................... 18
PREHEAT AND ACTIVE COOKING ......................................... 18
TO PAUSE COOKNG .............................................................. 18
TO CANCEL COOKING ........................................................... 18
TO GO BACK.......................................................................... 18
SMART COOK FEATURES ...........................................19
MICROWAVE SMART COOK .................................................. 19
SENSOR COOKING ............................................................... 19
REHEAT ................................................................................. 19
DEFROST .............................................................................. 19
CONVECTION SMART COOK ................................................. 19
TIPS ...................................................................................... 19
MANUAL COOK FEATURES .........................................20
MANUAL COOK MODES ........................................................ 20
TIME COOK ........................................................................... 20
DELAY COOK ........................................................................ 20
POWER LEVEL ...................................................................... 20
MANUAL DEFROST ............................................................... 20
SPEED BAKE AND ROAST ..................................................... 20
HIGH-SPEED PRO ................................................................. 20
MICROWAVE USE ................................................21-22
MICROWAVE SAFETY ........................................................... 21
ABSORB MICROWAVE ENERGY............................................ 21
CONDENSATION AND TEMPERATURE .................................. 21
OVEN VENTS ......................................................................... 21
OVEN DOOR .......................................................................... 21
WIRE RACKS ........................................................................ 21
MICROWAVE COOKING ........................................................ 21
FOOD IN THE MICROWAVE ................................................... 22
OVEN USE .............................................................23
BEFORE USING THE OVEN ................................................... 23
COMPONENT COOLING FAN ................................................. 23
CONDENSATION AND TEMPERATURE .................................. 23
OVEN VENTS ......................................................................... 23
OVEN DOOR .......................................................................... 23
WIRE RACKS ........................................................................ 23
CONVECTION COOKING ........................................................ 23
UTENSILS ............................................................................. 23
CLEANING AND CARE ...........................................24-25
EXTERIOR ............................................................................. 24
DOOR .................................................................................... 24
TOUCH CONTROL PANEL ...................................................... 24
INTERIOR - AFTER MICROWAVE COOKING .......................... 24
INTERIOR - AFTER HIGH-SPEED PRO, SPEED COOK,
OR CONVECTION COOKING .................................................. 24
WAVEGUIDE COVER ............................................................. 24
ODOR REMOVAL................................................................... 24
CLEANING SUGGESTIONS .................................................... 24
TROUBLE SHOOTING ............................................25-26
BEFORE YOU CALL ............................................................... 25
OPERATION .......................................................................... 25
ERROR DISPLAY AND CONDITIONS .................................... 26
PRECAUTIONS TO AVOID POSSIBLE EXPOSURE
TO EXCESSIVE MICROWAVE ENERGY
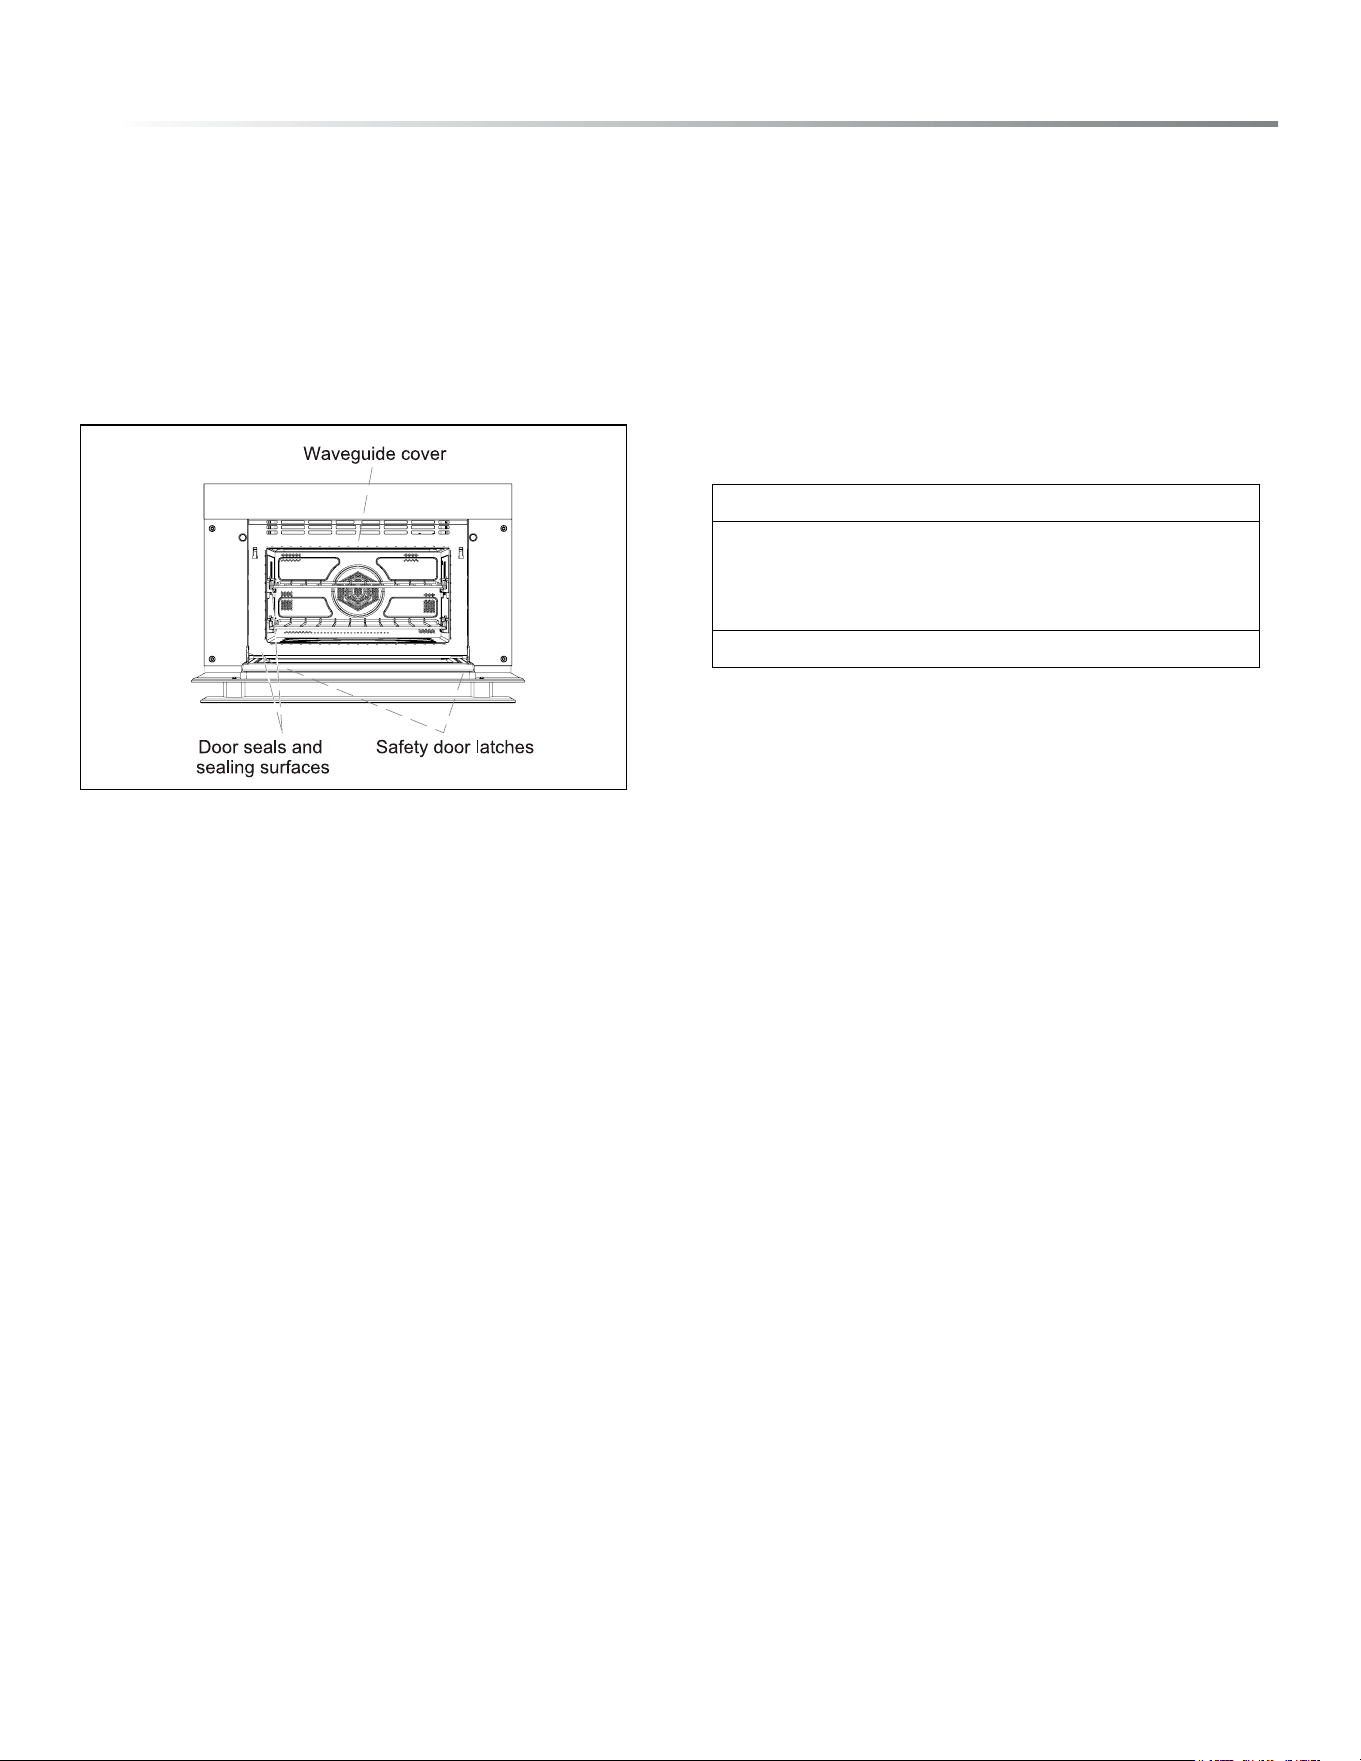
• Do not attempt to operate this oven with the door open since open-door operation can result in harmful exposure
to microwave energy. It is important not to defeat or tamper with the safety interlocks.
• Do not place any object between the oven front face and the door or allow soil or cleaner residue to accumulate
on sealing surfaces.
• Do not operate the microwave oven if it is damaged. It is particularly important that the microwave oven door close
properly and that there is no damage to the: (1) door (bent), (2) hinges and latches (broken or loosened), (3) door
seals and sealing surfaces.
• The microwave oven should not be adjusted or repaired by anyone except properly qualied service personnel.
E
E
E
E
E
E E E E E E E E E E E E E E E E E E
E E E E E E E E E E E E E E E E E E
E3
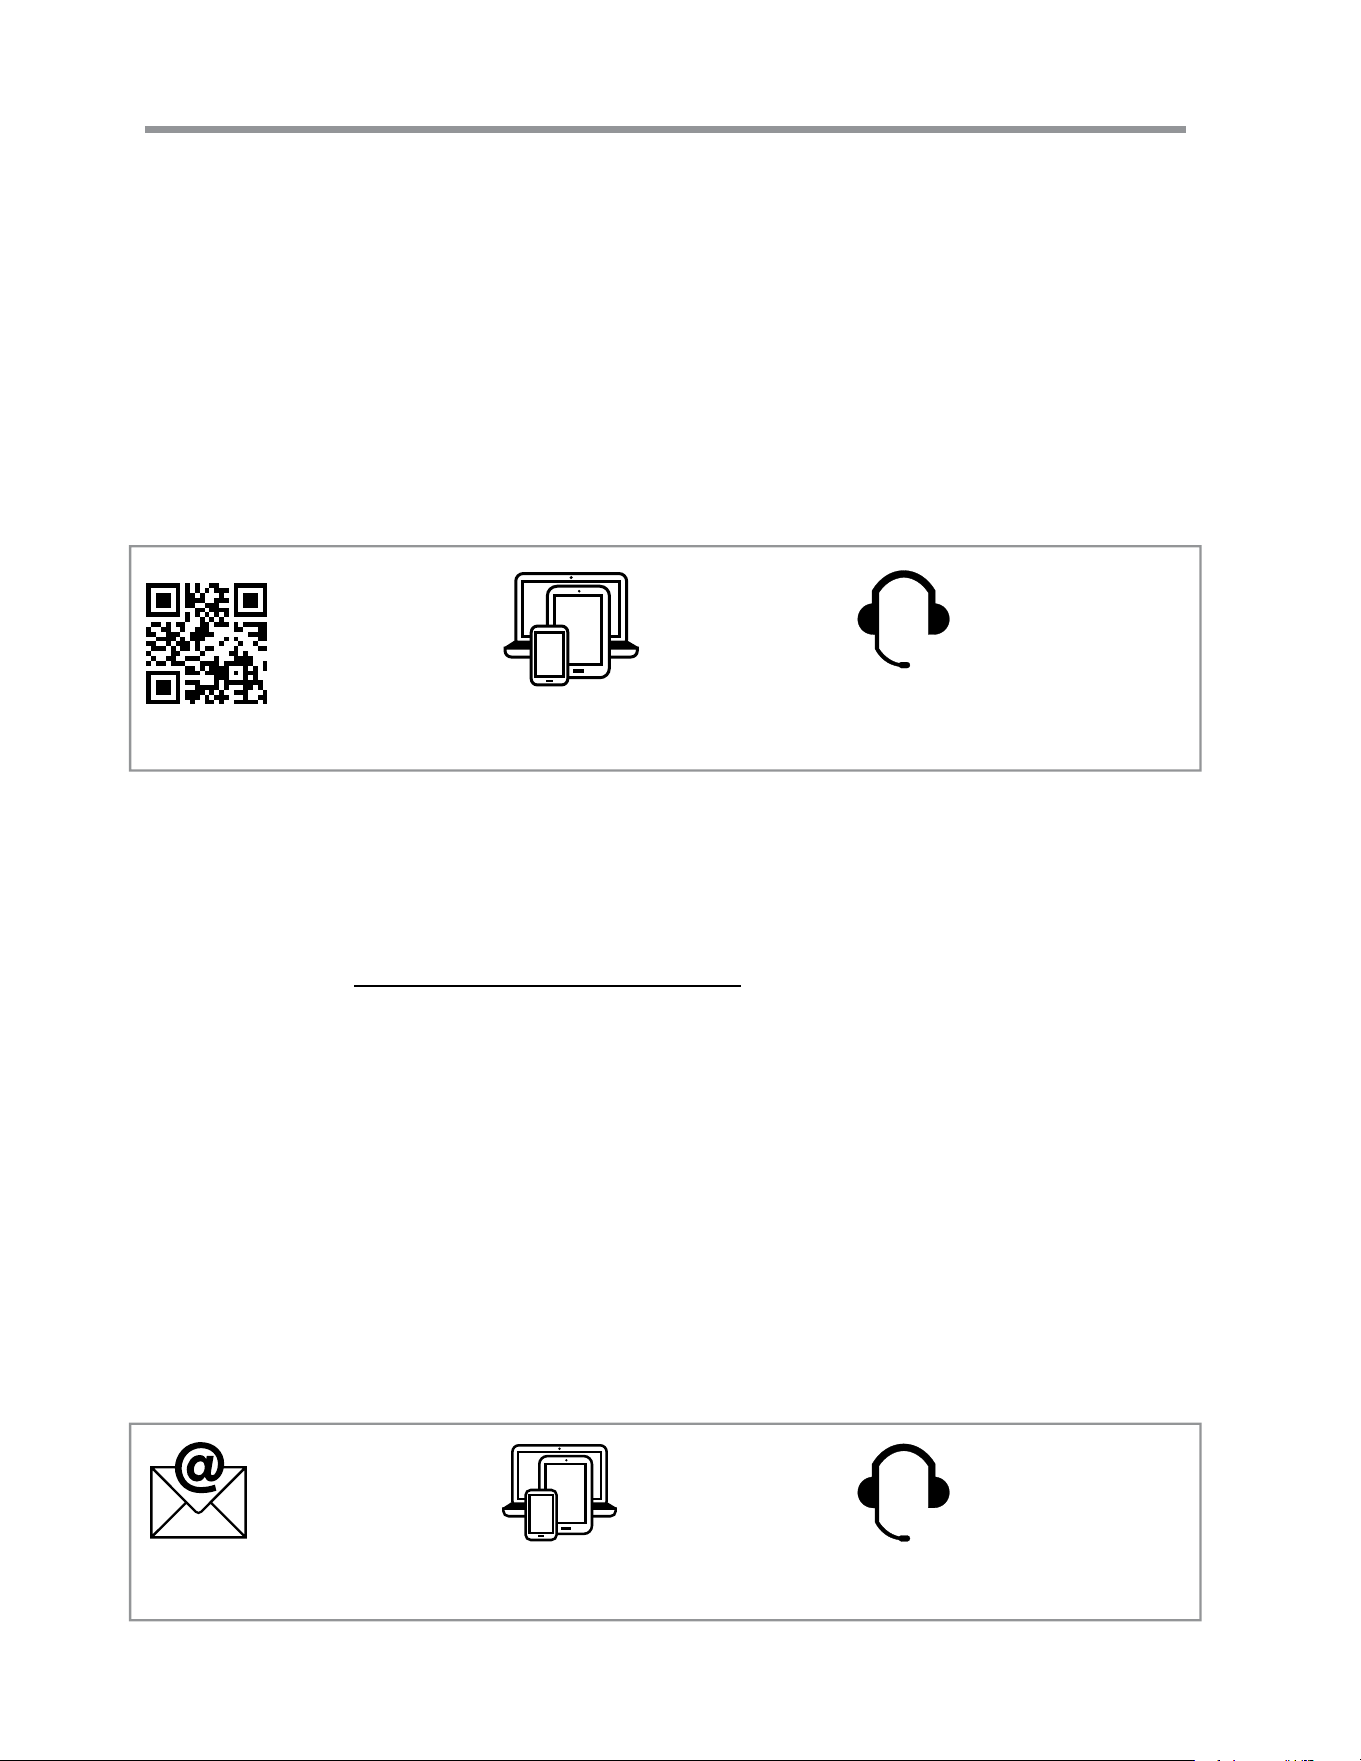
CUSTOMER ASSISTANCE UNITED STATES ONLY
REGISTER YOUR PRODUCT
Registering your new product is easy and offers benets that help you get the most
out of your Sharp product including:
9 Convenience: If you ever need warranty support, your product information is already on le.
9 Communication:Stay up to date with important notications and special offers from SHARP.
9 Support: Quickly access support content including Owner’s Manuals, FAQ’s,
How-to Videos, and much more.
3 EASY WAYS TO REGISTER TODAY!
PRODUCT SUPPORT
If you have questions about the setup or operation of your product, please refer to
the corresponding section within this manual.
Additionally, visit https://support.sharpusa.com/s/ to access exclusive content about
your product including:
Æ FAQ’s and How-To Videos
Æ Find or Request Service
Æ Extended Warranty Options
Æ Downloads including the Installation Guide, Spec Sheet, and Owner’s Manual
CONTACT US
If at any time you have questions or comments concerning your SHARP product,
please contact the SHARP Customer Assistance Center. We are available to
assist you through multiple contact methods for your convenience:
Scan this QR Code on your mobile device Visit http://www.sharpusa.com/register
ONLINE
Visit our sites to
learn more about
your product at
sharpusa.com and
sbl.sharpusa.com
See the Contact Us section on our sites
U.S. | https://support.sharpusa.com/s/
Contact a Sharp Advisor on the phone
Contact a Sharp Advisor on the phone
CALL US
US 800-BE-SHARP
800-237-4277
Mon-Fri: 7am-7pm CST
Sat-Sun: 9am-7pm CST
CALL US
US 800-BE-SHARP
800-237-4277
Mon-Fri: 7am-7pm CST
Sat-Sun: 9am-7pm CST
EMAIL
Available 24/7
US: sharpusa.com
CHAT ONLINE
Mon-Fri: 7am-7pm CST
Sat-Sun: 9am-7pm CST
SCAN
Use the camera or
QR code scanning
application on your
mobile device
TGANEB010MRR2 Sep 24, 2025

E
E
E
E
E
E E E E E E E E E E E E E E E E E E
E E E E E E E E E E E E E E E E E E
4E
E5
E E E E E E E E E E E E E E E E E E
US CONSUMER LIMITED WARRANTY
SHARP ELECTRONICS CORPORATION (“Sharp”) warrants to the first consumer purchaser (“Purchaserˮ) that this Sharp brand
product (“Productˮ), when shipped in its original container and sold or distributed in the United States by Sharp or an authorized
Sharp dealer or reseller, will be free from defective workmanship and materials, and agrees that it will, at its option, either repair
the defect or replace the defective Product or part thereof with a new or remanufactured equivalent at no charge to the Purchaser for
p
arts or labor for the period(s) set forth below.
This limited warranty does not apply to any appearance items of the Product nor to the additional excluded item(s) set forth below
nor to any Product the exterior of which has been damaged or defaced, which has been subjected to misuse, abnormal service or
In order to enforce the rights under this limited warranty, the Purchaser should follow the steps set forth below and provide proof of
purchase to the servicer.
The limited warranty described herein is in addition to whatever implied warranties may be granted to Purchasers by law. ALL
IMPLIED WARRANTIES INCLUDING THE WARRANTIES OF MERCHANTABILITY AND FITNESS FOR USE ARE
LIMITED TO THE PERIOD(S) FROM THE DATE OF PURCHASE S
ET FORTH BELOW. Some states do not allow limitations
on how long an implied warranty lasts, so the above limitation may not apply to you.
Neither the sales personnel of the seller nor any other person is authorized to make any warranties other than those described herein,
or to extend the duration of any warranties beyond the time period described above on behalf of Sharp.
The warranties described herein shall be the sole and exclusive warranties granted by Sharp and shall be the sole an
d exclusive
remedy available to the Purchaser. Correction of defects, in the manner and for the period of time described herein, shall constitute
full satisfaction of all claims, whether based on contract, negligence, strict liability or otherwise. In no event shall Sharp be liable,
or in any way responsible, for any damages or defects in the Product which were caused by repairs or attempted repairs performed
by anyone other than an authorized servicer. Nor shall Sharp be liable or in any way responsible for any incident or consequential
economic or property damage
. Some states do not allow the exclusion of incidental or consequential damages, so the above exclusion
may not apply to you.
THIS LIMITED WARRANTY IS VALID ONLY IN THE FIFTY (50) UNITED STATES, THE DISTRICT OF COLUMBIA AND
PUERTO RICO.
Your product model number &
description
Model # SW
30 Sharp Celerity
™
High Speed Oven
Be sure to have this information available when you need service for your Product.)
Warranty period for this product: One (1) year parts and labor including in-home service from date of purchase or delivery.
Additional item(s) excluded from
warranty coverage (if any):
Where to obtain service:
What to do to obtain service:
Product must be accessible to provide service.
The warranty period continues for an additional four (4) years, for a total of five (5) years,
with respect to the magnetron tube in the Product for parts only; labor and service are not
provided free of charge for this additional period.
Non-functional accessories, service calls to your home to instruct how to use your convec-
tion wall oven appliance, replace or repair house fuses or to correct house wiring, improper
commercial use, installation, or maintenance, damage to the product caused by delivery, acci-
dent modifications, fire, floods or acts of God.
From a Sharp Authorized Servicer located in the United States. To find the location of the
nearest Sharp Authorized Servicer, call Sharp toll free at 1-800-237-4277 (1-800-BE-
SHARP).
In-home service is provided for one year from date of purchase or delivery. In-home service can
be arranged by calling 1-800-BE-SHARP. Be sure to have Proof of Purchase and Delivery
Date available
.
TO OBTAIN SUPPLY, ACCESSORY OR PRODUCT INFORMATION, CALL 1-800-BE-SHARP or visit www.sharpusa.com.
SAVE THE PROOF OF PURCHASE AS IT IS NEEDED SHOULD YOUR APPLIANCE EVER REQUIRE WARRANTY SERVICE.
5 E
CUSTOMER ASSISTANCE
CANADA ONLY
To aid in answering questions if you call for service or for reporting loss or theft,
please use the space below to record the model and serial number located on the
back side of the unit.
Model Number:
Serial Number:
Date of Purchase:
Dealer Name:
Address:
City:
Province:
Postal Code:
Telephone:
PRODUCT SUPPORT
If you have questions about the setup or operation of your product, please refer to
the corresponding section within this manual.
Additionally, visit http://sharp.ca/support-home.aspx to access exclusive content
about your product including:
Æ Find a Dealer
Æ Find Service Locations
Æ Downloads including the Installation Guide, Spec Sheet, and Owner’s Manual
CONTACT US
If at any time you have questions or comments concerning your SHARP product,
please contact the SHARP Customer Assistance Center. We are available to
assist you through multiple contact methods for your convenience:
http://sharp.ca/contact-emailus.aspx CA | sharp.ca/support-home.aspx Contact a Sharp Advisor on the phone
CALL US
CA 877-278-6709
Mon-Fri: 7am-7pm CST
EMAIL
Available 24/7
See the Contact Us
section on our site.
SUPPORT SITE
Product Downloads,
Service Locater, Where
to Buy, Toner Recycling
Program and more.
2
E
E
E
E
E
E E E E E E E E E E E E E E E E E E
E E E E E E E E E E E E E E E E E E
E5
E5
E E E E E E E E E E E E E E E E E E
US CONSUMER LIMITED WARRANTY
SHARP ELECTRONICS CORPORATION (“Sharp”) warrants to the first consumer purchaser (“Purchaserˮ) that this Sharp brand
product (“Productˮ), when shipped in its original container and sold or distributed in the United States by Sharp or an authorized
Sharp dealer or reseller, will be free from defective workmanship and materials, and agrees that it will, at its option, either repair
the defect or replace the defective Product or part thereof with a new or remanufactured equivalent at no charge to the Purchaser for
p
arts or labor for the period(s) set forth below.
This limited warranty does not apply to any appearance items of the Product nor to the additional excluded item(s) set forth below
nor to any Product the exterior of which has been damaged or defaced, which has been subjected to misuse, abnormal service or
In order to enforce the rights under this limited warranty, the Purchaser should follow the steps set forth below and provide proof of
purchase to the servicer.
The limited warranty described herein is in addition to whatever implied warranties may be granted to Purchasers by law. ALL
IMPLIED WARRANTIES INCLUDING THE WARRANTIES OF MERCHANTABILITY AND FITNESS FOR USE ARE
LIMITED TO THE PERIOD(S) FROM THE DATE OF PURCHASE S
ET FORTH BELOW. Some states do not allow limitations
on how long an implied warranty lasts, so the above limitation may not apply to you.
Neither the sales personnel of the seller nor any other person is authorized to make any warranties other than those described herein,
or to extend the duration of any warranties beyond the time period described above on behalf of Sharp.
The warranties described herein shall be the sole and exclusive warranties granted by Sharp and shall be the sole an
d exclusive
remedy available to the Purchaser. Correction of defects, in the manner and for the period of time described herein, shall constitute
full satisfaction of all claims, whether based on contract, negligence, strict liability or otherwise. In no event shall Sharp be liable,
or in any way responsible, for any damages or defects in the Product which were caused by repairs or attempted repairs performed
by anyone other than an authorized servicer. Nor shall Sharp be liable or in any way responsible for any incident or consequential
economic or property damage
. Some states do not allow the exclusion of incidental or consequential damages, so the above exclusion
may not apply to you.
THIS LIMITED WARRANTY IS VALID ONLY IN THE FIFTY (50) UNITED STATES, THE DISTRICT OF COLUMBIA AND
PUERTO RICO.
Your product model number &
description
Model # SW
30 Sharp Celerity
™
High Speed Oven
Be sure to have this information available when you need service for your Product.)
Warranty period for this product: One (1) year parts and labor including in-home service from date of purchase or delivery.
Additional item(s) excluded from
warranty coverage (if any):
Where to obtain service:
What to do to obtain service:
Product must be accessible to provide service.
The warranty period continues for an additional four (4) years, for a total of five (5) years,
with respect to the magnetron tube in the Product for parts only; labor and service are not
provided free of charge for this additional period.
Non-functional accessories, service calls to your home to instruct how to use your convec-
tion wall oven appliance, replace or repair house fuses or to correct house wiring, improper
commercial use, installation, or maintenance, damage to the product caused by delivery, acci-
dent modifications, fire, floods or acts of God.
From a Sharp Authorized Servicer located in the United States. To find the location of the
nearest Sharp Authorized Servicer, call Sharp toll free at 1-800-237-4277 (1-800-BE-
SHARP).
In-home service is provided for one year from date of purchase or delivery. In-home service can
be arranged by calling 1-800-BE-SHARP. Be sure to have Proof of Purchase and Delivery
Date available
.
TO OBTAIN SUPPLY, ACCESSORY OR PRODUCT INFORMATION, CALL 1-800-BE-SHARP or visit www.sharpusa.com.
SAVE THE PROOF OF PURCHASE AS IT IS NEEDED SHOULD YOUR APPLIANCE EVER REQUIRE WARRANTY SERVICE.
5 E

E
E
E
E
E
E E E E E E E E E E E E E E E E E E
E E E E E E E E E E E E E E E E E E
6E
Revision: 03/21/2016
LIMITED WARRANTY
Consumer Electronics Products
Congratulations on your purchase!
Shar
p Electronics of Canada Ltd. (“Sharp”) warrants to the first purchaser for this Sharp brand product (“Product”), when shipped in its original container
and sold or distributed in Canada by Sharp or by an authorized Sharp dealer, and Product was not sold “as is” or “sales final” that the
Product will during
the applicable warranty period, be free from defects in material and workmanship, and will within the applicable warranty period, either repair the defective
Product or provide the first purchaser a replacement of the defective Product.
Conditions: This limited warranty shall not apply to:
(a) Any defects caused or repairs required as a result of abusive operation, negligence, accident, improper installation or inappropriate use as outlined
in the owner’s manual or other applicable Product documentation.
(b) Any defects caused or repairs required as a result of any Product that has been tampered with, modified, adjusted or repaired by any person other
than Sharp, a Sharp authorized service centre or a Sharp authorized servicing dealer.
(c) Any defects caused or repairs required as a result of the use of the Product with items not specified or approved by Sharp, including but not limited
to chemical cleaning agents.
(d) Any replacement of accessories required through normal use of the Product, including but not limited to, remote controls, AC adapters, batteries,
temperature probe, trays, filters, belts, ribbons, cables and paper.
(e) Any cosmetic damage to the Product surface or exterior that has been defaced or caused by normal wear and tear.
(f) Any defects caused or repairs required as a result of damage caused by any external or environmental conditions, including but not limited to,
transmission line/power line voltage or liquid spillage or acts of God.
(g) If the serial number or model number affixed to Product has been removed, defaced, changed, altered or tampered with.
(h) This limited warranty will not apply if the Product has been used or is being used in a commercial setting or application; this warranty is meant solely
for the non-commercial, household use of the Product by consumers in their home or residence.
(i) Any installation, delivery, setup and/or programming charges
(j) The removal and reinstallation of Over-The-Range Microwave, Microwave Drawer or Steam Oven if it is installed in an inaccessible location or
requiring removal of cupboards, handles or other cosmetic parts, or is not installed in accordance with installation instructions included with Product.
How to get service
: Warranty service may be obtained upon delivery of the Product, together with proof of purchase (including date of purchase) and a
copy of this limited warranty statement, to an authorized Sharp service centre or an authorized Sharp servicing dealer. In home warranty service
will be
carried out to locations accessible by on-road service vehicle and within 50 km of an authorized Sharp service centre on any Over-The-Range M
icrowave
Oven, Microwave Drawer Oven or Steam Oven. The servicer may if necessary take the unit for repair at the servicer's facility.
No other person (including
any Sharp dealer or service centre) is authorized to extend, enlarge or transfer this warranty on behalf of Sharp.
The purchaser will be responsible for any
and all removal, reinstallation, transportation and insurance costs incurred with exception for Over-The-Range Microwave Oven, Microwave Drawer
Oven
or Steam Oven whereby Sharp will be responsible for the removal and reinstallation.
The express warranties in this limited warranty are, except for consumer purchasers domiciled in Quebec, in lieu of and, except to the extent prohibited
by applicable law, Sharp disclaims all other warranties and conditions, express or implied, whether arising by law, statute, by course of dealing or usage
of trade, including, without limitation, implied warranties or conditions of merchantability and/or quality, fitness for a particular use or purpose, and/or non-
infringement. Limitations (not applicable to consumer purchasers domiciled in Quebec to the extent prohibited under Quebec law)
: (a) Sharp shall not be
liable for any incidental, special, consequential, economic, exemplary or indirect damages of any kind or nature (including lost profits or damages for loss
of time or loss of use or loss of data) arising from or in any connection
with the use or performance of a Product or a failure of a Product, even if Sharp is
aware of or has been advised of the possibility of such damages;
(b) the remedies described in this limited warranty constitute complete fulfillment of all
obligations and responsibilities of Sharp to the purchaser with respect to the Product and shall constitute full satisfaction of all claims, whether based on
contract, negligence, strict liability or otherwise. Some provinces may not allow the exclusion or limitation of
certain damages, or limits on the duration or
voiding of implied warranties or conditions; in such provinces, the exclusions and limits herein may not apply. This limited warranty is, except for consumer
purchasers domiciled in Quebec, governed by the laws of the Province in Canada in which the purchaser has purchased the Product. For consumer
purchasers domiciled in Quebec this limited warranty is governed by the laws of Quebec.
WARRANTY PERIODS (calculated from the date of original purchase): Parts & Labour (exceptions noted)
Microwave Oven 1 year (magnetron - 4 additional years)
Steam Oven 1 year
Small Kitchen Appliances 1 year
Air Purifiers 1 year
To obtain the name and address of the nearest Authorized Sharp Service Centre or Dealer, or for more information on this Limi
ted Warranty, Sharp
Extended Warranty Offers, Sharp Canada Products or Accessory Sales, please contact Sharp:
THIS LIMITED WARRANTY IS VALID ONLY IN CANADA
By writing to Sharp Electronics Of Canada Ltd. at 335 Britannia Road East Mississauga, Ontario L4Z 1W9
Calling: at 905-568-7140
Visiting our Web site: www.sharp.ca
3
E
E
E
E
E
E E E E E E E E E E E E E E E E E E
E E E E E E E E E E E E E E E E E E
E7
OVEN SAFETY
YOUR SAFETY AND THE SAFETY OF OTHERS ARE VERY IMPORTANT.
We have provided many important safety messages in this manual and on your appliance. Always read and obey all safety messages.
This is the safety alert symbol.
This symbol alerts you to potential hazards that can kill or hurt you and others. All safety messages will follow the
safety alert symbol and one of the following words: DANGER, WARNING or CAUTION.
DANGER
An imminently hazardous situation. You could be killed or seriously injured if you don't immediately
follow instructions.
WARNING
A potentially hazardous situation which, if not avoided, could result in death or serious bodily injury.
CAUTION
A potentially hazardous situation which, if not avoided, may result in moderate or minor injury.
All safety messages will tell you what the potential hazard is, tell you how to reduce the chance of injury and tell you what can happen
if the instructions are not followed.
State of California Proposition 65 Warnings:
WARNING: This product contains one or more chemicals known to the State of California to cause cancer.
WARNING: This product contains one or more chemicals known to the State of California to cause birth defects or other
reproductive harm.
WARNINGS FOR ELECTRIC INSTALLATION
WARNING
ELECTRICAL SHOCK HAZARD
• Installation and service must be performed by a qualied installer or service agency.
• The model is powered at 240V.
• Always disconnect the power before servicing this unit.
• This appliance must be properly grounded.
• Failure to do so could result in death or serious injury.

E
E
E
E
E
E E E E E E E E E E E E E E E E E E
E E E E E E E E E E E E E E E E E E
8E
CAUTION FOR WIRELESS LAN
CAUTION FOR USAGE ABOUT WI-FI
• Operation cannot be guaranteed near Bluetooth
®
wireless com-
munications devices using the same frequency (2.4 GHz) as this
product or specied low power wireless devices. There may also
be issues in locations with devices that emit a magnetic eld, such
as microwave ovens, as well as locations with static electricity or
radio disturbance, all of which can interfere with the Wi-Fi signal.
• Wireless connection and performance cannot be guaranteed for
all routers or housing environments. In the following places, it
is possible the Wi-Fi cannot reach or is disconnected: inside of a
building made with concrete, reinforced metal, near an obstruction
(e.g., a wall) or near a wireless communications device using the
same frequency.
• Wireless LAN of this product corresponds to channels 1-13. It is
not available to communicate with routers set up to other channels.
CAUTION FOR PERSONAL INFORMATION
(RELATED TO SECURITY)
• Using a wireless LAN device has the possibility of interception
when using Wi-Fi, regardless of password setting.
• Depending on the location where you are connecting your oven,
ensure you have the right/authority to connect the appliance to
the available Wi-Fi network.
• If disposing of, giving away or selling the unit, be sure to Reset
Wi-Fi Settings as described in this manual. The wireless LAN
function of the unit should be initialized (reset) in case of handover
to a third party to avoid illegal access from unauthorized parties.
MINIMUM REQUIREMENTS FOR WI-FI/ROUTER
SPECIFICATIONS:
• IEEE 802.11 b/g/n compatible WLAN
• 72.2Mbps receive and transmit PHY rate using 20MHz bandwidth
• 150Mbps receive and transmit PHY rate using 40MHz bandwidth
• 802.11i (WPA, WPA2). Open, shared key, and pair-wise key
authentication services
• Wi-Fi WPS support
IMPORTANT REGULATORY INFORMATION
CAUTION
Any changes or modications to the appliance not
expressly approved by the party responsible for compliance could
void the user’s authority to operate the appliance.
NOTE: This equipment has been tested and found to comply with
the limits for a Class B digital device, pursuant to Part 15 of the
FCC Rules. These limits are designed to provide reasonable protec-
tion against harmful interference in a residential installation. This
equipment generates, uses and can radiate radio frequency energy
and, if not installed and used in accordance with the instructions,
may cause harmful interference to radio communications. However,
there is no guarantee that interference will not occur in a particular
installation. If this equipment does cause harmful interference to
radio or television reception, which can be determined by turning
the equipment off and on, the user is encouraged to try to correct the
interference by one or more of the following measures:
• Reorient or relocate the receiving antenna.
• Increase the separation between the equipment and receiver.
• Connect the equipment to an outlet on a circuit different from
that to which the receiver is connected.
• Consult the dealer or an experienced radio/TV technician for help.
SHARP CELERITY™ HIGH-SPEED OVEN:
MODEL # SWA3099MS
This device complies with Part 15 of the FCC Rules. Operation is
subject to the following two conditions: (1) This device may not cause
harmful interference, and (2) this device must accept any interference
received, including interference that may cause undesired operation.
This device complies with Part 18 of the FCC Rules.
• Contains FCC: RX3-BZ02
RESPONSIBLE PARTY:
• Sharp Electronics Corporation
100 Paragon Drive, Montvale, NJ 07645
TEL: 1-800-BE-SHARP • www.sharpusa.com
• Sharp Electronics of Canada Ltd.
335 Britannia Road East Mississauga, Ontario L4Z 1W9
TEL: 877-278-6709 • www.sharp.ca
INFORMATION REGARDING EXPOSURE TO RADIO
FREQUENCY ENERGY
The output power of the radio technology used in the appliance
is below the radio frequency exposure limits set by the FCC.
This appliance should be installed and operated with a minimum
distance of 20 cm between the radiator and your body.
The appliance and the cord meet the FCC Radio Frequency
Emission Guidelines and are certied with the FCC. Information on
these products is on le with the FCC and can be found by inputting
such product's FCC ID (which can be found on the regulatory
label of the appliance) into the FCC ID Search from available at
transition.fcc.gov/oet/ea/fccid.
Please follow all applicable e-waste laws for the disposal of your
microwave oven.
IMPORTANT INFORMATION

E
E
E
E
E
E E E E E E E E E E E E E E E E E E
E E E E E E E E E E E E E E E E E E
E9
IMPORTANT SAFETY INSTRUCTIONS
READ ALL INSTRUCTIONS BEFORE USING
When using the appliance, basic safety precautions should be
followed, including the following:
WARNINGWARNING
To reduce the risk of burns, electric shock, re, injury
to persons or exposure to excessive microwave energy:
1 Read all instructions before using the appliance.
2 Read and follow the specic PRECAUTIONS TO AVOID
POSSIBLE EXPOSURE TO EXCESSIVE MICROWAVE
ENERGY on page 2.
3 This appliance must be properly grounded. See INSTALLA-
TION INFORMATION on pages 11-13.
4 Install or locate this appliance only in accordance with the
provided Installation Manual.
5 Use this appliance only for its intended use as described in
this manual. Do not use corrosive chemicals or vapors in this
appliance. This appliance is specically designed to heat, cook
or dry food. It is not designed for use in industrial, laboratory
or marine environments.
6 This appliance should be serviced only by qualied service
personnel. Contact nearest Sharp Authorized Servicer for
examination, repair or adjustment.
7 If the appliance light fails, consult a Sharp Authorized
Servicer.
8 Do not operate this appliance if it has a damaged cord or plug, if
it is not working properly or if it has been damaged or dropped.
9 Do not store or use this appliance outdoors. Do not use this
product near water, such as near a kitchen sink, in a wet basement,
near a swimming pool or similar locations.
10 Do not immerse cord or plug in water.
11 Keep cord away from heated surfaces.
12 Do not climb or sit on the appliance.
13 Do not let cord hang over edge of table or counter.
14 Be sure not to get ngers or clothes caught in the oven door
when closing.
15 Be sure that ngers and other objects or materials are not around
the oven door opening when closed.
16 When cleaning appliance sealing surfaces that come together on
closing the door, use only mild, nonabrasive soaps or detergents
applied with a soft cloth. See cleaning instructions on page 24.
17 Do not cover or block any openings on the appliance.
18 Stay near the appliance when it is in use and check progress
frequently to avoid overcooking food.
19 To reduce the risk of re in the appliance cavity:
• Do not overcook food. Carefully attend appliance when paper,
plastic or other combustible materials are placed inside the
appliance to facilitate cooking.
• Remove wire twist-ties from paper or plastic bags before
placing in appliance.
• If materials inside the appliance ignite, keep appliance door
closed, cancel the active cooking program and shut off power
at the fuse or circuit breaker panel.
• Do not use the appliance for storage purposes. Do not leave
paper products, cooking utensils, or food in the appliance
when not in use.
20 Do not use water on a grease re. Smother re or use a dry
chemical or foam-type extinguisher.
21 HOT CONTENTS CAN CAUSE SEVERE BURNS. DO NOT
ALLOW CHILDREN TO USE THE MICROWAVE OVEN.
Use caution when removing hot items.
22 Liquids such as water, coffee or tea are able to be overheated
beyond the boiling point without appearing to be boiling due
to surface tension of the liquid. Visible bubbling or boiling
when the container is removed from the appliance is not always
present. This could result in very hot liquids suddenly boiling
over when a spoon or other utensil is inserted into the liquid.
To reduce the risk of injury to persons:
• Do not overheat the liquid.
• Stir the liquid both before and halfway through heating it.
• Do not use straight-sided containers with narrow necks.
Use a wide-mouthed container.
• After heating, allow the container to stand in the appliance for
at least 20 seconds before removing the container.
• Use extreme care when inserting a spoon or other utensil
into the container.
23 Use care when opening the oven door. Open the door slightly,
allowing hot air or steam to escape, before removing or replacing
food.
24 Avoid steam burns by directing steam away from the face
and hands. Slowly lift the farthest edge of a dish covering
and carefully open cooking bags and popcorn bags away
from the face.
25 Use only dry potholders. Moist or damp potholders on hot
surfaces may result in steam that can cause burns. Do not let
potholders touch hot heating elements. Do not use a towel or
other bulky cloth.

E
E
E
E
E
E E E E E E E E E E E E E E E E E E
E E E E E E E E E E E E E E E E E E
10E
26 ALWAYS use potholders to prevent burns when handling utensils
in contact with hot food. Heat from the food can transfer through
utensils to cause skin burns.
27 If arcing (sparks inside the oven cavity) occurs, touch the
icon. Check the following:
• If using Microwave or Speed Cook functions, ensure that all
cookware is microwave-safe.
• If using the top or bottom racks (for Convection and Speed
Cook functions), ensure they are properly placed inside of the
oven cavity and not touching the walls of the oven interior.
• If using aluminum foil (safe for Convection cook modes only),
ensure foil is properly molded on top of the food item with
no edges turned up.
• No metal twist-ties, poultry pins or cookware with metal
decorative trim are used inside the oven.
• No recycled paper towels (may contain bits of metal particles)
are used to cover food or clean the oven.
28 When using Speed Cook functions, the exterior of the appliance
may also become hot.
29 Some products such as whole eggs in shell and sealed containers
(for example, closed glass jars) are able to rupture and should
not be heated in the appliance.
30 The door glass can become hot to touch during cooking and can
remain hot for some time after cooking is complete. Use caution
when touching the door during and after use.
31 Heat will exhaust from the ventilation located at the bottom side
of the door. Please avoid close proximity to the vents during and
after cooking to avoid exposure to the heated elements.
IMPORTANT SAFETY INSTRUCTIONS
READ AND SAVE THESE INSTRUCTIONS
FOOD SAFETY
Cook foods to safe temperatures recommended by the United States
Department of Agriculture (USDA). To check internal temperature
of foods to determine doneness, insert a temperature probe in a thick
or dense area away from fat or bone.
Do not let food sit in the oven more than one hour before or after
cooking. Doing so can result in food poisoning or sickness.
USDA RECOMMENDED TEMPERATURE
FOOD MINIMUM INTERNAL
TEMPERATURE
beef, pork, veal and lamb steaks,
chops and roasts
145 °F and allow to rest
for at least 3 minutes
ground meats 160 °F
ground poultry 165 °F
ham, fresh or smoked (uncooked) 145 °F and allow to rest
for at least 3 minutes
ham (fully cooked, to reheat) 165 °F
poultry breasts, whole bird, legs,
thighs, wings, giblets and stufng
165 °F
eggs 160 °F
sh and shellsh 145 °F
leftovers 165 °F
casseroles 165 °F
NOTE: Select, store and handle food carefully to preserve its high
quality and minimize the spread of foodborne bacteria.
E
E
E
E
E
E E E E E E E E E E E E E E E E E E
E E E E E E E E E E E E E E E E E E
E11
INSTALLATION INFORMATION
CUSTOMER ASSISTANCE
UNPACK THE APPLIANCE
Remove all packing materials from inside the appliance. Check the
oven for any damage, such as misaligned or bent door, damaged
door seals and sealing surfaces, broken or loose door hinges and
latches and dents inside the cavity or on the door. If there is any
damage, do not operate the oven and contact your dealer or a Sharp
Authorized Servicer.
IMPORTANT: Do not remove the waveguide cover located on the
inside of the oven cavity.
BEFORE OPERATING
• Read and understand all instructions in this Operation Manual.
• Ensure the appliance is properly installed and connected to power
according to all instructions in the included Installation Manual.
• Ensure all protective packaging materials and tape have been
completely and correctly removed.
CONDITION OF UNIT
Do not operate any appliance with a damaged cord or after the
appliance malfunctions or has been damaged in any manner.
Return the appliance to the nearest authorized service facility for
examination, repair or adjustment.
SERVICE AND REPAIR WARNING
Do not repair or replace any part of this appliance. If the oven,
display, or touch controls fail, consult a Sharp Authorized Servicer.
RADIO OR TV INTERFERENCE
Should there be any interference caused by the oven to your radio or
TV, ensure the oven is on a different electrical circuit, relocate the
radio or TV as far away from the oven as feasible or check position
and signal of receiving antenna.
TO AVOID THE POSSIBILITY
OF ELECTRIC SHOCK
If the power supply cord of this appliance is damaged, it must be
replaced with a special cord. The exchange must be made by an
authorized service agent.
CHOOSING A LOCATION
Your oven can be built into a cabinet or wall by itself, above any
electric or gas built-in oven, above a warming drawer, or below a
cooktop or counter. If installing above an oven or warming drawer,
please allow 2" (50.8 mm) of space between the products.
ELECTRICAL REQUIREMENTS
Locate the electrical supply as shown in the illustrations on the
following pages. The receptacle may also be located in an adjacent
cabinet within reach of the power cord. A separate circuit, servicing
only the appliance is required. A ground fault circuit interrupter
(GFCI) is not recommended and may cause interruption of operation.
Electrical Supply 208-240 V AC, 60 Hz, 30 Amp
Output Power 950W (Microwave).
1700W (Top Element)
500W (Bottom Element)
2200W (Convection Element)
Power Cord 55" (1397 mm)
NOTE:
• If you have any questions about the grounding or electrical
instructions, consult a qualied electrician or servicer.
• The unit can also be installed using an electrical outlet in an
adjacent cabinet within the area where the provided electrical
cord can reach.
• Always check electrical codes for requirements.
• If codes permit and a separate ground wire is used, it is
recommended that a qualied electrical installer determine that
the ground path is adequate and wire gauge is in accordance
with local codes.
IN U.S.A.
Be sure the electrical connection and wire size are adequate and in
conformance with the National Electrical Code, ANSI/ NFPA No.
70-latest edition and all local codes and ordinances.
A copy of the above code standards can be obtained from:
National Fire Protection Association
nfpa.org/Codes-and-Standards
IN CANADA
Be sure the electrical connection and wire size are adequate and in
conformance with CSA standard C22.1, Canadian Electrical Code,
Part 1 - latest edition, and all local codes and ordinances.
A copy of the above code standards can be obtained from:
Canadian Standards Association
csagroup.org/standards

E
E
E
E
E
E E E E E E E E E E E E E E E E E E
E E E E E E E E E E E E E E E E E E
12E
INSTALLATION INFORMATION
ELECTRICAL REQUIREMENTS
This unit must be supplied with the proper voltage and frequency
and connected to an individual, properly grounded branch circuit,
protected by a circuit breaker or fuse having amperage as noted on
the rating plate.
ELECTRICAL CONNECTIONS
BREAKER OR FUSE SIZE
240V 30 Amps
208V 30 Amps
NOTE:
• Check local codes for required breaker size.
• All electrical wiring and hookup for this unit must be done by
a qualied electrician. Make note of the location of the main
appliance disconnect.
POWER CONNECTIONS
This unit is manufactured with a neutral (white) power supply wire
and a cabinet-connected (green) grounding wire.
Connect the unit cable to the junction box through the UL-listed
conduit connector. Complete electrical connection according to
local codes and ordinances. See page 3 for junction box or electrical
outlet locations.
NOTE TO ELECTRICIAN: The armored cable leads supplied with
this unit are UL recognized for connection to larger gauge household
wiring. The installation of the leads is rated at temperatures much higher
than the temperature rating of household wiring. The current carrying
capacity of the conductor is governed by the temperature rating of the
installation around the wire, rather than the wire gauge alone.
NOTE:
• The proper size wire nut shall be placed over the stripped leads
and the wire nut twisted until the wire nut cannot be pulled from
the leads. No conductor shall be exposed in the connection.
• Do not shorten the exible conduit. The conduit strain relief
clamp (supplied by installer) must be securely attached to
the junction box, and the exible conduit must be securely
attached to the clamp. If the exible conduit will not t with
the junction box, do not install the unit until a clamp of proper
size has been obtained.
E
E
E
E
E
E E E E E E E E E E E E E E E E E E
E E E E E E E E E E E E E E E E E E
E13
WARNING
ELECTRICAL SHOCK HAZARD
• Grounding through the neutral conductor is prohibited for new branch-circuit installations (1996 NEC), mobile homes and recreational
vehicles, or in areas where local codes prohibit grounding through the neutral conductor. For installations where grounding through the
neutral conductor is prohibited, see the Ungrounded Neutral graphic.
• Use grounding terminal or lead to ground unit.
• Connect neutral terminal or lead to branch circuit neutral in usual manner. Failure to do so could result in death, re or electric shock.
• The electrical power to the oven branch circuit must be shut off while line connections are being made. Do not use an extension cord with this unit.
• Electrical ground is required on this unit. The free end of the green wire (the ground wire) must be connected to a suitable ground. This
wire must remain grounded to the oven.
• If cold water pipe is interrupted by plastic, non-metallic gaskets, union connections or other insulating materials, DO NOT use for grounding.
• DO NOT ground to a gas pipe.
• DO NOT have a fuse in the NEUTRAL or GROUNDING circuit. A fuse in the NEUTRAL or GROUNDING circuit could result in an
electric shock.
• If in doubt, have a qualied electrician verify the unit is properly grounded.
• Failure to properly ground the unit could result in death, re or electric shock.
• Improper connection of aluminum house wiring to copper leads can result in an electrical hazard or re. Use only connectors designed
for joining copper to aluminum and follow manufacturer’s recommended procedure closely.
3-WIRE CABLE FROM HOME POWER SUPPLY
- U.S. ONLY
IMPORTANT: Use the 3-wire cable from home power supply where
local codes permit a 3-wire connection.
GROUNDED NEUTRAL
A
B
C
D
G
H
F
E
I
A
Junction Box
B
Black Wires
C
Neutral (White) Wires
D
Ground (Green
or Bare) Wire
E
Cable from Oven
F
UL Listed Conduit Connector
G
Red Wires
H
UL Listed Wire Connectors
I
House Electrical Supply
1.
Disconnect power before servicing.
2.
Connect the 2 black wires
B
together using a UL listed wire connector.
3.
Connect the 2 neutral (white) wires
C
and the ground (green or
bare) wire
D
(of the oven cable) using a UL listed wire connector.
4.
Connect the 2 red wires
G
together using a UL listed wire connector.
5.
Install junction box cover.
4-WIRE CABLE FROM HOME POWER SUPPLY
IMPORTANT: Use the 4-wire cable from home power supply in
the U.S. where local codes do not allow grounding through neutral,
New Branch circuit installations (1996 NEC), mobile homes and
recreational vehicles, new construction, and in Canada.
UNGROUNDED NEUTRAL
I
B
C
D
G
F
E
H
A
A
Junction Box
B
Black Wires
C
Red Wires
D
Cable from Oven
E
UL listed or CSA Approved
Conduit Connector
F
Ground (Green or Bare)
Wires
G
UL Listed Wire
Connectors
H
Neutral (White) Wires
I
House Electrical Supply
1.
Disconnect power before servicing.
2.
Connect the 2 black wires
B
together using a UL listed wire connector.
3.
Connect the 2 red wires
C
together using a UL listed wire connector.
4.
Connect the 2 neutral (white) wires
H
together using a UL
listed wire connector.
5.
Connect the ground (green or bare) wire
F
from the oven cable
to the ground (green or bare) wire (in the junction box) using a
UL listed wire connector.
6.
Install junction box cover.

E
E
E
E
E
E E E E E E E E E E E E E E E E E E
E E E E E E E E E E E E E E E E E E
14E
UTENSILS AND COVERINGS
It is not necessary to buy all new cookware. Many pieces in your kitchen can be used in your new Sharp Celerity™ High-Speed Oven.
The chart below will help you decide what utensils and coverings should be used with each mode.
UTENSILS AND
COVERINGS
MICROWAVE ONLY
CONVECTION
BAKE, ROAST, GRILL
SPEED BAKE
SPEED ROAST
AIR FRY
Aluminum foil NO YES, for shielding NO YES
Aluminum containers NO YES (no cover during GRILL) NO YES
Browning dish NO NO NO NO
Glass ceramic (Pyroceram
®
) YES, preferred YES, preferred YES, preferred YES
Glass (heat-resistant) YES, preferred YES, preferred YES, preferred YES
Glass (non-heat-resistant) NO NO NO NO
Lids (glass) YES YES (no cover during GRILL) YES NO
Lids (metal) NO YES (no cover during GRILL) NO NO
Metal cookware NO YES NO YES
Silicone cookware YES YES YES, preferred NO
Metal (metal twist ties or
dishes with metallic trim,
screws, bands or handles)
NO NO NO NO
Oven cooking bags YES (no metal twist ties) YES (no cover during GRILL) YES (no metal
twist ties)
NO
Paper plates YES NO NO NO
Paper towels YES (no recycled paper
towels, which may contain
metal llings)
NO NO NO
Paper (ovenable) YES YES (up to 400˚F/204˚C;
do not use during GRILL)
YES (up to
400˚F/ 204˚C)
NO
Microwave-safe
plastic containers
YES NO NO NO
Plastic (Thermoset
®
) YES YES (up to 425˚F/218˚C;
do not use during GRILL)
YES NO
Microwave-safe plastic wrap YES NO NO NO
Pottery (porcelain stoneware) YES (if marked
microwave-safe)
YES YES (if marked
both microwave-
safe and oven-safe)
YES (if marked
oven-safe)
Styrofoam YES NO NO NO
Wax paper YES NO NO NO
Wicker, Wood, Straw YES (only foods with low
fat and sugar content)
NO NO NO
ACCESSORIES
There are many microwave accessories available for purchase. Evaluate carefully before you purchase so they meet your needs. When selecting
microwave accessories, ensure they are marked or are veried as microwave-safe. A microwave-safe thermometer will assist you in determining
correct doneness and assure you that foods have been cooked to safe temperatures when using microwave-only cooking. Sharp is not responsible
for any damage to the oven when accessories are used.

E
E
E
E
E
E E E E E E E E E E E E E E E E E E
E E E E E E E E E E E E E E E E E E
E15
PARTS AND FEATURES
1 Oven vents (upper)
2 Oven door (with see-through window)
3 Oven light (illuminates when the door is open or the oven is
in operation)
4 Turntable support
5 Turntable motor shaft
6 Waveguide cover (DO NOT REMOVE)
7 Handle
8 Glass control panel
9 Touch screen display
10 Convection air openings
11 Safety door latches (door must be closed for oven to operate)
12 Oven vents (lower)
13 Serial plate
1
10
13
2 11 5 7 12
3
4
9 6 8

E
E
E
E
E
E E E E E E E E E E E E E E E E E E
E E E E E E E E E E E E E E E E E E
16E
PARTS AND FEATURES
Carousel (1)
Basket (1) Rack (1)
Dish (1)
Wire Racks (2)
INCLUDED ACCESSORIES
E
E
E
E
E
E E E E E E E E E E E E E E E E E E
E E E E E E E E E E E E E E E E E E
E17
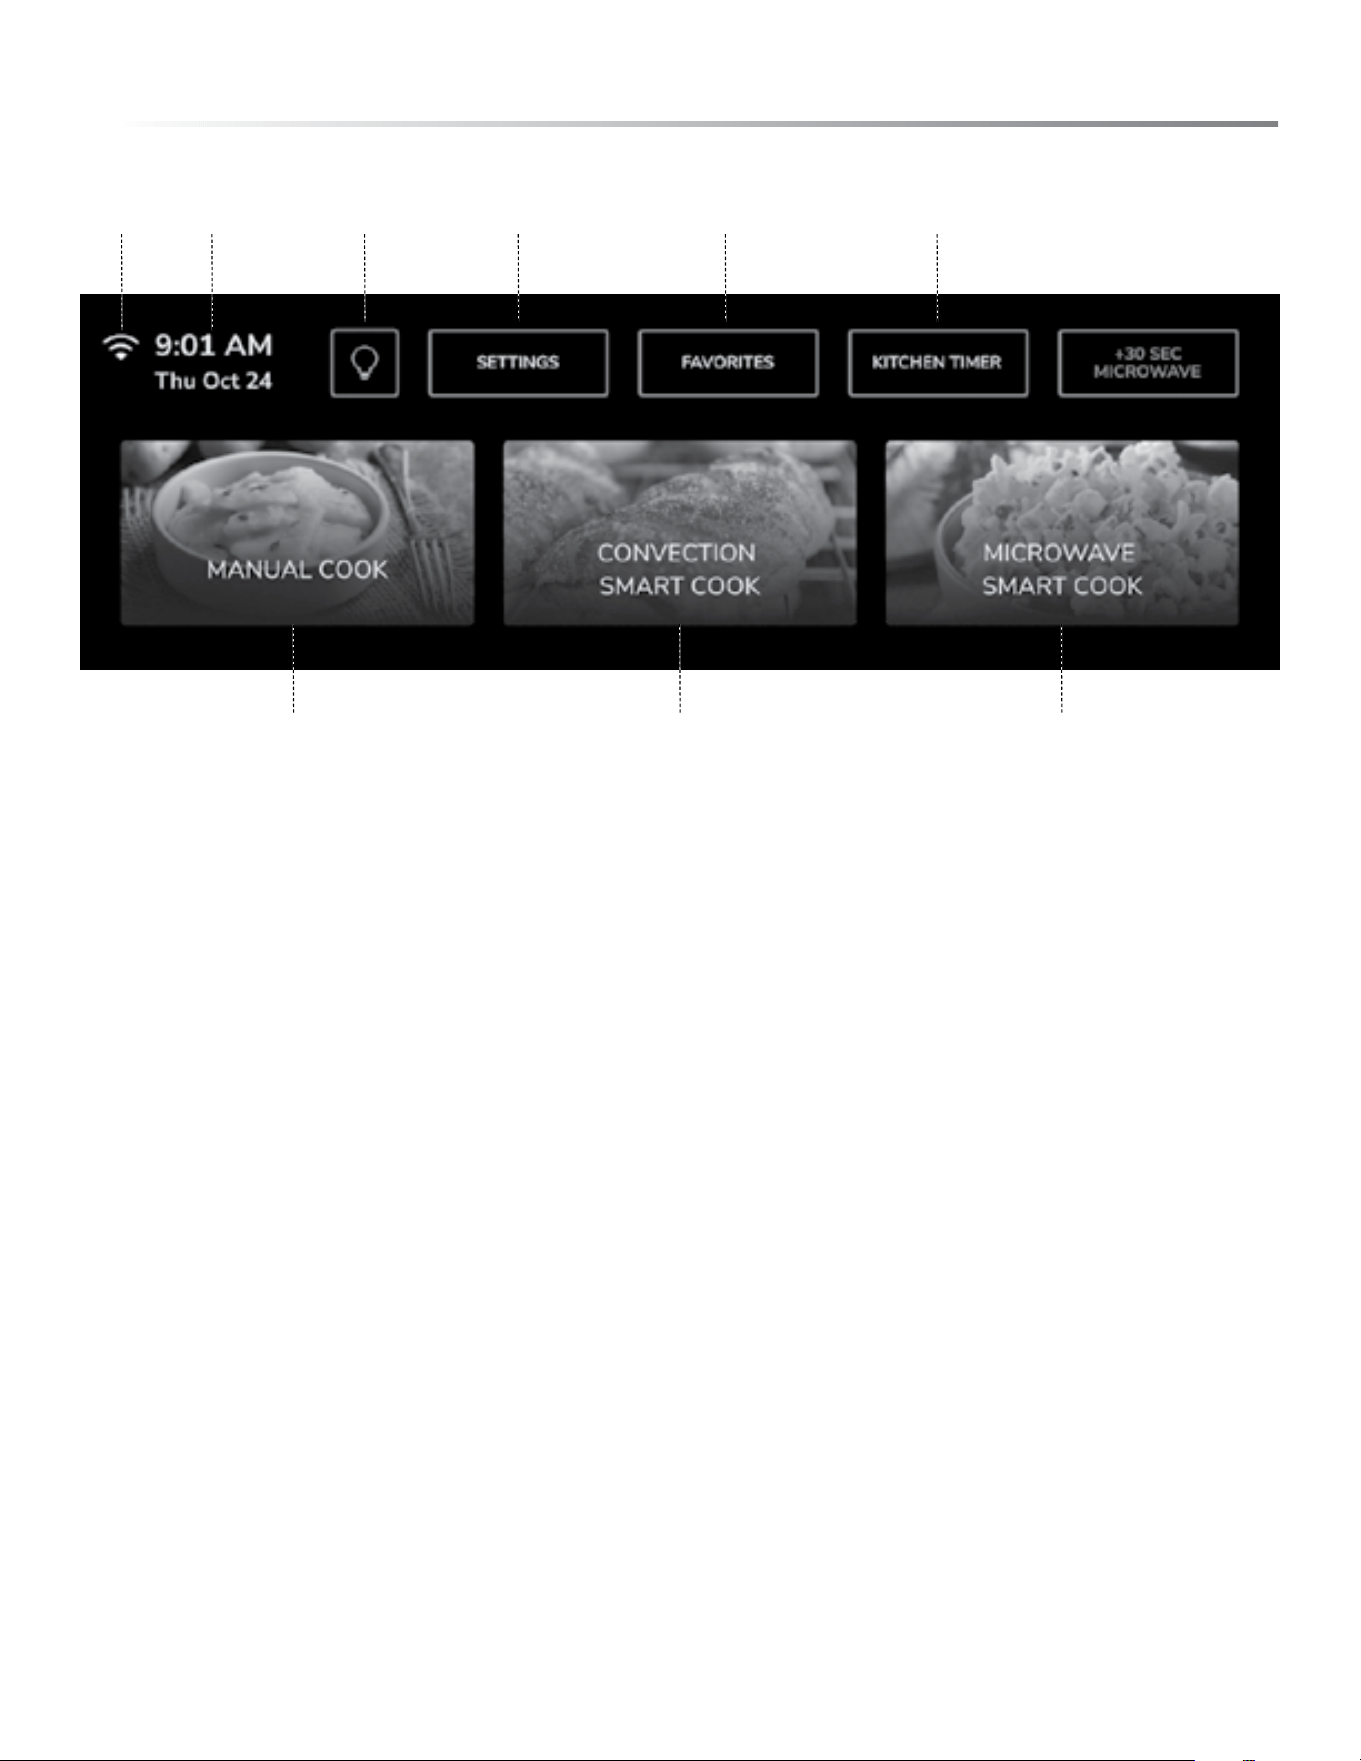
TOUCH SCREEN CONTROL
HOME SCREEN
1 Network Connectivity
2 Time and Date
3 Oven Light
4 Settings
5 Favorites
6 Kitchen Timer
7 Manual Cook
8 Convection Smart Cook
9 Microwave Smart Cook
1
7
8
9
10
7 8 9
2 3 54 6

E
E
E
E
E
E E E E E E E E E E E E E E E E E E
E E E E E E E E E E E E E E E E E E
18E
BEFORE OPERATING
Before the oven can be used, follow these procedures:
1 Plug in the oven. Close the door. A loading screen, then the Home
Screen will display.
2 Set the clock.
TO SET THE CLOCK
1 Touch SETTINGS, then DISPLAY.
2 Scroll down and touch DATE & TIME.
3 Switch the 24-HOUR CLOCK setting ON (24-hour time) or
leave OFF (12-hour time).
4 Scroll down and touch SET TIME.
5 Scroll through and set TIME OF DAY and AM/PM. When
nished, touch SET.
NOTE: If the electrical power supply to your oven should be
interrupted, a loading screen, then the Home Screen will display once
the power is reinstated. If this occurs during cooking, the program
will be erased. The time of day will also be erased, and you will need
to reset the clock.
HOME
The Home Screen displays:
• Settings, Oven Light, Favorites, and Kitchen Timer
• Progress information for active cooking program
• Manual and Smart Cook cooking modes
SETTINGS
The Settings Screen has six options to select from:
TEMPERATURE
The unit of temperature can be switched between Fahrenheit and
Celsius. The default oven calibration is 0˚ for all cook modes. Select
individual cook modes to adjust the calibration.
DISPL AY
View this menu to set Control Lock, Standby Mode, Screen
Brightness, Date & Time, and Demo Mode.
SOUND
View this menu to adjust sound, volume, beeps at the end of timed
cook, cooking reminders, and ring tone.
NOTE: If Sound is set to OFF, End of Cooking Reminders will also
be set to OFF.
WI-FI
View this setting to enable and reset Wi-Fi, update rmware, and
view Wi-Fi information. You can also view this setting to pair
your oven with the SHARP HOME™ and Amazon Alexa apps on
a mobile device. Follow instructions on the screen.
SYSTEM INFO
View this setting for the option to reset factory settings.
TOUCH SCREEN CONTROL
STEAM CLEAN
The Steam Clean function provides cleaning for light, fresh messes.
This option can be used as a maintenance task between deep cleans.
Follow instructions on the screen. The cleaning cycle will last for
5 minutes. During a cleaning cycle, the oven door is locked. If the
cycle is canceled before cleaning is completed, the door will remain
locked until the oven has cooled to a safe temperature.
CONTROL LOCK
The Control Lock prevents unwanted operation such as by small
children. The touch screen can be set so that the display panel is
locked. To view Control Lock, go to SETTINGS, then DISPLAY.
OVEN LIGHT
Touch the light bulb icon to turn the oven light ON/OFF.
FAVORITES
Touch the icon to save frequently used cook settings or menu items.
Touch FAVOR IT E S on the Home Screen to view your saved items.
KITCHEN TIMER
The timer can be set in hours, minutes and seconds for up to 12 hours.
Scroll to set the time and touch START. To add or subtract time
while the timer is in progress, touch +1 MIN or -1 MIN. To pause
the timer touch STOP, and to resume touch START. To cancel the
timer touch STOP, then the icon. When the timer reaches 00:00
an audible tone will sound.
PREHEAT AND ACTIVE COOKING
When preheating starts, the screen displays "LOW" until the
minimum temperature of 90°F is reached. During preheating,
the screen displays the current and target temperature. Once the
target temperature is reached, follow instructions displayed on the
screen. Once preheating is complete, the Active Cooking Screen will
display the current temperature, menu item, and timer.
TO PAUSE COOKING
To pause a timed convection cooking program, open and close the
oven door slightly. "PAUSE" will display. Touch START to resume.
For non-timed convection cooking programs (temperature only),
cooking will automatically resume once the oven door is closed.
For Manual Microwave and Microwave Smart Cook, touch the
icon once to pause.
TO CANCEL COOKING
To cancel a convection cooking operation, touch the icon. Cooking
will end, and you will be taken back to the Home Screen.
For Manual Microwave and Microwave Smart Cook, touch the
icon
twice to cancel.
TO GO BACK
To erase a mistake or go back to the previous screen, touch the icon.

E
E
E
E
E
E E E E E E E E E E E E E E E E E E
E E E E E E E E E E E E E E E E E E
E19
SMART COOK FEATURES
MICROWAVE SMART COOK
Use Smart Cook presets to cook any food items listed. Select
from 13 food categories:
• Beverage / Hot Cereal
• Defrost
• Fish / Seafood*
• Frozen Entrée*
• Ground Meat*
• Melt
• Popcorn*
• Potatoes*
• Reheat*
• Rice*
• Soften
• Vegetables*
• War m
Each food category has subcategories of different food items. For
example, the subcategories for Vegetables are: Frozen Vegetables,
Longer Fresh Vegetables, Quick Fresh Vegetables, and Steamer Bags.
After selecting MICROWAVE SMART COOK, select a food
category and subcategory. If prompted, use the slider to enter a
weight/amount. A detailed instruction screen will display. Touch
START to begin cooking.
NOTE: Food categories listed with *, utilize sensor cooking.
SENSOR COOKING
Sharp's sensor is a semi-conductor device that detects the vapor
(moisture and humidity) emitted from food as it heats.
The sensor adjusts the cooking times and power level for various
foods and quantities.
USING SENSOR SETTINGS:
1 After the oven is plugged in, wait 2 minutes before using
sensor settings.
2 Be sure the exterior of the cooking container and the interior of the
oven are dry. Wipe off any moisture with a dry cloth or paper towel.
3 During the first part of sensor cooking, "SENSOR COOK"
will display. Do not open the oven door or touch the icon
during this part of the cooking cycle. The measurement of
vapor will be interrupted. If this occurs, an error message will
display, and you will have to restart or *continue manually.
When the sensor detects the vapor emitted from the food, the
remainder of cooking time will display. At this time, the door
can be opened, and you may stir or season food as desired.
*To continue manually, touch the
icon. This will take you back
to the Home Screen. From there, touch MANUAL COOK, then
M I C ROWAV E. Select cooking time and variable power.
4 Check the temperature of food after cooking. If additional time is
needed, continue to cook with variable power and time.
SELECTING FOODS:
1 The sensor operates best with foods at normal storage temperature.
For example, dinner leftovers should be at refrigerator temperature,
and popcorn should be at room temperature.
2 Foods weighing less than 3 ounces should be reheated by time
and variable power.
REHEAT
This setting utilizes sensor cooking to reheat foods. When the sensor
detects the vapor emitted from the food, the remainder of reheating
time will display.
DEFROST
This setting automatically defrosts a set menu of foods. Part way
through defrosting, the oven will pause and display a new set of
instructions. Follow instructions and touch START to continue.
After defrosting ends, cover and let stand as indicated on the display.
NOTE: To defrost foods not listed as a subcategory or foods above/
below the weight range, see MANUAL DEFROST on page 20.
CONVECTION SMART COOK
Use Smart Cook presets to cook any food items listed. Select from
13 food categories:
• Beef
• Breads
• Burgers
• Casseroles
• Desserts
• Fish / Seafood
• Pies
• Pizza
• Pork
• Potatoes
• Poultry
• Snacks
• Vegetables
Each food category has subcategories of different food items.
For example, the subcategories for Desserts are: Brownies, Bundt
Cake, Cake, Cinnamon Rolls, Cookies, and Cupcakes.
After selecting CONVECTION SMART COOK, select a food
category and subcategory. If prompted, use the slider to enter a
weight/amount. A detailed instruction screen will display. Touch
START to begin cooking.
TIPS
Every Microwave and Convection Smart Cook menu item has cooking
tips that will display (below the instructions) before cooking begins.
E
E
E
E
E
E E E E E E E E E E E E E E E E E E
E E E E E E E E E E E E E E E E E E
Always stop the oven periodically to remove or separate the portions
that are defrosted. If food is not defrosted at the end of the estimated
defrosting time, program the oven in 1 minute increments on 30%
power level until completely defrosted.
SPEED BAKE AND ROAST
WARNINGWARNING
Do not use aluminum foil to cover or shield food when
using Speed Bake or Speed Roast. The microwave is active during
these cooking cycles. The use of any metal, other than the provided
wire racks and accessories, increases the risk of arcing and possibly
re inside the oven cavity.
SPEED BAKE
The Speed Bake cook mode provides superior results for baked goods
that require more than 20 minutes baking time. This cook mode
cycles the oven’s power between 90% convection and 10% microwave
power to create golden brown exteriors and perfectly moist interiors
for foods such as Bundt cakes, quick breads and mufns.
NOTE: When baking, check for doneness after time has elapsed. If
food is not completely done, let stand in the oven for a few minutes
to complete cooking.
SPEED ROAST
The Speed Roast cook mode is ideal for larger, dense cuts of meat
and whole poultry. This cook mode cycles the oven’s power between
70% convection and 30% microwave power. This reduces cooking
time as the convection circulates dry, heated air throughout the oven
cavity while the microwave directly and rapidly heats food internally
to create crispy brown exteriors and juicy interiors.
NOTE:
• Meats are best when roasted directly on the lower rack. A dish
can be placed below the meat if gravy is to be made from the
drippings.
• Less tender cuts of meat can be roasted and tenderized using
oven cooking bags.
HIGH-SPEED PRO
The High-Speed Pro cook mode can be customized to utilize any
percentage of the Top, Bottom, Convection, and Microwave heating
elements. Depending on the customization, this mode can cook food
up to 3x faster than an average oven.
WARNINGWARNING
If using any percentage of the Microwave heating
element, do not use aluminum foil to cover or shield food. The use
of any metal, other than the provided wire racks and accessories,
increases the risk of arcing and possibly re inside the oven cavity.
NOTE: It is recommended to use similar Smart Cook menu items as
a guide for setting cook time and heating elements. For example, to
cook a chicken casserole with a rice base, see Baked Ziti or Lasagna
in Convection Smart Cook.
20E
MANUAL COOK FEATURES
MANUAL COOK MODES
Select from 9 manual cook modes:
• Microwave
• Convection Bake
• Convection Roast
• Grill
• Air Fry
• Speed Cook (Speed Bake)
• Speed Cook (Speed Roast)
• High-Speed Pro
• Proof / Warm
Depending on which mode is selected, there will be options to set
preheat, temperature, cook time, delay cook, and power level. Once all
selections have been made, touch START.
TIME COOK
To set timed cooking, after which the oven will shut off, touch TIME
COOK. This will conrm the selected temperature and allow for
time input.
DELAY COOK
The Convection Bake cook mode includes an option to delay the
start of cooking. If needed, after setting temperature and cook
time, touch DELAY COOK. Set the time of day you want cooking
to start, and touch SET to accept settings.
WARNINGWARNING
Do not let food sit in oven for more than one hour
before or after cooking. Doing so can result in risk of food
poisoning or sickness.
POWER LEVEL
There are 11 preset power levels. Using lower power levels increases
the required cooking time, which is recommended for foods such
as cheese, milk, and slow cooking meats. Consult a microwave
cookbook or recipes for specic recommendations.
POWER LEVEL RECOMMENDED USE
100%
brown foods, boil liquids, cook sh, ground meats,
bacon, and vegetables
90%
80%
70%
cook meats and poultry gently, bake casseroles and
convenience foods, sauté or reheat foods
60%
50%
slow-cook or braise foods
40%
30%
defrost foods, simmer liquids, or cook delicate sauces
20%
10%
heat breads or soften butter, cheese, and chocolate
0%
MANUAL DEFROST
If the food you wish to defrost is not listed on the Microwave Smart
Cook Defrost menu or is above/below the weight range, defrost
manually. With this method, you can defrost any frozen food (either
raw or previously cooked).
1 Touch MANUAL COOK, then M IC ROWAV E .
2 Set POWER LEVEL to 30%.
3 Set COOK TIME according to weight (typically 5 minutes per
pound).
4 Touch START to begin defrosting.

E
E
E
E
E
E E E E E E E E E E E E E E E E E E
E E E E E E E E E E E E E E E E E E
• When cooking simultaneously on two wire racks, swap the top
and bottom dishes.
NOTE: See WIRE RACKS on page 23 for instructions on removing/
replacing wire racks.
MICROWAVE COOKING
STIR LIQUIDS
Liquids are able to reach the boiling point without appearing to
boil. To avoid eruption, stir liquids both before and halfway through
heating. Allow to cool slightly before removing.
ARRANGE FOODS CAREFULLY
Place the thickest parts of the food toward the outside of the dish.
WATCH COOKING TIME
When following recipes or package instructions, check food for
doneness a minute or two before the minimum time, and add
time as needed.
COVER FOODS WHILE COOKING
Covers prevent spattering and help foods cook evenly. See UTENSILS
AND COVERINGS on page 14.
STIR FOODS REGULARLY
Stir foods once or twice during cooking. Whenever possible, stir
from the outside to the center of the dish.
TURN OVER FOODS
Turn over foods such as chicken and hamburgers at least once during
cooking. Large items like roasts must be turned over at least once.
REARRANGE FOODS
Rearrange foods such as meatballs halfway through cooking by
moving pieces from top to bottom and from left to right.
ADD STANDING TIME
Standing time allows cooking to nish without overcooking food.
After microwave cooking, remove food, stir if possible and cover
for standing time.
CHECK FOR DONENESS
Look for signs indicating the cooking temperature has been reached.
Doneness signs include:
• Food steams throughout, not just at edges
• Center of the dish's underside is very hot to the touch
• Poultry thigh joints move easily
• Meat and poultry show no pinkness
• Fish is opaque and akes easily with a fork
NOTE: Use a meat thermometer to check if foods are cooked
to the safe temperature. See FOOD SAFETY and USDA
RECOMMENDED TEMPERATURE on page 10.
E21
MICROWAVE USE
MICROWAVE SAFETY
• Use potholders to prevent burns when handling utensils in contact
with hot food. Enough heat from food can transfer through utensils
to cause skin burns.
• Direct steam away from the face and hands. Slowly lift the farthest
edge of a dish covering. Carefully open cooking bags and popcorn
bags away from the face.
• Stay near the appliance when it is in use and check progress
frequently to avoid overcooking food.
ABSORB MICROWAVE ENERGY
When the Microwave cook mode is in use, ALWAYS have food or
drink in the cavity to absorb microwave energy.
CONDENSATION AND TEMPERATURE
• It is normal for a certain amount of moisture to evaporate from
food during any cooking process. The amount depends on the
moisture content of the food.
• The moisture may condense on any surface cooler than the
inside of the oven, such as the control panel.
• It is normal for the exterior of the oven to be warm to the touch
when cooking or reheating.
OVEN VENTS
Blocking or covering the oven vents will cause poor air circulation,
affecting cooking, cleaning and cooling results.
• Both the upper and lower oven vents allow fresh air to enter
the cooling system.
• The lower oven vent also allows hot air to be expelled from
the cooling system.
OVEN DOOR
To avoid oven door glass breakage:
• Do not close the oven door if the racks are not fully inserted into the
oven cavity or if bakeware extends past the front edge of an oven rack.
• Do not set objects on the glass surface of the oven door.
• Do not hit glass surfaces with bakeware or other objects.
• Do not wipe down glass surfaces until the oven has completely
cooled.
WIRE RACKS
Though not generally recommended, the provided wire racks
may be used for some microwave cooking such as warming a
one-quart casserole or larger. When using wire racks during
microwave cooking:
• Ensure racks and carousel are properly set before cooking. Racks
must be secured in the middle of the black mounts.
• Only microwave large amounts of food on the wire racks. A small
amount, with low moisture, may cause arcing.
• Rotate dishes in the middle of cooking to avoid uneven heating.

E
E
E
E
E
E E E E E E E E E E E E E E E E E E
E E E E E E E E E E E E E E E E E E
22E
MICROWAVE USE
FOOD IN THE MICROWAVE
FOOD DO DON'T
Eggs, sausages,
nuts, seeds, fruits
& vegetables
• Puncture egg yolks before cooking to prevent bursting.
• Pierce skins of potatoes, apples, squash, hot dogs and
sausages so steam escapes.
• DO NOT cook eggs in shells.
• DO NOT reheat whole eggs.
• DO NOT dry nuts or seeds in shells.
Popcorn • Use popcorn specially packaged for microwave cooking.
• Listen for the popping of corn to slow to 1 or 2 seconds
between pops to avoid overcooking.
• DO NOT pop corn in regular brown paper bags or
glass bowls.
• DO NOT exceed the maximum cooking time listed
in the package instructions.
Baby food • Transfer baby food to a small dish and heat carefully,
stirring often.
• Check temperature before serving. Test temperature of
bottles on your wrist before serving.
• Attach nipples to bottles AFTER heating. Shake well
before serving.
• DO NOT heat disposable bottles.
• DO NOT heat bottles with nipples attached.
• DO NOT heat baby food in original jars.
General • Cut lled baked goods after heating to release steam.
• Stir liquids briskly before and after heating to
avoid eruption.
• Use a deep bowl when cooking liquids and cereals to
prevent boilovers. Refer to the height of the side walls
of the oven.
• DO NOT heat or cook in closed glass jars or airtight
containers.
• DO NOT use the microwave for canning,
as harmful bacteria may not be destroyed.
• DO NOT deep-fat fry in the microwave.
• DO NOT dry wood, gourds, herbs or wet papers.

E
E
E
E
E
E E E E E E E E E E E E E E E E E E
E E E E E E E E E E E E E E E E E E
BEFORE USING THE OVEN
1 Select the CONVECTION BAKE cook mode.
2 Set TEMPERATURE to 450˚F.
3 Allow the oven to operate for 30 minutes with the door closed
and no food in the cavity.
NOTE: Any odor detected during initial use is due to evaporating
substances used to protect the oven during storage.
4 Turn off the oven and allow it to cool.
COMPONENT COOLING FAN
The cooling fan activates during any cooking or self-cleaning
mode to cool inner components and outer door surfaces. This air is
exhausted through the vent located above the oven door. It continues
to run until components have cooled sufciently. The cooling fan
operates at double speed (or RPM’s) in self-clean and whenever the
internal components temperature becomes high.
CONDENSATION AND TEMPERATURE
• It is normal for a certain amount of moisture to evaporate from
food during any cooking process. The amount depends on the
moisture content of the food.
• Moisture may condense on any surface that is cooler than the
inside of the oven, such as the control panel.
• Your new oven has an electronic temperature sensor to help
maintain an accurate temperature. Your previous oven may have
had a mechanical thermostat that drifted gradually over time to a
higher temperature. It is normal that you may need to adjust your
favorite recipes when cooking in a new oven.
OVEN VENTS
Blocking or covering the oven vents will cause poor air circulation,
affecting cooking, cleaning and cooling results.
• Both the upper and lower oven vents allow fresh air to enter the
cooling system.
• The lower oven vent also allows hot air to be expelled from the
cooling system.
OVEN DOOR
To avoid oven door glass breakage:
• Do not close the oven door if the racks are not fully inserted into
the oven cavity or if bakeware extends past the front edge of an
oven rack.
• Do not set objects on the glass surface of the oven door.
• Do not hit glass surfaces with bakeware or other objects.
• Do not wipe down glass surfaces until the oven has completely cooled.
WIRE RACKS
IMPORTANT: To avoid permanent damage to the stainless steel
nish, place food or bakeware on a wire rack (or other provided
accessories). Do not place food or bakeware directly onto the oven
door or oven bottom.
Sharp's Celerity™ High-Speed Oven comes with two wire racks that
can be used for traditional baking or warming. The racks slide into
the black mounts along the sides of the oven. When using wire racks
during convection cooking:
• Position racks before turning on the oven.
• Ensure racks are properly set and level before use.
TO REMOVE WIRE RACKS:
Wire racks have a stop to keep them from being fully withdrawn
unintentionally.
• Pull rack out to the stop position, raise the front edge, and then
lift out.
TO REPLACE WIRE RACKS:
• Place wire rack on the black mounts along the sides of the oven.
Tilt the front edge up slightly, and slide rack to the rear until
it clears the stop position. Lower the front and slide the rack
into the oven.
CONVECTION COOKING
IMPORTANT: To avoid damaging the stainless steel, do not place
anything (including dishes, foil, and oven trays) on the bottom of the
oven when it is in operation.
• Place bakeware with food on the provided wire racks and other
accessories.
• Place wire racks and other accessories in their proper position before
preheating.
• Preheating is necessary for good results when baking cakes, cookies,
pastries and breads.
• Preheat the oven when using the Convection Bake and Convection
Roast cook modes.
• Preheating will help to sear roasts and seal in meat juices.
• Selecting a higher temperature does not shorten preheat time.
• Use the interior oven lights to view food through the oven door
window rather than opening the door frequently.
UTENSILS
• Glass baking dishes absorb heat. Reduce oven temperature by
25°F when baking in glass.
• Use pans that produce the desired browning. The type of nish
on the pan will help determine the amount of browning.
Shiny smooth metal or light non-stick/anodized pans reect
heat, resulting in a lighter and more delicate browning. Use
this type for cakes and cookies.
Dark, rough, or dull pans absorb heat, resulting in a more brown
and crispy crust. Use this type for pies.
• Do not cook with the empty broiler pan in the oven, as this
could affect cooking performance. Store outside of the oven.
E23
OVEN USE

E
E
E
E
E
E E E E E E E E E E E E E E E E E E
E E E E E E E E E E E E E E E E E E
approved for interior use. Follow manufacturer's directions and be
careful not to get liquid cleaner in the wall and ceiling perforations
or any door surfaces. Rinse thoroughly and polish dry.
After cleaning, residual grease may be removed from the interior
ducts and heater by operating the oven on 450˚F (232˚C) for 20
minutes without food. Ventilate the room if necessary.
WAVEGUIDE COVER
The waveguide cover is made from mica, so it requires special
care. Keep clean to ensure good oven performance. With a damp
cloth, carefully wipe any food spatters from the surface of the cover
immediately. Built-up splashes may overheat and cause smoke or
possibly catch re. Do not remove the waveguide cover.
ODOR REMOVAL
To remove lingering odors, combine 1 cup water, grated peel and
juice of 1 lemon, and several whole cloves in a 2-cup glass measuring
cup. Boil for several minutes using 100% power. Allow to sit in oven
until cool. Wipe interior with a soft cloth.
CLEANING SUGGESTIONS
IMPORTANT: The oven needs to be diligently cleaned. After the
oven cools, wash immediately with hot, soapy water on a sponge or
cloth. Rinse and polish dry with a dry microber cloth or dish towel.
Harder to remove spatters may occur if the oven is not thoroughly
cleaned or if there is long time/high temperature cooking.
Do not use appliance wax, polish, steel wool, abrasives, ammonia,
acids, or commercial oven cleaner on the cavity or exterior surfaces.
CLEANING SUGGESTIONS CHART
OVEN CAVITY
• General Use hot, soapy water on a sponge/cloth. Rinse and polish dry with a dry microber cloth or dish towel.
• Heavy Soil Use an oven cleaner pad with mild, liquid cleaner. Rinse and polish dry using a dry microber cloth or dish towel.
As an additional option, a paste of baking soda and water can be applied evenly to the interior of a cool, empty
oven cavity. Do not apply to areas that have perforated holes or are close to heating elements. Allow the paste to sit
for at least 12 hours or overnight. Wipe away the paste with a soft, damp cloth followed by thoroughly rinsing the
cavity with hot, soapy water on a sponge/cloth.
• Stainless Steel Ensure the appliance is cool to touch before cleaning. Use liquid stainless steel cleaner (for interior and exterior) to
address yellowing, tarnishing, or blemishes. For interior stainless steel cleaning, ensure the cleaner being used is
approved for interior oven use. Spray or pour the stainless steel cleaner directly onto a soft cloth and apply in the
direction of the brush lines. After application and before your next use, it is recommended to heat your oven to at
least 300° F for 15-30 minutes to "burn off" any remaining fumes or residue.
• Inside Door Glass Use hot, soapy water on a sponge/cloth. Rinse and polish dry with a dry microber cloth or dish towel. For heavy
build up, a paste of baking soda and water can be applied evenly to the cool door glass. Let the paste sit for at least
15 minutes. Scrub with a non-abrasive sponge, then wipe away the paste with a soft, damp cloth.
BASKET & RACK
Use hot, soapy water or place in the dishwasher.
CAROUSEL & DISH
Use hot, soapy water or place in the dishwasher. If tough stains persist, soak with oven cleaner overnight. Thoroughly
clean with hot, soapy water, ensuring to wipe off any remaining residue.
WIRE RACKS (2)
Use hot, soapy water or place in the dishwasher.
TURNTABLE SUPPORT
Use hot, soapy water or place in the dishwasher.
24E
CLEANING AND CARE
Disconnect the power cord or leave the door open to inactivate the
oven during cleaning.
EXTERIOR
The outside surface is precoated metal and plastic. Clean the outside
with liquid stainless steel cleaner. Rinse and polish dry. Do not use
any type of household or abrasive cleaner.
DOOR
Clean both sides with hot, soapy water on a sponge or cloth. Rinse
and polish dry. Metal parts will be easier to maintain if cleaned
frequently. Avoid the use of spray and other harsh cleaners as they
may stain, streak or dull the door surface.
TOUCH CONTROL PANEL
Open the oven door before cleaning. Wipe the panel with a cloth,
dampened slightly with water only. Dry with a soft cloth. Do not scrub
or use any sort of chemical cleaners. Close door and touch the icon.
INTERIOR - AFTER MICROWAVE COOKING
Use hot, soapy water on a sponge or cloth. Rinse and polish dry. Do
not use abrasive or harsh cleaners or scouring pads. For heavier soil,
use an oven cleaner pad with mild, liquid cleaner. Rinse and polish
dry. Never spray oven cleaners directly onto any part of the oven.
INTERIOR - AFTER HIGH-SPEED PRO,
SPEED COOK, OR CONVECTION COOKING
Wash immediately after use with hot, soapy water. Rinse and polish
dry. For stainless surfaces, use liquid stainless steel cleaner that is

E
E
E
E
E
E E E E E E E E E E E E E E E E E E
E E E E E E E E E E E E E E E E E E
E25
TROUBLE SHOOTING
BEFORE YOU CALL
OP ERATION
PROBLEM POSSIBLE CAUSE SOLUTION
The oven display does not
illuminate
Turn off power at the main power supply (fuse or breaker box). Turn
breaker back on. If condition persists, call an authorized service center.
Cooling fan continues to run
after oven is turned off
The oven components have not
cooled sufciently
The fan turns off automatically when the electronic components have
cooled sufciently.
Oven is not heating No power going to the oven Turn on power at the main power supply (fuse or circuit breaker box).
If condition persists, call a qualied electrician.
Oven Mode or Temperature not
selected
Press cooking option on keypad to select the oven mode and tem-
perature.
Oven is not cooking evenly Oven rack is not in correct position
or wrong accessories are being used
Refer to the instructions on the oven display for food placement and
accessories.
Convection Bake Mode Always reduce recipe temperature by 25°F when baking with Convec-
tion Bake mode.
Oven light stays on Oven door is not closed
completely
Check for obstruction in oven door. Check to see if hinge is bent or
door switch is broken.
Clock and Timer are not
working properly
No power going to the oven Turn on power at the main power supply. If the problem persists, call
an authorized service center.
Clock or Timer not set correctly See KITCHEN TIMER or DISPLAY SETTINGS on page 18.
Excessive moisture Oven was not properly preheated When using bake mode, preheat the oven rst. Convection Bake and
Convection Roast will eliminate any moisture in oven (one of the
advantages of convection cooking).
Part or all of the appliance
does not operate
Power cord is not completely
connected to the electrical outlet
Make sure the power cord is tightly connected to the outlet.
Power outage Check house lights to be sure. Call your local electric company for service.
Fuse/circuit breaker at home doesn’t
work
Replace the fuse or reset the circuit breaker.
Oven is in Demo Mode
From the oven's Home Screen, go to SETTINGS, DISPLAY,
then DEMO MODE. Switch Demo off.
Food is not heated No power to the appliance Check for power connection/outage.
Controls improperly set Check if the controls have been properly set.
Oven light does not work Light has loose connection or is
burned out
Call for service.
Touch controls will not
operate
Control Lock is on
From the oven's Home Screen, go to SETTINGS, then DISPLAY.
Switch Control Lock off.
Steam from the vent During microwaving, steam may
come from the vent
This is normal.
E
E
E
E
E
E E E E E E E E E E E E E E E E E E
E E E E E E E E E E E E E E E E E E
26E
ERROR DISPLAY AND CONDITIONS
HIGH-SPEED OVEN
ERROR NO. ERROR CIRCLE SOUND CONDITIONS
EC-002 Communication
error
Red + No Blink BUZZER
(beep ×10)
Hardware error (DISP<=>Control).
EC-003
(Required to
check the log
data on the
cloud.)
Oven TH short – – When the temperature inside the OVEN is too high, the heater turns off.
This error can also occur when the thermistor has failed and
misidentication that the temperature is high when it is not. The heater
stays OFF all the time, so the food is not heated.
EC-004 Oven TH open Red + No Blink BUZZER
(beep ×10)
The oven may mistakenly judge that the temperature is low, and the
heater turns on all the time.
EC-005 Meat Probe short Red + No Blink Occurs when the temperature of the meat probe becomes too hot.
(Possible reason: The probe was preheated without inserting into food
or the probe is broken, etc.)
You can see that the meat probe is broken or not inserted well into the food.
EC-006 Meat Probe open Red + No Blink Occurs when the meat probe is not set in the oven or if the meat probe
detaches from the OVEN during heating.
EC-007 Door lock error
(during locking and
unlocking)
Red + No Blink Occurs when self-clean is started and the door is unable to lock. The
oven keeps waiting until the door is locked. (The heating will not start
until it is locked.)
EC-008 Power Board Failure Red + No Blink The oven is out of order. (Power board failure)
EC-009 Communication
error
Red + No Blink Hardware error (OVEN).
Errors can be displayed during heating.
EC-010 Wi-Fi error Red + No Blink BUZZER
(beep ×10)
Hardware error. Error judgment is performed when Wi-Fi is turned on.
EC-011 ACK hardware error
(Oven)
Red + No Blink Hardware error (ACK of Oven). Error judgment is performed when Wi-Fi
is turned on. If there is a hardware error, this error message is shown.
- Catch re error
(US error)
A re was detected due to a rise in temperature of the OVEN TH.
EC-013 Damper error DAMPER is not functioning.
EC- 014 Inverter error
(Decreased output)
Inverter is not functioning due to decreased output.
EC-015 Inverter error
(IGBT TH open)
Inverter is not functioning due to IGBT temperature abnormality.
EC-016 Inverter error
(Communication
error)
Inverter is not functioning due to communication error.
EC- 017 Magnetron error
(Surge)
Magnetron is not functioning due to deterioration or abnormality.
EC-018 Inverter error (Short
circuit detection)
Inverter is not functioning due to short circuit detection.
- Sensor error
(open door)
The door opened upon detecting humidity.
- Sensor error
(stop/clear)
The Stop or Clear button was pressed while sensing humidity.
- Sensor error
(T1 max error)
The oven stopped its sensing cycle because there isn’t enough moisture
or liquid inside.
EC-022 Sensor error
(hard error)
Some wires didn't plug properly.
- - The rmware update of the appliance failed due to a network problem.
TROUBLE SHOOTING

CUSTOMER ASSISTANCE UNITED STATES ONLY
REGISTER YOUR PRODUCT
Registering your new product is easy and offers benets that help you get the most
out of your Sharp product including:
9 Convenience: If you ever need warranty support, your product information is already on le.
9 Communication:Stay up to date with important notications and special offers from SHARP.
9 Support: Quickly access support content including Owner’s Manuals, FAQ’s,
How-to Videos, and much more.
3 EASY WAYS TO REGISTER TODAY!
PRODUCT SUPPORT
If you have questions about the setup or operation of your product, please refer to
the corresponding section within this manual.
Additionally, visit www.sharpusa.com/support to access exclusive content about your
product including:
Æ FAQ’s and How-To Videos
Æ Find or Request Service
Æ Extended Warranty Options
Æ Downloads including the Installation Guide, Spec Sheet, and Owner’s Manual
CONTACT US
If at any time you have questions or comments concerning your SHARP product,
please contact the SHARP Customer Assistance Center. We are available to
assist you through multiple contact methods for your convenience:
Scan this QR Code on your mobile device Visit http://www.sharpusa.com/register
ONLINE
Visit our sites to
learn more about
your product at
sharpusa.com and
sbl.sharpusa.com
See the Contact Us section on our sites U.S. | www.sharpusa.com/support Contact a Sharp Advisor on the phone
Contact a Sharp Advisor on the phone
CALL US
US 800-BE-SHARP
800-237-4277
Mon-Fri: 7am-7pm CST
Sat-Sun: 9am-7pm CST
CALL US
US 800-BE-SHARP
800-237-4277
Mon-Fri: 7am-7pm CST
Sat-Sun: 9am-7pm CST
EMAIL
Available 24/7
US: sharpusa.com
CHAT ONLINE
Mon-Fri: 7am-7pm CST
Sat-Sun: 9am-7pm CST
SCAN
Use the camera or
QR code scanning
application on your
mobile device
TGANEB010MRR1 Aug 26, 2024
SHARP ELECTRONICS CORPORATION
100 Paragon Drive • Montvale, New Jersey 07645 • 1-800-BE-SHARP (237-4277)
SHARP ELECTRONICS OF CANADA LTD.
335 Britannia Road East Mississauga • Ontario L4Z 1W9 • 877-278-6709
https://support.sharpusa.com/s/