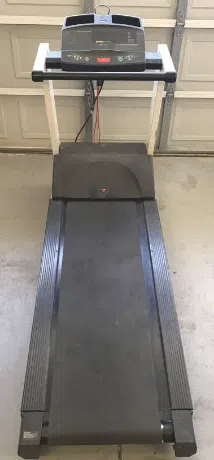
Precor M9.27 Treadmill
Product's Documents
Below are documents related to this product, you can read online or download:
- Owner's manual - (English) Read Online | Download pdf
The treadmill is equipped with certain items that, when used properly, help sustain an enjoyable workout. These items include:
• Safety clip and magnet
• I/O power switch
• Handrail
• Reset switch
Important: Before exercising, review the Important Safety Instructions found at the beginning of this manual.
Attach the safety clip to your clothing before each workout and attach the opposite end (the red magnet) to the display console. A tug on the lanyard dislodges the magnet, trips the safety switch, and stops the running belt.
If the safety switch trips while you are exercising, the treadmill does not retain your workout statistics. To resume your workout, reattach the magnet, reattach the safety clip to your clothing, and select a program from the banner.
Important: To prevent unauthorized use, remove the red magnet and safety clip after your workout and store it in a safe place. The treadmill will not operate without the red magnet attached to the display console.
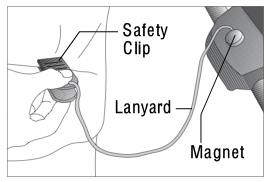
Diagram 3: Attach the safety clip to your clothing
To maintain your balance, always grasp a handrail when you step on or off the treadmill and when you use the keypad.
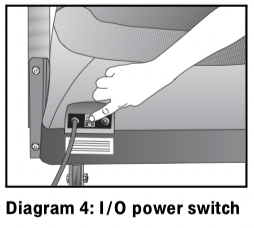
To turn the unit ON and OFF, use the I/O power switch located at the front of the unit, near the power cord. Refer to Diagram 4.
Important: When it is not being used, turn the unit OFF.
The treadmill is designed to automatically turn off if its electronic boards overheat. A red button near the power switch resets the unit after the thermal circuit breaker trips. Do not press this button indiscriminately. Excessive heat can damage the electronic boards on the treadmill.
To help eliminate overheating, locate your treadmill away from heating ducts. For more information, refer to Advanced Programming and Troubleshooting.
Heart rate and SmartRate ® features are available when the heart rate receiver is installed in the display console and you wear a chest strap. When a heart beat is detected, the letters Hr appear in the heart rate display and continue to blink until a heart rate is discernible. During a workout, a number representing your heart rate is displayed. (A small dot blinks in rhythm with your heart rate.)
Note: The heart rate receiver and chest strap are optional purchase items for the M9.23 treadmill. If you are interested in purchasing this option, refer to Obtaining Service.
Read the following before using the heart rate feature.
• Consult your physician before engaging in any vigorous exercise. Do not use the heart rate features until authorized by your physician.
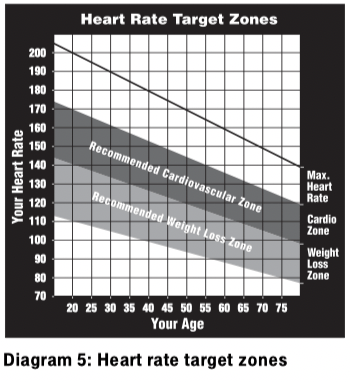
• Know your heart rate (pulse) and your physicianrecommended heart rate target zone. Individual heart rates vary according to several physiological factors and may not correspond directly with Diagram 5.
• After you put on the chest strap, face the display console for a minimum of 15 seconds. This allows the receiver in the console to recognize the signal from the chest strap.
• If  appears in the display, the treadmill cannot detect a heart rate. Make sure that the chest strap is positioned properly around your chest and against your skin. If the heart rate receiver in the display console has become disconnected, the display appears blank.
• Always face forward on the treadmill and use the handrail for balance. Keep upper body movement to a minimum.
The SmartRate feature helps you monitor and maintain your heart rate in the target zone best suited to your specific needs.
After you begin a workout, a blinking LED appears on the SmartRate display. The blinking LED indicates the current zone that your heart rate is maintaining: weight loss or cardiovascular.
The SmartRate indicator lights do not appear when:
• You press QUICKSTART at the banner.
• You bypass the AGE prompt.
• You do not wear or improperly position the chest strap.
Note: Review the information on the QUICKSTART card that accompanies your literature packet. It explains how to adjust the chest strap.
For the ideal weight loss range, the first and second SmartRate LEDs are lit and the third LED blinks. If you are working out in the cardiovascular zone, the fourth or fifth LED should be blinking. Refer to Table 1.
Table 1. Heart rate target zones and SmartRate LEDs
|
Heart Rate Target Zone Percent |
LED Lit |
LED Blinking |
|
Below 55% |
None |
None |
|
55% to 60% |
First |
First |
|
61% to 66% |
First |
Second |
|
67% to 72% |
First through second |
Third |
|
73% to 79% |
First through third |
Fourth |
|
80% to 85% |
First through fourth |
Fifth |
|
Above 85% |
First through fifth |
Sixth |
CAUTION: Your heart rate should never exceed 85% of your maximum aerobic heart rate. If it does, the sixth SmartRate LED begins to blink. Immediately reduce your pace or adjust the incline to return your heart rate to its target zone.
Both M9.23 and M9.27 treadmills include programs that let you exercise based on a specified heart rate. You set your target heart rate (THR) and the speed of the running belt after selecting the program. As you exercise, the Heart Rate Control Program monitors your heart rate and automatically maintains it within a few beats per minute (bpm) of your selected target. Your actual heart rate (pulse) appears in the HEART RATE display.
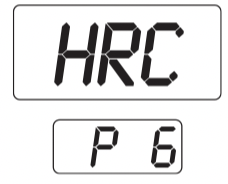
To use the Heart Rate Control Program, select HRC for M9.23 and HR1 or HR2 for M9.27. You must also wear the chest strap so the program can monitor your heart rate throughout the workout. For more information, refer to Heart Rate Control (HRC) Program (M9.23) or Heart Rate Control (HR1 or HR2) Program (M9.27).
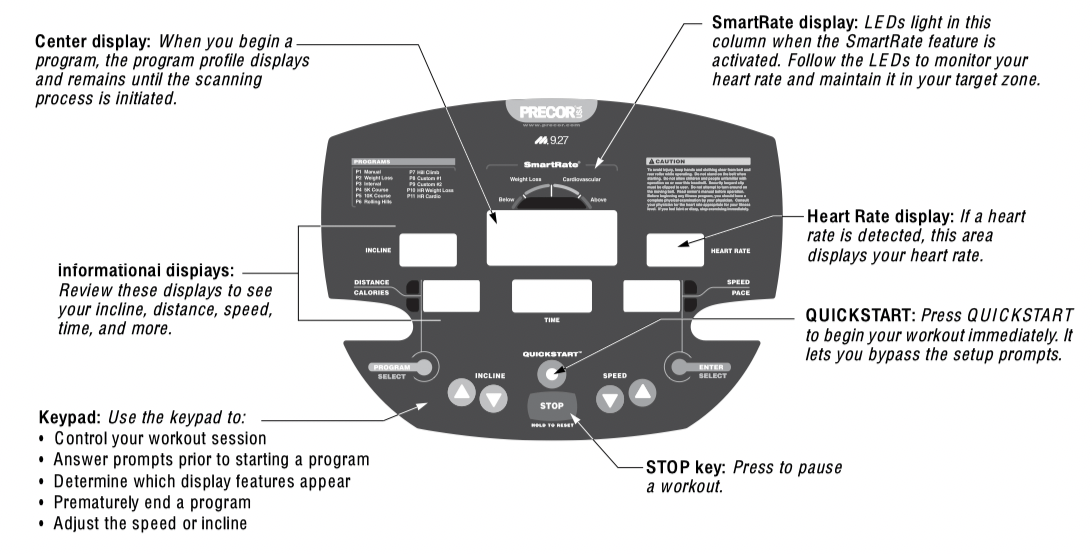
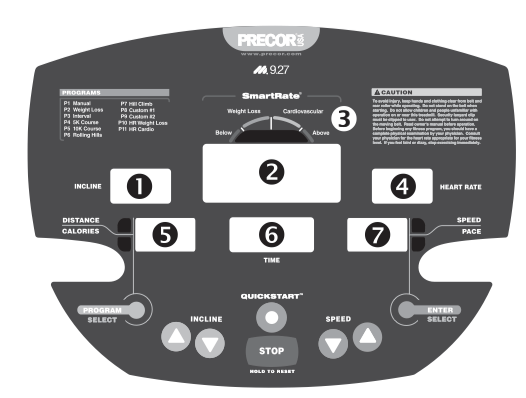
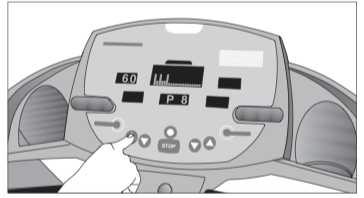
The following information explains what appears in the different displays. The numbers in this diagram only show the sequential order of information in this section.
1. INCLINE—displays the percentage of incline during your workout. The INCLINE ▲ and ▼ keys affect the lift and let you set an incline between 0% and 15%. The values displayed can change in 0.5% increments.
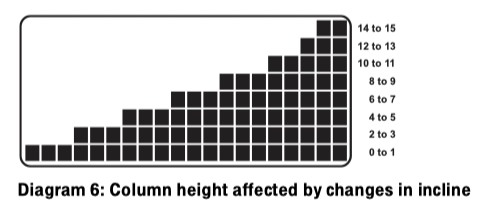
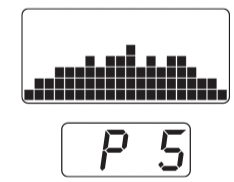
2. PROFILE—appears on the center display and corresponds to the program you selected. As you continue your workout, a blinking column indicates your position in the program. Changes in incline affect column height as shown in Diagram 6.
If the profile is only one row in height, then markers  appear occasionally and provide a sense of movement through the program.
Note: The center display provides an LED matrix consisting of 8 rows and 20 columns. You can determine the duration of each column in a program (if the workout time is less than 20 minutes) by dividing the program’s time limit by 20. If the workout time is greater than 20 minutes, each column represents 1 minute.
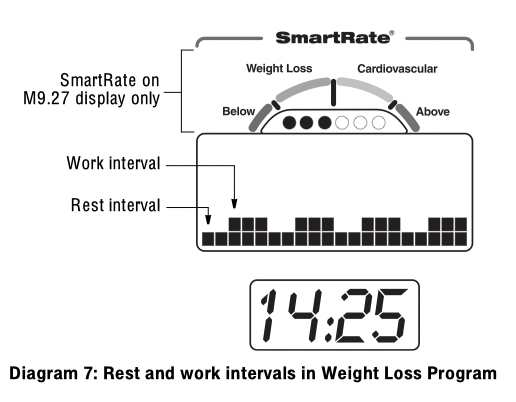
3. SMARTRATE—SmartRate LEDs appear on the M9.27 display only. The LEDs light when your heart rate remains within a percentage (55% to 85%) of your maximum aerobic heart rate. For more information, refer to Heart Rate Features.
4. HEART RATE—displays your heart rate. If you are wearing the chest strap, the display shows your heart rate. A small dot blinks in rhythm with your heart rate.
5. DISTANCE—shows a linear distance in miles. The distance is calculated based on your speed.
CALORIES—displays the estimated cumulative number of calories burned. The calorie calculation is derived from the speed, incline, and your weight. An accurate weight entry results in a more accurate calorie count. When using QUICKSTART and no weight has been specified, the default weight is 150 pounds (68 kilograms).
Note: You can toggle between displaying the DISTANCE or CALORIES by pressing the PROGRAM/SELECT key.
6. TIME—displays workout time in minutes and seconds; however, when you exceed 60 minutes during a single workout, the TIME display converts to hours and minutes. For programs with a workout time limit, the TIME display shows the amount of time remaining. For programs without a workout time limit, the TIME display indicates the amount of time you have been exercising.
7. SPEED—displays the running belt speed in miles per hour. The running belt speed ranges from 0.5 to 12 mph (0 to 20 kph) and can be changed in 0.1 increments using the SPEED keys.
PACE—displays your target speed in minutes and seconds per mile. For example, the number “4.23” indicates that your pace (speed at which you are moving) is 4 minutes and 23 seconds per mile.
Note: You can toggle between displaying the SPEED or PACE by pressing the ENTER/SELECT key.
Use the keypad to enter your workout session selections.
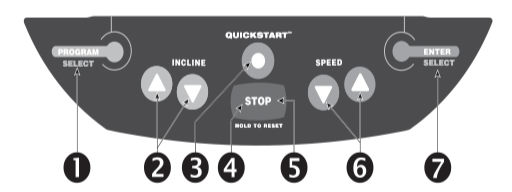
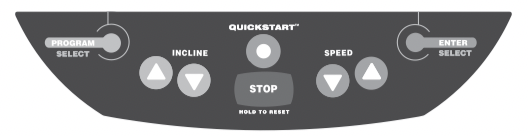
The following information explains the different uses of the keys from left to right. To locate each key, look at the display console or refer to the diagram on this page.
1. PROGRAM/SELECT: This key has two functions:
• It lets you select a program during setup.
• When you have started exercising, it acts as a toggle between the DISTANCE and CALORIES display.
2. INCLINE ▲▼:
Press and hold the INCLINE arrows to increase or decrease the incline from 0% to 15% in 0.5% increments.
During your workout, to view your current incline, tap either INCLINE ▲ or ▼ key. To change the incline, press the arrow key for more than one second.
Changes to the incline are not immediate. It takes time for the lift to reach the target incline shown on the display.
The incline setting affects the column height in the program profile as shown in Diagram 6.
The height of the column indicates the level of incline.
During the setup phase, pressing the INCLINE arrow keys will not affect the incline. However, the arrow keys do not affect what appears on the display. Refer to Selecting a Program.
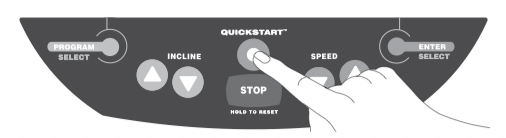
3. QUICKSTART: Press QUICKSTART to bypass the setup prompts and start your workout immediately using the Manual Program. Refer to Choosing QUICKSTART.
4. STOP: A firm tap on the STOP key slows the running belt to a stop and the treadmill enters pause mode. To resume, press the SPEED ▲ key. Refer to Pausing During a Workout or the Cool-Down Period.
5. HOLD TO RESET: During pause mode, if you press the HOLD TO RESET key for more than 2 seconds, the program displays the WORKOUT SUMMARY. No workout statistics are saved.
6. SPEED ▼▲: Press and hold the SPEED arrow keys to increase or decrease the running belt speed from 0 to 12 mph (1 to 20 kph) in 0.1 increments.
When you press the arrow keys, a target speed appears in the display. The running belt speed changes to meet the target, but the change occurs gradually so the transition is smooth.
During your workout, to view your current speed, tap either SPEED ▼ or ▲ key. To change the speed, press the arrow key for more than one second.
Note: During the setup phase, pressing the SPEED arrow keys will not affect the speed. However, the arrow keys do affect what appears on the display. Refer to Selecting a Program.
7. ENTER/SELECT: The ENTER/SELECT key has two functions:
• It accepts data that appears in the TIME display during setup.
• When you have started exercising, it acts as a toggle between the SPEED and PACE displays.
CAUTION: Before beginning any fitness program, see your physician for a complete physical examination. Know your physician-recommended heart rate target zone.
1. Turn the unit ON. The banner PRESS QUICKSTART OR PROGRAM scrolls across the display.
2. Step on the treadmill.
3. Face the display.
4. Attach the safety clip to your clothing and attach the opposite end (the red magnet) to the display console.
5. Hold on to the handrail with one hand.
6. Select one of the following options:
Option 1: Use the QUICKSTART key Choose this option to start your workout immediately. Refer to Choosing QUICKSTART.
Option 2: Use the PROGRAM/SELECT key Choose this option for a more customized approach. The display walks you through the preferences for a program, workout time, weight, and age (optional on M9.23). Refer to Selecting a Program.
1. Press QUICKSTART while the banner is scrolling to bypass the detailed workout prompts and access the Manual (MANL) Program.
A 3-second countdown appears on the center display, and then the running belt starts moving.
QUICKSTART applies the following defaults:
|
Prompts |
Default Value |
|
Program |
Manual (MANL) |
|
Time |
No limit |
|
Weight |
150 lb (68 kg) |
|
Age |
0 |
To use the SmartRate feature (M9.27), you need to specify your age. In this case, press PROGRAM/ SELECT. Follow the setup process to enter your age. Press QUICKSTART after your age is displayed.
2. Step on to the running belt with the speed at or below 1 mph (1.5 kph) and begin your workout. Use the SPEED ▲ to increase the speed of the running belt.
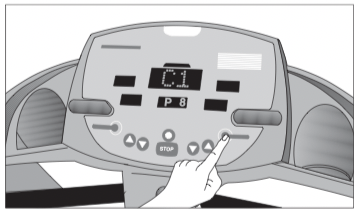
1. Press the PROGRAM/SELECT key while the banner PRESS QUICKSTART OR PROGRAM is scrolling.
2. Continue to press PROGRAM/SELECT to cycle through the available programs. Refer to Table 2.
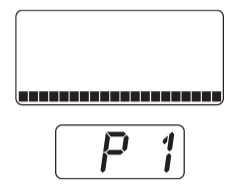
The program profile appears in the center display for a few seconds after the program’s abbreviated name. A program reference number appears in the TIME display.
3. When the program you want appears, press ENTER/SELECT.
Table 2. Available programs
|
Program |
Program Abbreviation |
M9.23 |
M9.27 |
|
Manual |
MANL |
P1 |
P1 |
|
Weight Loss |
WLS |
P2 |
P2 |
|
Interval |
INTV |
P3 |
P3 |
|
Random |
RAND |
P4 |
– |
|
5K Course |
5K |
– |
P4 |
|
Walk |
WALK |
P5 |
– |
|
10K Course |
10K |
– |
P5 |
|
Heart Rate Control* |
HRC |
P6 |
– |
|
Rolling Hills |
ROLL |
– |
P6 |
|
Hill Climb |
HILL |
– |
P7 |
|
Custom #1 |
C1 |
– |
P8 |
|
Custom #2 |
C2 |
– |
P9 |
|
Heart Rate Weight Loss* |
HR 1 |
– |
P10 |
|
Heart Rate Cardiovascular* |
HR 2 |
– |
P11 |
* Requires the user to wear a chest strap. The heart rate receiver must also be installed.
4. If a program includes a designated workout time, the TIME prompt blinks in the TIME field. Press the arrow keys to select the program time between 0:00 (no time limit) and 99 minutes. Press ENTER/SELECT.
Note: If you select the INTV Program, the REST and WORK prompts appear after you designate a workout time. Select a time frame for the rest and work intervals between 1 and 9 minutes. Refer to Interval (INTV) Program.
5. Continue through the setup phase by entering or changing your WGT (23 through 440 lb/10 to 200 kg) and AGE (1 through 99).
Important: You can also press QUICKSTART after any of the prompts (PROGRAM, TIME, WGT, or AGE). QUICKSTART applies default settings to any prompts you skipped and the running belt starts moving after a 3-second countdown.
6. When you complete the setup phase, a prompt PRESS SPEED ▲ TO BEGIN scrolls across the display. Step on the running belt with the speed at or below 1 mph (1.5 kph) and begin your workout. Use the SPEED ▲ to increase the speed of the running belt.
Note: If you wish to change some aspect of the setup phase (TIME, WGT, AGE, REST, WORK, or THR), you can press ENTER while the prompt PRESS SPEED ▲ TO BEGIN scrolls across the display. Doing so takes you back to the TIME prompt and you can reenter information from there.
Incorporate a cool-down period into your workout to help lower your heart rate and minimize muscle stiffness or soreness.
When you complete a program with a time limit or distance goal, you automatically enter a 5-minute cool-down period. The Manual (MANL) Program profile appears in the display, the running belt speed is reduced by 20%, and the incline is set to 0%. To adjust the speed and incline, press the arrow keys.
A workout summary appears at the end of the 5-minute cool-down period. Refer to Ending a Workout.
Important: If you press QUICKSTART, the automatic 5-minute cool-down period does not occur. If you exit a program before completing it, then the cool-down period is bypassed.
To prematurely end the 5-minute cool-down period, do the following:
1. Grasp the handrail with one hand.
2. Press the STOP key with your other hand. The treadmill enters pause mode.
3. Press and hold the HOLD TO RESET key for two seconds. WORKOUT SUMMARY scrolls across the display.
4. Press HOLD TO RESET to return to the banner.
Press the STOP key to pause anytime during a workout or during a cool-down period. The pause mode is limited to ten minutes. If you do not resume exercising during that time, the display returns to the banner.
The WORKOUT SUMMARY appears after you press and hold the HOLD TO RESET key for two seconds. Press HOLD TO RESET to return to the banner before the time limit expires.
Note: To resume exercising from pause mode, press SPEED ▲.
CAUTION: Hold on to the handrail when you near the end of a workout.
The treadmill stops the running belt when you complete the automated cool-down period. After the running belt stops, TIME stops accruing.
You hear several beeps and WORKOUT SUMMARY scrolls across the center display. The WORKOUT SUMMARY shows your cumulative workout statistics including warm-up and cool-down periods. Other information including speed and incline reset to zero. Toggle between the DISTANCE and CALORIES displays using the PROGRAM/SELECT key. You can review your workout statistics for 10 minutes before the display resets to the banner.
Note: If you choose to exercise with no set time limit, you must manually end a program by pressing the STOP key. You can also press the SPEED ▼ key until the speed is reduced to zero and the running belt stops.
This section describes the programs printed on the display label.
Choosing a program depends on your goals. If you are a beginner or returning to regular exercise, you can start a cardio-conditioning program to slowly return your body to a comfortable level of exercise. If you have been exercising and feel that you have an intermediate or advanced fitness level, you probably have established goals. The Precor web site (www.precor.com) can give you many ideas about fitness workouts and advice from the experts.
Several workout choices on the treadmill are preprogrammed with recommendations for incline levels, pace, and alternating rest or work intervals. You always have the option to override the suggested levels with the exception of the Heart Rate Control Programs.
If your level of exertion becomes too great, reduce you pace or use the arrow keys to override each upcoming segment in the program profile. If you use the arrow keys, the program profile changes accordingly. When you complete a program that contains a time limit, an automatic 5-minute cool-down period begins.
Table 3 shows the programs that have preset inclines.
Table 3. Preset incline programs
|
Program |
Program Abbreviation |
M9.23 |
M9.27 |
|
Weight Loss |
WLS |
P2 |
P2 |
|
Random |
RAND |
P4 |
– |
|
5K Course |
5K |
– |
P4 |
|
Walk |
WALK |
P5 |
– |
|
10K Course |
10K |
– |
P5 |
|
Rolling Hills |
ROLL |
– |
P6 |
|
Hill Climb |
HILL |
– |
P7 |
Note: The Manual, Interval, and Heart Rate Control Programs prompt you for more information and require more user interaction throughout the workout.
• Work out indefinitely in any program (except Weight Loss). At the TIME prompt, specify 0:00. While you exercise, TIME indicates the amount of time you have been exercising. If you choose to exercise without a time limit, the automatic 5-minute cool-down period is eliminated. You will need to incorporate a cool-down period by accessing the Manual Program.
• Place a time limit on any program during the setup phase. At the TIME display specify the time duration for your workout. While you exercise, TIME indicates the amount of time remaining.
• A blinking column tracks the progress that you make during a program.
You control incline and speed settings when you use the Manual Program. The profile begins as a flat line. Use the arrow keys to change the speed or to adjust the incline. The program profile reflects changes in all subsequent columns. The blinking column indicates your position in the program.
If you press QUICKSTART at the banner and access the Manual Program, the workout time is unlimited. A cooldown period does not automatically occur when you end your workout. Always remember to incorporate a cooldown period into your workout.
To use the SmartRate feature, you need to specify your age. Refer to Selecting a Program.
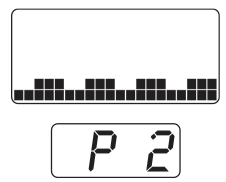
With the Weight Loss Program, the workout time is fixed at 28 minutes and consists of seven, 4-minute intervals. You are not prompted for a workout time.
For ideal weight loss range, your heart rate should be between 55% and 70% of your maximum aerobic heart rate. Set a comfortable pace and adjust the speed and incline to meet the target rage. Refer to Heart Rate Features.
Note: To view the heart rate and M9.27 SmartRate features, the heart rate receiver must be installed in the display. You must enter your age during setup and wear the chest strap. To purchase the heart rate option for the M9.23 treadmill, contact your local dealer. Refer to Obtaining Service.
Use the arrow keys to change the speed or the incline for the rest or work interval. Refer to Diagram 7. When you make changes, the software repeats the settings for the remaining intervals. During a workout, two audible beeps occur when an upcoming interval column changes the speed of the running belt.
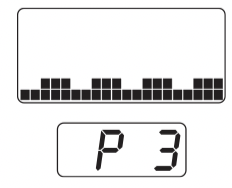
The Interval Program is among the best for conditioning your cardiovascular system. The program raises and lowers your level of exertion repeatedly for a specified period of time.
When you begin the program, the speed and incline are preset. You can change the speed and incline levels using the arrow keys. Refer to Diagram 8. The settings are repeated throughout the program.
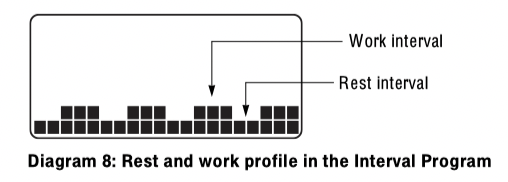
To change a setting, press the appropriate arrow key and continue. The change is applied to the remaining intervals. Two audible beeps let you know when the speed is about to change.
When you complete the program, any changes made to the incline and speed settings are not saved.
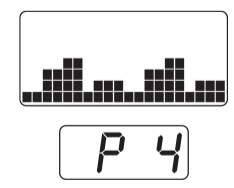
Every time the Random Program is selected on the M9.23, a different program profile appears. The columns that appear in the program profile maintain a set incline that you can override using the INCLINE arrow keys. The incline is preset to zero for the first column. The maximum incline change allowed between columns is plus or minus 4%.
The running belt speed is completely under your control and can be adjusted using the SPEED arrow keys.
The M9.23 Walk Program is a great cardio-conditioning program for both beginners and serious walkers. The incline is preprogrammed. The percentage of incline and the frequency with which the columns change determine the level of difficulty. You can change the speed and override the preprogrammed incline using the arrow keys. As you move through the program, the columns are repeated until the time limit is reached.
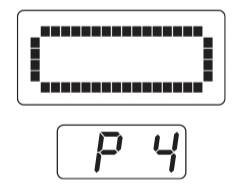
The 5K course is a great M9.27 program to run or walk depending on your level of fitness. The distance is fixed at 5 km (3.1 miles) and incline is preprogrammed. You can change the speed and override the preprogrammed incline using the arrow keys. The course profile appears as an oval track. A blinking LED indicates your position on the track. One “lap” around the track represents 440 yards (400 meters). You will have completed 12½ laps by the time you complete the course.
The TIME display shows the amount of time you have been exercising. For comparison purposes, keep track of your time to note changes as you increase your fitness and endurance levels.
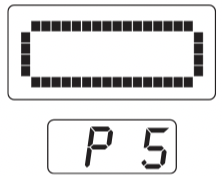
The distance for the M9.27 10K course is fixed at ten kilometers (6.2 miles) and the incline is preprogrammed. You can change the speed and override the preprogrammed incline using the arrow keys.
The course profile appears as an oval track. A blinking LED indicates your position on the track. One “lap” around the track represents 440 yards (400 meters). You will have completed 25 laps by the time you complete the course.
The TIME display shows the amount of time you have been exercising. For comparison purposes, keep track of your time to note changes as you increase your fitness and endurance levels.
The M9.23 Heart Rate Control (HRC) Program lets you set a target for your heart rate. The program adjusts the incline to maintain your heart rate within two beats per minute of the target heart rate (THR) while you exercise. The initial THR is determined using a simple calculation:
(220 minus your age) multiplied by 70%
During your workout, the number that represents your heart rate appears in the HEART RATE display.
For information about understanding your target heart rate, refer to Heart Rate Features.
Important: Consult your physician to determine the appropriate target heart rate for your age and fitness level. If your physician recommends a different target heart rate than the one that appears on the display, use the INCLINE arrow keys to change the target heart rate once you finish the warm-up period. Do not work out over the recommended range.
Note: Review the heart rate feature Guidelines before proceeding with the HRC Program.
Warm-up Period
The treadmill provides a 3-minute, warm-up period. During this time, you may change the incline or speed.
Note: If your heart rate moves into the target heart rate zone during the 3-minute, warm-up period, the warm-up period ends and the Heart Rate Control Program begins.
Using the HRC Program
When the warm-up period concludes,
• The treadmill automatically adjusts the incline to keep your heart rate at the selected target. Pressing the INCLINE arrow keys no longer affects the incline lift, but does change the target heart rate.
• You can change the target heart rate or speed of the running belt, but doing so affects the unit’s ability to maintain your target heart rate in the preferred zone. It takes time for the treadmill to readjust the incline so that your heart rate remains on target.
Note: If you are having difficulty with the heart rate features, refer to Advanced Programming and Troubleshooting.

The Rolling Hills Program on the M9.27 provides preprogrammed inclines over the length of the program. It is a good endurancebuilding program because of the range of incline. You can change the speed and override the preprogrammed inclines using the arrow keys. The blinking column indicates your position in the program. Changes to incline affect only the blinking column.
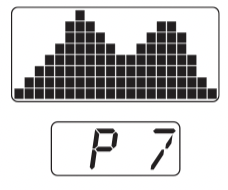
The Hill Climb Program on the M9.27 is great for endurance building. The program uses the full range of incline (0% to 15%). You can change the speed or override preprogrammed inclines using the arrow keys. The blinking column indicates your position in the program. Changes to incline affect only the blinking column.
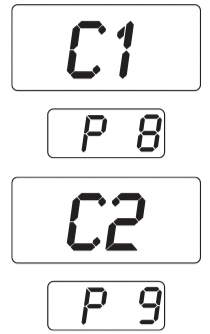
The C1 and C2 Programs on the M9.27 treadmill let you design customized programs to meet your fitness goals.
For more information, refer to Customizing a Program.
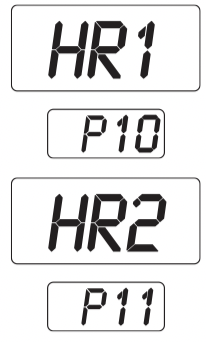
The M9.27 has two Heart Rate Control Programs where you set a target for your heart rate. The treadmill adjusts the incline to maintain your target heart rate within two beats per minute of the target heart rate while you exercise. The initial target heart rate (THR) is determined using a simple calculation, shown in Table 4.
Select a Heart Rate Control Program, based on the following information:
• Choose HR1 to maintain your heart rate at 65% of your maximum aerobic heart rate. During your workout, the SmartRate LEDs appear in the weight loss zone.
• Choose HR2 to maintain your heart rate at 80% of your maximum aerobic heart rate. During your workout, the SmartRate LEDs appear in the cardiovascular zone.
Table 4. Target heart rate calculations for M9.27
|
Program |
Calculation |
Target Heart Rate Zone |
|
HR1 |
(220 minus age) multiplied by 65% |
65% Weight Loss |
|
HR2 |
(220 minus age) multiplied by 80% |
80% Cardiovascular |
During your workout, the number that represents your heart rate appears in the HEART RATE display.
For information about understanding your target heart rate, refer to Heart Rate Features.
Important: Consult your physician to determine the appropriate target heart rate for your age and fitness level. If your physician recommends a different target heart rate than the one that appears on the display, use the INCLINE arrow keys to change the target heart rate once you finish the warm-up period. Do not work out over the recommended range.
Note: Review the heart rate feature Guidelines before proceeding with the HRC Program.
Warm-up Period
The treadmill provides a 3-minute, warm-up period. During this time, you may change the incline or speed.
Note: If your heart rate moves into the target heart rate zone during the 3-minute, warm-up period, the warm-up period ends and the Heart Rate Control Program begins.
Using the HRC Program
When the warm-up period concludes,
• The treadmill automatically adjusts the incline to keep your heart rate at the selected target. Pressing the INCLINE arrow keys no longer affects the incline lift, but does change the target heart rate. On the M9.27, you can check the SmartRate display to see if you are maintaining your preferred zone (weight loss or cardiovascular).
• You can change the target heart rate or speed of the running belt, but doing so affects the unit’s ability to maintain your target heart rate in the preferred zone. It takes time for the treadmill to readjust the incline so that your heart rate remains on target.
Note: If you are having difficulty with the heart rate features, refer to Advanced Programming and Troubleshooting.
The C1 and C2 Programs on the M9.27 treadmill let you design a customized workout before the running belt even begins moving. This section explains how you can program a new custom profile or “draw over” an existing one.
The keypad provides different functions while programming.
| Key | Description |
| INCLINE ▲ or ▼ | Affects the height of the column. |
| ENTER/SELECT | Moves the blinking LED from column to column. |
| Press and hold ENTER/SELECT for a few seconds to accept the changes and store the custom program in memory. | |
| HOLD TO RESET | Press HOLD TO RESET for at least two seconds to exit the custom programming mode without saving any changes. This reinstates the custom course that existed before your changes and the display returns to the banner. |
1. To enter the programming mode, press and hold ENTER/SELECT while C1 or C2 appears on the display.
A blinking LED appears at the top of the far-left column and indicates the starting position. Any incline changes that you make occur only in that column.
2. To begin modifying the course profile, use any INCLINE arrow key. The available incline range is 0% to 15%.
3. To move to the next column, press the ENTER/SELECT key.
A course consist of 20 columns. When you reach the last column (number 20), pressing ENTER/SELECT returns back to the first column (number 1).
4. When you have finished making changes, press and hold the ENTER/SELECT key for a few seconds to save the profile and use it during a future workout. The TIME prompt appears.
5. If you wish to begin a workout, enter a time limit for the program and continue answering the remaining setup prompts.
Certain features remain hidden and can only be accessed using special key presses. Read this section if you are interested in learning how to:
• Change the display to U.S. standard or Metric
• View the odometer
• Display the number of hours you have used your treadmill
• View the model and software version
• You have a 2-second window to access diagnostics mode. You may want to ask another adult for help. When you turn the treadmill ON, all the LEDs on the display light for two seconds. During this 2-second period, you need to press the appropriate keys quickly and without pause.
• Always start at the PRESS QUICKSTART OR PROGRAM banner prompt.
• Use the SELECT/ENTER, QUICKSTART, and ▼▲ keys while in the diagnostics mode.
• Exit the diagnostics mode by pressing the HOLD TO RESET key for two or more seconds.
The treadmill can display measurements in either METRIC or U.S. STANDARD. The default factory setting is set to display U.S. STANDARD. To change this setting, perform the following steps:
1. Turn the treadmill OFF and ON.
2. Within two seconds, press the following keys in sequence without hesitating:
STOP, INCLINE ▲, SPEED ▼
3. The current unit of measure (MILES or KM) appears in the center display. If you wish to use U.S. standard settings, select MILES. If you prefer Metric settings, select KM.
Any ▼ or ▲ key lets you alternate between the prompts.
Note: Changing the display to Metric measurements affects the default settings. Distances and the odometer value are converted to and appear in kilometers (KM). Speed appears in kilometers per hour. If you use QUICKSTART, the weight is set at 68 kg.
4. Press ENTER to accept the displayed setting. the change will be retained in memory even if the treadmill is turned OFF and unplugged.
5. If you want to exit without saving the change, press STOP.
The treadmill provides information about its use (odometer and hour meter), as well as model and software version. In general, you would only access this information if directed to do so by Precor Customer Support.
These instructions guide you through the informational displays. Pressing the ENTER/SELECT key moves you through the displays. To exit, press the HOLD TO RESET key at any time.
Viewing the Odometer
1. Turn the treadmill OFF and ON.
2. Within two seconds, press the following keys in sequence and without pause:
STOP, INCLINE ▼, SPEED ▲
Note: If the keys are not pressed within the 2-second window, the banner returns and you must begin again.
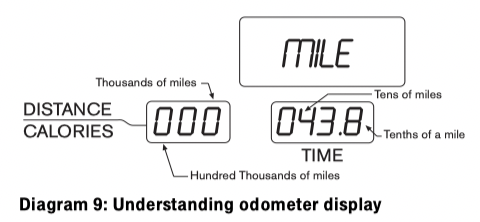
MILE appears in the center display. The odometer value (the cumulative miles users have traveled) appears in the DISTANCE/CALORIES and TIME displays. The furthest digit on the left marks the hundred-thousandths position, while the furthest digit to the right indicates tenths of a mile. Refer to Diagram 9.
3. When you are ready, press ENTER/SELECT to move to the next display (HOUR).
Viewing the Hour Meter
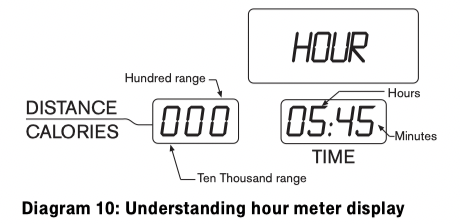
HOUR appears in the center display. The number of hours that the unit has been in use appears in both the DISTANCE/CALORIES and TIME displays. The hour meter resets to zero after 99,000 hours. Refer to Diagram 10.
4. If desired, you can press ENTER/SELECT to return to the odometer display. ENTER/SELECT toggles between MILE and HOUR information.
5. When you are ready, press QUICKSTART to move to the next display (model and software version).
Viewing the Model and Software Version
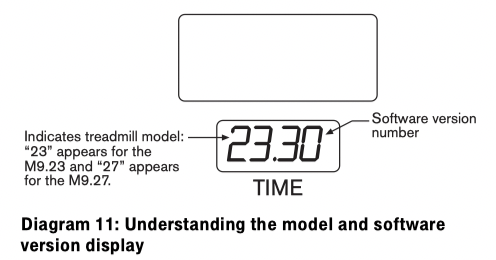
The unit’s model number and software version appear in the TIME display. Refer to Diagram 11.
6. When you are ready, press the HOLD TO RESET key for more than two seconds to return to the banner.
A red button near the power switch resets the unit. Do not use this button indiscriminately; it is attached to a thermal circuit breaker. If the circuit breaker trips, it may mean the unit is overheating. Excessive heat can damage the electronic boards on the unit. Move the treadmill if it is placed near a heating duct and call Precor Customer Support.
To reset the system, turn the power switch OFF. Wait a few minutes and then push the red reset button. Press the power switch ON. Check that the banner is scrolling across the display. If the display remains blank, call Precor Customer Support. Refer to Obtaining Service.
Initially, when the unit is turned ON, the display lights all the LEDs. If any are dark, call an authorized service person for assistance.
The following table shows the error codes that may appear in the TIME display. If you see these error codes, codes, call an authorized service person for assistance because the treadmill needs to be recalibrated. Refer to Obtaining Service.
|
Code |
Description |
|
LS |
Speed signal is not being received. |
|
Err |
EEPROM is damaged. |
|
E2 |
A problem occurred with the lift. |
|
E4 |
Incomplete calibration. |
The following chart may help you understand and troubleshoot erratic heart rate readings.
Note: A heart rate can only be detected when the Precor heart rate receiver is properly installed in the display and the unit is turned ON. You must also wear the chest strap during a workout.
Table 5. Erratic heart rate readings
|
What appears on the display |
Cause |
What to Do |
|
Nothing |
The heart rate receiver is not installed or it has been disconnected. |
Turn the unit ON. Be sure the heart rate receiver is installed properly. Be sure the chest strap is moist, centered, and in direct contact with your skin. |
|
HR |
Setup phase, heart rate detected |
Begin your workout and your heart rate should appear. |
| |
Heart rate is not detected when you access the Heart Rate Control Program |
Be sure the chest strap is moist, centered and in direct program contact with your skin. Stand within three feet of the display and face it. Allow a few seconds for the receiver to detect a signal. |
Note: To conduct electrical impulses from a user’s heart, the electrode strips on the chest strap must be in contact with the user’s skin. Usually, the concentration of salts in a person’s perspiration provides enough conductivity to transmit a signal to the receiver in the display console. However, because of body chemistry or erratic heartbeats, some people cannot use the heart rate feature.
It is important to perform the minor maintenance tasks described below. Failure to maintain the treadmill as described in this section could void the Precor Limited Warranty.
DANGER
To reduce the risk of electrical shock, always unplug the unit from its power source before cleaning it or performing any maintenance tasks.
Inspect the treadmill daily.
1. Look and listen for slipping belts, loose fasteners, unusual noises, worn or frayed power cords, and any other indications that the equipment may need service. If you notice any of these things, obtain service.
Important: If you determine that the treadmill needs service, make sure that the treadmill cannot be used inadvertently. Turn the unit OFF, and then unplug the power cord from its power source. Remove the red magnet and safety clip and store it in a safe place. Make sure other users know that the treadmill needs service.
2. Check for worn, frayed, or missing safety lanyards. Replace missing or worn safety lanyards immediately. A safety lanyard with its safety clip must be attached to the treadmill’s red magnetic button.
To order parts or to contact a Precor authorized service provider in your area, refer to Obtaining Service.
Most of the working mechanisms are protected inside the hood and base of the treadmill. However, for efficient operation, the treadmill relies on low friction. To keep the friction low, the unit’s running belt, staging platforms, and internal mechanisms must be as clean as possible.
Precor recommends the treadmill be cleaned before and after each workout. Use mild soap and water to dampen a soft cloth ad wipe all exposed surfaces. This helps remove any dust or dirt.
CAUTION: Do not use any acidic cleaners. Doing so will void the Precor Limited Warranty. Never pour water or spray liquids on any part of the treadmill. Allow the treadmill to dry completely before using.
Periodically, clean the running belt using a soft nylon scrub brush. Frequently vacuum the floor underneath the unit to prevent the accumulation of dust and dirt, which can affect the smooth operation of the unit.
Store the chest strap where dust and dirt cannot accumulate on it, such as a closet or drawer. Be sure to keep the chest strap protected from extremes in temperature. Do not store it in an area that may be exposed to temperatures below 32° F (0° C).
To clean the chest strap, use a sponge or soft cloth dampened in mild soap and water. Dry the surface thoroughly with a clean towel.
Proper belt alignment allows the belt to remain centered for smooth operation. Realigning the belt takes a few simple adjustments. If you are unsure about this procedure, call Precor Customer Support. Refer to Obtaining Service.
CAUTION: Special care must be taken when aligning the running belt. Turn OFF the treadmill while adjusting or working near the rear roller. Remove any loose clothing and tie back your hair. Be very careful to keep your fingers and any other object clear of the belt and rollers, especially in front of the roller and behind the deck. The treadmill will not stop immediately if an object becomes caught in the belt or rollers.
1. The treadmill has adjustable rear feet. Make sure that the running surface is level. If the treadmill is placed on an uneven surface, adjusting the rear feet can help, but will not compensate for extremely uneven surfaces.
2. Turn the unit ON.
Note: The treadmill will not operate unless the red magnet is appropriately placed on the display console.
3. Stand beside the treadmill and press QUICKSTART.
The running belt starts automatically after a 3-second countdown appears on the display.
4. Press the SPEED ▲ key until the display shows a speed of 3 mph (5 kph).
CAUTION: If you hear any chafing or the running belt appears to be getting damaged, stop the running belt immediately by pressing the STOP key. Contact Precor Customer Support.
5. Walk around to the rear of the unit and observe the belt for a few minutes. The belt should be centered on the platform. If the belt drifts off center, you must make adjustments.
Important: If the belt needs alignment, make the adjustments at once. Failure to align the belt may cause the belt to tear or fray, which is not covered by the Precor Limited Warranty.
6. To stop the running belt, press the STOP key.
7. Turn the treadmill OFF.
If you are unsure about adjusting the running belt, call Precor Customer Support (see Obtaining Service).
CAUTION: Always use the I/O power switch to turn OFF the treadmill before making any adjustments. Do not adjust the running belt when someone is standing on the unit.
1. Locate the right belt adjustment bolt in the rear end cap of the treadmill. Refer to Diagram 12.
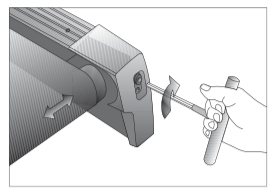
Diagram 12: Adjusting belt location
To determine left and right, stand at the rear of the treadmill and face the display.) Make all belt adjustments on the right rear corner bolt using the hex key provided.
• If the belt is off center to the LEFT, turn the adjusting bolt ¼ turn counterclockwise, which moves the running belt to the right.
• If the belt tracks off center to the RIGHT, turn the bolt ¼ turn clockwise; this moves the belt to the left.
Important: Do not turn the adjusting bolt more than ¼ turn at a time. Overtightening the bolt can damage the treadmill.
2. Recheck the alignment of the running belt.
Do not attempt to service the treadmill yourself except for the maintenance tasks described in this manual. The unit does not contain any user-serviceable parts that require lubrication. For information about product operation or service, call 1-800-347-4404.
When the treadmill is not in use for any length of time, turn it OFF. Make sure that the power cord is unplugged from its power source and is positioned so that it will not become damaged or interfere with people or other equipment. Remove the red magnet and safety clip. Store it in a safe place to prevent unauthorized use.
Reference file: Precor M9.27 Treadmill
Additionally, the document applies to other Precor models: M9.23