Loading ...
Loading ...
Loading ...
en Getting to know your appliance
8
*Getting to know your
appliance
Get t i ng to k now y our appl i ance
In this section, we will explain the indicators and
controls. You will also find out about the various
functions of your appliance.
Note: Depending on the appliance model, individual
details and colours may differ.
Control panel
In the control panel, you can use the various buttons,
touch fields, touch-screen displays and the rotary
selector to set the different appliance functions. The
current settings are shown on the display.
The overview shows the control panel when the
appliance is switched on with the menu display.
Controls
The individual controls are adapted for the various
functions of your appliance. You can set your appliance
simply and directly.
Buttons and touch fields
Here you can find a short explanation of the various
buttons and touch fields.
--------
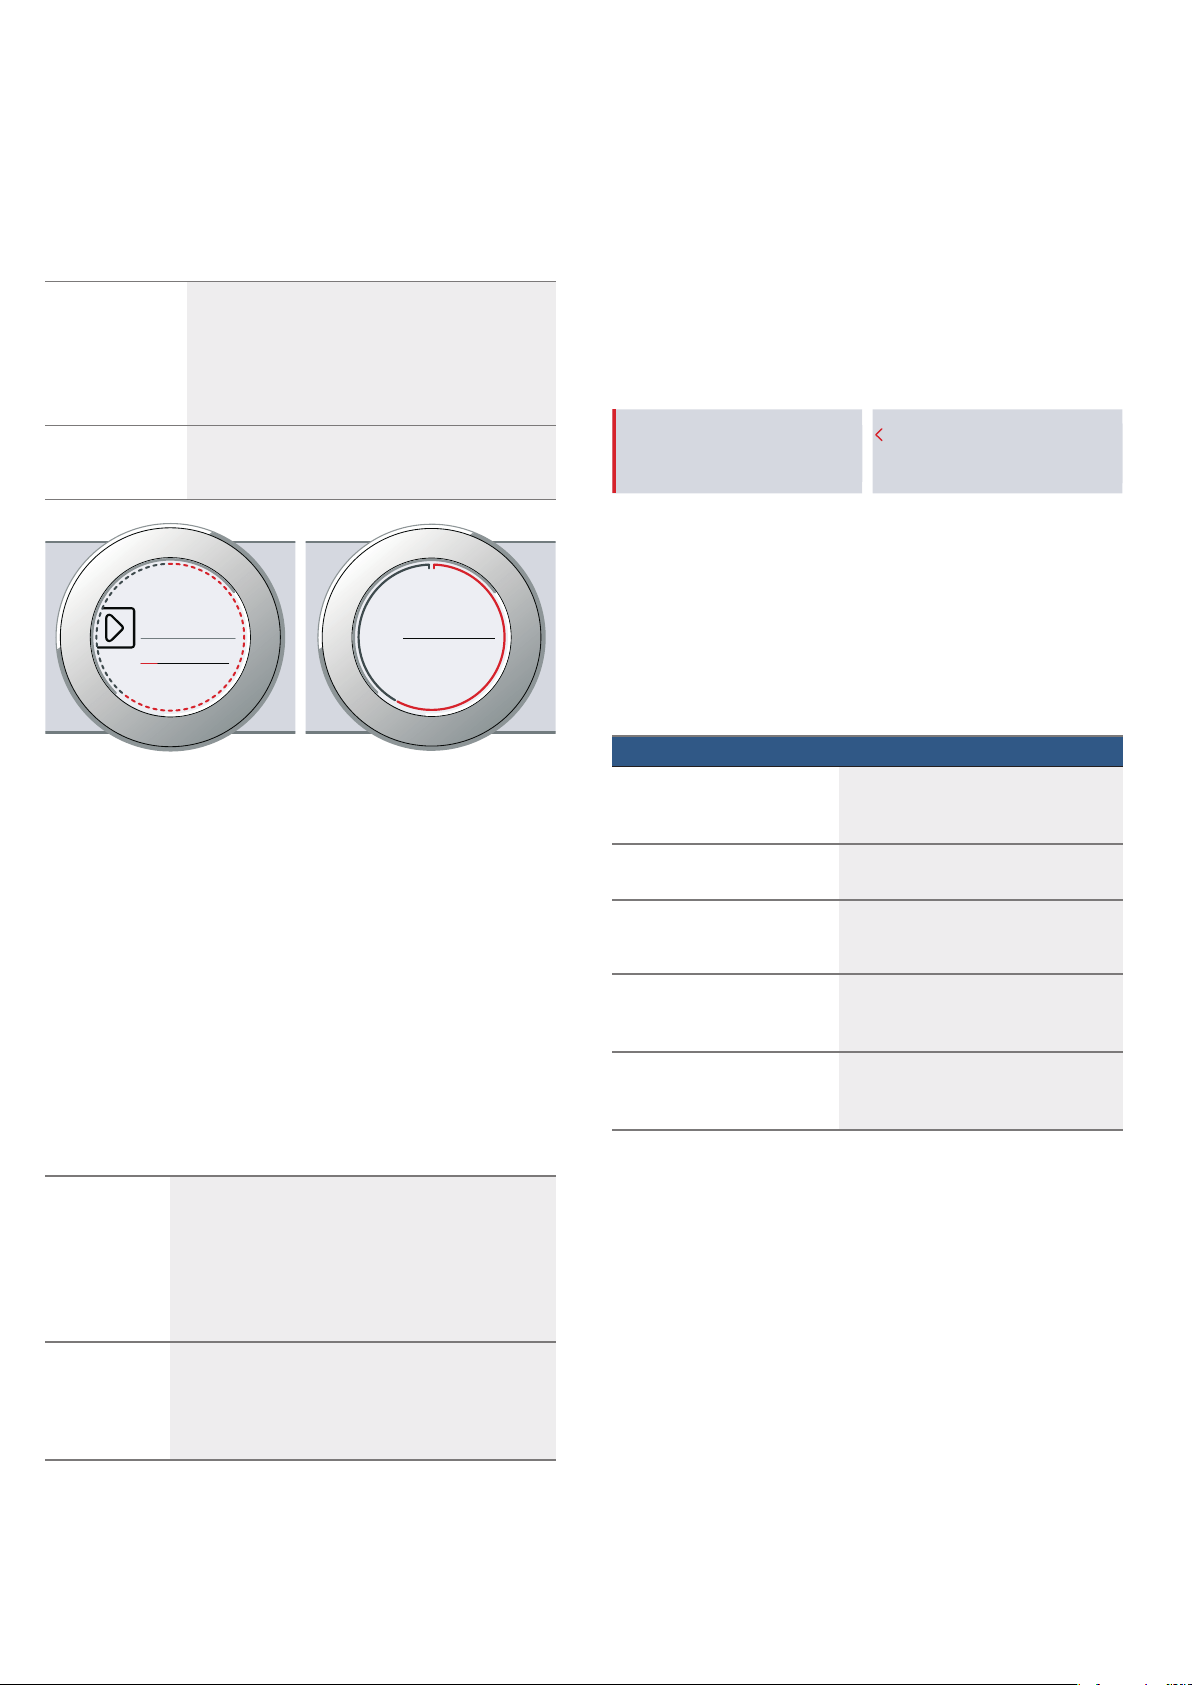
Rotary selector
You can use the rotary selector to change the setting
values shown on the display.
You can also use the rotary selector to scroll through
the selection lists on the touch-screen displays.
In most selection lists, you have to turn the rotary
selector in the opposite direction once you reach the
beginning or the end of the list.
#
+ +
&OHDQLQJ
6HOHFW
0DLQPHQX
%DVLF
VHWWLQJV
6WHDP
$VVLVW
7\SHVRI
KHDWLQJ
( Buttons
The buttons on the left- and right-hand side of the
control panel have a pressure point. Press these
buttons to activate them.
For appliances that do not have a stainless steel
front, these two button touch fields do not have a
pressure point.
0 Touch fields
There are sensors under the touch fields. Simply
touch the respective symbol to select the function.
8 Rotary selector
The rotary selector is fitted so that you can turn it
indefinitely to the left or right. Press it lightly and
move it in the direction required using your finger.
@ Display
You can see the current adjustment values,
options or notes in the display.
H Touch-screen displays
You can see the current selection options in the
touch-screen displays. You can select these here
directly by touching the appropriate text field. The
text fields change depending on the selection.
Symbol Meaning
Buttons
ÿ on/off Switching the appliance on and off
l Start/Stop Starting, pausing or cancelling (hold down
for approx. 3 secs) an operation
Touch fields
Menu Menu Opens the "Operating modes" menu
t Timer Selects the timer
° Information Displays information
D Childproof lock Activating and deactivating (hold down for
approx. 4 secs) the childproof lock
v Open cover Filling or emptying the water tank
Getting to know your appliance en
9
Display
The display is structured so that the information can be
read at a glance in any situation.
The value that you can currently set is highlighted and
displayed in white text. The value in the background is
displayed in grey.
Display ring
The display ring can be found around the outside of the
display.
If you change a value, the display ring shows you where
you are in the selection list. Depending on the settings
area and length of the selection list, the display ring
may be continuous or divided into segments.
During operation, the display ring turns red at second-
long intervals. After every full minute, the segments turn
red again from the beginning. As the cooking time
counts down, one segment disappears every second.
Temperature display
After the operation has started, the current cooking
compartment temperature is displayed graphically on
the display.
Note: Due to thermal inertia, the temperature displayed
may be slightly different to the actual temperature inside
the oven.
Touch-screen displays
The touch-screen displays are both a display medium
and control element at the same time. They show the
options that you can select for a function and the
current setting. To select a function, simply touch the
text field directly.
The function currently selected is identified by a red
vertical bar next to it. Its corresponding value is
highlighted in white on the display.
The small red arrow next to the text field shows the
functions to which you can scroll forwards or
backwards.
Operating modes
Your appliance has various operating modes which
make your appliance easier to use.
You can find more precise descriptions of these in the
corresponding sections.
You can open the "Operating modes" menu by pressing
the menu field.
--------
Highlighted The highlighted value can be changed directly
without first being selected.
After starting an operation, either the temperature
or the level is always highlighted. At the same
time, the white line is the heating line and gradu-
ally turns red.
Enlarged Whilst you are changing the highlighted value
using the rotary selector, only this value is
enlarged on the display.
Heating line The white line under the temperature turns red from
left to right as the cooking compartment heats up.
When you are preheating the appliance, the optimal
time to place the food in the cooking compartment
is when the line has completely turned red.
For set levels, e.g. the grill setting, the heating line
turns red immediately.
Residual heat
indicator
When the appliance is switched off, the display ring
shows the residual heat in the cooking compart-
ment. As the residual heat cools down, the display
ring becomes darker and disappears completely at
some point.
`
&
7HPSH
UDWXUH
P
V
a
&
Operating mode Use
Heating types
~ "Operating the appliance"
on page 15
There are various finely tuned heating
types for the optimal preparation of
your food.
Assist
~ "Dishes" on page 34
For many dishes, there are prepro-
grammed setting values.
Steam
~ "Steam" on page 17
There are various finely tuned steam
types of heating for the optimal prepa-
ration of your food.
Cleaning
~ "Cleaning function"
on page 26
There are several cleaning functions
available: EcoClean, Descaling and
Drying.
Basic settings
~ "Basic settings"
on page 23
You can change your appliance's
basic settings to suit your needs.
7\SHRIKHDWLQJ
'KRWDLU
7HPSHUDWXUH
Loading ...
Loading ...
Loading ...