Operating Instructions Headphones

Making connect
How to make a wireless connection to Bluetooth devices
You can enjoy music and hands-free calling with the headset wirelessly by using your Bluetooth device’s Bluetooth function.
Device registration (pairing)
- To use the Bluetooth function, both of the connecting devices must be registered in advance. The operation to register a device is called “device registration (pairing)”.
- If the device to be connected does not support one-touch connection (NFC), pair the headset and the device manually.
- If the device supports one-touch connection (NFC), you can pair the headset and device and establish a Bluetooth connection by simply touching the headset with the device.
Connecting to a paired device
- Once a device and the headset are paired, there is no need to pair them again. Connect to devices already paired with the headset using the methods necessary for each device.
Easy setup with app
Connecting with the “Sony | Headphones Connect” app
- Launch the “Sony | Headphones Connect” app on your Android smartphone/iPhone to connect the headset to a smartphone or iPhone. For more details, refer to the “Sony | Headphones Connect” app help guide.rd1.sony.net/help/mdr/hpc/h_zz/

Note: The connection with some smartphones and iPhone devices may become unstable when connecting using the “Sony | Headphones Connect” app. In that case, follow the procedures in “Connecting to a paired Android smartphone”, or “Connecting to a paired iPhone ” to connect to the headset.
Android smartphone
Pairing and connecting with an Android smartphone
The operation to register the device that you wish to connect to is called “pairing”. First, pair a device to use it with the headset for the first time. Before starting the operation, make sure of the following:
- The Android smartphone is placed within 1 m (3 feet) of the headset.
- The headset is charged sufficiently.
- The operating instructions of the Android smartphone is in hand.
Connecting to a paired Android smartphone
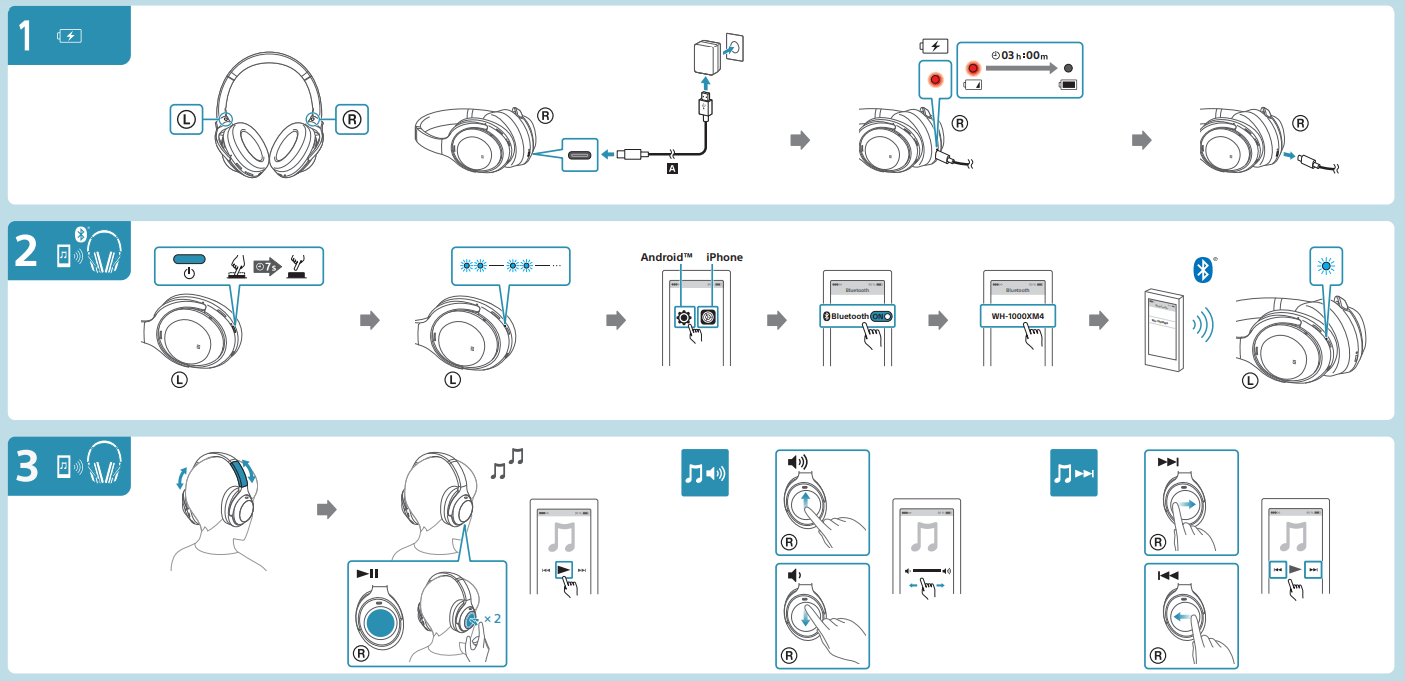
1. Enter pairing mode on this headset
- Turn on the headset when you pair the headset with a device for the first time after you bought it or after you initialized the headset (the headset has no pairing information). The headset enters pairing mode automatically. In this case, proceed to step 2.
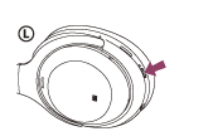
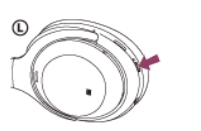
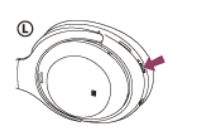
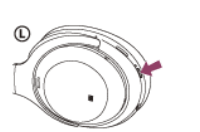
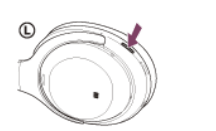
- When you pair a second or subsequent device (the headset has pairing information for other devices), press and hold the
 (power) button for about 7 seconds.
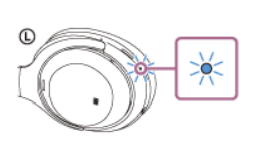
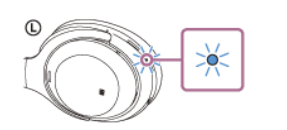
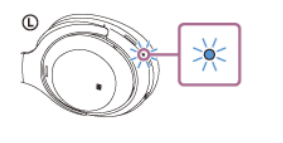
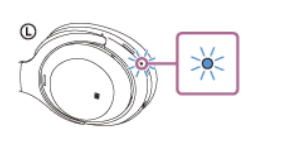
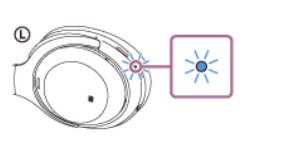
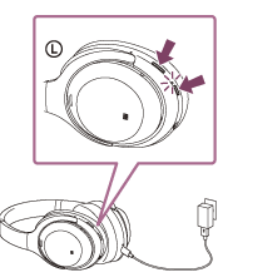
- Check that the indicator (blue) repeatedly flashes twice in a row. You will hear the voice guidance say, “Bluetooth pairing”.
2. Unlock the screen of the Android smartphone if it is locked.
3. Find the headset on the Android smartphone.
- Select [Settings] - [Device connection] - [Bluetooth].
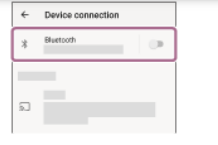
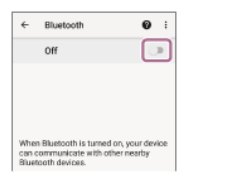
- Touch the switch to turn on the Bluetooth function.
- Touch [WH-1000XM4]. If [WH-1000XM4] and [LE_WH-1000XM4] are displayed, select [WH-1000XM4]. [LE_WH-1000XM4] will be displayed first, but wait until [WH-1000XM4] is displayed. It may take about 30 seconds to 1 minute for [WH-1000XM4] to be displayed. If [WH-1000XM4] is not displayed, try again from step 1
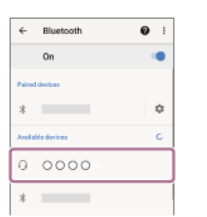
If Passkey (*) input is required, input “0000”. The headset and smartphone are paired and connected with each other. You will hear the voice guidance say, “Bluetooth connected”. If they are not connected, see “Connecting to a paired Android smartphone”. 4 * A Passkey may be called “Passcode”, “PIN code”, “PIN number”, or “Password”.
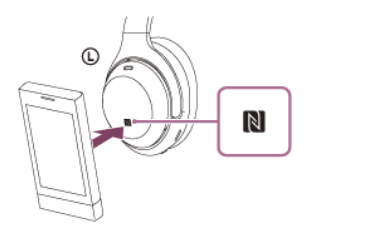
By touching the headset with a smartphone, the headset turns on automatically and then pairs and makes a Bluetooth connection.
Compatible smartphones
- NFC-compatible smartphones installed with Android 4.1 or later
What is NFC? NFC (Near Field Communication) is a technology enabling short-range wireless communication between various devices, such as smartphones and IC tags. Thanks to the NFC function, data communication — for example, Bluetooth pairing — can be achieved easily by simply touching NFC-compatible devices together (i.e., at the N-Mark symbol or location designated on each device).
1. Unlock the screen of the smartphone if it is locked.
2 Turn on the smartphone’s NFC function.
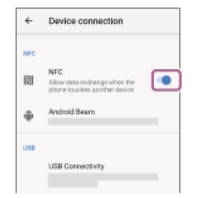
- Select [Settings] - [Device connection].
- Touch the switch to turn on the NFC function.
3. Touch the smartphone with the headset.
- Touch the smartphone on the N-Mark of the headset. Keep touching the headset with the smartphone until the smartphone reacts.
- Refer to the operating instructions of the smartphone for the designated location to be touched on the smartphone.
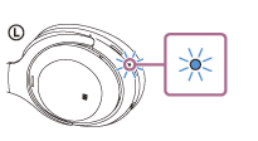
- Follow the on-screen instructions to complete the pairing and connection. When the headset is connected with the smartphone, the indicator (blue) starts flashing slowly. You will hear the voice guidance say, “Bluetooth connected”.
- To disconnect, touch the smartphone again with the headset. You will hear the voice guidance say, “Bluetooth disconnected”.
- To connect a paired smartphone, perform step 3.
- Unlock the screen of the smartphone if it is locked.
Hint:
- The operation above is an example. For more details, refer to the operating instructions supplied with the Android smartphone.
- If you cannot connect the headset, try the following.
- Unlock the screen of the smartphone if it is locked, and move the smartphone slowly over the N-Mark.
- If the smartphone is in a case, remove the case.
- Check that the Bluetooth function of the smartphone is enabled.
- If you touch an NFC-compatible smartphone connected to another NFC-compatible device with the headset, the smartphone terminates the Bluetooth connection with any current devices, and connects to the headset via one-touch (NFC) (One-touch connection switching).
iPhone (iOS devices)
Pairing and connecting with an iPhone
The operation to register the device that you wish to connect to is called “pairing”. First, pair a device to use it with the headset for the first time.
Before starting the operation, make sure of the following:
- The iPhone is placed within 1 m (3 feet) of the headset.
- The headset is charged sufficiently.
- The operating instructions of the iPhone is in hand.
1. Enter pairing mode on this headset.
- Turn on the headset when you pair the headset with a device for the first time after you bought it or after you initialized the headset (the headset has no pairing information). The headset enters pairing mode automatically. In this case, proceed to step 2.
- When you pair a second or subsequent device (the headset has pairing information for other devices), press and hold the (power) button for about 7 seconds.
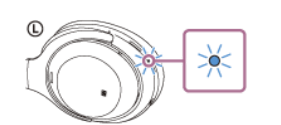
- Check that the indicator (blue) repeatedly flashes twice in a row. You will hear the voice guidance say, “Bluetooth pairing”.
2. Unlock the screen of the iPhone if it is locked.
3 Find the headset on the iPhone.
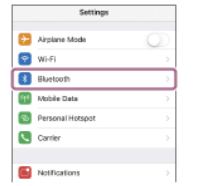
- Select [Settings].
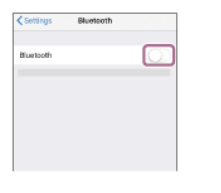
- Touch [Bluetooth].
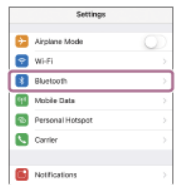
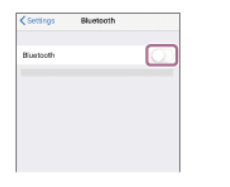
- Touch the switch to turn on the Bluetooth function.
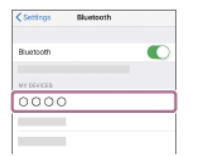
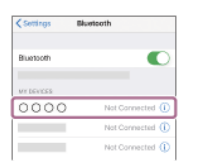
4. Touch [WH-1000XM4].
- If [WH-1000XM4] and [LE_WH-1000XM4] are displayed, select [WH-1000XM4]. [LE_WH-1000XM4] will be displayed first, but wait until [WH-1000XM4] is displayed. It may take about 30 seconds to 1 minute for [WH-1000XM4] to be displayed. If [WH-1000XM4] is not displayed, try again from step 1.
- If Passkey (*) input is required, input “0000”. The headset and iPhone are paired and connected with each other. You will hear the voice guidance say, “Bluetooth connected”.
- If they are not connected, see “Connecting to a paired iPhone ”. 4 * A Passkey may be called “Passcode”, “PIN code”, “PIN number”, or “Password”.
Connecting to a paired iPhone
1. Unlock the screen of the iPhone if it is locked.
2. Turn on the headset.
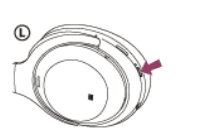
- Press and hold the (power) button for about 2 seconds.
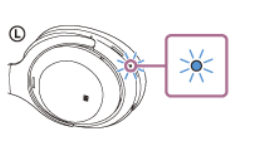
- You will hear the voice guidance say, “Power on”. Check that the indicator (blue) continues to flash after you release your finger from the button.
- If the headset has automatically connected to the last connected device, you will hear the voice guidance say, “Bluetooth connected”. Check the connection status on the iPhone. If it is not connected, proceed to step 3.
3. Display the devices paired with the iPhone.
- Select [Settings].
- Touch [Bluetooth].
- Touch the switch to turn on the Bluetooth function.
- Touch [WH-1000XM4]. You will hear the voice guidance say, “Bluetooth connected”.
Computers
Pairing and connecting with a computer (Windows 10)
The operation to register the device that you wish to connect to is called “pairing”. First, pair a device to use it with the headset for the first time.
Before starting the operation, make sure of the following:
- Your computer has a Bluetooth function that supports music playback connections (A2DP).
- When you use a video calling application on your computer, your computer has a Bluetooth function that supports calling connections (HFP/HSP).
- The computer is placed within 1 m (3 feet) of the headset.
- The headset is charged sufficiently.
- The operating instructions of the computer is in hand.
- Depending on the computer you are using, the built-in Bluetooth adaptor may need to be turned on. If you do not know how to turn on the Bluetooth adaptor or are unsure if your computer has a built-in Bluetooth adaptor, refer to the operating instructions supplied with the computer.
1. Enter pairing mode on this headset.
- Turn on the headset when you pair the headset with a device for the first time after you bought it or after you initialized the headset (the headset has no pairing information). The headset enters pairing mode automatically. In this case, proceed to step 2.
- When you pair a second or subsequent device (the headset has pairing information for other devices), press and hold the (power) button for about 7 seconds.
- Check that the indicator (blue) repeatedly flashes twice in a row. You will hear the voice guidance say, “Bluetooth pairing”.
2. Wake the computer up if the computer is in standby (sleep) or hibernation mode.
3 Register the headset using the computer.
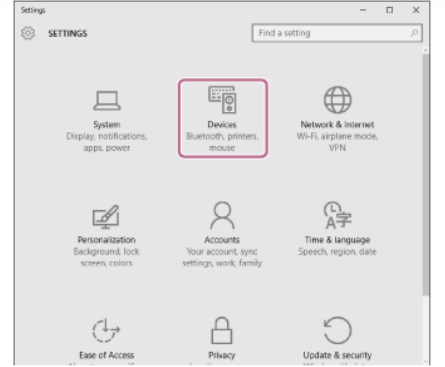
- Click the [Start] button, then [Settings].
- Click [Devices].
- Click the [Bluetooth] tab, click the [Bluetooth] switch to turn on the Bluetooth function, then select [WH1000XM4]. If [WH-1000XM4] and [LE_WH-1000XM4] are displayed, select [WH-1000XM4]. [LE_WH-1000XM4] will be displayed first, but wait until [WH-1000XM4] is displayed. It may take about 30 seconds to 1 minute for [WH-1000XM4] to be displayed. If [WH-1000XM4] is not displayed, try again from step 1.
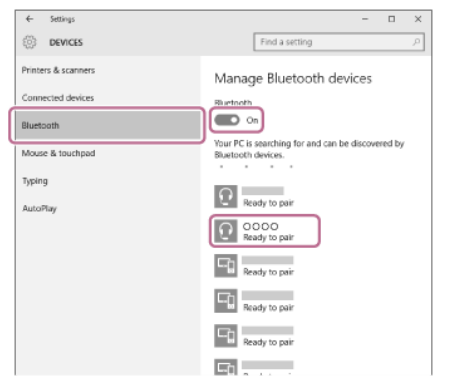
If Passkey (*) input is required, input “0000”. The headset and computer are paired and connected with each other. You will hear the voice guidance say, “Bluetooth connected”. If they are not connected, see “Connecting to a paired computer (Windows 10)”. * A Passkey may be called “Passcode”, “PIN code”, “PIN number”, or “Password”.
Pairing and connecting with a computer (Windows 8.1)
The operation to register the device that you wish to connect to is called “pairing”. First, pair a device to use it with the headset for the first time.
Before starting the operation, make sure of the following:
- Your computer has a Bluetooth function that supports music playback connections (A2DP).
- When you use a video calling application on your computer, your computer has a Bluetooth function that supports calling connections (HFP/HSP).
- The computer is placed within 1 m (3 feet) of the headset.
- The headset is charged sufficiently.
- The operating instructions of the computer is in hand.
- Depending on the computer you are using, the built-in Bluetooth adaptor may need to be turned on. If you do not know how to turn on the Bluetooth adaptor or are unsure if your computer has a built-in Bluetooth adaptor, refer to the operating instructions supplied with the computer.
1. Enter pairing mode on this headset.
- Turn on the headset when you pair the headset with a device for the first time after you bought it or after you initialized the headset (the headset has no pairing information). The headset enters pairing mode automatically. In this case, proceed to step 2.
- When you pair a second or subsequent device (the headset has pairing information for other devices), press and hold the (power) button for about 7 seconds.
- Check that the indicator (blue) repeatedly flashes twice in a row. You will hear the voice guidance say, “Bluetooth pairing”.
2. Wake the computer up if the computer is in standby (sleep) or hibernation mode.
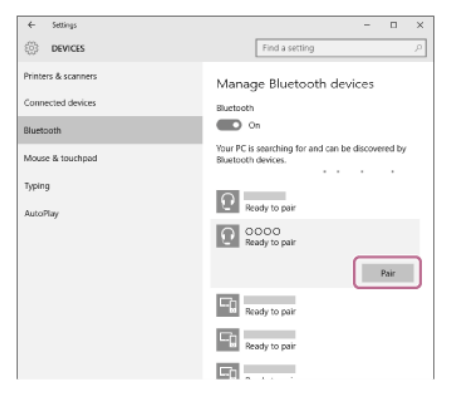
3 Register the headset using the computer.
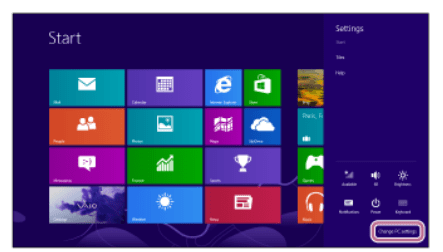
- Move the mouse pointer to the top-right corner of the screen (when using a touch panel, swipe from the right edge of the screen), then select [Settings] from the Charm Bar.
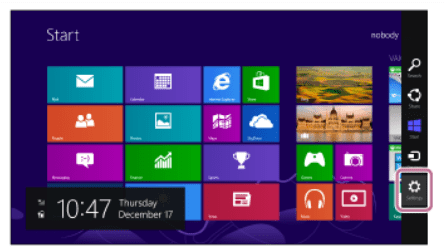
- Select [Change PC Settings] of the [Settings] charm.
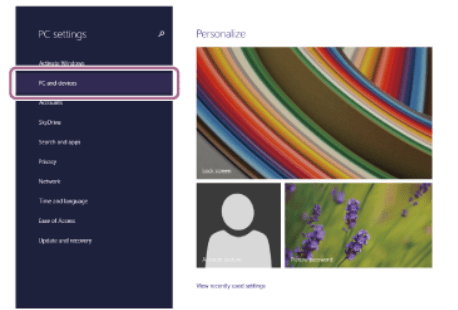
- Select [PC and devices] of the [PC Settings] screen.
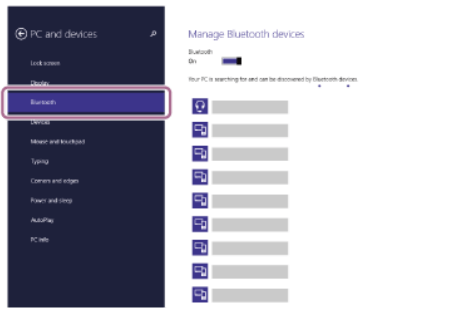
- Select [WH-1000XM4], then select [Pair]. If [WH-1000XM4] and [LE_WH-1000XM4] are displayed, select [WH-1000XM4]. [LE_WH-1000XM4] will be displayed first, but wait until [WH-1000XM4] is displayed. It may take about 30 seconds to 1 minute for [WH-1000XM4] to be displayed. If [WH-1000XM4] is not displayed, try again from step 1.
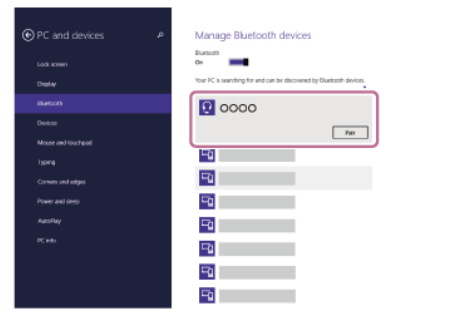
If Passkey (*) input is required, input “0000”. The headset and computer are paired and connected with each other. You will hear the voice guidance say, “Bluetooth connected”. If they are not connected, see “Connecting to a paired computer (Windows 8.1)”. [LE_WH-1000XM4] will be displayed first, but wait until [WH-1000XM4] is displayed. It may take about 30 seconds to 1 minute for [WH-1000XM4] to be displayed. If [WH-1000XM4] is not displayed, try again from step . * A Passkey may be called “Passcode”, “PIN code”, “PIN number”, or “Password”.
Other Bluetooth devices
Pairing and connecting with a Bluetooth device
The operation to register the device that you wish to connect to is called “pairing”. First, pair a device to use it with the headset for the first time.
Before starting the operation, make sure of the following:
- The Bluetooth device is placed within 1 m (3 feet) of the headset.
- The headset is charged sufficiently.
- The operating instructions of the Bluetooth device is in hand.
1. Enter pairing mode on this headset.
- Turn on the headset when you pair the headset with a device for the first time after you bought it or after you initialized the headset (the headset has no pairing information). The headset enters pairing mode automatically. In this case, proceed to step 2.
- When you pair a second or subsequent device (the headset has pairing information for other devices), press and hold the (power) button for about 7 seconds.
- Check that the indicator (blue) repeatedly flashes twice in a row. You will hear the voice guidance say, “Bluetooth pairing”.
2. Perform the pairing procedure on the Bluetooth device to search for this headset. [WH-1000XM4] will be displayed on the list of detected devices on the screen of the Bluetooth device. If [WH-1000XM4] and [LE_WH-1000XM4] are displayed, select [WH-1000XM4]. [LE_WH-1000XM4] will be displayed first, but wait until [WH-1000XM4] is displayed. It may take about 30 seconds to 1 minute for [WH-1000XM4] to be displayed. If [WH-1000XM4] is not displayed, try again from step 1.
3. Select [WH-1000XM4] displayed on the screen of the Bluetooth device for pairing. If Passkey (*) input is required, input “0000”. 3 * A Passkey may be called “Passcode”, “PIN code”, “PIN number”, or “Password”.
4. Make the Bluetooth connection from the Bluetooth device. Some devices automatically connect with the headset when the pairing is complete. You will hear the voice guidance say, “Bluetooth connected”.
Connecting to a paired Bluetooth device
1. Turn on the headset.
- Press and hold the (power) button for about 2 seconds.
- You will hear the voice guidance say, “Power on”. Check that the indicator (blue) continues to flash after you release your finger from the button.
- f the headset has automatically connected to the last connected device, you will hear the voice guidance say, “Bluetooth connected”. Check the connection status on the Bluetooth device. If it is not connected, proceed to step 2.
2. Make the Bluetooth connection from the Bluetooth device. As for the operations on your Bluetooth device, refer to the operating instructions supplied with the Bluetooth device. When connected, you will hear the voice guidance say, “Bluetooth connected”.
Multipoint connection
Connecting the headset to both a music player and a smartphone / mobile phone (multipoint connection)
Multipoint is a function which allows you to connect 2 Bluetooth devices to the headset and use one device for music playback (A2DP connection) and the other for calls (HFP/HSP connection).
When you wish to use a music player only for music playback and a smartphone only for calls, use a multipoint connection to the headset for each device. The connecting devices need to support the Bluetooth function.
- Pair the headset with both the music player and the smartphone/mobile phone.
- Connect the headset with the music player. Operate the music player to establish a Bluetooth connection with the headset.
- Connect the headset to the smartphone/mobile phone. Operate the smartphone/mobile phone to establish a Bluetooth connection with the headset.
Connecting the headset to 2 Android smartphones (multipoint connection)
Usually, when you connect the headset to a smartphone, both the music playback function and the phone call function are connected simultaneously.
To make a multipoint connection using 2 smartphones to use one for listening to music and the other for making phone calls, set up to connect to only one function by operating the smartphone.
1. Pair the headset with both smartphones, respectively.
2. Operate one of the smartphones to establish a Bluetooth connection with the headset.
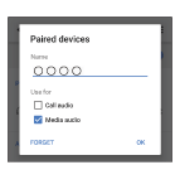
3. Operate the smartphone connected to the headset, uncheck either [Call audio] (HFP) or [Media audio] (A2DP).
- Operation example: For connecting only through media audio (A2DP) Touch [Settings] - [Device connection] - [Bluetooth] - the setting icon next to [WH-1000XM4].
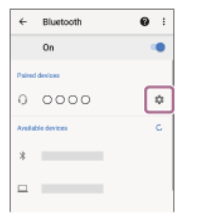
- On the [Paired devices] screen, uncheck [Call audio].
4. Operate the smartphone to terminate the Bluetooth connection.
5. Operate the other smartphone to establish a Bluetooth connection with the headset.
6. In the same way, uncheck the function that you did not uncheck in step 3.
7. Operate the first smartphone to establish a Bluetooth connection with the headset. Both smartphones are connected to the headset with only one function enabled.
Listening to music
Listening to music via a Bluetooth connection
Listening to music from a device via Bluetooth connection
If your Bluetooth device supports the following profiles, you can enjoy listening to music and control the device from your headset via Bluetooth connection.
- A2DP (Advanced Audio Distribution Profile) You can enjoy high-quality music wirelessly.
- AVRCP (Audio Video Remote Control Profile) You can adjust the volume, etc.
The operation may vary depending on the Bluetooth device. Refer to the operating instructions supplied with the Bluetooth device.
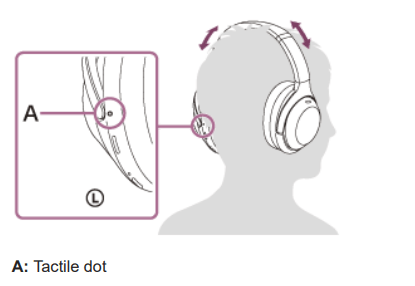
1. Connect the headset to a Bluetooth device.
2. Put the headset on your ears. Adjust the length of the headband. Put the headset on your head with the L (left) mark on your left ear and the R (right) mark on your right ear. There is a tactile dot on the L (left) mark side.
3.Operate the Bluetooth device to start playback and adjust the volume to a moderate level.
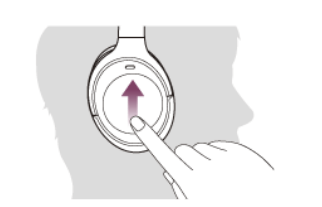
4. Adjust the volume using the touch sensor control panel of the headset. Increase the volume:
- Swipe up repeatedly until the volume reaches the desired level.
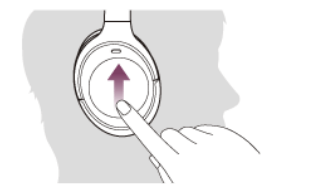
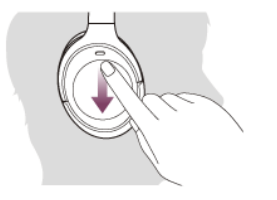
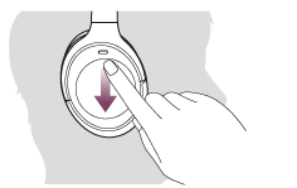
- Decrease the volume: Swipe down repeatedly until the volume reaches the desired level.
- Change the volume continuously: Swipe up or down and hold. Release at the desired volume level
When the volume reaches the maximum or minimum, an alarm sounds.
Disconnecting Bluetooth connection (after use)
- Unlock the screen of the Bluetooth device if it is locked.
- Touch the one-touch connection (NFC) compatible device again to disconnect it. If the Bluetooth device does not support one-touch connection (NFC), disconnect the device by operating the device. When disconnected, you will hear the voice guidance say, “Bluetooth disconnected”.
- Turn off the headset. You will hear the voice guidance say, “Power off”.
Making phone calls
Receiving a call
You can enjoy a hands-free call with a smartphone or mobile phone that supports the Bluetooth profile HFP (Hands-free Profile) or HSP (Headset Profile), via Bluetooth connection.
- If your smartphone or mobile phone supports both HFP and HSP, set it to HFP.
- The operation may vary depending on the smartphone or mobile phone. Refer to the operating instructions supplied with the smartphone or mobile phone.
- Only ordinary phone calls are supported. Applications for phone calls on smartphones or personal computers are not supported.
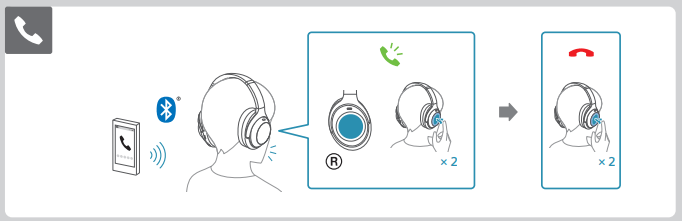
Ring tone: When an incoming call arrives, a ring tone will be heard from the headset, and the indicator (blue) flashes quickly. You will hear either of following ring tones, depending on your smartphone or mobile phone.
- Ring tone set on the headset
- Ring tone set on the smartphone or mobile phone
- Ring tone set on the smartphone or mobile phone only for a Bluetooth connection
1. Connect the headset to a smartphone or mobile phone via Bluetooth connection beforehand.
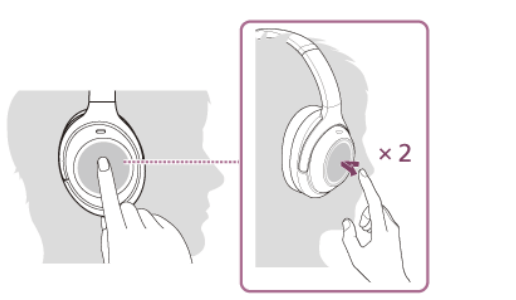
2. When you hear the ring tone, tap the touch sensor control panel twice quickly (with an interval of about 0.4 seconds) to receive the call.
- When an incoming call arrives while you are listening to music, playback pauses and a ring tone will be heard from the headset.
- The headset has omnidirectional microphones. You can talk without worrying about the position of the microphone.
If no ring tone is heard via the headset
- The headset may not be connected with the smartphone or mobile phone over HFP or HSP. Check the connection status on the smartphone or mobile phone.
- If playback does not pause automatically, operate the headset to pause playback.
3. Adjust the volume using the touch sensor control panel.
- Increase the volume: Swipe up repeatedly until the volume reaches the desired level.
- Decrease the volume: Swipe down repeatedly until the volume reaches the desired level
- Change the volume continuously: Swipe up or down and hold. Release at the desired volume level.
When the volume reaches the maximum or minimum, an alarm sounds.
4. When you finish your phone call, tap the touch sensor control panel twice quickly (with an interval of about 0.4 seconds) to end the call. If you received a call during music playback, music playback resumes automatically after ending the call.
Using the voice assist function
Using the Google Assistant
By using the Google Assistant feature that comes with the smartphone, you can speak to the headset’s microphone to operate the smartphone or perform a search.
Compatible smartphones
- Smartphones installed with Android 5.0 or later (The latest version of the Google app is required.)
- iPhone/iPod touch (Installation of the Google Assistant app is required.)
1. If your smartphone is an iPhone/iPod touch, open the Google Assistant app.
- If your smartphone is an Android smartphone, skip this step.
2. Open the “Sony | Headphones Connect” app, and set the CUSTOM button as the Google Assistant button.
- When using the Google Assistant for the first time, open the Google Assistant app and touch [Finish headphones setup] on the Conversation View, and follow the on-screen instructions to complete initial settings for the Google Assistant.
- For details on the “Sony | Headphones Connect” app, refer to the following URL. /rd1.sony.net/help/mdr/hpc/h_zz/
3. Press the CUSTOM button to use the Google Assistant.
- Press and hold the button: Input a voice command
- Press the button once: Read out the notification
- Press the button twice quickly: Cancel the voice command
Using the apps
What you can do with the “Sony | Headphones Connect” app
When you connect the smartphone with the “Sony | Headphones Connect” app installed and the headset via Bluetooth connection, you can do the following.
- Easy pairing
- Display the remaining battery charge of the headset
- Display the Bluetooth connection codec
- Adjust the noise canceling function and Ambient Sound Mode (ambient sound control)
- Use auto adjustment of the noise canceling function by behavior recognition (Adaptive Sound Control)
- NC Optimizer (Optimizing the noise canceling function)
- Switch between enabled/disabled the automatic audio detection and set the Speak-to-Chat
- Select the Equalizer setting
- Customize the Equalizer setting
- Set the Bluetooth connection mode (sound quality mode)
- Set the DSEE Extreme (completion for high-range sound) function
- Change the function of the CUSTOM button
- Turn off the headset
- Adjust the playback volume
- Play/pause music, skip to the beginning of the previous track (or the current track during playback)/skip to the beginning of the next track
- Check the connection status and the settings of the headset
- Check the headset software version
- Update the headset software
- Switch the voice guidance language
- Turn the voice guidance on/off
- Switch the touch sensor control panel on/off setting
- Set the wearing detection automatic power off function
- Set the wearing detection automatic music playback pause and resume function
- Switch the multipoint connection (Connect the headset to 2 devices simultaneously) on/off setting
Troubleshooting
What can I do to solve a problem?
If the headset does not function as expected, try the following steps to resolve the issue.
- Find the symptoms of the issue in this Help Guide, and try any corrective actions listed.
- Charge the headset.
- You may be able to resolve some issues by charging the headset battery.
- Reset the headset.
- Initialize the headset. This operation resets volume settings, etc. to the factory settings, and deletes all pairing information.
- Look up information on the issue on the customer support website.
If the operations above do not work, consult your nearest Sony dealer.
Power/Charging
1. Unable to turn on the headset.
- Make sure the battery is fully charged.
- The headset cannot be turned on while charging the battery.
- Remove the USB Type-C cable and turn on the headset.
- Reset the headset
2. Charging cannot be done.
- Be sure to use the supplied USB Type-C cable.
- Check that the USB Type-C cable is firmly connected to the headset and the USB AC adaptor or computer.
- Make sure that the USB AC adaptor is firmly connected to the AC outlet.
- Check that the computer is turned on.
- Wake the computer up if the computer is in standby (sleep) or hibernation mode.
- When using Windows 8.1, update using Windows Update.
- Reset the headset.
3. Charging time is too long.
- Check that the headset and the computer are directly connected, not via a USB hub.
- Check that you are using a commercially available USB AC adaptor capable of supplying an output current of 1.5 A or more.
- Check that you are using the supplied USB Type-C cable.
4. The headset cannot be charged even if connecting the headset to a computer.
- Check that the supplied USB Type-C cable is properly connected to the USB port of the computer.
- Check that the headset and the computer are directly connected, not via a USB hub.
- There may be a problem with the USB port of the connected computer.
- Try connecting to another USB port on the computer if one is available. Try the USB connection procedure again in cases other than those stated above.
5. The remaining battery charge of the headset is not displayed on the screen of smartphone.
- Only the iOS devices (including iPhone/iPod touch) which support HFP (Hands-free Profile), and Android smartphone (OS 8.1 or later) can display the remaining battery charge.
- Check that the smartphone is connected with HFP. If the smartphone is not connected with HFP, the remaining battery charge will not be correctly displayed.
Sound
1. No sound
- Check that both the headset and the connected device (i.e., smartphone) are turned on.
- When playing music, check that the headset and the transmitting Bluetooth device are connected via an A2DP Bluetooth connection.
- When using a video calling application on a computer, check that the headset and the computer are connected via an HFP or HSP Bluetooth connection. Depending on the video calling application you are using, microphone settings may not be available. In that case, disable Speak-to-Chat.
- Turn up the volume if it is too low.
- Check that the connected device is playing back.
- If you are connecting a computer to the headset, make sure the audio output setting of the computer is set for a Bluetooth device.
- Pair the headset and the Bluetooth device again.
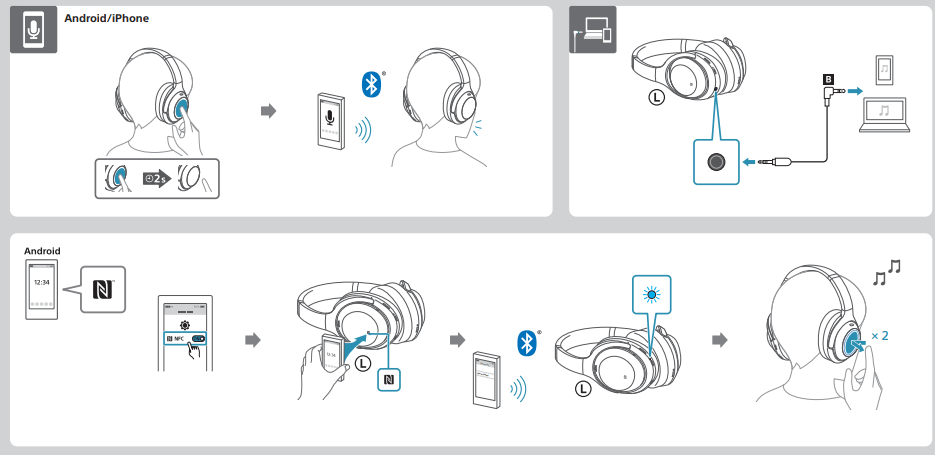
- Check that the headphone cable is connected firmly.
- When Speak-to-Chat is enabled, the Speak-to-Chat mode may launch and respond to the audio (in particular, recordings of conversations in foreign language study materials) that is playing even when the headset is not being worn. In this case, use the headset buttons or touch panel to exit the Speak-to-Chat mode.
- Reset the headset.
- Charge the headset. Check if the sound is output from the headset after charging.
- Initialize the headset, and pair the headset and the device again.
2. Low sound level
- Turn up the volume of the headset and the connected device.
- Connect the Bluetooth device to the headset once again.
3. Low sound quality
- Turn down the volume of the connected device if it is too loud.
- Keep the headset away from a microwave oven, wireless LAN device, etc.
- Bring the headset closer to the Bluetooth device. Remove any obstacles between the headset and the Bluetooth device.
- Keep the headset away from a TV.
- When playing music, if the headset and the transmitting Bluetooth device are connected via an HFP or HSP Bluetooth connection, switch the Bluetooth connection to A2DP with the connected device.
- When using a video calling application on a computer, switch the Bluetooth connection to HFP or HSP with the computer. During a video call, sound quality may become low due to the conditions of the communication line.
- If you connect a device with a built-in radio or tuner to the headset, broadcasts may not be received or the sensitivity may be reduced. Move the headset away from the connected device.
- If the headset connects to the previously connected Bluetooth device, the headset may only establish the HFP/HSP Bluetooth connection when it is turned on. Use the connected device to connect via an A2DP Bluetooth connection.
- When listening to music from a computer on the headset, the sound quality may be poor (e.g., difficult to hear the singer’s voice, etc.) for the first few seconds after a connection is established. This is due to the computer specifications (priority on stable connection at the start of transmission and then switches to priority on sound quality several seconds later) and is not a headset malfunction. If the sound quality does not improve after a few seconds, use the computer to establish an A2DP connection. As for the operations on your computer, refer to the operating instructions supplied with the computer.
- When [Connect to 2 devices simultaneously] is turned on with the “Sony | Headphones Connect” app, LDAC cannot be used. If you want to use LDAC for music playback, turn [Connect to 2 devices simultaneously] off.
3. Sound skips frequently
- Set the headset to “Priority on stable connection” mode. For details, see “About the sound quality mode”.
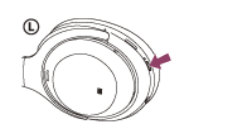
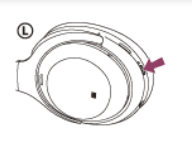
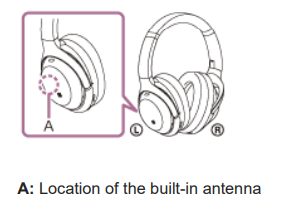
- Remove any obstacles between the antenna of the connecting Bluetooth device and the built-in antenna of the headset. The antenna of the headset is built into the part shown in the dotted line below.
- Bluetooth communications may be disabled, or noise or audio dropout may occur under the following conditions.
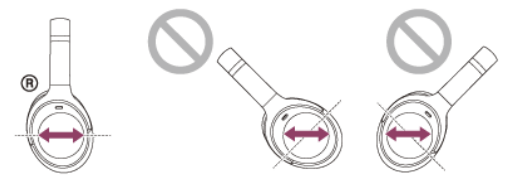
- When there is a human body between the headset and the Bluetooth device In this case, put the Bluetooth device in the same direction as the antenna of the headset to improve the Bluetooth communications.
- There is an obstacle, such as metal or a wall, between the headset and the Bluetooth device.
- In places with wireless LAN, where a microwave oven is used, electromagnetic waves are generated, etc.
- The situation may be improved by changing the wireless playback quality settings or fixing the wireless playback mode to SBC on the transmitting device. For details, refer to the operating instructions supplied with the transmitting device.
- Because Bluetooth devices and wireless LAN (IEEE802.11b/g/n) use the same frequency band (2.4 GHz), microwave interference may occur and result in noise, audio dropouts, or communications being disabled if this headset is used near a wireless LAN device. In such a case, perform the following steps.
- When connecting the headset to a Bluetooth device, use the headset at least 10 m (30 feet) away from the wireless LAN device.
- If this headset is used within 10 m (30 feet) of a wireless LAN device, turn off the wireless LAN device.
- Use this headset and the Bluetooth device as near to each other as possible.
- If you are enjoying music with your smartphone, the situation may be improved by shutting down unnecessary apps or restarting your smartphone.
- Connect the headset and the Bluetooth device once again.
4. The effect of noise canceling is not sufficient.
- Make sure that the noise canceling function is turned on.
- Adjust the headset into a comfortable position.
- The noise canceling function is effective in low frequency ranges such as airplanes, trains, offices, near airconditioning, and is not as effective for higher frequencies, such as human voices.
- Check that the Adaptive Sound Control is turned off. Check the setting of the Adaptive Sound Control on the “Sony | Headphones Connect” app. When the Adaptive Sound Control is turned on, the noise canceling function may become insufficient
Bluetooth connection
1. Pairing cannot be done.
- Bring the headset and the Bluetooth device within 1 m (3 feet) from each other.
- The headset automatically enters pairing mode when pairing for the first time after purchasing, initializing, or repairing the headset. To pair a second or subsequent device, press and hold the (power) button of the headset for 7 seconds or more to enter pairing mode.
- When pairing a device once again after initializing or repairing the headset, you may be unable to pair the device if it retains pairing information for the headset (iPhone or other device). In this case, delete the pairing information for the headset from the device and pair them again.
2. One-touch connection (NFC) does not work.
- Keep the smartphone close to the N-mark on the headset until the smartphone responds. If it still does not respond, slowly move the smartphone around in different directions.
- Check that the NFC function of the smartphone is turned on.
- If the smartphone is in a case, remove the case.
- NFC reception sensitivity varies depending on the smartphone. If it repeatedly fails to connect, connect/disconnect on the smartphone.
- You cannot establish a one-touch connection (NFC) while charging the battery, because the headset cannot be turned on. Finish charging before establishing the one-touch connection (NFC).
- You cannot establish a one-touch connection (NFC) when the headphone cable is connected to the headphone cable input jack. Remove the headphone cable before establishing the one-touch connection (NFC).
- Check that the connecting device supports the NFC function.
- Check that the Bluetooth function of the smartphone is turned on.
3. Unable to make a Bluetooth connection.
- Check that the headset is turned on.
- Check that the Bluetooth device is turned on and the Bluetooth function is on.
- If the headset automatically connects to the last connected Bluetooth device, you may fail to connect the headset to other devices via Bluetooth connection. In that case, operate the last connected Bluetooth device and disconnect the Bluetooth connection.
- Check if the Bluetooth device is in sleep mode. If the device is in sleep mode, cancel the sleep mode.
- Check if the Bluetooth connection has been terminated.
- If terminated, make the Bluetooth connection again. If the pairing information for the headset has been deleted on the Bluetooth device, pair the headset with the device again.
4. Distorted sound
- Keep the headset away from a microwave oven, wireless LAN device, etc.
5. The headset does not operate properly.
- You cannot operate the touch sensor control panel when not wearing the headset. Wear the headset and operate the touch sensor control panel.
- When you wear the headset with your face up or down, or when you wear the headset upside down, wearing detection may not work properly, and the touch sensor control panel and CUSTOM button may not be available for operation. Wear the headset correctly while facing forward, or press the (power) button briefly.
- When you wear the headset over a cap, a scarf, hair, etc., wearing detection may not work properly, and the touch sensor control panel may not be available for operation. Wear the headset so that your ears are inside the earpads.
- Reset the headset. This operation does not delete pairing information.
- If the headset does not operate properly even if you reset the headset, initialize the headset
6. Cannot hear a person on a call.
- Check that both the headset and the connected device (i.e., smartphone) are turned on.
- Turn up the volume of the connected device and the volume of the headset if they are too low.
- Check the audio settings of the Bluetooth device to make sure the sound is output from the headset during a call.
- Use the Bluetooth device to re-establish the connection. Select HFP or HSP for the profile.
- If you are listening to music with the headset, stop playback and tap the touch sensor control panel twice quickly (with an interval of about 0.4 seconds) to respond to an incoming call.
7. Low voice from callers
- Turn up the volume of the headset and the connected device.
8. The touch sensor control panel does not respond correctly
- The sensor of the touch sensor control panel is built into the flat surface of the right unit. Operate within the range of the sensor.

- When you swipe your finger forward/backward or up/down on the touch sensor control panel, the touch sensor control panel may not work correctly depending on the angle at which the headset is worn or the direction your head is facing.
- When you swipe your finger forward/backward, make the movements perpendicular to the headband.
- When you swipe your finger up/down, make the movements parallel to the headband.

Resetting or initializing the headset
1. Resetting the headset
- If the headset cannot be turned on or cannot be operated even when it is turned on, press both the (power) button and the CUSTOM button simultaneously while charging. The headset will be reset. The device registration (pairing) information is not deleted.
- If the headset does not operate correctly even after resetting, initialize the headset to restore factory settings.
2. Initializing the headset to restore factory settings
- If the headset does not operate correctly even after resetting, initialize the headset.
- Turn off the headset while the USB Type-C cable is disconnected and then press and hold the (power) button and the CUSTOM button simultaneously for 7 seconds or more.
- The indicator (blue) flashes 4 times (
 ), and the headset is initialized. This operation resets volume settings, etc. to the factory settings, and deletes all pairing information. In this case, delete the pairing information for the headset from the device and then pair them again.
Note
- If you have updated the software after purchasing the headset, even if you initialize the headset, the software is retained updated.
- When you initialize the headset to restore the factory settings after you change the language of the voice guidance, the language will also return to the factory setting