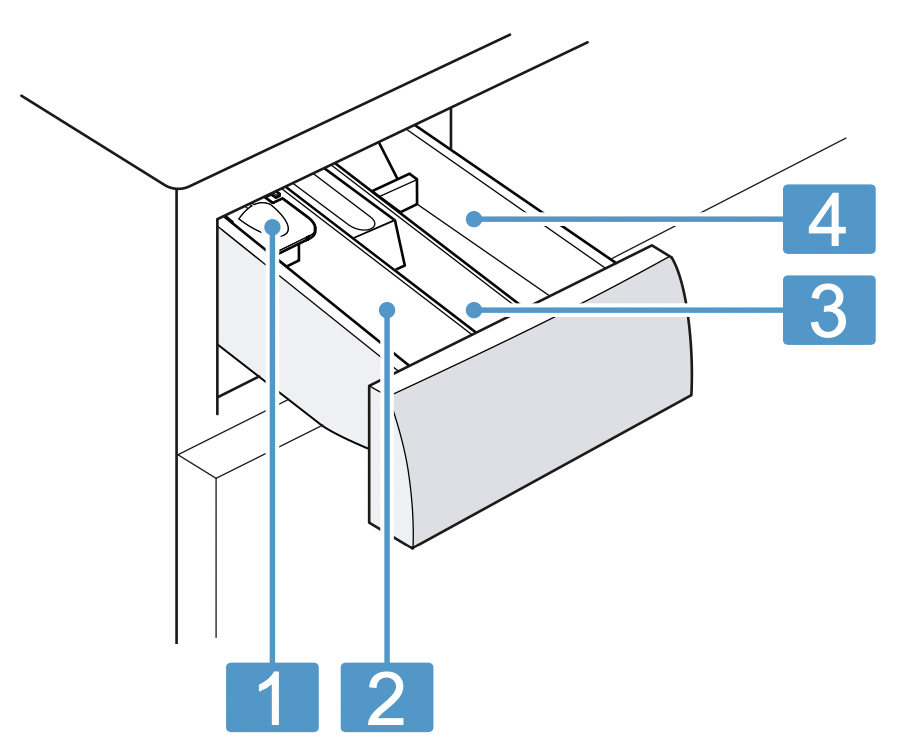
Compartment I: Detergent for prewash Hygiene detergent
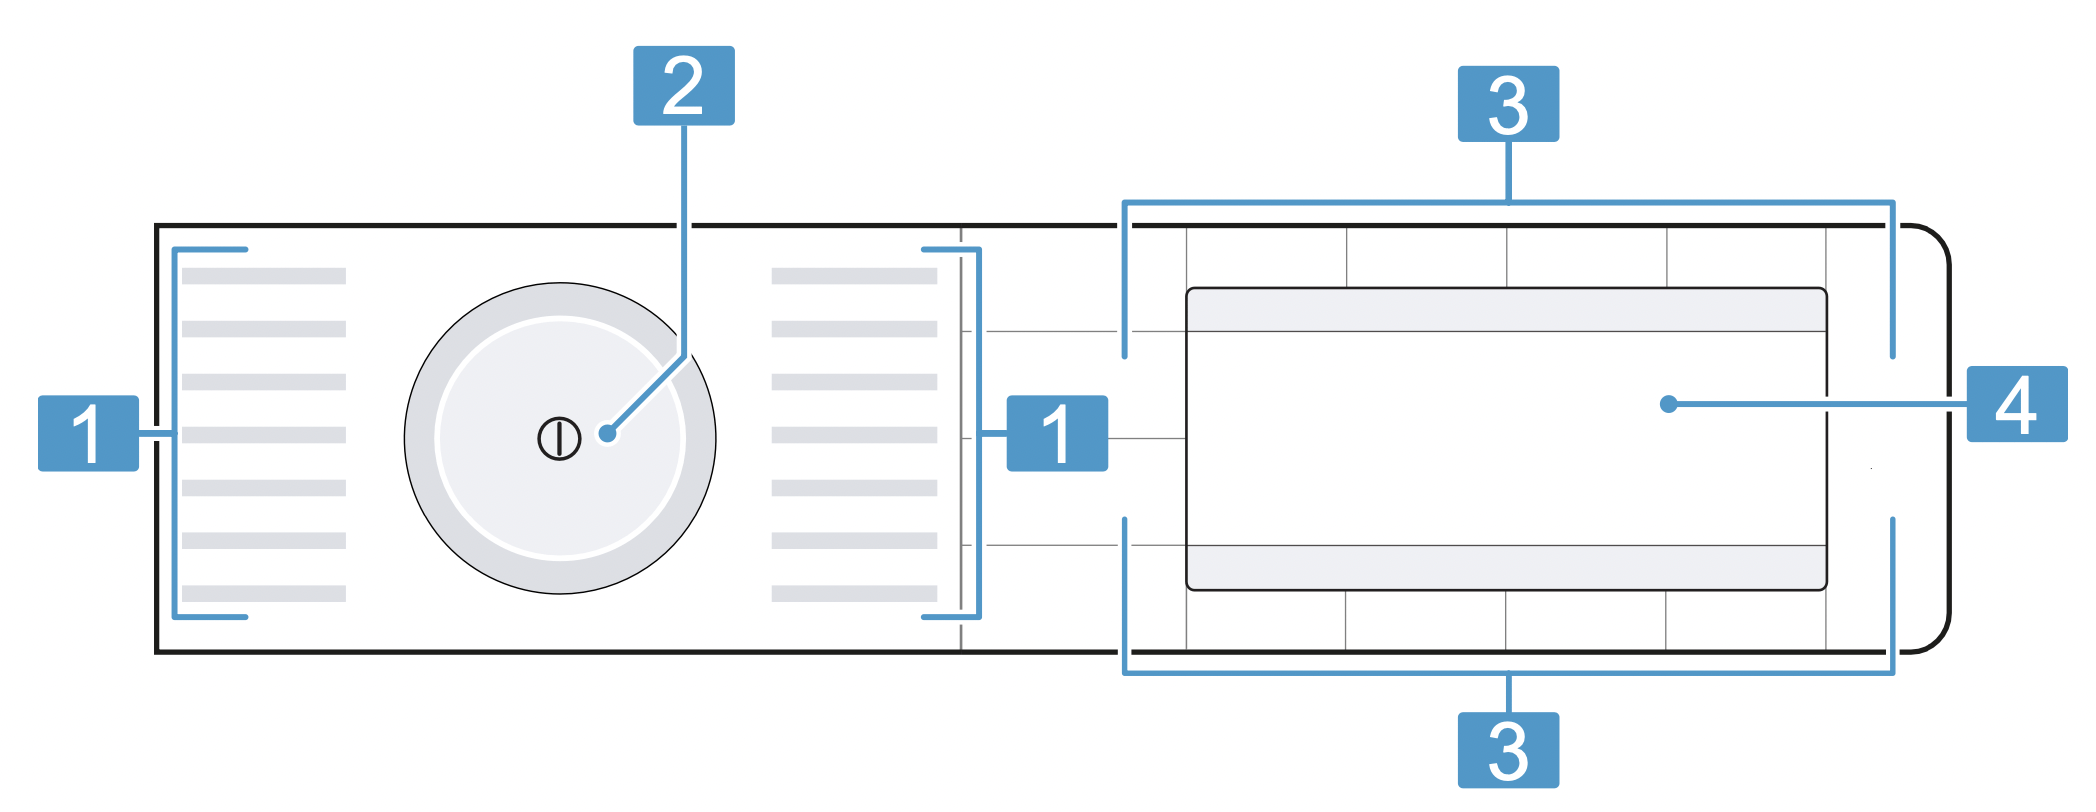
Controls
The controls are used to configure all functions of your appliance and to obtain information about the operating status.
Programmes
Programme selector
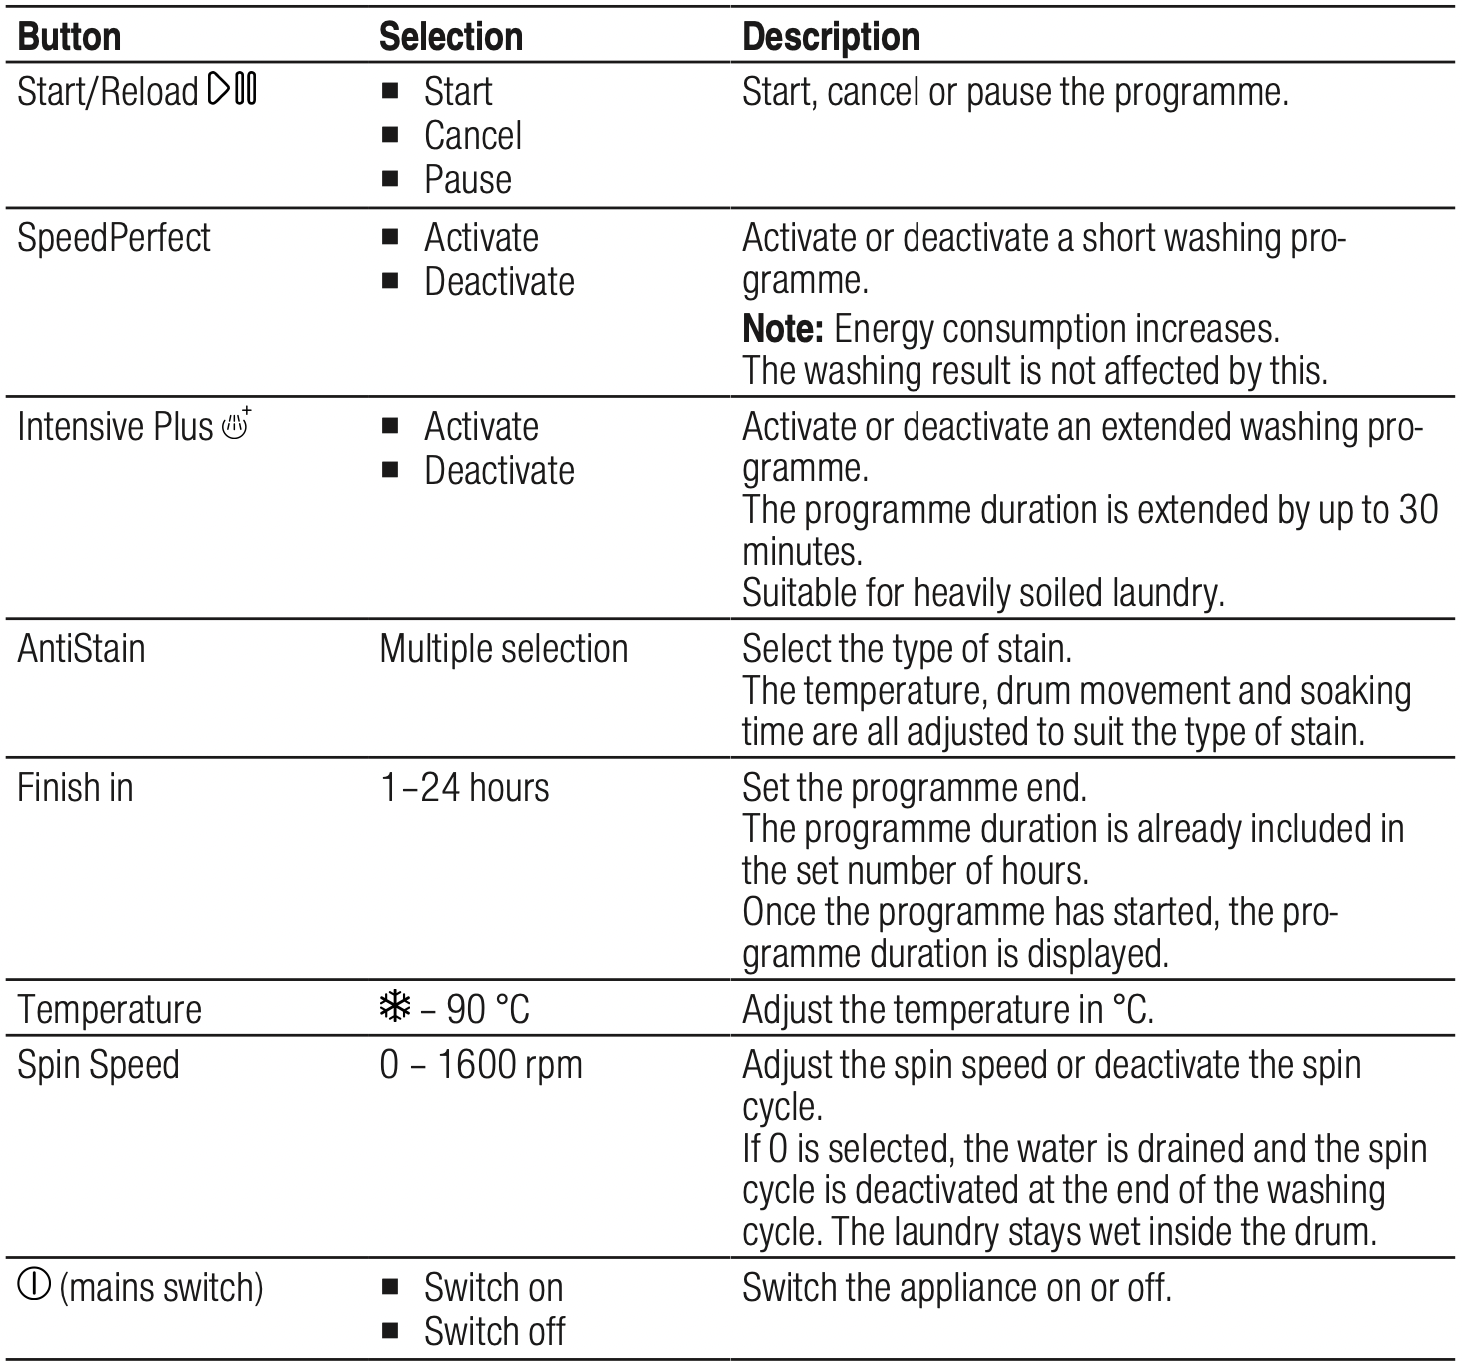
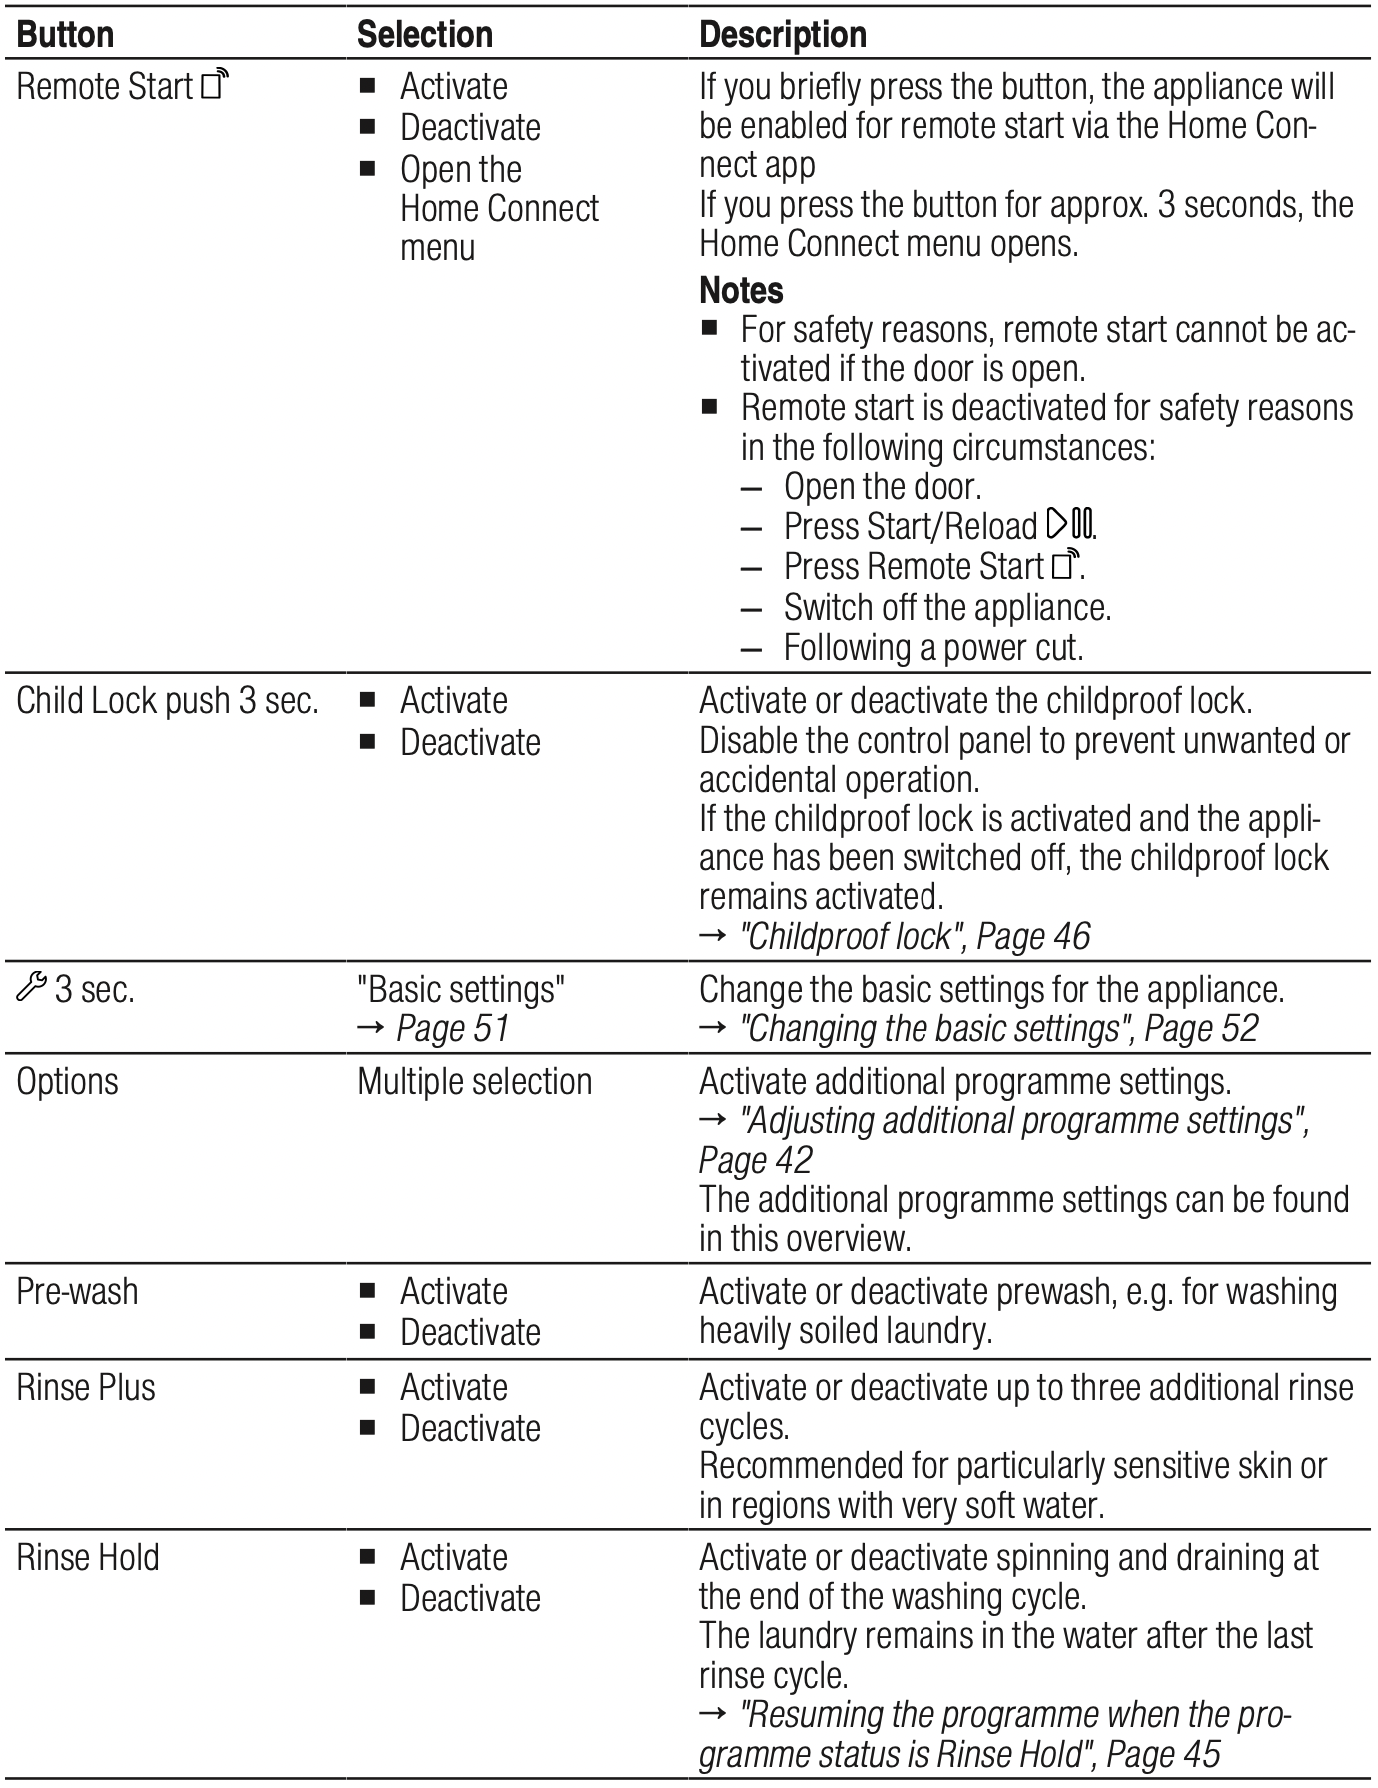
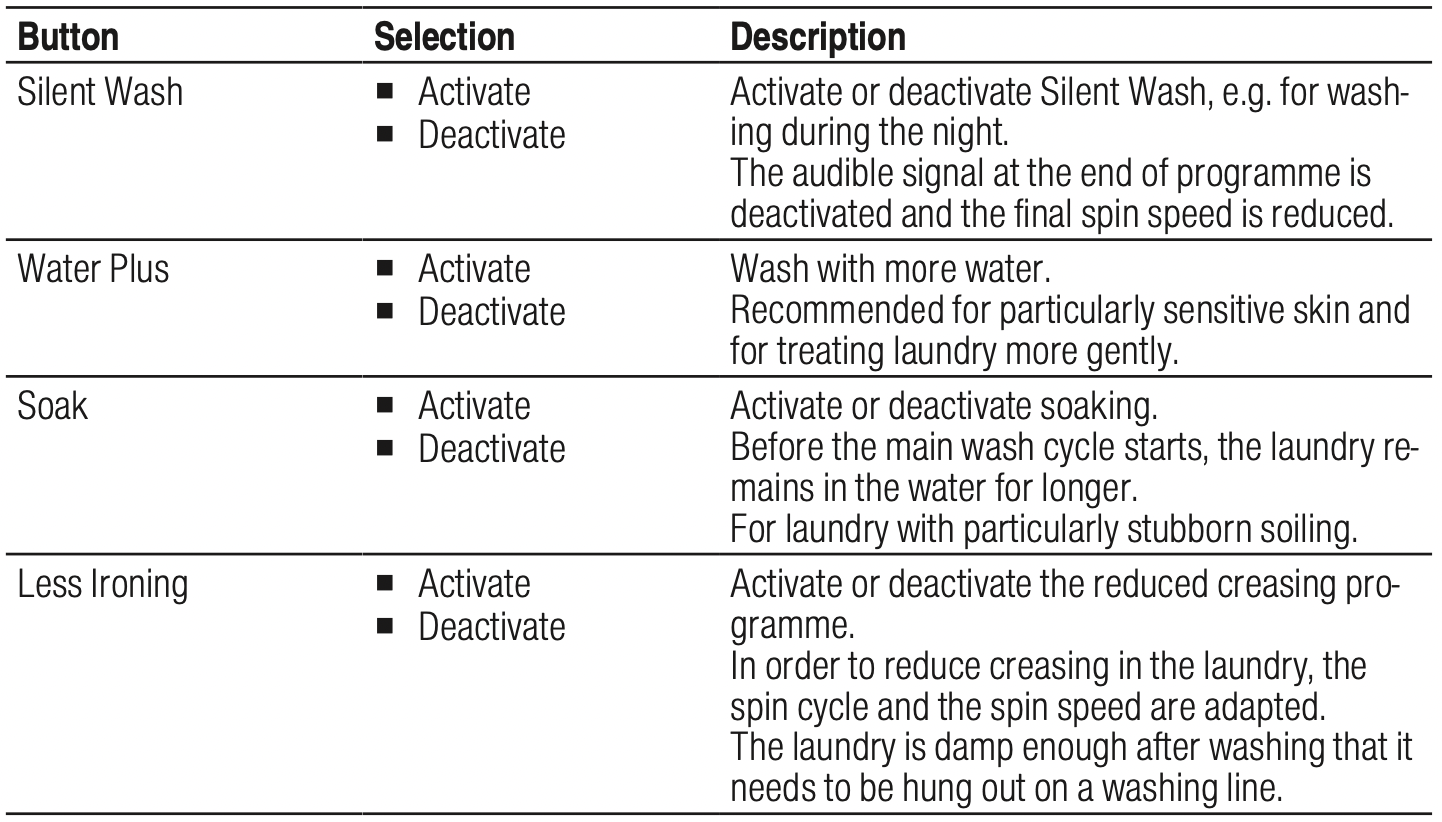
Buttons
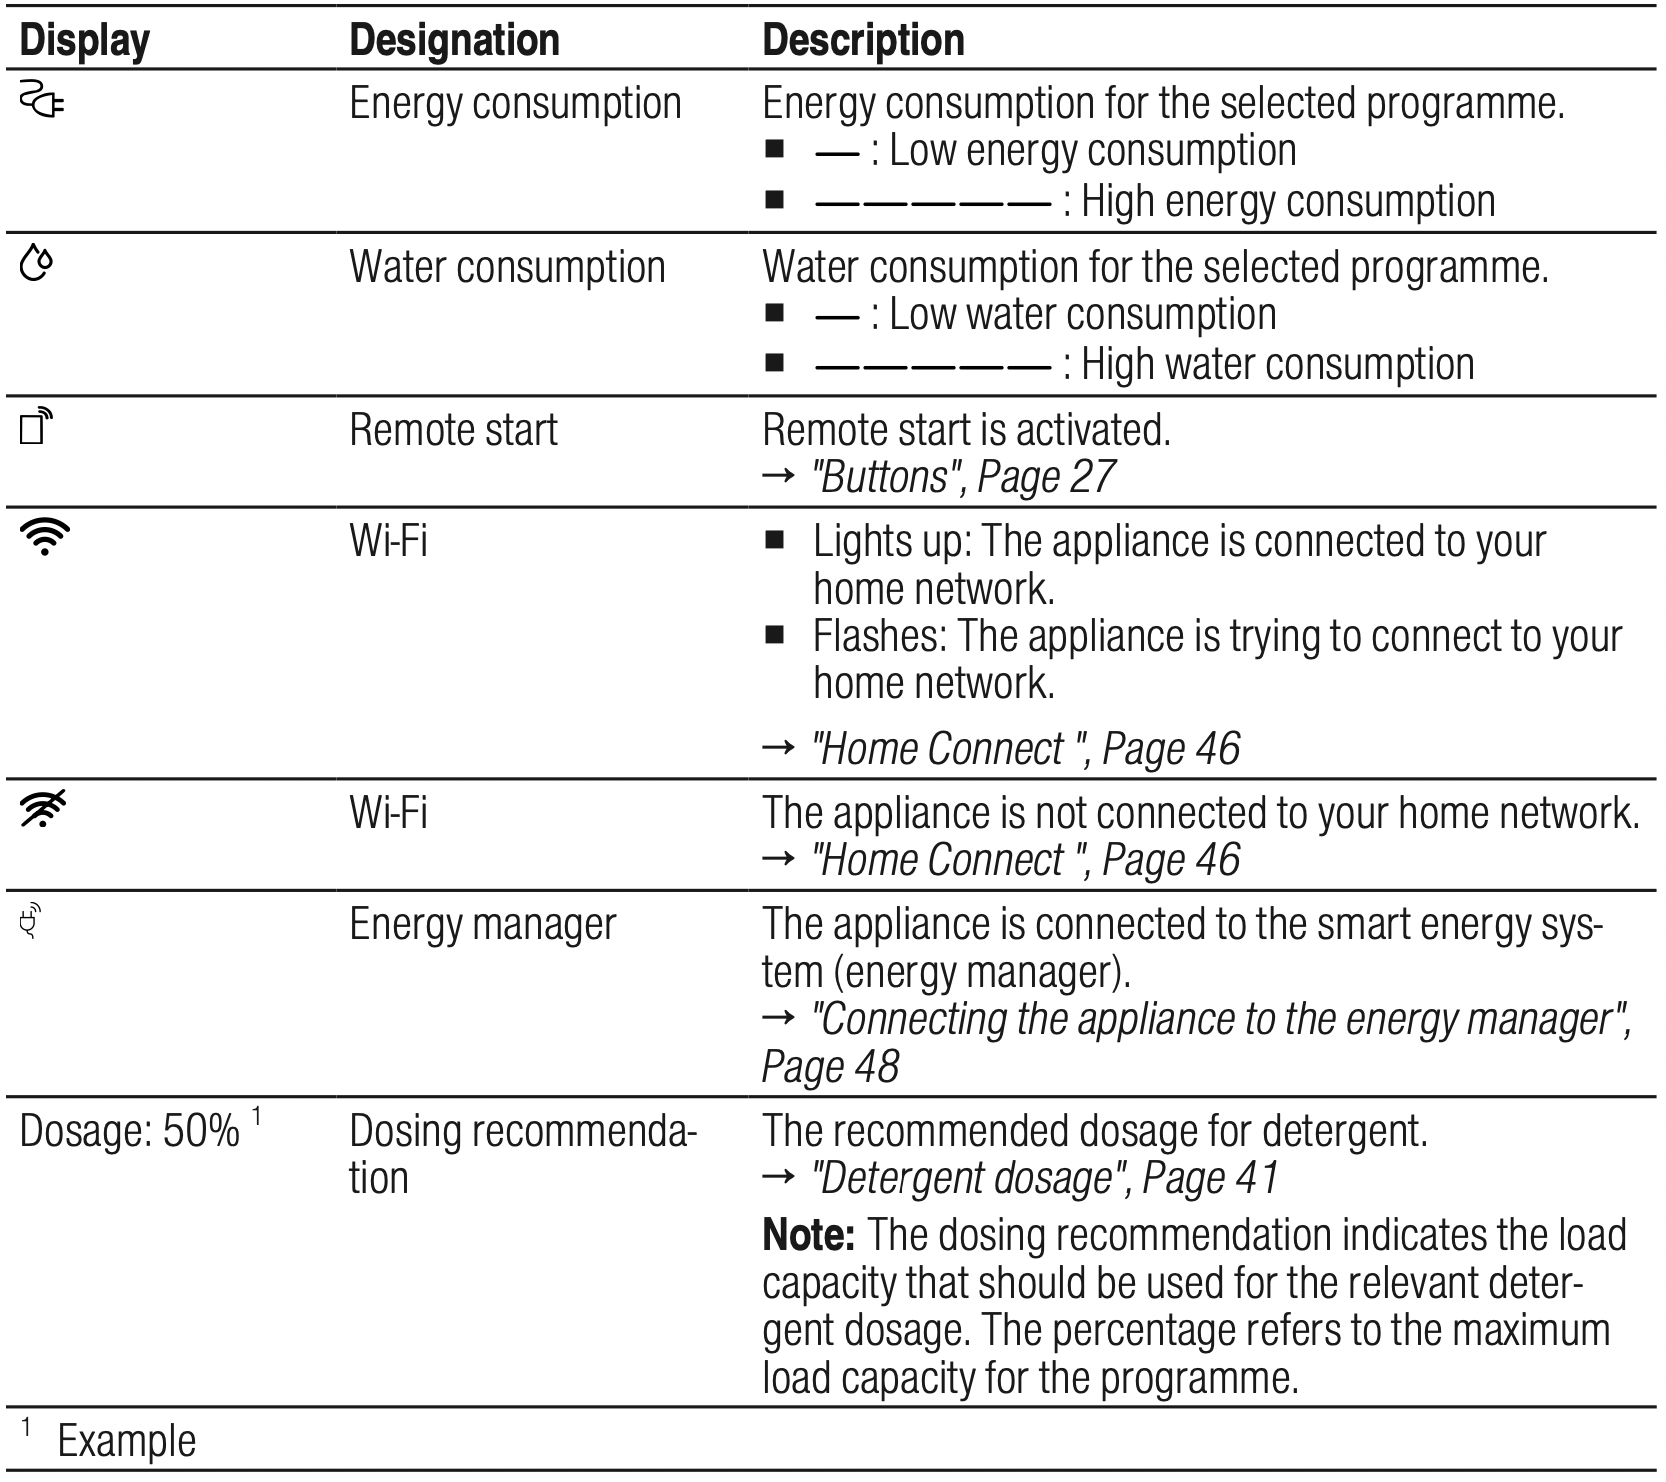
Display
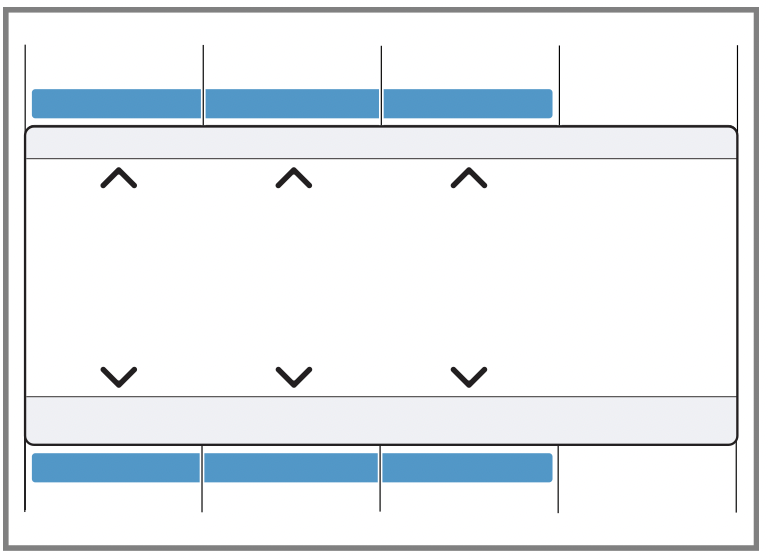
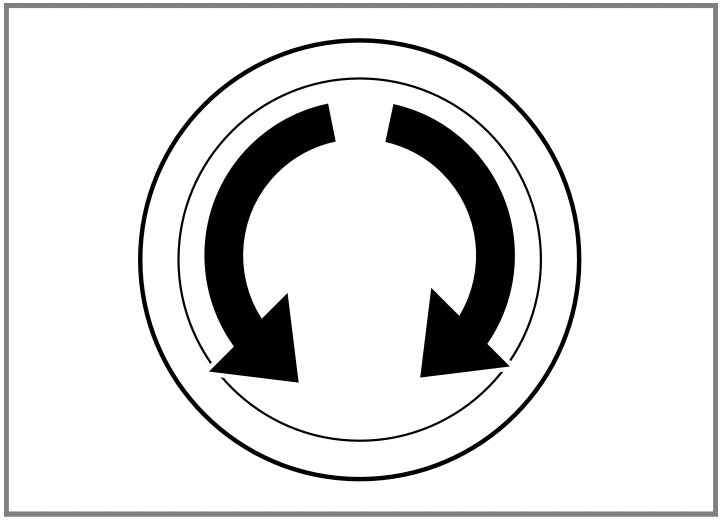
Operating logic
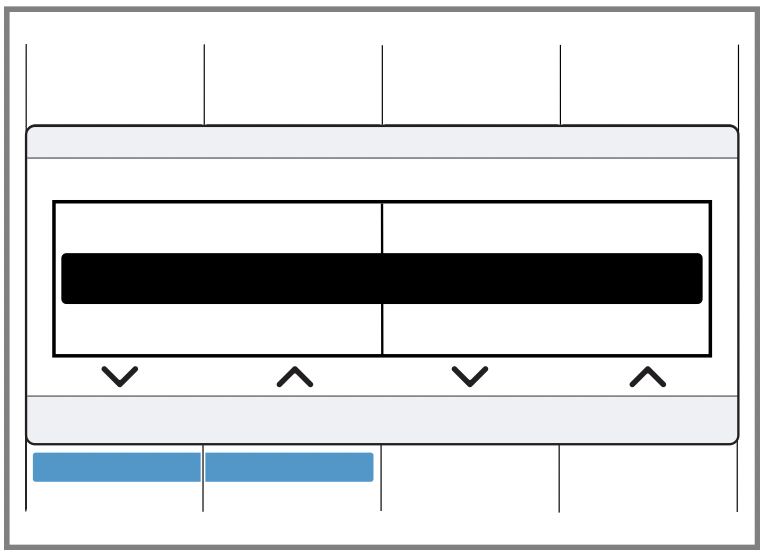
In addition to the actual functions of the buttons on the display, you can also use these buttons to select programme settings in the main menu and settings in the sub-menus. The buttons are then marked by symbols in the display.
Main menu To select programme settings, press the buttons above or below the symbols.
The selected programme setting is shown in the middle of the display.
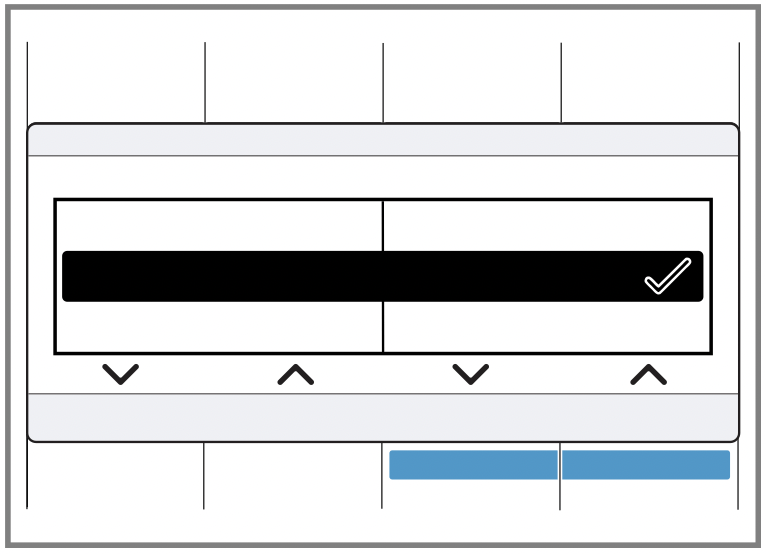
Sub-menu To select the settings you require, press the buttons below the symbols until the required setting is selected in the display.
To select the settings you require, press the buttons below the symbols until the required setting is selected in the display.
If a setting is activated, the display shows . The selection does not need to be confirmed again. The submenu closes automatically after a few seconds.
Display
The display shows the current settings, options or relevant information.
Buttons
Below is an overview of the buttons and their setting options. With the Options button, you can open the sub-menu for additional programme settings. The additional programme settings are listed in the overview for the buttons.
The selection of programme settings depends on the selected programme. You can see the selection options for each programme in the overview for → "Programmes".
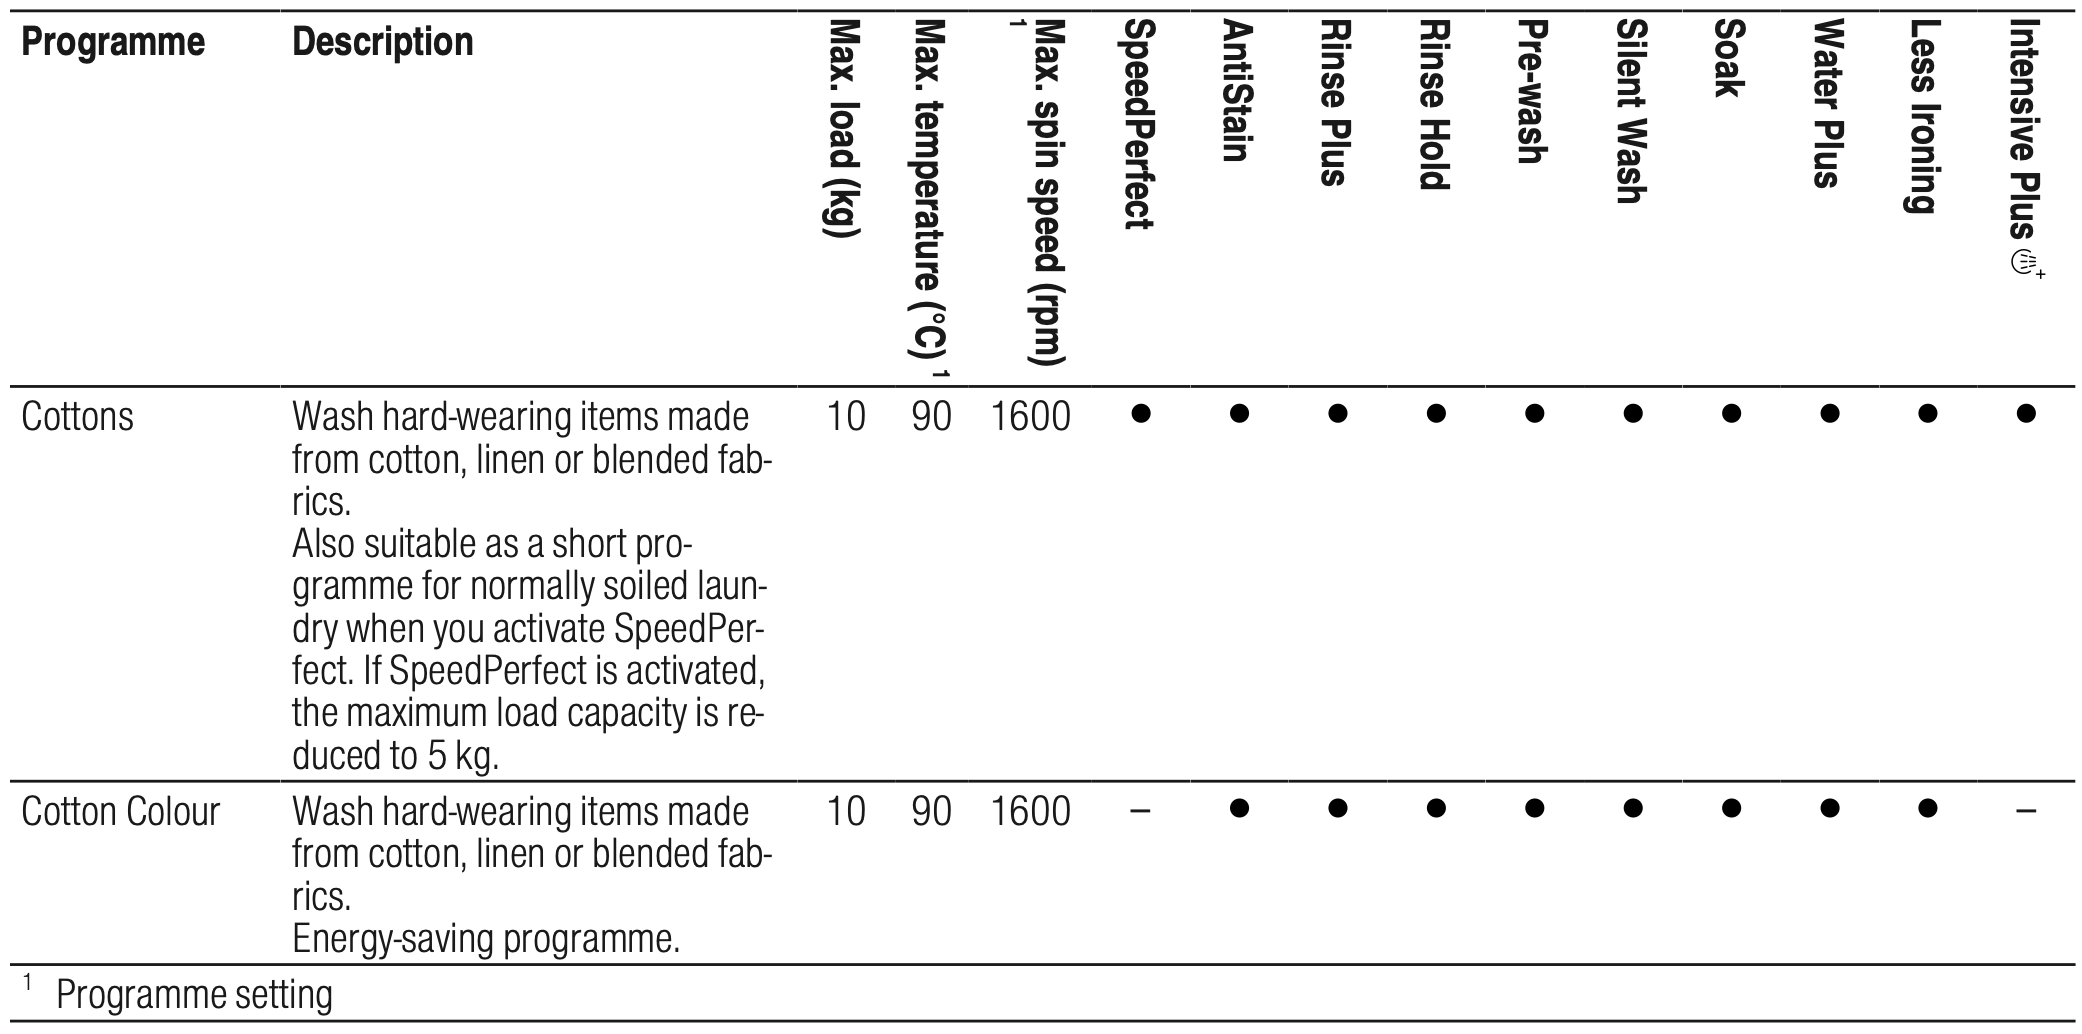
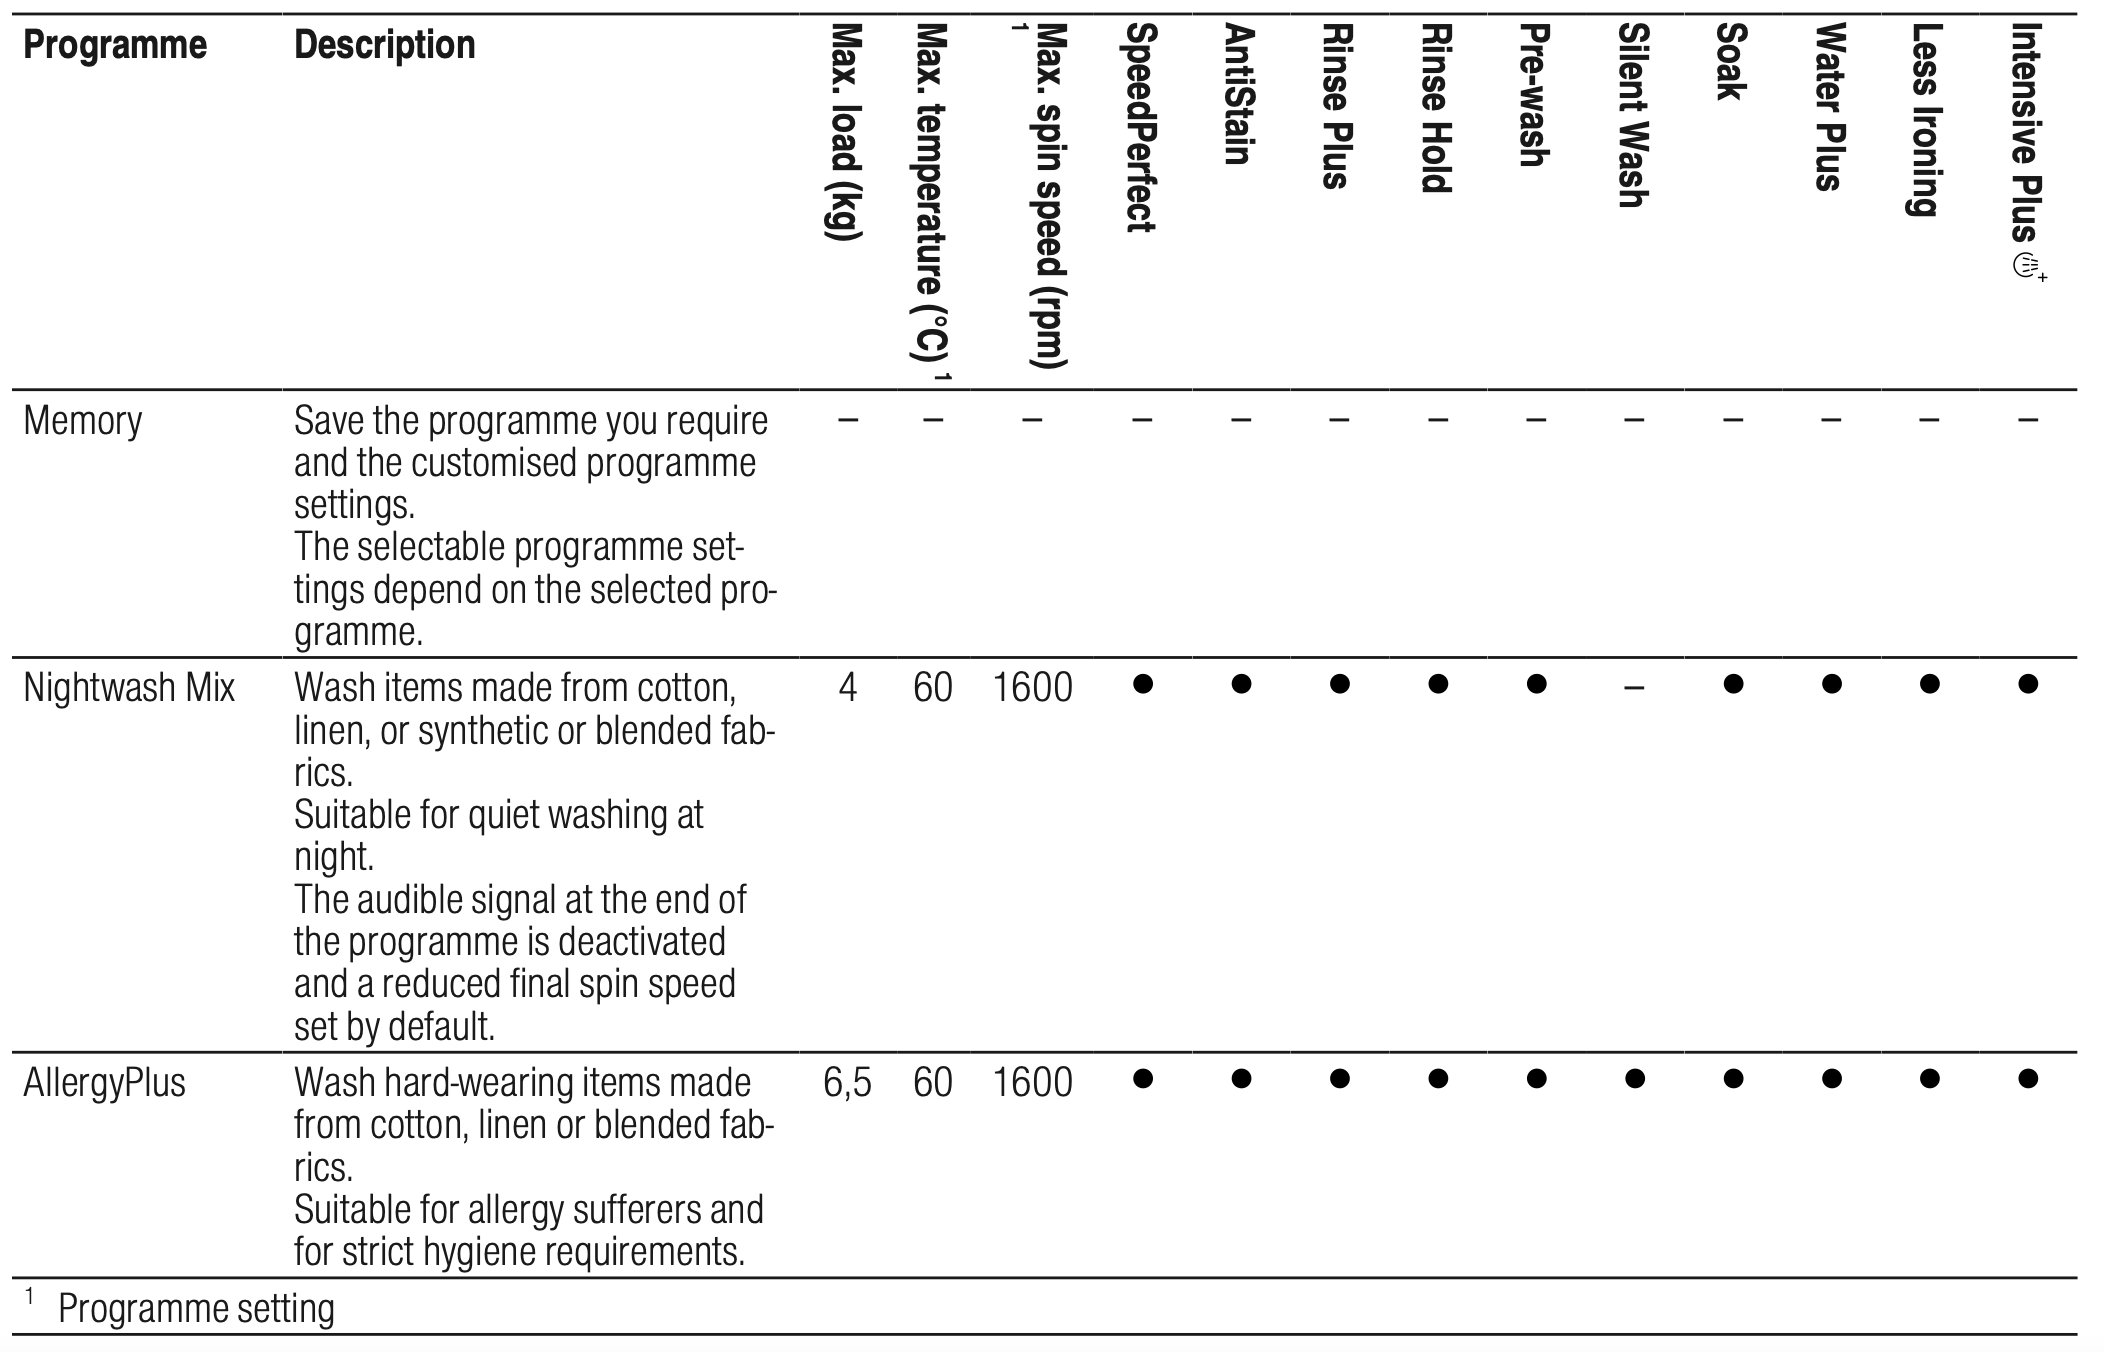
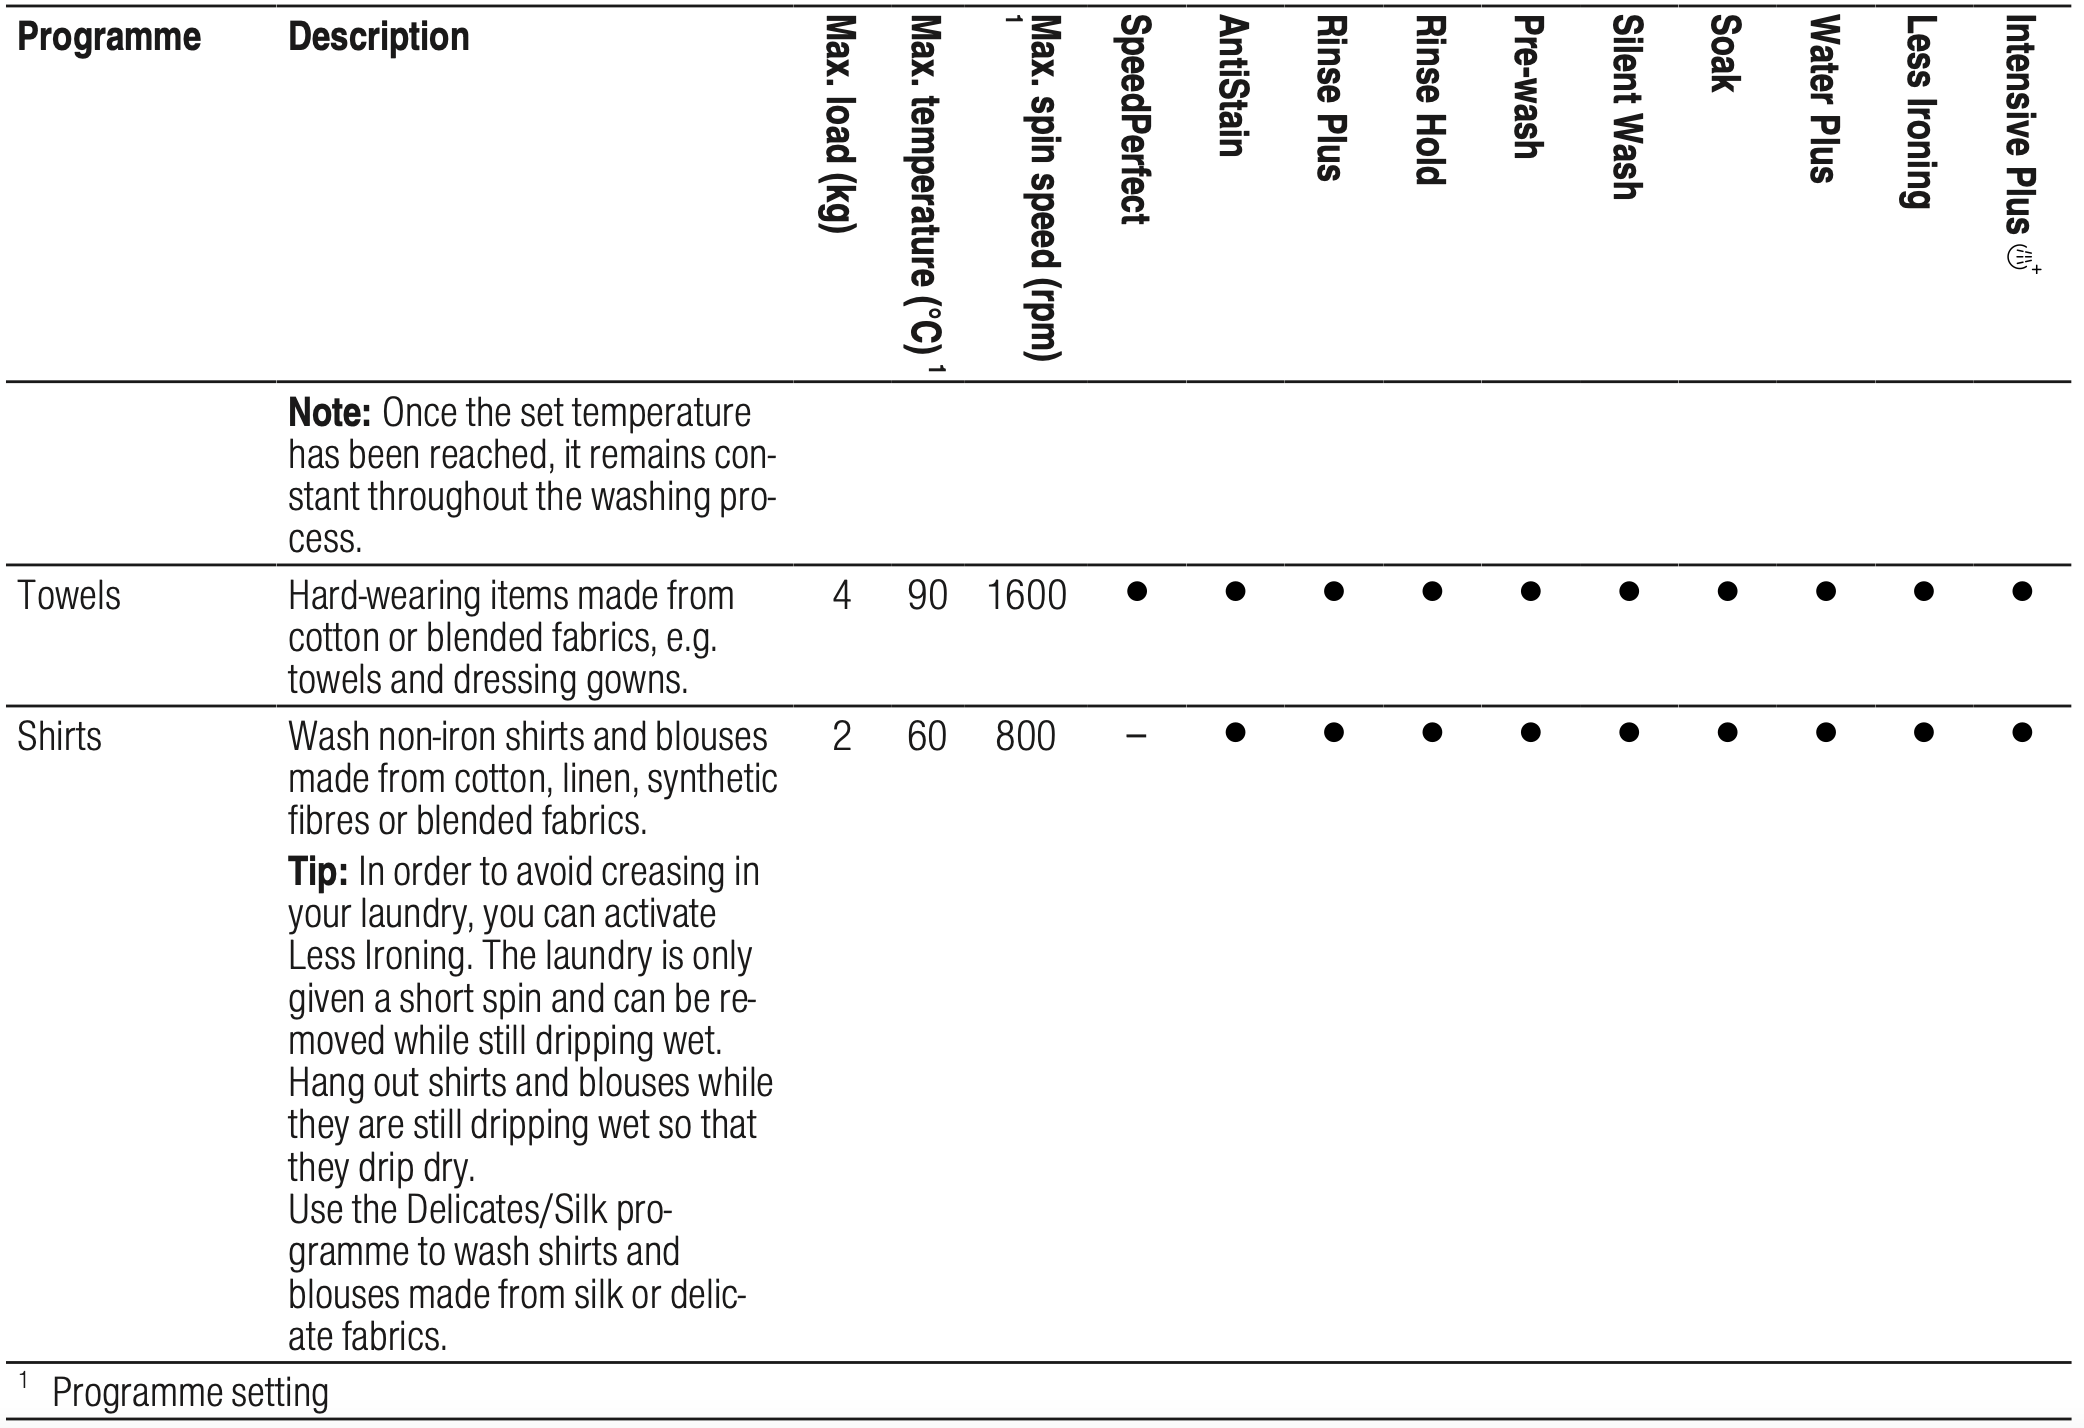
Programmes
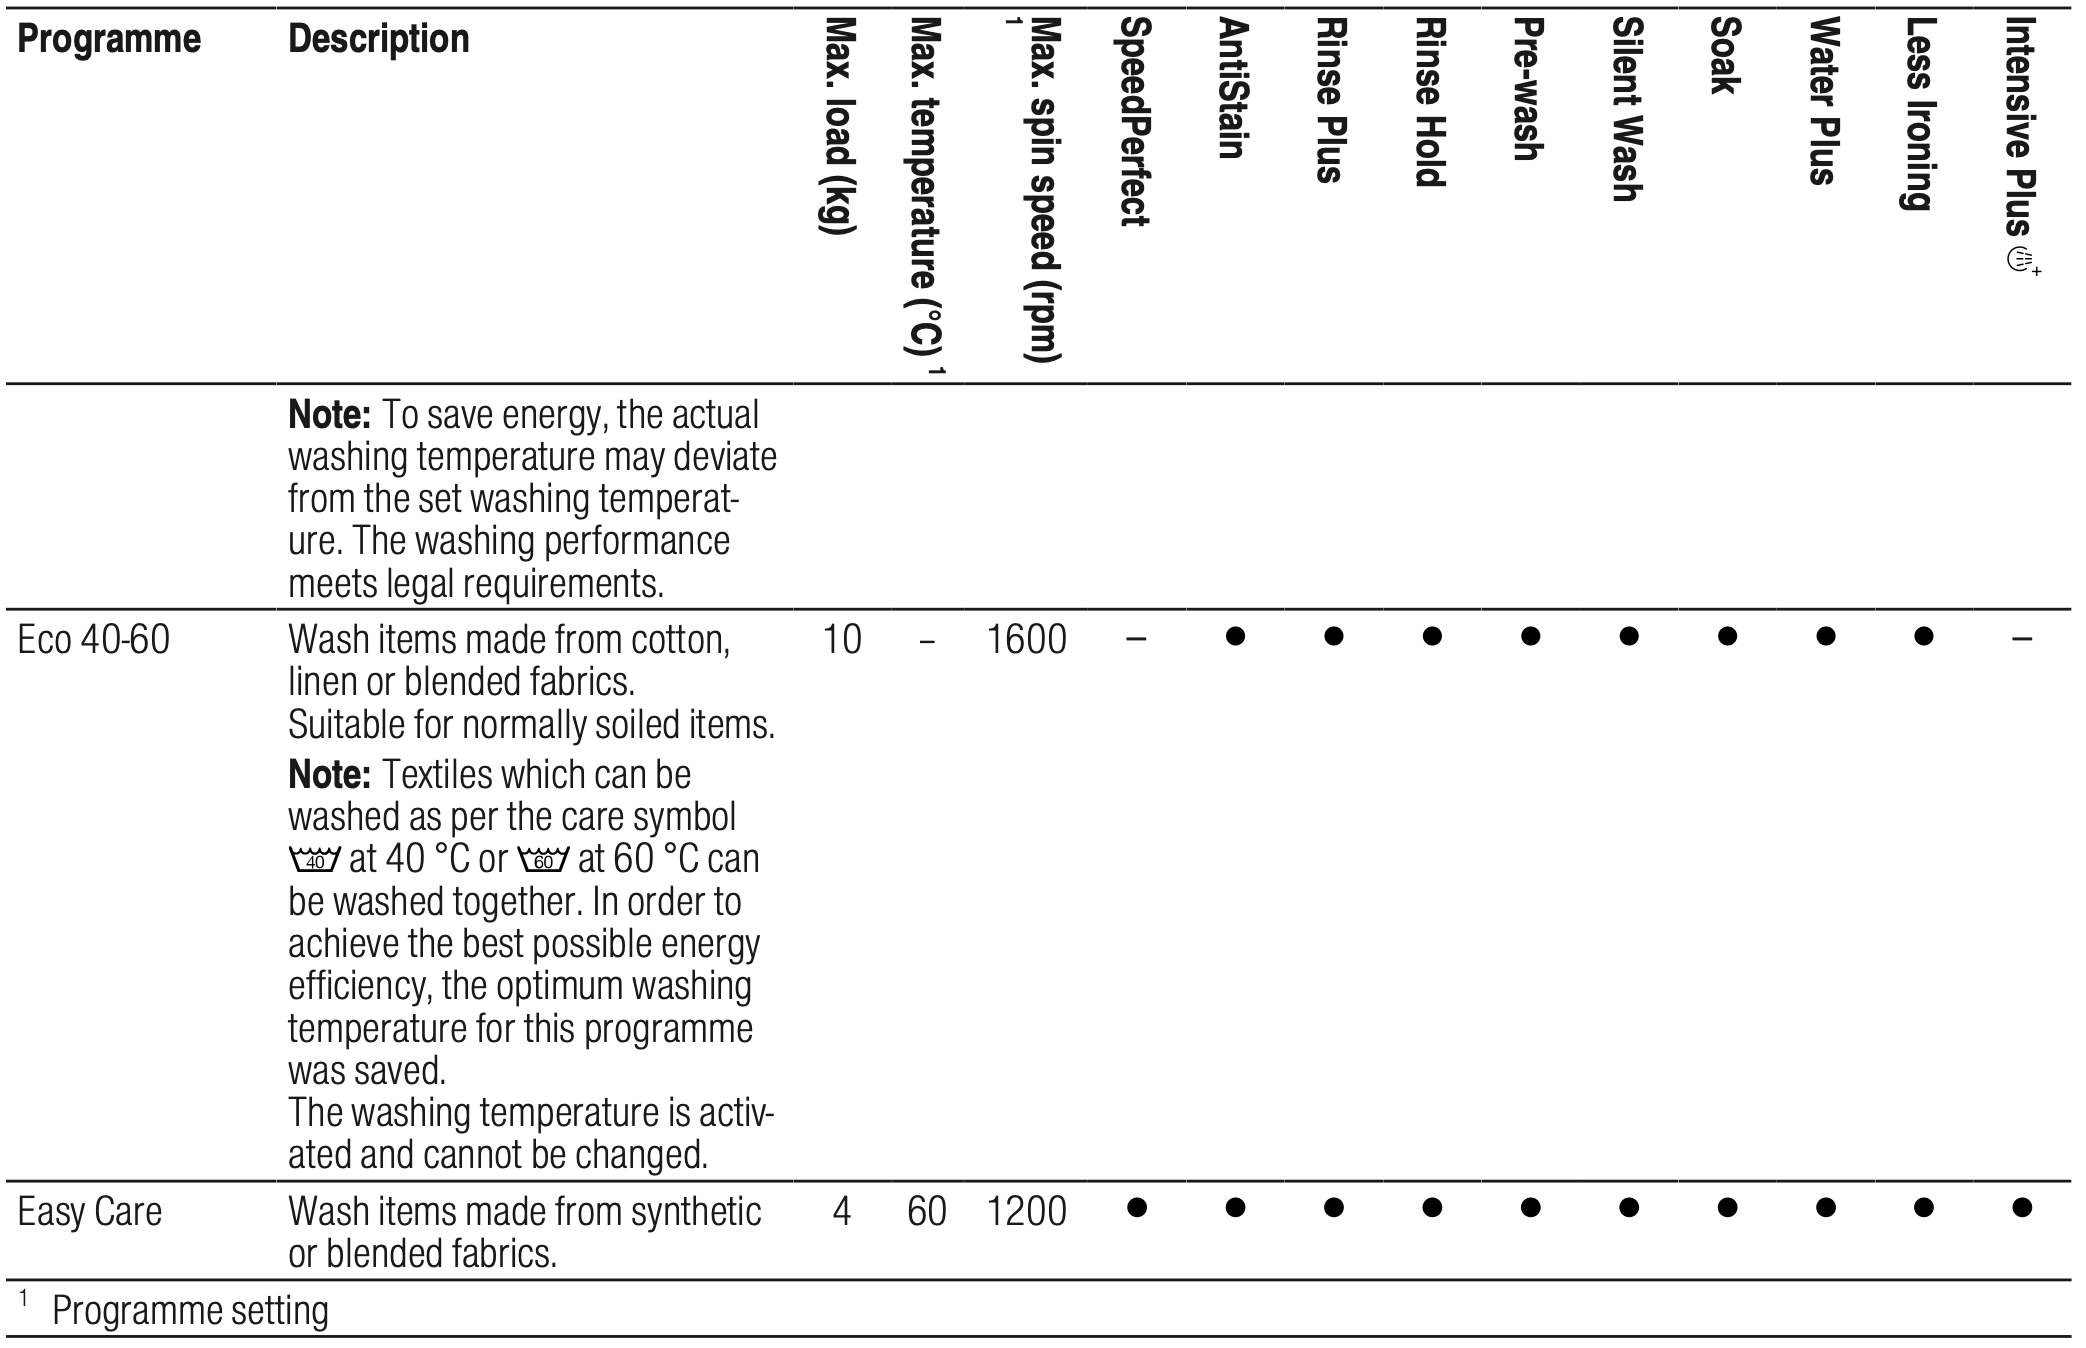
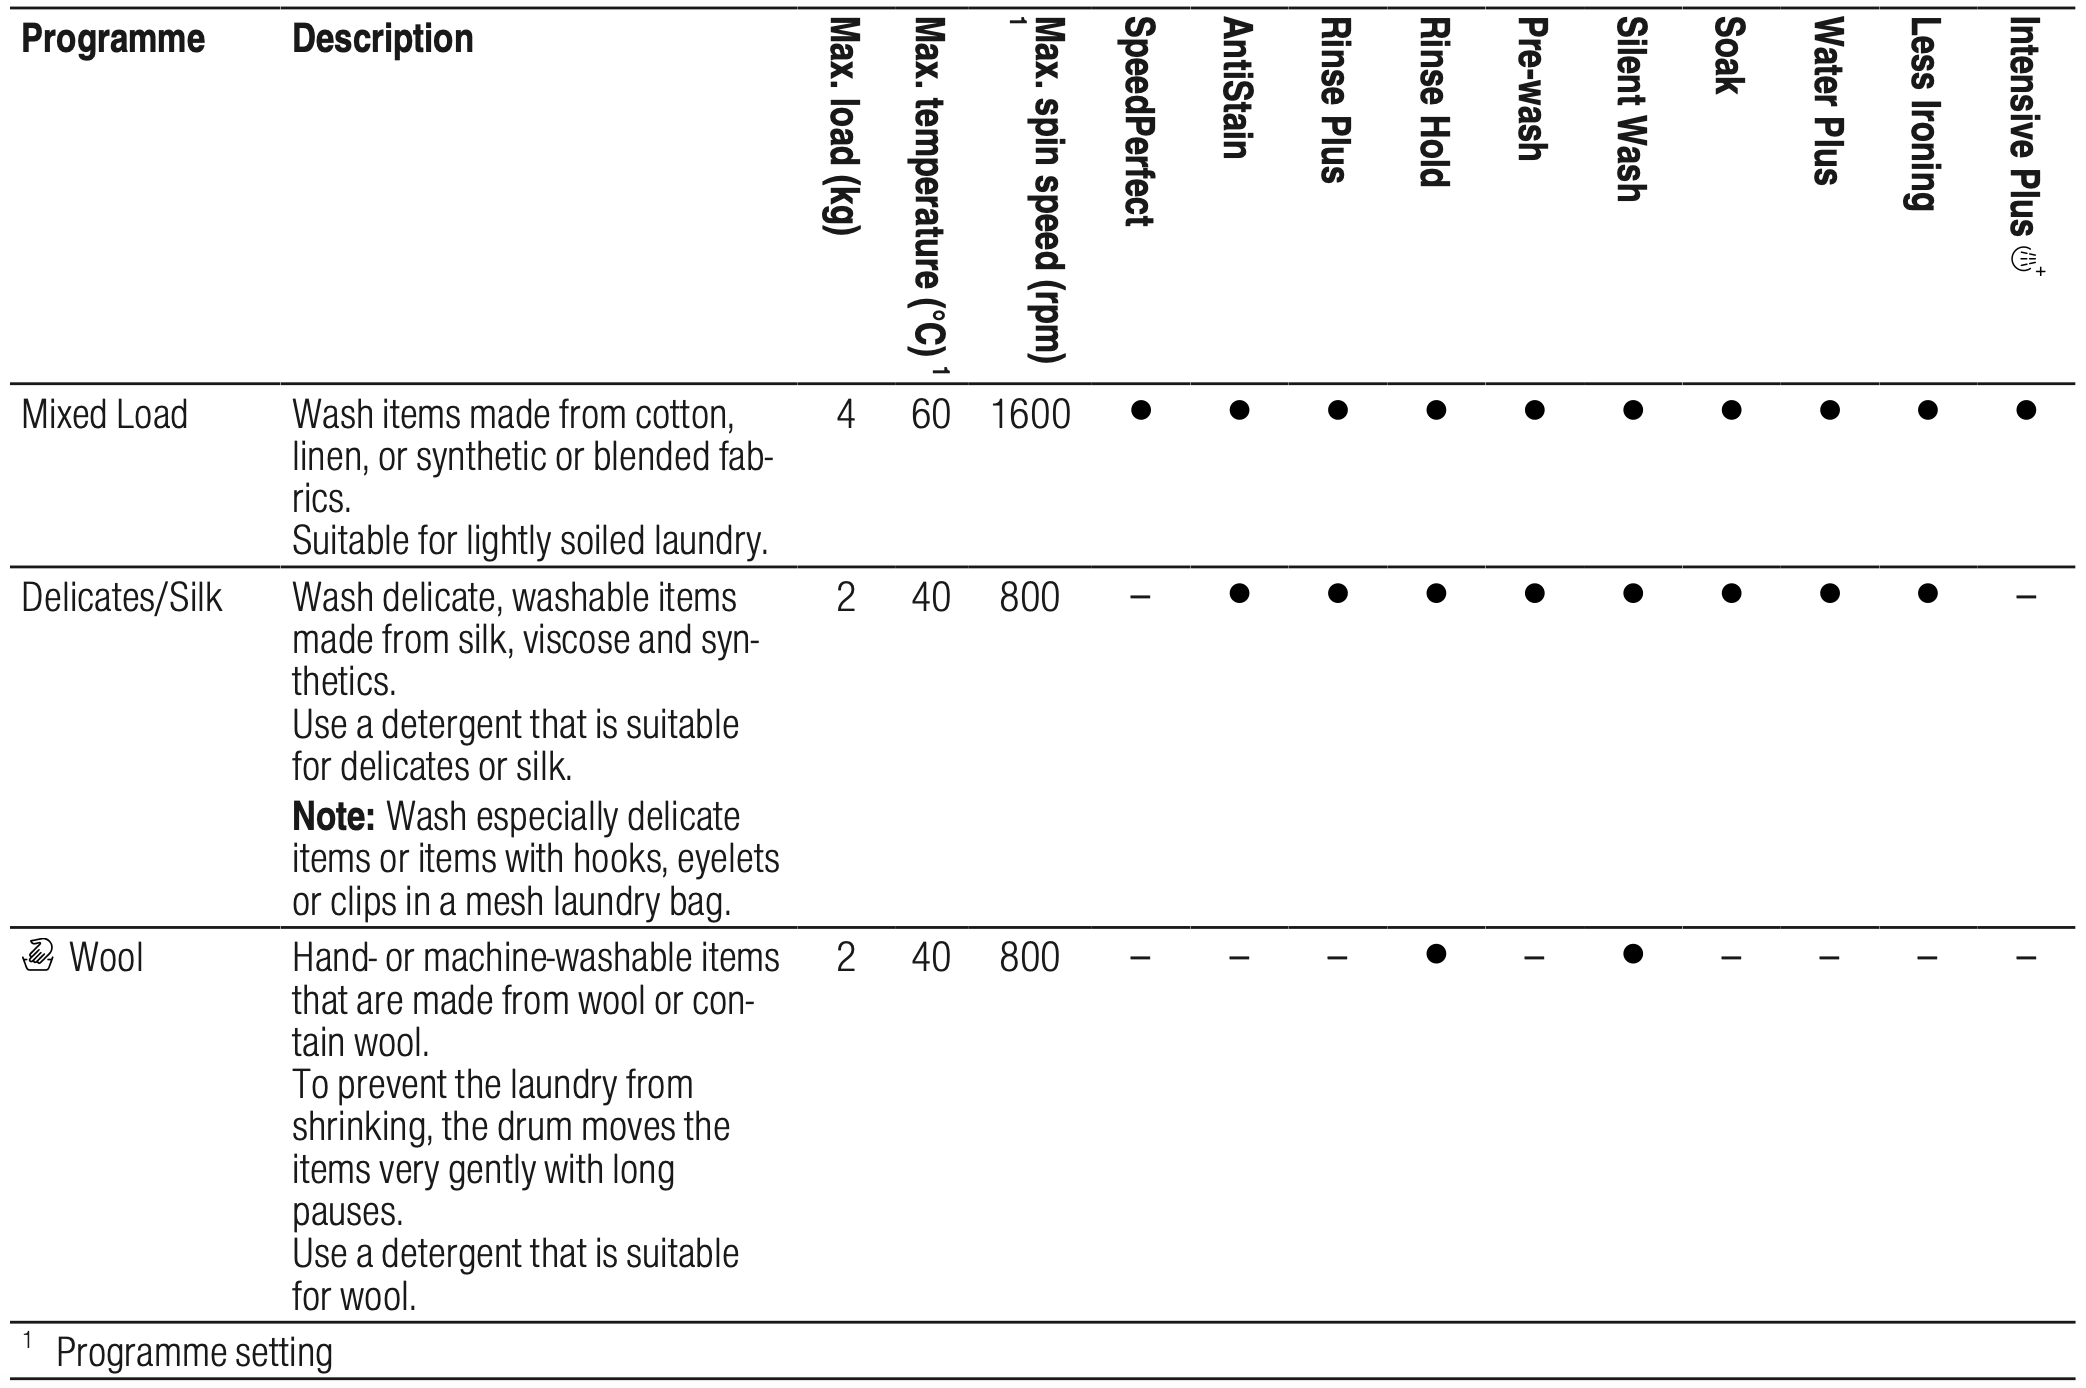
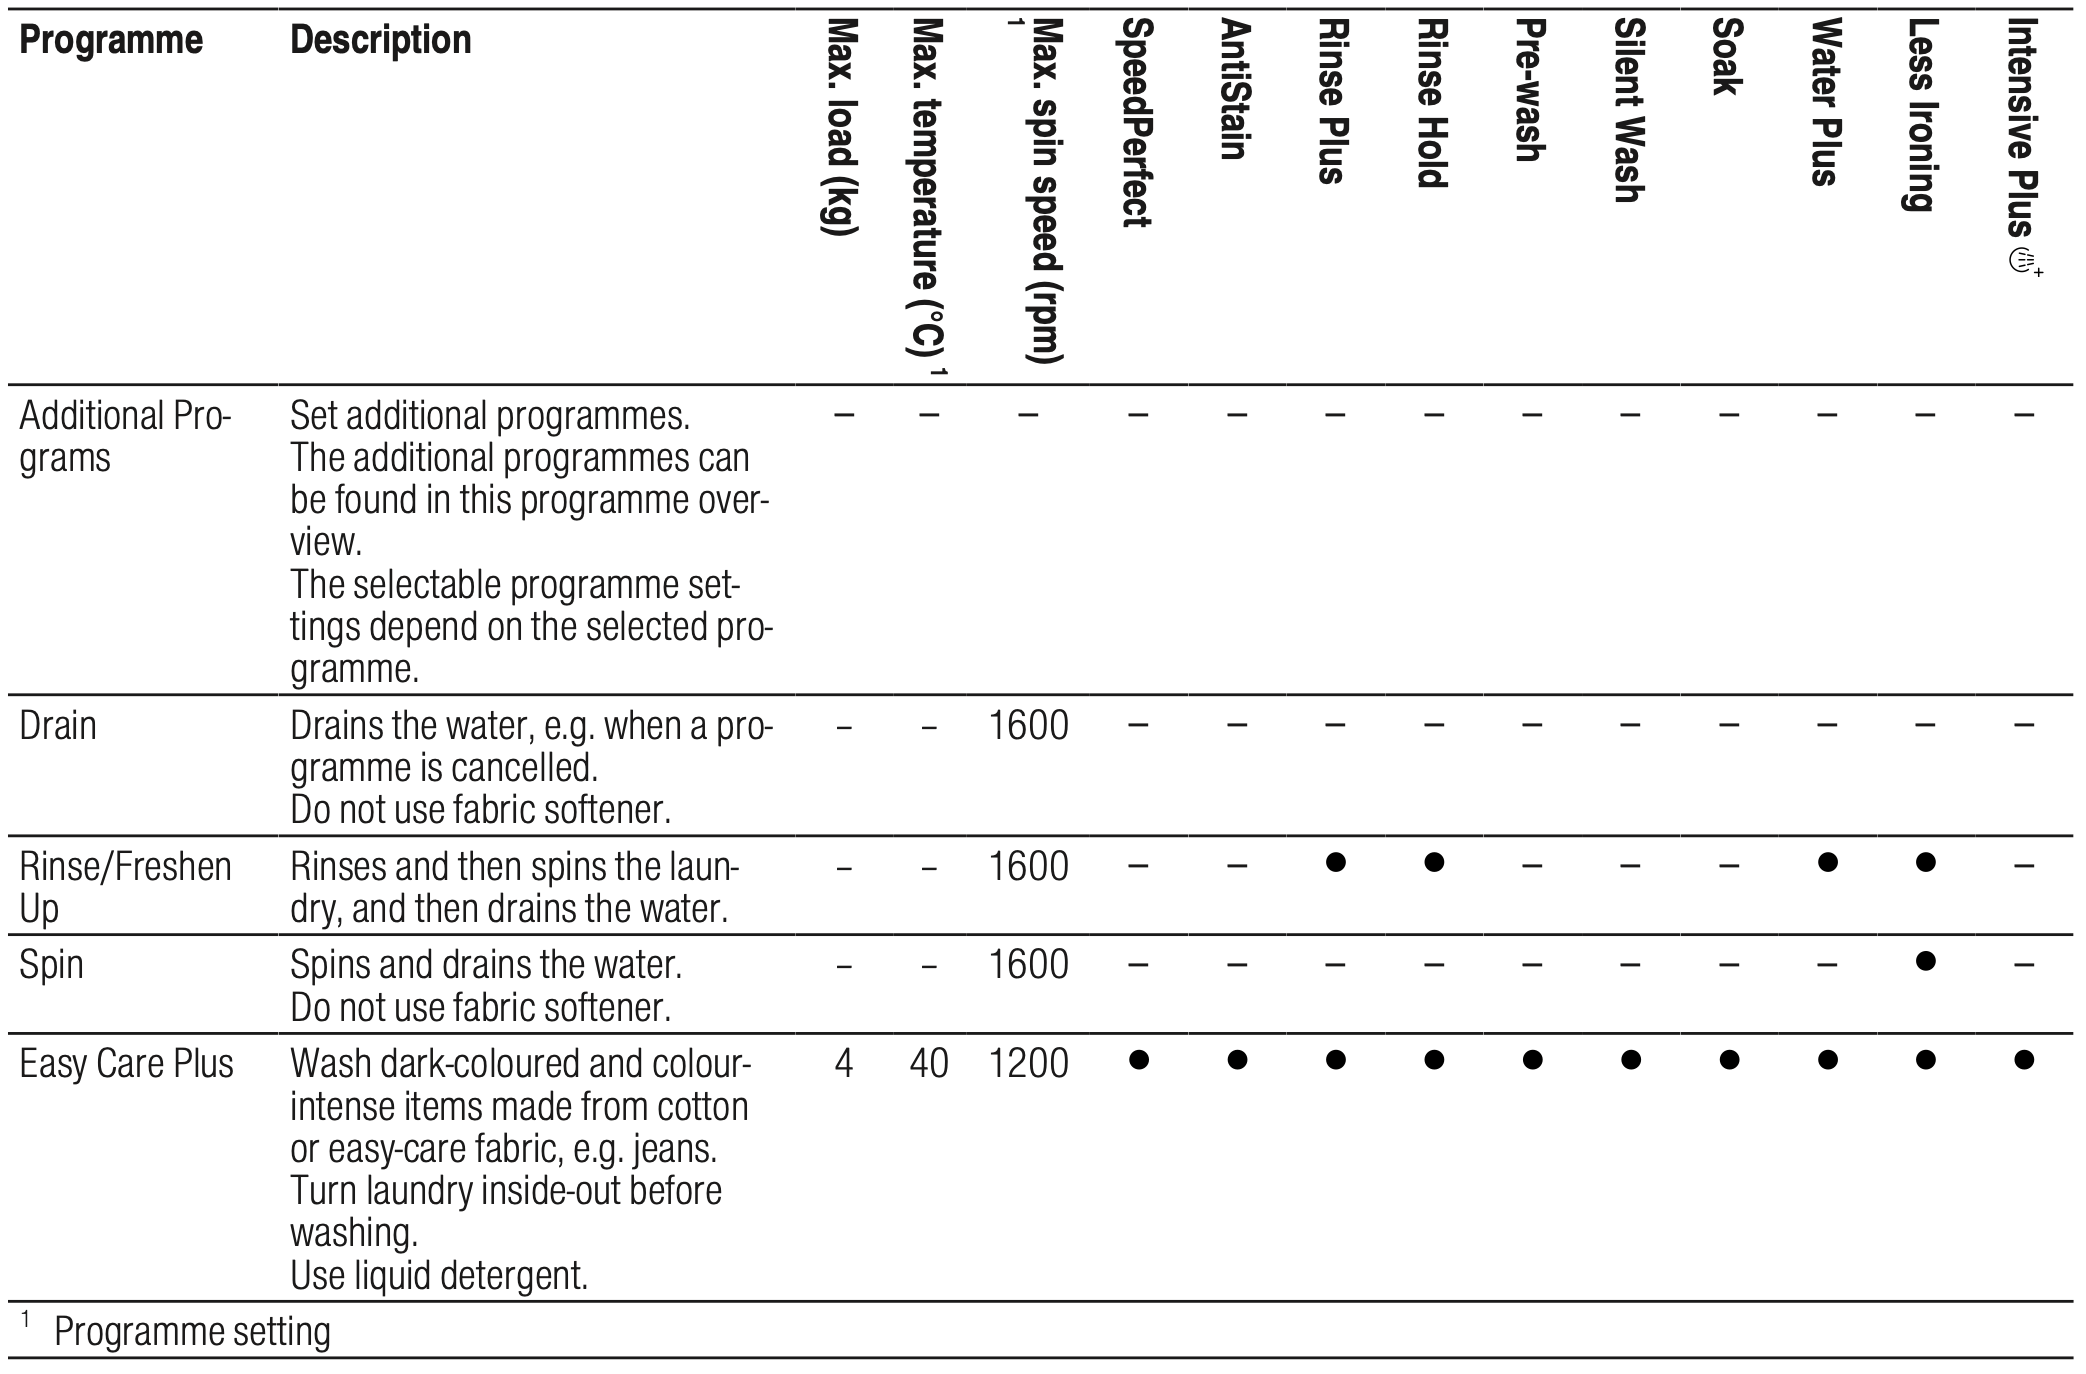
Below is an overview of the programmes. You can find information on the load and on the adjustable programme options.
Tip: The laundry's care labels provide you with additional information on programme selection. → '' Care symbols on the care labels ''.
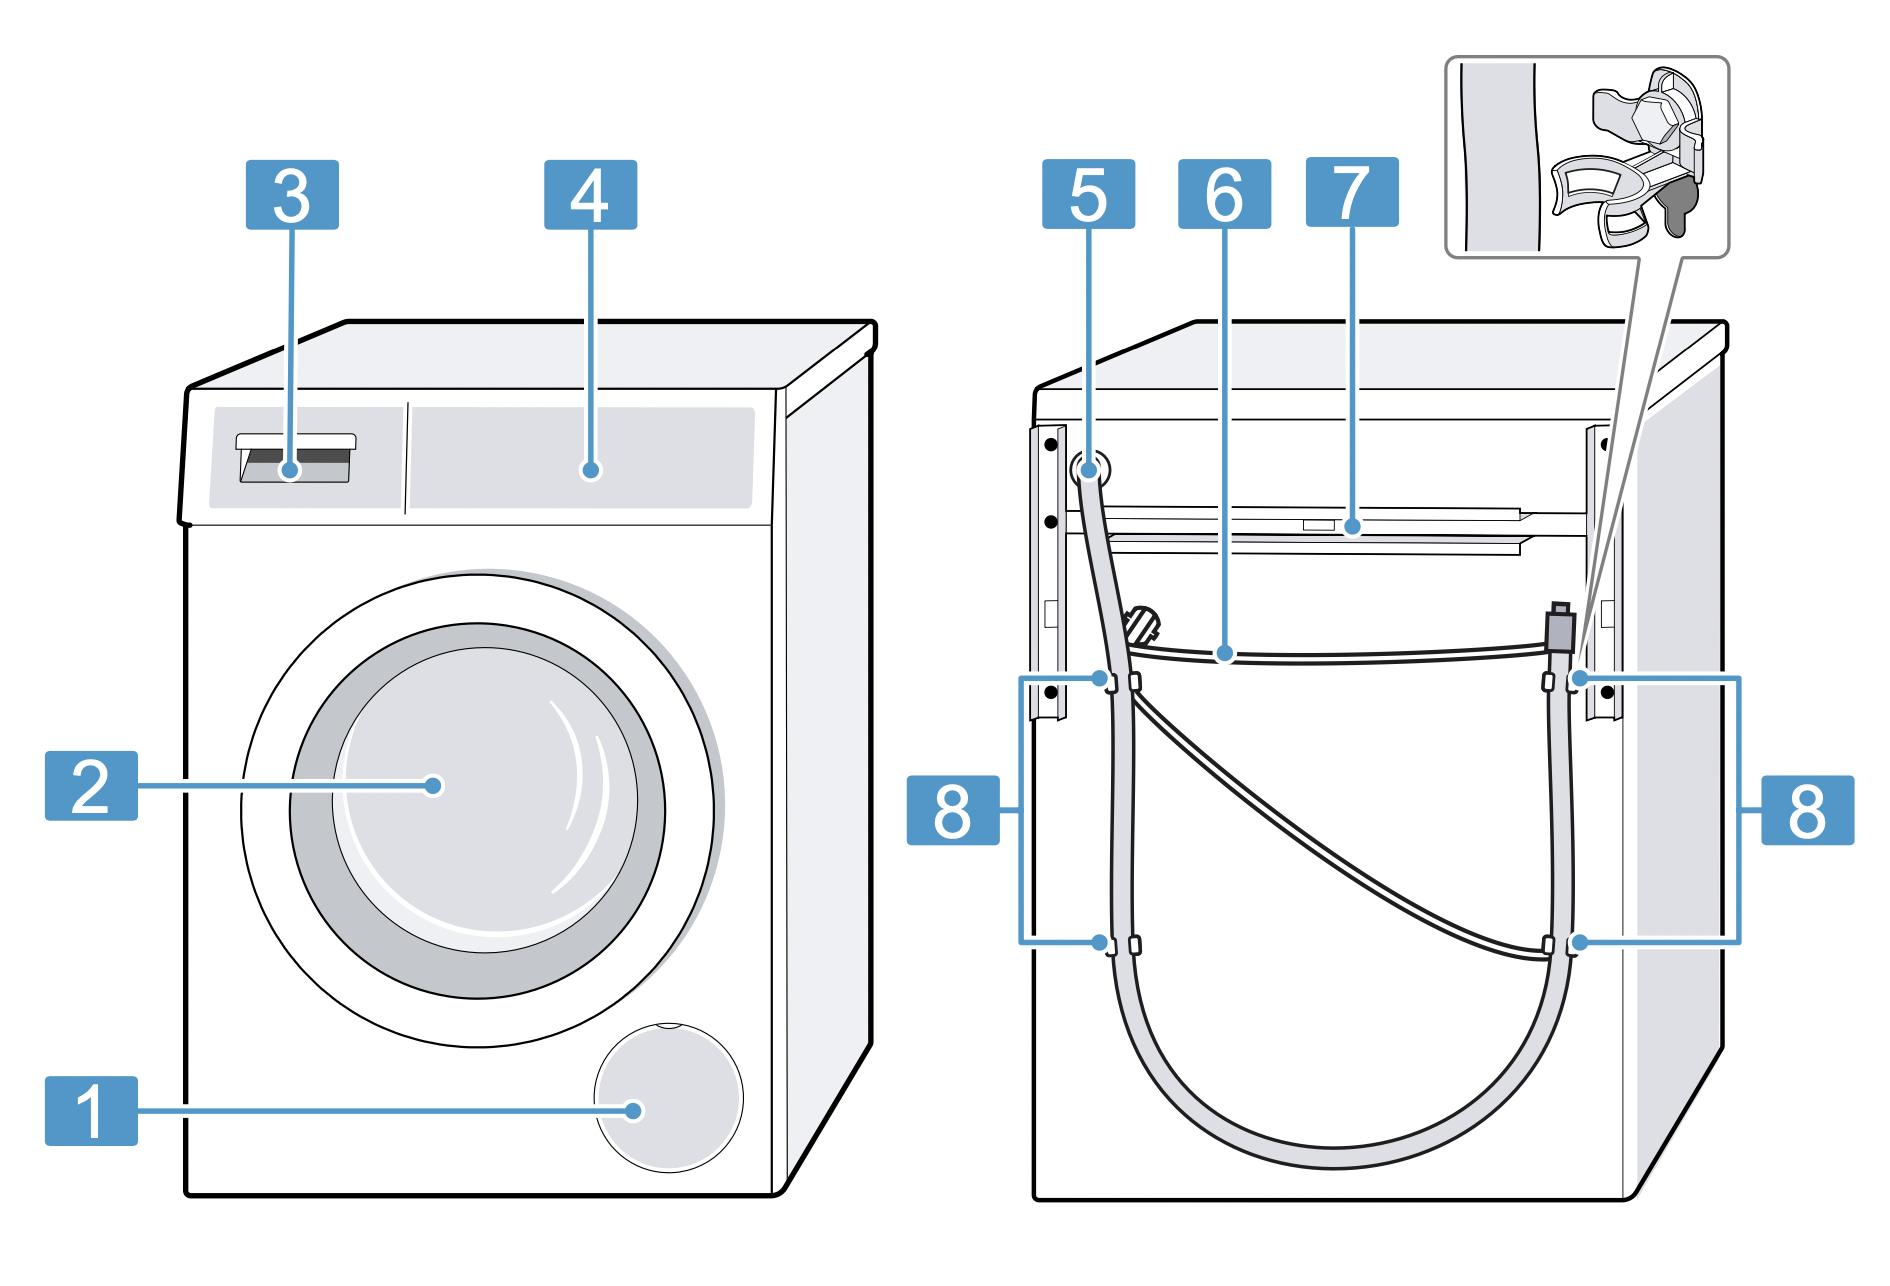
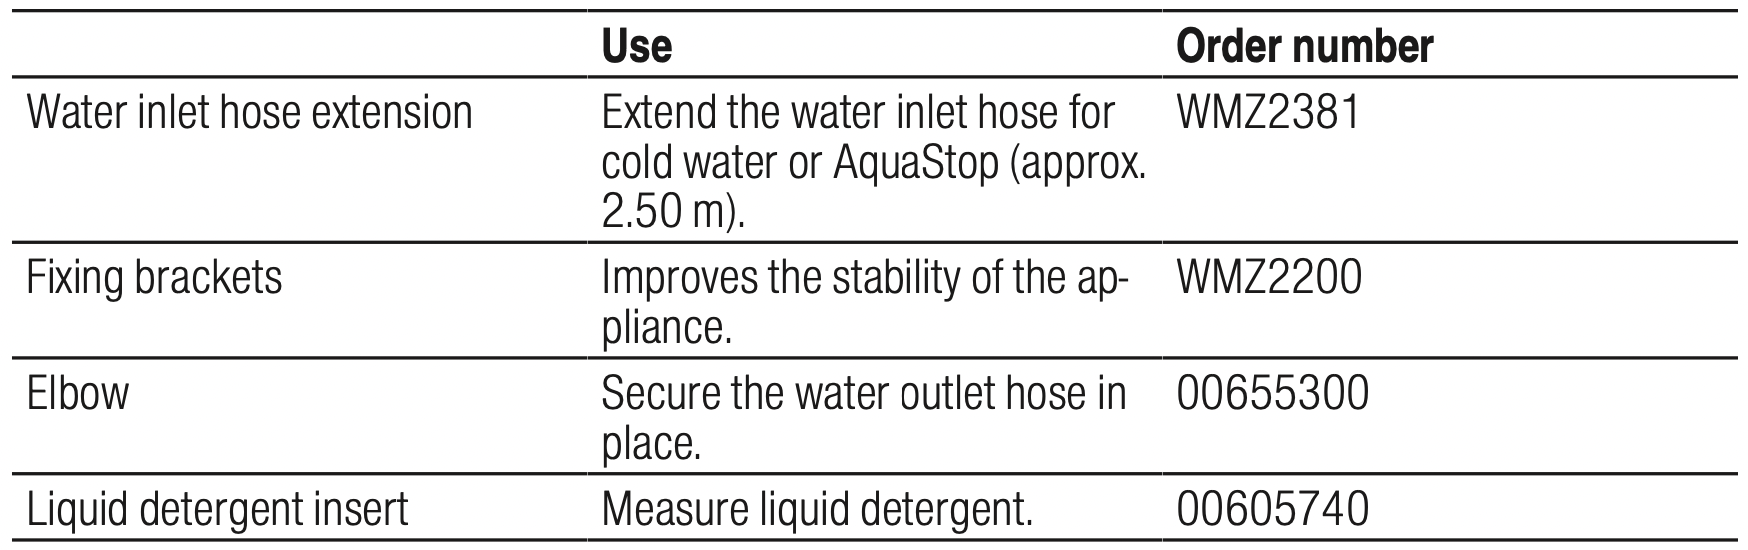
Accessories
Only use original accessories. These have been made especially for your appliance. Here you can find an overview of your appliance's accessories and how to use them.
Before using for the first time
Prepare the appliance for use.
Starting an empty washing cycle
Your appliance was inspected thoroughly before leaving the factory. To remove any residual water, run the first wash cycle without any laundry.
Note: Please read the information in the "Safety" and "Preventing material damage" sections to ensure that you use the appliance safely.
Press . It may take a few seconds for the appliance to switch on.
Set the Drum clean programme.
Close the door.
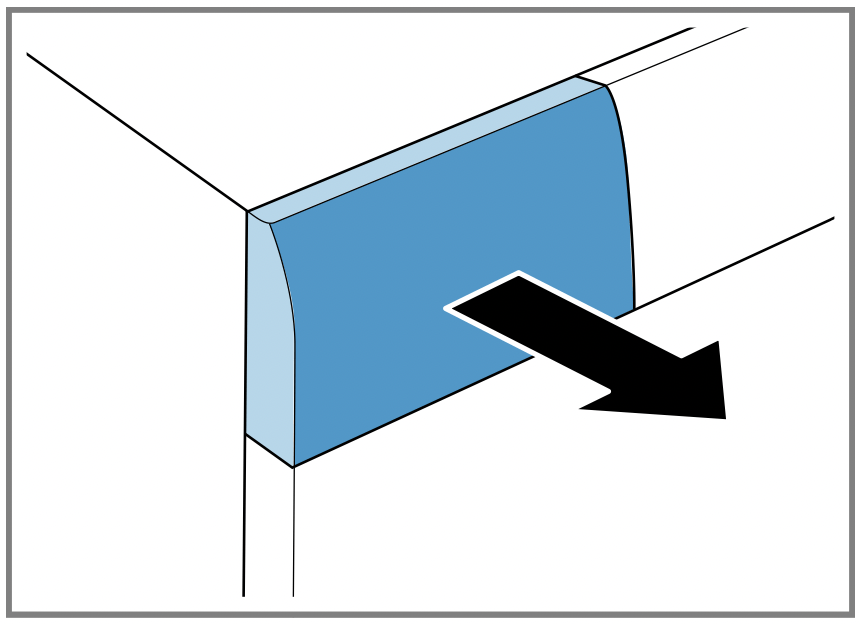
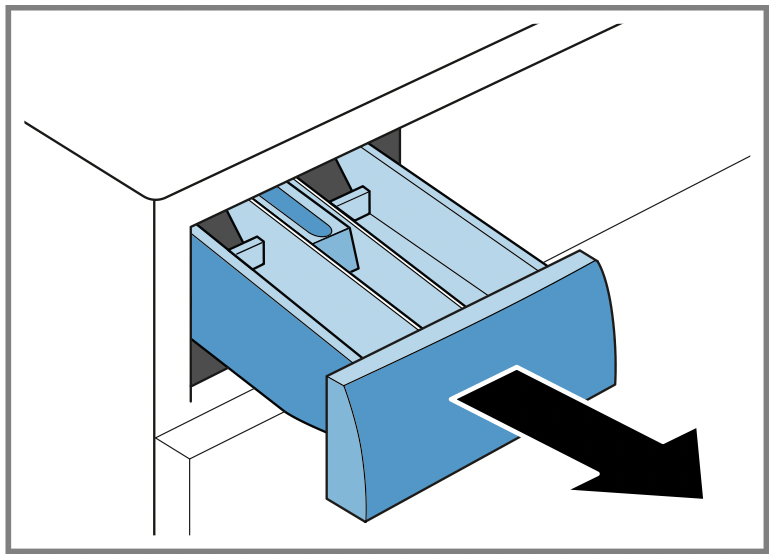
Pull out the detergent drawer.
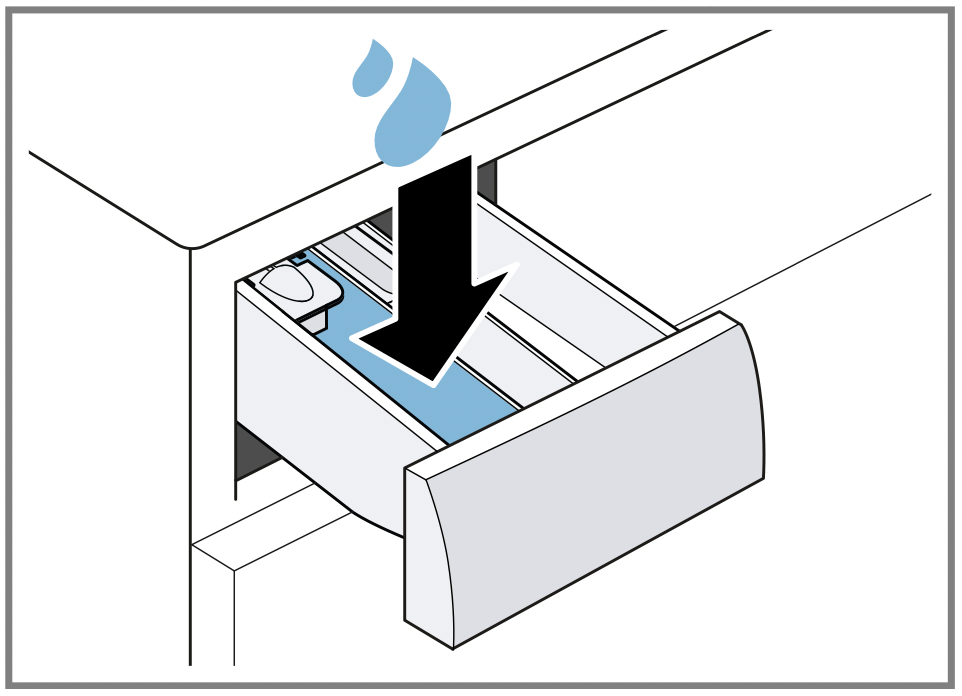
Pour approx. 1 litre of tap water into compartment II.
Pour washing powder into compartment II. To prevent foaming, use only half of the amount of detergent recommended by the detergent manufacturer for light soiling. Do not use detergent suitable for woollens or delicates.
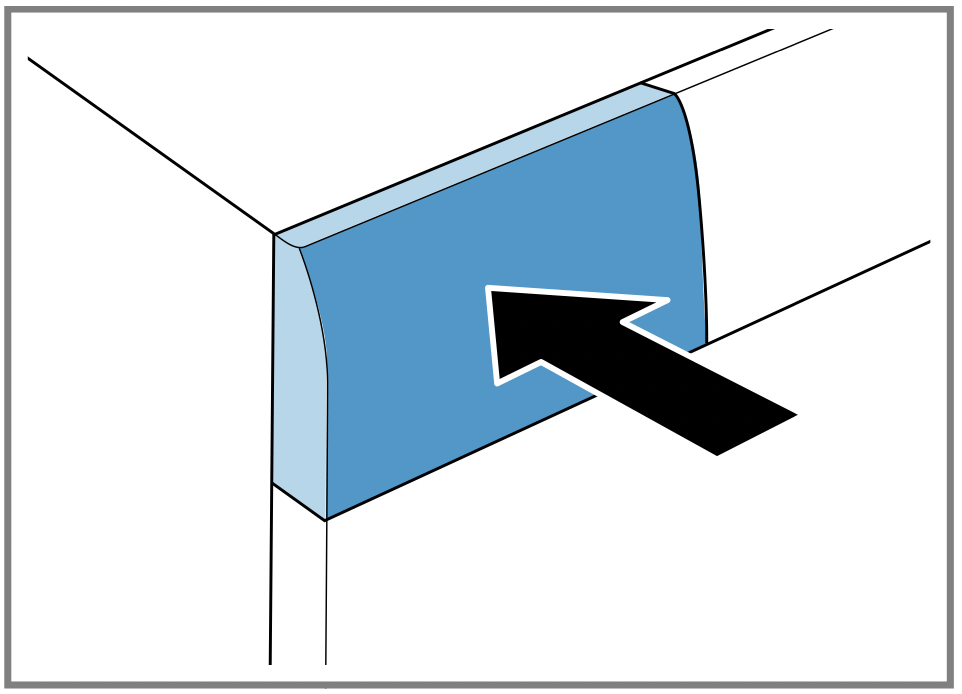
Push in the detergent drawer.
Press Start/Reload to start the programme. The display shows the remaining programme duration.
Start the first wash cycle or press to switch off the appliance. → "Basic operation".
Laundry
You can wash all items that the manufacturer has marked as machine washable on the care label and fabrics made from hand-washable wool using your appliance.
Preparing the laundry
ATTENTION! Objects remaining in the laundry may damage the laundry and the drum.
Remove all items from any pockets in your laundry before using the appliance.
To protect your appliance and the laundry, prepare the laundry be-forehand.
Empty all pockets
Brush sand out of all collars and pockets
Close bed covers and cushion covers
Close all zips, Velcro fasteners, hooks and eyes
Tie cloth belts and apron strings together or use a mesh laundry bag
Remove curtain hooks and lead strips or use a mesh laundry bag
Use a mesh laundry bag for small items of laundry such as children's socks
Separate items of laundry and shake them out
Wash large and small items of laundry together
Dab fresh stains with soapy water (do not rub them)
Some stubborn or dried-in stains can be removed by washing several times
Sorting laundry
Note: Please read the information in the "Safety" and "Preventing material damage" sections to ensure that you use the appliance safely.
To improve washing results and prevent discolouration, sort the laundry according to the following criteria before washing.
Type of fabric and fibre type
Whites
Colours
Wash new coloured items separately the first time you wash them.
"Soiling"
"Care symbols on the care labels"
Degrees of soiling
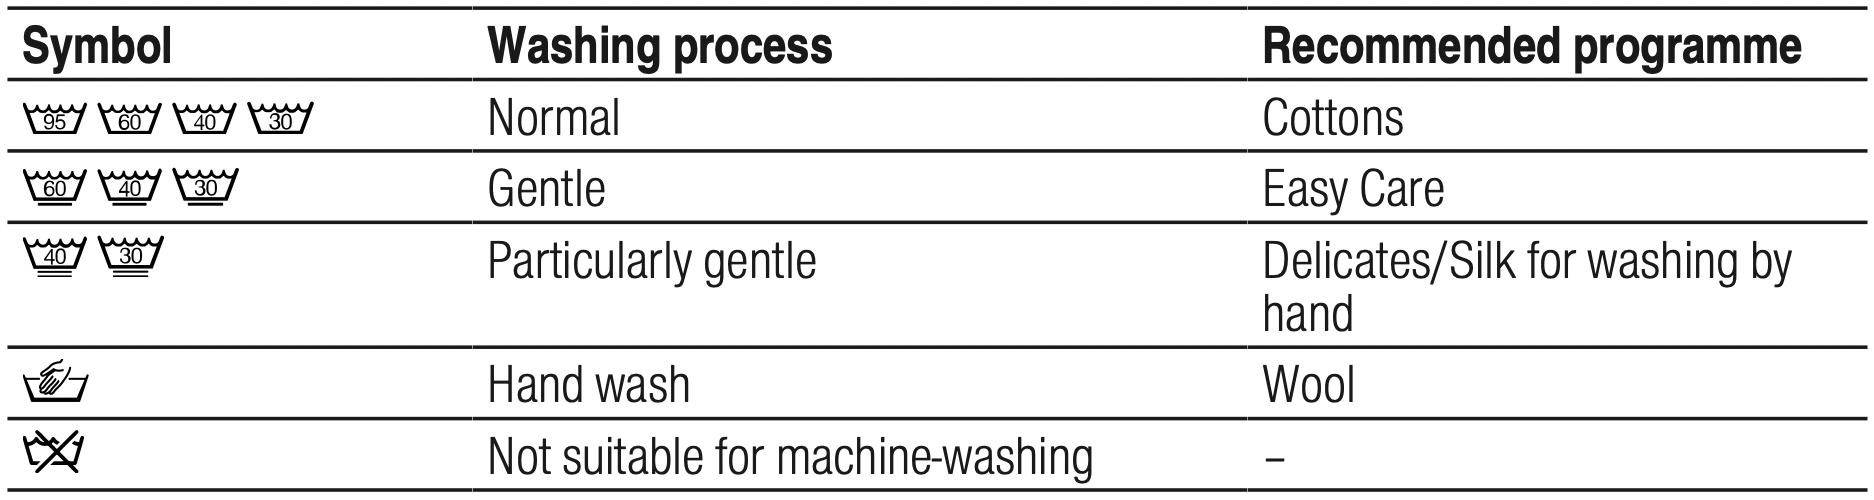
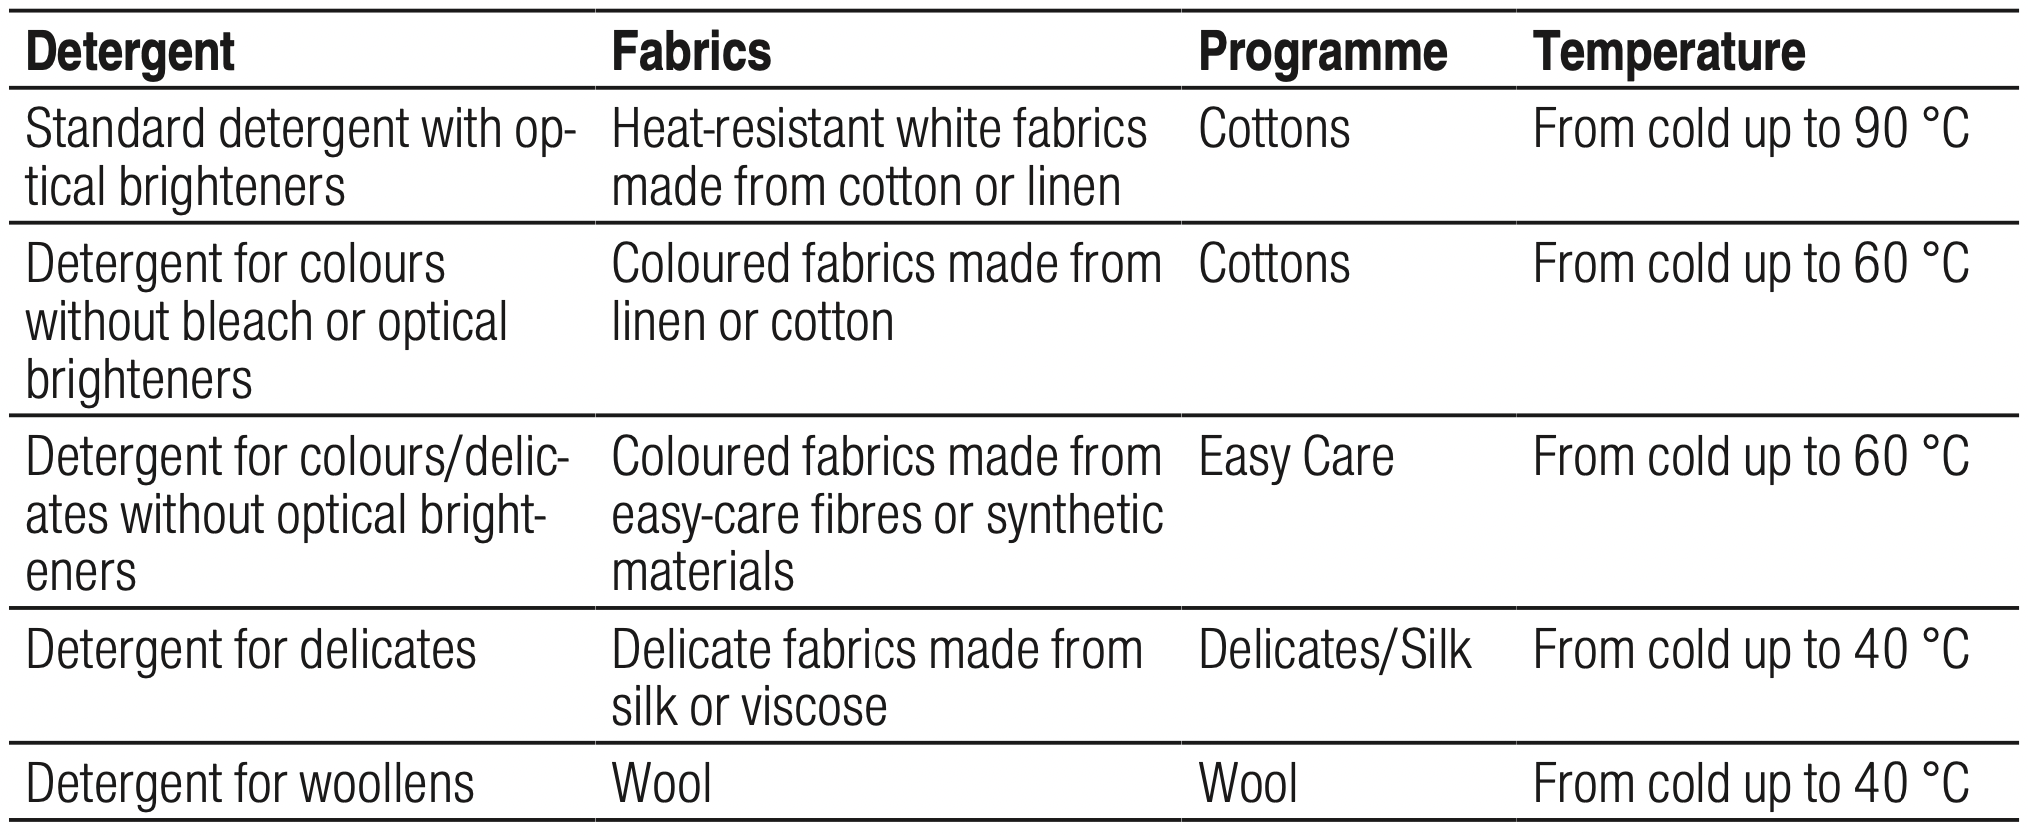
Care symbols on the care labels
The symbols indicate the recommended programme and the numbers in the symbols indicate the maximum recommended washing temperature.
Detergents and care products
You can protect your appliance and your laundry by selecting and using the correct detergents and care products. You can use all detergents and care products which are suitable for domestic washing machines.
Note: Please read the information in the "Safety" and "Preventing material damage" sections to ensure that you use the appliance safely.
The manufacturer's instructions for use and dosage can be found on the packaging.
Notes
Only use liquid detergents that are self-flowing
Do not mix different liquid detergents
Do not mix detergent and fabric softener
Do not use products which have developed a top layer or are highly congealed
Do not use products containing solvents, caustic agents or volatile substances (e.g. bleach)
Use dyes sparingly as salt may damage stainless steel
Do not use bleaching agents in the appliance
Detergent recommendation
This information helps you to choose the right detergent for your fabrics.
Detergent dosage
Use the correct detergent dosage to achieve optimal washing results and save resources. The detergent dosage depends on:
The amount of laundry
Degree of soiling
Water hardness You can find out how hard your water is from your local water company or measure it yourself using a water hardness tester.
Water hardness
Example of a manufacturer's instructions for detergent These example values refer to a standard load of 4–5 kg.
The dosages can be found on the manufacturer's packaging.
Adjust the dosage to the actual load.
Basic operation
You can find out everything you need to know about operating your appliance here.
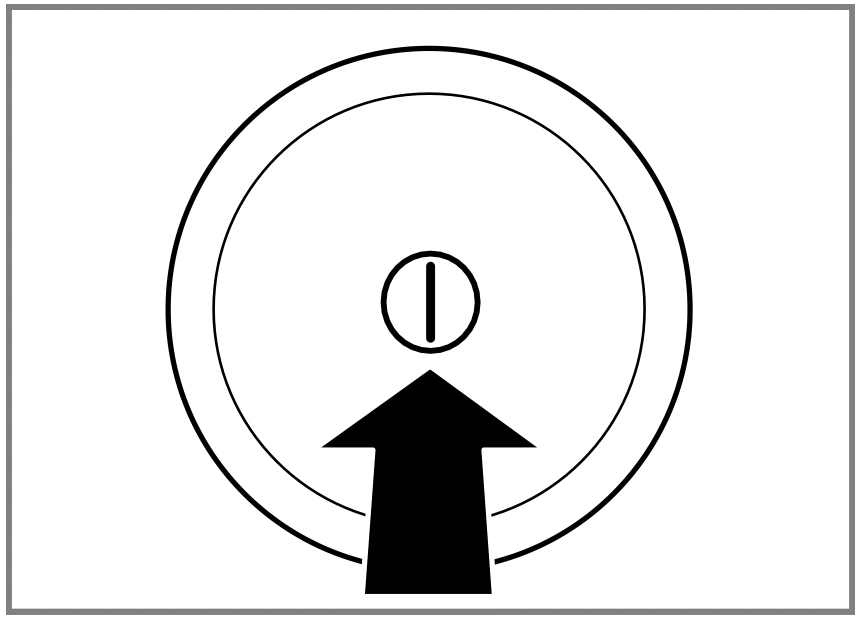
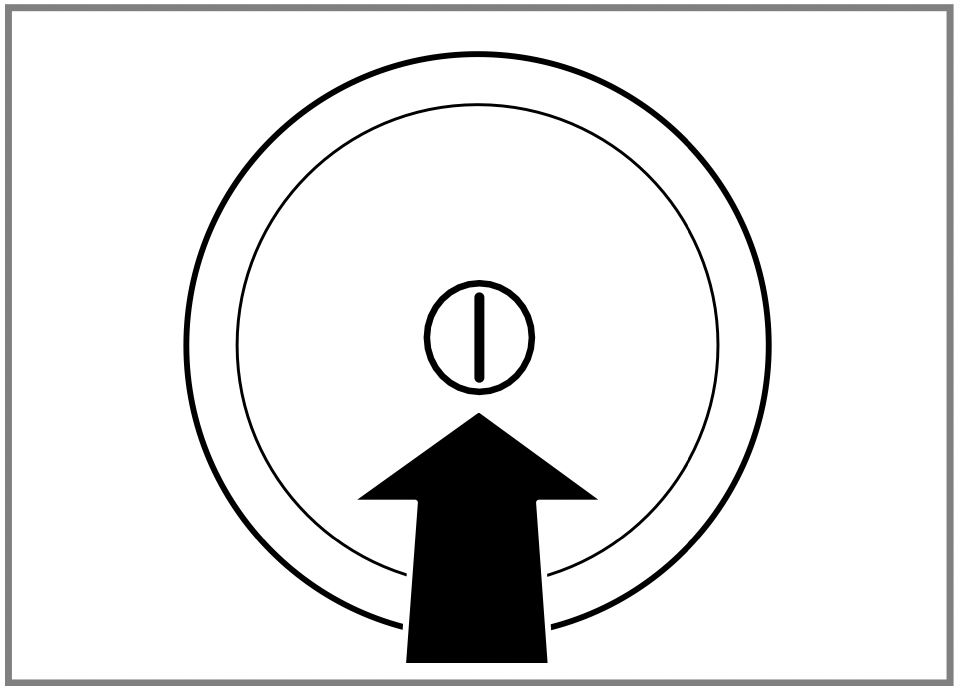
Switching on the appliance
Press .
It may take a few seconds for the appliance to switch on.
Note: The drum is lit up after the door is opened and closed and once the programme has started. The light goes out automatically.
Setting a programme
Set the programme selector to the required "programme".
If necessary, "adjust the programme settings".
Setting additional programmes
Set the Additional Programs programme.
Press to call up the sub-menu for additional programmes.
Select a programme.
Press Main menu to call up the main menu.
Adjust the programme settings if required.
Start the programme.
Adjusting the programme settings
Depending on the programme and programme progress, you can adjust or activate/deactivate the settings.
Note: Overview of all programme settings: → "Buttons"
Requirement: A programme has been set.
Adjust the programme settings. → "Operating logic"
The programme settings are not saved permanently for the programme.
Adjusting additional programme settings
Press Options to call up the sub-menu for the additional programme settings.
Select the programme settings. The programme settings are not saved permanently for the programme.
Press Options to call up the main menu.
Saving the programme settings
Set the Memory programme.
Press to call up the sub-menu for the memory programmes.
Select a programme.
Press Main menu to call up the main menu.
Adjust the programme settings if required. The programme is saved.
Loading laundry
Notes
Please read the information in the "Safety" and "Preventing material damage" sections to ensure that you use the appliance safely.
To prevent creasing, take note of the maximum load for the relevant "programme"
Requirement: Prepare and sort the laundry. → "Laundry".
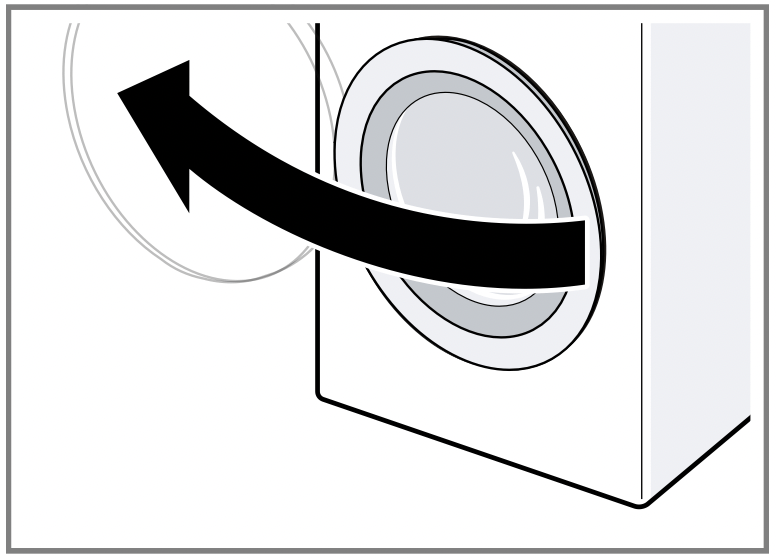
Open the door.
Ensure that the drum is empty.
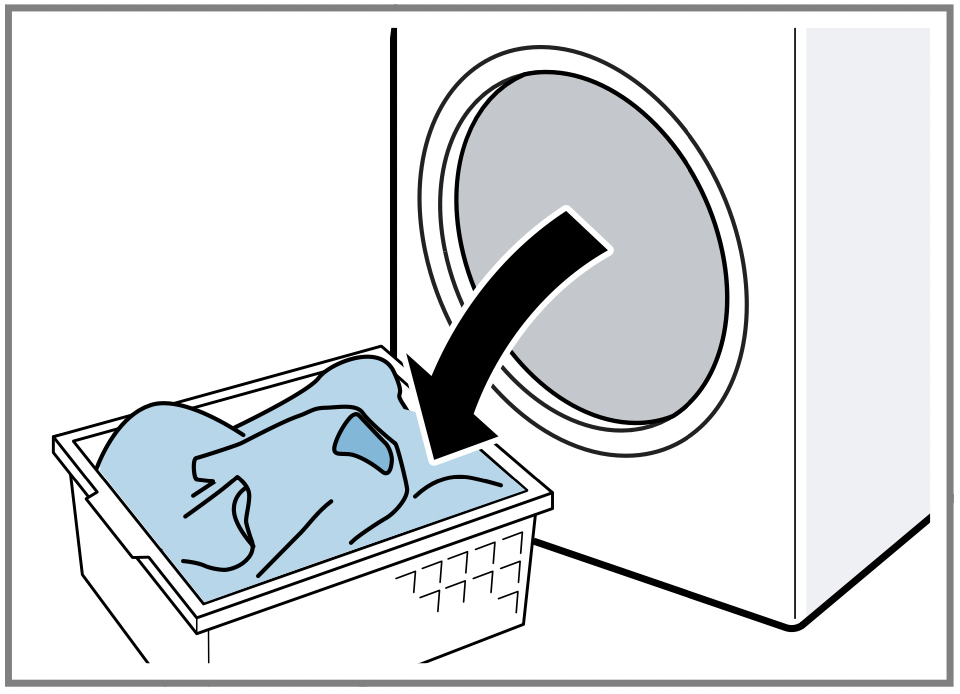
Separate the laundry and place it in the drum.
Note: Ensure that there is no laundry trapped in the door. Close the door.
Using a measuring aid for liquid detergent
If you order the measuring aid as an accessory, you must use the measuring aid.
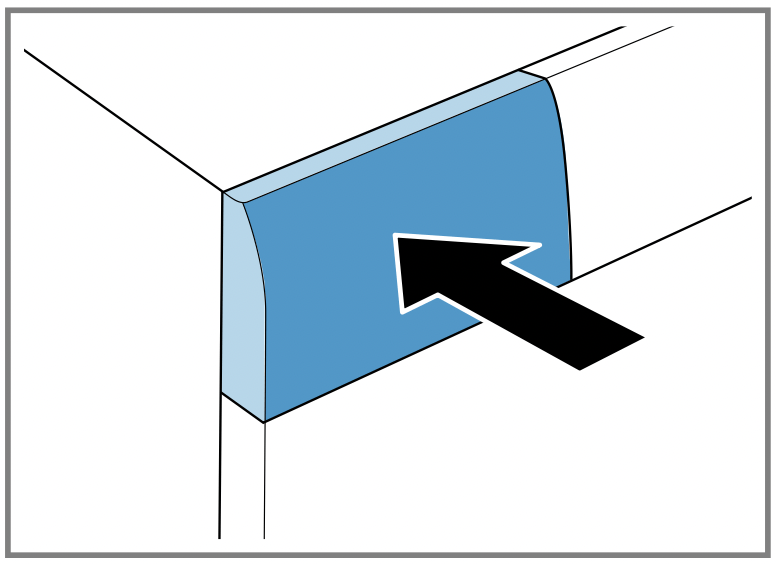
Pull out the detergent drawer.
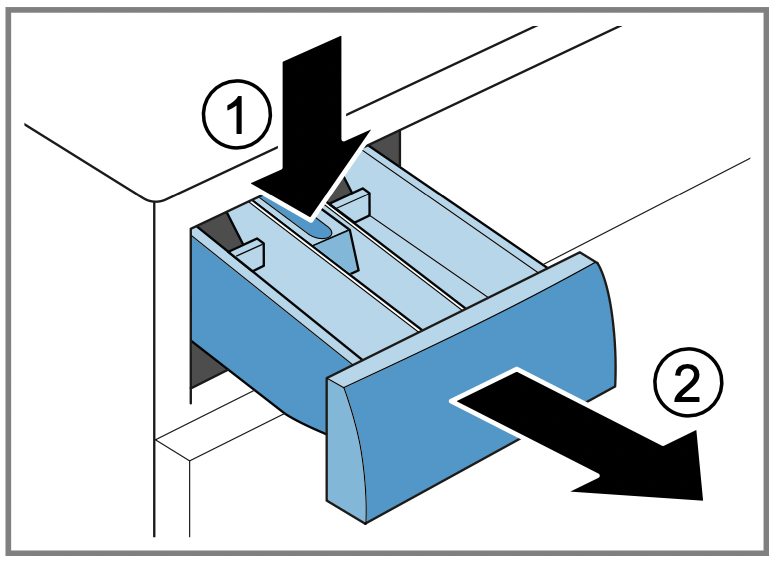
Press down on the insert and remove the detergent drawer.
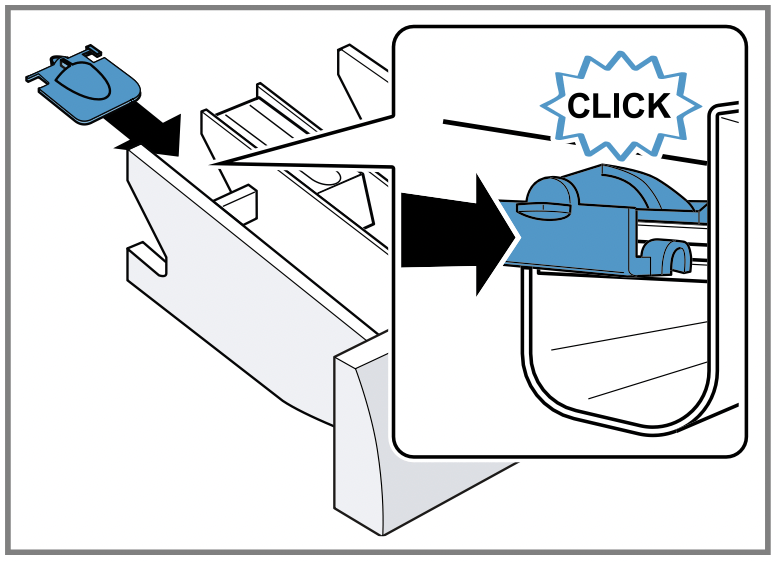
Insert the measuring aid.
Insert the detergent drawer.
Use the measuring aid for liquid detergent
To add liquid detergent, you can use a measuring aid in the detergent drawer.
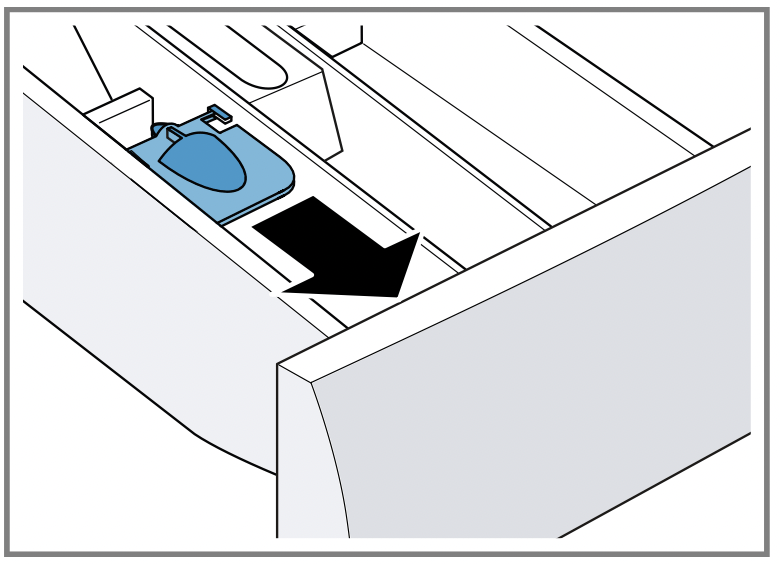
Pull out the detergent drawer.
Slide the measuring aid forwards.
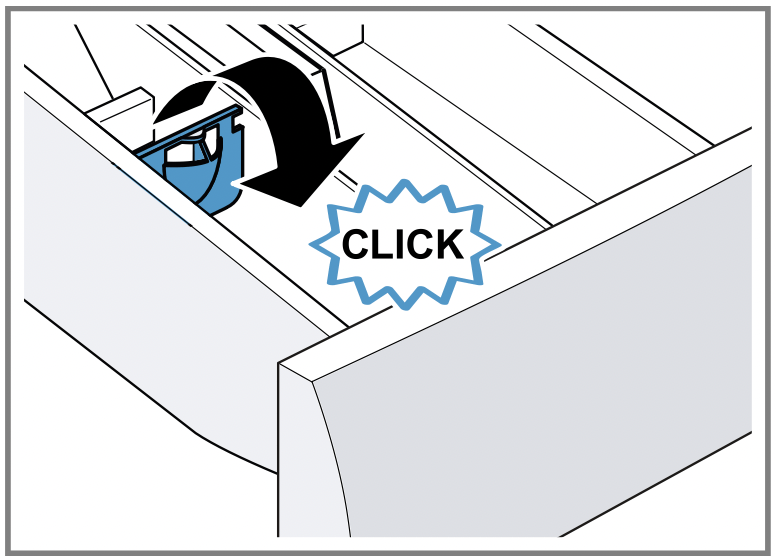
Fold the measuring aid down and click it into place.
Push in the detergent drawer.
Adding detergent and care product
Notes
Please read the information in the "Safety" and "Preventing material damage" sections to ensure that you use the appliance safely.
Do not use the measuring aid for liquid detergent for gel detergents, washing powder, or if Prewash or "Ready in" time are activated.
Requirement: Find out the optimum dosage for "detergent and care product."
Pull out the detergent drawer.
Pour in detergent. → "Detergent drawer"
If required, add the care product.
Push in the detergent drawer.
Starting the programme
Note: If you want to change the time until the programme ends, set the "Ready in" time first.
Press Start/Reload .
The drum rotates and load detection takes place. This can take up to 2 minutes, after which water enters the drum.
The display shows either the programme duration or the "Ready in" time.
Adding laundry
Note: Please read the information in the "Safety" and "Preventing material damage" sections to ensure that you use the appliance safely.
Press Start/Reload. The appliance is paused and checks whether it is possible to add or remove laundry.
Add or remove laundry.
Close the door.
Press Start/Reload
Cancelling the programme
Once the programme has started, you can cancel it at any time.
Note: Please read the information in the "Safety" and "Preventing material damage" sections to ensure that you use the appliance safely.
Press Start/Reload.
Open the door. The appliance door remains locked for safety reasons if the temperature and water levels are high. If the temperature is high, start the Rinse/Freshen Up programme. If the water level is high: Start the Spin or Drain programme.
Remove the laundry.
Resuming the programme when the programme status is Rinse Hold
Set the Spin or Drain programme.
Press Start/Reload
Unloading the laundry
Note: Please read the information in the "Safety" and "Preventing material damage" sections to ensure that you use the appliance safely.
Open the door.
Remove the laundry.
Switching off the appliance
Press
Turn off the tap.
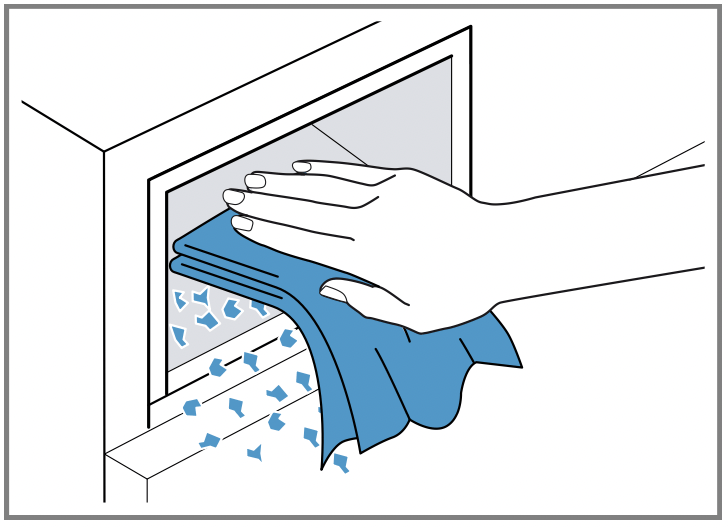
Wipe the rubber gasket dry and remove any foreign objects.
Leave the door and detergent drawer open so that residual water can evaporate.
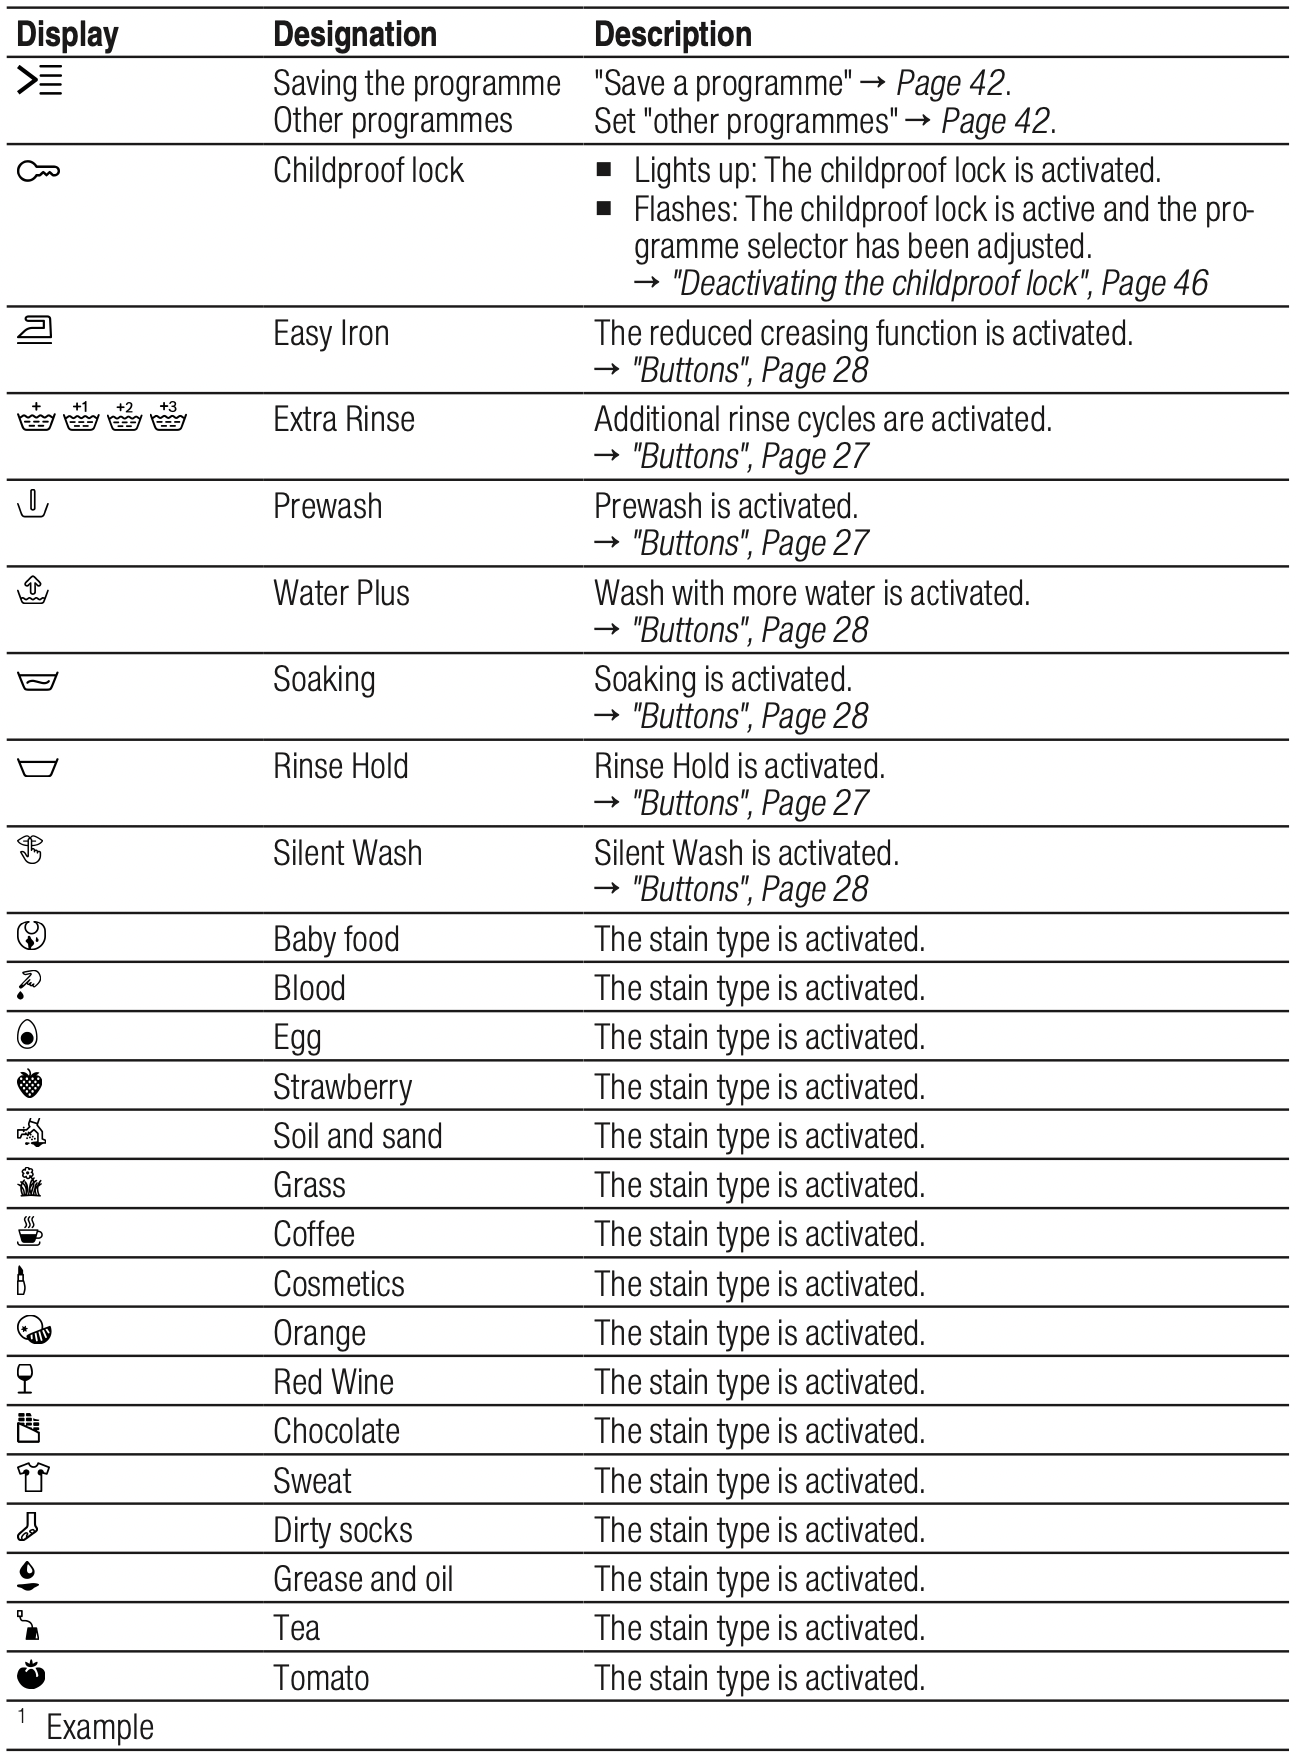
Childproof lock
Secure your appliance against being operated unintentionally using the controls.
Activating the childproof lock
Press and hold the two Child Lock push 3 sec. buttons for approx. 3 seconds.
The display shows .
The controls are locked.
The childproof lock remains active even after the appliance has been switched off.
Deactivating the childproof lock
Requirement: To deactivate the childproof lock, the appliance must be switched on.
Press and hold the two Child Lock push 3 sec. buttons for approx. 3 seconds.
So that the programme currently running is not cancelled, the programme selector must be set to the initial programme.
goes out in the display.
Basic settings
You can configure the appliance to meet your needs.
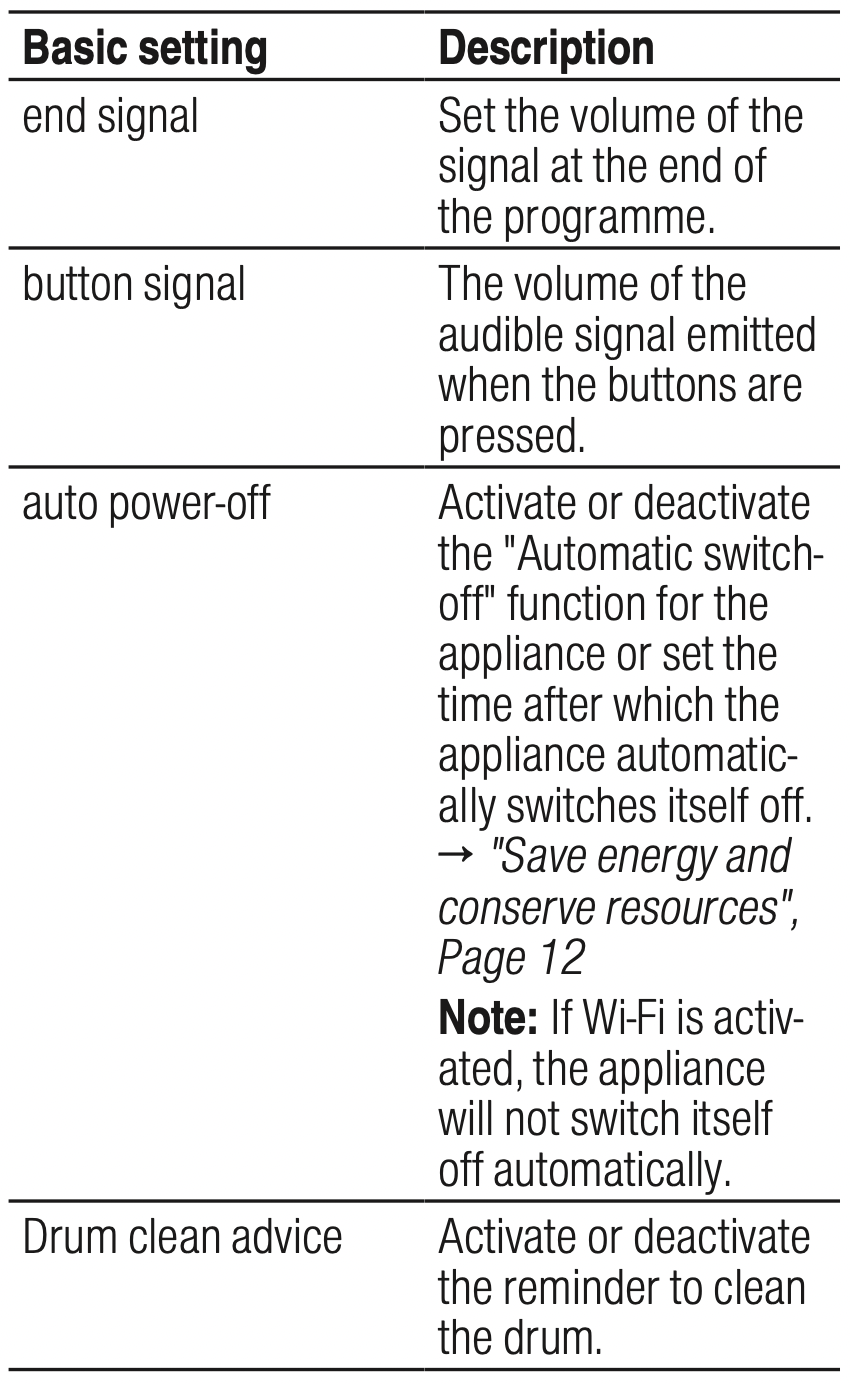
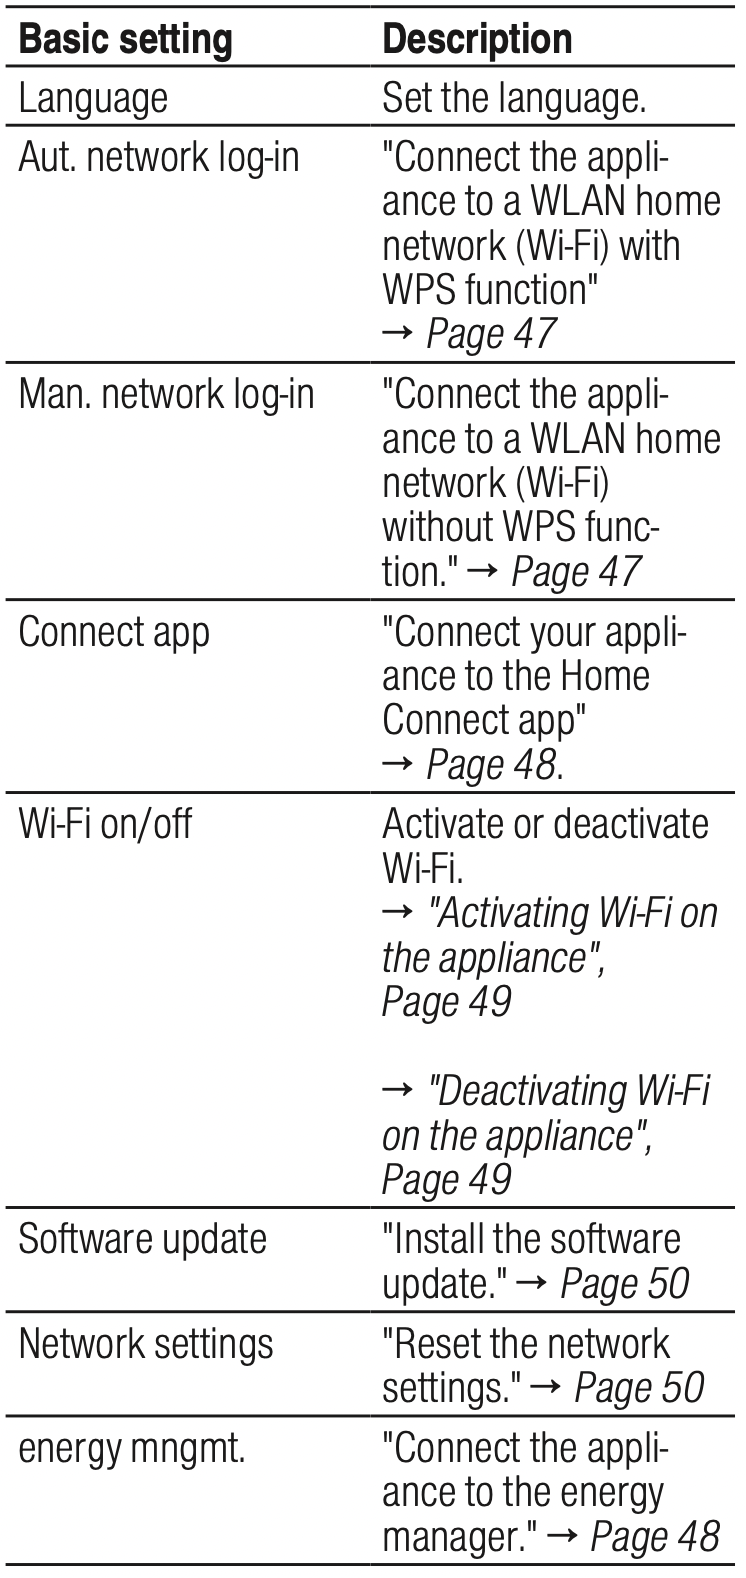
Overview of the basic settings
Below is an overview of the basic settings on the appliance.
Changing the basic settings
To call up the basic settings for the sub-menu, press and hold both buttons 3 sec. for approx. 3 seconds.
Select the required basic setting. → "Overview of the basic settings",
Adjust the basic setting.
Press 3 sec. to call up the main menu.
Cleaning and servicing
To keep your appliance working efficiently for a long time, it is important to clean and maintain it carefully.
Tips on appliance care
Follow the tips for appliance care to ensure your appliance works correctly in the long term.
Wipe down the housing and the control panel with nothing but water and a damp cloth.
The appliance parts remain clean and hygienic.
Remove all detergent residue, spray residue or other residues immediately.
Fresh deposits are easier to remove without leaving any residue.
Keep the appliance door and detergent drawer open after use.
This allows the residual water to dry, reducing odours in the appliance.
Cleaning the drum
If you often wash at a washing temperature of 40 °C and lower or the appliance has not been used for a long period, clean the drum.
CAUTION! Risk of injury! Permanently washing at low temperatures and a lack of ventilation for the appliance may damage the drum and cause injury.
Regularly run a programme for cleaning the drum or wash at temperatures of at least 60 °C.
Leave the appliance to dry after every operation with the door open, and leave the detergent drawer to dry.
Run the Drum clean programme without laundry. Add washing powder.
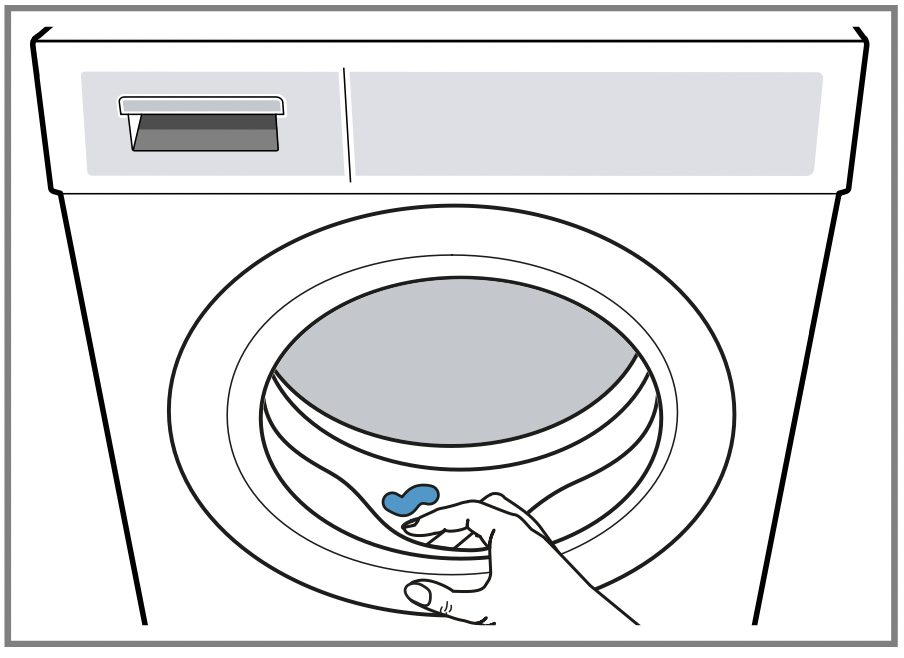
Cleaning the detergent drawer
Note: Please read the information in the "Safety" and "Preventing material damage" sections to ensure that you use the appliance safely.
Pull out the detergent drawer.
Press down on the insert and remove the detergent drawer.
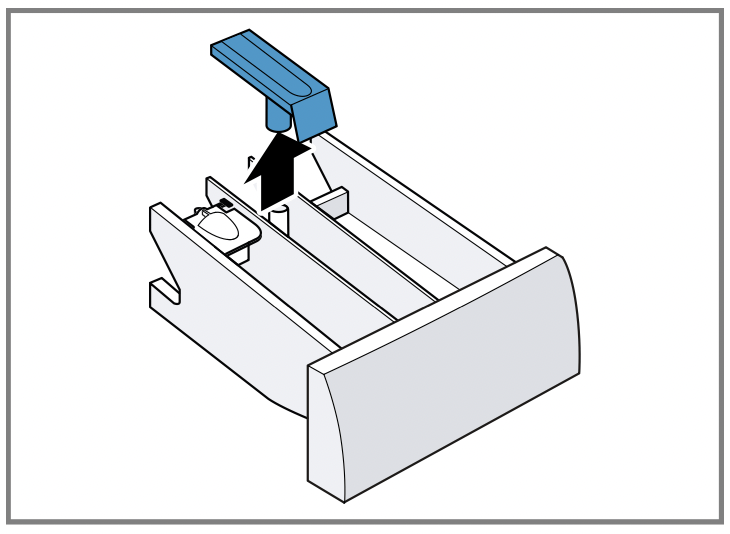
Press out the insert upwards from below.
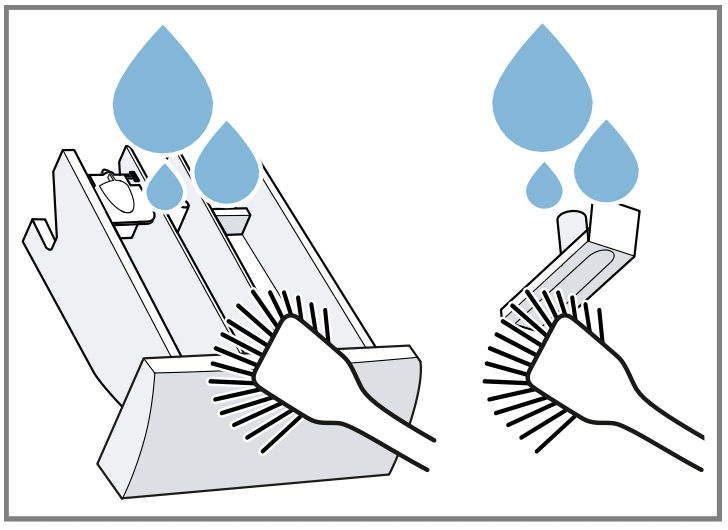
Clean the detergent drawer and insert with water and a brush, and then dry them.
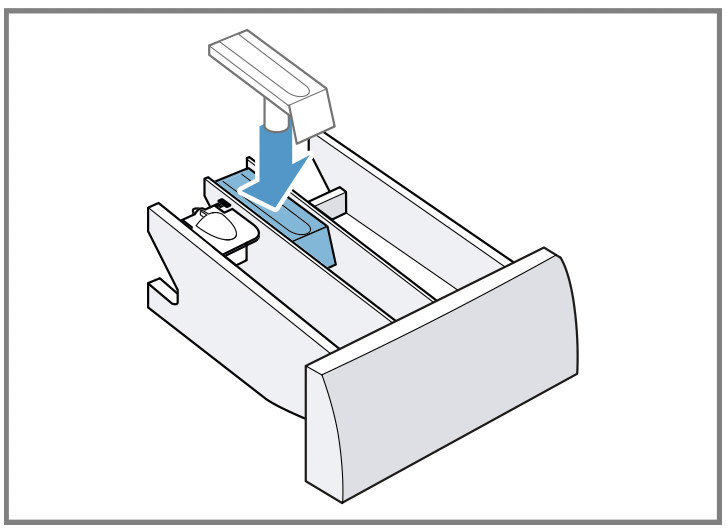
Fit the insert and lock it into place.
Cleaning the opening for the detergent drawer.
Push in the detergent drawer.
Descaling
If you add detergent correctly, you do not need to descale your appliance.
If you still wish to use descaler, follow the manufacturer's instructions for use.
ATTENTION! The use of unsuitable descaling agents, e.g. for coffee machines, may damage the appliance.
For this appliance, only use descaling agents that are available from the manufacturer's website or our after-sales service.
Cleaning the drain pump
Clean the drain pump in the event of faults, e.g. blockages or rattling noises.
Emptying the drain pump
Note: Please read the information in the "Safety" and "Preventing material damage" sections to ensure that you use the appliance safely.
Turn off the water tap.
Switch off the device.
Disconnect the appliance's mains plug from the power supply.
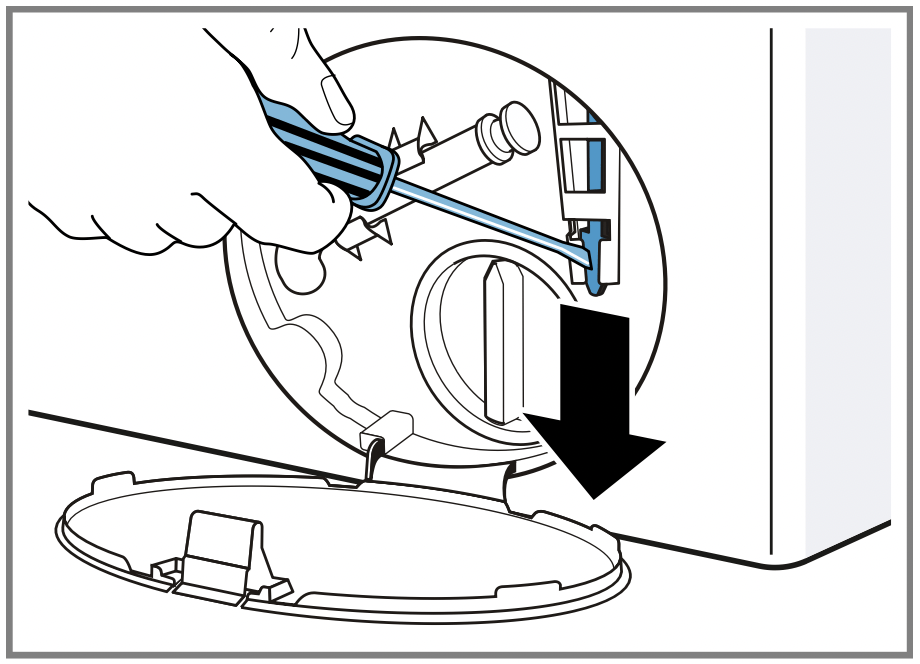
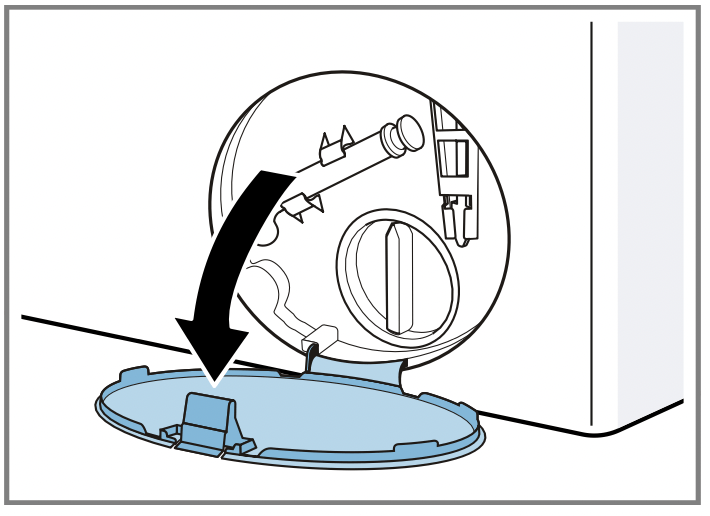
Open the maintenance flap.
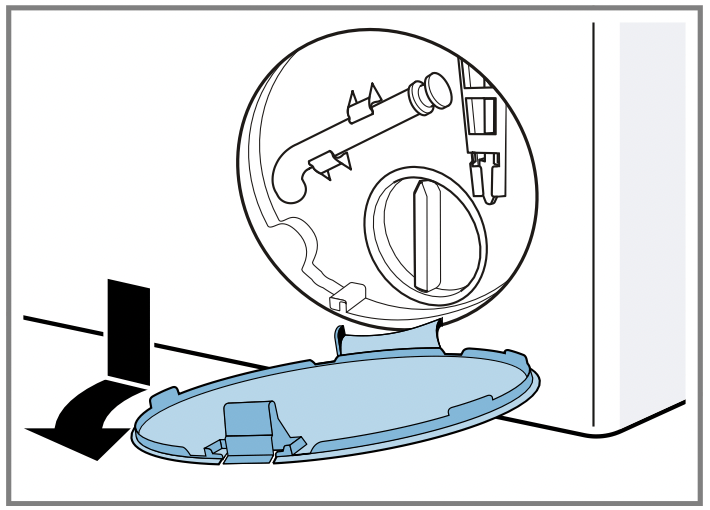
Remove the maintenance flap.
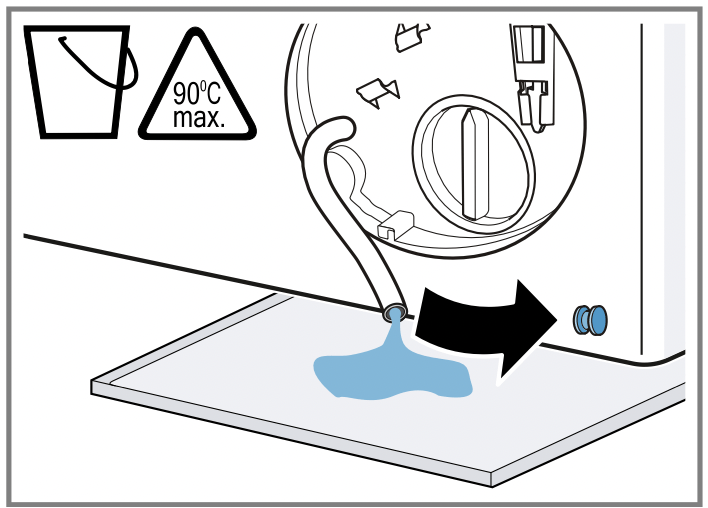
Slide a receptacle under the opening.
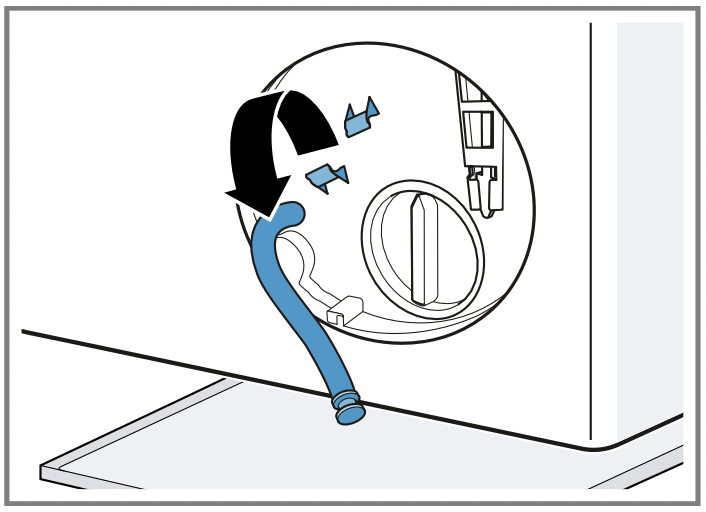
Take the drain hose out of the holder.
CAUTION - Risk of scalding! When you wash at high temperatures, the detergent solution gets hot. Do not touch the hot detergent solution. To allow the detergent solution to flow out into the container, remove the sealing cap.
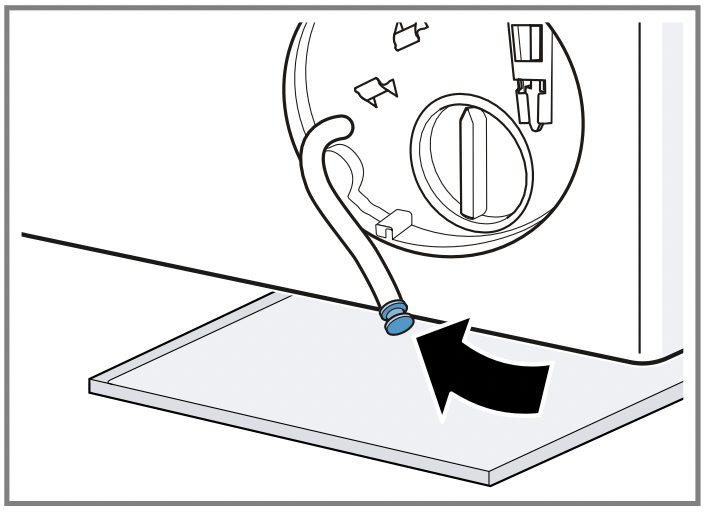
Firmly press on the sealing cap.
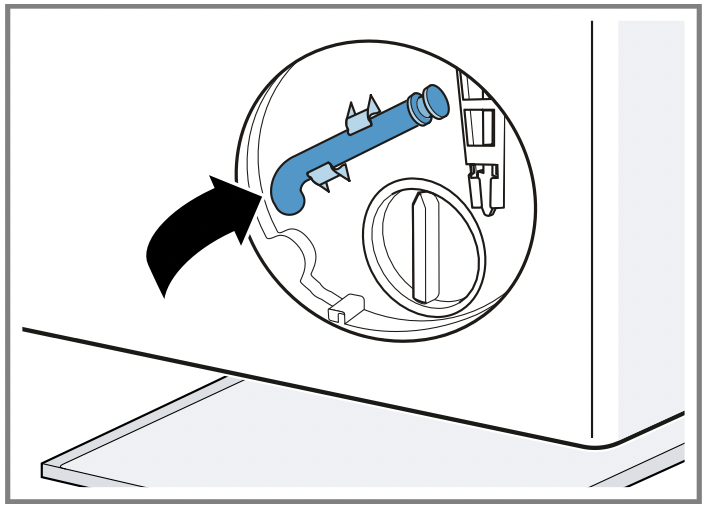
Insert the drain hose into the holder.
Cleaning the drain pump
Note: Please read the information in the "Safety" and "Preventing material damage" sections to ensure that you use the appliance safely.
Requirement: "The drain pump is empty."
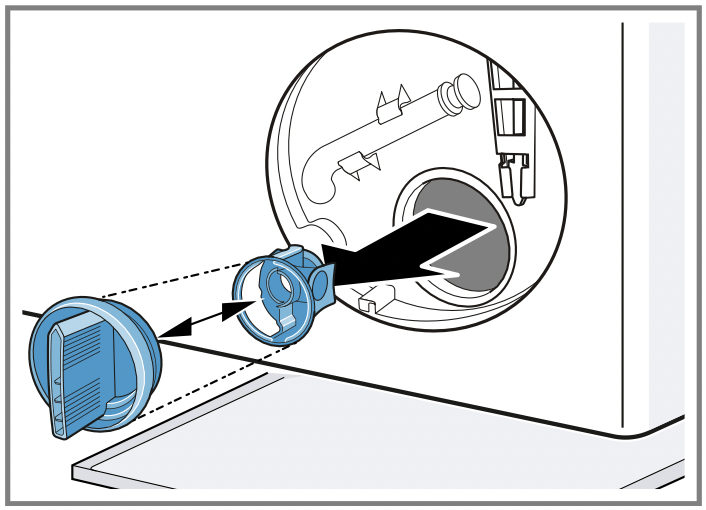
Since water may remain in the drain pump, remove the pump cap carefully. The filter insert in the pump housing may become stuck due to coarse particles of dirt. Loosen the dirt and remove the filter insert.
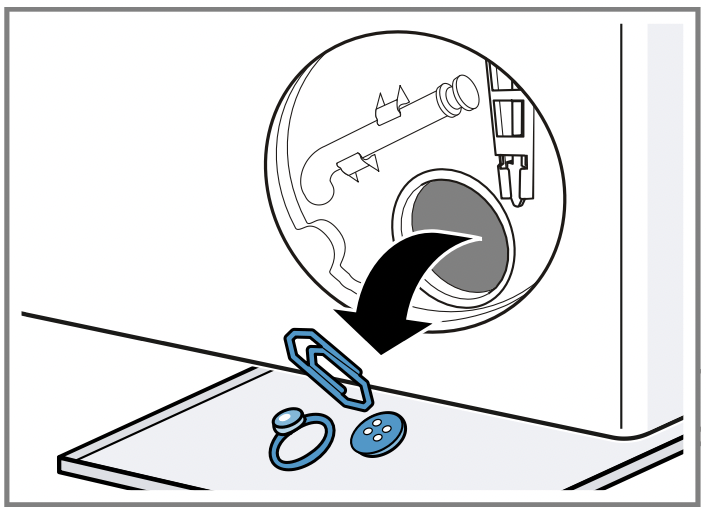
Clean the interior, the thread on the pump cap and the pump housing. The pump cap is comprised of two parts which can be taken apart for cleaning.
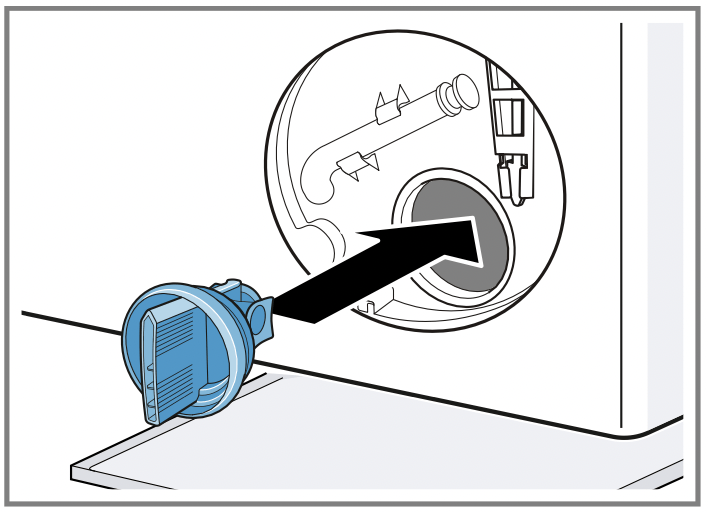
Make sure that the impeller in the drain pump can be rotated.
Insert the pump cap. Ensure that the parts of the pump cap are correctly assembled.
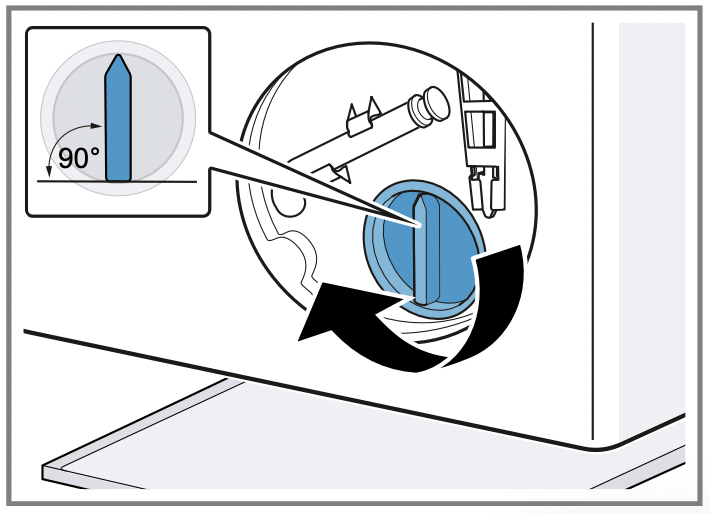
Screw on the pump cap. The handle on the pump cap must be in a vertical position.
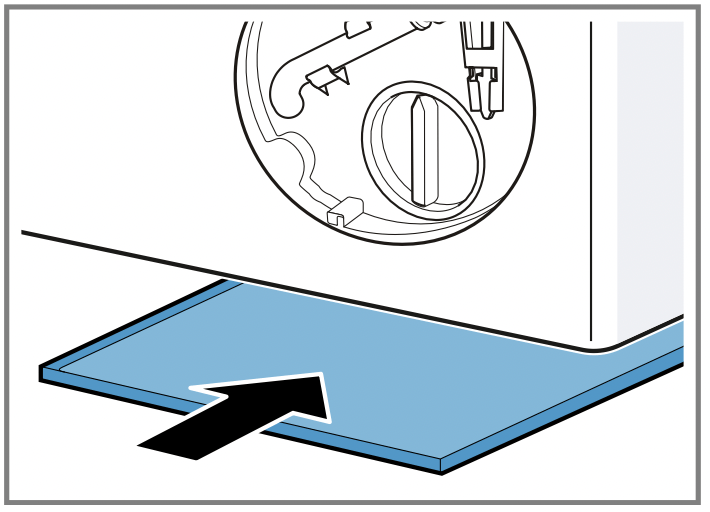
Insert the maintenance flap and lock it into place.
Close the maintenance flap.
Before the next wash
To prevent unused detergent from flowing straight into the outlet in the next wash, run the Drain programme after you have emptied the drain pump.
Turn on the tap.
Insert the mains plug.
Switch on the appliance.
Pour 1 litre of water into compartment II.
Start the Drain programme.
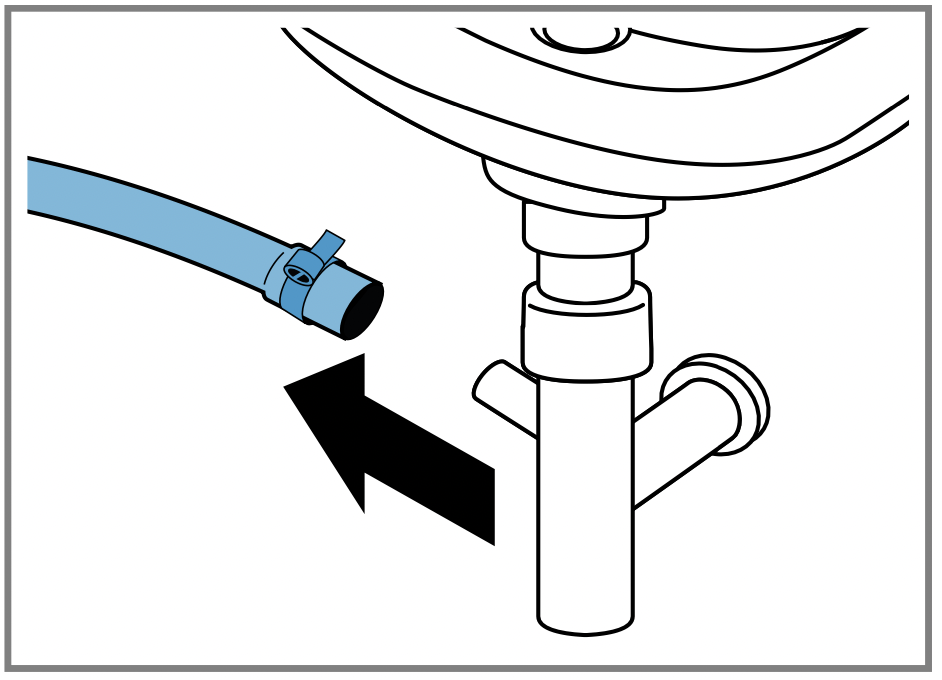
Cleaning the water outlet hose at the siphon
If the water outlet hose at the siphon is dirty or the detergent solution is not being pumped out, you must clean these.
Switch off the appliance.
Disconnect the appliance's mains plug from the power supply.
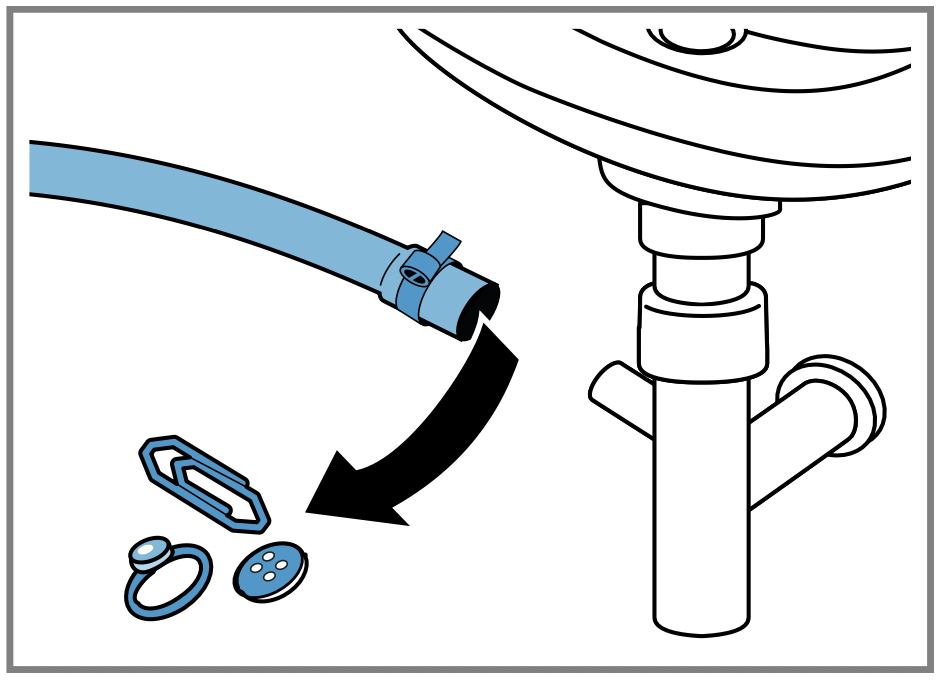
Loosen the hose clamp and carefully remove the water outlet hose. Residual water may leak out.
Clean the water outlet hose and siphon connecting piece.
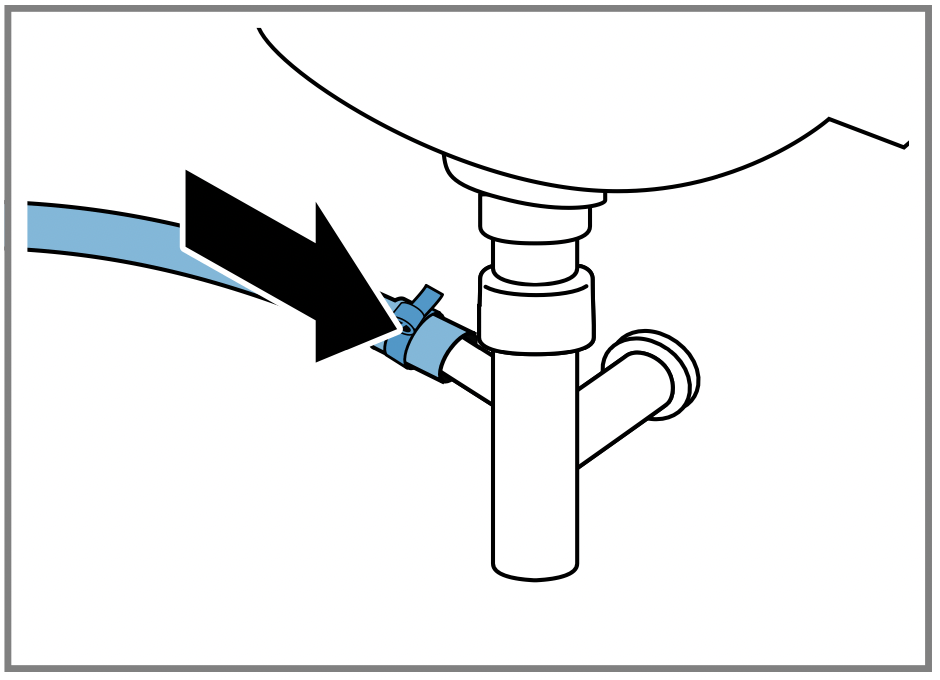
Reattach the water outlet hose and secure the connection point using the hose clamp.
Clean the water inlet filters.
Clean the filter in the water inlet in the event of blockages or if the water pressure is too low.
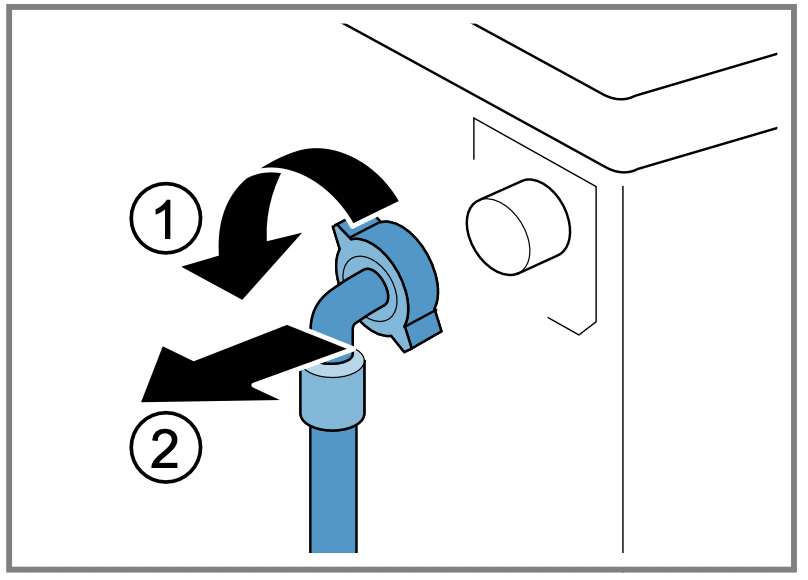
Emptying the water inlet hose
Turn off the tap.
Set a programme, except for Rinse/Freshen Up, Spin or Drain.
Start the programme and leave it to run for approx. 40 seconds.
Switch off the appliance.
Disconnect the appliance's mains plug from the power supply.
Cleaning the filter on the tap
Note: Please read the information in the "Safety" and "Preventing material damage" sections to ensure that you use the appliance safely.
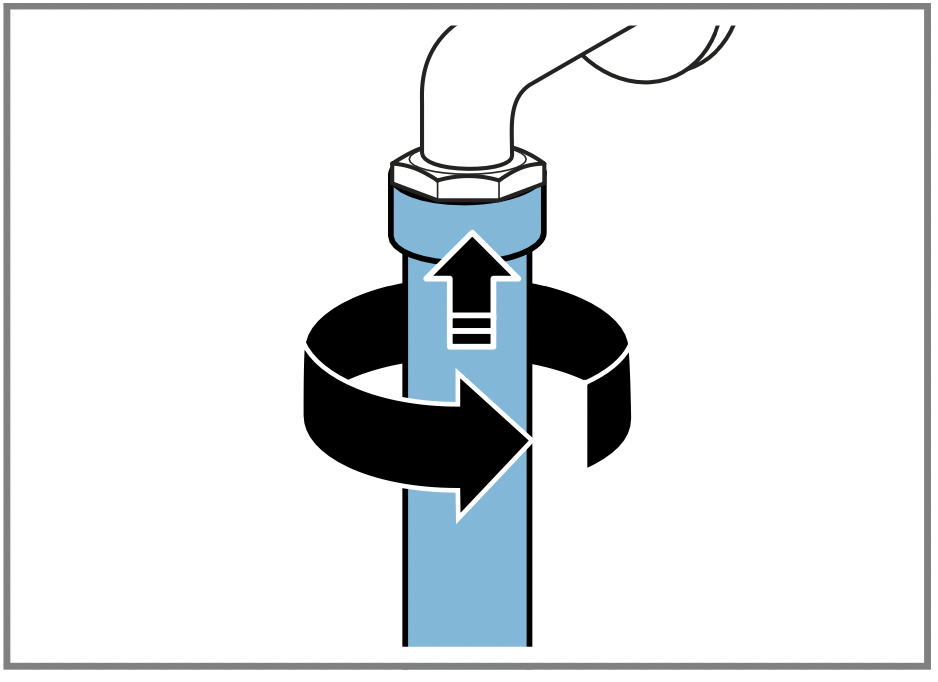
Requirement: The water inlet hose is empty.
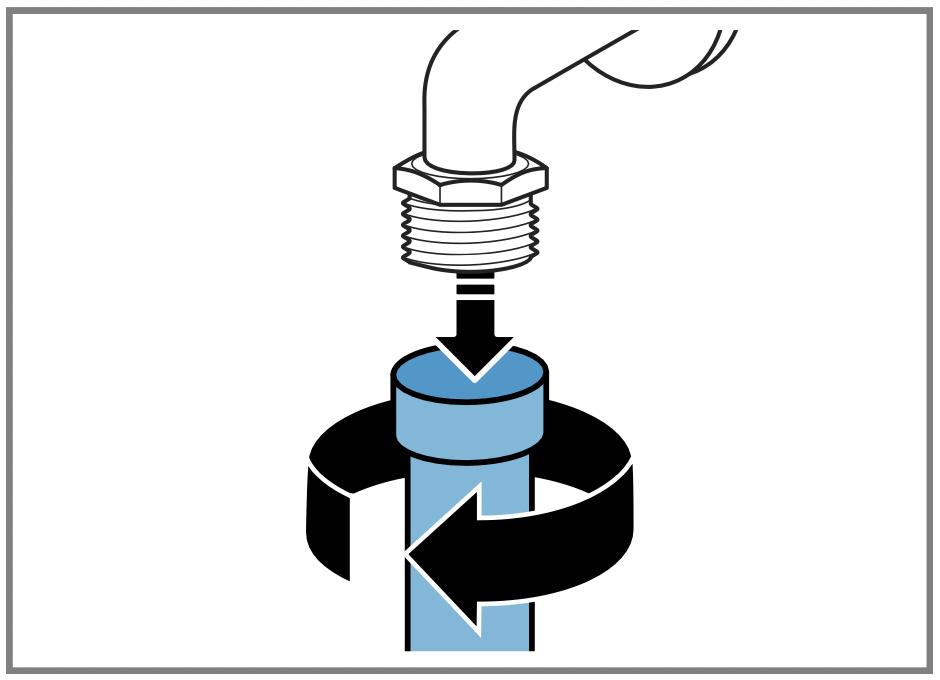
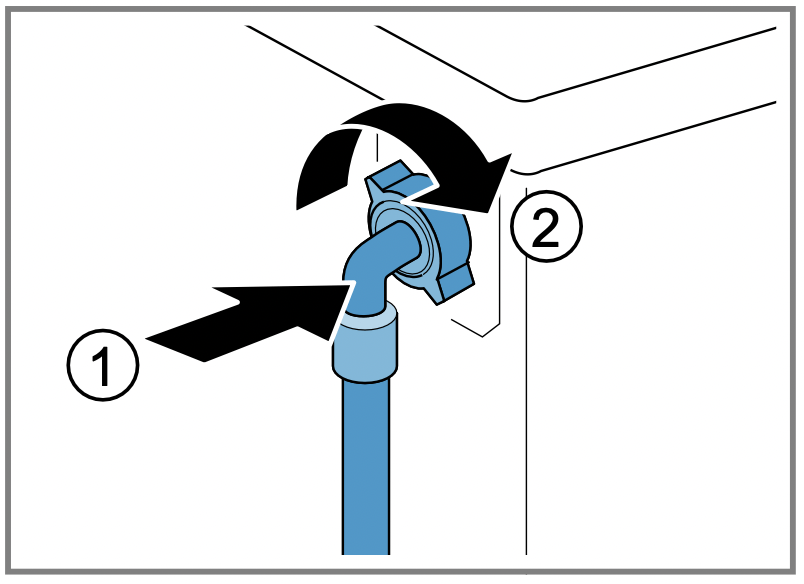
Remove the water inlet hose from the tap.
Clean the filter with a small brush.
Connect the water inlet hose and check for leaks.
Cleaning the filter on the appliance
Note: Please read the information in the "Safety" and "Preventing material damage" sections to ensure that you use the appliance safely.
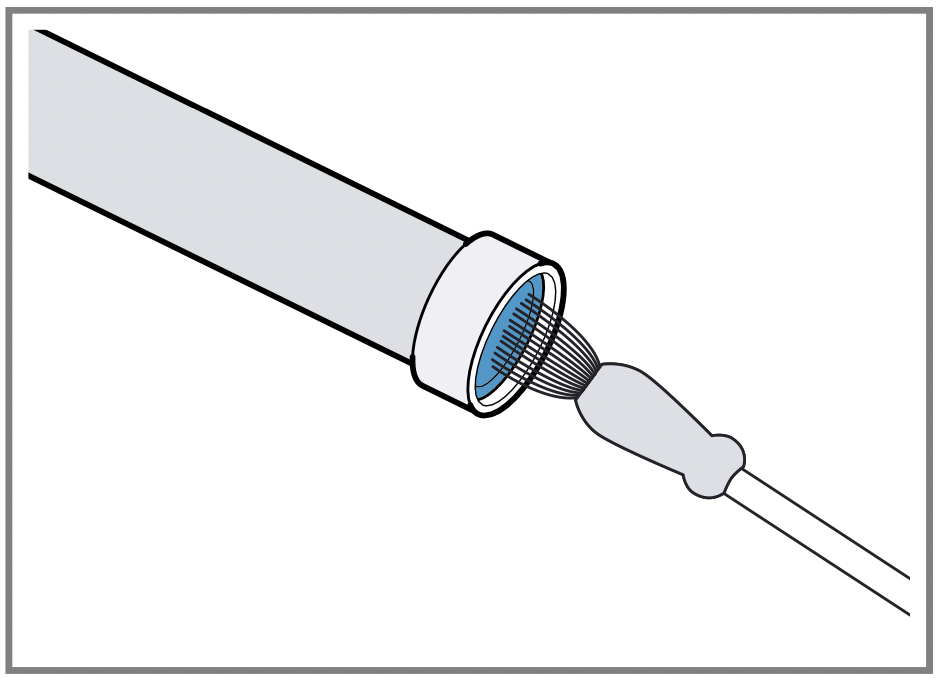
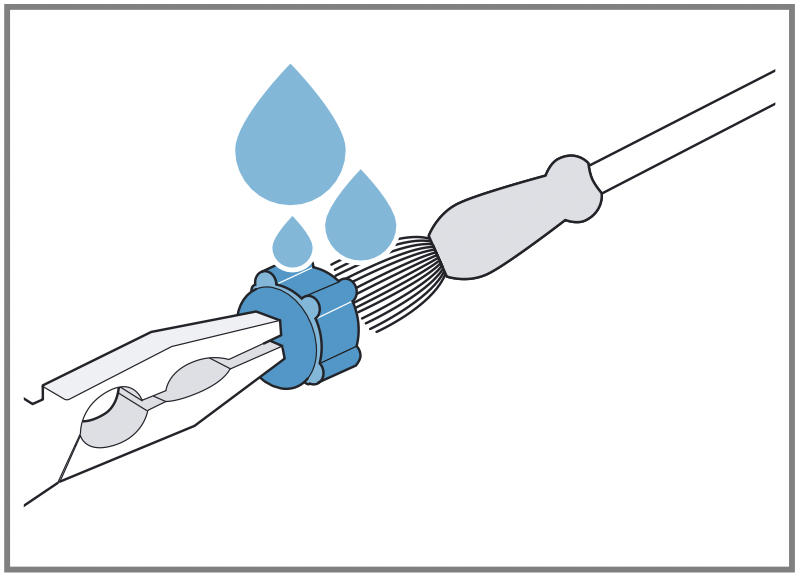
Requirement: The water inlet hose is empty. → "Emptying the water inlet hose"
Disconnect the hose from the rear of the appliance.
Use pliers to remove the filter.
Clean the filter with a small brush.
Reinsert the filter.
Connect the hose and check for leaks.
Troubleshooting
You can rectify minor faults on your appliance yourself. Read the troubleshooting information before contacting after-sales service. This will avoid unnecessary costs.
WARNING! Risk of electric shock! Improper repairs are dangerous.
Repairs to the appliance should only be carried out by trained specialist staff.
Only use genuine spare parts when repairing the appliance.
If the power cord of this appliance is damaged, it must be replaced by the manufacturer, the manufacturer's Customer Service or a similarly qualified person in order to prevent any risk.
Error code / Fault display / Signal
Fault
Cause
Troubleshooting
The display goes out and Start/Reload flashes.
Energy-saving mode is active
Press any button. The symbol lights up again.
"E:30 / -80"
Drain pipe or water outlet hose is blocked.
Clean the drain pipe and the water outlet hose.
Drain pipe or water drain hose is caught or jammed.
Ensure that the drain pipe and water drain hose are not kinked or trapped.
Drain pump is blocked.
→ "Cleaning the drain pump", Page 53.
The water outlet hose is connected too high.
Install the water outlet hose at a maximum height of 1 metre. → "Technical specifications", Page 70.
Pump cover is not correctly assembled.
Correctly assemble the pump cover.
"E:36 / -25 / -26"
Drain pump is blocked.
→ "Cleaning the drain pump", Page 53.
"E:60 / -2B"
The unbalanced load detection system has interrupted the spin cycle because the laundry is unevenly distributed.
Redistribute the laundry in the drum.
Note: Where possible, mix large and small items in the drum. Different sized items of laundry distribute themselves better during the spin cycle.
"E:10 / -10"
The filters in the water inflow are blocked.
"Clean the filters in the water inflow" → Page 57.
The tap is turned off.
Turn on the tap.
The water inlet hose is kinked or jammed.
Ensure that the water inlet hose is not kinked or jammed.
All other error codes.
Malfunction
Call the after-sales service. → "Customer Service", Page 68.
Water cooling
To protect the wastewater pipes, the hot detergent solution is cooled before being drained.
Wait until the detergent solution has cooled down.
Malfunctions
Fault
Cause
Troubleshooting
The appliance is not working.
The mains plug of the power cord is not plugged in.
Connect the appliance to the power supply.
The circuit breaker is faulty.
Check the circuit breaker in the fuse box.
There has been a power cut.
Check whether the lighting in your kitchen or other appliances are working.
The programme does not start.
You have not pressed Start/ Reload
Press Start/Reload
Door is not closed.
Close the door.
Press Start/Reload to start the programme.
Childproof lock is activated.
→ "Deactivating the childproof lock", Page 46.
Finish in is activated.
Check whether Finish in is activated. → "Buttons", Page 26.
Laundry is caught in the door.
Open the door again.
Remove any trapped laundry.
Close the door.
Press Start/Reload to start the programme.
The door cannot be opened.
Rinse Hold is activated.
Continue the programme by selecting Spin or Drain and pressing Start/Reload → "Resuming the programme when the programme status is Rinse Hold", Page 45.
The temperature is too high.
Wait until the temperature has dropped.
→ "Cancelling the programme", Page 45.
Water level is too high.
Start the Drain programme.
Power failure.
Open the door using the emergency release. → "Emergency release", Page 66
The water is not draining.
Drain pipe or water outlet hose is blocked.
Clean the drain pipe and the water outlet hose.
Drain pipe or water drain hose is caught or jammed.
Ensure that the drain pipe and water drain hose are not kinked or trapped.
Drain pump is blocked.
→ "Cleaning the drain pump", Page 53.
Rinse Hold is activated.
Continue the programme by selecting Spin or Drain and pressing Start/Reload → "Resuming the programme when the programme status is Rinse Hold", Page 45
The water outlet hose is connected too high.
Install the water outlet hose at a maximum height of 1 metre. → "Technical specifications", Page 70
Pump cover is not correctly assembled.
Correctly assemble the pump cover.
Water is not flowing in. Detergent is not being dispensed.
You have not pressed Start/Reload
Press Start/Reload
The filters in the water inflow are blocked.
"Clean the filters in the water inflow" → Page 57.
The tap is turned off.
Turn on the tap.
The water inlet hose is kinked or jammed.
Ensure that the water inlet hose is not kinked or jammed.
The spin cycle runs several times.
The unbalanced load detection system eliminates an imbalance by repeatedly redistributing the laundry.
Not a fault – no action required.
Note: When loading, where possible, place large and small items of laundry together in the drum. Different sized items of laundry distribute themselves better during the spin cycle.
The programme duration changes during the wash cycle.
The programme operation is optimised electronically. This may change the programme duration.
Not a fault – no action required.
The unbalanced load detection system eliminates an imbalance by repeatedly redistributing the laundry.
Not a fault – no action required.
Note: When loading, where possible, place large and small items of laundry together in the drum. Different sized items of laundry distribute themselves better during the spin cycle.
Foam detection system switches on a rinse cycle if foam build-up is too high.
Not a fault – no action required.
No water is visible in the drum.
Water is below the visible area.
Not a fault – no action required.
Drum jerks after the programme starts.
This is caused by an internal motor test.
Not a fault – no action required.
Residual water is present in the compartment
Insert in compartment is blocked.
→ "Cleaning the detergent drawer", Page 52
Vibrations and movement of the appliance whilst spinning.
Appliance is not correctly aligned.
Aligning the appliance
The appliance feet are not fixed.
Secure the appliance feet. Aligning the appliance
Transit bolts have not been removed.
Removing the transit bolts
Drum does not turn, water does not flow in.
Load detection is active.
Not a fault – no action required.
Note: The load detection can take up to two minutes.
Heavy foam build-up
Detergent dosage is too high.
Immediate measure: Mix one tablespoon of fabric softener with 0.5 litres of water and pour the mixture into the left-hand compartment (not for outdoor clothing, sportswear or items stuffed with down).
Reduce the amount of detergent for the next washing cycle with the same load.
Noise
Fault
Cause
Troubleshooting
Rushing, hissing noise.
Water is flushed under pressure into the detergent drawer.
Not a fault – normal operating noise.
Loud noises during the spin cycle.
Appliance is not correctly aligned.
Aligning the appliance
The appliance feet are not fixed.
Secure the appliance feet. Aligning the appliance
Transit bolts have not been removed.
Removing the transit bolts
Banging noises, rattling in the drain pump.
Foreign bodies have got into the drain pump.
→ "Cleaning the drain pump", Page 53.
Slurping, rhythmical suction noise.
The drain pump is active, the detergent solution is pumped out.
Not a fault – normal operating noise.
Problem with results
Fault
Cause
Troubleshooting
Creasing.
The spin speed is too high.
The next time you run a wash cycle, set a lower spin speed.
The load is too large.
The next time you run a wash cycle, reduce the amount of laundry being loaded.
The wrong programme is selected for the type of fabric.
Select the programmes that are suitable for the type of fabric. → "Programmes", Page 29
Detergent or fabric softener drips off the seal and collects on the door or in the seal fold.
Too much detergent/fabric softener in the detergent drawer.
When dosing liquid detergent and fabric softener, observe the marking in the detergent drawer and do not dose above this.
The spin result is not satisfactory. The laundry is too wet/too damp.
A low spin speed is selected.
The next time you run a wash cycle, set a higher spin speed.
Start the Spin programme.
Less Ironing is activated.
Select the programmes that are suitable for the type of fabric. → "Programmes", Page 29.
The unbalanced load detection system has interrupted the spin cycle because the laundry is unevenly distributed.
Redistribute the laundry in the drum.
Note: Where possible, mix large and small items in the drum. Different sized items of laundry distribute themselves better during the spin cycle.
Start the Spin programme.
Detergent residue on the damp washing.
Detergents may contain water-insoluble substances that deposit on the laundry.
Start the Rinse/Freshen Up programme.
Detergent residue on the dry laundry.
Detergents may contain water-insoluble substances that deposit on the laundry.
Brush out the laundry after washing and drying.
Home Connect problem
Fault
Cause
Troubleshooting
HomeConnect is not working correctly.
Different causes are possible.
No connection to the home network.
Wi-Fi is switched off.
→ "Activating Wi-Fi on the appliance", Page 49
Wi-Fi is activated but a connection to your home network cannot be established.
Ensure that the home network is available.
Reconnect the appliance to the home network. → "Connecting the appliance to a WLAN home network (Wi-Fi) with WPS function" → "Connecting the appliance to a WLAN home network (Wi-Fi) without WPS function"
Leakage
Fault
Cause
Troubleshooting
Water is leaking out at the water inlet hose.
Water inlet hose is not correctly/securely connected.
Connect the water supply hose correctly. Connecting the water inlet hose
Tighten the screw connection.
Water is leaking out at the water outlet hose.
The water outlet hose is damaged.
Replace the damaged water outlet hose.
Water outlet hose is not connected correctly.
Connect the water outlet hose correctly. Water outlet connection types
Odours
Fault
Cause
Troubleshooting
Odours have formed in the appliance.
Humidity and detergent residue may promote the formation of bacteria.
→ "Cleaning the drum", Page 52
If you are not using the appliance, leave the door and detergent drawer open so that residual water can evaporate.
Emergency release
To remove the laundry in the event of a power failure, for example, you can manually release the door.
Releasing the door
Requirement: "The drain pump is empty."
ATTENTION! Escaping water may cause material damage. Do not open the door if you can see water through the glass. Pull the emergency release downwards with a tool and release. The door lock is released.
Insert the maintenance flap and lock it into place.
#1 What temperature is the drum clean? And does this clean the pies also? I have ocd and would like to know to ease my mind. Also, the manual says do not use bleach yet the dispenser draw has a compartment for bleach?
The drum clean washes at 90 degrees, the hot water will clean the pipes too. As per the manual we would recommend you do not use neat bleach, when doing a maintenanace wash use a washing machine cleaner which you can source from supermarkets.
#2 Can you wash a king size duvet in this 10 kg machine?
We would always recommend you follow the care instructions. Single heavy items will not spin correctly.
We would advise that there is only a cold fill option, all Bosch washing machines will be cold fill only.
#4 Does this washing machine have a spin only option and cab you do a 1600 spin on the spin only cycle? How long does the mixed load programme take at temp 40 degrees?
We would advise that this is possible through the additional programs setting or creating one through the memory. We cannot advise the exact time to complete the requested cycle.
 . The selection does not need to be confirmed again. The submenu closes automatically after a few seconds.
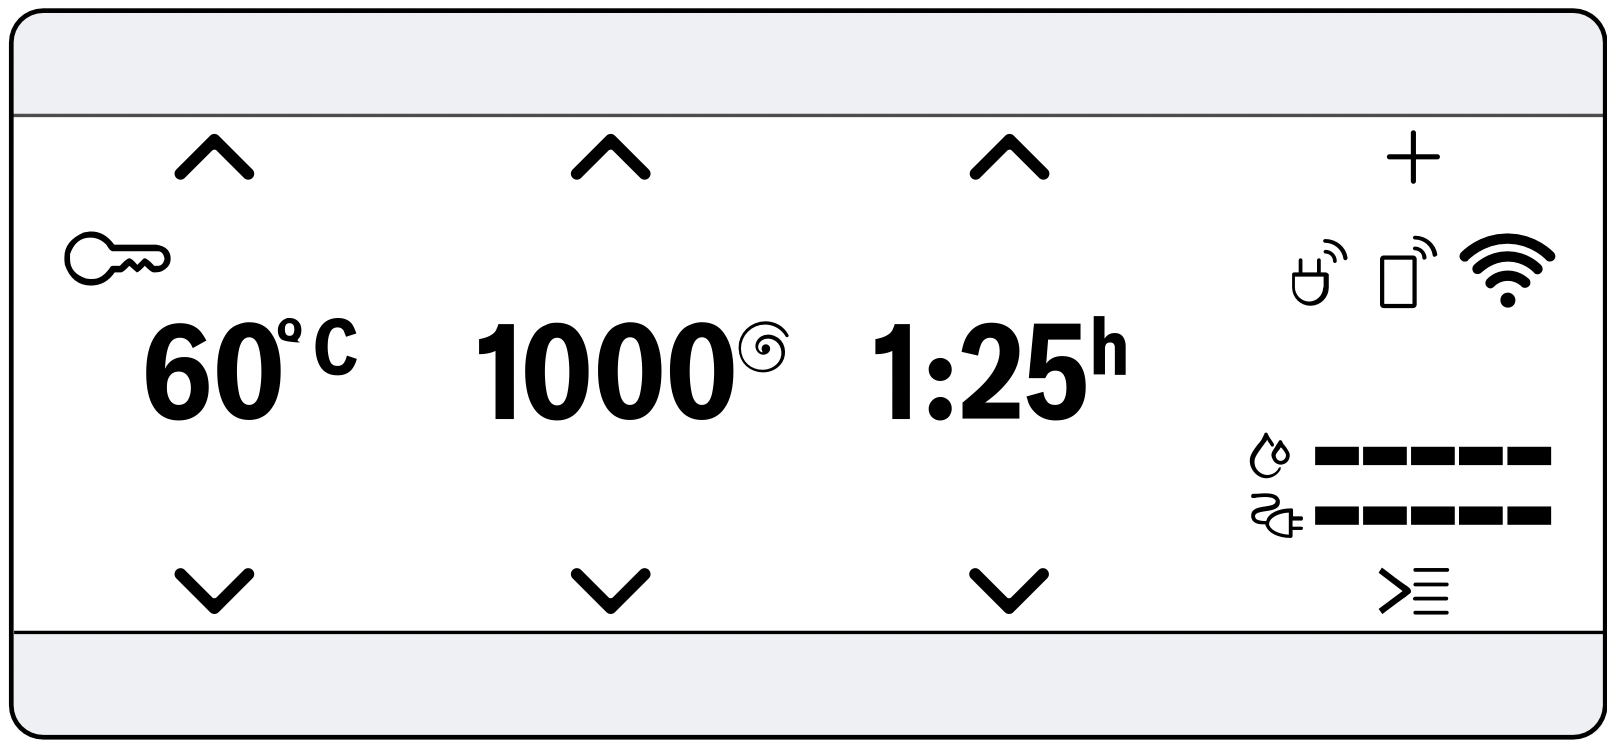


 .
.

 to start the programme.


 to call up the sub-menu for additional programmes.
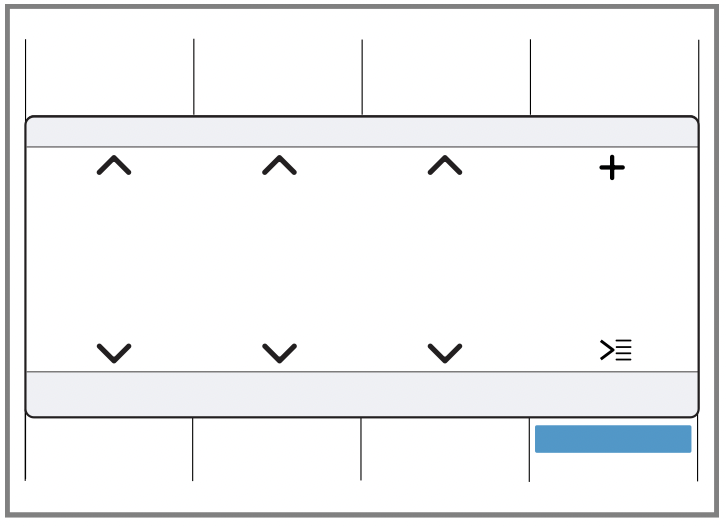
 .
.
 3 sec. for approx. 3 seconds.
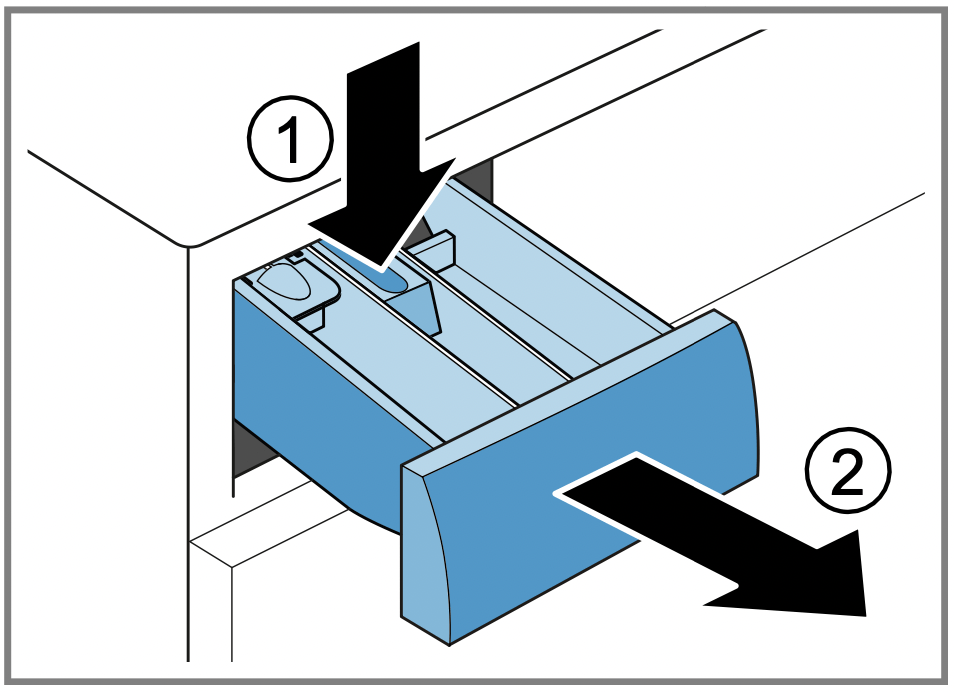


 is activated.