User Manual Dehumidifier
Operating Instructions
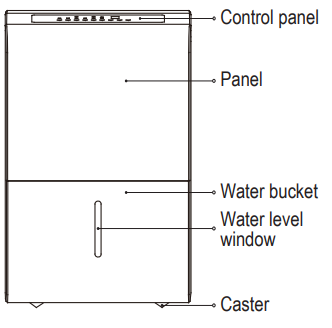
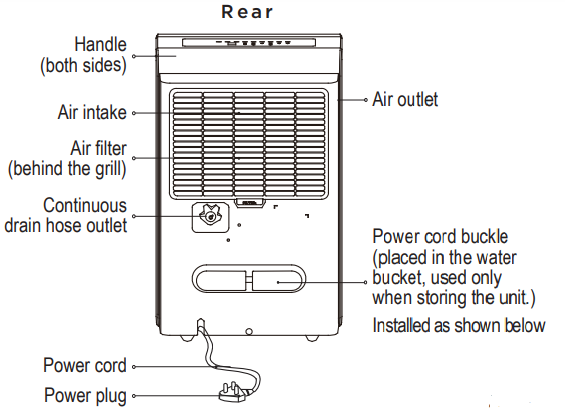
Product Overview
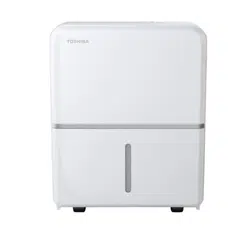
NOTE All the pictures in this manual are for illustrative purposes only. The actual shape of the unit you purchased may be slightly diff erent, but its operations and fuctions are similar.
Acessories
Power cord buckle (1 pc)
CAUTION Clean your unit occasionally to keep it looking new. Be sure to unplug the unit before cleaning to prevent shock or fire hazards.
Key Pad Features

NOTE The appearance of the control panel may vary slightly by model.
Control Pads
When you push the button to change operation modes, the unit will make a beep sound to indicate that it is changing modes.
COMFORT Button
Press to activate the comfort dehumidifying operation.
NOTE When COMFORT function is turned on, set humidity level is automatic and cannot be changed manually
FILTER Button
This feature is a reminder to clean the Air Filter for more efficient operation. The LED (light) will illuminate after 250 hours of fan motor operation. To reset after cleaning the filter, press the Filter button and the light will go off.
CONT (continuous) Button
Press to activate the continuous dehumidifying operation.
NOTE When CONTINUOUS function is turned on, set humidity level is automatic and cannot be changed manually.
TURBO Button
Control the Turbo speed. Press to select either Turbo or normal fan speed. Set the Turbo control to high for maximum moisture removal. When room humidity is at your preferred level, it is advised to turn off Turbo speed.
TIMER Button
Starts the Timer ON and Timer OFF function setting. Up/Down Buttons (  /
/  )
)
• Humidity Set Control Buttons
The humidity level can be set within a range of 35% RH (Relative Humidity) to 85% RH (Relative Humidity) in 5% increments.
For drier air, press the button and set to a lower value (%).
For damper air, press the button and set a higher value (%).
• TIMER Set Control Buttons
Use the and key buttons to set the Timer ON or Timer OFF from 0 to 24 hours.
POWER Button
Press to turn the dehumidifi er on and off .
LED Display
Shows the set % humidity level from 35% to 85% or auto start/stop time (0 ~ 24) while setting, then shows the actual (+/- 5% accuracy) room % humidity level in a range of 30% RH (Relative Humidity) to 90% RH (Relative Humidity).
Error Codes and Protection Code:
AS - Humidity sensor error - Unplug the unit and plug it back in. If error persists, contact Customer Service.
ES - Tube Temperature sensor of the evaporator error - Unplug the unit and plug it back in. If error persists, contact Customer Service.
P2 - Bucket is full or bucket is not in right position - Empty the bucket and replace it in the right position. (only available for the unit with no pump feature.)
E3 - Unit malfunction - Unplug the unit and plug it back in. If error persists, contact Customer Service.
Eb - Bucket is removed or not in right position - Replace the bucket in the right position. (only available for the unit with pump feature.)
Other Features
Bucket Full Light Lights up when the bucket is ready to be emptied.
Auto Shut Off
The dehumidifi er shuts off when the bucket is full, or when the bucket is removed or not replaced in the proper position. When the setting humidity is reached, the compressor will be shut o automatically. The fan motor will continue operating additional 3 minutes.
Other Features Auto Defrost
When frost builds up on the evaporator coils, the compressor will cycle off and Auto Defrost function will run automatically.
Wait 3 minutes before resuming operation
After the unit has stopped, it can not be restarted in the fi rst 3 minutes to protect compressor operation. The unit will restart automatically after 3 minutes.
Auto-Restart
If the unit stops unexpectedly due to a power cut, it will restart with the previous function setting automatically when the power resumes.
Setting the Timer ON and Timer OFF
• When the unit is on, fi rst press the Timer button, the Timer OFF indicator light illuminates. It indicates the Timer OFF program is initiated. Press it again the Timer ON indicator light illuminates.It indicates the Timer ON is initiated.
• When the unit is off , fi rst press the Timer button, the Timer ON indicator light illuminates. It indicates the Timer ON program is initiated. Press it again the Timer OFF indicator light illuminates. It indicates the Timer OFF is initiated.
• Press or hold the and key buttons to change the Timer by 0.5 hour increments, up to 10 hours, then at 1 hour increments up to 24 hours. The control will count down the time remaining until start.
• The selected time will register in 5 seconds and the system will automatically revert back to display the previous humidity setting.
• When the Timer ON and Timer OFF times are set, within the same program sequence, indicator lights illuminate identifying both ON and OFF times are now programmed.
• Turning the unit ON or OFF at any time or adjusting the timer setting to 0.0 will cancel the Timer function.
• When LED display window displays the code of P2, the Auto Start/Stop function will also be cancelled.
NOTES
• When first using the dehumidifier, operate the unit continuously 24 hours. Make sure the plastic cover on the continuous drain hose outlet install stightly properly so there are no leaks.
• This unit is designed to operate with a working environment between 5°C/41°F and 35°C/95°F.
• Make sure the water bucket is positioned correctly so that the unit can operate properly. When the water in the bucket reaches to a certain level, please be careful to move the unit to avoid it spill.
Removing Collected Water
There are two ways to remove collected water:
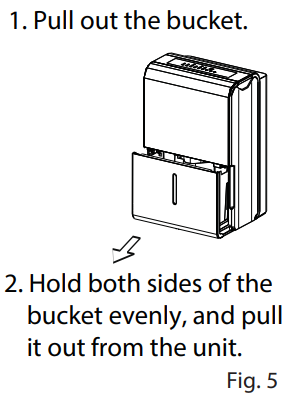
1. Use the bucket
• When the unit is off , if the bucket is full, the Full indicator light will light.
• When the unit is on, if the bucket is full, the compressor and the fan turn off , and the Full indicator light will light, the digital display shows P2.
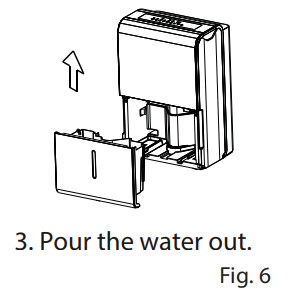
• Slowly pull out the bucket. Grip the left and right handles securely, and carefully pull out straight so water does not spill. Do not put the bucket on the as because the bottom of the bucket is uneven. Otherwise water may be spilled.
• Throw away the water and reposition the bucket.
• The unit will restart operation when the bucket back in place.
NOTES
• When you remove the bucket, do not touch any parts inside the unit. Doing so may damage the product.
• Be sure to push the bucket gently all the way into the unit.
• When the unit is on, if the bucket is removed, the compressor and the fan turn off , then the unit will beep 8 times and the digital display shows Eb.
• When the unit is off, if the bucket is removed, the unit will beep 8 times and the digital display shows Eb.
2. Continuous draining
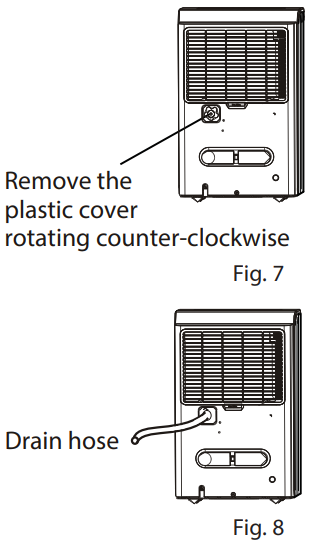
• Water can be automatically emptied into a fl oor drain by attaching the unit with a water hose (Id Ø 5/16”, not included) with a female threaded end (ID: M = 1”, not included).
• Remove the plastic cover from the back drain outlet of the unit and set aside, then insert the drain hose through the drain outlet of the unit and lead the drain hose to the fl oor drain or a suitable drainage facility. (See Fig. 7 and Fig. 8)
• When you remove the plastic cover, if there is some water in the back drain outlet of the unit you must dry it. Make sure the hose is secure so there are no leaks and the end of the hose is level or down to let the water fl ow.
• Direct the hose toward the drain, making sure that there are no kinks that will stop the warter fl owing.
• Select the desired humidity setting and fan speed on the unit for continuous draining to start.
NOTE
When the continuous draining feature is not being used, remove the drain hose from the outlet, and dry the water in the continuous drain hose outlet.
NOTE
Do not use this operation when the outdoor temperature is equal to or less than 32°F (0°C), otherwise water may freeze causing blockages and the unit may cease to function properly.
Make sure to empty the bucket at least once a week when using the pump draining feature. When the pump draining feature is not being used, remove the pump drain hose from the outlet.
Installation Instructions
Positioning the Unit
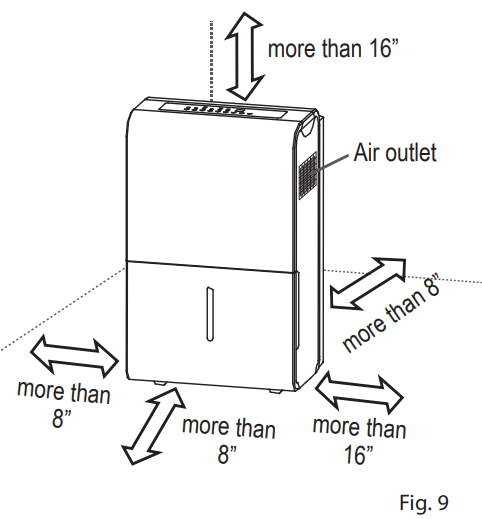
A dehumidifier operating in a basement will have little or no effect in drying an adjacent enclosed storage area, such as a closet, unless there is adequate circulation of air in and out of the area. (See Fig. 9)
• Do not use outdoors.
• This dehumidifer is intended for indoor residential applications only. This dehumidifier should not be used for commercial or industrial applications.
• Place the dehumidifier on a smooth, level floor strong enough to support the unit with a full bucket of water.
• Allow at least 8 inches of air space on all sides of the unit for air circulation (at least 16 inches for air outlet).
• Place the unit in an area where the temperature will not fall below 41°F (5°C). The coils can become covered with frost at at lower temperatures, which may reduce performance.
• Place the unit away from any clothes dryer, heater or radiator.
• Close all doors, windows and other outside openings to the room.
Care and Cleaning
Turn the dehumidifier off and disconnect the plug from the wall before cleaning.
1. Clean the Grill and Case
• Use water and a mild detergent. Do not use bleach or abrasives.
• Do not splash water directly onto the unit. Doing so may cause an electrical shock, cause the insulation to deteriorate, or cause the unit to rust.
• The air intake and outlet may get dirty during operation, use a vacuum cleaner or brush to clean.
2. Clean the bucket
Every few weeks, clean the bucket thoroughly to prevent growth of mold, mildew and bacteria. Partially fill the bucket with clean water and mild detergent. Swish it around in the bucket, empty and rinse.
NOTE
Do not use a dishwasher to clean the bucket.
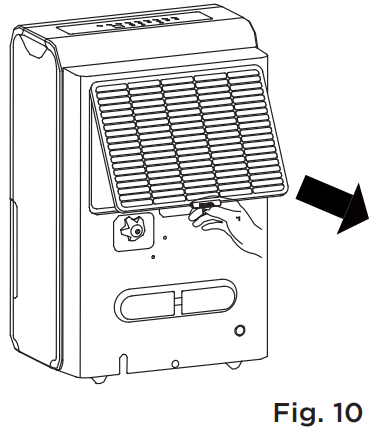
3. Clean the air filter
• To remove the filter, pull filter outwards (See Fig. 10).
• Wash the filter with clean water then dry.
• Re-install the filter, replace bucket.
CAUTION
Turn the dehumidifier off and disconnect the plug from the wall before cleaning. DO NOT operate the dehumidifi er without a fi lter to avoid loss of performance and damage to the unit.
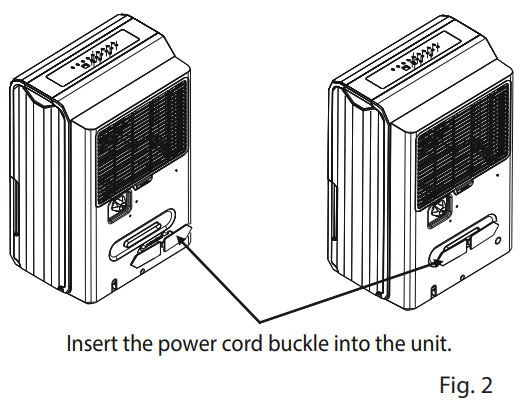
4. When not using the unit for long time periods
• Before storing the unit, let it rest for one full day so that the system can dry out naturally.
• Clean the unit, water bucket and air fi lter.
• Wrap the cord with the power cord buckle.
• Cover the unit with a plastic bag.
• Store the unit upright in a dry, well-ventilated place.
Troubleshooting Tips
Before calling for service, review this list. It may save you time and money. This list includes common occurrences that are not the result of defective workmanship or materials in this appliance.
| Problem |
Solution |
| Unit does not start |
Make sure the dehumidifiers plug is connected firmly into the wall outlet. |
| Check the house fuse/circuit breaker box. |
| Dehumidifier er has reached its preset level or bucket is full. |
| Water bucket is not in the proper position. |
| Dehumidifier does not dry the air as it should |
Not enough time to remove the moisture. |
| Make sure there are no curtains, blinds or furniture blocking the front or back of the dehumidifier. |
| The humidity control may not be set low enough. |
| Check that all doors, windows and other openings are securely closed. |
| Room temperature is too low, below 41°F (5°C). |
| There is a water vapor source in the room |
| The unit makes a loud noise when operating |
Air filter may be dirty. Clean filter. Refer to Care and Cleaning section.
|
| The unit is tilted instead of the upright as it should be. |
| The floor surface is not level. |
| Frost appears on the coils |
This is normal. The dehumidifier has Auto defrost feature. |
| Water on floor |
Hose to connector or hose connection may be loose. |
| Intend to use the bucket to collect water, but the back drain plug is removed. |
| ES, AS, P2, Eb and E3 appear in the display |
These are error codes and protection code. Check Operating Instructions. |