
三 二
各部分名稍
衢
导厘板
水箱把手
水箱
操作面板
俊面板
雹
三,统综柱
胸眭
水箱
水箱蒂
水箱把手
浮子
水褚
oo
水箱的浮子不可取下及拆卸。若取下浮子,
就燕法椋知满水,若漏水可能含尊致榄醴
不能正常勤作。
軗置塌所
恙了使抽渭榄有效的逼作,言青按右圈放置,如果空阁不足,
可能曾尊致除渭榄能力下降。
oo
·
鹃勤抽淉榄前,言青将水箱中的水清空。
·抽淉榄暹作晇講减少鹃阿窗,迼棵做可以第省能源。
·安放抽淉榄的位置,矜必在榄醴周圉预留
—
定的空阁,
要求上方最小
5
0厘米,前俊左右最小20厘米。如右圈。
·
本榄在使用峙娶瑰噪音大峙:
建講在本榄下塾上塾子或减震橡腮板等,
迼棵可以减少振勤和噪音,遠能减少木地
板或地毯的凹陷。
(
缅
)5
勹 厂
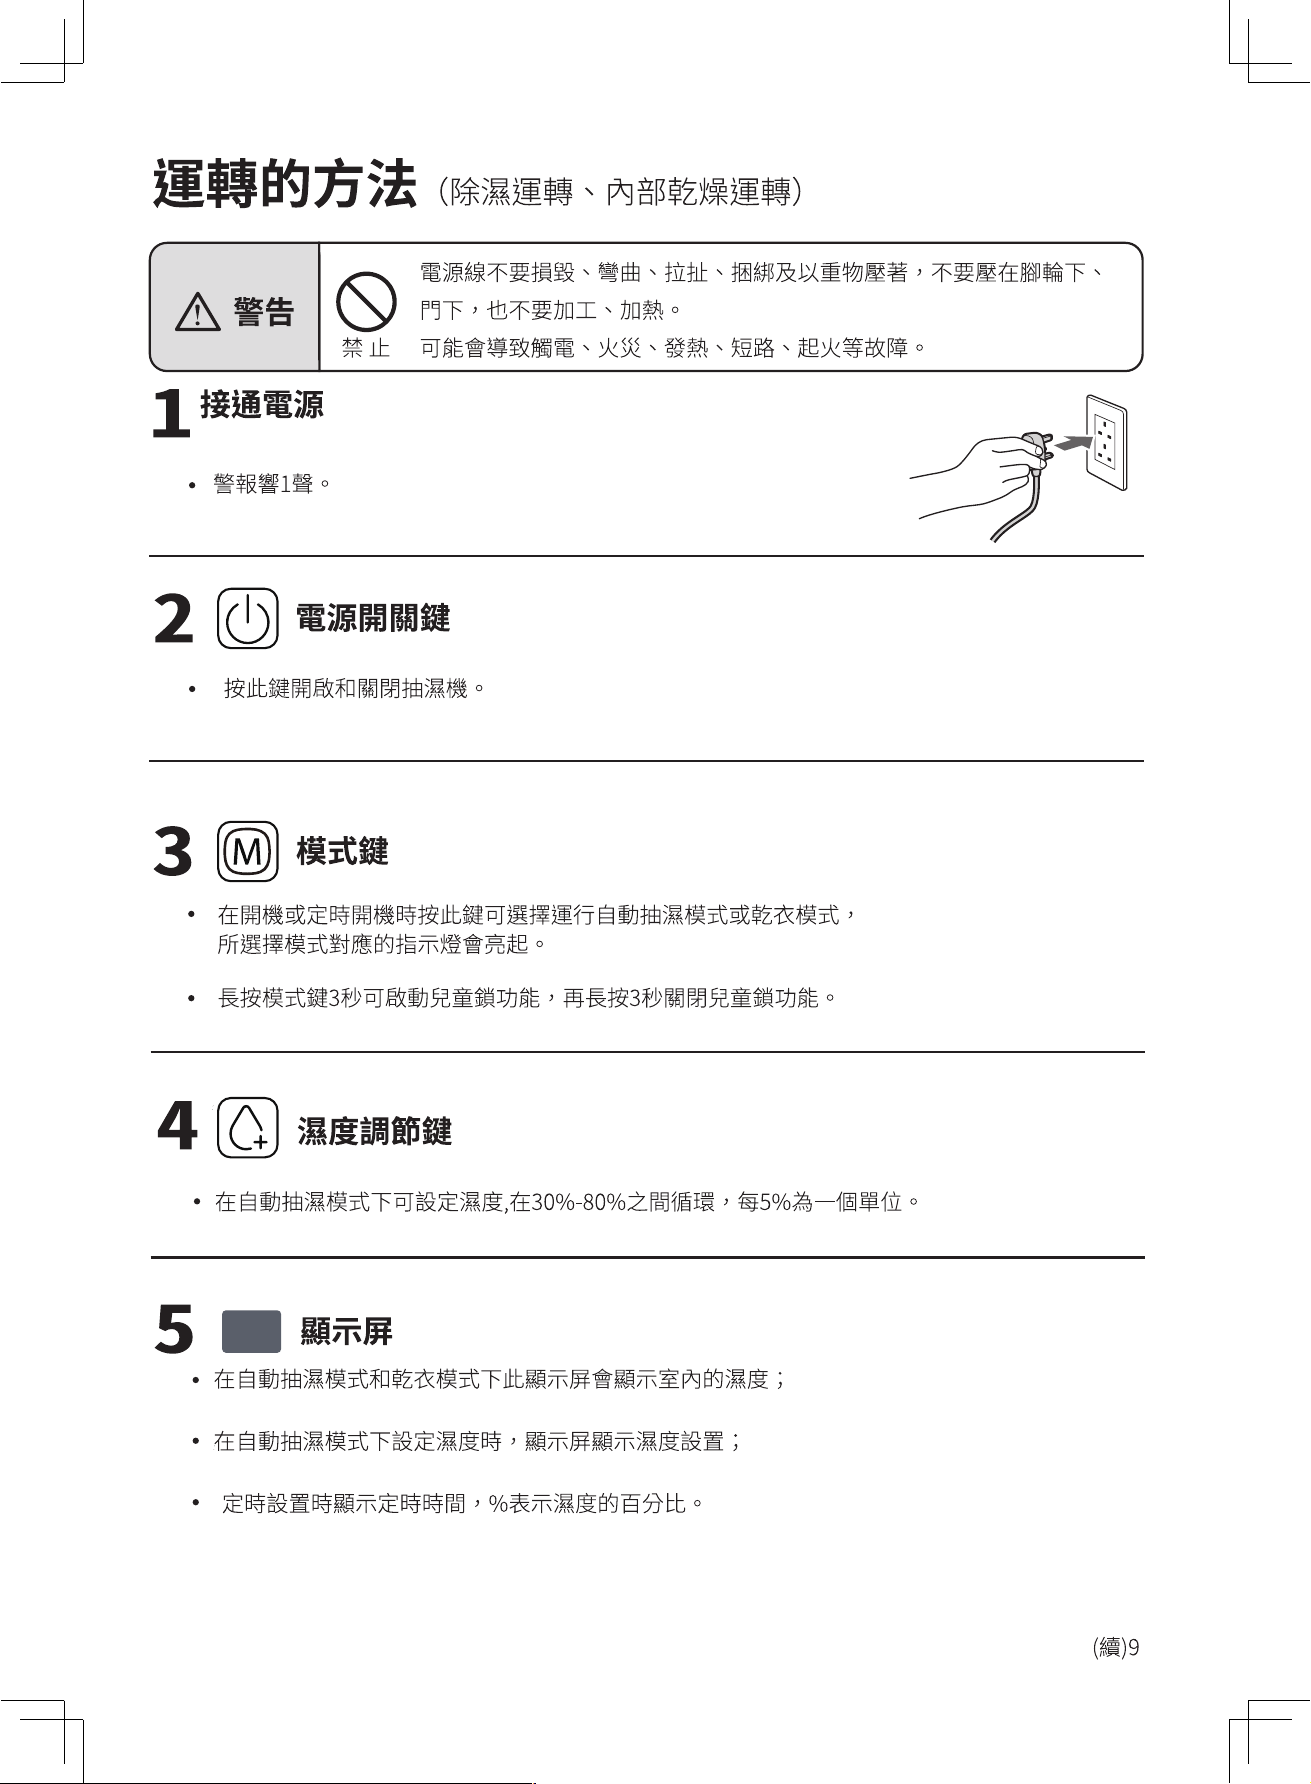
自動抽濕模式
自動抽濕,選中此頁,如果房間濕度>設定濕度+5%,則壓縮機啟動,
風機設定風速運行,如果房間濕度<設定濕度-5%,
則壓縮機停止,風扇停止運轉,如果房間濕度在設定濕度+5%到設定濕
度-5%之間,整機按原運行狀態運行,設定濕度的初始值為50%
乾衣模式
開啟乾衣模式下,不論房間裡的相對濕度如何,
壓縮機都會啟動,配合高風速運行,風速亦可調節。
連轉種類
想保持合適的濕度時
想乾燥衣物時
以暖風進行乾燥
調教風速鍵[強]或風速鍵[弱]
請放在抽濕機的風容易吹乾衣物的地方。(8頁)
三 二
衣颗乾燥
1 正唯使用乾衣模式
I
·淉衣物需要等距誰握放
出厘口嗯正面封著衣服追行乾燥,才能乾得更快,衣服舆衣服等距睢擁放 才曾斡得更快。
·抽淉榄的撰放位置
定晇燮更抽潠榄及衣服位置,衣服曾乾得更快。
·根掳不同衣服燮换握放位置位置
·
厚衣服—雅乾,正
面迎厘吹。
·牛仔裸或裙子—易斡,遠誰榄醴的地方吹斡。
·薄衣服—男斡,遠誰榄醴的地方吹。
·衣服乾燥俊要蛊快收起
潮渭季箭或下雨天氯,已乾燥的衣服需盄早收起,否削曾再次受潮。
提示
·以下情况峙,衣服比较雅乾。
·
衣服多
·
衣服
厚
·
嗯衣服的房陨大
·
衣服排放阁距小
· 房闹的溫度低
準借及榷韶
1 水箱的安装
I
水箱没有装好或满水峙,榄醴将不能湮韓。
取出方法 安装方法
婴手分别放在水箱俊凹
入的把手位, 轻轻向俊
拉出水箱。
@水箱排水口榷蛁盔好
@水箱呈水平状怹,轻轻推入内侧
把水箱轻轻地装回原位
水箱把手
· 講把水 箱把手整理好,
把水 箱轻轻地装回原位
oo
·水箱盔、水箱排水口唯蛁已装好。
否剧可能曾漏水。
8
勹 厂

三
/
速绩排水峙
A
注
意
湮续排水峙嗯榷貂排水管已正谁安装
否则可能曾弄溫家具、鳎霞、漏霞、火炎等。
e
提示 ·言青椋查排水管是否莺曲,没有向上倾斜擁放。
抽淉榄榄醴及排水管的周圈溫度在0
°
C以下峙不可使用。
榄醴、管内的水
—
旦结冰,在冰瑰融化特可能曾弄淉家具,遵致
禁
止
鳎霞、漏霞、火炎。水箱可能因破裂而漏水。
舆排水地贴距誰较近咭,可 直接安装排水管,速绩排水。可畏咭闹逼韓,箭省倒掉水箱
水的峙阴。
準侮之排水管(市面上的塑腮管)
畏
度:外接水管不可遏畏(建講畏度小於 0.6米) ,
水管末端离度项低於榄身排水口高度10厘米以
上,水管要保持顺畅,否削可能燕法正常排水。
排水管直径: 内径9毫米 ,外径13毫米。
虔理以下步眯前,先停
止
迵棘,亚把霍源插顽徙插座上拔掉 。
1 除下榄背俊面的排 水口水盖, 2 除下榄背俊面的排 水口水盔,
拔出水塞。将9.
0
毫米水 管湮接
袚出水塞。将樑準螺纹 的花圆
到排 水口
上。
软管装 在螺纹排 水口上。
00
· 耦不要使用伸缩管,曾粤致水
稹在管内,不能排出。
雹
00
y
/
X X
如果您不想经常去倒水箱梩的水,可以在本榄俊面遴接
—
佪排水管(管的内径湍9.0毫米)排水,
(用户需自行瞒黄排水管)
。
也可使用 ,具有樑準
螺
纹的花圆软管,其具有1
6
英时(1.0625英寸或26.98毫米)
的外径和11.STPI
的
螺距
。
1
2
勹
厂
室內溫度約在16℃以下時,機器內部會結霜,為了確保機器正常運行,在除濕過程中通常會
每約38分鐘進行一次除霜(每次約8分鐘),此時機器的運轉模式轉為送風運轉。
除霜過程中,數碼管會顯示“P1”。
除霜過程中,請不要拔掉插頭,及強行停止運轉。
運轉聲音
運轉及性能
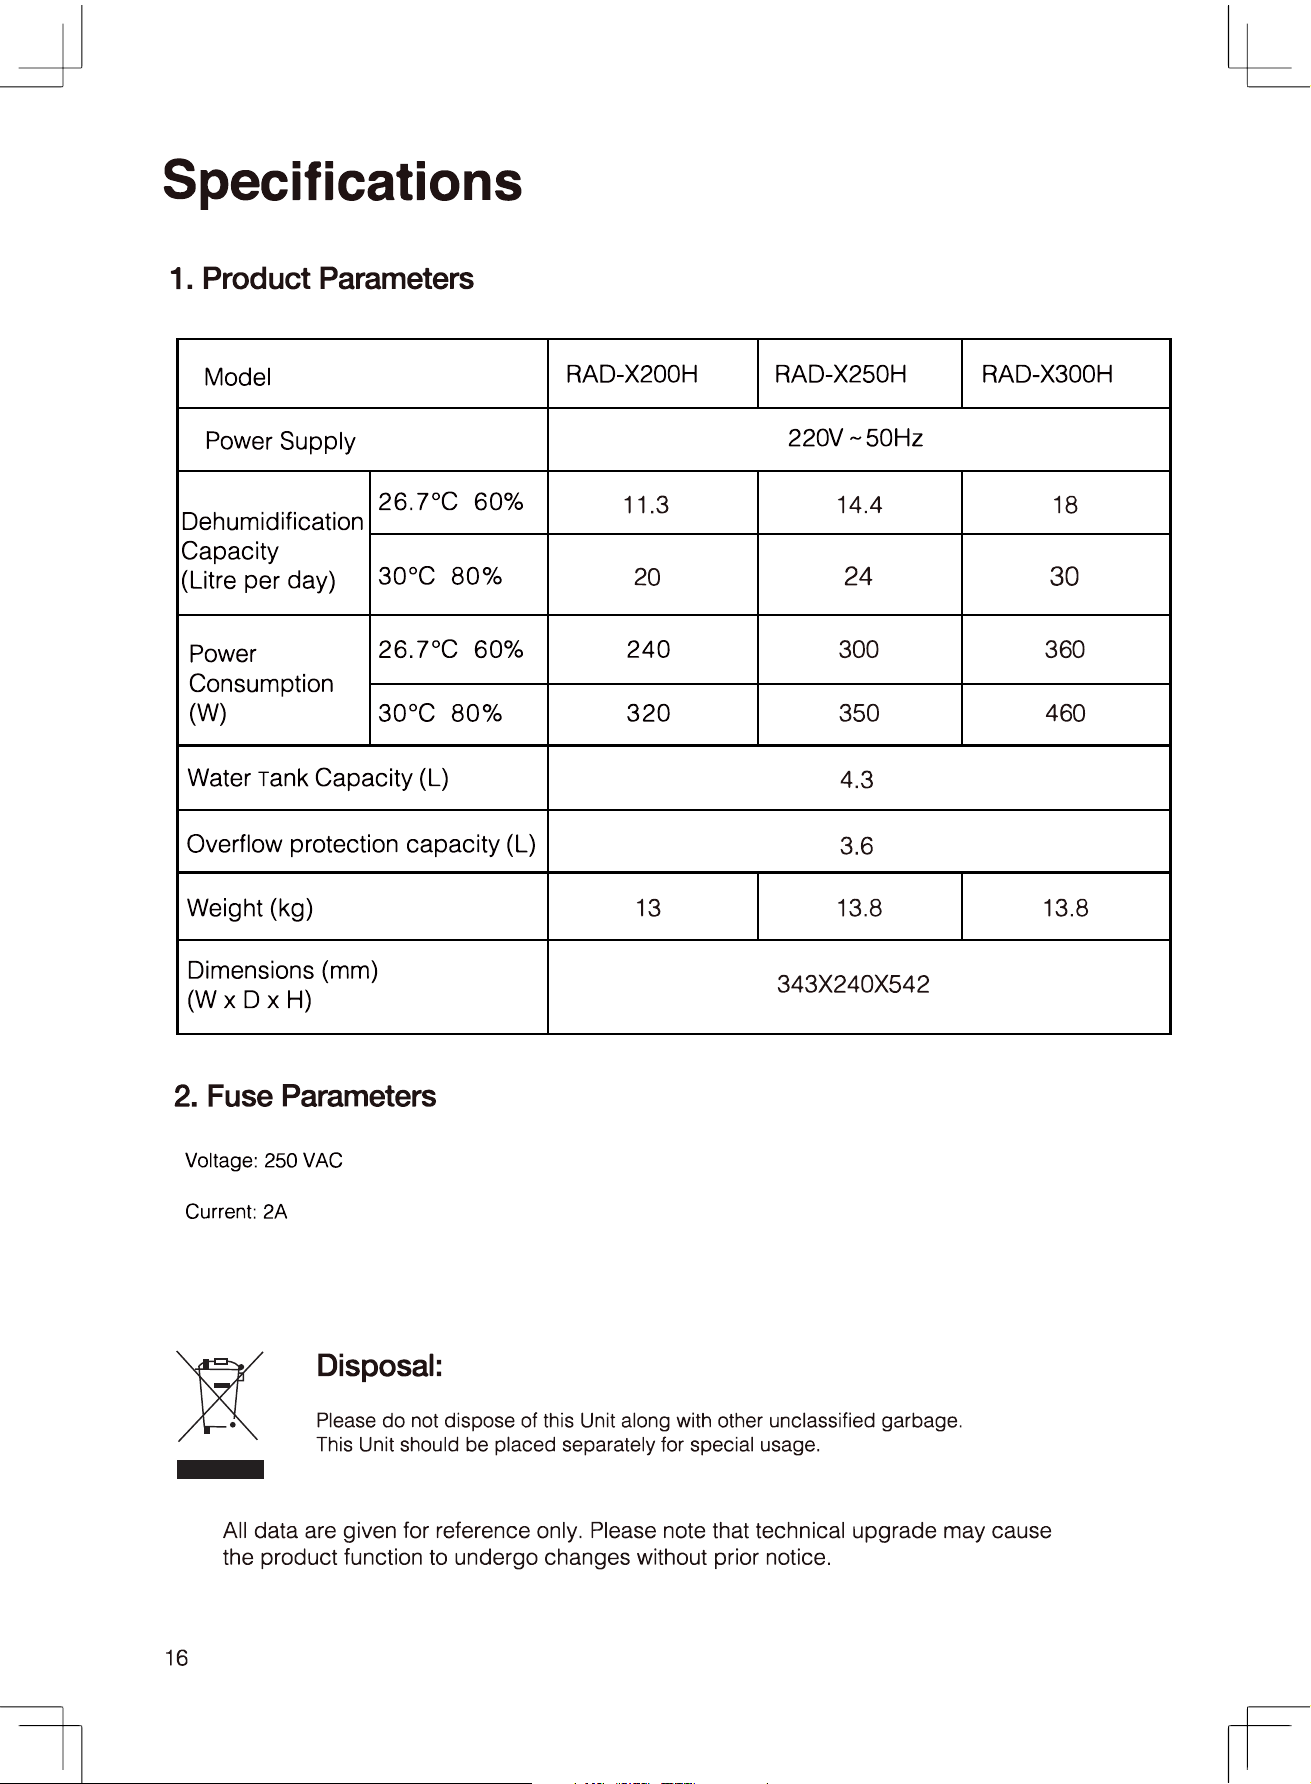
除濕能力
除濕能力(除濕風量[強]運轉)
用以下方法運轉時相當於1日(24小時)的除濕量。
(室溫26.7℃、室內濕度60%、不設定濕度、擺葉全開下進行除濕風量[強]運轉)
用其他使用方法運轉和不同的擺葉閉合程度,會使除濕量變小。
室內溫度、濕度和除濕量間的關係
室內溫度不變時的除濕量
... ...濕度越高除濕量越高,濕度越低除濕量越低。
室內溫度不變時的除濕量
... ...溫度越高除濕量越高,溫度越低除濕量越低。
濕度為60%時的例子
機器在設定濕度以下,運轉模式為[設定濕度]時,
會自動停止除濕運轉,風扇停止運轉。
此時除濕量雖會變少,但並非異常。
除濕原理
1
吸入空氣經過蒸發器會變冷。
2
濕空氣經過蒸發器時表面結霜,
繼而變成水滴會流到水箱衷。
乾燥的冷風
蒸發器
冷疑器
濕空氣
壓縮機
水箱
常溫空氣經過蒸發器後,水蒸氣遇
冷液化,在蒸發器表面形成水滴。
機器運行中的除霜過程
運轉中的室溫上升
抽濕機沒有製冷功能
相反會在運轉過程中產生熱能,室溫會上升約1℃~4℃。
因須關閉門窗運轉抽濕機,所以會因室內其他使用中的電器產品發熱及陽光照射等令
室內溫度上升約1℃~4℃。
除霜過程中,請不要拔掉插頭,及強行停止運轉。
運轉開始時,由於冷媒流動聲音會較大,但安定運轉時聲音會變小,這不是異常聲音。
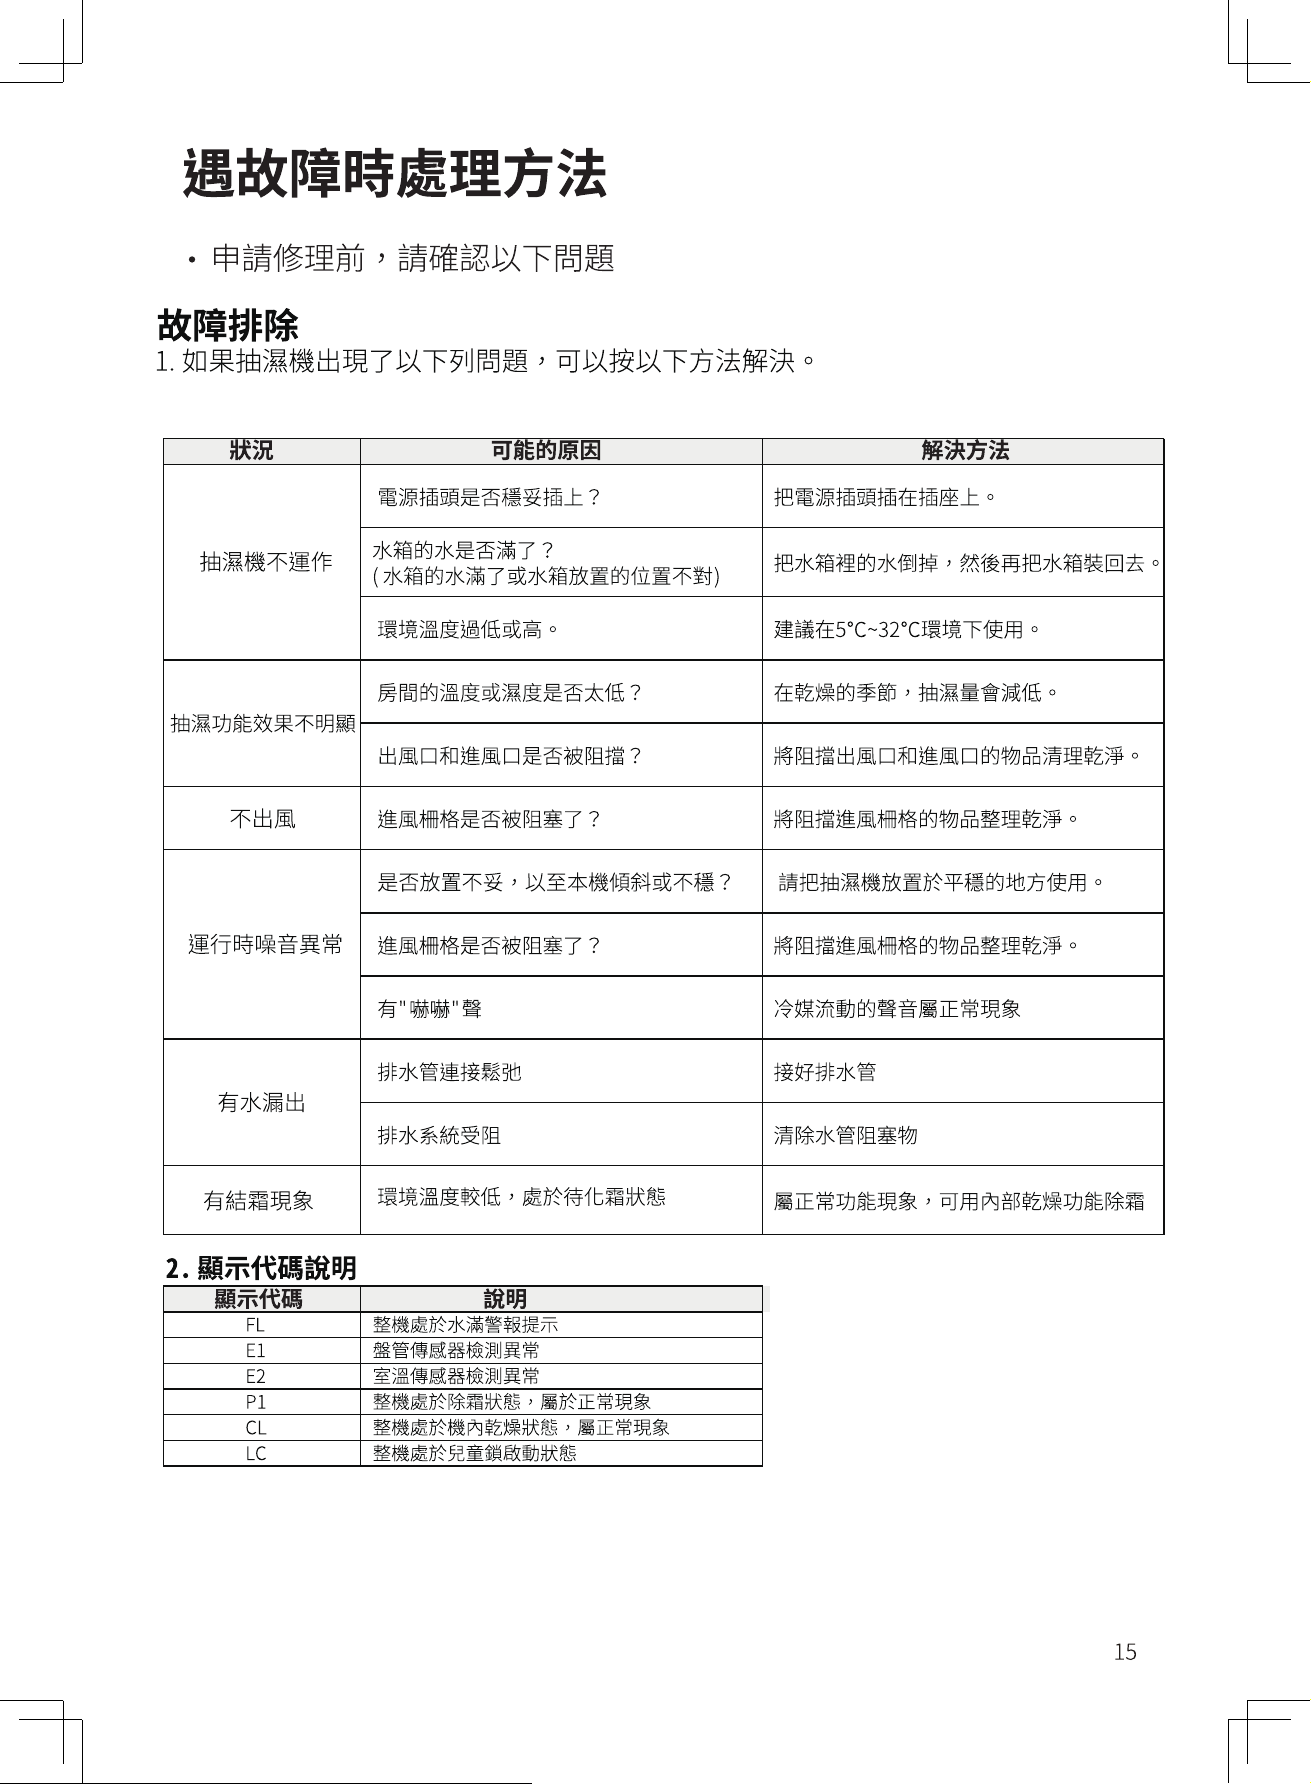
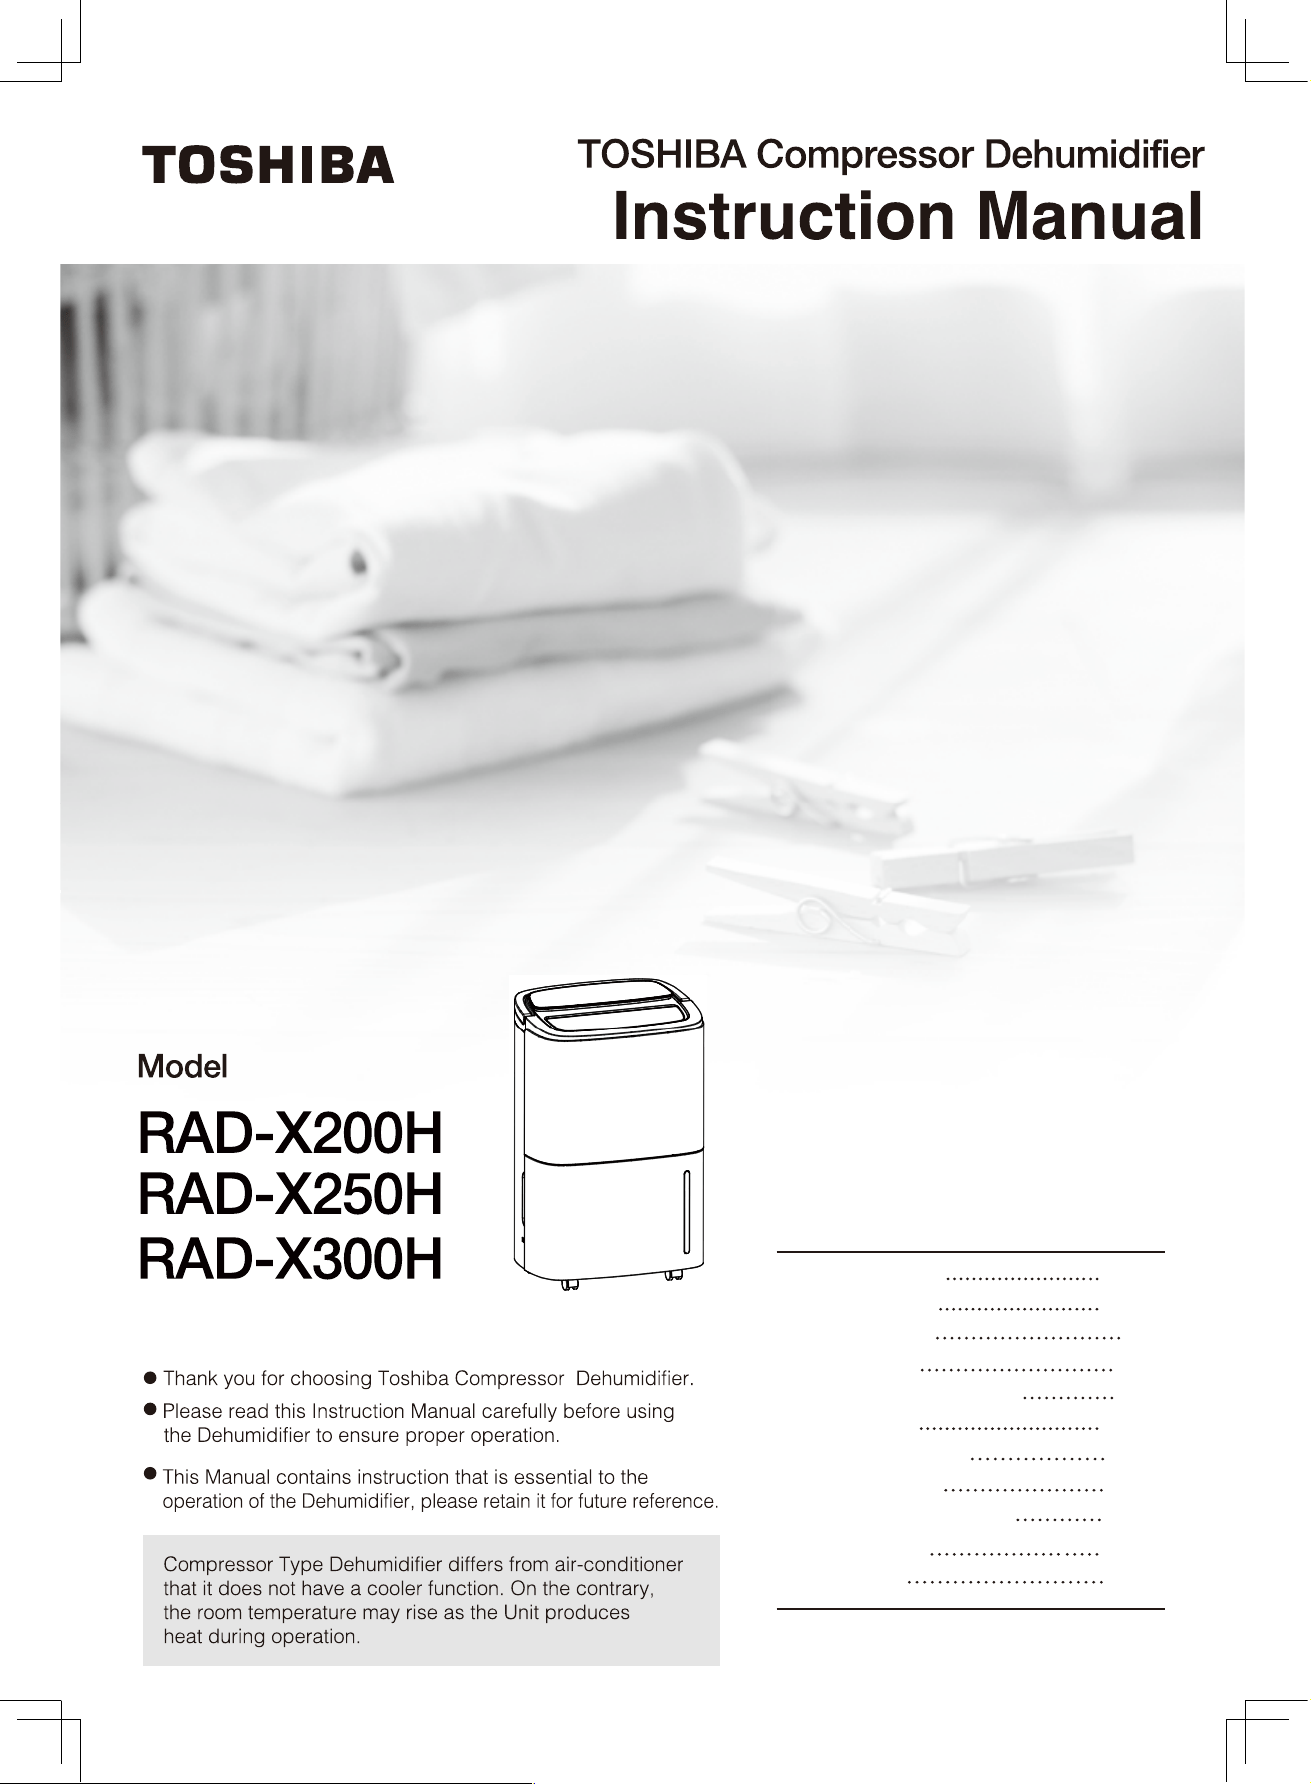
Table of Contents
Safety Precautions
Component Parts
Function Options
Laundry Drying
Preparation & Confirmation
How to Operate
Continuous Drainage
Maintenance Tips
Operation & Performance
Troubleshooting
Specifications
2~4
5~6
9~11
7
8
8
12
13
14
15
16
Do not damage or modify the power cord.
Power cords that are damaged, modified,
trapped under heavy objects, heated up
or stretched may cause fire or electric shock.
Do not use damaged power cord, which
may result in short circuit, fire or electric
shock. Please consult your dealer or
Toshiba Repairing Service & Parts Centre.
Do not remove the power plug by pulling
the power cord as this may damage the
power cord and cause short circuit, fire
or electric shock.
Do not move and store the Dehumidifier
by pulling the power cord as this may
cause short circuit or damage the wiring
of the power cord, and result in fire or
electric shock.
Safety Precautions
Strict observation
To prevent injury to user or others and damage to property, please carefully read and observe
the following precautions presented in signs and symbols.
Sign Symbol
WARNING
CAUTION
May result in fatal
or severe injury.
May result in minor
injuries or property damage.
Prohibited
Strict Observation
To prevent fire,
electric shock or injury
Stop using the Dehumidifier immediately if
abnormality or malfunction takes place.
Abnormal operation of the Dehumidifier
may result in fire, electric shock or injury that
the Unit should be switched off and unplugged
immediately, then contact Toshiba Repairing
Service & Parts Centre for check up and
repair. Examples of abnormality
Short circuit
Foreign objects or liquid inserted
Water leaks from the Unit
Power cord and plug overheated
or power cord damaged
Unusual loud operating noise
Function keys not working
Burning smells from normal operation
Operating Instruction
Do not place or apply spray near the
Dehumidifier, which may cause fire
or explosion.
Do not insert any foreign objects into
the swing Louver, Air Intake or Air
Outlet, which may result in injury
when the internal fan is running at
high speed.
Do not disassemble, repair or modify
the Dehumidifier as this may cause
fire, electric shock or injury.
Please contact Toshiba Repairing
Service & Parts Centre for repair.
Do not put the Dehumidifier near
heat-generating devices, such as
heater, as they may melt the plastic
parts of the Unit that causes fire.
Strict
Observation
Prohibited
Prohibited
Prohibited
2
WARNING
Power supply, power plug,
and power cord
Set up environment
Strict
Observation
Strict
Observation
The following rules must be
strictly observed, or it may
cause electric shock and fire.
Exclusively use 220V AC power sockets
Do not use an extension cord
Ensure that the plug is fully
inserted into the socket
Dust off and clean the power
plug regularly
Do not operate the Dehumidifier
in the following abnormal situations
It may result in electric shock, fire,
heat generation, short circuit,ignition,
and malfunction etc.
Do not operate the Unit with damaged
power plug or power cord and loose
power socket.
Do not damage, bend, stretch, twist,
press, modify, and heat up the power
cord, or get it caught under the
Casters or doors.
Do not disconnect the power supply
until the unit comes to a complete
stop. Do not drag the power cord
when the unit is operating.
Place and use the Dehumidifier on a stable
and leveled surface with a slope less than 2°.
An unleveled surface will cause excess operating
noise or vibration, or leave the Unit in a tilted
position that the water in the tank may overflow
and wet the floor and surrounding objects, which
in turn result in electric shock, electric leakage
and fire.
Do not place any objects on or close to the
Dehumidifier, it may result in heat generation,fire
and malfunction.
Do not operate the Dehumidifier
in the following abnormal
situations
Prohibited
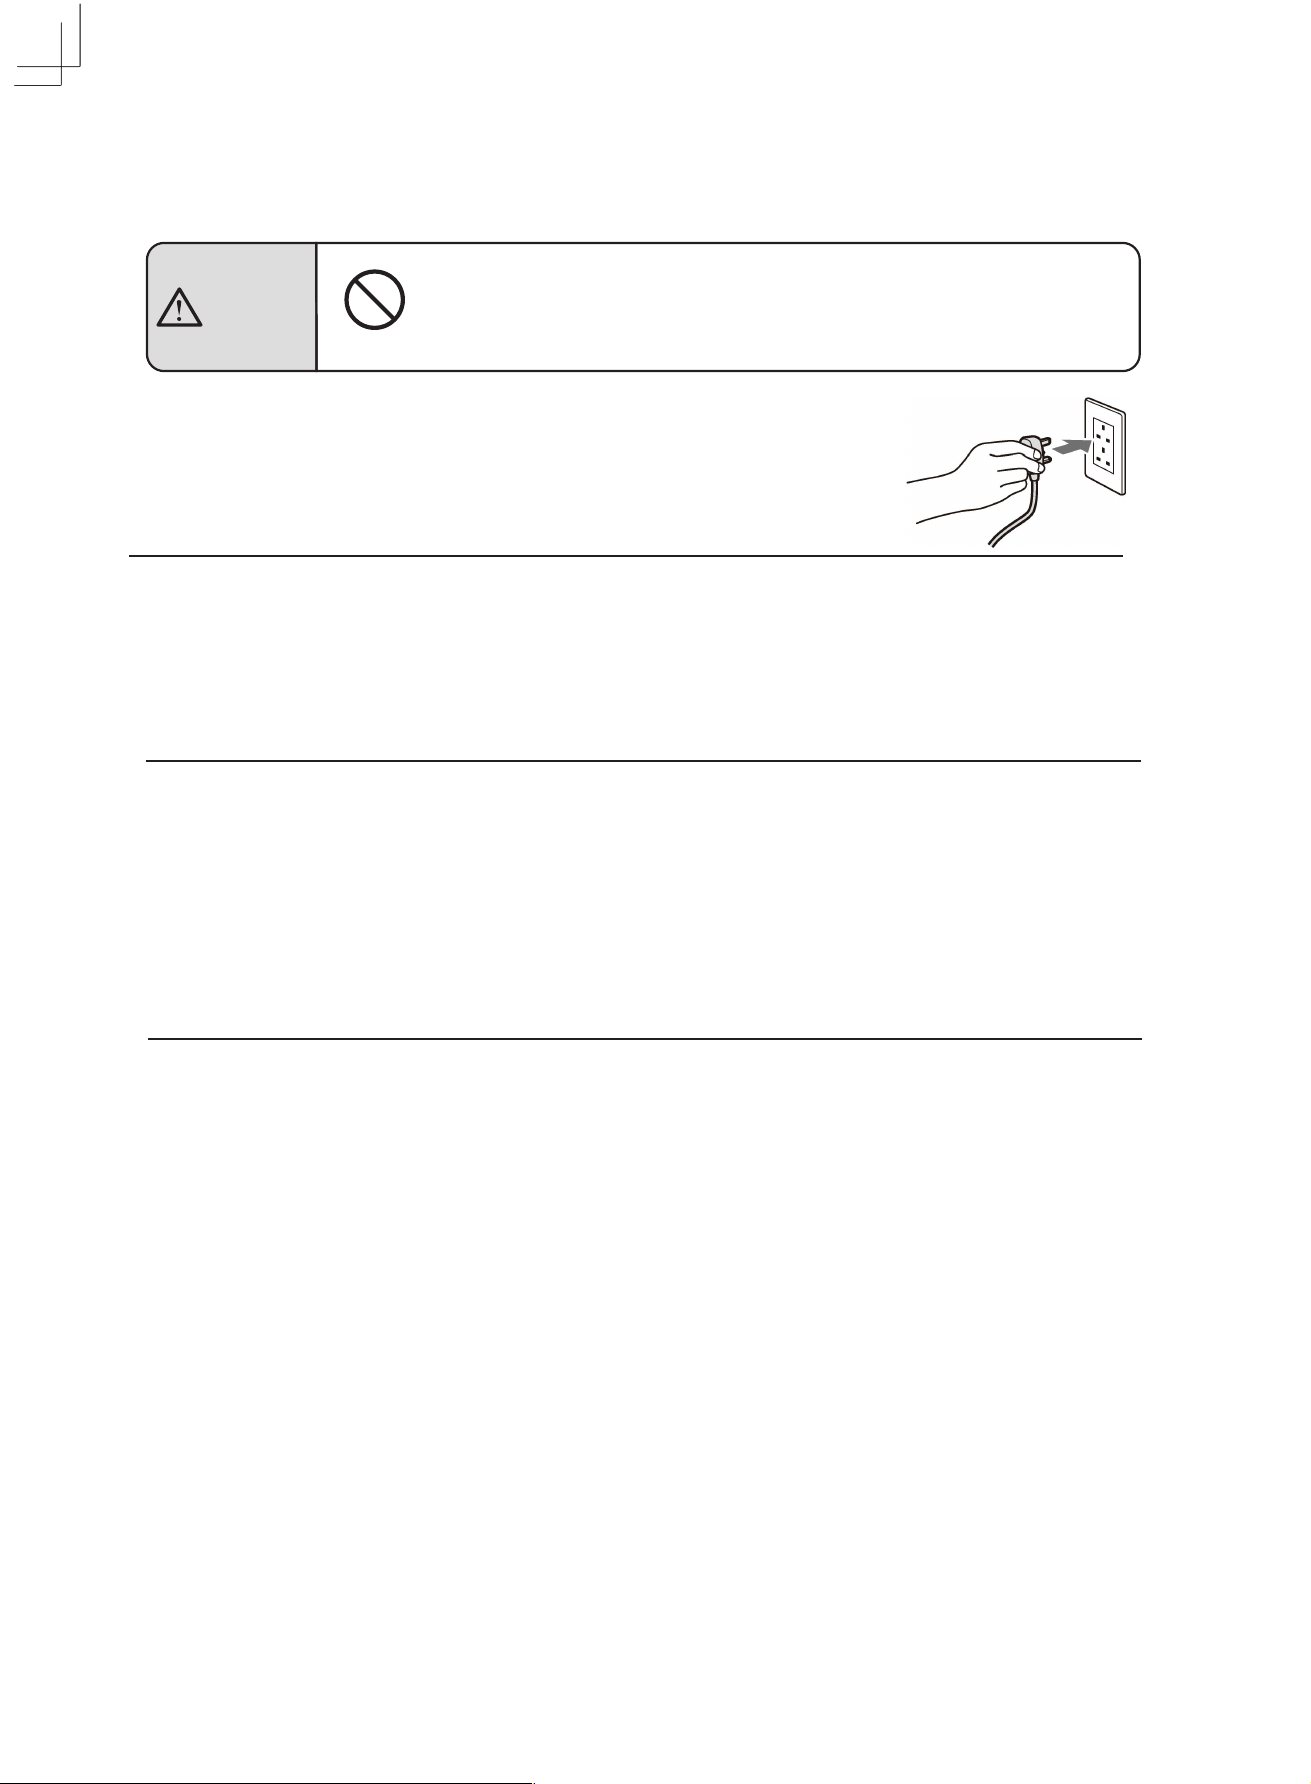
Do not plug in or unplug the
Dehumidifier with wet hand.
Doing so could result in electric
shock.
No Wet Hand
A place where it is likely to come into contact with
water such as bathroom. This could cause electric
shock, electric leakage and fire.
Where the unit may be subject to oil or flammable
gas leakage. The flammable gas around the
Dehumidifier could cause fire or explosion.
Elevated position such as on a table, as the
Dehumidifier may drop and cause damage
to the Unit.
Where the ambient temperature of the Dehumidifier
and drain hose is below freezing point. Water
inside the drain hose may freeze, that maywet the
surrounding objects when it thaws, and result in
electric shock, electric leakage or fire.
The Water Tank may consequently break and leak.
Where drugs and chemicals are used, such as
hospital, factory, laboratory and beauty salon.
Chemicals in the air may affect the performance
of the Unit, cause leakage, heat generation,
ignition and fire.
Outdoor location where the Dehumidifier is
exposed to direct sunlight or rain that may result
in leakage, heat generation, ignition and fire.
This Dehumidifier is for indoor use only.
Where space is narrow and enclosed that may
cause heat generation or fire.
Do not use combustion appliances
in the path of the airflow of the Dehumidifier,
as this may cause incomplete combustion.
Prohibited
Do not install the Dehumidifier
in the following setting
(Cont.)3
WARNING CAUTION
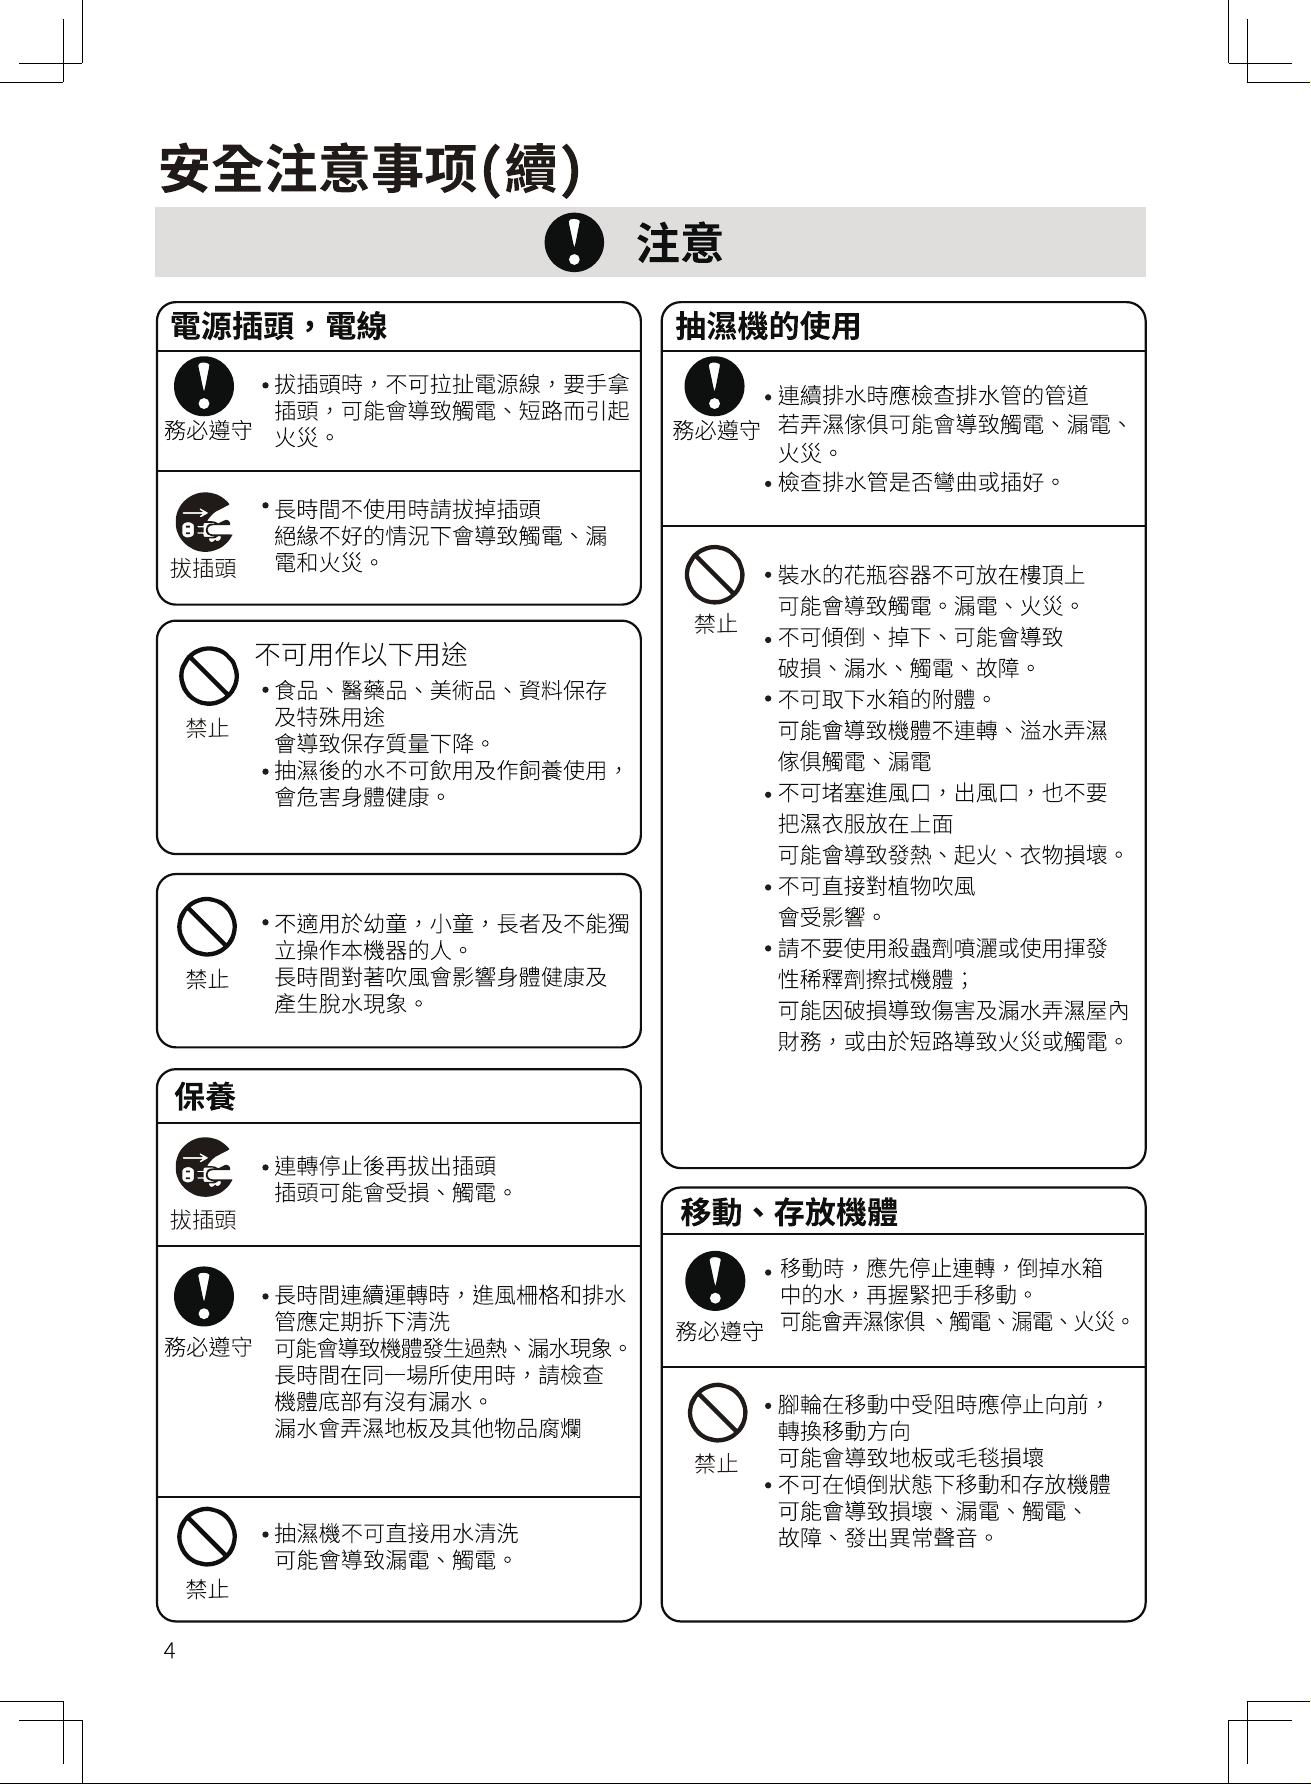
Safety Precautions (Cont.)
Unplugging
Unplugging
Maintenance
Caution
Power plug and power cord Operating the Dehumidifier
Do not remove the power plug by pulling the
power cord, but by grabbing hold of the plug,
as mishandling may cause result in fire caused
by electric shock and short circuit.
Strict
Observation
Strict
Observation
Strict
Observation
Strict
Observation
Unplug the Unit from the power source when not
using it for an extended period of time. Insufficient
insulation may cause electric shock, electric
leakage and fire.
Food, pharmaceuticals, artworks, data storage,
and special purpose. Doing so may deteriorate
the quality of the items stored.
Water from the Dehumidifier is not
suitable for human or animal
consumption as it is hazardous to health.
Do not use the Unit for
the following purposes
This Dehumidifier should be kept away from infant,
children, elderly person or anyone who cannot
operate the Unit independently.
Pointing airflow from the Unit directly at a body for
a prolonged period of time may be harmful to
health and cause dehydration.
Unplug only after the unit comes to a complete stop.
Otherwise, the plug may be damaged and
cause electric shock.
After running the Dehumidifier for a long period
of time, Air Intake and Drainage Hose should be
taken down to clean regularly.
Otherwise, overheating or leakage may occur.
Please check for leakage underneath the Unit after
using the Unit in the same spot for a long period
of time.
Leakage will wet the floor and ruin
surrounding items.
Do not wash the Dehumidifier with water
This may cause electric leakage and electric shock.
Check the Drainage Hose during the Continuous
Drainage Operation. Wetting furniture may result in
electric shock, electric leakage, and fire.
Check to ensure the drain hose is free of bent and
properly inserted.
Do not put objects filled with water, such as vase,
on the Unit.This may cause electric shock,
electric leakage and fire.
Do not tilt or drop the Dehumidifier or it may result
in damage, leakage, electric shock and malfunction.
Do not remove the Float from the Water Tank.
This may cause intermittent operation of the Unit,
leakage that wet the surrounding items,
electric shock and electric leakage.
Do not block the Air Intake and Air Outlet.
Do not cover the Air Intake and Outlet with laundry.
This may cause heat generation, fire, and damage
to the clothing.
Do not point the airflow directly at plants.
Do not use pesticide spray or volatile thinner
to wipe the body of the Unit.
This may cause damage to the Unit
and leakage that wet the property,
or short circuit that result in fire or electric shock.
Before moving the unit, always switch it off,
unplug and remove water from the Water Tank,
and firmly hold the Handle to lift it.
Mishandling may wet the surroundingitems,
electric shock, electric leakage and fire.
Moving the Unit and Storage
Stop pushing forward if the Casters are unable
to roll smoothly.This may cause damage to the
flooring or carpet.
Do not move or store the unit in horizontal position
This may cause damage, electric leakage,
electric shock, malfunction and abnormal noises.
4
Prohibited
Prohibited
Prohibited
Prohibited
Prohibited
二
二
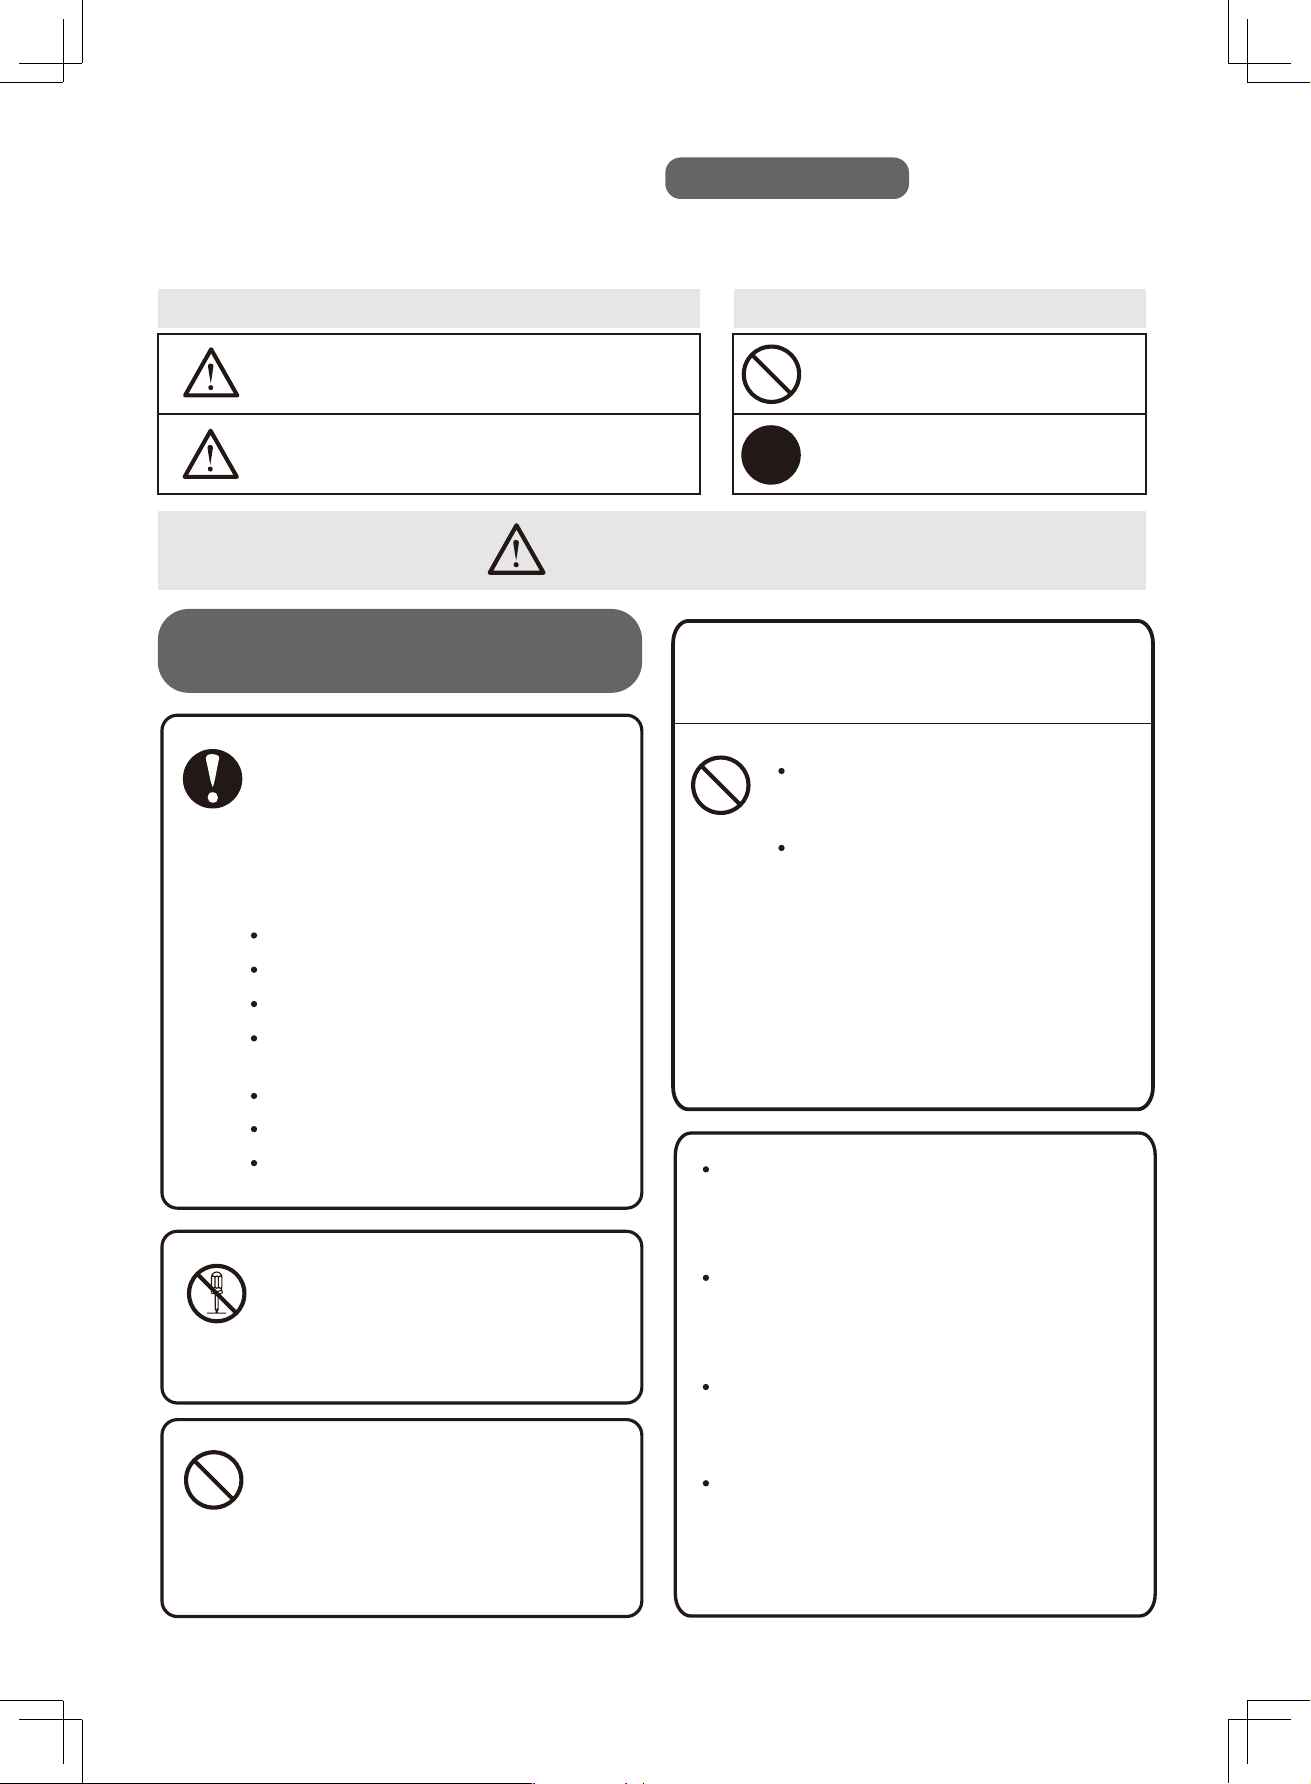
Component Parts
G 匠
Louver
Water Tank
Control Panel
Back Cover
Handle
Air Intake
Drainage
Outlet
Cord Tie
Caster
Water
Tank
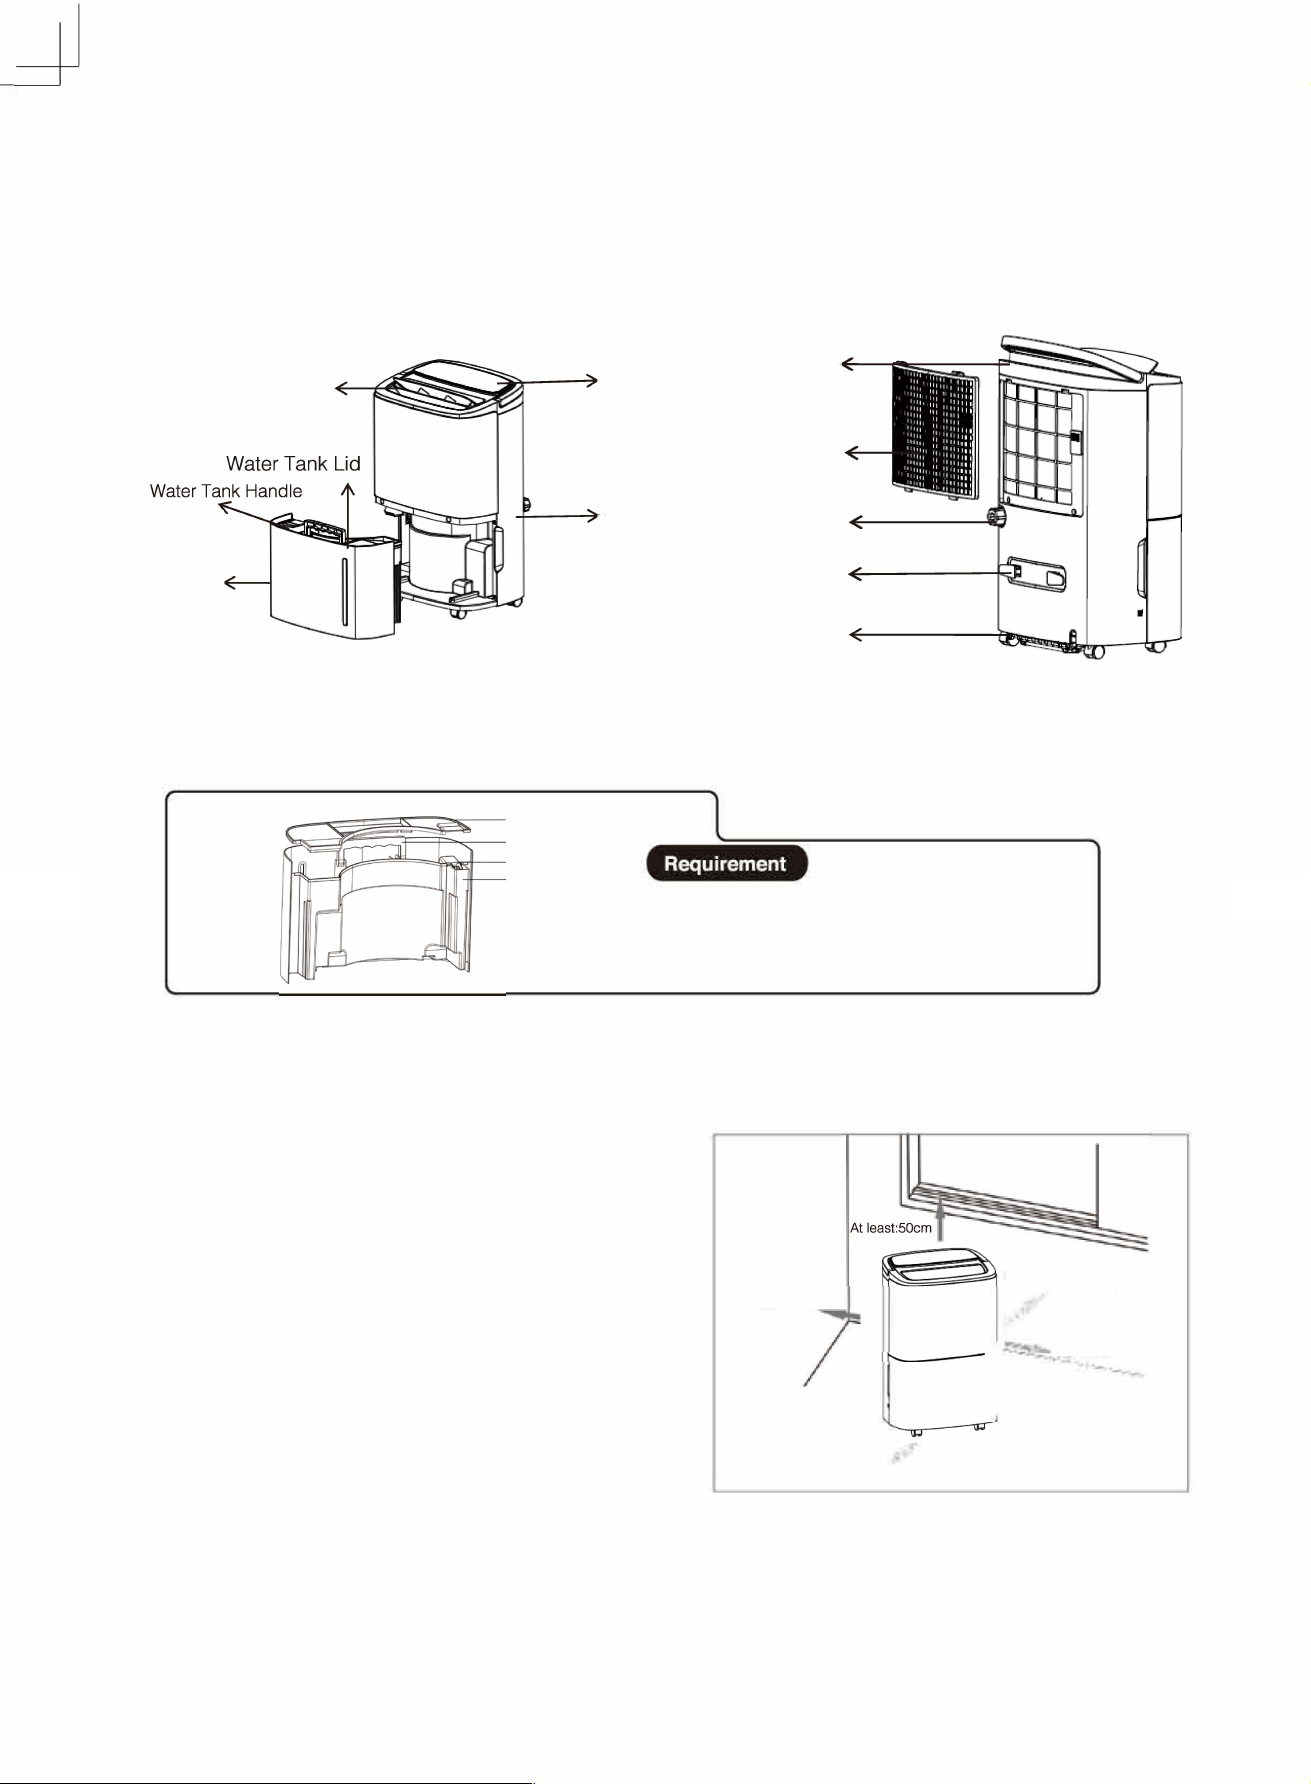
Water Tank Lid
Water Tank Handle
Float
Water Tank
Do not remove the Float from the Water Tank, or
otherwise the Dehumidifier cannot detect the
water level that may cause leakage and
malfunction.
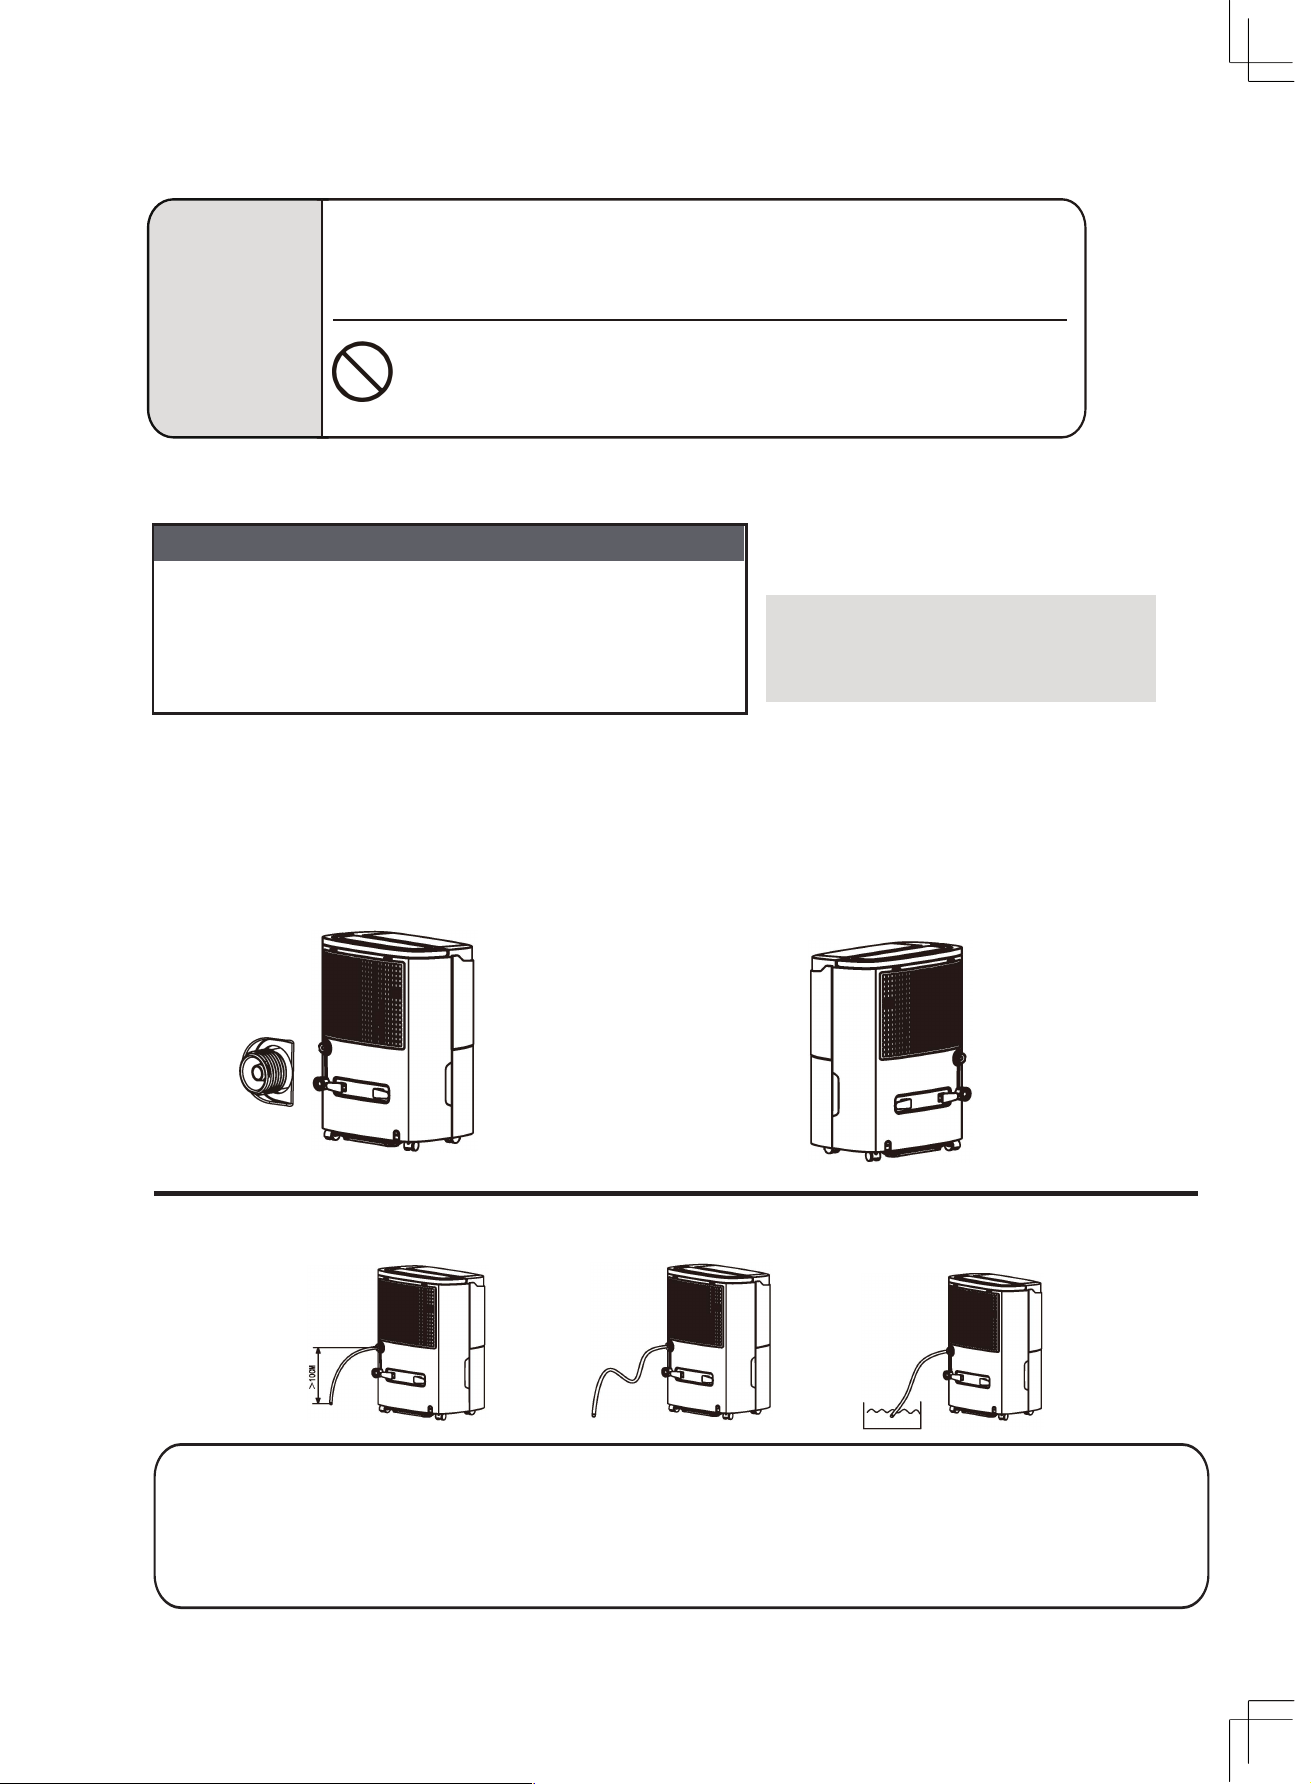
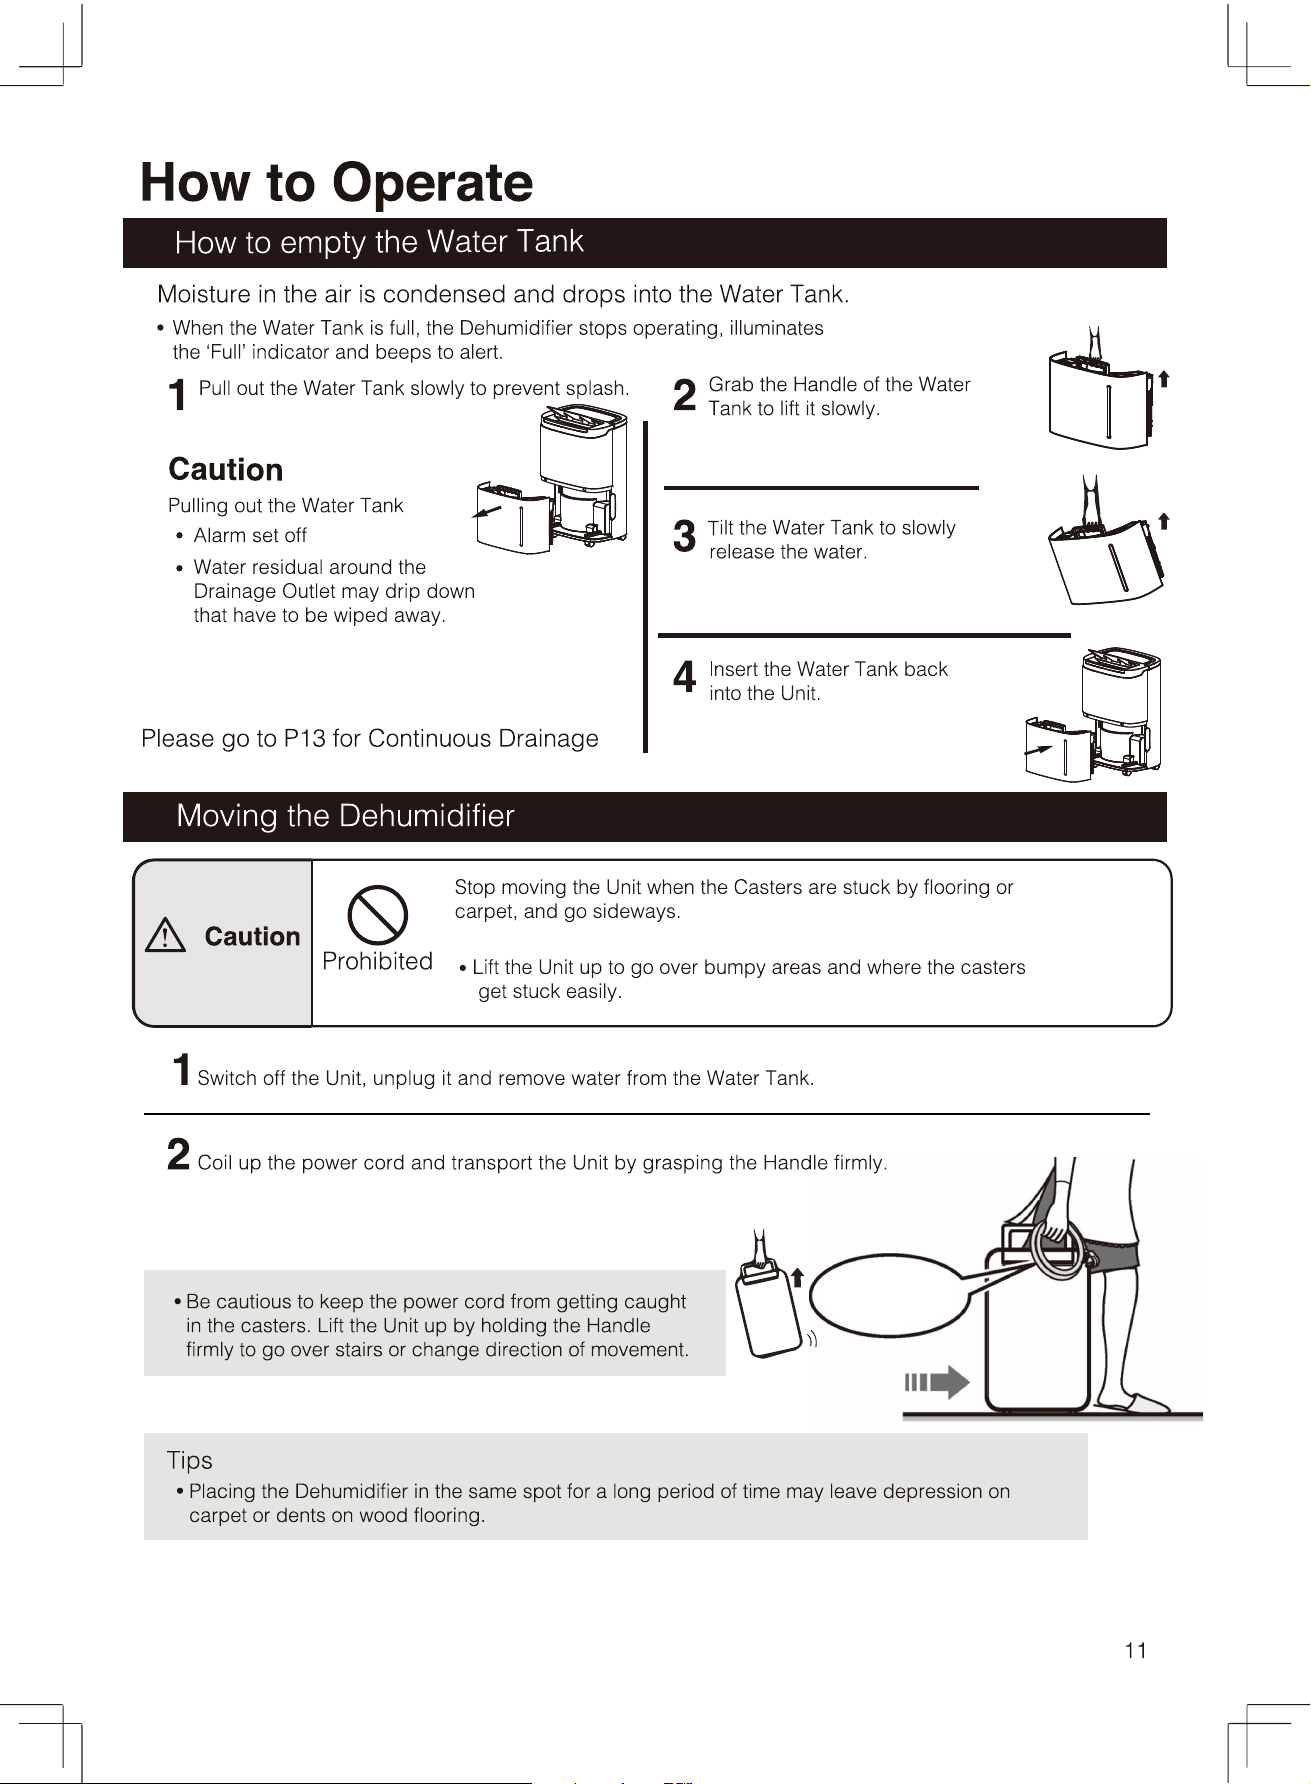
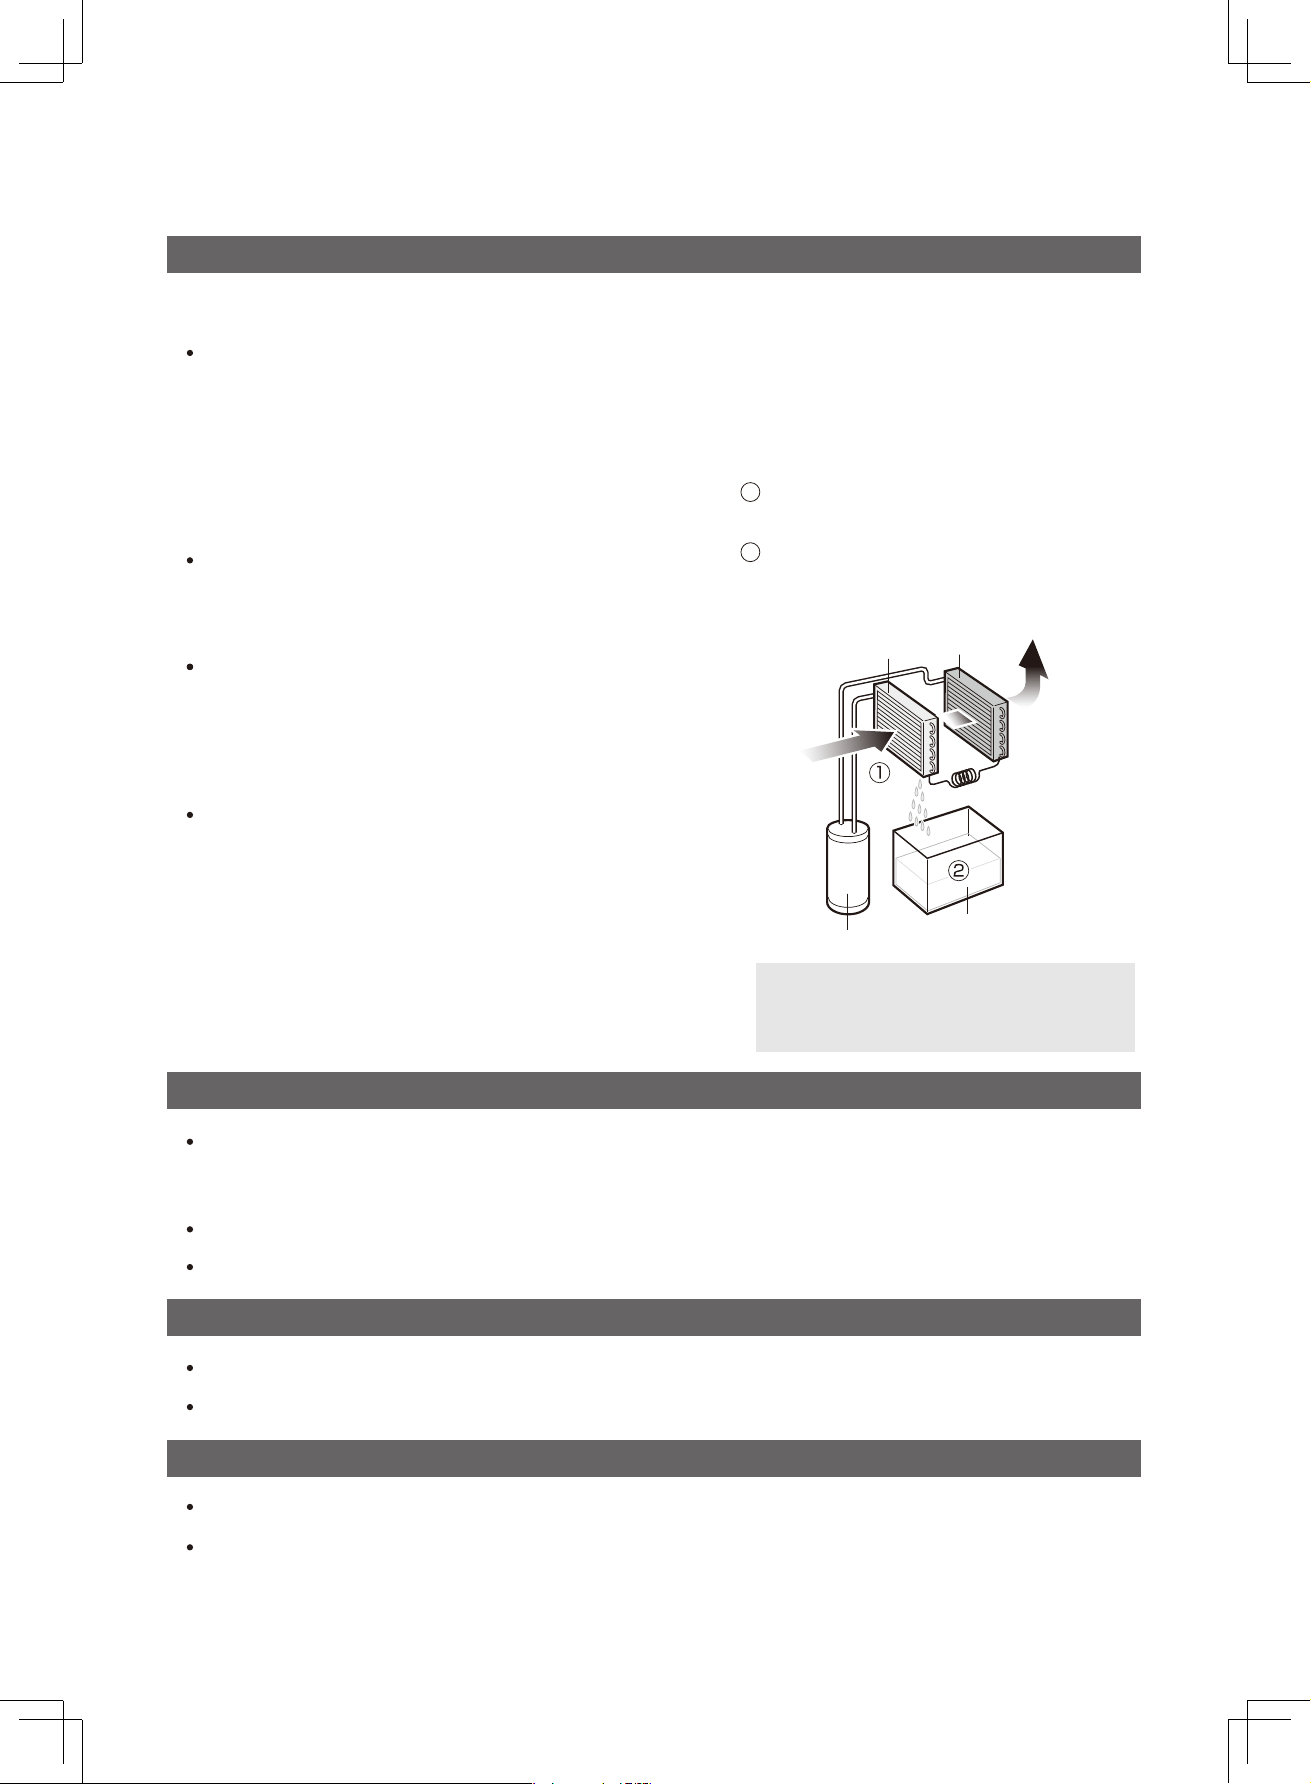
Installation setting
Keep enough space around the Dehumidifier to ensure effective
operation. Please place the Unit according to the specifications
shown in the diagram to the right. Insufficient space may
impact on the performance of the Dehumidifier
_
•
Drain the Water Tank before use
•
Minimise the frequency of opening and closing doors
and windows to save energy.
•
Keep enough space around the Dehumidifier.
Allow at least 50cm of air space above the Unit and
at least 20 cm on four sides, as shown in the diagram.
•
Operating noise: It is recommended to place the
Dehumidifier on top of a mat or rubber slab to reduce
vibration and noise, which may also prevent creating
carpet depression or dents on wood flooring
At least:20cm
/
'
At least:20cm
尸
=
At least:20cm
(Cont.)5
勹 厂
MODE
FAN HUMIDITY ON/OFFMODEFUNCTIONTIMER
LOUVER
ION
INTERNAL DRY
DRY CLOTHES
TANK FULL
HIGH
AUTO
LOW
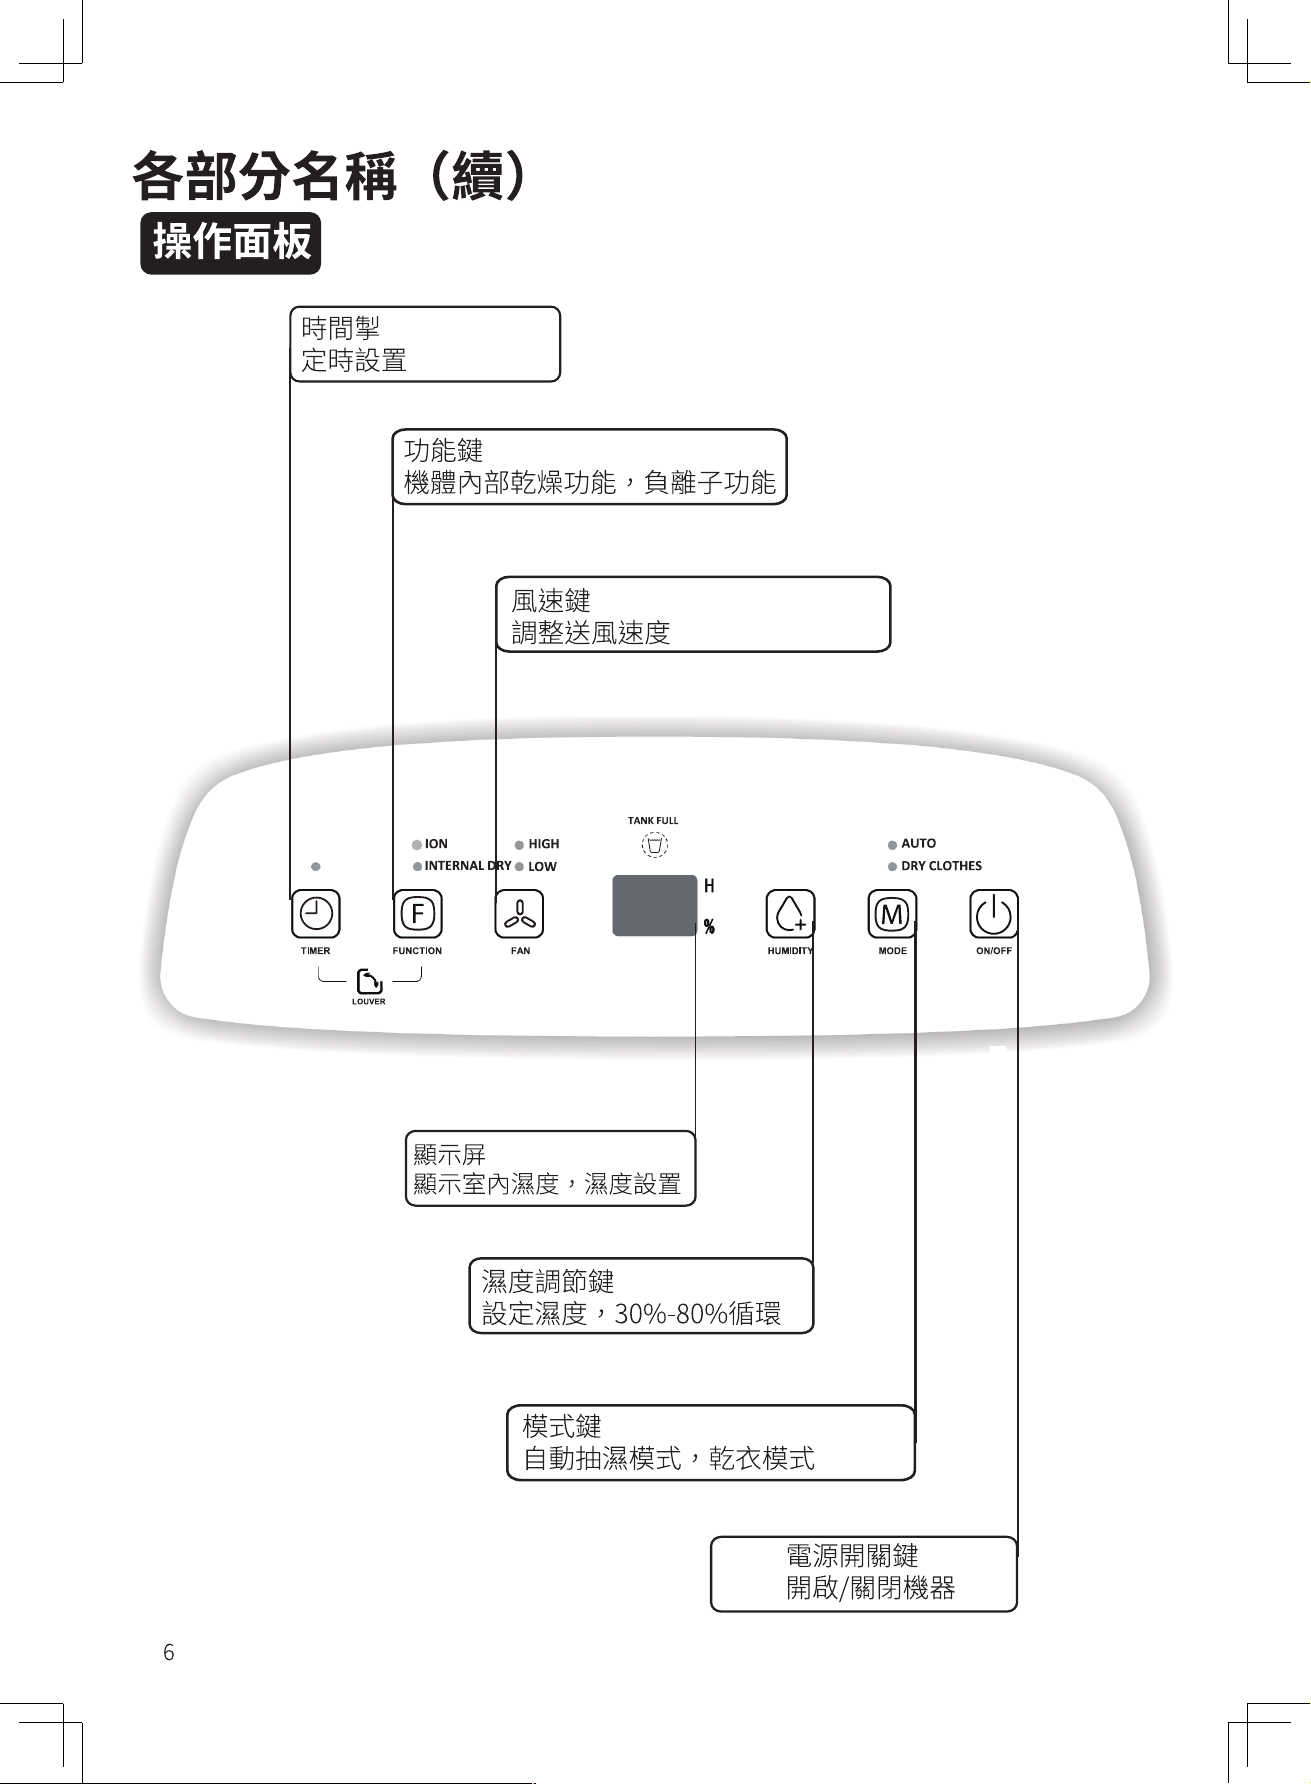
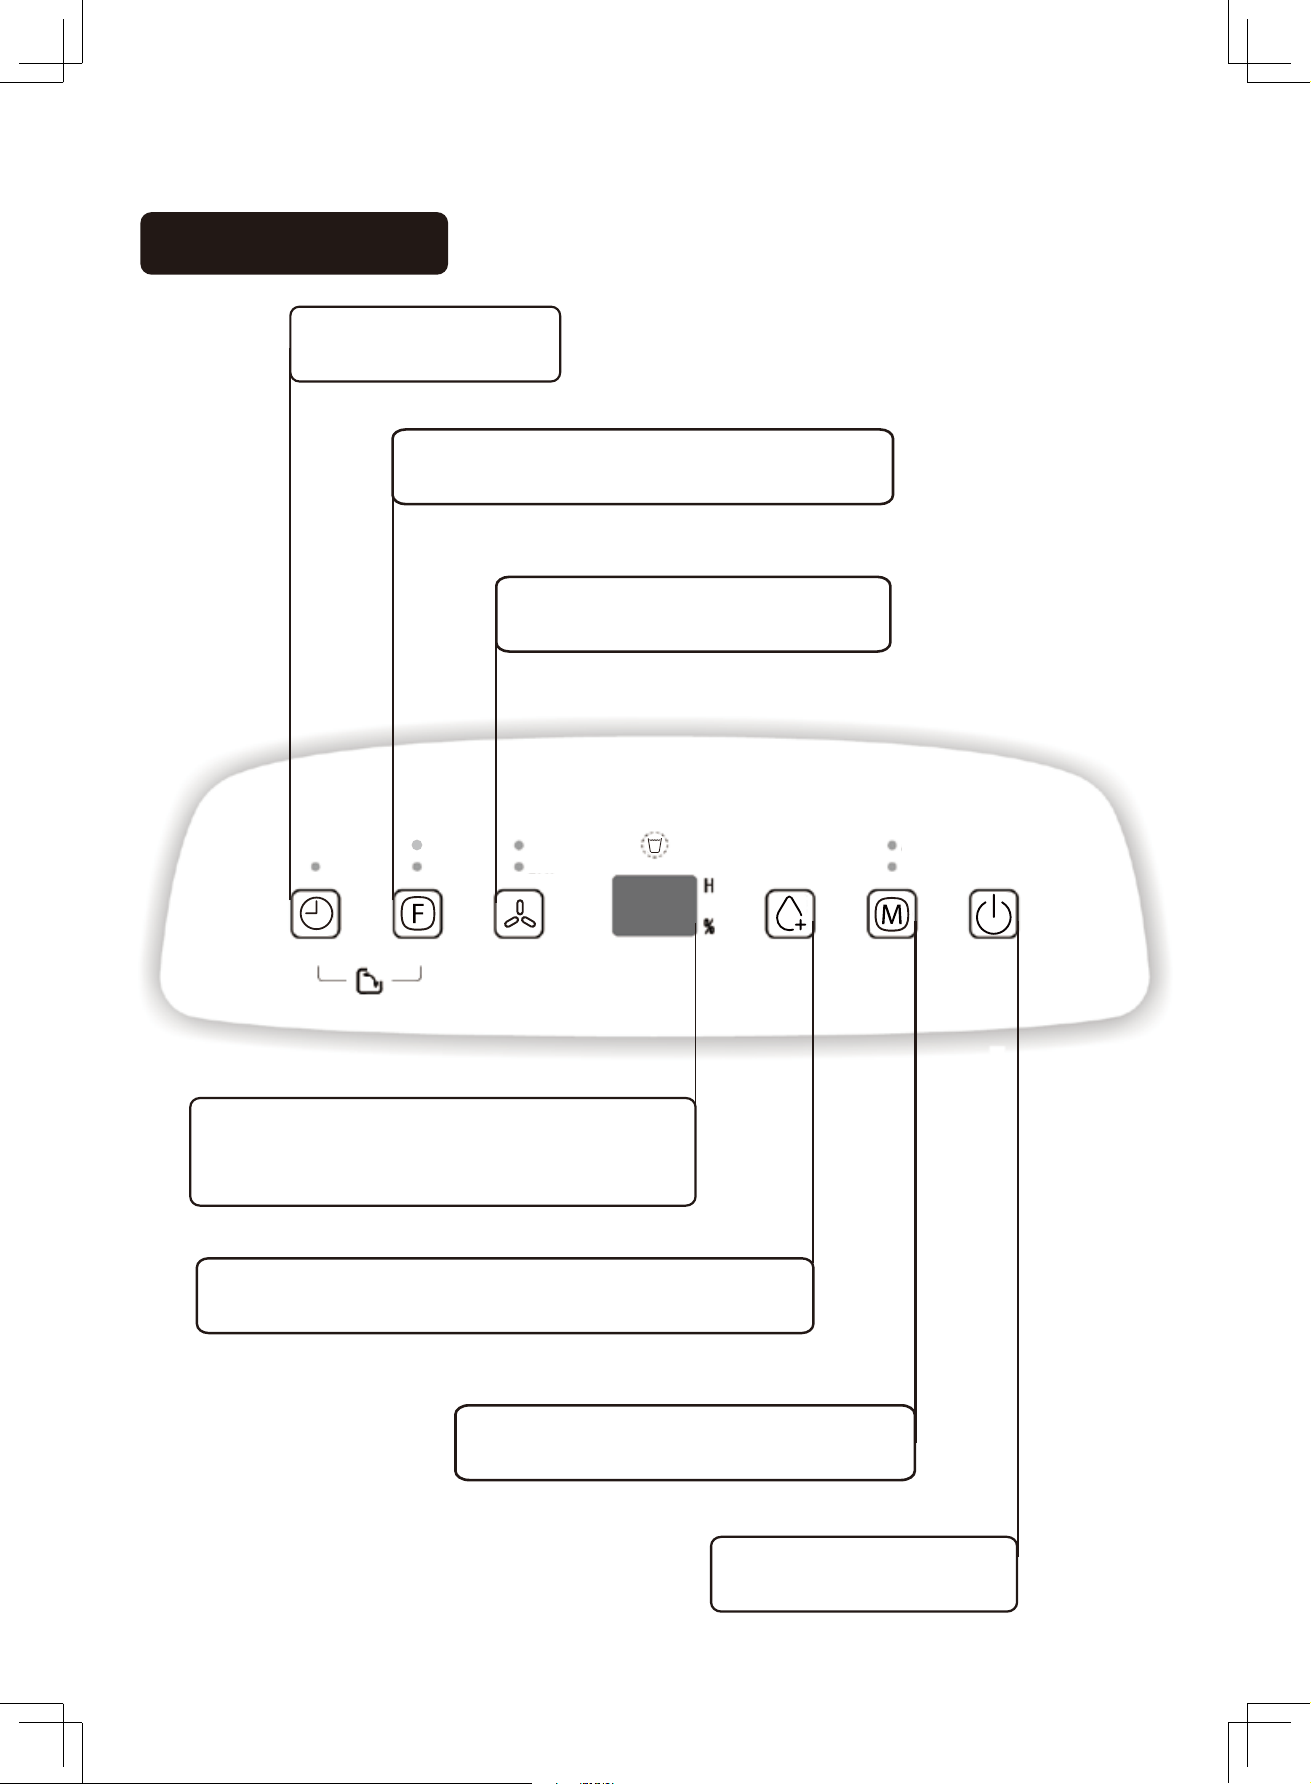
Timer
Timer setting
Component Parts (Cont.)
Control panel
Function
Internal Dry Operation and Negative Ions
Fan Speed
Fan Speed setting
Display
Humidity Indicator showing the current and
the selected humidity level
Humidity Selector
Setting of humidity level from the range of 30% to 80%
Modes of Operation
Automatic Mode, Laundry Drying Mode
Power Switch
Switch the Unit on and off
6
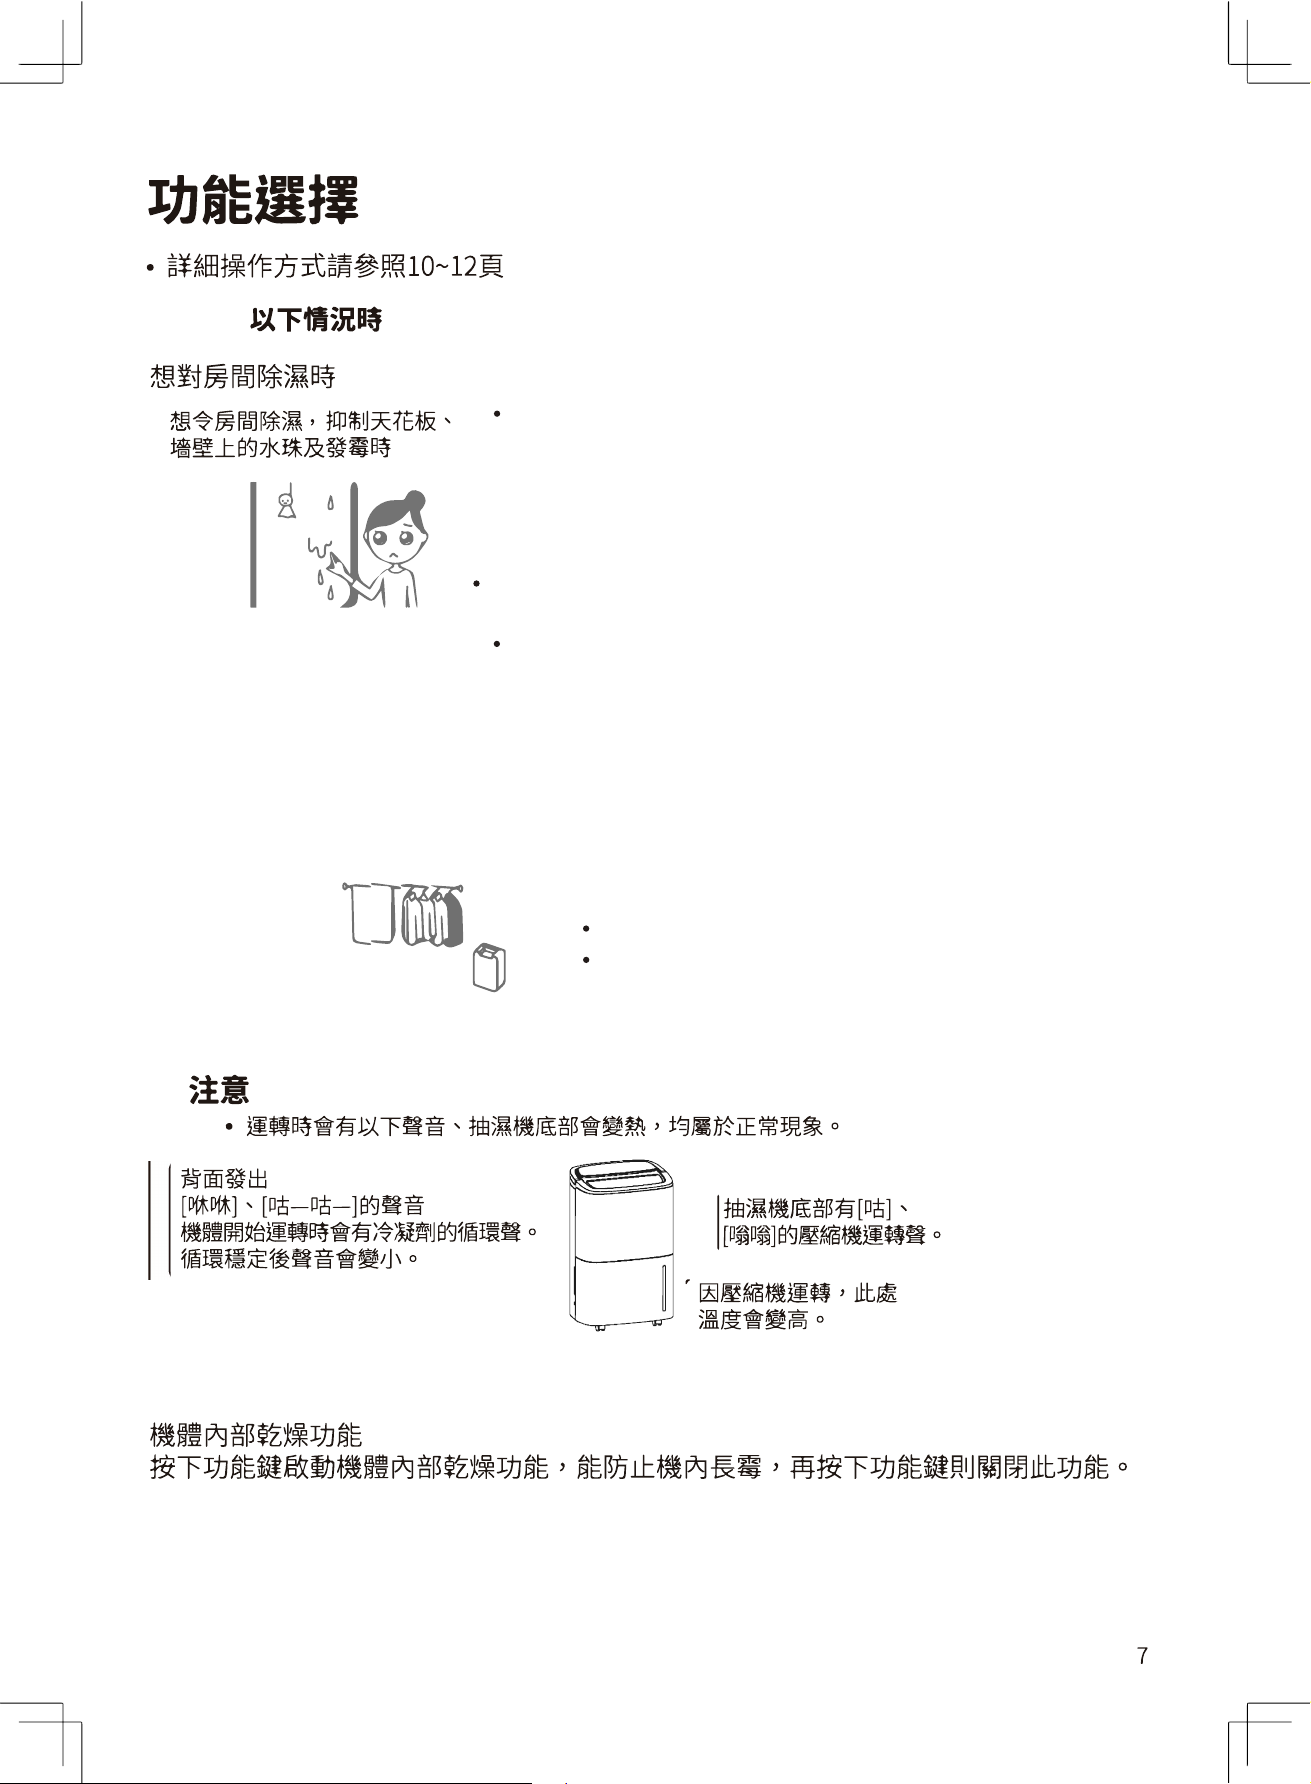
The bottom part of the
Unit heats up as a result
of the operation of the
compressor.
In this Mode, the Unit operates intermittently. When
the current humidity is higher than the preset humidity
level by 5%, the compressor turns on and the Fan starts
operating with the preset Fan Speed. When the current
humidity is lower than the preset humidity level by 5%, the
compressor stops operating, the fan stops running. When
the current humidity is within the +-5% range of the preset
humidity level, the Unit operates at the default operation
mode with the humidity level preset at 50%.
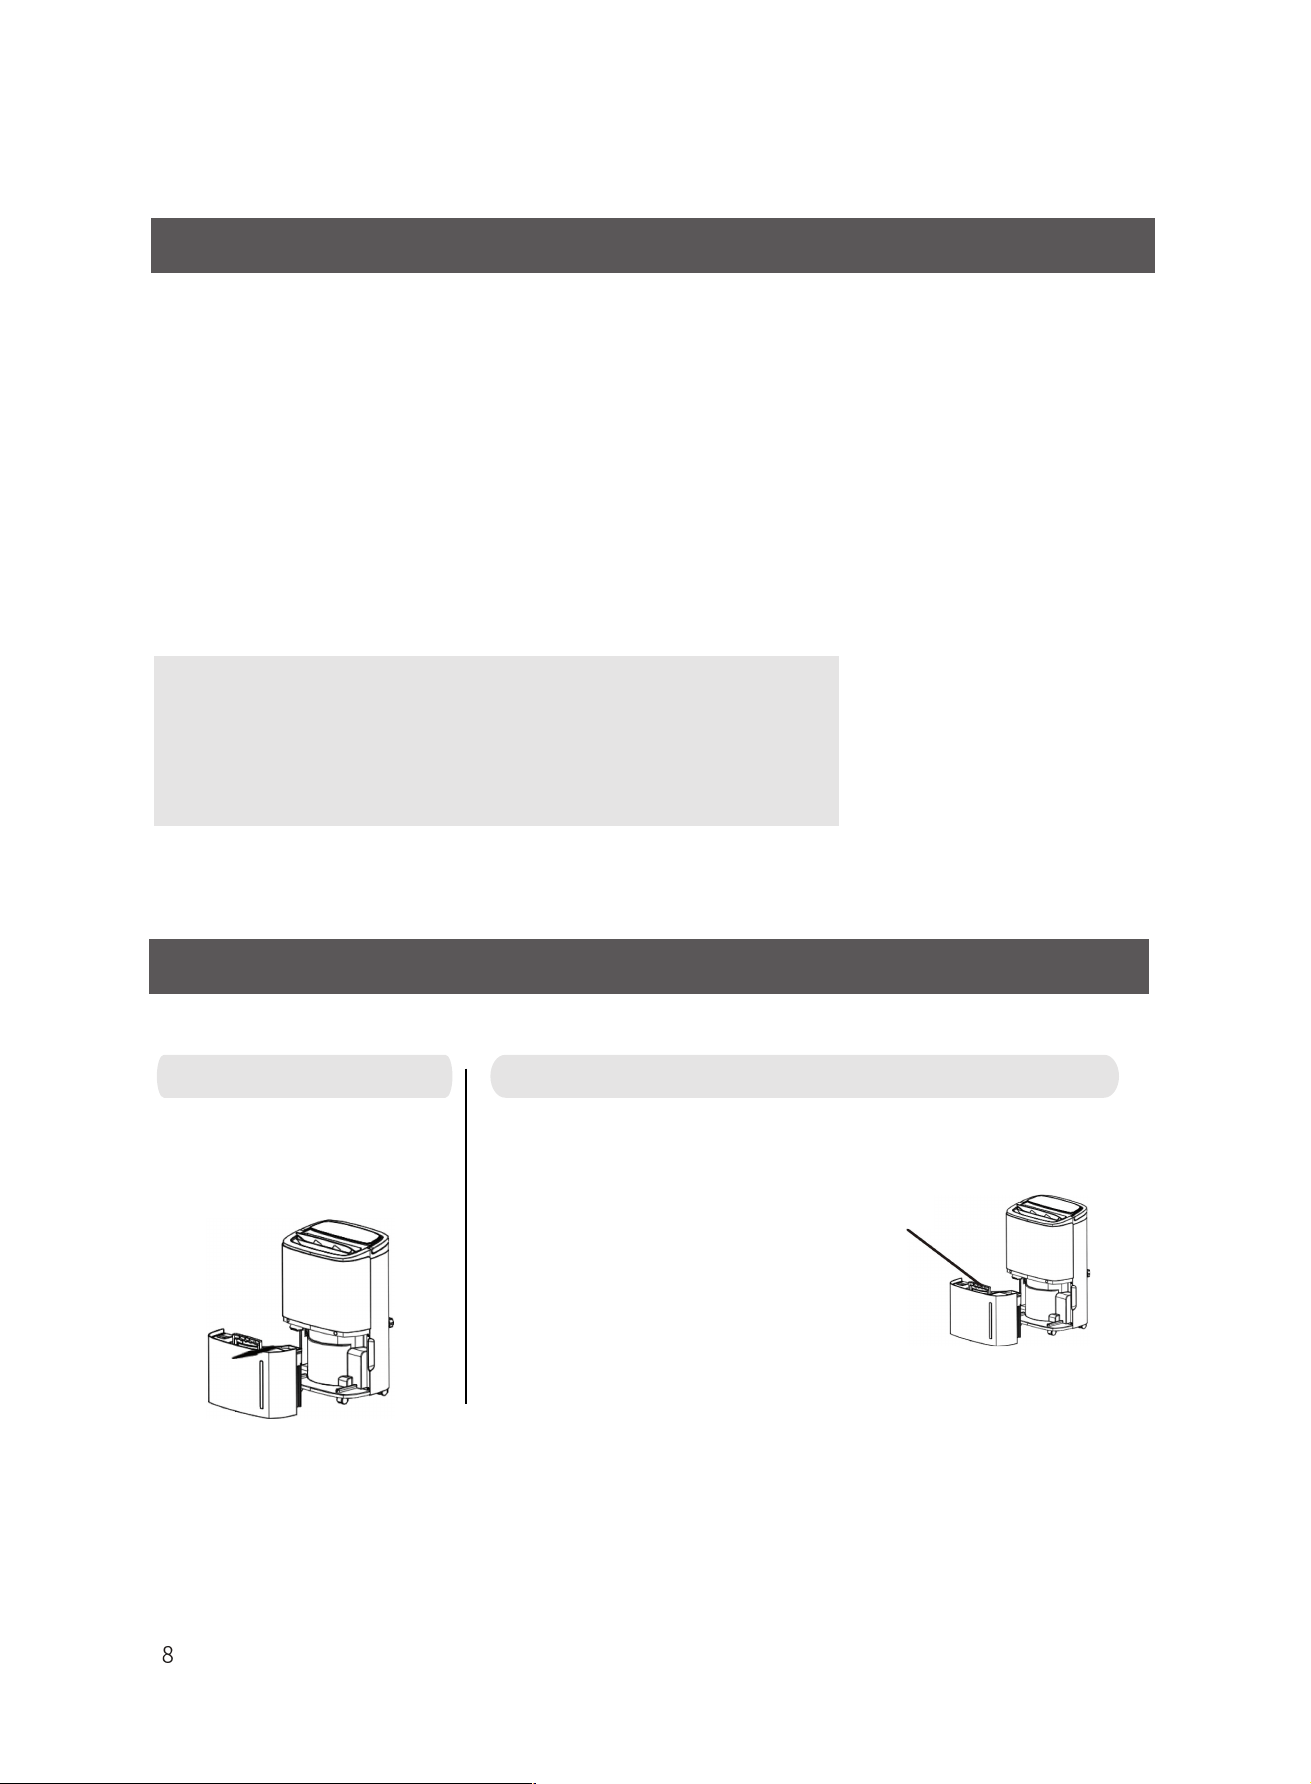
Hold the bottom of the Water
Tank and gently pull it out
from the Unit. Grab the handle
to lift the Tank.
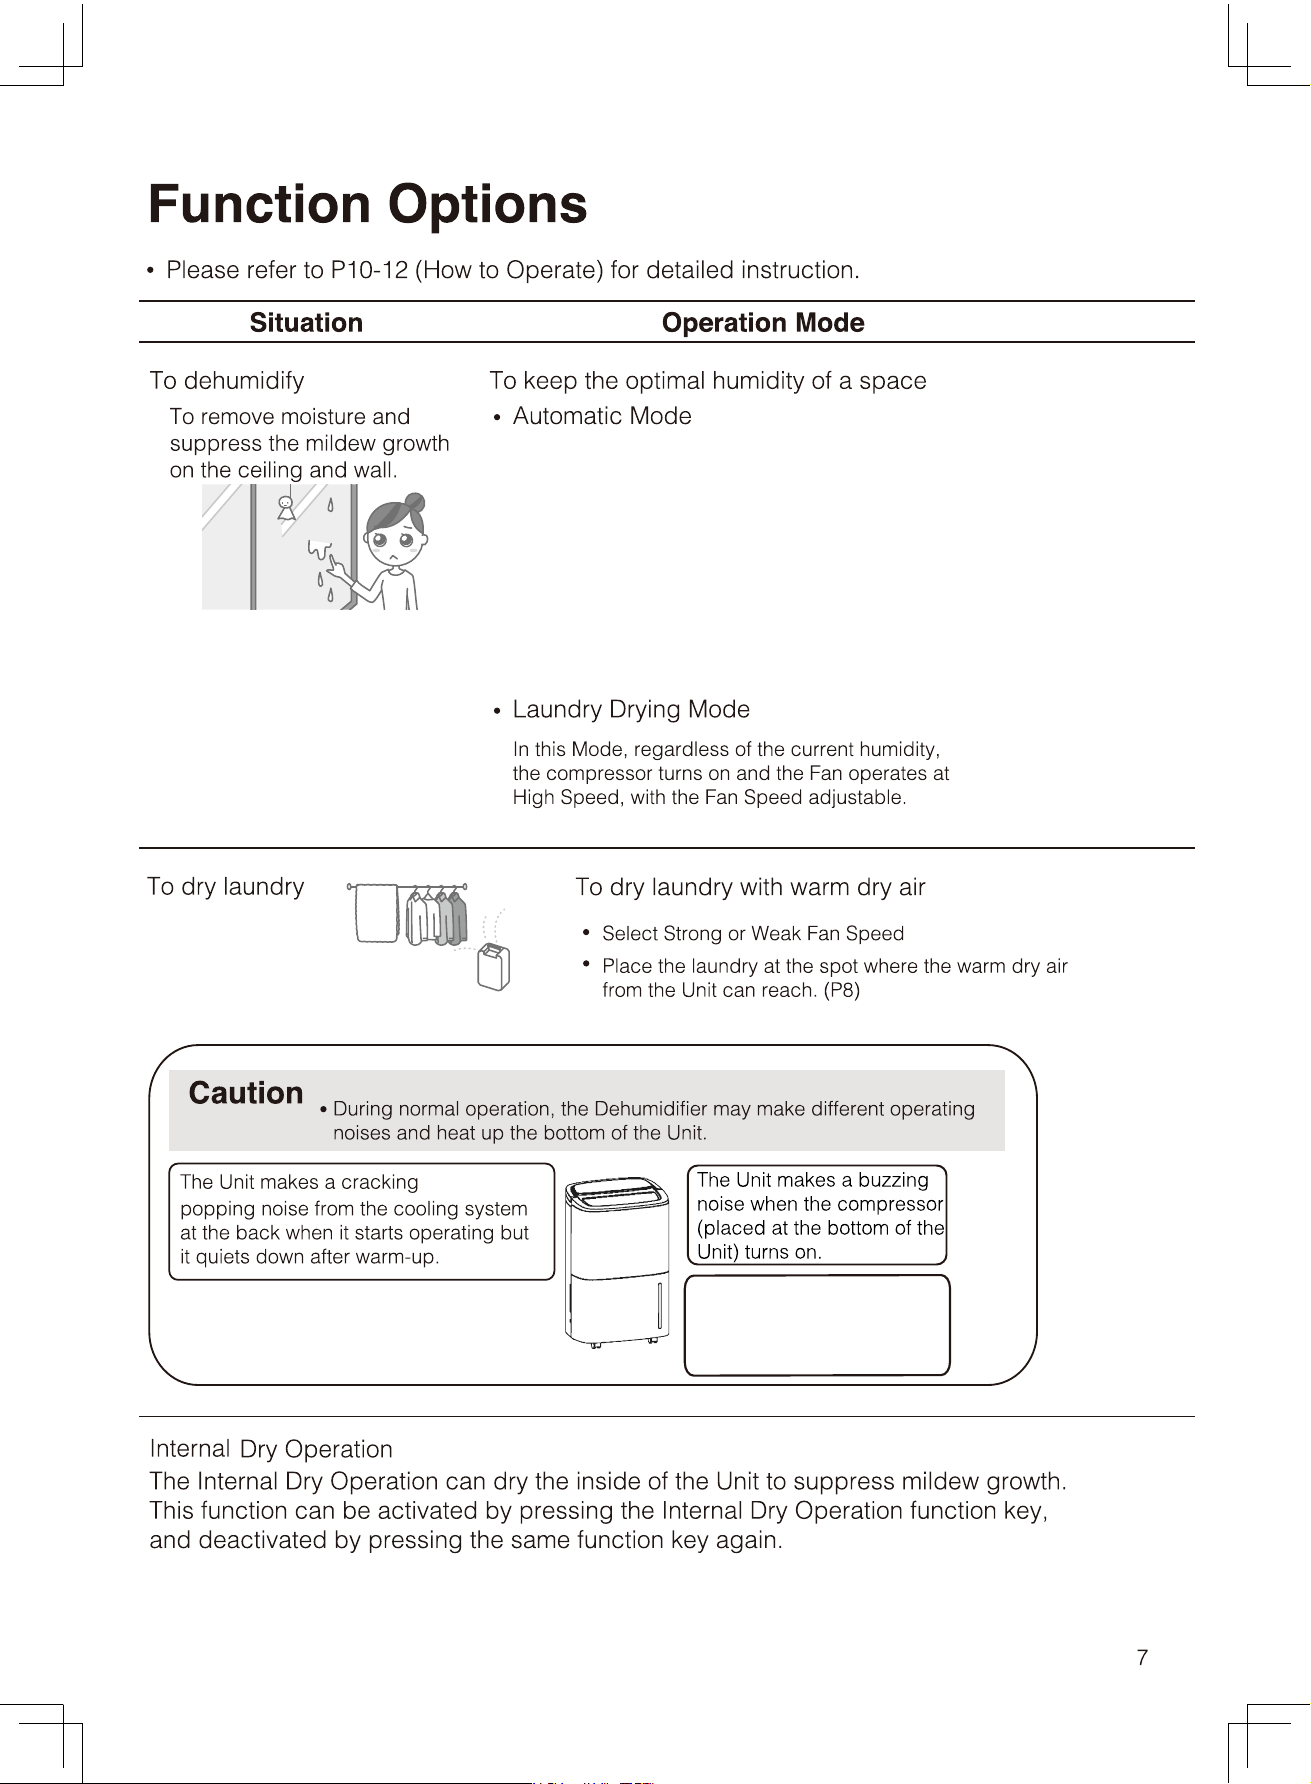
Drying Laundry
Proper use of the Laundry Drying Mode
Hang and space the laundry evenly
Pointing airflow from the Unit directly at the laundry and spacing the laundry evenly could shorten the laundry
Position of the Dehumidifier
Shifting the position of the Dehumidifier and the laundry to shorten the drying time.
Sort the laundry according to fabric type and thickness and position the laundry accordingly.
Heavyweight clothing takes a long time to dry so it should face the Air Outlet directly.
Denim jeans and dress takes a short time to dry that it could be placed further away from the Unit.
Lightweight clothing takes a short time to dry that it could be placed further away from the Unit.
Take down the laundry as soon as it is dry
On humid or rainy days, laundry should be taken down as soon as it is dry, or otherwise it will absorb
moisture from the air.
Tips
The drying time will be longer in the following situations:
The laundry is of a large volume Insufficient space between the laundry
The laundry is of heavyweight clothing The room for drying laundry is big
Preparation and Confirmation
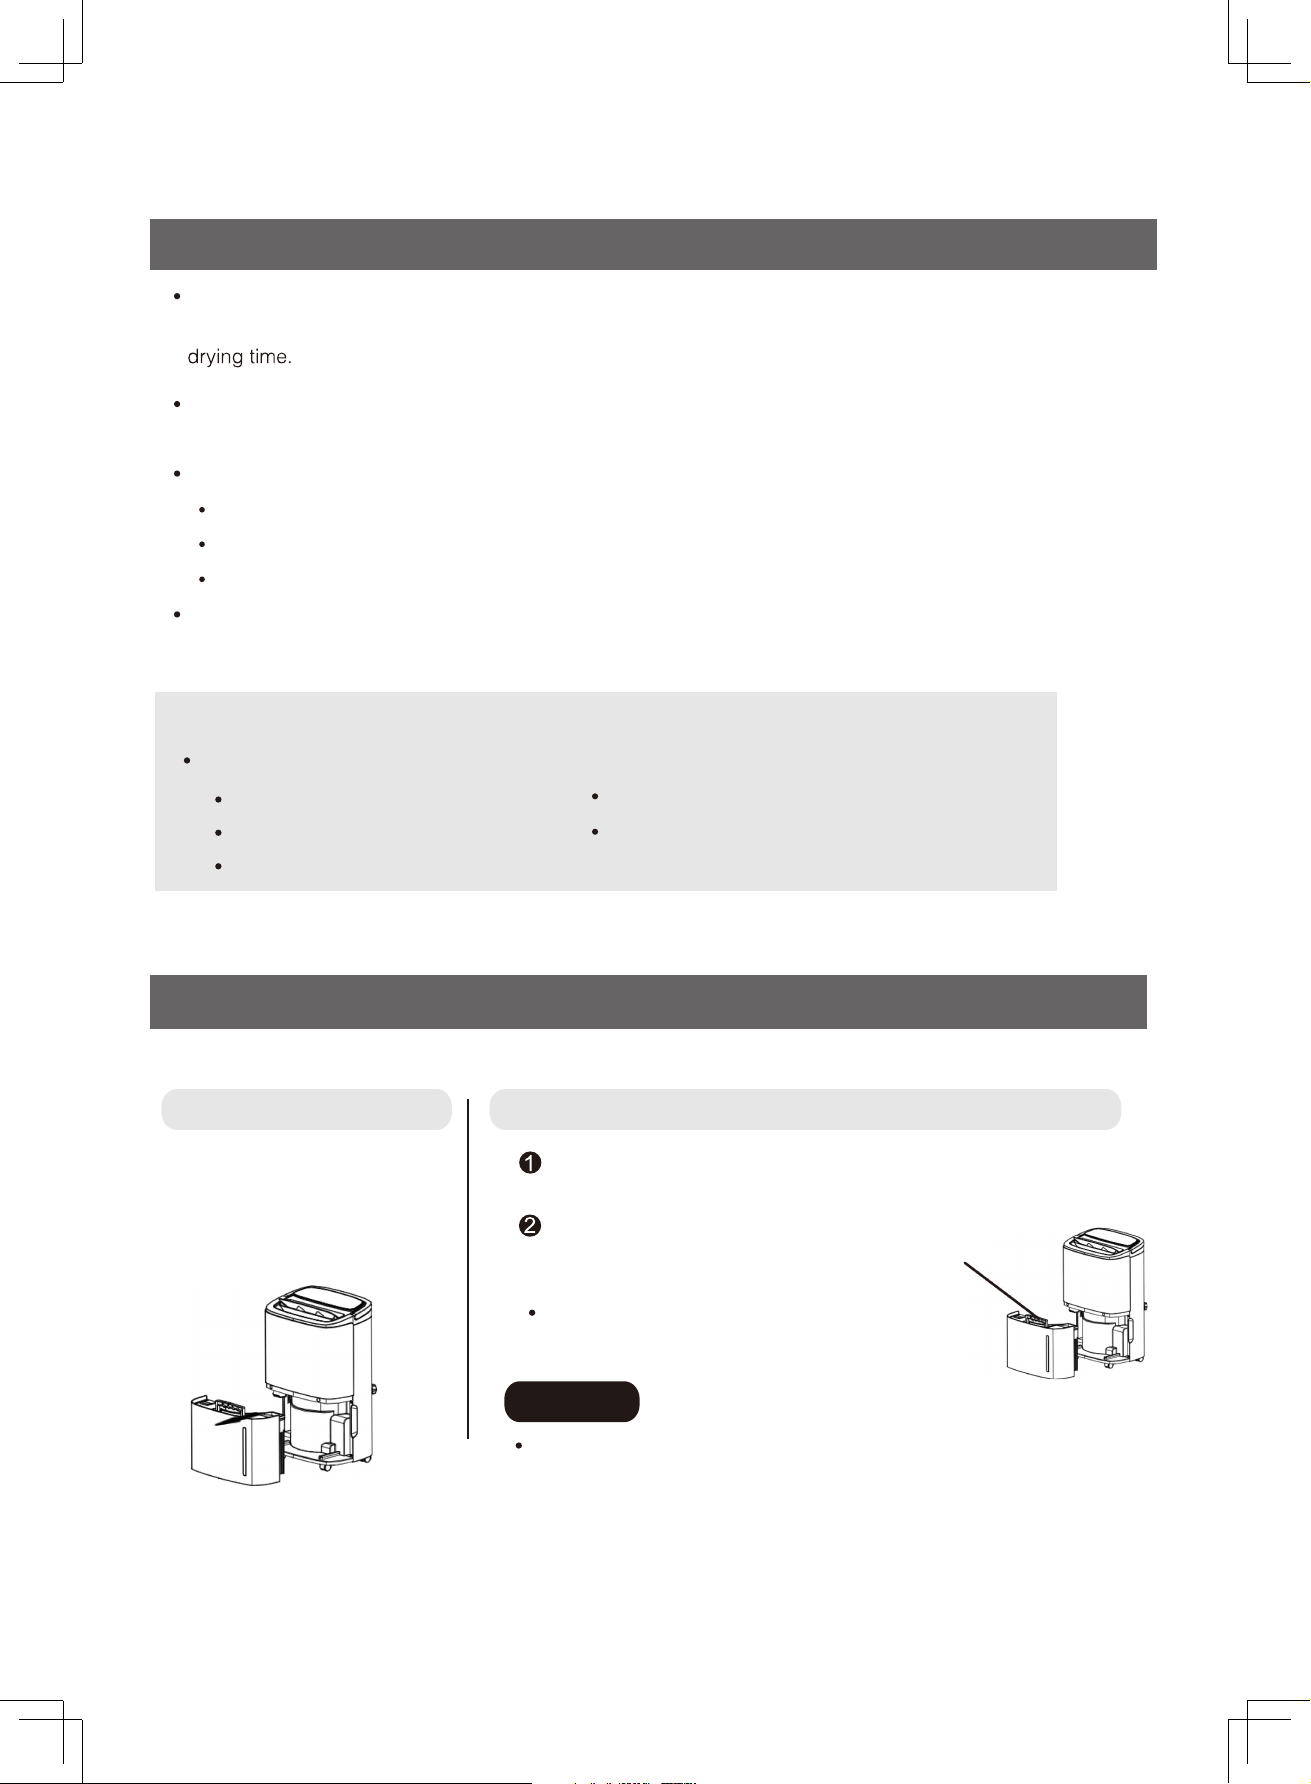
Water Tank Insertion
The Unit cannot operate if the Water Tank is not properly inserted or when it is full of water.
Taking out the Tank Inserting the Tank
Check that the Drainage Outlet is properly covered.
Hold the Water Tank
horizontally and gently push
it inside to install the Tank.
Water Tank handle
Caution
Ensure proper installation of Water Tank Lid and
Drainage Outlet to prevent leakage.
8
The room temperature is low
Please tidy up the handle of the water
tank and gently put the water tank back
in place.
J
丿
How to Operate (Dehumidification and Internal Dry Operation)
h
p
e
o
a
w
$fs
an
g
n
0
亿\言昙?
r
t
[
e
en
;as
s
骂;c震。言骂霄a\言u
p
It may result in electric shock, fire, heat generation, short circuit and ig nition
Proh心ted
1 Pl
u
g In
• Alarm beeps once.
2 四 Power Switch
•
Press the switch to turn on or off the Dehumidifier.
3 苞} Mode
s
of Operation
•
Choose between Automatic Mode and Laundry Drying Mode when turning on the Dehumidifier
The corresponding indicator of the Mode chosen will illuminate.
•
The Child Lock function can be activated and deactivated by pressing and holding the switch
for 3 seconds.
4 ·� H
umidit
y
Selector
•
The hum心tylevel can be set in Automatic Mode, with increment or decrement by 5%
between 30-80%
5
.
D
isp
lay
• Current hum昢tylevel is indicated on the Display in both Automatic Mode and Laundry Drying Mode
•
Preset humidity level is indicated on the Display in the course of setting desired humidity level
•
Both Preset time and humidity level are indicated on the Display in the course of setting Timer
(Cont.)9
勹
]
厂
Warning
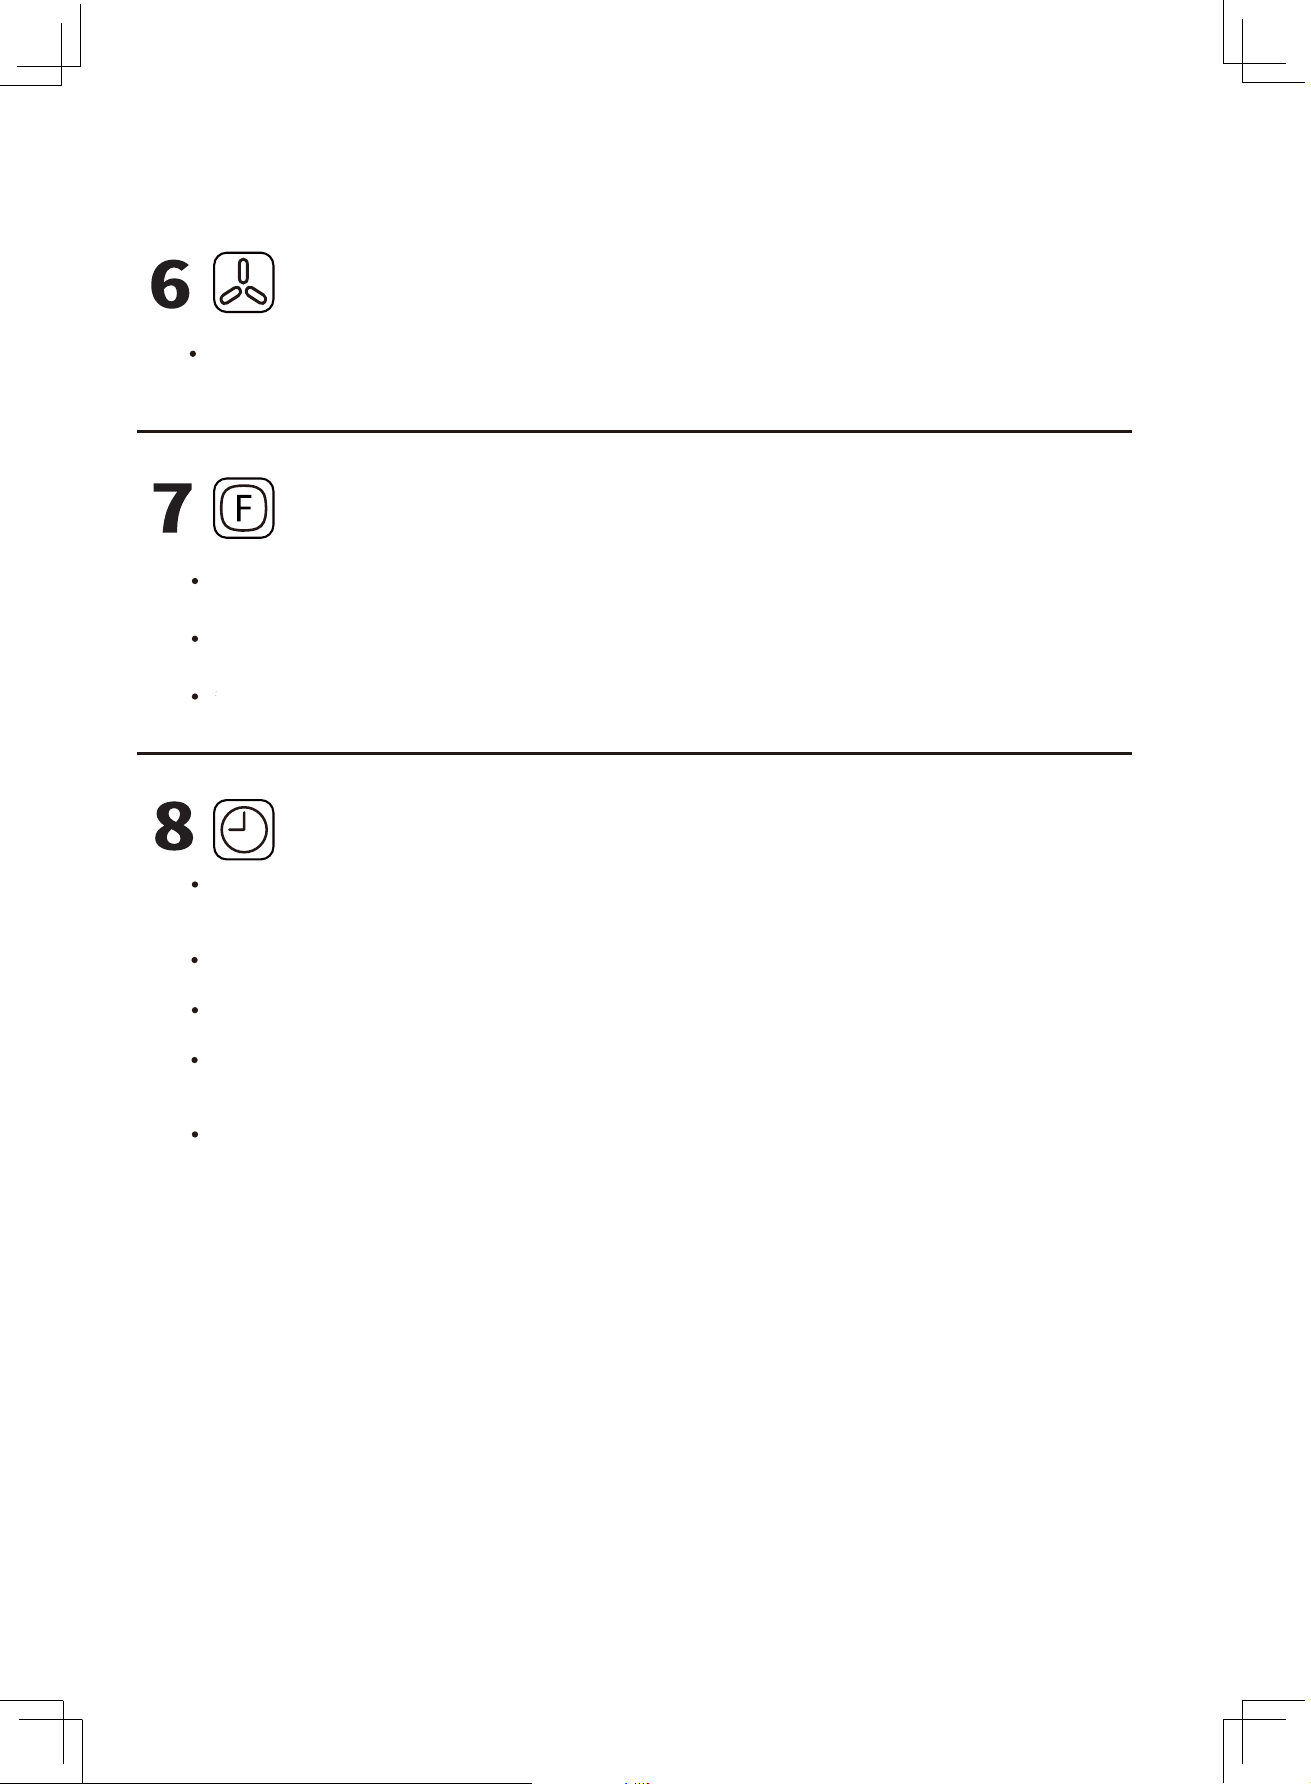
Fan Speed
Fan Speed can be adjusted in both Automatic Mode and Laundry Drying Mode between
High airflow mode and Low airflow mode.
Function
Press Function button to activate Drying Inside Operation.
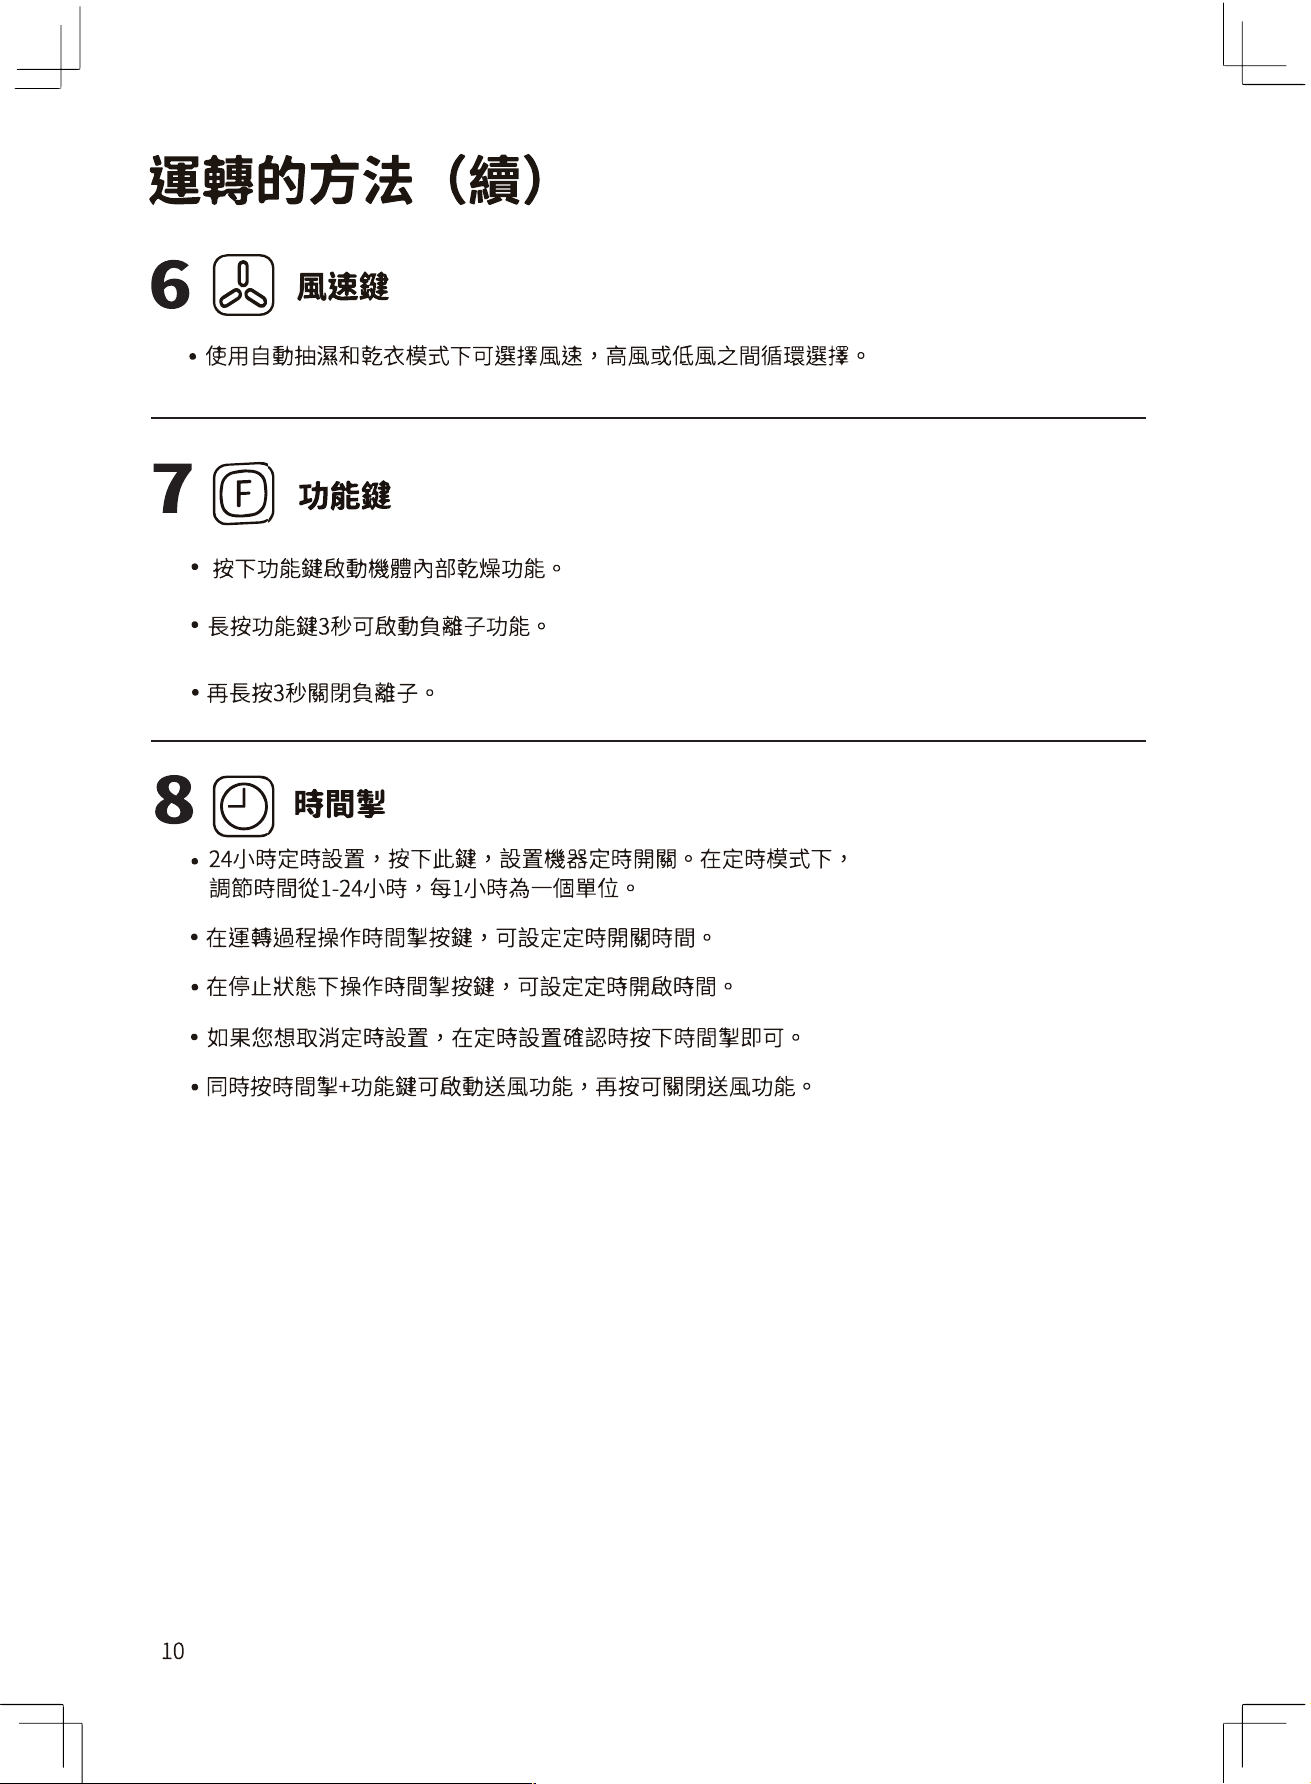
Press Function button and hold for 3 seconds to activate Negative Ions Operation.
Press Function button and hold for 3 seconds to deactivate Negative Ions Operation.
Timer
Press Timer button to set up Timer for switching the Unit on and off at specific times, within
a 24 hour period.
The Unit can be set to turn on and off at specific times during the operation of the unit.
The Unit can be set to turn on at specific time when it is not operating.
Timer setting can be cancelled by pressing the Timer button when asked to confirm the
Timer setting. The On and Off Timer can be set within a 24 hour period, with 1 hour as the unit of time.
Press both Timer and Function buttons simultaneously to activate the louver.
How to Operate (Cont.)
10
Coil up the power
cord when moving
the Dehumidifier
/
/
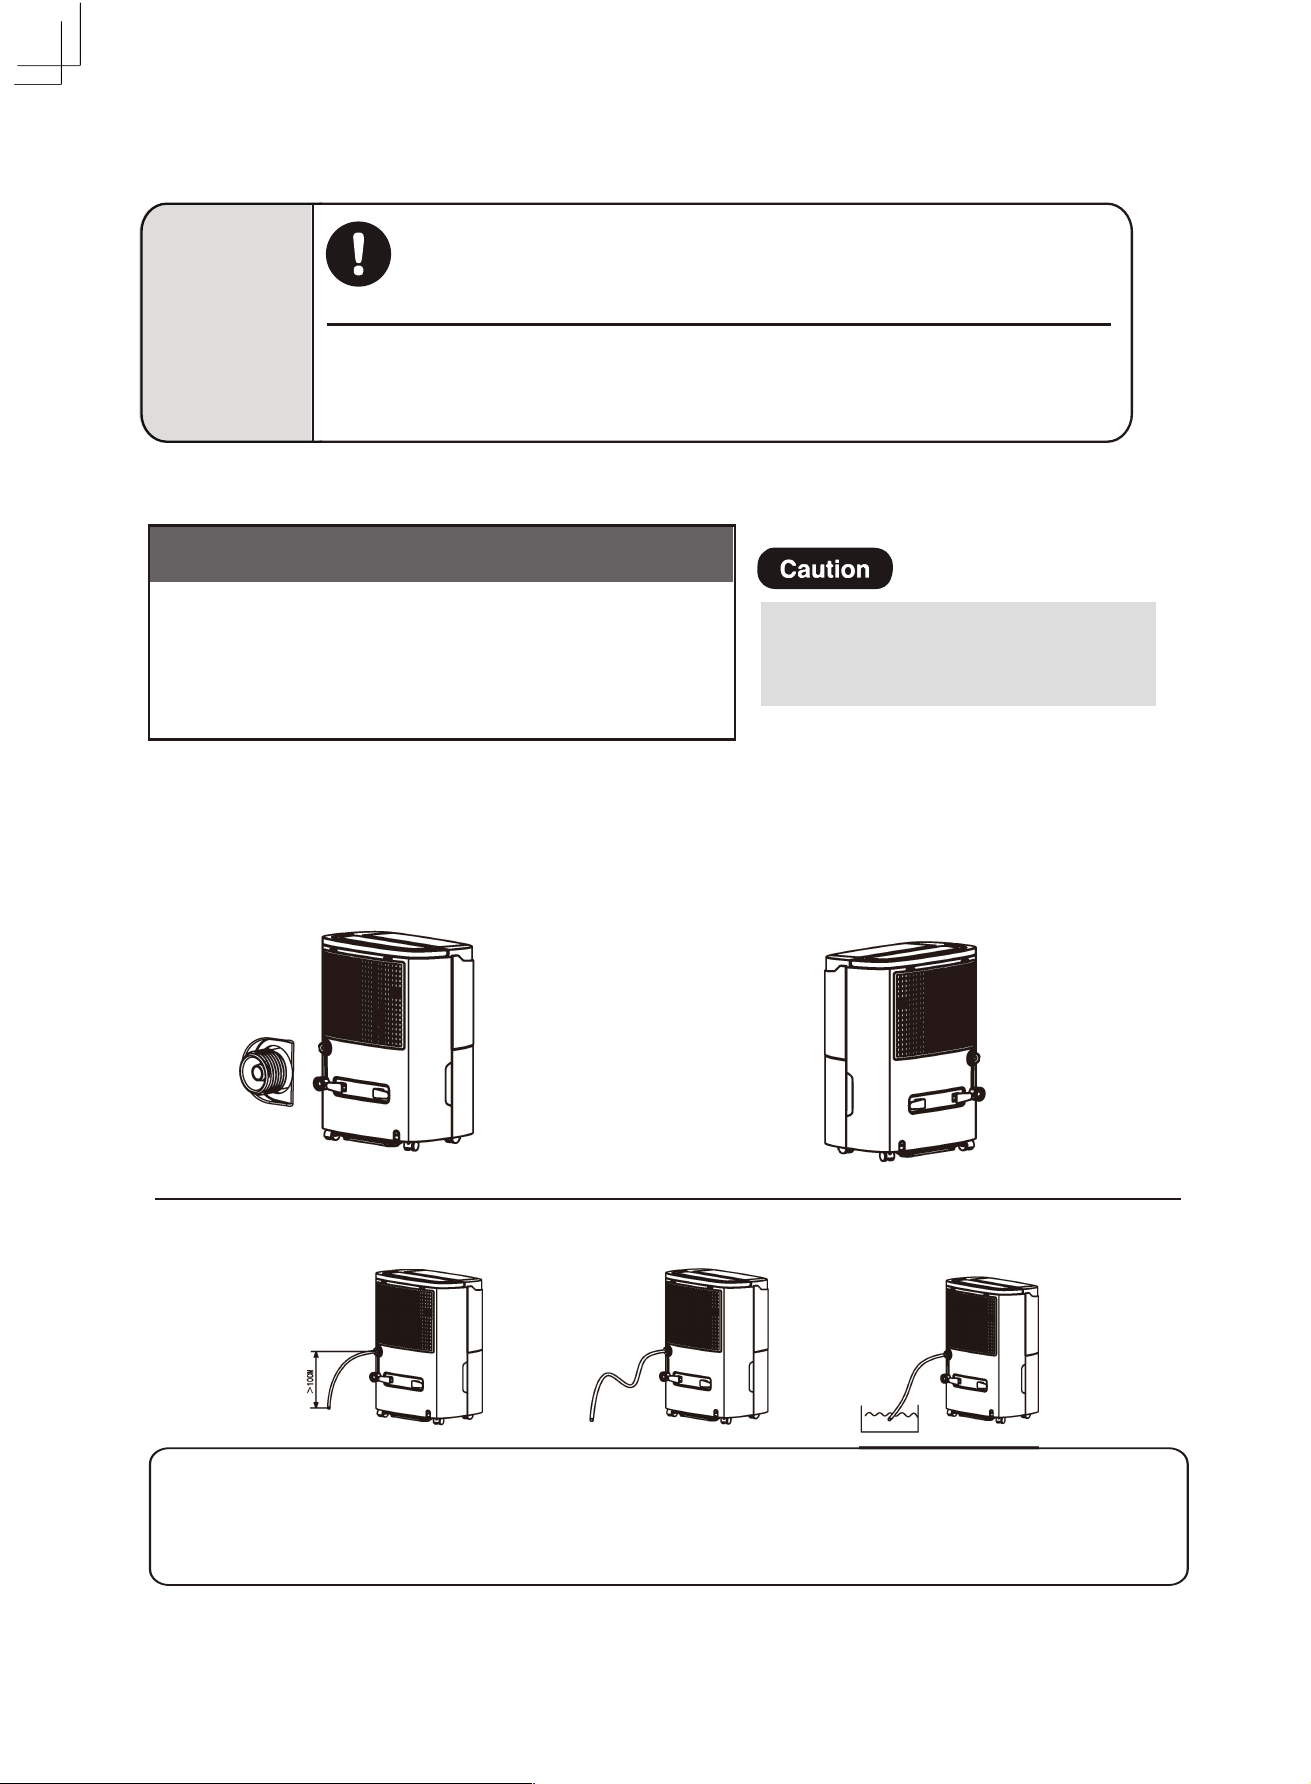
Continuous Drainage
Caution
Tips
A hose has to be properly installed for Continuous Drainage operation, or it
may result in dampening the surrounding objects, electric shock, electric
leakage or fire.
• Check to make sure the hose is free of bends, and is not placed hole-side up
。骂言震s
w
e
a
}s
e
};巨言:言言二e
of
盂
h
a
e
y芦芦5言
may wet the surrounding objects when it thaws, and result in electric shock,
Prohibited electric leakage and fire. Water Tank may consequently break and leak.
If a drain is available, the Dehumidifier can continuously drain water by installing a hose
This would enable the Unit to operate for a long period of time without the need to empty the Water Tank
|
Specificahon of the drain hose
(Plastic hose readily available in the market)
Length
: The length of the drain hose is suggested to be
under 0.6 m. The end of the hose is placed below
the DraInage OutIet by a mImmum of 10 cm keep
1
• Do not use expandab|e hose, as the
the hose free from clog to ensure proper drainage.
I
hose may not be drained completely
Internal Diameter: Internal and external diameter of the hose
are 9 mm and 13 mm respectively.
Stop the Dehumidifier before taking the following steps, and unplug it from the power socket
1
�emove the Lid _a�d vl�e of the Drainag_e Outlet
from the back of the Unit, and insert the 9 mm hose
onto the Drainage Outlet
2 Remove the Lid and va|ve of the Dramage
Outlet from the back of the Unit, and insert
the screw type garden tube onto the screw
type Drainage Outlet.
_
v
/
'
X X
This Dehumidifier can continuously drain water by attaching a drain hose (with an internal diameter of 9 mm)
onto the Drainage Outlet, saving the trouble of emptying the Water Tank
It is also possible to attach a screw type garden tube of an external diameter of 1 1/16 inch
(1.0625 inch or 26.98 cm) and a screw pitch of 11.5 TPI
12
勹
]
厂
-
雹
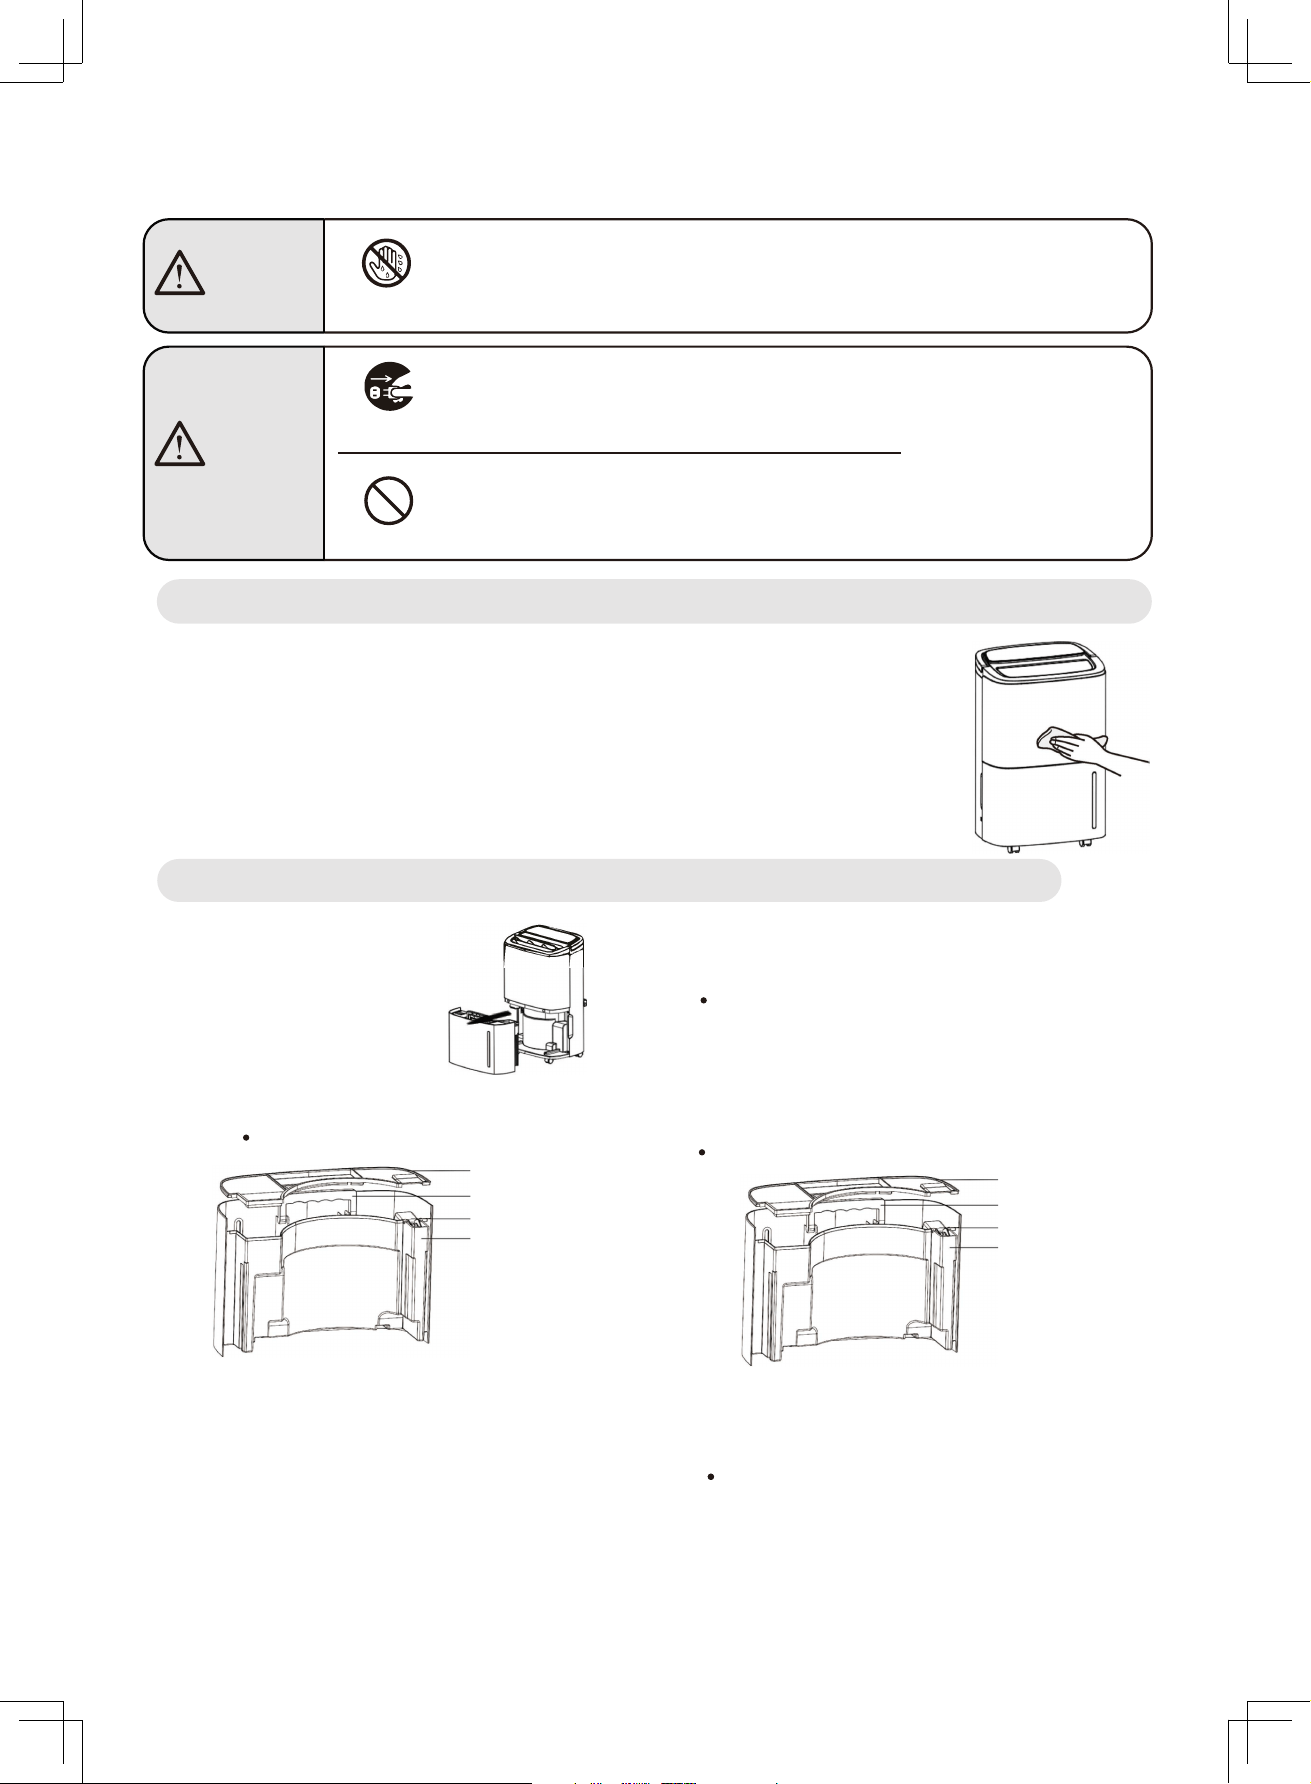
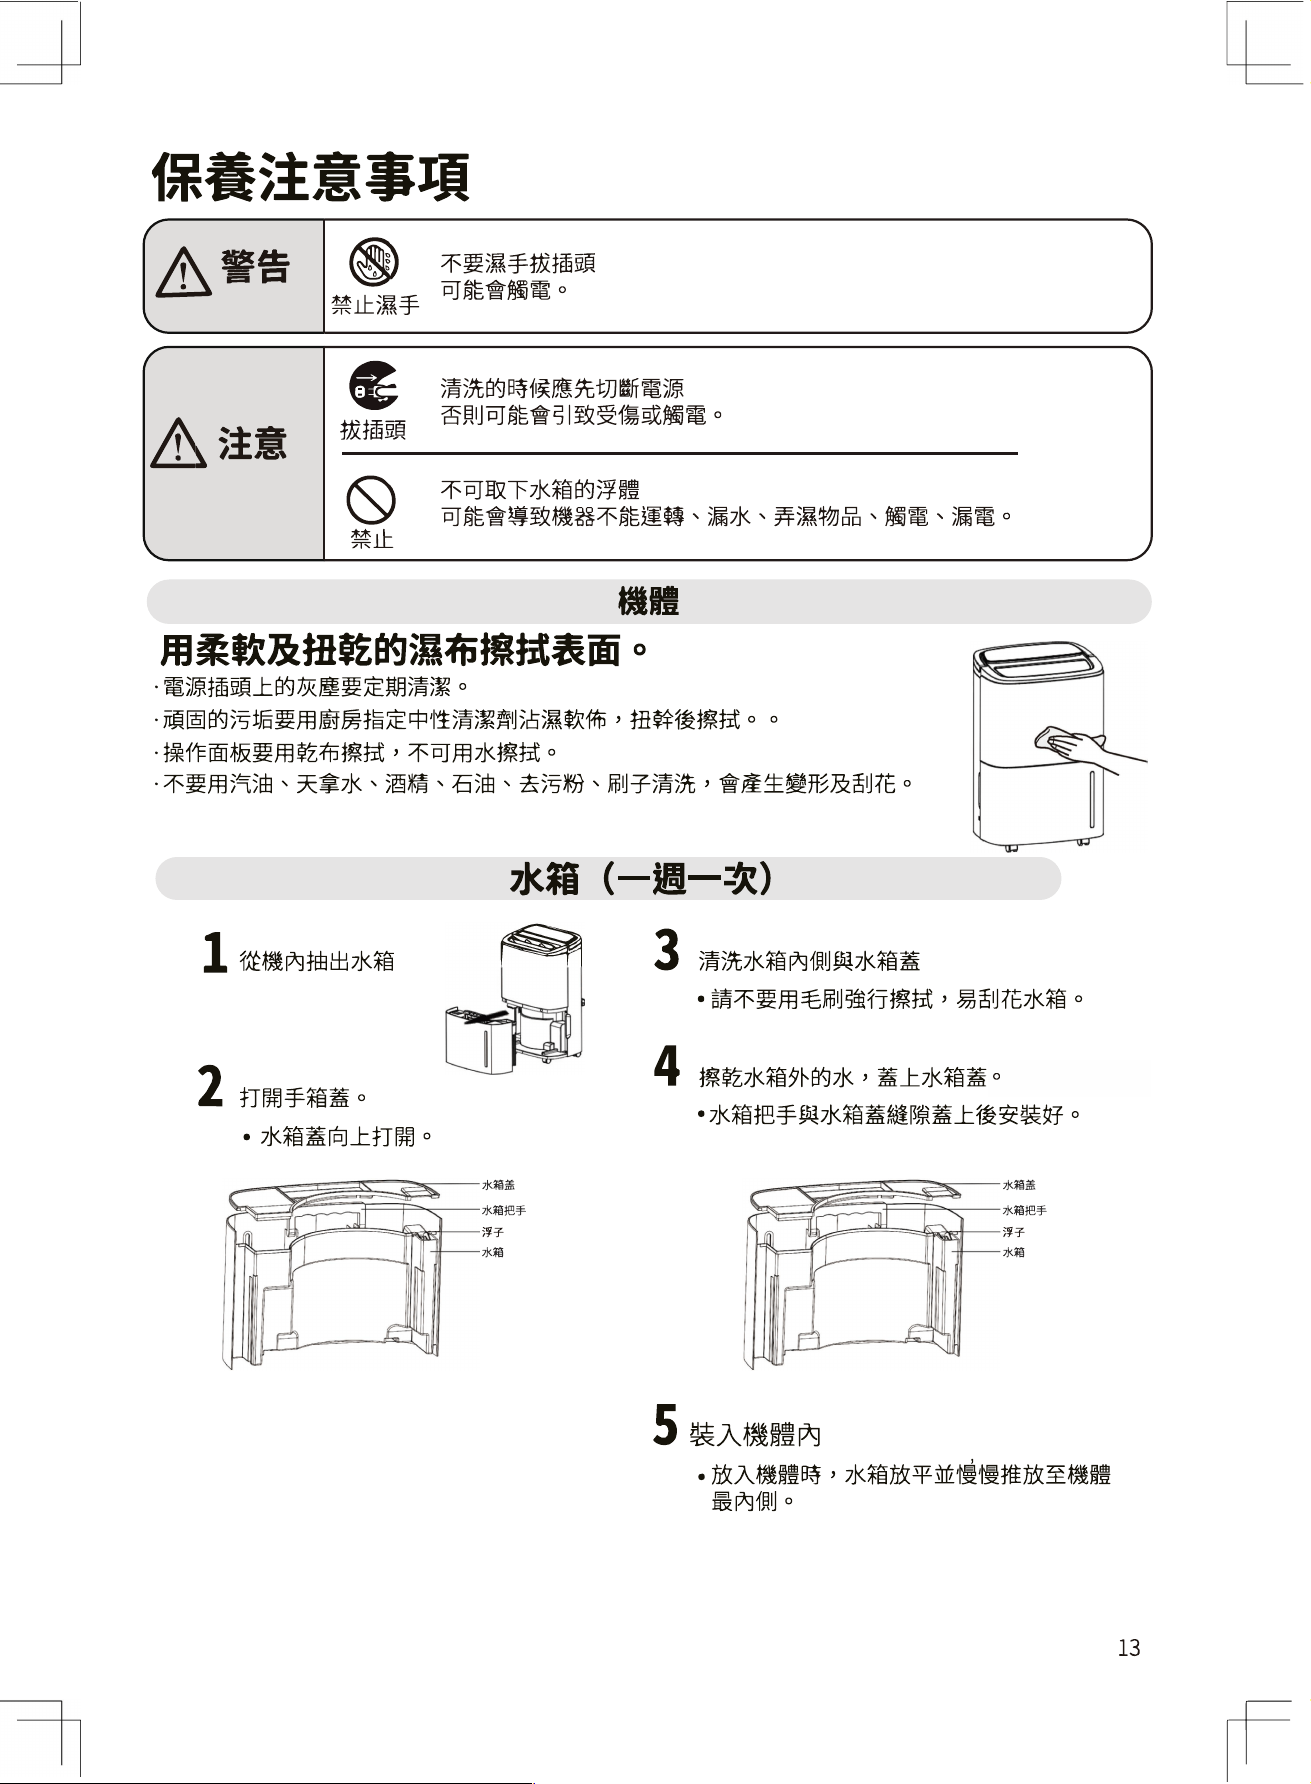
Maintenance Tips
Main Body
·Wipe dust off the Power Plug regularly.
·Remove stubborn dirt with soft cloth and neutral kitchen detergent.
·Clean Control Panel only with a dry cloth, and use no water.
·Do not use gasoline, thinners, alcohol, cleansing powder, or brush to
prevent deforming or scratching the Unit.
1
Remove the Water Tank Lid.
Clean the interior and the Lid of the Tank.Pull out the Water Tank
from the Unit.
3
Do not brush the Tank to prevent scratches.
4 Wipe dry the exterior of the Water Tank, put
the Lid back on and insert the Water Tank into
the Unit.Press down the Water Tank Handle and
Lid to ensure proper installation.
Water Tank Lid
Water Tank Lid
Water Tank Handle
Water Tank Handle
Water Tank
5 Insert the Water Tank back into the Unit.
No Wet Hand
Unplugging
Do not plug in or unplug the Dehumidifier with wet hand.
Doing so could result in electric shock.
Turn off the Unit and unplug the power cord
before cleaning it to prevent electric shock.
Prohibited
Do not remove the Float from the Water Tank.
Doing so could result in inoperability, leakage,
dampening surrounding objects, electric shock, and electric leakage.
Use soft and slightly damp cloth to wipe the Unit.
2
Lift the Lid to open.
Float
Water Tank
Float
Water Tank
Warning
Caution
Hold the Water Tank horizontally and push it
inside gently to install the Tank.
13
When the room temperature drops below 16°C, the Dehumidifier may frost. The Defrosting cycle will
be activated during Dehumidifying Operation every 38 minutes (takes about 8 minutes) by switching
to Fan Operation, to ensure proper operation of the Unit.
Display indicates “P1” during Defrosting Operation.
Do not unplug the power cord to force abort the Defrosting Operation.
Do not unplug the power cord to force abort the Defrosting Operation.
Operating noise
14
Operation and Performance
Dehumidifying capacity
Dehumidifying capacity
(
Operation at High Fan Speed
)
Operating the Dehumidifier under the conditions set out below, the dehumidifying capacity is the amount
of moisture removed per day (24 hours): High Fan Speed Operation at a room temperature of 26.7°C,
indoor humidity of 60%, with no preset humidity level, and the Louver
fully open. Operating with other
settings and different Louv
er
swing angle would diminish the dehumidifying capacity.
The correlation among room temperature,
humidity and dehumidifying capacity
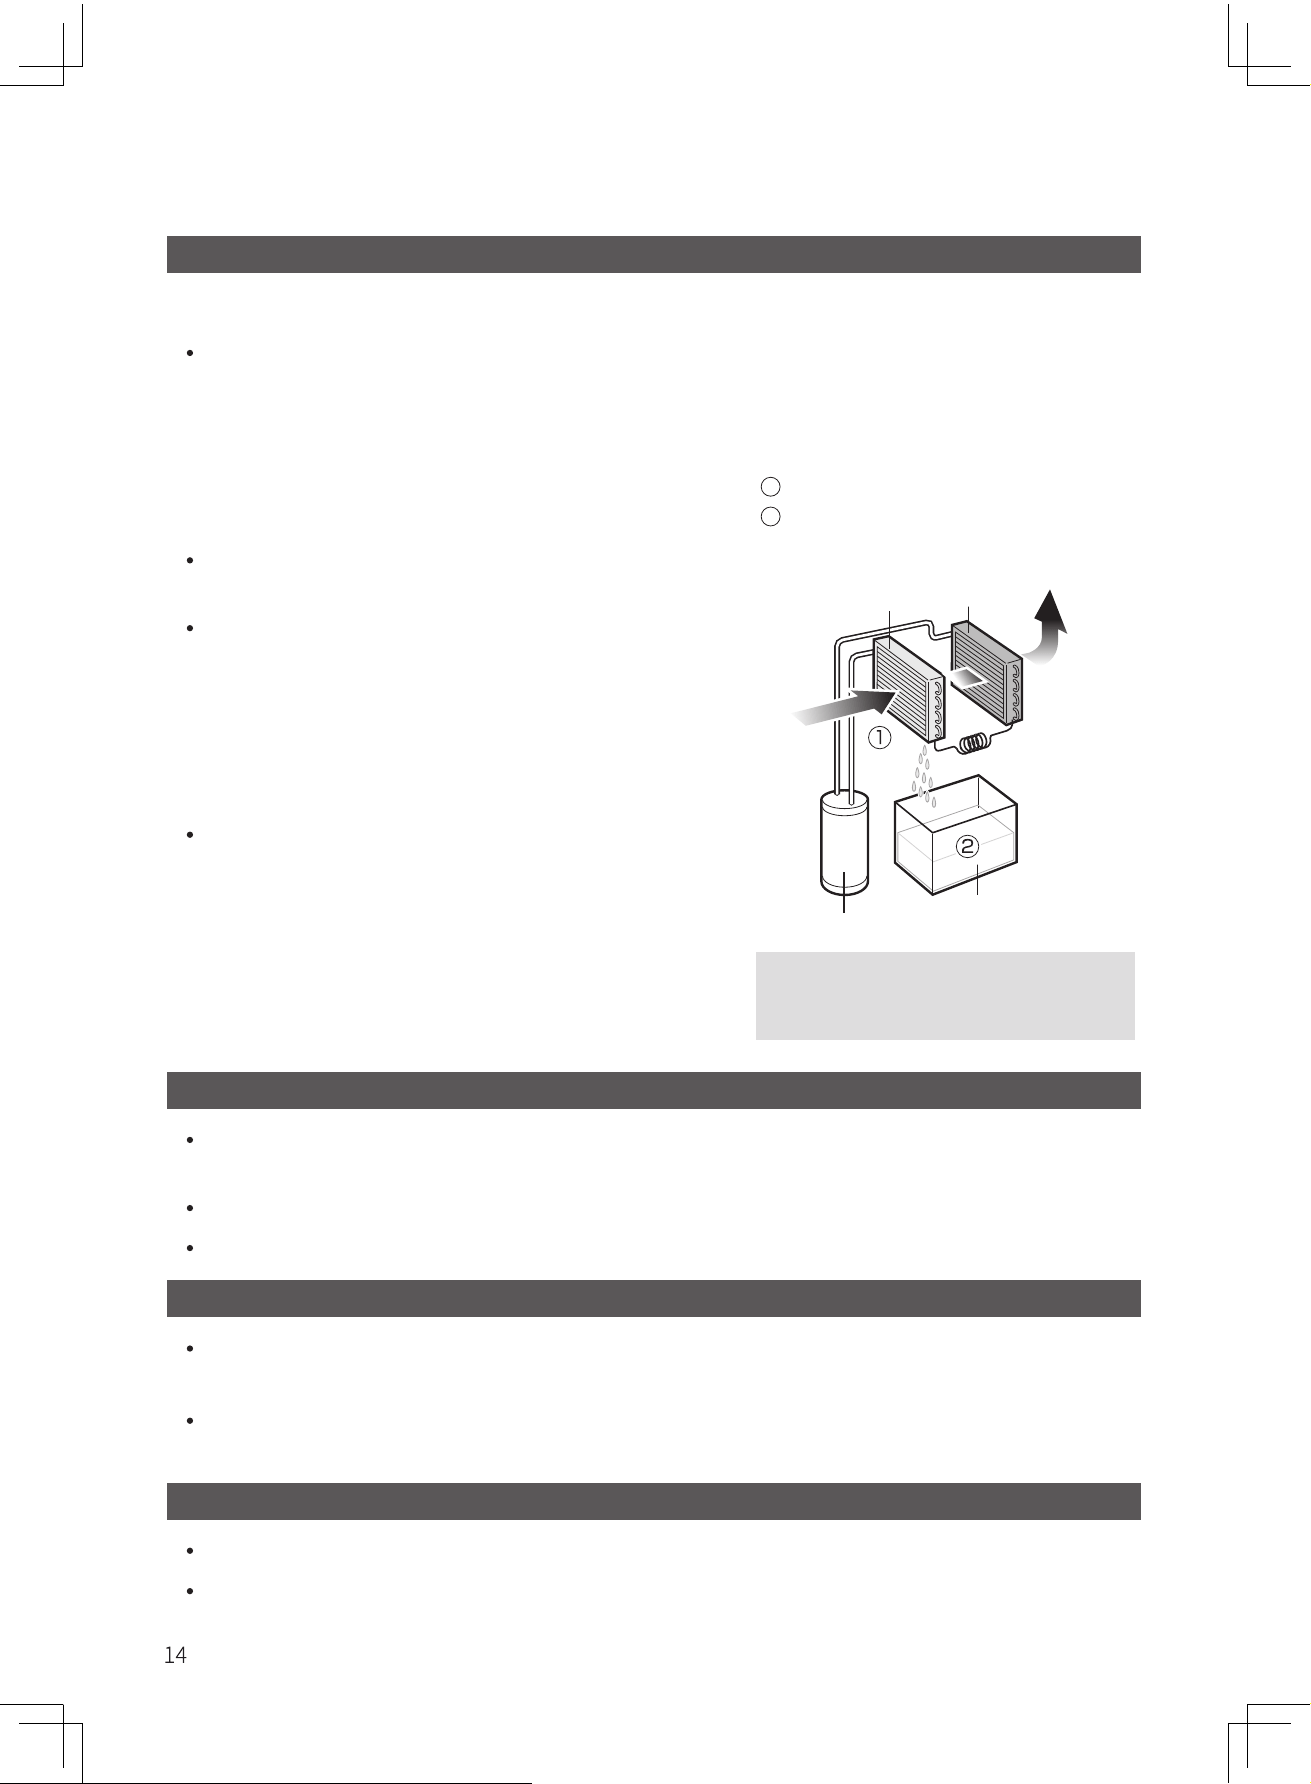
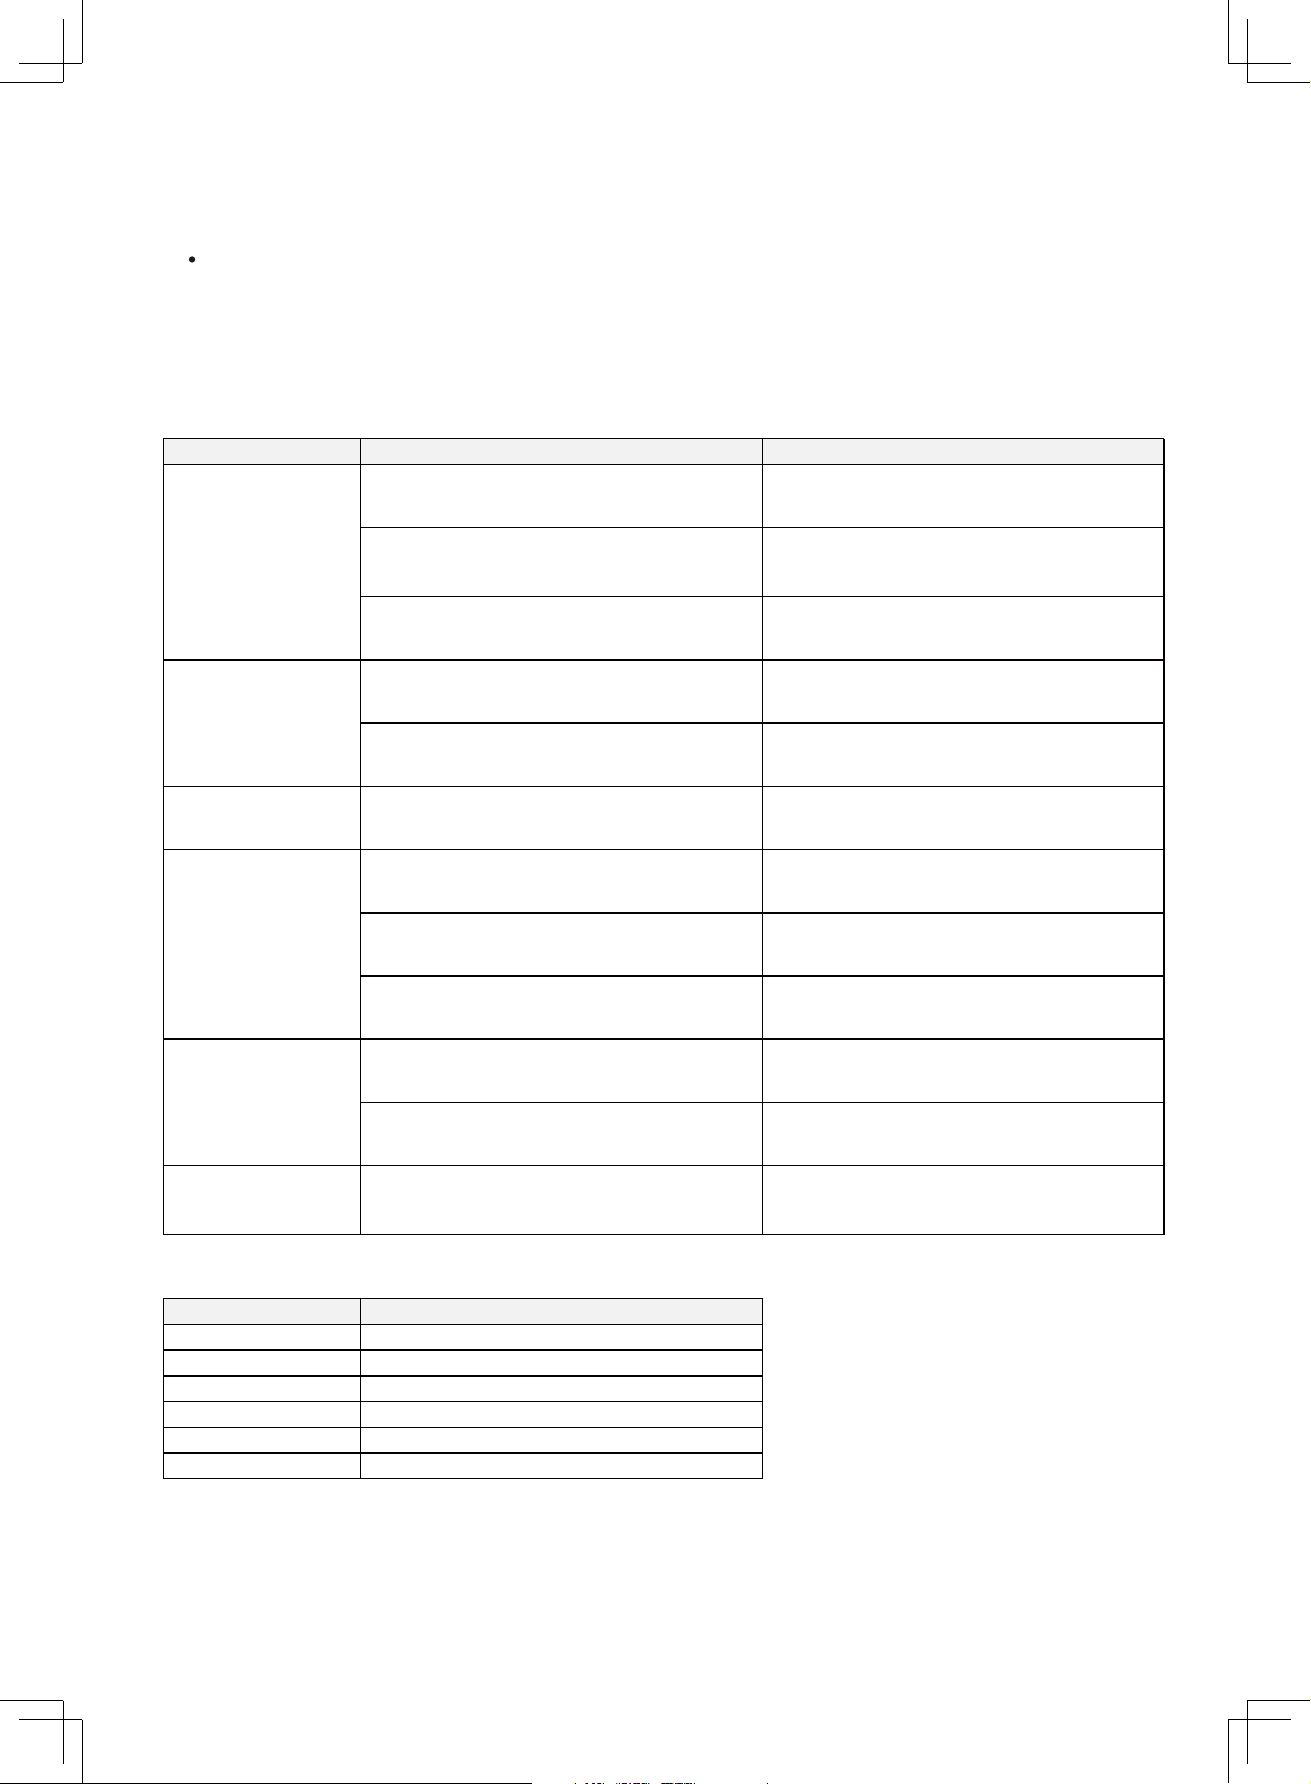
How does a dehumidifier work?
The Unit draws moist air from the
environment and cools it with evaporator.
1
2
As moist air passes through the evaporator coils,
moisture freezes and transforms into water
droplet that drips down into the Water Tank.
Warm dry Air
Evaporator Condenser
Moist Air
Compressor
Water Tank
Indoor air passes through the
evaporator coils and condenses on
the cold coil into water droplets.
Defrost cycle during operation
Rise of room temperature during operation
The Dehumidifier does not have a cooler function.
The Unit generates heat during operation that the room temperature may rise by 1°C -4°C.
The noise of the movement of the refrigerant is rather loud at start-up but it quiets down after warm-up.
Dehumidifying capacity at constant room temperature
The amount of dehumidifying increases with increasing
humidity level and vice versa. Eg. Humidity level at 60%.
When the Unit operates at the preset Humidity Level,
it stops Dehumidifying The fan stops running.The
amount of moisture removed may be small in such a
situation but this is not a malfunction.
When the machine is below the set humidity and the
operation mode is [Set Humidity], it will automatically
stop the dehumidification operation and
the fan will stop
running. Although the dehumidification volume will
decrease at this time, it is not abnormal.
Symptoms and remedies
Is the power cord properly inserted?
Plug the power cord fully into
the power socket.
Is the Water Tank full?
(
Water Tank is full of water or it is not properly inserted
)
Empty the Water Tank and insert it
back into the Unit.
Is the ambient temperature
too low or too high?
It is recommended to operate the Dehumidifier
between an ambient temperature range of 5-32°C.
Is the temperature or humidity of the
room too low?
Low humidity reduces dehumidifying
effectiveness.
Is the Air Outlet or Air Intake clogged?
Remove the items blocking the Air Outlet
and Air Intake.
No air comes out
Is the Air Intake blocked? Clear the items blocking the Air Intake.
Is the Unit placed on a slope or uneven
surface that causes it to tilt or wobble?
Place the Unit on a stable and
leveled surface.
Is the Air Intake blocked? Clear the items blocking the Air Intake.
The sound of flowing water
This is caused by the flow of refrigerant
inside the Unit.
The drain hose is loosely attached Securely insert the drain hose.
The Drainage system is blocked Unclog the hose.
Frosted up
This is not a malfunction that defrosting operation
could be activated by the Drying Inside Operation.
2. Error message code description
1. The remedies that could resolve the symptoms listed below.
FL Water Tank Full alarm
E1 Coil Sensor failure
E2 Ambient Temperature Sensor failure
P1 Defrosting Operation activated
CL Drying Inside Operation activated
LC Child Lock Mode activated
The Unit does not
operate
Poor
dehumidification
results
The Unit makes
abnormaloperating
noises
Water leakage
15
Troubleshooting
Please check the following items of the Dehumidifier before calling for service.
Symptom RemedyPossible Cause
Low ambient temperature causing the
Unit to activate the defrost operation.
Code Description