User Manual
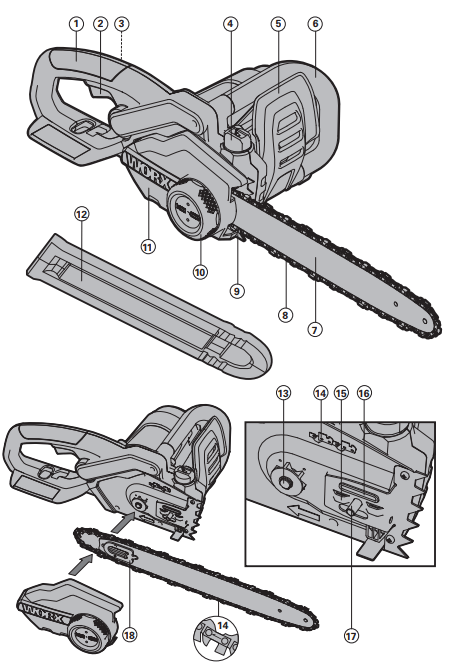
1. Rear handle
2. On/Off switch
3. Lock-off button
4. Oil filler cap
5. Activation lever for kickback brake(hand guard)
6. Front handle
7. Chain bar
8. Chain
9. Gripping teeth
10. Locking knob/ Chain tensioning knob
11. Cover plate
12. blade protection cover
13. drive sprocket
14. Symbol for rotation and cutting direction
15. Guide fins for chain bar
16. Oil outlet
17. Fastening bolt
18. Chain tensioning catch
19. Oil level gauge (See fig. H)
20. Chain catch bolt (See fig. C2)
LUBRICATION
Important: the chain saw is not supplied filled with oil. It is essential to fill with oil before use. Never operate the chain saw without chain oil or at an empty oil tank level, as this will result in extensive damage to the product.
Chain life and cutting capacity depend on optimum lubrication. Therefore, the chain is automatically oiled during operation via oil outlet.
Filling oil tank:
1. Set chain saw on any suitable surface with oil filler cap facing upward.
2. Clean area around the oil filler cap with cloth unscrew cap.
3. Add WORX chain saw oil until reservoir is full.
4. Avoid dirt or debris entering oil tank, refit oil filler cap (4) and tighten.
Important: To allow venting of the oil reservoir, small breather channels are provided between the oil filler cap and the strainer, to prevent leakage ensure machine is left in a horizontal position (oil filler cap (4) uppermost) when not in use. It is important to use only the recommended oil to avoid damage to the chain saw. Never use recycled/old oil. Use of non approved oil will invalidate the warranty.
Checking the automatic oiler
Proper functioning of the automatic oiler can be checked by running the chain saw and pointing the tip of the chain bar towards a piece of cardboard or paper on the ground. Caution: Do not touch the ground with the chain. Ensure safety clearance of 20 cm. If an increasing oil pattern developes, the automatic oiler is operating fine. If there is no oil pattern, despite a full oil reservoir, contact WORX customer service agent or approved service agent.
OPERATION
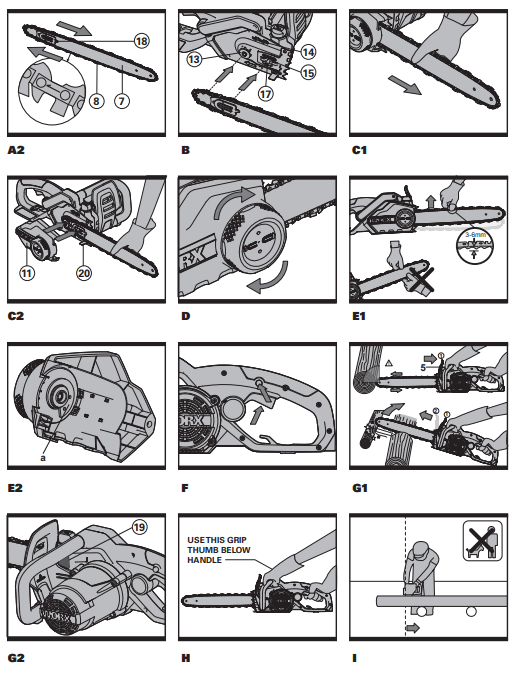
1. Switching on and off (See fig. F)
Attention! Check the voltage and current supply: The voltage and current supply must comply with the ratings on the type plate.
For switching on the machine, press the lock-off button, then fully press the on/off switch and hold in this position. The lock-off button can now be released.
For switching off, release the on/off switch. Do not stop chain saw after sawing by activating the front hand guard (kickback brake).
2. Kickback brake (See fig. G1)
The kickback brake is a safety mechanism activated through the front hand guard (5), when kickback occurs. Chain stops immediately.
The following function check should be carried out at regular intervals. Pull front hand guard (5) forwards (position 2 )and start the chain saw. The chain must not start. To deactivate the kickback brake, release On/Off switch (2) and push hand guard (5) backwards (position 1 ).
Cutting
Is the oil reservoir filled? Check oil level gauge (19) prior to starting and regularly during operation. Refill oil when oil level is low. The oil tank filling will last approx. 16minutes, depending on sawing intensity and stops. (Fig. G2)
Check new replaced chain tension approx. every 10 minutes during operation.
1. Connect saw to extension cord. Connect extension cord to power supply.
2. Make sure section of log to be cut is not laying on ground. This will keep chain from touching ground as it cuts through log. Touching ground with moving chain will dull chain.
3. Use both hands to grip saw. Always use left hand to grip front handle and right hand to grip rear handle. Use firm grip. Thumbs and fingers must wrap around saw handles.(See Fig.H)
4. Make sure your footing is firm. Keep feet apart. Divide your weight evenly on both feet.
5. When ready to make a cut, push the lockoff button completely forward with the right thumb and squeeze the trigger. This will turn saw on. Releasing trigger will turn saw off. Make sure saw is running at full speed before starting a cut.
6. When starting a cut, place moving chain against wood. Hold saw firmly in place to avoid possible bouncing or skating (sideways movement) of saw.
7. Guide saw using light pressure. Do not force saw. The motor will overload and can burn out. It will do the job better and safer at the rate for which it was intended.
8. Remove saw from a cut with saw running at full speed. Stop saw by releasing trigger. Make sure chain has stopped before setting saw down.
9. Practice until you can maintain a steady, even cutting rate. Kickback safety devices on this saw This saw has a low-kickback chain and reduced kickback chain bar. Both items reduce the chance of kickback.
Kickback can still occur with this saw.
The following steps will reduce the risk of kickback.
- Use both hands to grip saw while saw is running. Use firm grip. Thumbs and fingers must wrap around saw handles.
- Keep all safety items in place on saw. Make sure they work properly.
- Do not overreach or cut above shoulder height.
- Keep solid footing and balance at all times.
- Stand slightly to left side of saw. This keeps your body from being in direct line with chain. • Do not let guide bar nose touch anything when chain is moving.
- Never try cutting through two logs at same time. Only cut one log at a time.
- Do not bury guide bar nose or try plunge cut (boring into wood using guide bar nose).
- Watch for shifting of wood or other forces that may pinch chain.
- Use extreme caution when reentering a previous cut.
- Use low-kickback chain and guide bar supplied with this chain saw.
- Never use dull or loose chain. Keep chain sharp with proper tension.
General behavior
Use the chain saw only with secure footing. Hold the chain saw at the right-hand side of your body. (See Fig. I)
The chain must be running at full speed before it makes contact with the wood. Use the metal gripping teeth to secure the saw onto the wood before starting to cut. Use the gripping teeth as a leverage point “a” while cutting. (See Fig. J)
Do not operate the chain saw with arms fully extended or attempt to saw areas which are difficult to reach, or on a ladder. Never use the chain saw above shoulder height. (See Fig. K) Cutting wood under tension (See Fig. L)
Cutting wood under tension (See Fig. L)
When sawing logs supported on both ends, start the cut from above(Y) about 1/3 of the diameter into the log and then finish the cut (Z) from below, in order to avoid contact of the chain saw with the ground. When sawing logs supported on only one end, start the cut from below (Y) about 1/3 of the diameter into the log and finish the cut from above (Z) in order to avoid log splitting or jamming of the chain saw.
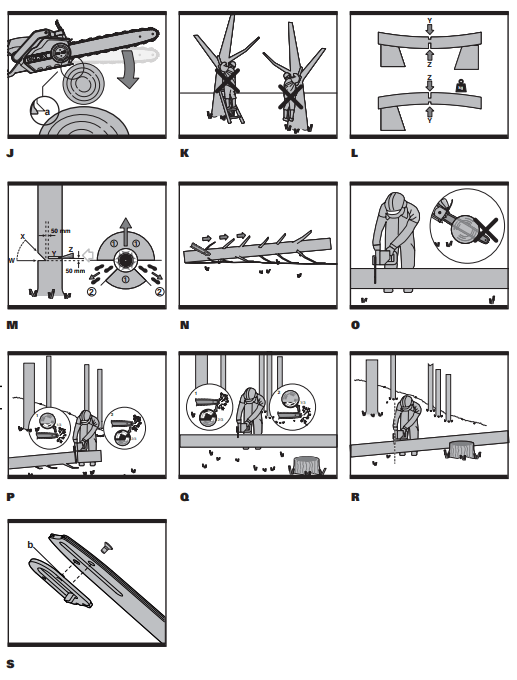
FELLING TREES (See Fig. M)
Always wear hard hat to protect head against falling branches. The chain saw can only be used to fell trees smaller in diameter than the length of the chain bar.
1 Secure work area. Ensure no persons or animals are in the vicinity of the falling tree. Never attempt to free a jammed saw with the motor running. Use wooden wedges to free chain and chain bar.
When cutting and felling operations are being performed by two or more persons, at the same time, the felling operations should be separated from the cutting operation by a distance of at least twice the height of the tree being felled. Trees should not be felled in a manner that would endanger any person, strike any utility line or cause any property damage. If the tree does make contact with any utility line, the company should be notified immediately. The chain saw operator should keep on the uphill side of the terrain as the tree is likely to roll or slide downhill after it is felled.
2 An escape path should be planned and cleared as necessary before cuts are started. The escape path should extend back and diagonally to the rear of the expected line of fall.
3 Before felling is started, consider the natural lean of the tree, the location of larger branches and the wind direction to judge which way the tree will fall. Remove dirt, stones, loose bark, nails staples, and wire from the tree.
Notching undercut: Make the notch (x-w)1/3 the diameter of the tree, perpendicular to the direction of falls as make the lower horizontal notching cut first. This will help to avoid pinching either the saw chain or the guide bar when the second notch is being made.
WARNING: Do not cut all the way through tree. Leave about two inches of tree diameter uncut directly behind felling notch (See Figure M). This uncut portion acts as a hinge(Y). The hinge helps keep tree from twisting and falling in wrong direction.
As the felling gets close to the hinge the tree should begin to fall. If there is any chance that the tree may not fall in desired direction or it may rock back and bind the saw chain, stop cutting before the felling back cut is complete and use wedges of wood, plastic, or aluminum to open the cut and drop the tree along the desired line of fall. When the tree begins to fall remove the chain saw from the cutting, stop the motor, put the chain saw down, and then use the retreat path planned. Be alert for overhead limbs falling and watch your footing. To complete the felling operation, drive a wedge (Z) into the horizontal cut.
LIMBING A TREE (See Fig. N)
Limbing is removing the branches from a fallen tree. When limbing leave larger lower limbs to support the log off the ground. Remove the small limbs in one cut as illustrated. Branches under tension should be cut from the bottom up to avoid binding the chain saw.
Bucking a log (See Fig. O)
Bucking is cutting a log into lengths. It is important to make sure your footing is firm and your weight is evenly distributed on both feet. When possible, the log should be raised and supported by the use of limbs, logs or chocks. Follow the simple directions for easy cutting. When the log is supported along its entire as illustrated, it is cut from the top (overbuck). When the log is supported on one end, as illustrated, cut 1/3 the diameter from the underside (underbuck). Then make the finished cut by overbucking to meet the first cut. (See Fig. P) When the log is supported on both ends, as illustrated, cut 2/3 the diameter from the top overbuck. Then make the finished cut by underbucking the lower 1/3 to meet the first cut. (See Fig. Q)
WARNING: (See Fig. R)
- If on slope, make sure log will not roll down hill. Secure log by using wooden stakes. Drive wooden stakes into ground on downhill side of log. Stand on uphill side of log while cutting. Log may roll after cutting.
- Never try cutting through two logs at same time. This could increase the risk of kickback.
- While cutting log, never hold log with your hand, leg, or foot.
- While cutting log, never allow another person to hold log.
- Turn off and unplug saw before moving from one place to another.
SAW MAINTENANCE AND KICKBACK SAFETY
Follow maintenance instructions in this manual. Proper cleaning of saw and chain and guide bar maintenance can reduce chances of kickback. Inspect and maintain saw after each use. This will increase the service life of your saw.
Note: Even with proper sharpening, risk of kickback can increase with each sharpening.
MAINTENANCE AND STORAGE OF CHAIN SAW
1. Unplug chain saw from power source
- When not in use
- Before moving from one place to another
- Before servicing
- Before changing accessories or attachments, such as saw chain and guard
2. Inspect chain saw before and after each use. Check saw closely if guard or other part has been damaged. Check for any damage that may affect operator safety or operation of saw. Check for alignment or binding of moving parts. Check for broken or damaged parts. Do not use chain saw if damage affects safety or operation. Have damage repaired by authorized service center.
3. Maintain chain saw with care.
- Never expose saw to rain.
- Keep chain sharp, clean, and lubricated for better and safer performance.
- Follow steps outlined in this manual to sharpen chain.
- Keep handles dry, clean, and free of oil and grease.
- Keep all screws and nuts tight.
- Inspect power cord often. If damaged, have repaired by authorized service center.
- Never carry chain saw by power cord.
- Never yank power cord to unplug it.
- Keep power cord from heat, oil, and sharp edges.
- Inspect extension cords often and replace if damaged.
4. When servicing, use only identical replacement parts.
5. When not in use, always store chain saw
- In a high or locked place, out of children’s reach
- In a dry place
Replacing Saw Chain/chain bar
Replace chain when cutters are too worn to sharpen or when chain breaks. Only use replacement chain noted in this manual. Always include new drive sprocket when replacing chain. This will maintain proper driving of chain. Inspect guide bar before sharpening chain. A worn or damaged guide bar is unsafe. A worn or damaged guide bar will damage chain. It will also make cutting harder. Fit the tensioning catch into the new bar by tightening the screw clockwise. The catch protrude (b) must be fitted into the bar hole. (See fig. S)
SHARPENING SAW CHAIN
WARNING: Unplug chain saw from power source before servicing. Severe injury or death could occur from electrical shock or body contact with moving chain.
WARNING: Cutting edges on chain are sharp. Use protective gloves when handling chain.
Keep chain sharp. Your saw will cut faster and more safely. A dull chain will cause undue sprocket, guide bar, chain, and motor wear. If you must force chain into wood and cutting creates only sawdust with few large chips, chain is dull.