Loading ...
Loading ...
Loading ...
20 21
A
B
C
NL
DE
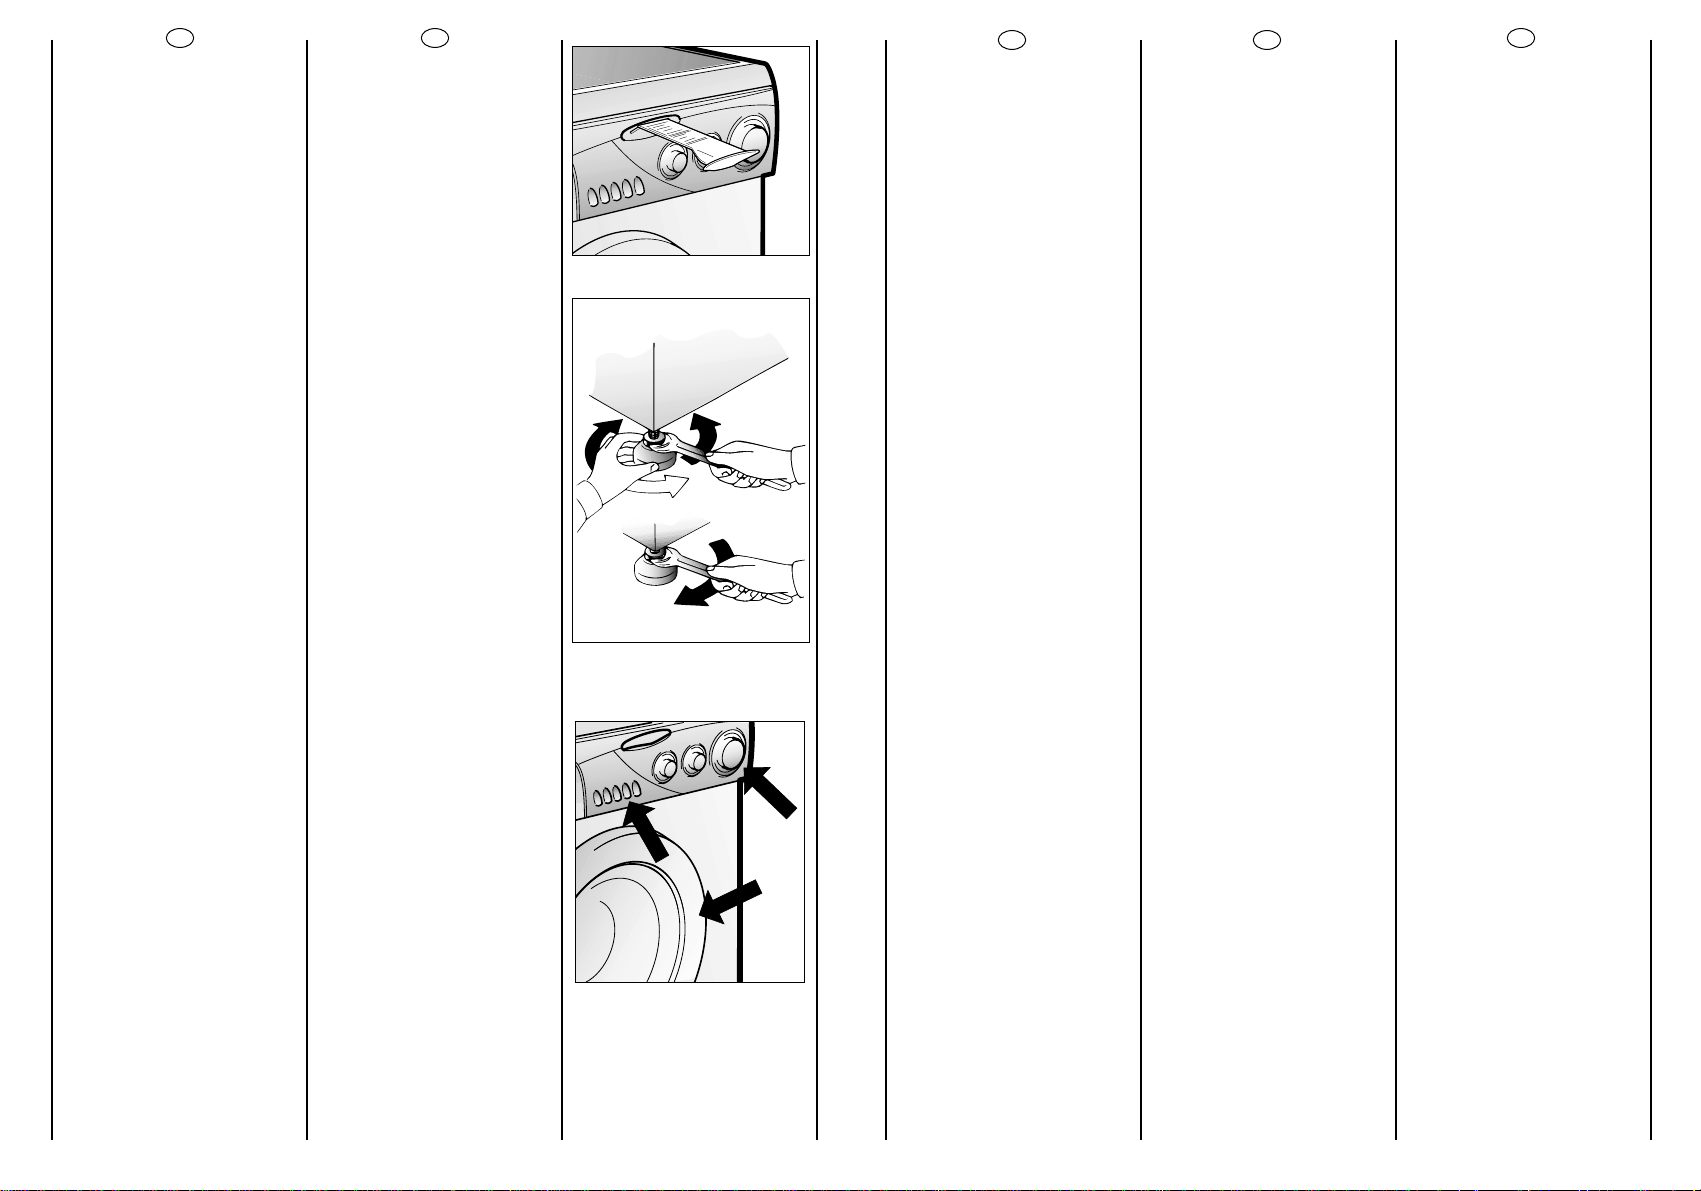
Plak de bijgevoegde sticker
op het uitschuifbare plaatje
(R). Let op de juiste taal.
Zet de machine waterpas
door middel van de
voorvoetjes.
a) Kontra moer losdraaien
b) Apparaatwaterpas
zetten m.b.v. verstelbare
voeten (maak eventueel
gebruik van een waterpas)
c) Kontra moer weer
vastdraaien.
Zorg er voor dat de
Aan/uit toets (C) niet is
ingedrukt.
Controleer of alle knoppen
op “0” staan en of de vulder
gesloten is.
Steek de stekker in het
stopcontact.
Na installatie, plaatst u het
apparaat zo, het
stopcontact makkelijk
toegangbaar is.
Druk de startknop (C ) in. Het
‘aan’ lampje (G) gaat nu
branden.Als het lampje niet
brand kijk dan bij Hoofdstuk:
Storingzoeker.
Kleben Sie die mitgelieferte
Programmtabelle in der
gewünschten Sprache auf
die herausziehbare
Halterung (R).
Ausrichten der Maschine
über die vorderen
Verstellfüße
a) Kontermuttern in
Uhrzeigersinn lösen.
b) Standfuß einregulieren, bis
das Gerät genau
ausgerichtet ist (möglichst
mit der Wasserwaage
justieren!).
c) Kontermutter (gegen den
Uhrzeigersinn) festziehen.
Wichtig: Sollte das Gerät auf
eien Sockel aufgestellt
werden,ist es durch eine
Sockelbefestigung zu
sichern. Erkundigen Sie sich
bitte hierfür im Fachhandel.
Der Hersteller haftet nicht für
unsachgemäße Aufstellung
und Installation.
Sicherstellen, daß die Start-
Stop-Taste (C) nicht
gedrückt ist.
Sicherstellen, daß alle
Schalter auf “0” stehen, und
das Bullauge geschlossen ist.
Stecker einstecken.
Nach der Installation muß
der Anschluß zugänglich
sein.
Bei Betätigen der “START”
Taste leuchtet die
Leuchtanzeige auf. Sollte
dies nicht der Fall sein, bitte
im Kapitel “Fehlersuche”
nachsehen.
ES
Aplique la leyenda de
programas en el idioma
deseado en el soporte
extraible.
Nivele la máquina con las
patas delantares
a) Girar la tuerca en el
sentido de las agujas del
reloj para desbloquear el
tornillo del pie.
b) Girar el pie y hacerlo
bajar o subir hasta
conseguir su perfecta
adherencia al suelo.
c) Bloquear el pie girando la
tuerca en el sentido
contrario a las agujas del
reloj hasta que se adhiera al
fondo de la lavadora.
Asegúrese de que el botón
Marcha/Paro (C) no esté
pulsado.
Asegúrese de que todos los
mandos estén en posición
“0” y que el ojo de buey
esté cerrado.
Enchúfela.
El aparato tiene que ser
colocado de forma que el
enchufe sea accesible una
vez instalado.
A continuación pulse el
botón START (C) se
encenderá el piloto de
funcionamiento “conexión
de corriente efectuada” (G)
si no se enciende vea “
causas de averías”
EN
Apply the adhesive label
supplied in the appropriate
language onto the pull-out
wash programme guide (R).
Use front feet to level the
machine with the floor.
a) Turn the nut clockwise to
release the screw adjuster of
the foot.
b) Rotate foot to raise or
lower it until it stands firmly
on the ground.
c) Lock the foot in position
by turning the nut anti-
clockwise until it comes up
against the bottom of the
machine.
Ensure that the Off/On
button (C) is not pressed.
Ensure that all the knobs are
on the “0” position and that
the door is closed.
Insert the plug.
After installation, the
appliance must be
positioned so that the plug is
accessible.
Press the START (C) button.
The power on (G) light will
light up.
If this does not light up see
faults search.
Nalepte samolepicí ätítek s
popisem pracích programå
v öeätinë na vÿsuvnou
destiöku (R) jak ukazuje
obrázek
Praöka má 2 pohyblivé
noïiöky, kterÿmi lze vyrovnat
vodorodnou polohu praöky.
aa))
Otáöejte maticí äroubu
po smëru hod. ruöiöek a
pak måïete püizpåsobit
vÿäku noïiöky.
bb))
Otáöením sniïujte nebo
zdvihejte noïiöku, dokud
perfektnë nepüilne k
podlaze.
cc))
Upevnëte polohu noïiöky
otoöením matice äroubu
proti smëru hod. ruöiöek.
Ujistëte se, ïe väechny
knoflíky (ovládací prvky) jsou
v pozici ”0” a dvíüka jsou
zavüená.
Zapojte záströku do sítë.
Po instalaci spotfiebiãe se
ujistûte, Ïe spotfiebiã je
umístûn tak, aby byla
snadno pfiístupná zásuvka.
Stisknëte tlaöítko START (C).
Rozsvítí se dioda G. Pokud
se nerozsvítí, najdëte si
kapitolu Poruchy.
CZ
Loading ...
Loading ...
Loading ...