Use and Care Manual For “NoFrost” Combined Refrigerator-Freezers with IceMaker
WATER FILTER
Water Filter - Figure 1
Before turning on the appliance install the water filter provided in the interior rear wall of the refrigerator compartment. This ensures good ice cube quality and keeps the water circuit free of solids such as sand.
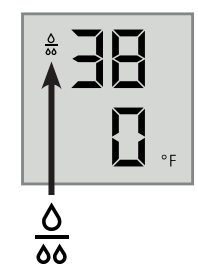
Replace the filter when the drop symbol appears on the temperature display. Filters can be obtained from your Liebherr Dealer or Distributor.
WARNING! To avoid the risk of bacteria growth, the water filter must be changed when the waterdrop symbol appears on the display!
IMPORTANT NOTE: It is not necessary to turn off the water supply when removing or installing the water filter.
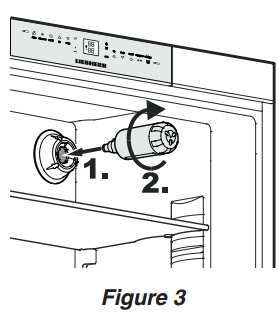
Installing the Water Filter - Figure 2 and Figure 3
Remove cover of the filter socket.
Insert the filter and turn it 90° clockwise.
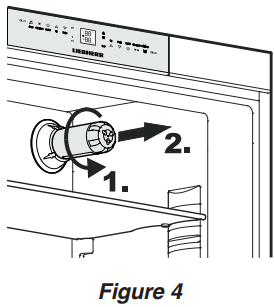
Removing the Water Filter - Figure 4
Turn the filter 90° counterclockwise and remove.
FEATURES
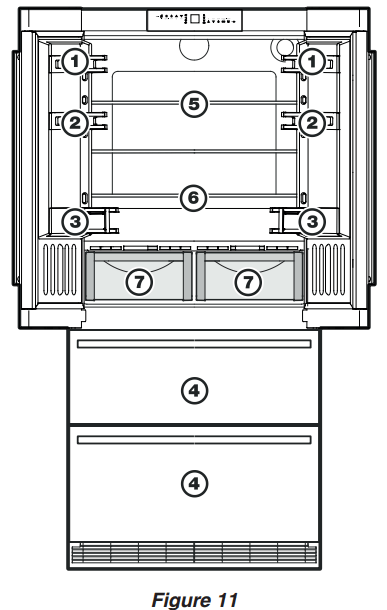
Description of Appliance and Equipment - Figure 5
Description of Refrigerator
(1) Operating and Control Elements (2) Adjustable Door Racks (3) Adjustable Shelves (4) Gallon Rack (5) Model Plate (behind the BioFresh drawer on the left hand side) (6) BioFresh Drawers (7) Water Filter
Description of Freezer
(8) Upper Freezer Drawer (9) Lower Freezer Drawer (10) Ice Maker (in the interior of the Upper Freezer Drawer) (11) Ventilation Grille (12) Adjustable-Height Unit (behind the Ventilation Grille)
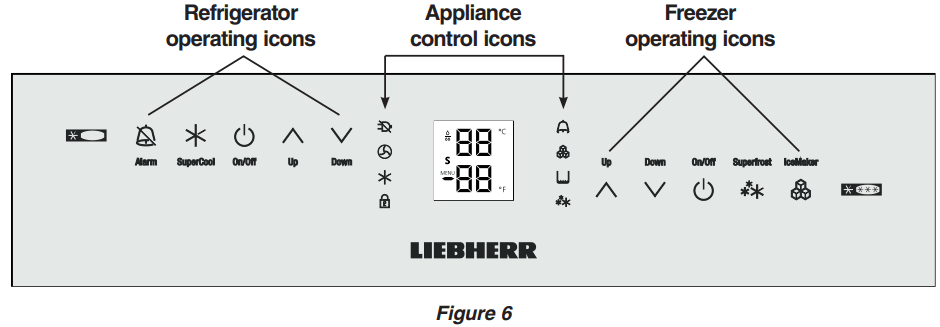
Operating and Control Elements - Figure 6, Figure 7
The electronic control panel has the new “Touch capacitance technology”. Any function can be activated by a fingertip on the symbol of the operating icons.
The exact contact point is between the symbol and its label .
Refrigerator operating icons
Alarm mute (refrigerator and freezer) Supercool Refrigerator On/Off Temperature Up control (to increase the refrigerator temperature) Temperature Down control (to reduce the refrigerator temperature)
Appliance control icons
Power Failure LED Air Filter LED: When this LED lights up the air filter in the toe kick area has to be cleaned. Supercooling LED Child Lock LED Alarm LED IceMaker On LED Superfrost LED
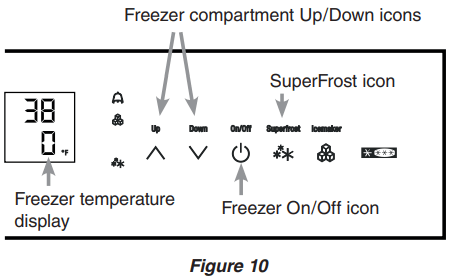
Freezer operating icons
Temperature Up control (to increase the freezer temperature) Temperature Down control (to reduce the freezer temperature) Freezer On/Off Superfrost IceMaker On/Off
Temperature and control display
OPERATION
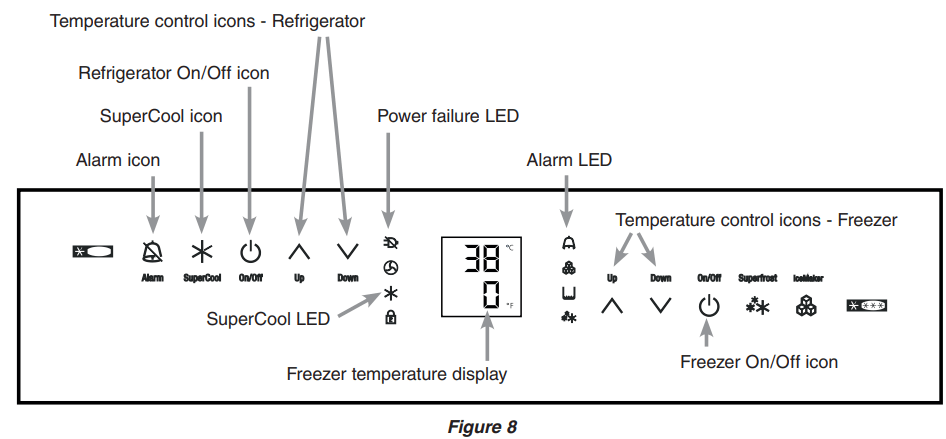
Turning the Appliance On and Off - Figure 8
Clean the appliance before turning it on for the first time. See Cleaning.
Do not place frozen food in the freezer until the temperature shows at least 0°F / -18°C. The refrigerator and freezer compartments can be operated separately
Turning on: Touch the Refrigerator On/Off icon and the Freezer On/Off icon so the Temperature Displays light up. The interior light will turn on if one of the refrigerator doors or freezer drawers are open.
Turning off: To turn off the refrigerator or freezer, touch the corresponding On/Off icon for approximately 3 seconds so the temperature display and interior lights go out.
Setting the Temperature - Figure 8
The appliance is pre-set for normal operation. We recommend temperatures of 38°F (3°C) in the refrigerator and 0°F (-18°C) in the freezer.
To reduce the temperature: Touch the DOWN icon on the left to reduce the refrigerator temperature and the DOWN icon on the right to reduce the freezer temperature.
To increase the temperature: Touch the UP icon on the left to increase the refrigerator temperature and on the right to increase the freezer temperature.
While you are entering the temperature, the set temperature will flash on the display.
When you touch the temperature setting icons for the first time, the most recent setting is displayed.
You can change the settings in increments of 1°F (1°C) by briefly touching the icons again. If the icons are held the temperature setting will change faster.
Approximately five seconds after the icon has been released, the display will automatically show the actual freezing or cooling temperature.
You can change the temperatures:
In the refrigerator – between 37°F and 45°F (3°C and 7°C) and
In the freezer – between -15°F and 7°F (-27°C and -14°C)
Temperature Display - Figure 8
In normal operation, the following settings will be displayed:
the average refrigerator temperature
the warmest frozen food temperature.
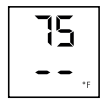
When starting up for the first time or when the appliance is warm, dashes will appear in the freezer temperature display, until the temperature in the freezer compartment is 32°F (0°C).
It will take between three and eight hours for the required temperature, 0°F or 38°F (-18°C or 3°C) to be reached and displayed permanently in the display, depending on the ambient conditions and the temperature setting.
The display will flash:
if you change the temperature or
if the temperature rises by several degrees, indicating cold loss, e.g. if you place fresh, “warm” food in the freezer or if you remove or repack frozen food, the temperature may rise for a short time due to warm air flowing into the freezer.
If “F1” to “F5” appears in the display, the appliance has a fault. Have the fault number available when you contact the customer service department.
Power Failure/Frost-Control Display - Figure 8
If the power failure LED is lit, this means the freezer temperature has risen too high during the last few hours or days due to a power failure. The freezer temperature display flashes at the same time.
If you touch the Alarm icon now, the highest temperature registered during the power failure will be displayed.
Check the quality of the food in case it has become too warm or even defrosted.
The highest temperature will appear for approximately one minute. After that, the actual temperature in the freezer will reappear. The display can be turned off by touching the Alarm icon again.
Audible Alarm Signal - Figure 8
The audible alarm signal helps to protect frozen food and to save energy
The audible alarm signal is switched off by touching the alarm icon.
Audible door alarm
This sounds when the door has been left open for longer than about 180 seconds. The sound switch-off function is active as long as the door is left open. The alarm automatically switches back to standby when the door is shut.
Audible/visual temperature alarm
It always sounds if the freezer temperature is not low enough. The temperature display and the alarm LED flashes at the same time.
This can be caused by:
warm, fresh food being placed in the freezer;
too much warm air from the outside entering when rearranging or removing frozen food,
a fault in the appliance.
The temperature display will continue to flash until the cause of the alarm has been rectified. It will then stop flashing and light up continually. The audible warning signal is now automatically reset.
Supercool - Figure 8
Touching the Supercool icon switches the refrigerator compartment to maximum cooling. It is recommended particularly if you wish to cool large quantities of food, drinks, freshly baked goods or meals rapidly
Turning on: Touch the Supercool icon briefly so the LED turns on. The refrigerator temperature will drop to its lowest value. IMPORTANT: The Supercool function uses slightly more energy. After approximately six hours, however, the refrigerator switches back automatically to normal energy-saving operation. If required, the Supercooling function can be turned off sooner.
Turning off: Touch the Supercool icon again until the LED turns off.
OPERATION
Setup Mode
In the setup mode you can activate the following functions:
How to activate the setup mode - Figure 9
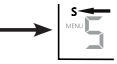
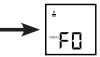
Touch the Superfrost icon for approximately five seconds - the Superfrost LED turns on for 5 seconds - after 5 seconds will flash in the display.
The appliance is in the setup mode now. You can select the setup mode functions by touching the freezer compartment Up/Down icons. Note: In the setup mode the display will flash continuously
Exit setup mode:
Touch the freezer compartment On/Off icon. The appliance will change back to normal operation.
= Sabbath mode
This feature considers the Religious requirements on Sabbath or Holidays. When the Sabbath mode is active some functions of the electronic controls are switched off
The door can be opened and closed at any time.
The lighting remains off.
The cooling fan remains in its actual state: If it is on it remains on, if it is off it remains off.
There is no door alarm.
There is no temperature alarm.
Defrost cycles are independent of the number of times and length of door openings.
The unit will return into Sabbath Mode after a power failure.
How to activate the Sabbath mode
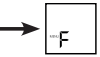
Activate the setup mode by touching the SuperFrost icon for 5 seconds. - the display shows
Touch the SuperFrost icon - the display shows
Touch the SuperFrost icon again - the display shows - the Sabbath mode is activated.
Exit setup mode by touching the freezer compartment On/Off icon.
Sabbath mode switches off automatically after 120 hours if it is not manually switched off beforehand.
How to deactivate the Sabbath mode
Activate the setup mode by touching the SuperFrost icon for 5 seconds. - the display shows
Touch the SuperFrost icon - the display shows
Touch the SuperFrost icon again - the symbol in the display disappears, the Sabbath mode is deactivated.
Exit setup mode by touching the freezer compartment On/Off icon.
= Child lock
The child lock is designed to protect the appliance from being turned off accidentally.
How to activate the child lock
Activate the setup mode by touching the Superfrost icon for 5 seconds
Touch the freezer compartment Down icon until appears in the freezer temperature display.
Touch the Superfrost icon - the display shows
Touch the Superfrost icon again - the LED is lit and the child lock is activated.
Exit setup mode by touching the freezer compartment On/Off icon
How to deactivate the child lock
Activate the setup mode by touching the Superfrost icon for 5 seconds. - the display shows
Touch the Superfrost icon - the display shows
Touch the Superfrost icon again - the LED goes out. The child lock is deactivated.
Exit setup mode by touching the freezer compartment On/Off icon
= Drop symbol reset
After the Water filter has been changed the drop symbol on the display must be reset.
How to reset the drop symbol
Activate the setup mode by touching the Superfrost icon for 5 seconds.
Touch the freezer compartment Down icon until appears in the freezer temperature display.
Touch the Superfrost icon - the display shows
Touch the Superfrost icon again - the display shows
The drop symbol disappears.
Exit setup mode by touching the freezer compartment On/Off icon.
= Ice maker function test
Activation by service personnel only.
Setup Mode - Figure 10
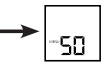
E = Water quantity for ice cube tray
If the produced ice cubes of the Ice Maker are too small, the inflowing water quantity can be adjusted.
How to adjust the water quantity
Activate the setup mode by touching the Superfrost icon for 5 seconds.
Touch the freezer compartment Down icon until E appears in the freezer temperature display.
Touch the Superfrost icon - the display shows E3
Touch freezer compartment Up icon once only so E4 appears in the display. IMPORTANT: Do not increase for more than one step. If the adjusted value is too high the ice cube tray of the Ice Maker could overflow.
Touch the Superfrost icon again.
Exit setup mode by touching the freezer compartment On/Off icon.
Check the ice cube size within the next days. If the ice cubes are still smaller than desired, follow the steps above again.
b = Biofresh temperature adjustment
You can adjust the temperature in the BioFresh drawers.
How to adjust the Biofresh temperature
Activate the setup mode by touching the Superfrost icon for 5 seconds.
Touch the freezer compartment Down icon until appears in the freezer temperature display.
Touch the Superfrost icon - the display shows b5
Touch freezer compartment Up/Down icons to select b6 - b9 to increase the temperature, b4 - b1 to reduce the temperature. IMPORTANT: At values b4 - b1 the temperature in the drawers can drop below 32°F (0°C). Stored goods could freeze.
Touch the Superfrost icon at the desired value.
Exit setup mode by touching the freezer compartment On/Off icon.
= Temperature display mode
You can choose the unit of temperature for the display in degrees Fahrenheit or degrees Celsius.
Note: The factory setting is degrees Fahrenheit
How to change the temperature display to degrees Celsius
Activate the setup mode by touching the Superfrost icon for 5 seconds.
Touch the freezer compartment Down icon until appears in the freezer temperature display.
Touch the Superfrost icon - the display shows
Touch the Superfrost icon again - the temperature reading is now displayed in degree Celsius.
Exit setup mode by touching the freezer compartment On/Off icon. Note: To change the temperature display back to degrees Fahrenheit, follow the steps above.
= Display brightness
How to adjust the display brightness
Activate the setup mode by touching the Superfrost icon for 5 seconds.
Touch the freezer compartment Down icon until h appears in the freezer temperature display.
Touch the Superfrost icon - the display shows
Touch freezer compartment Up/Down icons to select h0 = minimum to h5 = maximum brightness
Touch the Superfrost icon at the desired value.
Exit setup mode by touching the freezer compartment On/Off icon.
= Door gasket heating control
Condensed water on the gasket of the refrigerator doors can be eliminated by activating the door gasket heating.
How to activate the door gasket heating
Activate the setup mode by touching the Superfrost icon for 5 seconds
Touch the freezer compartment Down icon until H appears in the freezer temperature display.
Touch the Superfrost icon - the display shows
Touch freezer compartment Up/Down icons to select HR = at slight condensation of the gasket H1 = at heavy condensation of the gasket H0 = heating off
Touch the Superfrost icon at the desired value.
Exit setup mode by touching the freezer compartment On/Off icon.
= Reset air filter LED
After the air filter in the toe kick area has been cleaned the air filter LED must be reset. For how to clean the air filter refer to chapter “Cleaning”.
How to reset the air filter LED
Activate the setup mode by touching the Superfrost icon for 5 seconds.
Touch the freezer compartment Down icon until appears in the freezer temperature display.
Touch the Superfrost icon - the display shows
Touch the Superfrost icon again - the display shows
The air filter LED disappears.
Exit setup mode by touching the freezer compartment On/Off icon.
REFRIGERATOR COMPARTMENT
Arranging Food - Figure 11
Butter, cheese
Eggs
Gallon containers, cans, drinks, bottles
Frozen food, ice cubes
Meat and sausage products, dairy products
Baked goods, pre-cooked meals
Fruit, vegetables, salad (at high humidity setting) Meat and sausage products, dairy products (at low humidity setting) Refer to chapter “Biofresh compartment” for explanation.
IMPORTANT
Liquids and food which give off or absorb odors and flavors should always be stored covered or in closed containers.
High-percentage alcohols should be tightly sealed and stored upright.
Fruit, vegetables and salad can be stored unpacked in the bins.
Shelf Arrangement
WARNING! To avoid possible injury, only adjust an empty shelf or door rack. Do not attempt to adjust a shelf or door rack with food on it.
You can rearrange the height of the shelves and door racks as required.
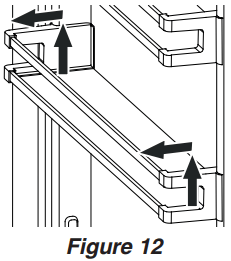
Repositioning the door racks - Figure 12
Slide the door rack up, pull out toward you and replace in reverse order.
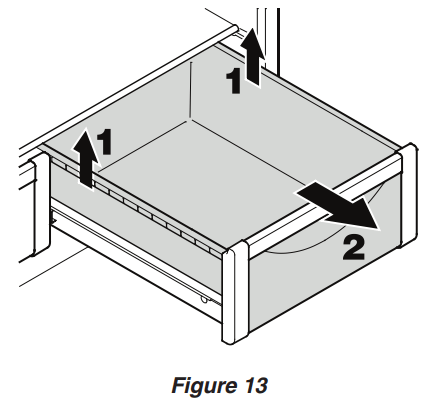
To remove the BioFresh drawer
Pull the drawer straight out, grip at the back and lift out - Figure 13.
To install the BioFresh drawer
Place the drawer on the rails. The rails must be fully extended and aligned with the front of the drawer. Slide the drawer in.
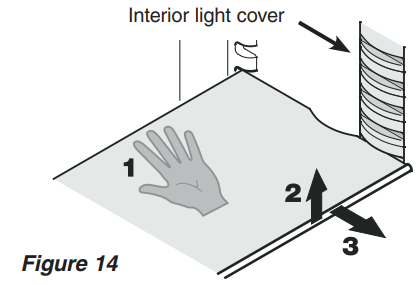
Repositioning the shelves - Figure 14
Hold the shelf underneath with your hand to avoid from tipping down backwards when removing.
Lift the shelf at the front.
Remove the shelf forward until the circular cutout of the shelf is in line with the interior light cover.
Lift the shelf up or down and replace in the desired position
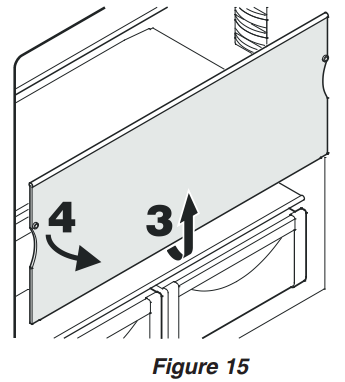
Removing the shelves - Figure 15
Follow the first three steps in the chapter above.
Lift the shelf down and stop just over the upper vegetable bin.
Move the front of the shelf upwards until the shelf is in a vertical position.
Turn the shelf out at left and remove.
WARNING! To avoid it falling down, always hold the shelf with both hands when removing
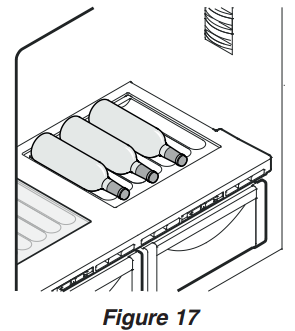
Bottle tray
The tray above the BioFresh compartment can be used for storing bottles horizontally.
Remove glass plate and reinsert under the tray - Figure 16.
The cavities in the plate ensures secure placement of the bottles - Figure 17. With storing tall bottles horizontally the gallon rack must be relocated to a higher position - Figure 12.
FREEZER COMPARTMENT
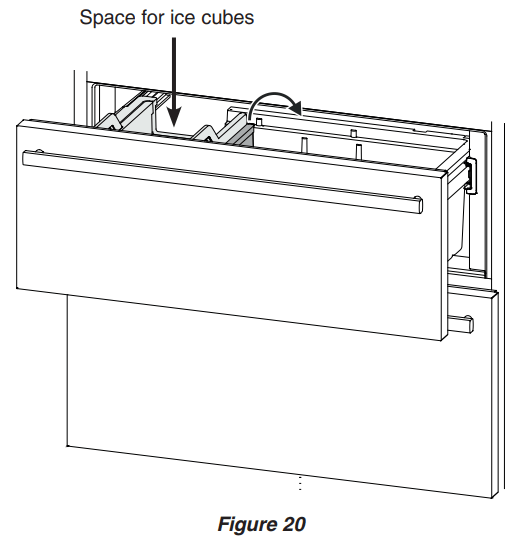
Freezer Compartment Description
The ice maker is located in the upper drawer on the left side. The ice cubes fall out of the ice maker into the drawer. The upper drawer is divided by a partition wall for storing ice cubes in the left part of the drawer (Figure 20). If you need more ice cube storage space, pull up the partition wall and refit on the adjacent rail (Figure 20). If you need the whole drawer for ice cube storage, the partition can be removed by pulling it upwards and out. If you need the whole upper drawer for freezing and storing food, turn off the ice maker (see chapter “Turning the Ice Maker On and Off”). The bottom drawer is intended for freezing and storing food. Ice cubes can also be stored in this drawer.
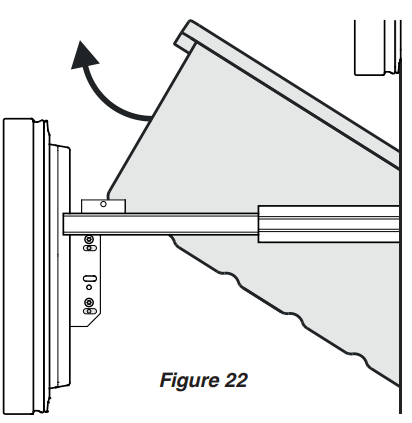
Removing the Freezer Compartment Containers
The containers of both freezer drawers can be removed.
Unlatch the container on the left and right corners by pulling upwards (1) - Figure 21.
Slide the container backwards (2) - Figure 21.
Tilt the container at an angle and remove - Figure 22. Install the container in the reverse order.
Freezing
Fresh food should be frozen completely and as rapidly as possible. This is provided by the Superfrost feature and ensures that the nutritional value, appearance and flavor of the food remains intact.
Freezing with Superfrost - Figure 23
Touch the Superfrost icon briefly so the LED turns on.
Wait 24 hours.
Then place the fresh food inside the freezer.
The Superfrost function turns off automatically. Depending on the quantity of food placed in the freezer, this will normally be between 30 and maximum of 65 hours. The freezing process is now complete; the Superfrost LED will turn off, and the freezer will change back to normal energy-saving operation.
IMPORTANT:You should not turn on the Superfrost function:
when placing frozen food in the freezer;
when freezing up to approximately 4-1/2 lbs (2 kg) fresh food daily.
Freezing and Storage
Pack frozen food in standard freezer bags or reusable plastic, metal or aluminum containers.
Do not allow fresh food which is to be frozen to come into contact with food already frozen. Always keep packages dry in order to avoid them sticking together.
Always write the date and contents on the package and do not exceed the stated storage time for the food. This prevents spoiling.
Pack food which you are freezing yourself in quantities right for your household. To ensure the food freezes right through quickly, the following quantities should not be exceeded per package: - fruit, vegetables: up to 2-1/4 lbs (1 kg); - meat: up to 5-1/2 lbs (2.5 kg).
Do not freeze bottles and cans which contain carbonated drinks as they might burst. Drinks can be cooled down quickly, but take the bottles out of the freezer compartment after an hour at the most.
Only take out as much food as needed for thawing. Cook food which has been thawed as quickly as possible. Frozen food can be thawed in the following ways: - in a microwave oven - in the refrigerator: the safer way to thaw food because there is less chance of bacteria growth. Use this method for high density food such as roasts or poultry.
ICEMAKER
Safety Instructions and Warnings for the Automatic Ice Maker
The ice maker is designed exclusively to make ice cubes in quantities needed by a household.
All repairs and work on the ice maker may only be done by customer service personnel or other appropriately trained personnel.
Do not consume or use the first three batches of ice. This applies both to using the appliance for the first time and also using it after it has not been used for a long period of time.
The manufacturer cannot accept liability for damage caused by equipment or water lines between the solenoid valve and the water supply.
The ice maker will only make ice cubes if the freezer compartment is operating and both freezer drawers are completely closed.
Turning the Ice Maker On and Off (Figure 24)
To turn the ice maker on
Touch the IceMaker icon so the IceMaker LED comes on.
To turn the ice maker off
If you do not need any ice cubes, the ice maker can be turned off independently of the freezer compartment.
Touch the IceMaker icon so the IceMaker LED goes out.
Ice maker at vacations
See chapter “Vacation tips”
Ice Maker Description
After you start the ice maker for the first time, it may take up to 24 hours before the first ice cubes are ready.
The ice cubes fall out of the ice maker into the drawer (see chapter “Freezer compartment description”).
IMPORTANT: The first three batches of ice must not be consumed or used.
When the ice reaches a certain level in the drawer, the appliance stops producing ice automatically
The production capacity is 100 - 120 ice cubes in 24 hours at a temperature of 0°F (-18°C) inside the freezer compartment.
To have the maximum capacity of approx. 150 ice cubes in 24 hours, activate the SuperFrost function.
Be aware that this increases the energy consumption because the compressor will run constantly
Note: If the IceMaker LED flashes, the ice maker is not being supplied with water. Check if the shut off valve of the water supply is opened.
DEFROSTING/CLEANING
Defrosting
Refrigerator compartment The refrigerator compartment defrosts automatically. The water that forms on the rear wall drains into a reservoir at the back of the appliance and evaporates automatically through the compressor heat.
Freezer compartment The NoFrost system automatically defrosts the freezer compartment. Any moisture will collect on the evaporator and freeze. It will periodically defrost and evaporate.
Cleaning
WARNING!
To prevent possible injury due to an electrical shock, be sure to disconnect the power cord or turn off the circuit breaker before cleaning the appliance.
To avoid injury or damage, do not use steam cleaning equipment to clean the appliance.
To avoid short-circuits, ensure no cleaning water penetrates into the electrical components when cleaning the appliance. Do not use a sponge or cloth that is overly wet.
Do not use abrasive or scouring sponges. Do not use concentrated cleaning agents. Never use abrasive or acid cleaners or chemical solvents.
Remove all food from the refrigerator and freezer compartments and store in a cool place temporarily. Store frozen food in other freezers if available.
Remove the door racks as shown in Figure 12.
Remove the BioFresh drawers as shown in Figure 13.
Remove glass shelves as shown in Figure 15.
Remove the freezer drawer containers as shown in Figure 21 and Figure 22.
A compound of lukewarm water and dishwasher detergent is recommended for cleaning the appliance and equipment parts. IMPORTANT: Do not clean the equipment parts in a dishwasher. Strips of these parts could get loose.
Dry all parts well with a cloth.
Do not damage or remove the model plate on the inside of the appliance. It is very important for servicing your appliance.
Install all equipment parts and replace the food in the appliance.
Turn the appliance on.
Cleaning instructions for stainless steel panels Keep your stainless steel looking new by cleaning with a good quality stainless steel cleaner or polish monthly. High quality stainless steel cleaners and conditioners are commercially available. Do not clean with steel wool pads or abrasive pads. Do not use cleaners that are not for use on stainless steel, such as glass, tile or counter cleaners. These types of cleaners can damage the surface permanently
CLEANING
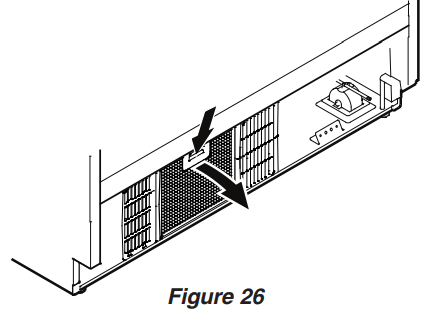
Cleaning the Air Filter
Open the bottom freezer drawer and remove the ventilation grille by pulling forwards - Figure 25.
Push down the button of the air filter, tilt to the front and remove - Figure 26.
Clean the filter in a dishwasher or by hand with lukewarm water and dishwasher detergent.
Install the air filter in the reverse order.
Install the ventilation grille.
Install all equipment parts and replace the food in the appliance.
Turn the appliance on.
Reset the air filter LED. Refer to chapter Setup Mode - = Reset air filter LED
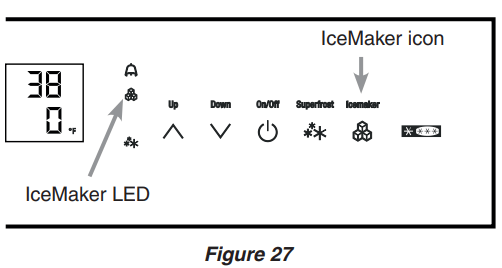
VACATION
Vacation Tips (Figure 27)
Short vacations
It is not necessary to turn off the refrigerator and freezer if you will be away for less than four weeks.
Shut off the water supply to the ice maker. > When the IceMaker LED starts blinking, the remaining water in the supply line is in the ice maker.
Leave the ice maker on and working for one day so that the remaining ice cubes are ejected.
Touch the IceMaker icon so that the IceMaker LED goes out.
Transfer all ice cubes to the right part of the drawer or to the bottom drawer.
Use all perishables.
Freeze other items.
Long vacations
If you will be away for a month or more:
Shut off the water supply to the ice maker. > When the IceMaker LED starts blinking, the remaining water in the supply line is in the ice maker.
Leave the ice maker on and working for one day so that the remaining ice cubes are ejected.
Touch the IceMaker icon so that the IceMaker LED goes out.
Remove all ice cubes from the drawer and dispose of them.
Remove all food from the refrigerator and freezer compartments.
Turn off the refrigerator and freezer compartments.
Clean the appliance. Refer to Cleaning.
Leave the door and both freezer drawers open to prevent unpleasant odors. This will also keep mold from building up
Turning on the ice maker after vacation
Open the water suppy to the ice maker.
Touch the IceMaker icon so that the IceMaker LED comes on.
IMPORTANT: Do not consume or use the first three batches of ice after the ice maker has not been used for longer than one week.
TROUBLESHOOTING
Troubleshooting
Your appliance is designed and manufactured for a long life and reliable operation.
If a problem occurs during operation, check whether it is due to an operating error. Please note that even during the warranty period, some repair costs may be your responsibility.
You may be able to correct the following faults by checking the possible causes yourself:
Problem
Possible Cause and Remedy
Appliance does not work, display is off
- Is the appliance turned on properly? - Is the power cord properly inserted in the outlet? - Is the circuit breaker or fuse in operating condition?
The interior light does not come on
- Is the appliance turned on?
Motor seems to run too long
- Is the ambient temperature too hot? See Safety Regulations. - Has the appliance been opened too often or left open too long? - A large amount of food has been added. - Unit is in SuperCool mode. Verify unit is in normal operation mode.
The temperature is not cold enough
- Is the temperature setting correct? See Setting The Temperature. - Has an excessive amount of fresh food been placed in the appliance? - Does a separately installed thermometer show the correct reading? - Is the ventilation system working properly? - Is the appliance set up too close to a heat source?
Freezer temperature display shows two dashes ‘‘- -”.
The freezer temperature display will only show temperatures that are below freezing. When initially starting the freezer, it will not be below freezing. It will take three to five hours (depending on ambient conditions) for freezing temperatures to be achieved and thus displayed numerically. This may also occur after a power failure.
Ice Maker Troubleshooting
You may be able to correct the following faults yourself:
Problem
Possible Cause and Remedy
Ice maker cannot be turned on
- Is the appliance connected to the electrical outlet?
Ice maker is not making any ice
- Is the ice maker turned on? - Is the water supply line open? - Are both freezer drawers closed properly?


 .
.
 Alarm mute (refrigerator and freezer)
  Supercool
  Refrigerator On/Off
  Temperature Up control (to increase the refrigerator temperature)
  Temperature Down control (to reduce the refrigerator temperature)
 Power Failure LED
 Air Filter LED: When this LED lights up the air filter in the toe kick area has to be cleaned.
  Child Lock LED
  Alarm LED
  IceMaker On LED
  Superfrost LED

 is lit, this means the freezer temperature has risen too high during the last few hours or days due to a power failure. The freezer temperature display flashes at the same time.
 flashes at the same time.
 turns on. The refrigerator temperature will drop to its lowest value.
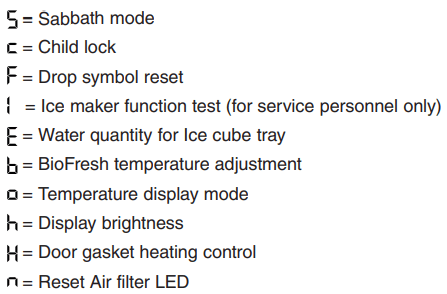
 turns on for 5 seconds
  will flash in the display.
 in the display disappears, the Sabbath mode is deactivated.
 = Child lock
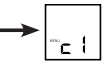
 is lit and the child lock is activated.
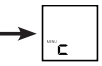

 = Drop symbol reset
 = Ice maker function test
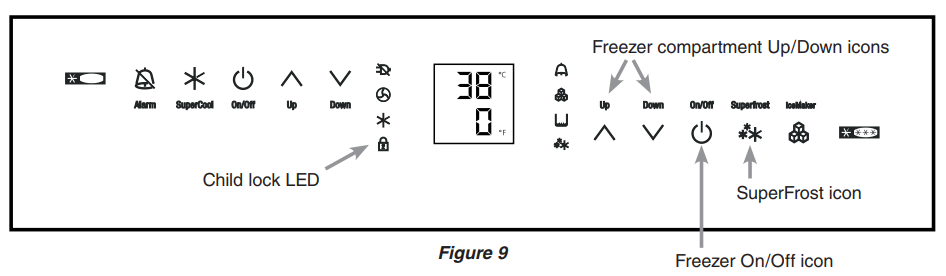
 = Temperature display mode
 = Display brightness
 = Door gasket heating control
 = Reset air filter LED


 turns on.


 = Reset air filter LED