Loading ...
Loading ...
Loading ...
ENG
5
1.Place the hob into the opening on worktop. The size of opening
is given in Figure 11.
Fordetails, see the headings either Fixing the solid hotplate hob
or Fixing the vitroceramic hob.
.2.Connect the hob to the oven using the the plug given on the
hob. The socket for plug is placed on the rear panel of oven.
3.Connect the oven to the electrical supply.
4.Place the oven into its built-in niche. Either placement in Figure
11 is applicable depending on the size of cabinet opening. For
details, see the heading Fixing the oven.
5.2.1. Installation Steps
5.2.2. Fixing the solid hotplate hob
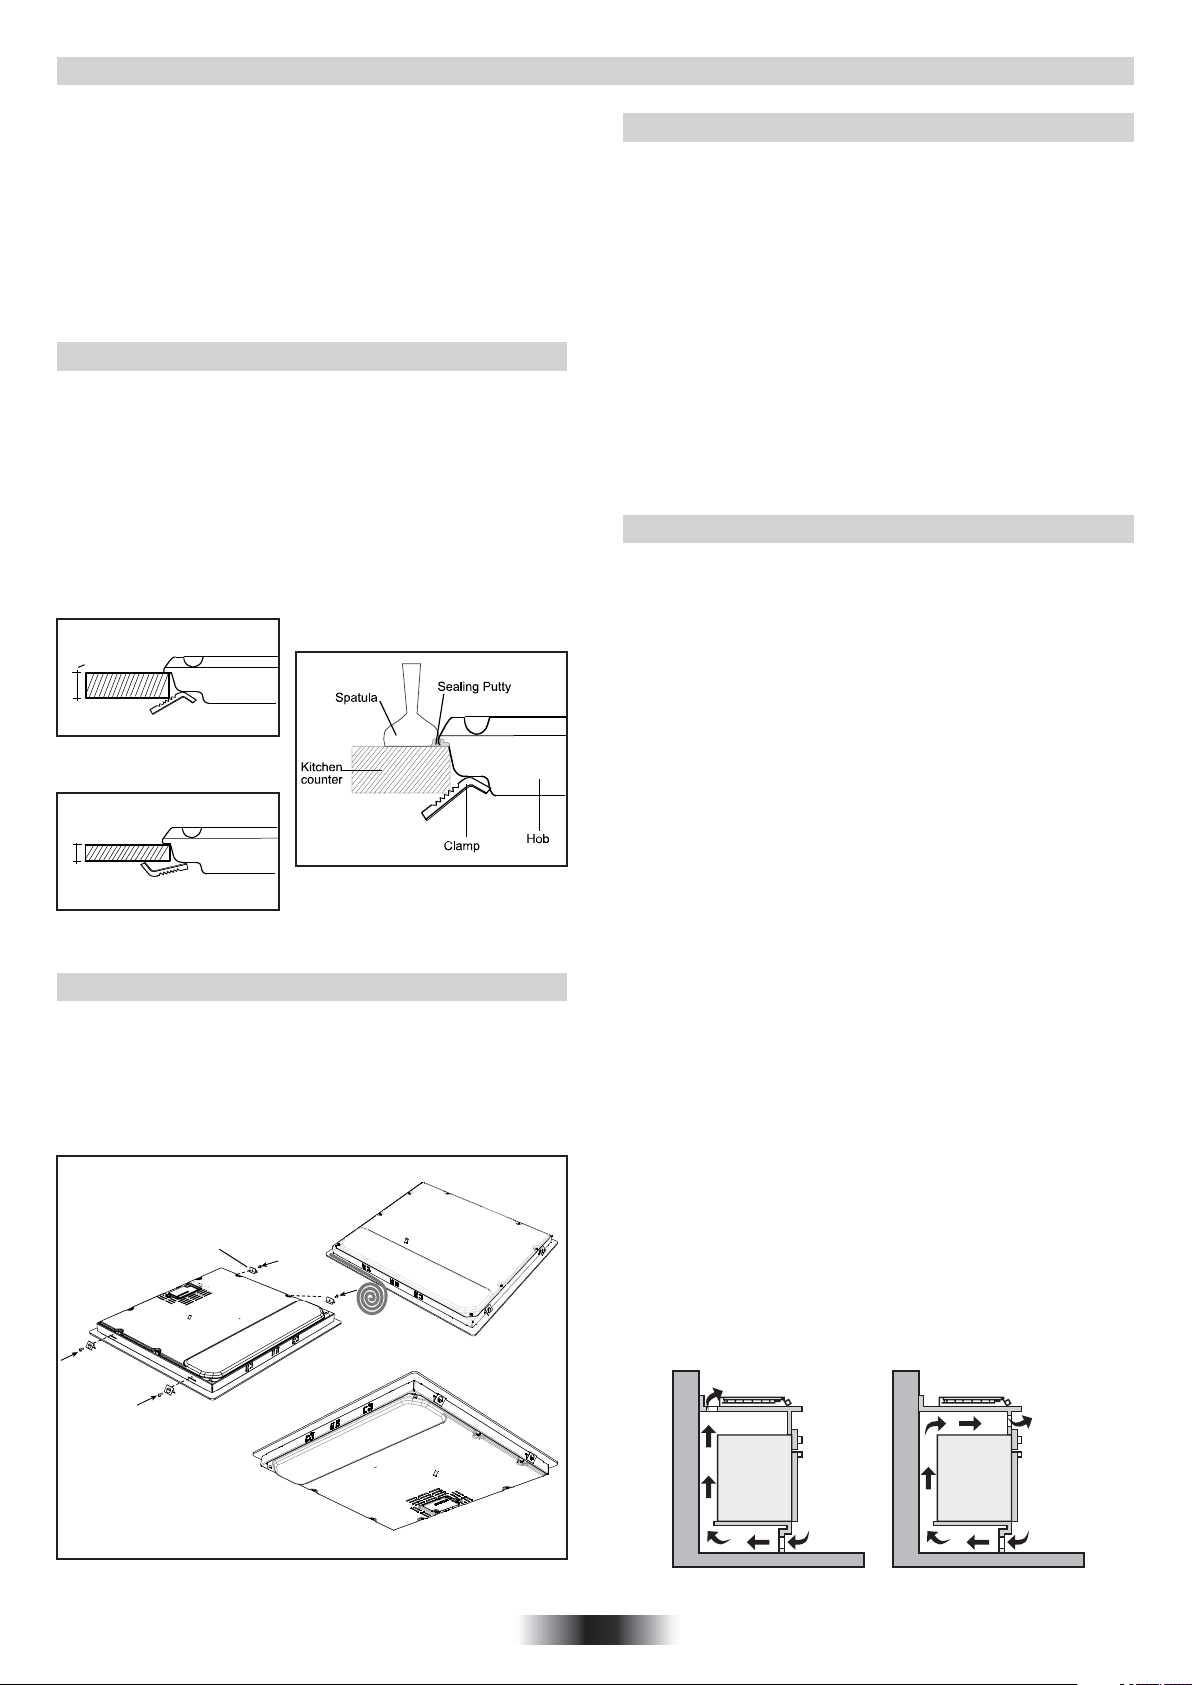
In order to prevent leakage of any liquids on the counter, a special
sealing putty is supplied together with your oven. Apply this putty
around the clearance on the kitchen counter. Extend the five-
piece putty by stretching and apply it around the clearance. Place
the hob on it, as indicated in the Figure 11. Make sure to fit all four
clamps by using one screw for each as shown in the Figure 12. In
case the thickness of the kitchen counter is less than 40mm, use
the clamp as shown in the Figure 14. After fitting your hob into its
place, neatly remove the excess sealing putty around the sides
with the help of a spatula Figure 13.
5.2.3. Fixing the vitroceramic hob
• Apply the one-sided self-adhesive sealing tape supplied
all the way round the lower edge of the cooking surface along the
outer edge of the glass ceramic panel. Do not stretch it.
• Screw the 4 worktop mounting brackets on the side walls
of product.
• Place the hob into the opening on the worktop.
Figure 13
h>40mm
h
h<40mm
h
Figure 12
Figure 14
Worktop mounting braket
5.2.4. Fixing the oven
Fit the oven into the space provided in the kitchen unit; it may be
fitted underneath a work top or into an upright cupboard. Fix the
oven in position by screwing into place, using the two fixing holes
in the frame. To locate the fixing holes, open the oven door and
look inside.
To allow adequate ventilation, the measurements and distances
indicated in the diagram on last page must be adhered to when
fixing the oven.
The dimensions and material of the cabinet in which the oven will
be installed must be correct and resistant to increases in
temparature. In a correct installation, contact with electrical or
insulated parts must be prevented. Insulating parts need to be
fitted in a way to ensure that they cannot be removed by using any
kind of tool. Installing the appliance in the close vicinity of a
refrigerator or a deep-freezer is not recommended. Otherwise, the
performance of the above-mentioned appliances will be
negatively affected due to emanating heat.
5.2.5. Warning
Warning regarding the installation of built-in oven without cooling
fan.
Prior inserting the oven, it is necessary to remove the rear kitchen
element panel in the area of the oven opening.
Equally, the front part of the element must have an opening.
Figure 15
Figure 16
08 GB
• When a cooktop burner knob is brought to another
position than the ‘’0’’ position, the operation light will be on.
• Use only pots which fit the burner diameter.
• Before placing the pot on the burner, be sure that its
bottom is not wet.
• Never operate a cooktop burner while empty. Pot
temperature may be high when the appliance is in use. Therefore,
it is recommended that you keep children and pets away from the
hob both during and after operation.
• In case you notice any crack on the ceramic glass , it
must be immediately switched off and replaced by the Authorised
Service.
• After use (in order to ensure its continuously effective
operation and long service life), hotplates need to be thoroughly
cleaned using appropriate cleaning materials. In order to prevent
any formation of rust and preserve their initial appearance, it is
recommended to clean the hotplates rubbing them with a piece of
cloth that is slightly damped by oil. Never use steam cleaners.
• In order to prevent waste of energy, the pots to be used
should not be smaller or larger than the burner surfaces.
• Take the necessary measures so that small children will
not come close to the burner surface in any way, as it will be hot in
operating position.
• Due to the flammable nature of hot oil, operations such
as frying should be performed with the container lids closed.
• Do not cut anything, bread etc., on the glass. Do not use
pots with aluminium bottoms. Avoid placing too heavy materials
on your hob.
• Do not place materials such as plastic, aluminium on the
ceramic glass surface. If for any reason there should be a plastic
or aluminium material melted on it, clean it up with a spatula
immediately.
• Do not wipe the ceramic surface with materials such as
dish cloth or sponge. Residues of detergents may lead to fire as
well as cause the glass colour to fade.
2
60 cm
2
240 cm
2
120 cm
2
180 cm
Loading ...
Loading ...
Loading ...