Documents: Go to download!
- User Manual - (English)
- User Guide - (English)
- Getting Started
- Connecting
- Operating
- Troubleshooting
Table of contents
OWNER’S MANUAL WIRELESS SOUND BAR
Getting Started
Unique features
Auto power down
This unit will turn off by itself for energy saving consumption.
LG Sound Sync
Controls volume level of this unit by the remote control of your LG TV that is compatible with LG Sound Sync.
BLUETOOTH®
Listens to music stored on your Bluetooth device.
Surround sound
You can enjoy surround sound by using Wireless Rear Speaker kit. (SPK8-S)
Introduction
Symbols used in this manual
Note
Indicates special notes and operating features.
Caution
Indicates cautions for preventing possible damages from abuse.
Remote control
Replacement of Battery
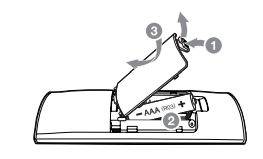
Remove the battery cover on the rear of the remote control, and insert the battery  with
with  and matched correctly
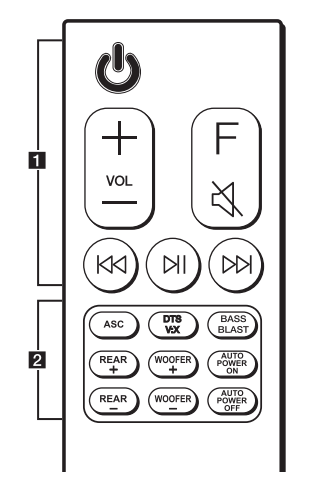
1
 (Standby) : Switches the unit ON or OFF
VOL (Volume)  : Adjusts speaker volume.
F (Function) : Selects the function and the input source.
 (Mute) : Mutes the sound
 (Skip/Search) :
- Skips Fast backward or Forward.
- Searches for a section within a file.
 (Play/Pause) : Starts playback. / Pauses playback.
2
ASC : Analyzes the property of input sound and provides the sound optimized for the content in real time.
DTS V:X :
- Selects cinematic surround sound.
- Turns off using your tv remote control function.
BASS BLAST :
- Selects reinforced bass sound.
- Turns on using your tv remote control function.
REAR  :
:
- Adjusts sound level of rear speakers.
- Turns on or off Surround function
Note
Adjustment of the Rear speakers volume levels and using Surround Sound are applied only when the rear speakers are connected. Rear speaker kit sold separately.
WOOFER  : Adjusts sound level of subwoofer.
AUTO POWER ON/OFF :
- Turns on or off AUTO POWER function.
- Turns on or off the Bluetooth connection lock.
Front panel

 Remote sensor
 Standby LED (Red)
 Function LED (White)

 (Volume) : Adjusts volume level
F (Function) : Selects the function and input source.
 (Standby) : Switches the unit ON or OFF
Rear panel
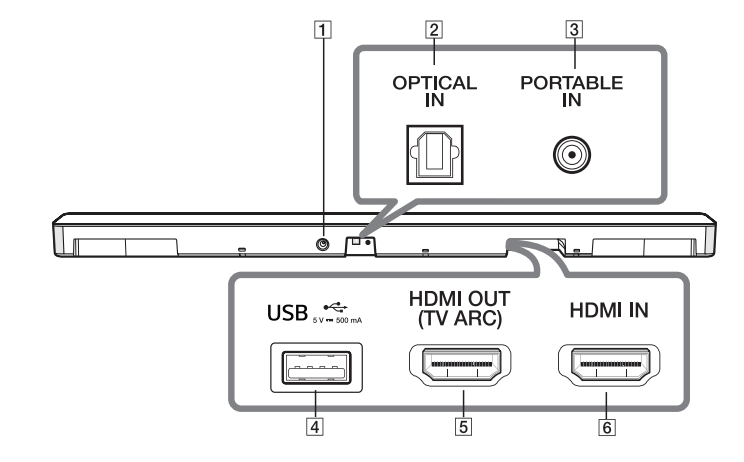
 DC IN : Connect to the AC adapter
 OPTICAL IN : Connect to an Optical device
 CPORTABLE IN : Connect to a Portable device
 USB
USB  : Connect to a USB device
 HDMI OUT (TV ARC) : Connect to a TV
 HDMI IN : Connect toDMI out on a device H
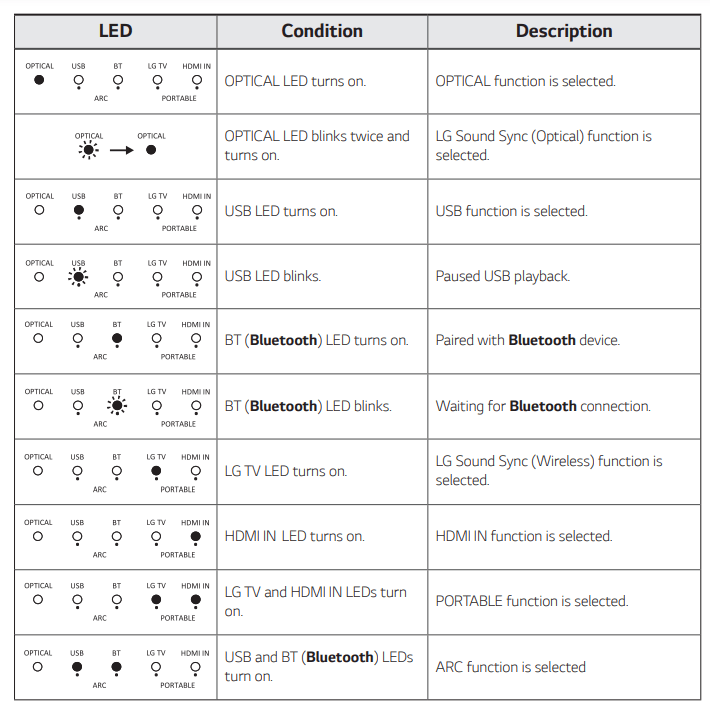
About LED condition
 : LED is staying on.
 : LED is staying on.
 : LED is off
Useful functions for using the unit.
TV Remote On/ Off
- It allows you to control the volume of this unit by your TV remote control even by other company’s product. Initial setting of this function was set to on.
- ON
- Press and hold BASS BLAST on the remote control for about 2 seconds.
The standby LED blinks once.
- OFF
- Press and hold DTS V:X on the remote control for about 2 seconds.
The standby LED blinks once.
BT Lock On/Off
- It allows you to connect a Bluetooth deivce only on Bluetooth and LG TV functions.
Initial setting of this function was set to off.
- ON
- Press and hold AUTO POWER ON on the remote control for about 2 seconds in Bluetooth function.
The standby LED blinks once.
- OFF
- Press and hold AUTO POWER OFF on the remote control for about 2 seconds in Bluetooth function.
The standby LED blinks once.
Auto Power On/Off
- It allows the unit to turn on and off automatically by input signals :
Optical, LG TV or Bluetooth
Initial setting of this function was set to on.
- ON
- Press AUTO POWER ON on the remote control.
- The standby LED blinks once.
- OFF
- Press AUTO POWER OFF on the remote control.
- The standby LED blinks once.
Surround On/ Off
- It allows you to enjoy surround sound with rear speakers.
Initial setting of this function was set to off.
- ON
- Pess REAR + on the remote control for about 2 seconds.
The standby LED blinks once.
- OFF
- Pess REAR - on the remote control for about 2 seconds.
The standby LED blinks once
Installing the sound bar
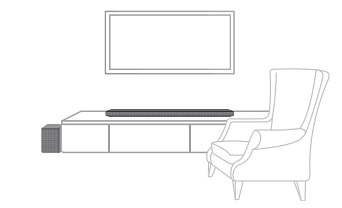
You can hear the sound by connecting the unit to the other device : TV, Blu-ray disc player, DVD player, etc. Place the unit in front of the TV and connect it to the device you want.
Caution
- For best performance of wireless connection such as Bluetooth or wireless subwoofer, do not install the unit on Metallic furniture because wireless connection communicates through a module positioned on the bottom of the unit.
- Be careful not to make scratches on the surface of the Unit / Subwoofer when installing or moving them.
Mounting the main unit on a wall
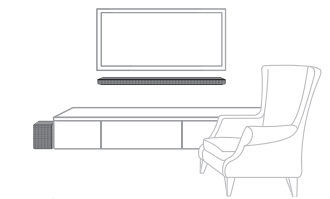
You can mount the main unit on a wall.
Caution
Because it is difficult to make a connection after installing this unit, you should connect the cables before installation.
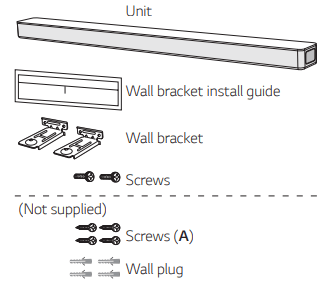
Preparation materials
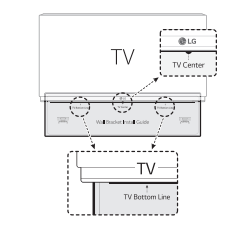
1. . Match the TV’s BOTTOM EDGE of Wall bracket install guide with the bottom of TV and attach to the position.
2. When you mount it on a wall (concrete), use the wall plugs. You should drill some holes. A guide sheet (Wall bracket install guide) is supplied to drill. Use the sheet to check the point to drill
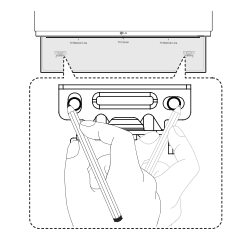
3. Remove the Wall bracket install guide.
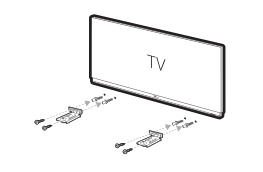
4. Fix the brackets with screws (A) as shown in the illustration below
Note
Screws (A) and Wall Plugs are not supplied for mounting the unit. We recommend the Hilti (HUD-1 6 x 30) for the mounting.
5. Put the unit on the brackets to match screw holes on the bottom of the unit.
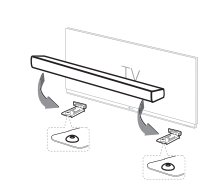
6. Fix the unit with the screws firmly.
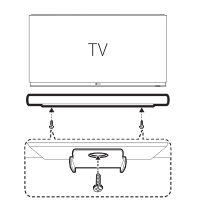
Note
To detach the unit, perform it in reverse order
Caution
- Do not install this unit upside down. It can damage the parts of this unit or be the cause of personal injury
- Do not hang onto the installed unit and avoid any impact to the unit
- Secure the unit firmly to the wall so that it does not fall off. If the unit falls off, it may result in an injury or damage to the product.
- When the unit is installed on a wall, please make sure that a child does not pull any of connecting cables, as it may cause it to fall.
Positioning the speakers (Optional)
For the best surround sound, place the speaers as shown below.
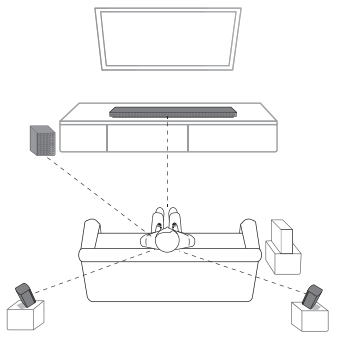
Note
The illustration above may differ from actual units.
Connecting
Organizing cables (Optional)
You can organize the cable with cable ties.
- Hold the cables together with cable ties as shown below.
- Tighten cable ties
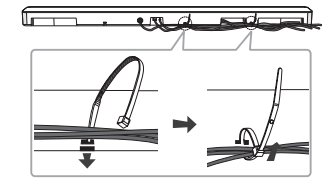
Note
- After all connections are completed, you can arrange cables as needed.
- Cable ties is not supported
Connecting the AC Adapter
Connect the speaker to the power supply with the supplied AC adapter
- Connect the supplied AC power cord to the AC adapter.
- Connect the AC adapter cable to DC IN adapter input.
- Plug the AC power cord into an AC outlet.
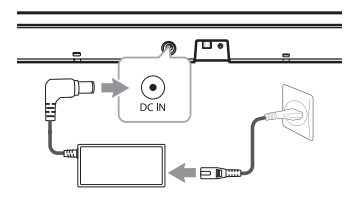
Caution
Only use the AC adapter supplied with this device. Do not use a power supply from another device or manufacturer. Using any other power cable or power supply may cause damage to the device and void your warranty.
Wireless subwoofer and rear speaker connection (Sold Separately)
Wireless subwoofer connection
LED indicator of wireless subwoofer
Green (Blink)
- The connection is trying.
Green
- The connection is completed.
Red
- The wireless subwoofer is in standby mode or the connection is failed.
Off (No display)
- The power cord of wireless subwoofer is disconnected
Setting up the wireless subwoofer for the first time
- Connect the power cord to the subwoofer and plug the power cord into a power outlet.
- Turn on the main unit : The sound bar and wireless subwoofer will be automatically connected.
- Green LED on the rear of wireless subwoofer turns on
Manually pairing wireless subwoofer
When your connection is not completed, you can check red LED on the wireless subwoofer and the wireless subwoofer does not make sound. To solve the problem, follow the steps below
1. Press Pairing button on the rear of the wireless subwoofer
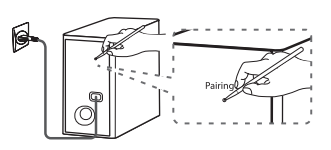
- The green LED on the rear of the wireless subwoofer blinks quickly. (If the green LED does not blink, press and hold the Pairing button.)
2. Turn on the main unit.
3. Pairing is completed.
- The green LED on the rear of the wireless subwoofer turns on
Note
- It takes a few seconds (and may take longer) for the main unit and the subwoofer to communicate with each other and make sounds.
- The closer the main unit and the subwoofer, the better sound quality. It is recommended to install the main unit and the subwoofer as close as possible and avoid the cases below
- There is an obstacle between the main unit and the subwoofer
- There is a device using same frequency with this wireless connection such as a medical equipment, a microwave or a wireless LAN device.
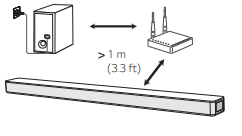
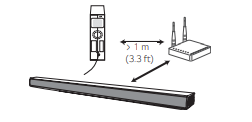
- Keep the sound bar and the subwoofer away from the device (ex. wireless router, microwave oven, etc.) over 1m (3.3 ft) to prevent wireless interference.
Rear speakers connection (Sold Separately)
Connecting the rear speakers
1. Connect the black stripe wire to the terminal marked - (minus) and the other end to the terminal marked + (plus).
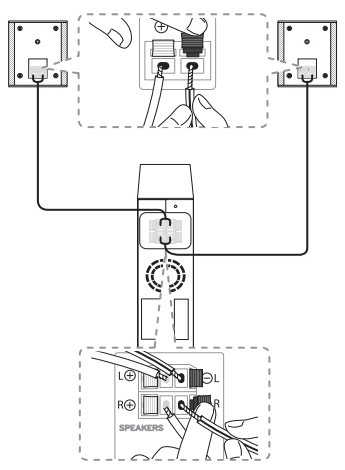
2. Connect the wireless receiver and the rear speakers (right, left) with the speaker cables.
Grey
- Rear right
Blue
- Rear left
Note
You need to purchase the wireless rear speakers kit (SPK8-S) to enjoy surround sound.
Caution
- Use the speaker supplied with this unit only. Using any other speaker may cause malfunction.
- Be sure to match the speaker cable to the appropriate terminal on the components: + to + and – to –. If the cables are reversed, the sound will be distorted and will lack bass.
LED indicator of wireless receiver
Yellow - green (Blink)
- The connection is trying.
Yellow - green
- The wireless receiver is receiving the signal from the sound bar.
Red
- The wireless receiver is in standby mode.
Off (No display)
- The power cord of wireless receiver is disconnected.
Setting up the wireless receiver for the first time
- Connect the power cord to the wireless receiver to the outlet
- Turn on the main unit : The sound bar and wireless receiver will be automatically connected
- Yellow - green LED on the wireless receiver turns on.
Manually pairing wireless receiver
When your connection is not completed, you can see the red LED on the wireless receiver and rear speakers are not made sound. To solve the problem, follow the below steps.
1. Press PAIRING button on the rear of the wireless receiver.
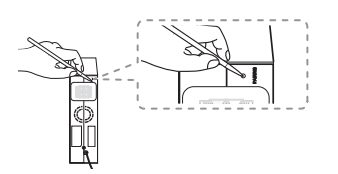
- The yellow - green LED on the wireless receiver blinks quickly
2. Turn on the main unit
3. Paring is completed
- The yellow - green LED on the wireless receiver turns on
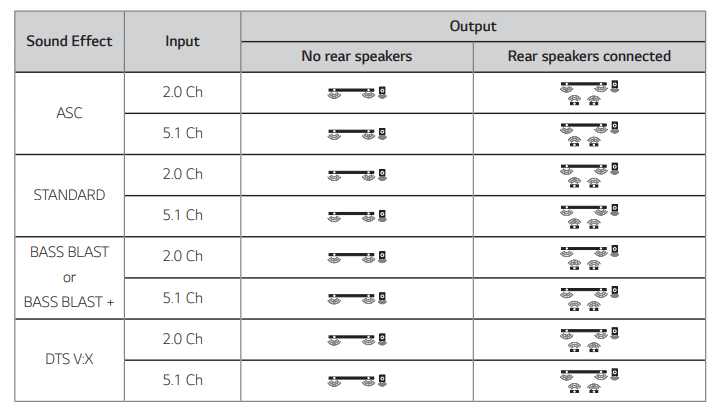
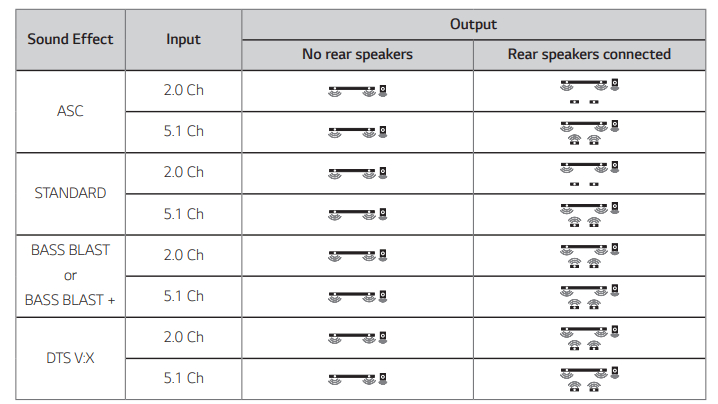
Surround sound
You can enjoy magnificent surround sound for all the input sound source with rear speakers
If you turn on the surround function, the whole speaker outputs sound.
When you turn off the surround function, the speakers output sound as an original input sound channel.
To turn on surround function, press and hold REAR + button for about 2 seconds.
To turn off surround function, press and hold REAR - button for about 2 seconds
Note
BASS BLAST or STANDARD sound effects may be applied differently depending on regional option.
Surround function ON
Surround function OFF
How to Affix the Ferrite Core
Ferrite core may not be provided depending on each nation’s regulations.
Affix the Ferrite Core for speaker cables
You must affix a ferrite core in order to reduce or eliminate electrical interference
- Pull the stopper [a] of the ferrite core to open.
- Wind the speaker cables around the ferrite core twice.
- Close the ferrite core until it clicks.
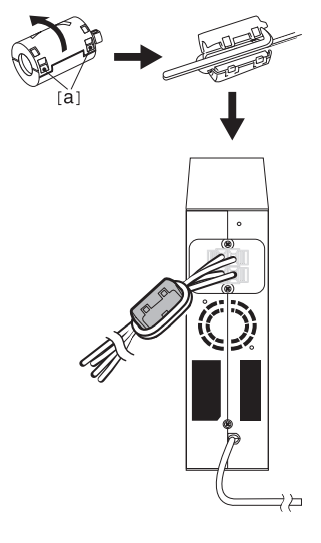
Note
- If there is a strong electromagnetic wave product nearby, interference may occur. Put the main unit and wireless receiver away from there
- The wireless receiver will automatically switch to standby mode in a few minutes after the sound bar is turned off. When the wireless reciever is in standby mode, the LED will turn on in red.
- When you turn on the sound bar, the wireless receiver will turn on and the LED will change to yellow - green and then the rear speakers makes sound within a few seconds
- It takes a few seconds (and may take longer) for the main unit and Wireless Receiver to communicate with each other.
- Use the rear speaker at least 30 cm (11.8 inch) away from either TV screen or PC monitor
- When the wireless receiver is being connected or disconneced with the main unit, output sound is maybe interrupted.
- Set the distance between the sound bar and the wireless receiver as close as possible and keep them away from the device (ex. wireless router, microwave oven, etc.) over 1 m (3.3 ft) to prevent wireless interference.
Connecting to your TV
Please connect this unit and the TV using the optical digital cable or HDMI cable considering the capability of the TV
Using an OPTICAL cable
1. Connect the OPTICAL IN jack on the back of the unit to OPTICAL OUT jack on the TV using an OPTICAL cable.
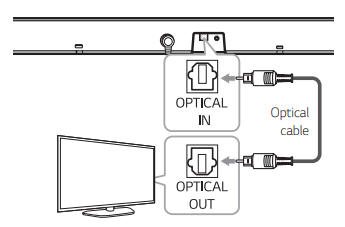
2. Select the input source to OPTICAL by pressing F button on the remote control or unit repeatedly.
Note
- Before connecting the optical cable, be sure to remove the protection plug cover if your cable has the cover
- You can enjoy the TV audio through the speakers of this unit. In the case of some TV models, you must select the external speaker option from the TV menu. (For details, reference your TV user manual.)
- Set up the sound output of TV to listen to the sound through this unit : TV setting menu → [Sound] → [TV Sound output] → [External speaker (Optical)]
- Details of TV setting menu vary depending on the manufacturers or models of your TV
- If this unit is connected by OPTICAL and ARC at the same time, the ARC signal is a high priority
LG Sound Sync

You can control some functions of this unit by your TV's remote control with LG Sound Sync. It is compatible with the LG TV that is supported LG Sound Sync. Make sure of the LG Sound Sync logo on your TV
Controllable function by LG TV's remote control : Volume up/down, mute
Refer to the TV's instruction manual for the details of LG Sound Sync.
Make one of the following connections, depending on the capabilities of your equipment.
Note
- You can also use the remote control of this unit while using LG Sound Sync. If you use TV's remote control again, the unit synchronizes with the TV. According to TV Specifications, the volume and mute of this unit synchronize with TV
- When the connection fails, make sure of the condition of the TV and power
- Make sure of the condition of this unit and the connection in the cases below when using LG Sound Sync
- The unit is turned off
- Changing the function to the others.
- Disconnecting the optical cable.
- Disconnecting the wireless connection caused by interference or a distance.
- The amount of time to turn off this unit is different depending on your TV when you set AUTO POWER function to ON.
- Details of TV setting menu vary depending on the models of your TV.
LG Sound Sync with wired connection
1. Connect your LG TV to the unit by using an optical cable.
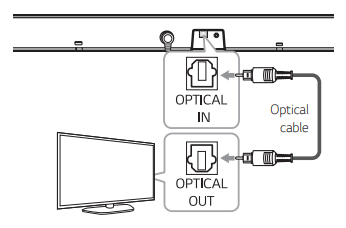
2. Set up the sound output of TV to listen to the sound through this unit :
TV setting menu → [Sound] → [TV Sound output] → [LG Sound Sync (Optical)]
3. Turn on the unit by pressing  on the remote control or on unit.
4. Select the input source to OPTICAL by pressing F button on the remote control or on unit repeatedly
LG Sound Sync with wireless connection
1. Turn on the unit by pressing on the remote control or on unit.
2. Select the input source to LG TV by pressing F button on the remote control or unit repeatedly
3. Set up the sound output of TV to listen to the sound through this unit :
TV setting menu → [Sound] → [TV Sound output] → [LG Sound Sync (Wireless)]
Note
If you turned off the unit directly by pressing on the remote control or on unit, LG Sound Sync (Wireless) will be disconnected. To use this function again, you should reconnect the TV and the unit.
Using an HDMI cable
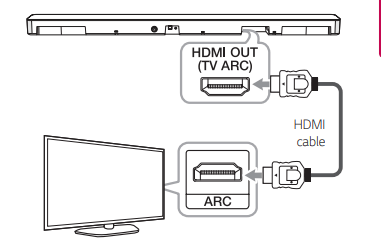
If you connect this unit to a TV that supports HDMI CEC and ARC (Audio Return Channel), you can enjoy the TV audio through the speakers of this unit without connecting the optical cable. Please refer to your TV user manual when you check HDMI CEC/ARC function of your TV
Note
- ARC function is automatically selected when ARC signal comes in from TV, no matter what kind of the function you are using.
- You can enjoy the TV audio through the speakers of this unit. In the case of some TV models, you must select the external speaker option from the TV menu. (For details, reference your TV user manual.)
- Set up the sound output of TV to listen to the sound through this unit :
TV setting menu → [Sound] → [TV Sound output] → [External speaker (HDMI ARC)]
- Depending on your LG TV model, you may need to turn on the SIMPLINK function on your LG TV.
- Details of TV setting menu vary depending on the manufacturers or models of your TV.
- When you return to ARC function from another function, you need to select the input source to OPTICAL. Then this unit changes to ARC function automatically.
ARC (Audio Return Channel) function
The ARC function enables an HDMI capable TV to send the audio stream to HDMI OUT of the unit.
To use this function :
- Your TV must support the HDMI-CEC and ARC function and the HDMI-CEC and ARC must be set to On
- The setting method of HDMI-CEC and ARC may differ depending on the TV. For details about ARC function, refer to your TV manual.
- You must use the HDMI cable (Type A, High Speed HDMI™ cable with Ethernet).
- You must connect the HDMI OUT on the unit with HDMI IN of the TV that supports ARC function using an HDMI cable
- You can connect only one Sound bar to TV compatible with ARC.
What is SIMPLINK?

Some functions of this unit are controlled by the TV’s remote control when this unit and LG TV’s with SIMPLINK are connected through HDMI connection.
Controllable functions by LG TV’s remote control : Power on/off, volume up/down, mute, etc.
Refer to the TV owner’s manual for the details of SIMPLINK function.
LG TV’s with SIMPLINK function has the logo as shown above.
Note
- Depending on the state of the unit, some SIMPLINK operation may differ from your purpose or not work
- Depending on a TV or a player which is connected with this unit, SIMPLINK operation may differ from your purpose.
Additional information for HDMI
- When you connect an HDMI or DVI compatible device make sure of the following:
- Try switching off the HDMI/DVI device and this player. Next, switch on the HDMI/DVI device and leave it for around 30 seconds, then switch on this player
- The connected device’s video input is set correctly for this unit.
- The connected device is compatible with 720 x 576p (or 480p), 1280 x 720p, 1920 x 1080i or 1920 x 1080p video input.
- Not all HDCP-compatible HDMI or DVI devices will work with this player
- The picture will not be displayed properly with non-HDCP device.
Note
- If a connected HDMI device does not accept the audio output of the player, the HDMI device’s audio sound may be distorted or may not output
- Changing the resolution when the connection has already been established may result in malfunctions. To solve the problem, turn off the player and then turn it on again.
- When the HDMI connection with HDCP is not verified, TV screen is changed to black screen. In this case, check the HDMI connection, or disconnect the HDMI cable.
- If there are noises or lines on the screen, please check the HDMI cable (length is generally limited to 4.5 m (15 ft).
- You cannot change the video resolution in the HDMI IN mode. Change the video resolution of the connected component
- If the video output signal is abnormal when your personal computer is connected to HDMI IN jack, change the resolution of your personal computer to 576p (or 480p), 720p, 1080i or 1080p
HDMI cable Checklist
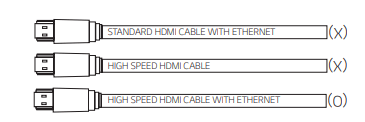
Some HDMI cables do not support the ARC function, this can result in no sound output.
When connecting this unit to the TV, if there is no sound, there might be a problem with the HDMI cable.
Therefore connect this unit to the TV and check whether the Type A, High speed HDMI™ Cable with Ethernet.
Connection through HDMI Cable
Your television must support the newest HDMI features (HDMI CEC1) / ARC (Audio Return Channel)) to fully enjoy the Live broadcasting channel with audio system through an HDMI cable. Unless your TV supports these HDMI features, the audio system should be connected through an OPTICAL cable
1) HDMI CEC (High-Definition Multimedia Interface Consumer Electronics Control)
Consumer Electronics Control (CEC) is an HDMI feature designed to allow the user to command and control the CEC-enabled devices, that are connected through HDMI by using only one of their remote controls.
Optional equipment connection
HDMI connection
You can enjoy the sound and picture from HDMI connection on external device.
For enjoying sound only
You can enjoy the sound from the external device you connect.
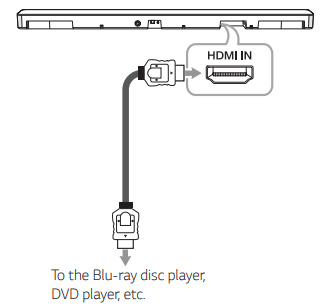
1. Connect HDMI IN jack on the back of the unit to HDMI OUT jack on the audio device such as Bluray disc player, DVD player, etc.
2. Select the input source to HDMI IN by pressing F button on the remote control or unit repeatedly.
For enjoying both sound and picture
You can enjoy both sound and picture from the external device you connect.
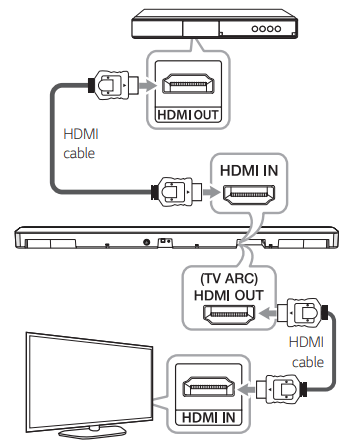
1. Connect HDMI IN jack on the back of the unit to HDMI OUT jack on the external device such as Blu-ray disc player, DVD player, etc.
2. Connect HDMI OUT (TV ARC) jack on the back of the unit to HDMI IN jack on the TV.
3. Select the input source to HDMI IN by pressing F button on the remote control or unit repeatedly
Note
- Audio and Video signal can't pass through when this unit is turned off.
- HDMI OUT (TV ARC) jack is for TV connection. Even though multi channel is inputted to the unit through an HDMI cable, the unit can only output PCM 2 channel to TV.
OPTICAL IN connection
Connect an optical output jack of external devices to the OPTICAL IN jack.
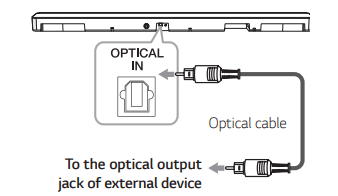
1. Connect the OPTICAL IN jack on the back of the unit to optical out jack of your external device.
2. Select the input source to OPTICAL by pressing F button on the remote control or unit repeatedly.
3. Listen to sound.
Note
Before connecting the optical cable, be sure to remove the protection plug cover if your cable has the cover
PORTABLE IN connection
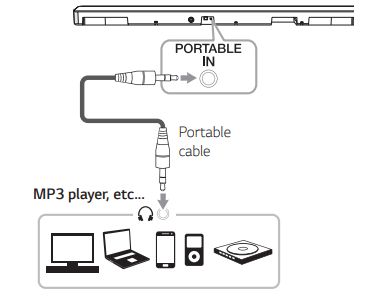
Listening to music from your portable player
The unit can be used to play the music from many types of portable players or external devices.
1. Connect the portable player to the PORTABLE IN connector of the unit by using 3.5 mm stereo cable.
2. Select the input source to PORTABLE by pressing F button on the remote control or unit repeatedly.
3. Turn on the portable player or external device and start playing it
USB connection
Connect USB memory device to the USB port on the back of the unit
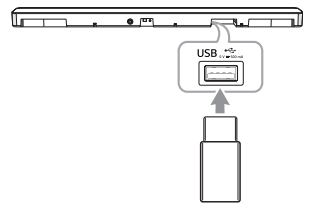
Note
If HDMI cable is connected on the unit, inserting a USB device may be limited depending on a USB device shape.
For more information of playing files on a USB, refer to the page 28. Removing the USB Device from the unit.
1. Choose a different function/mode.
2. Remove the USB device from the unit.
Compatible USB devices
- MP3 Player : Flash type MP3 player
- USB Flash Drive : Devices that support USB 2.0.
- The USB function of this unit does not support some USB devices.
USB device requirement
- Devices which require additional program installation connected to a computer, are not supported
- Do not extract the USB device while in operation
- For a large capacity USB, it may take longer than a few minutes to be searched.
- To prevent data loss, back up all data.
- This unit recognizes up to 2,000 files.
- The unit’s USB Port cannot be connected to PC. The unit can not be used as a storage device.
- The exFAT file system is not supported on this unit. (FAT16/FAT32/NTFS systems are available.)
- Depending on some devices, it may not available to recognize the followings on this unit
- External HDD
- Card readers
- Locked devices
- Hard type USB devices
- USB hub
- Using USB extension cable
- iPhone/iPod/iPad
- Android device
Playable file
Sampling Frequency
- MP3 : within 32 to 48 kHz
- WMA : within 32 to 48 kHz
- OGG : within 32 to 48 kHz
- FLAC : 32 kHz, 44.1 kHz, 48 kHz, 88.2 kHz, 96 kHz, 176.4 kHz and 192 kHz (16 bit/ 24 bit)
- WAV : 32 kHz, 44.1 kHz, 48 kHz, 88.2 kHz, 96 kHz, 176.4 kHz and 192 kHz (16 bit/ 24 bit)
Bitrate resolution
- MP3 : within 80 to 320 kbps
- WMA : within 56 to 128 kbps
- OGG : within 64 to 500 kbps
- Maximum files : Up to 2,000
- Maximum directories : Up to 200
- A protected file by DRM (Digital rights management) cannot be played on the unit.
- Video files in the USB storage device can not be played.
- Depending on the performance of your USB device, playback may not work well.
Note
- Folders and files on the USB are recognized as below
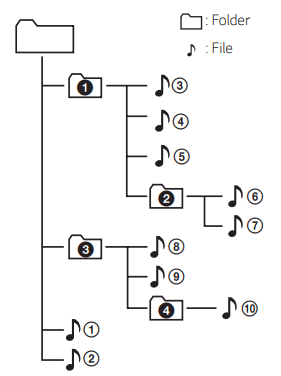
- File will be played from file
 to file
  one by one.
 - Files will be played in order recorded and it may be different depending on the record circumstances
- You can't see a folder or file through this unit
Operating
Basic operations
USB operation
1. Connect the USB device to the USB port.
2. Select the input source to USB by pressing F button on the remote control or unit repeatedly
Playback
- Press

Pause
- During playback, press

Skip to the next/ previous file
- During playback, press
 on the remote control to go to the next file.
 - Playing less than 2 seconds, press
 on the remote control to go to the previous file.
 - Playing after 3 seconds, press
 on the remote control to go to the beginning of the file.
Search for a section within a file
- Press and hold
 /
/ during playback and release it at the point you want to listen to
Resume playback
- This unit memorizes a current song which is played before changing the function or turning off the unit.
Note
- The resume point may be cleared when you pull out the power cord or removing the USB device from the unit
- If the USB function is not working, check the USB function is selected
- When you pause the USB playback, USB LED on the main unit blinks.
Other operations
Turn off the sound temporarily
Press  (Mute) to mute your unit.
To cancel it, press  (Mute) again on the remote control or change the volume level.
Using your TV remote control
You can control some functions of this unit by your TV remote control even by other company’s product. Controllable functions are volume up/down and mute.
Press and hold BASS BLAST on the remote control for about 2 seconds. The standby LED blinks once. To turn off this function, press and hold DTS V:X on the remote control for about 2 seconds. The standby LED blinks once.
Note
- Supported TV brands
- LG
- Panasonic
- Philips
- Samsung
- Sharp
- Sony
- Toshiba
- Vizio
- Make sure that the sound output of your TV is set to [External speaker].
- Depending on the remote control, this function may not work well.
- This function does not operate on LG TV's magic remote control.
- This function may not work well when some TV control functions such as CEC, SIMPLINK and LG Sound Sync set to ON.
Auto power down
This unit will turn itself off to save electric consumption if the main unit is not connected to an external device and has not been used for 15 minutes.
This unit also turns off after six hours if the Main unit has been connected to another device using the analog input. (Ex : Portable, etc..)
AUTO POWER On/Off
This unit automatically turns on by an input source : Optical, LG TV or Bluetooth.
When you turn on your TV or an external device connected to this unit, this unit recognizes the input signal and selects the suitable function. You can hear the sound from your device
. If you try to connect your Bluetooth device, this unit turns on and the unit will be connected to your Bluetooth device.
This function turns on or off each time you press AUTO POWER ON/OFF.
Note
- After the unit is turned on by AUTO POWER function, it will be automatically turned off if there is no signal for a certain period of time from the TV connected by LG Sound Sync (Optical/Wireless).
- After the unit is turned on by AUTO POWER function, it will be automatically turned off if there is no signal for a certain period of time from the external device
- If you turned off the unit directly, it cannot be turned on automatically by AUTO POWER function. However the unit can be turned on by AUTO POWER function when optical signal comes in after 5 seconds of no signal
- Depending on the connected device, this function may not operate.
- If you disconnect Bluetooth connection by this unit, some Bluetooth devices try to connect to the unit continually. Therefore it is recommended to disconnect the connection before turn off the unit.
- If you want to use AUTO POWER, SIMPLINK must be turned off. It takes for about 30 seconds to switch on or off SIMPLINK.
- When you turn on this unit for the first time, status of Auto Power function is turned on.
- To use this function, the main unit must be registered in paired devices list of Bluetooth device
- You can set the AUTO POWER function only when this unit is turned on.
Auto function change
This unit recognizes input signals such as Optical, Bluetooth, LG TV and Portable and then changes suitable function automatically.
When optical signal comes in
When you turn on the external device connected to this unit by an optical cable, this unit changes the function to optical. You can hear the sound from your device
When you try to connect BLUETOOTH device
When you try to connect your Bluetooth device to this unit, Bluetooth function is sele
When LG TV signal comes in
When you turn on your LG TV connected by LG Sound Sync (Wireless connection), this unit changes the function to LG TV. You can hear the sound from your TV.
When connect a Portable device
When you connect your portable device using the 3.5 mm stereo cable, this unit changes the function to Portable. You can hear the music from your device.
Note
- To change to optical function, it needs 5 seconds of no signal.
- This unit does not change the function to optical if SIMPLINK of the connected TV, Bluray disc player, set-top box or etc. device set to on or connected CEC supported device is turned on
- If you want to use the auto function change, trun off SIMPLINK function on your LG TV. It takes for about 30 seconds to turn off SIMPLINK
- If the Bluetooth connection lock function is set, Bluetooth connection will be only available on BT (Bluetooth) and LG TV function
Quick Start
This unit can stay in standby mode with low power consumption, so that the unit can reduce boot time when you turn on this unit.
To turn on this function, press 1 on the unit for 3 seconds when the unit is turned on.
All of the function LEDs blink twice
To turn off this function, press 1 on the unit for 3 seconds again when the unit is turned on.
The standby LED blinks twice and turn on the currnet function's LED
Note
- If the Quick start function is set and an AC power is accidently re-connected to the unit by power failure etc., the Quick start function will activate when the unit is turned on and off once
- When the Quick start function is set, power consumption will be higher than when the Quick start is off
- This function may not work depending on the models.
Using BLUETOOTH® technology
About BLUETOOTH
Bluetooth is wireless communication technology for short range connection
The sound may be interrupted when the connection has interference from other electronic waves or when you connect Bluetooth in the other rooms.
Connecting individual devices under Bluetooth wireless technology does not incur any charges. A mobile phone with Bluetooth wireless technology can be operated via the Cascade if the connection was made via Bluetooth wireless technology
- Available Devices : Smart phone, MP3, Notebook, etc
- Version : 4.0
- Codec : SBC, AAC
BLUETOOTH Profiles
In order to use Bluetooth wireless technology, devices must be able to interpret certain profiles.This unit is compatible with following profile. A2DP (Advanced Audio Distribution Profile)
Listening to music stored on the BLUETOOTH devices
Pairing your unit and BLUETOOTH device
Before you start the pairing procedure, make sure the Bluetooth feature is turned on in to your Bluetooth device. Refer to your Bluetooth device’s user guide. Once a pairing operation is performed, it does not need to be performed again
1. Select the input source to BT (Bluetooth) by pressing F button repeatedly. BT (Bluetooth) LED blinks.
2. Operate the Bluetooth device and perform the pairing operation. When searching for this unit with the Bluetooth device, a list of the devices found may appear in the Bluetooth device display depending on the type of Bluetooth device. Your unit appears as “LG SKM5Y (XX)”
Note
- XX means the last two digits of Bluetooth address. For example, if your unit has a Bluetooth address such as 9C:02:98:4A:F7:08, you will see ''LG SKM5Y (08)” on your Bluetooth device
- Depending on the Bluetooth device type, some device have a different pairing way. Enter the PIN code (0000) as needed.
3. When this unit is successfully connected with your Bluetooth device, BT (Bluetooth) LED will be turned on
4. Listen to music.
To play a music file stored on your Bluetooth device, refer to your Bluetooth device’s user guide.
Note
- When using Bluetooth technology, you have to make a connection between the unit and the Bluetooth device as close as possible and keep the distance.
- However it may not work well in the case below :
- There is an obstacle between the unit and the Bluetooth device.
- There is a device using same frequency with Bluetooth technology such as a medical equipment, a microwave or a wireless LAN device.
- If Bluetooth connection does not work well, try pairing it again.
- The sound may be interrupted when the connection has interference by the other electronic waves
- Pairing is limited to one Bluetooth device per unit and multi-pairing is not supported.
- Depending on the type of the device, you may not be able to use the Bluetooth function.
- You can enjoy Bluetooth function using smart phone, MP3, Notebook, etc
- The more distance between the unit and the Bluetooth device, the lower the sound quality becomes.
- Bluetooth connection will be disconnected when the unit is turned off or the Bluetooth device gets far from the unit
- When Bluetooth connection is disconnected, connect the Bluetooth device to the unit again.
Note
- When Bluetooth device is not connected, BT (Bluetooth) LED blinks.
- When you connect Bluetooth device (iOS device etc.) to this unit or operate the device, the volume level can be synchronized with each other
- You can control Bluetooth device using
 /
/ (Skip) and
  (Play/Pause) buttons on the remote control
 - If you change to another function after connecting Bluetooth, Bluetooth connection will be disconnected. And you return to Bluetooth function, Bluetooth connection will be connected automatically
BLUETOOTH connection lock (BT lock)
You can limit Bluetooth connections to only BT (Bluetooth) and LG TV function to prevent unintended Bluetooth connections.
Press and hold AUTO POWER ON on the remote control for about 2 seconds to turn on this function in BT (Bluetooth) function.
To turn off this function, press and hold AUTO POWER OFF on the remote control for about 2 seconds in BT (Bluetooth) function.
Note
Even if you set up Bluetooth connection lock to On, this sound bar turns on by Auto Power function. Turn off Auto Power function to prevent it
Using BLUETOOTH App
Note
- Only Android OS is available to use “Music Flow Bluetooth” app with this unit.
- Additional data charges may occur if installed over 3G/4G, according to your device plan.
About “Music Flow Bluetooth” App
“Music Flow Bluetooth” app brings a suite of new features to this unit.
To enjoy more features, you are recommended to download and install free “Music Flow Bluetooth” app.
Install “Music Flow Bluetooth” App onto Your BLUETOOTH Device
There are two ways to install “Music Flow Bluetooth” app onto your Bluetooth device
Install “Music Flow Bluetooth” App through QR code
1. Install “Music Flow Bluetooth” app through QR code. Use the scanning software to scan the QR code

2. Tap an icon for installation
Note
- Make sure that your Bluetooth device is connected to the Internet.
- Make sure that your Bluetooth device has a scanning software application. If you don’t have one, download one from “Google Android Market (Google Play Store)”
- Depending on area, QR code may not work
Install “Music Flow Bluetooth” App through “Google Android Market (Google Play Store)”
1. Tap the “Google Android Market (Google Play Store)” icon.
2. In the search bar, type in the “Music Flow Bluetooth” and search it.
3. In the search result list, find and tap “Music Flow Bluetooth” to start downloading Bluetooth app.
4. Tap an icon for installation.
5. Tap an icon for downloading.
Note
- Make sure that your Bluetooth device is connected to the Internet
- Make sure that your Bluetooth device is equipped with “Google Android Market (Google Play Store)”.
Activate BLUETOOTH with “Music Flow Bluetooth” App
“Music Flow Bluetooth” app helps to connect your Bluetooth device to this unit.
1. Tap “Music Flow Bluetooth” app icon on the home screen to open “Music Flow Bluetooth” app, and go to the main menu.
2. If you want to get more information to operate, tap [Setting] and tap [Help] menu
Note
- “Music Flow Bluetooth” app will be available in the software version as follow;
- Android O/S : Ver 4.0.3 (or later)
- If you use “Music Flow Bluetooth” app for operation, there would be some differences between “Music Flow Bluetooth” app and the supplied remote control. Use the supplied remote control as necessary
- Depending on the Bluetooth device, “Music Flow Bluetooth” app may not work.
- After connection of “Music Flow Bluetooth” app, music may be output from your device. In this case, try connecting procedure again.
- If you operate the other applications or change the settings on your Bluetooth device while using “Music Flow Bluetooth” app, “Music Flow Bluetooth” app may operate abnormally
- When “Music Flow Bluetooth” app operates abnormally, check your Bluetooth device and the connection of “Music Flow Bluetooth” app and then try to connect again
- Depending on the smart phone's operating system, you have some differences for “Music Flow Bluetooth” operation
- Even though Bluetooth connection will be disconnected, you can use “Music Flow Bluetooth” app when you change the function
- Additional features offered by "Music Flow Bluetooth" app may not work depending on the distance between this unit and Bluetooth device and wireless conditions.
Sound adjustment
Setting sound effect
This system has a number of pre-set surround sound fields. You can select a desired sound mode by using each sound effect button.
ASC (Adaptive Sound Control)
Analyzes the property of input sound and provides the sound optimized for the content in real time
BASS BLAST
Reinforces the bass and powerful sound
DTS V:X
You can enjoy more immersive and cinematic surround sound.
Note
- In some of sound effect mode, some speakers, there’s no sound or low sound. It depends on the mode of surround and the source of audio, it is not defective.
- You may need to reset the sound effect mode, after switching the input, sometimes even after the sound file changed.
Adjust the woofer level settings
You can adjust the sound level of subwoofer as your preference.
Press WOOFER +/- button to adjust woofer level.
Note
When the subwoofer level reaches maximum or minimum, standby LED (Red) on the main unit turns on for 2 seconds.
Adjust the rear speakers level settings (Optional)
You can adjust the sound level of rear speakers as your preference.
Press REAR +/- p button to adjust rear speakers leve
Note
- When the rear speaers level reaches maximum or minimum , standby LED (Red) on the main unit turns on for 2 seconds.
- Adjusting rear speakers level is applyed only when the rear speakers are connected.
Troubleshooting
General
The unit does not work properly
- Turn off the power of this unit and the connected external device (TV, Woofer, DVD-player, Amplifier, etc.) and turn them on again
- Disconnect the power cord of this unit and the connected external device (TV, Woofer, DVD-player, Amplifier, etc.) and then try connecting again.
- Previous setting may not be saved when device power is shut off
No Power
- The power cord is unplugged.
Plug in the power cord.
- Check whether electricity failed.
Check the condition by operating other electronic devices.
No sound
- Incorrect input source is selected.
- Check the input source and select the correct input source.
- The mute function is activated.
Press  (Mute) or adjust the volume level to cancel the mute function
- When you are using connection with a external device (set top box, Bluetooth device etc.), adjust volume level of the device.
No woofer sound
- The power cord of the subwoofer is not connected.
Plug the power cord into the wall outlet securely.
- Pairing between the unit and the subwoofer gets disconnected.
Connect the unit and the subwoofer
The remote control does not work properly.
- The remote control is too far from the unit.
Operate the remote control within about 7 m.
- There is an obstacle in the path of the remote control and the unit.
Remove the obstacle.
- The batteries in the remote control is exhausted.
Replace the batteries with new one
The AUTO POWER function does not work.
- Check connection of the external device such as TV, DVD/Blu-Ray player or Bluetooth device.
- Check the state of SIMPLINK on your LG TV and turn off SIMPLINK.
- Depending on the connected device, this function may not operate.
LG Sound Sync does not work
- Check whether your LG TV supports LG Sound Sync
- Check connection of LG Sound Sync (Optical or wireless).
- Check sound setting of your TV and this unit.
The unit does not connect with Bluetooth device
- Turn off the Bluetooth connection lock function
When you feel the output sound of the unit is low.
Check the details below and adjust the unit according to them
- With the sound bar connected with TV, change the AUDIO DIGITAL OUT setting on TV Setup Menu from [PCM] to [AUTO] or [BITSTREAM]
- With the sound bar connected with Player, change the AUDIO DIGITAL OUT setting on Player Setup Menu from [PCM] to [PRIMARY PASS-THROUGH] or [BITSTREAM]
- Change Audio DRC setting on connected device setup menu to [OFF] state
- Make sure Night Mode is not On. Turn [OFF] Night Mode.
NOTES to use wireless
This device may have wireless interference.
- Wireless may not operate normally in weak signal area. y
- Please install the device close enough to wireless subwoofer. y
- Do not install the device on metal furniture for optimum performance.
Bluetooth device may malfunction or make noise in the following cases.
- When any part of your body contact the transceiver of the Bluetooth device or sound bar. y
- When there is an obstacle or wall or the device is installed in a secluded spot. y
- When there is a device(a wireless LAN, a medical equipment or a microwave) using same frequency, make the distance between the products as far away as possible each other. y
- When to connecting the device to the Bluetooth device, make the distance between the products as close as possible each other. y
- When the device gets too far from the Bluetooth device, the connection is disconnected and also malfunction may occur
NOTES to release Demo mode
Can not change input source with F button such as BT (Bluetooth), HDMI etc. and All the function LEDs are turned on
Remote Control does not work. (No response)
- Unplug the power cord and plug it in again. If that doesn’t work, press and hold F button (About 15 seconds) on the main unit until the function LED indicates current selected function.
See other models: 60UL3E-B LSN240HSV2 MC12Y3JM STB-5500 GR-G277STSA
