User Manual Air Conditioner
Product Introduction
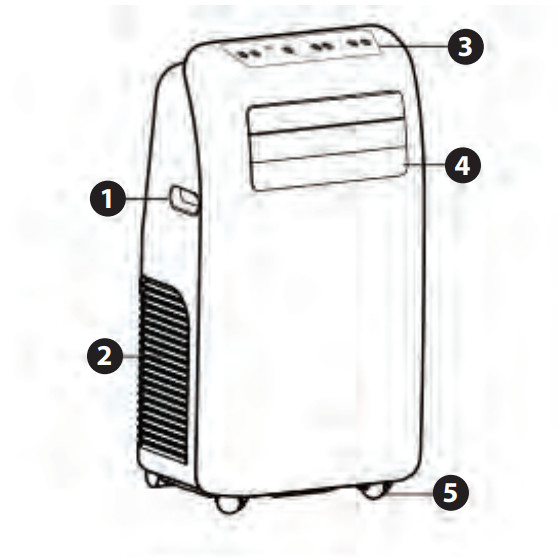
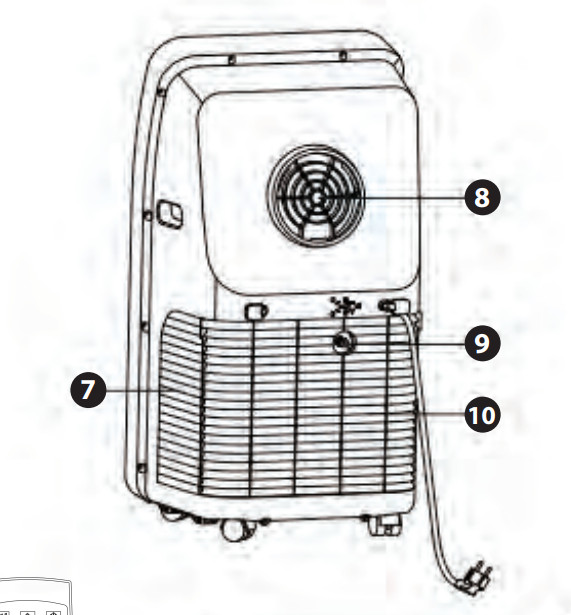
MAIN PARTS AND COMPONENTS
- Handle
- Air inlet (L)
- Control panel
- Wind guide vent
- Caster
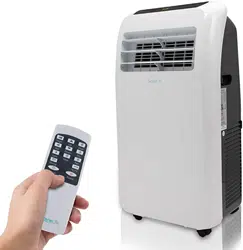
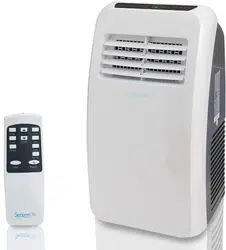
- Remote controller
- Air inlet (R)
- Air outlet
- Dehumidification drainage nozzle
- Air inlet grille
- Exhaust duct assembly
- Window sealing plate assembly

Control Panel and Remote Controller
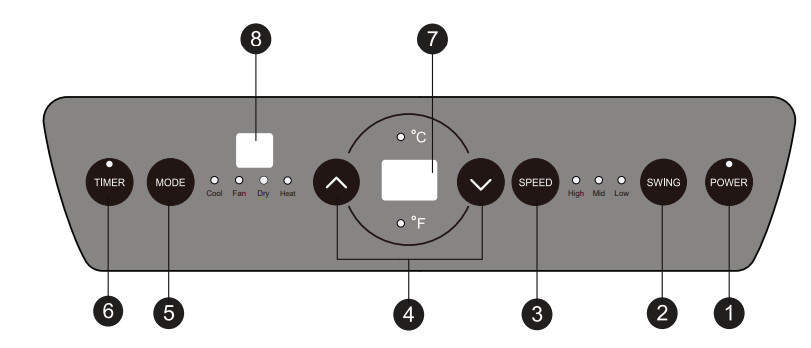
Cooling and Heating Model
- Power key
- Press the key to turn ON/OFF the A/C.
- Swing key
- Press this key at any time after turning on the A/C to swing the wind guide bar automatically.
- Speed key
- Press the key to choose high/middle /low gear wind speed.
- Temperature/ Time Adjusting key
- Press the key at cooling mode to increase /reduce the setting temperature; press it at timing mode to adjust timing ON/OFF time; press Up and Down keys simultaneously to switch Fahrenheit and Centigrade degree temperature.
- Mode key
- Press the key to choose cooling, fan, heating, dehumidification
- Timer key
- Press the key at standby mode to set ON time. Press this key at ON mode to set OFF time.
- Temperature/ Time Display Window
- This window displays the adjusted temperature and time.
- Remote controller receiving window
- This window is used to receive signal of the remote controller.
- °C/°F switching key:
- Press the key to switch °C and °F
Product Operation
Placement and Installation
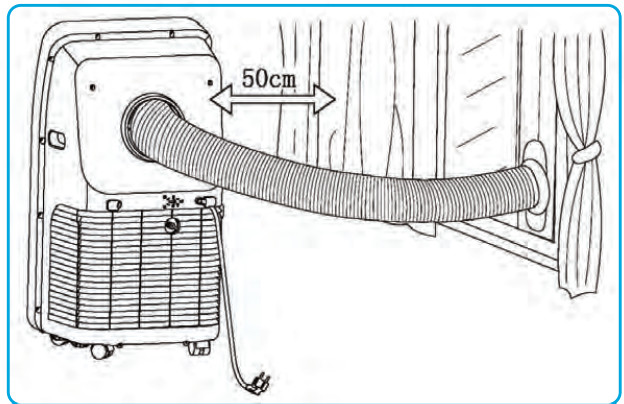
Placement
- Place it at even and dry place, and keep it at least 50cm. away from its surrounding object.
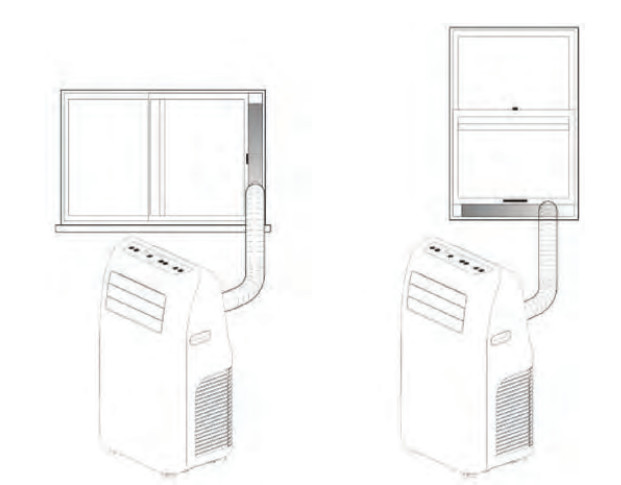
Installation
- Screw the exhaust duct assembly in the air outlet behind the panel (counterclockwise).
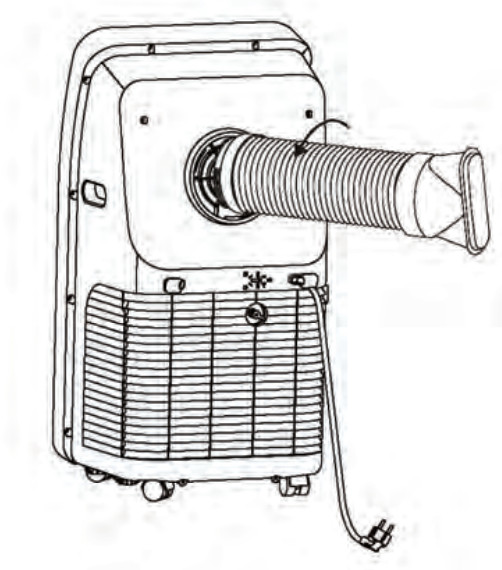
- Insert the air exhaust hose into the window sealing plate, adjust opening width of window so that the window can match with the sealing plate properly; length of the sealing plate is adjustable.
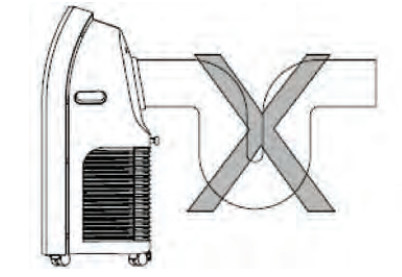
Incorrect Installation
- It’s important to keep the exhaust duct smooth. Incorrect installation will affect work of the A/C.
- Prevent the exhaust duct from sharp bending.
- Ensure air can flow smoothly in the duct.
Warning: The exhaust duct is designed especially for this model. Don’t replace or lengthen it; otherwise, it will result in failure.
Notice: Max. developed length of the exhaust duct is 1,500mm. It’s better to shorten it while in use and keep it horizontal while installation.
OPERATION METHOD
Cooling Mode
- When the A/C enters cooling mode automatically or cooling mode is selected after power ON, the cooling indicator lamp lights up.
- Press Up/Down key to adjust setting temperature (16°C~30°C)(60°F~86°F).
- Press Speed key to choose High/Mid/Low speed.
Fan Mode
- When pressing mode key or choosing Fan mode by pressing the remote controller, the wind indicator lamp lights up.
- Press Speed key to choose High/Mid/Low speed.
- Temperature can’t be set.
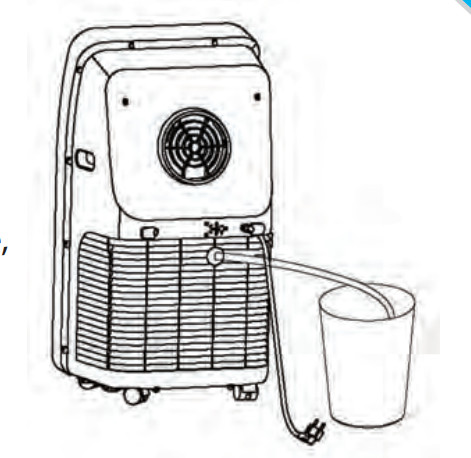
Dehumidification Mode
- When pressing mode key or choosing dehumidification mode by pressing the remote controller, the dehumidification indicator lamp lights up.
- Remove the dehumidification water wedge, insert water manifold, place the other end of the water manifold into the water vessel or drainage passage, as shown in the right figure.
- After entering the dehumidification mode, if room tempearture≥17°C (62°F), the compressor is ON. Then control as follows: when room temperature ≤15°C (59°F), the compressor is OFF; when temperature increases to room temperature≥17°C (62°F), the compressor will start again (in order to protect the compressor, it will be restarted 3min. later).
- In dehumidification mode, the fan is defaulted to run at low speed, and wind speed can’t be adjusted.
- Temperature can’t be set.
Auto mode (for cooling model only)
- When pressing mode key or choosing auto mode by pressing the remote controller, the auto indicator lamp lights up.
- After choosing Auto mode, operation state is determined by environmental temperature: when environmental temperature is higher than 25°C (77°F), the operation state is the same as that of cooling mode; when environmental temperature is lower than 25°C (77°F), the operation state is the same as that of fan mode.
Timer Mode
- In standby state, press the Timer key to set ON time. Press Up and Down keys to set ON time (1~24H), and the timer indicator lamp lights up.
- In ON state, pressure the timer key to set OFF time. Press Up and Down keys to set OFF time (1~24H), and the timer indicator lamp lights up
Clean and Maintenance
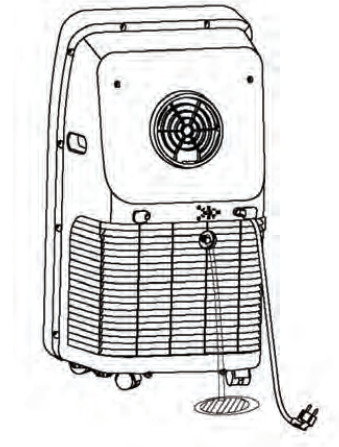
DRAINAGE METHOD
This product is equipped with automatic water vaporization system. The condenser is cooled with the circulating of condensing water, so as to improve cooling e�ciency and save energy.
- If the internal vessel is full of water, the display screen will display “FL”, and the compressor stops working automatically. After power of, unscrew the water cover, pull out the water plug to drain ofwater, and it will become normal after being restarted.
MAINTENANCE
Notice: In order to avoid electric shock, please turn o� the A/C and unplug before maintenance or repair.
CLEANING
- Unplug before cleaning.
- Wipe with soft semi-dry cloth. Don’t use chemical reagent, such as benzene, alcohol and gasoline etc; otherwise surface of the A/C and even the whole A/C will be damaged.
- Prevent water from spattering in the A/C.
FILTER SCREEN
- Vacuum the filter screen once every two weeks. If it is blocked by dust, efficiency of the A/C will be reduced.
- Take out the air inlet grille and pull out the filter screen at both sides according to the direction shown in the following figures. Use vacuum to remove lint from filters.
- Put the filter screen into the warm water (about 40°C or 104°F) added with neutral detergent, dry it at a shady place after cleaning.
SEASONAL CLEANING
If the A/C will not be used for a long time:
- Pull out the water plug to drain.
- Run the A/C in fan mode for 2H till the inside is dry.
- Turn of the A/C and unplug.
- Wash the filter screen and reassemble it.
- Dismantle the exhaust duct and keep it properly.
- Cover the A/C with a plastic bag and place it at a dry place.
Common Failures and Diagnosis
Intelligent Error Detection
Error-detecting code & Multi-functional defection
- E1
- Error of the coil’s temperature sensor
- E2
- Error of indoor temperature sensor
- E4
- Anti-freezing protection: temperature of the coil is too low and the whole A/C is of. When temperature excesses 8°C or 46.4°F, the protection is released and previous working state is recovered.
FUSE PARAMETERS
- Voltage: 250VAC
- Current: 3.15A
Troubleshooting
In case of any of the following trouble, please contact professional maintenance personnel in time.
TROUBLE, CAUSE & SOLUTION
- The A/C doesn’t work
- No display
- Reset circuit breaker on AC cord
- The display panel displays “FL”
- Restart the A/C after power off and draining, then it will become normal
- Time OFF function is started
- The A/C can be restarted 3 minutes after being turning off.
- The A/C starts frequently
- Direct sunlight
- Doors and windows keep open; there are lots of people or heat source in room
- Close doors and windows, remove heat source
- Filter screen is very dirty
- Air inlet or air outlet is blocked
- Big noise of the A/C
- The A/C is placed unevenly
- Place it at even and firm ground, avoid shaking
- The compressor doesn’t work
- Its delay protection is started
- Wait for 3min., turn on after temperature decreases
Notice: When there is any abnormal to the A/C, turn it of and unplug, and then contact professional maintenance personnel.
Features and Technical Specifications
Do not dispose of electrical appliances as unsorted municipal waste, use separate collection facilities. Contact you local government for information regarding the collection systems available. If electrical appliances are disposed of in landfills or dumps, hazardous substances can leak into the groundwater and get into the food chain, damaging your health and well -being. When replacing old appliances with new ones, the retailer is legally obligated to take back your old appliance for disposals at least free of charge.
Features:
- Lightweight & Portable AC Unit
- Compact Freestanding Room Air Conditioner & Heater
- (4) Operation Modes: AC Cool / Heat / Dehumidifier / Fan
- Hassle-Free, Quick Setup Heating & Cooling
- Simple Electric Plug-in Operation
- Temp Control Air Circulator Function
- Automatic Swing Mode: Moving Wind Vents for Air Circulation
- Convenient Wide-Area Climate Control Room AC Coverage
- Touch Button Control Panel with Digital LED Display
- Time, Temperature & Fan Speed Adjustment Settings
- Includes Universal Window Mount AC Exhaust Kit
- Removable & Washable Air Filter Screen
- Modern Style, Sleek Body Housing
- Energy Efficient: Low Power Consumption
- Low Noise Level Motor
- Rolling Wheels for Easy Portability
- Used for Home, Office, School & Business Rooms
What’s in the Box:
- AC Unit
- Exhaust Hose
- Window Installation Plate
- Digital Remote Control
Technical Specs:
- AC Cooling Power: 10,000 BTU
- Heating Power: 9,000 BTU
- Coverage Area: Cools & Heats Rooms Up to 270’+ Square Feet
- Rated Power: 1150Watt
- Air Flow: 350 Cubic Meters / Hour
- Operating Modes: Cool / Heat / Fan / Dry (Dehumidifier)
- Moisture Removal / Dehumidifier: 1.5 Liters / Hour
- Operating Noise Level: 56 +/-3 dBA
- Fan Speed Settings: Low/Medium/High
- Temperature Unit Selectable: °F / °C (Fahrenheit / Celsius)
- Adjustable Timer Settings: Up to 24 Hours
- Construction Material: Engineered ABS Housing
- Battery Operated Remote Control, Requires (2) x ‘AAA’ Batteries, Included
- Power Cable Length: 5.0’ ft.
- Power Supply: 120V
- Dimensions (L x W x H): 17.4’’ x 13.4’’ x 32.1’’ - inches