Preparation
Unpacking
3
Features
4
Wireless
4
Sound
4
Comfort
4
Durable
4
Features and functions
5
Charging / Battery status
6
Wearing
8
Switching Audio Guidance (notification sounds)
9
Connections
Turning the power on/off
10
Bluetooth operation
11
Pairing
11
Registering (Pairing) and connecting a Bluetooth device
11
Reconnecting paired devices
13
Deleting pairing information
14
Operation
Listening to music
15
Conducting phone calls
17
Making a call
17
Answering an incoming call
17
Ending a call
17
Using the call waiting function
18
Ignoring an incoming call
18
Switching a call from the headphones to a mobile phone
18
Other operations
19
Information
20
Replacing the ear tips
20
Replacing the ear rings
20
Audio Playback and Phone Calls on a Bluetooth Device
21
Troubleshooting
Troubleshooting
22
Appendix
Precautions for Use
24
Disposal of these headphones
25
Trademark information
25
Specifications
26
27
Contents Preparation Connections Operation
Troubleshooting
Appendix
Contents
2
Thank you for purchasing this product. To ensure proper operation, please read this Owner’s Manual carefully before using the product.
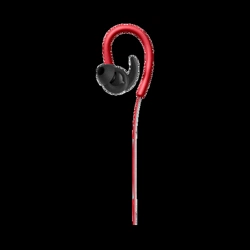
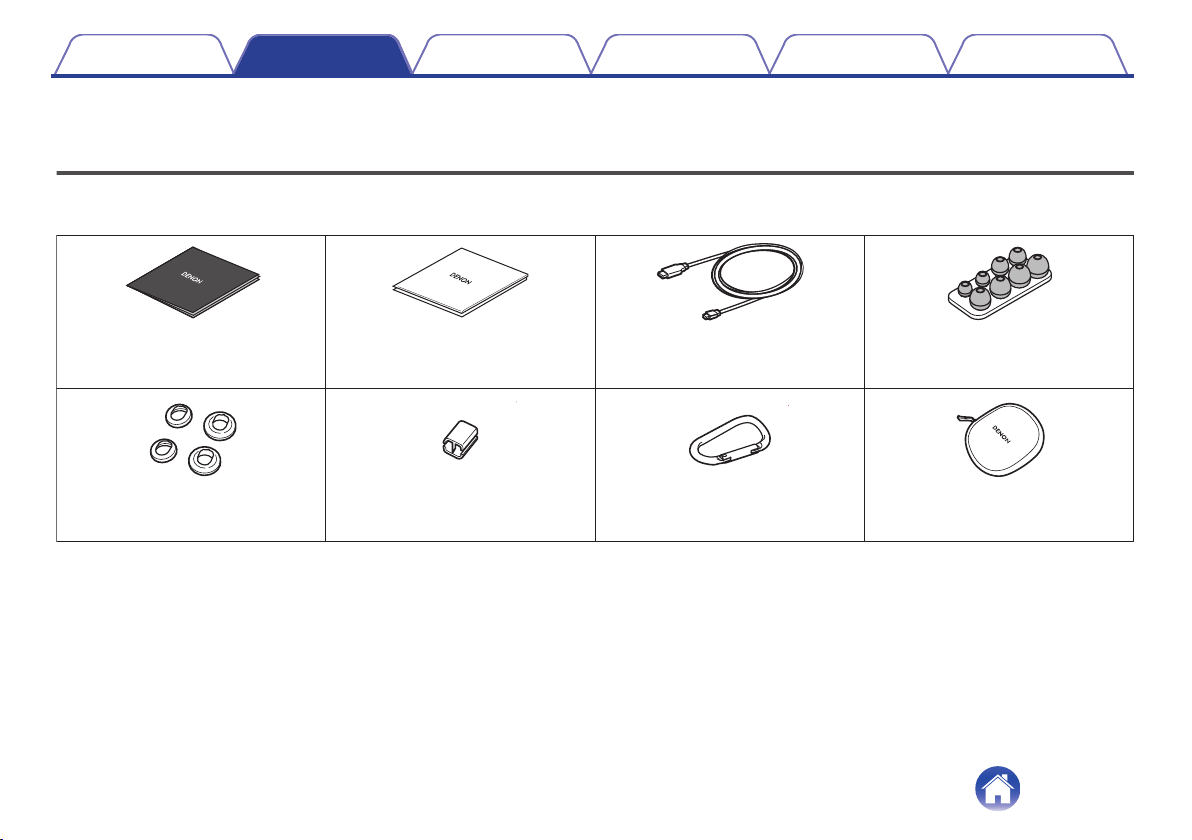
Unpacking
Unpack your new AH-C160W and verify that the following items are included.
.
Quick Start Guide Safety Instructions USB cable
(Micro B connector)
(for charging: Approx. 0.3 m)
Ear tips (XS/S/M/L)
Ear rings (S/L) Slider Carabiner
Carrying case
Contents Preparation Connections Operation
Troubleshooting
Appendix
Preparation
3
Features
Wireless
0
You can enjoy listening to music wirelessly by connecting the
AH-C160W to your Bluetooth device. Playback operations and
volume adjustment can be performed for the paired audio device
using the headphones.
Sound
0
The sound of the AH-C160W has been designed and tuned using
advanced digital signal processing – to help and inspire you to
achieve your fitness goals faster.
0
The AH-C160W uses Clear Voice Capture, a sophisticated noise
reduction system to deliver the clearest voice quality for phone
calls – even in the noisiest environments.
0
The AH-C160W’s Multilingual Voice Prompts keep you aware of
headphone status – such as battery level – so you can
concentrate on getting on with your workout!
Comfort
0
The sleek design of the AH-C160W uses unique Earhook
technology, developed with a leading hearing aid specialist, to
keep the earpieces in place – even during heavy workouts or
when running. Three sizes of ring give the best fit for the ears,
ensuring pure music playback and excluding noise.
0
Along with four sizes of silicon ear tip, the AH-C160W comes with
Comply tips made from Memory foam to ensure ultimate comfort
in the ear. They’re treated with SweatGuard to keep them clean –
however hard the exercise!
Durable
0
The AH-C160W is designed to survive: as well as its durable
mechanical structure, even the electronics inside are coated with
Nanofics technology, for IPX5/7 class sweat resistance.
Contents
Preparation Connections Operation
Troubleshooting
Appendix
4
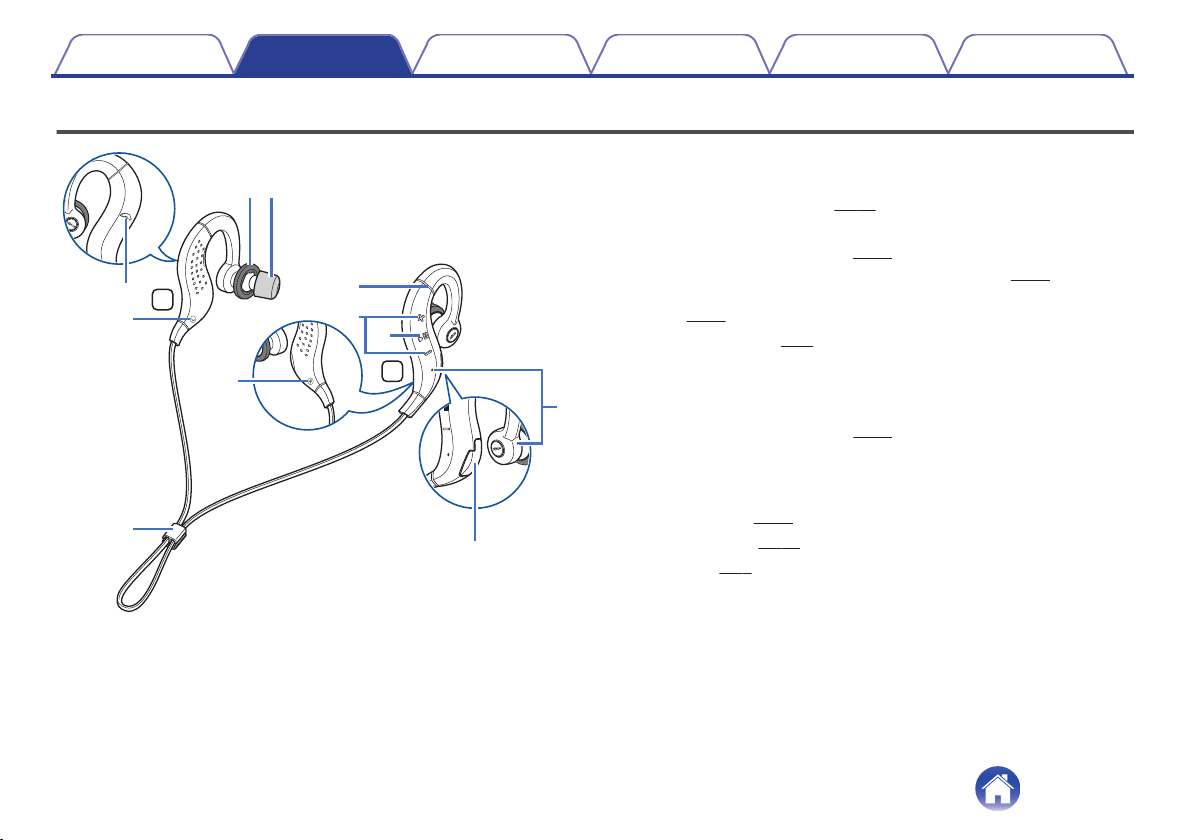
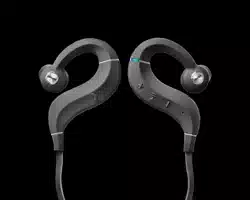
Features and functions
.
R
L
i
w
e
q
r
y
t
o
y
Q0
u
A
Status indicator LED
B
Call microphones
C
Volume buttons (+/–) (v
p. 16)
D
Control button (1 3)
0
Turns the power on/off. (v p. 10)
0
Pairs the headphones with Bluetooth devices. (v
p. 11)
0
Operates the audio device that is connected using Bluetooth.
(v
p. 15)
E
Charging port (v p. 6)
F
L/R Indicators
G
Ear rings
0
The M size is attached at the time of purchase. Replace them to
match your preference. (v
p. 20)
H
Ear tips
The Comply(TM) foam ear tips are attached at the time of purchase.
Replace them with any of the accessory ear tips to match your
preference. (v p. 20)
I
Call button (v p. 17)
J
Slider (v p. 8)
Contents
Preparation Connections Operation
Troubleshooting
Appendix
5
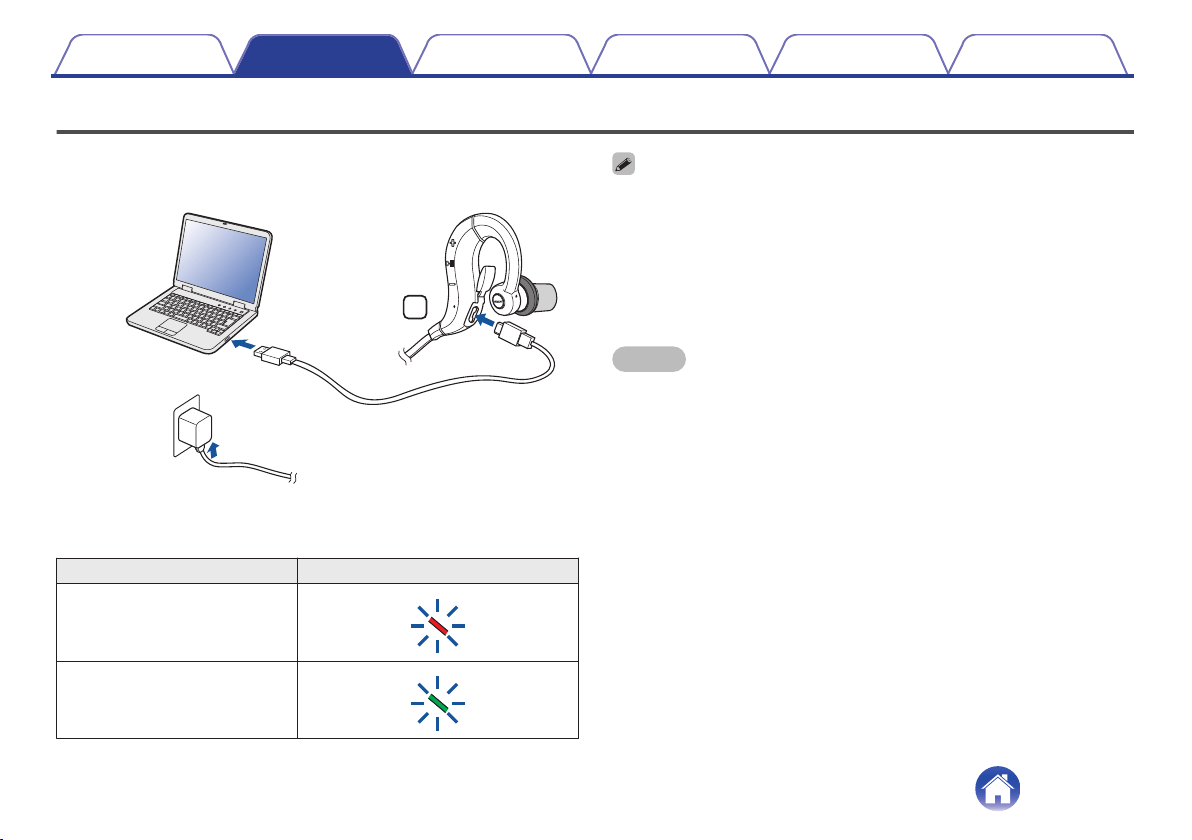
Charging / Battery status
Connect the headphones to a computer or USB AC adapter (sold
separately) using the supplied dedicated charging cable to charge the
battery.
.
R
or
PC
USB AC
adapter
The charging status can be checked from the status indicator LED on the
headphones.
Charging status Status indicator LED color
Charging
.
Fully charged
.
0
When using the headphones for the first time after purchase or when the
remaining power of the rechargeable battery is low, charge the battery.
0
The headphones can be used for approximately 4 hours of music playback when
fully charged.
0
It takes approximately 2 hours to fully charge the rechargeable battery from the
state of no remaining battery power.
0
The headphones can be used for approximately 1 hour of music playback after
charging for approximately 20 minutes.
NOTE
0
When the dedicated charging cable is connected to the headphones, the power of
the headphones turns off and the mode becomes charging mode. Before use after
charging, disconnect the cable from the headphones and turn on the power.
0
When connecting the dedicated charging cable to the charging port, be sure to
match the cable connector with the shape of the socket. Forcing the connector into
the socket will cause damage.
0
The rating of the charging output should be DC 5 V, 2.4 A or less.
0
The usable time of the headphones differs depending on the temperature of the
environment in which they are used and method of use.
Contents Preparation Connections Operation
Troubleshooting
Appendix
6
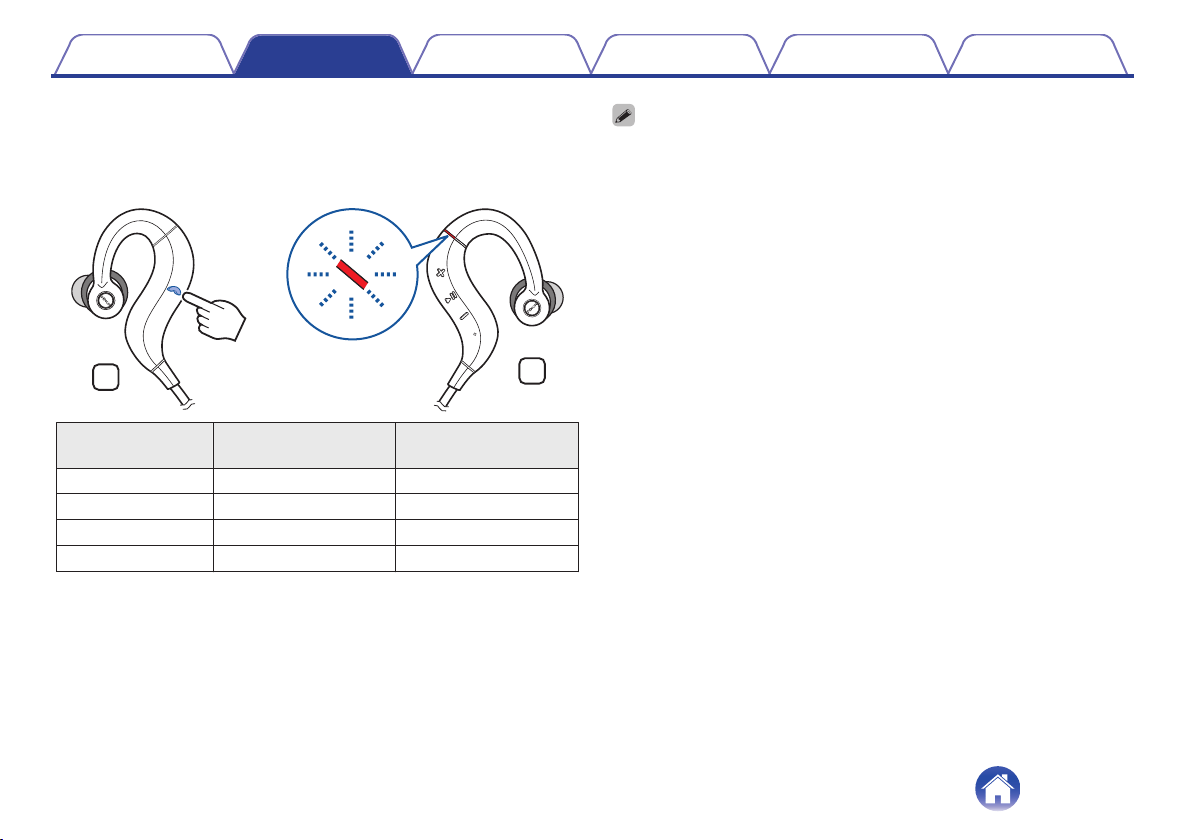
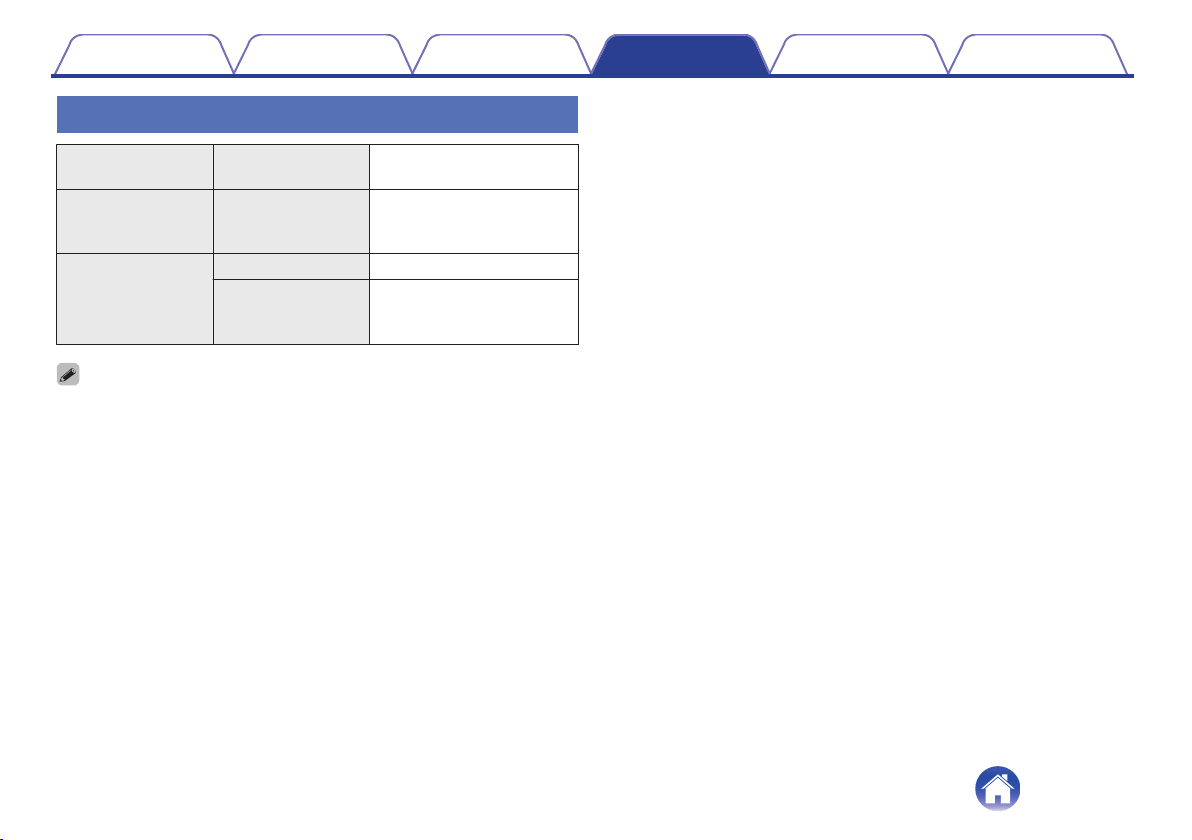
o
Checking the remaining battery power
The remaining power of the rechargeable battery can be checked from the
number of beeps or audio guidance. Furthermore, it can also be checked
from the number of times the LED flashes red. Turn on the power and
press the call button twice in succession when a call is not in progress.
.
L
R
×2
Number of beeps Number of times LED
flashes red
Remaining time of
rechargeable battery
Four times Four times Approx. 4 hours
Three times Three times Approx. 3 hours
Twice Twice Approx. 2 hours
Alert tone Once Less than 1 hours
0
When the remaining power of the rechargeable battery is running low, the LED
flashes red at approximately 3-second intervals together with a beeping sound.
0
You can also check the remaining power of the rechargeable battery on an iPhone. (*)
z
The remaining power of the rechargeable battery can be displayed as a
percentage (%) on an iPhone, but this number is an approximate value.
Contents Preparation Connections Operation
Troubleshooting
Appendix
7
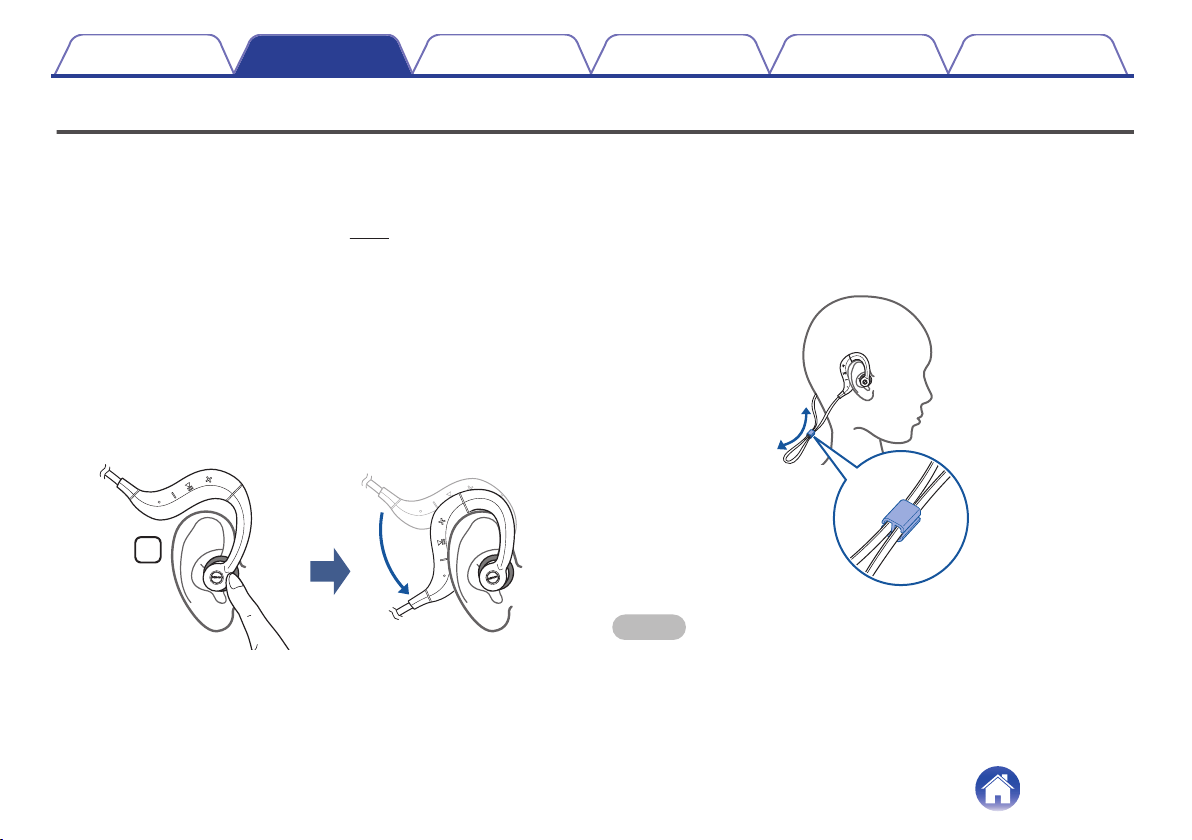
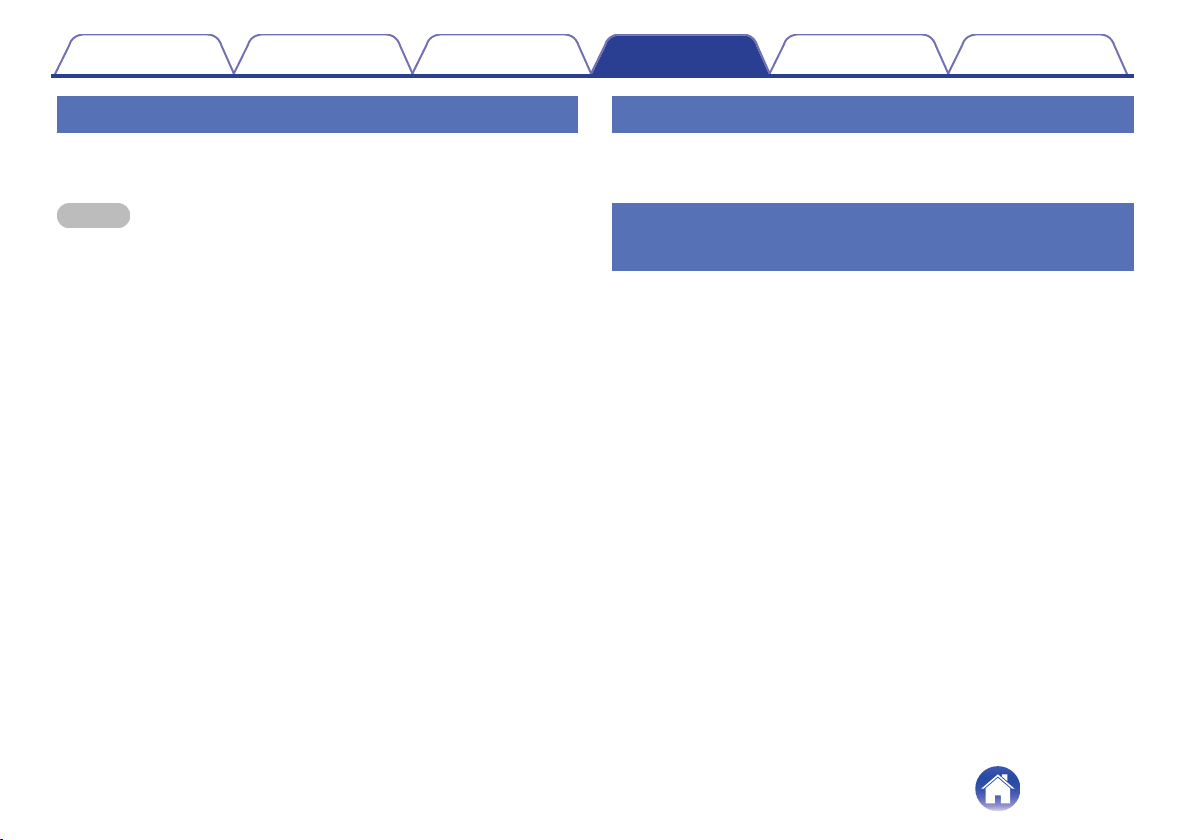
Wearing
o
Wearing the headphones
These headphones are supplied with different sizes of ear rings and ear
tips for adjusting the fit. Use the combination that best suits your ears in
order to find the most comfortable fit. (v p. 20)
Wear the headphones as described below.
1
Insert the ear tip of the “L” of the headphones into the
left ear, and the ear tip of the “R” into the right ear.
0
When using the Comply (TM) form ear tips that are already
attached to the headphones, mold the ear tips with your fingers
before inserting in your ears.
2
Lift the hook parts of the headphones over the ears and
then hook them behind the ears as shown in the figure.
.
R
o
Adjusting the length of the headphones cable
Attach the supplied slider to the headphones cable as shown in the figure
and then adjust the length of the cable.
Setting the slider to the position in the figure will make it difficult for any
vibration sound resulting from the cable moving up and down during
jogging to be transmitted to the ears.
.
NOTE
0
Do not forcefully pull or bundle the cable. The cable may break resulting in the
inability to output sound.
0
After attaching the slider, check that it does not become detached by vibration.
Contents
Preparation Connections Operation
Troubleshooting
Appendix
8
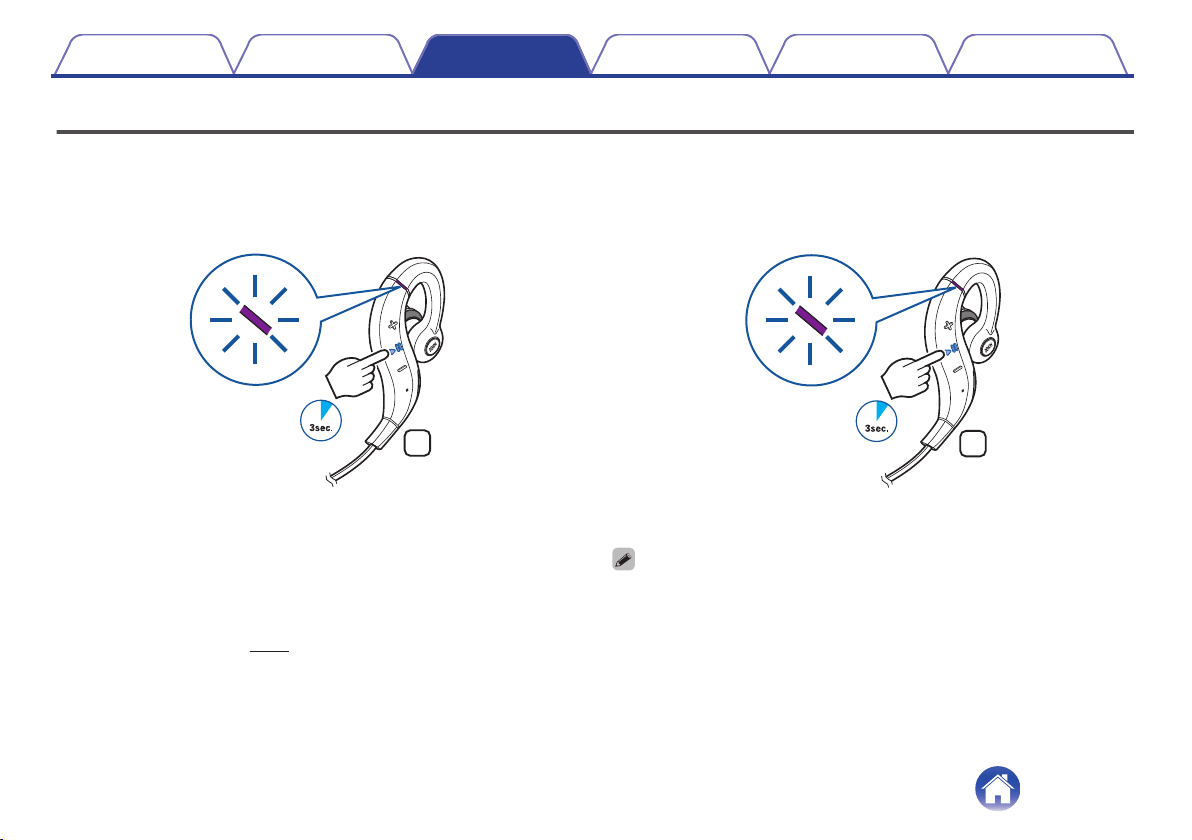
Switching Audio Guidance (notification sounds)
You are notified when an operation has completed correctly by a “beep” or “audio guidance”.
o
Switching the audio guidance language
You can switch to audio guidance in your preferred language or switch to a
beep sound.
1
Connect the headphones and Bluetooth device using
Bluetooth. (v p. 11)
2
Press and hold the call button and volume “+” button
together for approximately 1 second.
0
The audio guidance is switched.
0
Each press switches to an audio guidance language or beep
sound in the following order.
Beep sound, English, Japanese, German, French, Italian,
Spanish, Chinese
.
RL
1sec.
Contents
Preparation Connections Operation
Troubleshooting
Appendix
9
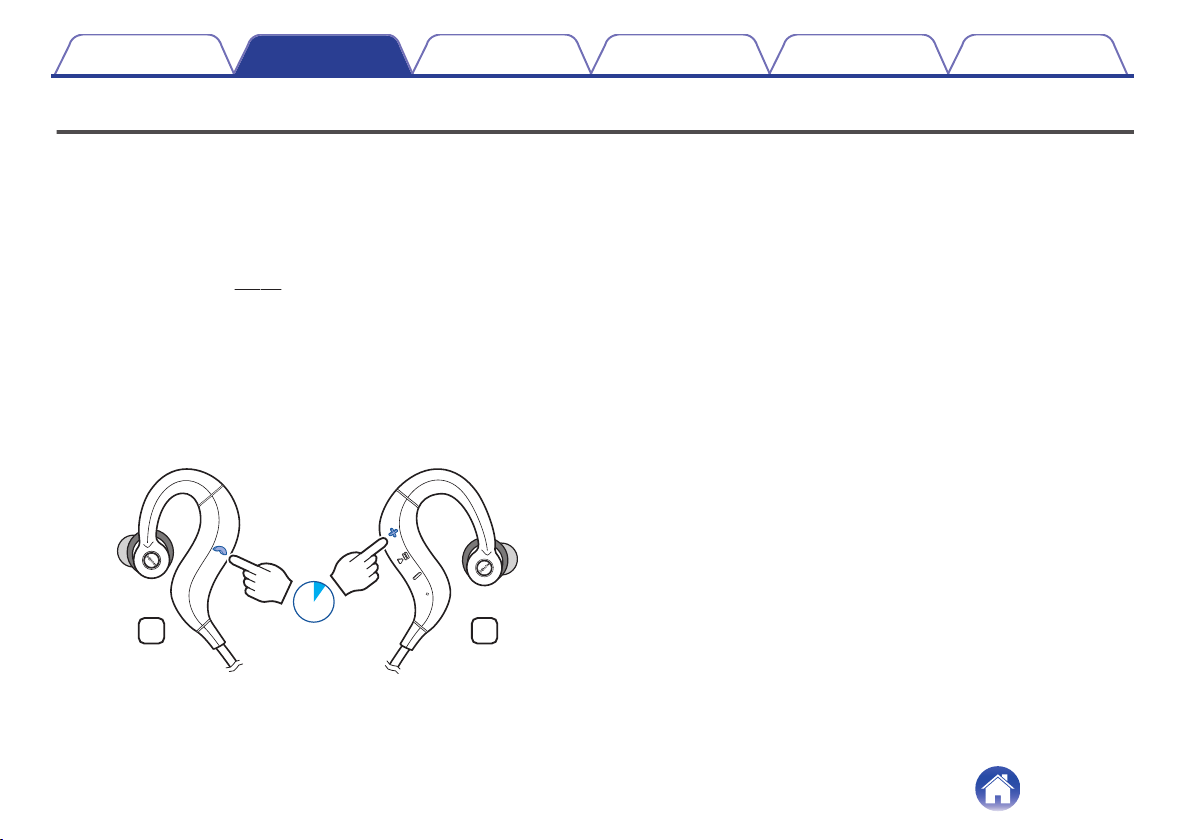
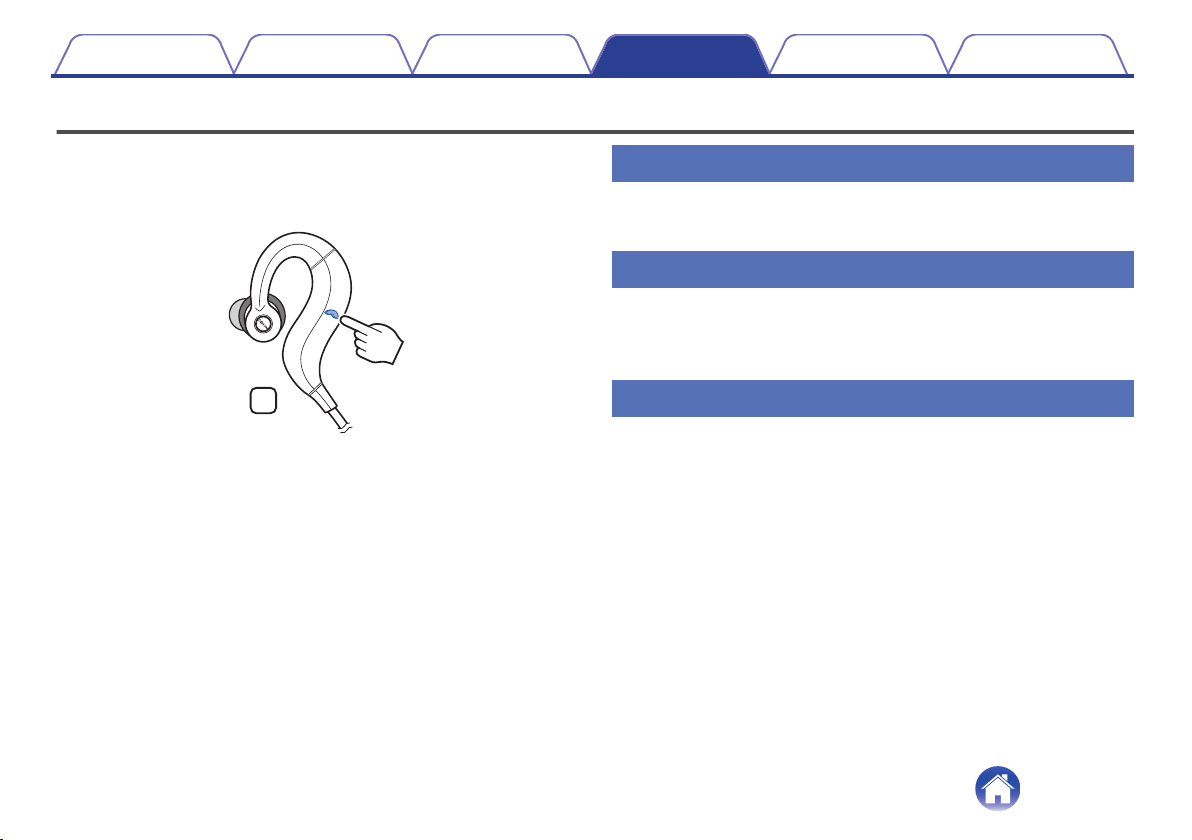
Turning the power on/off
Turn on the Bluetooth function of the Bluetooth device that you want to
connect to beforehand.
1
Press and hold the headphones' control button for
approximately 3 second.
.
R
0
When the pairing information is deleted, the headphones
automatically switch to pairing registration mode when the power
is turned on.
0
A beep sound is heard and the status indicator LED lights purple
for approximately 1 second.
0
The headphones automatically connect via Bluetooth to the
Bluetooth device when the device is already paired with the
headphones. (v p. 13)
o
Turning the power off
1
Press and hold the control button for approximately 3
seconds.
.
R
0
A beep sound is heard and the status indicator LED lights purple
for approximately 1 second.
0
A small amount of power is consumed even when the power is off.
Contents Preparation Connections Operation
Troubleshooting
Appendix
Connections
10
Bluetooth operation
Pairing
You need to register (pair) a Bluetooth device with the headphones in
advance in order to enjoy listening to wireless music or make phone calls.
You can connect to a Bluetooth device any time after it has been paired.
NOTE
0
Pairing needs to be done again in the following cases.
0
When 9 or more devices have been paired with the headphones
These headphones can store pairing information from a maximum of 8 devices.
When 9 or more devices are paired, the new pairing information overwrites the
oldest pairing information in order from the oldest information onwards.
Multiple Bluetooth devices cannot be played back at the same time.
Registering (Pairing) and connecting a
Bluetooth device
Check that the headphones are not connected to any Bluetooth device
before pairing.
1
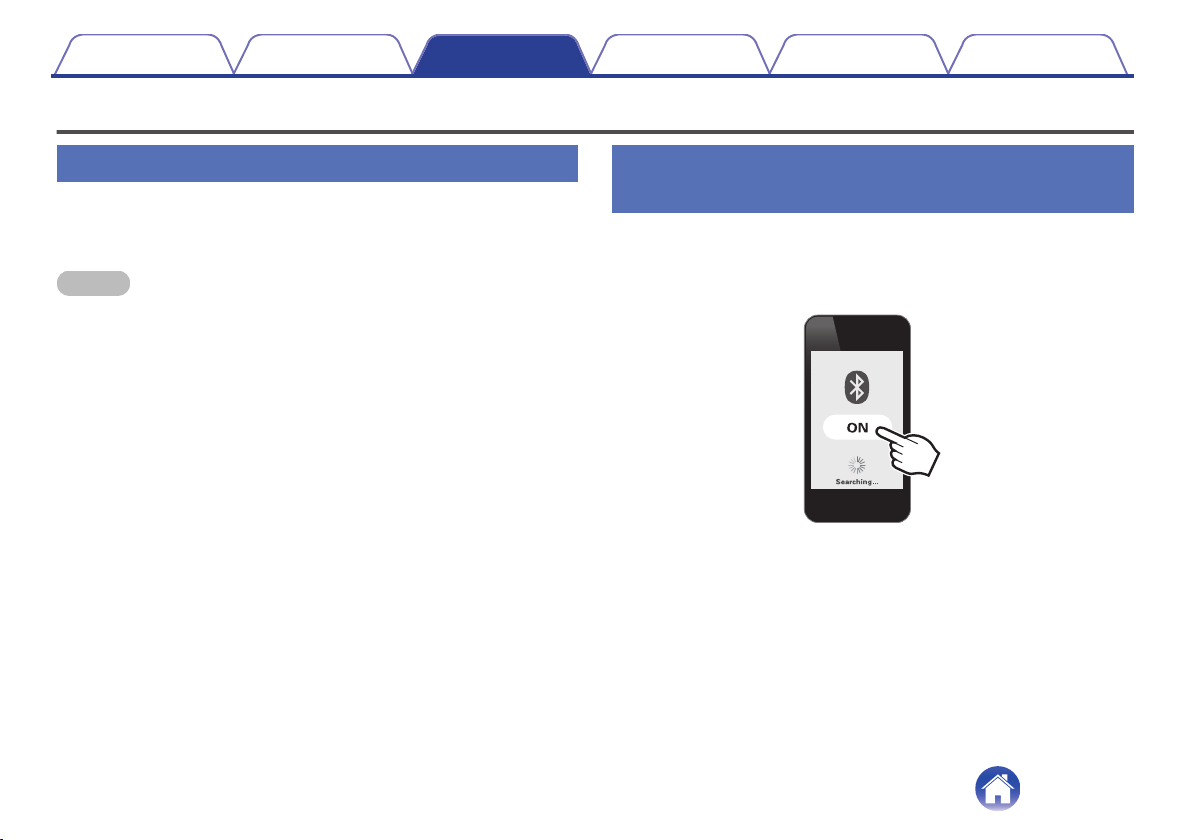
Turn on the Bluetooth function of your mobile device.
.
0
For details, see the Owner’s Manual of the Bluetooth device that
you want to connect.
Contents
Preparation Connections Operation
Troubleshooting
Appendix
11
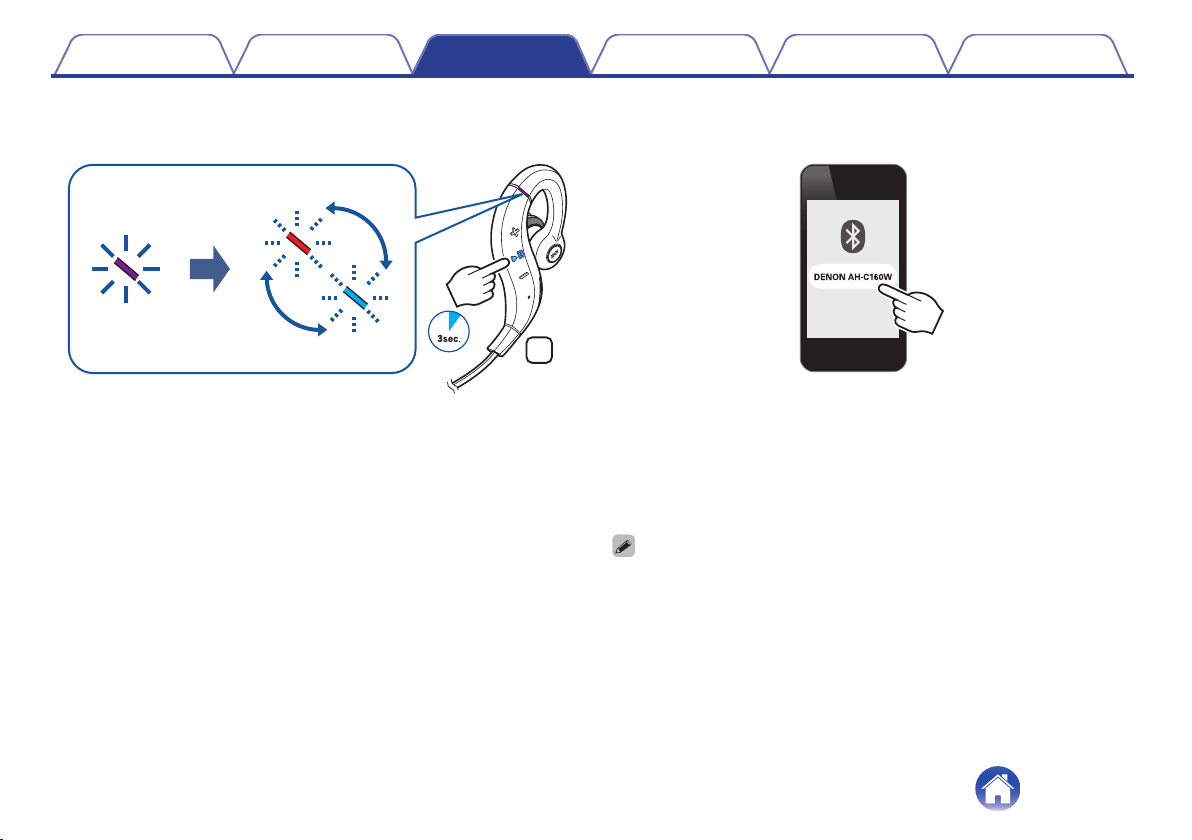
2
When the headphones power is off, press and hold the
control button for approximately 3 seconds.
.
R
0
The status indicator LED lights purple for approximately 1 second
and then flashes red and blue alternately indicating that the
headphones are in pairing registration mode.
0
If the status indicator LED does not light even when the control
button is pressed, the rechargeable battery has no power
remaining. Charge the battery.
3
Select “DENON AH-C160W” from the list of devices
displayed on the screen of your Bluetooth device.
.
When registration (pairing) is complete and a Bluetooth connection
is established, the status indicator LED on the headphones lights
blue for approximately 5 seconds.
4
Playing back music on the Bluetooth device.
Music played back on the connected Bluetooth device is output from
the headphones.
0
If the power is on, turn the power off before pairing.
0
The headphones pairing registration mode is canceled if pairing is not completed
within 3 minutes. In this case, press and hold the control button for approximately 3
seconds to turn the power off, and then try pairing again.
0
If you are requested to enter a PIN code (pass key), enter “0000” (four zeros).
Contents
Preparation Connections Operation
Troubleshooting
Appendix
12

Reconnecting paired devices
Check that the headphones are not connected to any Bluetooth device
before connecting.
1
Turn on the Bluetooth function of your mobile device.
.
0
For details, see the Owner’s Manual of the Bluetooth device that
you want to connect.
2
Press and hold the control button for approximately 3
seconds to turn the headphones power on.
.
R
0
A beep sound is heard and the status indicator LED lights purple
for approximately 1 second.
Contents
Preparation Connections Operation
Troubleshooting
Appendix
13
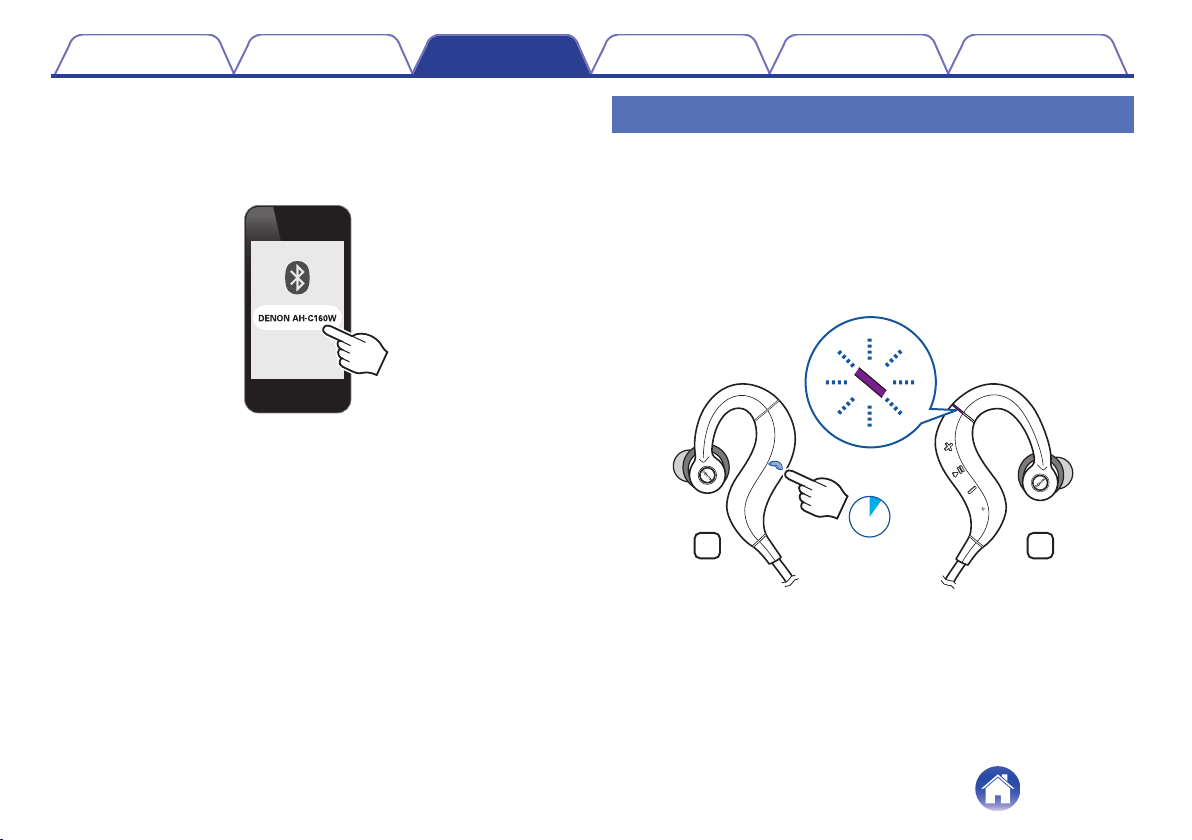
3
The headphones automatically connect via Bluetooth
to the Bluetooth device.
If the device is not connected, select “DENON AH-C160W” from the
list of devices displayed on the screen of your Bluetooth device.
.
0
When the Bluetooth connection is established, the status
indicator LED lights blue for approximately 5 seconds.
4
Playing back music on the Bluetooth device.
Music played back on the connected Bluetooth device is output from
the headphones.
Deleting pairing information
Delete pairing information if you have made a mistake entering pairing
information or when re-pairing a device.
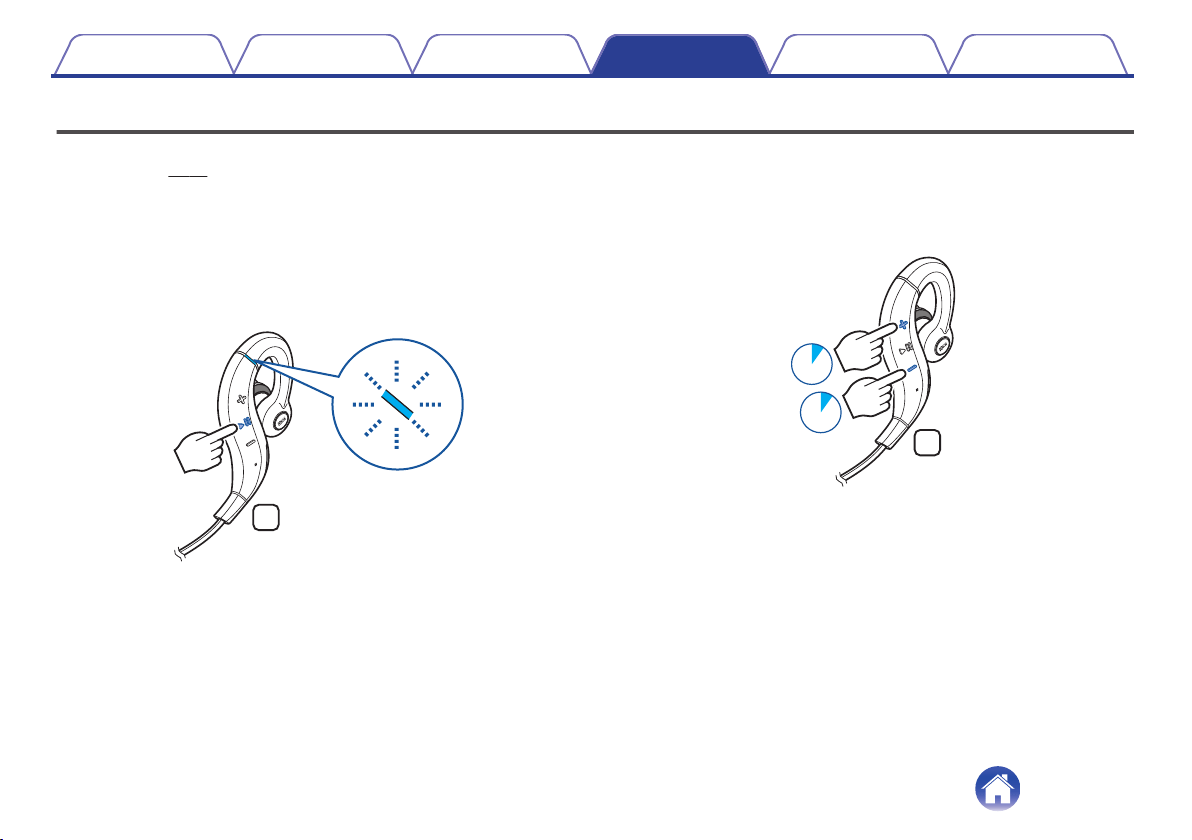
1
Press and hold the call button for approximately 3
seconds when the headphones are in pairing
registration mode with the Bluetooth device.
0
A beep sound is heard, the status indicator LED flashes purple 5 times,
and the pairing information is deleted.
.
RL
3sec.
Contents
Preparation Connections Operation
Troubleshooting
Appendix
14
Listening to music
First check that the headphones and Bluetooth device are connected via
Bluetooth. (v p. 11)
Playback operations can be performed from both the Bluetooth device and
headphones. Here we will explain the operations using the control buttons
on the headphones.
Playback/pause
Press the control button once.
0
The status indicator LED flashes blue during playback.
.
R
Select track
Next track: Press and hold the volume “+” button for approximately 1
second.
Previous track: Press and hold the volume “-” button for approximately
1 second.
.
R
1sec.
1sec.
Contents
Preparation Connections Operation
Troubleshooting
Appendix
Operation
15
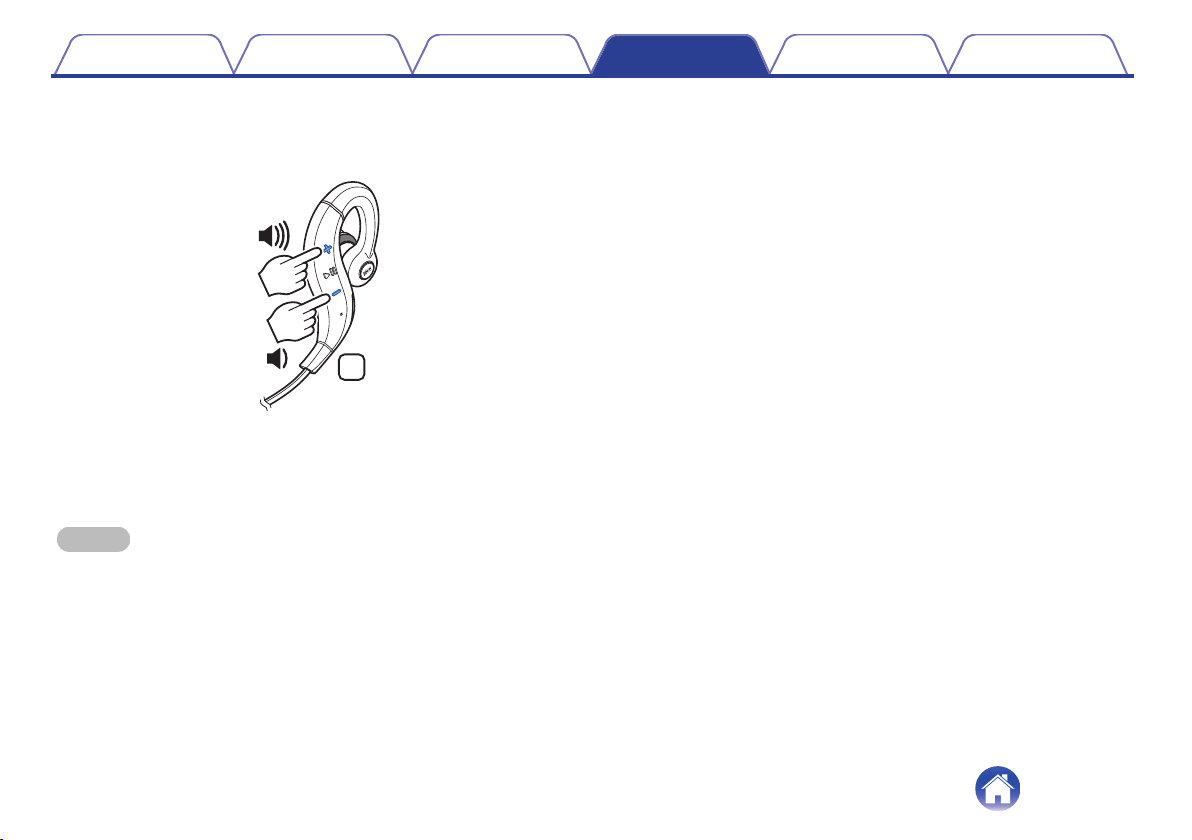
Volume adjustment
Increase volume (*1): Press the volume “+” button.
Decrease volume (*2): Press the volume “-” button.
.
R
z1
When the maximum volume is reached, a beep sounds twice. The volume
cannot be increased further.
z2
When the minimum volume is reached, a beep sounds once. The volume
cannot be decreased further.
NOTE
0
When the dedicated charging cable is connected to the headphones, the power
turns off automatically.
Contents Preparation Connections Operation
Troubleshooting
Appendix
16
Conducting phone calls
Calls can be made while you are wearing the headphones. You can hear
the caller’s voice through the headphones, and your voice is picked up by
the built-in microphone in the headphones. The paired Bluetooth
compatible mobile phone is controlled using the Call button.
.
L
Making a call
Dial operations are done on the paired mobile phone. Audio playback is
paused and the call is connected.
Answering an incoming call
When an incoming call is received, audio playback is paused and the ring
tone is heard.
Press the call button once to answer the call.
Ending a call
Press the call button once during the call.
When a call is ended, playback of the paused track is restarted.
Contents
Preparation Connections Operation
Troubleshooting
Appendix
17
Using the call waiting function
If you receive a call while another call is already in progress, you can place
the current call (call A) on hold and switch to the new call (call B).
NOTE
0
Some of mobile phones may not be compatible with these functions.
1
Press the call button once during the call.
0
This places the current call (call A) on hold and switches to the
new call (call B).
0
When the new call (call B) ends, the headphones return to the call
that is on hold (call A).
o
To return to the call that is on hold (call A)
1
Press and hold the call button for approximately 3
seconds during the call (call B).
0
This places the current call (call B) on hold and switches to the
call that is on hold (call A).
Ignoring an incoming call
Press and hold the call button for approximately 2 seconds when an
incoming call is received.
Switching a call from the headphones
to a mobile phone
Switch the current call to the mobile phone.
Press the call button twice.
Contents Preparation Connections Operation
Troubleshooting
Appendix
18
Other operations
Incoming call
detected
Answer Press the call button once
In standby mode/
During audio
playback
Voice dial/
Voice activated call
Press and hold the call
button for approximately 1
second.
Call in progress
End call Press the call button once
Mute on/off Press and hold the call
button for approximately 1
second.
0
Press the volume button to adjust the volume of the caller’s voice.
Contents Preparation Connections Operation
Troubleshooting
Appendix
19
Information
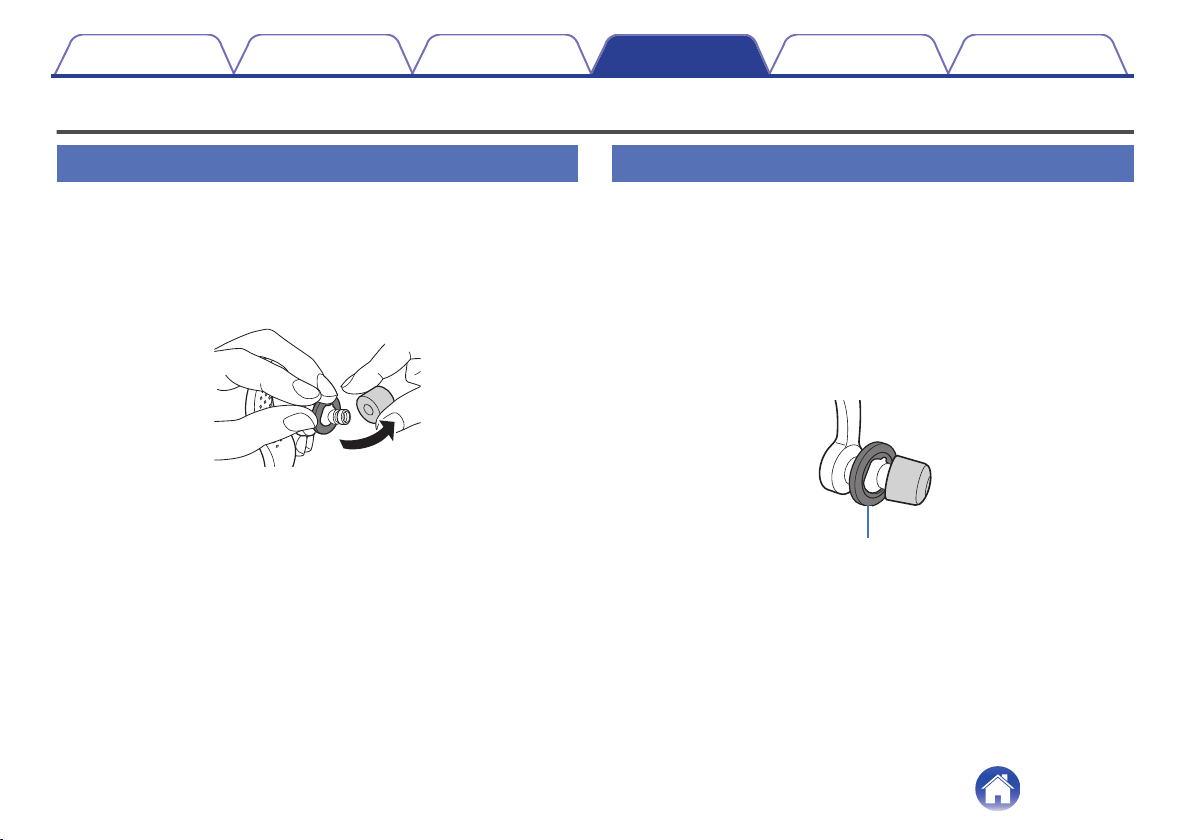
Replacing the ear tips
Removing
Hold the ear tip and pull while tilting it.
Attaching
Align the nozzle with the earpiece attachment part and push it all the
way in using a small amount of force.
.
Replacing the ear rings
Ear rings adjust the degree of fit of the headphones in the ears. This
enables the headphones to be held firmly when vibration from jogging and
other activities is transmitted to the headphones. Attach ear rings that
match the size of your ears.
1
Remove the ear tips and ear rings.
2
Align the protrusion on the housing of the headphones
and the depression of the ear ring of the preferred size
and then attach the ear ring.
.
Ear rings
Contents
Preparation Connections Operation
Troubleshooting
Appendix
20
Audio Playback and Phone Calls on a
Bluetooth Device
0
These headphones are compatible with SCMS-T content security
standards. You can use these headphones with SCMS-T compatible
mobile phones or devices.
0
In order to listen to music via a Bluetooth connection, the connected
Bluetooth device needs to be A2DP (Advanced Audio Distribution
Profile) compatible. (*)
0
In order to control playback on the Bluetooth device, the connected
Bluetooth device need to be AVRCP (Audio Video Remote Control
Profile) compatible. (*)
z
For details on profiles that the Bluetooth device is compatible with, see the
Bluetooth device Owner’s Manual.
0
The connected Bluetooth device needs to be compatible with either
HSP (Headset Profile) or HFP (Hands-free Profile) in order to use the
headphones for conducting phone calls. (*)
0
The Bluetooth device needs to be compatible with either HFP or HSP
and A2DP in order to conduct calls during audio playback. (*)
z
For details on profiles that the Bluetooth device is compatible with, see the
Bluetooth device Owner’s Manual.
Contents
Preparation Connections Operation
Troubleshooting
Appendix
21
Troubleshooting
If the headphones do not operate correctly, first check the following items.
Symptom Cause / Solution Page
The Bluetooth function of the
headphones does not switch
on.
0
When the rechargeable battery has no power remaining, connect the headphones to a computer using
the supplied dedicated charging cable to charge the battery. When the dedicated charging cable is
connected to the headphones, the power of the headphones turns off and the mode becomes charging
mode. Before use after charging, disconnect the cable from the headphones and turn on the power.
6
Cannot pair a Bluetooth
device.
0
Check that the power of the headphones is switched on.
10
0
Move the Bluetooth device that you want to connect closer to the headphones.
-
Cannot connect using
Bluetooth.
0
Check that the power of the headphones is switched on.
10
0
Check that the power of the Bluetooth device is on and the Bluetooth function is enabled.
11
0
Check whether the Bluetooth device is in sleep status.
-
0
Pair the devices again.
11
Sound is not output from the
headphones when connected
using Bluetooth.
0
Check that the power of the headphones is switched on.
10
0
Check that the power of the Bluetooth device is on and the Bluetooth function is enabled.
11
0
Select A2DP as the Bluetooth connection profile on the transmitting Bluetooth device. For details, see the
Owner’s Manual of the Bluetooth device.
-
0
Check that audio is being played back on the Bluetooth device.
-
0
Increase the volume. Increase the volume on the Bluetooth device if it is necessary to adjust the volume
on the Bluetooth device.
16
0
Pair the devices again.
11
Contents Preparation Connections Operation
Troubleshooting
Appendix
Troubleshooting
22
Symptom Cause / Solution Page
Cannot hear the caller’s voice.
0
When listening to audio through the headphones, press the call button to switch to the call.
17
0
Check that the power of the headphones is switched on.
10
0
Check that the power of the Bluetooth device is on and the Bluetooth function is enabled.
11
0
Select HSP or HFP as the Bluetooth connection profile on the transmitting Bluetooth device. For details,
see the Owner’s Manual of the Bluetooth device.
-
0
Check that the Bluetooth device is set to handle calls through the headphones. For details, see the
Owner’s Manual of the Bluetooth device.
-
0
Increase the incoming call volume.
19
Contents Preparation Connections Operation
Troubleshooting
Appendix
23
Precautions for Use
0
Be sure to read the Owner’s Manual of the device that you want to connect.
0
Check the volume settings when using the headphones on public transport or in public places and make sure you do not disturb people around you.
0
These headphones are not guaranteed to work with all combinations of Bluetooth devices/mobile phones.
0
These headphones do not support connection with all Bluetooth devices/mobile phones.
0
Bluetooth wireless technology can communicate over a distance of approximately 10 m. However, obstructions (people, metallic objects, walls, etc.)
and radio wave conditions affect the range in which communication is possible.
0
The Bluetooth device that you want to connect must support the same profile as these headphones in order to use the Bluetooth function. For details on
profiles that the Bluetooth device is compatible with, see the Bluetooth device Owner’s Manual.
0
Due to features of Bluetooth wireless technology, playback of audio on the headphones is slightly delayed compared to the voice/audio playback on the
transmitting device.
Precautions regarding sweat-resistance performance
0
These headphones are a product with a sweat-resistance performance equivalent to IPX7(*1) and IPX5(*2).
You can exercise in the rain, touch it with wet hands, and have it exposed to limited water spray.
0
Please do not connect and charge unit if there is water / moisture at the USB connecter. Please wipe it off and wait until dry.
0
Do not swim with this product.
0
Do not wash this product.
0
The sweat resistant performance of the system is based on our measurements under the conditions herein described. Note that malfunctions as a
result of water immersion caused by misuse by the customer are not covered by the warranty.
(*1) IPX7 (Degree of protection against water immersion): Water will not enter the system and it will remain functional even if the system is gently immersed in a tank of tap
water (static water) at a normal temperature at a depth of 1 meter for approx. 30 minutes.
(*2) IPX5 (Degree of protection against jets of water): The system has been tested and found to remain functional after exposure to direct jet streams of water using a nozzle
of 6.3 mm internal diameter from any direction where approximately 12.5 l/min of water is applied for a period of more than 3 minutes from a distance of about 3 meters.
Contents
Preparation Connections Operation
Troubleshooting
Appendix
Appendix
24
Disposal of these headphones
The rechargeable battery built into these headphones can be recycled.
Contact the Denon Customer Service Center for details on disposing of
these headphones.
Trademark information
.
The Bluetooth
®
word mark and logos are registered trademarks owned
by Bluetooth SIG, Inc. and any use of such marks by D&M Holdings Inc.
is under license. Other trademarks and trade names are those of their
respective owners.
Contents Preparation Connections Operation
Troubleshooting
Appendix
25

Specifications
o
Headphone section
Type: Dynamic type
Drive units: φ11.5 mm
Playback frequency: 5 – 22,000Hz
Output sound pressure level: 100 dBA
o
Bluetooth section
Compatible standards: Bluetooth 4.1
Transmission power class: Class1
Compatible profiles: A2DP/AVRCP/HSP/HFP
A2DP codec support: AAC/SBC
Continuous playback time: Approx. 4 hours
o
General
Operating temperature range: 5 ℃ - 40 ℃
Power supply: DC 3.7 V (internal lithium polymer rechargeable battery)
Weight: 23 g
z
For purposes of improvement, specifications and design are subject to change without notice.
Contents
Preparation Connections Operation
Troubleshooting
Appendix
26
.
此标志是根据2016/1/6颁布的「电器电子产品有害物质限制使用管理办法」,以及「电子电气产品有
害物质限制使用标识要求」,适用于在中国销售的电子电气产品的环保使用期限。
在此产品相关的安全和使用上遵守注意事项,在从生产日期起计算的此年限内,产品中的有害物质不
会往外泄漏,或者引起突然变异而给环境污染,人体或财产带来重大影响。
另外,包装在一起的电池等消耗品的环保期限是技术寿命5年。
适当地使用完后废弃的情况,请协助遵守各自治体的电子电气产品回收·再利用相关的法律·规定。
零部件名称 对象零部件
有害物质
铅
(Pb)
汞
(Hg)
镉
(Cd)
六价铬
(Cr(VI))
多溴联苯
(PBB)
多溴二苯醚
(PBDE)
电路板
电路板组件、安装·插入零部件、
电路板(不包括特定电子零部件)
×○○ ○ ○ ○
机壳
顶盖、底盖、底壳、框架、
垫片、小螺丝等(金属、塑胶)、
(包含的接合材料)
○
○○ ○ ○ ○
附件
遥控器/AC适配器、电源线、
RCA信号线等附件、包装
○○○ ○ ○ ○
备注:本表格依据SJ/T 11364的规定编制。
○: 在该零部件的所有均质材料中的有害物质的含量不超过在GB/T 26572标准规定的限量要求
×: 在该零部件中至少一种均质材料中的有害物质的含量超过在GB/T 26572标准规定的限量要求
(×判定:包括EU RoHS的豁免项目)
Contents
Preparation Connections Operation
Troubleshooting
Appendix
27

www.denon.com
3520 10494 00ADB
Copyright © 2016 D&M Holdings Inc. All Rights Reserved.
28