Loading ...
Loading ...
Loading ...
38
English
Installation
NOTE
• The pipe will be insulated and fixed permanently into
position after finishing the installation and the gas leak
test. For further details. see Step 3.1 Performing the gas
leak tests on page 40.
CAUTION
• Tighten the flare nut with a torque wrench according to
specified method. If the flare nut is over-tightened, the
flare may break and cause refrigerant gas leakage.
• Do not box in or cover the pipe connection. All refrigerant
pipe connection must be easily accessible and
serviceable.
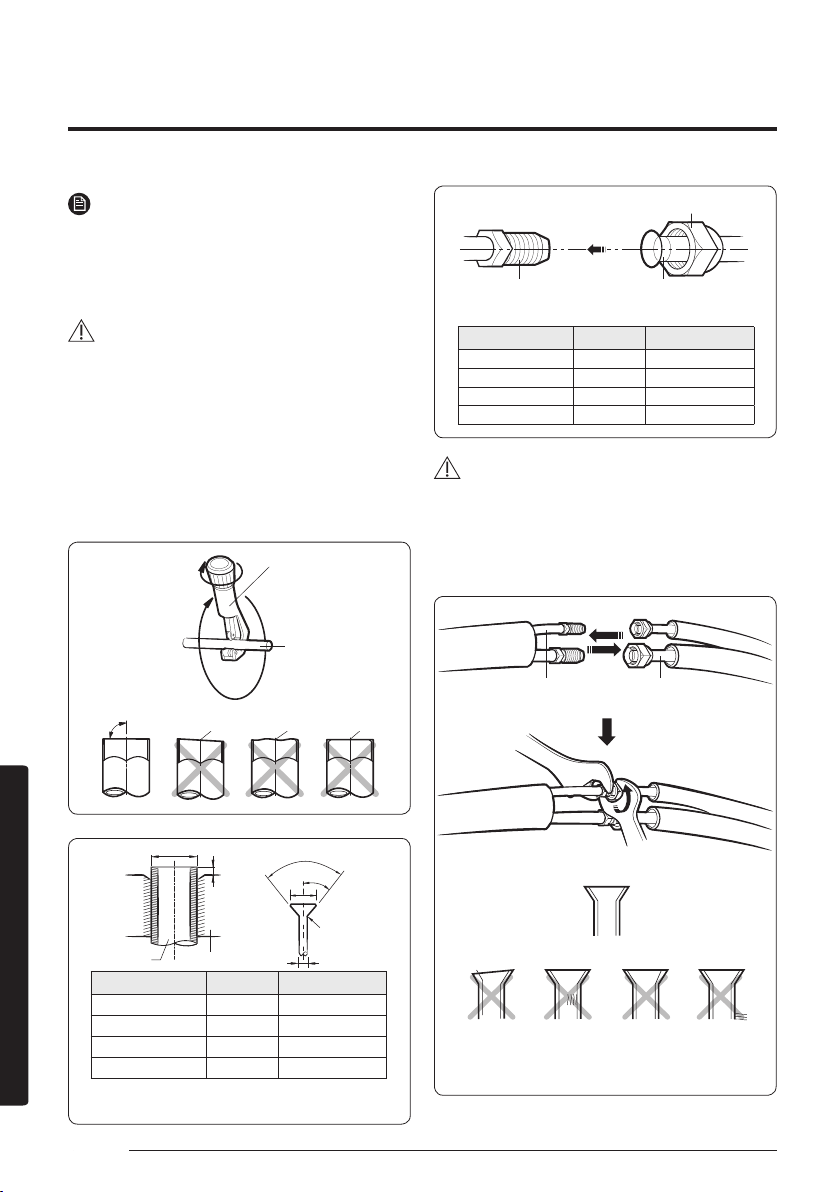
Step 2.7 Shortening or extending the
refrigerant pipes (assembly pipe)
90°
R 0.4 to 0.8
90°±2°
45°±2°
L
D
D
A
CAUTION
• If you need a pipe longer than specified in piping codes
and standards, you must add refrigerant to the pipe.
Otherwise, the indoor unit may freeze.
• While removing burrs, put the pipe face down to make
sure that the burrs do not get in to the pipe.
Pipe cutter
Pipe
Oblique Rough
Burr
(Unit: mm)
Outer diameter (D) Depth (A) Flare dimension (L)
ø 6.35 1.3 8.7 to 9.1
ø 9.52 1.8 12.8 to 13.2
ø 12.70 2.0 16.2 to 16.6
ø 15.88 2.2 19.3 to 19.7
(Unit: mm)
Outer diameter (mm) Torque(N•m) Torque(kgf•cm)
ø 6.35 14 to 18 140 to 180
ø 9.52 34 to 42 350 to 430
ø 12.70 49 to 61 500 to 620
ø 15.88 68 to 82 690 to 830
Pipe
Flare
Connecting pipe
Indoor outlet pipe
Flare nut
<Flare nut>
Liquid service port
<High pressure>
Gas service port
<Low pressure>
Correct
Inclined Cracked
Uneven
thickness
Damaged
surface
Indoor Unit Installation
Loading ...
Loading ...
Loading ...