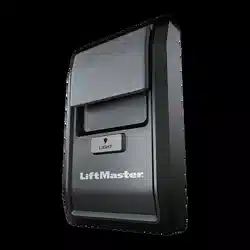
MODELS 78LM AND 78LMC
MULTI-FUNCTION DOOR CONTROL
OWNERS INSTRUCTIONS
To prevent possible SERIOUS INJURY or DEATH from electrocution:
• Be sure power is NOT connected BEFORE installing door control.
• Connect ONLY to 24 VOLT low voltage wires.
To prevent possible SERIOUS INJURY or DEATH from a closing
garage door:
• Install door control within sight of garage door, out of reach of
children at a minimum height of 5 feet (1.5 m), and away from ALL
moving parts of door.
• NEVER permit children to operate or play with door control push
buttons or remote control transmitters.
• Activate door ONLY when it can be seen clearly, is properly
adjusted, and there are no obstructions to door travel.
• ALWAYS keep garage door in sight until completely closed. NEVER
permit anyone to cross path of closing garage door.
FOR USE WITH GARAGE DOOR OPENERS MANUFACTURED
AFTER JANUARY 1, 1995. To ensure proper functioning of your
opener, remove all old or previous push buttons/wall control
panels. Use only the enclosed door control for proper operation.
Locate the door control within sight of the door at a minimum
height of 5 feet (1.5 m) where small children cannot reach, and
away from all moving parts of the door and door hardware.
INSTALLATION
The door control is typically attached directly to the wall. For pre-
wired installations (as in new home construction) it can be
mounted to a standard single gang box.
1. Disconnect power to the garage door opener.
2. Strip 1/4" (6 mm) of insulation from one end of the bell wire
and connect to the two screw terminals on the back of the door
control as follows: red/white wire to 1 and white wire to 2.
NOTE: After installation, the indicator light behind the push
button cover will indicate proper connection.
3. Remove the push button cover by gently prying off the top edge
with a screwdriver. Fasten with 6ABx1-1/4" self-tapping screws
(standard installation) or 6-32x1" machine screws (pre-wired
installation) as follows:
• (Standard Installation ONLY) Drill pilot holes and install
bottom screw, allowing 1/8"(3 mm) to protrude above the wall
surface.
• Position bottom of door control on screw head and slide
down to secure. Adjust screw for snug fit.
• Install top screw. Do NOT overtighten, you may damage the
plastic housing.
4. (Standard Installations ONLY) Run bell wire up wall and across
ceiling to motor unit. Use insulated staples to secure wire to
wall and ceiling in several places. Do NOT pierce wire with a
staple, this will create a short or open circuit.
5. Strip 7/16" (11 mm) of insulation from the end of the bell wire.
6. Connect bell wire to terminals as follows:
• Quick Connect Terminals: Red/white wire to red terminal and
white wire to white (Figure 1).
• Screw Terminals: Red/white to 1 and white to 2 (Figure 2).
7. Reconnect power to the garage door opener.
8. Replace the cover by inserting the bottom tabs and snapping it
into place. Test the wall control to ensure proper operation.
OPERATION
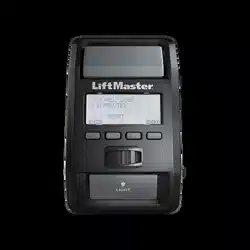
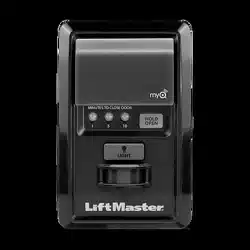
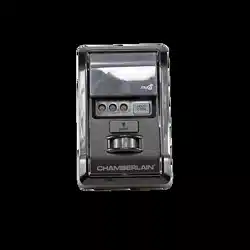
Door Control Push Button: Press to open or close the door.
Press again to reverse the door during the closing cycle, or to
stop the door while it is opening.
Light Feature: Press the Light button to switch the opener light
on or off. When the door is opened or closed, the light will remain
on for 4-1/2 minutes. Press the Light button to turn it off sooner.
The Light button will not control the opener light when the door is
in motion.
Lock Feature: Designed to prevent operation of the door from
portable remote controls. However, the door will open and close
from the Door Control push bar and from the Keylock and Keyless
Entry accessories.
To activate: Press and hold the Lock button for 2 seconds. The
push button indicator light will flash as long as the lock is on.
To turn off: Press and hold the Lock button again for 2 seconds.
The indicator light will stop flashing. Normal operation will
resume. The Lock feature will also turn off whenever the Learn
button on the opener end panel is activated.
WARNING: This product can expose you to chemicals
including lead, which are known to the State of California to
cause cancer or birth defects or other reproductive harm.
For more information go to www.P65Warnings.ca.gov
Strip wire 7/16" (11 mm)
7/16" (11 mm)
Red GreyWhite
Quick-Connect
Terminals
Antenna
To release wire, push in
tab with screwdriver tip
Door Control
Connections
Push Button
Light
Button
Lock
Button
WHT
RED
Bell Wire
Terminal
Screws
L
O
C
K
LIG
H
T
WARNING
Opener Terminal Screws
AntennaOpener Panel
WHT
RED
Bell Wire
Terminal
Screws
Push Button
Light
Button
Lock
Button
L
O
C
K
LIGH
T
OR
)LJXUH
)LJXUH
MODÉLES 78LM ET 78LMC
COMMANDE DE PORTE MULTIFONCTION
NOTICE D’UTILISATION
Pour prévenir d’éventuelles BLESSURES GRAVES ou LA MORT par suite
d’électrocution :
• S’assurer que le courant est coupé AVANT de poser la commande de porte.
• Raccorder UNIQUEMENT à des fi ls basse tension 24 V.
Pour prévenir d’éventuelles BLESSURES GRAVES ou LA MORT par suite d’une
porte de garage qui se ferme :
• Poser la commande de porte en vue de la porte de garage, hors de la portée
des enfants à une hauteur minimum de 5 pieds (1,5 m), et à l’écart de toutes
les pièces mobiles de la porte.
• Ne JAMAIS laisser des enfants faire fonctionner les boutons-poussoirs de
la commande de porte ou les émetteurs de la télécommande, ni jouer avec
ceux-ci.
• Actionner la porte UNIQUEMENT lorsqu’on la voit clairement, qu’elle est bien
réglée et que rien ne gêne la course de la porte.
• TOUJOURS garder la porte de garage en vue jusqu’à ce qu’elle soit
complètement fermée. Ne JAMAIS laisser personne croiser le chemin d’une
porte de garage qui se ferme.
ATTENTION
AVERTISSEMENT
AVERTISSEMENT
AVERTISSEMENT
AVERTISSEMENT : Ce produit peut vous exposer à des produits
chimiques comme le plomb, reconnu par l’État de la Californie comme
cause de cancers, d’anomalies congénitales et d’autres problèmes liés à la
reproduction. Pour plus d’informations, visitez www.P65Warnings.ca.gov
À UTILISER AVEC LES OUVRE-PORTES DE GARAGE FABRIQUÉS APRÈS LE 1er
JANVIER 1995. Pour vous assurer du bon fonctionnement de votre ouvre-porte
de garage, retirez tous les vieux panneaux muraux ou boutons de contrôle
précédents. N’utilisez que le bouton de contrôle inclus pour un bon
fonctionnement.
Poser la commande murale dans un endroit où on pourra la voir de la porte, à au
moins 5 pieds (1,5 m) du sol, là où les enfants ne pourront pas l’atteindre et loin
de toutes les pièces mobiles et fixations de la porte.
INSTALLATION
La commande de porte est généralement posée directement au mur. Dans le cas
d’installations précâblées (comme dans les habitations neuves), elle peut être
posée sur un modèle standard de boîte électrique simple.
1. Couper l’alimentation de l’ouvre-porte de garage.
2. Enlever 1/4 po (6 mm) d’isolation à une extrémité du fil de sonnerie.Raccorder
les deux bornes à vis à l’arrière de la commande de porte : le fil blanc/rouge
sur 1 et le fil blanc sur 2. REMARQUE : Après l’installation, un témoin lumineux
derrière le couvercle indiquera un branchement approprié.
3. Retirer le couvercle de bouton-poussoir en soulevant doucement la fente dans
la partie supérieure du couvercle à l’aide d’un petit tournevis à tête plate. Fixer
à l’aide de vis autotaraudeuses 6AB x 1-1/4 po (installation standard) ou de vis
à métaux 6-32 x 1 po (installation précâblée) comme suit :
• (Installation standard SEULEMENT) Percer et poser la vis inférieure en
laissant 1/8 po (3 mm) faire saillie du mur.
• Placer le bas de la commande de porte par-dessus la tête de vis et ajuster
pour un ajustement serré.
• Installez l’écrou du dessus. NE serrez pas trop, car vous risquez
d’endommager le boîtier en plastique.
4. (Installation standard SEULEMENT) Faire monter le fil de sonnerie le long du
mur et du plafond jusqu’au moteur. Utiliser des agrafes isolées pour fixer le fil
à plusieurs endroits. NE pas percer le fil avec une agrafe, ce qui créerait un
court-circuit ou un circuit ouvert.
5. Enlever 7/16 po (11 mm) d’isolation à l’extrémité du fil de sonnerie.
6. Raccorder le fil de sonnerie aux bornes à comme suit :
• Bornes à raccordement rapide : Le fil blanc/rouge à rouge et le fil blanc à
blanc (Figure 1).
• Bornes filetées de l’ouvre-porte : Le fil blanc/rouge à 1 et le fil blanc à 2
(Figure 2).
7. Rebranchez le courant électrique à l’ouvre-porte de garage.
8. Replacez le couvercle en insérant les encoches du dessus et en le poussant en
place. Testez le panneau mural pour vous assurer de son bon fonctionnement.
FONCTIONNEMENT
Bouton-poussoir de la commande de porte : Appuyer sur la bouton pour ouvrir
ou fermer la porte. Appuyer à nouveau pour faire remonter la porte lors du cycle
de fermeture ou pour arrêter la porte pendant le cycle d’ouverture.
Fonction d’éclairage : Appuyez sur le bouton d’éclairage pour allumer ou éteindre
l’éclairage de l’ouvre-porte. Lors du cycle d’ouverture ou de fermeture de la porte,
l’éclairage demeurera allumé pendant 4-1/2 minutes. Appuyer sur le bouton
d’éclairage (LIGHT) pour l’éteindre plus tôt. Le bouton d’éclairage (LIGHT) ne
contrôle pas la lumière de l’ouvre-porte lorsque la porte est en mouvement.
Élément de verrouillage : Conçu afin de prévenir le fonctionnement de la porte à
l’aide des télécommandes à main. Cependant, la porte s’ouvrira et se fermera à
partir de la commande de porte, de la serrure extérieure ou du système d’ouverture
sans clé en accessoire.
Pour actionner : Appuyer sur le bouton de verrouillage et le tenir pendant 2
secondes. L’éclairage de la barre-poussoir clignotera aussi longtemps que
l’élément de verrouillage sera en marche.
Pour arrêter : Appuyer à nouveau sur le bouton de verrouillage et le tenir pendant
2 secondes. L’éclairage de la barre-poussoir cessera de clignoter. L’élément de
verrouillage sera également neutralisé chaque fois que le bouton «LEARN» se
trouvant sur le panneau de l’ouvre-porte sera actionné.
Antenne
Bouton-
poussoir
Fil de
sonnerie à
conducteurs
Bornes
filetées
Bouton de
verrouillage
Bouton
d'éclairage
Dénuder le fil sur 7/16 po
(11 mm)
Rouge
GrisBlanc
7/16po (11 mm)
Pour relâcher le fil, enfoncer
la languette à l'aide de l'extrémité
du tournevis
Connexions de
commande de porte
Bornes à
raccordement rapide
WHT
RED
L
O
C
K
LIG
H
T
Bornes filetées de l'ouvre-porte
Bouton de
verrouillage
Bouton
d'éclairage
Antenne
Panneau d'ouvre-porte
Bornes
filetées
Fil de
sonnerie à
conducteurs
Bouton-
poussoir
WHT
RED
L
O
C
K
LIG
HT
OU
)LJXUH
)LJXUH
AVERTISSEMENT
1-800-528-9131
© 2006, LiftMaster
All Rights Reserved
114A2380F Tous droits réservés
LiftMaster.com