

2
Table of Contents
Basics
3 About the 360 Round
4 Read me first
6 Package contents
8 Device layout
11 Status indicator light and camera
status light
12 Camera status screen
14 Memory card
18 Installing the 360 Round
22 Waterproof adapter
25 Turning the 360 Round on and off
Using the 360 Round
program
26 Learning more about 360 Round
program
29 Recording videos
43 Editing a recording video
44 Live broadcast
47 Setting the SDI output
49 Setting the audio output to the DVS
(Dante Virtual Soundcard)
50 Configuring camera settings
59 Deleting videos
60 Updating the software
62 Recording and checking the video
without using the 360 Round
Using the 360 Round Viewer
program
63 Learning more about 360 Round
Viewer program
64 Exporting videos
70 Editing a recorded video
80 Viewing videos
83 Viewing the exported video
85 Setting the SDI output
87 Uploading the video on Samsung VR
88 Updating the 360 Round Viewer
program software
Appendix
89 Managing the 360 Round
91 Troubleshooting
93 Error message
101 Safety information
3
Basics
About the 360 Round
The 360 Round camera records high quality 360-degree videos and broadcasts videos in real
time. You can record high-quality 360-degree 2D or 3D 4K videos with 17 cameras, and 3D
sound with 6 internal microphones.
Save high-quality 4K videos after stitching, or broadcast high-quality 4K videos in real time.
Enjoy virtual reality on VR devices recorded on the 360 Round.

Basics
4
Read me first
Please read this manual before using the 360 Round to ensure safe and proper use.
•
Images may differ in appearance from the actual product. Content is subject to change
without prior notice.
•
Before using the 360 Round make sure they are compatible with your 360 Round.
•
This product includes certain free/open source software. To see the instructions for
viewing the open source licence, go to the Samsung website opensource.samsung.com.
Maintaining water and dust resistance
Your 360 Round supports water- and dust-resistance. Follow these tips carefully to maintain
the water- and dust-resistance of your 360 Round. Failure to do so may result in damage to
your 360 Round.
•
To use the waterproof feature, attach the power adapter and LAN cable to the waterproof
adapter. Close the cover of the external microphone jack, memory card slot, and
multipurpose jack, and then lock the cover switches.
•
If the 360 Round is not dried thoroughly, the sound may not record correctly. Dry the 360
round thoroughly before recording video.
•
When you attach an external microphone, the waterproof feature may not be supported.
•
If you are using the 360 Round while it is connected to an SSD and external battery, the
waterproof feature is not available.
•
Do not expose the 360 Round to a jet of water, rainwater, etc for more than 3 minutes.
•
Do not expose the 360 Round to water moving with force, such as running water from
taps, ocean waves, or waterfalls.
•
Do not immerse the 360 Round in fresh water deeper than 5 ft or keep it submerged for
more than 30 minutes. If you immerse the 360 Round in any liquid other than fresh water,
such as salt water, ionized water, or alcoholic beverage, liquid will enter the 360 Round
faster.
•
When the 360 Round or your hands are wet, dry them thoroughly before using the 360
Round.
Basics
5
•
If the 360 Round is exposed to fresh water, dry it thoroughly with a clean, soft cloth. If the
360 Round is exposed to other liquids, such as salt water, swimming pool water, soapy
water, oil, perfume, sunscreen, hand cleaner, or chemical products such as cosmetics,
rinse it with fresh water and dry it thoroughly with a clean, soft cloth. If you do not follow
these instructions, the 360 Round’s performance and appearance may be affected.
•
If the 360 Round is dropped or impacted, the water-and dust-resistant features of the
360 Round may be damaged.
•
The power adapter has no waterproof feature. Although, the barrel connector interface
can be protected by the waterproof adapter, the power adapter included in the box has
no waterproof characteristics.
•
Your 360 Round has been tested in a controlled environment and certified to be
water- and dust-resistant in specific situations (meets requirements of classification
IP65 as described by the international standard IEC 60529-Degrees of Protection
provided by Enclosures [IP Code]; test conditions: Water jet nozzle, flow rate (12 L/
min), at least 3 minutes). Despite this classification, it is still possible for your 360
Round to be damaged in certain situations.
Instructional icons
Warning: situations that could cause injury to yourself or others
Caution: situations that could cause damage to your 360 Round or other equipment
Notice: notes, usage tips, or additional information

Basics
6
Package contents
Check the products inside the hard case.
•
360 Round
•
Power adapter
•
Waterproof adapter (2 included)
•
Quick start guide
•
The items supplied with the 360 Round and any available accessories may vary
depending on the region or service provider.
•
The supplied items are designed only for this 360 Round and may not be
compatible with other devices.
•
Appearances and specifications are subject to change without prior notice.
•
You can purchase additional accessories from the Samsung website. Make sure
they are compatible with the 360 Round before purchase.
•
Use only Samsung-approved accessories. Using unapproved accessories may cause
the performance problems and malfunctions that are not covered by the warranty.
•
Availability of all accessories is subject to change depending entirely on
manufacturing companies. For more information about available accessories, refer
to the Samsung website.
•
Always keep the 360 Round inside the hard case when it is not in use. If the
cameras are scratched or damaged, the video’s quality may be reduced.
Basics
7
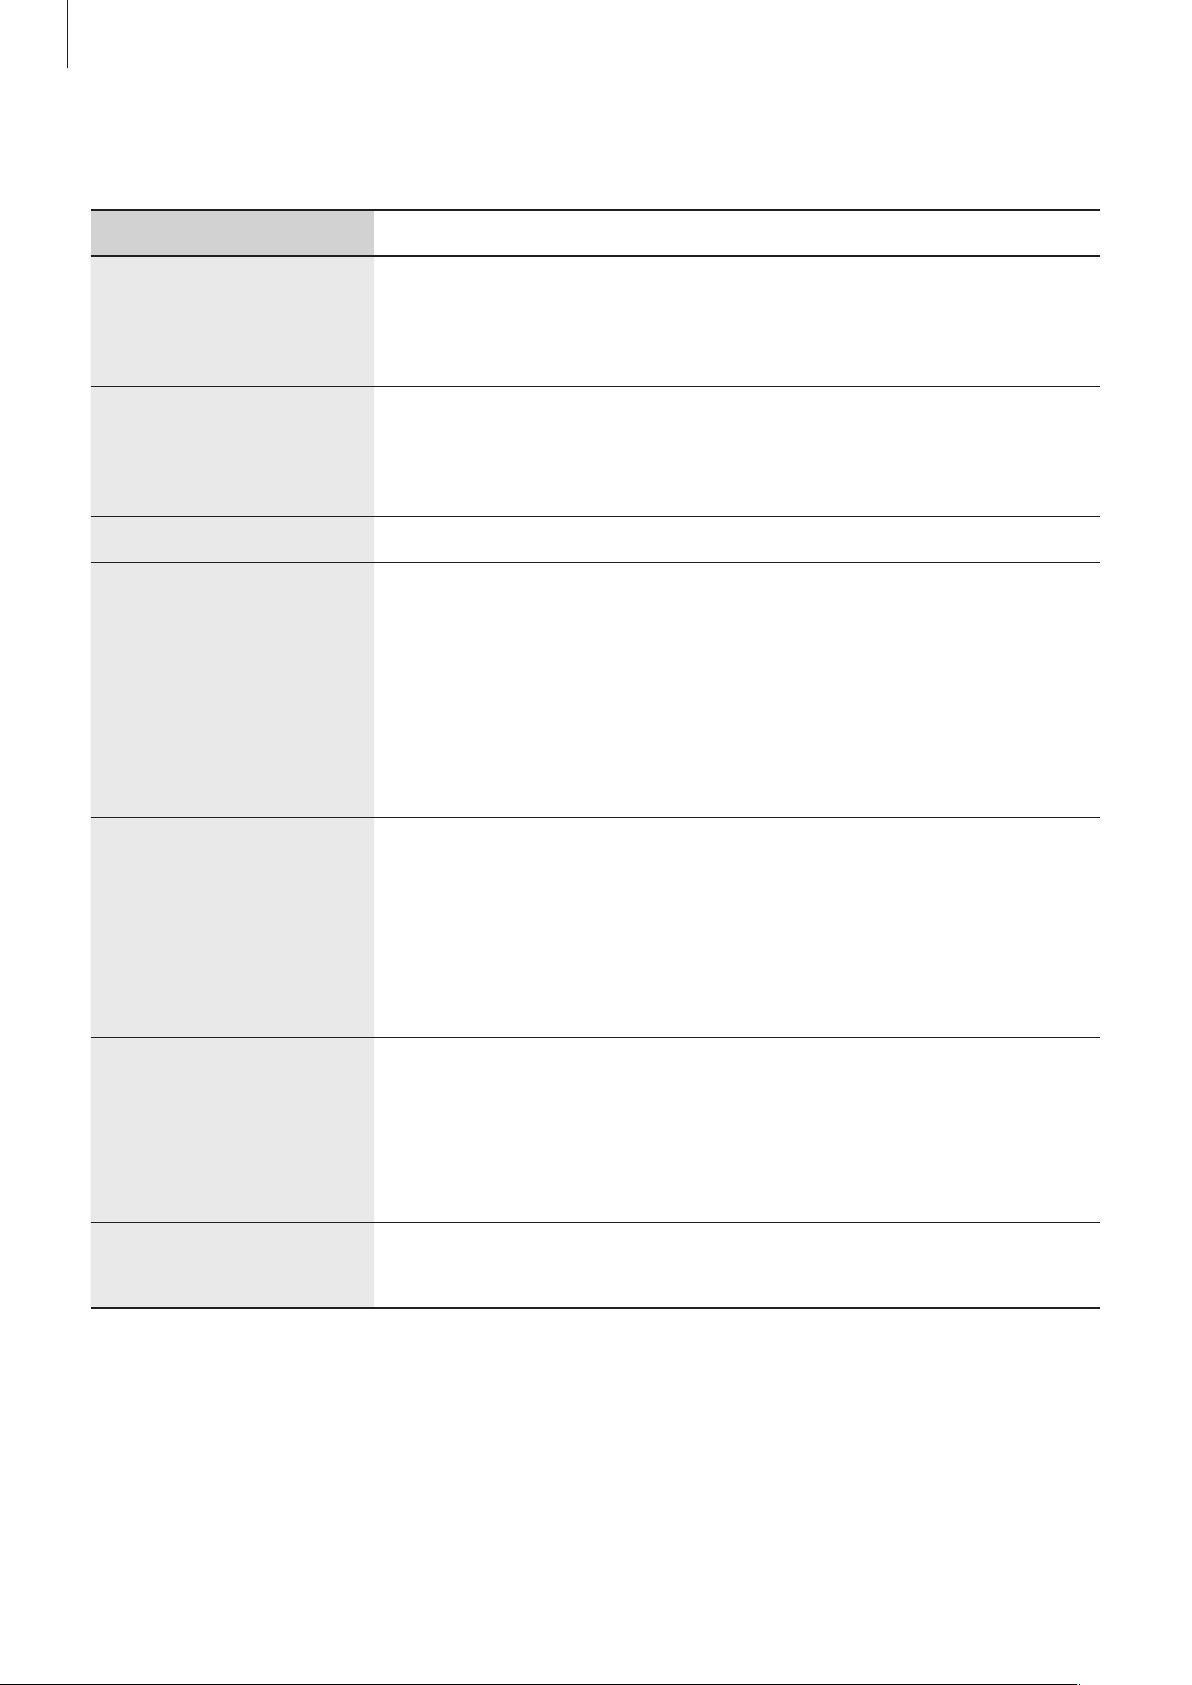
Required specification
Preparation material Required specification
Memory card
•
UHS II U3 Read 150 MB/s
•
Write speed 80 MB/s or more
•
Maximum supported: Up to 512 GB
Tripod
•
Connected screw: 0.4 inch
•
Bearing weight: 2 lb
•
Minimum height: 5 ft
LAN cable
•
Cat 6a, 0.2 inch in diameter and under 328 ft long
Computer (for
stitching)
•
Operating system: Windows 10 Professional or above, 64 bit
•
CPU: Intel Core i7-6700 K or above
•
Graphic card: NVIDIA: GTX 1080 1 each or more or GTX 1060
6 GB Memory 1 each or more
•
RAM: 16 GB DDR4 RAM 1 each or more
•
Power: 850 W
Computer (for preview
and Live stream)
•
Operating system: Windows 10 Professional or above, 64 bit
•
CPU: Intel Core i7-6950 X or above
•
Graphic card: NVIDIA: GTX 1080 Ti 2 each or more
•
RAM: 32 GB DDR4 RAM 2 each or above
•
Power: 1,200 W
Computer (when
using the laptop
for recording and
previewing videos in
Source view mode)
•
CPU: i7 4700HQ 2.4 GHz or above
•
Graphic card: NVIDIA GeForce feature SET D above
(GT 750 : 2 fps, GeForce 820 M 2 fps, GeForce GTX 1060
30 fps)
Power adapter
•
Input: 100-240 VAC, 50-60 Hz
•
Output: 19 VDC, 2.1 A
Basics
8
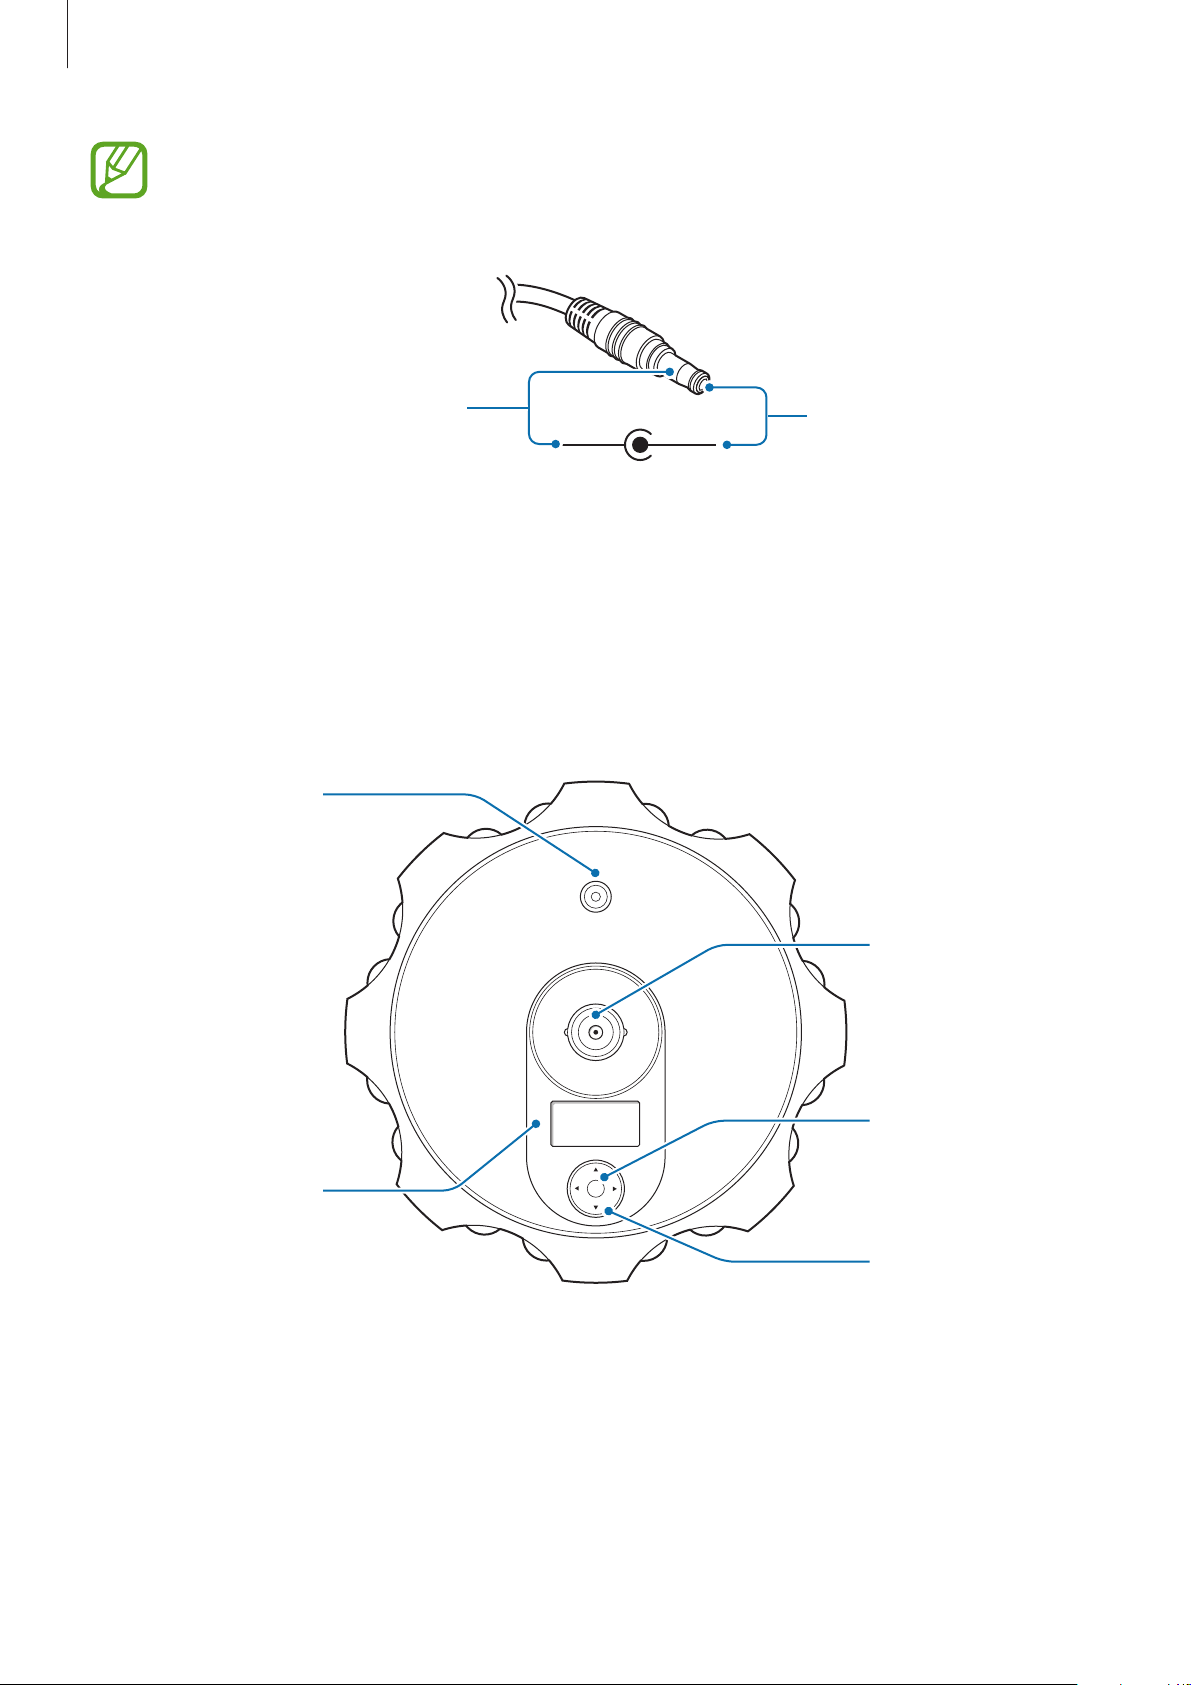
•
Requirement except the power adapter are sold separately. Only use power
adapters which have a power connector with a positive inner output and a
negative external output. If the reverse is used, the 360 Round may be damaged.
Positive inner
output (+)
Negative external
output (-)
•
The above requirements are the minimum required for using the 360 Round. If
your computer does not meet the minimum specifications, some features may be
restricted.
Device layout
OK key
Direction key
OK
Record key
Status screen
Top camera
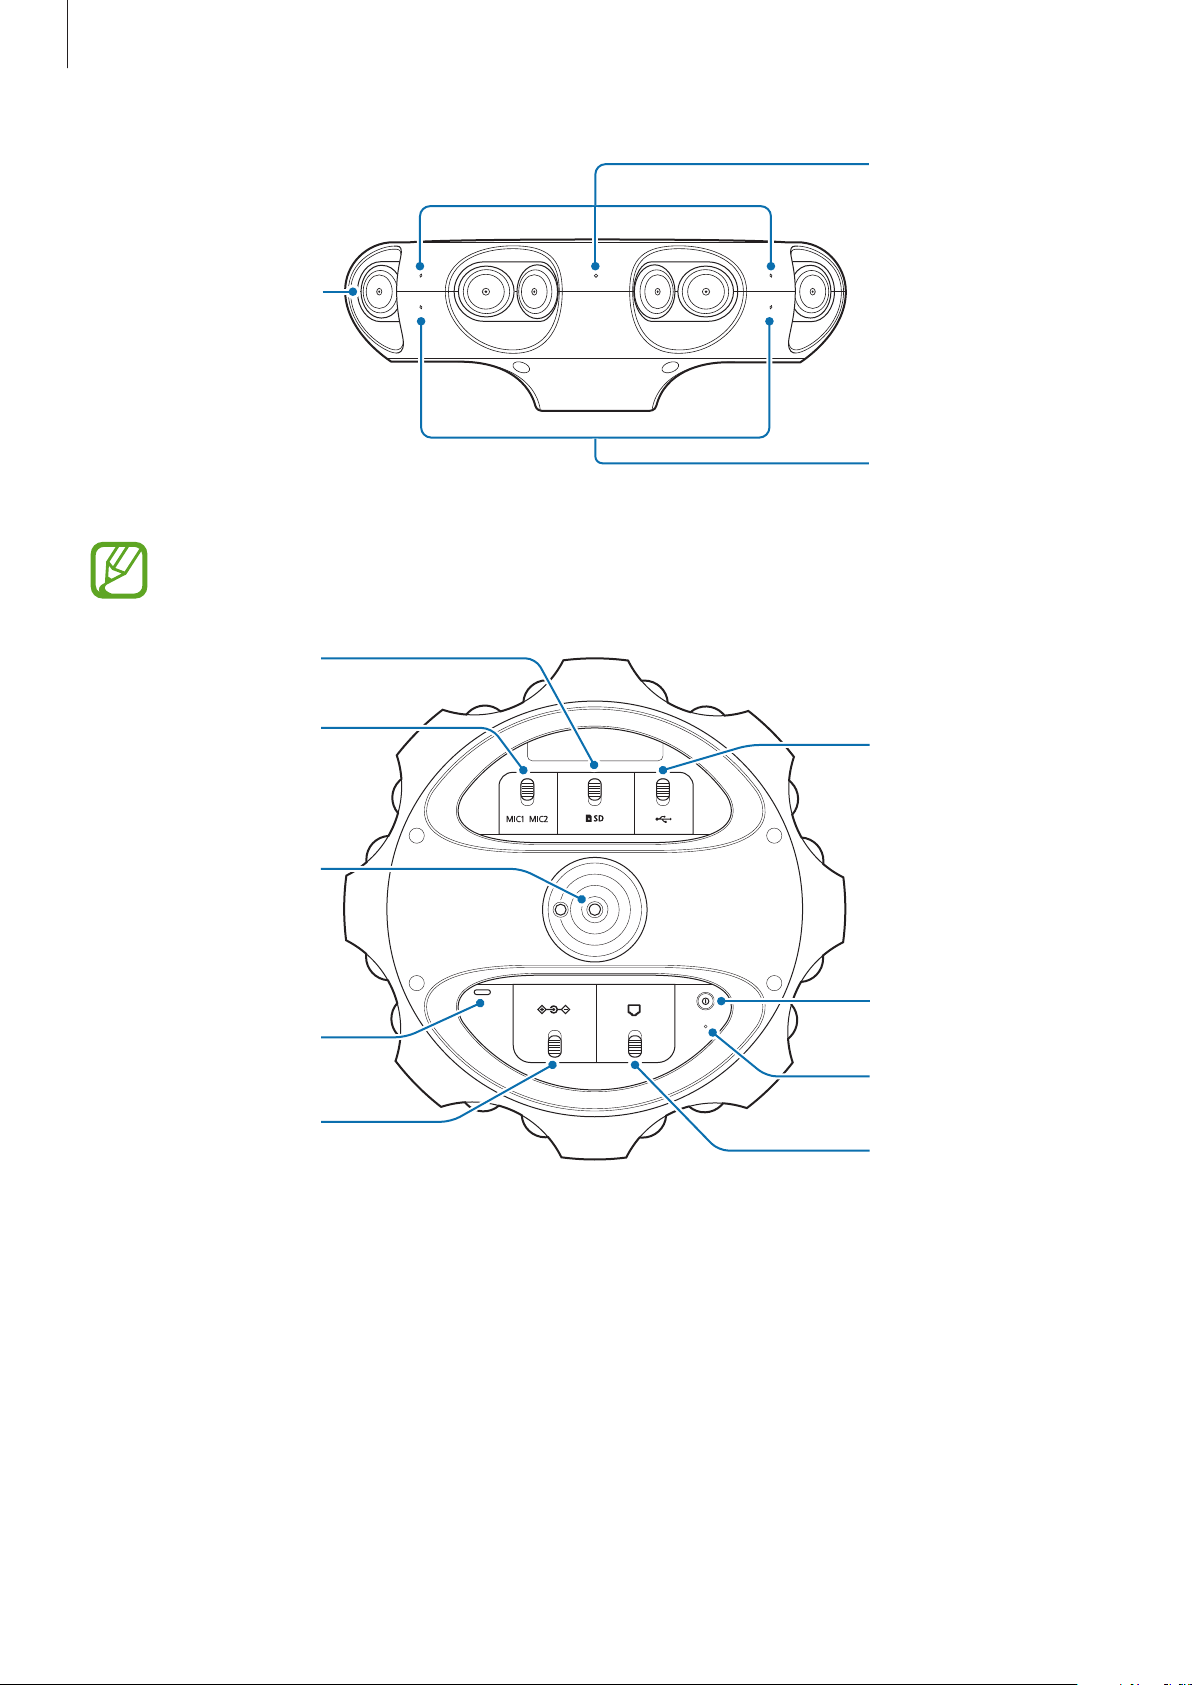
Basics
9
Side camera (16)
Microphone (6)
Camera status light
(4)
When you use the 360 Round and record the video for a long time, wipe the lens
periodically.
Power key
LAN port
Status indicator light
External
microphone jack
Memory card slot
Speaker
Tripod socket
Power adapter jack
Multipurpose jack
(USB Type-C)
Basics
10
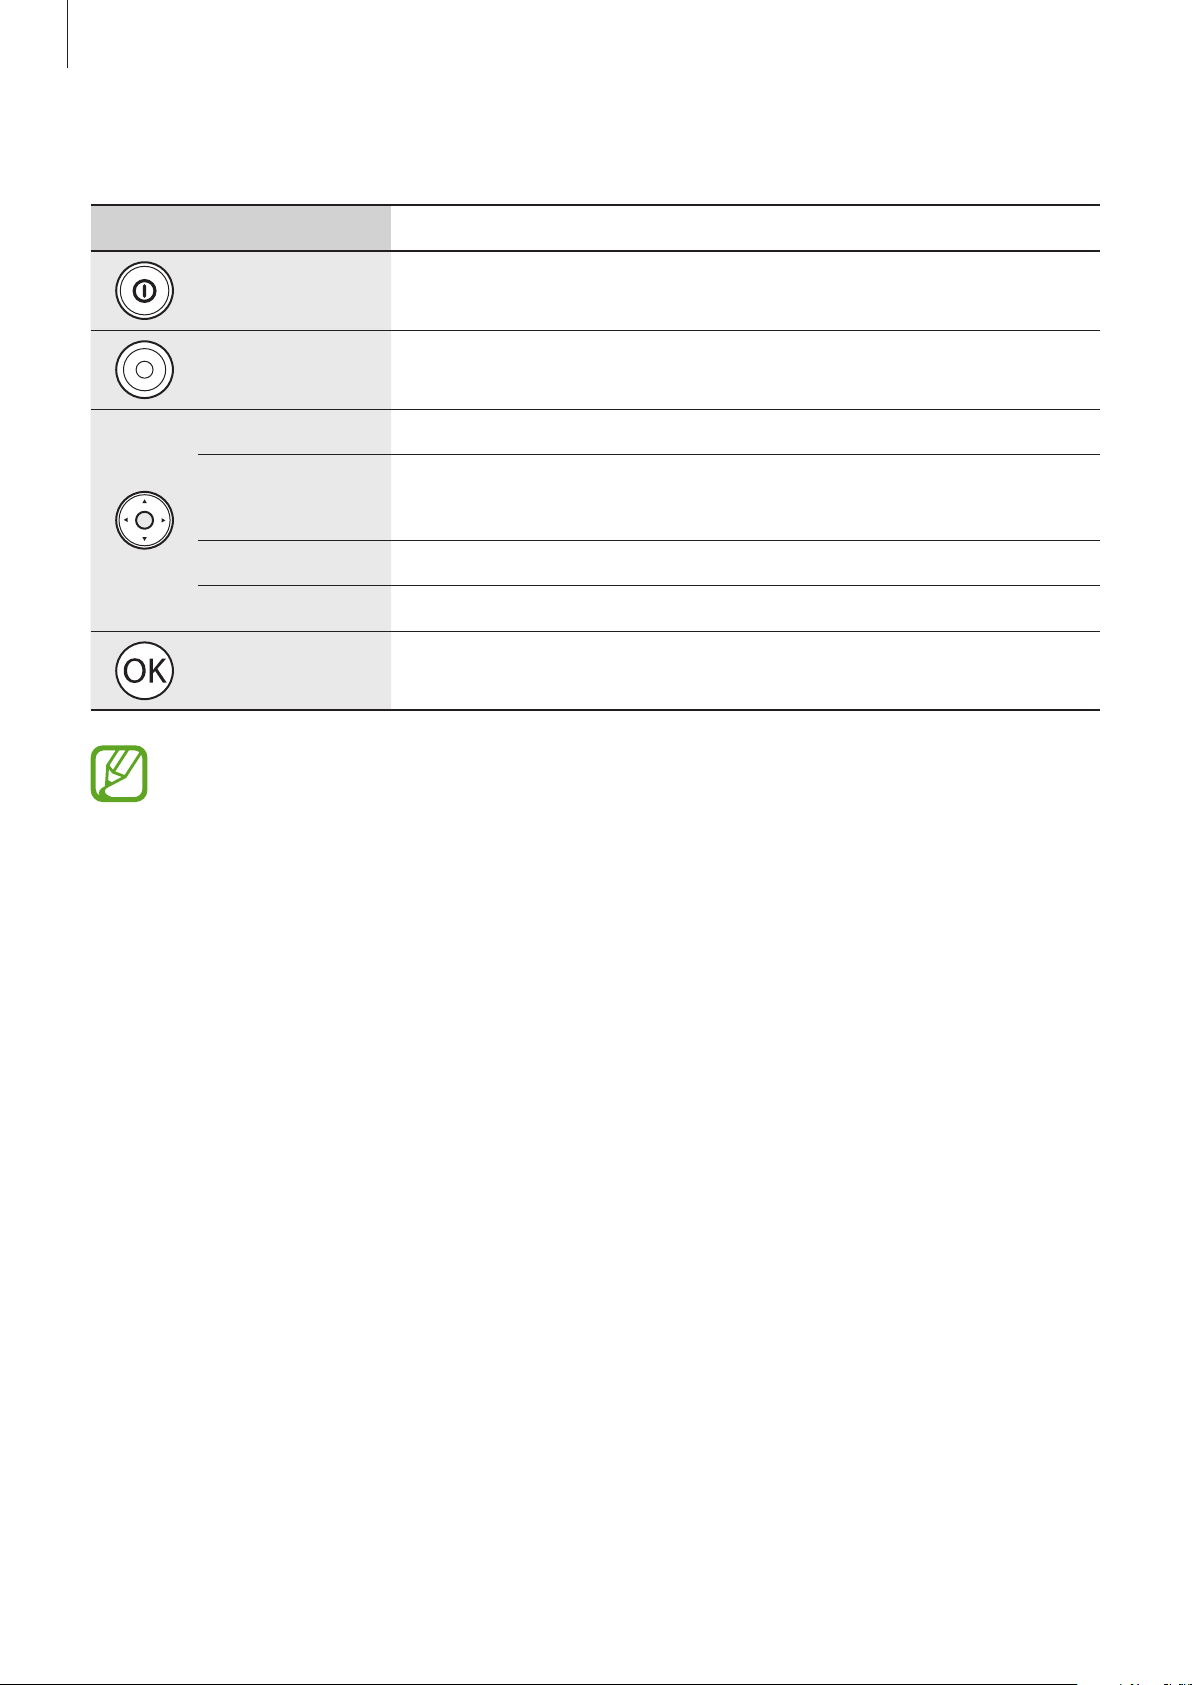
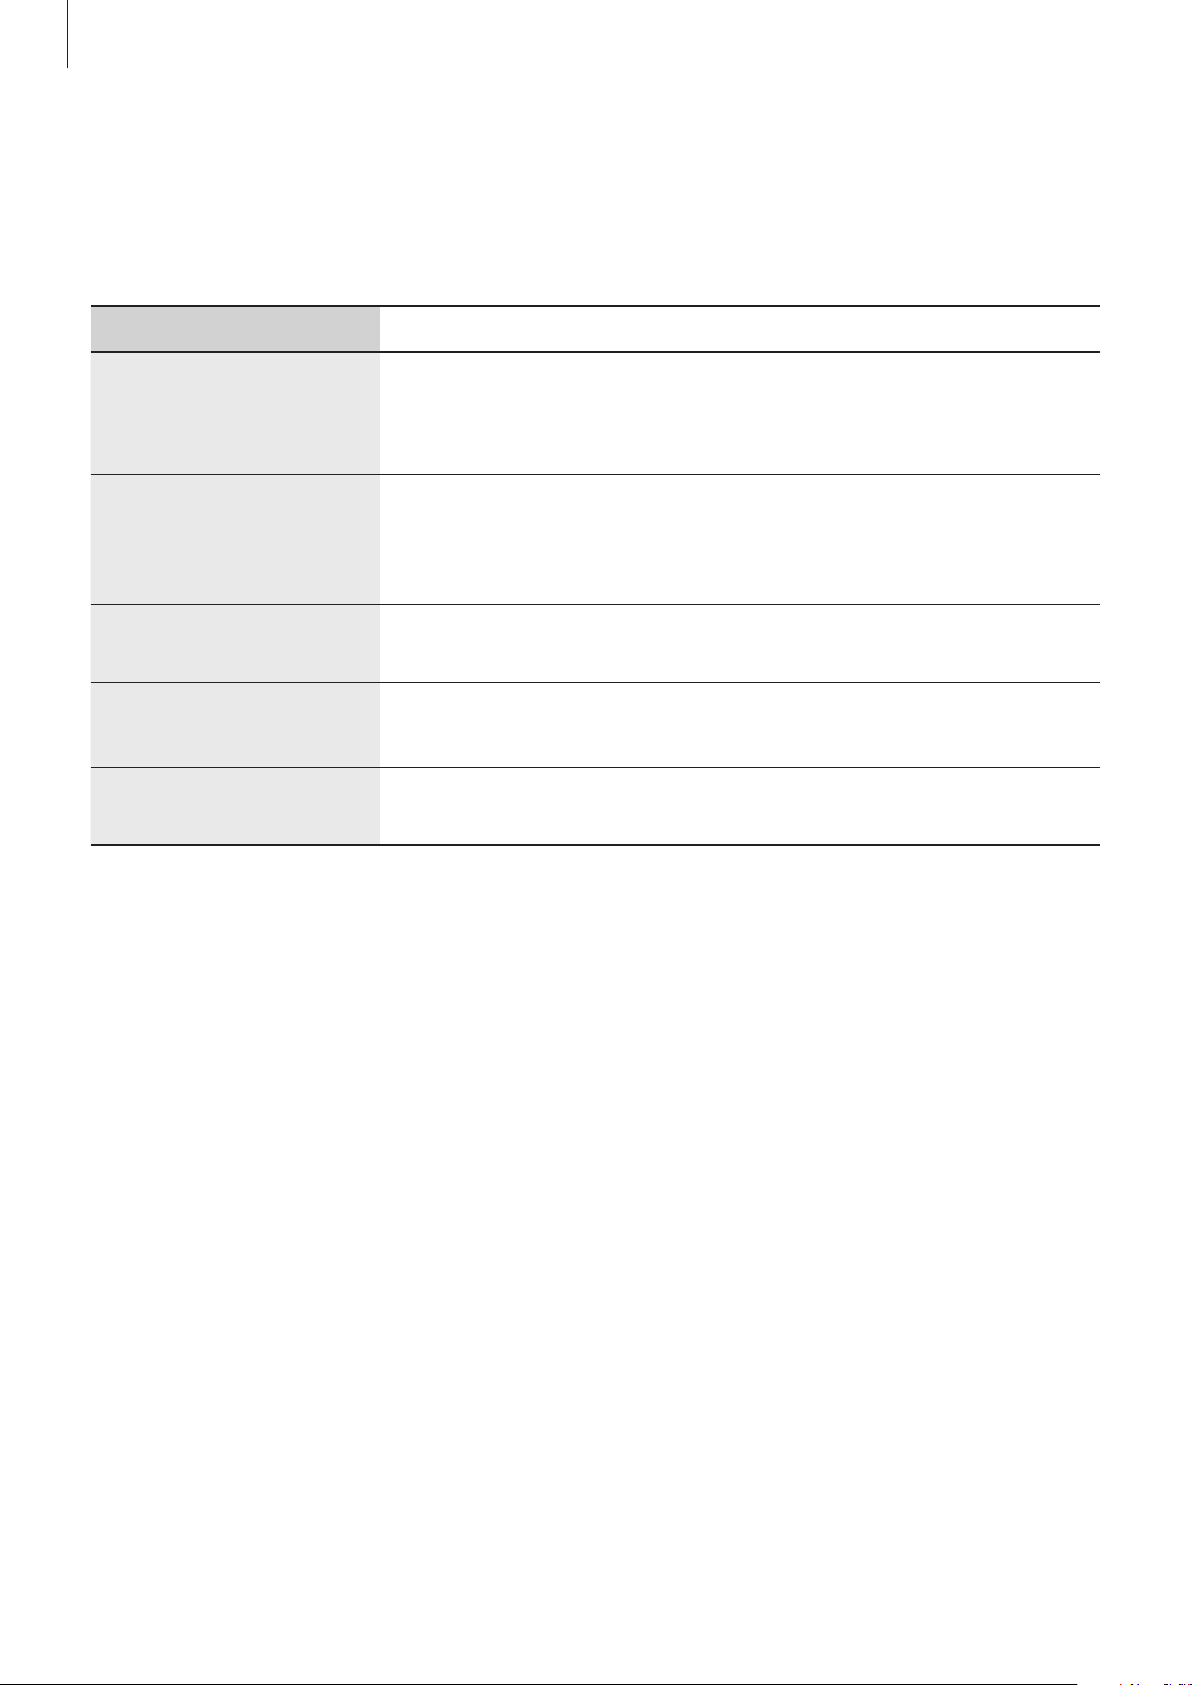
Keys
Key Function
Power
•
Press and hold to turn the 360 Round on or off.
Record
•
Start or stop recording a video.
Up
•
Move to the above option.
Down
•
Move to the below option.
•
Press and hold to lock or unlock the keys.
Left
•
Move to the previous step.
Right
•
Access the settings menu or move to the next step.
OK
•
Select an option.
Lock the keys by pressing and holding the Down key to prevent changing the
settings by accident.
Basics
11
Status indicator light and camera status light
You can check the recording status of the 360 Round through the camera status light, and
check the current status through the status indicator light.
Color Status
Status indicator light
flashes blue three times
•
Power on
•
Successfully formatting a memory card or resetting the 360
Round
Status indicator light
flashes blue
•
Transferring data
•
Updating software
•
Formatting a memory card
Status indicator light
flashes red three times
•
Power off
Status indicator light
flashes red
•
Error occurred
•
Overheating
Camera status light
flashes red
•
Recording videos
Basics
12
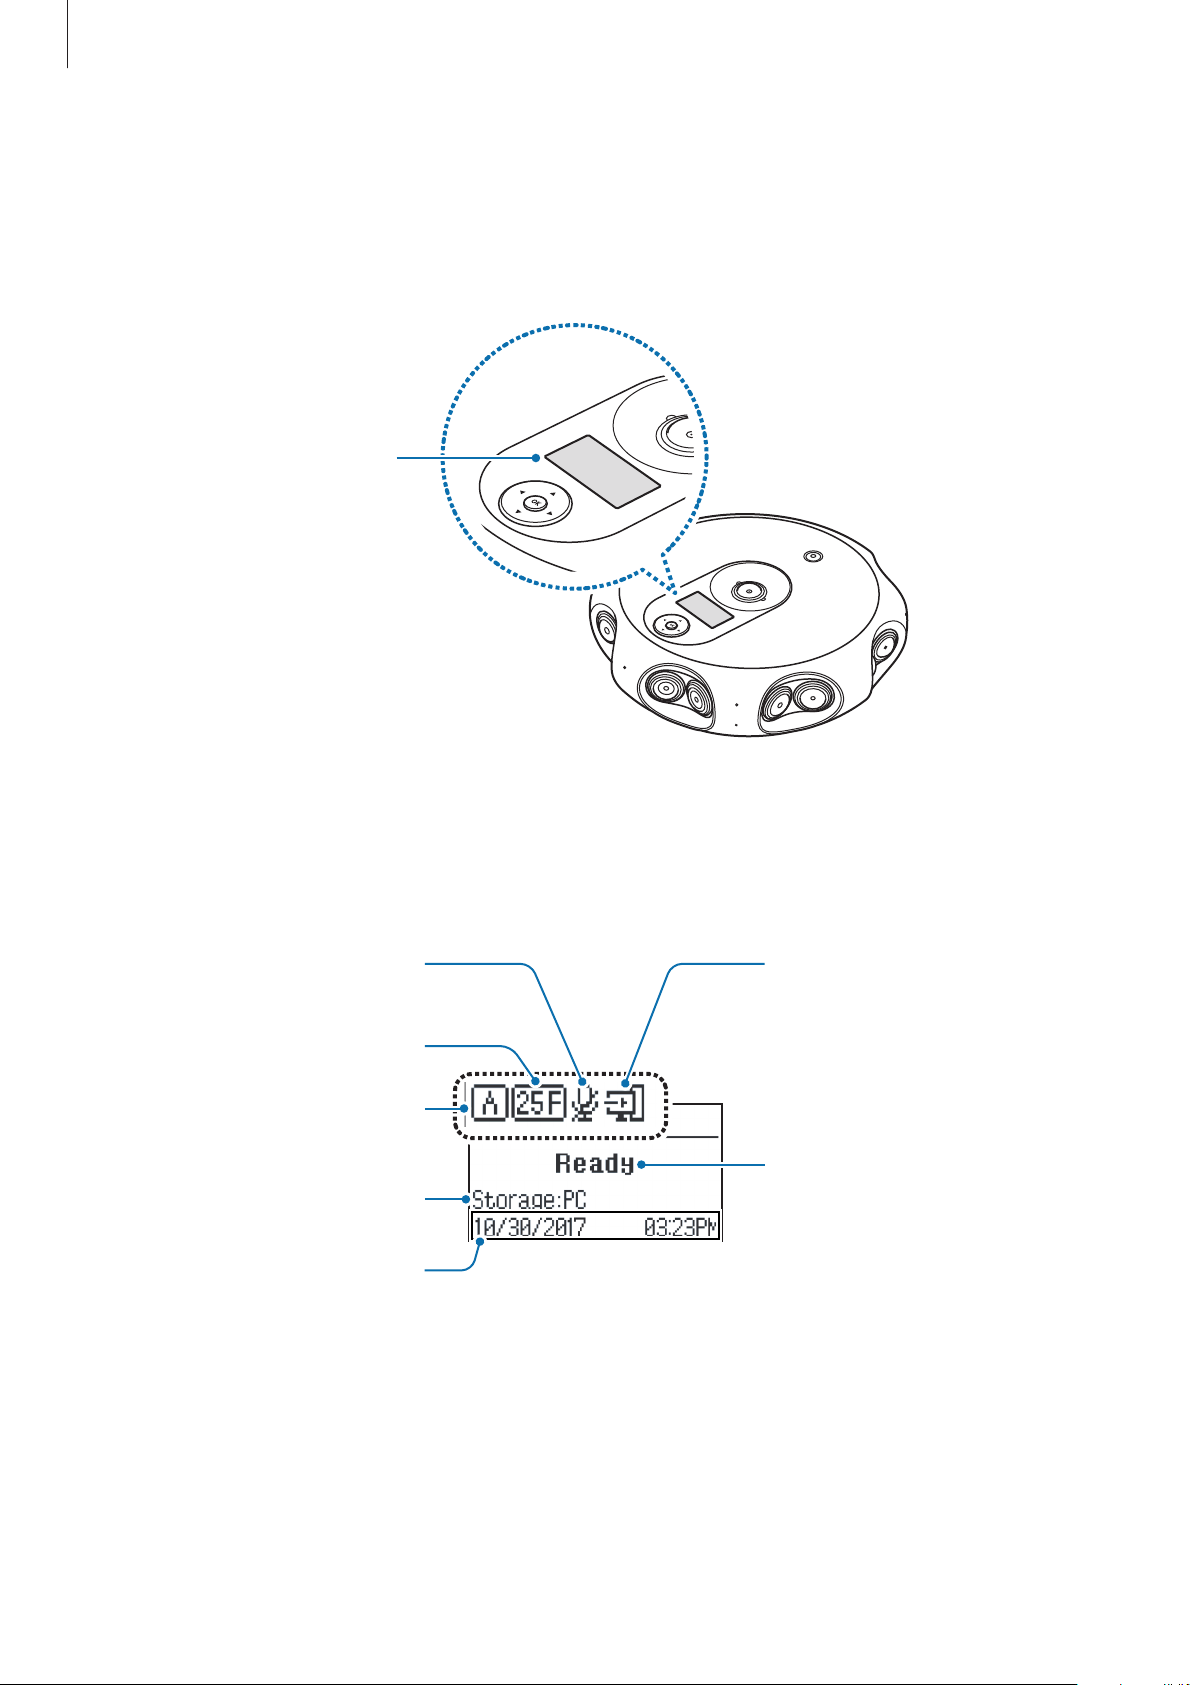
Camera status screen
Access menus, such as camera modes and connection modes, and view the 360 Round’s
status via messages and indicator icons on the camera status screen.
Camera status
screen
Indicator icons
Indicator icons appear on the camera status screen. You can check the 360 Round’s status on
the camera status screen.
Storage location
Date and time
Recording status
Recording mode
Frame rate
LAN cable connection
status
Audio recording
status
Basics
13
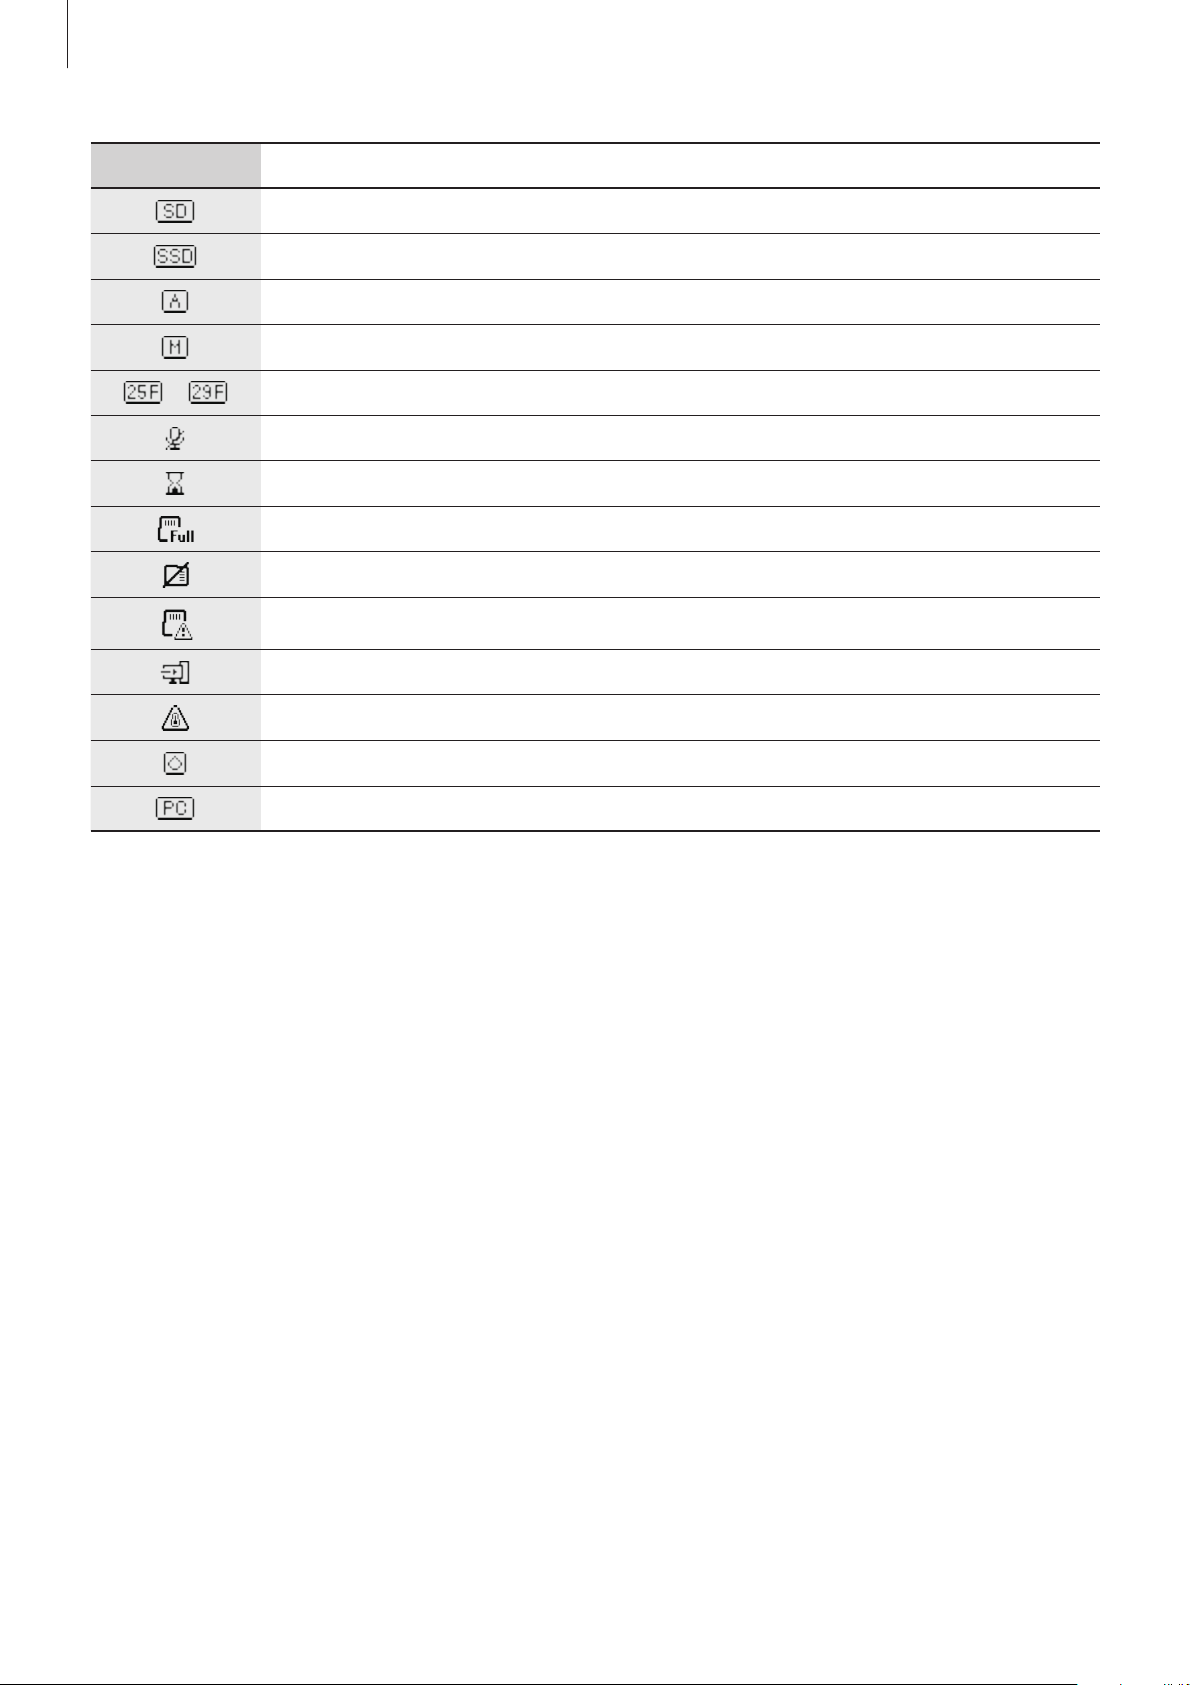
Icon Meaning
Video saved to memory card
Video saved to SSD
Set to automatic recording mode (Aperture priority mode)
Set to manual recording mode (Manual mode)
/
Frame rate
Can not record audio
Timer set
Memory card full
No memory card
Memory card recognition error
LAN cable connected
Temperature abnormality
Moisture detected on multipurpose jack
Connected to a computer
Basics
14
Memory card
Installing a memory card
A memory card must be inserted to record videos. Depending on the memory card
manufacturer and type, some memory cards may not be compatible with your 360 Round.
•
Some memory cards may not be fully compatible with the 360 Round. Using an
incompatible card may damage the 360 Round or the memory card, or corrupt the
data stored in it.
•
If you use a slow writing memory card, the recording of your video can be
interrupted because the card cannot process data at the rate the video is being
shot. Replace the card with a faster memory card.
•
Use caution to insert the memory card right-side up.
•
The 360 Round only supports memory cards using the exFAT file structure. Refer to
Required specification for required memory card specifications.
•
Memory cards are sold separately. Before purchasing a memory card, be sure to
check the specifications of the memory card and purchase a memory card that
supports the required specifications or above.
•
If you insert or remove a memory card while the 360 Round is turned on, the
power may automatically turn off. To use the 360 Round, turn it on again.
•
Frequent writing and erasing of data shortens the lifespan of memory cards.
•
When a memory card is not inserted,
No media
is displayed on the camera status
screen.
Basics
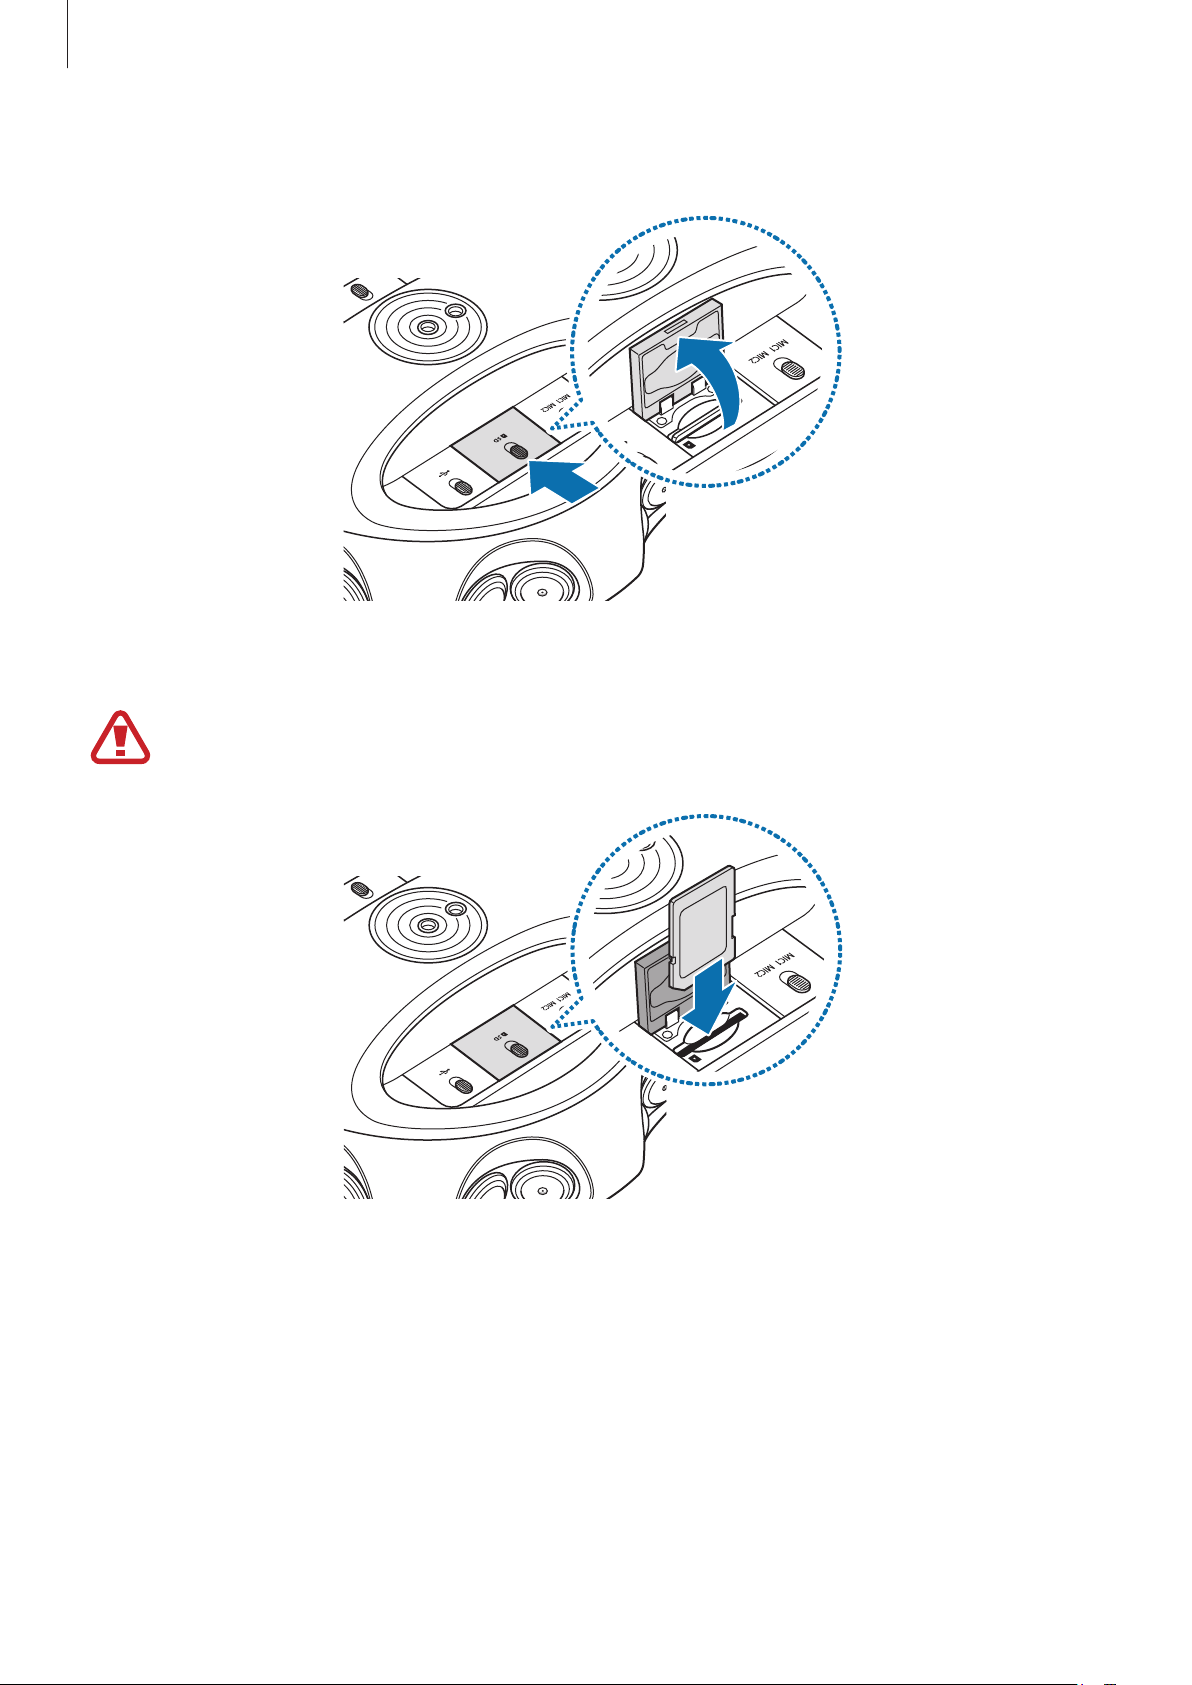
15
1
Unlock the memory card slot switch to open the memory card slot cover.
2
Insert the memory card into the memory card slot until it clicks into the place.
Be careful not to damage your fingernails when you insert the memory card.
Basics
16
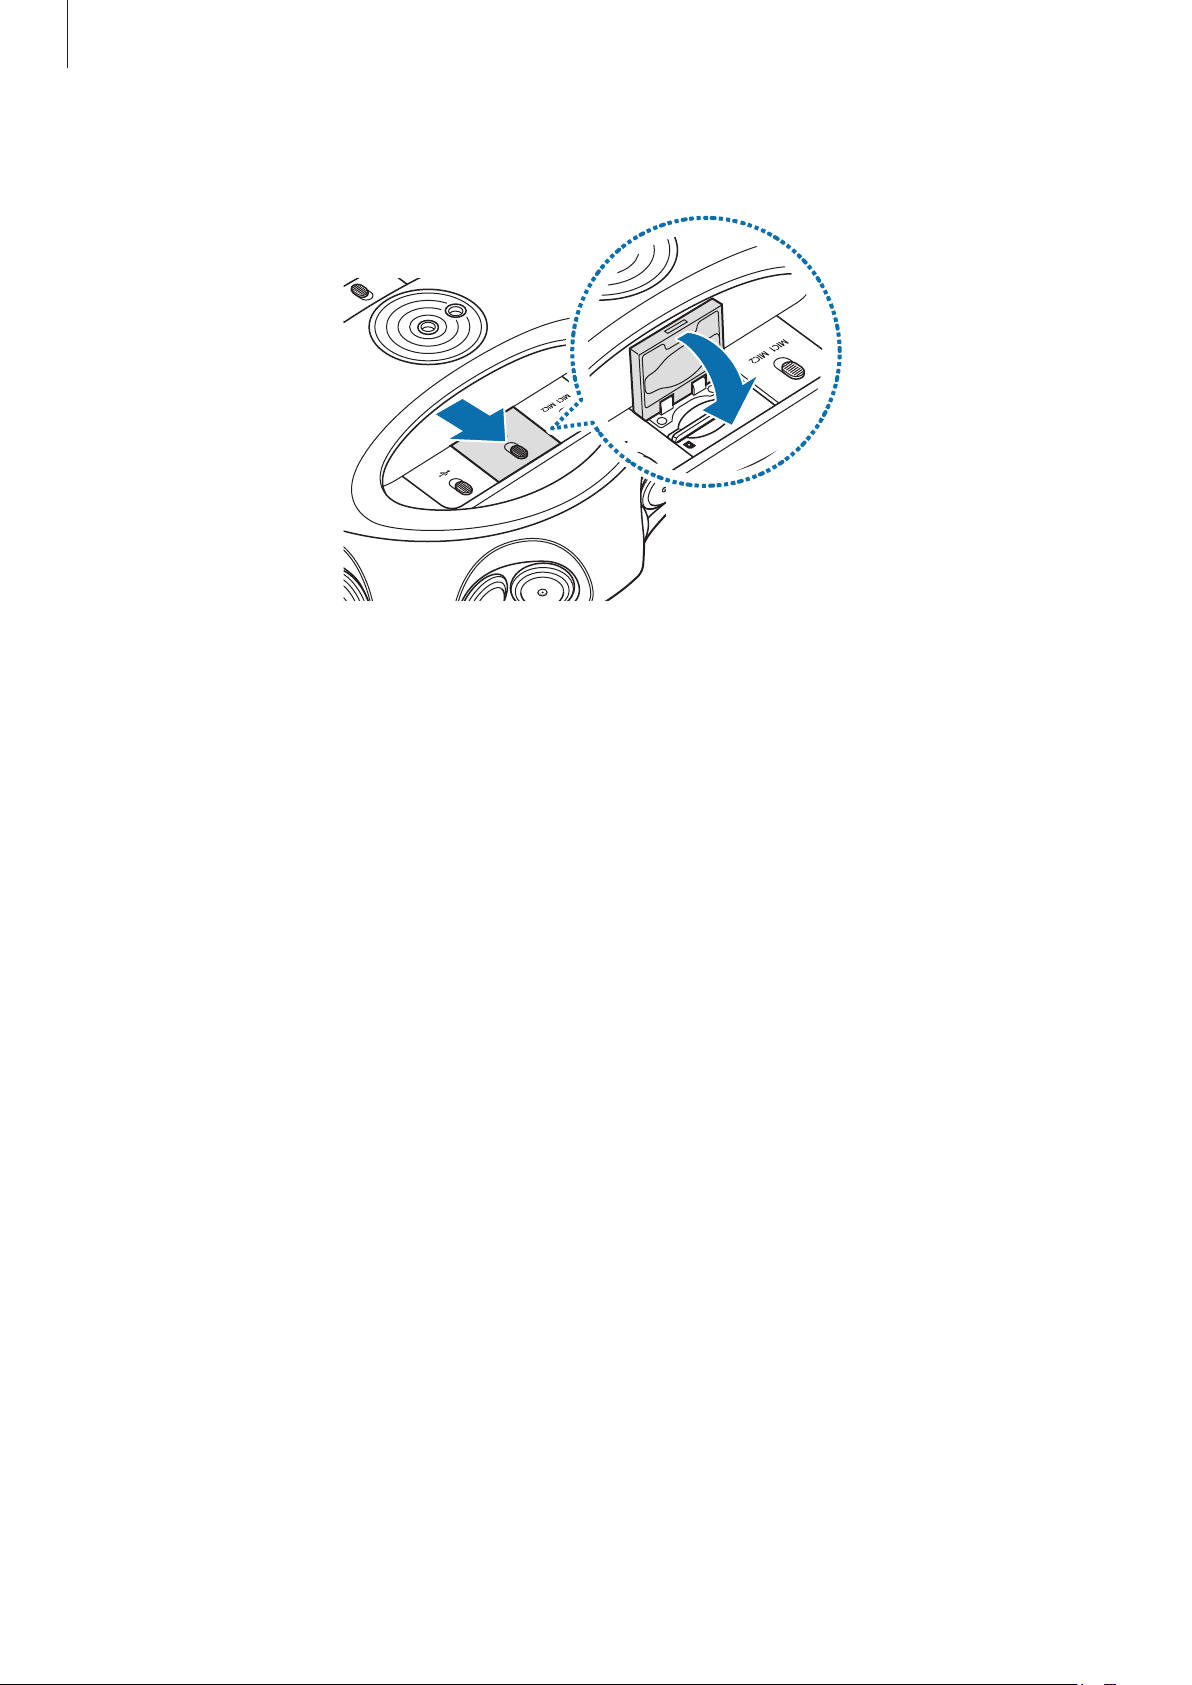
3
Close the memory card slot cover and lock the slot cover switch.
Removing the memory card
1
Unlock the memory card slot switch to open the memory card slot cover.
2
Gently push the memory card in and pull out the removed memory card completely.
3
Close the memory card slot cover and lock the slot cover switch.

Basics
17
Formatting the memory card
You can format the memory card on the 360 Round or computer.
Before formatting the memory card, remember to make backup copies of all
important data stored in the memory card. The manufacturer’s warranty does not
cover loss of data resulting from user actions.
On the 360 Round program
Connect the 360 Round and your computer with a LAN cable before formatting the
memory card on your computer.
1
Launch the
360 Round
program on your computer.
2
Click
Device
tab
→
Manage files
→
Format
→
OK
on the control panel.
The memory card will be formatted.
On the 360 Round
1
Press the Right key on the 360 Round to access the settings menu.
If the 360 Round is connected to the computer with a LAN cable, you can not enter
the settings menu. Remove the LAN cable before formatting the memory card on the
360 Round.
2
Press the Down key until
Manage files
appears on the camera status screen and press
the OK key.
3
Select
Format storage
→
OK
and press the OK key.
When formatting is complete, the completion message appears on the camera status
screen.
Basics
18
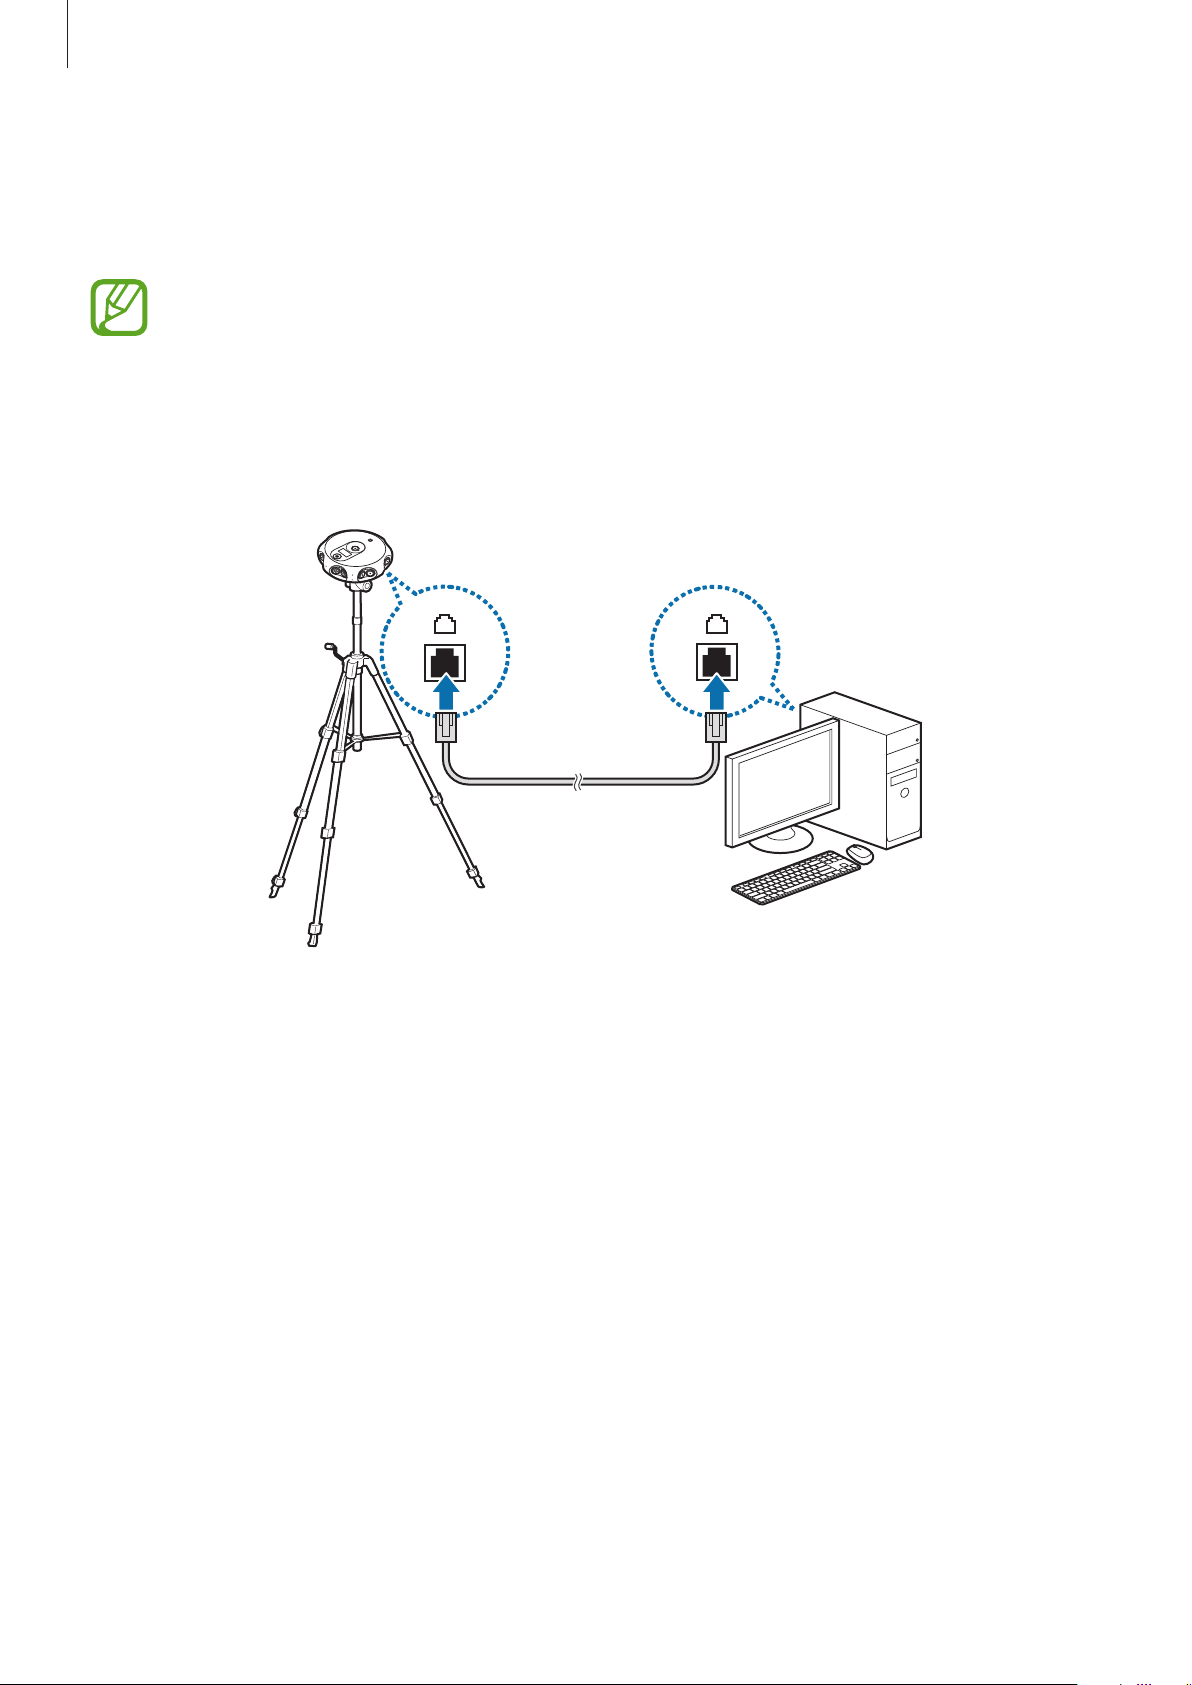
Installing the 360 Round
Attach a tripod on the 360 Round and place it on a flat area. Connect the 360 Round to your
computer via a LAN cable to control the 360 Round from your computer.
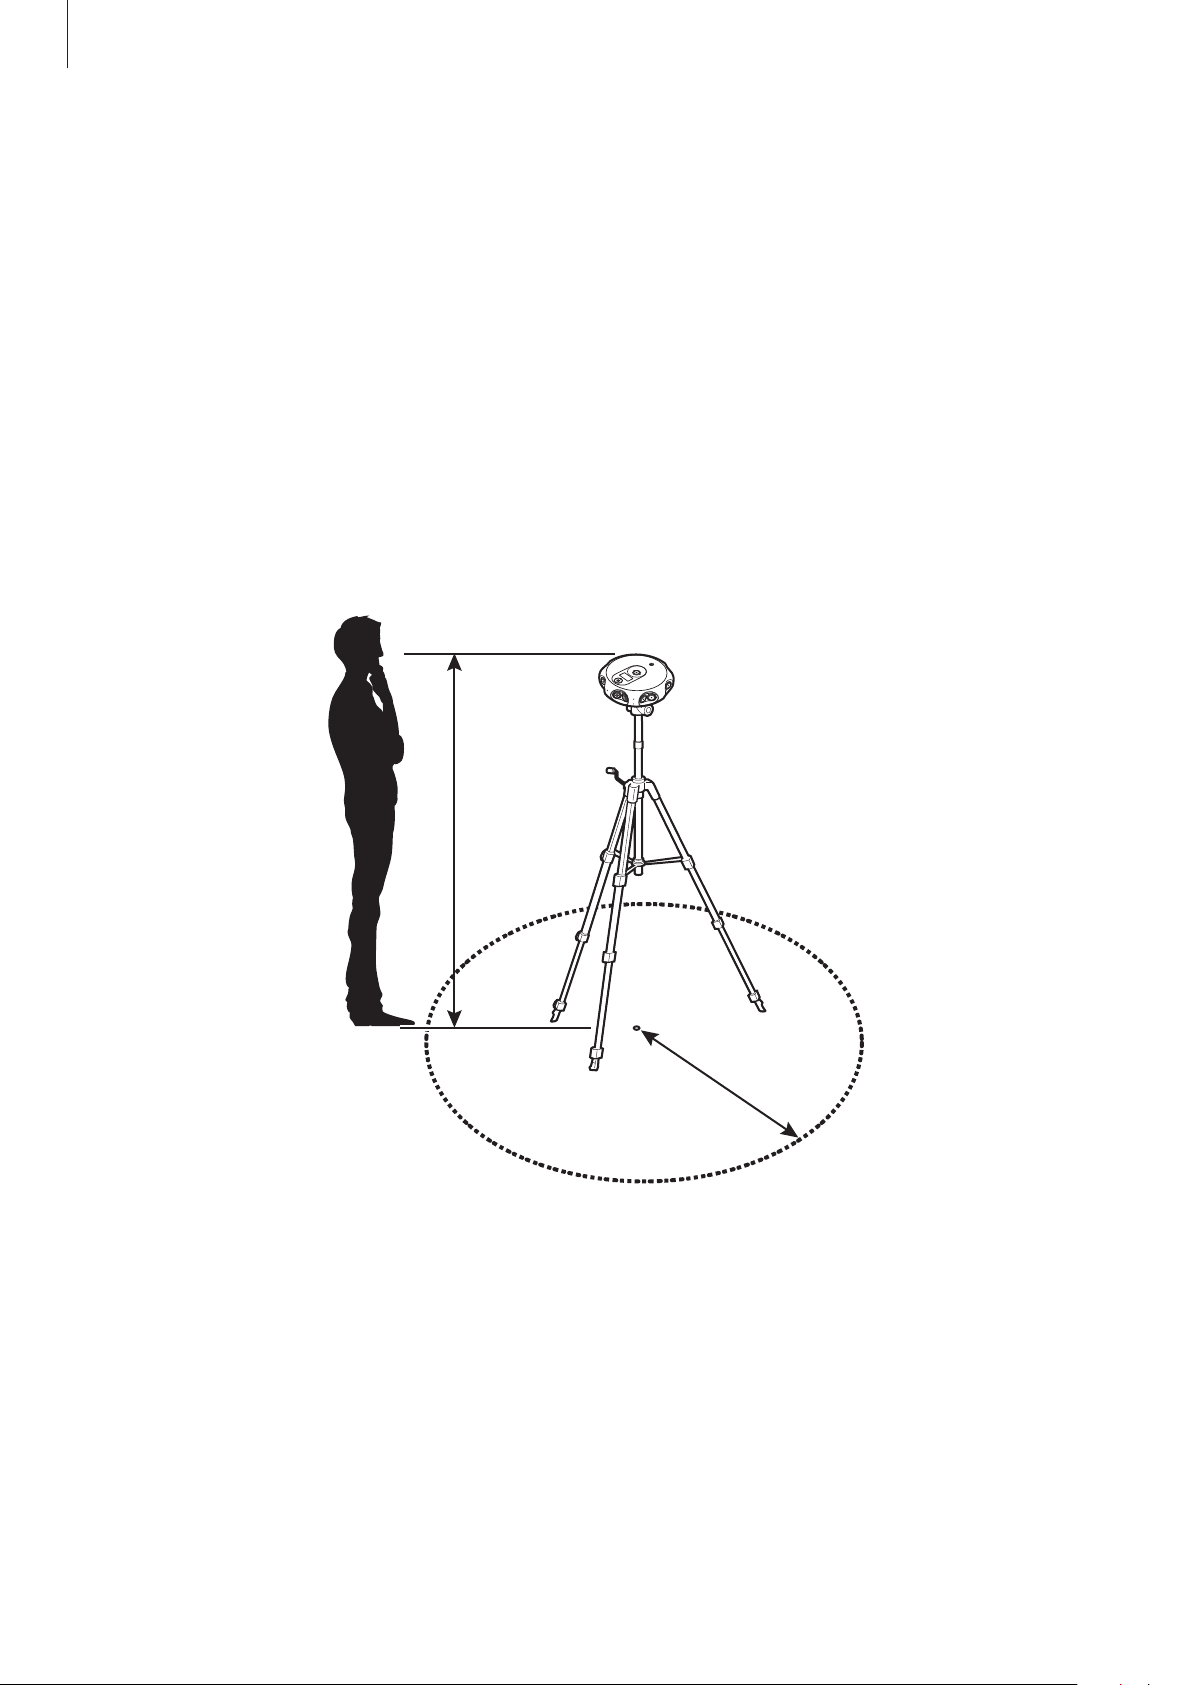
Installation tips
•
Set up the 360 Round and tripod securely on a flat area so that they do not topple over.
•
Keep a minimum distance of at least 5 ft between the 360 Round and the subject,
otherwise the recorded video may appear to be unnatural.
•
Install the 360 Round a minimum distance of at least 5 ft above ground, and at least 5 ft
under a ceiling.
5 ft or more
5 ft or more
•
If the 360 Round is tilted vertically or rotated while recording, the recorded video may
appear to be unnatural.
•
If you use the 360 Round in a dark location, the recommended ambient brightness
should be at least 100 lx.
Basics
19
•
Move any objects you do not want in the shot, such as the computer and other recording
equipment, out of the 360 Round’s view.
•
If you install the 360 Round outdoors, be sure to place the power adapter in a waterproof
power box as it is not waterproof.
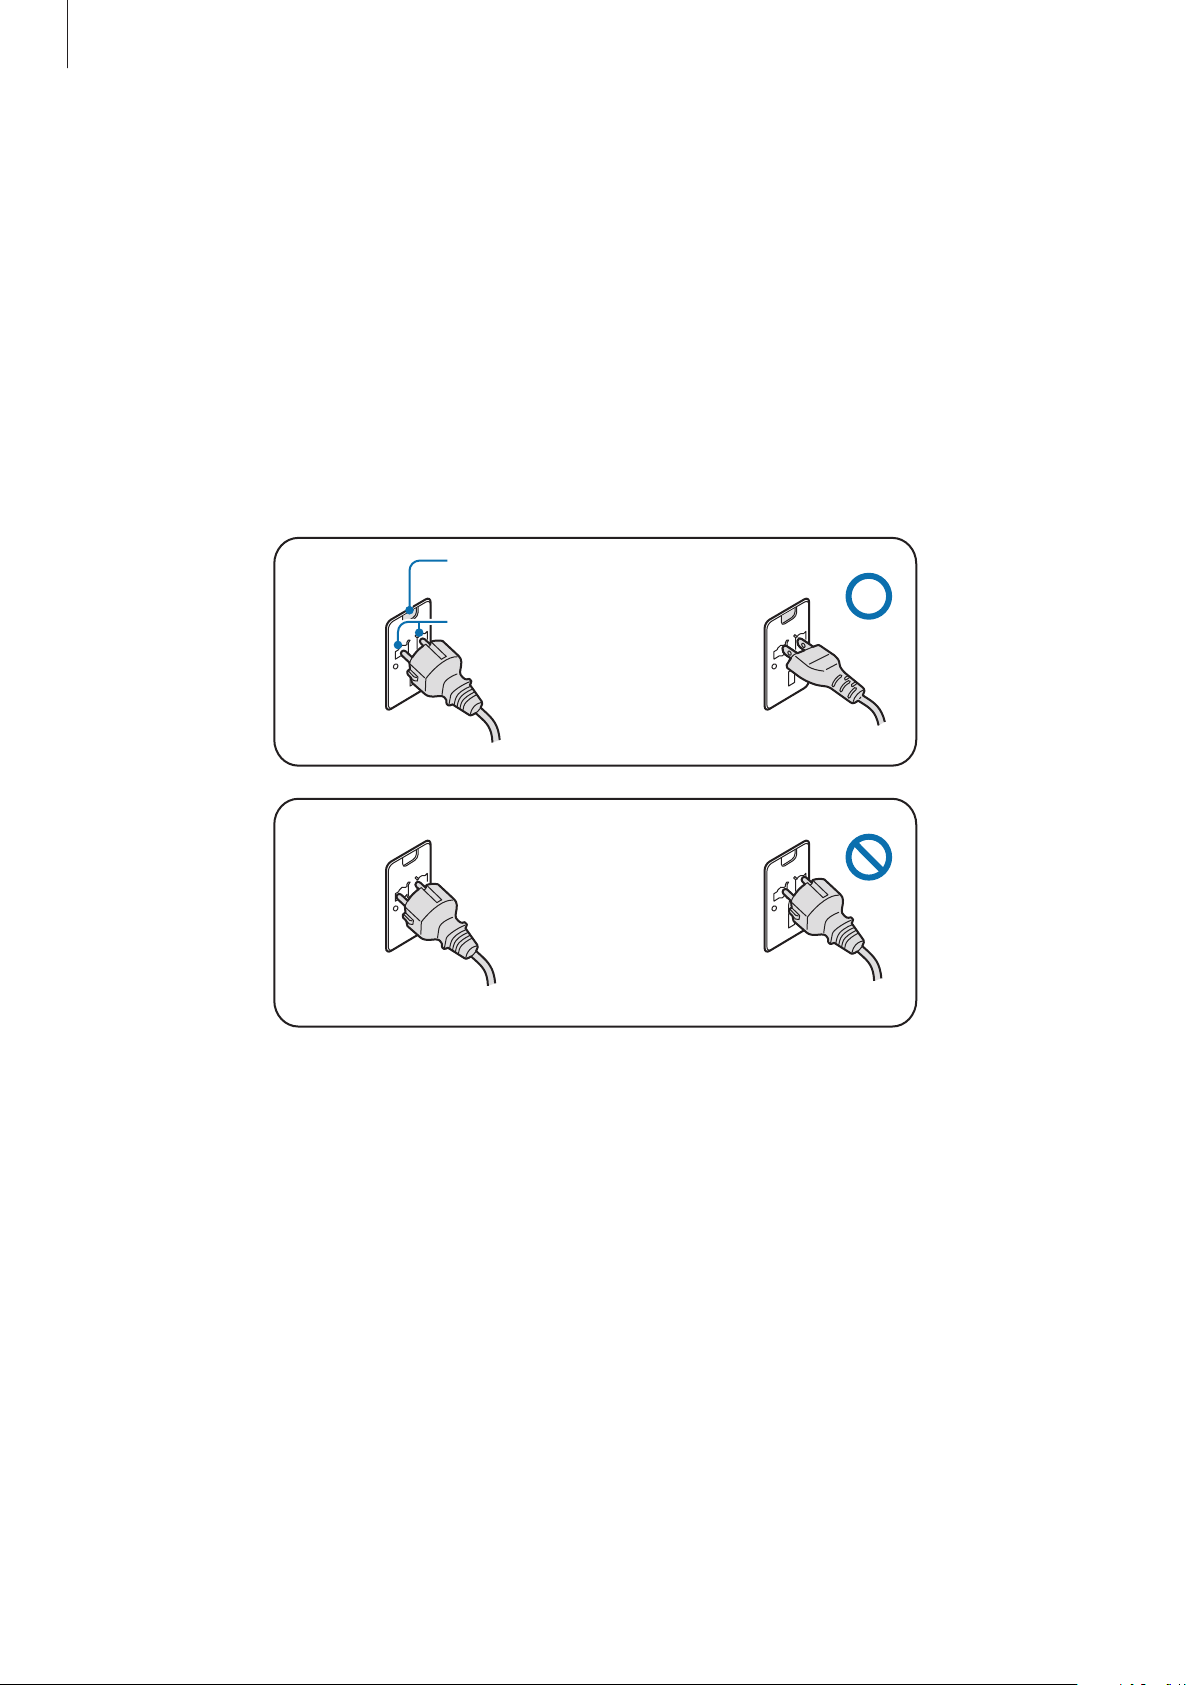
Caution when using an AC power terminal
Connect the power plug pin vertically into the center hole of the power terminal.
•
If you do not connect the plug pin directly into the center hole, it will not be correctly
connected. Reconnect the plug pin until it fits correctly into the center hole.
Power indicator light (LED)
Center hole
Power plug (220 V) Power plug (110 V)
Power plug (220 V) Power plug (110 V)
•
Connect the power plug to the power terminal when the power indicator light
(LED) flashes green. The power indicator light (LED) flashes green when it is correctly
connected. If the power plug is connected incorrectly, the power indicator light (LED) will
turn off. Disconnect the plug and check the power indicator light (LED) is on, and then
reconnect.

Basics
20
Using as a stationary 360 Round
1
Insert the tripod into the 360 Round’s tripod socket.
2
Connect the LAN cable to the 360 Round’s LAN port and to the computer’s LAN port.
3
Plug the power adapter into the 360 Round’s power adapter jack, and into an electric
socket.
4
Set up the tripod upright.
•
The LAN cable and tripod are sold separately. Set up the tripod so it is not included
in the frame when you are shooting a video.
•
If the length of the LAN cable that connects the 360 Round and the computer is
more than 328 ft, using an optic LAN converter is recommended.
•
Avoid high-voltage electronics when installing the LAN cable.
Setting the IP address
After connecting the 360 Round with your computer, you have to set the IP address to make
the 360 Round work with your computer properly.
1
On your computer, launch the
Control Panel
.
2
Click
Network and Internet
→
Network and Sharing Center
→
Change adapter
settings
.
3
Right-click the network adapter connected to your 360 Round with the mouse’s right
button and click
Properties
.
4
Select
Internet Protocol Version 4 (TCP/IPv4)
→
Properties
.
Basics
21
5
Select
Use the following IP address
and set the IP address to what is shown below, and
then click
OK
.
•
IP address
: 192.168.0.2 - 192.168.0.255
•
The 360 Round’s default IP address has 100 as the last three numbers.
•
Do not enter the same IP address as the second network’s IP address which is
automatically assigned.
•
Subnet mask
: 255.255.255.0
•
Gateway
: 192.168.0.1
If the 360 Round’s IP address has changed in the 360 Round program, set your
computer’s IP address to connect to the 360 Round’s IP address.
Using as a portable 360 Round
Insert a UHS II SD card or connect an SSD, and connect the external battery to use the 360
Round without connecting it to your computer and power adapter.
Connect the SSD to the multipurpose jack and connect the external battery to the power
adapter jack. You can control the 360 Round using the 360 Round’s keys.
External battery
SSD
Use either a 12 V, 16 V or 19 V standard external battery of 2 A or more. The 360 Round
may not work correctly if you use a non-standard external battery.
Basics
22
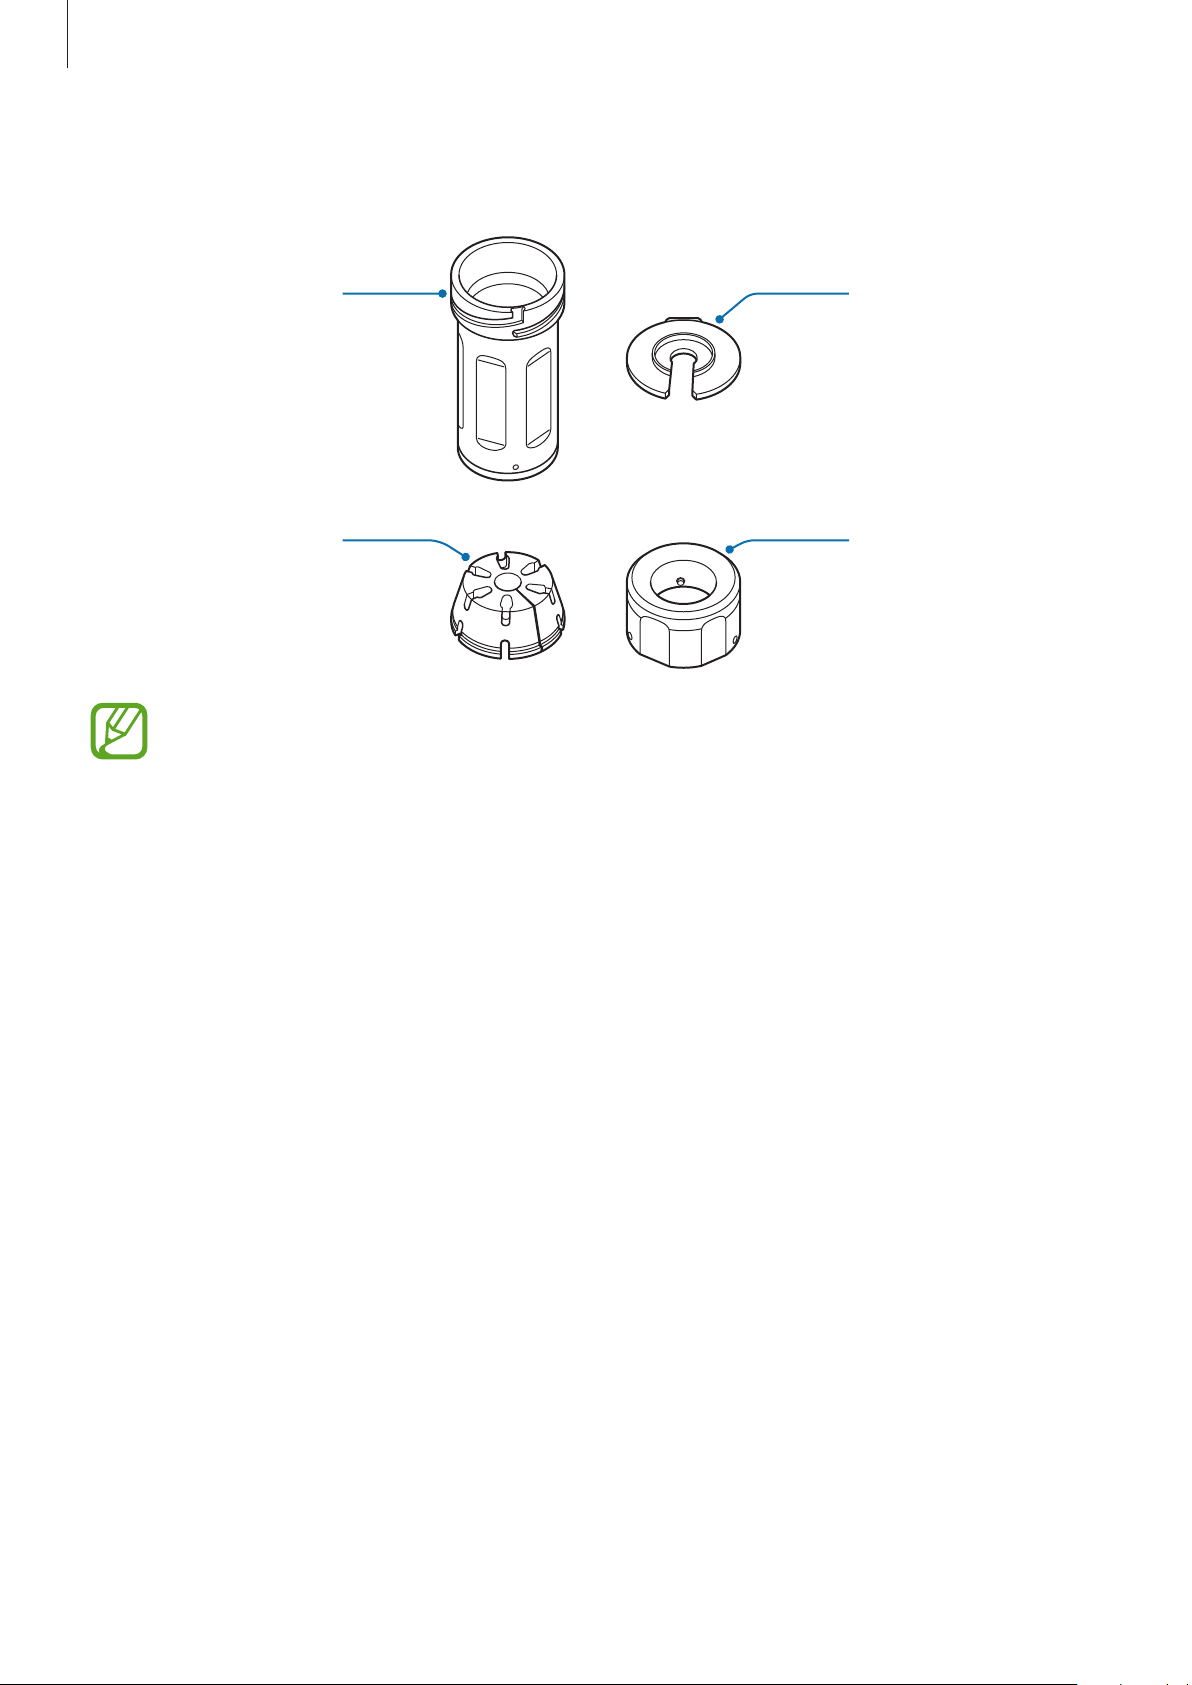
Waterproof adapter
Body
Washer
Rubber stopper
Cap
Two rubber stoppers are provided with the 360 Round, the rubber stopper with the
small hole is fitted to the power adapter jack, and the rubber with the large hole is
fitted to the LAN cable. Use the appropriate rubber stopper. If you cannot distinguish
the sizes, check the imprint under each rubber stopper.
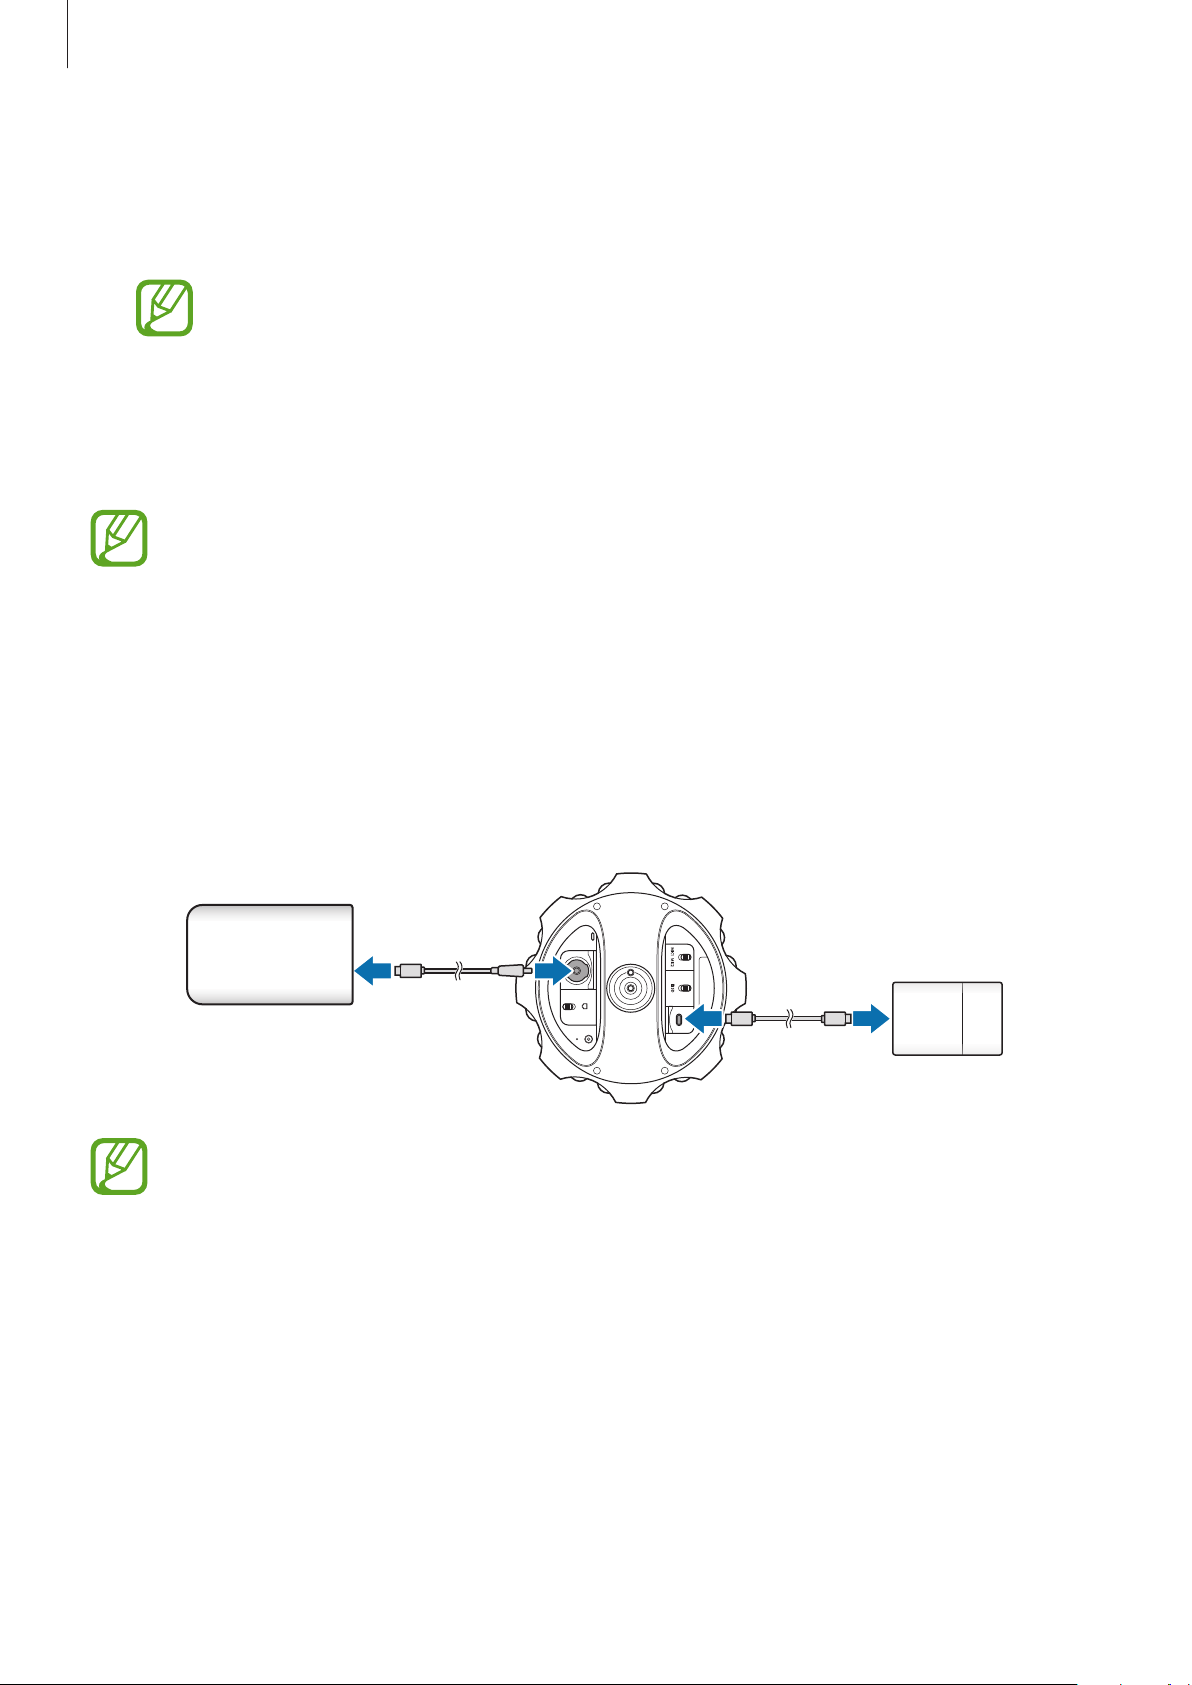
Using the waterproof adapter
To use the waterproof feature, each waterproof adapter must be attached to the supplied
power adapter and to the LAN cable (Cat 6a, 0.2 inch in diameter and under 100 m long, sold
separately).
1
Twist the cap of the waterproof adapter to remove the cap, washer and rubber stopper.

Basics
23
2
Attach the cap, washer, rubber stopper and body respectively to the connecting cable.
1
2
3
4
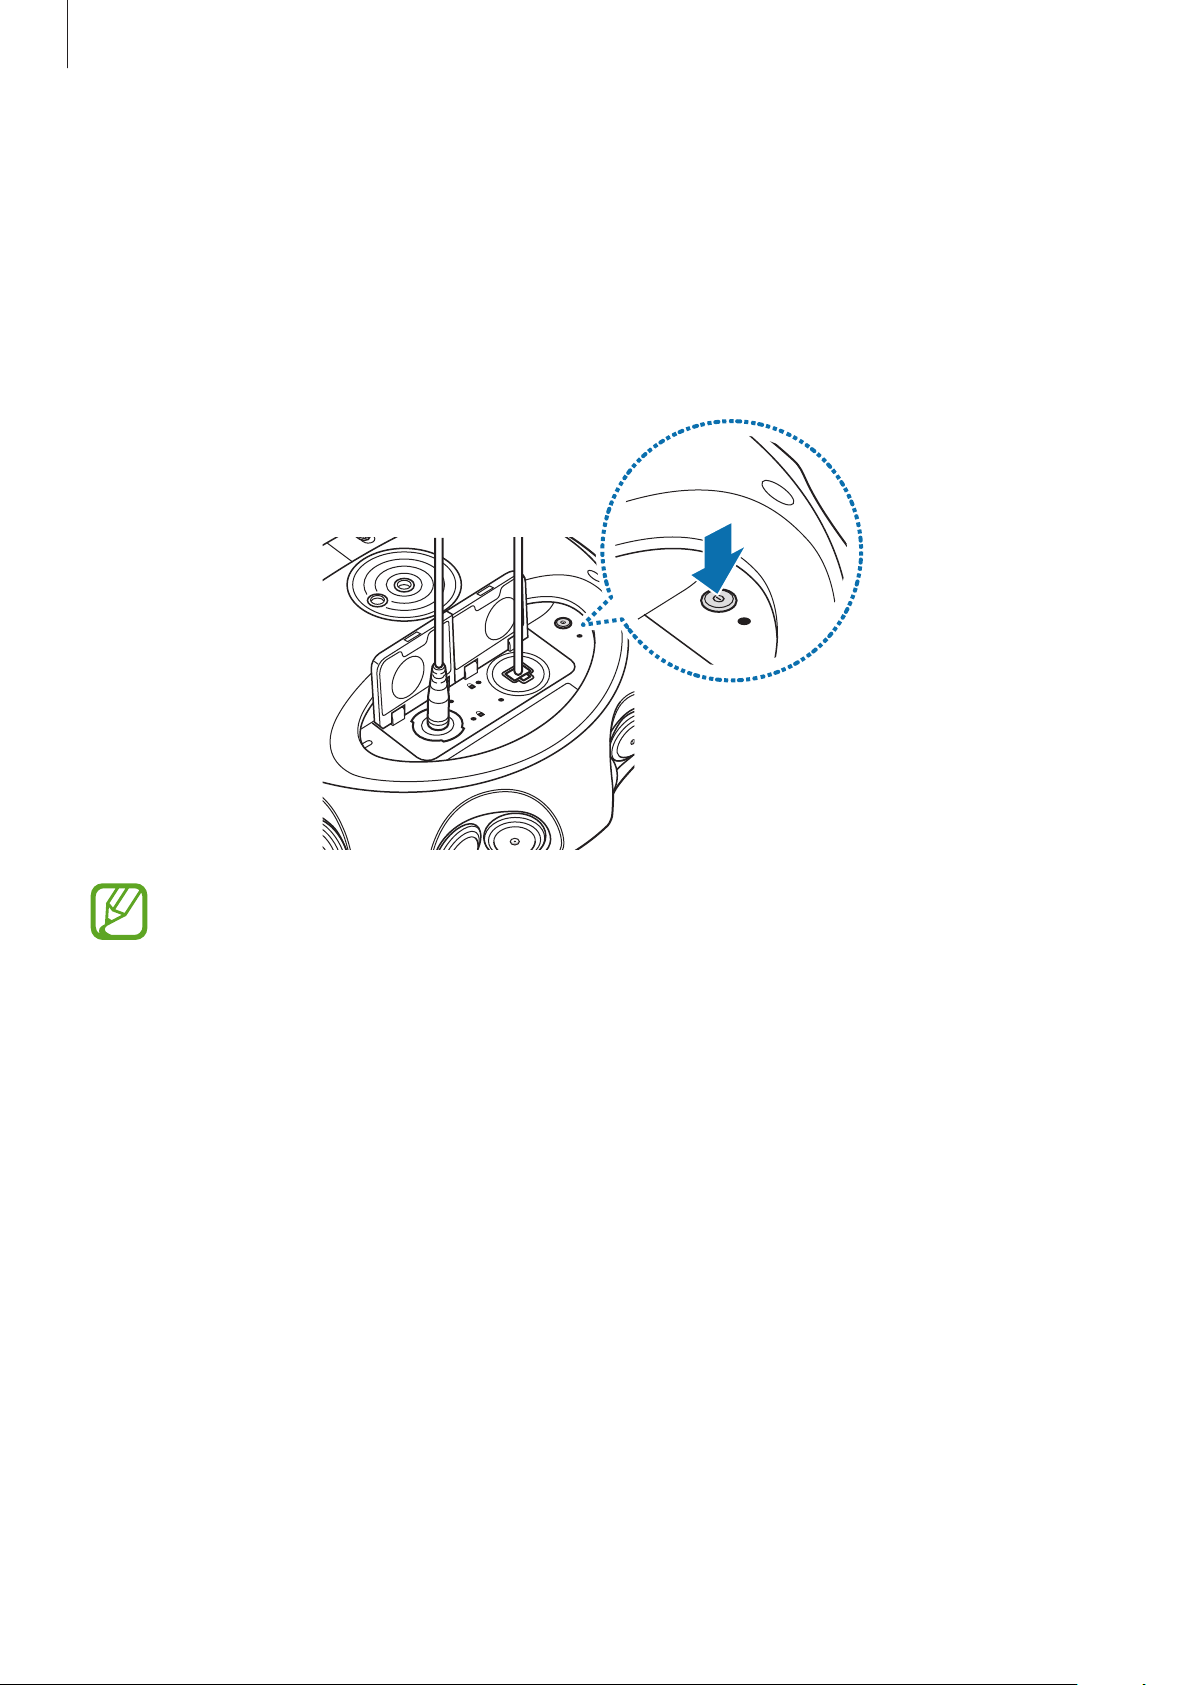
3
Connect the cable to the 360 Round and align the white dot located on the bottom of
the waterproof adapter’s body with the
in the port compartment on the 360 Round.
Turn the waterproof adapter in the direction of the
to securely lock it to the 360 Round
until it clicks.
1
2

Basics
24
4
Insert the rubber stopper and washer in order into the body and turn the cap to lock until
it clicks.
1
2
•
Make sure that the waterproof adapter has been locked in the right order and in
the correct direction. If there is a space between the rubber stoppers, the power
adapter cable, and the LAN cable, the waterproof adapter may not work correctly.
•
If the power adapter and the LAN cable are very thin or thick, or if you use non-
standard cables, the waterproof adapter may not work. Samsung recommends
using a power adapter cable 0.1 inch in diameter and a LAN cable 0.2 inch in
diameter.
•
Be careful to not allow the power adapter, which is not water resistant, to come
into contact with water.
•
Do not touch the 360 Round, power cable, plug and socket with the wet hands
or other body parts. The 360 Round may be damaged or you may be affected by
electricity.
Basics
25
Turning the 360 Round on and off
Press and hold the Power key to turn on the 360 Round.
Indicator light flashes blue three times.
To turn off the 360 Round, press and hold the Power key again.
Indicator light flashes red three times.
•
When the 360 Round is connected to your computer, you can turn the 360 Round
on and off via the 360 Round program.
•
You can set the power to turn off automatically when the 360 Round is not used for
a certain period of time. The power off time can be selected from the
Auto power
off
setting menu. Refer to System settings for more information.
•
Follow all posted warnings and directions from authorized personnel in areas
where the use of wireless devices is restricted, such as airplanes and hospitals.
Restarting the 360 Round
If your 360 Round is frozen and unresponsive, disconnect the power cable and reconnect it.
Press and hold the Power key to restart it.
26
Using the 360 Round program
Learning more about 360 Round program
By using the 360 Round program, you can record videos or stream a live broadcast on your
computer.
After configuring the 360 Round’s settings, record videos or start to broadcast videos in real
time.
The 360 Round program screen recording 360-degree video
Using the 360 Round program
27
Installing and launching the 360 Round program
1
Download the 360 Round program from www.samsung.com/us/business.
When the pop-up window that prompts you to restart the computer while
downloading the program appears, turn off the computer and turn it on again. If not,
the program may not be installed properly.
2
Connect the 360 Round to the computer with the LAN cable while the power adapter is
connected.
3
Press and hold the Power key to turn on the 360 Round.
4
Launch the
360 Round
program on your computer.
Using the 360 Round program
28
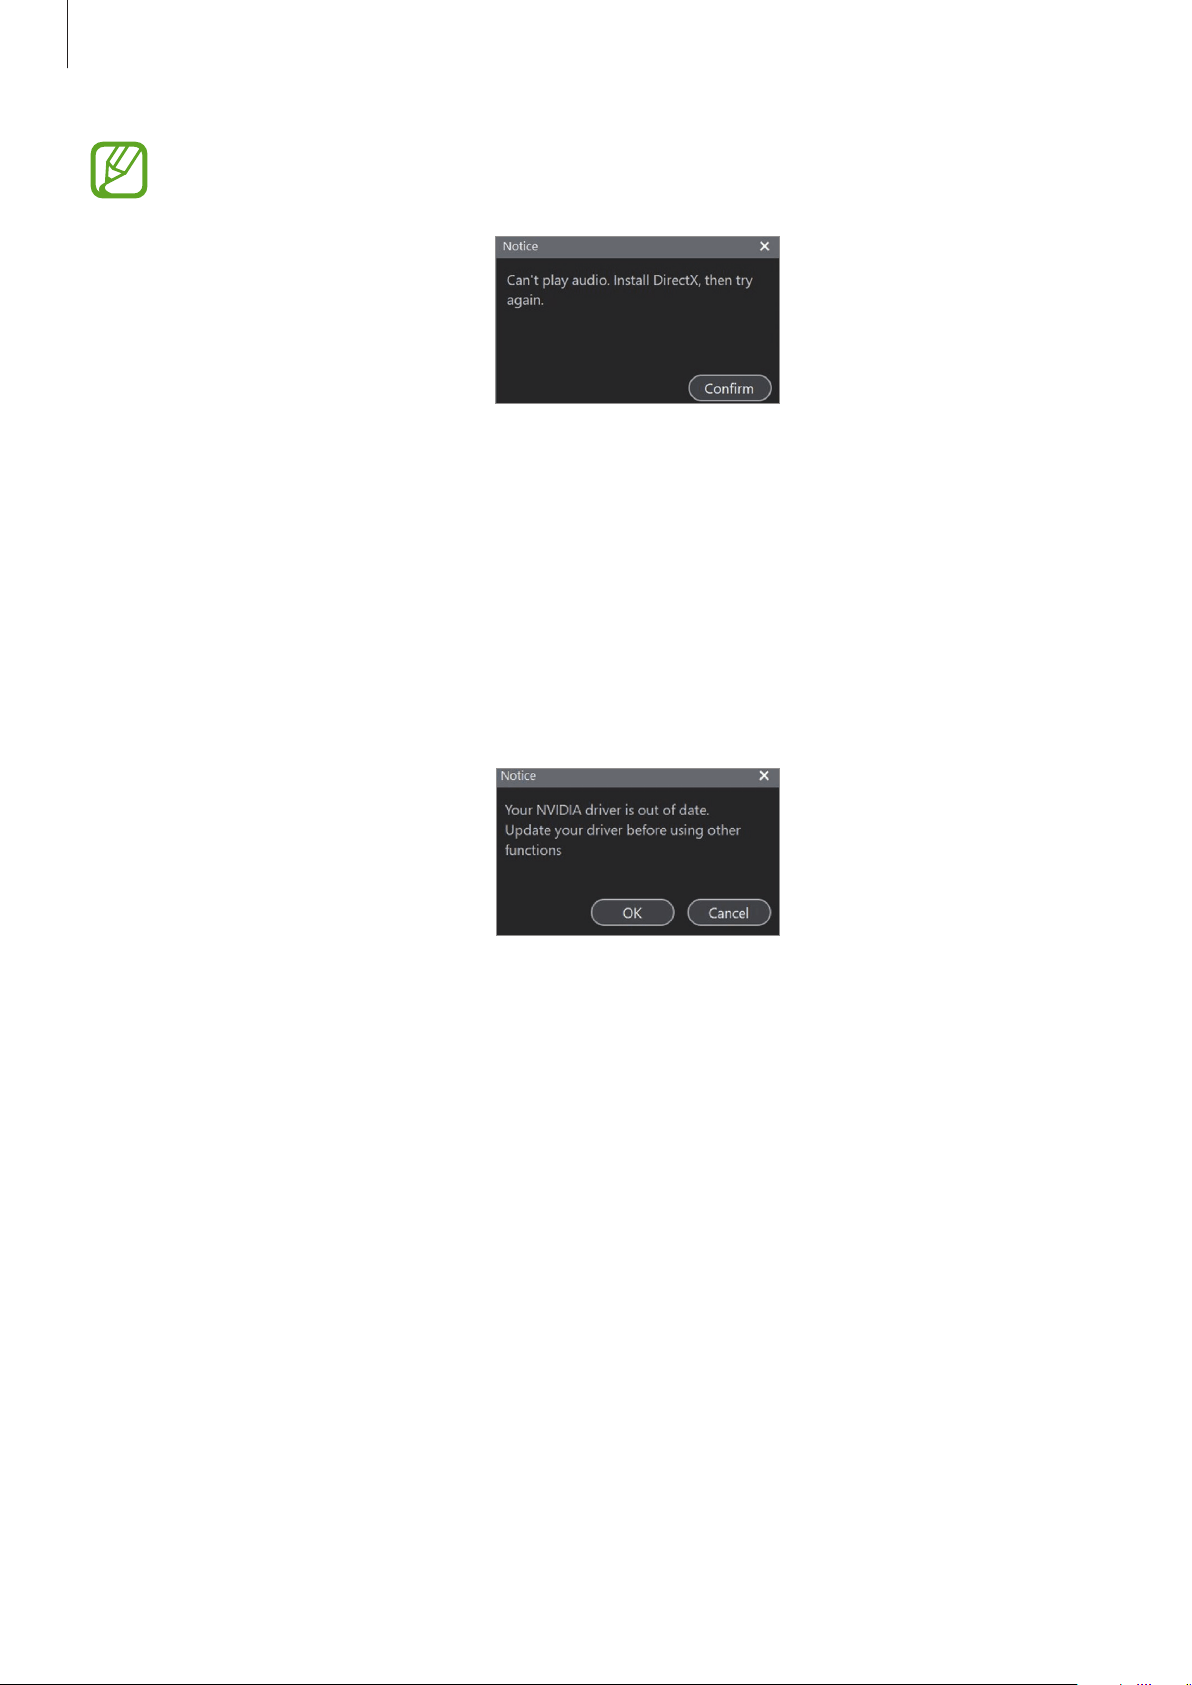
•
When the pop-up window that install the DirectX program appears, install the
DirectX program to play the 5.1 ch audio.
•
Allow the programs to launch through the Windows Firewall. On your computer,
launch the
Control Panel
, click
System and Security
→
Windows Firewall
→
Allow an app or feature through Windows Firewall
→
Change settings
, and
then select both
Private
and
Public
. Then, select
360 round
→
OK
.
•
When the pop-up window about slow network speed appears, refer to Error
message to solve the problem.
•
When the pop-up window notifies you to update your graphic card driver, install
the latest graphic card driver on your computer.

Using the 360 Round program
29
Recording videos
Introduction
You can record a 360-degree video in 2D or 3D format with 17 cameras. You can also record
videos using the 360 Round solely, or connect it to a computer and record using various
functions.
Camera etiquette
•
Do not record videos of other people without their permission.
•
Do not record videos where legally prohibited.
•
Do not record videos in places where you may violate other people’s privacy.
Tips for getting the best shots
•
Make sure that the cameras are clean before recording video and avoid touching the
lenses while capturing videos.
•
Installing the 360 Round on a tripod is recommended to prevent the 360 Round shaking.
•
Do not disconnect the 360 Round from the LAN cable while transferring files. The 360
Round and data may be damaged.
•
The 360 Round stops recording video or turns off automatically if the temperature rises
above a certain level when it has been used for extended periods. In this case, turn it off
and wait until it has sufficiently cooled.
Using the 360 Round program
30
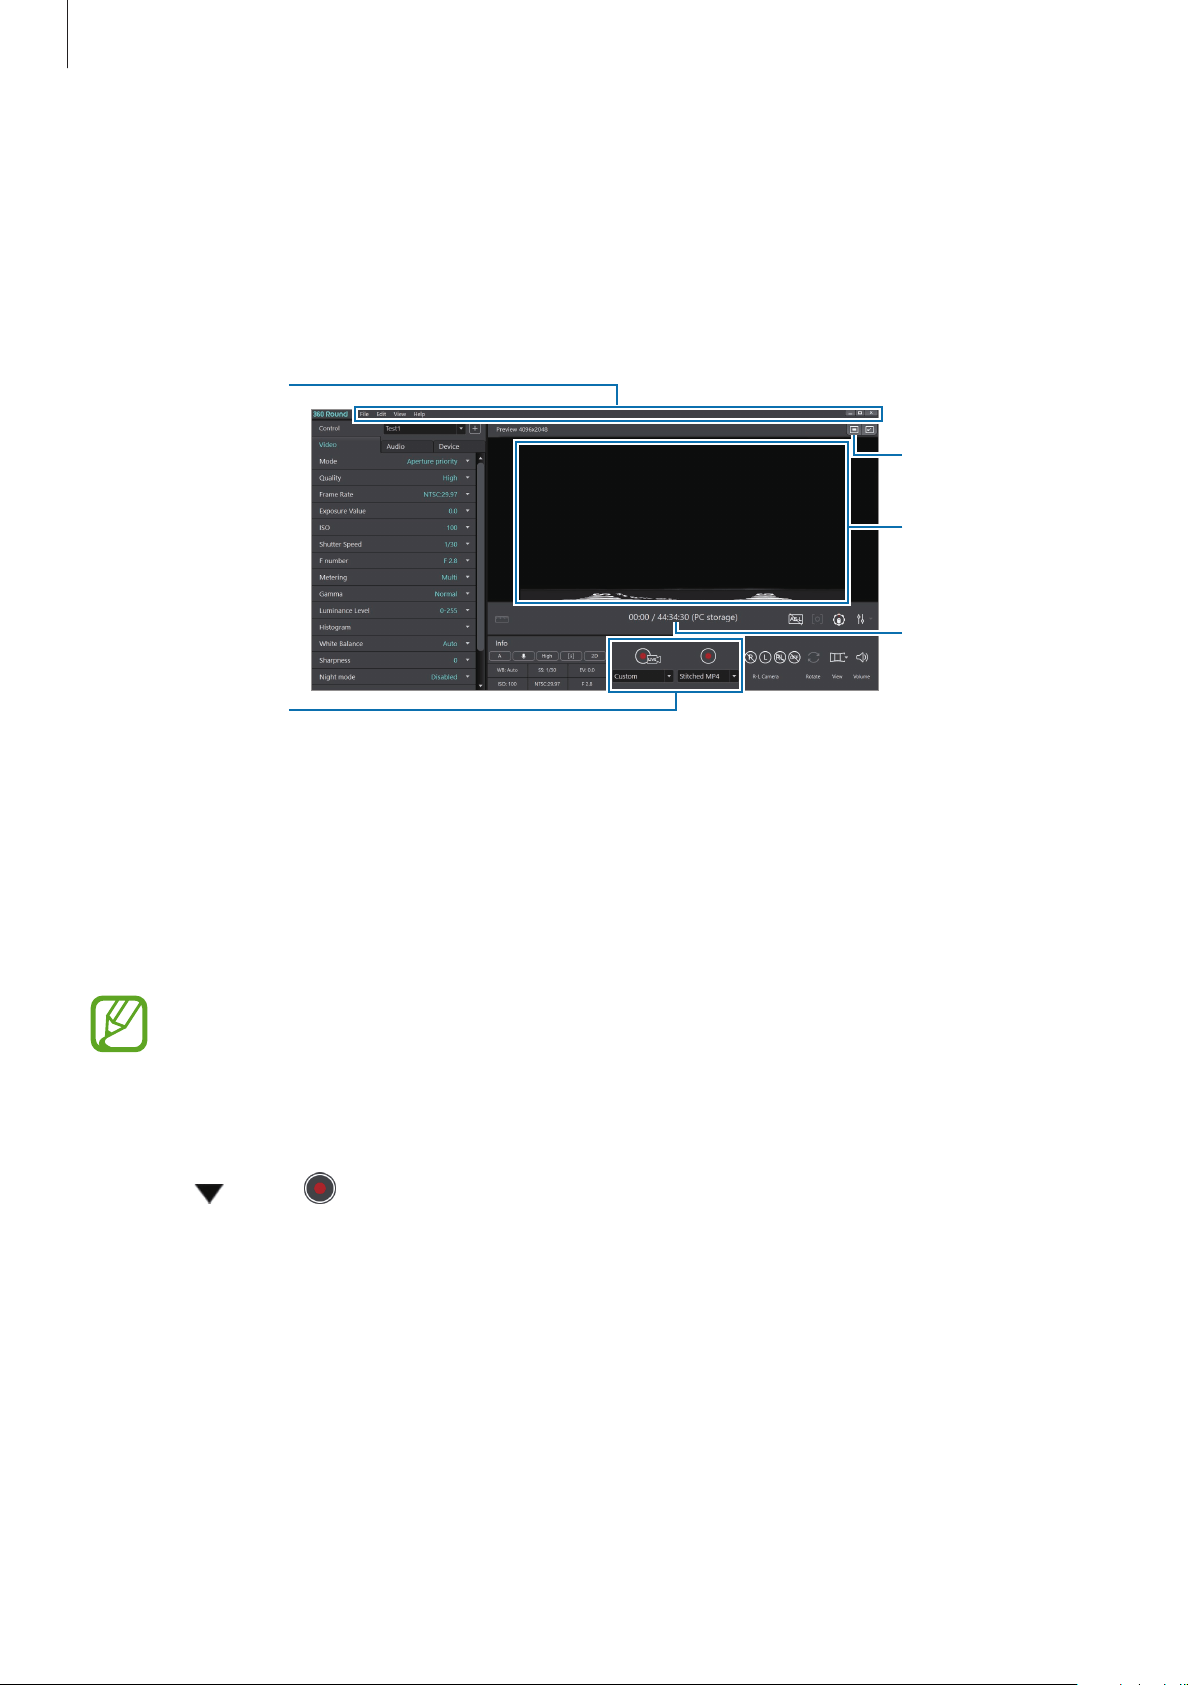
Recording videos using a computer
Use your computer as a viewfinder to record videos. You can check and change video settings
during a recording.
1
Launch the
360 Round
program on your computer.
Apply full screen.
Recording time
and remaining
time
Menu bar
Recording and
live
broadcasting
buttons
Preview screen
2
Click
Device
tab
→
Storage
on the control panel and select a location to save videos to.
You can select
PC
and save videos to your computer or select
Camera
and save videos to
the 360 Round’s memory card.
A memory card must be inserted into the 360 Round if
Camera
is selected as the
storage location.
3
Configure camera settings on the control panel of the program.
4
Click under and select the recording format.
•
Stitched MP4
: You can record 2D or 3D videos in
Panoramic view
mode.
•
RAW SLS
: You can record 3D videos in
Source view
mode and also record original
videos that are not stitched.
•
MP4 + SLS
: You can record 2D or 3D videos and the videos will be saved both as a
stitched MP4 and a RAW SLS file.

Using the 360 Round program
31
5
Click under and select
Settings
.
6
Configure the video settings if needed on the settings window.
•
Program settings
–
General
: Configure the basic settings, such as the storage folder, stitching options,
and SDI output options.
Select the
Stabilizer
option to correct the video if the video recording was tilted
due to your 360 Round not being set on a flat surface. Also, you can reduce shaky
video resulting from the 360 Round shaking during recording with this feature.
–
Stitched recording
: Configure the settings for the recorded video, such as the file
format or the video or audio codec.
–
Live broadcasting
: Configure the settings when you start the live broadcasting.
–
GPU selection
: Select which GPU to use for various actions.
–
Preference
: Specify preferences for using the 360 Round, such as storage and view
mode.
•
Device settings
–
Camera Device
: Configure the 360 Round settings.
–
IP address
/
Subnet mask
/
Gateway
: Enter the information to change the IP address
settings.
–
Connected Camera
: View the 360 Round list connected to your computer. You can
select the camera you want to use when two or more 360 Rounds are connected to
your computer at once.
7
Click
Stitched recording
, enter information, and then select
OK
.

Using the 360 Round program
32
8
Click to record a video.
The preview screen will appear on the computer. At the same time,
Recording
will
appear on the status screen of your 360 Round and the camera indicator light will blink
red.
To zoom in or out while recording video, click
View
→
Zoom
→
Zoom in
or
Zoom out
on the menu bar.
9
Click to finish recording video.
The camera status light will turn off and the recorded video will be saved to the location
that you selected automatically. If you select
PC
as the storage location, you can check
where the video will be saved by clicking
View
→
Open storage folder
on the menu bar.
•
The 360 Round stops recording video or turns off automatically if the temperature
rises above a certain level when it has been used for extended periods. In this case,
turn the 360 Round off and wait until it has cooled.
•
The 360 Round has been developed for content production and can not be
used for security such as CCTV. Do not use it outdoors for more than 12 hours
continuously. Doing so may affect the life and performance of the 360 Round and
may cause errors when recording videos.
•
When connecting to a computer, the keys on the 360 Round will not work.
•
To change the storage location, click
Device
tab
→
Storage
→
PC
or
Camera
on
the control panel. When
Camera
is selected as the storage location, it changes to
Source view
mode.
•
A slight difference in time may occur between the actual subject movement and
the subject movement on the preview screen.
Using the 360 Round program
33
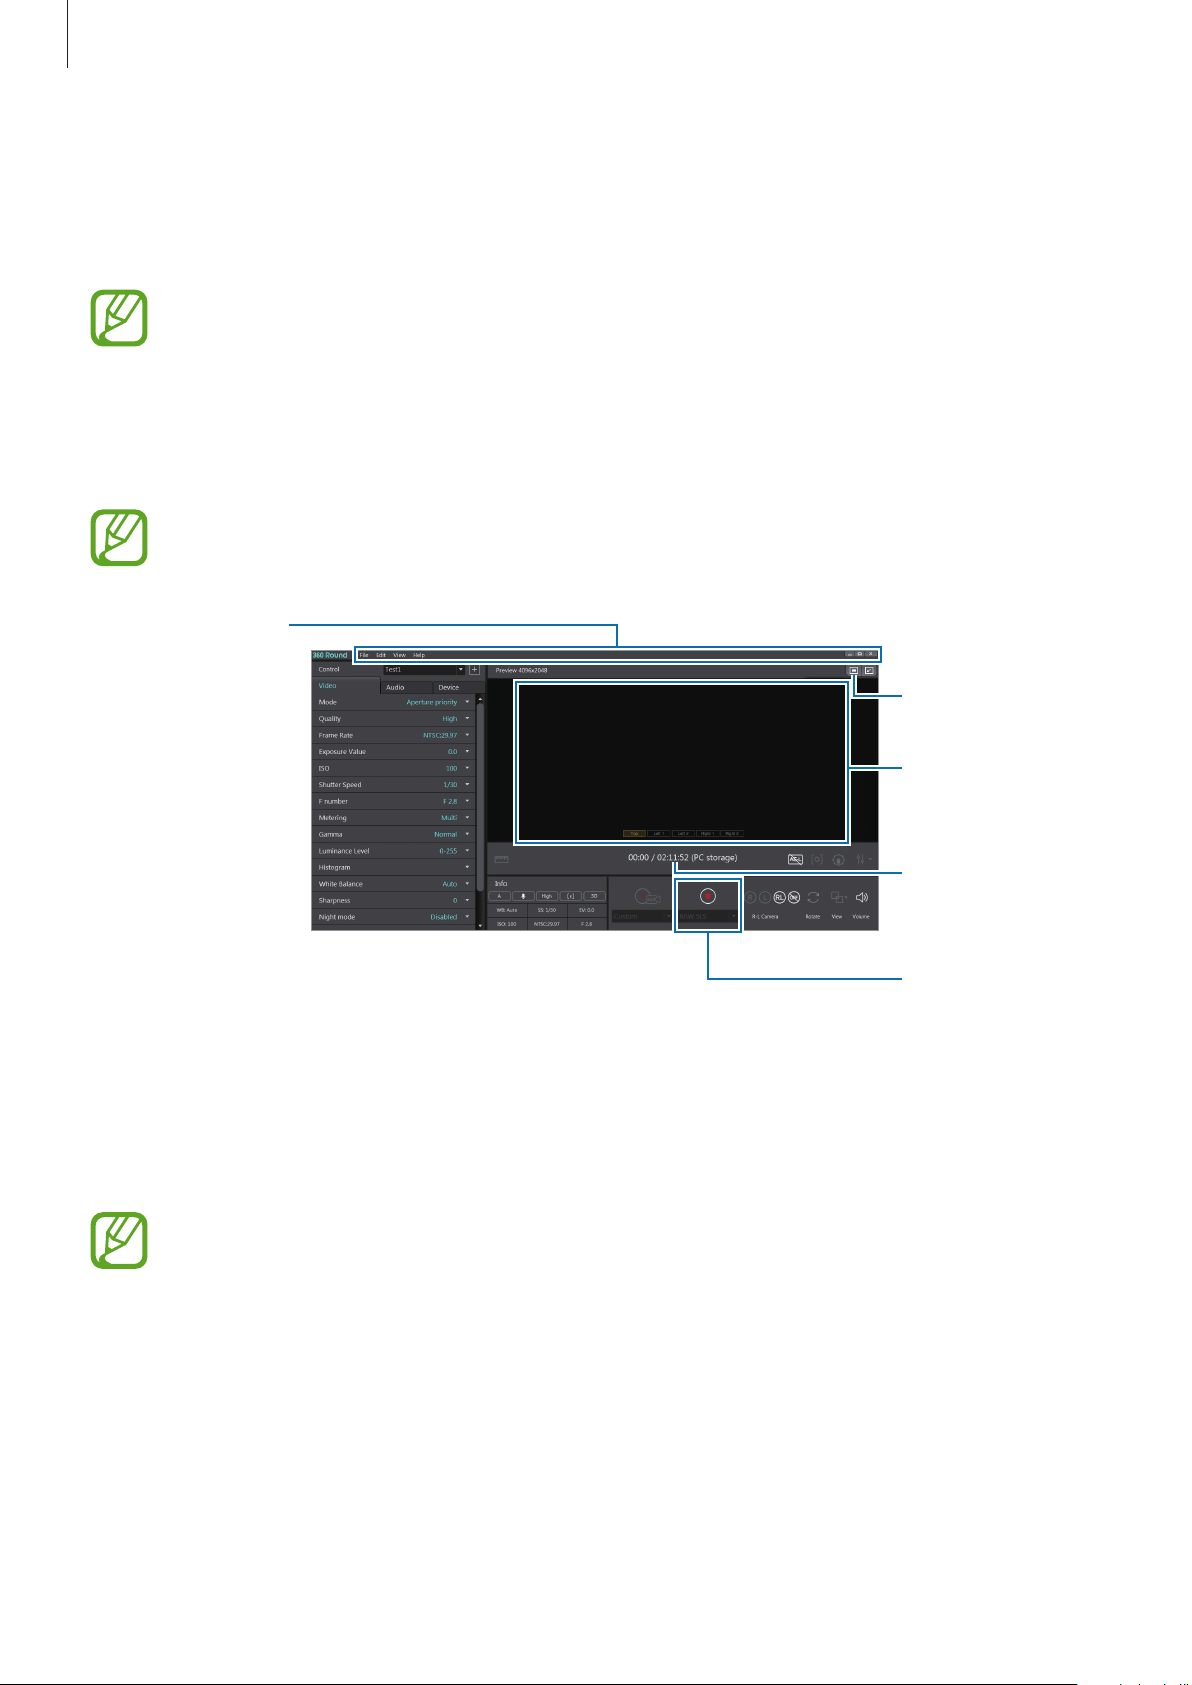
Recording videos using a laptop
If you do not have a computer for stitching, you can use a laptop to preview the recording
video and control the camera with a laptop.
•
Refer to Required specification for laptop specifications.
•
Some features may be disabled when using the laptop.
•
A memory card must be inserted into the 360 Round to record videos.
1
Launch the
360 Round
program on your computer.
If you use a laptop, you can only use
Source view
mode.
Apply full screen.
Recording time
and remaining
time
Menu bar
Recording
button
Preview screen
2
Click
Device
tab
→
Storage
on the control panel and select a location to save videos to.
You can select
PC
and save videos to your computer or select
Camera
and save videos to
the 360 Round’s memory card.
A memory card must be inserted into the 360 Round if
Camera
is selected as the
storage location.
Using the 360 Round program
34
3
Configure camera settings on the control panel of the program.
4
Click
Edit
→
Settings
to configure the video settings if needed.
•
Program settings
–
General
: Configure the basic settings, such as the storage folder, stitching
resolution, and calibration interval.
–
GPU selection
: Select which GPU to use for various actions.
–
Preference
: Specify preferences for using the 360 Round, such as storage and view
mode.
•
Device settings
–
Camera Device
: Configure the 360 Round settings.
–
IP address
/
Subnet mask
/
Gateway
: Enter the information to change the IP address
settings.
–
Connected Camera
: View the 360 Round list connected to your computer. You can
select the camera you want to use when two or more 360 Rounds are connected to
your computer at once.
5
Click to record a video.
The preview screen will appear on the computer and
Recording
will appear on the status
screen of your camera. The camera indicator light will blink red.
To zoom in or out while recording video, click
View
→
Zoom
→
Zoom in
or
Zoom out
on the menu bar.
If you select
Camera
as the storage location, the preview screen and zoom menu will
not be available.
6
Click to finish recording video.
The camera status light will turn off and the recorded video will be saved to the location
that you selected automatically. If you select
PC
as the storage location, you can check
where the video will be saved by clicking
View
→
Open storage folder
on the menu bar.
Using the 360 Round program
35
•
The 360 Round stops recording video or turns off automatically if the temperature
rises above a certain level when it has been used for extended periods. In this case,
turn the 360 Round off and wait until it has cooled.
•
The 360 Round has been developed for content production and can not be
used for security such as CCTV. Do not use it outdoors for more than 12 hours
continuously. Doing so may affect the life and performance of the 360 Round and
may cause errors when recording videos.
•
When connecting to a computer, the keys on the 360 Round will not work.
•
To change the storage location, click
Device
tab
→
Storage
→
PC
or
Camera
on
the control panel.
•
A slight difference in time may occur between the actual subject movement and
the subject movement on the preview screen.
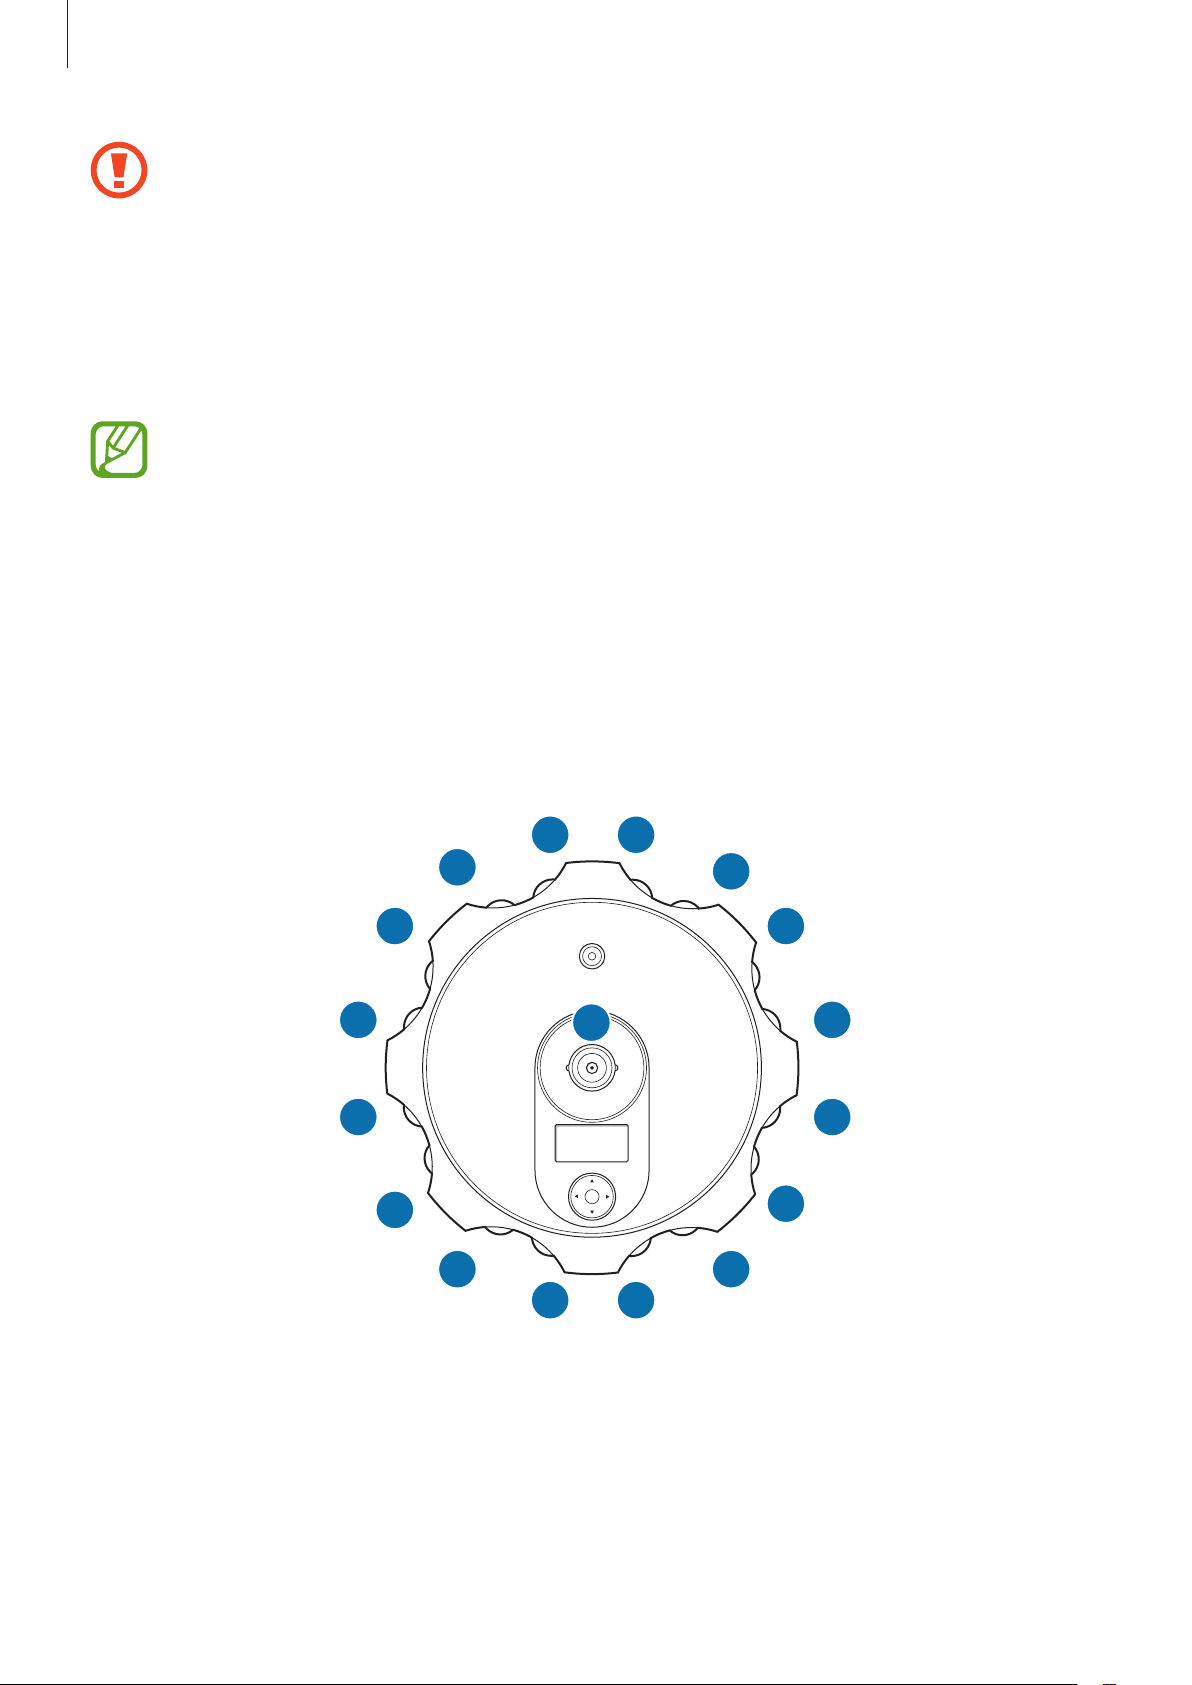
Checking the location of each camera
Before recording a video, check the location of the cameras. One is located on the top of the
360 Round and the other 16 cameras are located on the sides of the 360 Round.
OK
216
1
0
15
8
14
7
13
6
12
5
11
4
10
3
9
•
Top camera: The camera number 0.
•
Left camera: The cameras number 1 to 8.
•
Right camera: The cameras number 9 to 16.
Using the 360 Round program
36
Checking the location of each camera on the recording video screen
Check the location of the 17 cameras in the video you are recording on the 360 Round screen.
The following screen shot was taken in
Panoramic view
mode using all 17 cameras.
L5 L6 L7 L8 L1 L2 L3 L4
Top
R5 R6 R7 R8 R1 R2 R3 R4
2D mode
3D mode
Top
You can check the each camera’s label when recording a video. Click
View
→
Show
camera label
on the menu bar. If you use the zoom in/out feature or change the view
mode into
Source view
, you cannot use this feature.
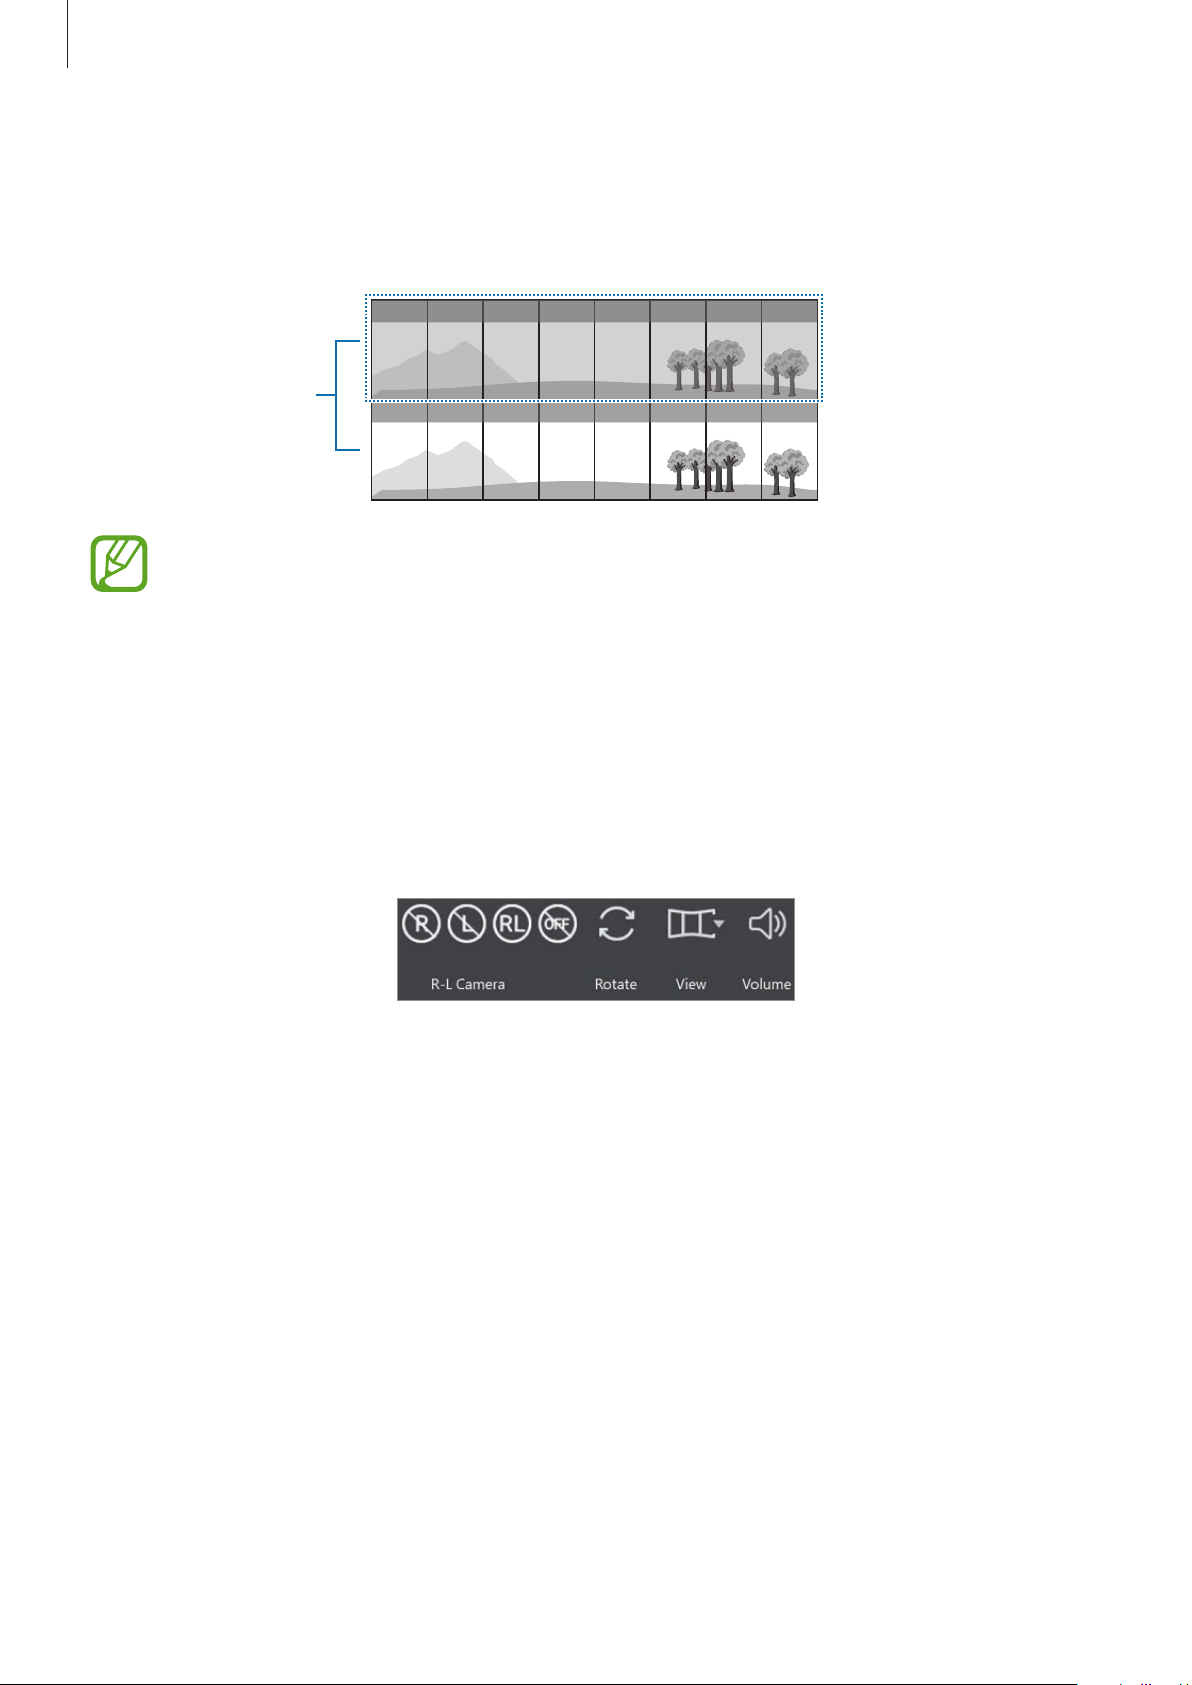
Using main buttons
You can use the various main buttons on the preview screen while recording videos to easily
apply various settings.
Launch the
360 Round
program on your computer.
Main buttons for the 360 Round program

Using the 360 Round program
37
Setting 2D or 3D mode
You can select which camera to use when you are recording video.
Click the
R-L Camera
buttons to select the camera to be used for recording. Refer to Checking
the location of each camera for the detailed location of cameras on the right or left side of the
360 Round.
If you use a laptop, you can only use
Source view
mode.
•
On Panoramic view, Stretched view, 360˚ view or Round view mode:
–
: You can record 2D video using the 8 cameras on the right side, and the
camera on the top of the 360 Round.
–
: You can record 2D video using the 8 cameras on the left side, and the
camera on the top of the 360 Round.
–
: You can record 3D video with all of the 17 cameras on the 360 Round.
–
: All cameras are turned off and the preview screen is disabled.
•
On Source view mode:
–
: You can record 3D video with all of the 17 cameras on the 360 Round.
–
: All cameras are turned off and the preview screen is disabled.
Rotating the preview screen
You can record and view videos by rotating the preview screen up and down in 180 degrees.
Click
to rotate the preview screen.

Using the 360 Round program
38
Changing the preview screen view mode
You can change the preview screen view mode to record 2D or 3D videos. When recording in
Source view
mode, you can record original videos that are not stitched. In
Panoramic view
mode, you can record 2D and 3D videos.
Click
on the
View
option to change the preview screen view mode. Alternatively, click
View
→
View mode
or click the
View
option icon repeatedly to change the view mode.
•
Panoramic view
: View the preview screen as a horizontally stretched screen.
•
Stretched view
: View the preview screen as a big enlarged scene.
•
360˚ view
: View the preview screen in spherical form.
•
Round view
: View the preview screen as a rounded scene.
•
Source view
: View the preview screen through the cameras of each section. Select
Top
,
Left 1
,
Left 2
,
Right 1
or
Right 2
on the preview screen to check the recording
videos from each section. Refer to Checking the location of each camera for detailed
location of cameras on the right or left.
–
Top
: Use the camera on the top numbered 0.
–
Left 1
: Use the cameras on the left numbered 5 to 8.
–
Left 2
: Use the cameras on the left numbered 1 to 4.
–
Right 1
: Use the cameras on the right numbered 13 to 16.
–
Right 2
: Use the cameras on the right numbered 9 to 12.
Adjusting the volume of recording video
You can adjust the volume of the recording video.
Click
and drag on the adjustment bar to adjust the volume.
To mute the video, click
→
and click
→
to unmute the video.
If you set the volume excessively high when recording video in a high surrounding
environment, the audio may be distorted. Launch the
360 Round
program and click
the
Audio
tab and set
Mic
.
Level - Internal
to
Auto
or
Manual
to turn down the
volume.
Using the 360 Round program
39
Using the tool bar
Various tools are located on the tool bar as buttons. Use the tools to record a video more
effectively with the simple press of a button. The available tools may be changed depending
on the current recording mode and settings.
Launch the
360 Round
program on your computer.
Tool bar for the 360 Round program
Hover the mouse pointer over each tool bar button to check their descriptions before
using them.
Calibrating video
You can get better stitching results through video calibration. Calibration performs depth
map estimation of the scene and also performs local warping of the seam line area.
Select
on the tool bar under the preview screen.
Calibration will be performed from where
is clicked and the depth map of the image is
updated.
The calibration values are maintained until another calibration is performed.
Short distance cut object correction

Using the 360 Round program
40
Thin object depth error correction
To automatically trigger video calibration by sensing the scene transition, click
under
, select
Settings
→
General
, and then set the
Calibration interval
to
Auto
.
Locking the automatic exposure
Select on the tool bar under the preview screen.
When you turn on the AE-L feature on the aperture priority mode:
•
You can change the exposure value manually.
•
You cannot adjust the value for the frame rate, ISO, or F number.
•
You cannot use the metering feature and the metering button ( ) on the tool bar is
disabled.
When you turn on the AE-L feature on the manual mode:
•
You can turn on the AE-L feature only when
ISO
is set to
Auto
on the control panel.
•
You cannot adjust the value for the frame rate, ISO (except setting it to
Auto
), F number,
or shutter speed.
•
You can change the recording mode in
Manual
on the control panel.
•
The AE-L feature will not be changed even if the network connection is lost or
disconnected.
•
When the 360 Round is turned off, the AE-L feature will turn off.
Using the 360 Round program
41
Using spot metering
Spot metering focuses the light in a specific camera to calculate the exposure of the
recording video.
1
Select on the tool bar under the preview screen.
If you cannot find
on the tool bar, click
Metering
and select
Spot
on the control panel.
2
Select a camera to apply the spot metering mode to and click the its preview screen.
The cursor is changed to the metering VI cursor and appears on the selected camera
preview screen.
Changing the center camera
1
Select on the tool bar under the preview screen.
2
Click the preview screen of the camera that you want to set as the center.
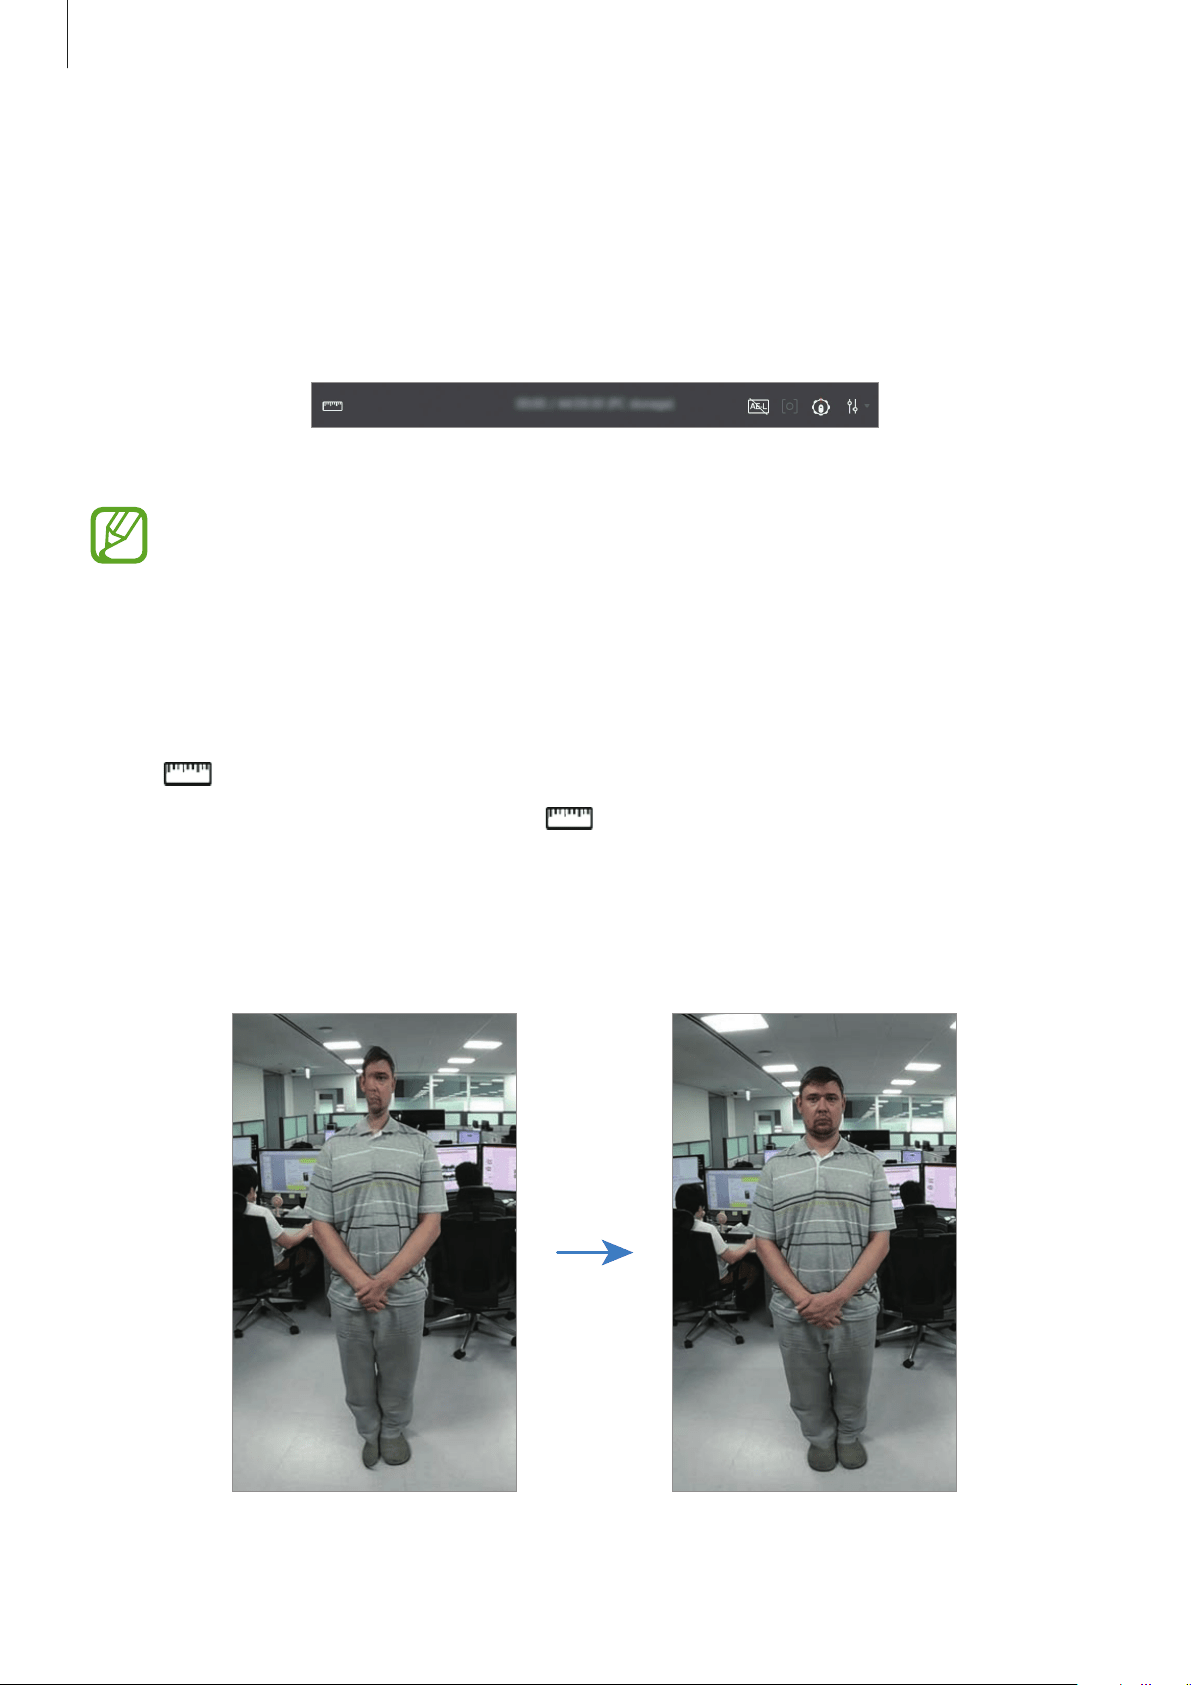
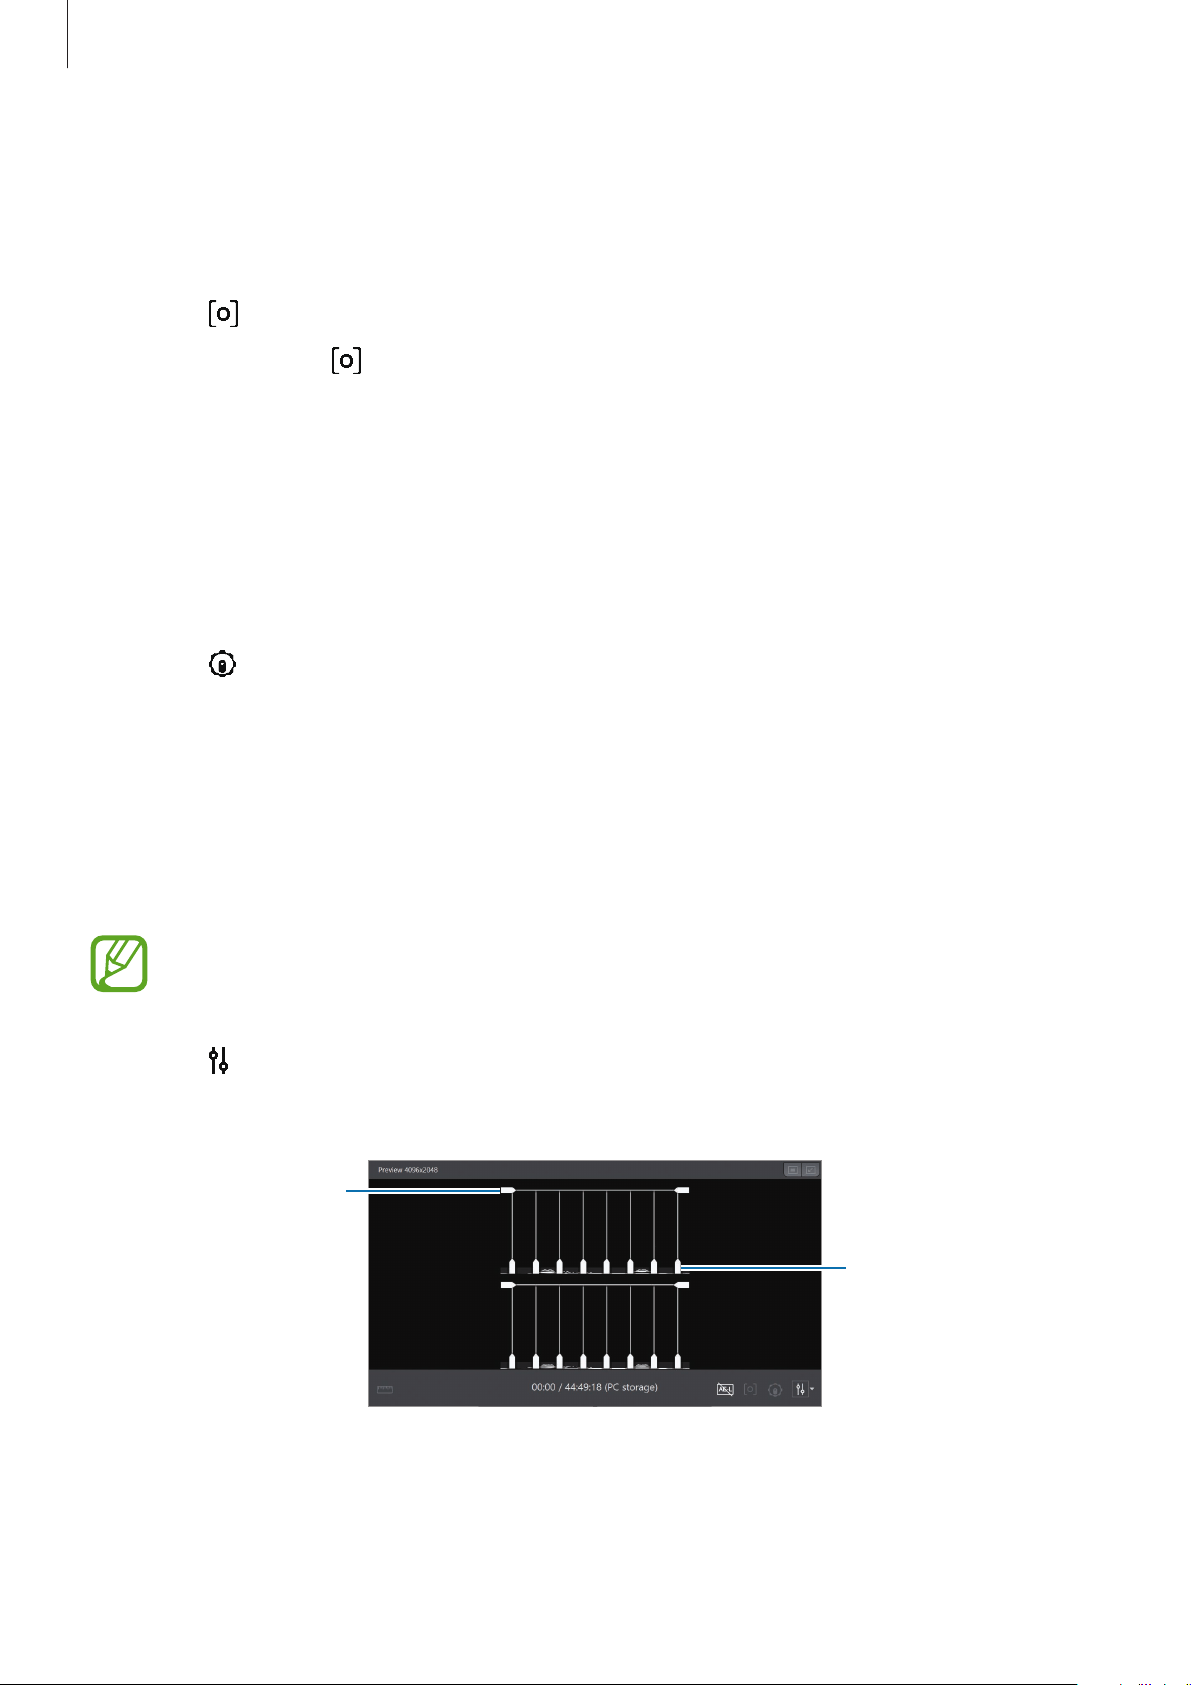
Changing the seam line of the preview screen
The seam line is the borderline along which each camera’s footage is joined when the video is
stitched. You can change the seam line to get better quality videos after stitching.
This feature may be disabled while recording a video.
1
Select
on the tool bar under the preview screen.
The seam lines will appear on the preview screen.
The preview screen of the 360 Round program with
the seam line feature activated
Adjust the seam line
vertically.
Adjust the seam line
horizontally.
Using the 360 Round program
42
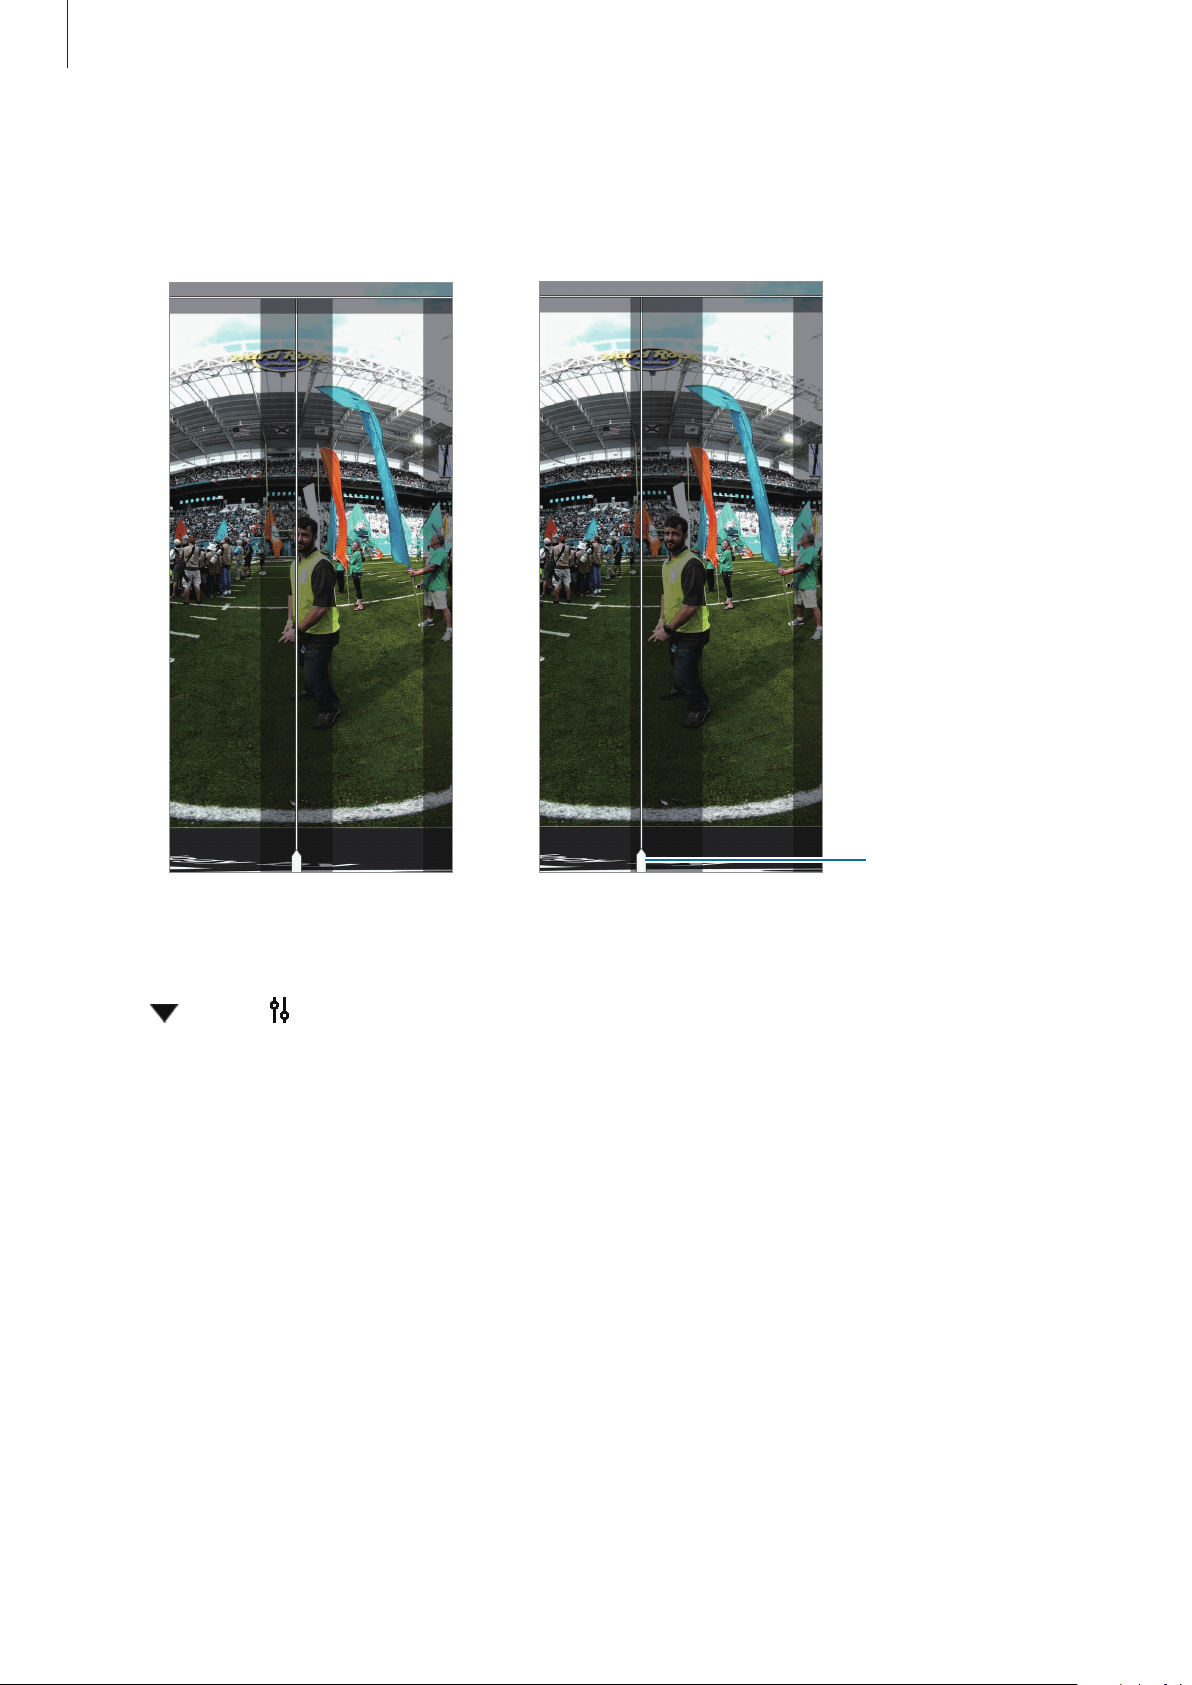
2
Click the seam line handle and drag it horizontally or vertically in the direction you want.
3
Check the preview screen while adjusting the seam line.
Before adjusting the
seam line
After adjusting the
seam line
Move the seam line
lay on the object to
outside it.
Click next to and select
Reset seam line
to restore the seam line to its original position.

Using the 360 Round program
43
Editing a recording video
Changing a base logo on the recording screen
You can apply or remove a base logo on the recording video and change the default base
logo into your own new one.
The base logo
The preview screen of the 360 Round program with
the base logo applied
1
Launch the
360 Round
program on your computer.
2
Click
File
→
Place
→
Change Base logo
on the menu bar.
3
Select an image file for the base logo.
The image should be a 4096 X less than 2048 in the PNG file format.
To delete the base logo, on the menu bar, click
File
→
Place
→
Delete base logo
.
Using the 360 Round program
44
Live broadcast
Invite your family and friends to watch videos you record with the 360 Round in real time.
•
To use this feature, you must be connected to the network and sign in to your
service account.
•
Some features may vary depending on the service provider.
•
You can specify your own broadcasting URL address with the following protocols:
rtmp, rtsp, and http.
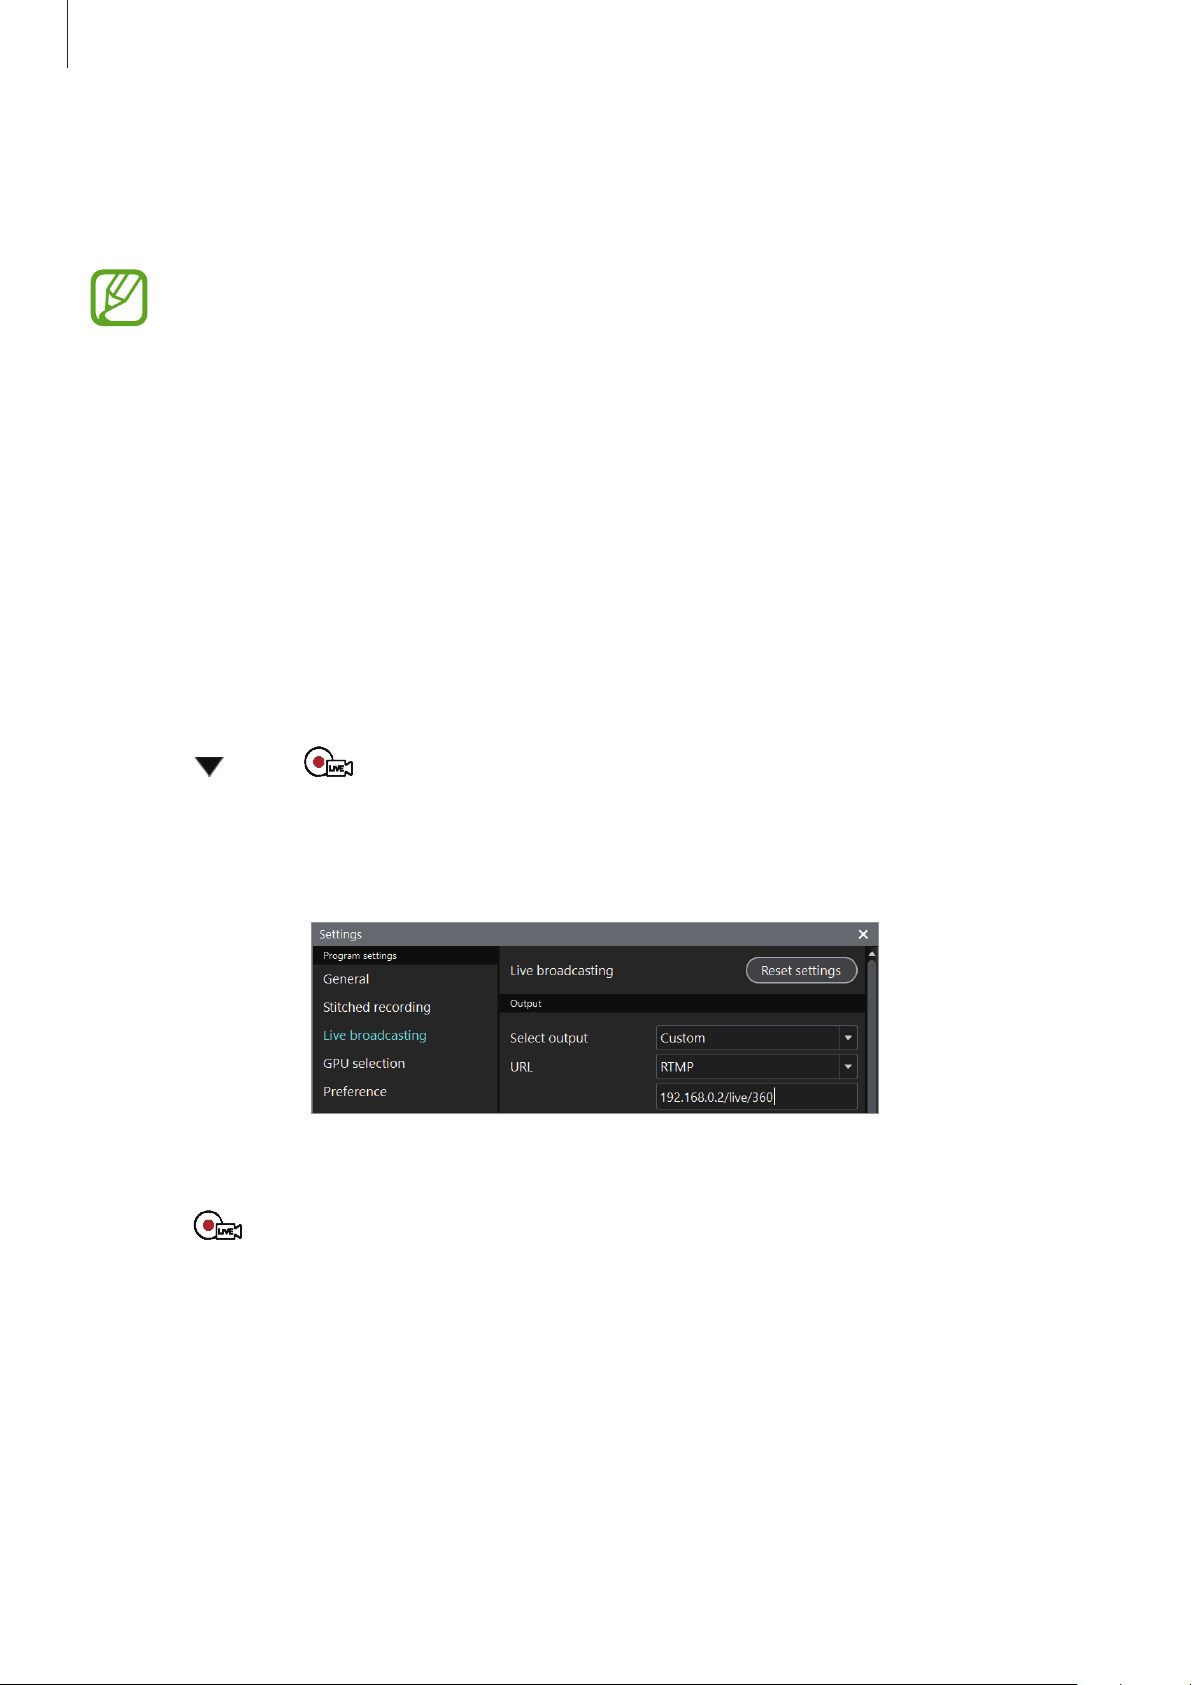
When you select Custom
When you select
Custom
, you can experience and enjoy live streaming in a customized live
streaming environment.
1
Launch the
360 Round
program on your computer.
2
Click under and select
Custom
.
3
Click
Live broadcasting
when the settings window appears, enter information (ingest
protocol, URL, bitrate, etc.), and click
OK
.
The settings screen for live broadcasting
4
Click .
The broadcast will begin.
Using the 360 Round program
45
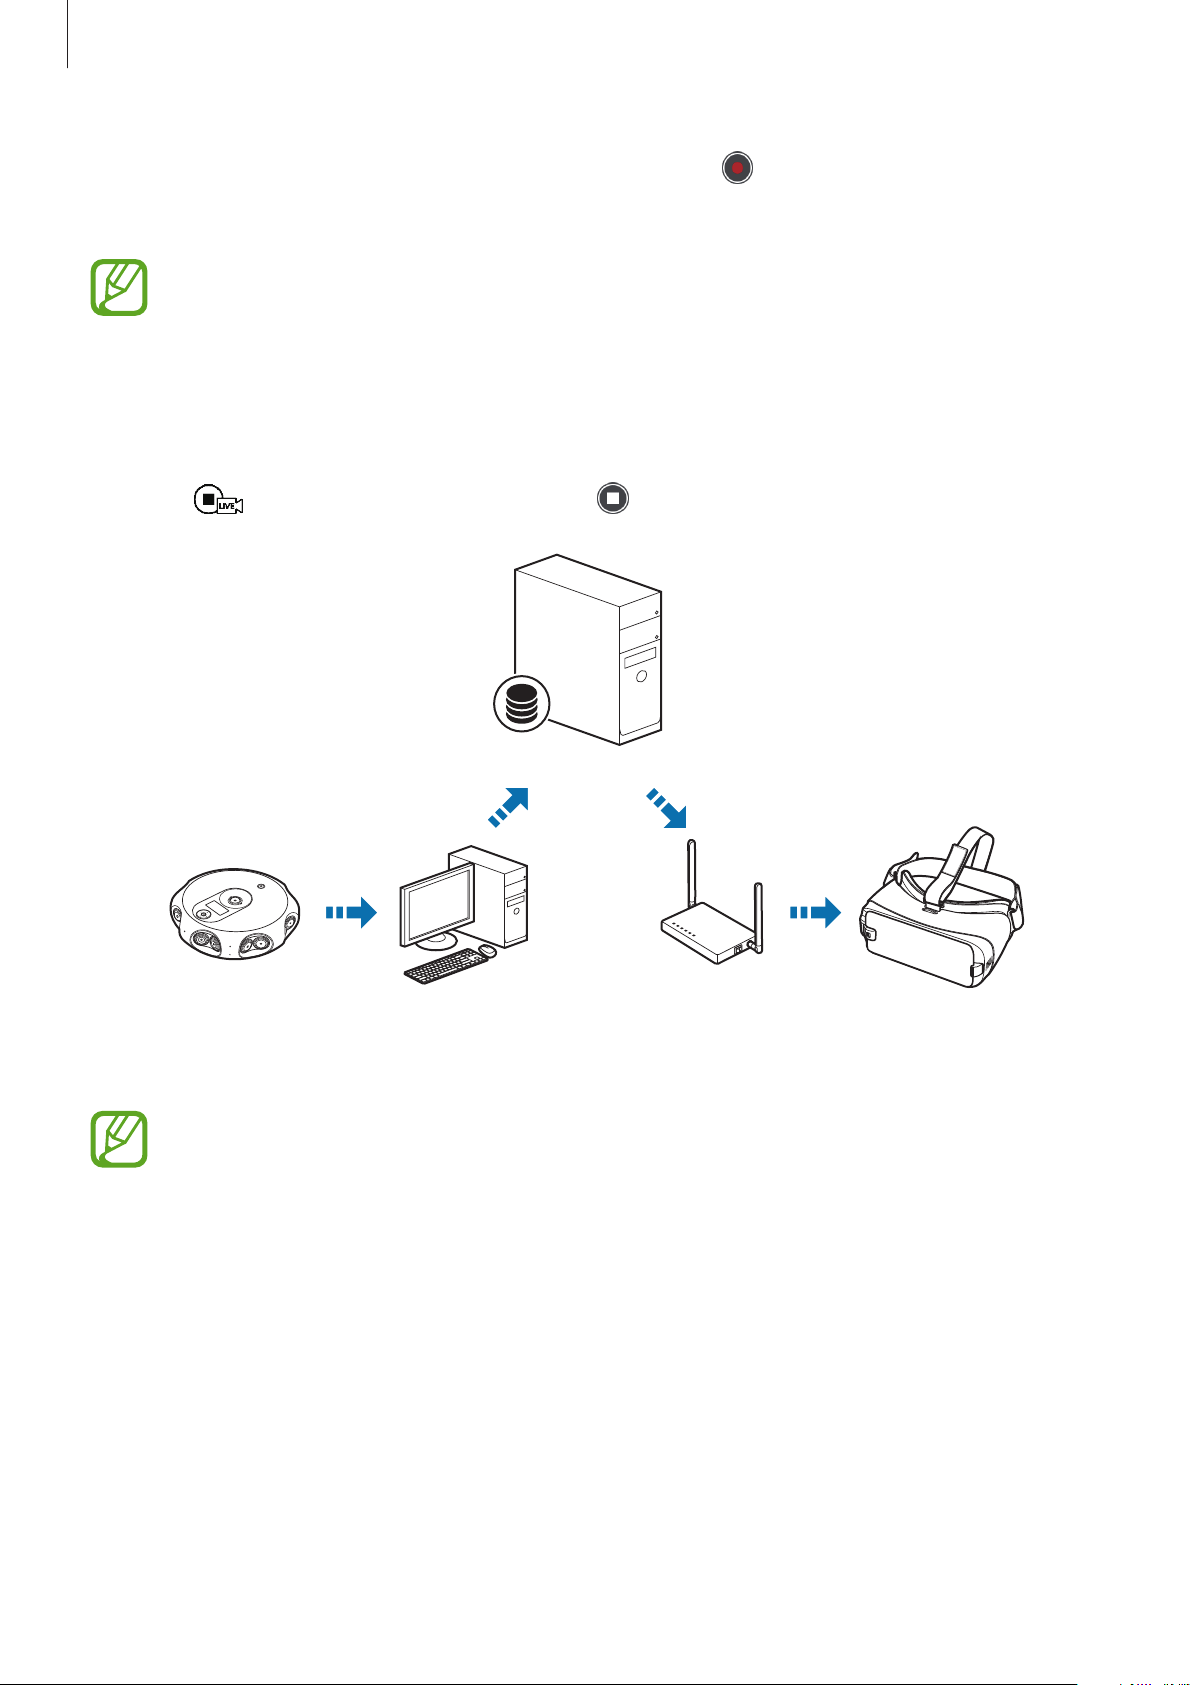
5
If you want to save the video while broadcasting, click .
The broadcasted video will be also saved on your computer.
•
Only some parts of the video may be saved to your computer depending on the
amount of available storage space.
•
The broadcasted video will be created as a TS file which is close to the original
video and the video will be split into an M3U8 file. Open the settings window and
click
Live broadcasting
→
Internal storage
.
6
Click to finish the broadcast and click to stop recording.
Wi-FiLAN Cable
Computer with 360
Round program
Access Point(AP)Camera Gear VR
Stream server
You have to set up a streaming server which supports RTMP or RTSP as the ingest
protocol.
Using the 360 Round program
46
When you select Samsung VR, YouTube, or Facebook
1
Launch the
360 Round
program on your computer.
2
Click under
→
Samsung VR
,
Youtube
, or
Facebook
.
3
Click .
4
Sign in to your Samsung VR account or Samsung account. Alternatively, sign in to your
Google account or Facebook if you will be broadcasting to YouTube or Facebook.
When the login webpage does not appear, open the settings window, select
Live
broadcasting
, and then check the options on the
Sign in browser
.
•
Select
Web browser
on the
Sign in browser
and sign in again.
•
When the Samsung VR login webpage does not appear even if
Web browser
is
selected on the
Sign in browser
, launch
Windows Settings
on your computer,
select
Apps
→
Default apps
, select
Internet Explorer
as the default app of
Web
browser
, and then sign in again.
5
Enter the title and details of the broadcast, and then set your broadcast to be public or
private.
•
Title
: Enter the title of the broadcast. The maximum title length is 25 characters. For
Facebook, the maximum length is 100 characters. If you go over the maximum length,
‘...’ will replace any extra text.
•
Description
: Enter a description of your broadcast.
•
Privacy
: Change the settings for your broadcast.
–
Public
: Anyone can find and watch your broadcast.
–
Unlisted
: Only people with the direct link can watch your broadcast.
–
Private
/
Only Me
: Nobody can find or watch your broadcast except you.
–
Friends
(only when using Facebook): Only people who are registered as friends on
the Facebook can watch your broadcast.
Using the 360 Round program
47
6
Click
Start broadcasting
.
The broadcast will begin.
If the network or a streaming server has a problem, check network’s condition or
reduce
Bitrate
and then try again.
7
Click to finish the broadcast.
Broadcasts on Facebook are limited to four hours. After four hours, the broadcasting
will stop automatically.
Setting the SDI output
The 360 Round program is compatible with Blackmagic Design’s DeckLink series which
supports DeckLink SDI output. You can send out high-quality 4K video with 4K compatible
DeckLink SDI cards.
The SDI card for 4K video is sold separately.
1
Install a DeckLink PCI Express card, such as the DeckLink Mini
Monitor 4K and DeckLink 4K Extreme 12 G, on your computer from
https://www.blackmagicdesign.com/products/decklink.
2
Open the settings window.

Using the 360 Round program
48
3
Click
General
and enter the settings in the
SDI output
menu.
The settings screen for SDI output in the 360 Round program
•
Device 0 (DeckLink Mini Monitor 4K)
–
SDI output
: Select an option to output the video on SDI Device 0.
•
Device 1 (DeckLink Mini Monitor 4K)
–
SDI output
: Select an option to output the video on SDI Device 1.
•
The
Separate: Left / Right
option will be displayed only if you use an SDI card
(DeckLink 4K Extreme 12 G, DeckLink 8K Pro) that supports the 3D output.
•
To enable 4K output for both the left and right cameras and get high-quality
4K X 4K video, insert two SDI cards for both the left and right cameras.
•
Monitor resolution
: Select
2160p29.97
for 4K video.
•
The supported resolutions may differ depending on the DeckLink SDI card you
use. The frame rate has to be the same as the one you set in
Frame rate
on the
control panel.
•
If you use an SDI card (DeckLink 4K Extreme 12 G) that supports the 3D output
and select the
Separate: Left / Right
option for SDI output, the supported
monitor resolution will be limited to 2K video.
Using the 360 Round program
49
•
Audio channel
: Select an audio channel.
•
Audio source
: Select either the 360 Rounds integrated microphone or a connected
external microphone.
Setting the audio output to the DVS (Dante
Virtual Soundcard)
You can output audio through the DVS (Dante Virtual Soundcard) with the 360 Round
program.
•
The DVS and the Audinate product are sold separately.
•
You can check how to configure the DVS network and how to use it on the
Audinate website (www.audinate.com).
1
Install the DVS after purchaing it from www.audinate.com.
2
Open the settings window.
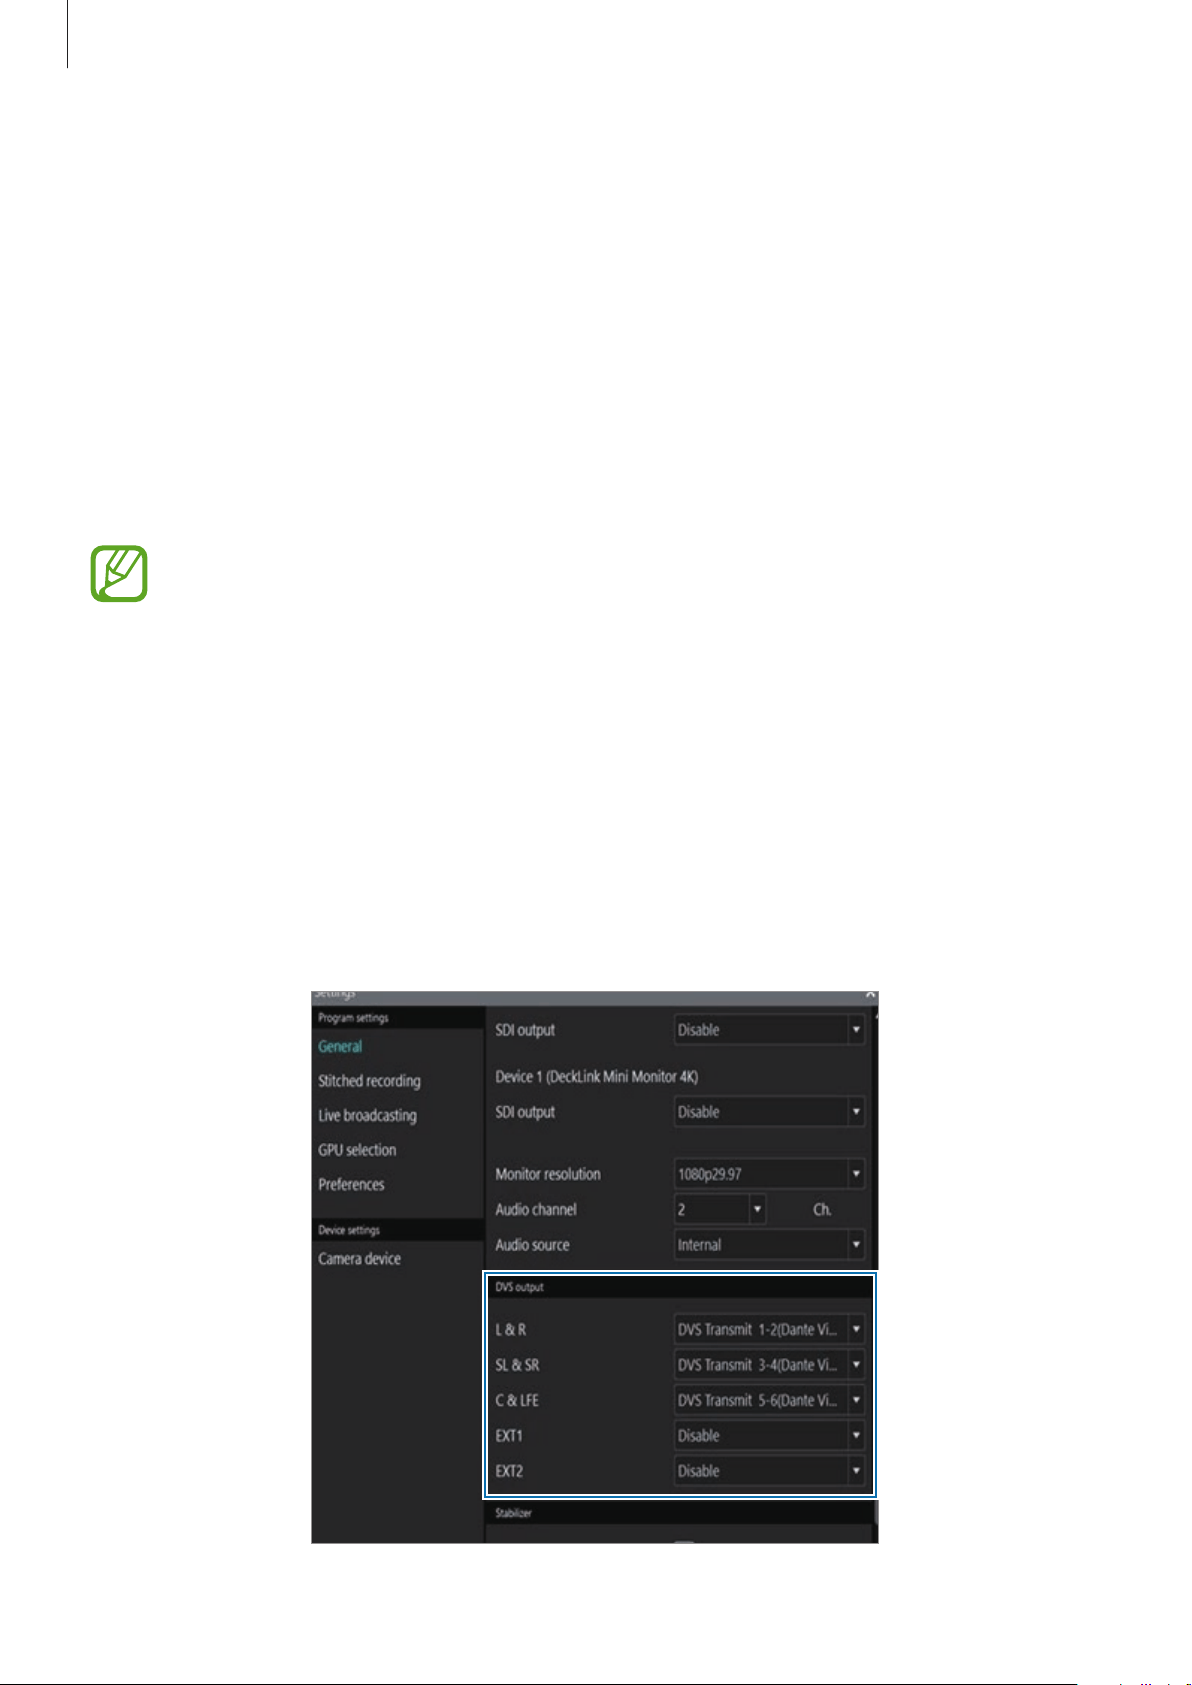
3
Click
General
and enter the settings in the
DVS output menu
.
Select the DVS output source for each audio source. Each audio source is composed of
two channels.
The settings screen for DVS output in the 360 Round program
Using the 360 Round program
50
Configuring camera settings
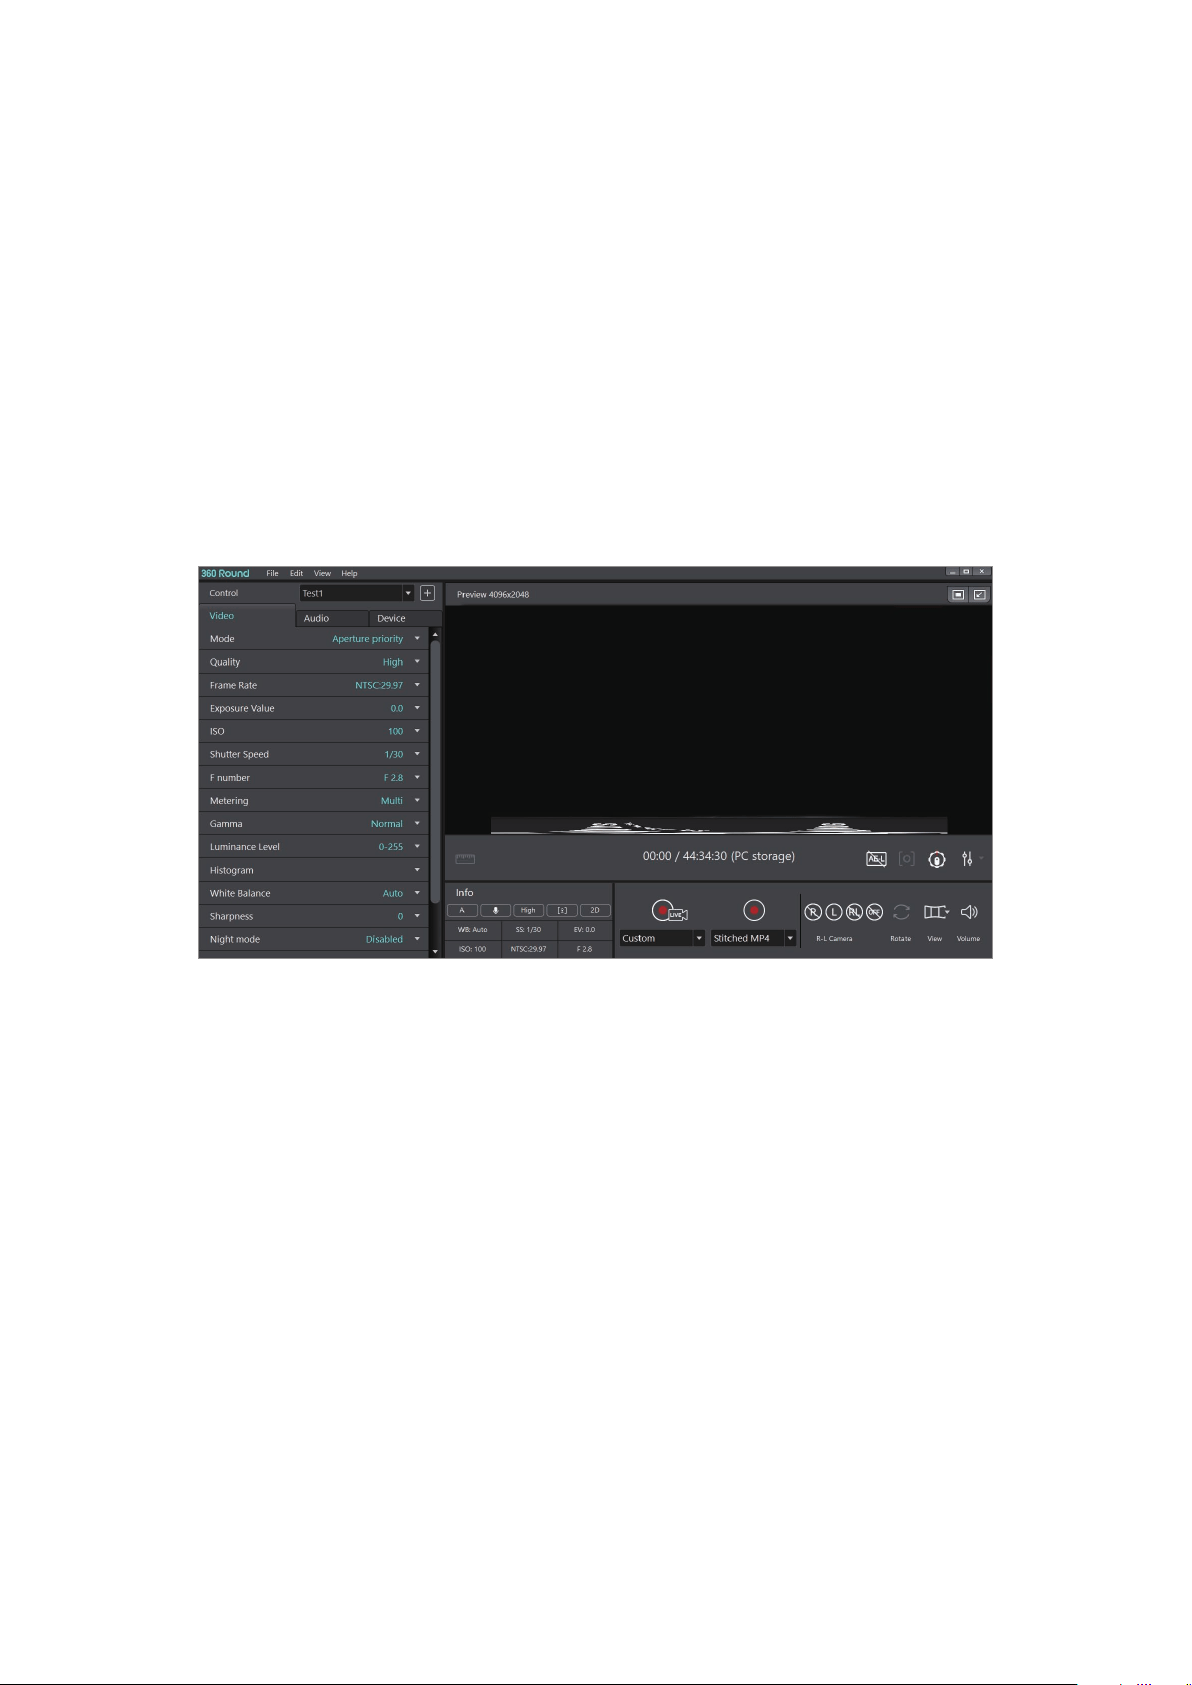
Configuring settings on the 360 Round program
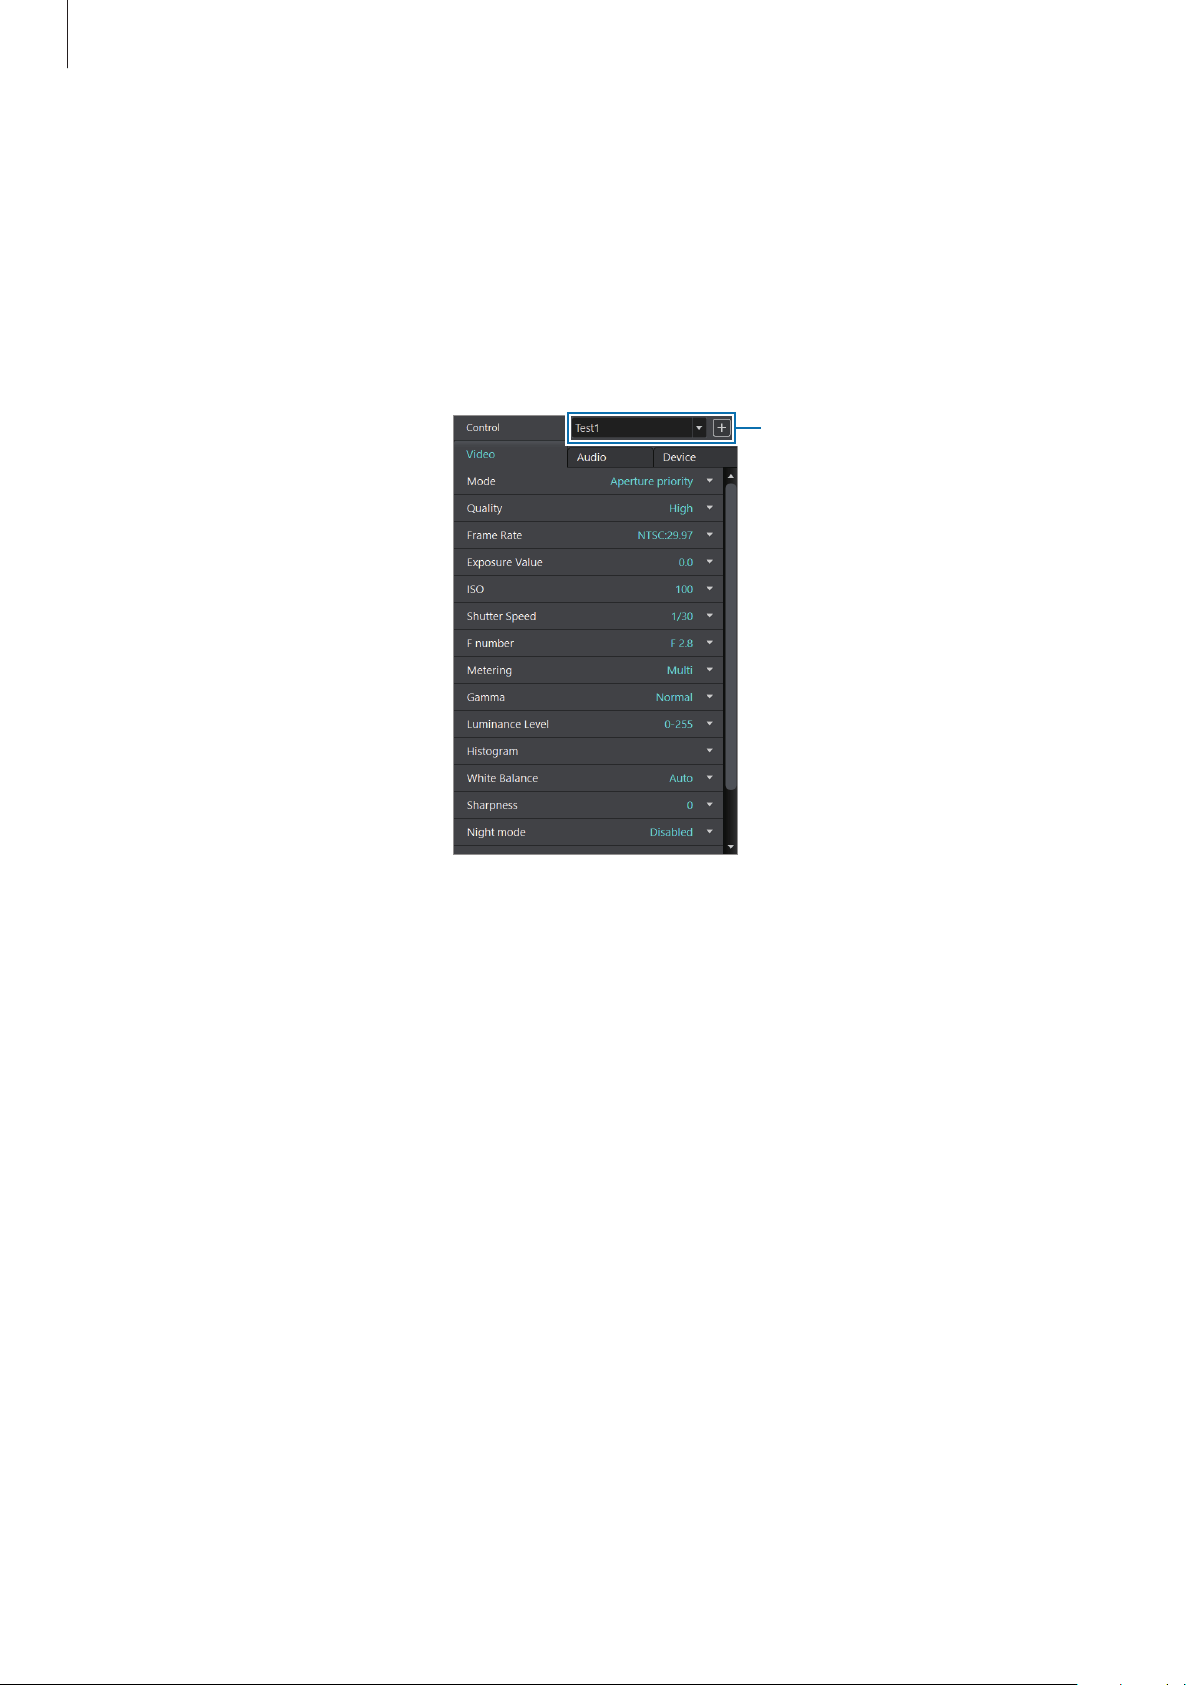
You can configure various camera settings from the control panel on the 360 Round program.
Launch the
360 Round
program on your computer.
Control panel
Preset menu
Video
•
Mode
: Set the recording mode.
–
Aperture priority
: Set the shutter speed to be adjusted automatically according to the
aperture value set by the user.
–
Manual
: Set the shutter speed and aperture value to be set manually by the user.
•
Quality
: Set the quality of the video. The higher the quality, the higher the video’s size will
be.
•
Frame Rate
: Set the number of frames to be recorded.
–
NTSC:29.97
: Set to record 30 frames per second.
–
PAL:25.00
: Set to record 25 frames per second.

Using the 360 Round program
51
•
Exposure Value
: Adjust the exposure value. The exposure value is set automatically
depending on the balance of brightness in the composition or the position of the main
subject. Set the exposure value higher if the video is dark or set the exposure value lower
if the video is bright.
•
ISO
: The ISO image sensor determines the sensitivity to light. The higher the ISO, the
more sensitive the light is, so you can record bright videos in dark environments.
However, as the ISO increases, the grain will be rougher and the noise will increase.
–
Limit
: When
Auto
is selected in
ISO
, the maximum value of the ISO value is set and
can not be adjusted beyond its maximum value.
•
Shutter Speed
: The shutter speed determines the exposure time that the camera (image
sensor) accepts light.
•
F number
: Select an aperture size between
F 1.8
and
F 2.8
. The smaller the F value,
the larger the diameter of the diaphragm and more light is allowed to pass through to
change the brightness of the camera.
•
Metering
: Set the metering method. You can change the way light is measured on the
recording screen.
–
Multi
: Measure the light and apply the average value to the video using the camera
on the top and the 8 cameras on the right side.
–
Center
: Measure the light in front of and around the camera and apply it to your
video.
–
Spot
: Only the light from the camera you select will be measured and applied to the
video.
•
Gamma
: Set the gamma value that controls the tone and color of the video.
–
Normal
: Set the gamma value as default.
–
Gamma C
: Set the contrast higher than the default value. The dark area will look
darker and the bright area will look brighter.
–
Gamma DR
: Set the dynamic value higher than the default value level to make the
screen looks wider.
•
Luminance Level
: Set the brightness range of the video.
–
0-255
: Set the brightness range of the video to the maximum range.
–
16-235
: Set the brightness range of the video to conform to the TV standard.

Using the 360 Round program
52
•
Histogram
: View the currently recording video’s RGB and brightness level in the
histogram.
•
White Balance
: By selecting the white balance according to the recording environment,
you can display the color of the subject, which depends on the original color
temperature, same as a person’s natural view.
–
Auto
: The optimum light source is automatically set according to the light source
conditions.
–
Daylight
: This is the appropriate setting when recording on a clear day or outdoors,
similar to what a person sees naturally.
–
Cloudy
: This is the appropriate setting for cloudy days or shadows. It corrects the
bluish color of a cloudy day.
–
Fluorescent_W
: This is the appropriate setting when recording under a white
fluorescent light.
–
Fluorescent_N
: This is the appropriate setting when recording under a fluorescent
light (significant white color).
–
Fluorescent_D
: This is the appropriate setting when recording under daylight
fluorescent light (slightly bluish color).
–
Tungsten
: This is the appropriate setting when recording under a halogen lamp or
incandescent lamp. Correct the incandescent yellow light.
–
K(Manual)
: You can also adjust the color temperature of the video.
•
Sharpness
: Set the clarity of the video.
•
Night Mode
: Block the infrared-absorbing filter and set the video to be recorded in black
and white. You can record bright videos even in dark environments using infrared light.

Using the 360 Round program
53
•
Individual Camera tune
: Calibrate each camera separately. Select
Tune cameras
to start
calibration.
–
Selected Camera
: Select the camera to be calibrated on the preview screen.
–
RGB
: You can adjust the
RED
,
GREEN
, and
BLUE
color value individually to raise or
lower certain color tones on the preview screen.
–
Noise reduction
: You can reduce the noise that can occur when recording with high
sensitivity or when recording at high speed by increasing the ISO value.
–
Contrast
: Calibrate the contrast of the video.
–
Sharpness
: Set the clarity of the video.
–
Reset
: You can select
Reset Current camera
to set the camera calibration values
individually, or select
Reset All camera
to set them all as default.
Audio
•
Source
: Select a device that will record audio.
•
Microphone
: Turn on or off the audio to be recorded in the video.
•
Mic. Level - Internal
: Set the volume of the microphone in the 360 Round.
–
Auto
: Set the audio to be recorded at the optimal sound with the Samsung sound
solution.
–
Manual
: Set the audio to be recorded at the original sound without the Samsung
sound solution.
•
Sample rate
: Set the sampling frequency of the recorded audio. The larger the sampling,
the closer you can record to the original sound, but the size of the video may increase.
•
Audio monitoring
: You can check and set the audio status of the internal or external
microphone.
Using the 360 Round program
54
Device
•
Camera name
: You can check or change the name of the 360 Round.
•
Power
: You can turn the 360 Round on and off or reboot it.
–
Device Mac
: Set the Mac address of the 360 Round. Connect the 360 Round to your
computer to get a unique Mac address of your 360 Round before launching the 360
Round program.
•
Manage files
: Manage and delete recorded videos. You can also format the memory card.
•
Set Timer
: Select the length of the delay before the 360 Round starts to record video after
pressing the Record key.
•
Storage
: Set the location to save the video to either the
PC
or
Camera
.
Using the presets
You can save the settings value as a preset and apply the configured settings by selecting the
preset without adjusting the setting values again.
Launch the
360 Round
program on your computer.
1
Configure the settings.
2
Click , enter a name for the preset, and then click
Save
.
The setting values are saved as a preset.
You can save up to 100 presets on your computer.
3
To apply the preset, click on the preset menu and select the preset you want to use.
Alternatively, click
on the preset menu, click
Manage preset
, select the preset, and
then click
Apply
.
You can add a new preset or apply the preset only when your 360 Round is connected
to the computer.

Using the 360 Round program
55
Checking the presets
1
Click on the preset menu and click
Manage preset
.
2
Hover the mouse pointer on next to the preset that you want to check.
All settings values you configured will appear.
Changing the name of presets
Click on the preset menu, click
Manage preset
, select the preset, and then click
Rename
.
Copying the presets to the 360 Round
Copy the preset to your 360 Round to use the same preset when you use the 360 Round by
itself.
Click
on the preset menu, click
Manage preset
, select the preset to copy, and then click
Copy to Camera
.
You can save up to 10 presets on your 360 Round.
Configuring settings on the 360 Round
You can change the recording environment or set the operating environment of the 360
Round from the setup menu.
If the 360 Round is connected to a computer via a LAN cable, you can not enter the
settings menu. Remove the LAN cable before entering the settings menu on the 360
Round.
1
Press the Right key on the 360 Round to access the settings menu.
2
Press the Up key or Down key to access the settings menu you want.
3
Press the OK key or Right key and select the settings menu.
Press the Left key to cancel the settings or move to the previous step.

Using the 360 Round program
56
Video
•
Mode
: Set the recording mode.
–
Aperture priority
: Set the shutter speed to be adjusted automatically according to the
aperture value set by the user.
–
Manual
: Set the shutter speed and aperture value to be set manually by the user.
•
Quality
: Set the quality of the video. The higher the quality, the higher the video’s size will
be.
•
Frame rate
: Set the number of frames to be recorded per second.
–
NTSC:29.97
: Set to record 30 frames per second.
–
PAL:25.00
: Set to record 25 frames per second.
•
EV
: Adjust the exposure value. The exposure value is set automatically depending on
the balance of brightness in the composition or the position of the main subject. Set the
exposure value higher if the video is dark or set the exposure value lower if the video is
bright.
•
ISO
: The ISO image sensor determines the sensitivity to light. The higher the ISO, the
more sensitive the light is, so you can record bright videos in dark environments.
However, as the ISO increases, the grain will be rougher and the noise will increase.
–
ISO Limit
: When
Auto
is selected in
ISO
, the maximum value of the ISO value is set
and can not be adjusted beyond its maximum value.
•
Shutter speed
: The shutter speed determines the exposure time that the camera (image
sensor) accepts light.
•
F number
: Select an aperture size between
F 1.8
and
F 2.8
. The smaller the F value,
the larger the diameter of the diaphragm and more light is allowed to pass through to
change the brightness of the camera.
•
Metering
: Set the metering method. You can change the way light is measured on the
recording screen.
–
Multi
: Measure the light and apply the average value to the video using the camera
on the top and the 8 cameras on the right side.
–
Center
: Measure the light in front of and around the camera and apply it to your
video.
–
Spot
: Only the light from the camera you select will be measured and applied to the
video.

Using the 360 Round program
57
•
Gamma
: Set the gamma value that controls the tone and color of the video.
•
Luminance
: Set the brightness range of the video.
•
WB
: By selecting the white balance according to the recording environment, you can
display the color of the subject, which depends on the original color temperature, same
as a person’s natural view.
–
Auto
: The optimum light source is automatically set according to the light source
conditions.
–
Daylight
: This is the appropriate setting when recording on a clear day or outdoors,
similar to what a person sees naturally.
–
Cloudy
: This is the appropriate setting for cloudy days or shadows. It corrects the
bluish color of a cloudy day.
–
Fluorescent W
: This is the appropriate setting when recording under a white
fluorescent light.
–
Fluorescent N
: This is the appropriate setting when recording under a fluorescent
light (significant white color).
–
Fluorescent D
: This is the appropriate setting when recording under daylight
fluorescent light (slightly bluish color).
–
Tungsten
: This is the appropriate setting when recording under a halogen lamp or
incandescent lamp. Correct the incandescent yellow light.
–
Manual
: You can also adjust the color temperature of the video.
•
Sharpness
: Set the clarity of the video.
•
Night mode
: Block the infrared-absorbing filter and set the video to be recorded in black
and white. You can record bright videos even in dark environments using infrared light.
•
AE-L
: Turn the auto exposure lock feature on or off.
Audio
•
Microphone
: Turn on or off the audio to be recorded in the video.
•
Source
: Select a device that will record audio.
•
Int. Mic level
: Set the volume of the microphone in the 360 Round.
•
Sample rate
: Set the sampling frequency of the recorded audio. The larger the sampling,
the closer you can record to the original sound, but the size of the video may increase.

Using the 360 Round program
58
Manage files
•
Storage
: Select a storage location to save the video.
•
Delete files
: Delete recorded videos.
–
Delete last file
: Delete the last recorded video.
–
Delete all
: Delete all recorded videos.
•
Format storage
: All videos stored in the 360 Round or in the SSD or memory card will be
deleted.
System settings
•
Screen timeout
: Set the time to turn off the screen automatically when the 360 Round is
not in use.
•
Set timer
: Select the length of the delay before the 360 Round starts to record video after
pressing the Record key.
•
Auto power off
: Set auto power off.
•
Beep Sound
: Adjust the volume of the effect sound of the 360 Round.
•
LED
: Turn the indicator light on and off.
•
Reset settings
: Initialize the settings of the 360 Round.
•
Date and time
: Manually set the time and date displayed on the camera status screen or
change the displaying format.
•
Language
: Select the language you want to use.
•
About device
: Check information such as the 360 Round’s name or firmware version, or
update software.
•
IP settings
: Check the IP address of your 360 Round and reset it.
•
System check
: Check the current status of the 360 Round or the memory card inserted in
the 360 Round.
Presets
Select a saved preset and copy it from your computer. You can choose the preset that works
best for the shooting environment. Refer to Using the presets for more information.
Using the 360 Round program
59
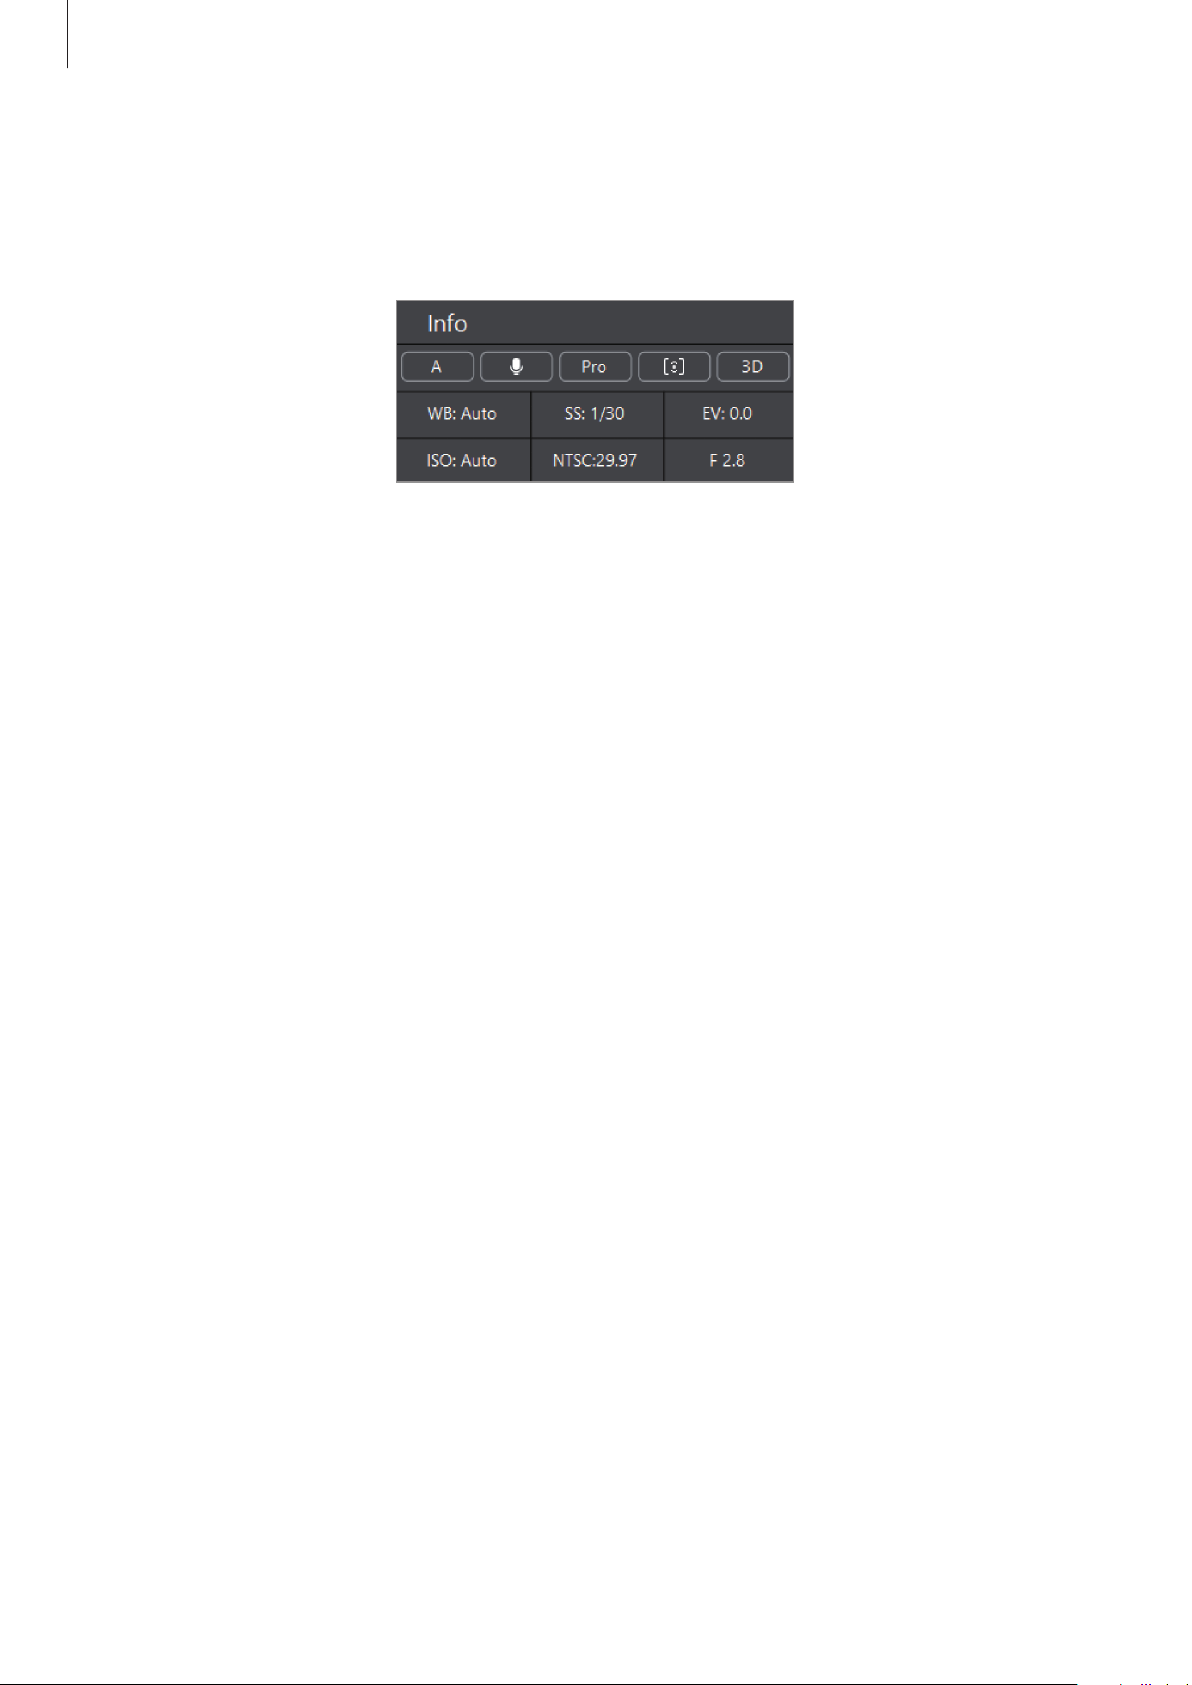
Checking the camera settings
On the 360 Round program
Camera settings information panel in the 360 Round
You can check the camera settings set on the control panel of the
360 Round
program on the
information panel. The setting values of the information panel are changed to what you set
on the control panel.
On the 360 Round
You can check the camera settings set in the settings menu on the camera status screen.
The indicator icons on the camera status screen are changed to what you set on the settings
menu. Refer to Camera status screen for more information.
Deleting videos
On the 360 Round program
1
Launch the
360 Round
program on your computer.
2
Click
Device
tab
→
Manage files
→
Browse Camera storage
on the control panel.
3
Select the video to delete and click
Delete
.
To delete all videos, click
Select all
→
Delete
.
Using the 360 Round program
60
On the 360 Round
1
Press the Right key on the 360 Round to access the settings menu.
2
Select
Manage files
→
Delete files
.
To delete last recorded video, select
Delete last files
.
To delete all videos, select
Delete all
.
Updating the software
The 360 Round and the 360 Round program can be updated to the latest software.
•
You can update the software of 360 Round and 360 Round program only if the
computer is connected to a wireless or wired network.
•
If you have trouble with updating the software, contact a Samsung Service Center.
Updating the 360 Round
On the 360 Round program
Connect the 360 Round to your computer via a LAN cable before updating.
1
Connect the 360 Round to the computer with the LAN cable while the power adapter is
connected.
2
Press and hold the Power key to turn on the 360 Round.
3
Launch the
360 Round
program on your computer.
4
Click
Help
→
Check for updates
→
Camera software
→
OK
on the menu bar.
Using the 360 Round program
61
On the 360 Round
You can update the firmware directly from the 360 Round.
Download the latest software from www.samsung.com/us/business and save it to the
memory card first.
1
Insert the memory card that includes the latest software.
2
Press and hold the Power key to turn on the 360 Round.
3
Press the Right key on the 360 Round to access the settings menu.
4
Select
System settings
→
About device
→
Software Update
→
OK
.
Be careful not to turn off or disconnect the 360 Round from the power adapter cable
during an update.
Updating the 360 Round program
1
Launch the
360 Round
program on your computer.
2
Click
Help
→
Check for updates
→
360 Round software
→
OK
on the menu bar.

Using the 360 Round program
62
Recording and checking the video without using
the 360 Round
Recording videos with the 360 Round solely
You can record videos when the 360 Round is only connected to the power adapter without
connecting it to your computer and power adapter. To record video with the 360 Round
solely, you must connect a UHS II SD card or SSD and an external battery. Refer to Using as a
portable 360 Round for more information.
1
Press and hold the Power key to turn on the 360 Round.
2
Press the Right key on the 360 Round and configure camera settings.
3
Press the Record key to start recording video.
Recording
appears on the camera status screen and recording will be start.
4
To finish recording video, press and hold the Record key again.
The video will be saved in the UHS II SD card or SSD.
•
The recorded videos are saved in the UHS II SD card or SSD. Even if the UHS II SD
card is inserted, the SSD is recognized as the default storage location when the SSD
is connected.
•
When using an SSD, use an SSD that supports USB 3.1 Super Speed (5 Gbps).
•
The 360 Round supports UHS II SD card or SSD using the exFAT file structure.
•
If the SSD is connected to the 360 Round, you can not connect the 360 Round
to the computer via a LAN cable. Remove the SSD from the 360 Round and then
connect it to your computer via a LAN cable.
Viewing videos recorded solely by the 360 Round
The videos saved in the UHS II SD card or SSD can be checked on the 360 Round Viewer
program. You can view not only all 17 videos recorded by each of the 17 cameras, but also a
stitched video. Refer to Viewing videos for more information.
63
Using the 360 Round Viewer
program
Learning more about 360 Round Viewer
program
Use the 360 Round Viewer program to import the recorded video from the 360 Round
program and view it. You can also export the video by stitching it to the 360-degree video by
applying various settings.
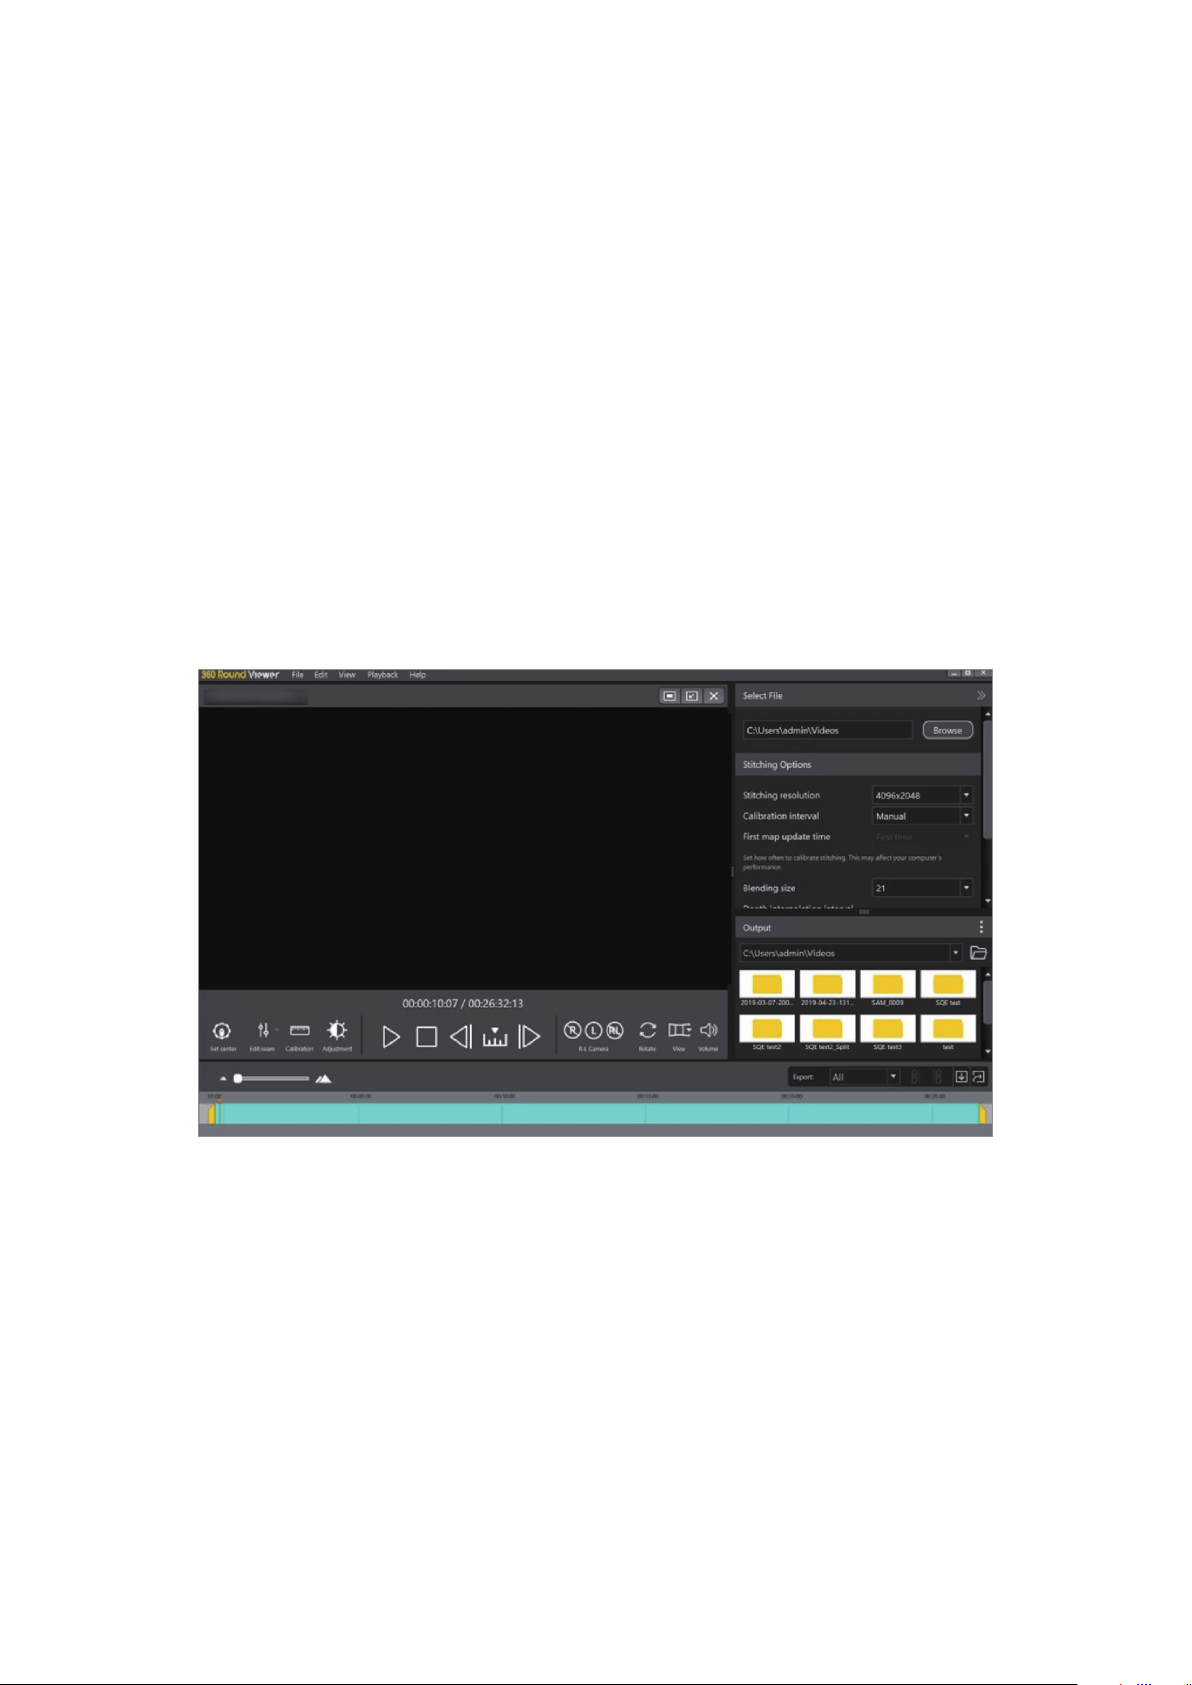
The 360 Round Viewer program screen for editing a 360-degree video

Using the 360 Round Viewer program
64
Installing and launching the 360 Round Viewer program
1
Download the 360 Round Viewer program from www.samsung.com/us/business.
When the pop-up window that prompts you to restart the computer while
downloading the program appears, turn off the computer and turn it on again. If not,
the program may not be installed properly.
2
Launch the
360 Round Viewer
program on your computer.
Exporting videos
Stitching and exporting videos
You can make a 360-degree video by stitching recorded videos together.
1
Launch the
360 Round Viewer
program on your computer.
2
Click
Simple Export
.
3
Click
Import
on the Simple Export window to import an SLS file.
Using the 360 Round Viewer program
65
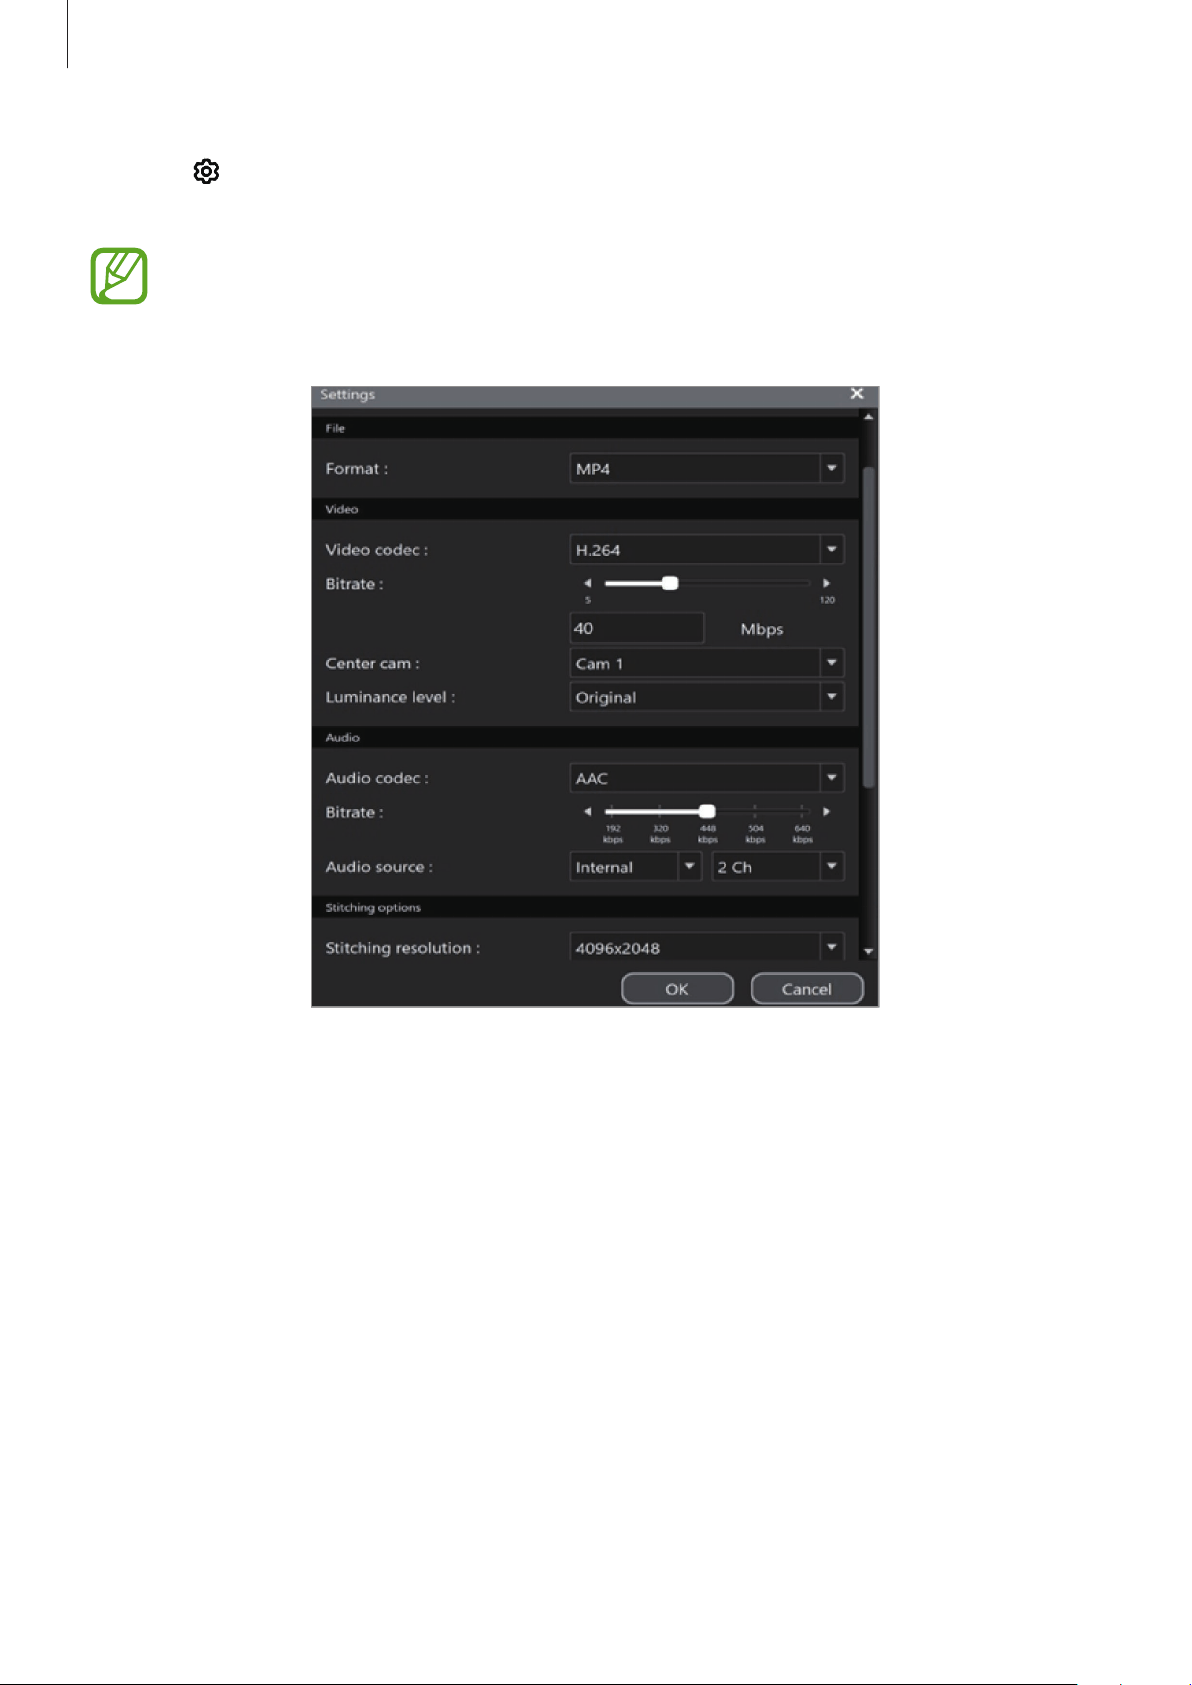
4
Click on the imported file list to set the exporting options, such as the video, audio,
and stitching options, for each SLS video file.
Select the
Stabilizer
option to correct the video if the video recording was tilted due
to your 360 Round not being set on a flat surface. Also, you can reduce shaky video
resulting from the 360 Round shaking during recording with this feature.
The settings screen for exporting video files
Using the 360 Round Viewer program
66
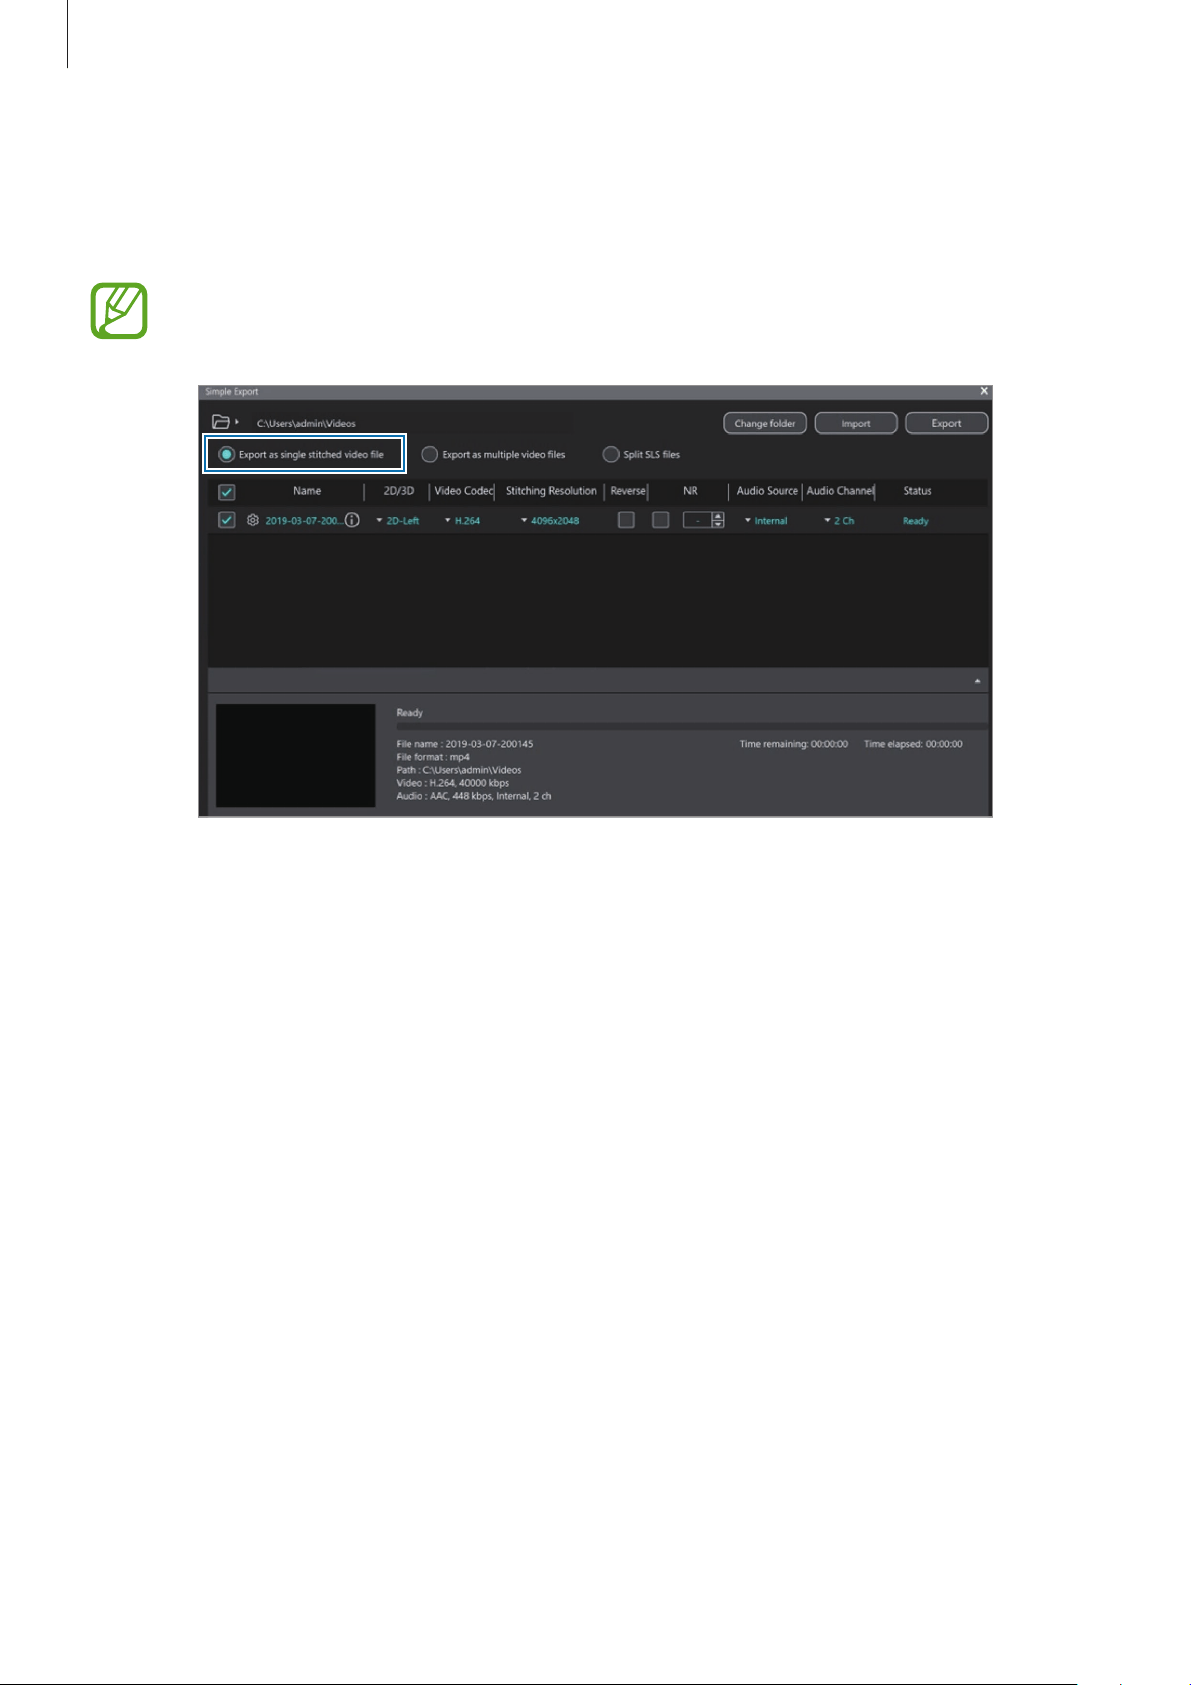
5
Select
Export as single stitched video file
and select a file to export from the file list.
To change the storage location of the file, click
Change folder
and select a folder to
export videos.
Only SLS files can be exported.
The export window for a single stitched video file
6
Click
Export
.
The video will be stitched in the MP4 file format.
Using the 360 Round Viewer program
67
Exporting individual videos
You can export the videos to get all 17 videos recorded by each of the 17 cameras.
1
Launch the
360 Round Viewer
program on your computer.
2
Click
Simple Export
.
3
Click
Import
on the Simple Export window to import an SLS file.
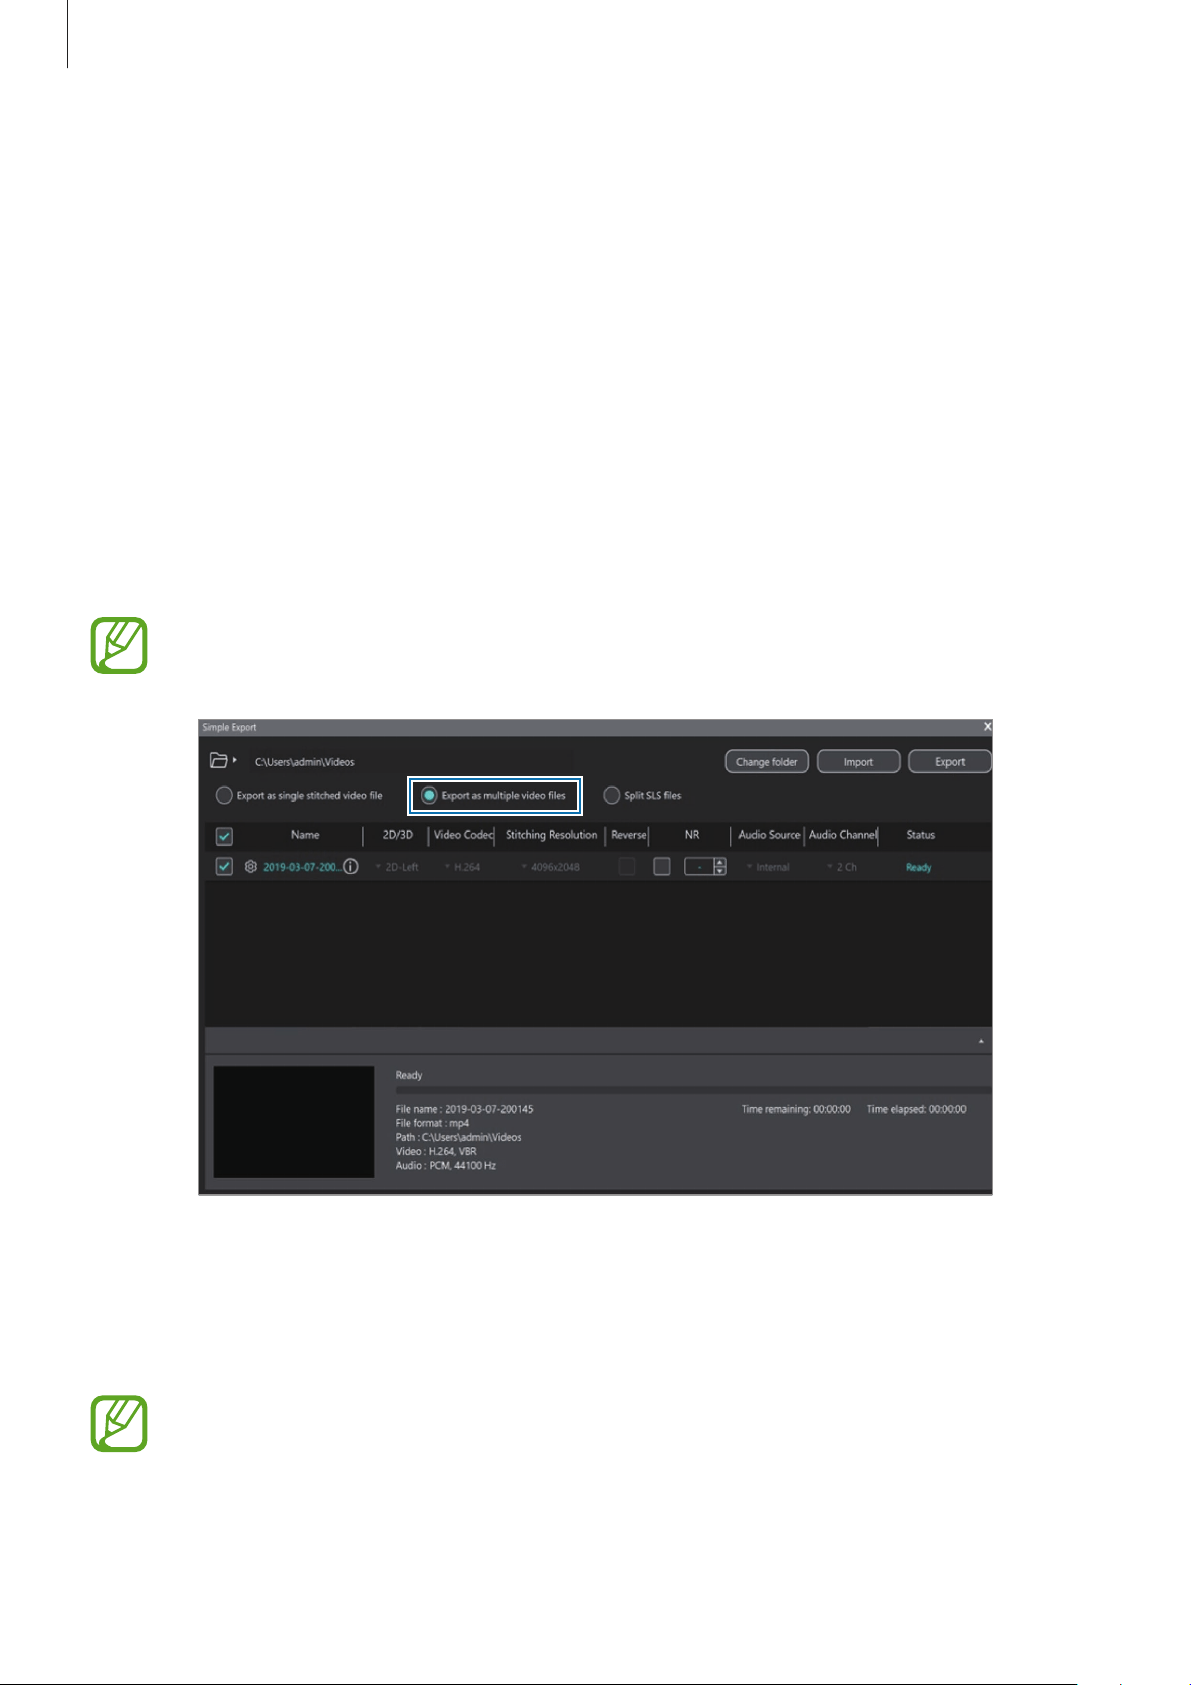
4
Select
Export as multiple video files
and select a file to export from the file list.
To change the storage location of the file, click
Change folder
and select a folder to
export videos.
Only SLS files can be exported.
The export window for exporting multiple video files
5
Click
Export
.
The 17 video files will be exported in the MP4 file format.
When exporting 17 individual videos, unnecessary parts can appear at the edge of
the video. Those parts will be deleted after stitching so that they will not affect the
finished video’s quality.
Using the 360 Round Viewer program
68
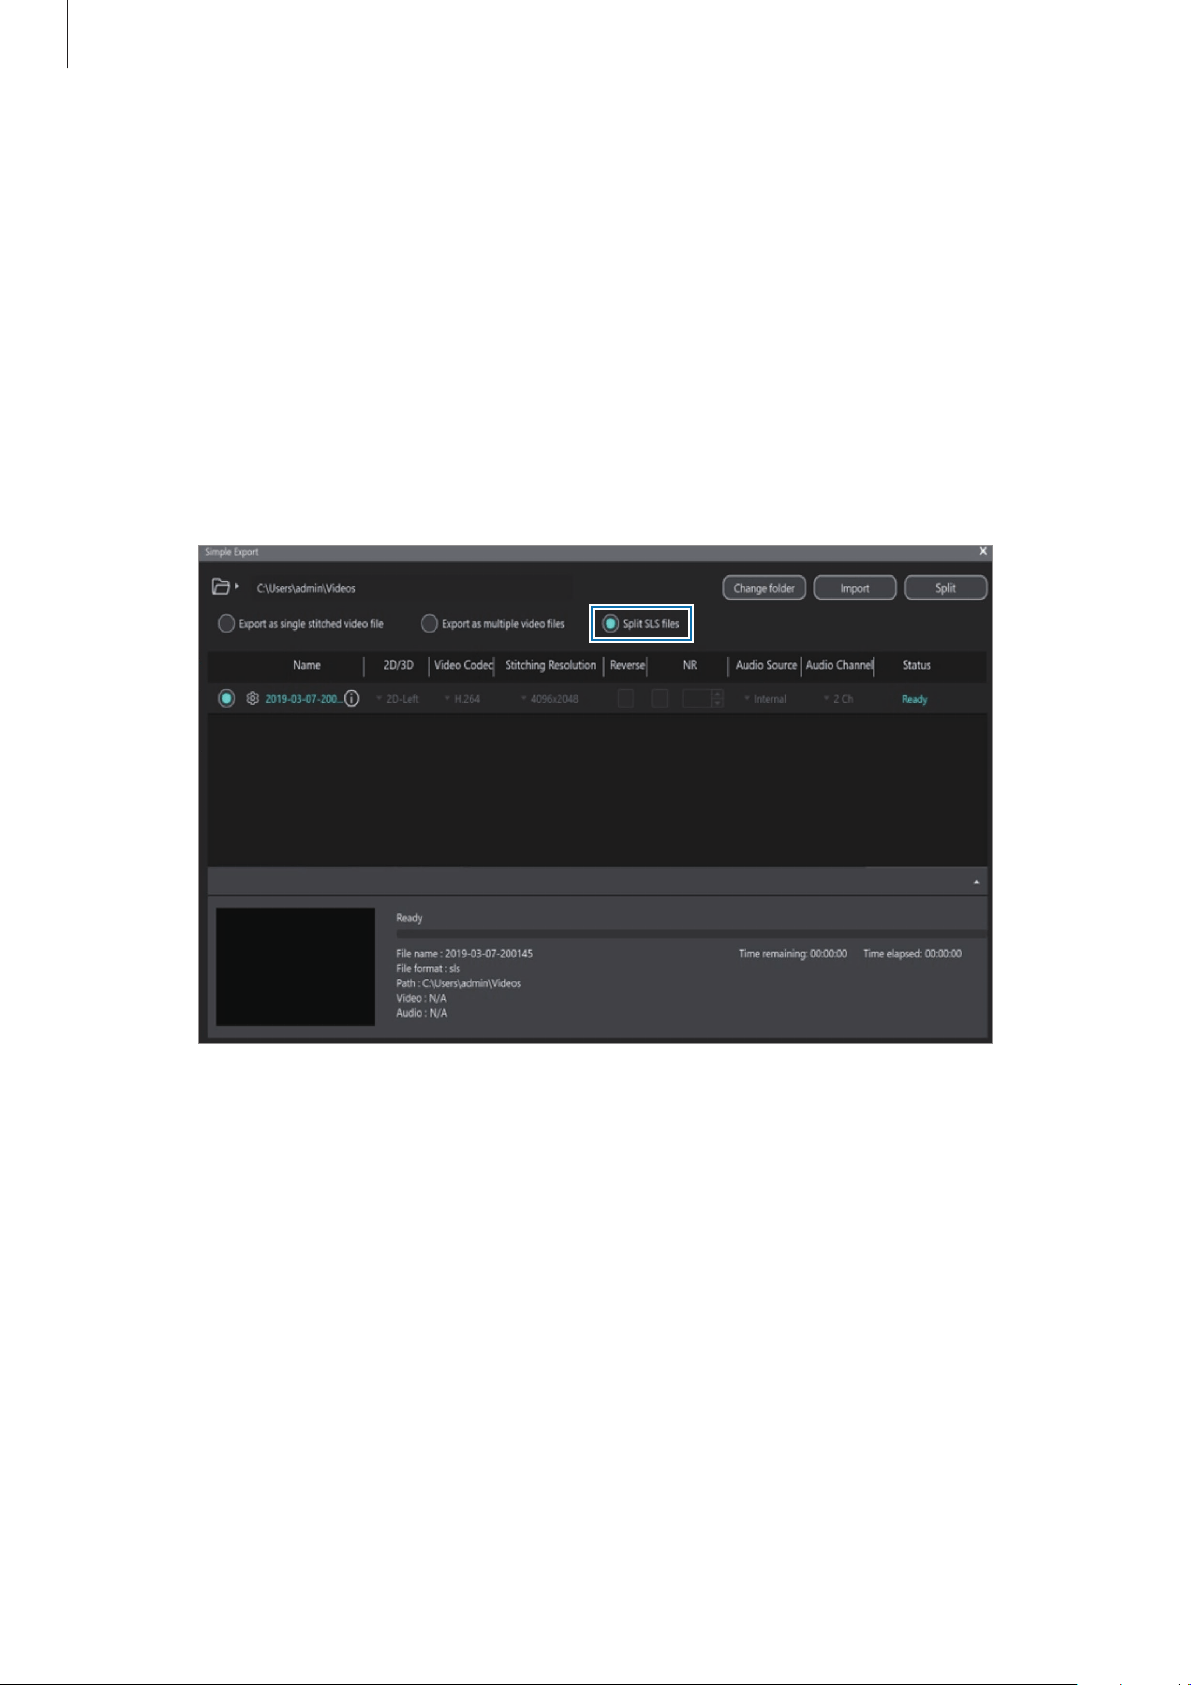
Exporting SLS files after splitting
You can export the recorded SLS video files after splitting it into preset minutes.
1
Launch the
360 Round Viewer
program on your computer.
2
Click
Simple Export
.
3
Click
Import
on the Simple Export window to import an SLS file.
4
Select
Split SLS files
and select a file to export from the file list.
The export window for exporting SLS video files after splitting
Using the 360 Round Viewer program
69
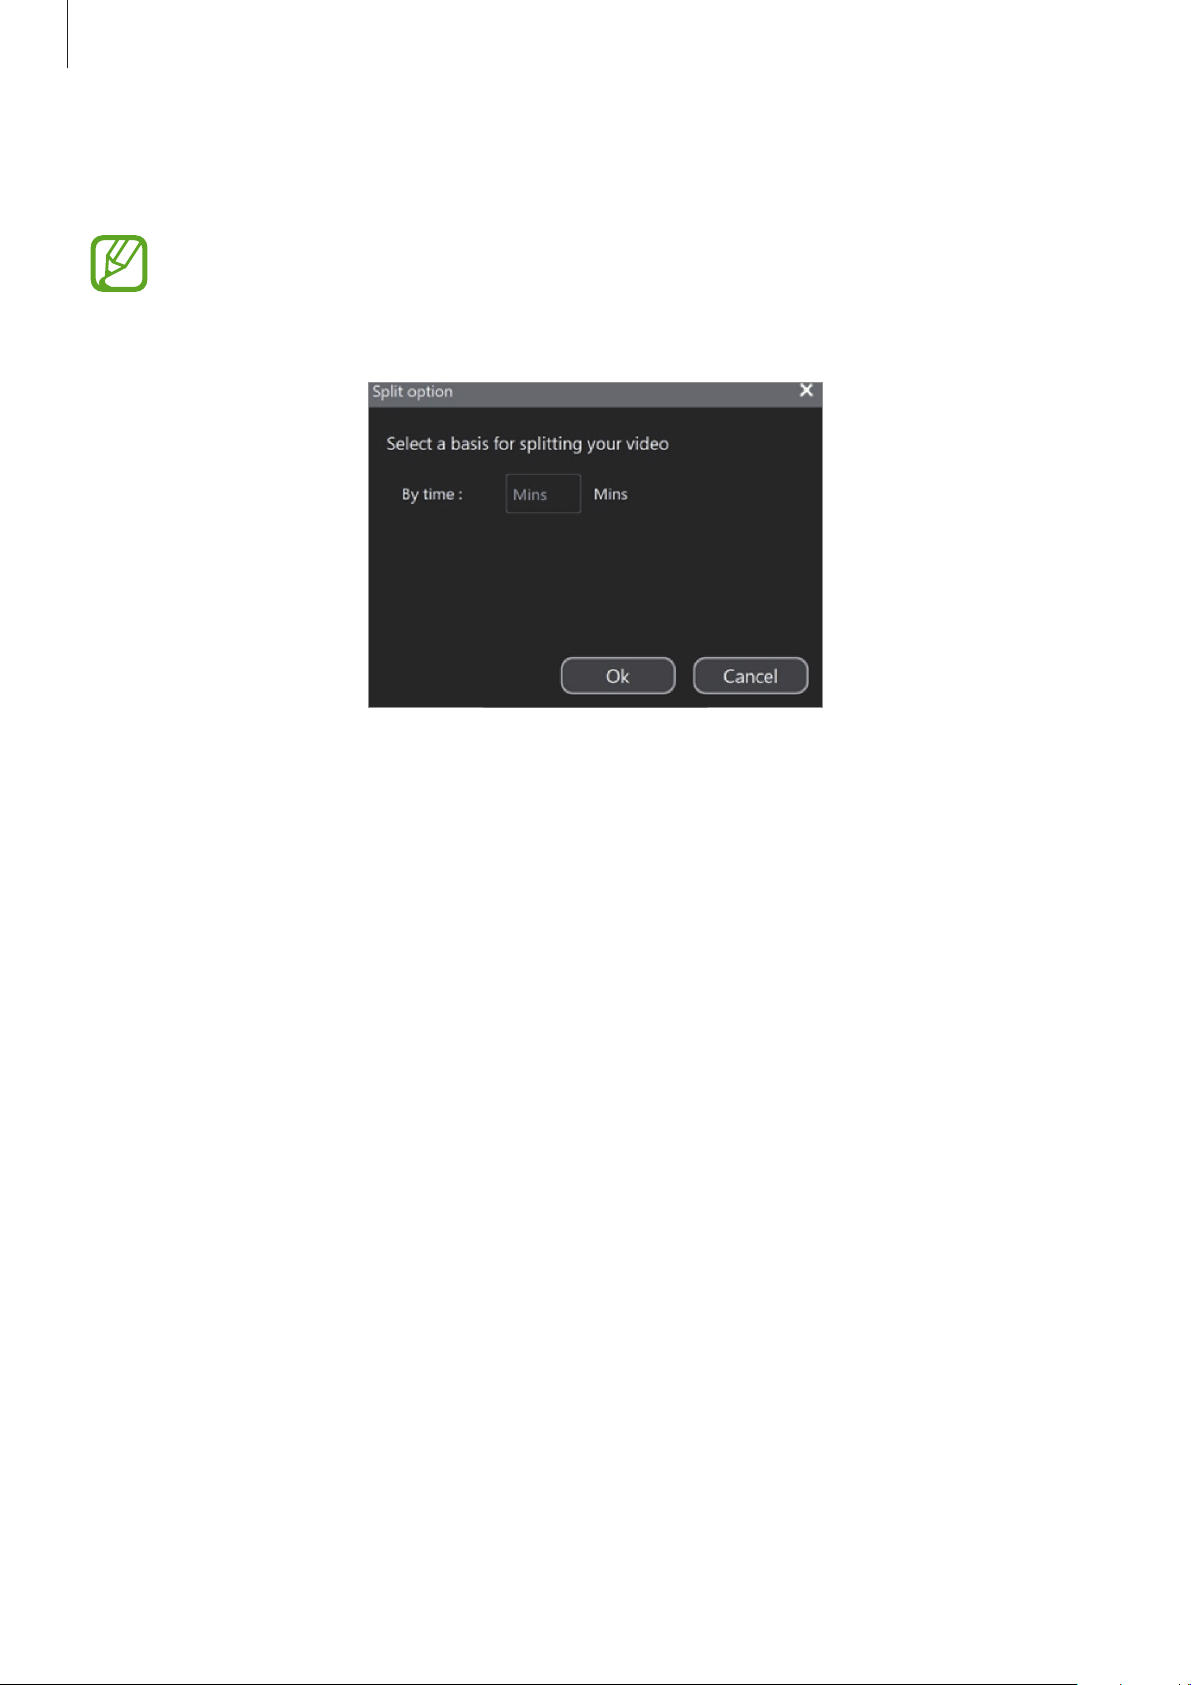
5
Click
Split
, enter the split value you want in minutes on the Split option window, and
then tap
Ok
.
•
The split feature is not supported when the recorded video’s duration is under a
minute.
•
Enter a number within the range of the recorded video’s duration.
6
Select a folder to export videos to.
The recorded SLS video file will be saved after splitting it into the preset minutes.
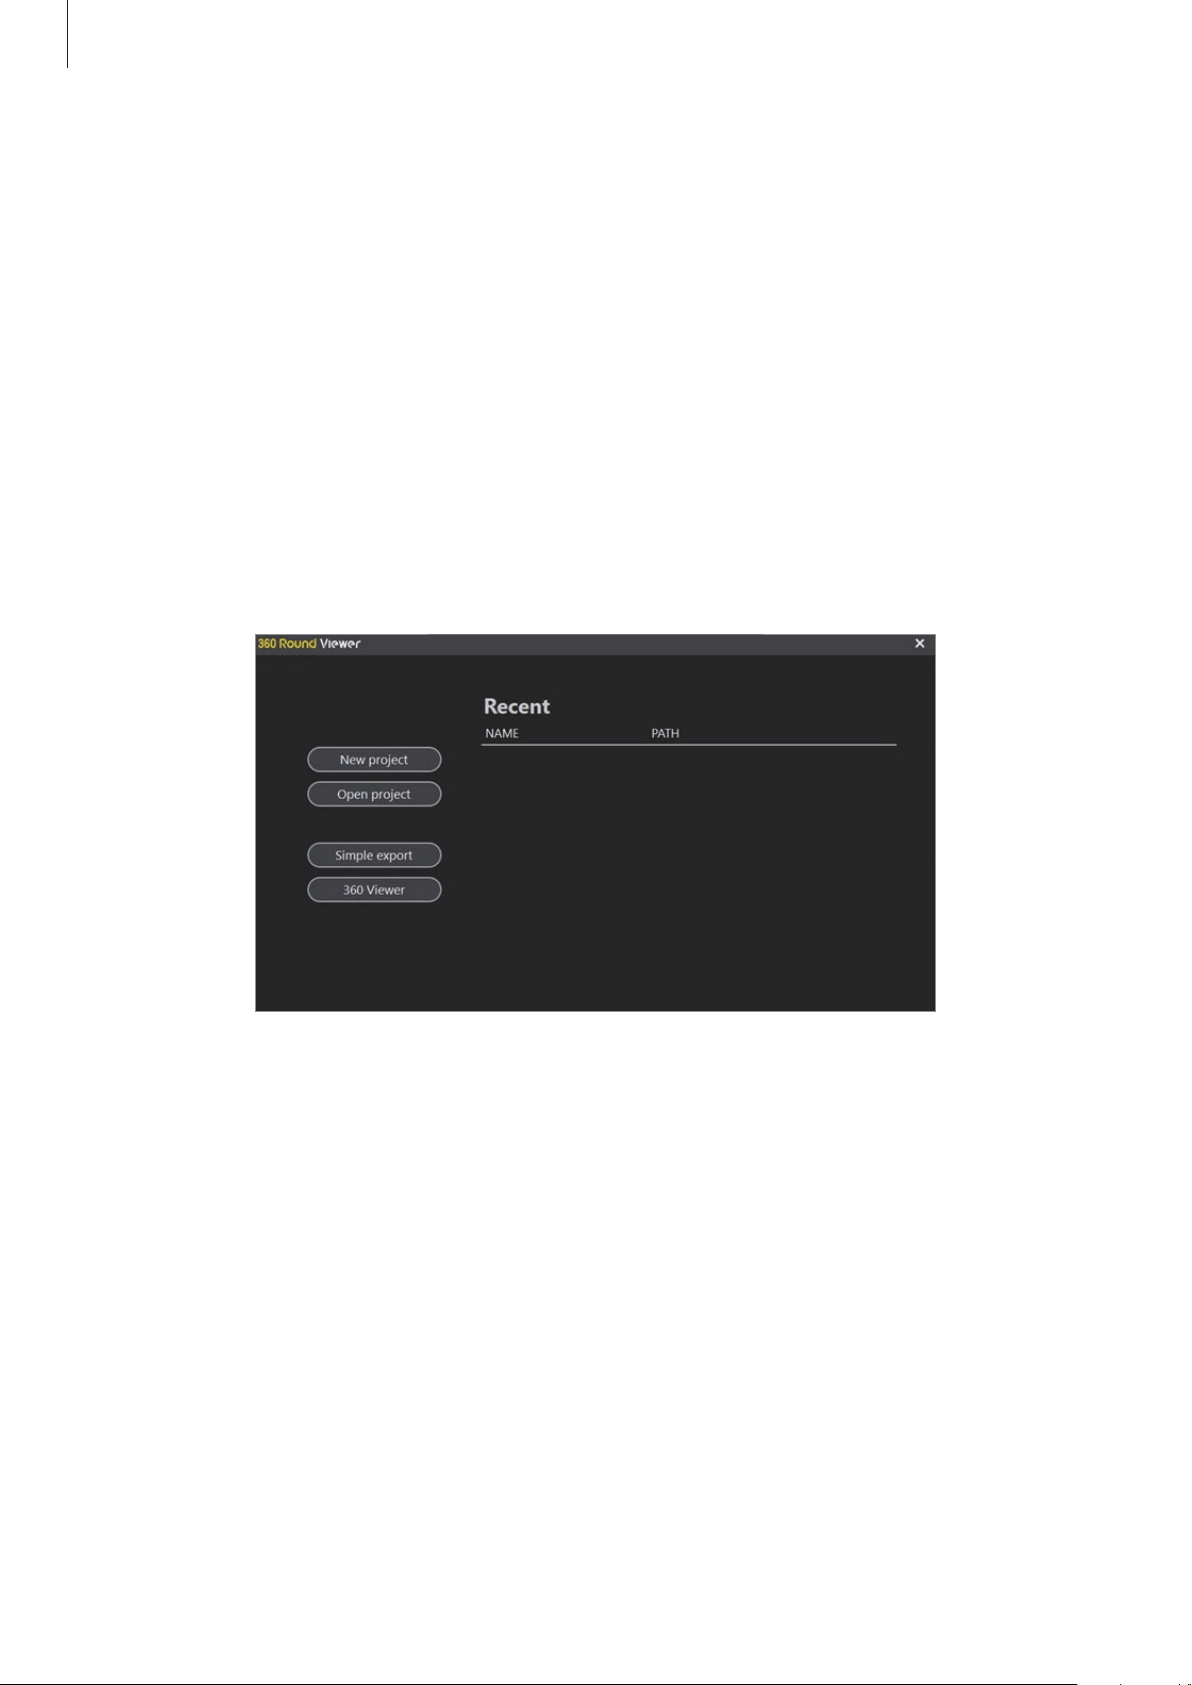
Using the 360 Round Viewer program
70
Editing a recorded video
Importing the recorded video to the edit screen
You can import the recorded video to the edit screen and edit it.
1
Launch the
360 Round Viewer
program on your computer.
2
Click
New project
to select the recorded original video (.sls) files or click
Open project
to select the project video (.prj) files that include the editing information. Alternatively,
select the recently saved project video (.prj) files from the
Recent
list.
The video will appear on the edit screen.
3
Edit the video on the edit screen.
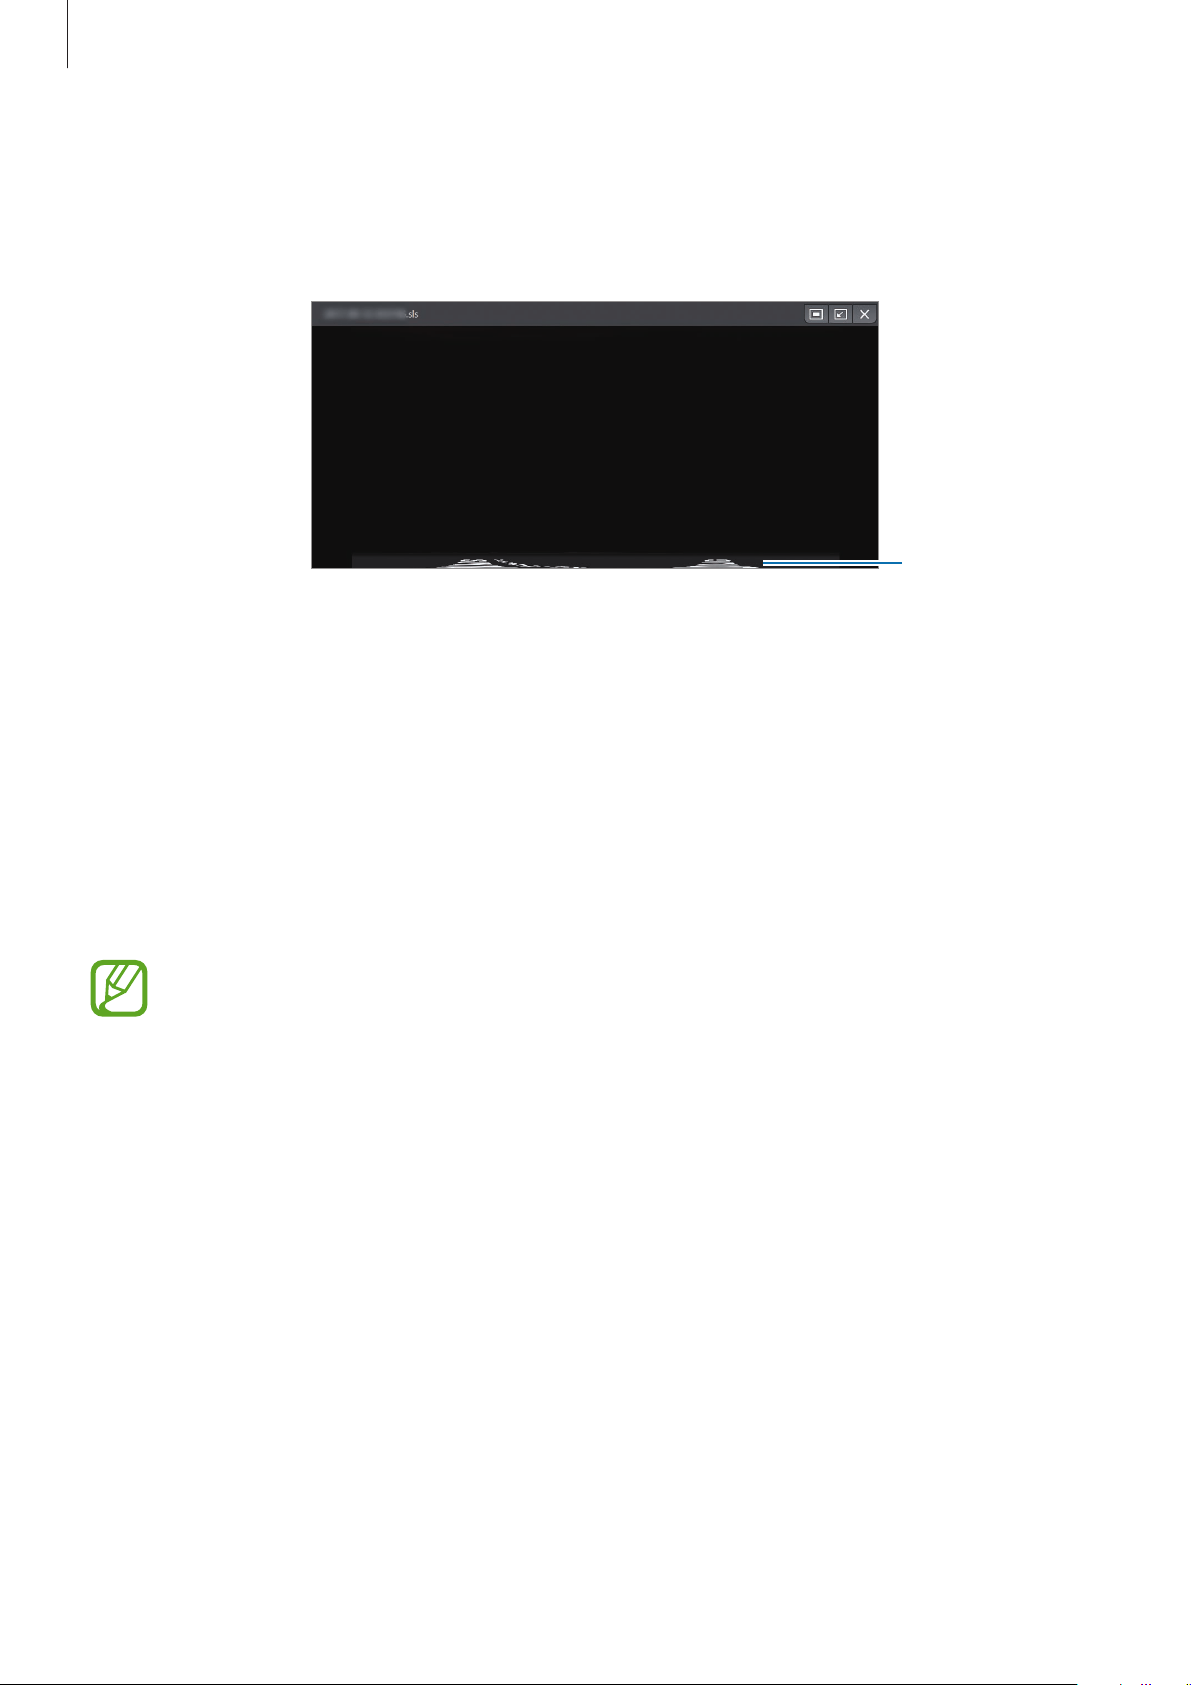
Using the 360 Round Viewer program
71
Changing a base logo on the recorded video
You can apply or remove a base logo on the recorded video and change the default base logo
into your own new one.
The base logo
The preview screen of the 360 Round Viewer program
with the base logo applied
1
Launch the
360 Round Viewer
program on your computer.
2
Click
New project
or
Open project
to select a video file to edit.
3
Click
File
→
Place
→
Change base logo
on the menu bar.
4
Select an image file for the base logo.
The image should be a 4096 x less than 2048 resolution in the PNG file format.
To reset the base logo to the default one, on the menu bar, click
File
→
Place
→
Use default
logo
.
To delete the base logo, on the menu bar, click
File
→
Place
→
Delete Base logo
.
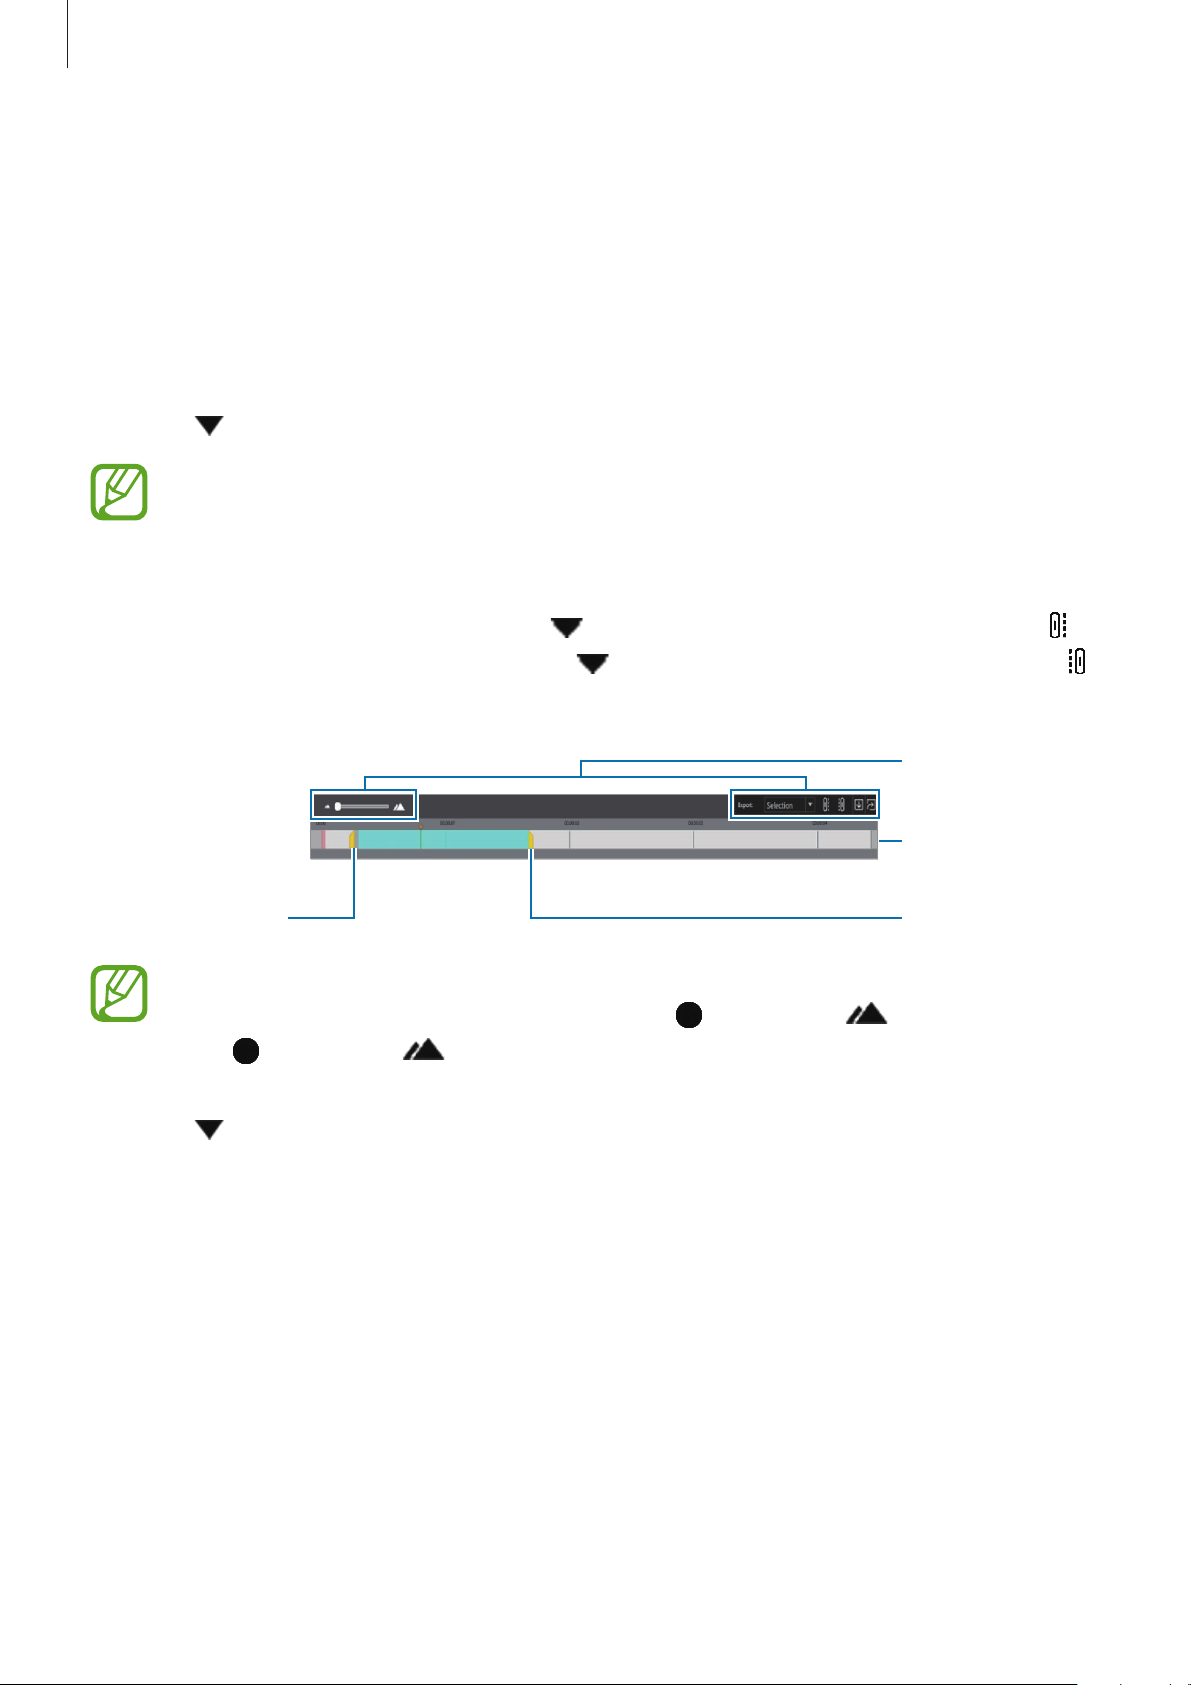
Using the 360 Round Viewer program
72
Trimming the recorded video section
You can edit the video by trimming the section and view the necessary parts.
1
Launch the
360 Round Viewer
program on your computer.
2
Click
New project
or
Open project
to select a video file to edit.
3
Click on the timeline menu and select
Selection
.
The timeline menu may be disabled in
Source view
mode. However, the zoom in/out
feature can be used.
4
Drag the start bracket and the end bracket to the desired points to set the duration of the
video to be played. Alternatively, drag
to the start point on the timeline and click to
set the start point of the video, and drag
to the end point on the timeline and click
to set the end point.
Timeline
Timeline menu
Start bracket
End bracket
If you want to adjust the trimmed section more precisely, use the zoom in/out feature.
You can change the timeline unit by dragging
to the right ( ). The more you
drag
to the right ( ), the more precise the unit of time will become.
5
Click on the timeline menu and select the option.
•
All
: The trimmed video from beginning to end will be exported.
•
Selection
: Select the range of the trimmed video by dragging the handle that appears
on the timeline.

Using the 360 Round Viewer program
73
6
Click to export the trimmed video. Alternatively, click
File
→
Export
on the menu bar.
The trimmed video will be stitched and exported.
To save the trimmed video as an SLS file, click on the timeline menu.
Using the tool bar
Various tools are located on the tool bar as buttons. Use the tools to edit a video more
effectively with the simple press of a button. The available tools may be changed depending
on the current view mode and settings.
Launch the
360 Round Viewer
program on your computer.
Tool bar for the 360 Round Viewer program
Hover the mouse pointer over each tool bar button to check their descriptions before
using them.
Changing the center camera
1
Select on the tool bar under the preview screen.
2
Click the preview screen of the camera you want to set as the center.
3
Click
OK
on the pop-up window.
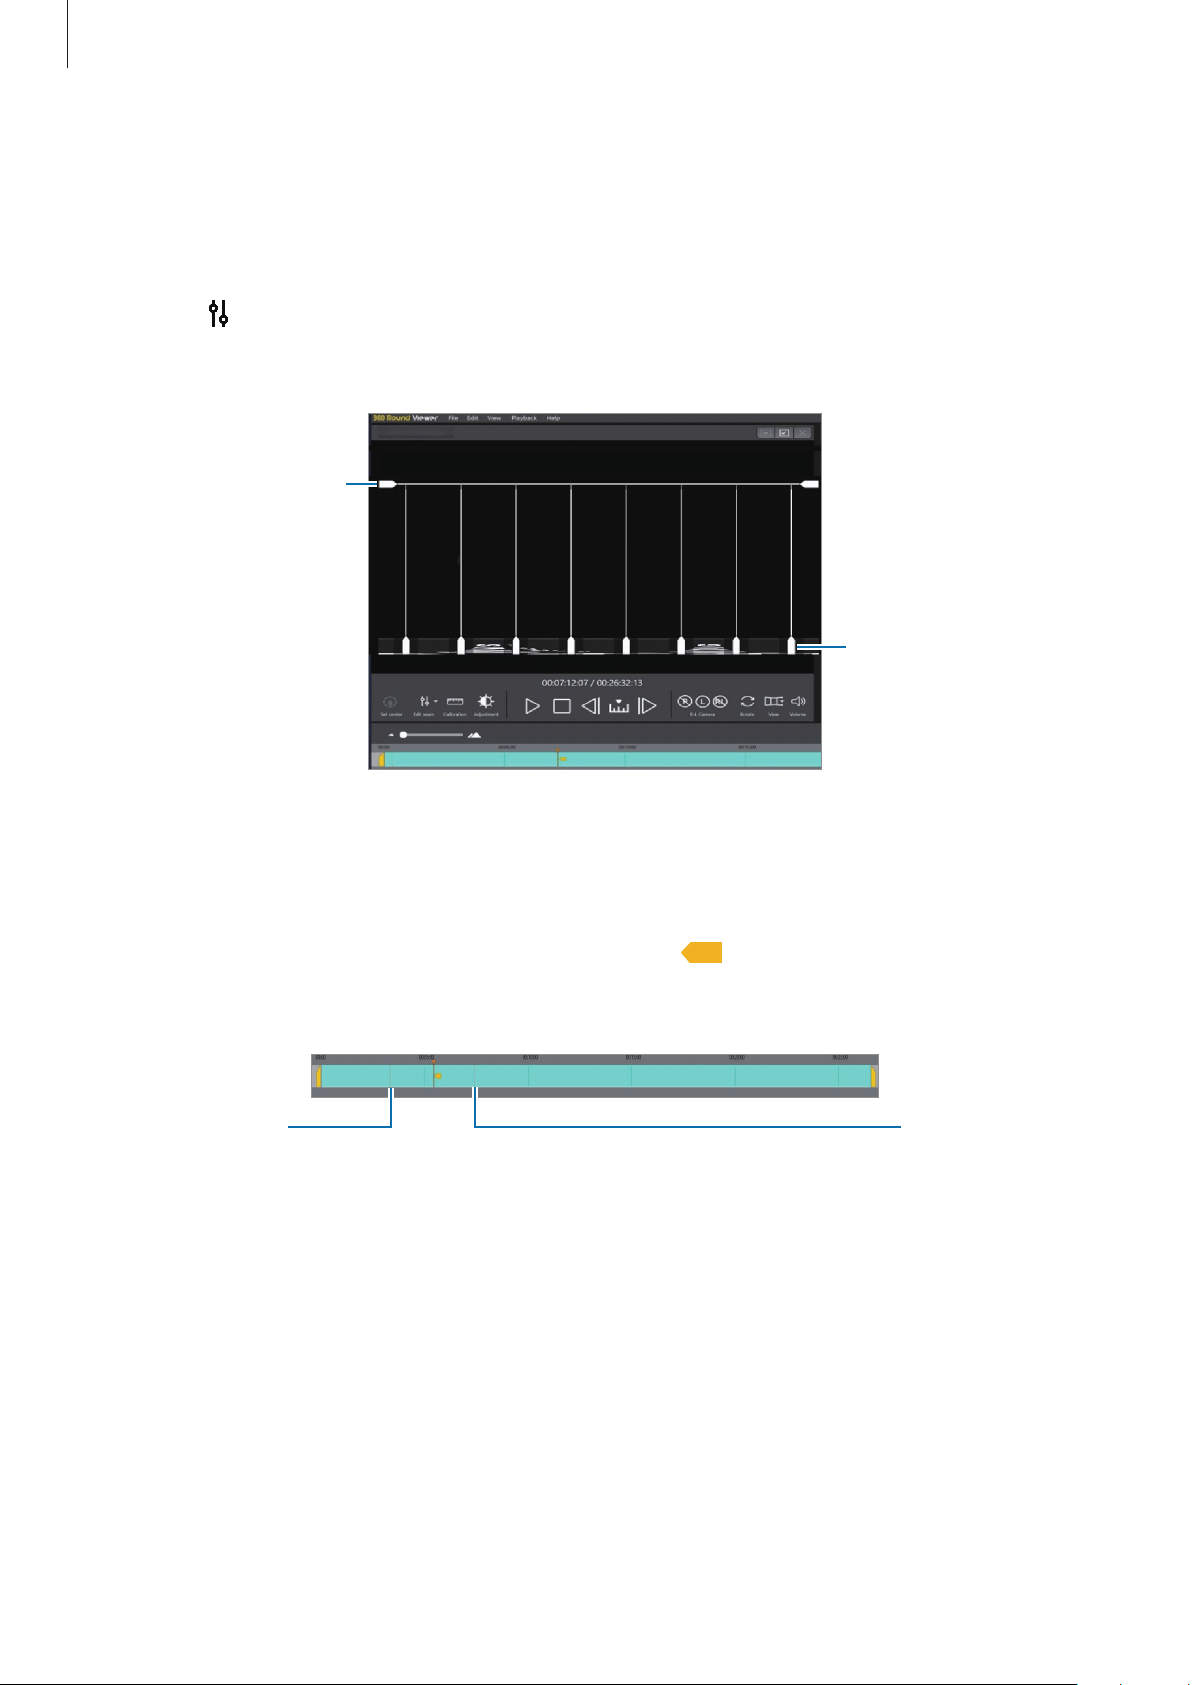
Using the 360 Round Viewer program
74
Changing the seam line of the preview screen
The seam line is the borderline along which each camera’s footage is joined when the video is
stitched. You can change the seam line to get better quality videos after stitching.
1
Select on the tool bar under the preview screen.
The seam lines will appear on the preview screen.
The preview screen of the 360 Round Viewer program
with the seam line feature activated
Adjust the seam line
vertically.
Adjust the seam line
horizontally.
2
Click the seam line handle and drag it horizontally or vertically in the direction you want.
The orange marker and the orange direction icon (
) will appear on the timeline.
The adjusted seam lines are maintained until the next seam line adjustment.
Seam line
adjusting point
Seam line
adjusting point
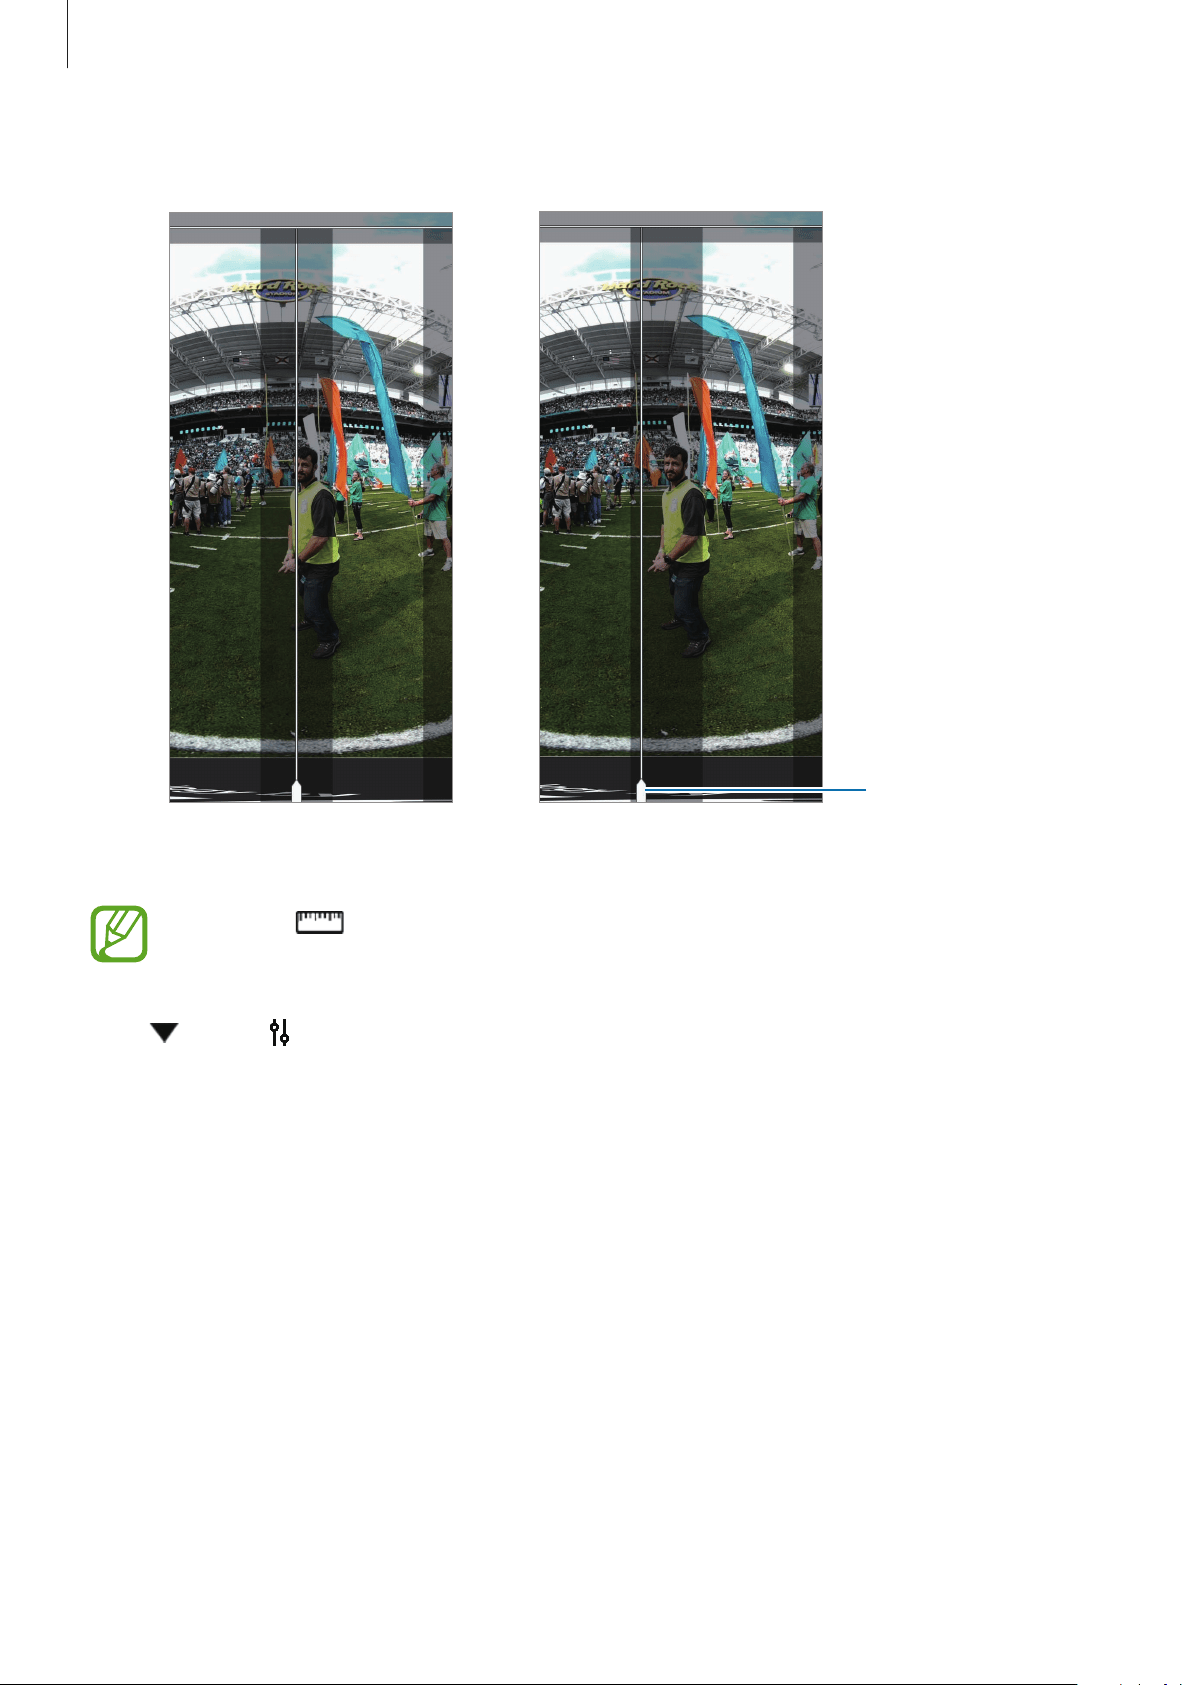
Using the 360 Round Viewer program
75
3
Check the preview screen, adjusting the seam line.
Before adjusting the
seam line
After adjusting the
seam line
Move the seam line
lay on the object to
outside it.
If you click to calibrate the video after adjusting the seam line, video calibration
will be performed again with the newly adjusted seam lines.
Click
next to and select
Reset seam line
to restore the seam line to its original position.
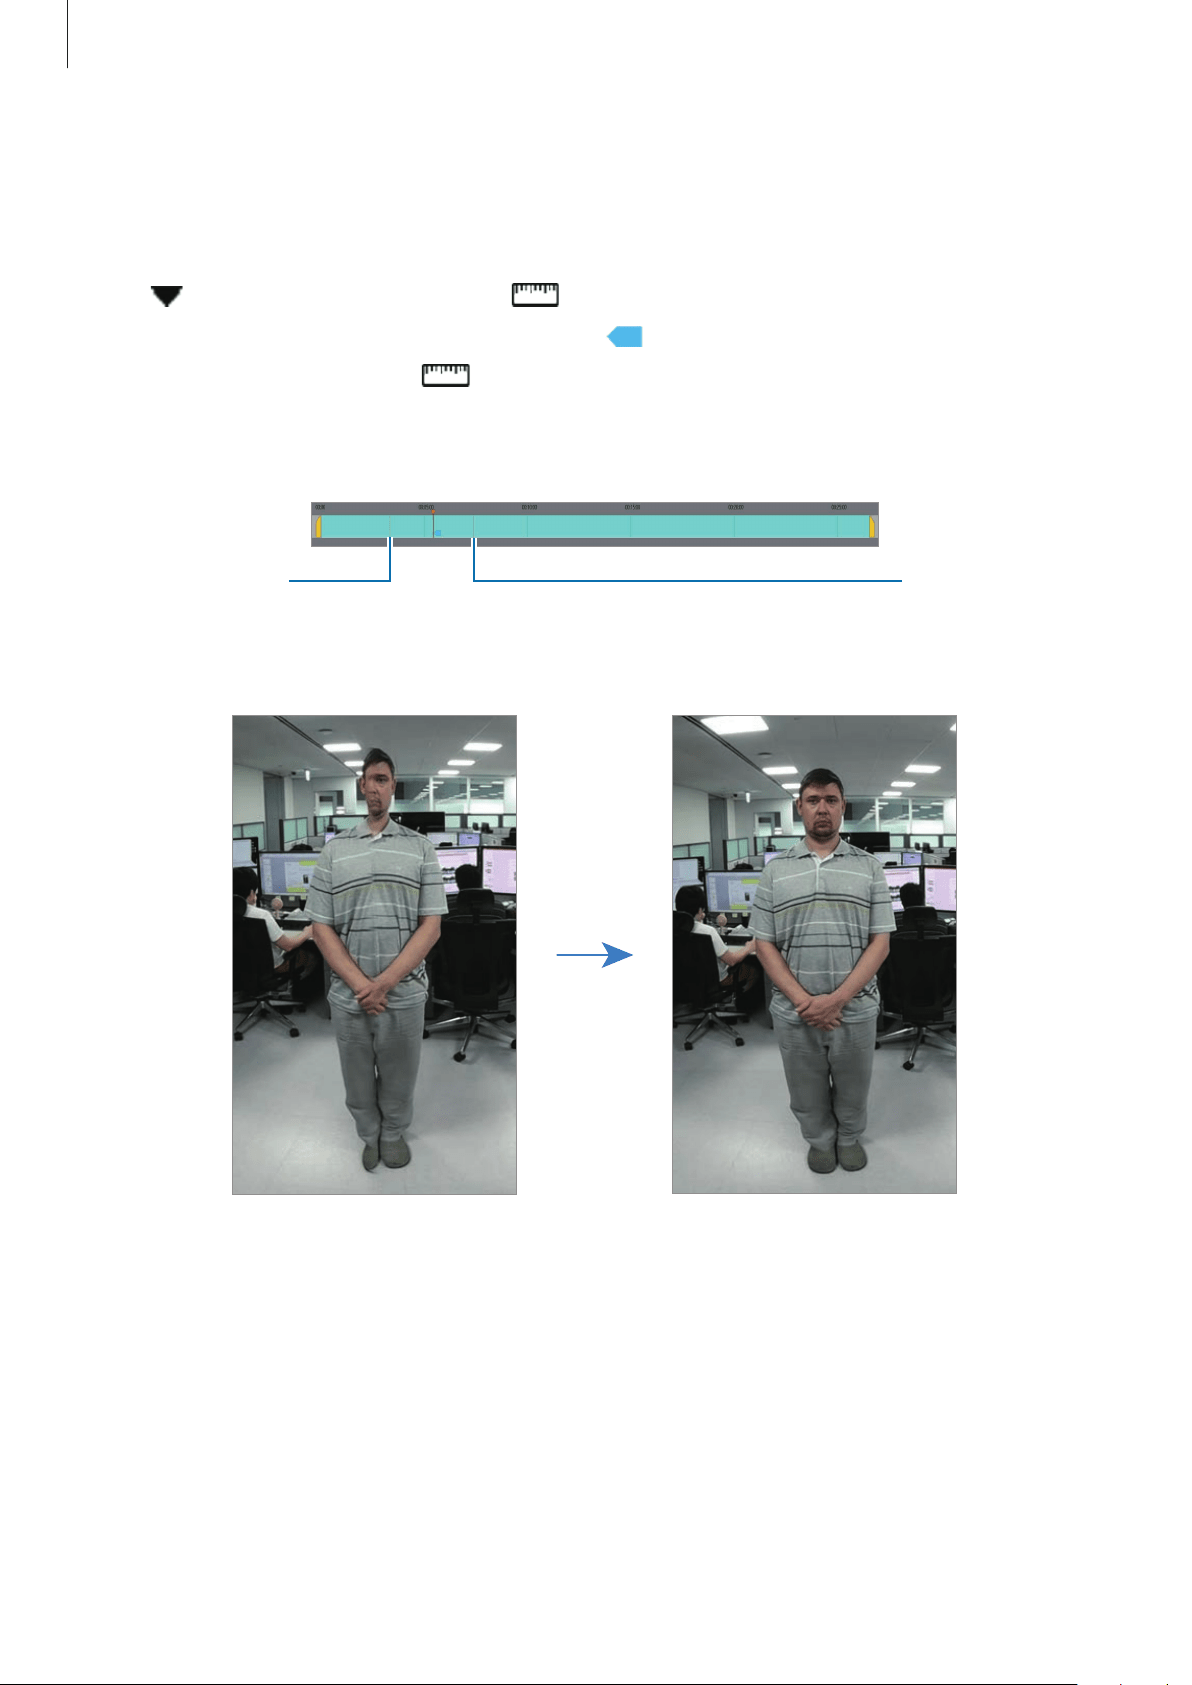
Using the 360 Round Viewer program
76
Calibrating video
You can get better stitching results through video calibration. Calibration performs depth
map estimation of the scene and also performs local warping of the seam line area.
Drag
to the desired point and click on the tool bar under the preview screen.
The orange marker and the blue direction icon (
) will appear on the timeline, calibration
will be performed from where
is clicked, and then the depth map of the image is
updated.
The calibration values are maintained until another calibration is performed.
Calibrated point
Calibrated point
Short distance cut object correction
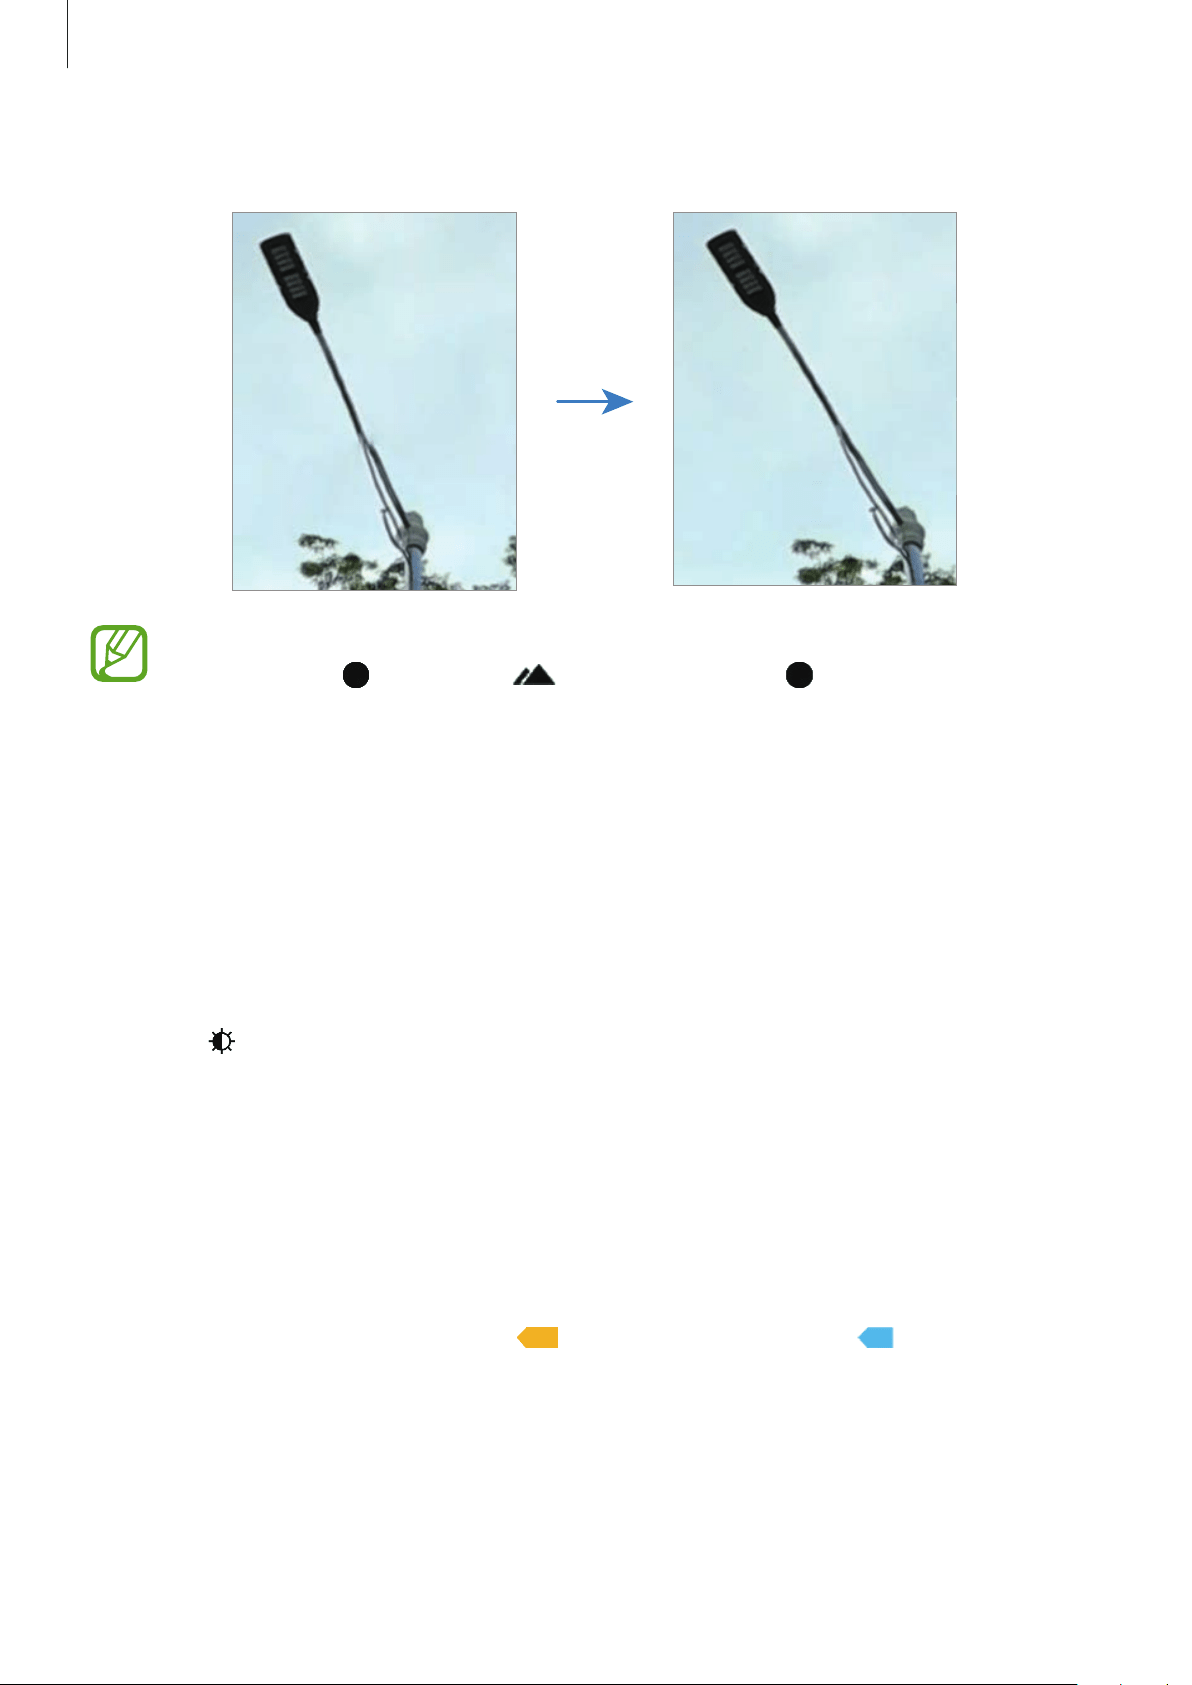
Using the 360 Round Viewer program
77
Thin object depth error correction
•
If you want to adjust the calibrated point more precisely, change the timeline unit
by dragging
to the right ( ). The more you drag to right, the more precise
the unit of time will become.
•
If you calibrate the scene frequently, the image may wobble while it is played. For
more natural results, adjust the interval of the calibration properly.
Adjusting videos
Adjust the luminance level or reduce the noise of the video that is recorded for better video
quality.
1
Select on the tool bar under the preview screen.
2
Click
Luminance level
and select an option for adjusting the luminance.
Click
Noise Reduction
, adjust the noise level on the adjustment bar, and then click
OK
.
Checking the markers
The orange markers that tag the editing points will appear on the timeline. When clicking
each marker the orange direction icon (
) or the blue direction icon ( ) will be displayed
and they can distinguish which settings are applied.
Click the marker on the timeline to jump to the point where the video was edited.
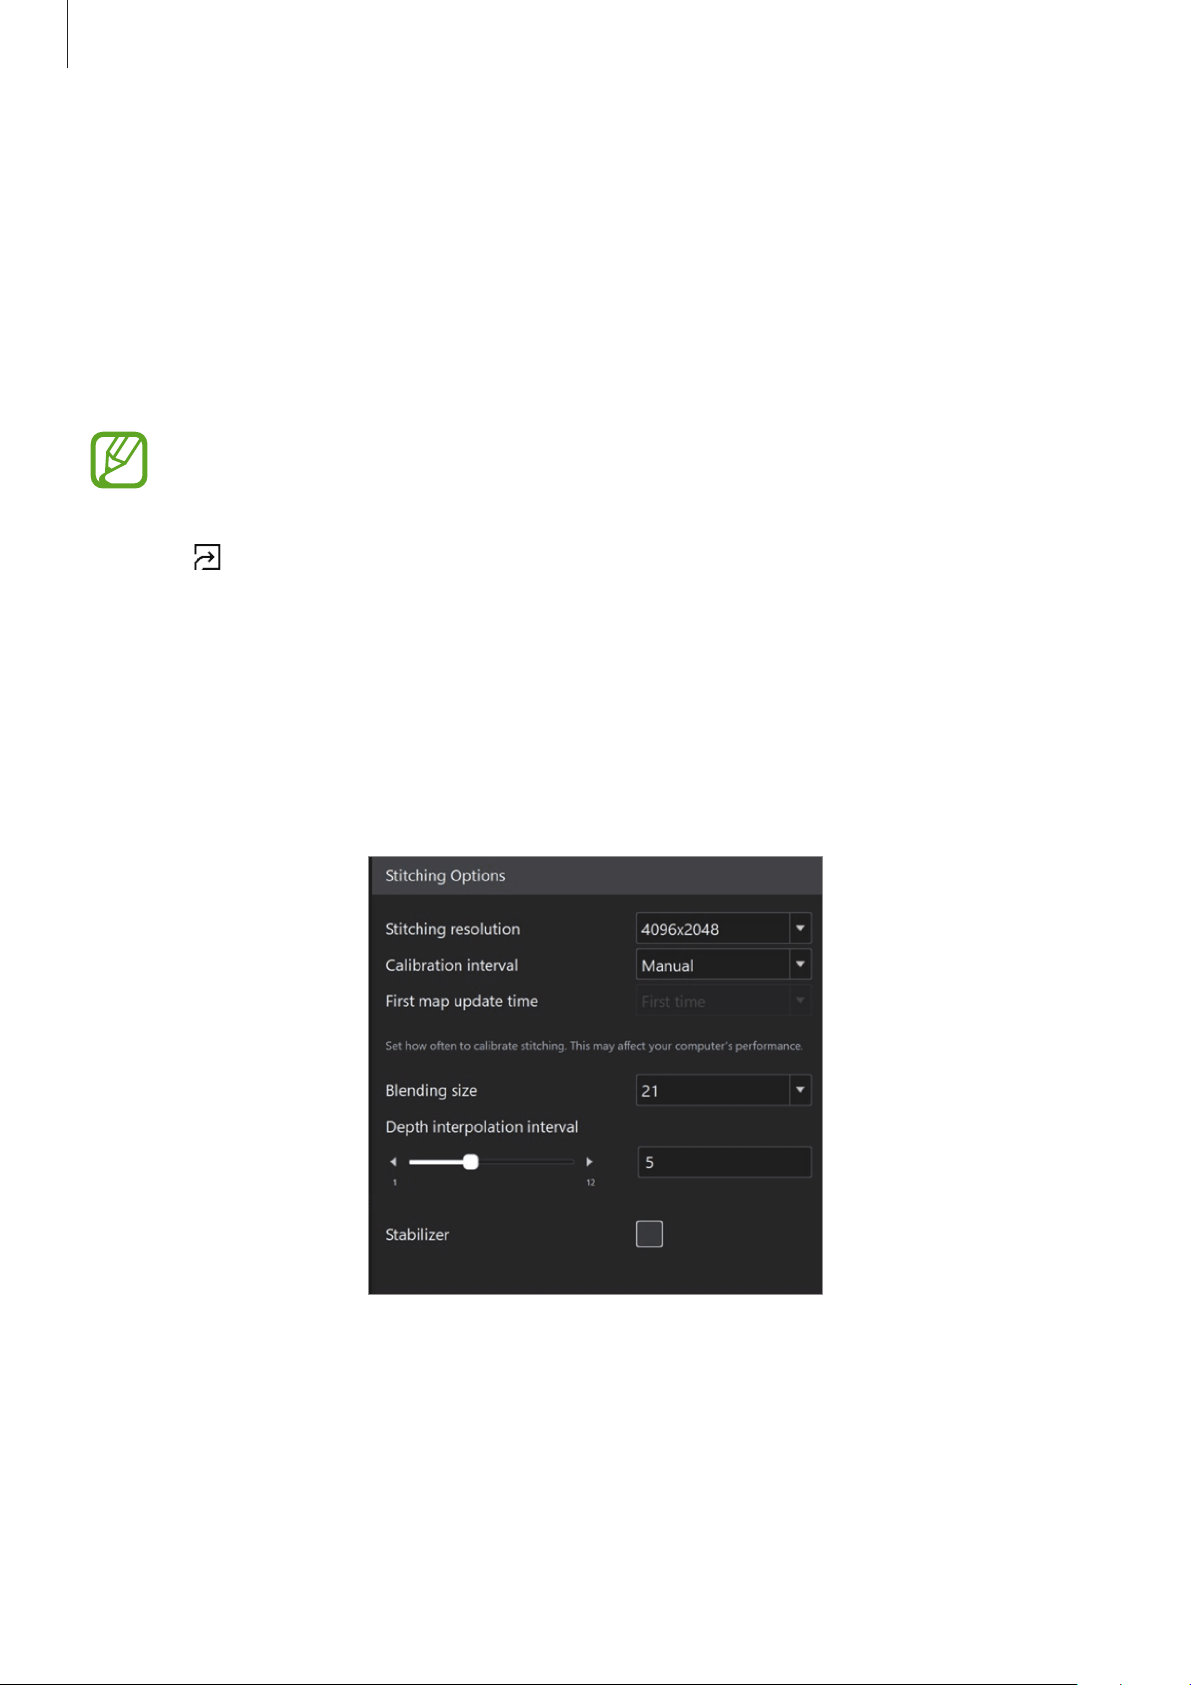
Using the 360 Round Viewer program
78
Saving and exporting the videos after editing
After editing the original video (.sls) files, the videos will be saved as project (.prj) files that
include the editing information. Since the project file contains information about the edits
that you performed before, you can get the same stitching result with it.
1
Edit your video and click
File
→
Save
or
Save as
to save the edited video over the
original, unstitched file and also save it as a project (.prj) file.
To open the saved project video (.prj) files, launch the
360 Round Viewer
program
and click
Open project
, or click
File
→
Open file
on the edit screen.
2
Click on the timeline menu on the edit screen to export and save the edited project
video (.prj) file.
Configuring the stitching options
You can set the various options for determining the stitching quality when stitching the
recorded original videos into one file. The changed stitching options can be directly checked
on the edit screen also.
The stitching options setting window
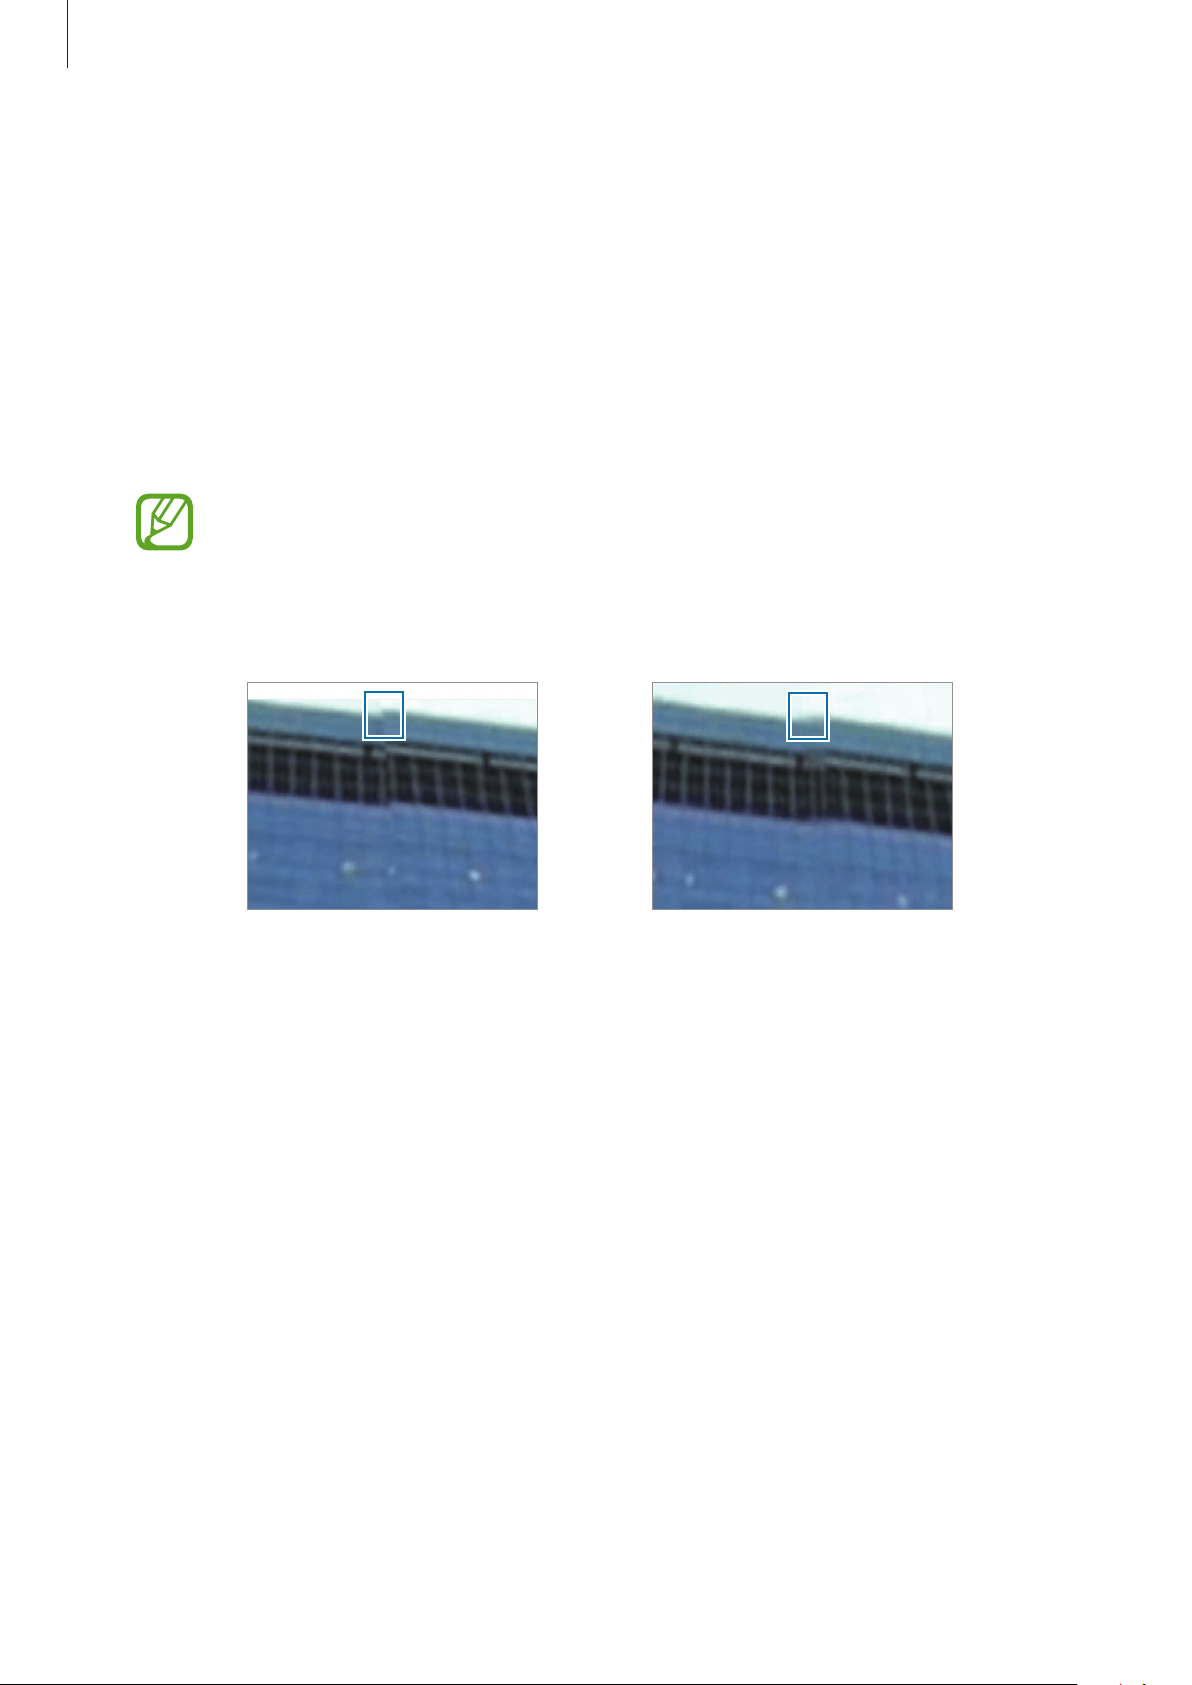
Using the 360 Round Viewer program
79
•
Stitching resolution
: Set the stitched video’s resolution.
•
Calibration interval
–
Once
: Set the video to calibrate only one time based on the value set on
First map
update time
.
–
Manual
: Set the video to calibrate manually.
–
Auto
: Set the video to calibrate frames which have a different depth automatically
after calibrating the first frame.
•
First map update time
: Set the first started time to calibrate the recorded video.
This option can be set only when the
Calibrate interval
is set as
Once
.
•
Blending size
: Set the degrees that make even the seam line after stitching it. A higher
value can make the seam line softer, but it may be blurry.
When the blending size value is 1 When the blending size value is 21
•
Depth Interpolation interval
: Set to prevent changes between the videos before and
after calibration, such as changes to the depth value, when calibrating the frame. If the
value is ‘5,’ the video will be calibrated gradually from five frames before the point that
starts the calibration.
•
Stabilizer
: Set the video to correct when the video recording was tilted due to your 360
Round not being set on a flat surface. Also, you can reduce shaky video resulting from the
360 Round shaking during recording.
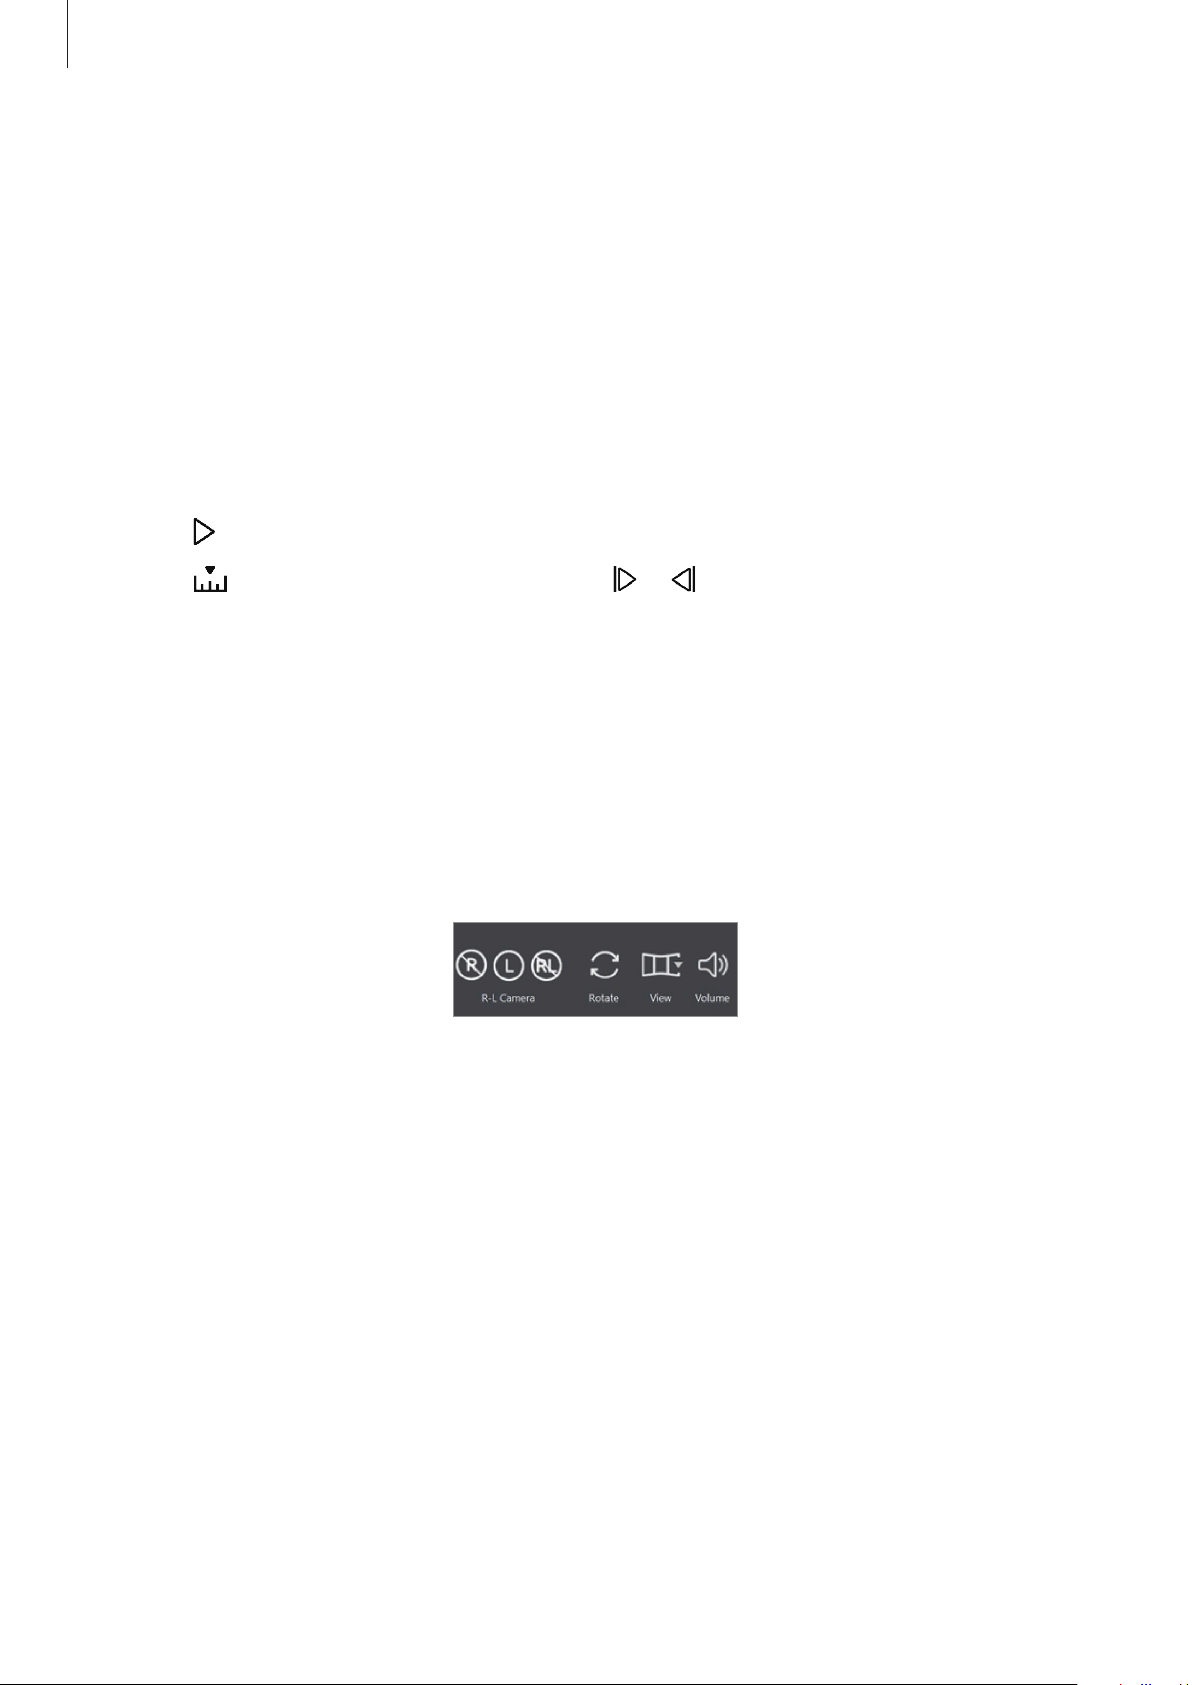
Using the 360 Round Viewer program
80
Viewing videos
Viewing videos recorded
You can view your recorded videos on your computer.
1
Launch the
360 Round Viewer
program on your computer.
2
Click
New project
to select the original recorded video (.sls) files.
3
Click
to play video.
Click
, select the time unit, and then click or to forward or rewind the video. If
you select
Second
, you can forward or rewind the video second by second, and if you
select
Frame
, you can jump to the next frame or go back to the previous frame.
Using main buttons
You can use the various main buttons on the preview screen while editing the videos to easily
apply various view options.
Launch the
360 Round Viewer
program on your computer and select a main button.
Main buttons of the 360 Round Viewer program

Using the 360 Round Viewer program
81
Setting 2D or 3D mode
Select a camera and view the video that it recorded.
Click the
R-L Camera
buttons button to select the camera to be used for viewing. Refer to
Checking the location of each camera for the detailed location of cameras on the right or left
side of the 360 Round.
•
On
Panoramic view
,
Stretched view
,
360˚ view
,
Round view
or
Three screen view
mode:
–
: You can view 2D video recorded by the 8 cameras on the right side, and the
camera on the top of the 360 Round.
–
: You can view 2D video recorded by the 8 cameras on the left side, and the
camera on the top of the 360 Round.
–
: You can view 3D video recorded by all of the 17 cameras on the 360 Round.
•
On
Source view
mode:
–
: The camera icons are disabled and cannot be selected because only 3D video
recorded by all of the 17 cameras is available.
Rotating the screen
You can view videos by rotating the screen up and down in 180 degrees.
Click
to rotate the screen.
Changing the preview screen view mode
You can change the preview screen view mode while playing a video.
Click
on the
View
option to change the preview screen view mode. Alternatively, click the
View
option icon repeatedly to change the view mode.
•
Panoramic view
: View the recorded video as a horizontally stretched scene.
•
Stretched view
: View the recorded video as an enlarged scene.
•
360˚ view
: View the recorded video in spherical form.
•
Round view
: View the recorded video as a rounded scene.
Using the 360 Round Viewer program
82
•
Three screen view
: View the recorded video split up into a right, left, and top view.
•
Source view
: View the recorded video through the cameras of each section. Select
Top
,
Left 1
,
Left 2
,
Right 1
or
Right 2
on the preview screen to check the recorded videos
from each section. Refer to Checking the location of each camera for detailed location of
cameras on the right or left.
–
Top
: Check the video recorded by the number 0 camera on the top.
–
Left 1
: Check the video recorded by the cameras on the left numbered 5 to 8.
–
Left 2
: Check the video recorded by the cameras on the left numbered 1 to 4.
–
Right 1
: Check the video recorded by the cameras on the right numbered 13 to 16.
–
Right 2
: Check the video recorded by the cameras on the right numbered 9 to 12.
•
In
Stretched view
,
Round view
,
Three screen view
, and
360° view
modes, you can
view videos from different angles by dragging across the screen in any direction. To
reset the angle to the default setting, click
.
•
Only
Panoramic view
mode is supported for videos recorded in 3D.
Adjusting the volume of the recorded video
You can adjust the volume of the recorded video.
Click
and drag on the adjustment bar to adjust the volume.
To mute the video, click
→
and click
→
to unmute the video. Alternatively, click
Play back
→
Mute/Mute off
on the menu bar.
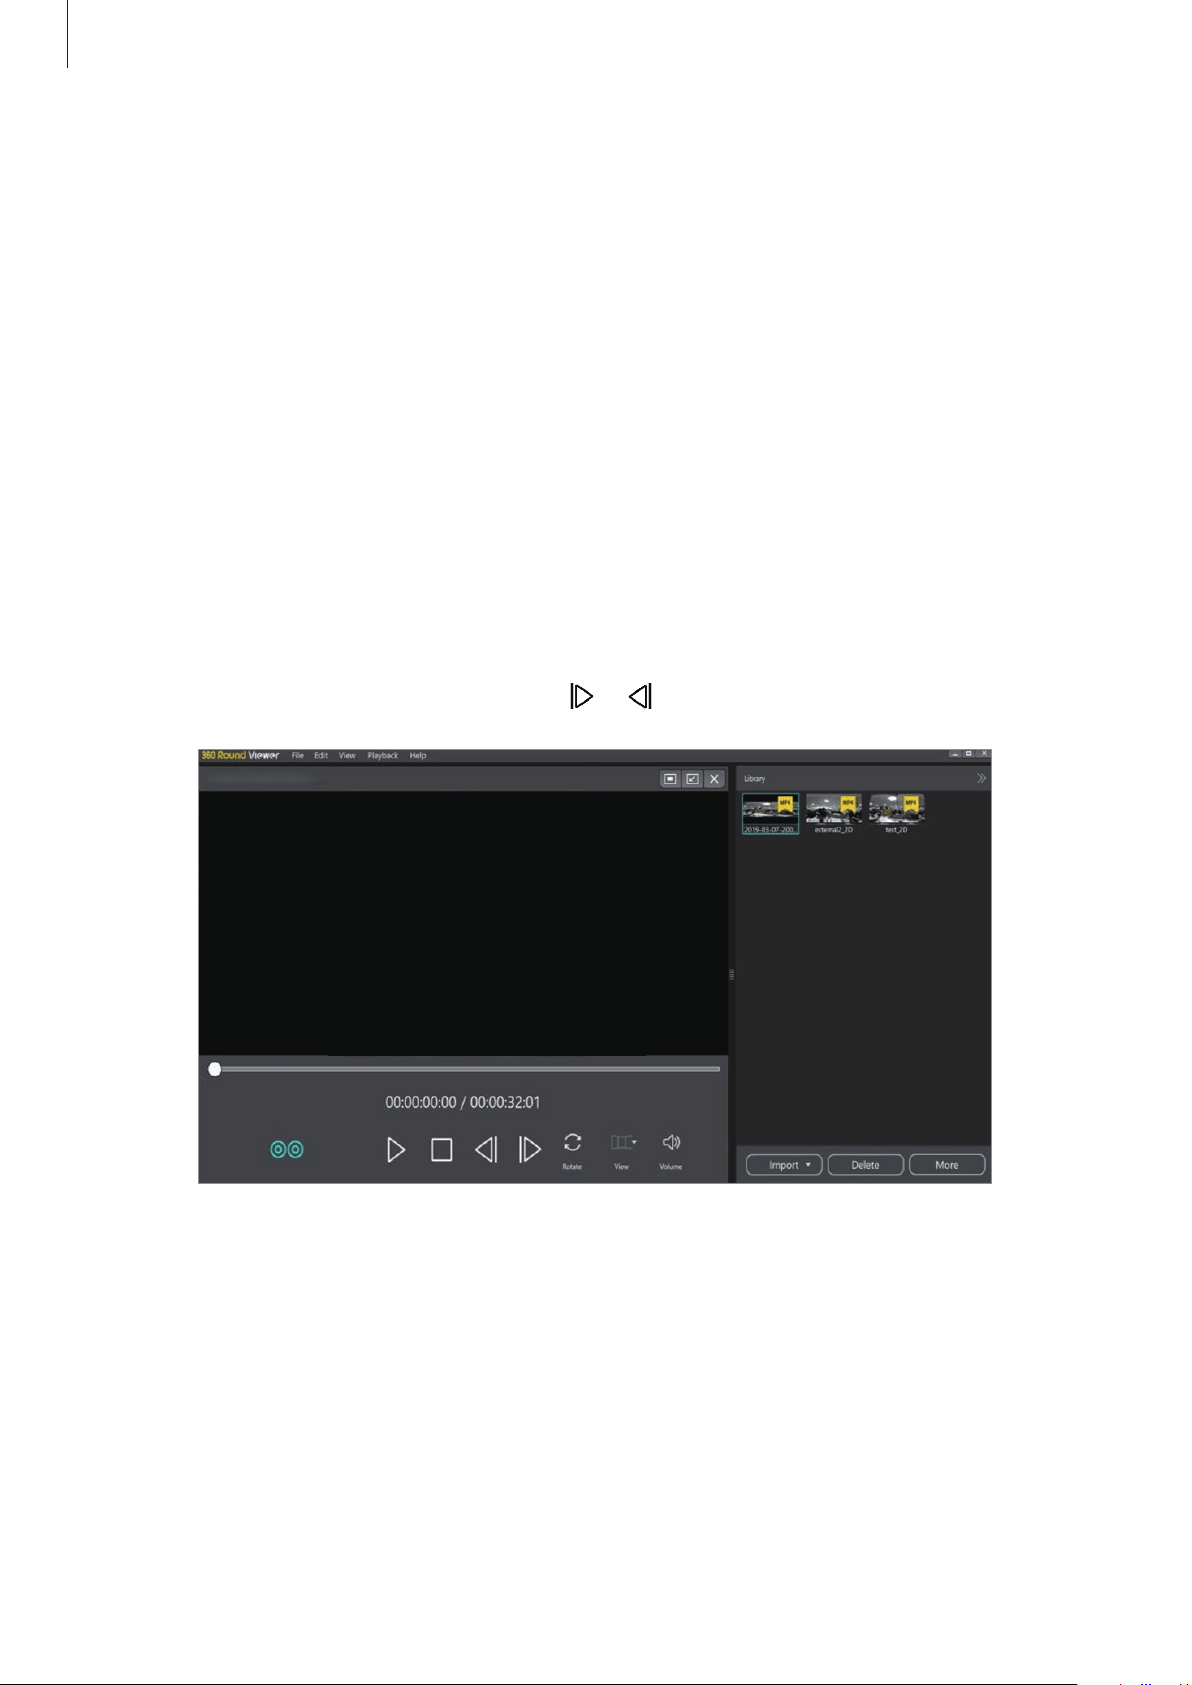
Using the 360 Round Viewer program
83
Viewing the exported video
Viewing exported videos with the computer
You can view your exported videos (MP4) on your computer.
1
Launch the
360 Round Viewer
program on your computer.
2
Click
360 Viewer
.
3
Click
Import
on the 360 Viewer window to import the exported video (MP4).
4
Select the desired file or drag the file to the preview screen on the
Library
panel.
The video will be played.
To move to next or previous frame, click
or .

Using the 360 Round Viewer program
84
Using main buttons
You can use the various main buttons on the preview screen while viewing the videos to
easily apply various settings.
Launch the
360 Round Viewer
program on your computer, click
360 Viewer
, and then select
a main button.
Main buttons of the 360 Viewer screen
Viewing 2D or 3D video
Click to view the 2D video that was recorded with each right or left camera or 3D video
that was recorded with all of the cameras of the 360 Round.
•
will be activated only when viewing the 3D video.
•
The preview screen view mode cannot be changed when viewing the 3D video.
You can change it only when viewing the 2D video by clicking the
View
option
icon.
Rotating the screen
You can view videos by rotating the screen up and down in 180 degrees.
Click
to rotate the screen.

Using the 360 Round Viewer program
85
Changing the preview screen view mode
You can change the preview screen view mode while playing a video.
Click
on the
View
option to change the preview screen view mode. Alternatively, click the
View
option icon repeatedly to change the view mode.
•
Panoramic view
: View the video as a horizontally stretched scene.
•
Stretched view
: View the video as an enlarged scene.
•
360˚ view
: View the video in spherical form.
•
Round view
: View the video as a rounded scene.
•
Three screen view
: View the video split up into a right, left, and top view.
Adjusting the volume of the video
You can adjust the volume of the video.
Click
and drag on the adjustment bar to adjust the volume.
To mute the video, click
→
and click
→
to unmute the video. Alternatively, click
Play back
→
Mute/Mute off
on the menu bar.
Setting the SDI output
The 360 Round Viewer program is compatible with Blackmagic Design’s DeckLink series
which supports DeckLink SDI output. You can send out high-quality 4K video with 4K
compatible DeckLink SDI cards.
•
The SDI card for 4K video is sold separately.
•
The SDI output only supports the video (ERP format) recorded in the
Panoramic
view
mode.
1
Install a DeckLink PCI Express card, such as the DeckLink Mini
Monitor 4K and DeckLink 4K Extreme 12 G, on your computer from
https://www.blackmagicdesign.com/products/decklink.
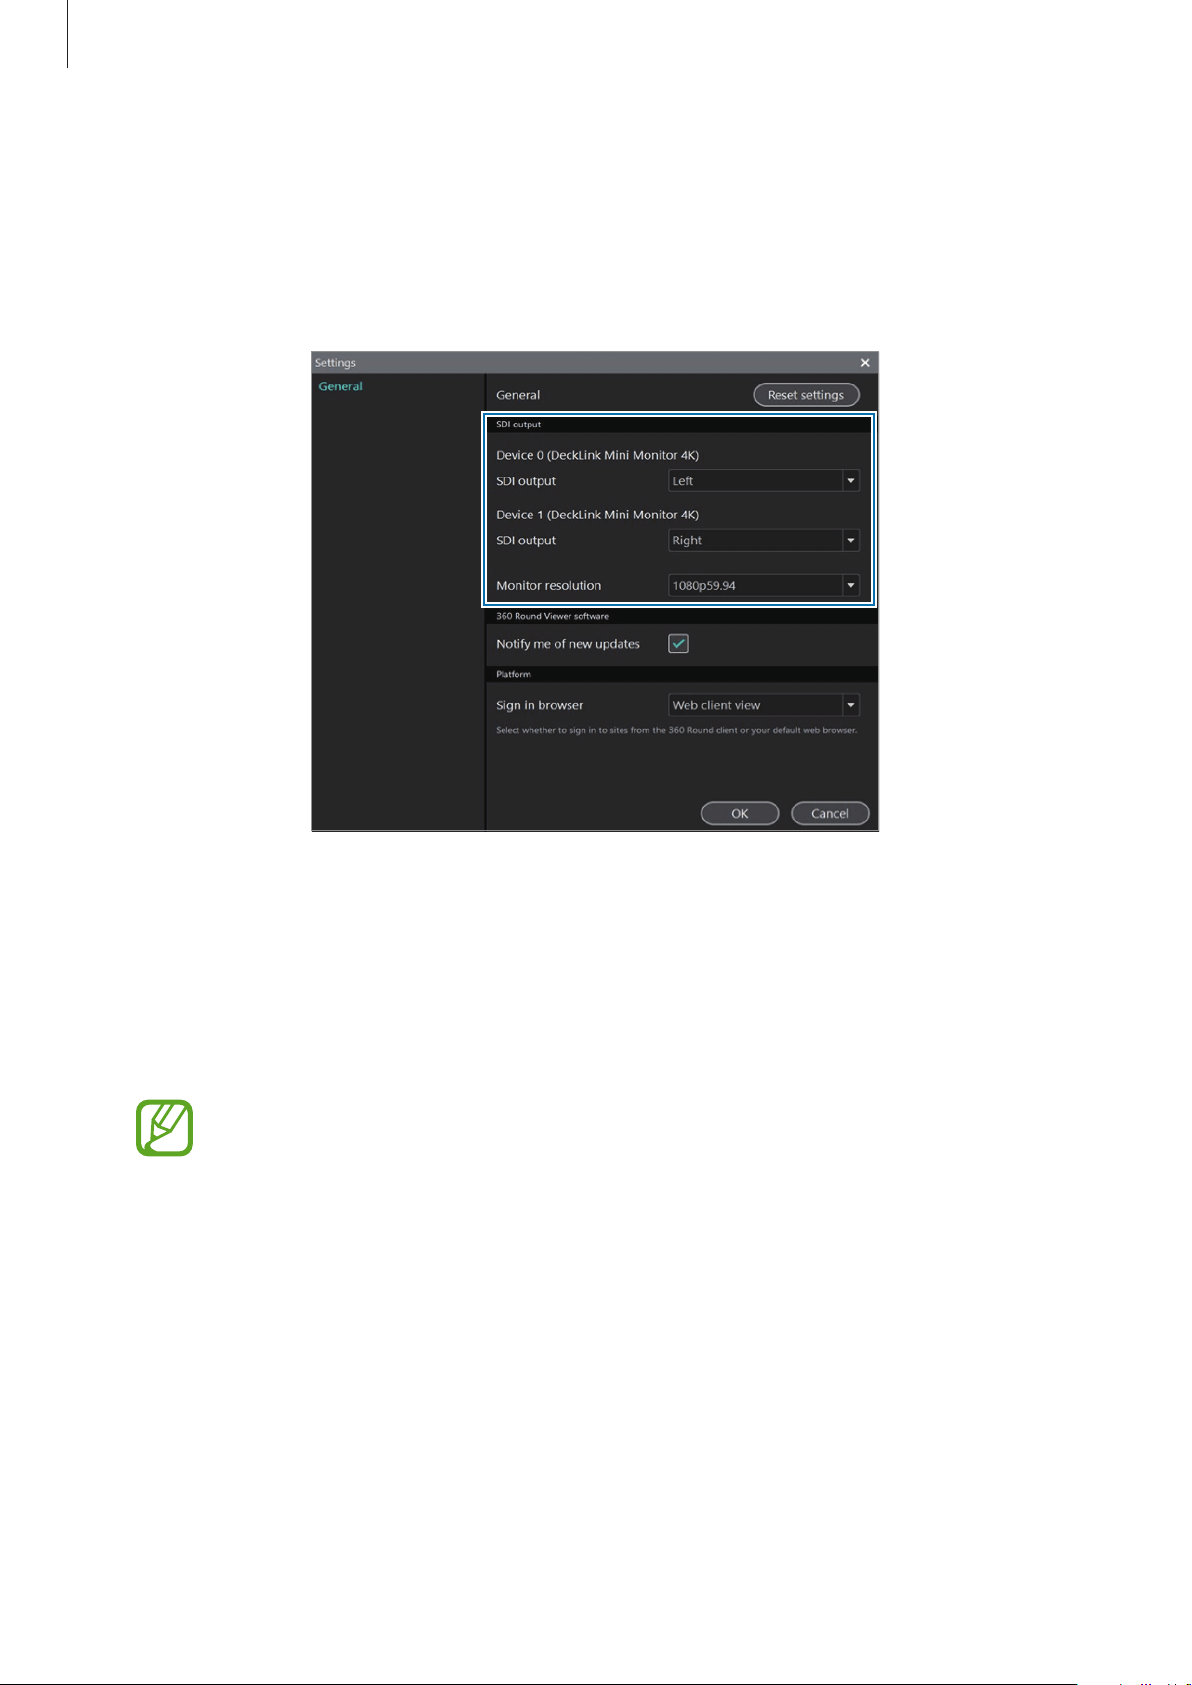
Using the 360 Round Viewer program
86
2
Launch the
360 Round Viewer
program on your computer and click
360 Viewer
.
3
Click
Edit
→
Settings
→
General
on the 360 Viewer screen to open the settings window.
4
Configure the settings in the
SDI output
menu.
The settings screen for SDI output in the 360 Round Viewer program
•
Device 0 (DeckLink Mini Monitor 4K)
–
SDI output
: Select an option to output the video on SDI Device 0.
•
Device 1 (DeckLink Mini Monitor 4K)
–
SDI output
: Select an option to output the video on SDI Device 1.
•
The
Separate: Left / Right
option will be displayed only if you use an SDI card
(DeckLink 4K Extreme 12 G, DeckLink 8K Pro) that supports the 3D output.
•
To enable 4K output for both the left and right cameras and get high-quality
4K X 4K video, insert two SDI cards for both the left and right cameras.
Using the 360 Round Viewer program
87
•
Monitor resolution
: Select
2160p29.97
for 4K video.
•
The supported resolutions may differ depending on the DeckLink SDI card you
use. The frame rate has to be the same as the one you set in
Frame rate
on the
control panel.
•
If you use an SDI card (DeckLink 4K Extreme 12 G) that supports the 3D output
and select the
Separate: Left / Right
option for SDI output, the supported
monitor resolution will be limited to 2K video.
Uploading the video on Samsung VR
You can upload the exported video files (MP4) on Samsung VR.
To use this feature, you must be connected to the network and sign in to your service
account.
1
Launch the
360 Round Viewer
program on your computer and click
360 Viewer
.
2
Click
File
→
Upload
→
Samsung VR
on the 360 Viewer window.
3
Sign into your Samsung VR or Samsung account.
The upload window will appear.
When the login webpage does not appear, open the settings window, select
Live
broadcasting
, and then check the options on the
Sign in browser
.
•
Select
Web browser
on
Sing in browser
and sign in again.
•
When the Samsung VR login webpage does not appear even if
Web browser
is
selected on the
Sign in browser
, launch
Windows Settings
on your computer,
select
Apps
→
Default apps
, select
Internet Explorer
as the default app of
Web
browser
, and then sign in again.
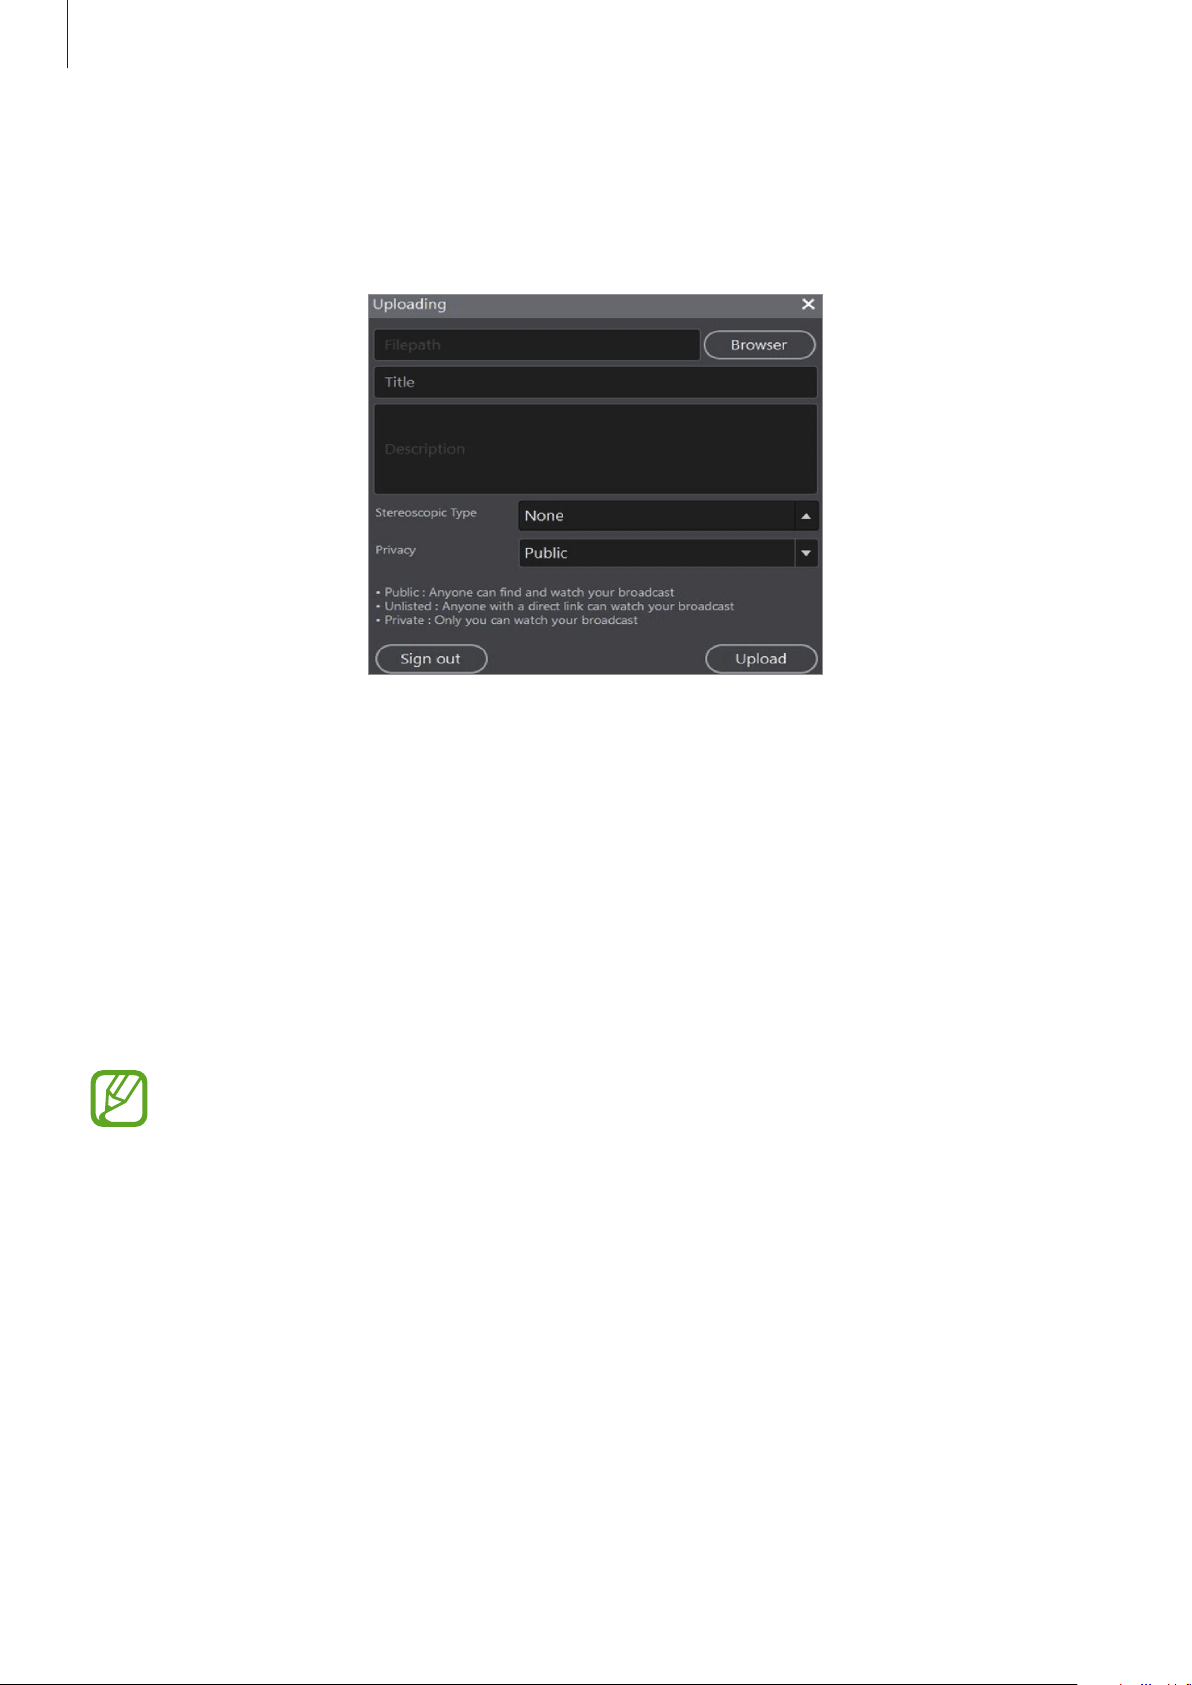
Using the 360 Round Viewer program
88
4
Select a file to upload, enter the title and details of the broadcast, and then set your
broadcast to be public or private.
To upload a 3D video file, set the
Stereoscopic Type
as
top-bottom
.
5
Click
Upload
.
The video file will be uploaded to Samsung VR.
Updating the 360 Round Viewer program
software
The 360 Round Viewer program can be updated to the latest software.
•
You can update the software of 360 Round Viewer program only if the computer is
connected to a wireless or wired network.
•
If you have trouble with updating the software, contact a Samsung Service Center.
1
Launch the
360 Round Viewer
program on your computer.
2
Click
Help
→
Check for updates
→
OK
on the menu bar.

89
Appendix
Managing the 360 Round
Cleaning the camera
Use a brush to remove dust from the camera and status screen, and wipe with a soft cloth. For
persistent dust, lightly wipe the lens with a little cleaning fluid on the lens cleaning paper and
wipe the exterior with a soft cloth.
When using the 360 Round, fine dust may enter the camera and it may appear on the
recorded videos depending on the recording environment. This is not a defect of the 360
Round, but rather caused by fine dust entering the lens. Use a blower to clean the dust.
Using and storing the 360 Round
Do not store or use the 360 Round in the following situations:
•
Extremely high or low temperature
•
Where it is stuffy, highly humid, or the humidity changes rapidly
•
Where there is direct sunlight or airtightness (such as in a closed car in summer)
•
Where there is a strong vibration or a strong magnetic field (by motor, transformer,
magnet)
•
Where there is a lot of sand or dust
•
Where there is a fire or volatile material
•
Where there are mothballs such as naphthalene

Appendix
90
Using the 360 Round at the beach or near water
Please note the following when using the 360 Round near the beach or water.
•
Be careful not to let water or sand get into the 360 Round. This may cause a malfunction.
•
The 360 Round is not waterproof when the cover is open. Do not insert an adapter or
memory card with wet hands.
•
Do not touch the 360 Round, power cable, plug and socket with wet hands or another
body part. The 360 Round may be damaged or you may be affected by electricity.
Dealing with dew
Moving from a cold place to a warm place in a short period of time may cause water droplets
to appear inside of the 360 Round or on the lens. Turn off the power and wait for about one
hour before using the 360 Round. If water droplets form on the memory card, remove the
memory card and dry it completely before using it.
Managing and sending log files
You can create log files and check the history of your 360 Round. If you save your log files, you
can check your 360 Round’s status and report any problem’s easily if there are any issues. Click
Help
→
Create log file
on the menu bar in the
360 Round
program to create log files for the
360 Round program and your 360 Round. Also, click
Help
→
Log dump
on the menu bar in
the
360 Round Viewer
program to create log files for the 360 Round Viewer program.
You can also send the created log file to the 360 Round customer center when you have a
problem using your 360 Round and cannot figure out what the problem is. Click
SEND
on the
pop-up window after the log file is created.

Appendix
91
Troubleshooting
Before contacting a Samsung Service Center, please attempt the following solutions. Some
situations may not apply to your 360 Round.
Your 360 Round does not turn on
Make sure the power adapter cable is connected properly to your 360 Round. If you use the
360 Round as a portable, make sure that the external battery is connected properly.
The 360 Round does not connected to the computer properly or it is
disconnected
•
Make sure that the 360 Round and your computer are properly connected to the LAN
cable.
•
Check your 360 Round is turned on.
•
Make sure the specifications of the computer meets the recommended specifications of
computer.
The time on the 360 Round has been reset
The time will be reset when you update the 360 Round.
Your 360 Round is hot to the touch
When using the 360 Round for an extended period, the 360 Round and its battery may heat
up. If the temperature rises above a certain level, the 360 Round will stop recording and turn
off automatically to prevent damage. If the 360 Round is turned off due to overheating, wait
for it to cool down before resuming use.
The memory card icon appears on the camera status screen
•
Ensure that a memory card is inserted.
•
Ensure that your memory card is not damaged.

Appendix
92
Data stored in the 360 Round has been lost
Always make backup copies of all important data stored in the Gear 360. Otherwise, you
cannot restore data if it is corrupted or lost. Samsung is not responsible for the loss of data
stored in the Gear 360.
A small gap appears around the outside of the 360 Round case
•
This gap is a necessary manufacturing feature and some minor rocking or vibration of
parts may occur.
•
Over time, friction between parts may cause this gap to expand slightly.
The lens is dirty
Wipe the lens in a circular motion with a clean, soft cloth.
System update screen appears continuously
Copy the new software to the memory card and restart the 360 Round. The software update
will be performed automatically.
An error message that says your 360 Round has stopped working
appears
Check the network speed. Click
Help
→
Test network speed
on the menu bar in the
360
Round
program. This will take several minutes. After running the network speed test, check
the result and follow the instructions on the pop-up window.
Appendix
93
Error message
Error messages may appear on the status screen of the 360 Round.
Check the error messages and follow the instructions
Error message Solution
•
Moisture detected. Make sure
port is dry.
•
Moisture detected. Unplug the
charger.
Moisture is detected in the multipurpose jack and
the power adapter jack. Disconnect the external USB
device or power adapter from the multipurpose jack
and power adapter jack and dry them thoroughly
before reconnecting them.
•
SLAVE BOOT ERROR
•
LV START ERROR
•
Slave LENS MODULE START
ERROR! DEVICE WILL OFF.
Check your 360 Round software version and update
your 360 Round to the latest software. If you cannot
solve this problem even after updating the 360
Round, contact a Samsung Service Center.
•
Camera too hot
•
Power off to cool down
The 360 Round’s temperature is too high to be used.
Turn off the 360 Round for more than an hour and
restart the it.
•
CARD MOUNT ERROR
•
No media
The memory card is not detected in the 360 Round.
Check whether the memory card is inserted
properly in the memory card slot. If you cannot
solve this problem and the memory card is inserted
correctly, try to change the memory card to a new
one.
•
SD CARD LOCKED!!!
Remove the memory card from the memory card
slot and switch the lock button to the unlock
position, and then reinsert it. If you cannot solve this
problem by doing the above, you can format it on
the 360 Round or computer. Refer to Formatting the
memory card.
Appendix
94
Error message Solution
•
SD CARD Error
•
Slow SD card. REC stopped.
The inserted memory card may not be supported
by the 360 Round. Change to a supported memory
card. Refer to Required specification for memory
card specifications.
•
Storage full
The memory card or SSD is full. Delete unnecessary
files or use another memory card or SSD.
•
Storage error
•
Can’t record
The connected SSD may not be supported by the
360 Round. Change to a supported SSD. Use an SSD
that supports USB 3.1 Super Speed (5 Gbps) with
exFAT file structure.
•
Connected device is not
supported.
The computer connected with the 360 Round does
not meet the minimum specifications. Refer to
Required specification for computer specifications.
•
Slow SSD REC stopped.
•
SSD too slow. (USB 2.0)
The Recording is stopped because the connected
SSD’s writing speed may be slower than the
required writing speed for recording with the 360
Round. Change to a supported SSD. Use an SSD that
supports USB 3.1 Super Speed (5 Gbps).
•
MIC INIT FAILED. TURN OFF
AUDIO.
Sound cannot be recorded due to a malfunction of
the internal microphone. Update your 360 Round to
the latest software. If you cannot solve this problem
even after updating the 360 Round, contact a
Samsung Service Center.
•
No update file in the SD card
There is no updated firmware to install on the 360
Round in the memory card. Save the latest firmware
in the memory card first before updating the 360
Round.
•
Invalid file. Update canceled.
The software update is canceled because the
firmware file is invalid. Save the correct firmware file
in the memory card again.
Appendix
95
Error messages may appear on the computer as a pop-up window.
Check the error messages and follow the instructions
Error message Solution
•
Can’t show preview. Camera
isn’t responding.
•
Can’t receive data from camera.
Check if camera is turned on or
if network cable is plugged in.
•
Can’t show preview. 360 Round
program isn’t working properly.
Check the network condition by confirming
whether the LAN cable is connected to the LAN
port correctly. If the LAN port is connected correctly,
check if the network speed is more than 1 Gbps.
Click
Help
→
Test network speed
on the menu bar
in the
360 Round
program. You can also run the
network connection test (PING test) after turning
the 360 Round on.
•
Allocation output context error.
•
Allocation output format error.
•
Couldn’t find codec.
•
Couldn’t find encoder.
•
Couldn’t open video codec.
If you are using H/W for
decoding, you can try to
change to S/W for decoding.
•
Couldn’t open audio codec.
•
Initialize resample error.
•
Initialize filter error.
•
Initialize decoder error.
The computer connected with the 360 Round does
not meet the minimum specifications. Refer to
Required specification for computer specifications.
•
Write header file error.
When you are broadcasting with your 360 Round,
click
Edit
on the menu bar, click
Settings
→
Live
broadcasting
, and then check the streaming
settings in the
360 Round
program. When you
are recording a video with your 360 Round, check
whether the output directory is read only or not.
Appendix
96
Error message Solution
•
Couldn’t allocate stream.
•
Couldn’t allocate video frame.
•
Couldn’t allocate picture.
•
Couldn’t allocate resample
context.
When you are broadcasting with your 360 Round,
click
Edit
on the menu bar, click
Settings
→
Live
broadcasting
, and then check the streaming
settings in the
360 Round
program. When you
are recording a video with your 360 Round, check
whether the storage device is correctly inserted
or whether the computer storage folder that you
entered exists or not, and then check if there is
enough memory available to save the recorded
video.
•
Can’t start live broadcasting.
Check your streaming URL and
try again.
Click
Edit
on the menu bar, click
Settings
→
Live
broadcasting
, and then check the streaming
settings, especially the URL settings in the
360
Round
program.
•
Can’t start recording. Check
your save path and try again.
•
Recording stopped. Check if
save path is correct.
Check whether the storage device is correctly
inserted or whether the computer storage folder
that you entered exists or not, and then check
if there is enough memory available to save the
recorded video.
•
Live broadcast stopped. Check
your network or the streaming
server.
Check the network condition by confirming
whether the LAN cable is connected to the LAN
port correctly. If the LAN port is connected correctly,
check if the network speed is more than 1 Gps.
Also, click
Edit
on the menu bar, click
Settings
→
Live broadcasting
, and then check the streaming
settings in the
360 Round
program.

Appendix
97
Error message Solution
•
Can’t find GTX 1080 GPU.
•
Cuda initialization error.
•
Cuda Ctx create error.
•
cuCtxPopCurrent error.
•
cuvidCtxLockCreate error.
•
Error creating video parser.
•
cuStreamCreate error.
•
Error creating video decoder.
•
cuvidCtxLockDestroy error.
•
WARNING: cuCtxDestroy error.
Check the GPU (Graphics Processing Unit) in your
computer’s hardware. Check whether your graphic
card is latest one or not and needs to be upgraded.
If there is no problem with your GPU, close other
programs that use the GPU, such as video player,
and restart your computer.
•
Unusual memory usage
detected. This may be caused
by GPU load too high. Check if
stitching resolution too high
or latest graphic card driver
version installed and try again.
Unusual memory usage detected. The GPU is
overloaded so that the current task cannot be
performed by your computer. Check whether the
stitching resolution is too high for your current
graphic card to do the task.
•
Unusual memory usage
detected. This may be caused
by the network or a streaming
server problem. Check
network’s condition or reduce
video bitrate and try again.
The network or a streaming server has a problem.
Check the network condition. Alternatively, click
Edit
on the menu bar, click
Settings
→
Live
broadcasting
, and then reduce the
Bitrate
in the
360 Round
program.
•
Unusual memory usage
detected. This may be caused
by low storage speed. Check
storage performance.
The connected SSD’s writing speed may be
slower than the required writing speed. Change
a supported SSD. Use an SSD that supports USB
3.1 Super Speed (5 Gbps). When you use the
memory card, the inserted memory card may
not be supported by the 360 Round. Change to
the available memory card. Refer to Required
specification for memory card specifications.
Appendix
98
Error message Solution
•
No audio output. Check that
DirectX is installed correctly.
Restart your computer and install the DirectX
program to play the 5.1 ch audio.
•
Your camera temporarily
stopped working. Wait a few
seconds and try again.
•
Your camera temporarily
stopped recording. Wait a few
seconds and try again.
•
Your camera temporarily
stopped broadcasting. Wait a
few seconds and try again.
•
Your camera temporarily
stopped recording and
broadcasting. Wait a few
seconds and try again.
Wait until the 360 Round is ready to start recording a
video or broadcasting, then the preview screen will
appear automatically.
•
Your camera’s too hot. Wait for
it to cool down, then try again.
•
Broadcasting stopped because
the camera’s too hot. Wait for it
to cool down, then try again.
•
Recording stopped because the
camera’s too hot. Wait for it to
cool down, then try again.
The 360 Round’s temperature is too high to be used.
Turn off the 360 Round for more than an hour and
restart it.
•
Your camera’s restarting to cool
down. It will reconnect soon.
The 360 Round will be rebooted automatically to
cool itself down. After it has rebooted, try to use it
again.
Appendix
99
Error message Solution
•
The SD card is locked. Remove
the SD card, slide the lock
switch to the unlock position,
and then reinsert it into your
camera.
The inserted memory card is locked. Remove the
memory card from the memory card slot and switch
the lock button to the unlock position, and then
reinsert it. If you cannot solve this problem by doing
the above, you can format it on the 360 Round or
computer. Refer to Formatting the memory card.
•
Couldn’t read/write SD card.
This may be caused by a
damaged or incompatible SD
card.
The inserted memory card may have a problem.
Change to a supported memory card.
•
There isn’t enough space on
your camera. Free up some
space, then try again.
There is not enough memory on your memory card.
Delete unnecessary files or change the memory card
to a new one. Refer to Deleting videos for removing
video files from your memory card.
•
There’s no enough space on
your computer. Free up some
space, then try again.
There is not enough memory in the storage folder.
Delete unnecessary files in the folder or change the
storage folder. Refer to Deleting videos for removing
video files from your memory card.
•
There’s a GPU memory overflow
error. Select another GPU and
try again.
Change the GPU. Click
Edit
on the menu bar, click
Settings
→
GPU selection
, and then select another
GPU for each action
in the
360 Round
program.
•
There’s no enough GPU
memory. Close any other
applications and try again.
Close other programs that use the GPU such as a
video player and restart your computer.
•
Error occur when SLS recording,
failed to write file to disk.
The inserted memory card may not be supported
by the 360 Round. Save the recorded video on your
computer.
Appendix
100
Error message Solution
•
Internet connection is slow.
Network speed need to be
1Gbps or faster.
Check the network condition by confirming
whether the LAN cable is connected to the LAN
port correctly. If the LAN port is connected correctly,
check if the network speed is more than 1 Gps. Click
Help
→
Test network speed
on the menu bar in the
360 Round
program, and follow the solutions below
if the test result is not good.
•
On your computer, launch the
Control Panel
,
click
Network and Internet
→
Network and
Sharing Center
→
Change adapter settings
, and
then right click the network adapter connected to
your 360 Round. Click
Status
and check whether
the network speed next to
Speed
is more than
1 Gbps.
•
You can also disconnect the LAN cable from both
your computer and 360 Round and reconnect
them.
•
Export as single stitched video
file error
The recorded video (SLS file) is too short to export.
Select
Export as multiple video files
when you
export the video in the
360 Round Viewer
program.
•
Output folder does not exist.
Select another storage folder. Click
Edit
on the
menu bar, click
Settings
→
General
, and then
click the path next to PC storage to specify another
storage folder in the
360 Round
program.
•
Not enough space available for
exporting file
There is not enough capacity on your computer’s
hard disk. Delete unnecessary files and export the
video again.
•
The file does not exist!
Check if the file still exists or already has been
deleted and then try again.

Appendix
101
Safety information
Follow the warning information provided below to prevent incidents
such as fire or explosion
•
Do not expose the 360 Round to physical impact or damage.
•
Use only manufacturer-approved accessories and supplies.
•
Prevent the power adapter jack, LAN port, etc. from contacting conductive elements,
such as metal or liquids.
•
If any part of the 360 Round is cracked or broken, stop using the 360 Round immediately.
Follow the warnings below to prevent injury to people or damage to
the 360 Round
•
Do not allow children or animals to chew or suck the 360 Round.
•
The 360 Round can be used in locations with an ambient temperature of 0 °C to 35 °C.
You can store the 360 Round at an ambient temperature of -20 °C to 50 °C. Using or
storing the 360 Round outside of the recommended temperature ranges may damage
the 360 Round.
•
Do not use your 360 Round in a hot environment or near fire.
•
Use only the power adapter supplied with the 360 Round. Using an unapproved adapter
may cause an electric shock.
•
When connecting the 360 Round to the tripod or fixing it to a high position, make sure to
tighten the connecting part.
•
Do not use your 360 Round outdoor during a thunderstorm.
Copyright
Copyright © 2017 Samsung Electronics
This manual is protected under international copyright laws.
No part of this manual may be reproduced, distributed, translated, or transmitted in any form
or by any means, electronic or mechanical, including photocopying, recording, or storing
in any information storage and retrieval system, without the prior written permission of
Samsung Electronics.
Trademarks
•
SAMSUNG and the SAMSUNG logo are registered trademarks of Samsung Electronics.
•
All other trademarks and copyrights are the property of their respective owners.