User manual Flycam
Product Profile
Preparing the Aircraft
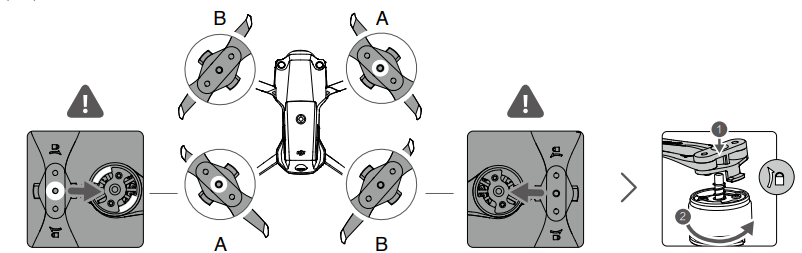
All aircraft arms are folded before the aircraft is packaged. Follow the steps below to unfold the aircraft.
- Remove the gimbal protector from the camera.
- Unfold the front arms, and then unfold the rear arms

- Attach the gimbal protector when not in use
- Attach the propellers with marks to the motors with marks. Press the propeller down onto the motors and turn until it is secure. Attach the other propellers to the unmarked motors. Unfold all the propeller blades
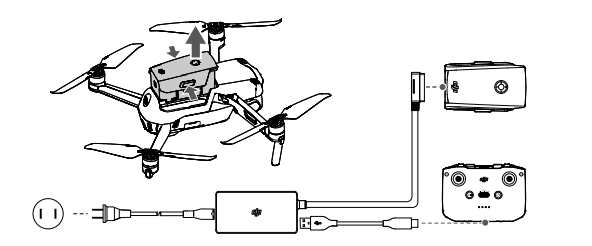
- All Intelligent Flight Batteries are in hibernation mode before delivery to ensure safety. Use the provided charger to charge and activate the Intelligent Flight Batteries for the first time. It takes approximately 1 hour and 35 minutes to fully charge an Intelligent Flight Battery.
Unfold the front arms before unfolding the rear arms.
Make sure the gimbal protector is removed and all arms are unfolded before powering on the aircraft. Otherwise, it may affect the aircraft self-diagnostics.
Preparing the Remote Controller
- Remove the control sticks from their storage slots on the remote controller and screw them into place
- Pull out the mobile device holder. Choose an appropriate remote controller cable based on the type of mobile device. A Lightning connector cable, Micro USB cable, and USB-C cable are included in the packaging. Connect the end of the cable with the phone icon to your mobile device. Make sure the mobile device is secured
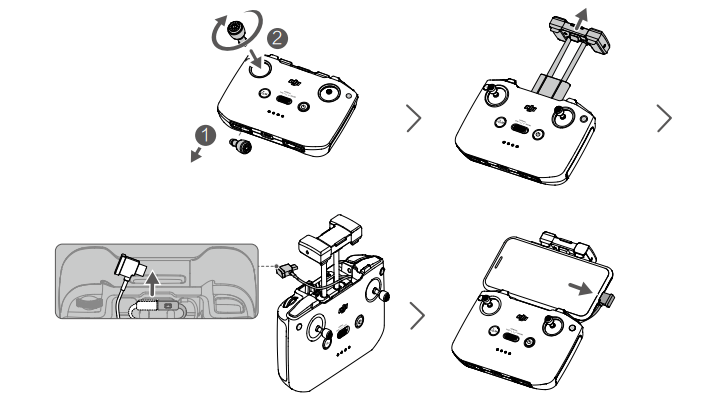
If a USB connection prompt appears when using an Android mobile device, select the option to charge only. Otherwise, it may Otherwise, it may fail to connect.
Aircraft Diagram
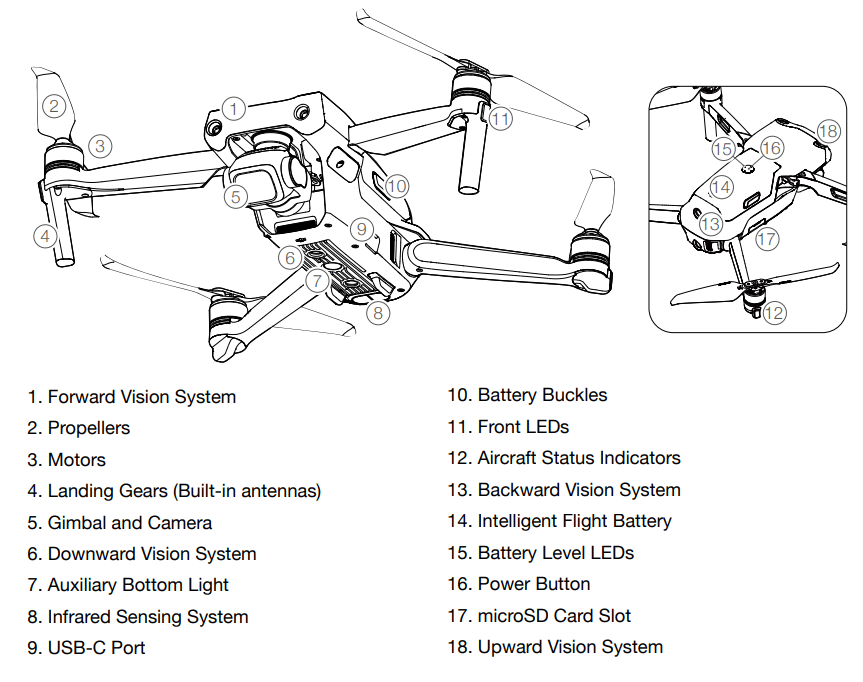
Aircraft
Aircraft Status Indicators
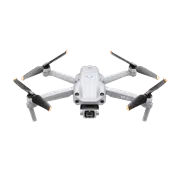
DJI Air 2S has front LEDs and aircraft status indicators
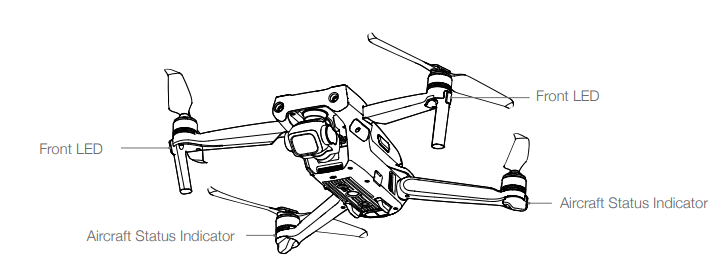
- When the aircraft is powered on but the motors are not running, the front LEDs glow solid red to displaythe orientation of the aircraft. When the aircraft is powered on but the motors are not running, theaircraft status indicators display the status of the flight control system. Refer to the table below for moreinformation about the aircraft status indicators.
- After the motor starts, the front LEDs blink green and the aircraft status indicators blink red and greenalternately.
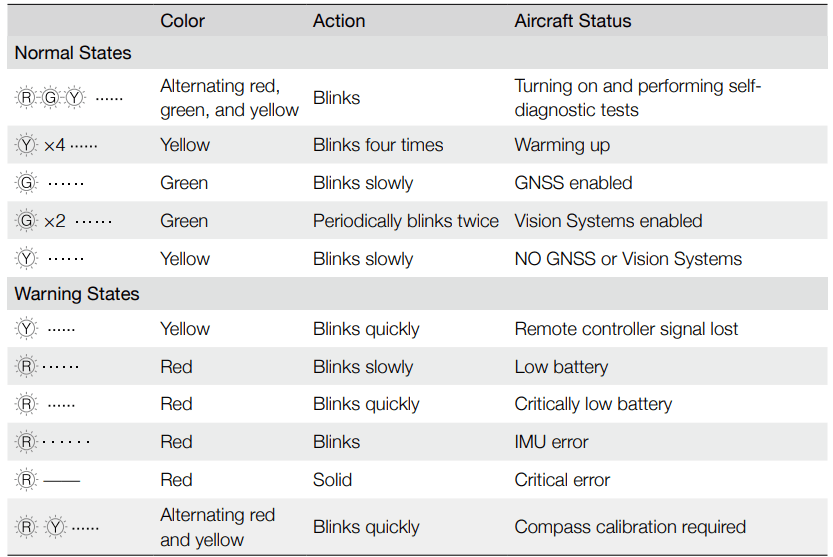
Aircraft Status Indicator States
Return to Home
Landing Protection
Landing Protection will activate during Smart RTH.
- During Landing Protection, the aircraft will automatically detect and carefully land on suitable ground.
- If the ground is determined unsuitable for landing, DJI Air 2S will hover and wait for pilot confirmation.
- If Landing Protection is not operational, DJI Fly will display a landing prompt when the aircraft descends below 0.5 m. Pull down on the throttle stick or use the auto landing slider to land.
Landing Protection activates during Low Battery RTH and Failsafe RTH. The aircraft performs as follows:
During Low Battery RTH and Failsafe RTH, the aircraft hovers at 0.5 m above the ground and waits for the pilot to confirm it is suitable to land. Pull down on the throttle for one second or use the auto landing slider in the app to land. Landing Protection activates and the aircraft performs the steps listed above.
Precision Landing
The aircraft automatically scans and attempts to match the terrain features below during RTH. When the current terrain matches the Home Point terrain, the aircraft will land. A prompt will appear in DJI Fly if the terrain match fails.
- Landing Protection is activated during Precision Landing.
- The Precision Landing performance is subject to the following conditions:
- The Home Point must be recorded upon takeoff and must not be changed during flight. Otherwise, the aircraft will have no record of the Home Point terrain features.
- During takeoff, the aircraft must ascend at least 7 m before flying horizontally.
- The Home Point terrain features must remain largely unchanged.
- The terrain features of the Home Point must be sufficiently distinctive. Terrain such as snow-covered areas are not suitable.
- The lighting conditions must not be too light or too dark.
- The following actions are available during Precision Landing:
- Press the throttle stick down to accelerate landing.
- Move the control sticks in any direction to stop Precision Landing. The aircraft will descend vertically after the control sticks are released
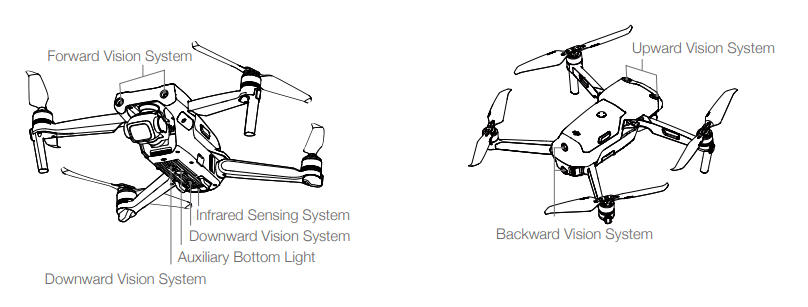
Vision Systems and Infrared Sensing System
- DJI Air 2S is equipped with both an Infrared Sensing System and Forward, Backward, Upward, and downward Vision Systems.
- The Forward, Backward, Upward, and Downward Vision Systems consist of two cameras each and the Infrared Sensing System consists of two 3D infrared modules.
- The Downward Vision System and Infrared Sensing System helps the aircraft maintain its current position, hover in place more precisely, and to fly indoors or in other environments where GNSS is unavailable.
- In addition, the Auxiliary Bottom Light located on the underside of the aircraft improves visibility for the Downward Vision System in weak light conditions
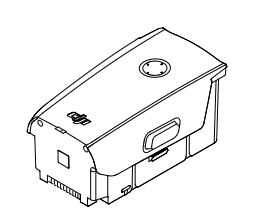
Intelligent Flight Battery
- The DJI Air 2S Intelligent Flight Battery is an 11.55 V, 3500 mAh battery with smart charging and discharging functionality.
Battery Features
- Battery Level Display: The LED indicators display the current battery level.
- Auto-Discharging Function: To prevent swelling, the battery automatically discharges to 96% of the battery level when it is idle for one day, and automatically discharges to 60% of the battery level when it is idle for five days. It is normal to feel moderate heat being emitted from the battery during the discharging process.
- Balanced Charging: During charging, the voltages of the battery cells are automatically balanced.
- Overcharge Protection: The battery stops charging automatically once fully charged.
- Temperature Detection: In order to protect itself, the battery only charges when the temperature is between 41° and 104° F (5° and 40° C).
- Overcurrent Protection: The battery stops charging if an excess current is detected.
- Over-Discharge Protection: Discharging stops automatically to prevent excess discharge when the battery is not in use. Over-discharge protection is not enabled when the battery is in use
- Short Circuit Protection: The power supply is automatically cut if a short circuit is detected.
- Battery Cell Damage Protection: DJI Fly displays a warning prompt when a damaged battery cell is detected.
- Hibernation Mode: The battery switches off after 20 minutes of inactivity to save power. If the battery level is less than 5%, the battery enters Hibernation mode to prevent over-discharge after being idle for six hours. In Hibernation mode, the battery level indicators do not illuminate. Charge the battery to wake it from hibernation.
- Communication: Information about the voltage, capacity, and current of the battery is transmitted to the aircraft.
Flight
Once pre-flight preparation is complete, it is recommended to hone your flight skills and practice flyingsafely. Make sure that all flights are carried out in an open area. Refer to the Remote Controller and DJIFly sections for information about using the remote controller and the app to control the aircraft
Flight Environment Requirements
- Do not use the aircraft in severe weather conditions including wind speeds exceeding 10.7 m/s, snow, rain, and fog.
- Only fly in open areas. Fly in open areas. Tall structures and large metal structures may affect the accuracy of the onboard compass and GNSS system. It is recommended to keep the aircraft at least 5 m away from structures.
- Avoid obstacles, crowds, high-voltage power lines, trees, and bodies of water. It is recommended to keep the aircraft at least 3 m above water.
- Minimize interference by avoiding areas with high levels of electromagnetism such as locations near power lines, base stations, electrical substations, and broadcasting towers.
- Aircraft and battery performance is subject to environmental factors such as air density andtemperature. Be careful when flying 10,464 ft (5,000 m) or more above sea level, since battery and aircraft performance may be reduced.
- Aircraft cannot use GNSS within the polar regions. Use the Downward Vision System when flying in such locations.
- If taking off from a moving surface, such as a moving boat or vehicle, fly with caution.
Flight Limits and GEO Zones
- Unmanned aerial vehicle (UAV) operators should abide by the regulations from self-regulatory organizations such as the International Civil Aviation Organization, the Federal Aviation Administration, and local aviation authorities. For safety reasons, flight limits are enabled by default to help users operate this aircraft safely and legally. Users can set flight limits on height and distance.
- Altitude limits, distance limits, and GEO zones function concurrently to manage flight safety when GNSS is available. Only altitude can be limited when GNSS is unavailable.
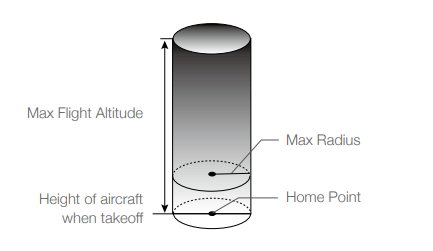
Flight Altitude and Distance Limits
- The flight altitude and distance limits can be changed in DJI Fly. Based on these settings, the aircraft will be in a restricted cylinder, as shown below:
GEO ZonesAll
- GEO zones are listed on the DJI official website at http://www.dji.com/flysafe. GEO zones are divided into different categories and include locations such as airports, flying fields where manned aircraft operate at low altitudes, borders between countries, and sensitive locations such as power plants.
- There will be prompts in the DJI Fly app to fly in GEO zones
Pre-Flight Checklist
- Make sure the remote controller, mobile device, and Intelligent Flight Battery are fully charged.
- Make sure the Intelligent Flight Battery and the propellers are mounted securely.
- Make sure the aircraft arms are unfolded.
- Make sure the gimbal and camera are functioning normally.
- Make sure that there is nothing obstructing the motors and that they are functioning normally.
- Make sure that DJI Fly is successfully connected to the aircraft.
- Make sure that the camera lens and Vision System sensors are clean.
- Use only genuine DJI parts or parts certified by DJI. Unauthorized parts or parts from non-DJIcertified manufacturers may cause system malfunctions and compromise safety
Auto Takeoff/Landing
Auto Takeoff
Use auto takeoff when the aircraft status indicator blinks green.
- Launch DJI Fly and enter the camera view.
- Complete all steps in the pre-flight checklist.
- Tap
 . If conditions are safe for takeoff, press and hold the button to confirm.
- The aircraft will take off and hover 1.2 m above the ground.
Auto Landing
Use auto landing:
- Tap
 . If conditions are safe to land, press and hold the button to confirm.
- Auto landing can be cancelled by tapping

- If the Vision System is working normally, Landing Protection will be enabled.
- Motors stops after landing
Starting/Stopping the Motors
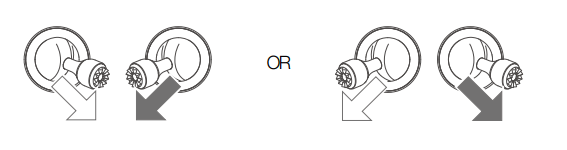
Starting the Motors
- A Combination Stick Command (CSC) is used to start the motors. Push both sticks to the bottom inner or outer corners to start the motors. Once the motors have started spinning, release both sticks simultaneously
Stopping the Motors
There are two methods to stop the motors.
- Method 1: When the aircraft has landed, push and hold the left stick down. The motors will stop after three seconds.
- Method 2: When the aircraft has landed, push the left stick down and perform the same CSC that was used to start the motors. The motors will stop immediately. Release both sticks once the motors have stopped

Stopping the Motors Mid-Flight
- Stopping motors mid-flight will cause the aircraft to crash. The motors should only be stopped mid-flight in an emergency situation such as if a collision has occurred or if the aircraft is out of control and is ascending or descending very quickly, rolling in the air, or if a motor has stalled. To stop the motors mid-flight use the same CSC that was used to start the motors. The default setting can be changed in DJI Fly
Flight Test
Takeoff/Landing Procedures
- Place the aircraft in an open, flat area with the aircraft status indicator facing toward you.
- Turn on the aircraft and the remote controller.
- Launch DJI Fly and enter the camera view.
- Wait until the aircraft status indicators blink green indicating that the Home Point has been recorded and it is now safe to fly.
- Gently push the throttle stick to take off or use auto-takeoff.
- Pull the throttle stick or use auto-landing to land the aircraft.
- After landing, push the throttle stick down and hold. The motors stop after three seconds.
- Turn off the aircraft and remote controller.
Video Suggestions and Tips
- The pre-flight checklist is designed to help you fly safely and to ensure that you can shoot video during flight. Go through the full pre-flight checklist before each flight.
- Select the desired gimbal operation mode in DJI Fly.
- Use Normal or Cine mode to record video.
- DO NOT fly in bad weather conditions such as when it is raining or windy.
- Choose the camera settings that best suit your needs.
- Perform flight tests to establish flight routes and to preview scenes
Make sure to place the aircraft on a flat and steady surface before takeoff. DO NOT takeoff from yourpalm or while holding the aircraft with your hand
It is important to understand the basic flight guidelines for the safety of both youand those around you.DO NOT forget to read the disclaimer and safety guidelines