Ed : Rev :
Cod :
INSTRUCTION
01/20
GRLDEVEFTFK13000
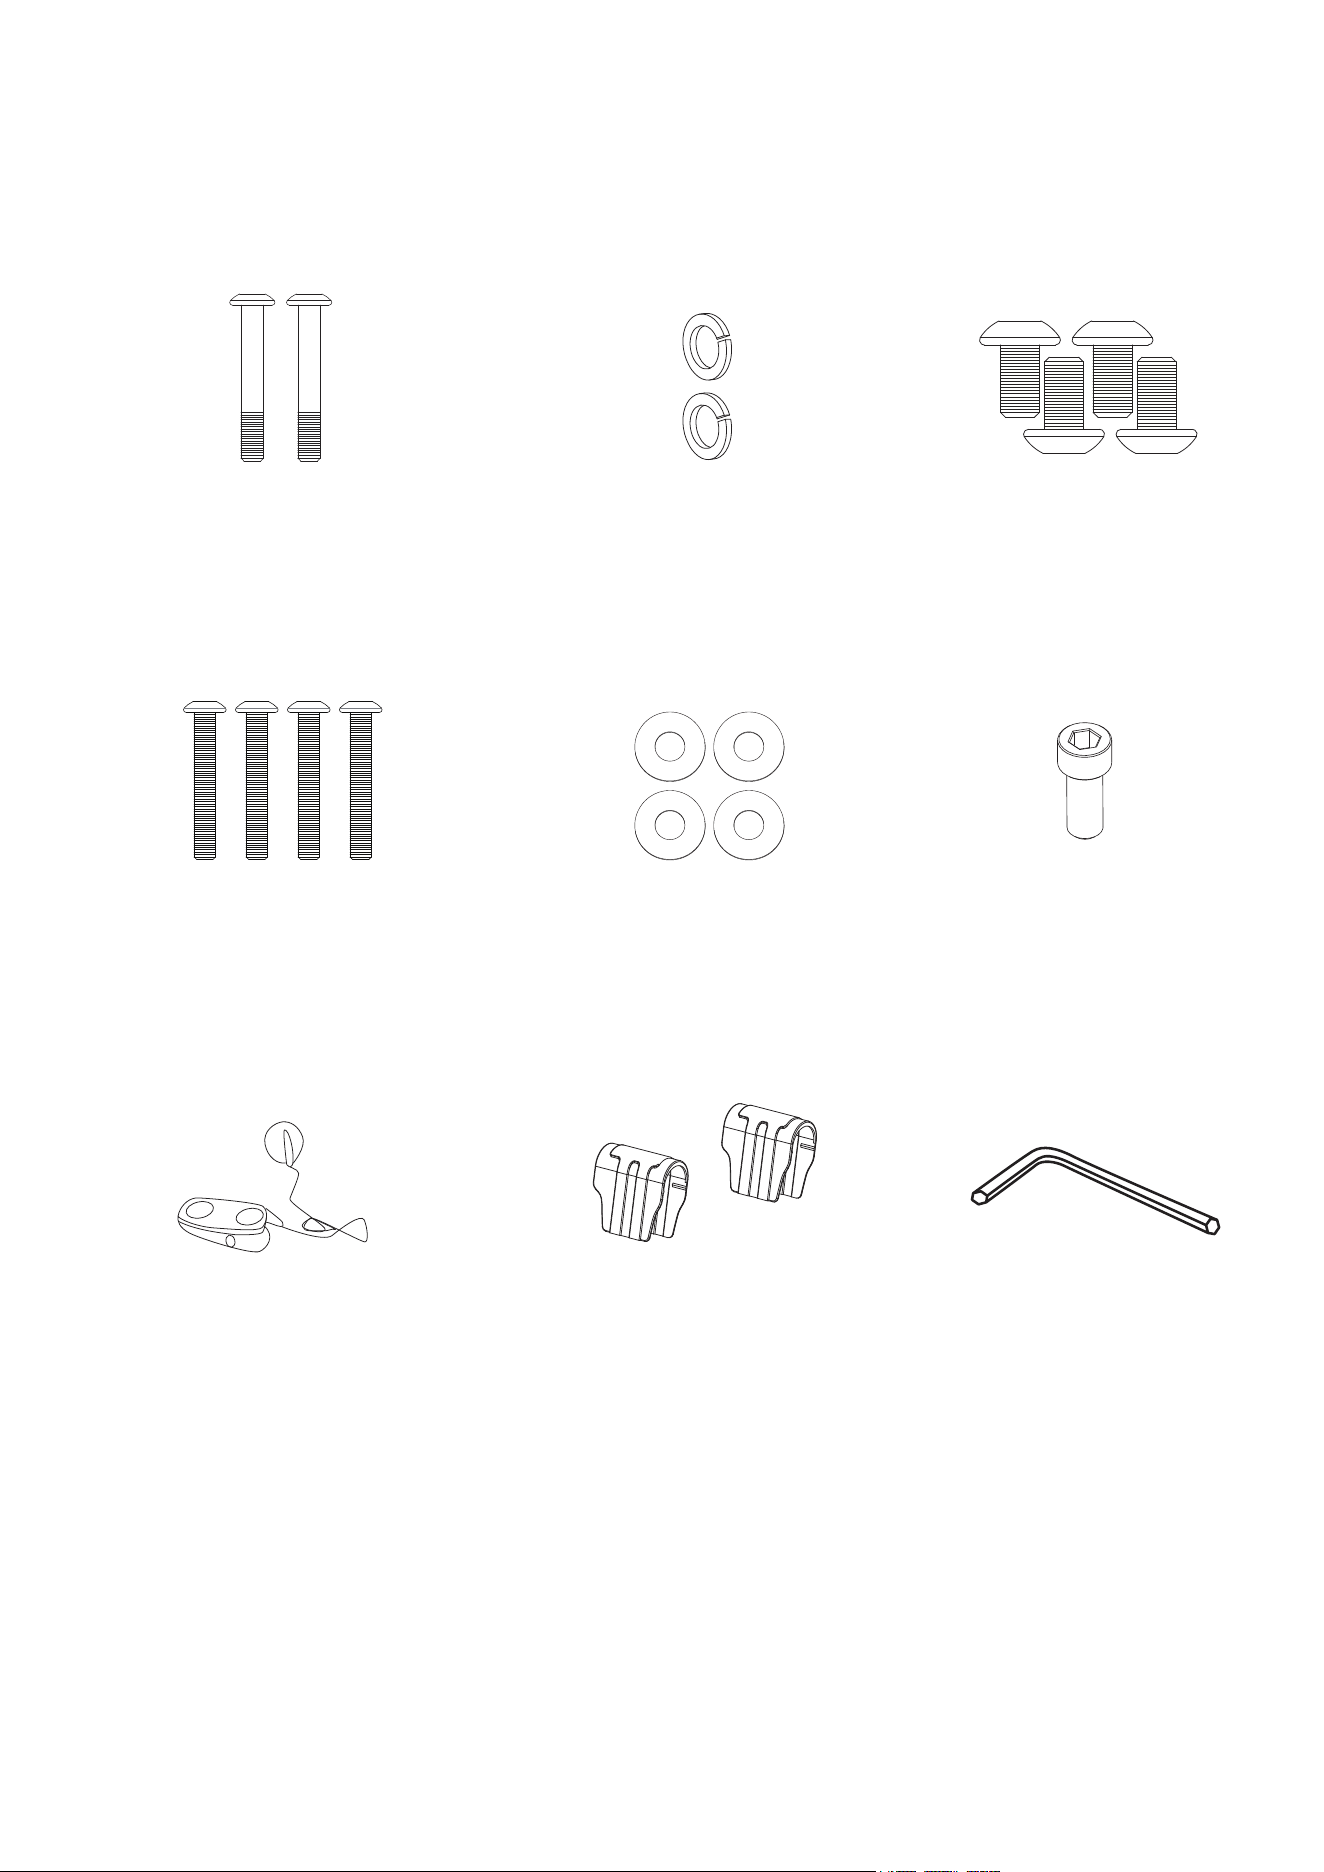
Safety Tether Key
X 1
Hexagon Socket Oval
Head Bolt M8x50
X2
Spring Washer M8
X2
Hexagon Socket Oval
Head Bolt M8x55
4 PCS
Curve Washer M8
4 PCS
Hexagon Socket Round
Head Cap Bolt M6x20
1 PC
M8x16 Allen Bolt
X 4
S1 S2
S6S4 S5
S7 S8 S9
HARDWARE LIST & ASSEMBLY COMPONENT
S3
Allen Wrench
Multi Hex Tool with
Phillips Screwdriver
X1
X 1
ASSEMBLY INSTRUCTIONS
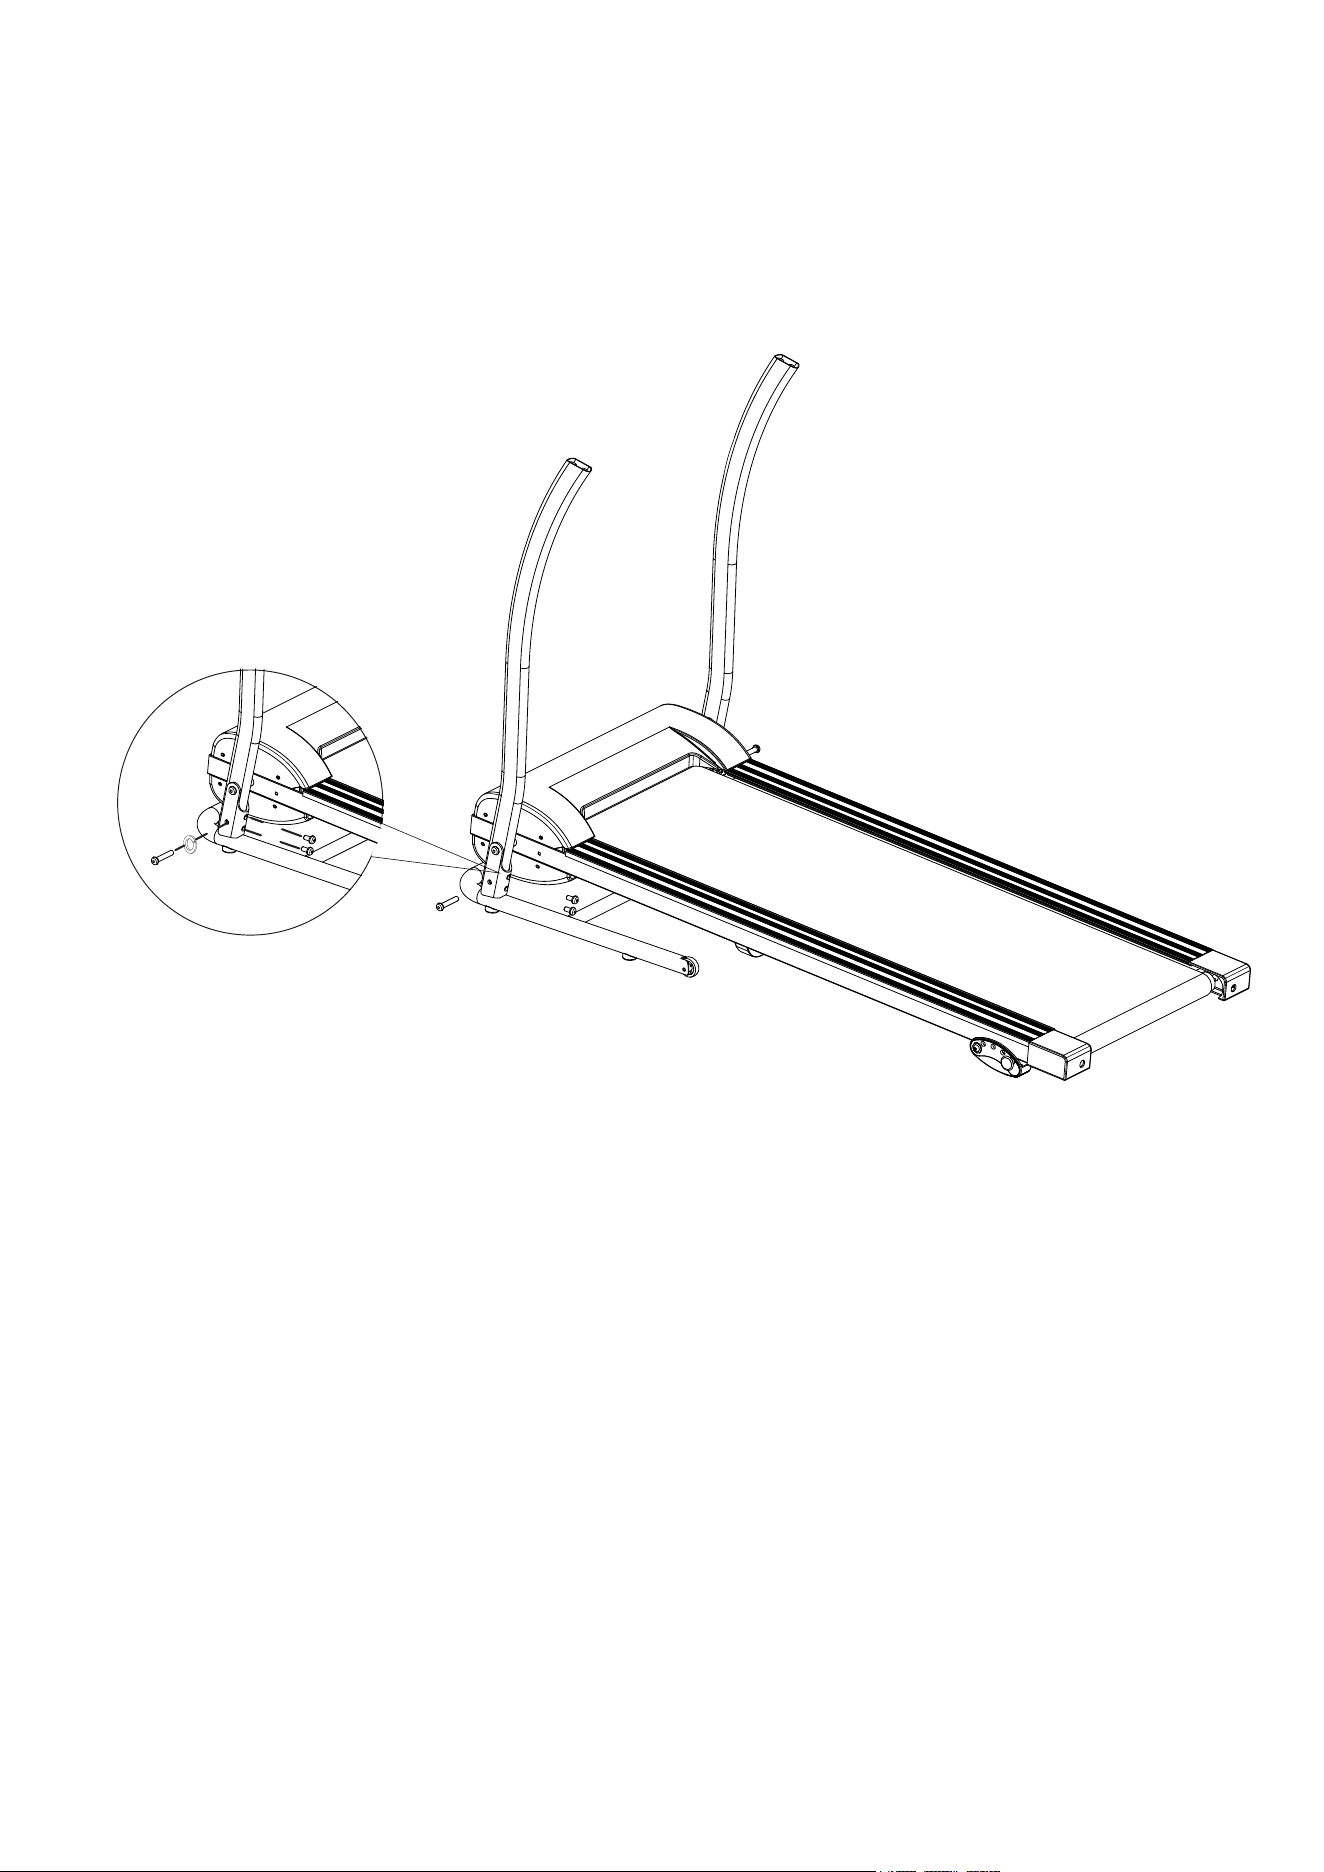
STEP 1
It is recommended to have a second person assist with this step. Lift both Right and Left
Handlebar Support Tubes up. One person should hold the both Right and Left
Handlebar Support Tubes in place while the other person tightens the bolts.
A. Use two M8x50 Hexagon Socket Oval Head Bolts (S1) and two Spring Washer M8 (S2)
to secure both Left/Right Handlebar Support Tubes onto the Base Frame .
B. Use four M8x16 Hexagon Socket Oval Head Bolts (S3) to secure both Left/Right
Handlebar Support Tubes onto the Base Frame . Semi-tighten bolts with the Allen Wrench
provided.
NOTE: DO NOT FULLY TIGHTEN BOLTS IN STEP 1 UNTIL STEP 2 IS COMPLETED.
S2
S3
S1
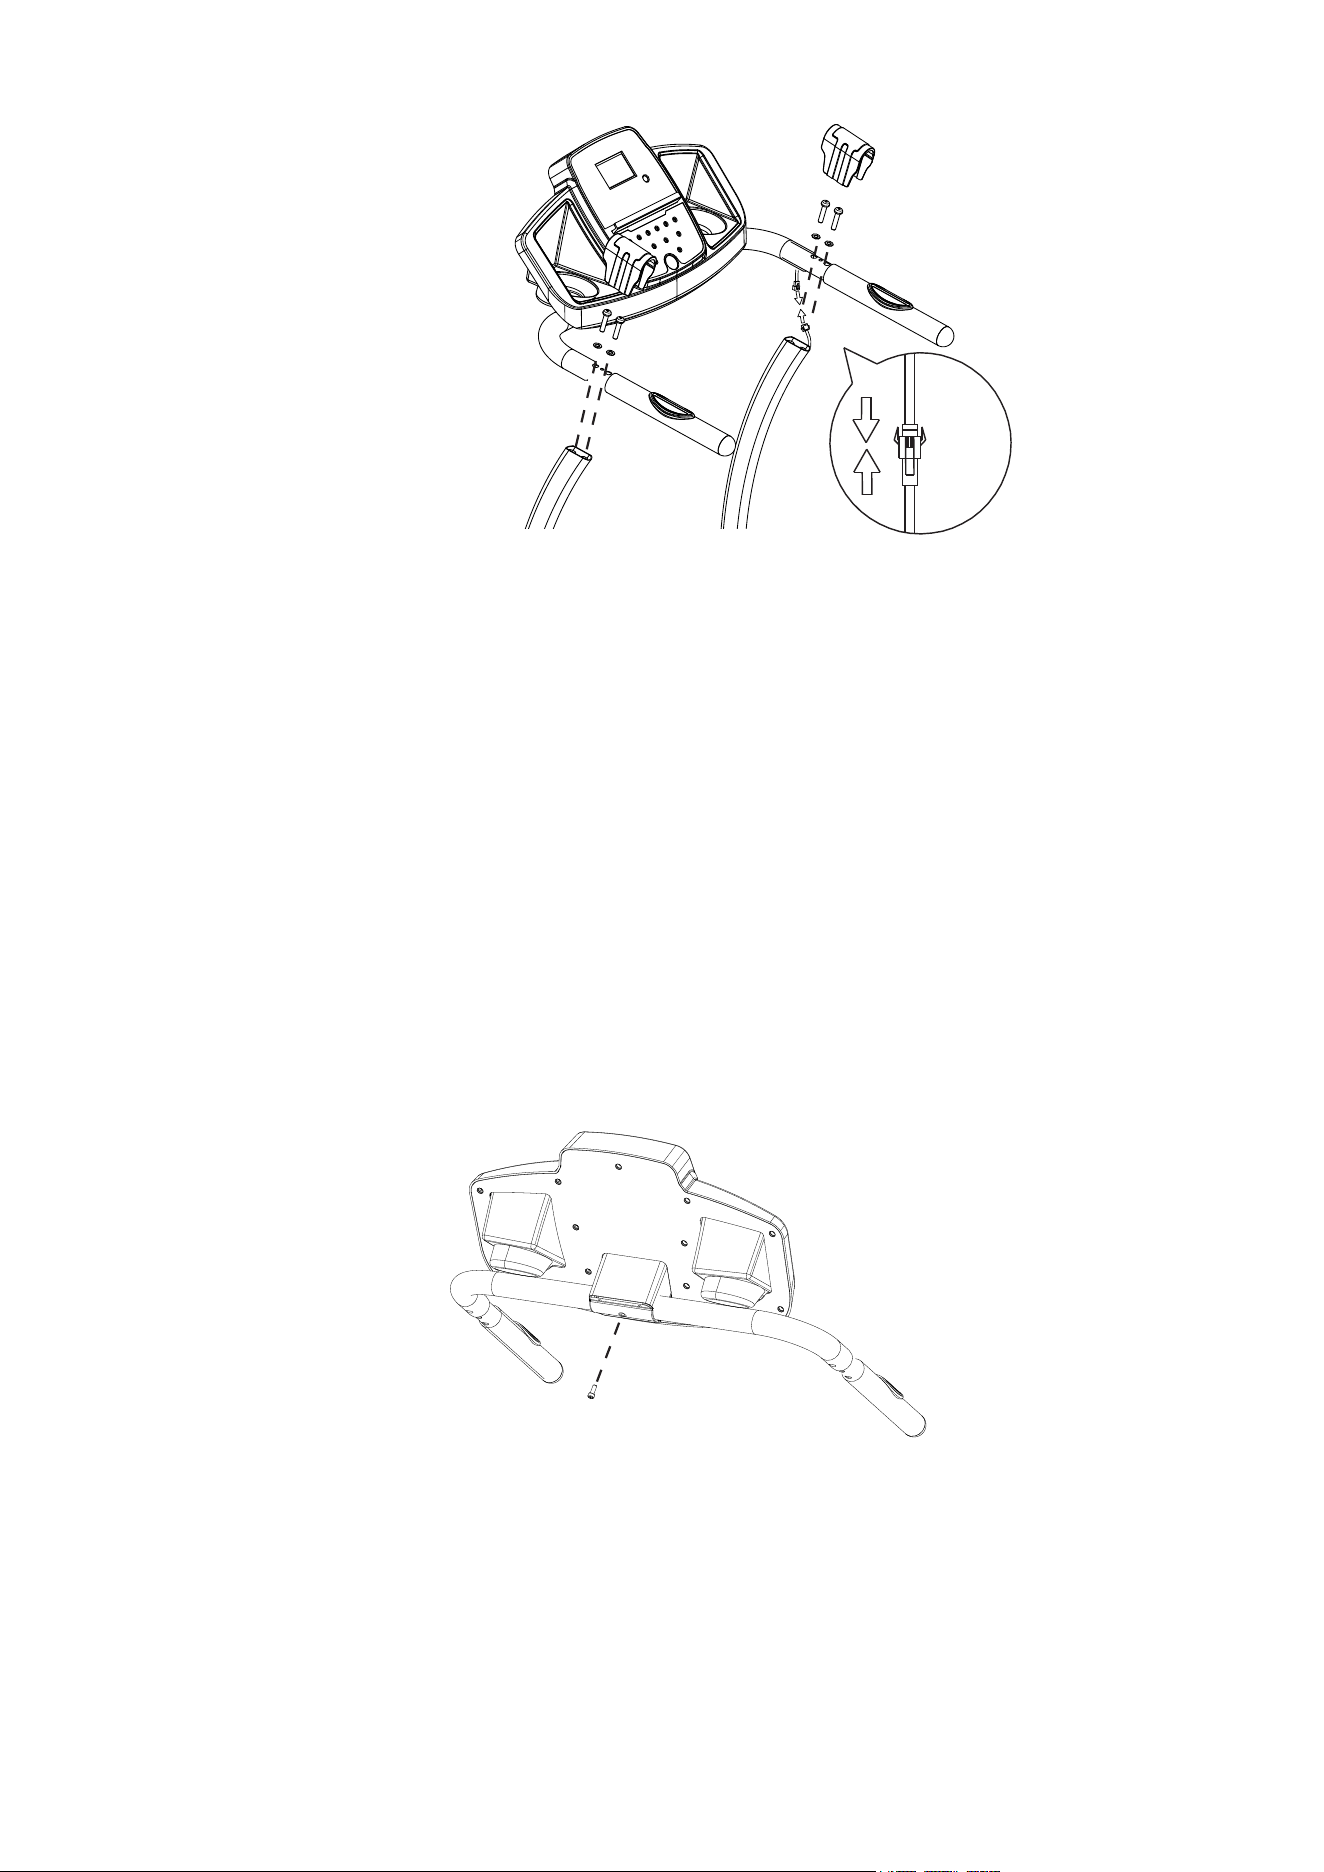
STEP 2
A.Connect the cable that comes fro the Computer to the Main Control Cable that
comes from the Right Handlebar Support Tube.
B.Slide the Handlebar onto the both Left/Right Handlebar Support Tubes . Secure
the Handlebar onto the both Left/Right Handlebar Support Tubes with four
M8x55 Hexagon Socket Oval Head Bolts (S4) and four M8 Curve Washers (S5). Tighten
bolts with the 5 mm Allen Wrench provided.
C.Install both Handlebar Plastic Covers (S8) onto the Handlebar.
D.Place the Safety Tether Key (S7) onto the Computer.
IMPORTANT: While sliding the Handlebar Bracket onto the Right and Left Handlebar
Support Tubes make sure the cables are installed inside the Right Handlebar
Support Tube and pay attention not to pinch the cables.
STEP 3
Turn the Computer up or down to align the bolt hole on the Handlebar. Lock the
Computer in place by tightening a M6x20 Hexagon Socket Round Head Cap Bolt (S6).
Tighten bolt with the Allen Wrench provided.
NOW PLEASE FULLY TIGHTEN ALL BOLTS INSTALLED IN STEP 1 .
S6
S5
S4
S5
S4
S8

OPERATING THE COMPUTER
Flip the Master Power Switch that is located at the front of the treadmill to the ON position.
Before beginning a workout session ensure that the Safety Tether Key is properly placed
onto the Computer Console and the Safety Clip is securely attached to an article of your
clothing.
NOTE: Always stand on the side rails when you start the treadmill,
never start the treadmill while you are standing on the running belt.
QUICK START:
Press the START button on the computer to start exercise, the LCD window will
countdown 3 seconds with the LCD showing "3-2-1" before the running belt starts moving.
The running belt starts moving with an initial speed of 0.8 KPH. Always allow the
treadmill to reach a speed of 0.8 KPH before stepping on to the running belt. You may
press the SPEED∧ or SPEED∨ button on the computer console or handlebar to
increase or decrease the running speed during exercise. The split window of SPEED will
display your current running speed. The speed range is from the min
imum 0.8 KPH to
the maximum 12.0 KPH. You may also press one of the INSTANT SPEED buttons (2 / 4
/ 6 / 8 / 10) on the computer console and the split window of SPEED will display the
speed that you have pressed and the running speed will change to 2 KPH, 4 KPH, 6 KPH,
8 KPH, or 10 KPH respectively. The split window of TIME will display your elapsed
workout time in minutes and seconds. The split window of DIST. (DISTANCE) will display
the accumulative distance travelled during workout. The sp
lit window of CAL.
(CALORIES) will display the total accumulated calories burned during workout. The split
window of PULSE will display your current heart rate in beats per minute (BPM). To
activate, grip the hand pulse sensors on both handlebars during exercise and the pulse
will display after 4-5 seconds. For a more accurate reading, grip pulse sensors with both
hands. During training, you may press the STOP button on the computer console to stop
the treadmill running at any time, or pull out the safety tether key to stop the treadmill
running.
FUNCTION BUTTONS:
START:
Press the START button to start training on different training mode.
STOP:
Press the STOP button to stop training on different training mode.

PROG (PROGRAM):
Press the PROG button to select the pre-set training program (P01-P12) mode before
training.
MODE:
Press the MODE button to select different functions (time or distance) for setting exercise
goals in manual program mode before training.
SPEED∧ (SPEED UP):
Press the SPEED∧ button to make upward adjustments for pre-setting target training time
or distance in manual program mode before training.
Press the SPEED∧ button to make upward adjustments for pre-setting target training time
in pre-set t
raining program (P01-P12) mode before training.
Makes speed adjustments during all training periods on different training modes.
The speed range is from 0.8 KPH to 12.0 KPH.
SPEED∨ (SPEED DOWN):
Press the SPEED∨ button to make backward adjustments for pre-setting target training
time or distance in manual program mode before training.
Press the SPEED∨ button to make backward adjustments for pre-setting target training
time in pre-set training program (P01-P12) mode before training.
Makes speed adjustments duri
ng all training periods on different training modes.
The speed range is from 0.8 KPH to 12.0 KPH.
INSTANT SPEED (2 / 4 / 6 / 8 / 10):
Used to reach desired speed more quickly.
PULSE/cal:
During exercise mode, press the PULSE/cal button to switch display the pulse and calories
values on the split window of PULSE/CAL..
DISPLAY FUNCTIONS:
TIME: Displays your elapsed workout time in minutes and seconds. Press the START
button on the computer to begin exercising, the LCD window will countdown 3 seconds
with the LCD showing "3-2-1" before the running belt starts moving. The running belt
starts moving with an initial speed of 0.8 KPH. You may press the SPEED∧ or SPEED∨
button on the computer console or handlebar to increase or decrease the running speed
during exercise. Time starts counting up.
SPEED: Displays the current speed from the minimum 0.8 KPH to the maximum
12.0 KPH. You may increase or decrease the speed by pressing the SPEED∧ or
SPEED∨ button on the computer console or handlebar.
DIST. (DISTANCE): D
isplays the accumulative distance travelled during workout. Press
the START button on the computer to begin exercising, the LCD window will countdown 3
seconds with the LCD showing "3-2-1" before the running belt starts moving. The running

belt starts moving with an initial speed of 0.8 KPH. You may press the SPEED∧ or
SPEED∨ button on the computer console or handlebar to increase or decrease the
running speed during exercise. Distance starts counting up.
CAL. (CALORIES): Displays the total calories burned during your workout. Press the
START button on the computer to begin exercising, the LCD window will countdown 3
seconds with the LCD showing "3-2-1" before the running belt starts moving. The running
belt starts moving with an initial speed of 0.8 KPH. You may press the SPEED∧ or
SPEED∨button on the computer console or handlebar to increase or decrease the
running speed during exercise. Calorie starts counting up. (This data is a rough guide for
comparison of different exercise sessions and should not be used in medical treatment).
PULSE: Displays your current heart rate in beats per minute (BPM). To activate, grip the
hand pulse sensors during exercise and the pulse will display after 2-5 seconds. For a
more accurate reading, grip pu
lse sensors with both hands.
TRAINING IN MANUAL PROGRAM MODE:
You may pre-set target TIME or DISTANCE in STOP mode before training. Only one of
the functions can be pre-set.
To set TIME press the MODE button on the computer console until you see the split
window of TIME begin blinking. Press the SPEED∧ or SPEED∨ button on the computer
console or handlebar to change the setting. Each increment is 1 minute. The pre-set
target time range is from 5:00 to 99:00 minutes. Once you pre-set target tim
e, press the
START button on the computer to begin exercising. The running belt starts moving with
an initial speed of 0.8 KPH. You may press the SPEED∧ or SPEED∨ button on the
computer console or handlebar to increase or decrease the running speed during
exercise. Time starts counting down from pre-set target time to 0:00 per 1 second
backward. When the pre-set target time counts down to 0:00, the computer will beep to
alert you and the treadmill will stop automatically.
To set DISTANCE press the MODE button on the computer console until you see the split
window of DISTANCE begin blinking. Press the SPEED∧ or SPEED∨ button on the
computer console to change the setting. The pre-set target distance range is from 0.50 to
99.5 kilometers, the default distance is 1 kilometer. Once you pre-set target distance,
press the START button on the computer to begin exercising. The running belt starts
moving with an initial speed of 0.8 KPH. You may press the SPEED∧ or SPEED∨
but
ton on the computer console or handlebar to increase or decrease the running speed
during exercise. Distance starts counting down from pre-set target distance to 0.00.
When the pre-set target distance counts down to 0.00, the computer will beep to alert you
and the treadmill will stop automatically.
TRAINING IN PRE-SET PROGRAM MODE (P01-P12):
The computer offers 12 pre-set programs (P01-P12). You may select one of the pre-set
training programs in STOP mode before training. Press the PROG (PROGRAM) button
on the computer console to select one of the training programs. The split window of TIME
begin blinking. You may press the SPEED∧ or SPEED∨ button on the computer
console or handlebar to change the setting. Each increment is 1 minute. The pre-set
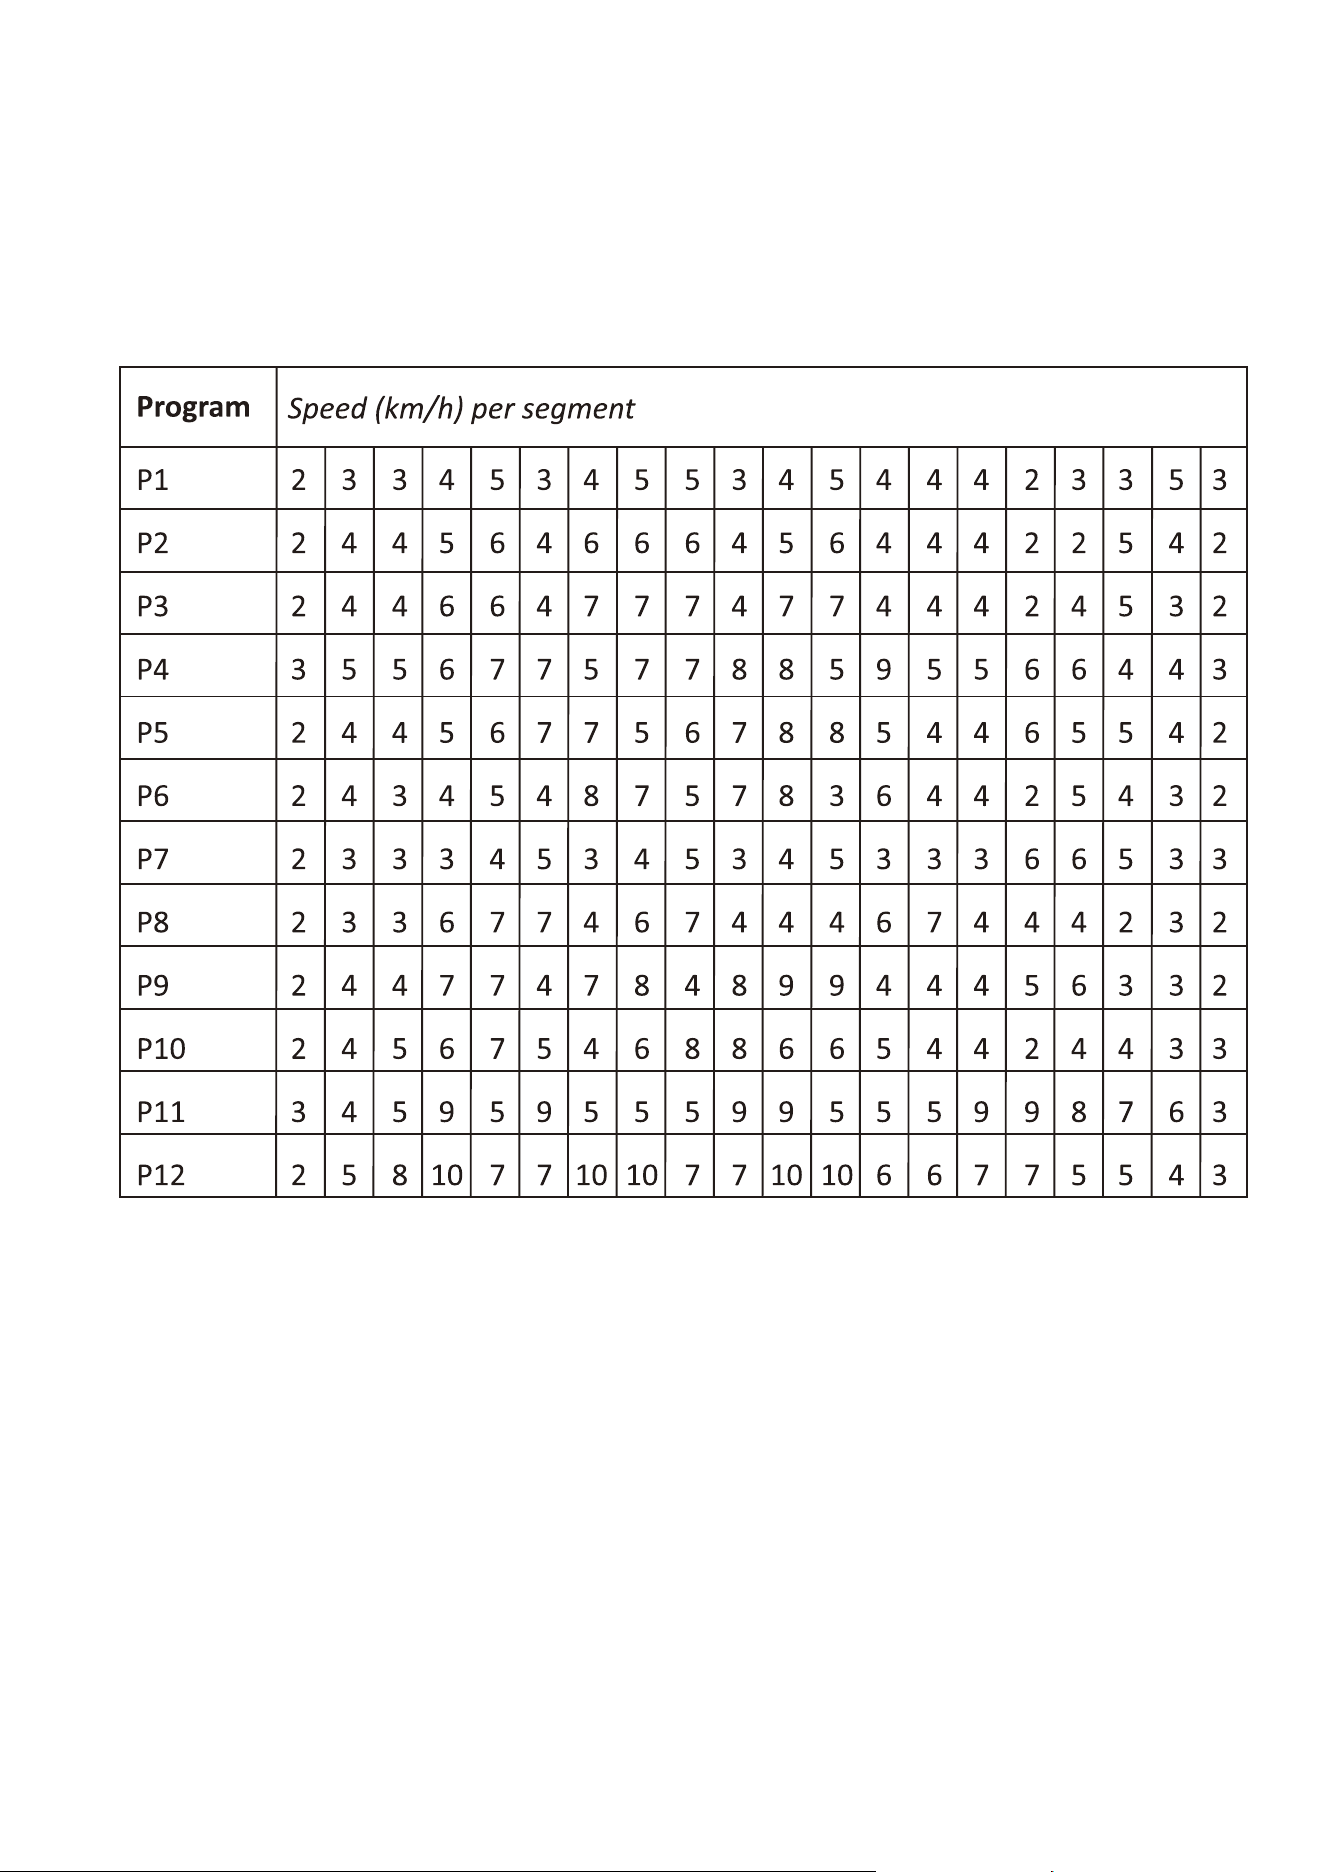
target time range is from 5:00 to 99:00 minutes. Once you pre-set target time, press the
START button on the computer to begin exercising. The running speed will change
automatically during the workout (as shown below). The program is split evenly into 20
intervals. You may press the SPEED∧ or SPEED∨ button on the computer console or
handlebar to increase or decrease the running speed during exercise. When the pre-set
training program time count down to 0:00, the computer will beep to alert you and the
treadmill will stop automatically.
EMERGENCY STOP
SAFETY TETHER KEY
Before beginning a workout session ensure that the Safety Tether Key is properly placed
onto the Computer Console and the Safety Clip is securely attached to an article of your
clothing. If you fall the clip will pull out the SAFETY TETHER KEY from the Computer
Console and the running belt will stop immediately for emergency stop, helping to prevent
injury.
Replaced the Safety Tether Key onto the Computer Console. Press the START button to
begin exercise again.
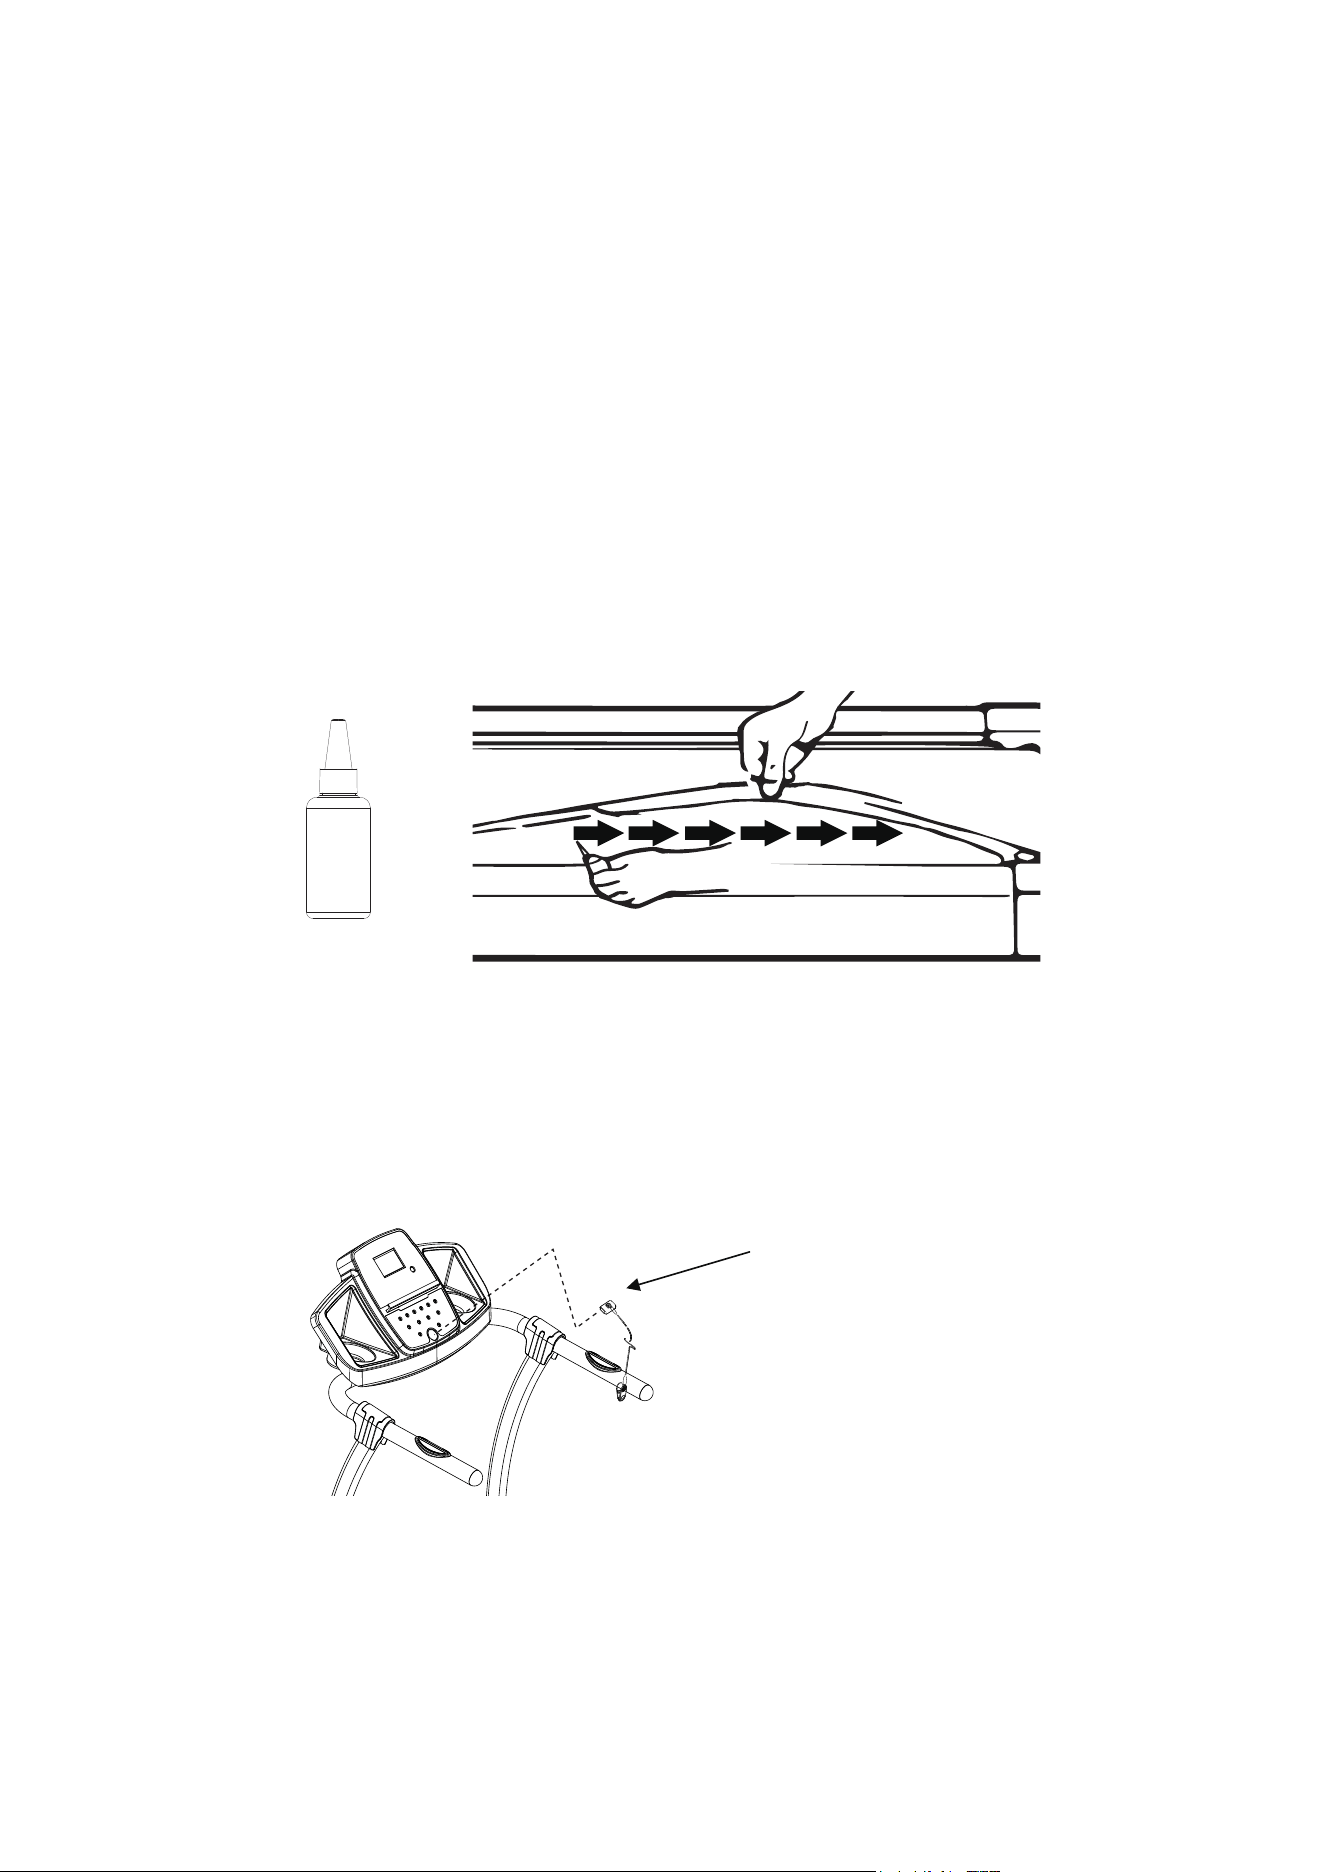
LUBRICATION
Lubricating under the running belt will ensure superior performance and extend its life
expectancy. After the first 25 hours of use (or 2-3 months) apply some lubricant, and
repeat for every following 50 hours of use (or 5-8 months).
How to check running belt for proper lubrication
Lift one side of the running belt and feel the top surface of the running deck.
If the surface is slick to the touch, then no further lubrication is required.
If the surface is dry to the touch, apply some lubricant.
How to apply lubricant
Lift one side of running belt.
Pour some lubricant under the centre of the running belt on the top surface of the running
deck.
Run on the treadmill at a slow speed for 3 to 5 minutes to evenly distribute lubricant.
NOTE: DO NOT over lubricate running deck. Any excess lubricant that comes out should
be wiped off.
Lubricant
1 PC
Tool:
Allen Wrench
Allen Wrench
Allen Wrench
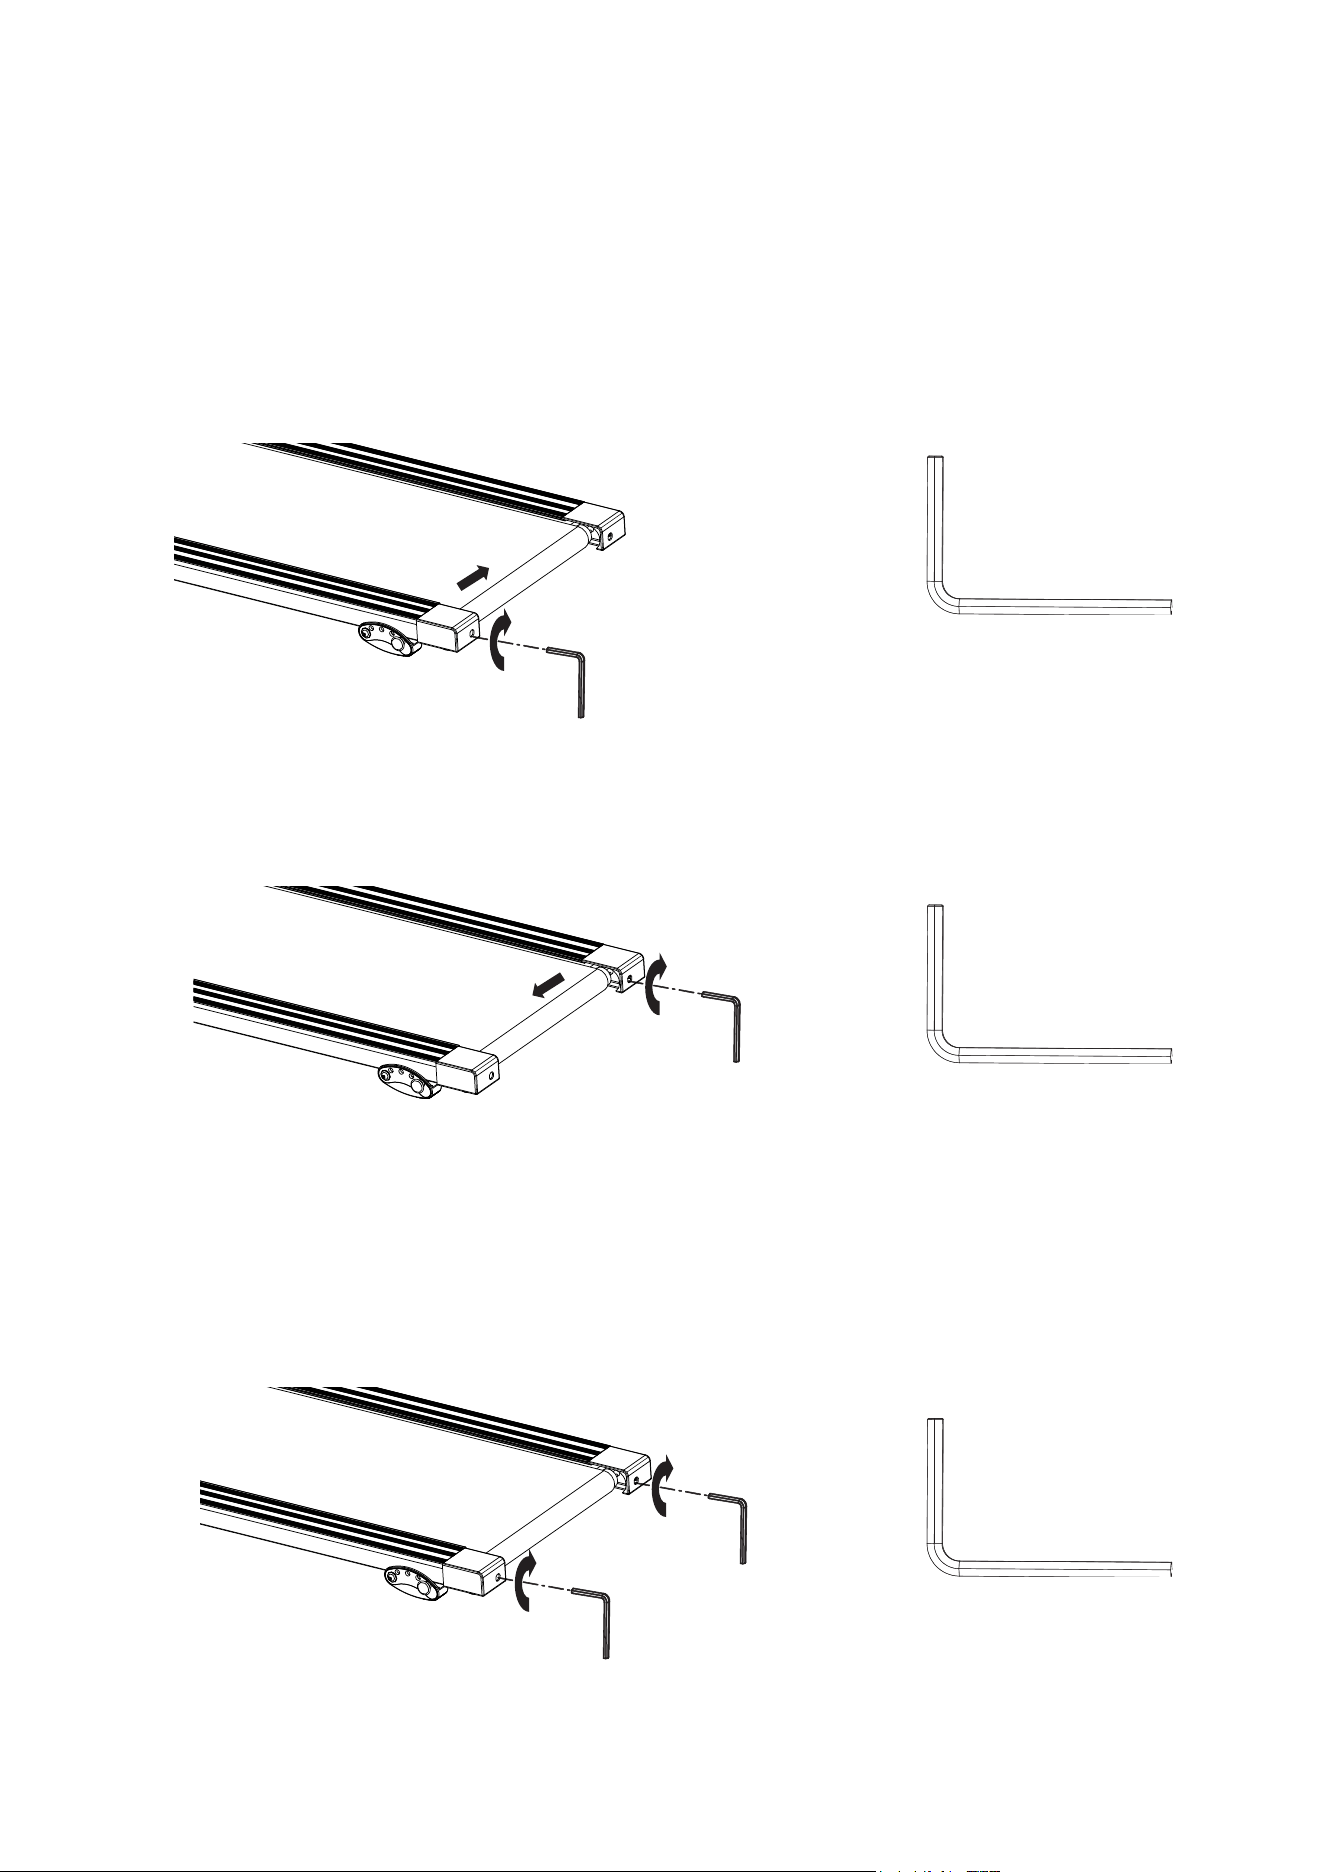
BELT ADJUSTMENT
The running belt is pre-adjusted to the running deck at the factory, but after prolonged use
it can stretch and require readjustment. To adjust the belt, turn on the main power switch
of the treadmill and let the belt run at a speed of 8-10 KPH. Use the Allen Wrench
provided to turn the rear roller adjustment bolts in order to centre the belt. If the running
belt is shifting to the left, turn the left adjustment bolt 1/4 turn clockwise, and the running
belt should start to correct itself.
If the running
belt is shifting to the right, then turn the right adjustment bolt 1/4 turn
clockwise, and the belt should start to correct itself. Keep turning the adjustment bolts until
the running belt is properly centered.
If the running belt is slipping during use, turn off and unplug the treadmill. Using the
Allen Wrench provided, turn both left and right rear roller adjustment bolts 1/4 turn
clockwise, then turn the main power switch back on and run the treadmill at a speed of
8-10 KPH. Run on to the running belt t
o determine if the belt is still slipping. Repeat this
procedure until the belt no longer slips.
Tool:
Tool:

CARE, MAINTENANCE & TROUBLESHOOTING GUIDE
WARNING: To prevent electrical shock, please turn off and unplug the treadmill before
cleaning or performing routine maintenance.
WARNING: Always check the wear and tear components like spring knob and running belt
to prevent injury.
CLEANING
After each exercise, ensure that the unit is wiped down and any sweat is removed
from the unit.
The treadmill can be cleaned with a soft cloth and mild detergent. Do not use abrasives
or solvents. Be careful not to get excessive moisture on the display panel as this might
damage the unit and create an electrical hazard.
Please keep the treadmill, especially the computer console, out of direct sunlight to
prevent damage to the screen.
STORAGE
Store the treadmill in a clean and dry indoor environment. Never leave or use the unit
outdoors. Ensure the master power switch is off and the power cord is un-plugged from
wall outlet.
TROUBLESHOOTING GUIDE
Problem Potential Causes Corrections
Treadmill will not
start.
1. Treadmill not plugged in.
2. Safety Tether Key is not
correctly installed.
3. Circuit breaker in the
house has been tripped.
4. Treadmill circuit breaker
has been tripped.
1. Plug the power cord into a wall
outlet.
2. Reinstall the Safety Tether Key.
3. Reset the circuit breaker, or call
an electrician to replace the
circuit breaker.
4. Wait 5 minutes and then try to
restart the treadmill.
Belt slips. Belt not tight enough. Adjust belt tension.
Belt hesitates when
stepped on.
1. Not enough lubrication
applied onto the running
deck.
2. Belt is too tight.
1. Apply lubricant.
2. Adjust belt tension.
Belt is not centred. Running belt tension not even
across the rear roller.
Centre the belt.
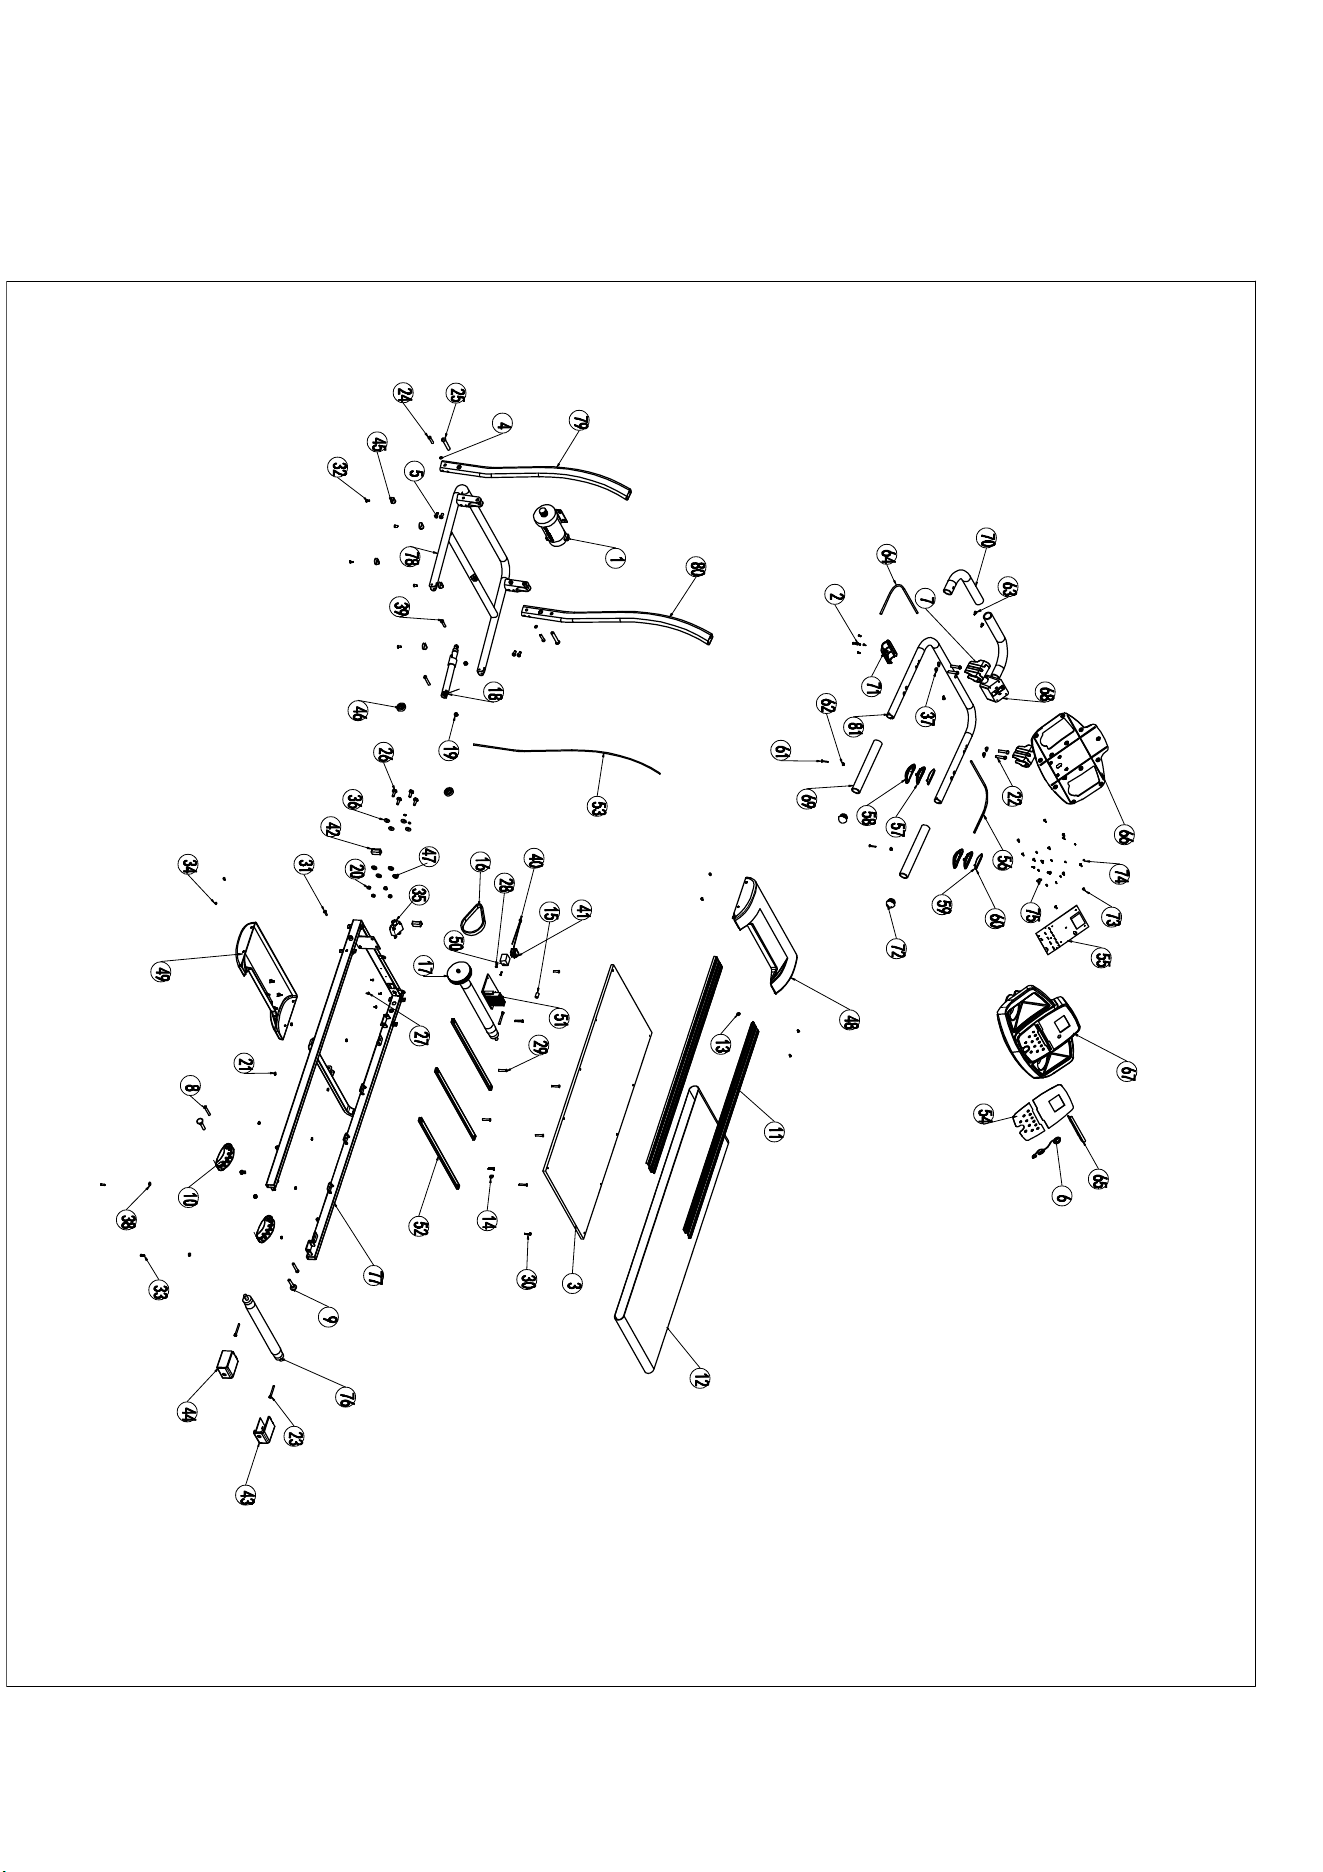

NO DESCRIPTION QTY NO
1 Motor 1 42
2 Cross Recessed Truss Head Screw M6x20 1 43
3 Running Board 1 44
4 Spring Washer M8 2 45
5 Hexagon Socket Oval Head Bolt M8x16 4 46
6 Safety Key 1 47
7 Handle Cover 2 48
8 Hexagon Socket Oval Head Bolt M8x50 3 49
9 Lock Pin Ø28x17xØ10x45 2 50
10 Incline Adjuster 2 51
11 Side Rail 2 52
12 Running Belt 1 53
13 Wire Grommet For Support Tube Ø14 1 54
14 Wire Grommet Ø10 1 55
15 Power Cord Grommet 1 56
16 Motor Belt 1 57
17 Front Roller 1 58
18 Foot Lock Latch Tube 1 59
19 Nylon Nut M8 4 60
20 Flange Nut M8 4 61
21 Flange Nut M6 10 62
22
Cross Recessed Countersunk Head Bolt
M8x50
4
63
23
Hexagon Socket Round Head Cap Bolt
M6x55
3
64
24
Hexagon Socket Round Head Cap Bolt
M8x40
2
65
25
Hexagon Socket Round Head Cap Bolt
M12x70
2
66
26
Hexagon Socket Round Head Cap Bolt
M8x25
4
67
27 Cross Recessed Truss Head Screw ST3x10 4 68
28 Cross Recessed Truss Head Screw ST4x16 2 69
29
Cross Recessed Countersunk Head Bolt
M6x35
6
70
30
Cross Recessed Countersunk Head Bolt
M6x25
4
71
31 Cross Recessed Truss Head Screw M6x25 1 72
32 Cross Recessed Oval Head Bolt M6x16 5 73
33 Cross Recessed Truss Head Screw ST5x16 2 74
34 Cross Recessed Truss Head Screw M5x10 8 75
35 Fuse Box 1 76
36 Washer M8 4 77
37 Curve Washer M8 4 78
38 Washer M5 2 79
39
Hexagon Socket Round Head Cap Bolt
M8x35
1
80
40 Wire for Power Switch 1 81
41 Power Switch 1

DESCRIPTION QTY
Rectangular End Cap 2
Right End Cap 1
Left End Cap 1
Base Frame Plastic Foot Pad 5
Transportation Wheel 2
Foot Pad for Motor Ø22xT10 4
Motor Cover (Up) 1
Motor Cover (Down) 1
Choke 1
Electric controller 1
Reinforced Tube 3
Main Control Cable (L=1500 mm) 1
Overlay 1
Display Board 1
Console Control Cable 2
Pulse Sensor Bracket 2
Pulse Sensor Sleeve 2
Right Pulse Sensor 2
Left Pulse Sensor 2
Cross Recessed Truss Head Screw ST4x30 2
Washer For Pulse Sensor 2
Hexagon Socket Round Head Cap Bolt M5x10 3
Wie For Pulse Sensor 1
Tablet Holder 1
Console Cover (Down) 1
Console Cove (Up) 1
Handlebar Bracket (Up) 1
Handlebar Foam Grip φ30XT3.0X350mm 2
Handlebar Foam Grip φ30XT3.0X200mm 2
Handlebar Bracket (Down) 1
Handlebar End Cap 2
Cross Recessed Truss Head Screw ST4x12 12
Cross Recessed Truss Head Screw ST3x12 8
Cross Recessed Truss Head Screw ST3x8 12
Rear Roller 1
Main Frame 1
Base Frame 1
Right Handlebar Support Tube 1
Left Handlebar Support Tube 1
Handlebar Frame 1

GARLANDO SPA
Via Regione Piemonte, 32 - Zona Industriale D1
15068 - Pozzolo Formigaro (AL) - Italy
www.evert.it - info@evert.it