User Manual Smart TV
Before setting up your TV
Some TV models are packaged with a detached Table-Top Stand so you can mount your TV to a wall right away. See “Installing the TV to the Wall” if you want to mount the TV to a wall. If you are not mounting the TV to a wall, you will need to attach the Table-Top Stand (refer to the Setup Guide).
Be sure to consider the following while setting up your TV:
- Disconnect all cables when carrying the TV.
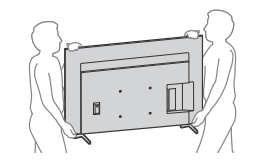
- Carry the TV with the adequate number of people; larger size TVs require two or more people (four or more people for XR-100X92).
- Correct hand placement while carrying the TV is very important for safety and to avoid damage.
XR-100X92
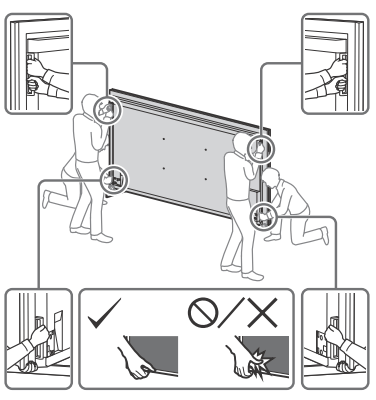
XR-75X90J / 75X90CJ / 65X90J / 65X90CJ / 55X90J / 55X90CJ / 50X90J
- Ensure your TV has adequate ventilation, refer to the safety documentation.
- For best picture quality, do not expose the screen to direct illumination or sunlight.
- Avoid installing the TV in a room with reflective wall and floor materials. Avoid
- moving the TV from a cold area to a warm area. Sudden room temperature changes may cause moisture condensation. This may cause the TV to show poor picture and/or poor color. Should this occur, allow moisture to evaporate completely before powering the TV on
Preventing the TV from Toppling
- Secure the TV to a wall and/or Stand.
- Do not allow children to play or climb on furniture and TV sets.
- Avoid placing or hanging items on the TV.
- Never install the TV on:
- slippery, unstable and/or uneven surfaces.
- furniture that can easily be used as steps, such as a chest of drawers.
- Install the TV where it cannot be pulled, pushed, or knocked over.
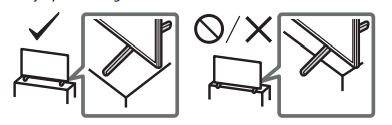
- Install the TV so that the TV’s Table-Top Stand does not protrude out from the Stand (not supplied). If the Table-Top Stand protrudes out from the Stand, it may cause TV set to topple over, fall down, and cause personal injury or damage to the TV.
- Route all AC power cords and connecting cables so that they are not accessible to curious children
Recommended Measures to Secure the TV
Consider the following measures when securing your TV to a Stand (not supplied).
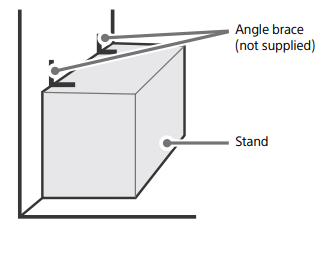
1 Secure the Stand for the TV.
Make sure the Stand can adequately support the weight of the TV. Use two angle braces (not supplied) to secure the Stand. For each angle brace use the appropriate hardware to:
- Attach one side of the angle brace to the wall stud.
- Attach the other side to the Stand.
2 Secure the TV to the Stand.
Use the optional hardware listed as follows (not supplied):
- M6 machine screws (screwed into the TV’s Table-Top Stand) (XR-100X92 only).
- M6 machine screws (screwed into the TV’s rear cover) (Except XR-100X92).
- A screw or similar (attach it to the Stand).
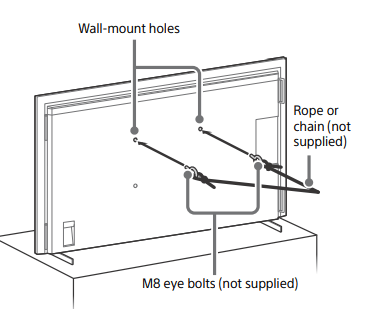
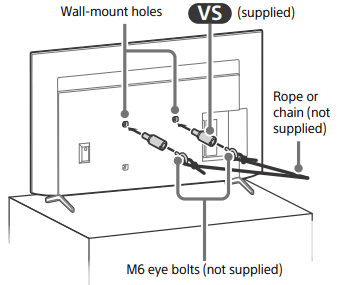
- Rope or chain (strong enough to support the weight of the TV). Make sure that there is no excess slack in the rope or chain.
XR-100X92
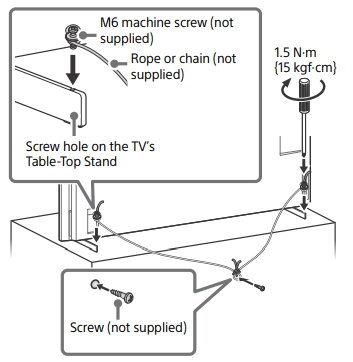
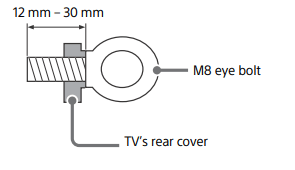
The length of the M6 machine screw differs depending on the rope or chain diameter. Please refer to below illustration.

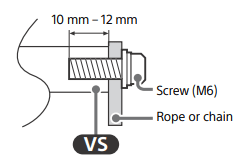
XR-75X90J / 75X90CJ / 65X90J / 65X90CJ / 55X90J / 55X90CJ / 50X90J
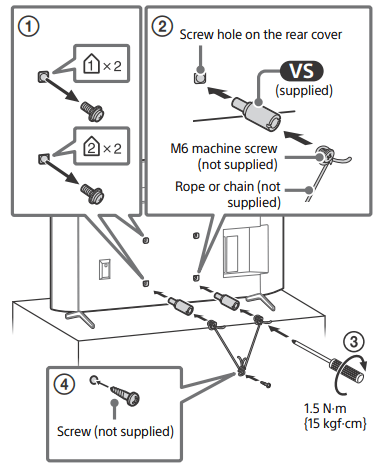
The length of the M6 machine screw differs depending on the rope or chain diameter. Please refer to below illustration
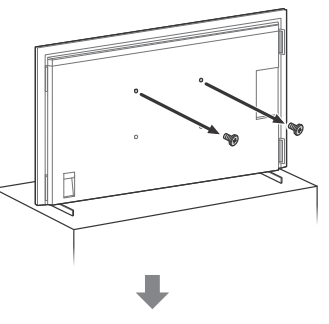
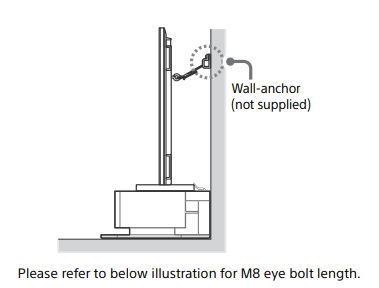
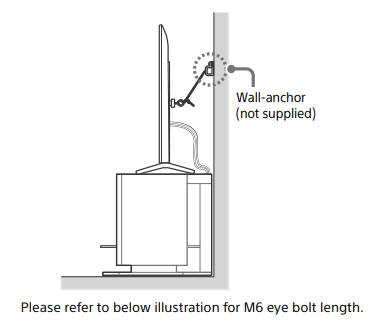
3 Anchor the TV to the wall by using bolts, wall anchor and chain (or rope).
XR-100X92
XR-75X90J / 75X90CJ / 65X90J / 65X90CJ / 55X90J / 55X90CJ / 50X90J

Note
- Your TV is shipped with screws attached to the rear of the TV depending on the TV model. (They are fastened in the screw holes for wall mounting.) Be sure to remove the upper two screws prior to anchoring the TV to a wall.
- Securing the TV to the Stand without securing the TV and the Stand to the wall provides minimum protection against the TV toppling over. For further protection, be sure to follow the three measures recommended.
Remote Control and TV
The remote control shape, layout, availability and function of remote control buttons may vary depending on your region/country/TV model/TV settings.
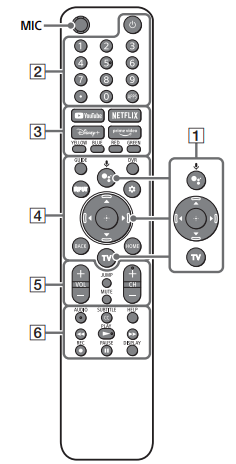
1.  (Google Assistant): Use Google Assistant*1 *2. For hints on how to control your TV, press the Google Assistant button on the remote control and say “voice hints”.*1
 : On screen menu navigation and selection.
TV: Display TV channel list or switch to input.
2.  (Power)
Number buttons
 (dot)
(dot)
APPS
3. YouTube™ / NETFLIX / Disney+ / Prime Video / Color buttons
4. GUIDE: Display the digital program guide of TV or Cable/Satellite box*3.
DVR: Display the Rec list of DVR*3.
INPUT: Display and select the input source, etc.
 (Quick settings): Display Quick Settings.
BACK
HOME
5. VOL +/– (Volume)
JUMP
MUTE*4
CH +/– (Channel)
6. AUDIO: Select the sound of multilingual source or dual sound (depend on program source).
SUBTITLE/CC
HELP: Display the Help menu.
 REC: Record the currently viewed program on DVR*3.
DISPLAY: Display information.
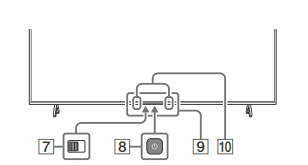
7. BUILT-IN MIC SWITCH*1 : Turn on/off the built-in MIC.
8. (Power)
9. Remote Control sensor / Light sensor / LED
10. Built-in MIC*1 *2*5: To enable the built-in MIC, press the Google Assistant button on the remote control and follow the on-screen instructions.
*1 Only on limited region/country/TV model/ language.
*2 Google Assistant requires an Internet connection.
*3 [Cable/Satellite box setup] setting is required.
*4 Accessibility shortcut is available by pressing and holding MUTE.
*5 Power consumption will increase when the built-in MIC is enabled as it is always listening
Guidelines for IR Remote Control
- Point your remote control directly at the IR sensor located on your TV.
- Make sure that no objects are blocking the path between the remote control and the IR sensor on your TV.
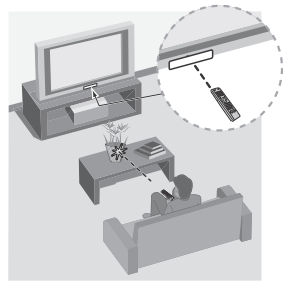
- Fluorescent lamps can interfere with your remote control; try turning off the fluorescent lamps.
- If you are having problems with the remote control, reinsert or replace your batteries and make sure that they are correctly inserted.
Installing the TV to the Wall
Using the optional Wall-Mount Bracket (SU-WL855 only)* (not supplied)
To Customers:
For product protection and safety reasons, Sony strongly recommends that installation of your TV be performed by Sony dealers or licensed contractors. Do not attempt to install it yourself.
To Sony Dealers and Contractors:
Provide full attention to safety during the installation, periodic maintenance and examination of this product.
Wall-Mount Bracket Installation Information
For instructions on Wall-Mount Bracket installation, see the Installation Information (Wall-Mount Bracket) on the Sony Customer Support website for your TV model at the following address.
- Follow the instruction guide provided with the Wall-Mount Bracket for your model. Sufficient expertise is required in installing this TV, especially to determine the strength of the wall for withstanding the TV’s weight.
- Sony is not liable for any damage or injury caused by mishandling or improper installation.
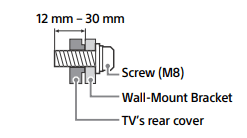
- The length of the screw for Wall-Mount Bracket differs depending on the Wall-Mount Bracket thickness. Please refer to below illustration.

- Be sure to store the unused screws and Table-Top Stand in a safe place until you are ready to attach the Table-Top Stand. Keep the screws away from small children.
Using the optional Wall-Mount Bracket (Except SU-WL855) (not supplied)
This TV’s instruction manual only provides the steps to prepare the TV for Wall-Mount installation before it is installed on the wall.
Your TV can be mounted to a wall using a suitable Wall-Mount Bracket (not supplied). If the Table-Top Stand is attached to the TV, the TV may require detaching the Table-Top Stand; see “Detaching the Table-Top Stand from the TV”.
Prepare the TV for the Wall-Mount Bracket before making cable connections.
For product protection and safety reasons, Sony strongly recommends that installation of your TV on the wall be performed by qualified professionals. Do not attempt to install it yourself
- Follow the instruction guide provided with the Wall-Mount Bracket for your model. Sufficient expertise is required in installing this TV, especially to determine the strength of the wall for withstanding the TV’s weight.
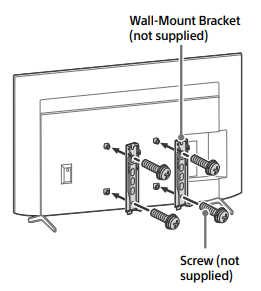
- The screws for installing the Wall-Mount Bracket to the TV are not supplied.
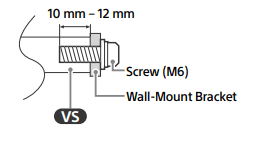
- The length of the screw for Wall-Mount Bracket differs depending on the Wall-Mount Bracket thickness. Please refer to below illustration.
XR-100X92
XR-75X90J / 75X90CJ / 65X90J / 65X90CJ / 55X90J / 55X90CJ / 50X90J
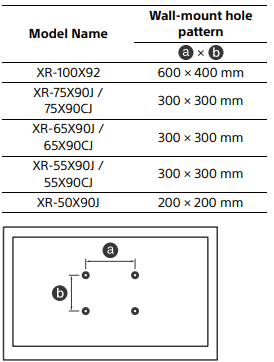
- Refer to the following table for wall-mount hole pattern.
- Be sure to store the unused screws and Table-Top Stand in a safe place until you are ready to attach the Table-Top Stand. Keep the screws away from small children.
Note
- Read the supplied safety documentation for additional safety information.
- For more detailed information, visit Sony Customer Support website.*
* Only on limited region/country/TV model.
XR-100X92
1. Remove the stand covers.
2. Remove the screws from the rear of the TV.
3. Attach the Wall-Mount Bracket (not supplied) using the screws (not supplied).
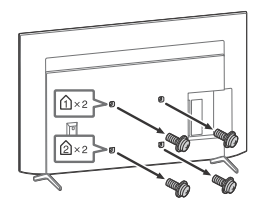
XR-75X90J / 75X90CJ / 65X90J / 65X90CJ / 55X90J / 55X90CJ / 50X90J
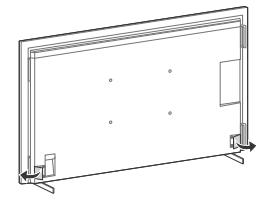
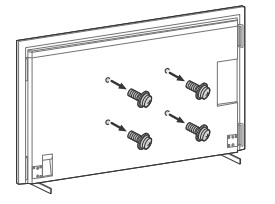
1. Remove the screws from the rear of the TV.
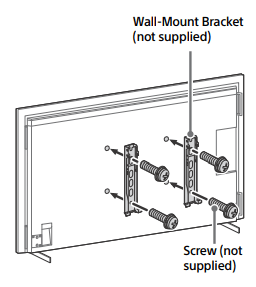
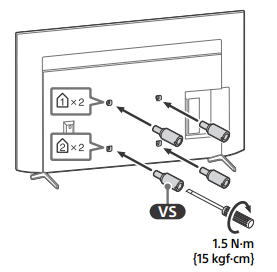
2 Attach the Wall-Mount Attachment (supplied with the TV) to the rear of the TV (to make it parallel with the wall).
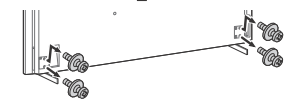
3 Attach the Wall-Mount Bracket (not supplied) using the screws (not supplied).
Note
- If using an electric screwdriver, set the torque at approximately 1.5 N·m {15 kgf·cm}.
- Be sure to fasten the Wall-Mount Attachment when attaching them to the TV. Use only a flat head screwdriver to install the Wall-Mount Attachment. Use of another tool might result in over torqueing the Wall-Mount Attachment and damaging the TV.
Detaching the Table-Top Stand from the TV
XR-100X92
To detach the Table-Top Stand from the TV, remove the screws 
Note
- Be careful when lifting the TV as the Table-Top Stand is detached, the Table-Top Stand may topple over and cause personal injury.
- Take care when removing the Table-Top Stand from the TV to prevent it from falling over and damaging the surface that the TV is sitting on.
- Do not remove the Table-Top Stand for any reason other than to install corresponding accessories on the TV.
- Be sure the TV is vertical before turning on. To avoid uneven picture uniformity do not power on the TV with the panel facing down.
- When attaching the Table-Top Stand again, be sure to fasten the screws (previously removed) to the original holes on the rear of the TV.
XR-75X90J / 75X90CJ / 65X90J / 65X90CJ / 55X90J / 55X90CJ / 50X90J
1. Remove one side of the Table-Top Stand at a time. Firmly hold the Table-Top Stand securely with both hands while the other people lift up the TV.

2. Repeat the previous step and remove the other side of the Table-Top Stand.
Note
- Three or more people are required to detach the Table-Top Stand.
- Be careful not to use excessive force while detaching the Table-Top Stand from the TV as it may cause the TV set to fall resulting in personal injury or physical damage to the TV.
- Take care when handling the Table-Top Stand to prevent damage to the TV.
- Be careful when lifting the TV as the Table-Top Stand is detached, the Table-Top Stand may topple over and cause personal injury.
- Take care when removing the Table-Top Stand from the TV to prevent it from falling over and damaging the surface that the TV is sitting on.
- Do not remove the Table-Top Stand for any reason other than to install corresponding accessories on the TV.
- Be sure the TV is vertical before turning on. To avoid uneven picture uniformity do not power on the TV with the LCD panel facing down.
Troubleshooting
General troubleshooting for issues like: black screen, no sound, frozen picture, TV does not respond, or network is lost, do the following steps.
1 Restart your TV by pressing the power button on the remote control for about five seconds. The TV will restart. If the TV does not recover, try unplugging the AC power cord then press the power button on the TV and release it. Wait for two minutes, and plug in the AC power cord. Or, press the power button on the TV for about 40 seconds until the TV turns off.
2 Refer to the Help menu by pressing HELP on the remote control.
3 Connect your TV to the Internet and perform a software update. Sony recommends you to keep your TV software updated. Software updates provide new features and performance improvements.
4 Visit Sony support website (information provided at the end of this manual).
5 Perform the factory data reset.
When you plug in the TV, the TV may not be able to turn on for a while even if you press the power button on the remote control or the TV.
It takes time to initialize the system. Wait for about one minute, then operate it again.
How to reset the TV to factory settings
WARNING: The reset will clear all of your customized settings including the parental lock setting.
- You can reset the TV to factory settings by selecting [Factory data reset]. How to select [Factory data reset], refer to the online Help Guide.
- To force factory data reset, unplug the AC power cord. Press and hold button on the TV, then plug in the AC power cord.
- For security purposes, be sure to remove all personal and account information before discarding, selling or passing your TV to someone else by: unlinking/ unregistering, signing out of and deactivating all network services as well as factory reset the TV.
The remote control does not function.
The parental lock password has been forgotten.
- Enter 4357 for the PIN and enter the new PIN.
The restricted profile password has been forgotten.
- Perform the force factory data reset.
Specifications
System
TV system: Depend on your country/area selection/TV model
NTSC: American TV Standard
ATSC (8VSB Terrestrial): ATSC compliant 8VSB
NEXTGEN TV: ATSC 3.0 compliant (Single tuner)
QAM on cable: ANSI/SCTE 07 2000 (Does not include CableCARD functionality)
Channel coverage: Depend on your country/area selection/TV model
Analog terrestrial: 2 – 69 / Digital terrestrial: 2 – 69*1
Analog Cable: 1 – 135 / Digital Cable: 1 – 135
Panel system: LCD (Liquid Crystal Display) Panel, LED Backlight
Speaker output: 10 W + 10 W
Wireless technology
Protocol IEEE 802.11a/b/g/n/ac
Bluetooth® Version 4.2
Input/Output jacks
CABLE/ANTENNA
75 ohm external terminal for RF inputs  VIDEO IN Video/Audio input (mini jack)
HDMI IN 1/2/3/4 (HDCP 2.3-compatible)
Video:
4096 × 2160p (60 Hz)*2*3, 4096 × 2160p (24 Hz)*2, 3840 × 2160p (60 Hz)*3, 3840 × 2160p (24, 30 Hz), 1080p (30, 60, 120 Hz), 1080/24p, 1080i (60 Hz), 720p (30, 60 Hz), 720/24p, 480p, PC Formats*4 3840 × 2160p (120 Hz)*3*5
Audio:
In eARC (Enhanced Audio Return Channel) mode
Refer to the online Help Guide for details.
Except eARC mode
5.1 channel linear PCM: 32/44.1/48/ 88.2/96/176.4/192 kHz 16/20/24 bits,
Dolby Audio, Dolby Atmos, DTS
eARC/ARC (Enhanced Audio Return Channel/Audio Return Channel) (HDMI IN 3 only)*6
In eARC mode
Refer to the online Help Guide for details.
In ARC mode
Two channel linear PCM: 48 kHz 16 bits, Dolby Audio, Dolby Atmos, DTS
 DIGITAL AUDIO OUT (OPTICAL) Digital optical jack (Two channel linear PCM: 48 kHz 16 bits, Dolby Audio, DTS)
 (Stereo mini jack)
Headphone
 1, 2
1, 2
USB port 1 supports High Speed USB (USB 2.0)
USB port 2 supports Super Speed USB (USB 3.1 Gen 1)
 LAN
LAN
10BASE-T/100BASE-TX connector (Depending on the operating environment of the network, connection speed may differ. The communication rate and quality are not guaranteed.) Home Network supported files and formats*4
REMOTE
RS-232C mini jack, IR IN mini jack These jacks are for receiving the external control signal.
Power and others
Power requirements 110 V – 240 V AC, 50/60 Hz (U.S.A./ Canada 120 V AC, 60 Hz)
Power consumption
In use
XR-100X92: 426 W
XR-75X90J / 75X90CJ: 304 W
XR-65X90J / 65X90CJ: 240 W
XR-55X90J / 55X90CJ: 197 W
XR-50X90J: 159 W
In standby*7 *8
Less than 0.5 W with 120 V AC and less than 0.5 W with 240 V AC
Screen size (measured diagonally) (Approx.)
XR-100X92: 252.8 cm / 99.5 inches (100" class)
XR-75X90J / 75X90CJ: 189.3 cm / 74.5 inches (75" class)
XR-65X90J / 65X90CJ: 163.9 cm / 64.5 inches (65" class)
XR-55X90J / 55X90CJ: 138.8 cm / 54.6 inches (55" class)
XR-50X90J: 125.7 cm / 49.5 inches (50" class)
Display resolution (horizontal × vertical) (pixels)
3840 × 2160
Output rating
500 mA (for USB 1), 900 mA (for USB 2)
Dimensions (Approx.) (w × h × d) (mm) / (inches)
with stand
XR-100X92: 2260 × 1346 × 475 / 89 × 53 × 183/4
XR-75X90J / 75X90CJ: 1675 × 1040 × 410 / 66 × 41 × 161 /4
XR-65X90J / 65X90CJ: 1452 × 905 × 338 / 571 /4 × 353/4 × 133/8
XR-55X90J / 55X90CJ: 1233 × 784 × 338 / 485/8 × 307 /8 × 133/8
XR-50X90J: 1119 × 715 × 286 / 441 /8 × 281 /4 × 113/8
without stand
XR-100X92: 2260 × 1297 × 98 / 89 × 511 /8 × 37 /8
XR-75X90J / 75X90CJ: 1675 × 962 × 73 / 66 × 377/8 × 27/8
XR-65X90J / 65X90CJ: 1452 × 834 × 72 / 571 /4 × 327/8 × 27/8
XR-55X90J / 55X90CJ: 1233 × 711 × 72 / 485/8 × 28 × 27 /8
XR-50X90J: 1119 × 649 × 70 / 441 /8 × 255/8 × 27/8
wall-mount hole pattern
XR-100X92: 600 × 400 mm XR-75X90J / 75X90CJ: 300 × 300 mm
XR-65X90J / 65X90CJ: 300 × 300 mm XR-55X90J / 55X90CJ: 300 × 300 mm
XR-50X90J: 200 × 200 mm
wall-mount screw size (mm)
XR-100X92: M8 (length: see “Installing the TV to the Wall”.)
XR-75X90J / 75X90CJ / 65X90J / 65X90CJ / 55X90J / 55X90CJ / 50X90J: M6 (length: see “Installing the TV to the Wall”.)
Mass (Approx.) (kg) / (lb.)
with stand
XR-100X92: 92.6 / 204 XR-75X90J / 75X90CJ: 34.5 / 76
XR-65X90J / 65X90CJ: 23.8 / 52.5 XR-55X90J / 55X90CJ: 18.3 / 40.4
XR-50X90J: 14.1 / 31.1
without stand
XR-100X92: 88.9 / 195.9 XR-75X90J / 75X90CJ: 33.3 / 73.4
XR-65X90J / 65X90CJ: 22.9 / 50.5
XR-55X90J / 55X90CJ: 17.4 / 38.4
XR-50X90J: 13.5 / 29.8
Others
Optional accessories
Wall-Mount Bracket: SU-WL855 (XR-75X90J / 75X90CJ / 65X90J / 65X90CJ / 55X90J / 55X90CJ only)
Operating temperature: 0 ºC – 40 ºC / 32 ºF – 104 ºF
*1 2 – 36 for NEXTGEN TV scanning range in U.S.A.
*2 When 4096 × 2160p is input and [Wide mode] is set to [Normal], the resolution is displayed as 3840 × 2160p. To display 4096 × 2160p, set [Wide mode] setting to [Full 1] or [Full 2].
*3 Refer to the on screen menu to set [HDMI signal format].
*4 Refer to the online Help Guide for details.
*5 HDMI IN 3 & 4 only. Use the Ultra High Speed HDMI Cable to connect.
*6 Connect your audio system to the HDMI IN 3 to route TV audio to your audio system.
*7 Specified standby power is reached after the TV finishes necessary internal processes.
*8 Standby power consumption will increase when your TV is connected to the network.
Note
- Optional accessories availability depends on countries/region/TV model/stock.
- Design and specifications are subject to change without notice.
- Subscriptions for services and applications may be required and additional terms, conditions and/or charges may apply when using Google Assistant.
Licensing Information
- The terms HDMI, HDMI High-Definition Multimedia Interface, and the HDMI Logo are trademarks or registered trademarks of HDMI Licensing Administrator, Inc.
- Dolby, Dolby Vision, Dolby Atmos, Dolby Audio, and the double-D symbol are trademarks of Dolby Laboratories Licensing Corporation. Manufactured under license from Dolby Laboratories. Confidential unpublished works. Copyright © 1992-2020 Dolby Laboratories. All rights reserved.
- Gracenote, the Gracenote logo and logotype, “Powered by Gracenote” logo are either registered trademarks or trademarks of Gracenote, Inc. in the United States and/or other countries.
- Google TV and related logos are trademarks of Google LLC.
- For DTS patents, see http://patents.dts.com. Manufactured under license from DTS, Inc. DTS, Digital Surround, and the DTS logo are registered trademarks or trademarks of DTS, Inc. in the United States and other countries. © 2020 DTS, Inc. ALL RIGHTS RESERVED.
- Netflix is a registered trademark of Netflix, Inc.
- TUXERA is a registered trademark of Tuxera Inc. in the US and other countries.
- All other trademarks are the property of their respective owners.