Loading ...
Loading ...
Loading ...
CZ
DE
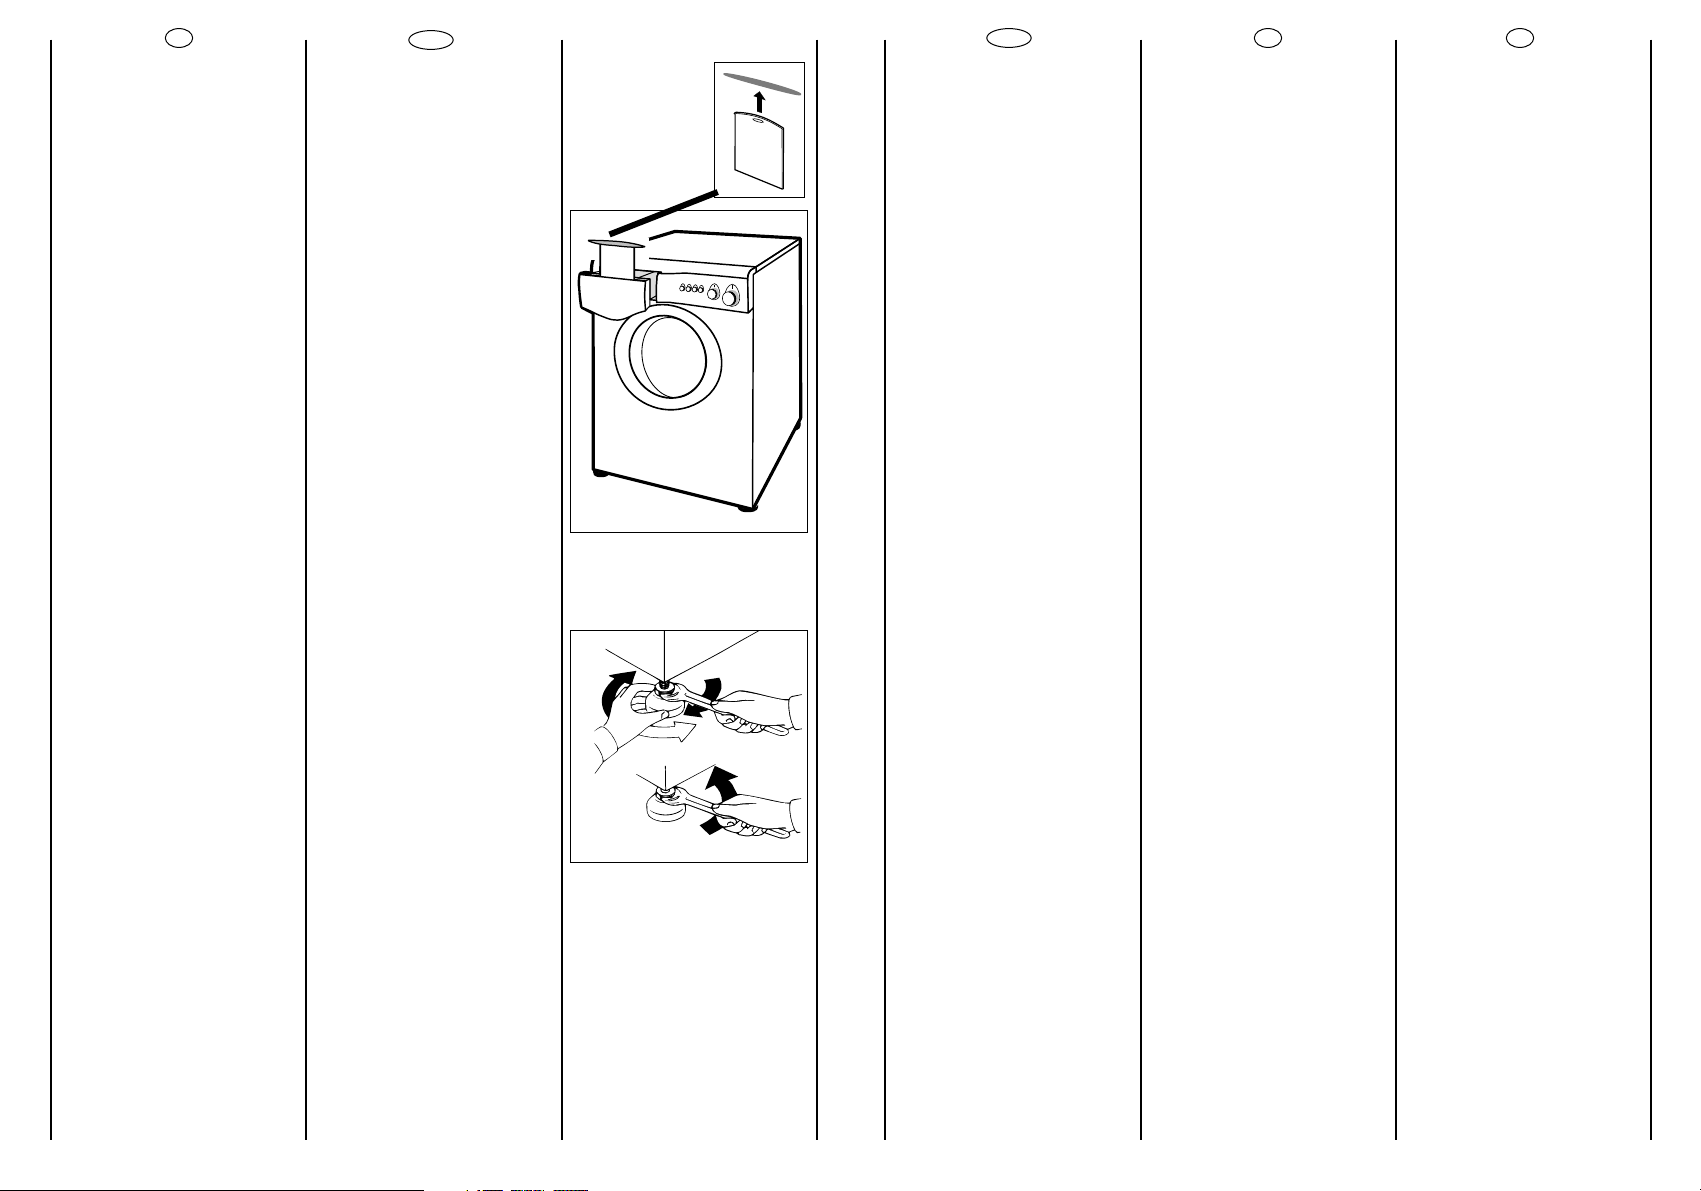
Zkontrolujte, zda ätítek s
tabulkou programå, kterÿ se
nachází v püihrádce vedle
zásobníku pracího pra’äku, je
ve správném jazyce. Pokud
ne, vymëñte jej za ätítek,
kterÿ se nachází v návodu k
obsluze.
Pomocí püedních noïek
praöky nastavte vodorovnou
polohu.
aa))
Otoöte matkou ve smëru
hodinovÿch ruöiöek.
bb))
Otáöením noïky nastavte
vodorovnou a pevnou
polohu praöky (zkontrolujte
pomocí vodováhy).
cc))
Matku opët utáhnëte
(proti smëru hodinovÿch
ruöiöek).
Zapojte záströku do sítë.
Po instalaci spotüebiöe se
ujistëte, ïe spotüebiö je
umístën tak, aby byla
snadno püístupná zásuvka.
Versichern Sie sich, daß die
Programmtabelle wie
vorgesehen und in der
gewünschten Sprache
eingeklebt ist. Ist dies nicht
der Fall, wählen Sie aus den
mitgelieferten Tabellen die
gewünschte aus und kleben
Sie sie an die dafür
vorgesehene Stelle.
Ausrichten der Maschine
über die vorderen
Verstellfüße
a) Kontermuttern in
Uhrzeigersinn lösen.
b) Standfuß einregulieren, bis
das Gerät genau
ausgerichtet ist (möglichst
mit der Wasserwaage
justieren!).
c) Kontermutter (gegen den
Uhrzeigersinn) festziehen.
Stecker einstecken.
Nach der Installation muß der
Anschluß zugänglich sein.
20 21
A
B
C
8
7
▲
RU
Hjkrkymjklnjeqmt9 xmk
dvmgdltyykt d
hjt;evbkmjtyykt btvmk
khnvgynt hjkujgbb .slk
yg jevvrkb zpsrt9 d
hjkmndykb vlexgt
pgbtynmt tuk np
nbt/otukvz rkbhltrmg7
Dsjkdyzqmt vmnjgl,ye/
bginye hk ukjnpkymgln9
nvhkl,pez
jgvhklk'tyyst dynpe
ajkymgl,ykq xgvmn
bginys jtuelnjkdkxyst
yk'rn7
Gπ Hkdtjynmt hk xgvkdkq
vmjtlrt ugqre9 xmk.s
jgp.lkrnjkdgm,
jtuelnjkdkxysq dnym
yk'rn7
Dπ Djgogqmt yk're9
hjnhk;ynbgz nln
khevrgz tt9 xmk.s
;kvmnuyem, ygnlexituk
hjnltugynz r hkle7
Vπ pg.lkrnjeqmt yk're9
pgdkjgxndgz ugqre hjkmnd
xgvkdkq vmjtlrn ;k tf
rkymgrmg v yn'ytq xgvm,/
vmnjgl,ykq bginys7
Âêëю÷èòå âèëêó â pîçåòêó.
èÓÒΠÔÓ‰ÒÓ‰ËÌÂÌËfl ÔË·Ó
‰ÓÎÊÂÌ ·˚Ú¸ ‡ÒÔÓÎÓÊÂÌ Ú‡ÍËÏ
Ó·‡ÁÓÏ, ˜ÚÓ·˚ ÓÁÂÚ͇ ·˚·
‰ÓÒÚÛÔÌÓÈ.
ìÒÚ‡ÌÓ‚¥Ú¸ ԇθÌÛ Ï‡¯ËÌÛ
„ÓËÁÓÌڇθÌÓ, ‚ËÍÓËÒÚÓ‚Û˛˜Ë
„Ûβ‚‡Î¸Ì¥ Ô‰̥ Ì¥ÊÍË, flÍ
ÔÓ͇Á‡ÌÓ Ì‡ Ï‡Î˛ÌÍÛ:
Ä. ÔÓ‚ÂÌ¥Ú¸ Á‡ „Ó‰ËÌÌËÍÓ‚Ó˛
ÒÚ¥ÎÍÓ˛ „‡ÈÍÛ, ‡·Ë ÓÁ·ÎÓÍÛ‚‡ÚË
„Ûβ‚‡Î¸ÌËÈ „‚ËÌÚ Ì¥ÊÍË;
Ç. Ó·ÂÚ‡˛˜Ë Ì¥ÊÍÛ, Ô¥‰Ì¥Ï¥Ú¸ ˜Ë
ÓÔÛÒÚ¥Ú¸ χ¯ËÌÛ ‰Ó ‰Ó·Óª ªª ÓÔÓË
̇ Ô¥‰ÎÓ„Û;
ë. Á‡·ÎÓÍÛÈÚ „‚ËÌÚ Ì¥ÊÍË,
Á‡Úfl„ÌÛ‚¯Ë „‡ÈÍÛ ÔÓÚË
„Ó‰ËÌÌËÍÓ‚Óª ÒÚ¥ÎÍË ‰Ó ªª ÍÓÌÚ‡ÍÚÛ
Á ÌËÊÌ¸Ó˛ ˜‡ÒÚËÌÓ˛ ԇθÌÓª
χ¯ËÌË.
èÂÂÍÓ̇ÈÚÂÒfl ‚ ÚÓÏÛ, ˘Ó Í·‚¥¯‡
“‚ÍÎ/‚ËÍΔ Ì ̇ÚËÒÌÛÚ‡.
èÂÂÍÓ̇ÈÚÂÒfl ‚ ÚÓÏÛ, ˘Ó ‚Ò¥
ÍÌÓÔÍË Ô·ۂ‡˛Ú¸ Û ‚ËÏÍÌÂÌÓÏÛ
Òڇ̥, ‡ Î˛Í - Á‡ÍËÚËÈ.
ì‚¥ÏÍÌ¥Ú¸ χ¯ËÌÛ ‰Ó ÏÂÂÊ¥.
Óâiìêíiòü âèëêó äî pîçåòêè.
è¥ÒÎfl ‚ÒÚ‡ÌÓ‚ÎÂÌÌfl, ÔË·‰
ÔÓ‚ËÌÂÌ ·ÛÚË ÓÁÚ‡¯Ó‚‡ÌËÈ Ú‡Í,
˘Ó· ¯ÚÂÔÒÂθ̇ ‚ËÎ͇ Ú‡ ÓÁÂÚ͇
ÂÎÂÍÚÓÔÓÒÚ‡˜‡ÌÌfl ·ÛÎË Î„ÍÓ
‰ÓÒÚÛÔÌ¥.
UKR EN
Be sure the programme
chart, inserted in the proper
place, is in the correct
language or replace it with
the proper chart supplied
with the machine.
Use front foot to level the
machine with the floor.
a) Turn the nut clockwise to
release the screw adjuster of
the foot.
b) Rotate foot to raise or
lower it until it stands firmly on
the ground.
c) Lock the foot in position
by turning the nut anti-
clockwise until it comes up
against the bottom of the
machine.
Insert the plug.
After installation, the
appliance must be
positioned so that the plug is
accessible.
Loading ...
Loading ...
Loading ...