The air which is drawn in is cleaned by the grease filters and conveyed to the exterior by a pipe system.
The air must not be discharged into a flue that is used for exhausting fumes from appliances burning gas or other fuels (not applicable to appliances that only discharge the air back into the room).
If the exhaust air is to be conveyed into a non-functioning smoke or exhaust gas flue, you must obtain the consent of the heating engineer responsible.
If the exhaust air is conveyed through the external wall, a telescopic duct should be used.
Air recirculation mode
The air which is drawn in is cleaned by the grease filters and an odour filter, and conveyed back into the room.
To bind odours in circulating-air mode, you must install an odour filter. The different options for operating the appliance in circulating-air mode can be found in our catalogue. Alternatively, ask your dealer. The required accessories are available from specialist retailers, from customer service or from the Online Shop.
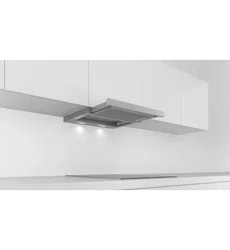
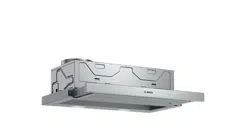
Familiarising yourself with your appliance
Controls, variant 1 and 2
The controls are used to configure all functions of your appliance and to obtain information about the operating status.
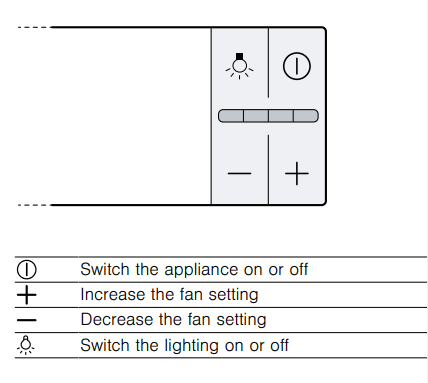
Controls, variant 3
The controls are used to configure all functions of your appliance and to obtain information about the operating status.
Basic operation
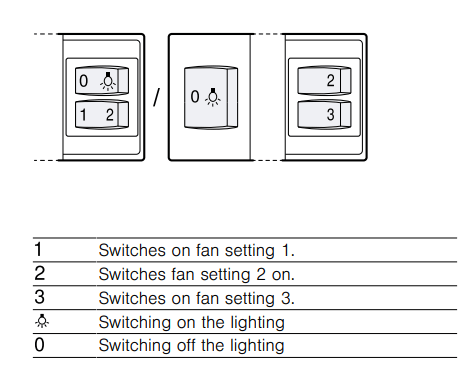
Control panel, variant 1 and 2
Switching on the appliance
Pull out the filter pull-out.
The appliance starts at the selected fan setting.
Switching off the appliance
Slide the filter pull-out as far as it will go.
Selecting a fan setting
Press 1, 2 or 3.
Switching on the lighting
The lighting can be switched on and off independently of the ventilation system.
Press .
Switching off the lighting
Press 0.
Control panel, variant 3
Switching on the appliance
Pull out the filter pull-out.
Press .
The appliance starts at fan setting 2.
Switching off the appliance
Press .
Slide in the filter pull-out.
Selecting a fan setting
Press + or - .
Switching on intensive mode: If particularly strong odours or vapours develop, you can use intensive mode.
Press + repeatedly until all of the LEDs in the display light up.
After approx. six minutes, the appliance automatically switches to a lower fan setting.
Switching off intensive mode
To select a fan setting of your choice, press -.
Switching on the fan run-on:
During the fan run-on, the appliance continues to run for a short time and then switches off automatically.
Requirement: The appliance is switched on.
Slide in the filter pull-out.
The appliance switches off automatically after approx. 10 minutes.
Switching on the lighting:
The lighting can be switched on and off independently of the ventilation system.
Press .
Cleaning and servicing
To keep your appliance working efficiently for a long time, it is important to clean and maintain it carefully
Cleaning products
You can obtain suitable cleaning products from aftersales service or the online shop.
WARNING ‒ Risk of electric shock! An ingress of moisture can cause an electric shock.
Before cleaning, pull out the mains plug or switch off the fuse in the fuse box.
Do not use steam- or high-pressure cleaners to clean the appliance.
WARNING ‒ Risk of burns! The appliance will become hot during operation.
Allow the appliance to cool down before cleaning it.
ATTENTION! Unsuitable cleaning products may damage the surfaces of the appliance.
Do not use harsh or abrasive detergents.
Do not use cleaning products with a high alcohol content.
Do not use hard scouring pads or cleaning sponges.
Do not use any special cleaners for cleaning the appliance while it is hot.
Only use glass cleaners, glass scrapers or stainless steel care products if recommended in the cleaning instructions for the relevant part.
Wash sponge cloths thoroughly before use.
Cleaning the appliance
Clean the appliance as specified. This will ensure that the different parts and surfaces of the appliance are not damaged by incorrect cleaning or unsuitable cleaning products.
WARNING ‒ Risk of explosion! Highly caustic alkaline or highly acidic cleaning agents in conjunction with aluminium parts in the interior of the appliance may cause explosions.
Never use highly caustic alkaline or highly acidic cleaning agents. In particular, do not use commercial or industrial cleaning agents in conjunction with aluminium parts, e.g. grease filter on extractor hoods.
WARNING ‒ Risk of electric shock! An ingress of moisture can cause an electric shock.
Before cleaning, pull out the mains plug or switch off the fuse in the fuse box.
Do not use steam- or high-pressure cleaners to clean the appliance.
WARNING ‒ Risk of burns! The appliance will become hot during operation.
Allow the appliance to cool down before cleaning it.
WARNING ‒ Risk of injury! Components inside the appliance may have sharp edges. Carefully clean the appliance interior.
Observe the information regarding the cleaning agents. → "Cleaning products"
Clean as follows, depending on the surface:
Clean stainless steel surfaces in the direction of the finish using a sponge cloth and hot soapy water.
Clean painted surfaces using a damp sponge cloth and hot soapy water.
Clean aluminium using a soft cloth and glass cleaner.
Clean plastic using a soft cloth and glass cleaner.
Clean glass using a soft cloth and glass cleaner.
Dry with a soft cloth.
Apply a thin layer of the stainless steel cleaning product to stainless steel surfaces using a soft cloth. You can obtain stainless steel cleaning products from the after-sales service or the online shop.
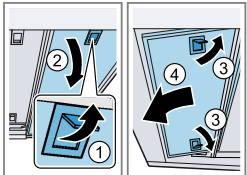
Removing the grease filter
Pull out the filter pull-out fully.
ATTENTION! Falling grease filters may damage the hob below. Grip below the grease filter with one hand. Note: Remove the grease filter in the filter pull-out first, then remove the grease filters in the appliance. Open the locks on the grease filters.
Remove the grease filters from the holders. To prevent grease from dripping, hold the grease filter horizontally
Cleaning grease filters in the dishwasher
The grease filters filter the grease from the cooking vapour. Regularly cleaned grease filters guarantee a high level of grease removal.
WARNING ‒ Risk of fire! Fatty deposits in the grease filters may catch fire.
Clean the grease filters roughly every 2 months.
ATTENTION! The grease filters may become damaged if they are squeezed.
Do not squeeze the grease filters.
Note: When cleaning the grease filter in the dishwasher, light discolouration may occur. This discolouration has no effect on the performance of the metal grease filters.
Requirement: The grease filters have been removed. → "Removing the grease filter"
Observe the information regarding the cleaning agents. → "Cleaning products"
Place the grease filters loosely into the dishwasher. Do not clean heavily soiled grease filters with utensils. Use special grease solvent for stubborn dirt. You can obtain grease solvents from after-sales service or the online shop.
Start the dishwasher. Select a temperature of no more than 70 °C.
Allow the grease filters to drain.
Cleaning grease filters manually
The grease filters filter the grease from the cooking vapour. Regularly cleaned grease filters guarantee a high level of grease removal.
WARNING ‒ Risk of fire! Fatty deposits in the grease filters may catch fire.
Clean the grease filters roughly every 2 months.
Requirement: The grease filters have been removed. → "Removing the grease filter"
Observe the information regarding the cleaning agents. → "Cleaning products"
Soak the grease filter in hot soapy water. Use special grease solvent for stubborn dirt. You can obtain grease solvents from after-sales service or the online shop.
Use a brush to clean the grease filters.
Rinse the grease filters thoroughly.
Allow the grease filters to drain.
Fitting grease filters
ATTENTION! Falling grease filters may damage the hob below. Grip below the grease filter with one hand.
Fit the grease filters.
Fold the grease filters upwards and engage the locks.
Make sure that the locks engage.
Troubleshooting
You can rectify minor faults on your appliance yourself. Read the troubleshooting information before contacting after-sales service. This will avoid unnecessary costs.
WARNING ‒ Risk of injury! Improper repairs are dangerous.
Repairs to the appliance should only be carried out by trained specialist staff.
If the appliance is defective, call Customer Service.
WARNING ‒ Risk of electric shock! Incorrect repairs are dangerous.
Repairs to the appliance should only be carried out by trained specialist staff.
Only use genuine spare parts when repairing the appliance.
If the power cord of this appliance is damaged, it must be replaced by the manufacturer, the manufacturer's Customer Service or a similarly qualified person in order to prevent any risk.
Malfunctions
Fault
Cause and troubleshooting
The appliance is not working.
The mains plug of the power cord is not plugged in.
Connect the appliance to the power supply.
The circuit breaker is faulty.
Check the circuit breaker in the fuse box.
There has been a power cut.
Check whether the lighting in your kitchen or other appliances are working
The LED lighting does not work.
Different causes are possible.
Defective LED lights may be replaced by the manufacturer, their customer service or a qualified technician (electrician) only.

 Pull out the filter pull-out.
 The appliance starts at the selected fan setting.
 .
. .
.