
ASSEMBLY/OWNER’S
MANUAL
ASSEMBLY/OWNER’S
MANUAL

2
Table of Contents
Important Safety Instructions 3
Safety Warning Labels / Serial Number 5
Specications 6
BeforeAssembly 6
Tools 6
Parts 7
Hardware 7
Assembly 8
Leveling the Bike 17
Moving the Bike 17
Features 18
Operations 21
Adjustments 21
Workout Mode 22
Pausing or Stopping 22
Workout Results 23
Maintenance 24
Troubleshooting 26
Warranty (US/Canada only) 30
To validate warranty support, keep the original proof of purchase and record the following
information:
Serial Number __________________________
Date of Purchase __________________________
If purchased in US/Canada: To register your product warranty, go to: www.nautilus.com/
registerorcall1(800)605–3369.
If purchased outside US/Canada: To register your product warranty, contact your local
distributor.
For details regarding product warranty or if you have questions or problems with your
product,pleasecontactyourlocaldistributor.Tondyourlocaldistributor,goto:www.
nautilusinternational.com
Nautilus,Inc.,5415CenterpointParkway,Groveport,OH43125USA,www.NautilusInc.com-
CustomerService:NorthAmerica(800)605-3369,[email protected]|outsideU.S.orCanada:www.
nautilusinternational.com|PrintedinChina|©2018Nautilus,Inc.|®indicatestrademarksregisteredin
theUnitedStates.Thesemarksmayberegisteredinothernationsorotherwiseprotectedbycommon
law.Schwinn,theSchwinnQualitylogo,andClassicCruiseraretrademarksownedbyorlicensedto
Nautilus,Inc.GooglePlay™,andiTunes
®
aretrademarksoftheirrespectiveowners.TheBluetooth
®
wordmarkandlogosareregisteredtrademarksownedbyBluetoothSIG,Inc.,andanyuseofsuch
marksbyNautilus,Inc.isunderlicense.
ORIGINALMANUAL-ENGLISHVERSIONONLY

3
!
This icon means a potentially hazardous situation which, if not avoided,
could result in death or serious injury.
Obey the following warnings:
!
Read and understand all warnings on this machine.
Carefully read and understand the Assembly instructions.
• Keepbystandersandchildrenawayfromtheproductyouareassemblingatalltimes.
• Donotconnectpowersupplytothemachineuntilinstructedtodoso.
• Donotassemblethismachineoutdoorsorinawetormoistlocation.
• Makesureassemblyisdoneinanappropriateworkspaceawayfromfoottrafcand
exposuretobystanders.
• Somecomponentsofthemachinecanbeheavyorawkward.Useasecondperson
whendoingtheassemblystepsinvolvingtheseparts.Donotdostepsthatinvolve
heavyliftingorawkwardmovementsonyourown.
• Setupthismachineonasolid,level,horizontalsurface.
• Donottrytochangethedesignorfunctionalityofthismachine.Thiscould
compromisethesafetyofthismachineandwillvoidthewarranty.
• If replacement parts are necessary, use only genuine Nautilus replacement parts and
hardware.Failuretousegenuinereplacementpartscancausearisktousers,keep
themachinefromoperatingcorrectlyandvoidthewarranty.
• Do not use until the machine has been fully assembled and inspected for correct
performanceinaccordancewiththeManual.
• ReadandunderstandthecompleteManualsuppliedwiththismachinebeforerstuse.
KeeptheManualforfuturereference.
• Doallassemblystepsinthesequencegiven.Incorrectassemblycanleadtoinjuryor
incorrectfunction.
• SAVETHESEINSTRUCTIONS.
Before using this equipment, obey the following warnings:
!
Read and understand the complete Manual. Keep the Manual for future
reference.
Read and understand all warnings on this machine. If at any time the
Warning labels become loose, unreadable or dislodged, replace the labels. If
purchased in US/Canada, contact Customer Service for replacement labels. If
purchased outside US/Canada, contact your local distributor for them.
• Childrenmustnotbeletonorneartothismachine.Movingpartsandotherfeaturesof
themachinecanbedangeroustochildren.
• Notintendedforusebyanyoneunder14yearsofage.
• Consultaphysicianbeforeyoustartanexerciseprogram.Stopexercisingifyoufeel
painortightnessinyourchest,becomeshortofbreath,orfeelfaint.Contactyour
doctorbeforeyouusethemachineagain.Usethevaluescalculatedormeasuredby
themachine’scomputerforreferencepurposesonly.
• Before each use, examine this machine for damage to power cord, power receptacle,
loosepartsorsignsofwear.Inspectallcables,pulleysandtheirconnections,making
sure they are properly secured and attached, and show no signs of visible wear or
damage.Donotuseiffoundinthiscondition.IfpurchasedinUS/Canada,contact
Important Safety Instructions

4
CustomerServiceforrepairinformation.IfpurchasedoutsideUS/Canada,contact
yourlocaldistributorforrepairinformation.
• This appliance should only be used with the power supply unit provided, or a
replacementpowersupplyunitsuppliedfromNautilus,Inc.
• Maximumuserweightlimit:136kg(300lbs.).Donotuseifyouareoverthisweight.
• Thismachineisforhomeuseonly.
• Donotwearlooseclothingorjewelry.Thismachinecontainsmovingparts.Donotput
ngersorotherobjectsintomovingpartsoftheexerciseequipment.
• Setupandoperatethismachineonasolid,level,horizontalsurface.
• MakethePedalsstablebeforeyousteponthem.Usecautionwhenyousteponand
offthemachine.
• Disconnectallpowerbeforeservicingthismachine.
• Donotoperatethismachineoutdoorsorinmoistorwetlocations.Keepthefoot
pedalscleananddry.
• Keepatleast0.6m(24”)oneachsideofthemachineclear.Thisistherecommended
safe distance for access and passage around and emergency dismounts from the
machine.Keepthirdpartiesoutofthisspacewhenmachineisinuse.
• Donotoverexertyourselfduringexercise.Operatethemachineinthemanner
describedinthismanual.
• CorrectlyadjustandsafelyengageallPositionalAdjustmentDevices.Makesurethat
theAdjustmentDevicesdonothittheuser.
• Exerciseonthismachinerequirescoordinationandbalance.Besuretoanticipatethat
changes in speed and resistance level can occur during workouts, and be attentive in
ordertoavoidlossofbalanceandpossibleinjury.
• Priortouse,readandunderstandtheowner’smanual.Theapplianceisnottobe
used by persons with functional limitations and impairments, reduced physical,
sensoryormentalcapabilities,orlackofexperienceandknowledge.

5
FCC Compliance
!
Changes or modications to this unit not expressly approved by the party
responsible for compliance could void the user’s authority to operate the
equipment.
ThemachineandpowersupplycomplywithPart15oftheFCCrules.Operationissubject
to the following two conditions: (1) This device may not cause harmful interference, and (2)
this device must accept any interference received, including interference that may cause
undesiredoperation.
Note: This machine and power supply have been tested and found to comply with the
limitsforaClassBdigitaldevice,pursuanttoPart15oftheFCCRules.These
limits are designed to provide reasonable protection against harmful interference
inaresidentialinstallation.Thisequipmentgenerates,usesandcanradiateradio
frequency energy and, if not installed and used in accordance with the instructions,
maycauseharmfulinterferencetoradiocommunications.
However,thereisnoguaranteethatinterferencewillnotoccurinaparticularinstallation.If
this equipment does cause harmful interference to radio or television reception, which can
be determined by turning the equipment off and on, the user is encouraged to try to correct
the interference by one or more of the following measures:
•Reorientorrelocatethereceivingantenna.
•Increasetheseparationbetweentheequipmentandreceiver.
• Connect the equipment into an outlet on a circuit different from that to which the receiver
isconnected.
•Consultthedealeroranexperiencedradio/TVtechnicianforhelp.
Serial Number and Product
Specications
WARNING!
• Injury or death is possible if
caution is not used while using
thismachine.
• Keep children and pets
away.
• Read and follow all warnings on
thismachine.
• Refer to the Owner’s Manual for
additional warnings and safety
information.
• The heart rate displayed is an
approximation and should be
usedforreferenceonly.
• Not intended for use by anyone
under14yearsofage.
• The maximum user weight for this
machineis300lbs(136kg).
• This machine is for home use
only.
• Consult a physician prior to using
anyexerciseequipment.
Safety Warning Labels and Serial Number
(LabelisavailableinEnglishandFrenchCanadianonly.)
6
Before Assembly
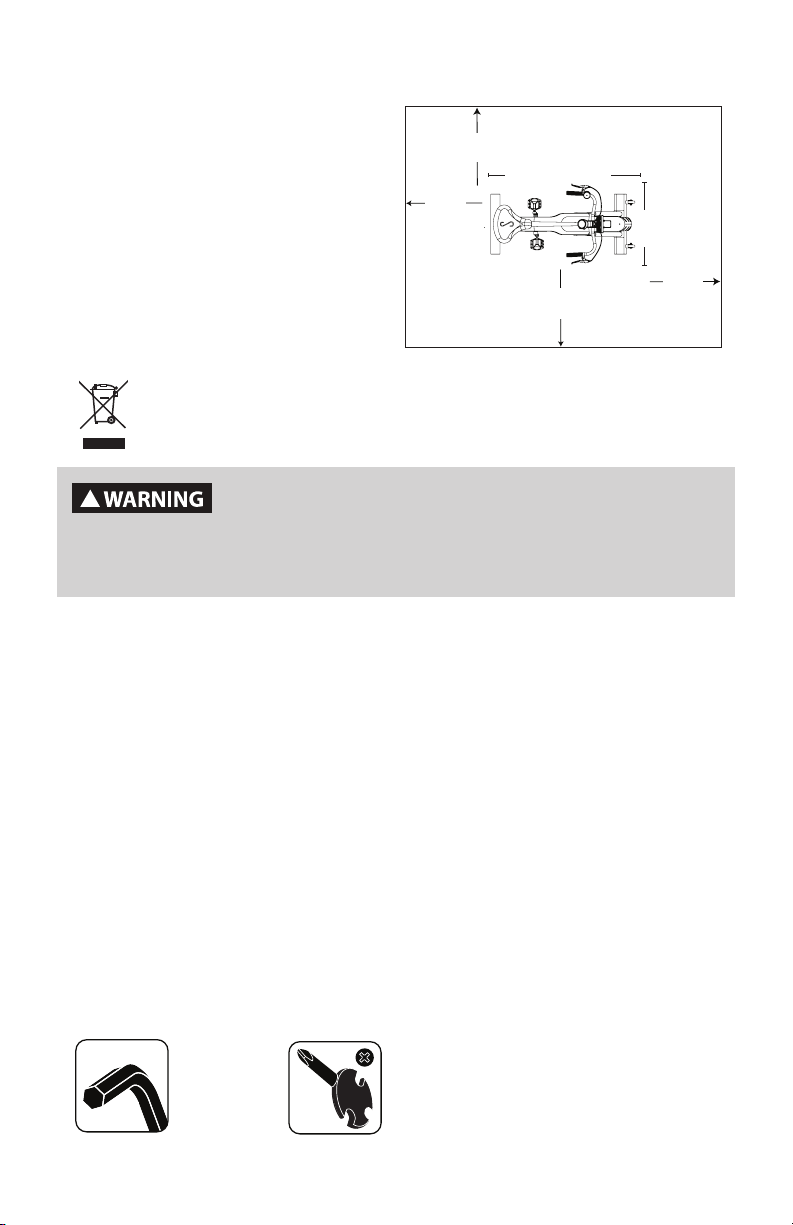
Selecttheareawhereyouaregoingtosetupandoperateyourmachine.Forsafe
operation,thelocationmustbeonahard,levelsurface.Allowaworkoutareaofa
minimum242.6cmx179cm(95.5”x70.5”).
Basic Assembly Tips
Follow these basic points when you assemble your machine:
1.Readandunderstandthe“ImportantSafetyInstructions”beforeassembly.
2.Collectallthepiecesnecessaryforeachassemblystep.
3.Usingtherecommendedwrenches,turntheboltsandnutstotheright(clockwise)to
tighten,andtheleft(counterclockwise)toloosen,unlessinstructedotherwise.
4.Whenattaching2pieces,lightlyliftandlookthroughtheboltholestohelpinsertthebolt
throughtheholes.
5.Theassemblyrequires2people.
Maximum User Weight:136kg(300lbs.)
Machine Weight: 33.1kg(73lbs.)
Power Requirements:
InputVoltage:100-240VAC,50-60Hz,
0.4A
OutputVoltage: 9VDC,1.5A
DONOTdisposeofthisproductasrefuse.Thisproductistoberecycled.For
proper disposal of this product, please follow the prescribed methods at an
approvedwastecenter.
!
This product, its packaging, and components contain chemicals
known to the State of California to cause cancer, birth defects, or
reproductive harm. This Notice is provided in accordance with
California’s Proposition 65. If you would like additional informa-
tion, please refer to our website at www.nautilus.com/prop65.
Tools
Included
5 mm
Specifications / Tools
2.4 m (95.5”)
1.8 m
(70.5”)
0.6 m
( 24” )
0.6 m
( 24” )
0.6 m
( 24” )
0.6 m
( 24” )
120.7 cm (47.5”)
57.2 cm
(22.5”)
MachineHeight:122cm(48”)
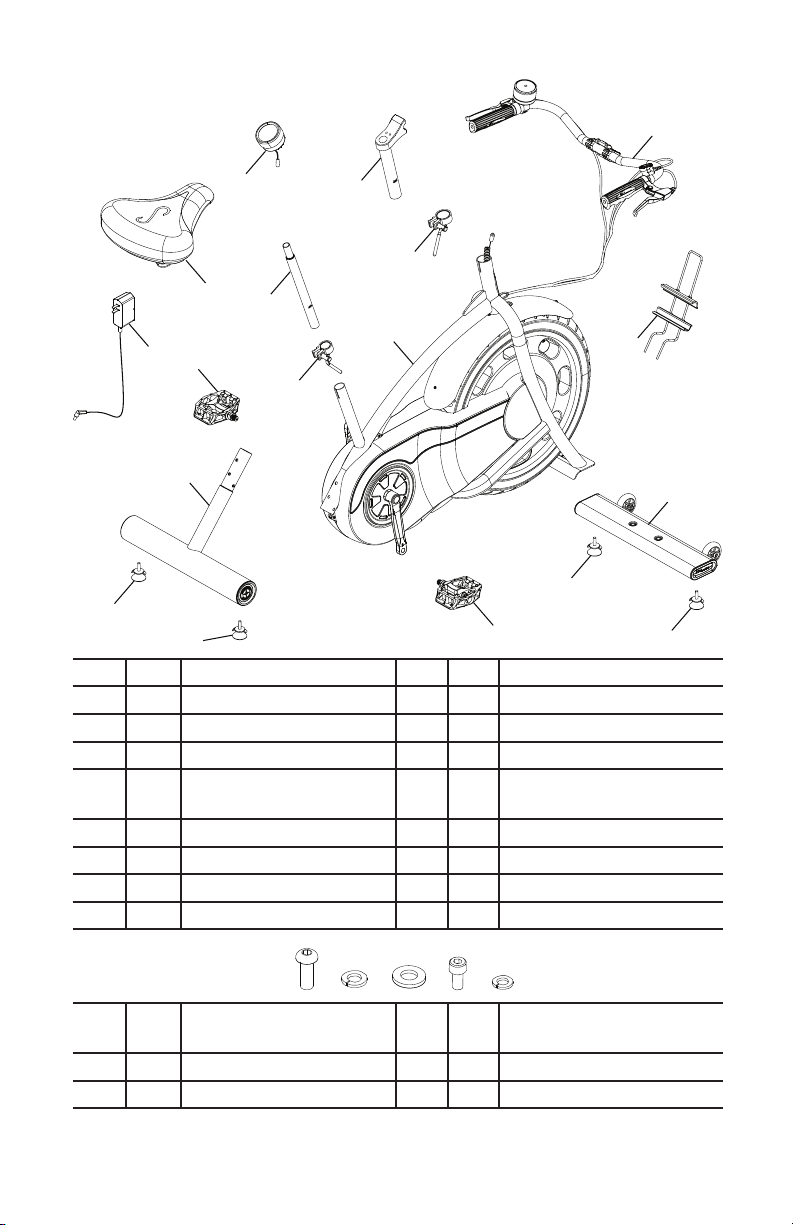
7
Item Qty Description Item Qty Description
1 1 Handlebar Post 9 1 Seat Adjustment Clamp
2 1 Handlebar Assembly 10 1 Seat Post
3 1 Media Rack 11 1 Seat
4 1 Handlebar Adjustment
Clamp
12 1 Console
5 1 Frame Assembly 13 1 Pedal, Left
6 1 Front Stabilizer 14 1 Rear Stabilizer
7 4 Leveler 15 1 Power Supply
8 1 Pedal, Right
A 6 Button Head Hex Screw,
M8 x 20
D 4 Socket Head Cap Screw,
M6x12
B 6 Lock Washer, M8 E 4 LockWasher,M6
C 6 Flat Washer, M8
Note: SelectpiecesofHardwarehavebeenprovidedassparesontheHardwareCard.Be
awarethattheremayberemainingHardwareaftertheproperassemblyofyourmachine.
1
3
2
6
8
14
15
13
10
11
5
12
larger diame-
ter clamp
4
9
7
7
7
7
A B D
C E
Parts / Hardware

8
5
X6
A
B
C
5mm
Note: Because of the cables that run from the Handlebars to inside the Frame Assembly,
besuretocarefullyunpackandplacetheHandlebarsinfrontoftheFrameAssembly.Be
surenottocrimpthecablesduringunpackingorassembly.
1. Attach Levelers to the Front and Rear Stabilizers
14
6
7
7
Assembly
9
5
X6
A
B
C
5mm
2. Attach the Stabilizers to the Frame Assembly
10
4. Place the Seat and Handlebar Adjustment Clamps on the Frame Assembly
NOTICE: Orient the clamps so the inner ridge rests on the top of the posts from the
FrameAssembly.Donotfullytighten.
3. Attach the Seat to the Seat Post
NOTICE: Tighten the bolts on each side of the Seat bracket to hold the Seat in posi-
tion.
11
10
9
4
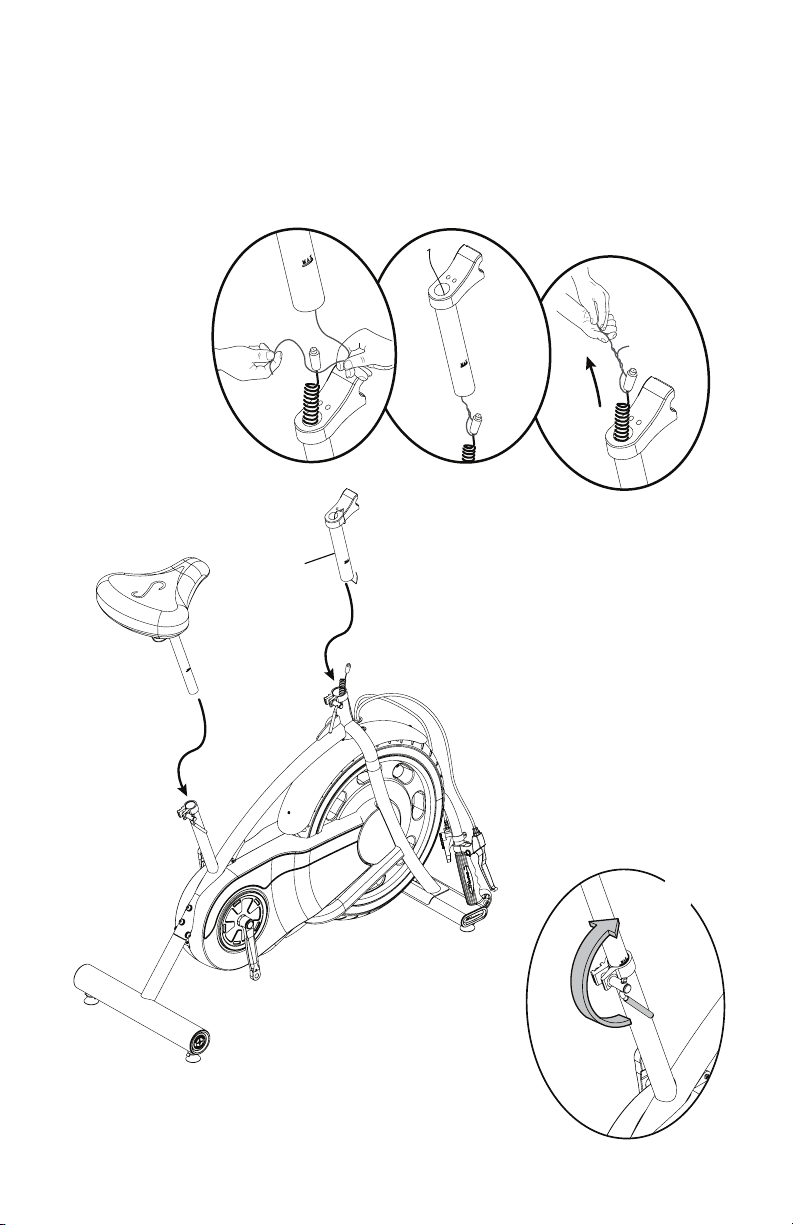
11
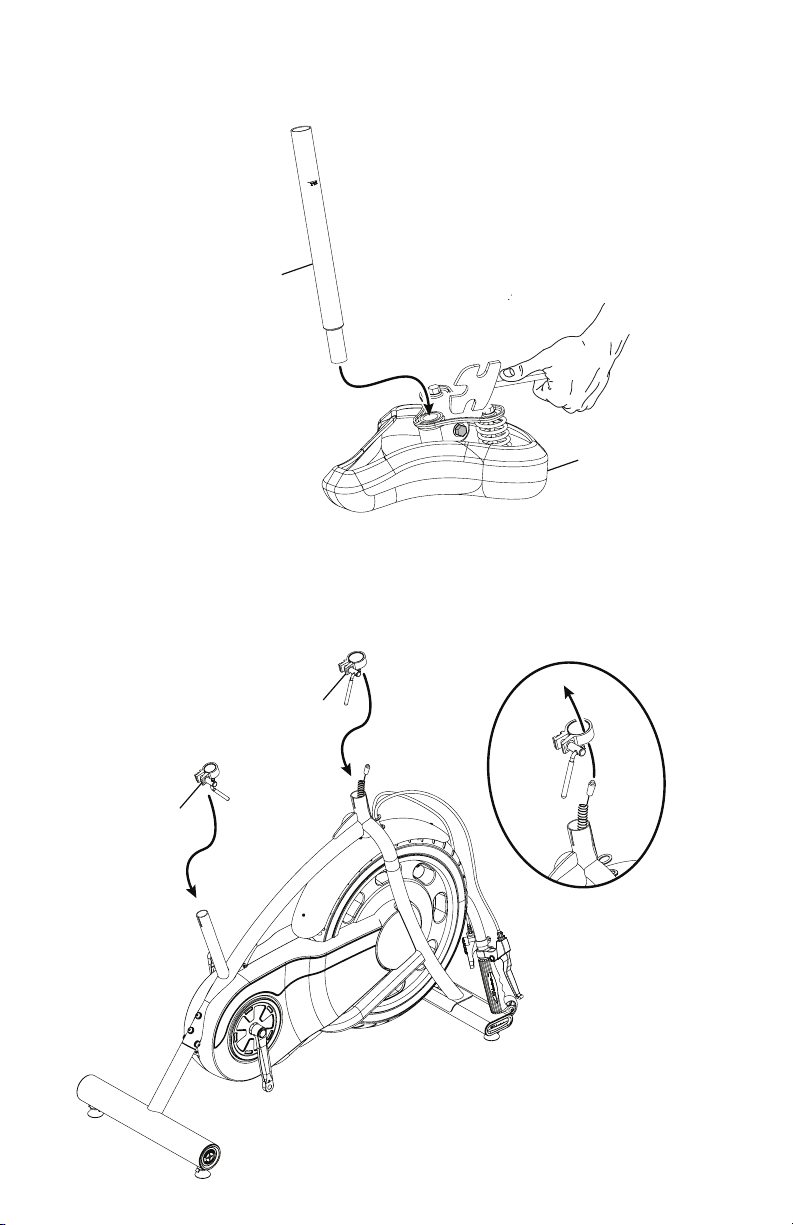
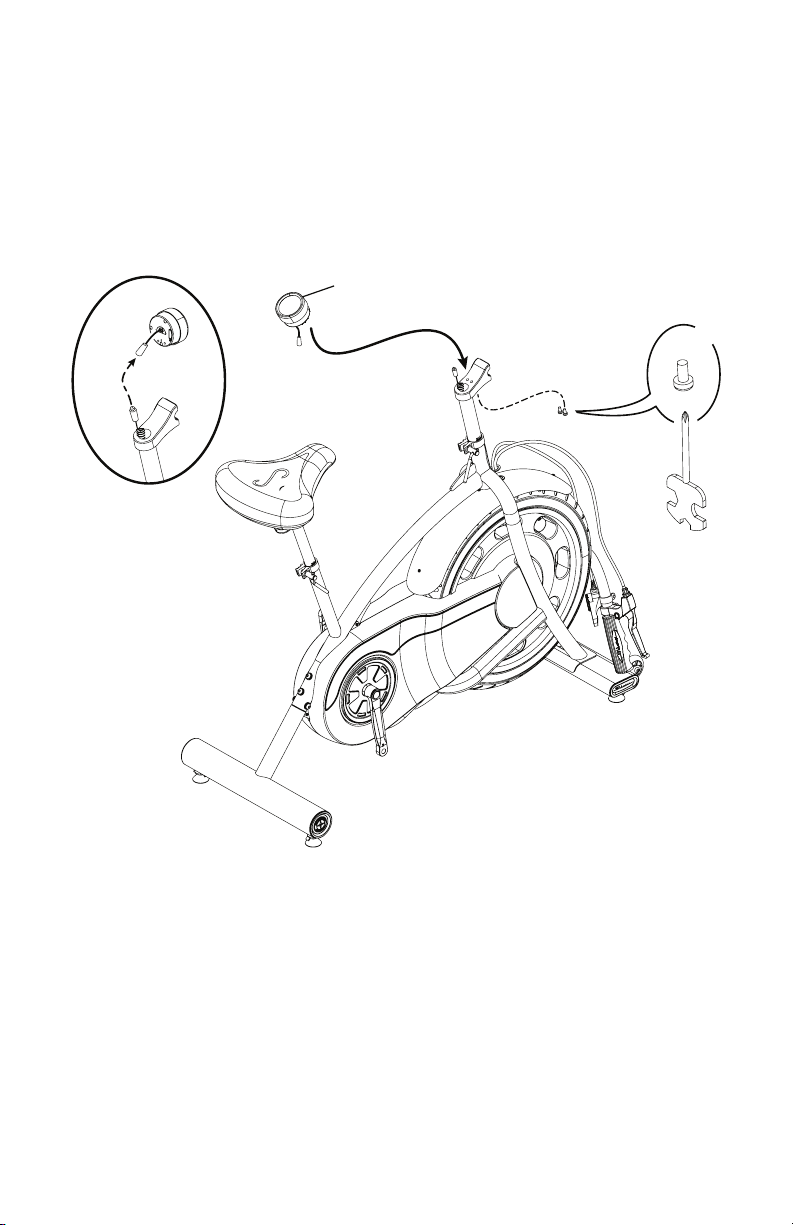
5. Route the Console Cable through the Handlebar Post. Attach the Handlebar and
Seat Posts to the Frame Assembly
NOTICE:Donotcrimpthecable.Makesuretheadjustmentleversfullyengagethe
Posts.
BesurethePostsarebelowthemaximumheightmarks.
1
X2
1
X2
1
X2
12
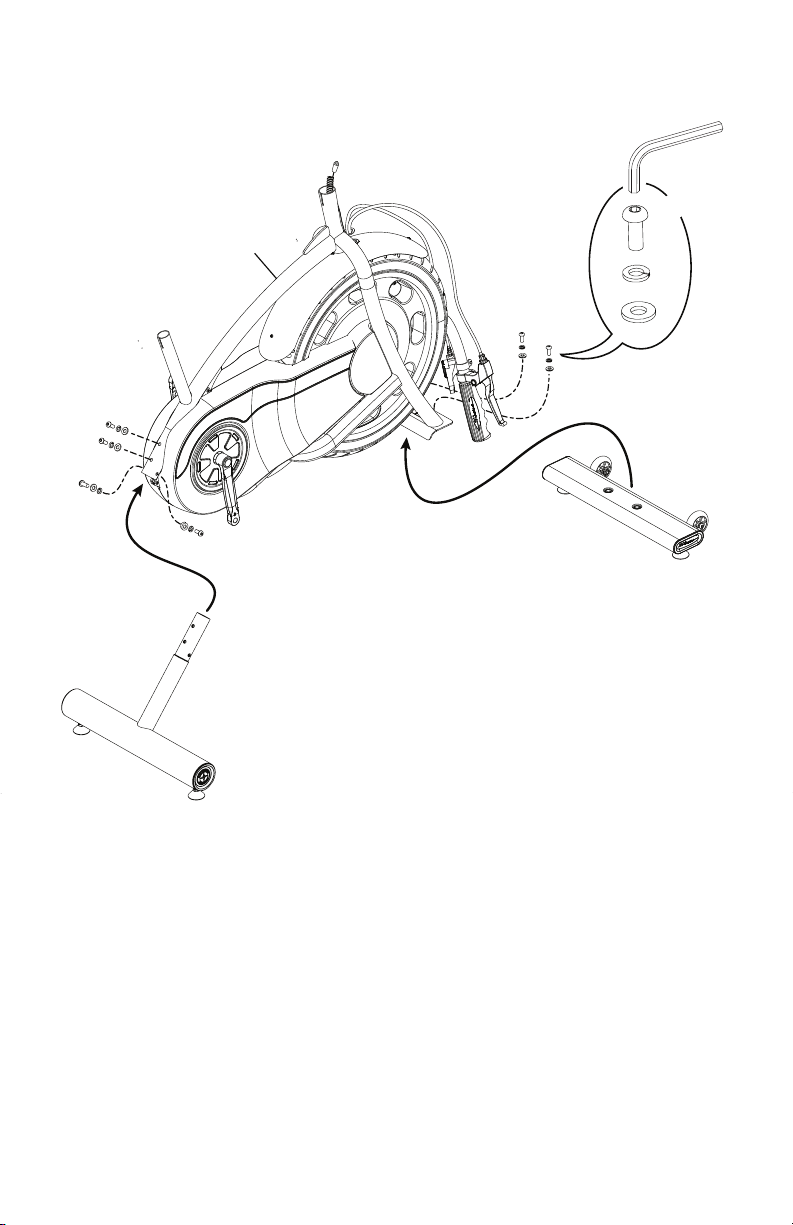
6. Attach the Console to the Frame Assembly
NOTICE:Donotcrimpthecable.Hardwareispre-installedandnotontheHardware
Card (*).
12
*
X2
13
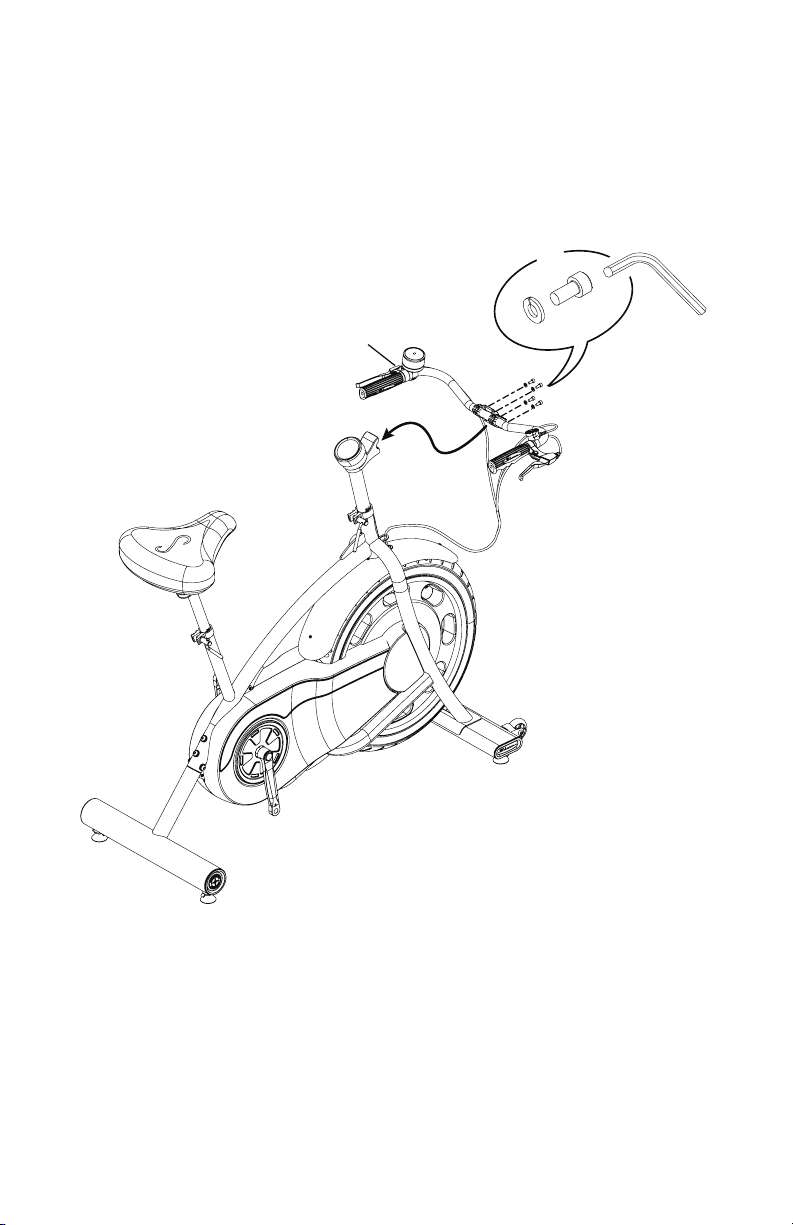
7. Attach the Handlebars to the Frame Assembly
Note:BesurenottocrimpanycableswhenattachingtheHandlebars.
2
X4
D
E
5mm
14
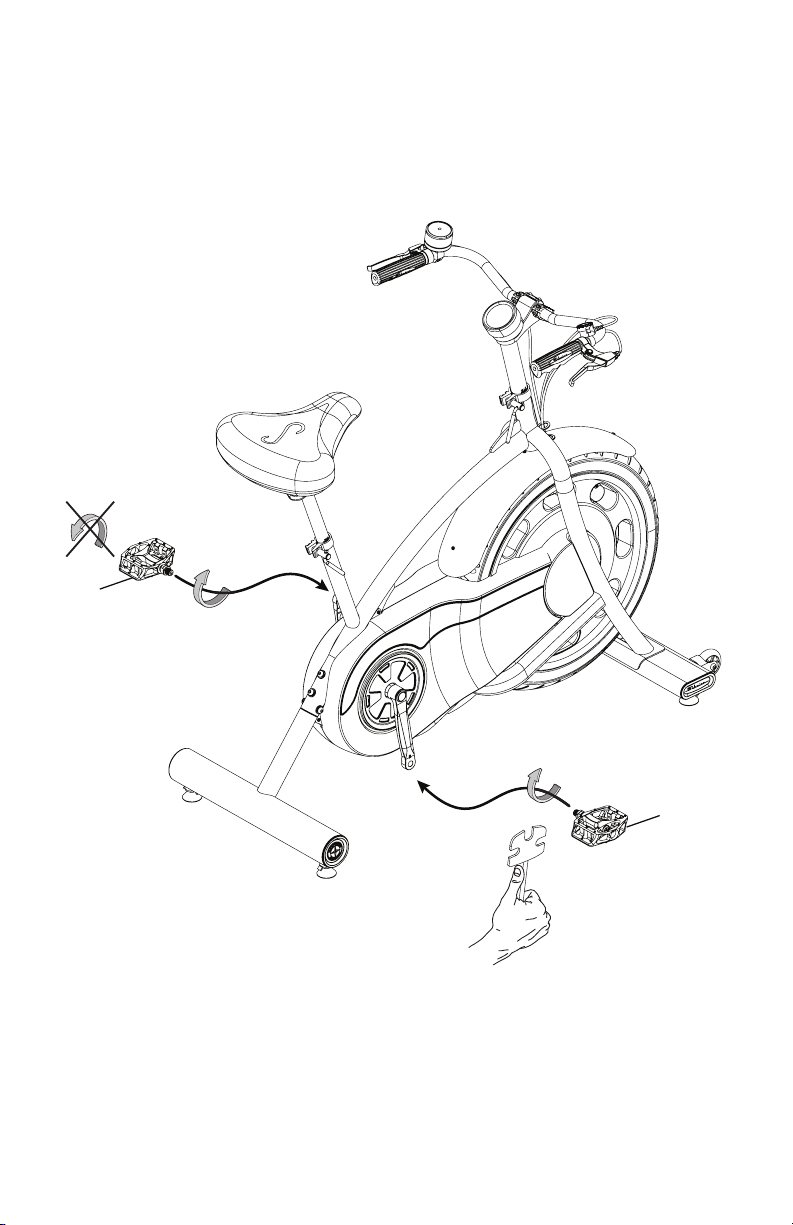
8. Attach Pedals to Frame Assembly
Note: The Left Pedal is reverse-threaded. Be sure to attach Pedals on the
propersideofheBike.Orientationisbasedfromaseatedpositiononthebike.
TheLeftPedalhasan“L”,theRightPedalan“R”.
8
13
15
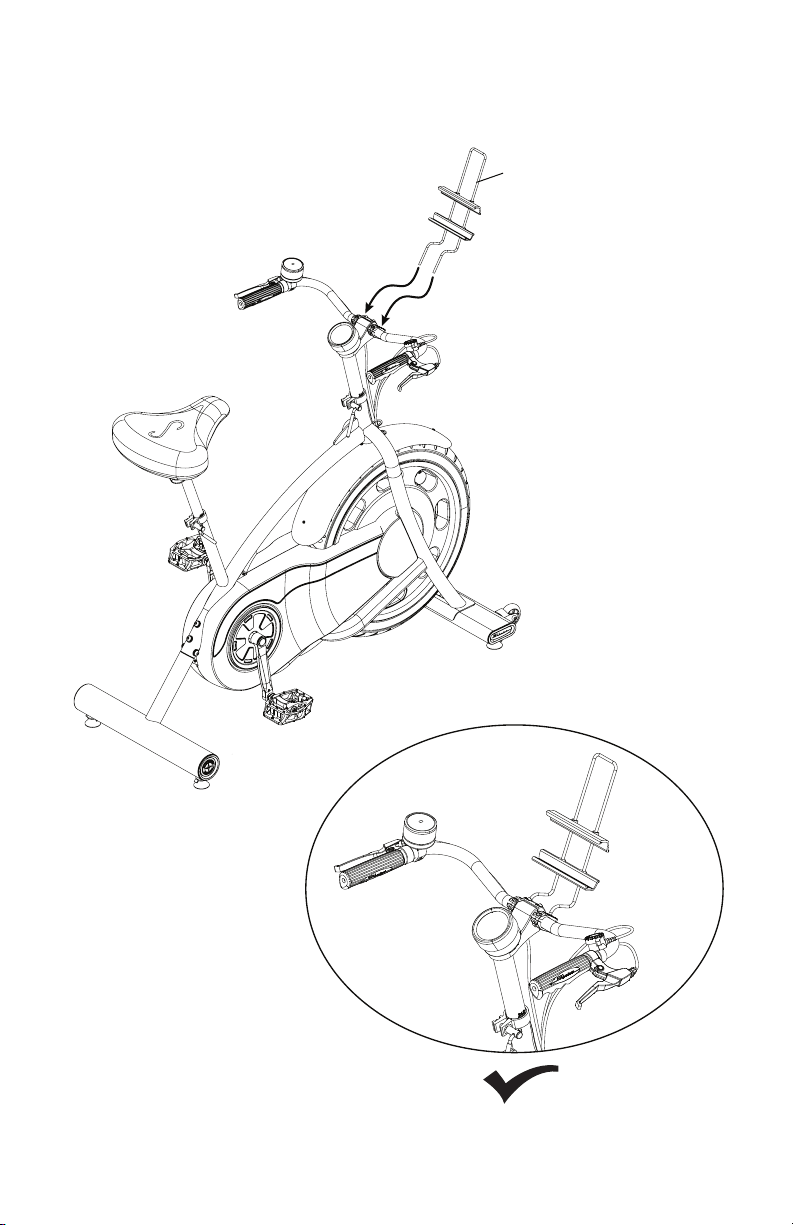
9. Attach Media Rack to Frame Assembly
Note: Adjust the Media Rack to the desired orientation, and fully tighten the hard-
warethatsecuresittotheHandlebars.
3
3
16
10. On the Handlebars, inspect the orientation of the Timer, Resistance Shifter, and
Brake Levers. Adjust for Proper Positioning
11. Fully Tighten All Hardware from Previous Steps
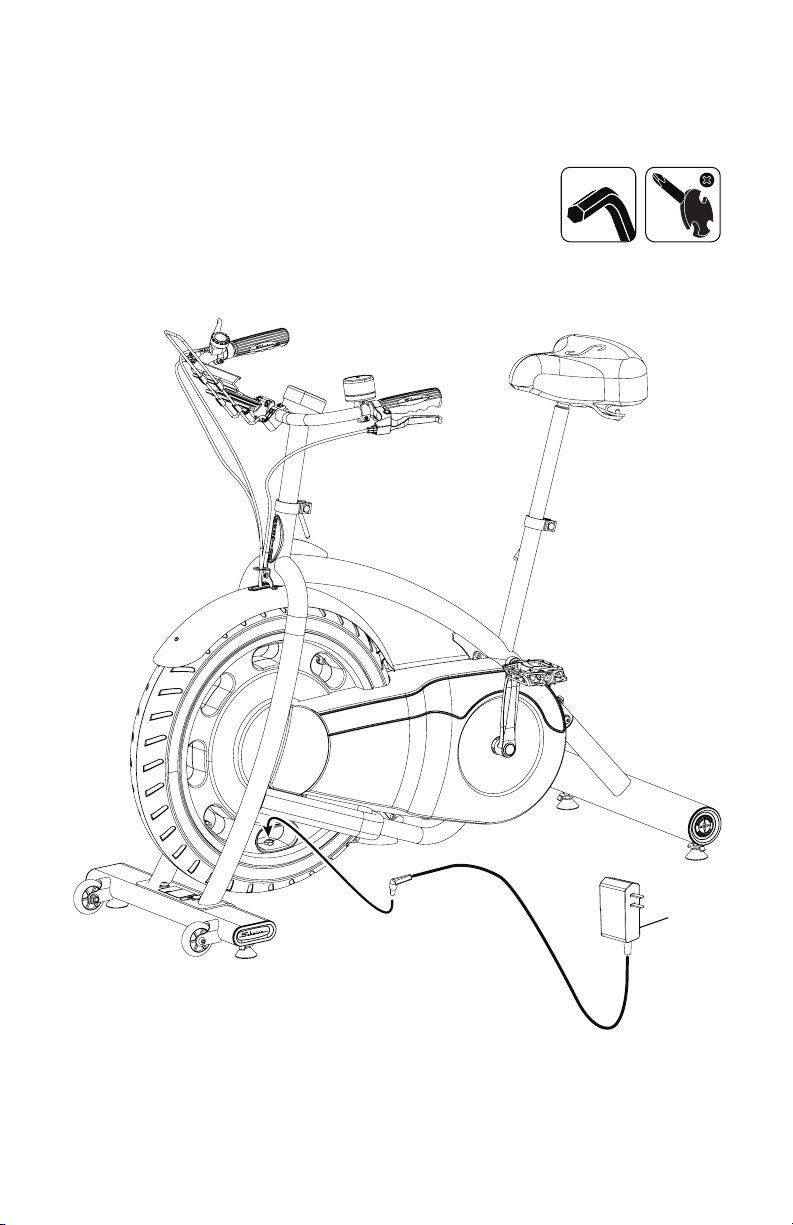
12. Connect AC Power Adapter to Frame Assembly
15
17
13. Final Inspection
Inspect your machine to ensure that all hardware is tight and components are properly
assembled.
Besuretorecordtheserialnumberinthefieldprovidedatthefrontofthismanual.Referto
theSafetyWarningLabelsandSerialNumbersectionofthismanual.
!
Do not use or put the machine into service until the machine has been fully
assembled and inspected for correct performance in accordance with the
Owner’s Manual.
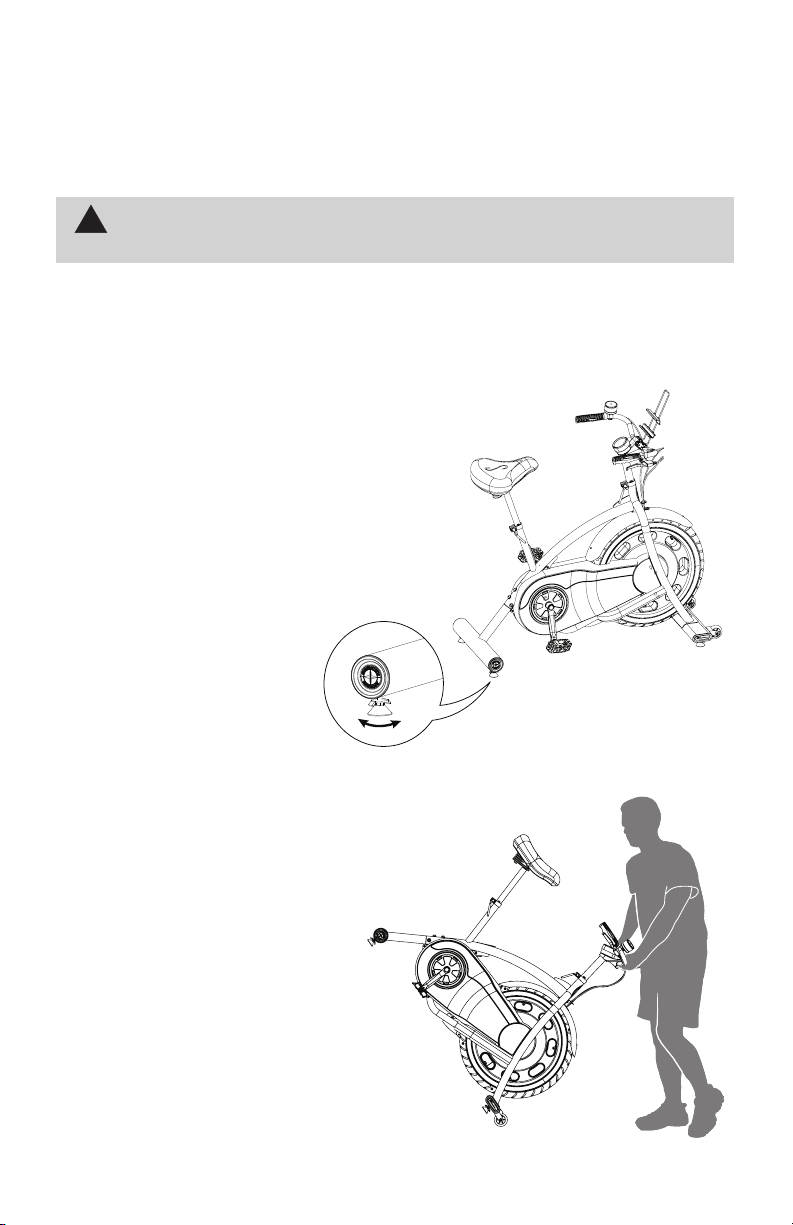
Leveling the Bike
Levelersarefoundoneachsideofthestabilizers.Turntheknobtoadjustthestabilizer
foot.Makesurethebikeislevelandstablebeforeyouexercise.
Moving the Bike
To move the bike, carefully pull the
Handlebars toward you while pushing the
frontofthebikedownward.Pushthebike
tothedesiredlocation.
NOTICE: Be careful when you move the
machine.Abruptmotionscan
affectthecomputeroperation.
18
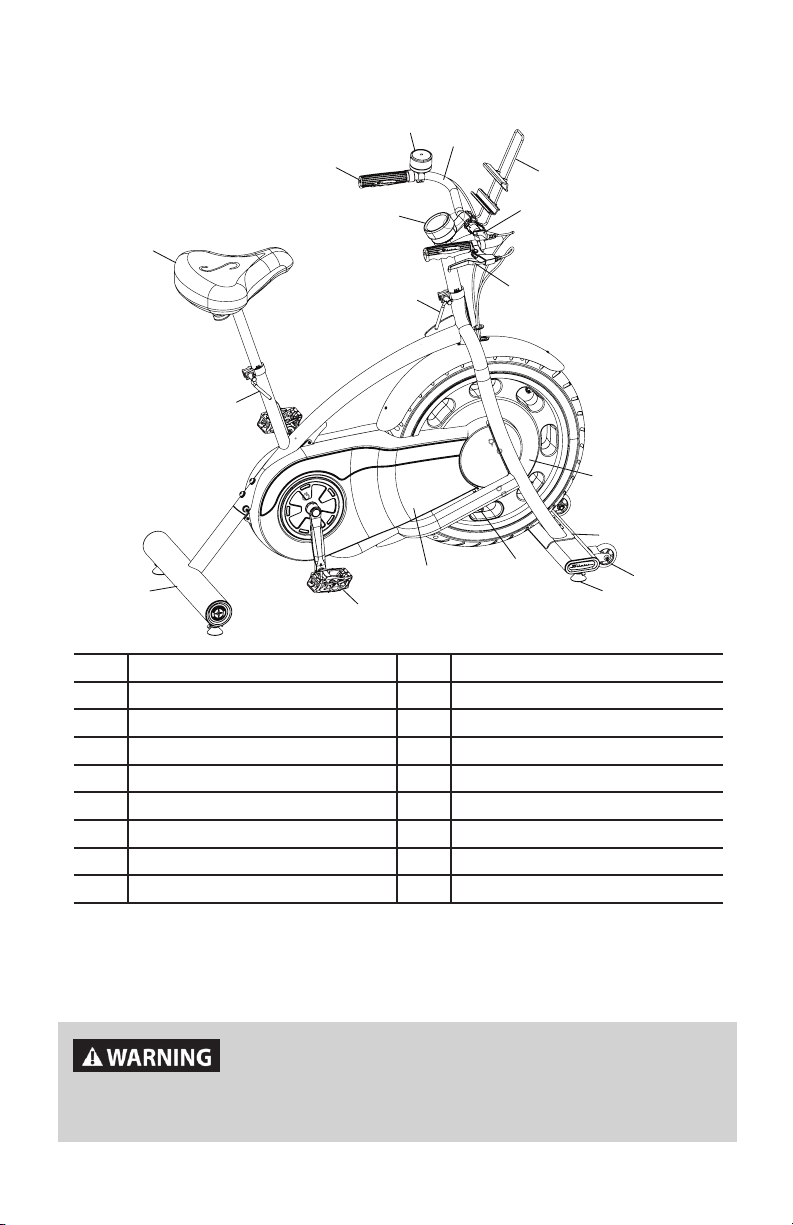
Features
R
Q
P
O
N
M
L
K
I
H
B
A
C
D
E
F
G
J
Use the values calculated or measured by the machine’s
computer for reference purposes only. Over exercising may
result in serious injury or death. If you feel faint stop exercising
immediately.
A Console J Stabilizer, Front
B Handgrip K Transport Wheels
C Timer L Leveler
D Handlebars M Power Inlet
E Media Rack N DriveBeltGuard
F Resistance Shifter O Pedal
G AppGameControlLever P Rear Stabilizer
H Handlebar Adjustment Lever Q Seat Adjustment Lever
I Flywheel (enclosed) R Seat
19
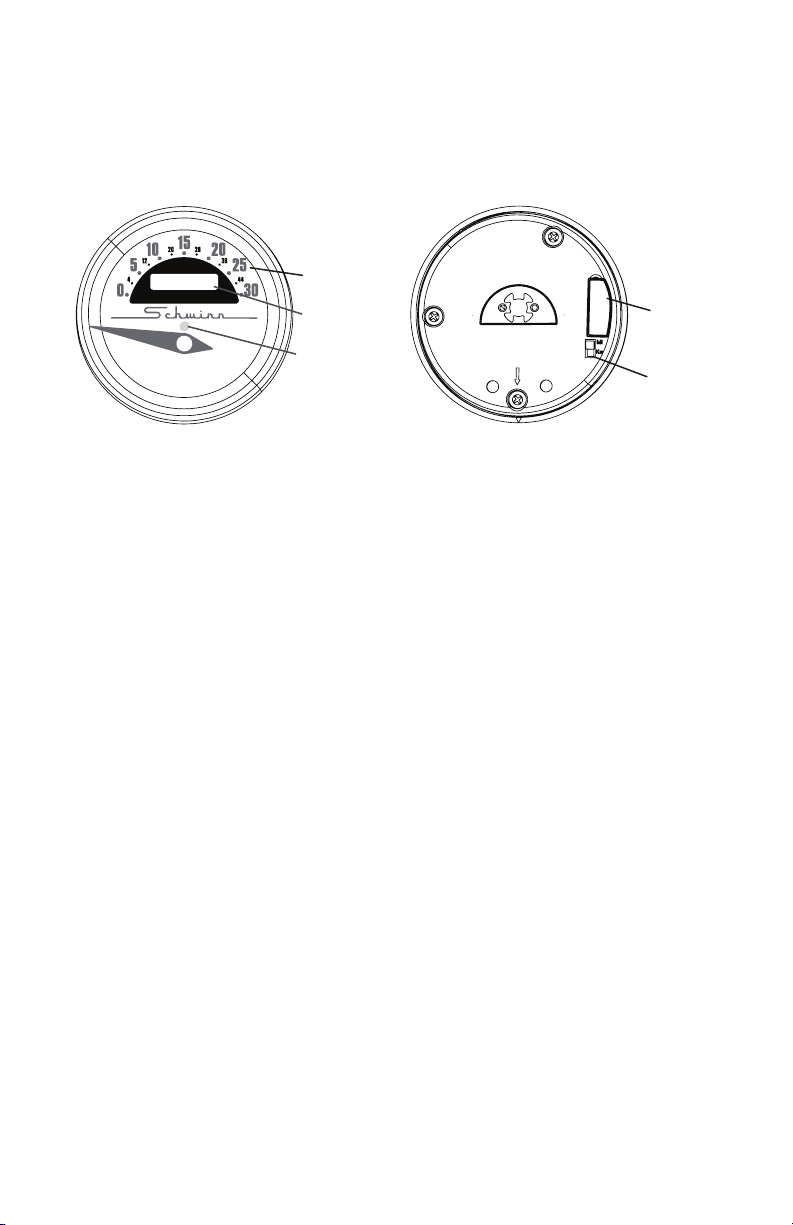
Console Features
TheConsoleprovidesinformationaboutyourworkout.
Note: TheUSBPortisonlyusedtoupdatetheConsole.Itisnotabletochargeadeviceor
exportworkoutresults.
Front Back
Odometer and Units Switch
Theodometertracksthetotaldistanceofthetnessmachineinmilesorkilometers
dependingontheunitsselected.TheunitsswitchonthebacksideoftheConsoleselects
betweenmilesandkilometers.
Note: If the units switch is changed after a distance has already been tracked, the odom-
eterwillcontinuetoaddtothetotal,butatthenewrate.Thiswillresultinamixedvalueof
milesandkilometers.
Speed
TheSpeeddisplayeldshowsthemachinespeedinmilesperhour(mph)orkilometers
perhour(km/h).Themaximumdisplayedspeedis30mphor44km/h.
Note: The needle for the Speed display will adjust to zero when power is initially supplied to
theConsole.
Bluetooth
®
Connectivity with the “Schwinn Classic Cruiser™” Fit-
ness App
ThistnessmachineisequippedwithBluetooth
®
connectivity and can wirelessly sync
withthe“SchwinnClassicCruiser™”FitnessApponsupporteddevices.TheAppsyncs
withyourtnessmachinetotracktotalcaloriesburned,time,distance,andmore.The
Bluetooth
®
AppConnecteddisplayshowswhentheConsoleispairedwiththeApp.
Before you begin your workout, open the App on your Bluetooth
®
enableddevice.Ifthe
Appisnotrunningduringyourworkout,theresultswillnotbetracked.Besuretoselectthe
desiredUser(1or2)ontheApptocorrectlytracktheworkout.
1. DownloadthefreeApp,namedSchwinnClassicCruiser
™
.TheAppisavailableon
iTunes
®
andGooglePlay
™
.
Note: For a complete list of supported devices, review the App on iTunes
®
orGoogle
Play™.
2. FollowtheinstructionsontheApptosyncyourdevicetoyourexercisemachine.
Odometer
Speed
000000
Units Switch
USB Port
Plug
000000
Bluetooth
®
App
Connected
display

20
Workout with Other Fitness Apps
This fitness machine has integrated Bluetooth
®
connectivity which allows it to work with a
numberofdigitalpartners.Forourlatestlistofsupportedpartners,pleasevisit:
www.nautilus.com/partners
21
What to Wear
Wearrubber-soledathleticshoesorappropriatecyclingshoes.Youwillneedtheappropri-
ateclothesforexercisethatallowyoutomovefreely.
How Often Should You Exercise
!
Consult a physician before you start an exercise program. Stop exercising if
you feel pain or tightness in your chest, become short of breath, or feel faint.
Contact your doctor before you use the machine again. Use the values
calculated or measured by the machine’s computer for reference purposes
only.
• 3timesaweekfor30minuteseachday.
• Scheduleworkoutsinadvance.
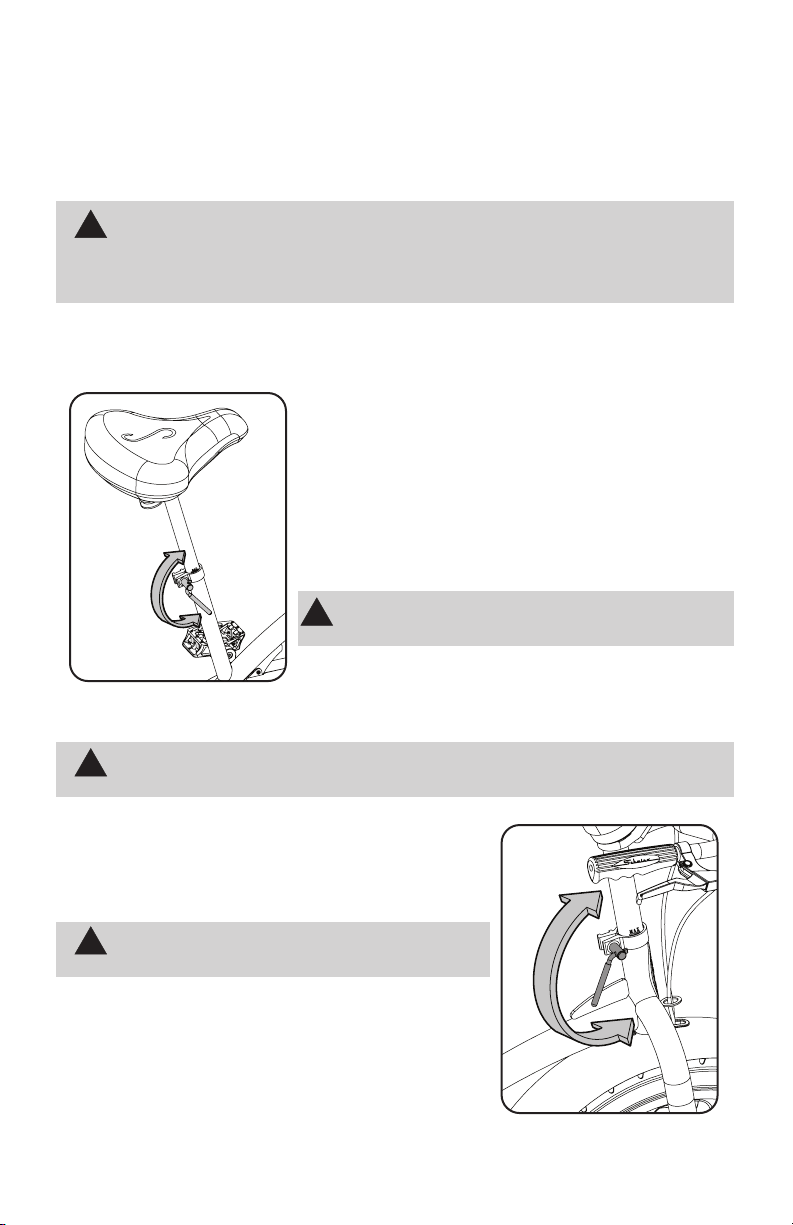
Seat Post Adjustment
Correct seat and handlebar placement encourages exer-
ciseefciencyandcomfort,whilereducingtheriskofinjury.
1.WithaPedalintheforwardposition,centertheballof
yourfootoverthecenterofthePedal.Yourlegshouldbe
bentslightlyattheknee.
2.Ifyourlegistoostraightoryourfootcannottouchthe
Pedal,movetheseatdownontheuprightbike.Ifyourleg
isbenttoomuch,movetheseatupontheuprightbike.
!
Step off the bike before you adjust the seat.
LoosentheSeatAdjustmentLeverontheseatpost.Adjust
theseattothedesiredheight.Tightentheadjustmentlever
tolocktheseatpost.Besurethattheadjustmentleveris
fullyengaged.
!
Do not lift the Seat Post above the MAX mark on the tube.
Handlebar Adjustment
Loosen the Handlebar Adjustment Lever on the handlebar
post.Adjustthehandlebarassemblytothedesiredheight.
Fullytightentheadjustmentlever.
!
Do not lift the Handlebar Assembly above the
MAX mark on the tube.
To adjust the angles of the items attached to the
Handlebar, loosen the screws that secure them and adjust
tothedesiredangle.Fullytightenthehardware.
Operations
22
3
5
2
1
6
7
4
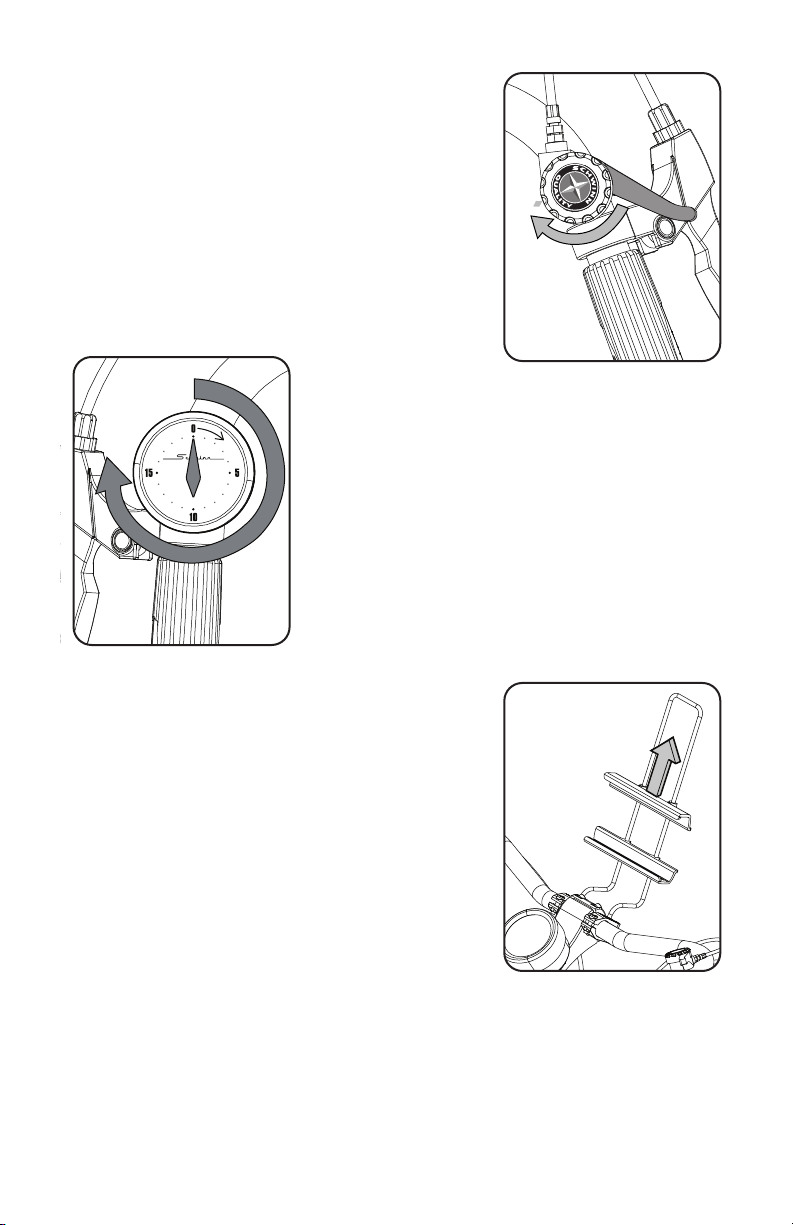
Resistance Shifter
The Resistance Shifter controls the level of resistance that
isappliedtotheywheel.Theselectedresistancelevelis
pointedtobythelower“starburst”oftheSchwinn
®
Quality
logo.Therearesevenlevelsofresistance(1-7)onthe
exercisebike.
Adjust the Resistance Shifter to increase or decrease the
resistanceatanytimeduringyourworkout.
Workout Timer
Yourtnessmachineis
equippedwitha20minuteWorkoutTimer.Gentlyturnthe
face of the Timer clockwise 3/4 of the way around (past
15),andthentothedesiredamountoftimeandreleaseit.
The Workout Timer begins counting down immediately, and
willmakeanaudiblesoundwhenthetimeends.
Note:NeverturnthefaceoftheTimercounter-
clockwiseduringtheinitial3/4ofthewayaroundwinding.
ThismaydamagetheTimer.
Media Rack
YourfitnessmachineisequippedwithaMediaRackabove
theHandlebars.TheMediaRacksecuresyourmobile
device,orothermedia.Adjustthelowerparttothelowest
settingforyourmobiledevice.Placeyourdeviceonthe
lower part of the Media Rack and, while holding the device
in place, slide down the upper part until your device is
securebetweenthelowerandupperparts.
Workout Mode
The machine starts Workout Mode when it is plugged in or
if it receives a signal from the RPM sensor as a result of
pedalingthemachine.
Pausing or Stopping a Workout / Auto Shut-Off (Sleep Mode)
If the Console does not receive any input in approximately 2 minutes, it will automatically
shutoff.
23
Workout Results
TheConsoledoesnotshowyourworkoutresults.Tobeabletoreviewaworkout,a
Bluetooth
®
enableddevicewiththeSchwinnClassicCruiser™Appmustberunningforthe
durationoftheworkout.BesuretoselectyourUserprole(1or2)ontheAppbeforethe
workout.
The App will track the user, date/time of the workout, duration, average speed, highest
speed,distance,RPMs(RotationsPerMinute),andTotalCalories.
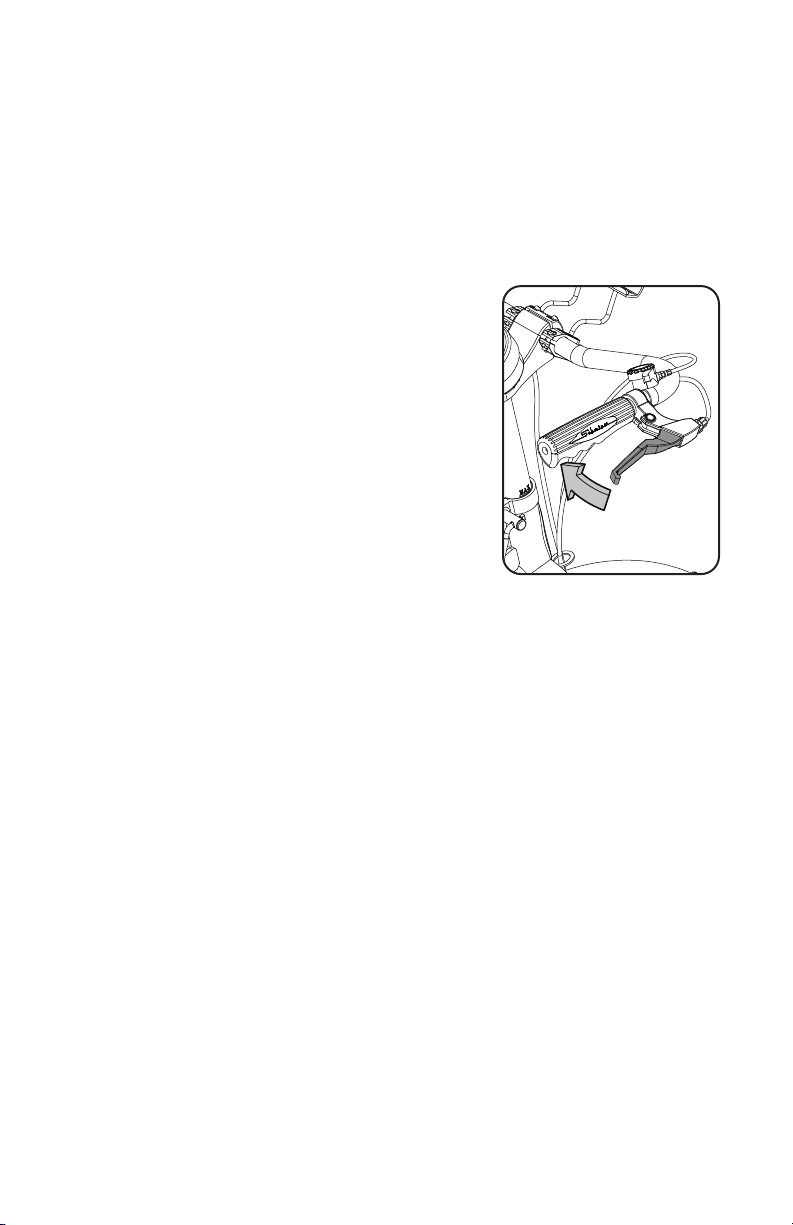
App Game Control Levers
TheAppGameControlLeversaddalevelofinteraction
when used with features on the Schwinn Classic Cruiser™
App.

24
Readallmaintenanceinstructionsfullybeforeyoustartanyrepairwork.Insome
conditions,anassistantisnecessarytodothenecessarytasks.
!
Equipment must be regularly examined for damage and repairs. The owner is
responsible to make sure that regular maintenance is done. Worn, damaged
or loose components must be repaired or replaced immediately. Only
manufacturer supplied components can be used to maintain and repair the
equipment.
If at any time the Warning labels become loose, unreadable or dislodged,
replace the labels. If purchased in US/Canada, contact Customer Service
for replacement labels. If purchased outside US/Canada, contact your local
distributor for them.
Daily: Before each use, examine the exercise machine for loose, broken,
damaged,orwornparts.Donotuseiffoundinthiscondition.Repairor
replaceallpartsattherstsignofwearordamage.Makesureadjust-
mentclampsaretight.Tightenasnecessary.Aftereachworkout,usea
dampclothtowipeyourmachineandConsolefreeofsweat.
Note:AvoidexcessivemoistureontheConsole.
Weekly: Cleanthemachinetoremoveanydust,dirt,orgrimefromthesurfaces.
Checkforsmoothseatandhandlebaroperation.Ifneeded,sparingly
applyathincoatingofsiliconelubetoeaseoperation.
!
Silicone lubricant is not intended for human consumption.
Keep out of reach of children. Store in a safe place.
Note:Donotusepetroleumbasedproducts.
Monthly
or after 20
hours:
Checkpedalsandcrankarmsandtightenasnecessary.Makesureall
boltsandscrewsaretight.Tightenasnecessary.
NOTICE:Donotcleanwithapetroleumbasedsolventoranautomotivecleaner.
BesuretokeeptheConsolefreeofmoisture.
Maintenance
25
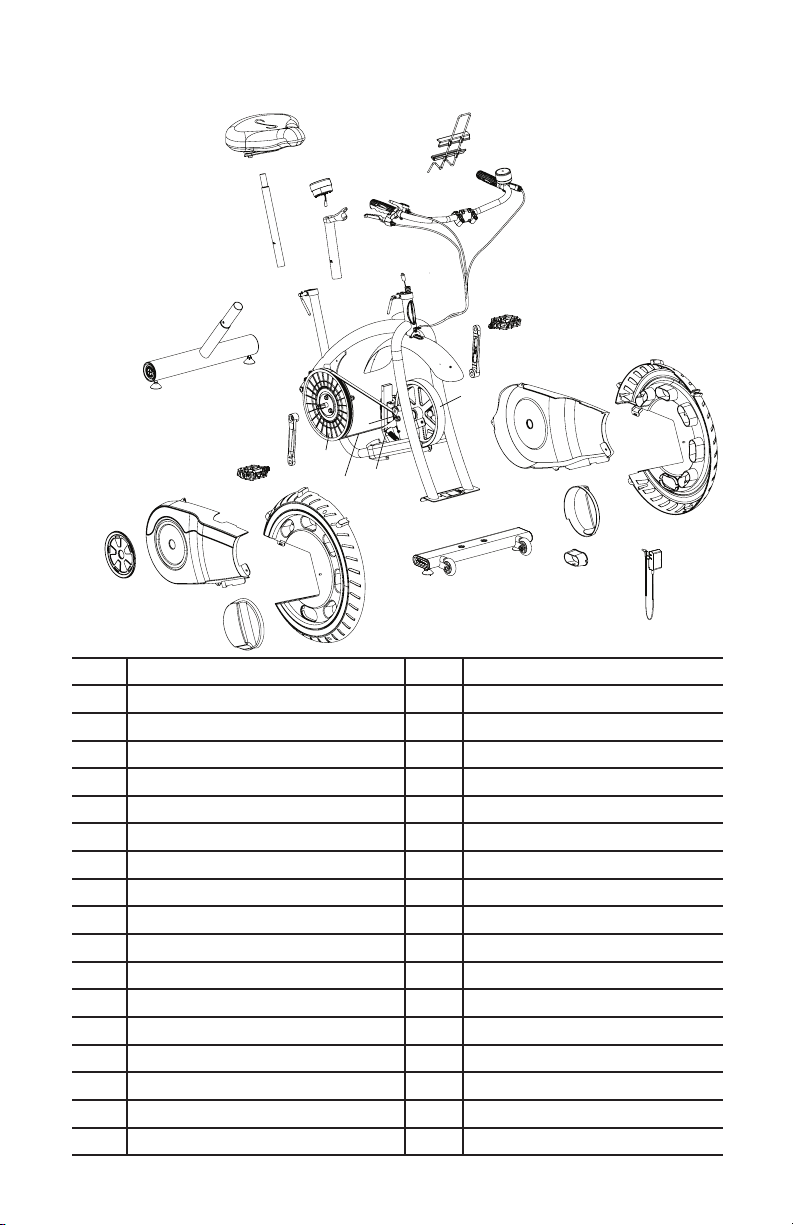
A Seat S Front Stabilizer
B Seat Post T Leveler
C Console U Flywheel
D Console Mast V Tensioner
E AppGameControlLever W Brake Assembly/Servo Motor
F HandlebarGrip X Drive Belt
G Brake Shifter Y Drive Pulley
H Handlebars Z Data Cable
I Media Rack AA Handlebar Adjustment Clamp
J Timer BB Seat Adjustment Clamp
K Crank Arm, Left CC Crank Arm, Right
L Pedal, Left DD Pedal, Right
M Left Shroud EE Right Wheel Shroud
N Left Wheel Shroud FF Right Axle Shroud
O Left Axle Shroud GG Crank Cover
P Adjustment Knob HH Right Shroud
Q Power Inlet Shroud II Rear Stabilizer
R Transport Wheel JJ Frame Assembly
A
B
D
Z
I
J
H
E
E
G
F
F
AA
BB
CC
K
L
DD
II
U
U
GG
HH
EE
FF
T
S
R
M
N
O
Q
P
U
X
V
Y
W
JJ
C
Maintenance Parts

26
Condition/Problem Things to Check Solution
No display/partial
display/unit will not
turn on
Check electrical (wall)
outlet
Make sure unit is plugged into a
functioningwalloutlet.
Check connection at unit Connection should be secure and
undamaged.Replaceadapteror
connection at unit if either are dam-
aged.
Check data cable integrity Allwiresincableshouldbeintact.
If any are visibly crimped or cut,
replacecable.
Check data cable
connections/orientation
Be sure cable is connected securely
andorientedproperly.
Check console display for
damage
Check for visual sign that console
display is cracked or otherwise dam-
aged.ReplaceConsoleifdamaged.
If the above steps do not resolve the
problem, contact Customer Service
(if inside US/Canada) or your local
distributor (if outside US/Canada) for
furtherassistance.
No speed/RPM
reading,
Check data cable integrity Allwiresincableshouldbeintact.
If any are cut or crimped, replace
cable.
Check data cable
connections/orientation
Be sure cable is connected securely
andorientedproperly.
Check magnet position
(requires shroud removal)
Magnets should be in place on pul-
ley.
Check Speed Sensor
(requires shroud removal)
Speed sensor should be aligned with
magnetandconnectedtodatacable.
Realignsensorifnecessary.Replace
if there is any damage to the sensor
ortheconnectingwire.
Resistance does
not change (ma-
chine turns on and
operates)
Check Resistance Shifter Check for visual sign that Resistance
Shifterisdamaged.ReplaceResis-
tanceShifterifdamaged.
If the above step does not resolve
the problem, contact Customer
Service (if inside US/Canada) or
your local distributor (if outside US/
Canada)forfurtherassistance.
Troubleshooting

27
Condition/Problem Things to Check Solution
Console shuts off
(enters sleep mode)
while in use
Check electrical (wall)
outlet
Make sure unit is plugged into a
functioningwalloutlet.
Check connection at unit Connection should be secure and
undamaged.Replaceadapteror
connection at unit if either are dam-
aged.
Check data cable integrity All wires in the cable should be
intact.Ifanyarecutorcrimped,
replacecable.
Check data cable
connections/orientation
Be sure cable is connected securely
andorientedproperly.
Reset Machine Unplug unit from electrical outlet for
3minutes.Reconnecttooutlet.
Check magnet position
(requires shroud removal)
Magnets should be in place on pul-
ley.
Check Speed Sensor
(requires shroud removal)
Speed sensor should be aligned with
magnetandconnectedtodatacable.
Realignsensorifnecessary.Replace
if there is any damage to the sensor
ortheconnectingwire.
Unit rocks/does not
sit level
Check leveler adjustment Adjustlevelersuntilbikeislevel.
Check surface under unit Adjustment may not be able to
compensate for extremely uneven
surfaces.Movebiketolevelarea.
Pedals loose/unit
difculttopedal
Check pedal to crank arm
connection
Pedal should be tightened securely
tocrank.Insureconnectionisnot
cross-threaded.
Check crank arm to axle
connection
Crank should be tightened securely
toaxle.Besurecranksareconnect-
edat180degreesfromeachother.
Clicking sound
when pedaling
Check pedal to crank arm
connection
Removepedals.Makesurethereis
no debris on threads, and reinstall
the pedals
Seat or handlebar
post movement
Check adjustment lever Besureleverissecurelytightened.

28
Condition/Problem Things to Check Solution
Console will not
sync with Blue-
tooth
®
enabled
device
Fitness machine Unplug unit from electrical outlet for
5minutes.Reconnecttooutlet.
Bluetooth
®
enabled device Consult your device to be sure that
the Bluetooth
®
wireless feature has
beenenabledonit.
Previous device still
synced
AdeviceisstillsyncedtoConsole.
Disconnect that device and sync to
Console.
Open Fitness App Open the Fitness App and sync to
theConsole.
Fitness App ReviewSpecicationsofFitness
Appandconrmyourdeviceis
compatible.
Contact[email protected]
or your local distributor for further
assistance.

29

30
Warranty ( if purchased in US/Canada )
Who Is Covered
This warranty is valid only to the original purchaser and is not transferable or applicable to any other
person(s).
What Is Covered
Nautilus, Inc. warrants that this product is free from defects in materials and workmanship, when used for
the purpose intended, under normal conditions, and provided it receives proper care and maintenance as
described in the Product’s Assembly and Owner’s manual. This warranty is good only for authentic, original,
legitimate machines manufactured by Nautilus, Inc. and sold through an authorized agent and used in the
United States or Canada.
Terms
Warranty terms for products purchased in US/Canada are as stated below.
• Frame 5 years
• Mechanical parts 1 year
• Electronics 1 year
• Labor 90 days
(Labor support does not include the installation of replacement parts involved in the initial product
assembly and preventative maintenance services.)
For warranty & service of products purchased outside US/Canada, please contact your local distributor. To
find your local international distributor, go to: www.nautilusinternational.com
How Nautilus Will Support the Warranty
Throughout the terms of the warranty coverage, Nautilus, Inc. will repair any machine that proves to be
defective in materials or workmanship. Nautilus reserves the right to replace the product in the event
a repair is not possible. When Nautilus determines replacement is the correct remedy, Nautilus may
apply a limited credit reimbursement toward another Nautilus, Inc. brand Product, at our discretion. This
reimbursement may be prorated based on length of ownership. Nautilus, Inc. provides repair service within
major metropolitan areas. Nautilus, Inc. reserves the right to charge the consumer for travel outside these
areas. Nautilus, Inc. is not responsible for dealer labor or maintenance charges beyond the applicable
warranty period(s) stated herein. Nautilus, Inc. reserves the right to substitute material, parts or products
of equal or better quality if identical materials or products are not available at the time of service under this
warranty. Any replacement of the product under the terms of the Warranty in no way extends the original
Warranty period. Any limited credit reimbursement may be prorated based on length of ownership. THESE
REMEDIES ARE THE EXCLUSIVE AND SOLE REMEDIES FOR ANY BREACH OF WARRANTY.
What You Must Do
• Retain appropriate and acceptable Proof of Purchase.
• Operate, maintain, and inspect the Product as specified in the Product Documentation (Assembly,
Owner’s Manuals, etc.).
• Product must be used exclusively for the purpose intended.
• Notify Nautilus within 30 days after detecting an issue with the Product.
• Install replacement parts or components in accordance with any Nautilus instructions.
• Perform diagnostic procedures with a trained Nautilus, Inc representative if requested.
What Is Not Covered
• Damage due to abuse, tampering or modification of the Product, failure to properly follow assembly
instructions, maintenance instructions, or safety warnings as stated in the Product Documentation
(Assembly, Owner’s Manuals, etc), damage due to improper storage or the effect of environmental
conditions such as moisture or weather, misuse, mishandling, accident, natural disasters, power
surges.

31
• A machine placed or used in a commercial or institutional setting. This includes gyms, corporations,
work places, clubs, fitness centers and any public or private entity that has a machine for use by its
members, customers, employees or affiliates.
• Damage caused by exceeding maximum user weights as defined in the Product’s Owner’s manual or
warning label.
• Damage due to normal usage and wear and tear.
• This warranty does not extend to any territories or countries outside the United States and Canada.
How to Obtain Service
For Products purchased directly from Nautilus, Inc. contact the Nautilus office listed on the Contacts page
of the products Owner’s manual. You may be required to return the defective component to a specified
address for repair or inspection, at your expense. Standard ground shipping of any warranty replacement
parts will be paid by Nautilus, Inc. For products purchased from a retailer, you may be asked to contact your
retailer for warranty support.
Exclusions
The preceding warranties are the sole and exclusive express warranties made by Nautilus, Inc.
They supersede any prior, contrary or additional representations, whether oral or written. No agent,
representative, dealer, person or employee has the authority to alter or increase the obligations or
limitations of this warranty. Any implied warranties, including the WARRANTY OF MERCHANTABILITY
and any WARRANTY OF FITNESS FOR A PARTICULAR PURPOSE, are limited in duration to the term of the
applicable express warranty provided above, whichever is longer. Some states do not allow limitations on
how long an implied warranty lasts, so the above limitation may not apply to you.
Limitation of Remedies
EXCEPT AS OTHERWISE REQUIRED BY APPLICABLE LAW, THE PURCHASER’S EXCLUSIVE REMEDY
IS LIMITED TO REPAIR OR REPLACEMENT OF ANY COMPONENT DEEMED BY NAUTILUS, INC. TO BE
DEFECTIVE UNDER THE TERMS AND CONDITIONS STATED HEREIN. IN NO EVENT WILL NAUTILUS, INC.
BE LIABLE FOR ANY SPECIAL, CONSEQUENTIAL, INCIDENTAL, INDIRECT OR ECONOMIC DAMAGES,
REGARDLESS OF THE THEORY OF LIABILITY (INCLUDING, WITHOUT LIMITATION, PRODUCT LIABILITY,
NEGLIGENCE OR OTHER TORT) OR FOR ANY LOST REVENUE, PROFIT, DATA, PRIVACY OR FOR ANY
PUNITIVE DAMAGES ARISING OUT OF OR RELATED TO THE USE OF THE FITNESS MACHINE EVEN IF
NAUTILUS, INC. HAS BEEN ADVISED OF THE POSSIBILITY OF SUCH DAMAGES. THIS EXCLUSION AND
LIMITATION SHALL APPLY EVEN IF ANY REMEDY FAILS OF ITS ESSENTIAL PURPOSE. SOME STATES DO
NOT ALLOW THE EXCLUSION OR LIMITATION OF CONSEQUENTIAL OR INCIDENTAL TYPE DAMAGES SO
THE ABOVE LIMITATION MAY NOT APPLY TO YOU.
State Laws
This warranty gives you specific legal rights. You may also have other rights, which vary from state to state.
Expirations
If the warranty has expired, Nautilus, Inc. may assist with replacements or repairs to parts and labor, but
there will be a charge for these services. Contact a Nautilus office for information on post-warranty parts
and services. Nautilus does not guarantee availability of spare parts after expiration of warranty period.
International Purchases
If you purchased your machine outside of the United States consult your local distributor or dealer for
warranty coverage.

ASSEMBLY/OWNER’S
MANUAL
8018256.021518.A
EN