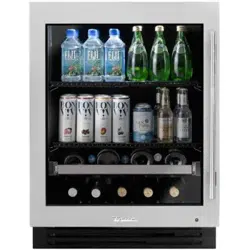
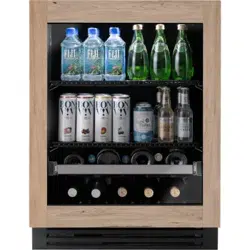
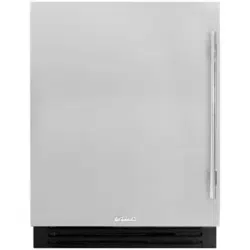
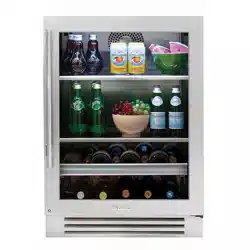
SOLID (OP) AND GLASS FRAMED PANEL (OG) INSTALLATION
Required Tools:
• Phillips Screwdriver
• 3/8" Wrench
• 1/8" Drill Bit
• Ten (10) Screws #6
1. Open front door and pull grill forward to remove.
2. To remove door back out two bottom hinge screws with a 3/8" wrench. Secure door while removing screws. Remove two Phillips screws from the top hinge. Save all these screws for later reinstall.
3. Lay door on a safe solid surface. If retrofitting glass door model be careful not to damage glass. Lay cardboard or other safe material down before working on the door. Remove door gasket from the inside of the door frame. Place gasket to the side for later reinstall.
4. There are pre marked areas on the front of the door. Drill these pre marked holes with 1/8" drill bit. Make sure to go all the way through the door.
5. It is recommended to clamp the door front on top of the overlay before drilling pilot holes and installing anchor screws. The clamp ensures the overlay panel and door stay aligned with each other while installing. Once panel is clamped in place, pilot holes may be drilled into the panel from the rear side of the door.
6. Once all holes are pre drilled use the appropriate specified screws to secure the overlay panel onto the front of the refrigerator door.
7. Reinstall all components in reverse order. Door gasket snaps back into place. Overlay panel and door stay aligned with each other while installing.
DRAWER OVERLAY PANEL INSTALLATION
Required Tools:
• Phillips Screwdriver
• 1/8" Drill Bit
1. Open the drawer and detach the front drawer panel by removing four #2 Phillips screws (two on each side). (See image 1). Save all these screws for later reinstallation.
2. Remove front drawer panel gasket.
3. Using a 1/8" drill bit, drill out the eight pilot holes (each drawer) from the front of the drawer panel. Drill completely through the panel.
4. Attach drawer handle to the front of the overlay panel. Attach handle before step 5.
5. Lay overlay panel face-down on a safe solid surface. Lay drawer panel face-down on top of the overlay panel. Align panels and secure with a clamp. Lay cardboard or other soft or safe material down before working on drawer front.
6. Secure overlay panel to drawer panel using appropriate size screws.
7. Reattach drawer gasket by pressing and snapping back into place in gasket channel.
8. Reattach drawer panel front to the drawer using four screws.
CARE AND CLEANING
STAINLESS STEEL EQUIPMENT CARE AND CLEANING
STAINLESS STEEL OPPONENTS
There are three basic things which can break down your stainless steel’s passivity layer and allow corrosion to rear its ugly head.
Scratches from wire brushes, scrapers, and steel pads are just a few examples of items that can be abrasive to stainless steel’s surface.
Deposits left on your stainless steel can leave spots. You may have hard or soft water depending on what part of the country you live in. Hard water can leave spots. Hard water that is heated can leave deposits if left to sit too long. These deposits can cause the passive layer to break down and rust your stainless steel. All deposits left from food prep or service should be removed as soon as possible.
Chlorides are present in table salt, food, and water. Household and industrial cleaners are the worst type of chlorides to use.
RECOMMENDED CLEANERS FOR CERTAIN SITUATIONS / ENVIRONMENTS OF STAINLESS STEEL
A. Soap, ammonia and detergent medallion applied with a cloth or sponge can be used for routine cleaning.
B. Arcal 20, Lac-O-Nu Ecoshine applied provides barrier film for fingerprints and smears.
C. Cameo, Talc, Zud First Impression is applied by rubbing in the direction of the polished lines for stubborn stains and discoloring.
D. Easy-off and De-Grease It oven aid are excellent for removals on all finishes for grease-fatty acids, blood and burnt-on foods.
E. Any good commercial detergent can be applied with a sponge or cloth to remove grease and oil.
F. Benefit, Super Sheen, Sheila Shine are good for restoration / passivation.
8 STEPS THAT CAN HELP PREVENT RUST ON STAINLESS STEEL:
1. USING THE CORRECT CLEANING TOOLS
Use non-abrasive tools when cleaning your stainless steel products. The stainless steel’s passive layer will not be harmed by soft cloths and plastic scouring pads. Step 2 tells you how to find the polishing marks.
2. CLEANING ALONG THE POLISH LINES
Polishing lines or “grain” are visible on some stainless steels. Always scrub parallel to visible lines on some stainless steels. Use a plastic scouring pad or soft cloth when you cannot see the grain.
3. USE ALKALINE, ALKALINE CHLORINATED OR NONCHLORIDE CONTAINING CLEANERS
While many traditional cleaners are loaded with chlorides, the industry is providing an ever increasing choice of nonchloride cleaners. If you are not sure of your cleaner’s chloride content contact your cleaner supplier. If they tell you that your present cleaner contains chlorides, ask if they have an alternative. Avoid cleaners containing quaternary salts as they can attack stainless steel, causing pitting and rusting
4. WATER TREATMENT
To reduce deposits, soften the hard water when possible. Installation of certain filters can remove corrosive and distasteful elements. Salts in a properly maintained water softener can be to your advantage. Contact a treatment specialist if you are not sure of the proper water treatment.
5. MAINTAINING THE CLEANLINESS OF YOUR FOOD EQUIPMENT
Use cleaners at the recommended strength (alkaline chlorinated or non-chloride). Avoid build-up of hard stains by cleaning frequently. When boiling water with your stainless steel equipment, the single most likely cause of damage is chlorides in the water. Heating any cleaners containing chlorides will have the same damaging effects.
6. RINSE
When using chlorinated cleaners you must rinse and wipe dry immediately. It is better to wipe standing cleaning agents and water as soon as possible. Allow the stainless steel equipment to air dry. Oxygen helps maintain the passivity film on stainless steel.
7. HYDROCHLORIC ACID (MURIATIC ACID) SHOULD NEVER BE USED ON STAINLESS STEEL
8. REGULARLY RESTORE/PASSIVATE STAINLESS STEEL
GENERAL MAINTENANCE
Keeping the condenser coil clean will minimize required service and lower electrical cost. The condenser coil is accessible from the front.
The condenser coil should be cleaned by removing dust and other build-up from the tube assembly with vacuum or a cleaning rag.
When properly cleaned you should be able to see through the tube assembly.
Warranty does not cover cleaning the condenser coil.
CONDENSATION
Leaving the door open for a long period of time or a unit that is running with little to no product inside may also cause excessive condensation.
REPLACEMENT PARTS
True maintains a record of the cabinet serial number for your unit. If at any time during the life of your unit, a part is needed, you may obtain that part by furnishing the model number and serial number to the company from whom you purchased the cooler. For replacement parts contact the dealer from whom you purchased the refrigerator or call True parts department at 844-849-6179.
FREQUENTLY ASKED QUESTIONS
Q. HOW DO I ADJUST THE TEMPERATURE?
A. Refer to True Precision Control® Operation listed in Table of Contents on page 1.
Q. WHY DOES THE EVAPORATOR FAN MOTOR RUN CONSTANTLY?
A. This is a normal operation. The evaporator fan motor will run continuously to ensure even temperature throughout your cabinet. This will only stop when the door is opened to keep warm air from being circulated throughout the cabinet.
Q. WHY ISN’T MY UNIT COOLING PROPERLY?
A. Check to see that there are no obstructions to the condenser coil (behind front grill). Confirm that the condenser area is clean.
Q. HOW DO I ADJUST OR REMOVE A SHELF FROM MY CURRENT CONFIGURATION?
A. Refer to Shelving Adjustment listed in Table of Contents on page 1.
Q. WHY IS THERE WARM AIR COMING FROM THE BOTTOM/FRONT OF THE REFRIGERATOR (GRILL/KICKPLATE AREA)?
A. This is normal as heat dissipation is part of the refrigeration cycle.
Q. WHY IS THERE CONDENSATION FORMING ON THE INSIDE OR OUTSIDE OF THE UNIT?
A. Leaving the door open for a long period of time or a unit that is running with little to no product inside may also cause excessive condensation.
Q. WHAT ARE THE PRESET LIMITS FOR THE HIGH TEMPERATURE ALARM?
A. The electronic control will monitor temperatures and activate an alert if unsafe product temperatures are present for more than 60 minutes. For single and dual zone wine cabinets, the alarm will activate at 70°F. For all refrigerators, the alarm will activate at 50°F.
Q. HOW MUCH DISTANCE IS NEEDED FROM THE WALL TO HAVE THE HINGE ON THE WALL SIDE AND STILL OPEN 90 DEGREES?
A. 2 inches
Q. CAN I PUT 2 UNITS FLUSH AGAINST EACH OTHER WITHOUT SPACING?
A. Yes, usually. In typical climate controlled temperature/humidity conditions our units can be installed flush against each other. However, if you place your units in a humid, non-climate controlled area, ½ to 1 inch of spacing between the units will help prevent potential condensation buildup.
Q. DOES TRUE SELL THE WOOD DOORS ON OVERLAY?
A. No, for wood front doors, reach out to your cabinet maker and provide them with the overlay template available on the right hand side of our document library
Q. DOES THE OVERLAY COME WITH THE HANDLE?
A. No, our handle can be ordered as an accessory, or any pull can be added to your overlay drawer.
Q. DO TRUE UNITS HAVE A ZERO CLEARANCE HINGE?
A. Yes. No spacing is needed on the either side of our unit. It can be placed flush with adjoining cabinetry and still open fully.
Q. WHY DOESN’T THE WARRANTY COVER COMMERCIAL UNITS IN MY HOME?
A. Due to Department of Energy regulations on refrigerator energy use, we are not able to market and sell our commercial units in homes. Providing a warranty to home users is included in this.
Q. WHAT IS THE DECIBEL RATING OF THE UNITS?
A. 42-47 db.
Q. HOW DO I CHANGE THE LIGHTING?
A. For models that include a color button, simply push the button until the desired color appears.
• For 15 inch models without a color button press + at the same time until your desired color is reached.
• On 24 inch dual zone models press + .
Q. MY DISPLAY WAS READING “REF” WHAT DOES THAT MEAN?
A. The REF code is shown when the cabinet doesn’t reach the desired set temp in the allotted time. The problem may be that the door was left open or very hot product was loaded into the unit. To reset the code, simply power off, and power on the refrigerator. If the code returns, please contact True for service.
Q. I DON’T SEE A SERVICE COMPANY IN MY AREA, WHO CAN I CALL?
A. Please call True’s service line: 888.616.8783 or email us to have us help find an appropriate servicer for your cabinet.
Q. DOES MY REFRIGERATOR HAVE TO BE COVERED OUTDOORS?
A. No. All True undercounter are UL rated for outdoor use.
True units are able to be installed free standing. If left exposed to the elements throughout winter months, a cover will help preserve the life and beauty of your True product.
Please note: The gaskets do not provide a water tight seal, so it is recommended that the unit is installed so that the countertop of your outdoor kitchen covers the door or drawer gasket.
Q. WHAT SHOULD I DO IN THE WINTER? DO I HAVE TO BRING IT IN? HOW COLD CAN IT GET BEFORE IT’S A PROBLEM?
A. In regions with cold winters (consistently below 32ºF), True refrigerators should be turned to off, and emptied of all contents. If exposed to the elements, covering your cooler will extend its life and beauty.
BEVERAGE DISPENSER QUESTIONS
Q. WHAT TYPE OF TAP SYSTEM CAN BE USED WITH A TRUE UNIT?
A. Different tap systems can be used on ¼ barrel short kegs, but low profile taps are not available in the nonsankey variety, and therefore will probably not fit in our dispensers when used with tall kegs.
Q. WHERE CAN I GET MY CO2 TANK FILLED?
A. C02 is available at many sporting good stores as well as paintball stores. C02 canisters can often be exchanged (much like propane tanks) at many liquor stores as well as nationally at AIRGAS locations.
WINE CABINET QUESTIONS
Q. CAN I STORE MAGNUM BOTTLES?
A. Magnums will fit on our floor rack which holds 5 bottles. Also, our shelves are removable to create additional space.
Q. CAN I STORE PINOT/BORDEAUX/RIESLING BOTTLES?
A. Yes. Almost all bottle varieties will fit in your True Wine Cabinet.
DRAWER CABINET QUESTIONS
Q. HOW TALL ARE THE DRAWERS? CAN I STORE AN UPRIGHT BOTTLE OF WINE, OR A GALLON OF MILK?
#1 WHAT TYPE OF TAP SYSTEM CAN BE USED WITH A TRUE UNIT?
Different tap systems can be used on 1⁄4 barrel short kegs, but low profile taps are not available in the non- sankey variety, and therefore will probably not fit in our dispensers when used with tall kegs.
#2 DOES MY REFRIGERATOR HAVE TO BE COVERED OUTDOORS?
No. All True undercounter are UL rated for outdoor use. True units are able to be installed free standing. If left exposed to the elements throughout winter months, a cover will help preserve the life and beauty of your True product. Please note: The gaskets do not provide a water tight seal, so it is recommended that the unit is installed so that the countertop of your outdoor kitchen covers the door or drawer gasket.


 +
+  at the same time until your desired color is reached.
 +
+