お買い上げいただきありがとうございます。
このセットアップガイドには、健康を守るための重要な注意事
項を示しています。このセットアップガイドをよくお読みのう
え、製品を安全にお使いください。
お読みになった後は、いつでも見られるところに必ず保管してください。
© 2001 Sony Corporation
4-659-731-01(1)
日本語
English
Français
Deutsch
Setup Guide
ERF-220AW05

2
警告表示の意味
セットアップガイド、ユーザーガイドおよび製品では、次のような表示をし
ています。表示の内容をよく理解してから本文をお読みください。
行為を禁止する記号
この表示の注意事項を守らないと健康を害するおそれがあります。
下記の注意を守らないと健康を害するおそれがあります。
ディスプレイ画面を長時間継続して見ない
ディスプレイなどの画面を長時間継続して見続けると、目が疲れ
たり、視力が低下するおそれがあります。ディスプレイ画面を見
続けて体の一部に不快感や痛みを感じたときは、すぐにコン
ピュータの使用をやめて休息してください。万一、休息しても不
快感や痛みのとれないときは、医師の診察を受けてください。
安全のために
3
キーボード、マウス、コントローラなどを使いすぎない
キーボード、マウス、コントローラなどを長時間継続して使用す
ると、腕や手首が痛くなったりすることがあります。使用中に体
の一部に不快感や痛みを感じたときは、すぐにコンピュータの使
用をやめて休息してください。万一、休息しても不快感や痛みの
とれないときは、医師の診察を受けてください。
また、コントローラなどの振動機能を使用する場合は、目安とし
て約
30
分ごとに休息をとってください。
•
権利者の許諾を得ることなく、ソフトウェアおよび取扱説明書の内容の全部また
は一部を複製すること、およびソフトウェアを賃貸することは、著作権法上禁止
されています。
•
セットアップガイドおよびユーザーガイドに記載されている以外の方法によって
ご使用になられたことによる不都合につきましては、当社は一切その責任を負い
ません。
•
付属のソフトウェアは、指定された装置以外には使用できません。
•
付属のソフトウェアの仕様は、改良のため予告なく変更することがありますが、
ご了承ください。
4
お使いになる前に、付属のソフトウェア使用許諾契約書をお読みください。
OPEN-R
は、用途に応じた「柔軟なハードウェアの構成」や「ソ
フトウェアの交換」により、エンターテインメントロボットの世
界を広げるためにソニーが提唱するエンターテインメントロボッ
ト・システムの標準インターフェースです。
AIBO Navigator 2
は、
OPEN-R
バージョン
1.1.2
に準拠して
います。
AIBO
と
AIBO
ロゴ
、
OPEN-R
と
OPEN-R
ロゴ
はソニー株式会社の登録
商標です。
メモリースティック(
Memory Stick
)と はソニー株式
会社の商標です。
Microsoft
、
Windows
、
Direct X
は米国
Microsoft Corporation
の米国及びその他の
国における登録商標です。
その他、本書で登場するシステム名、製品名は、一般に各開発メーカーの登録商標ある
いは商標です。
なお、本文中では
TM
、
®
マークは明記していません。
インターネット上でも情報をご覧になることができます。
http://www.aibo.com/

5
目次
はじめに........................................................................................................
6
マニュアルについて..........................................................................
6
付属品一覧 ....................................................................................................
7
必要なシステム .............................................................................................
8
ワイヤレス
LAN
環境.........................................................................
8
PC
の動作環境.................................................................................
10
インストール ..............................................................................................
11
アンインストール .......................................................................................
14
ワイヤレス
LAN
の設定 ...............................................................................
15
AIBO
をワイヤレス
LAN
に接続する ..............................................
15
AIBO
のネットワーク設定を変更する............................................
16
AIBO Navigator 2
での設定 ........................................................
18
故障かな?と思ったら ................................................................................
19
AIBO
本体の取り扱い(各部名称、各種設定、メモリースティックの取り
付けかた、使用上の安全の注意事項など)については、
ERS-210/220
の各
取扱説明書をご覧ください。

6
はじめに
AIBO Navigator 2
(アイボナビゲーター
2
)はワイヤレス
LAN
を使って
PC
か
ら
AIBO
をコントロールできるソフトウェアです。
AIBO
をあなたの思うままに動かしたり、
AIBO
が見ている風景を
PC
上で楽し
むこともできます。
さあ、あなたも
AIBO
をコントロールしてみましょう!
マニュアルについて
AIBO Navigator 2
のマニュアルは次の
2
部構成になっています。
セットアップガイド(本書)
AIBO Navigator 2
のインストール、必要なシステムや、ワイヤレス
LAN
の
設定について説明しています。
はじめて
AIBO Navigator 2
をお使いになるときは、必ず「セットアップガイ
ド」からお読みください。
ユーザーガイド
AIBO Navigator 2
の起動から、メインウィンドウとなる「コントロールパネ
ル」について、また実際に
AIBO
をリモートコントロールする方法について説
明しています。

7
付属品一覧
ご使用の前に、付属品がすべて揃っていることをご確認ください。
■
AIBO-ware“
メモリースティック
”
■
アプリケーション
CD-ROM
■
ソフトウェア使用許諾契約書
■
セットアップガイド(本書)
■
ユーザーガイド
■
キーコードシール

8
必要なシステム
AIBO Navigator 2
をご使用になるためには以下のシステムが必要です。
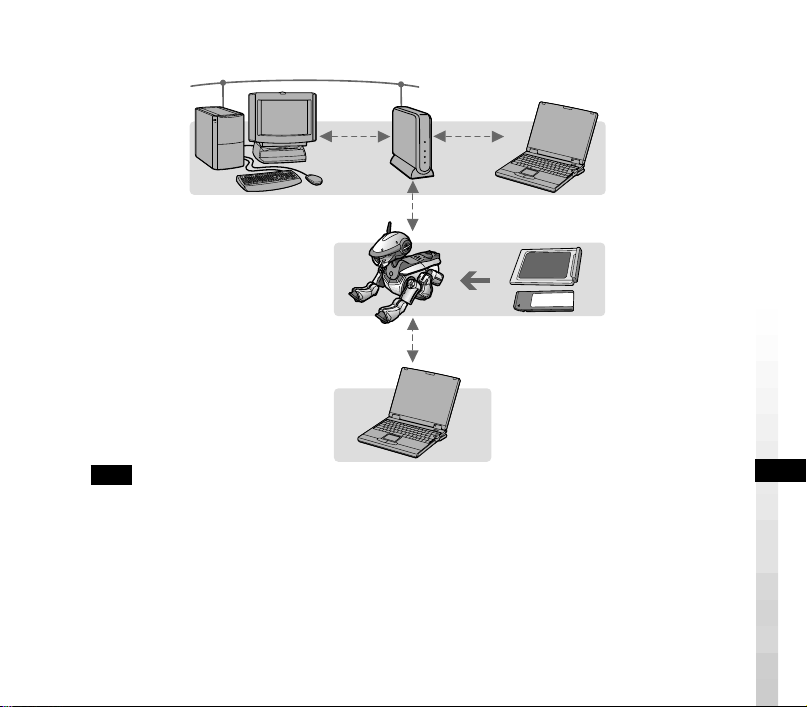
ワイヤレス
LAN
環境
AIBO
側と
PC
側に必要な環境はそれぞれ次のとおりです。
AIBO
側
AIBO
ワイヤレス
LAN
カード
ERA-201D1
AIBO ERS-210/220
への装着のしかたは、
AIBO
ワイヤレス
LAN
カードの取
扱説明書をご覧ください。
PC
側
以下のいずれかが必要です。
• IEEE802.11b
準拠のワイヤレス
LAN
カード
*
を備えた
PC
• IEEE802.11b
準拠のワイヤレス
LAN
アクセスポイント
*
と
LAN
接続された
PC
*弊社推奨品をご利用ください
9
アクセスポイントを使う場合
アクセスポイントがない場合
備考
PC
とアクセスポイントの
LAN
接続には、ワイヤレス
LAN
と有線
LAN
(ネットワーク
ケーブルを使う)方法があります。
•PC
とアクセスポイントをワイヤレス
LAN
で接続する場合
PC
用
IEEE802.11b
準拠ワイヤレス
LAN
カードを
PC
に装着します。
•PC
とアクセスポイントを有線
LAN
で接続する場合
ハブ
1
台とネットワークケーブル
2
本が必要です。
ワイヤレス
LAN
の設定については、
15
ページをご覧ください。
“
メモリースティック
”
と
AIBO
ワイヤレス
LAN
カードを装着した
AIBO
ワイヤレス
LAN
対応
PC
アクセス
ポイント

10
PC
の動作環境
OS Microsoft Windows 2000 Professional
(
Service Pack 2
以降)
日本語版
Microsoft Windows Millennium Edition
日本語版
Microsoft Windows 98 Second Edition
日本語版
CPU Intel Pentium III 500MHz
相当以上
メモリー
128M
バイト以上
HDD 50M
バイト以上の空き容量(インストール時)
グラフィックス
Direct X 7
互換ビデオカード
サウンド
Direct X 7
互換サウンドカード
CD-ROM
ドライブ(インストール時など)
その他
IEEE802.11b
準拠無線
LAN
に対応していることが必要です
(詳細は
8
ページをご覧ください)。
市販のコントローラーに対応しています。
“
メモリースティック
”
リーダー/ライター
*
*
必須ではありませんが、
“
メモリースティック
”
リーダー/ライター
を使って次のことができます。
• LAN
の設定
•AIBO
マスタースタジオで作成したモーションデータの取り込み

11
インストール
付属の
CD-ROM
から
AIBO Navigator 2
ソフトウェアと、必要に応じて
Direct X
をハードディスクにインストールします。
1
PC
の電源を入れ、
Windows
を起動する
ご注意
•
セットアップを始める前に他のプログラムはすべて終了させてください。
• Windows 2000 Professional
にインストールする場合は、管理者または
Administrators
グループのメンバーとしてログオンしてください。
2
付属の
CD-ROM
を
CD-ROM
ドライブに入れる
セットアッププログラムが自動的に実行されます。
実行されないときは、
CD-ROM
の「
AutoRun.exe
」をダブルクリックしてく
ださい。
3
[
インストール
]
ボタンをクリックする
「
AIBO Navigator 2
セットアップメニューへようこそ」ダイアログボックスが
表示されます。
4
[
次へ
]
をクリックする
「ユーザー情報」ダイアログボックスが表示されます。

12
5
「ユーザー名」に名前を、「キーコード」に製品のキーコードを入力し、
[
次
へ
]
をクリックする
「キーコード」は付属のキーコードシールに印刷されています。
キーコードシールは
CD-ROM
のケースに貼り、なくさないように保管してくだ
さい。
[
次へ
]
をクリックすると、「登録情報の確認」ダイアログボックスが表示されます。
6
登録情報を確認し、内容が正しければ
[
はい
]
をクリックする
間違っている場合は、
[
いいえ
]
をクリックして、登録しなおしてください。
「インストール先の選択」ダイアログボックスが表示されます。
7
インストール先を指定し、
[
次へ
]
をクリックする
通常は「
C¥Program Files¥Sony¥AIBO Navigator 2
」フォルダにインス
トールされます。
インストールするフォルダを変更したいときは、
[
参照
]
をクリックしてインス
トール先を指定します。
[
次へ
]
をクリックすると「プログラムフォルダの選択」ダイアログボックスが表
示されます。

13
8
プログラムアイコンを追加するプログラムフォルダを選択し、
[
次へ
]
をク
リックする
通常は「
AIBO Navigator 2
」フォルダに追加されますが、「既存のフォルダ」
一覧のすでにあるプログラムフォルダに追加することもできます。また、「プロ
グラムフォルダ」に新たにフォルダ名を入力して指定することもできます。
[
次へ
]
をクリックすると「問い合わせ」ダイアログボックスが表示されます。
9
デスクトップに
AIBO Navigator 2
のショートカットアイコンを作成する
場合は
[
はい
]
を、作成しない場合は
[
いいえ
]
をクリックする
インストールが開始されます。
インストールが終了すると「インストールの終了」ダイアログボックスが表示さ
れます。
10
[
完了
]
をクリックする
これでインストールは終了です。続いて、ワイヤレス
LAN
の設定(
15
ページ)
を行ってください。

14
アンインストール
アンインストールすると、
PC
上の
AIBO
データは削除されます。
ご注意
Windows 2000 Professional
でアンインストールする場合は、管理者または
Administrator
グループのメンバーとしてログオンしてください。
1
タスクバーの
[
スタート
]
ボタンをクリックし、
[
設定
] - [
コントロール
パネ
ル
]
をクリックする
2
[
アプリケーションの追加と削除
]
アイコンをダブルクリックする
3
「
AIBO Navigator 2
」を選択して
[
追加と削除
]
ボタン(
Windows 2000
Professional
では
[
変更
/
削除
]
ボタン)をクリックする

15
ワイヤレス
LAN
の設定
AIBO Navigator 2
では、ワイヤレス
LAN
を使って、
PC
から
1
体の
AIBO
を
リモートコントロールします。
AIBO
をワイヤレス
LAN
に接続する
1
PC
(またはアクセスポイント)の設定を、
AIBO
ワイヤレス
LAN
カードの
初期設定でネットワークが構築できるように変更する
設定の変更方法ついては、各機器の取扱説明書をご覧ください。
AIBO
ワイヤレス
LAN
カードの初期設定については、
LAN
カードの取扱説明
書をご覧ください。
2
AIBO
に
AIBO
ワイヤレス
LAN
カードを装着する
装着方法ついては、
AIBO
ワイヤレス
LAN
カードの取扱説明書をご覧くださ
い。
3
AIBO
に「
AIBO Navigator 2
」の
“
メモリースティック
”
を挿入する
挿入方法については、
AIBO
の取扱説明書をご覧ください。
4
AIBO
のポーズボタンを押し、
AIBO
を起動する
これで、ネットワークに接続できます。

16
AIBO
のネットワーク設定を変更する
AIBO
ワイヤレス
LAN
カードの初期設定を変更してお使いになる場合は、次の
ABいずれかの方法で設定を変更します(Bの場合、
“
メモリースティック
”
リーダー/ライターが必要です)。
A
AIBO
をワイヤレス
LAN
に接続した状態で、
LAN
内の
PC
から設定変更する
1
PC
の
Web
ブラウザで次の
URL
を入力し、
AIBO
側の設定画面を呼び出し
て設定を変更する
URL: http://10.0.1.100/SETUP.HTM
詳しくは、
AIBO
ワイヤレス
LAN
カードの取扱説明書をご覧ください。
2
ユーザー
ID
、パスワードを入力する
AIBO Navigator 2
起動時のユーザー認証のために、ユーザー
ID
とパスワード
(半角英数
8
文字以内)を入力します。
ユーザー認証が必要ない場合は入力しません。
ご注意
AIBO
は、ユーザー
ID
とパスワードが一致した
PC
とのみ接続を行います。
17
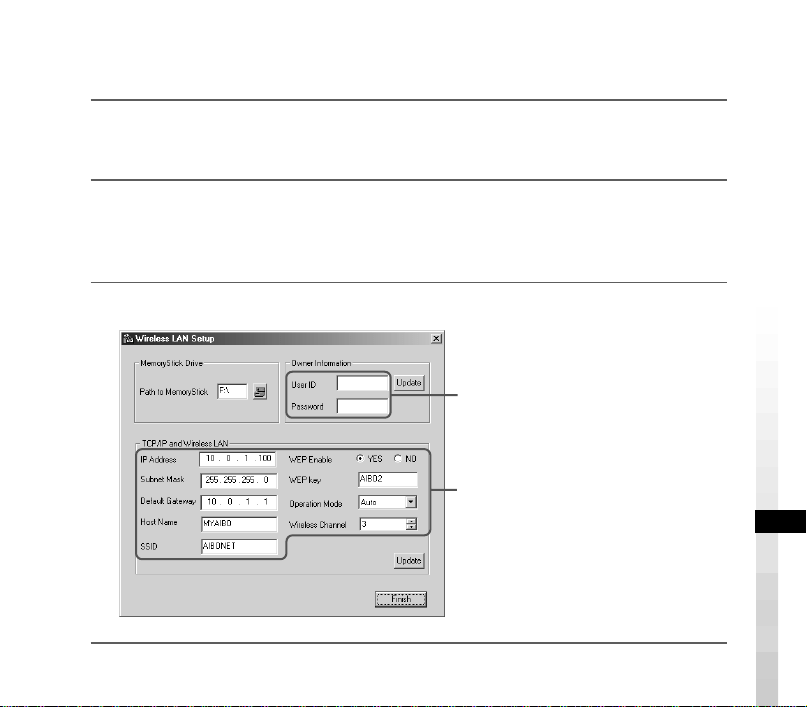
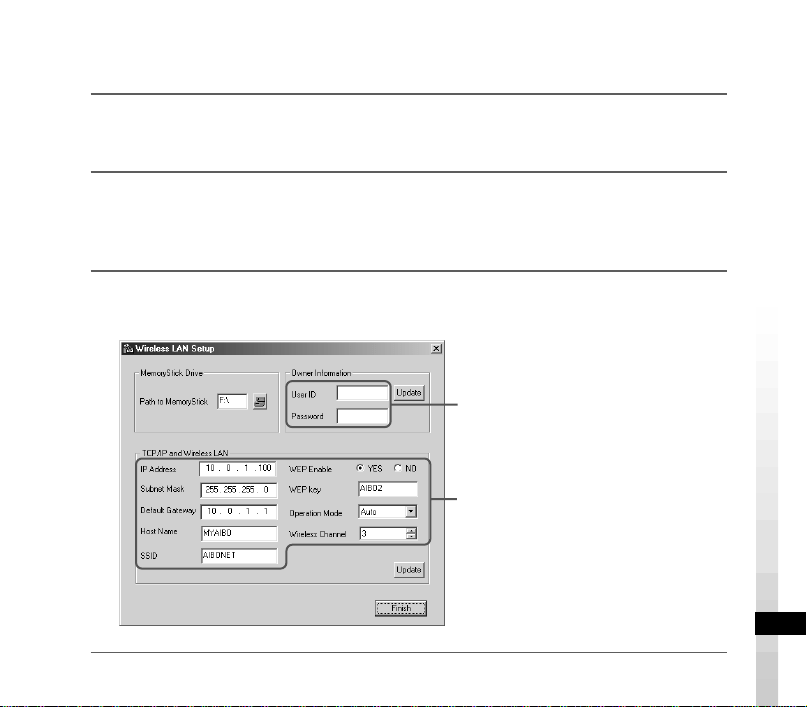
B
AIBO Navigator 2
の
“
メモリースティック
”
上のワイヤレス
LAN
の設定を
書き換える(
“
メモリースティック
”
リーダー/ライターが必要です)
1
“
メモリースティック
”
リーダー/ライターに「
AIBO Navigator 2
」の
“
メモ
リースティック
”
を挿入する
2
タスクバーの
[
スタート
]
ボタンをクリックし、
[
プログラム
] - [AIBO
Navigator 2] - [
ワイヤレス
LAN
セットアップ
]
をクリックする
「ワイヤレス
LAN
セットアップ」が表示されます。
3
“
メモリースティック
”
ドライブを選択し、ワイヤレス
LAN
の設定をする
AIBO Navigator 2
起動時のユーザー
認証のために、ユーザー
ID
、パスワー
ドを入力する(半角英数
8
文字以内)
ユーザー認証が必要ない場合は入力し
ません
AIBO
ワイヤレス
LAN
カードの取扱説
明書にしたがって、各項目を設定する
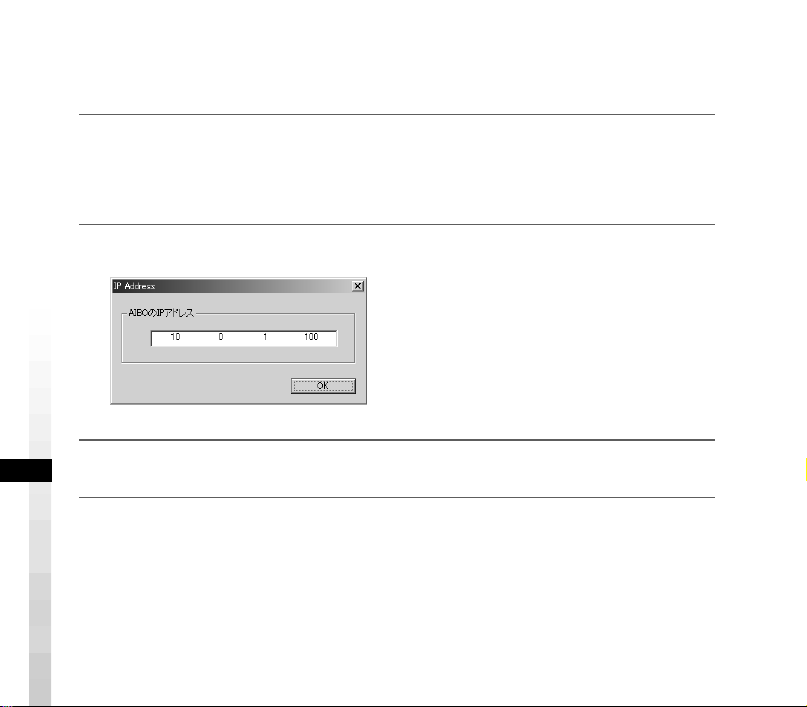
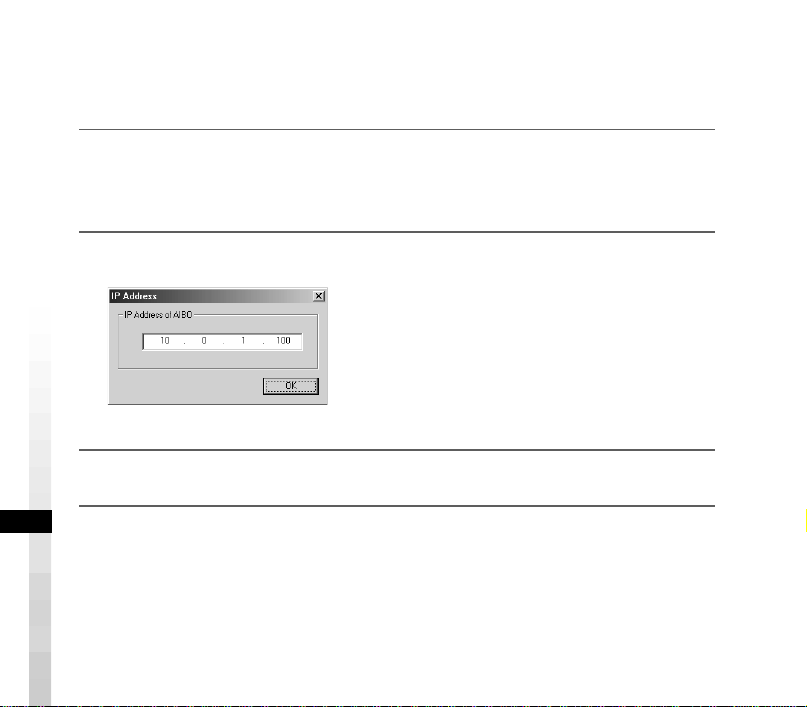
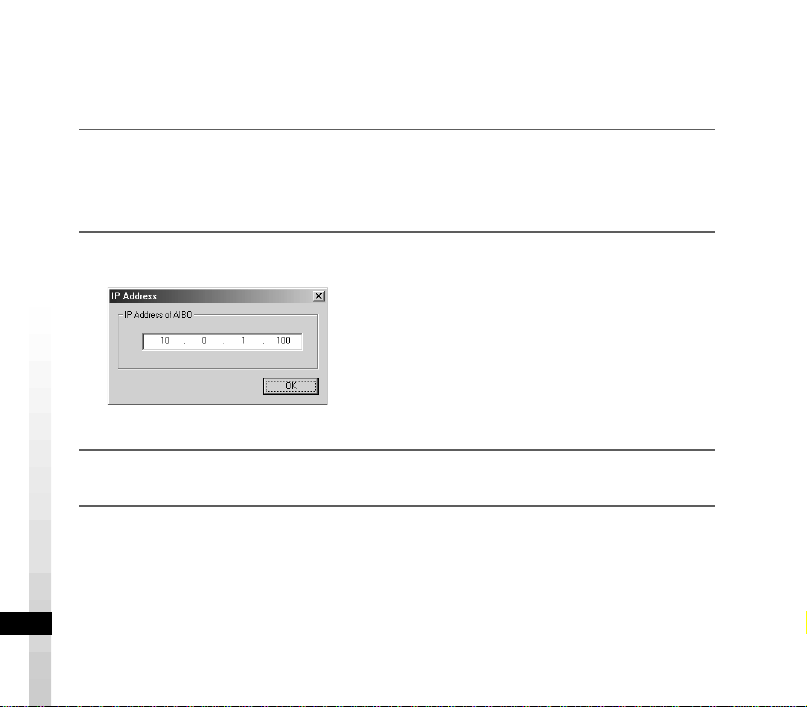
18
AIBO Navigator 2
での設定
AIBO Navigator 2
でワイヤレス
LAN
機能を使うための設定をします。
1
タスクバーの
[
スタート
]
ボタン
- [
プログラム
] - [AIBO Navigator 2] -
[AIBO Navigator 2]
をクリックする
「
IP Address
」が表示されます。
2
AIBO
の
IP
アドレスを設定する
3
[OK]
ボタンをクリックする

19
故障かな?と思ったら
AIBO
クリニックにご相談になる前に下表でチェックしてみてください。
それでも具合が悪いときは、
AIBO
クリニックにご相談ください。(
AIBO
クリ
ニックについて詳しくは、裏表紙をご覧ください。)
症状
•
原因 →対策
CD-ROM
からインス
トールできない
•
ハードディスクの空き容量が少ない
→ 空き容量を確認してください。ドライブが複数ある場
合には
C
ドライブ以外で空きのあるハードディスクを選
択してください。
• CD-ROM
の自動再生が
OFF
になっている
→
CD-ROM
内の「
AutoRun.exe
」を実行してくださ
い。
•
他のプログラムが起動している
→ すべてのプログラムを終了させてから、再度セット
アップを行ってください。
• Windows NT/Windows 3.1/ Windows95
にインストー
ルしようとしている
→ 本製品は
Windows 98 Second Edition/Me/2000
Professional
でのみ動作します。動作対象
OS
の入っ
た
PC
にインストールしてください。
20
症状
•
原因 →対策
• VGA
設定が
16bit
色未満になっている
→
VGA
設定を
16bit
色以上に設定してください。
• Windows 2000 Professional
で一般ユーザーまたは制限
ユーザーでインストールしようとしている
→ 管理者または
Administrators
グループのメンバーとし
てログオンし、インストールしてください。


En
2
Notice to Users
©2001 Sony Corporation All rights
reserved. This manual and the software
described herein, in whole or in part, may
not be reproduced, translated or reduced
to any machine-readable form without
prior written approval.
EXCEPT AS SPECIFICALLY SET FORTH
IN THE END-USER LICENSE
AGREEMENT, SONY CORPORATION
PROVIDES THIS MANUAL, THE
SOFTWARE AND THE OTHER
INFORMATION CONTAINED HEREIN
“AS IS” WITH NO WARRANTY AND
HEREBY EXPRESSLY DISCLAIMS ANY
IMPLIED WARRANTIES OF
MERCHANTABILITY,
NONINFRINGEMENT OR FITNESS FOR
ANY PARTICULAR PURPOSE WITH
REGARD TO THIS MANUAL, THE
SOFTWARE, OR SUCH OTHER
INFORMATION. IN NO EVENT SHALL
SONY CORPORATION BE LIABLE FOR
ANY INCIDENTAL, CONSEQUENTIAL,
OR SPECIAL DAMAGES, WHETHER
BASED ON TORT, CONTRACT, OR
OTHERWISE ARISING OUT OF OR IN
CONNECTION WITH THIS MANUAL,
THE SOFTWARE, OR OTHER
INFORMATION CONTAINED HEREIN
OR THE USE THEREOF.
THIS DOES NOT AFFECT YOUR
STATUTORY RIGHTS.
Sony Corporation reserves the right to
make any modification to this manual or
the information contained herein at any
time without notice.
The software described herein may also
be governed by the terms of a separate
user license agreement.
This product contains software owned by
Sony Corporation and licensed from third
parties. Use of such software is subject to
the terms and conditions of license
agreements enclosed with this product.
Software specifications are subject to
change without notice and may not
necessarily be identical to current retail
versions.
En
3
Before using this software, please read the accompanying End-User License
Agreement which governs use of this software.
• This software or document is protected by copyright, and distributed under
licenses restricting its use, copying, and distribution. No part of this software or
document may be reproduced in any form by any means and rental of this
software may not be allowed without prior authorization of Sony Corporation.
• Sony Corporation assumes no responsibility for any inconvenience caused by
misuse or any use not stated in this document.
• The supplied software cannot be used with any device other than those devices
specified herein.
• The specifications of the supplied software are subject to change without notice.
Customer Support
How to contact the AIBO Customer Link.
In the United States and Canada
1-800-427-2988 (USA)
Email address:
In Europe
English line: +44 (0)-20-7365-2937
German line: +49 (0)-69-9508-6309
French line: +33 (0)-1-5569-5117
In Australia
Call +1300-36-2426 (toll free within
Australia)
E-mail address: [email protected].com
In Hong Kong
Sony style
Tel: +852-2345-2966
E-mail address:
[email protected].com.hk

4
“OPEN-R” is the standard interface for the entertainment robot
system that Sony is actively promoting. This interface expands the
capability of the entertainment robot through a flexible combination
of hardware and interchangeable software to suit various applications.
“AIBO Navigator 2” conform to OPEN-R version 1.1.2 (software
specifications).
“AIBO,” the AIBO logo
, “OPEN-R” and the OPEN-R logo are registered
trademarks of Sony Corporation.
“Memory Stick,” “
” and “ ” are trademarks of Sony
Corporation.
Microsoft, Windows and Direct X are registered trademarks of Microsoft
Corporation in the United States and other countries.
All other system names and product names mentioned herein may be the
trademarks or registered trademarks of their respective companies.
In this manual, the “™” and “®” marks have been omitted.
Other information about AIBO is available on the Internet at the following site:
http://www.aibo.com/
Reproduction in whole or in part without written permission is prohibited. All
rights reserved.
5
For more information about “AIBO” ERS-210/220 (names of parts, settings,
“Memory Stick” installation, safety precautions, etc.), please refer to the
“AIBO” ERS-210/220 operation manual.
Table of Contents
Introduction ......................................................................................6
Manual organization .................................................................. 6
Checking the supplied accessories ................................................... 7
System requirements ........................................................................8
The wireless LAN environment ................................................ 8
PC requirements ...................................................................... 10
Installing the software ....................................................................11
Uninstalling the software ............................................................... 14
Setting up a wireless LAN ............................................................. 15
Connecting AIBO to a wireless LAN ...................................... 15
Changing AIBO’s network settings ......................................... 16
Setting up AIBO Navigator 2 .................................................. 18
Troubleshooting ............................................................................. 19

6
Introduction
The AIBO Navigator 2 software lets you control AIBO from a PC using a wireless
LAN.
With this software, you can control AIBO’s movements and see what AIBO sees
from your PC screen.
So get set to control your AIBO!
Manual organization
AIBO Navigator 2 comes with the following two manuals:
Setup Guide (this manual)
The setup guide provides information on installing AIBO Navigator 2, system
requirements and setting up a wireless LAN.
If you’re using AIBO Navigator 2 for the first time, read the Setup Guide first.
User’s Guide
The user’s guide describes how to start up AIBO Navigator 2, how the main
Control panel is organized and how to operate AIBO by remote control.

7
Checking the supplied accessories
First, check that you have all of the following supplied accessories:
x “Memory Stick” containing AIBO-ware
x CD-ROM containing software
x End-User License Agreement
x Setup Guide (this manual)
x User’s Guide
x Key code sticker

8
System requirements
You must have the following system to use AIBO Navigator 2:
The wireless LAN environment
You must equip your AIBO and PC as follows.
On your AIBO
AIBO Wireless LAN Card ERA-201D1
For instructions on installing the card in “AIBO” ERS-210/220, please refer to the
instruction manual of the AIBO Wireless LAN Card.
On your PC
You will need either of the following:
• A PC equipped with an IEEE802.11b-compatible wireless LAN card*
• A PC that is connected via LAN to an IEEE802.11b-compatible wireless LAN
access point*
* Please use products that are recommended by Sony.
9
AIBO equipped with
“Memory Stick” and
AIBO wireless LAN card
When an access point is used
Notes
The PC can be connected to the access point via a wireless LAN or wired LAN (network
cable).
• To connect the PC to an access point via a wireless LAN
Install an IEEE802.11b-compatible wireless LAN card into the PC.
• To connect the PC to an access point via a wired LAN
You will need a hub and two network cables.
For information on setting up a wireless LAN, refer to page 15.
When an access point is
not used
Access
point
PC connected to
a wireless LAN

10
PC requirements
OS Microsoft Windows 2000 Professional (Service Pack 2 or later),
English/French/German/Traditional Chinese version
Microsoft Windows Millennium Edition, English/French/
German/Traditional Chinese version
Microsoft Windows 98 Second Edition, English/French/German/
Traditional Chinese version
CPU Intel Pentium III 500 MHz or above
RAM 128 MB or more
Hard disk space 50 MB or more (for installation)
Graphics Video card that supports Direct X 7
Sound Sound card that supports Direct X 7
CD-ROM drive (for software installation)
Others Supports for an IEEE802.11b-compatible wireless LAN
(refer to page 8 for details)
Supports for commercially available controllers
“Memory Stick” Reader/Writer*
*The “Memory Stick” Reader/Writer is not required, but it can
be used to do follow things.
• Setting the LAN.
• Importing motion data produced by AIBO Master Studio.

11
Installing the software
Do the following procedure to install AIBO Navigator 2 and DirectX (if required)
onto the hard disk of your PC from the accompanying CD-ROM.
1
Turn on your PC and start up Windows.
Notes
• End all other programs before beginning the setup procedure.
• When installing to a system running Windows 2000 Professional, log on as the
administrator or as an Administrators Group member.
2
Insert the supplied CD-ROM into the CD-ROM drive.
The setup program is executed automatically.
If the setup program does not start up, double click the “AutoRun.exe” file in the
CD-ROM.
3
Click Install.
The Welcome to AIBO Navigator 2 Setup dialog box appears.
4
Click Next.
The User Information dialog box appears.

12
5
Type your name in the User name box and the product key code in the
Key code box, and then click Next.
The key code is printed on the accompanying key code sticker.
Attach the sticker to the CD-ROM case so as not to lose it.
When you click Next, the Confirmation of Registration dialog box appears.
6
Check the information. If everything that you entered is correct, click
Next.
The Choose Destination Location dialog box appears.
If any of the information is incorrect, click No and repeat the registration procedure.
7
Choose the folder where you want to install the software and click
Next.
The default folder setting is “C:\Program Files\Sony\AIBO Navigator 2”.
To install to a different folder, click Browse and select a folder of your choice.
When you click Next, the Select Program Folder dialog box appears.

13
8
Choose the folder where you want to add the program icon, and then
click Next.
The default folder setting is “AIBO Navigator 2”. If you prefer, you can select a
different folder from the Existing Folders list or type a new folder name in the
Program Folder box.
When you click Next, the Query dialog box appears.
9
If you want to create an AIBO Navigator 2 shortcut icon on the
desktop, click Yes. If not, click No.
The installation process begins.
When the installation ends, the Installation complete dialog box appears.
10
Click Finish.
This concludes the installation. The next thing to do is to set, up a wireless LAN
(page 15).

14
Uninstalling the software
Uninstalling the software will erase all existing AIBO data from the PC.
Note
To uninstall the software from a Windows 2000 Professional environment, log on
as an administrator or an Administrators Group member.
1
Click the Start button on the taskbar and select Settings–Control
Panel.
2
Double click the Add/Remove Programs icon.
3
Select AIBO Navigator 2 and click Add/Remove (Change/Remove in
Windows 2000 Professional).

15
Setting up a wireless LAN
AIBO Navigator 2 lets you control a single AIBO from your PC over a wireless
LAN.
Connecting AIBO to a wireless LAN
1
Change the network settings on your PC (or access point) to match the
default settings on the AIBO Wireless LAN Card.
For instructions on how to change the network settings on your PC, refer to the
respective instruction manual of the PC (or access point).
For information on the default settings of the AIBO Wireless LAN Card, refer to its
respective instruction manual.
2
Install the AIBO Wireless LAN Card into AIBO.
For instructions on installing the card, refer to the instruction manual of the AIBO
Wireless LAN Card.
3
Insert the AIBO Navigator 2 “Memory Stick” into AIBO.
For further instructions, refer to the instruction manual for AIBO.
4
Press the pause button on AIBO to activate AIBO.
AIBO can now connect with the wireless LAN.

16
Changing AIBO’s network settings
To change the default settings of the AIBO Wireless LAN Card, do procedure A
or B below. (For procedure B, the “Memory Stick” Reader/Writer is required.)
A Connecting AIBO to the wireless LAN and changing the settings from
the PC on the LAN
1
Enter the URL indicated below into the Web browser on the PC to
open the AIBO setup screen for changing the settings.
URL: http://10.0.1.100/SETUP.HTM
For details, refer to the instruction manual of the AIBO Wireless LAN Card.
2
Enter the user ID and password.
Enter a user ID and password (up to 8 alphanumeric characters), that will be for
user authentication whenever AIBO Navigator 2 is started up.
Do not enter a user ID or password if user authentication is not required.
Note
AIBO will connect to the PC only if the user ID and password match.
17
BChanging the wireless LAN settings on the AIBO Navigator 2
“Memory Stick” (the “Memory Stick” Reader/Writer is required)
1
Insert the AIBO Navigator 2 “Memory Stick” into the “Memory Stick”
Reader/Writer.
2
Click the Start button on the Task-bar and choose Programs–AIBO
Navigator 2–Wireless LAN Setup.
The Wireless LAN Setup window appears.
3
Select the “Memory Stick” drive and set up the wireless LAN.
Enter a user ID and password (up to
8 alpha-numeric characters), that will
be used for user authentication
whenever AIBO Navigator 2 is
started up.
Do not enter a user ID or password if
user authentication is not required.
Enter each parameter setting
according to the operation manual of
the Wireless LAN card.
18
Setting up AIBO Navigator 2
Do the following procedure to set up AIBO Navigator 2 for using the wireless LAN
features.
1
From the Task-bar, click Start–Programs–AIBO Navigator 2–AIBO
Navigator 2.
The IP Address dialog box is displayed.
2
Enter the AIBO IP address.
3
Click OK.

19
Symptom Remedy
The software cannot
be installed from the
CD-ROM.
• There isn’t enough space on the hard disk.
t Check the hard disk space. If several drives are available,
choose a hard disk other than drive C with adequate space.
• The CD-ROM’s auto-play function is switched off.
t Execute the “AutoRun.exe” file on the CD-ROM.
• Other programs are running.
t First end all programs and then redo the setup.
• You attempted to install the software to a Windows NT/
Windows 3.1/Windows95 environment.
t This software runs only under Windows 98 Second Edition/
Me/2000 Professional. Install the software to a PC operating
under one of these enivronments.
• The VGA monitor is set to a resolution of less than 800 × 600
and/or a color setting of less than 16 bits.
t Set the VGA monitor resolution to 800 × 600 or more and the
color to 16 bits or more.
• You attempted to install the software to a Windows 2000
Professional environment as a Power User or User.
t Log on as an administrator or an Administrators Group
member before installing the software.
Troubleshooting
If you experience any of the following difficulties, use this troubleshooting guide
to remedy the problem.
Should the problem persist, please contact the AIBO Customer Link. (See page 3
for details on the AIBO Customer Support.)

Fr
2
Avis aux utilisateurs
©2001 Sony Corporation Tous droits
réservés. Le présent manuel et le logiciel
qui y est décrit ne peuvent être
reproduits, traduits ou réduits, en tout ou
en partie, sous quelque forme
compréhensible pour une machine que ce
soit sans l’autorisation écrite préalable de
Sony Corporation.
MIS A PART LES ELEMENTS
CLAIREMENT SPECIFIES DANS LE
CONTRAT DE LICENCE DU LOGICIEL,
SONY CORPORATION FOURNIT CE
MANUEL, LE LOGICIEL ET LES
INFORMATIONS QUI Y SONT
CONTENUES “EN L’ETAT” SANS
GARANTIE SONY CORPORATION
REJETTE TOUTE GARANTIE IMPLICITE
DE COMMERCIALISATION OU
D’APTITUDE AU SERVICE A DES FINS
PARTICULIERES EN CE QUI
CONCERNE CE MANUEL, LE
LOGICIEL OU TOUTE AUTRE
INFORMATION. EN AUCUN CAS,
SONY CORPORATION NE POURRA
ÊTRE TENU RESPONSABLE D’UN
QUELCONQUE DOMMAGE DIRECT,
INDIRECT OU SPÉCIAL RÉSULTANT
D’UN DÉLIT, D’UN CONTRAT OU
D’UNE AUTRE CAUSE, DANS LE
CADRE DE OU EN RAPPORT AVEC CE
MANUEL, LE LOGICIEL OU TOUTE
AUTRE INFORMATION QUI Y FIGURE
OU L’UTILISATION QUI EN EST FAITE.
Sony Corporation se réserve le droit
d’apporter à tout moment et sans préavis
des modifications au présent manuel ou
aux informations qu’il contient.
Le logiciel décrit dans le présent manuel
peut également être régi par les
dispositions d’un contrat de licence
utilisateur séparé.
Ce produit contient un logiciel qui est la
propriété de Sony et cédé en licence par
des tiers. L’utilisation de ce logiciel est
régie par les conditions des accords de
licence qui accompagnent ce produit. Les
spécifications logicielles sont sujettes à
modifications sans préavis et peuvent être
différentes des versions actuellement
commercialisées.
Fr
3
Avant d’utiliser ce logiciel, lisez le contrat de licence de l’utilisateur final, qui
régit l’utilisation de ce logiciel.
Assistance consommateur
Comment contacter le service consommateur AIBO.
• Ce logiciel ou document est protégé par des droits d’auteur, et distribué sous
licences limitant son emploi, la reproduction et la distribution. Aucune partie de
ce logiciel ou document ne peut être reproduite sous quelque forme que ce soit ni
par quelque moyen que ce soit, et la location de ce logiciel peut ne pas être
autorisée sans l’approbation préalable de Sony Corporation.
• Sony Corporation n’assume aucune responsabilité pour l’incommodité causée
par un usage abusif ou toute utilisation non prescrite dans ce document.
• Le logiciel fourni n’est utilisable avec aucun dispositif autre que ceux spécifiés.
• Les spécifications du logiciel fourni sont sujettes à modification sans préavis.
Aux Etats-Unis et Canada
1-800-427-2988 (USA)
Courrier électronique :
En Europe
France : +33 (0)-1-5569-5117
Angleterre : +44 (0)-20-7365-2937
Allemagne : +49 (0)-69-9508-6309
En Australie
+1300-36-2426 (appel gratuit en
Australie)
Courrier électronique :
En Hong Kong
Sony Style
Tél : +852-2345-2966
Courrier électronique :
[email protected].com.hk
4
“OPEN-R” est l’interface standard du robot de compagnie pour lequel
Sony mène une campagne de promotion active. Cette interface étend
les capacités du robot de compagnie en associant subtilement
matériels et logiciels interchangeables pour l’adapter à différentes
applications.
“AIBO Navigator 2” est conforme à la version 1.1.2 OPEN-R
(spécifications relatives au logiciel).
“AIBO”, le logo AIBO
, “OPEN-R” et le logo OPEN-R sont des marques
déposées de Sony Corporation.
“Memory Stick”, “
” et “ ” sont des marques de Sony
Corporation.
Microsoft, Windows et Direct X sont des marques déposées de Microsoft
Corporation aux Etats-Unis et dans d’autres pays.
Tous les autres noms de systèmes ou de produits mentionnés dans ce document
sont les marques ou les marques déposées de leurs sociétés respectives. Dans ce
mode d’emploi, les indications “™” et “®” n’apparaissent pas.
Vous trouverez d’autres informations concernant AIBO sur Internet à l’adresse
suivante :
http://www.aibo.com/
La reproduction de tout ou partie de ce document sans autorisation écrite est
interdite. Tous droits réservés.
5
Table des matières
Introduction ......................................................................................6
Organisation du manuel ............................................................. 6
Vérification des accessoires fournis .................................................7
Configuration minimale requise ....................................................... 8
Environnement de réseau local sans fil ..................................... 8
Configuration de l’ordinateur .................................................. 10
Installation du logiciel ....................................................................11
Désinstallation du logiciel .............................................................. 14
Configuration d’un réseau local sans fil ......................................... 15
Connexion d’AIBO au réseau local sans fil ............................ 15
Modification des paramétrages réseau d’AIBO ...................... 16
Configuration de AIBO Navigator 2 ....................................... 18
Dépannage ...................................................................................... 19
Pour obtenir plus d’informations sur l’AIBO ERS-210/220 (noms des pièces,
réglages, installation d’un “Memory Stick”, précautions de sécurité, etc.),
reportez-vous au mode d’emploi de l’AIBO ERS-210/220.

6
Introduction
Le logiciel AIBO Navigator 2 vous permet de commander AIBO à partir d’un
ordinateur à l’aide d’un réseau local sans fil.
Vous pouvez commander les mouvements d’AIBO et afficher ce que “voit” AIBO
sur votre écran d’ordinateur.
Alors préparez-vous à diriger votre AIBO !
Organisation du manuel
Le manuel de AIBO Navigator 2 est composé de deux parties :
Le Guide d’installation (le présent manuel)
Ce manuel vous donne des informations sur l’installation de AIBO Navigator 2, la
configuration minimale requise et la configuration d’un réseau local sans fil.
Si vous utilisez AIBO Navigator 2 pour la première fois, commencez par lire ce
Guide d’installation.
Le Guide de l’utilisateur
Le guide de l’utilisateur décrit le démarrage de AIBO Navigator 2, l’organisation
du panneau principal Control (Commande) et le fonctionnement d’AIBO par
commande à distance.

7
Vérification des accessoires fournis
Commencez par vérifier que vous disposez de tous les accessoires fournis :
x Le “Memory Stick” contenant l’AIBO-ware
x Le CD-ROM contenant le logiciel
x Le contrat de licence de l’utilisateur final
x Le Guide d’installation (le présent manuel)
x Le Guide de l’utilisateur
x L’autocollant du code de clé

8
Configuration minimale requise
Vous devez disposer de l’équipement suivant pour utiliser AIBO Navigator 2 :
Environnement de réseau local sans fil
Votre AIBO et votre ordinateur doivent être équipés de la façon suivante.
Sur AIBO
Une carte réseau sans fil AIBO ERA-201D1
Pour connaître les instructions d’installation de la carte dans “AIBO” ERS-210/
220, reportez-vous au mode d’emploi de la carte réseau sans fil AIBO.
Sur l’ordinateur
Vous avez besoin d’une des deux configurations suivantes :
• Un ordinateur disposant d’une carte de réseau local sans fil compatible
IEEE802.11b*
• Un ordinateur raccordé via le réseau local sans fil à un point d’accès du réseau
local sans fil compatible IEEE802.11b*
* Veuillez utiliser les produits recommandés par Sony.
9
Lorsqu’un point d’accès est utilisé
Remarques
L’ordinateur peut être raccordé au point d’accès via un réseau local sans fil ou via un réseau
local câblé (câble réseau).
• Pour raccorder l’ordinateur au point d’accès via un réseau local sans fil
Installez une carte réseau sans fil compatible IEEE802.11b dans l’ordinateur.
• Pour raccorder l’ordinateur au point d’accès via un réseau câblé
Vous devez disposer d’un concentrateur (hub) et de deux câbles réseau.
Pour obtenir des informations sur la configuration d’un réseau local sans fil,
reportez-vous à la page 15.
AIBO équipé d’un
“Memory Stick” et d’une
carte réseau sans fil AIBO
Ordinateur se raccordant à
un réseau local sans fil
Lorsqu’aucun point
d’accès n’est utilisé
Point
d’accès

10
Configuration de l’ordinateur
Système d’exploitation
Microsoft Windows 2000 Professional
(Service Pack 2 ou ultérieur), version anglaise/française/
allemande/chinois traditionnel
Microsoft Windows Millennium Edition, version anglaise/
française/allemande/chinois traditionnel
Microsoft Windows 98 Second Edition, version anglaise/
française/allemande/chinois traditionnel
Unité centrale Intel Pentium III 500 MHz et plus
RAM 128 Mo ou plus
Espace du disque dur
50 Mo ou plus (pour l’installation)
Graphique Carte vidéo supportant Direct X 7
Son Carte son supportant Direct X 7
Lecteur de CD-ROM (pour l’installation du logiciel)
Autres Supporte le réseau local sans fil compatible IEEE802.11b
(reportez-vous à la page 8 pour plus de détails)
Supporte des contrôleurs disponibles dans le commerce
Lecteur/enregistreur de “Memory Stick”*
*Le lecteur/enregistreur de “Memory Stick” n’est pas requis,
mais il peut être utilisé dans les cas suivants :
• Configuration du réseau local.
• Importation de données de mouvements produites par AIBO
Master Studio.

11
Installation du logiciel
Installez AIBO Navigator 2 et DirectX (le cas échéant) sur le disque dur à partir du
CD-ROM fourni.
1
Mettez votre ordinateur sous tension et démarrez Windows.
Remarques
• Quittez tous les autres programmes avant de procéder à l’installation.
• Lorsque vous effectuez l’installation sous Windows 2000 Professional, ouvrez une
session en tant qu’administrateur ou en tant que membre du groupe Administrateurs.
2
Insérez le CD-ROM fourni dans le lecteur de CD-ROM.
Le programme d’installation s’exécute automatiquement.
Si le programme d’installation ne démarre pas, double-cliquez sur le fichier
“AutoRun.exe” du CD-ROM.
3
Cliquez sur Install (Installation).
La boîte de dialogue Welcome to AIBO Navigator 2 Setup (Installation de AIBO
Navigator 2) apparaît.
4
Cliquez sur Next (Suivant).
La boîte de dialogue User Information (Informations utilisateur) apparaît.

12
5
Saisissez votre nom dans la boîte User name (Nom de l’utilisateur) et le
code de clé du produit dans la zone Key code (Code de clé), puis cliquez
sur Next (Suivant).
Le code de clé est imprimé sur l’autocollant fourni.
Collez-le sur le boîtier du CD-ROM de façon à ne pas le perdre.
Lorsque vous cliquez sur Next (Suivant), la boîte de dialogue Confirmation of
Registration (Confirmation de l’enregistrement) apparaît.
6
Vérifiez les informations que vous avez enregistrées et, si elles sont
correctes, cliquez sur Next (Suivant).
La boîte de dialogue Choose Destination Location (Choix de l’emplacement de
destination) apparaît.
Si les informations sont incorrectes, cliquez sur No (Non) et recommencez la
procédure d’enregistrement.
7
Choisissez le dossier dans lequel vous souhaitez installer le logiciel et
cliquez sur Next (Suivant).
Le dossier par défaut est “C:\Program Files\Sony\AIBO Navigator 2”.
Pour effectuer l’installation dans un autre dossier, cliquez sur Browse (Parcourir) et
sélectionnez le dossier de votre choix.
Lorsque vous cliquez sur Next (Suivant), la boîte de dialogue Select Program Folder
(Sélection du dossier de programmes) apparaît.

13
8
Choisissez le dossier dans lequel vous souhaitez ajouter l’icône du
programme et cliquez sur Next (Suivant).
Le dossier par défaut est “AIBO Navigator 2”. Si vous préférez, vous pouvez
sélectionner un dossier différent dans la liste Existing Folders (Dossiers existants)
ou saisir un nouveau nom de fichier dans la boîte Program Folder (Dossier de
programmes).
Lorsque vous cliquez sur Next (Suivant), la boîte de dialogue Query (Requête)
apparaît.
9
Si vous souhaitez créer un raccourci AIBO Navigator 2 sur le bureau,
cliquez sur Yes (Oui). Dans le cas contraire, cliquez sur No (Non).
Le processus d’installation commence.
Lorsque l’installation est terminée, la boîte de dialogue Installation complete
(Installation terminée) apparaît.
10
Cliquez sur Finish (Terminer).
L’installation est terminée. Passez maintenant à la configuration d’un réseau local
sans fil (page 15).

14
Désinstallation du logiciel
La désinstallation du logiciel efface toutes les données AIBO de l’ordinateur.
Remarque
Pour désinstaller le logiciel sous Windows 2000 Professional, ouvrez une session
en tant qu’administrateur ou en tant que membre du groupe Administrateurs.
1
Cliquez sur le bouton Démarrer de la barre des tâches et choisissez
Paramètres–Panneau de configuration.
2
Double-cliquez sur l’icône Ajout/Suppression de programmes.
3
Sélectionnez AIBO Navigator 2 et cliquez sur Ajouter/Supprimer
(Modifier/Supprimer sous Windows 2000 Professional).

15
Configuration d’un réseau local
sans fil
AIBO Navigator 2 vous permet de diriger un AIBO à partir de votre ordinateur à
l’aide d’un réseau local sans fil.
Connexion d’AIBO au réseau local sans fil
1
Modifiez les paramétrages réseau sur l’ordinateur (ou point d’accès)
pour qu’ils correspondent aux paramétrages par défaut de la carte
réseau sans fil AIBO.
Pour connaître les instructions concernant la modification des paramétrages,
reportez-vous au mode d’emploi de l’ordinateur (ou point d’accès).
Pour obtenir des informations sur les paramétrages par défaut de la carte réseau sans
fil AIBO, reportez-vous à son mode d’emploi.
2
Installez dans AIBO la carte réseau sans fil AIBO.
Pour obtenir des instructions sur l’installation, reportez-vous au mode d’emploi de
la carte réseau sans fil AIBO.
3
Insérez dans AIBO le “Memory Stick” AIBO Navigator 2.
Pour plus d’informations, reportez-vous au mode d’emploi d’AIBO.
4
Appuyez sur la touche pause d’AIBO pour l’activer.
AIBO peut à présent être raccordé au réseau local sans fil.

16
Modification des paramétrages réseau d’AIBO
Pour modifier les paramètres par défaut de la carte réseau sans fil AIBO, suivez la
procédure A ou B ci-dessous. (Pour la procédure B, le lecteur/enregistreur de
“Memory Stick” est requis.)
A Raccordement d’AIBO au réseau local sans fil et modification des
paramètres à l’aide d’un ordinateur du réseau
1
Saisissez l’URL indiquée ci-dessous dans le navigateur Web de
l’ordinateur, ouvrez l’écran de configuration AIBO et modifiez les
paramètres.
URL:http://10.0.1.100/SETUP.HTM
Pour obtenir plus de détails, reportez-vous au mode d’emploi de la carte réseau sans
fil AIBO.
2
Saisissez l’ID utilisateur et le mot de passe.
Tapez un ID utilisateur et un mot de passe (jusqu’à 8 caractères alphanumériques) qui
seront utilisés pour confirmer l’utilisateur lors du démarrage d’AIBO Navigator 2.
N’entrez pas l’ID utilisateur ou le mot de passe si l’authentification de l’utilisateur
n’est pas requise.
Remarque
AIBO se raccorde à l’ordinateur uniquement lorsque l’ID utilisateur et le mot de passe
correspondent.
17
B
Modifications des paramètres du réseau local sans fil sur le “Memory Stick”
AIBO Navigator 2 (un lecteur/enregistreur de “Memory Stick” est requis)
1
Insérez le “Memory Stick” AIBO Navigator 2 dans le lecteur/
enregistreur de “Memory Stick”.
2
Cliquez sur le bouton Démarrer de la barre des tâches et choisissez
Programmes–AIBO Navigator 2–Wireless LAN Setup (Configuration
réseau local sans fil).
La fenêtre Wireless LAN Setup (Configuration réseau local sans fil) apparaît.
3
Sélectionnez le pilote du “Memory Stick” et configurez le réseau local sans fil.
Tapez un ID utilisateur et un mot de
passe (jusqu’à 8 caractères
alphanumériques) qui seront utilisés
pour confirmer l’utilisateur lors du
démarrage d’AIBO Navigator 2.
N’entrez rien si l’authentification de
l’utilisateur n’est pas requise.
Entrez la configuration de chaque
paramètre conformément au mode
d’emploi de la carte réseau sans fil.
18
Configuration de AIBO Navigator 2
Configurez AIBO Navigator 2 pour utiliser des fonctions de réseau local sans fil.
1
A partir de la barre des tâches, cliquez sur Démarrer–Programmes–
AIBO Navigator 2–AIBO Navigator 2.
La boîte de dialogue de l’adresse IP apparaît.
2
Saisissez l’adresse IP d’AIBO.
3
Cliquez sur OK.

19
Dépannage
Si vous rencontrez l’une des difficultés décrites ci-après, utilisez ce guide de
dépannage pour résoudre le problème.
Si le problème persiste, contactez le service consommateur AIBO. (Reportez-vous
à page 3 pour obtenir des détails sur l’assistance clientèle AIBO.)
Symptôme Remède
Impossible
d’installer le
logiciel à
partir du
CD-ROM.
• L’espace disponible sur le disque dur est insuffisant.
t Vérifiez l’espace du disque dur. Si plusieurs lecteurs sont
disponibles, choisissez un disque dur différent du disque C avec un
espace disque suffisant.
• La fonction de lecture automatique du CD-ROM est désactivée.
t Exécutez le fichier “AutoRun.exe” du CD-ROM.
• D’autres programmes fonctionnent.
t Commencez par quitter tous les autres programmes et recommencez
l’installation.
• Vous essayez d’installer le logiciel sous Windows NT/Windows 3.1/
Windows 95.
t Ce logiciel fonctionne uniquement sous Windows 98 Second
Edition/Me/2000 Professional. Installez le logiciel sur un ordinateur
fonctionnant avec un système d’exploitation compatible.
• Le moniteur VGA est réglé sur une résolution inférieure à 800 × 600
et/ou un réglage des couleurs inférieur à 16 bits.
t Réglez la résolution du moniteur VGA sur 800 × 600 ou plus et la
couleur sur 16 bits ou plus.
• Vous essayez d’installer le logiciel sous Windows 2000 Professional en
tant que Utilisateur avec pouvoir ou Utilisateur.
t Pour procéder à l’installation, ouvrez une session en tant
qu’administrateur ou membre du groupe Administrateurs.

De
2
Hinweis für Benutzer
©2001 Sony Corporation Alle Rechte
bleiben vorbehalten. Dieses Handbuch
bzw. die darin beschriebene Software darf
ohne vorherige schriftliche Zustimmung
der Sony Corporation weder ganz noch
auszugsweise nachgedruckt, übersetzt
oder in eine maschinenlesbare Form
gebracht werden.
MIT AUSNAHME DER SPEZIELLEN
BESTIMMUNGEN IM
SOFTWARELIZENZVERTRAG LIEFERT
DIE SONY CORPORATION DIESES
HANDBUCH, DIE SOFTWARE SOWIE
ANDERE DARIN ENTHALTENE
INFORMATIONEN „WIE GESEHEN“
UND „SO WIE SIE SIND“ OHNE JEDE
GEWÄHRLEISTUNG. DIE SONY
CORPORATION LEHNT HIERMIT JEDE
GEWÄHRLEISTUNG IM HINBLICK
AUF HANDELSÜBLICHE QUALITÄT,
DIE BEACHTUNG DER RECHTE
DRITTER ODER DIE EIGNUNG FÜR
EINEN BESTIMMTEN ZWECK DIESES
HANDBUCHS, DER SOFTWARE ODER
ANDERER ENTSPRECHENDER
INFORMATIONEN AUSDRÜCKLICH
AB. UNTER KEINEN UMSTÄNDEN
ÜBERNIMMT DIE SONY
CORPORATION DIE HAFTUNG FÜR
INDIREKTE, SPEZIELLE ODER
FOLGESCHÄDEN, OB AUF
VERTRAGSVERLETZUNGEN ODER
DER EINHALTUNG DES VERTRAGS
ODER ANDEREM BASIEREND, DIE
AUF DIE VERWENDUNG DIESES
HANDBUCHS, DER SOFTWARE ODER
ANDERER DARIN ENTHALTENER
INFORMATIONEN ZURÜCKGEHEN
ODER IN VERBINDUNG DAMIT
AUFTRETEN, SOWEIT DER SONY
CORPORATION NICHT VORSATZ
ODER GROBE FAHRLÄSSIGKEIT ZUR
LAST FÄLLT.
Die Sony Corporation behält sich das
Recht vor, an diesem Handbuch oder den
darin enthaltenen Informationen jederzeit
ohne Ankündigung Änderungen
vorzunehmen.
Die in diesem Handbuch beschriebene
Software kann auch den Bestimmungen
eines separaten
Endbenutzerlizenzvertrags unterliegen.
Die in diesem Produkt enthaltene Software
ist Eigentum von Sony oder wurde von
Drittherstellern lizenziert. Die
Verwendung dieser Software unterliegt
den Bestimmungen des Lizenzvertrags,
der diesem Produkt beiliegt. Die
Spezifikationen der Software unterliegen
unangekündigten Änderungen und sind
nicht unbedingt mit den zur Zeit im
Einzelhandel erhältlichen Versionen
identisch.
De
3
Bevor Sie die Software verwenden, lesen Sie bitte den beiliegenden
Endbenutzerlizenzvertrag. Dieser enthält die Bestimmungen zur Verwendung
dieser Software.
• Diese Software bzw. Dokumentation ist urheberrechtlich geschützt und wird
unter einer Lizenz vertrieben, die Beschränkungen hinsichtlich Einsatz, Kopieren
und Distribution mit sich bringt. Diese Software bzw. diese Dokumentation darf
ohne vorherige schriftliche Genehmigung von Sony Corporation weder ganz
nach auszugsweise vervielfältigt bzw. gewerbsmäßig verliehen werden.
• Sony Corporation schließt jegliche Haftung aus für Unannehmlichkeiten, die auf
Missbrauch oder unsachgemäßen, anderen als in diesem Dokumentation
beschriebenen Gebrauch zurückzuführen sind.
• Die mitgelieferte Software ist ausschließlich für den Einsatz mit den
angegebenen Einheiten bestimmt.
• Änderungen der Spezifikationen der mitgelieferten Software bleiben
vorbehalten.
Kundendienst
So erreichen Sie den AIBO-Kundendienst.
Europa
Deutschland: +49 (0)-69-9508-6309
Großbritannien: +44 (0)-20-7365-2937
Frankreich: +33 (0)-1-5569-5117
4
„OPEN-R“ ist die Standardschnittstelle für ein Spielrobotersystem,
das Sony aktiv fördern möchte. Ziel dieser Schnittstelle ist es, die
Palette der Funktionen und Merkmale von Spielrobotern mit Hilfe
einer flexiblen Kombination von Hardware und austauschbarer
Software für unterschiedliche Anwendungsmöglichkeiten zu
erweitern.
„AIBO Navigator 2“ entspricht der OPEN-R-Version 1.1.2 (Software-
Spezifikationen).
„AIBO“, das AIBO-Logo
, „OPEN-R“ und das OPEN-R-Logo sind
eingetragene Marken der Sony Corporation.
„Memory Stick“, „
“ und „ “ sind Marken der Sony Corporation.
Microsoft, Windows und Direct X sind eingetragene Marken der Microsoft
Corporation in den USA und anderen Ländern.
Alle anderen in diesem Handbuch erwähnten Produkt- oder Firmennamen können
Marken oder eingetragene Marken der jeweiligen Unternehmen sein. In diesem
Handbuch sind die Marken nicht mit dem Zeichen „™“ und „®“ markiert.
Weitere Informationen zu AIBO finden Sie im Internet auf folgender Web-Site:
http://www.aibo.com/
Die Reproduktion ganz oder auszugsweise ist ohne schriftliche Genehmigung
untersagt. Alle Rechte vorbehalten.
5
Inhalt
Einführung .......................................................................................6
Hinweis zur Dokumentation ...................................................... 6
Überprüfen des mitgelieferten Zubehörs .........................................7
Systemvoraussetzungen ...................................................................8
Eine drahtlose LAN-Umgebung ................................................ 8
PC-Voraussetzungen ................................................................ 10
Installieren der Software ................................................................ 11
Deinstallieren der Software ............................................................14
Konfigurieren eines drahtlosen LAN .............................................15
Anschließen von AIBO an das drahtlose LAN ........................ 15
Ändern der Netzwerkeinstellungen des AIBO ........................ 16
Konfigurieren von AIBO Navigator 2 ..................................... 18
Störungsbehebung ..........................................................................19
Weitere Informationen zu „AIBO“ ERS-210/220 (Bezeichnung von Teilen,
Einstellungen, Einsetzen des „Memory Sticks“, Sicherheitsmaßnahmen usw.)
finden Sie in der Bedienungsanleitung zu „AIBO“ ERS-210/220.

6
Einführung
Mit der AIBO Navigator 2-Software können Sie AIBO vom PC aus über ein
drahtloses LAN kontrollieren.
Sie können die Bewegungen des AIBO steuern und sehen auf dem Bildschirm Ihres
PC dasselbe wie AIBO.
Freuen Sie sich also auf ganz neue Möglichkeiten, mit Ihrem AIBO zu spielen!
Hinweis zur Dokumentation
Die Dokumentation zu AIBO Navigator 2 besteht aus zwei Teilen:
Installationsanleitung (dieses Handbuch)
In dieser Anleitung finden Sie Informationen zum Installieren von AIBO Navigator
2, zu den Systemvoraussetzungen und zum Konfigurieren eines drahtlosen LAN.
Wenn Sie AIBO Navigator 2 zum ersten Mal benutzen, lesen Sie zunächst diese
Installationsanleitung.
Benutzerhandbuch
Im Benutzerhandbuch wird beschrieben, wie Sie AIBO Navigator 2 starten, wie das
Steuerungsfenster aufgebaut ist und wie Sie AIBO fernsteuern können.

7
Überprüfen des mitgelieferten
Zubehörs
Überprüfen Sie zunächst, ob alle Zubehörteile mitgeliefert wurden:
x „Memory Stick“ mit AIBO-Ware
x CD-ROM mit Software
x Endbenutzerlizenzvertrag
x Installationsanleitung (dieses Handbuch)
x Benutzerhandbuch
x Aufkleber mit Produktcode

8
Systemvoraussetzungen
Um AIBO Navigator 2 verwenden zu können, benötigen Sie folgende Ausstattung:
Eine drahtlose LAN-Umgebung
Dazu ist für AIBO und den PC folgendes Zubehör erforderlich.
An AIBO
Drahtlose LAN-Karte ERA-201D1 für AIBO
Anweisungen zum Installieren der Karte in „AIBO“ ERS-210/220 finden Sie in der
Bedienungsanleitung zur drahtlosen LAN-Karte für AIBO.
Am PC
Sie benötigen:
• einen PC, der mit einer IEEE802.11b-kompatiblen drahtlosen LAN-Karte
ausgestattet ist,* oder
• einen PC, der über ein LAN an einen IEEE802.11b-kompatiblen drahtlosen
LAN-Zugriffspunkt angeschlossen ist.*
* Bitte verwenden Sie von Sony empfohlene Produkte.
9
Wenn ein Zugriffspunkt verwendet wird
Hinweise
Der PC kann über ein drahtloses oder ein verkabeltes LAN (Netzwerkkabel) an den
Zugriffspunkt angeschlossen sein.
• Wenn Sie den PC über ein drahtloses LAN an den Zugriffspunkt anschließen wollen
Installieren Sie eine IEEE802.11b-kompatible drahtlose LAN-Karte im PC.
• Wenn Sie den PC über ein verkabeltes LAN an den Zugriffspunkt anschließen wollen
In diesem Fall benötigen Sie einen Hub und zwei Netzwerkkabel.
Informationen zum Konfigurieren eines drahtlosen LAN finden Sie auf Seite 15.
An ein drahtloses LAN
angeschlossener PC
AIBO mit „Memory Stick“ und
drahtloser LAN-Karte für AIBO
Wenn kein Zugriffspunkt
verwendet wird
Zugriffspunkt

10
PC-Voraussetzungen
Betriebssystem Microsoft Windows 2000 Professional
(Service Pack 2 oder höher), Version für Englisch/Französisch/
Deutsch/traditionelles Chinesisch
Microsoft Windows Millennium Edition, Version für Englisch/
Französisch/Deutsch/traditionelles Chinesisch
Microsoft Windows 98 Second Edition, Version für Englisch/
Französisch/Deutsch/traditionelles Chinesisch
CPU Mindestens Intel Pentium III mit 500 MHz
RAM Mindestens 128 MB
Festplattenplatz Mindestens 50 MB (für die Installaion)
Grafik Videokarte, die Direct X 7 unterstützt
Ton Sound-Karte, die Direct X 7 unterstützt
CD-ROM-Laufwerk (zur Software-Installation erforderlich)
Sonstiges Unterstützung von IEEE802.11b-kompatiblem drahtlosen LAN
(Näheres dazu auf Seite 8)
Unterstützt handelsübliche Controller
Lese-/Schreibgerät für
„
Memory Stick
“
*
*Das Lese-/Schreibgerät für „Memory Stick“ ist nicht
erforderlich, kann aber bei folgenden Funktionen eingesetzt
werden:
• Konfigurieren des LAN.
• Importieren von Bewegungsdaten, die mit AIBO Master
Studio erzeugt wurden.

11
Installieren der Software
Installieren Sie AIBO Navigator 2 und DirectX (falls erforderlich) von der
beiliegenden CD-ROM auf die Festplatte.
1
Schalten Sie den PC ein und starten Sie Windows.
Hinweise
• Beenden Sie alle anderen Programme, bevor Sie die Installation starten.
• Wenn die Installation unter Windows 2000 Professional vorgenommen wird, melden
Sie sich als Administrator oder als Mitglied der Administratorgruppe an.
2
Legen Sie die mitgelieferte CD-ROM ins CD-ROM-Laufwerk ein.
Das Installationsprogramm wird automatisch ausgeführt.
Wenn das Installationsprogramm nicht startet, doppelklicken Sie auf die Datei
„AutoRun.exe“ auf der CD-ROM.
3
Klicken Sie auf „Install“.
Das Dialogfeld „Welcome to AIBO Navigator 2 Setup“ erscheint.
4
Klicken Sie auf „Next“.
Das Dialogfeld „User Information“ erscheint.

12
5
Geben Sie Ihren Namen in das Feld „User name“ und den
Produktcode in das Feld „Key code“ ein und klicken Sie auf „Next“.
Den Produktcode finden Sie auf dem beiliegenden Aufkleber.
Bringen Sie diesen Aufkleber an der CD-ROM-Hülle an, damit er nicht verloren
geht.
Wenn Sie auf „Next“ klicken, wird das Dialogfeld „Confirmation of Registration“
angezeigt.
6
Überprüfen Sie die Informationen, die Sie eingegeben haben, und wenn
diese korrekt sind, klicken Sie auf „Next“.
Wenn nicht, klicken Sie auf „No“ und nehmen die Registrierung erneut vor.
Das Dialogfeld „Choose Destination Location“ wird angezeigt.
7
Wählen Sie den Ordner aus, in dem die Software installiert werden
soll, und klicken Sie auf „Next“.
Standardmäßig ist dies der Ordner „C:\Programme\Sony\AIBO Navigator 2“.
Wenn Sie das Programm in einem anderen Ordner installieren wollen, klicken Sie
auf „Browse“ und wählen einen Ordner aus.
Wenn Sie auf „Next“ klicken, wird das Dialogfeld „Select Program Folder“
angezeigt.

13
8
Wählen Sie den Ordner aus, in den das Programmsymbol eingefügt
werden soll, und klicken Sie auf „Next“.
Standardmäßig ist dies der Ordner „AIBO Navigator 2“. Wenn Sie möchten, können
Sie einen anderen Ordner aus der Liste „Existing Folders“ auswählen oder ins Feld
„Program Folder“ einen neuen Ordnernamen eingeben.
Wenn Sie auf „Next“ klicken, wird das Dialogfeld „Query“ angezeigt.
9
Wenn Sie auf dem Desktop ein Verknüpfungssymbol für AIBO
Navigator 2 erstellen wollen, klicken Sie auf „Yes“. Wenn nicht, klicken
Sie auf „No“.
Die Installation beginnt.
Wenn die Installation beendet ist, erscheint das Dialogfeld „Installation complete“.
10
Klicken Sie auf „Finish“.
Damit ist die Installation abgeschlossen. Fahren Sie nun mit dem Konfigurieren
eines drahtlosen LAN (Seite 15) fort.

14
Deinstallieren der Software
Wenn Sie die Software deinstallieren, werden alle AIBO-Daten vom PC gelöscht.
Hinweis
Wenn Sie die Software unter Windows 2000 Professional deinstallieren, melden
Sie sich als Administrator oder als Mitglied der Administratorgruppe an.
1
Klicken Sie auf die Schaltfläche „Start“ auf der Task-Leiste, und
wählen Sie „Einstellungen“ - „Systemsteuerung“.
2
Doppelklicken Sie auf das Symbol „Software“.
3
Wählen Sie AIBO Navigator 2 und klicken Sie auf „Hinzufügen/
Entfernen“ („Ändern/Entfernen“ bei Windows 2000 Professional).

15
Konfigurieren eines drahtlosen LAN
Mit AIBO Navigator 2 können Sie einen einzelnen AIBO vom PC aus über ein
drahtloses LAN steuern.
Anschließen von AIBO an das drahtlose LAN
1
Ändern Sie die Netzwerkeinstellungen am PC (bzw. Zugriffspunkt) so,
dass sie mit den Standardeinstellungen der drahtlosen LAN-Karte für
AIBO übereinstimmen.
Anweisungen zum Ändern der Einstellungen finden Sie in der Bedienungsanleitung
zum PC (bzw. Zugriffspunkt).
Informationen zu den Standardeinstellungen der drahtlosen LAN-Karte für AIBO
schlagen Sie bitte in der dazugehörigen Bedienungsanleitung nach.
2
Setzen Sie die drahtlose LAN-Karte für AIBO in AIBO ein.
Anweisungen dazu finden Sie in der Bedienungsanleitung zur drahtlosen LAN-
Karte für AIBO.
3
Setzen Sie den AIBO Navigator 2-„Memory Stick“ in AIBO ein.
Weitere Anweisungen finden Sie in der Bedienungsanleitung zu AIBO.
4
Drücken Sie die Pausetaste an AIBO, um AIBO zu aktivieren.
Sie können AIBO nun an das drahtlose LAN anschließen.

16
Ändern der Netzwerkeinstellungen des AIBO
Wenn Sie die Standardeinstellungen der drahtlosen LAN-Karte für AIBO ändern
wollen, gehen Sie wie in Verfahren A oder B unten erläutert vor. Für Verfahren
B ist ein Lese-/Schreibgerät für „Memory Stick“ erforderlich.
A Anschließen von AIBO an das drahtlose LAN und Ändern der
Einstellungen mit einem PC im LAN
1
Geben Sie im Web-Browser auf dem PC den unten angegebenen URL
ein, öffnen Sie den Konfigurationsbildschirm für AIBO und ändern Sie
die Einstellungen.
URL: http://10.0.1.100/SETUP.HTM
Einzelheiten dazu finden Sie in der Bedienungsanleitung zur drahtlosen LAN-Karte
für AIBO.
2
Geben Sie die Benutzer-ID und das Kennwort ein.
Geben Sie eine Benutzer-ID und ein Kennwort ein (bis zu 8 alphanumerische
Zeichen), mit denen der Benutzer beim Starten von AIBO Navigator 2 überprüft
werden soll.
Geben Sie keine Benutzer-ID und kein Kennwort ein, wenn keine
Benutzerauthentifizierung erforderlich ist.
Hinweis
AIBO kann nur mit dem PC verbunden werden, wenn die Benutzer-ID und das
Kennwort zusammenpassen.
17
B
Ändern der Einstellungen für das drahtlose LAN auf dem AIBO Navigator 2-
„Memory Stick“ (ein Lese-/Schreibgerät für
„
Memory Stick
“
ist erforderlich)
1
Setzen Sie den AIBO Navigator 2-„Memory Stick“ in das Lese-/
Schreibgerät für „Memory Stick“ ein.
2
Klicken Sie auf der Task-Leiste auf die Schaltfläche „Start“ und wählen
Sie „Programme“ - „AIBO Navigator 2“ - „Wireless LAN Setup“.
Das Fenster „Wireless LAN Setup“ erscheint.
3
Wählen Sie das „Memory Stick“-Laufwerk aus und konfigurieren Sie
das drahtlose LAN.
Geben Sie eine Benutzer-ID und ein
Kennwort ein (bis zu 8 alphanumerische
Zeichen), mit denen der Benutzer beim
Starten von AIBO Navigator 2 überprüft
werden soll.
Geben Sie nichts ein, wenn keine
Benutzerauthentifizierung erforderlich ist.
Geben Sie die einzelnen
Parametereinstellungen nach den
Anweisungen in der
Bedienungsanleitung zur drahtlosen
LAN-Karte ein.
18
Konfigurieren von AIBO Navigator 2
Konfigurieren Sie AIBO Navigator 2, damit Sie die Funktionen des drahtlosen
LAN nutzen können.
1
Klicken Sie auf der Task-Leiste auf „Start“ - „Programme“ - „AIBO
Navigator 2“ - „AIBO Navigator 2“.
Das Dialogfeld „IP Address“ wird angezeigt.
2
Geben Sie die IP-Adresse von AIBO ein.
3
Klicken Sie auf „OK“.

19
Störungsbehebung
Sollte die folgende Störung auftreten, versuchen Sie, diese anhand der folgenden
Checkliste zu beheben.
Sollte sich das Problem auf diese Weise nicht lösen lassen, wenden Sie sich bitte an
die AIBO-Kundendienst-Hotline. (Informationen zum AIBO-Kundendienst finden
Sie auf Seite 3.)
Symptom Abhilfemaßnahme
Die Software
von der
CD-ROM
lässt sich
nicht
installieren.
• Es ist nicht genug Platz auf der Festplatte.
t Überprüfen Sie, wieviel Platz auf der Festplatte vorhanden ist. Wenn
mehrere Laufwerke vorhanden sind, wählen Sie ein anderes Laufwerk
als C, auf dem genügend Platz vorhanden ist.
• Die Automatikfunktion der CD-ROM ist deaktiviert.
t Führen Sie die Datei „AutoRun.exe“ auf der CD-ROM aus.
• Andere Programme werden ausgeführt.
t Beenden Sie zuerst alle Programme und wiederholen Sie dann die
Installation.
• Sie versuchen gerade, die Software auf Windows NT/Windows 3.1/
Windows 95 zu installieren.
t Diese Software läuft nur unter Windows 98 Second Edition/Me/2000
Professional. Installieren Sie die Software auf einem PC mit einem
kompatiblen Betriebssystem.
• Für den VGA-Monitor ist eine Auflösung von weniger als 800 × 600
und/oder eine Farbeinstellung von weniger als 16 Bit eingestellt.
t Stellen Sie die Auflösung des VGA-Monitors auf mindestens 800 ×
600 und die Farben auf mindestens 16 Bit ein.
• Sie versuchen gerade, die Software als Hauptbenutzer oder Benutzer
unter Windows 2000 Professional zu installieren.
t Melden Sie sich zum Installieren als Administrator oder als Mitglied
der Administratorgruppe an.
Printed in Japan
ソニー株式会社
〒
141-0001
東京都品川区北品川
6-7-35
お問い合わせ
ソニー株式会社
AIBO
クリニック
電話:ナビダイヤル
0570-008833
(全国どこからでも市内通話料でご利用いただけます)
携帯電話・
PHS
でのご利用は:
03-5470-0688
受付時間:
10:00
〜
17:00
(年末年始を除く)
(1)
*465973101*
お電話の前に、必ず付属の「セットアップガイド」
「ユーザーガイド」をご覧ください。
このユーザーガイドは再生紙を使用しています。
Printed on recycled paper