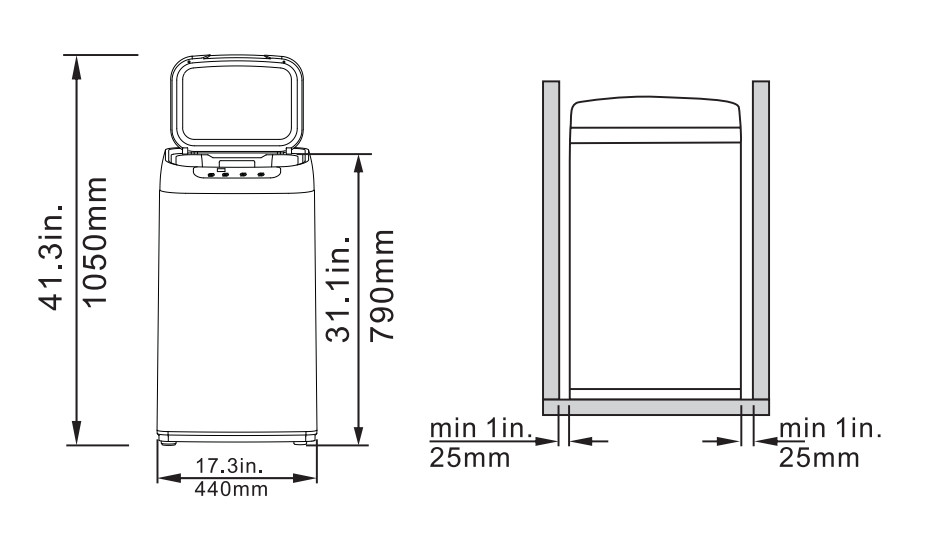
For best performance, you must install your washer on a solidly constructed floor. Wood floors may need to be reinforced to minimize vibration and/or unbalanced load situations.
Carpeting and soft tile surfaces are contributing factors to vibration which can cause your washer to move slightly during the spin cycle.
WARNING: Do not install your washer in areas where water may freeze, since your washer will always retain some water in its water valve, pump, and hose areas. Frozen water can damage the belts, the pump, hoses, and other components. Never install on a platform or weakly supported structure.
ELECTRIC
Use 120Volt 60Hz 15 Amps fuse or circuit breaker. Individual branch circuit serving only for your washer is recommended.
WARNING: Never use an extension cord.
GROUNDING
Electrical grounding is required for this washer.
This appliance must be grounded. In the event of malfunction or breakdown, grounding will reduce the risk of electric shock by providing a path of least resistance for electric current. This appliance is equipped with a power cord having a threeprong grounding plug for use in a properly installed and grounded outlet. The plug must be plugged into an appropriate outlet that is properly installed and grounded in accordance with all local codes and ordinances.
CAUTION: An improperly connected equipment-grounding conductor can increase the risk of electrical shock. Check with a qualified electrician or serviceman if you are not sure whether the appliance is properly grounded. Do not modify the plug provided with the appliance. If it does not fit the outlet, have a proper outlet installed by a qualified electrician. To prevent unnecessary risk of fire, electrical shock or personal injury, all wiring and grounding must be done in accordance with the National Electrical Code ANSI/FNPA, No.70 Latest Revision and local codes and ordinances. It is the personal responsibility of the appliance owner to provide adequate electrical service for this appliance.
WARNING: Never connect the ground wire to plastic plumbing lines, gas lines, or hot water pipes.
WATER
To correctly fill your washer in the proper amount of time, water pressure of 14 to 70psi (100 to 500 kPa) is required. Water pressure less than 14psi may cause water valve failure, or may not allow the water valve to shot off completely, or may extend the fill time beyond what your washer controls allow, causing your washer to turn off and alarm error. A time limit is built into the controls to prevent flooding in your home if a hose becomes loose.
The water faucet must be within 4 feet / 122cm of the back of your washer to match the inlet hoses provided with your washer.
To avoid the possibility of water damage:
Operate with cold water only.
Have water faucets easily accessible.
Turn off faucets when the washer is not in use.
Periodically check that there is no leakage from the water inlet hose fittings.
DRAIN FACILITY
The recommended height of the standpipe is 35in. or 90cm. The drain hose must be routed through the drain hose clip to the standpipe. The standpipe must be large enough to accept the outside diameter of the drain hose.
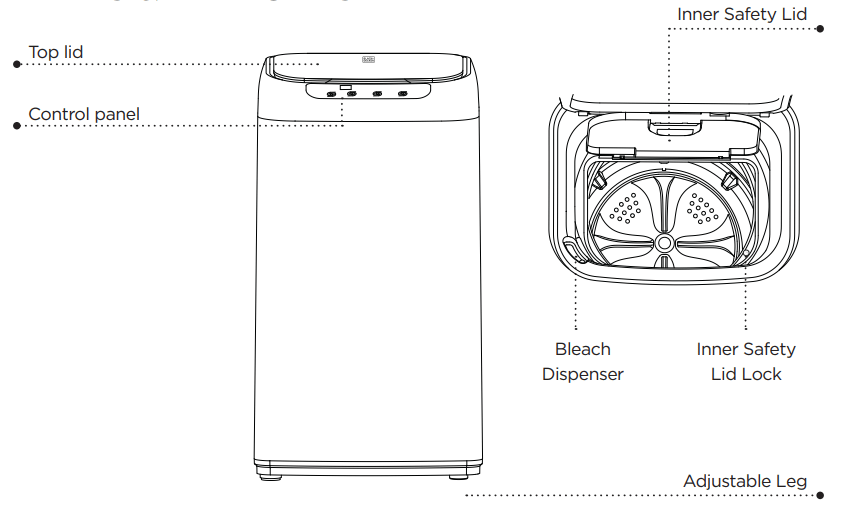
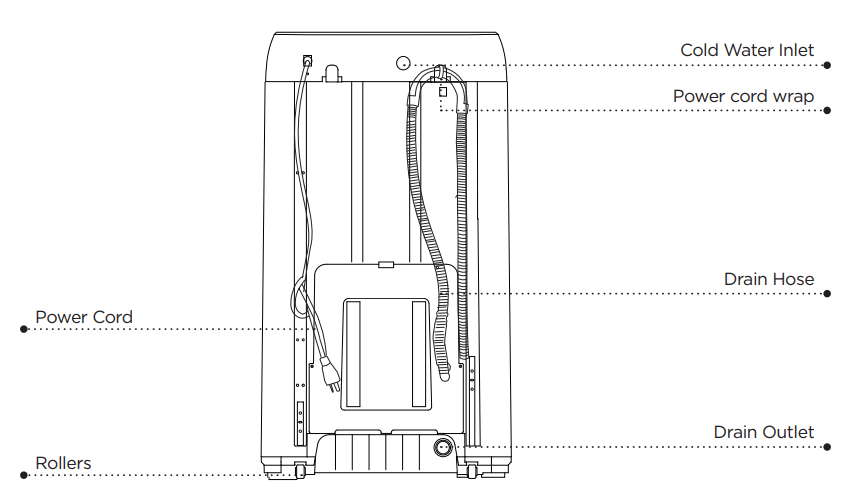
INSTALL YOUR WASHER
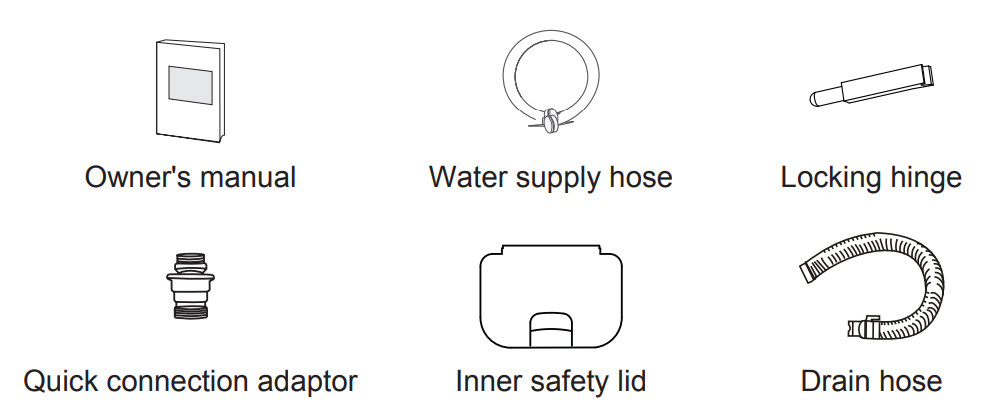
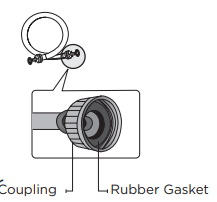
Before installing, make sure there are rubber gaskets inside the fittings at both ends of the water supply hoses. If there are no water inlet hoses packed with the washer or if the hoses are damaged, Call the Customer Satisfaction Center at 1-844-299-0879. Installing the water supply hoses without rubber gaskets can cause water leakage. When you initially install the washer, be sure to use new hoses. Failing to do so may result in a water leakage or overflow and may damage your property. If a hose is too short, replace the hose with a longer, high pressure hose.
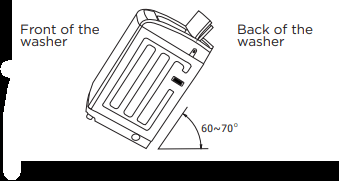
Step 1: Move your washer to selected position
Tilt the unit back onto its rear rollers and push it forward as shown in the figure below. Move the unit to a location as described in the previous Choose the Proper Location section.
CAUTION: Make sure the location has a hard, level surface without carpeting. There should be no direct sunlight. Do not expose the unit to freezing temperatures (under 32° F or 0° C).
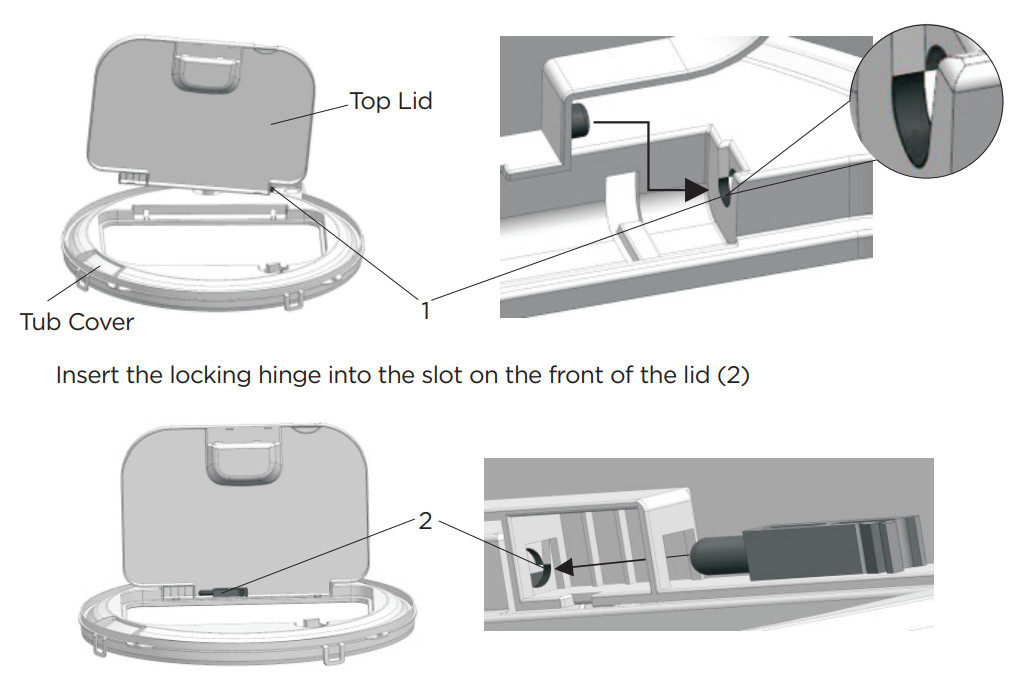
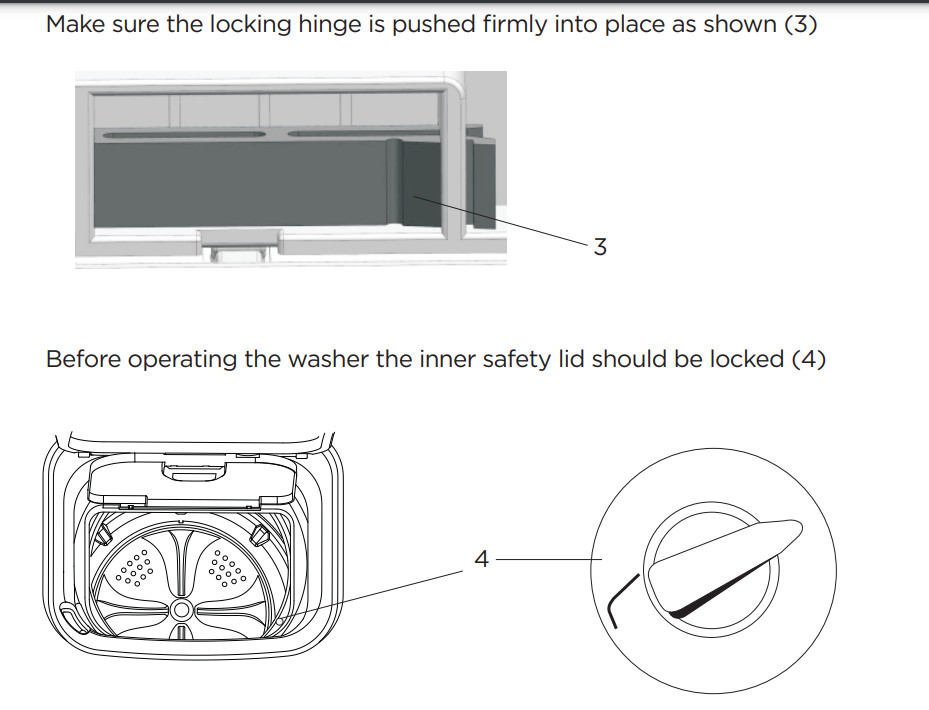
Step 2: Install the Inner Safety Lid
Insert the right pin of the inner lid into the slot of the tub cover (1) .
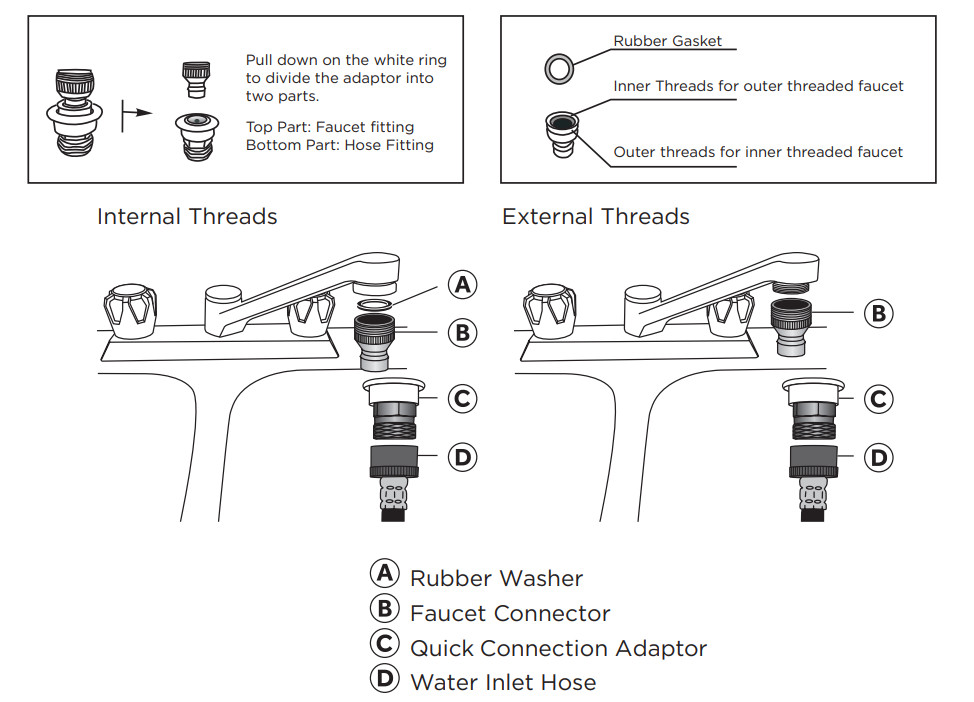
Step 3: Connect the water supply hose
TEMPORARY CONNECTION
The Quick Connection Adaptor is primarily for quick connection to a single faucet, such as a typical kitchen sink, in cases where the washer is stored in a different place than where it is used. (Skip this step if you are connecting the washer to a sink with separate hot and cold faucets. See PERMANENT INSTALLATION section below.) The adaptor consists of two parts that quickly connect or disconnect. One part, the faucet fitting, is for connection to the faucet and the other part, the hose fitting, connects to the COLD water hose of the washer.
Pull back on the white ring to free the faucet fitting from the adaptor for installation into the faucet.
Screw the end of the COLD water hose onto the base of the hose fitting.
If the faucet has internal screw threads, unscrew the aerator if present from the tip of the faucet. Then screw the faucet fitting into the faucet. Make sure that the black rubber gasket is on the top of the adaptor before screwing it in.
If the faucet has external screw threads, remove the gasket from the top of the faucet fitting, and screw the fitting over the external threads.
Pull back on the white ring to connect the two parts of the adaptor back together.
NOTE: When connected to a single faucet that can dispense either hot or cold water, both hot and cold water can be run through the cold water line. It is recommended to ONLY run COLD water washes with this machine.
PERMANENT CONNECTION
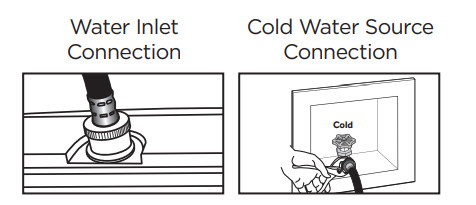
Connect the ends of the water supply hose to the COLD faucet.
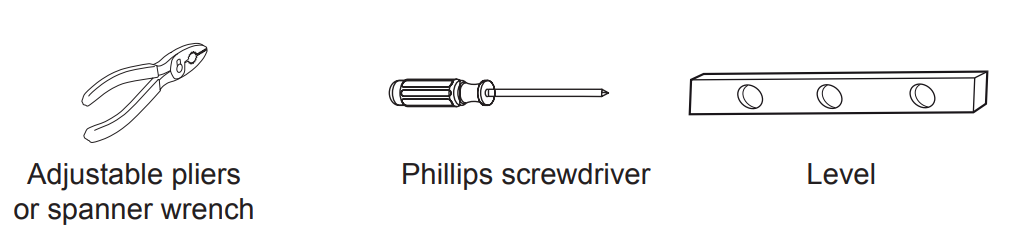
Tighten the fittings by hand until they are snug, and then tighten them an additional two-thirds of a turn with a wrench/pliers.
CAUTION: When you fasten the fitting, do not fasten it too tightly or apply tape or sealant to the faucet or water supply inlet. This can damage the fitting. After you have connected the water supply hose to the faucet, ensure that it is connected securely by pulling the water supply hose downwards.
Place the unconnected end of the hose into a bucket and open the faucet connected to the water supply hose for 10 or 15 seconds to remove any foreign substances from the hose. Close the faucet before continuing.
Connect the end of the water supply hose to the water supply inlet connection at the top of the washer.
WARNING: The hose connected to the COLD water source must be connected to the COLD water supply inlet.
Tighten the fitting by hand until it is snug, and then tighten them an additional two-thirds of a turn with a wrench/pliers.
CAUTION: Confirm that the water supply hose is not twisted or bent. If the hose is twisted or bent, the hose can leak and cause electric shock due to the water leakage. To ensure correct water usage, connect the COLD water faucet only.
Turn on the COLD water supply and check all the water supply inlet connections and the faucet for water leaks.
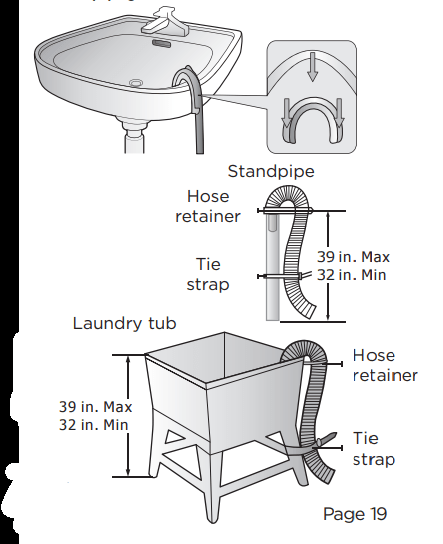
Step 4: Connect the drain hose
Insert the end of the drain hose into the drain outlet located at the back of the unit. The other end of the hose should be positioned using one of the following methods:
A. Over the edge of a wash basin. Secure the guide to the side of the basin wall with a hook or to the tap with a piece of string to prevent the drain hose from moving.
B. In a standpipe The standpipe must be no shorter than 32 in. (81cm) and no longer than 39 in. (100cm).
C. In a laundry tub. The laundry tub must be no shorter than 32 in. (81cm) and no higher than 39 in. (100cm).
WARNING: Make sure that the connection between the drain hose and the wash basin, standpipe or laundry tub is not airtight.
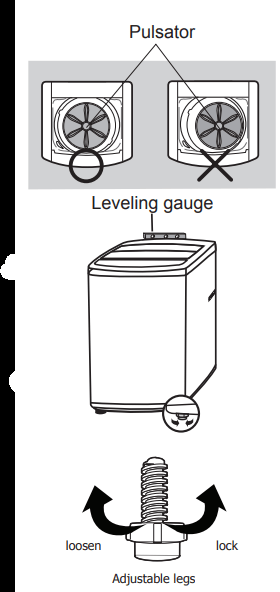
Step 5: Leveling your washer
See if the washer is level by checking the position of the tub or using a leveling gauge.
Slide the washer into position.
Open the lid of the washer, and pour the water into the tub to just below the pulsator level.
If the washer is level, the pulsator is positioned at the center of the washer as shown in the figure above right. If not, level your washer by turning the front leveling leg clockwise or counterclockwise as necessary.
CAUTION: There is ONLY ONE adjustable leg as right figure on this washer.
Step 6: Powering your washer
Plug the power cord into a 3-prong, well grounded 120 volt 60 Hz approved electrical outlet protected by a 15-amp fuse or comparable circuit breaker. Your washer is grounded through the third prong of the power cord when plugged into a 3-prong grounded electrical outlet.
Step 7: Running a test cycle
Run a test cycle as follows to check if your washer is properly installed.
Fill approx. 1/2 the tub with laundry.
Press the Power button to turn on your washer.
Select the Rinse+Spin cycle as per guide on page 23.
Press the Start/Pause button to start the test cycle.
The washer should not rock or vibrate excessively when water is supplied or when washing or spinning, and should drain well during the spin cycle.
CAUTION: If water leaks while water is being supplied or drained, check the water connections. If the washer rocks and vibrates excessively, level your washer again.
Step 8: Storing your washer
If you want to store your washer at another location, unplug it, drain any remaining water from the drain pipe and hook the pipe onto the back of the washer. Disconnect the water inlet hoses from the faucets and move washer to new location.
CONTROL PANEL
Power
Press the POWER button once to turn ON the power to the washer. Press again to turn OFF the unit.
Start/Pause
Press Start/Pause once to start the wash cycle. Press again during operation to PAUSE the cycle. Press again to continue the cycle.
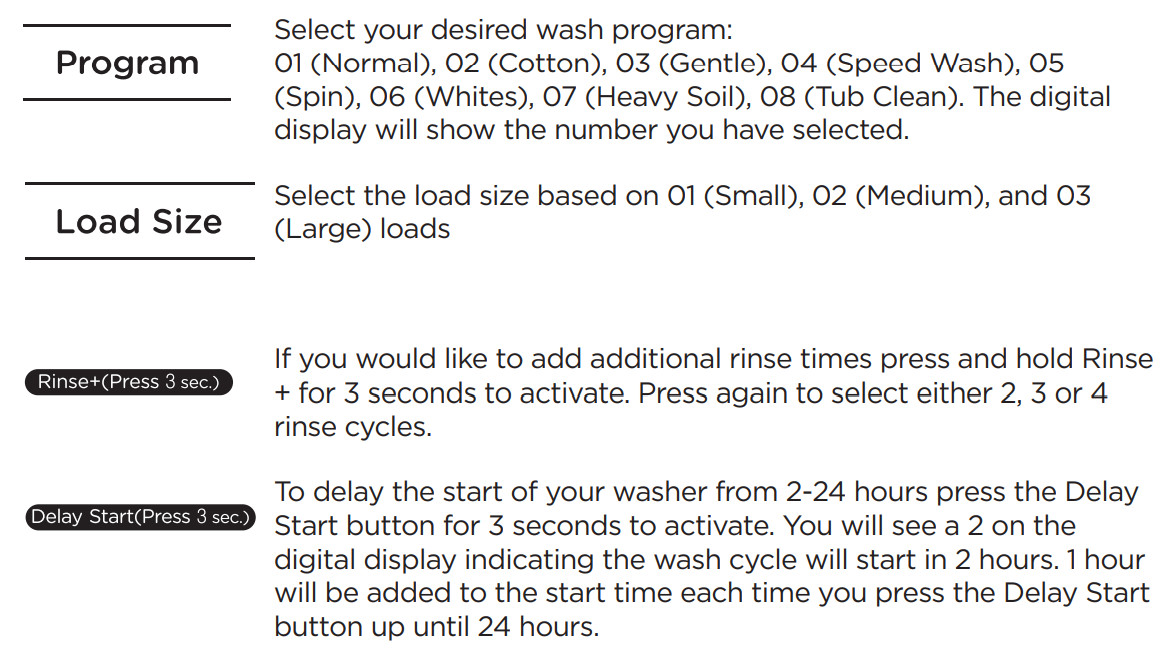
Program
Press the Program button to select from the following wash cycles: 01 (Normal), 02 (Cotton), 03 (Gentle), 04 (Speed Wash), 05 (Spin), 06 (Whites), 07 (Heavy Soil), 08 (Tub Clean)
Rinse + (Press 3 sec.)
Press and hold this button for 3 seconds in order to select additional rinse cycles. You can select 2, 3 or 4 rinse cycles.
Note: Additional rinse times cannot be selected with Speed Wash, Spin and Tub Clean cycles
Load Size
Press Load Size for 3 seconds to choose from 01 (Small) 02 (Medium) and 03 (Large) based on the size of the load of laundry when using normal, cotton, gentle, whites and heavy soil programs. The selected load size will determine the water fill level. You will see the number associated with the load size in the digital display
When selecting the Speed Wash program the washer will automatically be set at 01 (Small)
Tub clean will automatically set load size to 03 (Large)
A water level is not selected for spin cycles.
Delay Start (Press 3 sec.)
You can delay the start of the wash cycle for 2-24 hours. Activate Delay Start by pressing the button for 3 seconds. You will see”2” on the digital display which stands for 2 hours. You can add 1 hour to the start time each time you press the button up until 24 hours.
Child Lock
Use this option to disable the controls. This feature can prevent children from changing cycles or powering off the machine. The washer can only be locked during a cycle. To activate this function after starting the washer press the water level and program button at the same time. When controls are locked CL will display with estimated time remaining. To cancel this function select the water level and program buttons again.
Digital Display
The digital display shows the program and estimated time remaining in the cycle.
WARNING To reduce the risk of electric shock, or injury to persons, read the important safety instructions before operating this appliance.
WASHING A LOAD OF LAUNDRY
WARNING: Operate with cold water only
Step 1: Power on your washer
Press the POWER button to power your washer on.
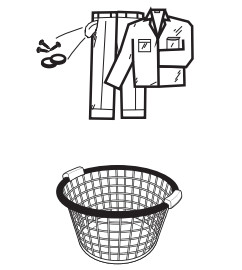
Step 2: Load your washer
CAUTION: Before loading your laundry, be sure to take out coins, keys and other hard objects, and close all zippers to prevent the clothes from damage.
Sort laundry by fabric type, soil level, color and load size as needed. Refer to the Fabric Care Chart on page 35. You can fill the tub with dry, unfolded clothes ,but DO NOT OVERLOAD the tub. Load the tub no more than 3/4 full. To ensure good cleaning results do not overload the tub, especially when washing heavily soiled loads. Never load the tub more than 3/4 full.
WARNING: Overloading may reduce washing efficiency, cause excess wear, and possibly cause creasing or wrinkling of items in the load.
NOTE: To add a forgotten item:
Press the START/PAUSE button to pause the washer.
Wait for the tub to stop turning, then open the lid.
Add the item, close the lid, and then press the START PAUSE button. The cycle will resume.
Step 3: Add detergent
This washer can be used with any type of liquid or powdered laundry detergent however (HE) detergent is recommended. Use 1/4 to 1/2 the amount of detergent recommended by the detergent manufacturer. Always reduce the amount of detergent if the load is small or lightly soiled, or if your water is very soft. Never use more than recommended by the detergent manufacturer.
The laundry detergent should be put directly into the wash load.
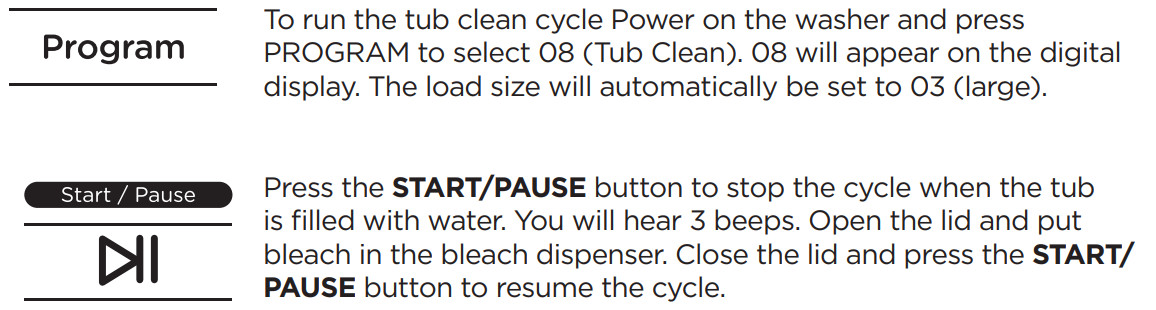
Your portable washer also comes with a bleach dispenser. If you choose to use bleach to launder your clothes you can add the bleach in the dispenser when the washer is filled with water. You will hear 3 beeps when the tub is filled. Press Start/Pause. The bleach dispenser is not intended for use with laundry detergent.
Step 4: Select your desired cycle and options
Step 5: Start the cycle
Press the START/PAUSE button to start the washing cycle. When the washing cycle begins, the Estimated Time in minutes for the cycle to complete will show and count down in the digital display. Or, if Delay Start is set, the display will count down the hours until the cycle begins, and then change to a minute countdown for the cycle.
WARNING: When the washer is running, you should pause the program and wait for the tub to stop completely before you open the lid.
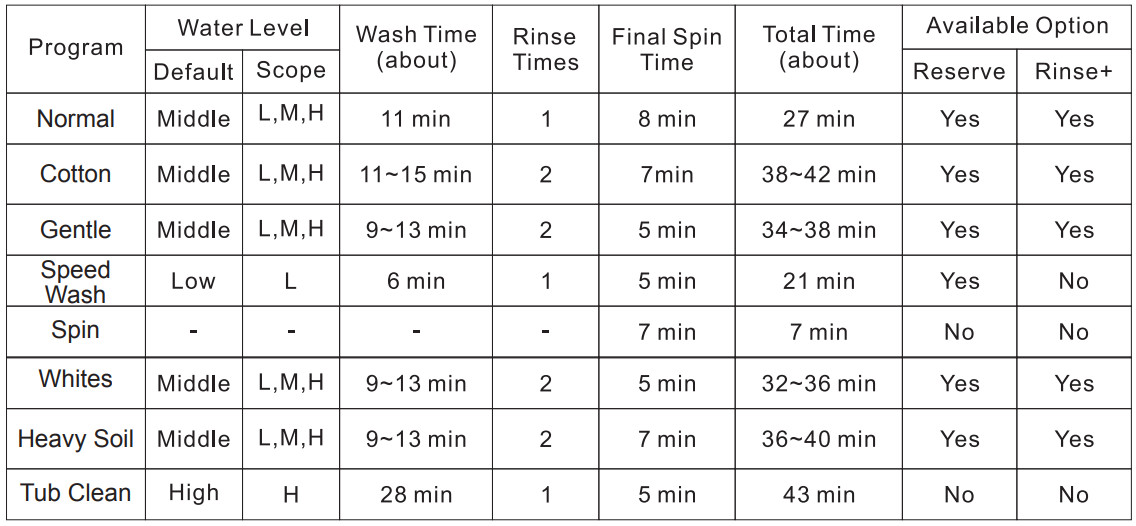
RINSE & SPIN CYCLE GUIDE
Energy efficiency test program
“Normal” program is the most suitable program to wash soiled cotton or linen clothes and is the most efficient program in terms of combined energy and water consumption for washing that type of laundry
CARE AND CLEANING
CLEANING AND MAINTENANCE
Cleaning the exterior
Turn off the water faucets to shut off the water supply to your washer and prevent the unlikely possibility of damage from escaping water. Use a soft cloth to wipe up all detergent, lint or other residue. Clean the control panel with a soft, damp cloth. Do not use abrasive powders or pads. Do not spray cleaners directly onto the panel.
Cleaning the interior
Clean the interior of your washer periodically to remove any dirt, odor mildew, or other residue that may remain in your washer after multiple uses or cleaning very soiled clothes. Failure to follow these instructions may result in unpleasant conditions, such as odors and/or permanent stains on your washer or laundry. Hard water deposits should be removed. Use cleaners labeled “Washer safe”.
Tub clean
Run a Tub Clean Cycle with some bleach every month or as needed to remove dirt, mildew, hard water stains or odors.
Note: If you wish to use other products suitable for cleaning laundry tubs, follw the tub cleaner manufacturers instructions.
TROUBLESHOOTING
BEFORE YOU CALL FOR SERVICE
IF THE UNIT FAILS TO OPERATE:
A) Check to make sure that the unit is plugged in securely. If it is not, remove the plug from the outlet, wait 10 seconds and plug it in again securely.
B) Check for a blown circuit fuse or a tripped main circuit breaker. If these seem to be operating properly, test the outlet with another appliance.
IF NONE OF THE ABOVE SOLVES THE PROBLEM, CONTACT OUR CUSTOMER SATISFACTION CENTER. DO NOT TRY TO ADJUST OR REPAIR YOURSELF.
Troubleshoot your problem by using the chart below. If the unit still does not work properly, contact W Appliance Co. customer service center or the nearest authorized service center. Customer must never troubleshoot internal components.
SYMPTOMS
POSSIBLE CAUSE
SOLUTIONS
Thumping sound
Heavy wash loads may produce a thumping sound. Washer load may be out of balance.
This is normal. If sound continues, washer is probably out of balance. Stop and redistribute wash load. Pause the cycle and redistribute the load.
Vibrating noise
Packaging materials were not removed. Wash load may be unevenly distributed in the tub. Floor not rigid enough.
See the UNPACKING AND REMOVING SHIPPING MATERIAL section in the installation instructions. Pause the cycle and redistribute the load. See Leveling the Washer in the Installation Instructions. Make sure that the floor is solid. See Flooring in the Installation Requirements.
Excessive sudsing
Too much detergent.
Use 1/4 to 1/2 the amount of detergent recommended by the detergent manufacturer. Reduce the amount of detergent if the load is small or lightly soiled, or if your water is very soft.
Water leaking
Inlet hose connection is loose at faucet or washer.
House drain pipes are clogged.
Drain hose has come out of drain or is not inserted far enough.
A large item such as a pillow or blanket is above the top of the tub.
Check hoses for leaks, cracks and splits. Check and tighten hose connections.
The washer pumps out water very rapidly. Check for water backing up out of the drain pipe during drain. If water is seen coming out of the drain, check for proper drain hose installation and check for restrictions in the drain . Contact a plumber to repair drain pipe.
Tie drain hose to inlet hose or standpipe to prevent it from coming out during drain. For smaller drain pipes, insert the drain hose into the pipe as far as the drain hose flange.
For larger drain pipes, insert the drain hose into the pipe 1-2 in. past the flange . Stop the washer and check the load. Make sure the load does not crest above the top edge of the tub.
Rattling and clanking noise
Foreign objects, such as keys, coins, or safety pins, may be in tub or pump.
Stop washer, check tub and drain filter for foreign objects. If noise continues after washer is restarted, call for service.
Wrinkling
Washer not unloaded promptly. Washer overloaded. Water is too hot
Always remove items from the washer as soon as the cycle is complete.
The washer can be fully loaded, but the tub should not be tightly packed with items. '
The lid of the washer should close easily. Hot water rinse can set wrinkles in garments.
Staining
Washer was not unloaded promptly. Clothes were not properly sorted.
Always remove items from the washer as soon as possible after the cycle is complete. Always wash dark colors separately from light colors and whites to prevent discoloration. Never wash heavily soiled items with lightly soiled items
Wash cycle time is longer than usual
The washer automatically adjusts the wash time for the amount of laundry, water pressure and other operating conditions.
This is normal. The washer adjust cycle time automatically to provide optimal results for the selected cycle. The time remaining shown in the display is only an estimate. Actual time may vary.
Musty or mildewy odor in washer
Inside of tub was not cleaned properly
Run a tub clean cycle with bleach once a month to clean tub and remove any mold from inside washer.
Washer will not turn ON
NOTE: If the washer stopped during a cycle due to a loss of power, the washer will resume the cycle where it stopped when the power is restored.
Power cord is not properly plugged in. House fuse is blown, circuit breaker has tripped, or power outage has occurred. House fuse is blown, circuit breaker has tripped, due to multiple appliances on one outlet.
Make sure that the plug is plugged securely into a grounded,3-prong, 120-VAC, 60-Hz outlet. Reset circuit breaker or replace fuse. Do not increase fuse capacity. If the problem is a circuit overload, have it corrected by a qualified electrician. Reset circuit breaker or replace fuse. If more than one appliance is connected to the outlet, call an electrician to have an additional circuit installed.
Water leaks
Over sudsing of detergent.
Use 1/4 to 1/2 the amount of detergent recommended by the detergent manufacturer. Reduce the amount of detergent if the load is small or lightly soiled, or if your water is very soft.
Poor stain removal
Previously set stains.
Articles that have previously been washed may have stains that have been set . These stains may be difficult to remove and may require hand washing or pre-treating to aid in stain removal.
Washer will not drain water
Kinked drain hose. Drain located higher than 48 in. above the floor.
Ensure that the drain hose is not kinked. Make sure that the drain hose is no higher than 4 ft. above the bottom of the washer and is no more than 5 ft. away from the washer.
Washer will not operate
Water supply is turned off . Control panel has powered off due to inactivity.
Washer is unplugged. Controls are not set properly. Lid is open.
Circuit breaker/fuse is tripped/blown. Control needs to be top reset.
START/PAUSE was not pressed after a cycle was set. Extremely low water pressure.
Washer is too cold. Washer is running under Delay start program.
This is normal. Press the POWER button to turn the washer on.
Make sure cord is plugged securely into a working outlet.
Turn faucet fully on.
Make sure the cycle was set correctly, close the lid and press the START/PAUSE button.
The washer will not operate if the lid is open. Close the lid and make sure that nothing is caught under the lid preventing it from closing completely.
Check house circuit breakers/fuses. Replace fuses or reset breaker. The washer should be on a dedicated branch circuit. The washer will resume the cycle where it stopped once power is restored.
Press the POWER button, then reselect the desired cycle and press the START/PAUSE button.
Press the POWER button then reselect the desired cycle and press the START/PAUSE button.
The washer will shut off if the START/ PAUSE button is not pressed within ten minutes.
Check another faucet in the house to make sure that household water pressure is adequate.
If the washer has been exposed to temperatures below freezing for an extended period of time, allow it to warm up before pressing the POWER button. Otherwise, the display will not come on.
It’s normal if the unit doesn’t operate under Delay start function. It will start automatically after the delay time is out.
Washer not filling properly
Filter clogged. Inlet hoses may be kinked Insufficient water supply. The washer lid is open. Water inlet valve damaged.
Disassemble the water inlet hose and clean the inlet point. Check that inlet hoses are not kinked or clogged. Make sure that water faucets are turned on all the way.
The washer will not operate if the lid is open. Close the lid and make sure that nothing is caught under the lid preventing it from closing completely.
Check inlet hose connections. Contact Customer Satisfaction Center if you think the water inlet valve is damaged.
Water leaks every load
Hoses not installed correctly
Check all fill and drain hose connections to ensure that they are tight and secure.
ERROR CODE
POSSIBLE CAUSE
SOLUTIONS
E0
It takes over 20 minutes to fill water but cannot achieve its preset water level.
Check for washer not filling properly and water leakage.
E1
It takes over 7 minutes to drain water and/or cannot drain the washer totally empty
Ensure that the drain hose is not kinked. Make sure that the drain hose is no higher than 4 ft. above the bottom of the washer and is no more than 5 ft. away from the washer.
E2
The top lid is open.
Close the lid and press the START/ PAUSE button
E3
The washer is out of balance.
Redistribute the load. Close the lid and press the START/PAUSE button.
E4
The water level/load size sensor is not working correctly.
Call customer satisfaction center for help.
E5
The top lid is open when child lock is selected.
Call customer satisfaction center for help.
E9
Water fills too much and exceeds selected load size
If E5 error occurs within 5 seconds close the lid. If this doesn’t work cancel the Child Lock function, make sure the lid is closed before setting the Child Lock function again
dE
Reed switch sensor error
Call customer satisfaction center for help.
cE
Microprocessor error
Call customer satisfaction center for help.
FABRIC CARE CHART
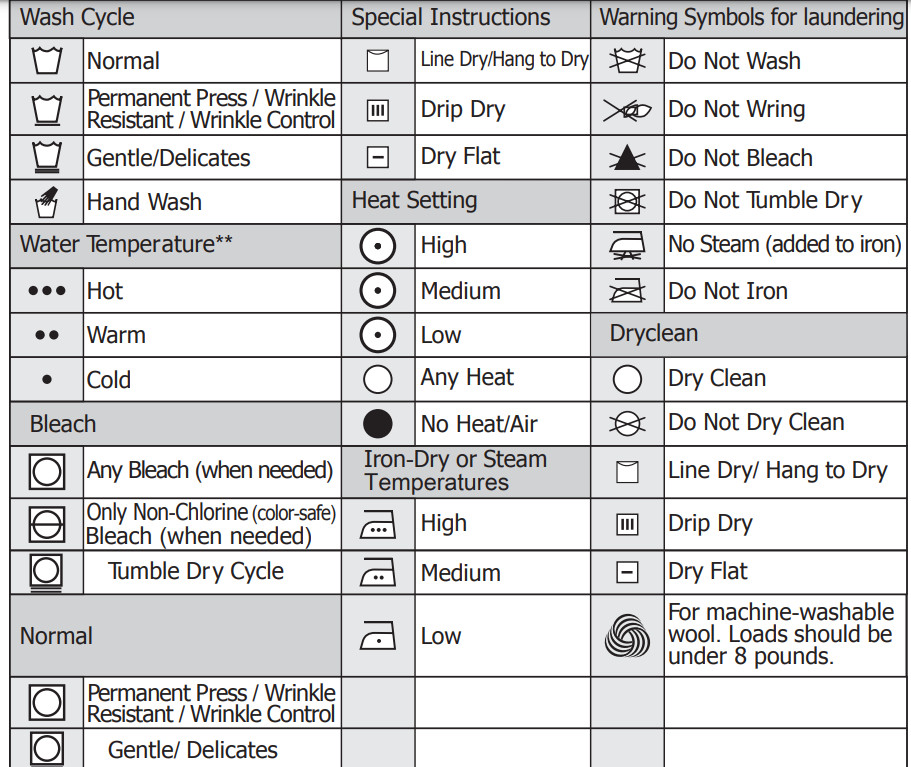
The following symbols provide garment care direction. The Clothing care labels include symbols for washing, bleaching, drying and ironing, or dry cleaning when necessary. The use of symbols ensures consistency among garment manufacturers of domestic and imported items. Follow care label directions to maximize garment life and reduce laundering problems.
** The number of dots represent appropriate wash water temperatures for various items. The temperature range for Hot is 105°-125°F/41°-52°C, for Warm 85°-105°F/29°- 41°C and for Cold 60°-85°F/16°-29°C.(Wash water temperature must be a minimum of 60°F/16°C for detergent activation and effective cleaning.)The clothes washer can not ensure these temperatures because the actual temperature of the water entering your washer depends on water heater settings and regional water supply temperatures.
For example, cold water entering the home in the northern states during winter may be 40°F/4°C which is too cold for effective cleaning. In this situation, you will need to adjust the water temperature by selecting a warm setting, adding some hot water to the MAX FILL line, or using your Washer’s heating option, if available.