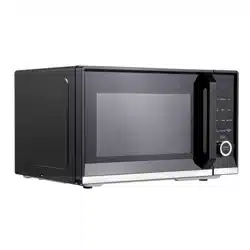
Owner’s Manual
Parts & Accessories
NOTE: Unpack all contents from the packaging. Contents vary by model. Check all packaging material carefully for parts. Please remove any clear or blue protective film on the components.

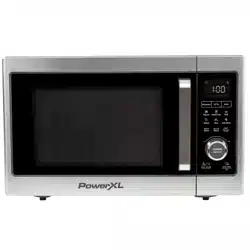
1. MAIN UNIT: Features sturdy construction throughout.
2. GLASS DOOR: Sturdy, durable glass keeps heat in and helps ensure even heat distribution to food. NEVER cook with this door in the open position.
3. DOOR HANDLE: Always use the handle and avoid touching the Glass Door. The Door may become very hot during the cooking process and can cause injury.
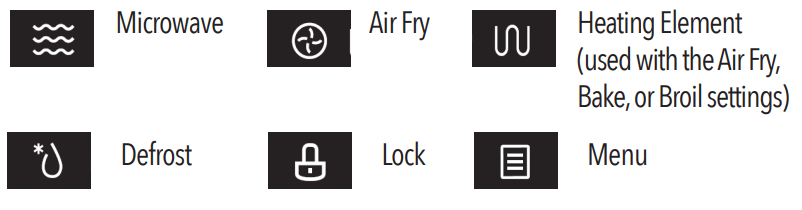
4. CONTROL PANEL: Use the Control Panel to use the cooking presets and set the cooking time and temperature (see “The Control Panel” section).
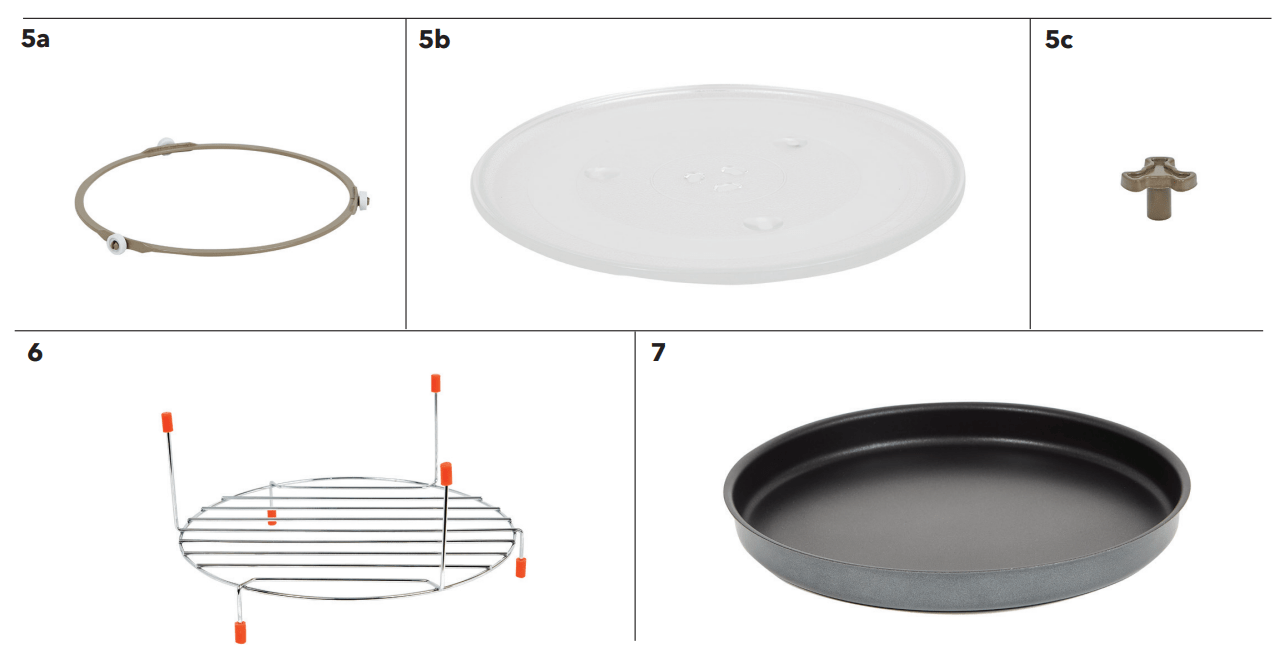
5. TURNTABLE ASSEMBLY: Food, containers, and cooking accessories must always be placed on the Turntable Assembly when using all the appliance’s cooking modes.
5a. TURNTABLE RING: Used to assemble the turntable so that food rotates during the cooking process.
5b. GLASS TRAY: Used to assemble the turntable. The glass tray assembly is ALWAYS required for all cooking modes. It must not be removed. 5c. TURNTABLE SHAFT: Used for rotating the Glass Tray when cooking food.
6. AIR FRY RACK: Use for air frying onion rings, mozzarella sticks, French fries, and more. Cannot be used with Microwave mode and must always be placed on the Glass Tray.
7. BAKING PAN: Use for baking pizzas and baked goods. Cannot be used with Microwave mode and must always be placed on the Glass Tray. May be sold separately.
Turntable Installation
All food and food containers should be placed on the Glass Tray when cooked in this appliance. If the Glass Tray or the Turntable Ring are damaged, contact Customer Service using the contact information located on the back of this manual. To assemble the turntable:
1. Place the Turntable Ring in the groove on the bottom of the inside of the appliance (see Fig. i).
2. Place the Glass Tray on top of the Turntable Ring (see Fig. ii). Ensure that the Glass Tray is right side up.

WARNING
- The metal components of this appliance will get extremely hot during use. Great care should be taken to avoid personal injury. Wear protective oven mitts or gloves.
- Oversized metal utensils and accessories, including the Air Fry Rack and Baking Pan, should not be used with this appliance’s microwave function.
The Control Panel
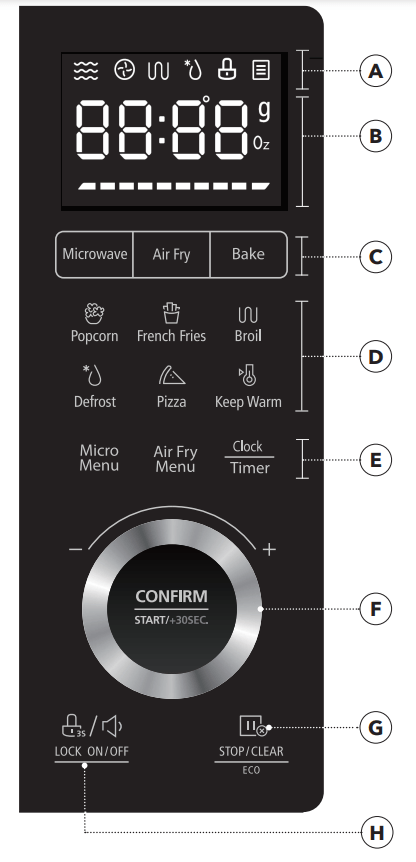
A. INDICATORS
B. LED PANEL: Displays functions, cooking times, temperatures, and weights.
C. FUNCTION BUTTONS: Use to set Microwave, Air Fryer, or Bake in manual mode. Bake and Air Fry have adjustable time and temperature. Microwave has adjustable power and time. Microwave Power Level: Press to change the power level.
D. PRESET BUTTONS: Use to select a preset cooking function, which sets a preset cooking time and temperature.
E. FUNCTION MENU BUTTONS: Use to select presets from the preset menu (see “Preset Cooking Chart” section) or to adjust the clock. Micro Menu: Refer to the “Preset Cooking Chart” section for preset cooking times and temperatures. Air Fry Menu: Refer to the “Preset Cooking Chart” section for preset cooking times and temperatures. Clock/Timer Button: Press once to set the current time on the appliance. Press twice to set the timer on the appliance. Use the Control Knob to adjust and confirm the selected time.
F. CONTROL KNOB: Once a cooking mode, time, and temperature have been set either manually or by using the Preset Buttons, press the Control Knob to begin the cooking process. During the cooking process, press the Control Knob to add 30 seconds to the cooking time. The Control Knob can also be used to confirm settings, such as the clock/timer on the appliance.
G. STOP/CLEAR/ECO BUTTON: Press the Stop/Clear/Eco Button to stop the cooking process at any time. When the cooking process is stopped, press the Stop/Clear/Eco Button to cancel the current cooking timer and enter standby mode. When the appliance is in standby mode, press the Stop/Clear/Eco Button to darken the control panel. When the panel is darkened, press any button on the panel to illuminate the panel.
H. LOCK/MUTE BUTTON: Press to mute or unmute the appliance. Hold to lock or unlock the appliance (see “Using the Lock and Mute Functions” section).
STANDBY MODE: When no cooking program is running, the appliance is in standby mode.
Using the Accessories
Using the Air Fry Rack
- Assemble the turntable (see the “Turntable Installation” section).
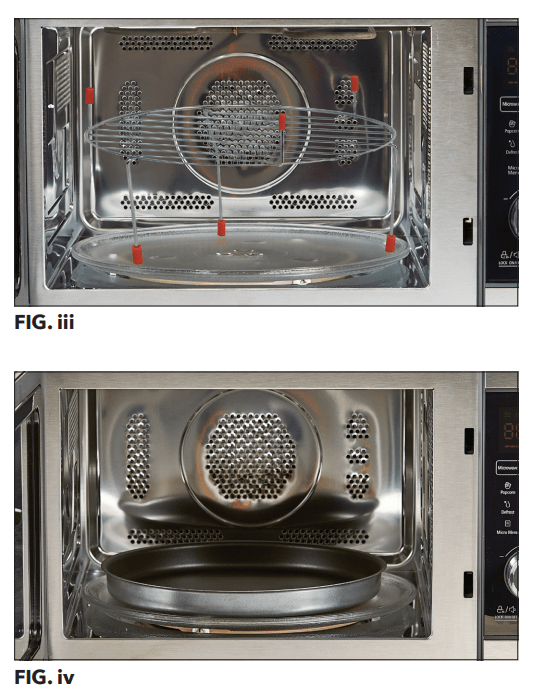
- Place food on the Air Fry Rack. Place the Air Fry Rack on the Tray (see Fig. iii). The Air Fry Rack can be flipped so that food can be placed closer to or farther from the top heating element.
- Choose a cooking mode, time, and temperature. Press the Control Knob to begin the cooking process.
NOTE: Do not use the Air Fry Rack with the microwave function.
Using the Baking Pan
- Assemble the turntable (see the “Turntable Installation” section)
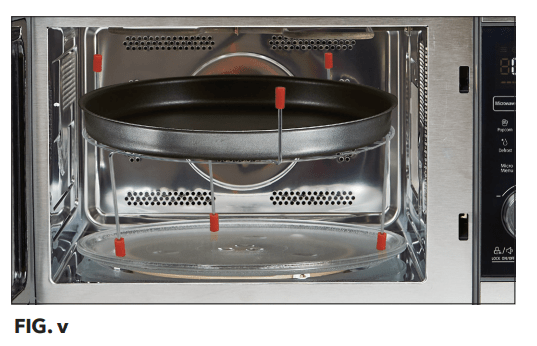
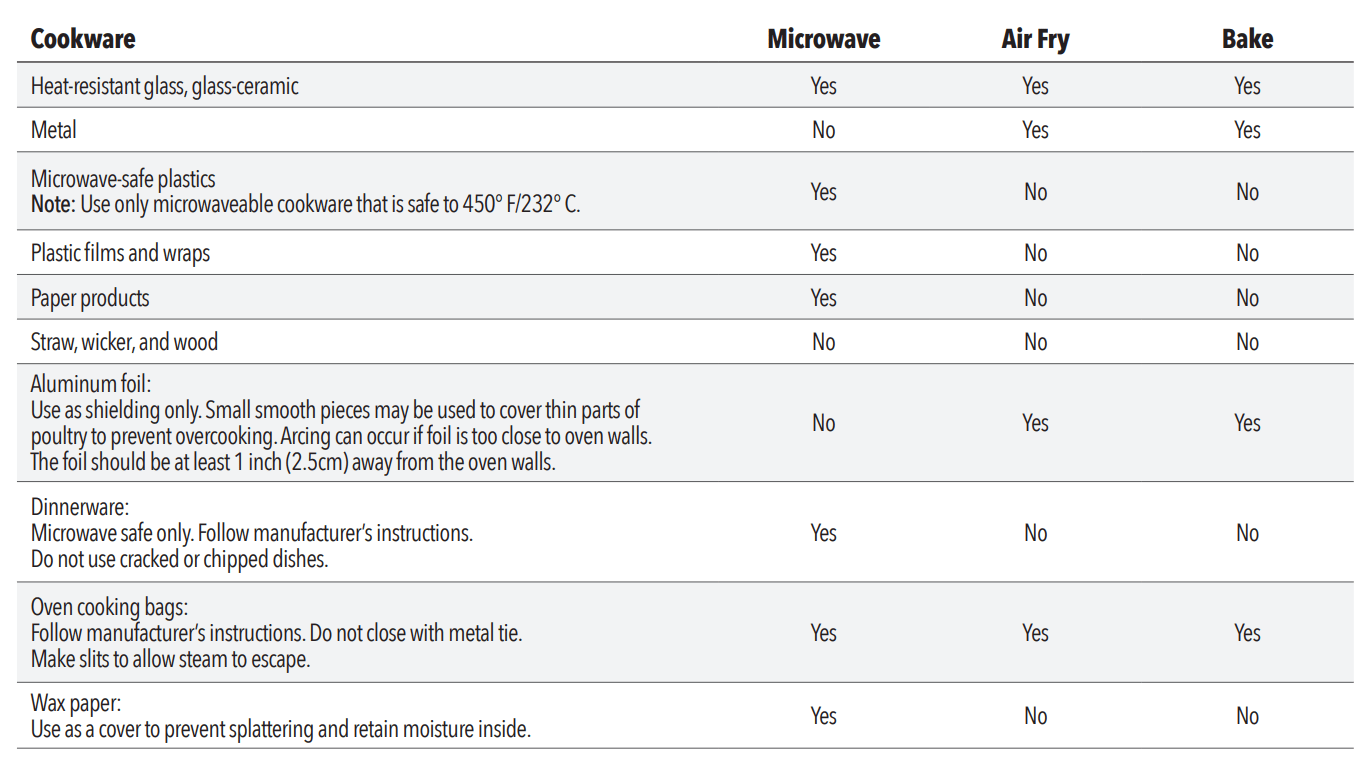
- Place food on the Baking Pan. Place the Baking Pan on the Glass Tray (see Fig. iv) or on the Air Fry Rack (see Fig. v).
- Choose a cooking mode, time, and temperature. Press the Control Knob to begin the cooking process.
Instructions for Use
Before First Use
- Read all material, warning stickers, and labels.
- Remove all packing materials.
- Hand-washing is recommended. Wash all parts and accessories used in the cooking process with warm, soapy water.
- Never wash or submerge the cooking appliance in water. Wipe the inside and outside of the cooking appliance with a clean, moist cloth. Rinse with a warm, moist cloth.
- Before cooking food, preheat the appliance for a few minutes to allow the manufacturer’s protective coating of oil to burn off. Wipe the appliance with warm, soapy water and a dishcloth after this burn-in cycle.
Setting the Clock
- Press the Clock/Timer Button once. The LED Panel will show “00:00.”
- Turn the Control Knob to adjust the hour setting from 1 to 12.
- Press the Clock/Timer Button to confirm the hour setting.
- Turn the Control Knob to adjust the minute setting from 0 to 59.
- Press the Clock/Timer Button to confirm the time setting.
Setting the Kitchen Timer
- Press the Clock/Timer Button twice. The LED Panel will show “00:00.”
- Turn the Control Knob to adjust the kitchen timer from 0 to 95 minutes.
- Press the Clock/Timer Button to start the kitchen timer
Cookware in the Microwave
- It is not necessary to buy new cookware. Many pieces already in your kitchen can be used successfully in your new appliance. The charts below will help you decide which cookware and coverings should be used with each feature. Make sure the utensil does not touch the interior walls during the cooking process
Containers
CAUTION: PERSONAL INJURY HAZARD
- Tightly-closed containers could explode. Closed containers should be opened and plastic pouches should be pierced before cooking.
- See the instructions in the “Materials You Can Safely Use in a Microwave Oven” and “Materials To Be Avoided in a Microwave Oven” sections.
- There may be certain non-metallic materials that are not safe to use for microwaving. If in doubt, you can test the utensil in question by following the instructions in the “Material/Container Test” section.
Material/Container Test
- Fill a microwave-safe container with 1 cup (250 ml) of cold water and the container.
- Set the appliance to microwave mode and cook on maximum power for 1 minute. NOTE: Do not microwave the container for more than 1 minute.
- Carefully feel the container. If the container is warm, do not use the container in microwave mode.
- Do not exceed 1 minute cooking time to not overheat the container.
Preventing Arcing
- Arcing is sparks or electric flashes that crackle or pop. Arcing can produce heat that is quite intense and can damage the interior of the microwave or containers being used in the microwave. It can also cause fire.
- Arcing occurs when metal containers are used in the microwave and can also occur with the use of metal skewers, metal clamps, or twist ties for plastic bags. To prevent arcing, use the charts to determine which materials are microwave safe, or follow instructions from container/ wrap manufacturer.
Plastic Cookware
- Plastic cookware designed for microwave cooking is very useful, but should be used carefully. Even microwave-safe plastic may not be as tolerant of overcooking conditions as are glass or ceramic materials and may soften or char if subjected to short periods of overcooking. In longer exposures to overcooking, the food and cookware could ignite.
- Follow these guidelines:
- Use microwave-safe plastics only and use them in strict compliance with the cookware manufacturer’s recommendations.
- Do not microwave empty containers.
- Do not permit children to use plastic cookware without adult supervision.
Microwave Function
- Press the Microwave Button to manually adjust the power and time of the Microwave function.
- Press the Microwave Button or turn the Control Knob to select one of the ten power levels (see Fig. vi). Press the Control Knob to confirm the power level.
- Turn the Control Knob to adjust the cooking time. Press the Control Knob to confirm the cooking settings and begin the cooking process.
Fast Microwave
- Turning the Control Knob while the appliance is in standby mode (see “The Control Panel” section) allows you to add or subtract time. Pressing the Control Knob will confirm the time and run the microwave at 100% power. Pressing the Control Knob again will increase the cooking time in 30-second increments.
Defrost Button
- Pressing the defrost button displays DEF1.
- You can scroll though the DEF1–DEF6 settings by repeatedly pressing the Defrost Button or by turning the Control Knob (see the Defrost Charts in the “Microwave Programming” section).
- Press the Control Knob to confirm the setting.
- Turn the Control Knob to select the defrost weight (4–100 oz).
- Press the Control Knob to start defrosting.
- Turn food over when unit beeps twice.
- When the timer is complete, the appliance will beep five times and display “0:00.”
Popcorn Button
- Press the Popcorn Button.
- The LED Display will show “2.75Oz.” Turn the Control Knob to cycle between the available preset popcorn weights (2.75 oz., 3.2 oz., and 3.5 oz.).
- Press the Control Knob to begin the cooking process.
- When the cooking timer is complete, the appliance will beep five times and display “0:00.”
Micro Menu Button
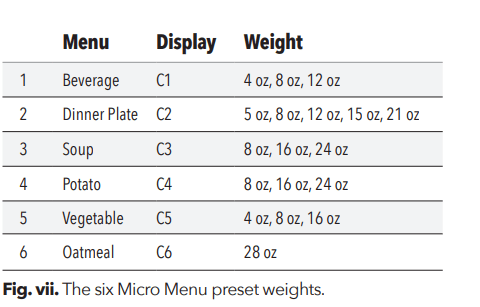
- Press the Micro Menu button repeatedly or turn the Control Knob to select one of the preset weights, press the Control Knob to confirm the selected preset, and then turn the Control Knob to select a food weight (see Fig. vii).
- Press the Control Knob to confirm the cooking settings.
- When the cooking timer is complete, the appliance will beep five times and display “0:00.”
NOTE: Pressing the Control Knob increases the cooking time in 30-second increments.
Bake Function
- Press the Bake Function Button once. The LED Panel will display “350F”.
- Turn the Control Knob to cycle between the available cooking temperatures (100° F/38° C, 150° F/65° C, 250° F/121° C, 275° F/135° C, 300° F/149° C, 325° F/163° C, 350° F/177° C, 375° F/190° C, 400° F/204° C, 425° F/218° C). Press the Control Knob to confirm the cooking temperature.
- Turn the Control Knob to adjust the cooking time (30-second intervals for 5–10 minutes, 1-minute intervals for 10–30 minutes, and 5-minute intervals for 30–90 minutes). Press the Control Knob to begin the preheating process. The Fan Icon will flash to indicate that the appliance is preheating.
- When the appliance has preheated, the Fan Icon will stop flashing and the appliance will display the selected cooking time. Open the door, insert your food and accessories, and close the door. Press the Control Knob to start the timer.
- When the cooking timer is complete, the appliance will beep five times and display “0:00.”
Using the Air Fry Menu
- Press the Air Fry Menu button
- Turn the Control Knob to cycle through the 13 preset functions (AF01–AF13; see the “Air Fry Programming” section for preset times and temperatures).
- Once an air frying setting has been selected, press the Control Knob to begin the cooking process.
- When the cooking timer is complete, the appliance will beep five times and display “0:00.”
French Fries Button
- Press the “French Fries” Button to set the appliance to French Fry mode.
- The LED Display will show “22:00.” Press the Control Knob to begin the cooking timer. Open the door, insert your food and accessories, and close the door.
- When the cooking timer is complete, the appliance will beep five times and display “0:00.”
Pizza Button
- Press the Pizza Button to set the appliance to pizza mode.
- Press the Control Knob to start preheating the appliance. When the appliance has preheated, the LED Display will show “18:00.” Open the door, insert your food and accessories, and close the door.
- When the cooking timer is complete, the appliance will beep five times and display “0:00.” Press the Control Knob to begin the cooking timer.
Air Fry Function
- Press the Air Fry Button to set the appliance to air fry mode. “400” will flash on the LED Display.
- Turn the Control Knob to cycle between the available cooking temperatures (300° F/149° C, 325° F/163° C, 350° F/177° C, 375° F/190° C, 400° F/204° C, 425° F/218° C). Press the Control Knob to confirm the cooking temperature.
- Turn the Control Knob to adjust the cooking time. Press the Control Knob to confirm the cooking time and start the timer.
- When the cooking timer is complete, the appliance will beep five times and display “0:00.”
Using the Lock and Mute Functions
- When the appliance is in standby mode (see “The Control Panel” section), press the LOCK ON/OFF Button once to mute the appliance. When muted, the appliance’s Control Panel and timer will not sound until the LOCK ON/OFF Button is pressed again to unmute the appliance.
- Hold the LOCK ON/OFF Button for 3 seconds to lock and unlock the appliance.
Cooking Guidelines & Tips
Internal Temperature Meat Chart
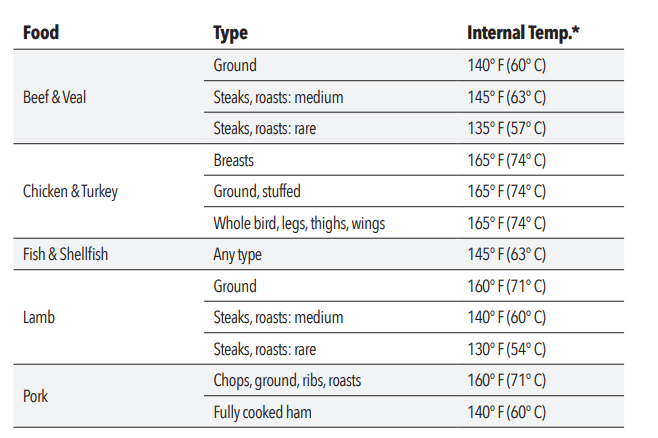
- Use this chart and a food thermometer to ensure that meat, poultry, seafood, and other cooked foods reach a safe minimum internal temperature.
- *For maximum food safety, the U.S. Department of Agriculture recommends 165° F for all poultry; 160° F for ground beef, lamb, and pork; and 145° F, with a 3-minute resting period, for all other types of beef, lamb, and pork. Also review the USDA Food Safety Standards.
Tips
- Foods that are smaller in size usually require a slightly shorter cooking time than larger ones.
- Large sizes or quantities of food may require a longer cooking time than smaller sizes or quantities.
- Flipping or turning food halfway through the cooking process ensures that the food is evenly cooked.
- Adding a bit of vegetable oil to fresh potatoes is suggested for a crispier result. When adding oil, do so just before cooking and add only a small amount onto the potato.
- Snacks normally cooked in an oven can also be cooked in the appliance.
- Use premade dough to prepare filled snacks quickly and easily. Premade dough also requires a shorter cooking time than homemade dough.
- A baking tin or oven dish can be placed on the Air Fry Rack inside the appliance when cooking foods such as cakes or quiches. Using a tin or dish is also recommended when cooking fragile or filled foods
Troubleshooting
Appliance not working as expected? Review the chart for possible causes and solutions.
| Problem |
Possible Cause |
Solution |
| Oven will not start |
Electrical cord for oven is not plugged in. |
Plug power cord into wall socket. |
| Door is open |
Close the door and try again. |
| Wrong operation is set. |
Check instructions. |
| Arcing or sparking |
Materials to be avoided in microwave oven were used. |
Use microwave-safe cookware only |
| The oven is operated when empty |
Do not operate with oven empty |
| Spilled food remains in the cavity. |
Clean cavity with wet towe |
| Unevenly cooked foods |
Materials to be avoided in microwave oven were used |
Use microwave-safe cookware only. |
| Food is not defrosted completely. |
Completely defrost food. |
| Cooking time, power level is not suitable. |
Use correct cooking time, power level. |
| Too much food is attempted to be cooked. |
Cook smaller quantities of food |
| Overcooked foods |
Cooking time, power level is not suitable |
Use correct cooking time, power level. |
| Undercooked foods |
Materials to be avoided in microwave oven were used. |
Use microwave-safe cookware only. |
| Food is not defrosted completely |
Completely defrost food |
| Oven ventilation ports are restricted. |
Check to see that oven ventilation ports are not restricted. |
| Cooking time, power level is not suitable |
Use correct cooking time, power level |
| Too much food is attempted to be cooked. |
Cook smaller quantities of food |
| Improper defrosting |
Materials to be avoided in microwave oven were used. |
Use microwave-safe cookware only. |
| Cooking time, power level is not suitable. |
Use correct cooking time, power level. |
| Food is not turned or stirred. |
Turn or stir food |
| The appliance does not work |
The appliance is not plugged in |
Plug power cord into wall socket |
| The appliance has not been turned on by setting the preparation time and temperature. |
Set the temperature and time |
| The appliance is plugged into an outlet that is shared with other devices |
Plug the appliance into a dedicated power outlet |
| Food not cooked |
The appliance is overloaded. |
Use smaller batches for more even cooking |
| The temperature is set too low. |
Raise temperature and continue cooking |
| Food is not fried evenly |
Some foods need to be turned during the cooking process |
Check halfway through process and turn food if needed |
| Foods of different sizes are being cooked together |
Cook similar-sized foods together |
| If using multiple racks, trays need to be rotated. |
Rotate trays from top to bottom and vice versa. |
| White smoke coming from appliance |
Oil is being used. |
Wipe down to remove excess oil. |
| Accessories have excess grease residue from previous cooking. |
Clean the components and appliance interior after each use. |
| French fries are not fried evenly |
Wrong type of potato being used. |
Use fresh, firm potatoes |
| Potatoes not blanched properly during preparation. |
Use cut sticks and pat dry to remove excess starch. |
| Too many fries are being cooked at once |
Cook less than 2 ½ cups of fries at a time. |
| Fries are not crispy |
Raw fries have too much water. |
Dry potato sticks properly before misting oil. Cut sticks smaller. Add a bit more oil. |
Radio Interference
Operation of the microwave oven may cause interference to your radio, television, or similar equipment. Interference can be reduced or eliminated by taking the following measures:
- Clean the door and sealing surface of the oven.
- Reorient the receiving antenna of radio or television.
- Relocate the appliance with respect to the receiver.
- Move the appliance away from the receiver.
- Plug the appliance into a different outlet so that the appliance and the receiver are on different branch circuits.
Cleaning & Storage
Cleaning
Clean the appliance after each use. Remove the power cord from the wall socket and be certain the appliance is thoroughly cooled before cleaning.
- Wipe the outside of the appliance with a warm, moist cloth and mild detergent.
- To clean the door, gently scrub both sides with warm, soapy water and a damp cloth. DO NOT soak or submerge the appliance in water or wash in the dishwasher.
- Clean the inside of the appliance with hot water, a mild detergent, and a nonabrasive sponge. Do not scrub the heating coils because they are fragile and may break. Then, rinse the appliance thoroughly with a clean, damp cloth. Do not leave standing water inside the appliance.
- If necessary, remove unwanted food residue with a nonabrasive cleaning brush.
- Caked-on food on accessories should be soaked in warm, soapy water to remove the food easily. Hand-washing is recommended.
- If any other service needs to be performed, contact Customer Service using the contact information on the back of this manual.
Storage
- Unplug the appliance and let it cool thoroughly.
- Make sure all components are clean and dry.
- Place the appliance in a clean, dry place
Frequently Asked Questions
1. Does the appliance need time to heat up?
- Preheating is needed when you are cooking from a cold start when using the Bake or Air Fry cooking function. Add 3 minutes to the cooking time to compensate when preheating is necessary (preheating is automatic with the Bake and Pizza cooking functions).
2. Can I check the food during the cooking process?
- You can check the cooking process at any time by looking through the glass door.
3. What happens if the appliance still does not work after I have tried all the troubleshooting suggestions?
- Never attempt home repair. Contact Customer Service and follow the procedures set forth by the manual. Failure to do so could render your guarantee null and void.