7-in-1 Air Fryer Microwave & Grill, 28L Capacity - Black
Model No. DH277
Thank you for purchasing a Dellonda product. Manufactured to a high standard, this product will,
if used according to these instructions, and properly maintained, give you years of trouble free performance.
DH277 Issue:2 11/04/25
www.dellonda.co.uk

Important Information
Please read these instructions carefully. Note the safe operational requirements, warnings & cautions. Use the product correctly and with care
for the purpose for which it is intended. Failure to do so may cause damage and/or personal injury and will invalidate the warranty. Keep these
instructions safe for future use.
Refer to
instruction
manual
Warning:
hot
surface
SPECIFICATION
Capacity: 28L
Internal Dimensions: 350 x 367 x 215mm
Material: Powder Coated Steel Cavity - SUS430
Maximum Timer Setting: 95 minutes
Microwave Frequency: 2450MHz
Weight: 18.5kg
Number of Presets: 9
Plug Type: 3-Pin BS
Power: Microwave - 900W Air Fryer - 1850W Grill - 1800W
Product Dimensions (W x D x H): 526 x 447 x 324mm
Temperature Range: Air Fryer - 100 to 230°C
SAFETY INSTRUCTIONS
• ELECTRICAL SAFETY
• ELECTRICAL SAFETY
• WARNING! It is the user’s responsibility to check the following:
• Check all electrical equipment and appliances to ensure that they are safe before using.
• Inspect power supply leads, plugs and all electrical connections for wear and damage.
• Ensure that the insulation on all cables and on the appliance is safe before connecting it to the power supply.
• DO NOT use worn or damaged cables, plugs or connectors.
• Ensure that any faulty item is repaired or replaced immediately by a Sealey qualied technician.
• If the cable or plug is damaged during use, switch off the electricity supply and remove from use.
• Sealey recommend that an RCD (Residual Current Device) is used with all electrical products.
• Important: Ensure that the voltage rating on the appliance suits the power supply to be used and that the plug is tted with the
• correct fuse.
• DO NOT pull or carry the appliance by the power cable.
• DO NOT pull the plug from the socket by the cable.
• If the supply cord is damaged, it must be replaced by the manufacturer, its service agent or similarly qualied persons in order to avoid a hazard.
• GENERAL SAFETY
• Important safety instructions - Read carefully before use and keep for future reference.
• This is a FREESTANDING product. Product must NOT be placed in a cabinet.
• Children from age 8 years and above, persons with reduced physical, sensory, or mental capabilities those with lack of experience and knowledge
can use the appliance, if they have been given supervision or instruction concerning use of the appliance in a safe way to understand the
hazards involved.
• Only to be used as described in this manual. DO NOT use with corrosive chemicals or gases. NOT intended for laboratory or industrial use.
• DO NOT use: non heat resistant glass or plastic containers, lacquerware, bamboo, aluminium boxes or containers.
• DO NOT block or cover openings.
• DO NOT use with any external timer or remote control system.
• Children shall NOT play with the appliance.
• WARNING!: Liquids and other foods must not be heated in sealed containers since they are liable to explode.
• This appliance is intended to be used in household and similar applications such as:
• staff kitchen areas in shops, ofces and other working environments;
• farm houses;
• by clients in hotels, motels and other residential environments;
• bed and breakfast type environments.
• DO NOT use this device for commercial purposes; it is intended for general household use only.
• WARNING!: When the appliance is operated in the combination mode, children should only use the oven under adult supervision due to the
temperatures generated.
• During use, pay attention to the following points to reduce the risk of injury:
• DO NOT use narrow-necked straight-sided containers; use wide-mouthed containers (bottles) instead.
• Stir liquids before and during heating.
• Avoid overheating liquids.
• Be extra careful when inserting a spoon or other utensil into a container; this can cause delayed boiling.
• Allow the container to sit in the microwave for at least 20 seconds after heating before removing it.
• DO NOT place this device in a cupboard or near ammable or explosive materials.
• Place this device on a level surface in a well-ventilated and dry environment, with a distance of at least 10cm from the surroundings and 30cm
overhead, to ensure that any openings on the device are not blocked. Ensure that this device is at least 2m away from electrical appliances with
signal reception, such as televisions, radios, antennas, etc., to avoid signal interference.

• Place the glass tray and turntable assembly inside the cavity when cooking. Handle the glass tray with care and gently place kitchen utensils on it
to avoid damage.
• DO NOT puncture the oven door mesh holes to prevent microwave leakage.
• When using preset programs, place ingredients of the corresponding weight according to the program instructions.
• The cavity contains a safety switch that ensures the power remains off when the door is open; do not modify it yourself.
• DO NOT use the microwave when it is empty to avoid damaging the machine.
• DO NOT operate it without food or with very low moisture content, to avoid scorching, sparking, or res. Foods with low moisture content may
heat unevenly during cooking due to different materials absorption of microwaves; this is normal.
• DO NOT place bacon or similar ingredients directly on the turntable, as localized overheating may cause the turntable to break.
• DO NOT heat baby bottles or baby food in the microwave, as it may result in uneven heating and high temperatures, causing harm.
• The contents of feeding bottles and baby food jars shall be stirred or shaken and the temperature checked before consumption, in order to avoid
burns.
• DO NOT heat narrow-necked containers such as syrup bottles.
• DO NOT attempt deep frying in this device.
• DO NOT attempt to place home-canned goods in this device, as it cannot ensure that all items in the cans reach boiling temperatures.
• Only use utensils that are suitable for use in microwave ovens.
• When heating food in plastic or paper containers, keep an eye on the oven due to the possibility of ignition.
• The microwave oven is intended for heating food and beverages. If smoke is observed, switch off or unplug the appliance and keep the door
closed in order to stie any ames.
• Microwave heating of beverages can result in delayed eruptive boiling, therefore care must be taken when handling the container.
• Eggs in their shell and whole hard-boiled eggs should not be heated in microwave ovens since they may explode, even after microwave heating
has ended.
• Metallic containers for food and beverages are not allowed during microwave cooking.
• Regularly clean the microwave and remove all food residues to prevent dangerous situations caused by deterioration of the appliance’s surface.
• Disconnect the power and unplug it from the socket before not using or cleaning the device; do not pull on the cord.
• DO NOT heat food or beverages in metal packaging, as this may cause res or electrical hazards.
• DO NOT use metal materials such as steel wool for cleaning this machine, as it will reduce the microwave oven’s lifespan and may increase the
risk of res during subsequent use.
• When operating this device in oven mode, do not use paper products.
• DO NOT cover the oven rack or any other part of this device with a metal box, as it can cause overheating.
• The microwave function is only for heating food and beverages not for: drying of food or clothing, heating of warming pads,slippers, sponges,
damp cloth and similar may lead to risk of injury, ignition or re.
• This device is for indoor use only. Do not use it in high-temperature, exposed, strong magnetic field, humid, or corrosive environments.
• DO NOT touch hot surfaces during microwave use; use handles or knobs to prevent burns. Ensure that the door is closed when operating the
microwave.
• DO NOT let the power cord hang over the edge of the table or come into contact with hot surfaces.
• When cleaning this device, use only mild, non-abrasive soap or a sponge or soft cloth dampened with a cleaning agent. DO NOT use sharp
objects (such as scouring pads, spatulas, etc.) to clean this device.
• DO NOT use accessories from non-designated manufacturers to avoid damaging the product, harming the user, or posing potential dangers.
• During use, pay attention to the following points to reduce the risk of fires in the cavity.
• Avoid cooking for too long. When heating food in plastic or paper packaging, always monitor the cooking process and set the cooking time
correctly to prevent overheating, which could cause a fire.
• Before placing bags inside the cavity, remove any tying strings from paper or plastic bags.
• If smoke is detected, unplug the power cord immediately and keep the oven door closed to suppress the flames.
• When not in use, do not place any materials inside the cavity, except for accessories recommended by the manufacturer.
• During microwave air frying , ensure there are no water droplets left on the glass plate, as water droplets can cause the glass plate to overheat
and break.
• After using this device for extended periods of heating, do not defrost immediately; wait for the bottom tray to cool before defrosting.
• WARNING!: Ensure that the appliance is switched off before replacing the lamp to avoid the possibility of electric shock.
• MAINTENANCE
• Cleaning and user maintenance on the appliance shall not be made by children without supervision.
• The oven should be cleaned regularly and any food deposits removed.
• Failure to maintain the oven in a clean condition could lead to deterioration of the surface that could adversely affect the life of the appliance and
possibly result in a hazardous situation.
• The appliance shall not be cleaned with a steam cleaner.
• WARNING!: If the door or door seals are damaged, the oven must not be operated until it has been repaired by a competent person.
• WARNING!: It is hazardous for anyone other than a competent person to carry out any service or repair operation that involves the removal of a
cover which gives protection against exposure to microwave energy.
• COOKING RANGES
• During use the appliance becomes hot. Care should be taken to avoid touching heating elements inside the oven.
• WARNING!: The appliance and its accessible parts become hot during use. Care should be taken to avoid touching heating elements. Children
less than 8 years of age shall be kept away unless continuously supervised.
• The appliance must not be installed behind a decorative door to avoid overheating.
• OVENS
• During use the appliance becomes hot. Care should be taken to avoid touching heating elements inside the oven.
• WARNING!: The appliance and its accessible parts become hot during use. Care should be taken to avoid touching heating elements. Children
less than 8 years of age shall be kept away unless continuously supervised.
• DO NOT use harsh abrasive cleaners or sharp metal scrapers to clean, since they can scratch the surface, or which may result in shattering of
the glass components.
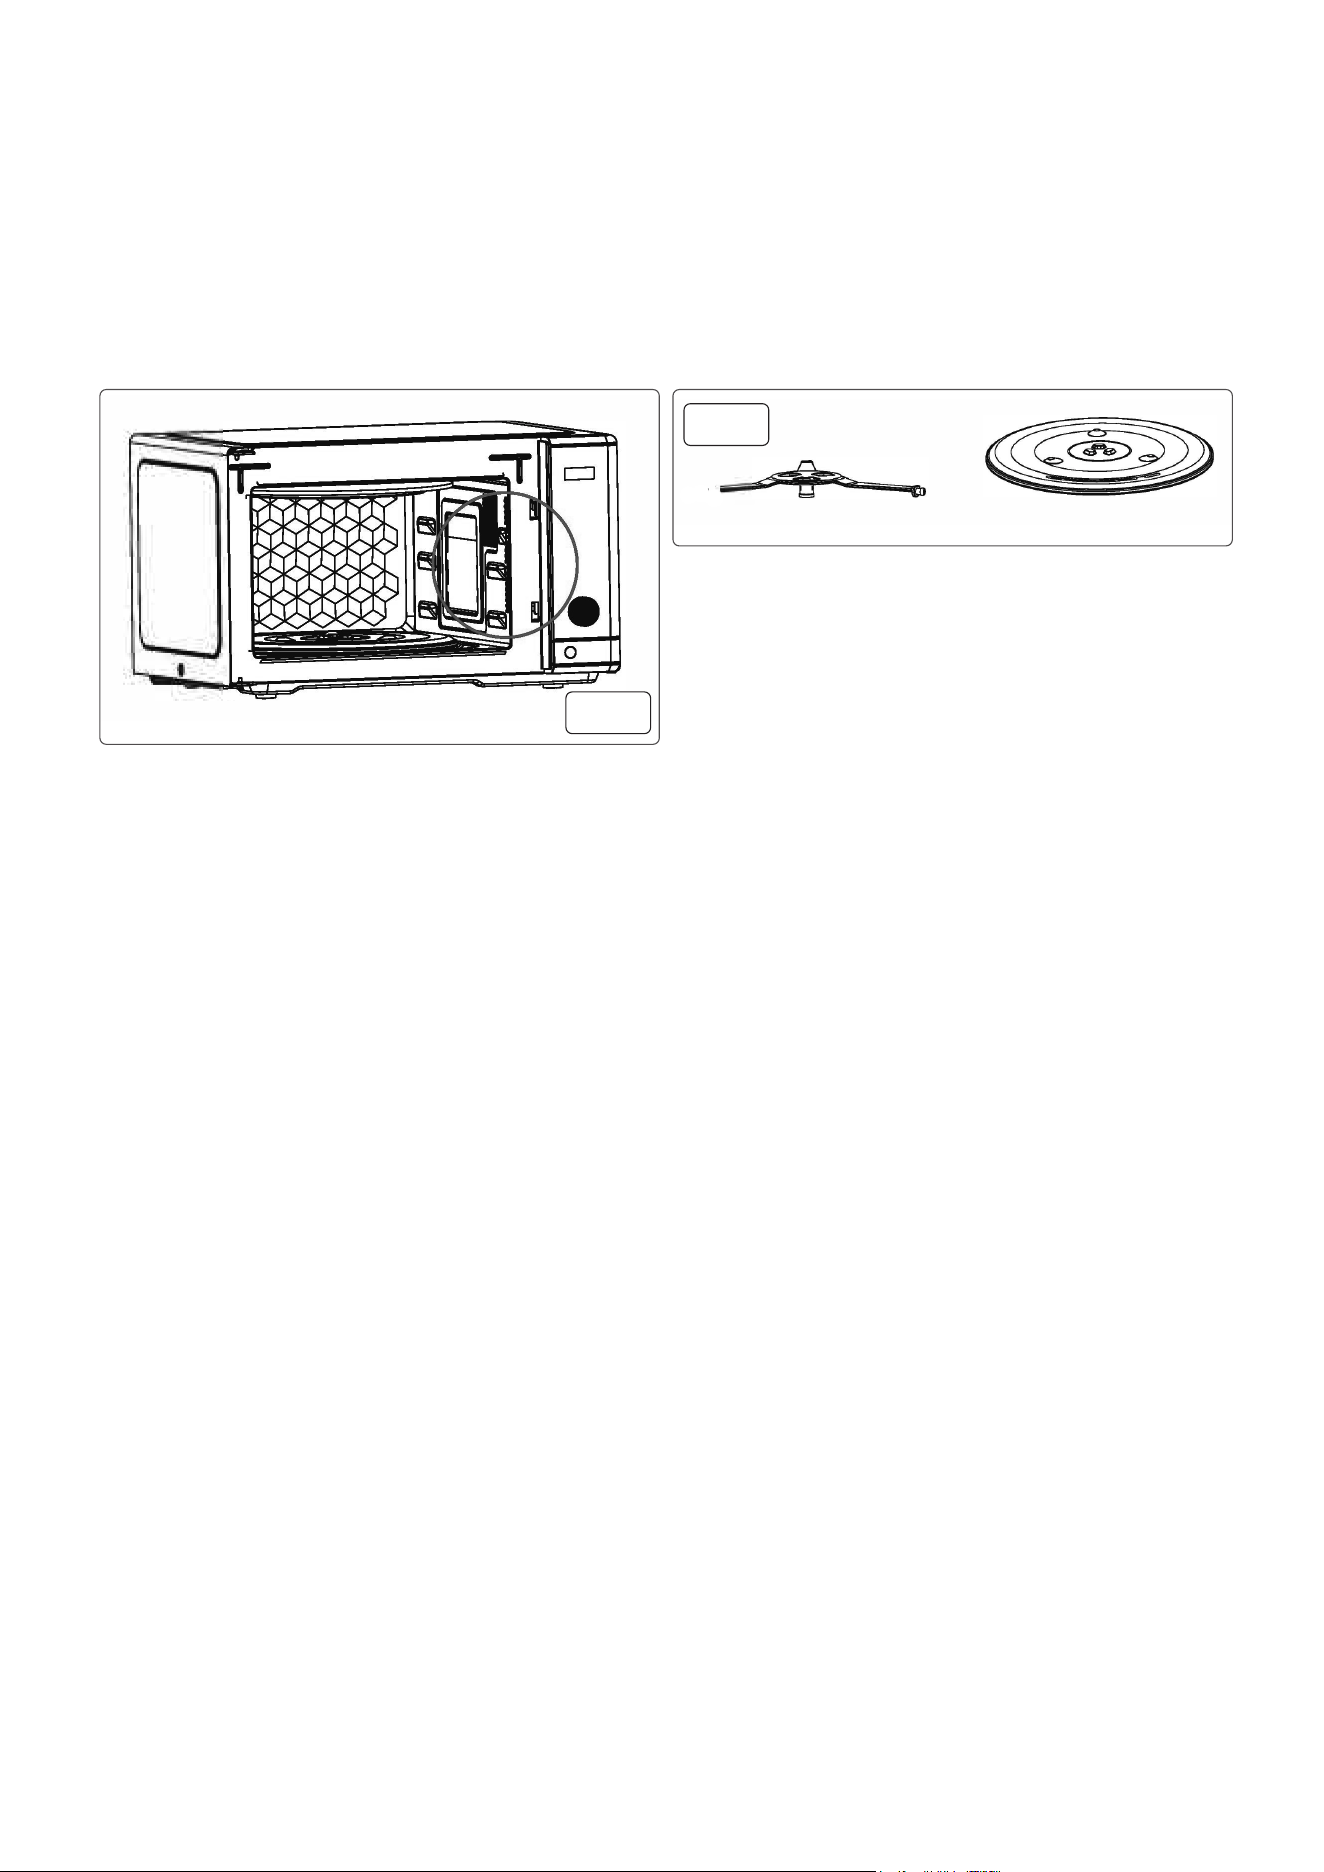
CONTENTS
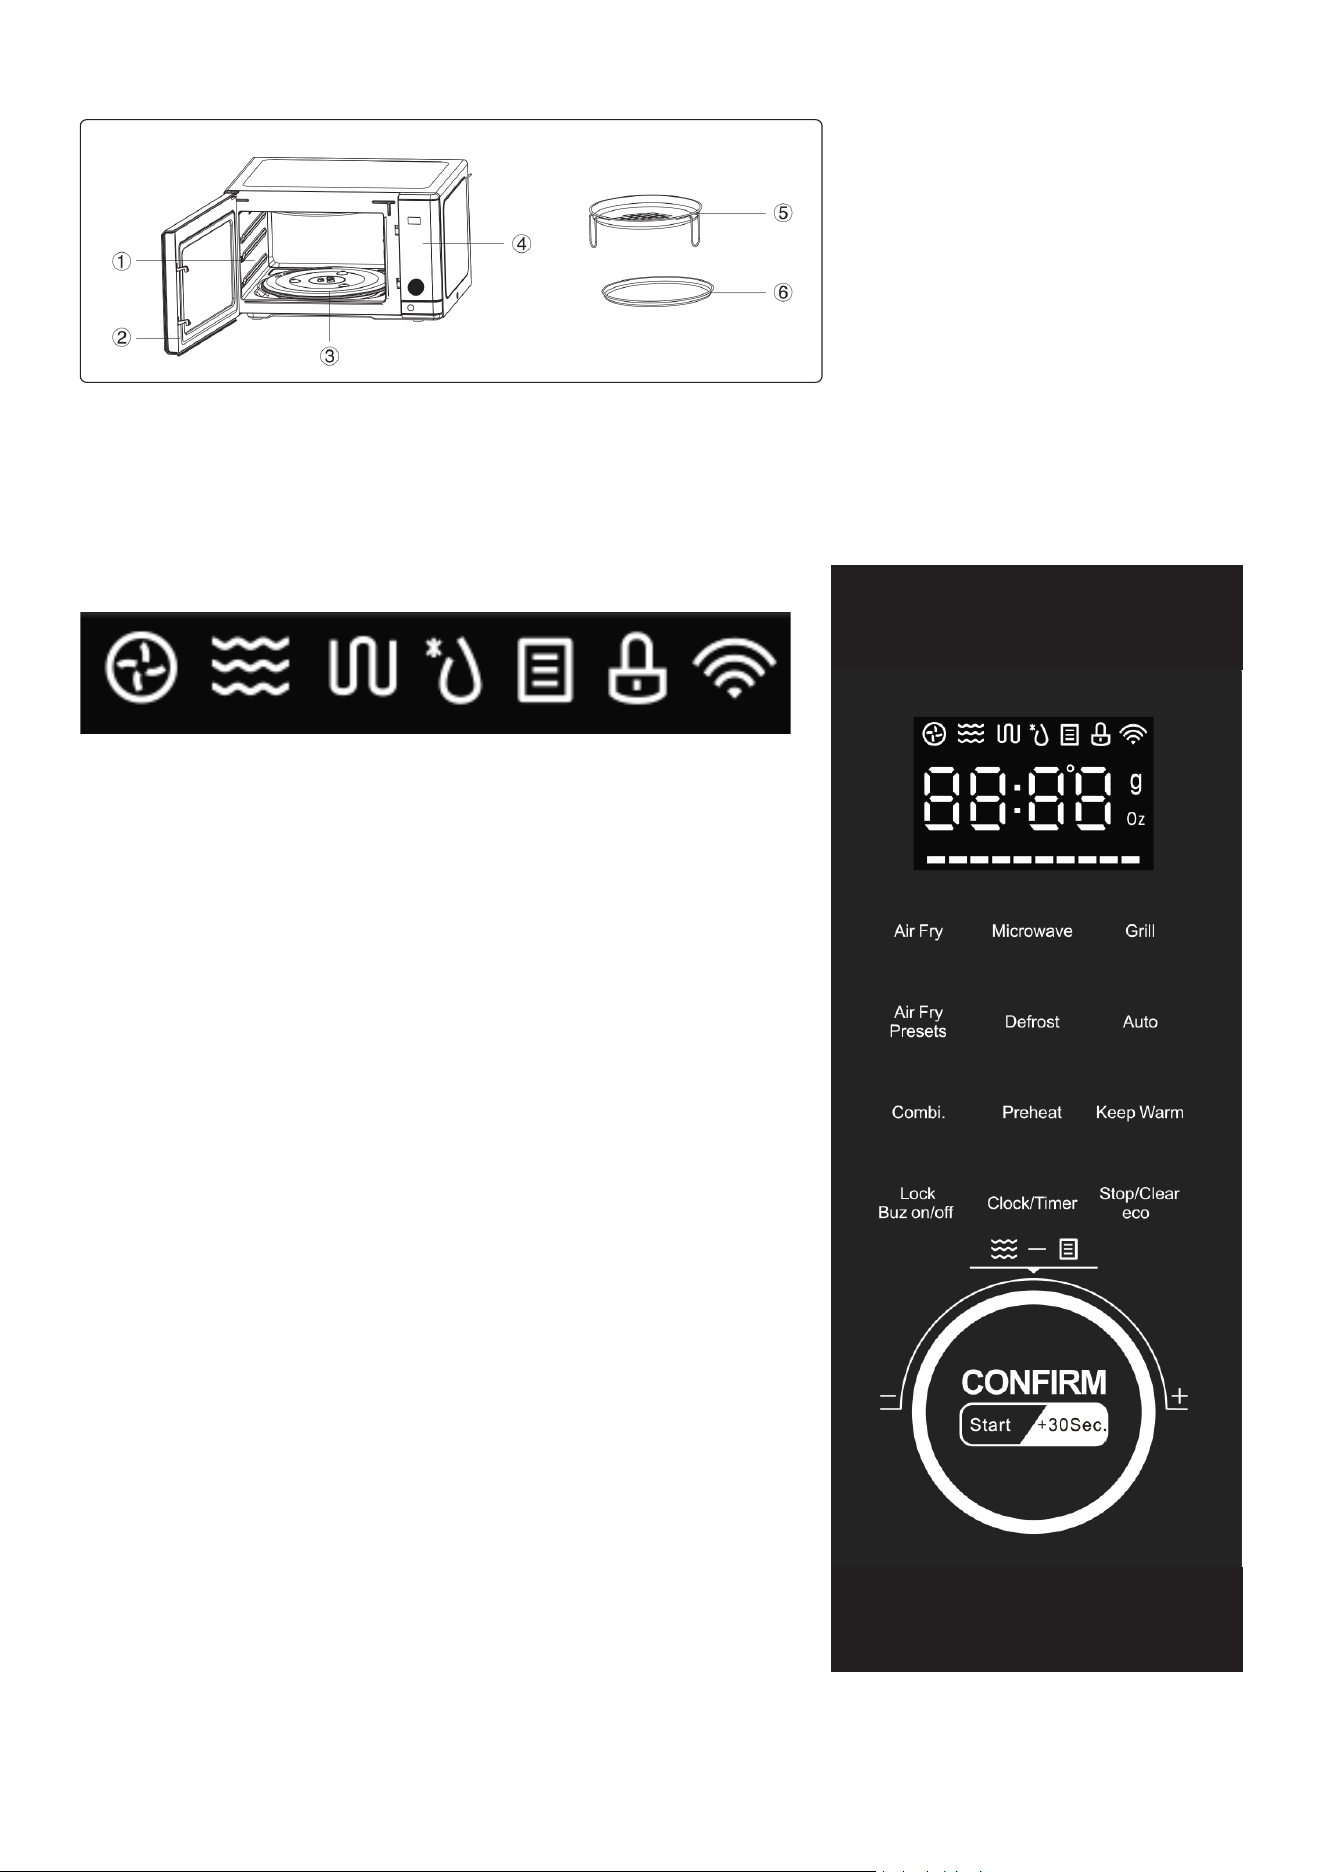
• 1. STAINLESS STEEL CAVITY: The stainless steel material is easy to clean and reduces odour absorption.
• 2. DOOR: The glass door has high transparency, allowing you to observe the cooking process inside.
• 3.TURNTABLE ASSEMBLY: Includes the turntable shaft, turntable ring, turntable roller, glass tray.
• 4. CONTROL PANEL: Refer to the control panel description.
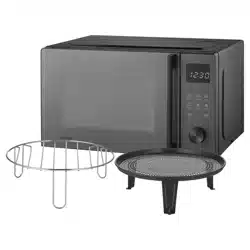
• 5. AIR FRY BASKET: Use the air fry basket for optimizing your cooking results during air frying, grilling, or drying . It is recommended to place it
on the air fry baking pan.
• 6. AIR FRY BAKING PAN: Used for baking or roasting separately; use it together with the air fry basket during air frying , grilling, or drying.
CONTROL PANEL: ICONS
• AIR FRY: Temperature range from 100°C to 230°C , temperature adjustment in 10°C
increments. Select this function to air fry according to your desired time and temperature.
After setting, the AIR FRY icon will be displayed, and the program will beep 5 times on
completion.
• MICROWAVE: There are 5 power levels for microwaving, P10 (Low), P30 (Medium- Low),
PS0 (Medium), P70 (Medium-High), and P100 (High). Choose this function to adjust power
and time as needed. After setting, the MICROWAVE icon and the program will beep 5 times
upon completion.
• GRILL: Temperature range from 100°C to 200°C , temperature adjustment in 10°C
increments. Choose this function to adjust time and temperature for grilling.
After the grill icon will be displayed, and the program will beep 5 times upon completion.
• AIR FRY PRESET: Preset menus range from AF01 to AF12.
• AF01-AF09 show an air fry icon, while AF10-AF12 show a grill icon.
• COMBINATION COOKING: Combines microwave and air frying cooking settings.
• Refer to the microwave and air fry combination cooking function for details.
• AUTO MENU: Menu options range from A01 to A 10. Select this function to rotate the auto
menu or rotate the weight knob. The corresponding icons will remain lit.
• MULTI-STAGE COOKING: Automatically switches between various functions in the order
you select. Refer to the multi-stage cooking function for details.
• EXPRESS COOKING: Quickly select and start your desired cooking.
• Refer to the express cooking function for details.
• TURNTABLE: When a menu function is started, the turntable will remain on.
• DEFROST: Defrost by time or weight as needed. After setting, the DEFROST icon will be
displayed.
• PREHEAT: Preheat function time cannot be adjusted. After selecting this function, the
circle icon will be displayed, and the program will beep 5 times upon completion.
• KEEP WARM: Keep warm function temperature cannot be adjusted. After selecting this
function, the grill icon will be displayed, and the program will beep 5 times upon completion.
• CLOCK: Displays time and power on.
• CHILD LOCK: Press and child lock icon lights up, indicating child lock is active. Press again and child lock turns off.
Air fry
Microwave
Grill
Defrost
Auto Menu
Child lock
Wi N/A
OPERATION
• PLACEMENT AND POWER CONNECTION
• Placement - Choose a level surface and leave a gap of at least 30 cm above this device, and maintain a distance of at least 10 cm between the
device and adjacent walls on all sides.
• NOTE:
• 1.Blockage of the air intake or exhaust outlet can cause damage to the device.
• 2. DO NOT place any objects on top of this device as the outer casing becomes hot during use.
• 3. Please do not install this product on or near heat sources such as stoves or other appliances that generate heat. Improper installation near or
above heat sources may result in damage to the device, and in such cases, it will not be covered by the warranty.
• REMOVE ALL PROTECTIVE FILMS from the exterior of the machine.
• NOTE:
• DO NOT remove the mica cover and waveguide board attached inside (g.1) as they play a key role in shielding and protecting against
uctuations.
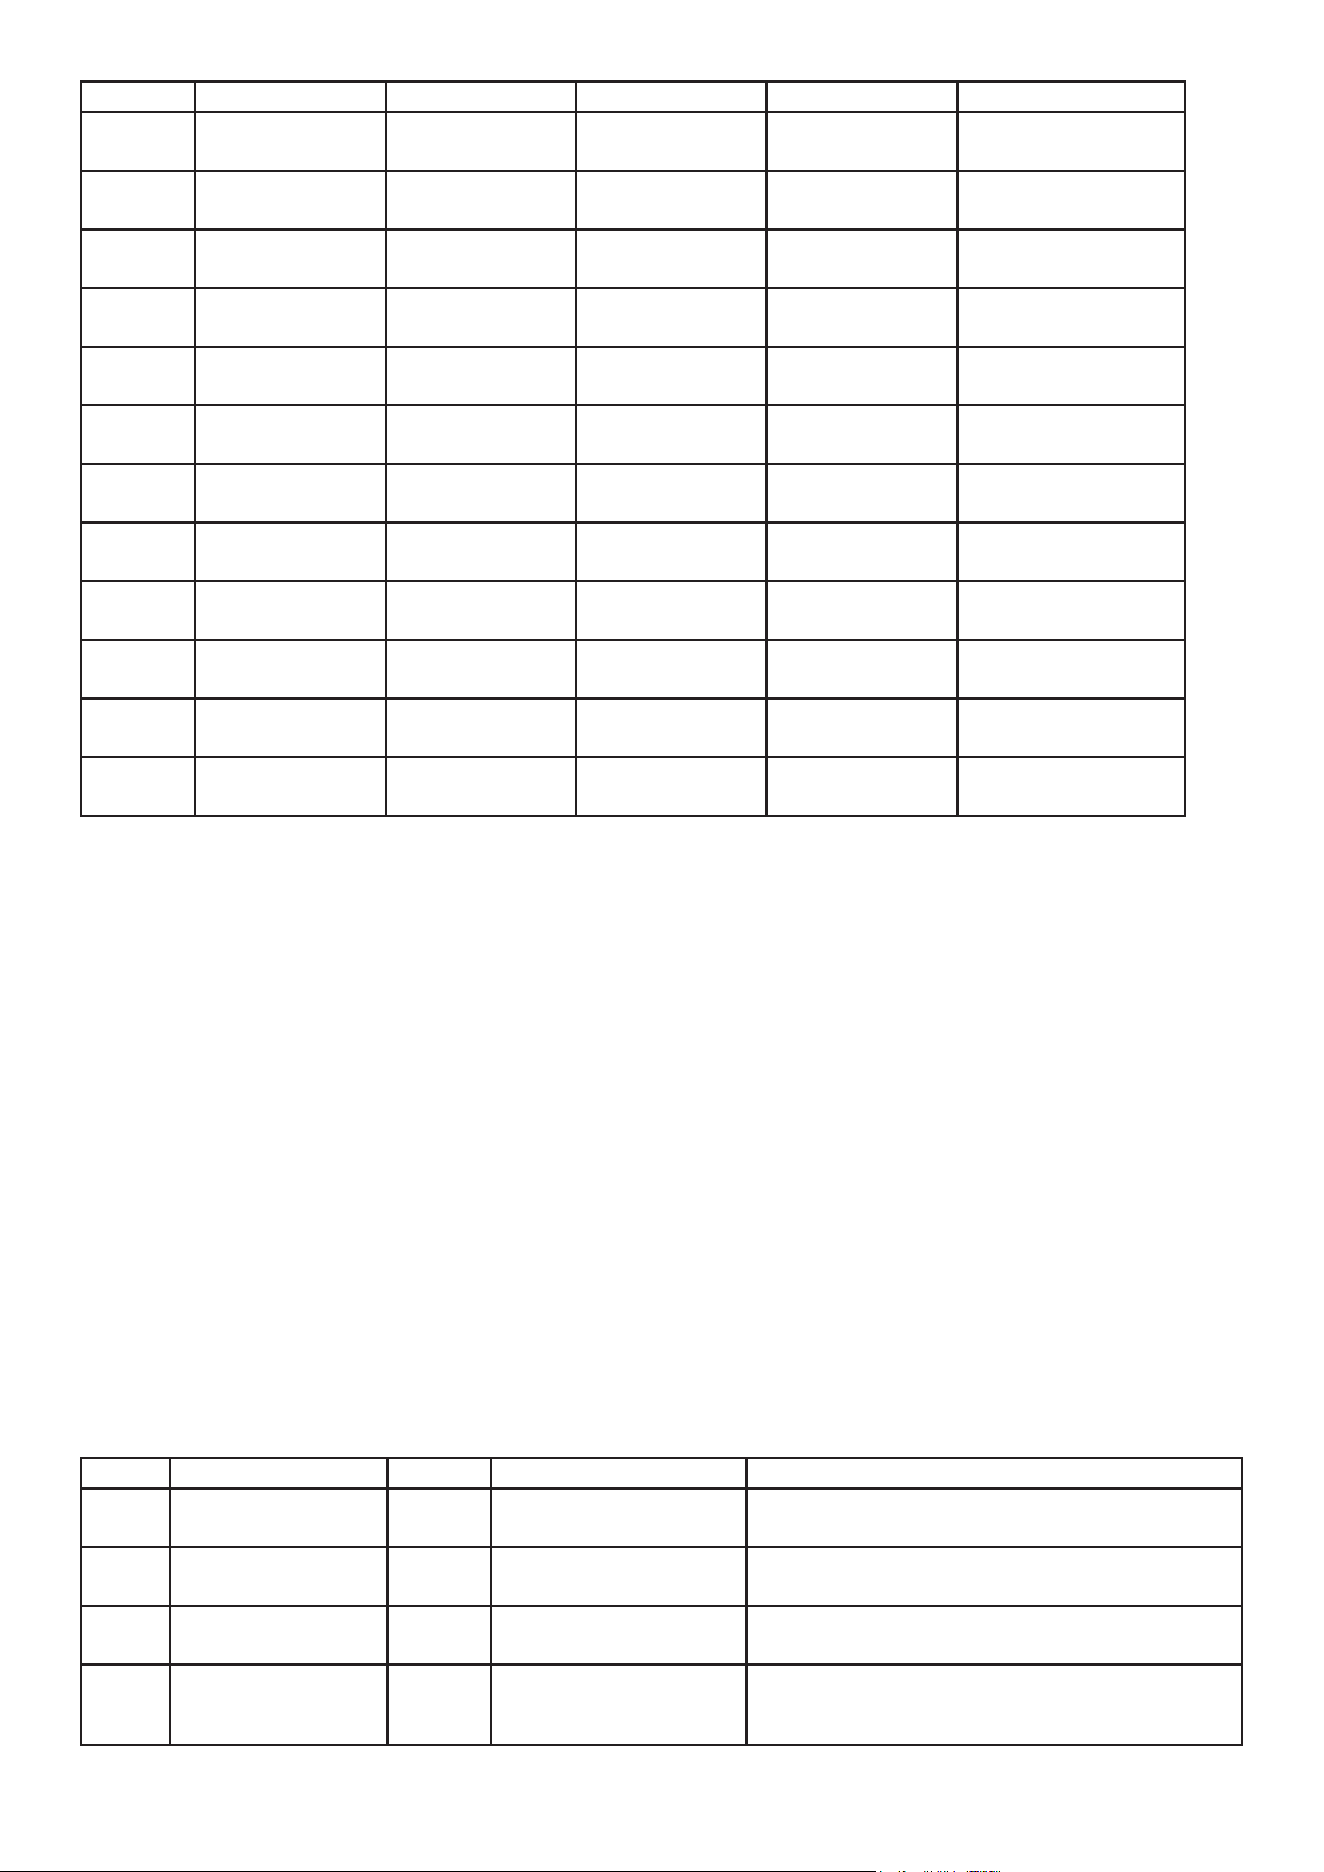
• Install the ring assembly on the bottom of the oven and centre the turntable on the turntable shaft (g.2).
• Then, place the glass tray inside the oven and carefully install the tray roller onto the turntable shaft.
• NOTE: Ensure that the turntable assembly remains in the correct position during use.
• DO NOT use the glass tray upside down. The tray must be properly connected to the turntable ring before operation. If the glass tray or turntable
ring assembly is broken, do not continue to use it and contact customer service immediately. Replacement must be carried out by the
manufacturer, their service department, or a qualied professional.
• Plug into mains supply.
• TIME SETTING
• (1) CLOCK SETTING:
• After initial power-up, the display will show “0:00” for 1 second, and the buzzer will sound once, then the product enters standby mode.
• (1) Press the “Clock/Timer” button; the hour digits will start ashing while the minute digits remain steady.
• (2) Rotate the knob to set the hour digits. When you select the hour digits with the knob, they will remain steady, and after pressing the button,
they will return to ashing. The range is 0-23. Rotating left decreases the hour, and rotating right increases it.
• (3) Press the “Clock/Timer” button again, and the minute digits will start ashing while the hour digits remain steady.
• (4) Rotate the knob to set the minute digits. When you select the minute digits with the knob, they will remain steady, and after pressing the
button, they will return to ashing. The range is 0-59. (5)Press the “Clock/Timer” button, and “:” will start ashing, indicating the clock setting is
complete.
• NOTE:
• 1.The clock is in a 24-hour format. If the clock is not set after power-up, it won’t count time (displaying “0:00”).
• 2.lf the clock is set but not conrmed by pressing the “Clock/Timer” button within 60 seconds of inactivity, the setting will be invalid, and the
display will return to the previous state.
• 3.The seconds indicator ”:” will ash in the clock display.
• 4. After adjusting the clock by rotating the knob, you can also press the knob to conrm the setting.
• 2) KITCHEN TIMER
• (1) Press the “Clock/Timer” button; the hour digits will start ashing while the minute digits remain steady. Without rotating the knob, press the
“Clock/Timer” button again, and the display will ash “00:00”.
• (2) Rotate the knob to set the timer, with a maximum setting of 95 minutes. Rotating left decreases the time, and rotating right increases it.
• (3) After setting, press the “Clock/Timer” button to conrm the timer, and the display will show the countdown of the set time.
• (4) When the kitchen timer reaches the set time, the buzzer will sound ve times, and it will return to standby mode. If a clock was previously set
(in 24-hour format), it will display the current time.
• NOTE:
• 1.The kitchen timer function is different from the clock function; the Kitchen Timer is a standalone timer with the “alarm clock” function.
• 2. While displaying “00:00,” if you rotate the knob and then press the “Clock/Timer” button again, it will return to the clock setting mode.
• 3. After rotating the knob, you can either press the “Clock/Timer” button or press the knob to conrm the setting.
• (3) AIR FRY
• (1) Press the “Air Fry “ button once; the display will ash and show the default temperature of 230°C . The Air Fry icon will light up.
• (2) You can continue pressing this button to select the air frying temperature or rotate the knob to choose the temperature.
• (3) Press the “Start/+30SEC.Conrm” button to conrm, and the display will remain steady.
• (4) You can now press the conrm button directly to start the operation, with a default working time of 10 minutes. Alternatively, you can rotate
the knob to adjust the air frying cooking time. The display will ash to show the entered time, with increments as mentioned in the note. The
maximum airfrying cooking time is 95 minutes.
• (5) Press the “Start/+30SEC.Conrm” button, and the buzzer will sound once, starting the cooking process. The display will show the remaining
cooking time, the Air Fry symbol will remain lit, and the seconds indicator “:” will ash.
fig.
1
fig.
2

• NOTE:
• 1.The time adjustment step size with the knob is as follows:
Time 0-1 min 1-5 min 5-10min 10-30 min 30-95 min
Adjust step 5 seconds 10 seconds 30seconds 1 minutes 5 minutes
• 2.The temperature can be adjusted within the range of 100°C to 230°C, in increments of 10°C .
• 4. MICROWAVE
• (1) Press the “Microwave” button; the display will ash and show “P100,” and the Microwave icon will light up.
• (2) You can continue pressing this button to select the microwave power or rotate the knob to choose the power level.
• (3) Press the “Start/+30SEC.Conrm” button to conrm, and the display will remain steady, showing the currently selected power level.
• (4) Rotate the knob to adjust the cooking time. The display will show the entered cooking time, with a range from 00:05 to 95:00, in increments as
mentioned in the airfry cooking time setting.
• (5) Press the “Start/+30SEC.Conrm” button, and the buzzer will sound once, starting the cooking process. The display will show the remaining
cooking time, the Microwave icon will remain lit, and the seconds indicator”:” will ash. There are ve microwave power levels, with a cycle of T
=30 seconds, as listed in the table below.
Microwave Display Code Recommended Use
Power
High P100 Heating liquid foods, cooking vegetables, meat, soup, and all frozen prepared foods
Medium-High P70 Cooking sh and poultry, as well as legumes, green beans, and dairy foods
Medium PSO Completing cooking for ingredients that have been previously cooked at high power, such as
soups, casserole dishes, etc.
Medium-Low P30 Defrosting food, cooking custards, melting butter and chocolate, etc.
Low P10 Softening ice cream, keeping warm, etc.
• In cooking mode (including microwave, grill, combination, defrost, automatic menus etc.), the seconds indicator”:” will ash.
When Using the Microwave for Cooking, please Note:
• (1) DO NOT cook eggs in their shells, as pressure can cause them to explode. First, break the eggs and pierce the yolk and egg white several
times with a toothpick.
• (2) Foods like dumplings and poached eggs that have already been cooked might splatter and cause burns if removed immediately due to the
internal liquid boiling. It’s advisable to wait a moment after opening the oven door before removing the food.
• (3) DO NOT set the cooking time too long when cooking food because insufcient cooking time can be adjusted, but excessive time cannot be
corrected.
• (4) The cooking time provided in the cooking recipes is approximate. Factors affecting cooking time include:
• individual taste preferences,
• the initial temperature of the food,
• its size and shape,
• the quantity,
• and the shape and size of the utensil used, as well as the arrangement, covering, and stirring of the food.
• 5. GRILL
• (1) Press the “Grill” button once; the display will ash and show the default temperature of 200°C , and the Grill icon will light up.
• (2) You can continue pressing this button to select the grilling temperature or rotate the knob to choose the temperature.
• (3) Press the “Start/+30SEC.Conrm” button to conrm, and the display will remain steady.
• (4) You can now press the conrm button directly to start the operation, with a default working time of 10 minutes. Alternatively, you can rotate
the knob to adjust the grilling cooking time. The display will ash to show the entered time, with a maximum grilling cooking time of 95 minutes
(with the same increments as microwave cooking time).
• (5) Press the “Start/+30SEC.Conrm” button, and the buzzer will sound once, starting the cooking process. The display will show the remaining
cooking time, the Grill symbol will remain lit, and the seconds indicator “:” will ash.
NOTE:
The temperature can be adjusted within the range of 100°C to 200°C, in increments of 10°C.
• 6. AIR FRY PRESETS
• (1) Press the “Air Fry Presets” button once; the display will ash and show the default menu AF01, and both the Air Fry icon and the Auto Menu
icon will light up.
• (2) You can continue pressing this button to select the air fry preset menu or rotate the knob to choose the menu.
• Press the “Start/+30SEC.Conrm” button, and the buzzer will sound once, starting the cooking process. The display will show the countdown to
show time remaining. The Airfry icon and Automatic Menu are on and ashing.
• (4) Due to differences in ingredients and personal preferences, after the air fryer preset menu is activated, you can make slight adjustments to the
cooking time based on individual needs and preferences.
• NOTE:
• 1.The preset menu can be adjusted within the range of AF01~AF12, with AF01 ~AF09 displaying the air frying icon, and AF1O~AF12 displaying
the barbecue icon.
• 2. See table below for reference:
.
• 7. COMBINATION COOKING
• (1 ) Press the “Combi.” button once; the rst three digits on the display will ash, showing “C-1.” Both the Microwave icon and the Grill icon will
light up.
• (2) Continue to press this key or rotate the knob to select the desired combination cooking.
• (3) Press the “Start/+30SEC.Conrm” button to conrm, and the display will remain steady, indicating the type of combination cooking.
• (4) Rotate the knob to adjust the cooking time. The display will ash to show the entered time, with a maximum combination cooking time of 95
minutes (with the same increments as airfry cooking time).
• (5) Press the “Start/+30SEC.Conrm” button, and the buzzer will sound once, starting the cooking process. The display will show the remaining
cooking time, with both the Microwave and Grill icons remaining lit and the seconds indicator “:” ashing.
• NOTE:
• The combination power levels are as follows, with a cycle of T =30 seconds:
Function Display Microwave Power Air Fry Power Cooking Guide
Combination 1 “C-1” 20/30 10/30 Suitable for cooking large or thick meats such as chicken,
roast beef, etc.
Combination 2 “C-2” 10/30 20/30 Suitable for cooking small or thin ingredients like chicken
wings, kebabs, sausages, etc.
• 8. AUTO MENU
• (1) Press the “Auto” button; the middle two digits 8 on the display will ash, showing “A01.” Both the Microwave icon and the Auto Menu icon
will light up.
• (2) Rotate the knob to select the desired auto menu or continue pressing the “Auto” button to choose. Once selected, press the “Start/+30SEC.
Conrm” button to conrm, and the selected menu will remain steady on the display.
• (3) Rotate the knob again to select the weight, and the display will ash to show the selected weight in grams. The “g” symbol will remain lit.
• (4) After making the selections, press the “Start/+30SEC.Conrm” button. The buzzer will sound once, and the auto menu will start. The Auto
Menu icon will remain lit, and the countdown of the remaining work time will be displayed. The seconds indicator “:” will ash.
•
CONTROL PANEL
Code Menu Food weight Program Accessory Remark
AF01 French fries
(3/8inch)
300g 200°C not
preheat
Mesh basket + grill
plate
Food initial temperature:
frozen (around -18° C)
AF02 French fries
(1/8inch)
300g 200°C not
preheat
Mesh basket + grill
plate
Food initial temperature:
frozen (around -18° C)
AF03 Chicken nuggets 300g
200°C not
preheat
Mesh basket + grill
plate
Food initial temperature:
frozen (around -18° C)
AF04 Chicken wing 400g
200°C not
preheat
Mesh basket + grill
plate
Food initial temperature:
frozen (around -18° C)
AF05 Chicken steak 200g
200°C not
preheat
Mesh basket + grill
plate
Food initial temperature:
frozen (around -18° C)
AF06 Chicken rice 250g
200°C not
preheat
Mesh basket + grill
plate
Food initial temperature:
frozen (around -18° C)
AF07 Onion ring 200g
200°C not
preheat
Mesh basket + grill
plate
Food initial temperature:
frozen (around -18° C)
AF08 Potato pie 250g
200°C not
preheat
Mesh basket + grill
plate
Food initial temperature:
frozen (around -18° C)
AF09 Sausage 400g
200°C not
preheat
Mesh basket + grill
plate
Food initial temperature:
room temp
AF10 Bacon 4pcs
180°C not
preheat
Mesh basket + grill
plate
Food initial temperature:
room temp
AF11 Toast 4pcs
200°C not
preheat
Mesh basket
Food initial temperature:
room temp
AF12 Cake 500g
160°C need
preheat
8 inch cake tool
Food initial temperature:
room temp
Code Menu Weight Kitchen ware Remarks
A01 Popcorn 100g 1. Microwave special bagged popcorn
2. Food at room temperature
A02 beverage mug 1. 240ml/cup
2. Food at room temperature
A03 Potato 1. Potato: 220-240g
2. Food at room temperature
A04 Reheat dinner 250g
350g
450g
Microwave suitable
dish
1. Dish diameter 20cm approx
2. Food at room temperature
3. When heating it needs to be covered

• 9. MULTI-STAGE COOKING
• You can input up to 3 stages of cooking, or you can set just 2 stages. The setup process is the same as for the corresponding single-stage
cooking, except that after setting the time (or weight), do not press the knob to conrm the start.
• Instead, press the function key for one of the stages to set it, and the corresponding cooking indicator will light up. You can only set one defrost
• program, which can be in the second or third stage if you have one. However, the program will automatically be placed in the rst stage. Except
for defrosting, all other functions can be set repeatedly, such as setting all 3 stages to microwave.
• After each stage of cooking nishes, the buzzer will sound, and the next stage will begin.
• NOTE:
• 1. Only Microwave, Air Fry, Grill, and Defrost can be used for multi-stage cooking.
• 2. Auto Menu, Air Fry Presets, Preheat, Combination, and Keep Warm cannot be used as a stage in multi-stage cooking.
• 3. During multi-stage cooking, if one of the three stages is a cooking program other than defrost, you can adjust the time during operation.
• 10. QUICK COOKING
• (1) In standby mode, press the “Start/+30SEC.Conrm” button once to start cooking immediately with 30 seconds at 100% microwave power. The
• Microwave icon will remain lit. Each press adds 30 seconds of cooking time, with a maximum setting of 95 minutes.
• (2) For Microwave, Grill, Air Fry, Keep Warm, Combination Cooking, and Defrost, you can press the “Start/+30SEC.Conrm II button to add cooking
time during the cooking process. You can also change the time by rotating the knob and press the Conrm button for quick conrmation, or wait
for 3 seconds for automatic conrmation.
• (3) In standby mode, you can directly left-rotate the knob to select quick cooking time. The display will show the selected time, and the rst left
rotation selects the Quick Cook function. It will ash and show the default time of 00:30. You can press the Conrm button directly to start or
rotate the knob to select the cooking time (in the same increments as Air Fry settings). Once selected, press the “Start/+30SEC.Conrm” button,
and cooking will begin at 100% microwave power.
• In standby mode, you can directly turn the knob to the right to quickly enter the automatic menu selection. The display screen ashes A01, and
the auto menu icon and microwave icon light up. Please refer to the Automatic Menu table for specic operations.
• 1. During the automatic menu, air frying preset, and Defrost by weight cooking process, the “Start/+30SEC. Conrm” key cannot be pressed to
increase cooking time, nor can the working time be adjusted by rotating the knob.
• 2. In standby mode, the rst left turn of the knob selects the “Quick Cooking Function”, and subsequent left or right turns can select the time for
quick cooking. If the rst right turn of the knob is in standby mode, it selects the “Automatic Menu Cooking Function”, and then left or right turns
can select the type of automatic cooking menu.
• 11. DEFROST
• (1) WEIGHT DEFROST
• (1) Press the “Defrost” button once; the display will ash and show “DEF1.”
• Both the Microwave icon and the Defrost icon will light up.
• (2) Rotate the knob to select the desired weight defrost menu (DEF1 - DEF3) or keep pressing the “Defrost” button to choose. Once selected,
press the “Start/+30SEC.Conrm” button to conrm, and the selected menu will remain steady on the display.
• (3) Rotate the knob to adjust the defrost weight, and the weight icon “g” will remain lit. The weight can range from 100g to 2000g.
• (4) Press the “Start/+30SEC.Conrm” button, and the buzzer will sound once. The defrost process will begin, with both the Microwave and Defrost
symbols remaining lit. The weight icon “g” will turn off, and the countdown of the remaining work time will be displayed.
• NOTE:
• 1. Defrost parameters are shown in the table.
• 2. dEF1 ~ dEF3 are for Weight Defrost, and dEF4 is for Time Defrost.
• 3. During Weight Defrost, you cannot change the working time with the knob.
• 4. When half of the time has passed during Weight Defrost or Time Defrost, the buzzer will sound 3 times to indicate that you should ip the food.
Food Code Weight Cooking guide
Meat dEF1 100-2000g Place the meat on a at ceramic plate and be aware of thin areas to prevent
excessive thawing. Follow the voice prompts to ip the meat half way through the
thawing process.
A05 Fresh vegetables 200g
300g
400g
500g
Covered microwavable dish 1. Container volume: 1.0-1.5L
2. Food at room temperature
3. Add 1 tbsp water to every 100g of vegetables
A06 Frozen vegetables 200g
300g
400g
500g
Covered microwavable dish 1. Container volume 1.0-1.5L
2. Frozen around -18°C
A07 Soup Microwavable small bowl 1. 200g/bowl
2. Initial temperature of food: refrigerated 5°C
3. Small bowl, about 11cm in diameter
A08 Fish 150g
300g
450g
600g
Covered microwavable dish 1. Food at room temperature
2. Diameter of vessel 0-22cm
3. Cover whilst heating
A09 Meat 150g
300g
450g
600g
Covered microwavable dish 1. Food at room temperature
2. Diameter of vessel 0-22cm
3. Cover whilst heating
A10 Pasta 50g
100g
150g
Microwavable bowls with
lids or wide mouthed deep
containers
1. Food at room temperature
2. Containers: diameter 18-20cm, height 10-15cm
3. Food to water ratio 1:8-10
4. Add 5g of salt whilst heating

Fish dEF1 100-2000g Place the sh on a at pottery thief plate, place the thinner or thinner part under the thicker part,
and thaw until half a time. Follow the voice prompts to ip the sh.
Poultry dEF3 100-2000g Place the food on a at ceramic plate, with the block shaped chicken skin facing down and the
entire chicken breast facing down. Thaw until half a time. Follow the voice prompts to ip over to
other the side.
• (2) TIME DEFROST
• (1) Press the “Defrost” button once; the display will ash and show “dEF1.” Both the Microwave icon and the Defrost icon will light up.
• (2) Rotate the knob to select the desired time defrost menu (dEF4) or keep pressing the “Defrost” button to choose. Once selected, press the
“Start/+ 30SEC.Conrm” button to conrm, and the selected menu will remain steady on the display.
• (3) Rotate the knob to input the defrost time, with a maximum setting of 95 minutes, in the same increments as Air Fry cooking time.
• (4) Press the “Start/+30SEC.Conrm” button, and the buzzer will sound once.
• The defrost process will begin, with both the Microwave and Defrost icons remaining lit.
• NOTE:
• 1.Time Defrost operates at P30 and cannot have its power level adjusted.
• 2.The working time can be changed through the knob during the time defrost.
• 12. PREHEAT FUNCTION
• (1 ) Press the “Preheat” button once; the display will ash and show the default temperature of 230°C . At the same time, the Air Fry icon will light
• up, indicating preheating for the Air Fry function.
• (2) If you continue to press this button or rotate the knob, the display will ash and show the default temperature of 200°C . At this point, the Grill
symbol will light up, indicating preheating for the Grill function. You can switch between Air Fry and Grill preheating by continuously pressing this
button or rotating the knob.
• (3) After switching to the desired preheating function, press the “Start/+30SEC” conrm button once, and the buzzer will sound once, indicating
successful selection.
• (4) You can now rotate the knob to select the desired preheat temperature. For Air Fry preheat, the temperature can be adjusted from 100°C to
230°C in 10°C increments. For Grill preheat, the temperature can be adjusted from 100°C to 200°C in 10°C increments.
• (5) After selecting the desired preheat temperature, press the “Start/+30SEC” conrm button. The buzzer will sound, and the cooking will start.
The display will ash and show the selected temperature without displaying the time. The Air Fry icon or Grill icon will remain lit.
• (6) When the cavity temperature reaches the set temperature, heating stops, and the buzzer will sound three times, prompting the user to put in
the food and set the working time. You can use the knob to set the working time. The time range and step size are the same as for Air Fry cooking
time. If you don’t set the time and press the “Start/+30SEC.Conrm” button, the button press will be invalid, and the buzzer will sound twice to
remind you to set the time.
• (7) After setting the time, press the “Start/+30SEC.Conrm” button again, and the buzzer will sound. The work will restart, and the display will
count down the remaining cooking time. The seconds indicator “:” will ash. You can use the knob to adjust the working time.
• NOTE:
• 1.During preheating, if the set preheat temperature is not reached within 15 minutes, heating will stop, assuming that the desired temperature has
been reached.
• 2. For menus with preheat functions, if the cavity temperature is higher than the set temperature when starting, “Cool” will be displayed for 5
seconds to indicate cooling, and the microwave will return to standby mode with three buzzer sounds.
• (13) KEEP WARM FUNCTION
• (1) Press the “Keep Warm” button once; the display will ash and show the default temperature of 60°C . At the same time, the Grill icon will
light up.
• (2) Press the “Start/+30SEC.Conrm” button to conrm, and the display will light up.
• (3) At this point, you can either press the Conrm button directly to start with the default working time of 60 minutes or rotate the knob to adjust
the keep Warm cooking time. The display will ash to show the entered time. The maximum setting for Keep Warm cooking time is 95 minutes, in
the same increments as Air Fry cooking time.
• (4) Press the “Start/+30SEC.Conrm” button again, and the buzzer will sound once. The cooking will start, and the display will count down the
remaining cooking time. The Grill icon will remain lit. The seconds indicator “:” will ash.
• NOTE:
• Keep Warm function temperature cannot be adjusted; only the time can be adjusted, with a xed temperature of 60°C .
• 14. QUERY FUNCTION
• During operation, you can query the clock and power.
• (1) Clock Query:
• If you have set the clock previously and are in the cooking or Kitchen Timer mode, press the “Clock” button to query time. The display will show
the current clock for 3 seconds and then return.
• (2) POWER QUERY:
• During menu cooking, press the corresponding menu button to query the power, set temperature, auto menu type, or combination menu type.
The display will show the queried content for 3 seconds and then return.
• 15. CHILD LOCK
• To lock: Press and hold the “Lock/Buz on/off” button for 3 seconds; the Child Lock icon will light up, indicating that Child Lock mode is active.
• To unlock: While in locked mode, press and hold the “Lock/Buz on/off” button for 3 seconds; the Child Lock symbol “ 8 “w ill turn off, indicating
that it is unlocked.
• NOTE:
• 1. When locked, all buttons and knobs except for the Child Lock function will be disabled.
• 2. Operations can only be performed when no error codes are displayed.

ERROR CODES
TROUBLESHOOTING
Issue Cause Solution
No power Not connected to mains Connect to mains supply
Filter board failure Contact Dellonda service
Microwave Door not fully closed 1. Check if food or foreign objects are holding door open
does not work 2. Ensure sealing surface is clean.
3. Check if door seal is twisted. Press the start button.
Heating time is too long Microwave power setting Choose higher power setting
is too long
Placing more food than normal
in the appliance
The light is not working Lamp has failed Contact Dellonda
Door glass has broken Replace glass Contact Dellonda
Door glass has broken Cold objects placed on hot glass Contact Dellonda
No time display or Current time not set Set time, refer to manual
incorrect time
Placing food in appliance during Add food after preheating
Preheat
Food burnt or uneven Temperature set too high Check the temperature setting and use correct temperature
cooking or too much food in appliance
MAINTENANCE
• WARNING! Disconnect from mains supply before performing maintenance.
• Before cleaning any part of this product, unplug the power cord and let the machine cool down. Regularly clean the machine to prevent grease
build up, which can cause the cavity to catch re or produce odours, and to prevent corrosion from dirt.
• DO NOT use abrasive cleaning agents or cleaning items with metal materials to clean the cavity and door.
• 1. CLEANING THE INTERIOR OF THE APPLIANCE
• (1) Periodically wipe the interior of the appliance with a solution of baking soda and water to keep it clean.
• (2) Use a foamy cloth to remove greasy splatters and then wipe with a damp cloth.
• DO NOT use sharp cleaning tools (such as scouring pads or spatulas) to clean the appliance.
• (3) After closing the door, use a soft cloth dipped in mild, non-abrasive soap or detergent to clean the junction between the door and the
appliance. Then, wipe with a damp cloth.
• (4) To remove stubborn stains, mix 1 cup of water with 2 tablespoons of lemon juice or baking soda, pour it into a cup, place it in the appliance,
and heat it until it boils. Let it stand inside the cavity for 5 minutes to allow the softened cooking residue to evaporate. Then, use a clean paper
towel, a damp clean cloth, or a damp microber cloth to wipe the inside of the cavity to remove softened cooking residue.
• 2. CLEANING THE EXTERIOR OF THE APPLIANCE
• (1) Keep the seal between the door and the appliance clean at all times.
• (2) Use a soft cloth with soapy water to clean the outer shell of the product and wipe it clean with a soft dr y cloth, avoiding water from entering
the cavity.
• DO NOT use cleaning sprays, excessive cleaning agents and water, abrasive tools, or sharp objects as these may damage the appliance.
• Note that certain tissues may also scratch the control panel, so use caution.
• 3. CLEANING ACCESSORIES
• (1) After the appliance has cooled down, wash the accessories by hand in hot soapy water or use a nylon scrubber or nylon brush, then rinse
thoroughly. Do not wash these accessories in a dishwasher.
• (2) For food residues that are difcult to remove or baked-on grease, soak the accessories in hot soapy water or use other non-corrosive cleaning
agents.
Error code Cause Product logic Solution
E1 Abnormal operation of hot
air motor
Beep 3 times, work or setting
is cancelled, heating is
stopped and other buttons
and knobs are not operable
except for the cancel button
1. Press the cancel button and it will return to standby mode
2. Automatically return to standby mode after 2.30 seconds
3. If E1 is still displayed after repeated restarts, it is necessary to
contact Dellonda service
E2 Sensor short circuit 1 beep, work or settings are
cancelled, stops heating, all
controls are inoperable
1. Check if the temperature of the product is too high or too low.
2. Turn off the mains power and turn it back on again after 1
minute to check if the error code is still displayed.
3. Contact Dellonda.
E3 Sensor open circuit

• NOTE:
• 1. lf the appliance is not used for an extended period, unplug the power plug and dry any water or dirt that may remain on various parts of the
appliance to prevent rust.
• 2. Any other maintenance work should be performed by the customer service department.
END OF LIFE
• Separate the individual parts of the product. Recycle as per local regulations in force.
Environment Protection and Waste Protection and Electrical Equipment Regulations (WEEE)
Recycle unwanted packaging materials. When this product is no longer required, or has reached the end of it’s useful life, please dispose of it in
an environmentally friendly way. Drain any fluids (if applicable) into approved containers, in accordance with local waste regulations. Under the
Waste Batteries and Accumulators Regulations 2009, Dellonda would like to inform the user that this product contains one or more batteries. It
is our policy to continually improve products and we reserve the right to alter data, specifications and parts without prior notice. No liability is
accepted for incorrect use of this product. Guarantee is 12 months from purchase date, proof of which is required for any claim.
Dellonda
Sealey Group, Kempson Way, Suolk Business Park, Bury St Edmunds, IP32 7AR
www.dellonda.co.uk