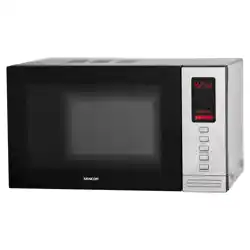

SMW 6025BK
EN
MICROWAVE OVEN WITH GRILL
AND AIR FRYER FUNCTION
Translation of the original manual
SMW 6025BK
A
1
2
3
4
5
10
6
7
13
12
11
9
8
B
1
2
5
8
4
6
9
10
3
7
C
6
5
1 2 3 4
7
8
9
10

- 1 -
07/2025
2025, .
EN
Microwave Oven withGrill and Air Fryer
Function
User Manual
IMPORTANT SAFETY INSTRUCTIONS
READ CAREFULLY AND STORE FOR FUTURE USE.
• This appliance may be only used by children aged
8years and older and by persons with physical, sensory
or mental impairments or lack of experience and
knowledge, if they are supervised or have been instructed
on the safe use of the appliance and understand the
potential hazards.
• Children must not play with the appliance.
• Cleaning and maintenance must not be performed by
unsupervised children.
• If the power cord is damaged, have it replaced in
aprofessional service centre in order to prevent
adangerous situation. Never use the appliance if the
power cord is damaged.
• This appliance is not designed to be controlled using an
external timer switch or aremote control.
WARNING:
If the door or door seals are damaged, the oven
must not be operated until it has been repaired by
aqualified person.

- 2 -
07/2025
2025, .
WARNING:
It is dangerous for anybody other than aqualified
person to carry out any repairs or maintenance
whatsoever that leads to the removal of any cover
providing protection from microwave energy
radiation.
WARNING:
Liquids and other foods must not be heated in
sealed containers as they are liable to explode.
• This appliance is intended for household use. It is also
suitable for personal non-commercial use in spaces such
as:
– kitchenettes in shops, offices and other work
environments;
– agricultural premises;
– hotels, motels and other residential environments;
– bed and breakfast establishments.
• To ensure adequate air circulation, there must be free
space around the microwave oven. Leave at least 20cm
of free space above the upper surface of the oven and
10 cm behind its rear part and sides. Do not block any
openings of the oven.
• The recommended distance from the floor is at least
85cm.
• Do not remove the feet of the oven.
• Use only containers that are suitable for use in microwave
ovens.
- 3 -
07/2025
2025, .
• Metal containers for food andbeverages are not allowed
for microwave or combination cooking (microwave + grill
or microwave and hot air). This does not apply if
the
manufacturer specifies the size andshape of metal
containers suitable for microwave or combination cooking.
• When heating food in plastic or paper containers, check
the oven occasionally to prevent ignition.
• The grill rack supplied with the microwave may only
be used for the grill mode. Do not use it in microwave or
combination cooking mode.
CAUTION:
The baking rack supplied with the microwave may
only be used for the hot air fryer or grill mode. Do
not use it in microwave or combination cooking
mode (microwave andgrill or microwave andhot air).
• Only use the grill andbaking rack with the microwave with
which they are supplied. Do not use them withother types
of microwave ovens.
• Inthe modes of hot air fryer, grilling andcombination
cooking (microwave andgrill or microwave andhot air) do
not use plastic utensils. This may damage the appliance.
• The microwave oven is designed for heating food and
beverages. Drying food or clothing and heating of warming
pads, slippers, sponges, damp textiles and similar items
may lead to risk of injury, ignition or fire.
• If you observe smoke, turn off the appliance or unplug it
and keep the door closed to prevent spreading of possible
fire.

- 4 -
07/2025
2025, .
• Microwave heating of beverages can cause delayed
boiling, which must be taken into account when handling
the container. Be careful when handling the container.
• The contents of feeding bottles and baby food must be
stirred or shaken and the temperature must be checked
before consumption to prevent burns.
• Eggs in shells and whole hard-boiled eggs should not be
heated in microwave ovens as they may explode even
after the microwave heating has ended.
• Regularly clean the door and window of the oven on both
sides, door seals and adjacent parts from dirt and any
food residues. For cleaning, we recommend using amild
solution of neutral kitchen detergent. Remove solution
residue with acloth slightly dampened in clean water.
Wipe the cleaned surface dry with acloth.
• Ensure that no cleaning agent residue remains on the
inner side of the door. Follow the instructions in the
“CLEANING AND MAINTENANCE” section.
• Keep the microwave oven clean. Clean it regularly
according to the instructions in the “CLEANING AND
MAINTENANCE” section and remove any food residues.
• Clean the turntable andgrill or baking grate that may
come into contact withfood according to the instructions in
the “CLEANING AND MAINTENANCE” section.
• Failure to keep the oven clean could lead to surface
damage, which could adversely affect the lifetime of the
appliance and could lead to adangerous situation. Use
only accessories supplied with the microwave oven or
recommended by the manufacturer.
- 5 -
07/2025
2025, .
• This microwave oven is designed as free-standing and
must be placed on aclean, level and stable work surface
that can support the weight of the microwave oven. It
must not be attached or used as abuilt-in appliance. The
microwave oven must not be placed in acabinet.
• The microwave oven must not be cleaned with asteam
cleaner.
CAUTION: Hot surface.
Accessible surfaces can become hot during use. Do
not touch the hot surface.
. . . . . . . . . . . . . . . . . . . . . . . . . . . . . . . . . . . . . . . . . . . . . . . . . . . . . . . . . . . . . . . . . . . . . . . . . . . . . . . . . . . . . . . . . . . . . . . . . . . . . . . . . . . . . . . . . . . . . . . . . . . . . . . . . . . . . . . . . . . .
Additional Important Safety Instructions forUse of the Appliance
• Before connecting the appliance to apower socket, make sure the voltage stated on the label matches the electrical voltage in the socket. Connect
the microwave oven only to aproperly grounded power socket. Do not use extension cords, multi-socket adapters or adapters.
• Before using the appliance, fully unwind the power cord.
• Do not touch the power cord or plug with wet or damp hands.
• Route the power cord so that it does not touch sharp objects, hot surfaces, open flames, does not hang over the edge of atable or work surface, etc.
• The microwave oven is intended for use only inside abuilding. Do not use it outdoors or expose it to outdoor environmental influences.
• Do not place the microwave oven on window sills, kitchen sink draining board or unstable surfaces. Always place it on astable, flat and dry surface.
• Do not place any objects on the top cover of the microwave oven.
• This microwave oven is intended for heating and preparing food. Use it only for purposes described in this manual.
• The microwave oven must be supervised during operation. Check the condition of the food inside the microwave regularly.
• Never use the microwave oven in the immediate vicinity of abath, shower or swimming pool.
• Do not use the microwave oven for industrial or laboratory purposes.
• Do not attempt to use the microwave oven with the door open. You could expose yourself to harmful microwave radiation.
• Do not run the microwave oven when it is empty. Otherwise, overloading and damage to the microwave oven could occur.
• Food should never be heated by placing it directly on the turntable. Exercise increased caution when handling heated beverages and food, as hot
steam may be released.
• Neither the containers nor the food must touch the inner walls or the rear heating spiral.
• Do not fry food in the microwave oven. Hot oil can damage parts of the oven, cookware, or even cause skin burns.
• Before cooking, pierce foods with thick skins, such as potatoes, squash, apples. Do not prepare shellfish or crustaceans in the microwave oven.
• Do not cut food on the baking grate. Sharp or metallic objects could damage the non-stick surface of the baking grate.
• Before moving the oven, always make sure that there are no containers with food in the interior cavity.
• Do not use the microwave oven without aproperly inserted turntable and roller ring.
• During operation, some parts of the microwave oven may heat up. Do not touch heated surfaces.
• The quartz grill heating unit andthe rear heating spiral contain residual heat after use. Do not touch the hot surface. This could cause burns.
• Food andcontainers must be placed in the microwave so that they do not touch the inner walls or the heating spiral.
• Use kitchen mitts to remove the heated containers from themicrowave oven.
• When not using the oven, do not leave paper materials, cookware or food inside.
• If you will not be using the microwave oven for an extended period, need to move it, store or clean it, first disconnect the power cord plug from the
power socket.
• Disconnect the power cord by pulling on the plug, not the power cord. Otherwise, damage to the power cord, microwave oven or power socket could
occur.
• Do not use the microwave oven if it is not working properly, if it is damaged or if it has been dropped. Any repair of the microwave oven or
replacement of adamaged power cord may only be carried out by an authorised service centre to prevent ahazardous situation.
• The microwave oven does not contain any parts that the user could repair themselves.
• Do not use the microwave oven if the glass plate, tray, grill or baking grate is damaged. Damaged parts must be immediately replaced with new
original spare parts.

- 6 -
07/2025
2025, .
Cleaning the microwave oven
• Keep the interior of the oven clean. If the oven walls are spattered with food juices, wipe them with adamp cloth. If the oven is heavily soiled, you
may use amild solution of neutral kitchen detergent. Remove any solution residue with acloth dampened in clean water. Wipe the cleaned surface
dry.
• Insufficient cleaning and maintenance can cause damage to the surface finish of the interior walls, which can lead to ashortened lifespan of the
microwave oven. Dried food or liquids can cause unpleasant odours and the formation of unwanted microorganisms, which can have anegative
impact on human health.
• When cleaning the baking grate, do not use scourers, abrasive sponges or cleaning agents with an abrasive effect. This may damage the non-stick
coating.
. . . . . . . . . . . . . . . . . . . . . . . . . . . . . . . . . . . . . . . . . . . . . . . . . . . . . . . . . . . . . . . . . . . . . . . . . . . . . . . . . . . . . . . . . . . . . . . . . . . . . . . . . . . . . . . . . . . . . . . . . . . . . . . . . . . . . . . . . . . .
SUITABLE AND UN SUITABLE COOKWARE ACCORDING TO THE HEATING/COOKING MODE
Microwave heating mode
• Use only cookware expressly marked as suitable for use in amicrowave. Follow the manufacturer'sinstructions for that type of cookware.
• Cookware unsuitable for microwave mode:
– metal containers andcutlery;
– cookware withmetal decor or metal handles;
– metal clamps (e.g. for sealing plastic bags);
– common kitchen thermometers (unless specifically designed for microwaves);
– melamine cookware (not heat resistant andmay release harmful substances);
– cracked, worn out or damaged cookware.
• Metal cookware or cookware withametal trim can cause sparking when heated in the microwave. This can damage the microwave oven. Never use
metal containers, forks, knives, etc. Follow the instructions in this manual in the section “USING THE RIGHT COOKWARE”.
Grill mode
• Grilling does not use microwaves, so metal cookware can also be used. However, the heat resistance of the cookware should be taken into account
and refractory containers should be used. The supplied grill rack can be used in this mode.
• Not suitable for grill mode:
– plastic cookware (may melt or distort);
– melamine (not resistant to high temperatures);
– paper trays, packaging or other disposable paper containers, as they could ignite;
– materials that are not designed for direct contact withhigh temperatures.
Combined microwave + grill mode
• This mode combines microwave heating with grilling. It requires specially adapted cookware, that is:
– suitable for use in amicrowave andalso resistant to high temperatures.
• Not suitable for combination mode:
– metal cookware (microwaves may cause sparks anddamage the oven);
– plastic cookware (risk of melting);
– paper trays, packaging or other disposable paper containers, as they could ignite;
– melamine cookware (not suitable dueto microwaves and the temperature of the grill).
– In thecombined microwave andgrill mode, do not use the grill or baking grate supplied withthis microwave.
– Metal cookware or cookware with metal trim can cause sparking when heated in combination microwave and grill mode. This can damage
the microwave oven. Never use metal containers, forks, knives, etc. Follow the instructions in this manual in the section “USING THE RIGHT
COOKWARE”.
Hot Air Fryer Mode
• Hot air fryer mode does not use microwaves, so metal cookware can also be used. However, the heat resistance of the cookware should be taken
into account and refractory containers should be used. The supplied baking grate can be used in this mode. For the preparation of baked dishes, use
baking containers made ofquality ceramic or refractory glass.
• Not suitable for hot air fryer mode:
– plastic cookware (may melt or distort);
– melamine (not resistant to high temperatures);
– paper trays, packaging or other disposable paper containers, as they could ignite;
– materials that are not designed for direct contact withhigh temperatures.
Combined mode of microwaves andhot air
• This mode combines microwave heating with hot air. It requires specially adapted dishes that are suitable for microwave operation andat the same
time resistant to high temperatures. For the preparation of sweet desserts, use baking moulds made ofceramic, refractory glass or high-quality heat-
resistant silicone, which do not contain metal reinforcements or parts. For the preparation of baked dishes, use baking containers made ofquality
ceramic or refractory glass.
• Not suitable for combination mode:
– metal cookware (microwaves may cause sparks anddamage the oven);
– plastic cookware (risk of melting);
– paper trays, packaging or other disposable paper containers, as they could ignite;
– melamine cookware (not suitable dueto microwaves and the temperature of the grill).
• Metal cookware or cookware with metal trim can cause sparking when heated in combination microwave and hot air mode. This can damage the
microwave oven. Never use metal containers, forks, knives, or similar utensils.
• In the combined microwave andhot air mode, do not use the baking or grill grate supplied withthis microwave. When using the baking or grill grate
in thecombined mode, sparking could occur. This can damage the microwave oven.
• Follow the instructions inthis user'smanual under “USING THE RIGHT COOKWARE”.
- 7 -
07/2025
2025, .
. . . . . . . . . . . . . . . . . . . . . . . . . . . . . . . . . . . . . . . . . . . . . . . . . . . . . . . . . . . . . . . . . . . . . . . . . . . . . . . . . . . . . . . . . . . . . . . . . . . . . . . . . . . . . . . . . . . . . . . . . . . . . . . . . . . . . . . . . . . .
Sparking
• If sparking occurs inside the microwave oven, immediately stop the microwave oven and wait amoment before opening the door. Remove the dish
from the microwave oven. The dish may be hot, so put on oven mitts.
Delayed boiling
• During heating of liquids, delayed boiling may occur. This is aphysical phenomenon where the liquid reaches ahigher temperature than its boiling
point, which is usually accompanied by the formation of bubbles inside the liquid. The liquid heats up faster than bubbles form, and therefore
accumulated heat stays inside the liquid. Upon the slightest movement, the liquid may suddenly boil over or splatter, which can cause serious
scalding. Exercise increased caution to avoid scalding.
• You can prevent delayed boiling by not using containers with straight sides and narrow necks; stir the liquid before placing it in the microwave oven;
after completion of heating, let the liquid stand for awhile and carefully stir it before removing.
The microwave oven is aGroup 2 Class B device.
• Group 2 includes all ISM (Industrial, Scientific and Medical) equipment in which radio-frequency energy is intentionally generated and/or used in the
form of electromagnetic radiation for the treatment of material, and EDM (Electrical Discharge Machining) and arc welding equipment.
• Class B equipment is equipment suitable for use in households and in establishments directly connected to alow-voltage power supply network
which supplies buildings used for domestic purposes.
Prevention of household accidents
• Heated foods, hot or boiling liquids present ahigh risk for children, and even slight burns can be serious. Follow the basic rules for accident
prevention in the household and take extra care if children are near such foods or liquids, or explain to them the risks associated with heated foods
or liquids.
• If aburn or scald occurs, start rinsing the affected area with astream of cold water and seek medical help if necessary.
. . . . . . . . . . . . . . . . . . . . . . . . . . . . . . . . . . . . . . . . . . . . . . . . . . . . . . . . . . . . . . . . . . . . . . . . . . . . . . . . . . . . . . . . . . . . . . . . . . . . . . . . . . . . . . . . . . . . . . . . . . . . . . . . . . . . . . . . . . . .
EXPLANATION OF SYMBOLS AND TEXTS PLACED ON THE PRODUCT OR INTHE ACCOMPANYING
DOCUMENTATION
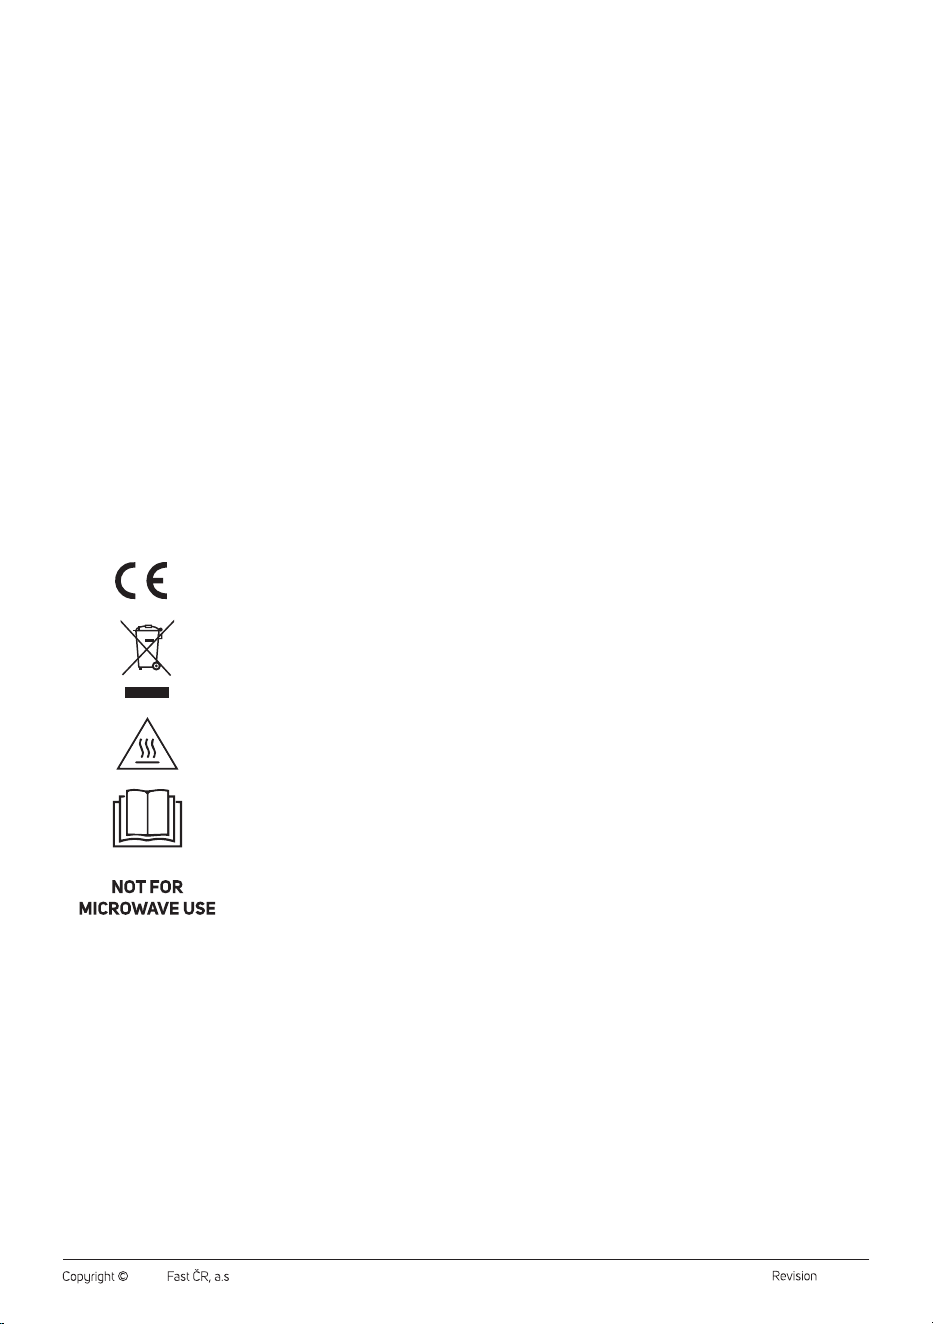
The product meets all the basic requirements of the applicable EU directives.
This symbol on products or original documents means that used electric or electronic products must not be added to
ordinary municipal waste.
This symbol warns of ahot surface.
Read the user manual.
This sign on the baking grate indicates that the grate is not intended for use inmicrowave or combination mode.
Combined mode means amode that combines microwave heating and grill or hot air.
. . . . . . . . . . . . . . . . . . . . . . . . . . . . . . . . . . . . . . . . . . . . . . . . . . . . . . . . . . . . . . . . . . . . . . . . . . . . . . . . . . . . . . . . . . . . . . . . . . . . . . . . . . . . . . . . . . . . . . . . . . . . . . . . . . . . . . . . . . . .
- 8 -
07/2025
2025, .
EN
Microwave Oven withGrill and Air Fryer
Function
User Manual
• Thank you for purchasing our SENCOR product; we hope it will serve
to your satisfaction.
• Prior to using this appliance, please read the user manual thoroughly,
even in cases when you are already familiar with the use of similar
types of appliances. Use the appliance only as described in this
user manual. Keep the manual for future reference. If you pass the
appliance on to another person, ensure that this user manual is
included.
• Carefully unpack the appliance and make sure not to discard any part
of the packaging material until you have removed all its components.
It is recommended to keep the original packaging, packing material,
receipt and confirmation of the extent of the seller'sliability or warranty
certificate at least for the duration of the legal right to file defect
claims or the quality warranty. When transporting the appliance,
we recommend repackaging it in the original box provided by the
manufacturer.
. . . . . . . . . . . . . . . . . . . . . . . . . . . . . . . . . . . . . . . . . . . . . . . . . . . . . . . . . . . . . . . . . . . .
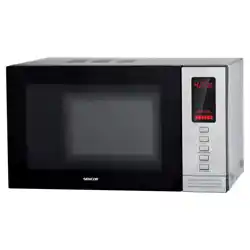
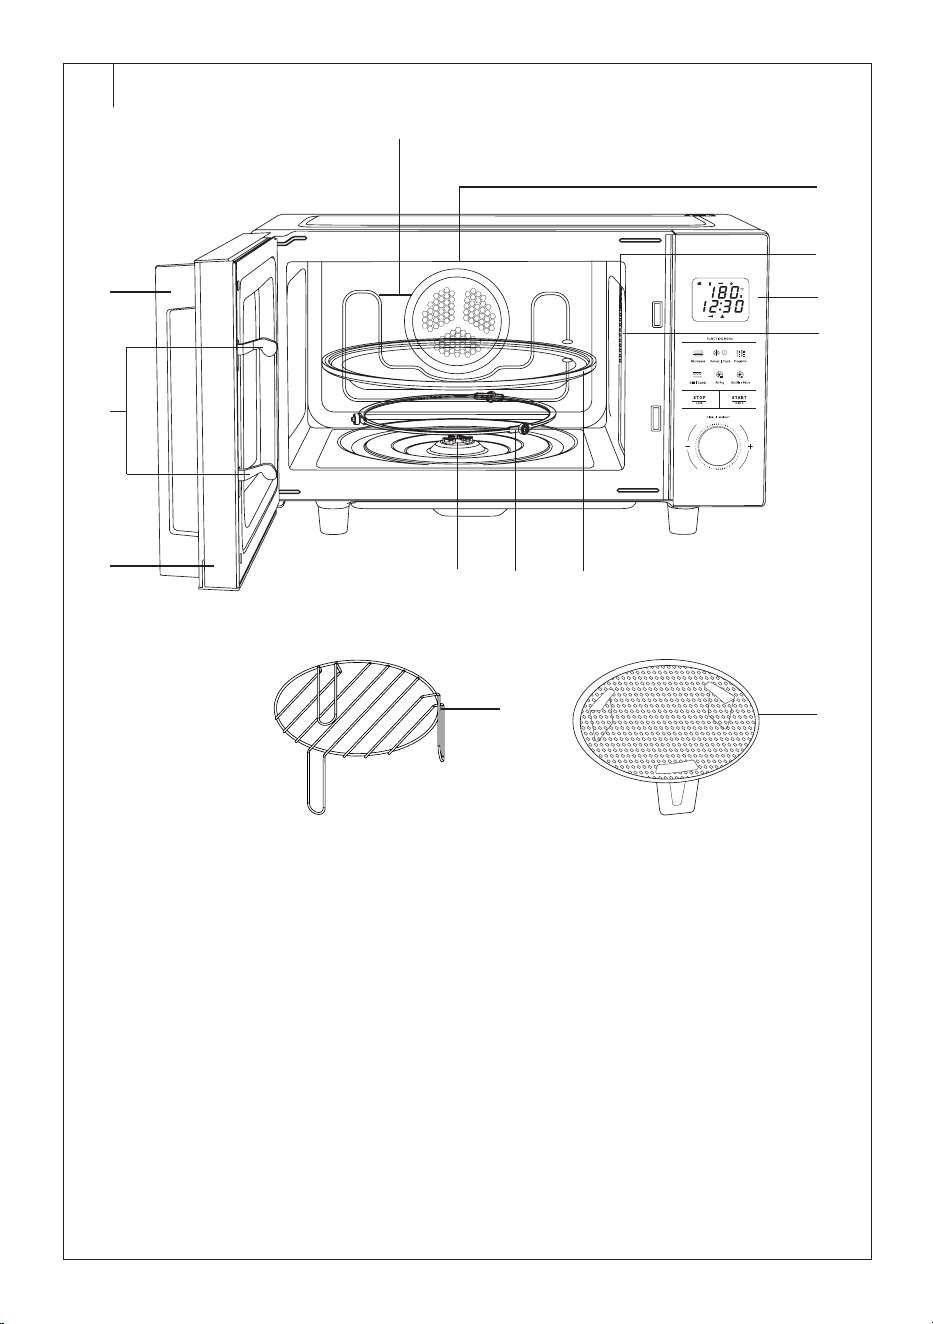
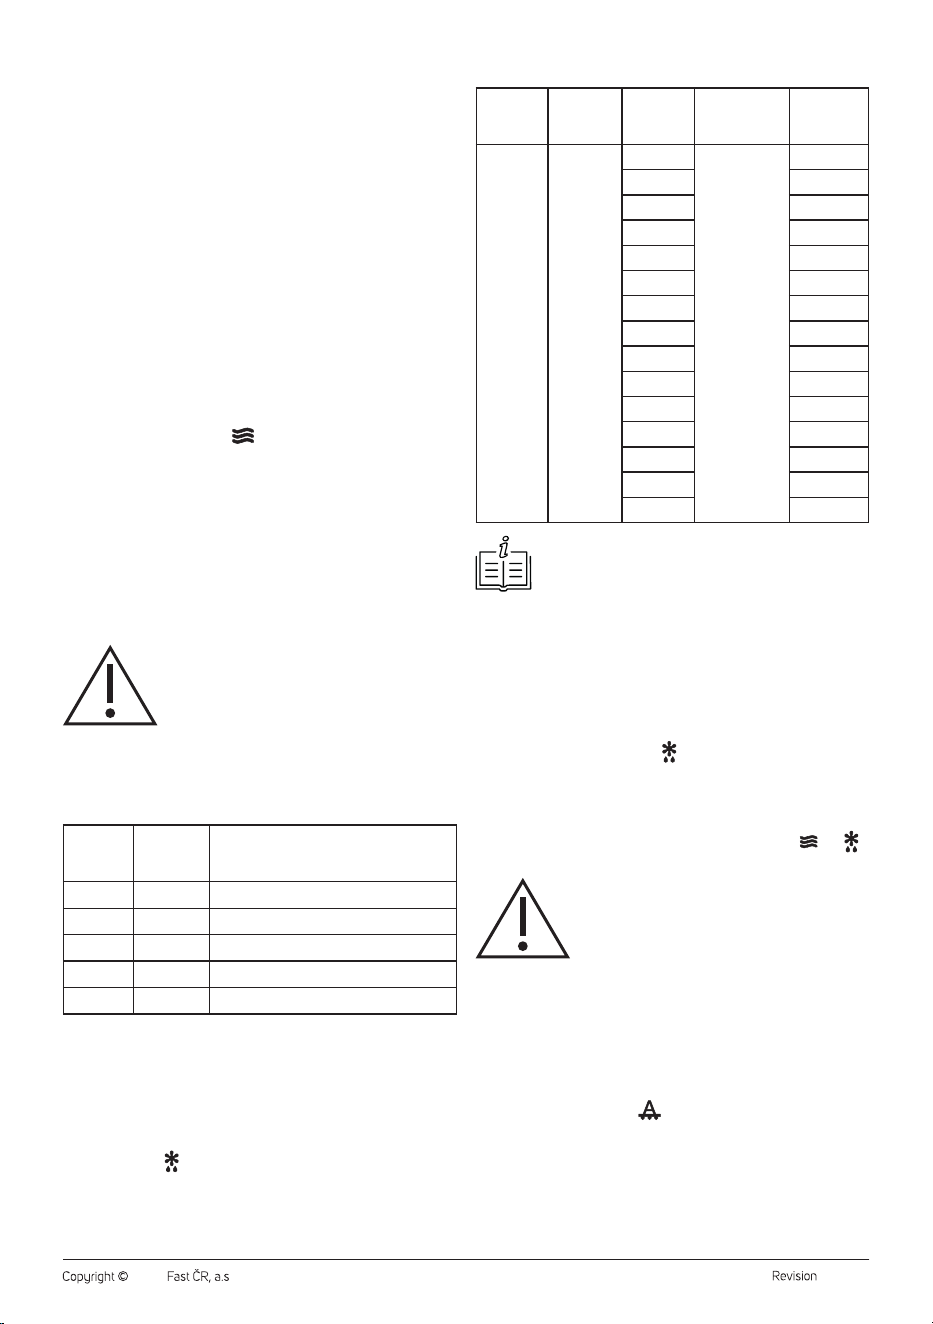
DESCRIPTION OF THE MICROWAVE OVEN
A1 Handle
A2 Safety door lock
A3 Door with viewing window
A4 Quartz grill heating unit
A5 Internal LED lighting
A6 Control panel with an LED
display
A7 Waveguide cover
A8 Heating spiral andfan
A9 Turntable Ø31.5 cm
A10 Roller ring
A11 Coupler
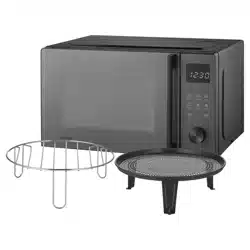
A12 Grill grate Ø27 cm
A13 Baking grate Ø27 cm
. . . . . . . . . . . . . . . . . . . . . . . . . . . . . . . . . . . . . . . . . . . . . . . . . . . . . . . . . . . . . . . . . . . .
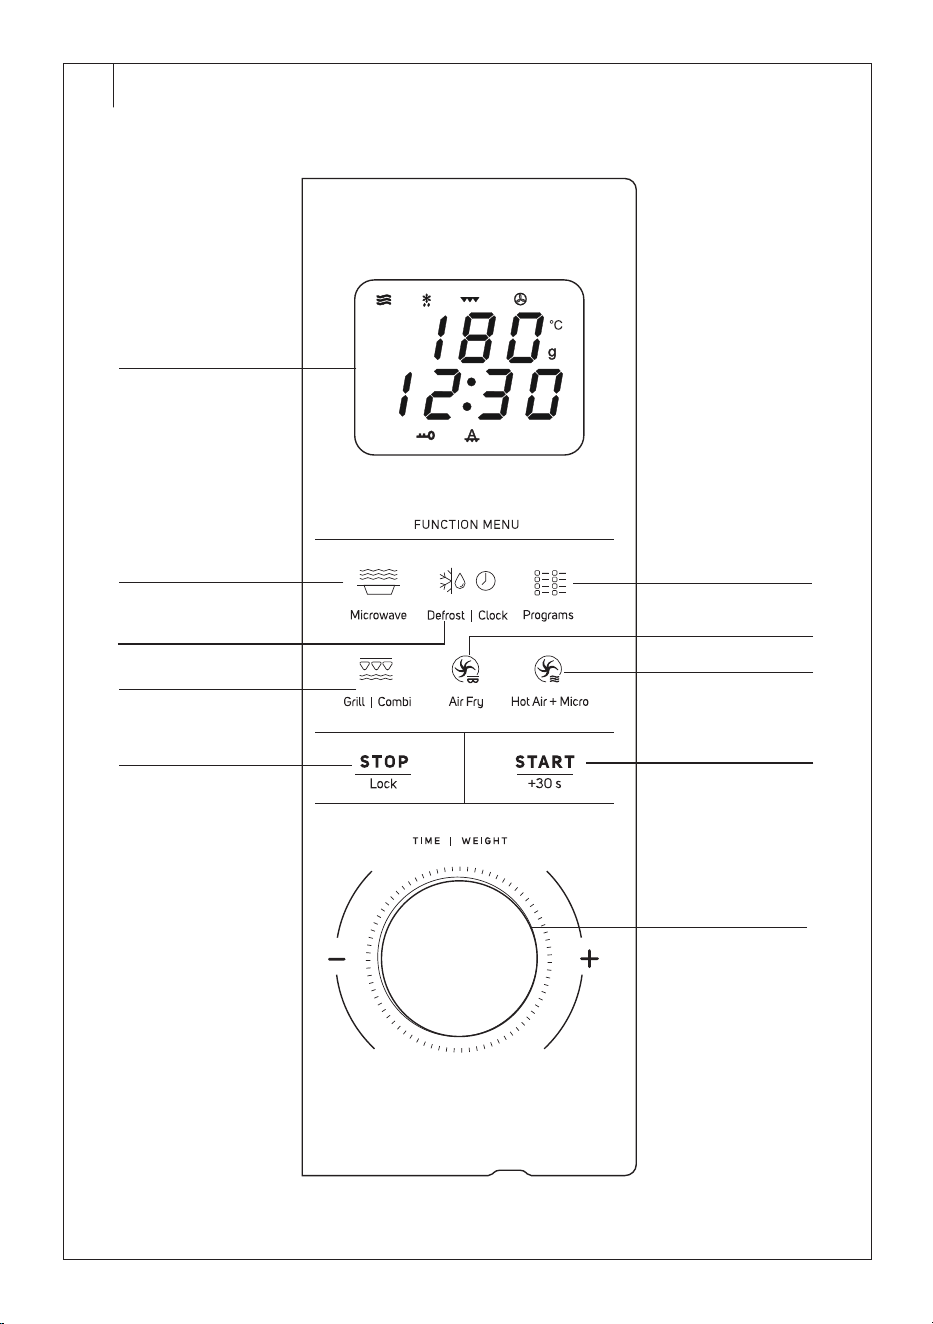
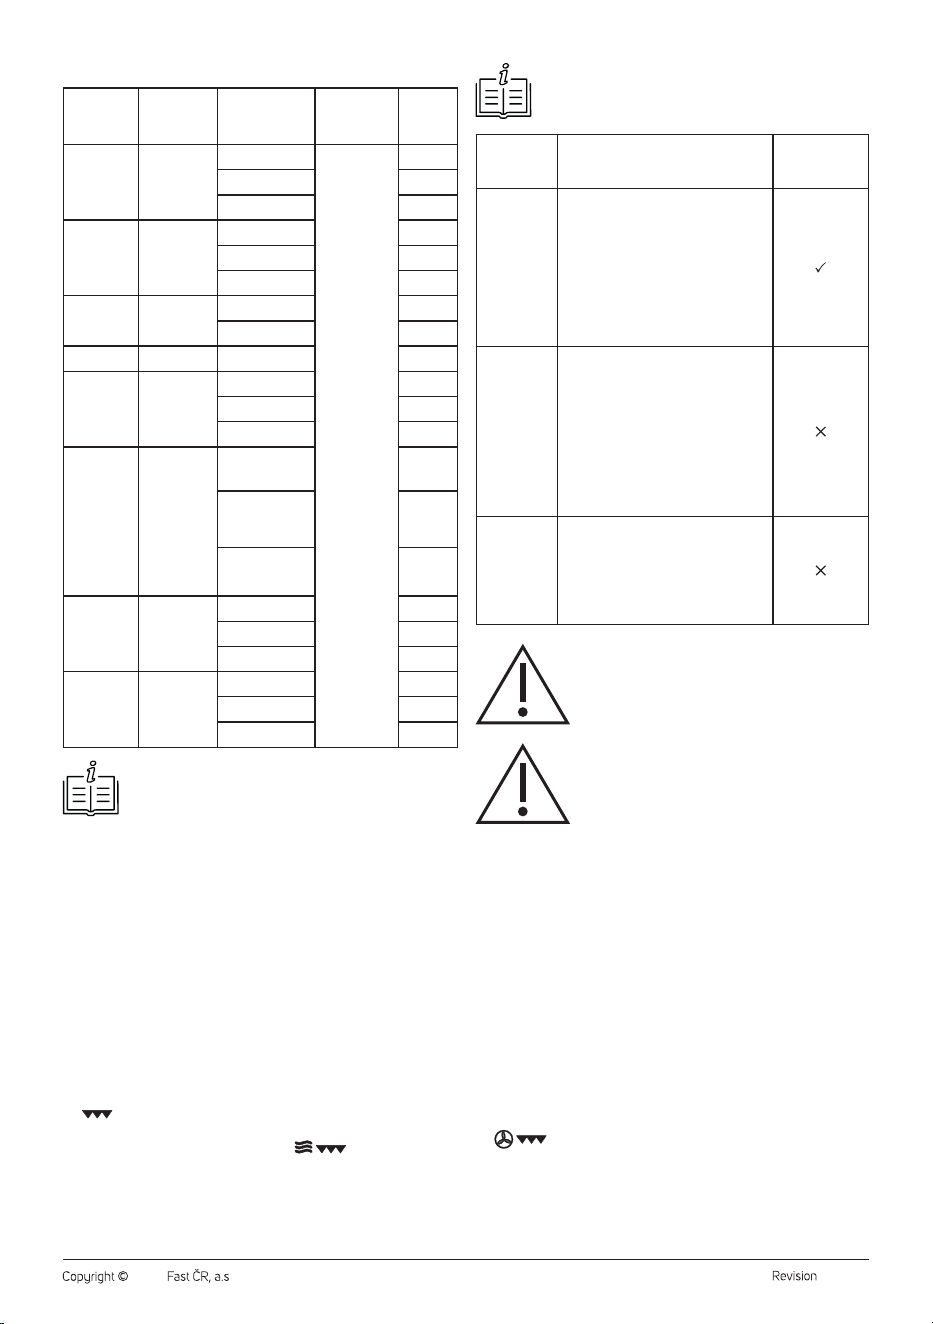
DESCRIPTION OF THE CONTROL PANEL
B1 LED display
B2 Microwave touch button
B3 Defrost | Clock touch button
B4 Programs touch button
B5 Grill | Combi touch button
B6 Air Fry touch button
B7
Hot Air + Micro touch button
B8 STOP | Lock touch button
B9 START | +30s touch button
B10 TIME | WEIGHT rotary control
to set the time or weight of
food
. . . . . . . . . . . . . . . . . . . . . . . . . . . . . . . . . . . . . . . . . . . . . . . . . . . . . . . . . . . . . . . . . . . .
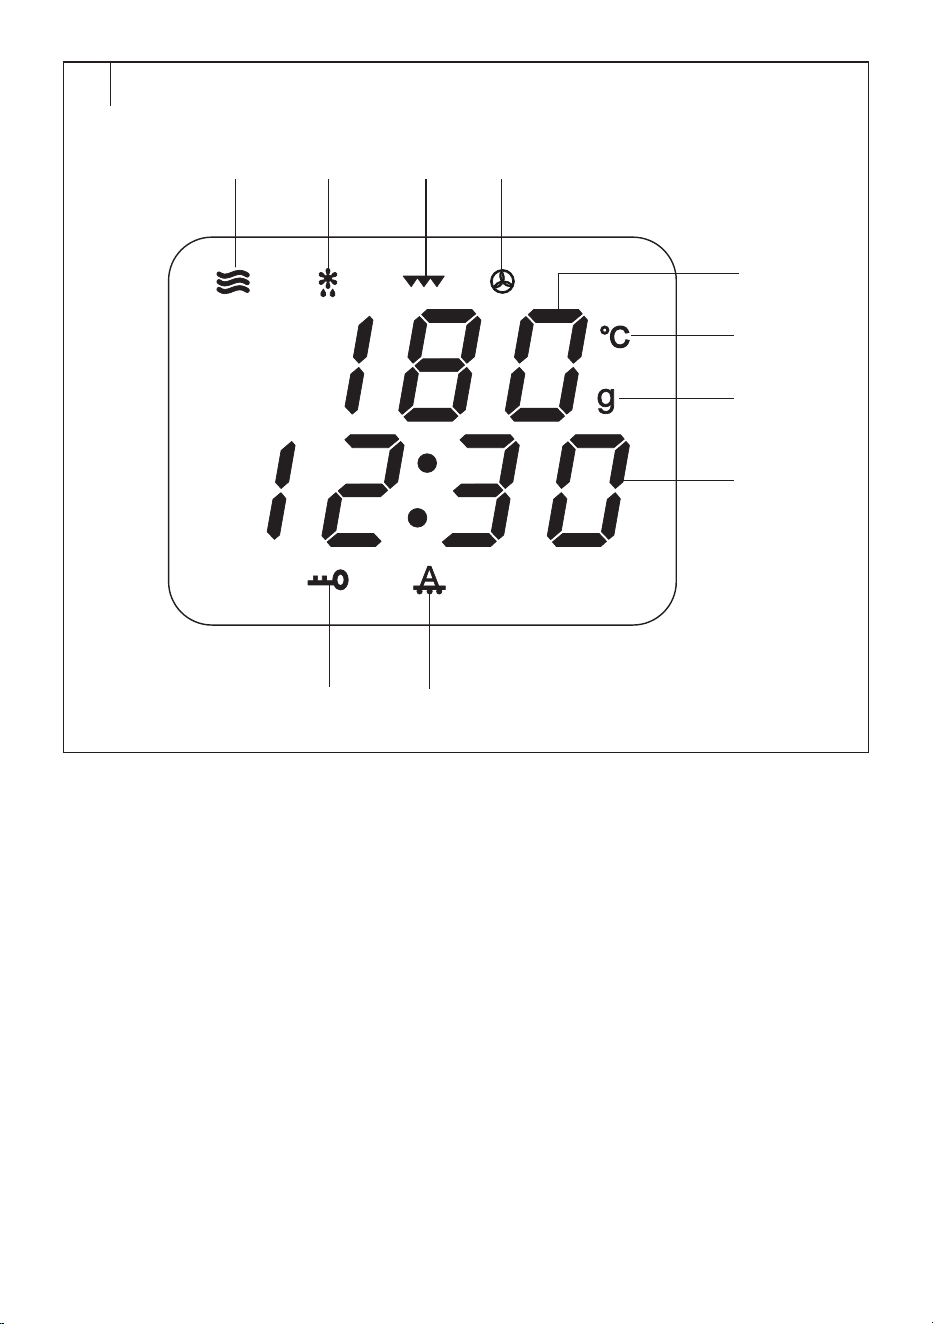
DESCRIPTION OF THE DISPLAY
C1 Microwave cooking
symbol
C2 Defrost symbol
C3 Grill symbol
C4 Hot air symbol
C5 Child lock symbol
C6 Automatic cooking
symbol
C7 Temperature unit symbol °C
C8 Unit of weight symbol
C9 Indication of theset
microwave power,
temperature or weight
C10 Clock, indication of theset
mode, operating time
andother information data
. . . . . . . . . . . . . . . . . . . . . . . . . . . . . . . . . . . . . . . . . . . . . . . . . . . . . . . . . . . . . . . . . . . .
INTENDED USE
• The microwave oven Sencor MW 6025BK offers more options than
just conventional microwave heating or cooking. With the function of
grill, hot air fryer andcombined cooking modes, you can prepare tasty
dishes quickly, comfortably andwithout fat.
• The hot air fryer function uses acombination of rear heating spiral,
fan andtop quartz grill. The result is healthier food preparation with
apreserved taste. The food is roasted more evenly andhas acrisper
surface.
• With the function of combination cooking of microwaves andhot air,
you can easily bake muffins, base for cupcakes or sponge cake.
. . . . . . . . . . . . . . . . . . . . . . . . . . . . . . . . . . . . . . . . . . . . . . . . . . . . . . . . . . . . . . . . . . . .
UNPACKING
• Remove the microwave oven from the packaging and remove all
packaging material, fillers, protective foils, etc. Before disposing of the
packaging material, make sure that you have removed all accessories.
Caution:
Check that the oven is not damaged in any way,
e.g. that the oven door is not poorly fitted or dented,
that the door seal is not damaged or that the hinges
or door locks are not loose. If you find any damage,
do not use the oven and contact aqualified service
technician.
. . . . . . . . . . . . . . . . . . . . . . . . . . . . . . . . . . . . . . . . . . . . . . . . . . . . . . . . . . . . . . . . . . . .
PLACEMENT
• The microwave oven must be placed on alevel, stable surface that
can support its weight with food inside.
• Do not place the oven near heat sources, in places with high humidity,
or near flammable materials.
• The microwave oven is designed for use in an open space, not as
abuilt-in. Therefore, ensure sufficient free space around the oven.
Leave at least 20 cm of free space above the upper surface of the
oven and 10 cm behind its rear part and sides. Do not block any
openings of the oven.
• The recommended distance from the floor is at least 85 cm.
• Make sure that the power cord is not placed under the bottom part of
the oven or in contact with hot or sharp surfaces.
• The mains socket must be easily accessible so that the power cord
plug can be quickly disconnected if necessary.
• Do not use the microwave oven outdoors.
Note:
If you turn on the microwave for the first time, you
may notice aslight odour andsmoke. This is anormal
occurrence which disappears with use. When first turning
on, we recommend placing asufficiently large glass
container with 200 ml of water in the microwave oven
and running it for 2–3 minutes at maximum power in
microwave mode. Repeat if necessary. This will eliminate
the odour.
. . . . . . . . . . . . . . . . . . . . . . . . . . . . . . . . . . . . . . . . . . . . . . . . . . . . . . . . . . . . . . . . . . . .
EARTHING INSTRUCTIONS
• This microwave oven must be earthed. The microwave oven is
equipped with apower cord that has aearthing wire with aearthing
plug. The plug must be connected to asocket that is properly installed
and earthed. Earthing reduces the risk of electric shock. In the case
of ashort circuit the electric current is conducted though the earthing
wire. We recommend that the oven be connected to aseparate
electrical circuit.
Caution:
An improperly earthed power socket may cause the
risk of electric shock.
- 9 -
07/2025
2025, .
Note:
If you have any questions regarding earthing or electrical
instructions, consult aqualified electrician or repair
technician. The manufacturer and the seller are not
responsible for any damage to the oven or injury resulting
from improper electrical connection.
. . . . . . . . . . . . . . . . . . . . . . . . . . . . . . . . . . . . . . . . . . . . . . . . . . . . . . . . . . . . . . . . . . . .
RADIO INTERFERENCE
• Operation of the microwave oven may cause interference with radios,
televisions or similar receivers. If you notice interference, take the
following measures to reduce or completely eliminate it.
1. Clean the door and door seals.
2. Move the affected receiver further away from the microwave oven.
3. Move the microwave oven further away from the receiver.
4. Plug the microwave oven power cable into adifferent socket so that
the oven and the receiver are on separate electrical circuits.
. . . . . . . . . . . . . . . . . . . . . . . . . . . . . . . . . . . . . . . . . . . . . . . . . . . . . . . . . . . . . . . . . . . .
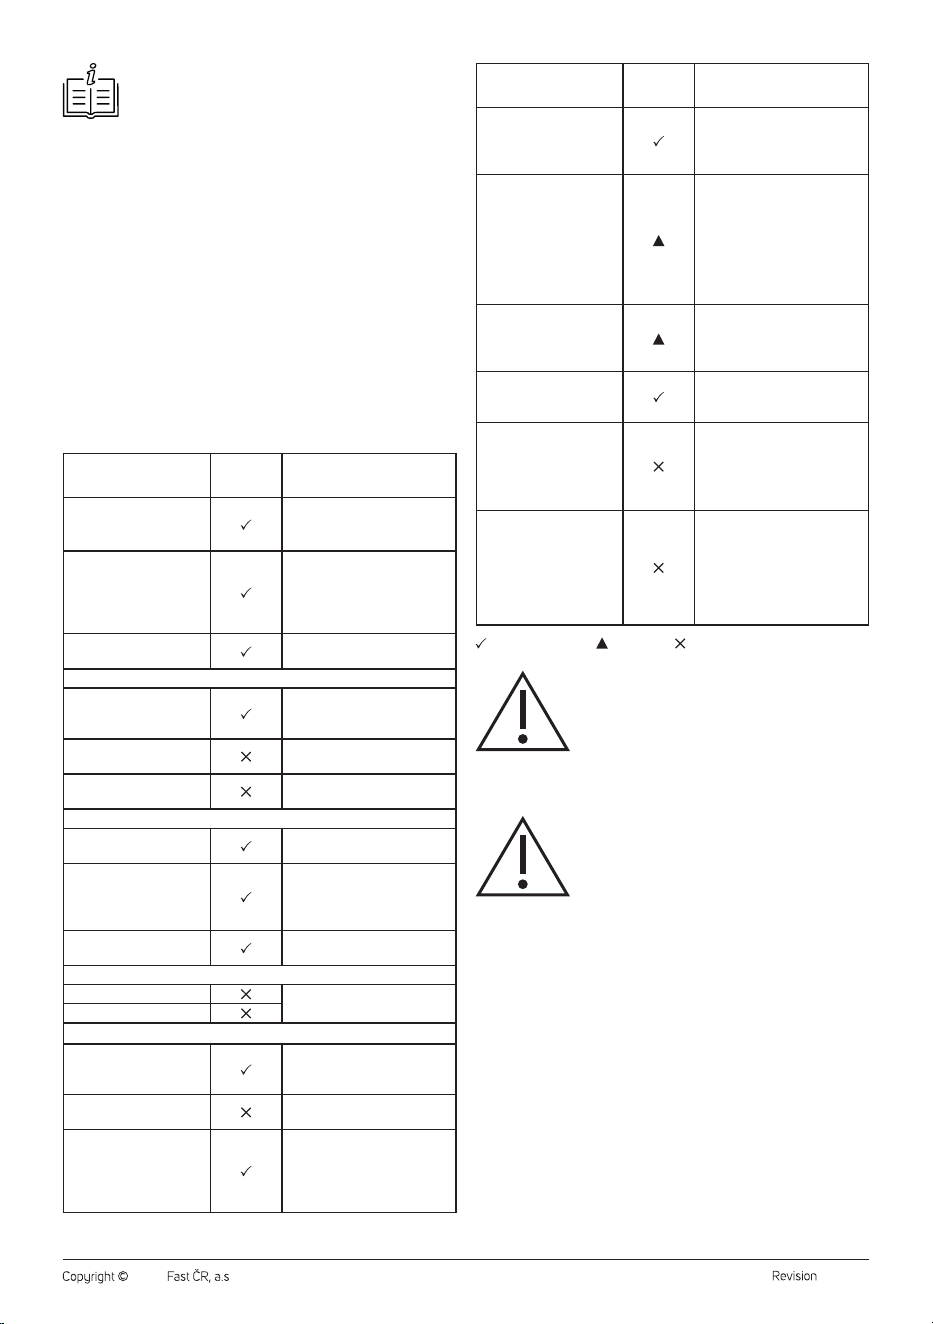
USING THE RIGHT COOKWARE
Cookware for microwave heating
This general list will help you select the correct cookware.
COOKWARE
SAFE
TO USE
NOTE
Low-edged baking dishes
for microwave ovens
Do not use them longer than
8 minutes.
Porcelain and ceramic
cookware
Porcelain and ceramic
cookware including glazed
cookware and bone china are
suitable if they do not have
any metal decor.
Disposable polyester
plates
Used for the packaging of
some frozen foods.
Packaged ready-made meals
• Polystyrene cups
Can be used to heat up food.
Overheating may cause the
polystyrene to melt.
• Paper bags or
newspapers
May ignite in the oven.
• Recycled paper or
metal edging
May cause sparking in the
oven.
Glass
• Glassware
Can be used if it has no metal
decor.
• Fine glass
Can be used for heating food
and drinks. Fine glass may
break if suddenly heated to
ahigh temperature.
• Preserving jars
Remove the lid. Use only for
heating.
Metal cookware
• Plates
Can cause sparking or ignition
of food in the oven.
• Metal bag clips
Paper cookware
• Trays, cups, napkins
and kitchen paper
Suitable for short heating
and cooking time, also for
absorbing excess moisture.
• Recycled paper
May cause sparking in the
oven.
Plastic cookware
Use only heat-resistant
plastics; other plastics may
lose shape or colour due to
high temperatures. Do not use
melamine products.
COOKWARE
SAFE
TO USE
NOTE
Cling film
Use to maintain moisture; it
should not come into contact
with food. When removing, be
careful of the escaping steam.
Aluminium foil
Can be used in small amounts
to protect parts of food from
overcooking. Foil must not be
crumpled or bent.
If too much foil is used or if
the foil is too close to the inner
wall of the oven, sparking
may occur.
Bags for frozen food
Only if intended for cooking or
resistant to high temperatures.
Must not be airtight. If
necessary, pierce with afork.
Waxed paper
Can be used to maintain
moisture in food and to prevent
splattering of fat and juice.
Supplied grill grate
Use only for grill mode. Do
not use it in microwave or
combination cooking mode
(microwave andgrill or
microwave andhot air).
Supplied baking grate
Use only for the function of
ahot air fryer or grill. The
baking grate must not be used
in microwave or combination
cooking mode (microwave
andgrill or microwave andhot
air).
recommended use; limited use; not recommended
Caution:
Use only cookware suitable for microwave heating.
Follow the manufacturer'sinstructions for that type of
cookware. Unsuitable cookware could crack. If you
are unsure about its use in the microwave oven, do
not use it. If the cookware shows signs of wear or is
cracked, do not use it in the microwave oven under
any circumstances.
Caution:
Metal cookware or cookware with ametal trim
can cause sparking when heated in microwave or
combination mode. This can damage the microwave
oven. Never use metal containers when operating
inmicrowave mode or in the combined mode of
microwaves andgrill or microwaves andhot air.
Kitchenware suitable for grill mode
• Grilling does not use microwaves, so metal cookware can also be
used. However, it is necessary to pay attention to the heat resistance
of the used dishes. Use refractory containers. The supplied grill grate
can be used in this mode. Alternatively, abaking grate can be used.
• Not suitable for grill mode:
– plastic cookware (may melt or distort);
– melamine (not resistant to high temperatures);
– paper trays, packaging or other disposable paper containers, as they
could ignite;
– materials that are not designed for direct contact withhigh
temperatures.
Kitchenware
for combination mode of microwaves andgrill
• This mode combines microwave heating with grilling. It requires
specially adapted dishes that are suitable for microwave operation
andat the same time resistant to high temperatures.
• Not suitable for combination mode:

- 10 -
07/2025
2025, .
– metal cookware (microwaves may cause sparks anddamage
the oven);
– plastic cookware (risk of melting);
– paper trays, packaging or other disposable paper containers, as
they could ignite;
– melamine cookware (not suitable dueto microwaves and the
temperature of the grill).
• Metal cookware or cookware with metal trim can cause sparking
when heated in combination microwave and grill mode. This can
damage the microwave oven. Never use metal containers, forks,
knives, or similar utensils.
• In thecombined microwave andgrill mode, do not use the grill or
baking grate supplied withthis microwave. When using the grill or
baking grate in thecombined mode, sparking could occur. This can
damage the microwave oven.
Kitchenware for hot air fryer mode
• Hot air fryer mode does not use microwaves, so metal cookware can
also be used. However, it is necessary to pay attention to the heat
resistance of the used dishes. Use refractory containers. The supplied
baking grate can be used in this mode. For the preparation of baked
dishes, use baking containers made ofquality ceramic or refractory
glass.
• Not suitable for hot air fryer mode:
– plastic cookware (may melt or distort);
– melamine (not resistant to high temperatures);
– paper trays, packaging or other disposable paper containers, as
they could ignite;
– materials that are not designed for direct contact withhigh
temperatures.
Kitchenware for combination mode of microwaves andhot air
• This mode combines microwave heating with hot air. It requires
specially adapted dishes that are suitable for microwave operation
andat the same time resistant to high temperatures. For the
preparation of sweet desserts, use baking moulds made ofceramic,
refractory glass or high-qualityheat-resistant silicone, which do not
contain metal reinforcements or parts. For the preparation of baked
dishes, use baking containers made ofquality ceramic or refractory
glass.
• Not suitable for combination mode:
– metal cookware (microwaves may cause sparks anddamage
the oven);
– plastic cookware (risk of melting);
– paper trays, packaging or other disposable paper containers, as
they could ignite;
– melamine cookware (not suitable dueto microwaves and the
temperature of the grill).
• Metal cookware or cookware with metal trim can cause sparking
when heated in combination microwave and hot air mode. This can
damage the microwave oven. Never use metal containers, forks,
knives, or similar utensils.
• In the combined microwave andhot air mode, do not use the baking or
grill grate supplied withthis microwave. When using the baking or grill
grate in thecombined mode, sparking could occur. This can damage
the microwave oven.
. . . . . . . . . . . . . . . . . . . . . . . . . . . . . . . . . . . . . . . . . . . . . . . . . . . . . . . . . . . . . . . . . . . .
TIPS FOR PREPARING FOOD IN THE MICROWAVE
OVEN
Microwave heating
• Place the food on aplate or in asuitable container. The size of the
plate or container should correspond to the amount of food you will
be heating.
• We recommend placing thicker pieces of food around the edge of the
container. Conversely, place smaller or thinner pieces in the centre.
• Cover the food with alid, or you can use cling film (suitable for use in
amicrowave oven). Pierce it several times to allow excess steam to
escape. Covering food will retain steam, which helps the food to heat
up faster. Do not heat food in closed containers.
• Do not cover food with acrust or crispy pastry. Steam could cause
them to soften and lose crispness.
• Do not cover beverages.
• Set the correct preparation time. We recommend setting ashorter
time and extending it if necessary. When preparing food at high
temperature (power), smoke or ignition may occur.
• Regularly check the heating status and stir or turn food as needed.
• After heating is complete, thoroughly stir the food, or let it rest for
awhile before consumption.
• Always check the temperature of heated food before serving it to
children or the elderly.
Defrosting inmicrowavemode
• Remove foods to be defrosted from packaging, place them on aplate
or in ashallow-edged container. If frozen foods are in acontainer
suitable for amicrowave oven, remove the lid.
• Larger pieces of food take longer to defrost than smaller ones.
Therefore, regularly check the defrosting status, turn individual pieces
and separate them if possible.
• We recommend allowing meat, poultry or fish to completely defrost at
room temperature.
• If necessary, cover smaller foods with apiece of aluminium foil. The
foil must not touch the oven walls.
• If parts of the defrosted food start to cook, remove them and let them
defrost at room temperature, or separate such pieces of food.
• Gradually separate minced meat into smaller pieces, which will speed
up defrosting.
• We recommend placing paper kitchen towel under defrosting pastries,
which will absorb excess moisture.
• After defrosting is complete, we recommend letting the food “rest”
on the kitchen counter for 5 to 25 minutes. The defrosting process
continues even after removal from the oven.
Cooking in microwave mode
• For cooking food, always use only cookware suitable for microwave
ovens. We recommend using low and wide rather than high and
narrow cookware.
• Cut food into equally sized pieces. This ensures that they cook evenly.
• Distribute food evenly in the container. Make sure that pieces do
not overlap. Smaller or thinner pieces should be directed towards
the centre of the container, thicker pieces towards the edge of the
container.
• Regularly check how well they are done and stir or turn the food as
needed.
• Foods with higher fat content, or bones, conduct heat faster. Cover
these foods (at the beginning or halfway through preparation) to
prevent overcooking.
• Place bacon on lean slices of meat, making the meat juicier.
• Sprinkle vegetables with asmall amount of water. This will help them
to cook faster.
• Season food after it is cooked.
• You can brown the surface of the food by coating it with melted butter,
marinade or sprinkling it with paprika.
• After it is cooked, let the food rest for awhile before consumption. The
cooking process may continue even after turning off the oven.
Grilling
• The grilling mode is suitable for grilling slices of various types of meat,
chicken sticks or wings, fish fillets, sausages, thin slices of bacon,
vegetables or toast, preparing toast with cheese, etc.
• Ingrill mode, use the grill grate provided. Alternatively, abaking grate
can be used.
• Place asuitable dish on the rotating plate under the grill grate so that
the food'sjuice or fat can drip into it.
• With the grill grate, the food is closer to the grill element. This cooks
it better.
• Do not use excessively large fatty pieces of food.
• There must be sufficient space between the top wall of the microwave
oven and the food.

- 11 -
07/2025
2025, .
• Turn the food once or more as it is grilling so that it is evenly cooked
onboth sides. The result depends on the type of food.
Combination cooking (grill andmicrowaves)
• The combination cooking function allows you to cook the food and
grill it at the same time. The action of microwaves shortens the
cooking time.
• This function is suitable for preparing chicken drumsticks, baked foods
such as baked potatoes or pasta, etc., or semi-finished products such
as frozen fried chicken fillets, etc.
• Do not use the grill or baking grate in combination mode. Sparking and
damage to the microwave oven could occur.
• After the food is cooked, let it rest for afew minutes – the heat is
evenly distributed and the flavours blend.
Cooking inthe hot air fryer
• The hot air fryer function uses acombination of rear heating spiral,
fan andtop quartz grill. The result is healthier food preparation with
apreserved taste. The food is roasted more evenly withacrisper
surface without unnecessary fat.
• The hot air fryer mode is suitable forpreparing chicken drumsticks
or wings, chicken breast fillets or fish fillets, slices of various types of
meat, baked bacon, baked foods such as lasagne or baked potatoes
or pasta, frozen pre-fried fries in the oven, pizzas, French toast, baked
toast with cheese or baked vegetables, etc.
• This mode is not suitable for baking desserts, etc. Use acombination
of hot air andmicrowaves for this purpose.
• Inthe hot air fryer mode, use the supplied baking grate. Place
asuitable dish on the glass rotating plate under the baking grate
so that the food'sjuice or fat can drip into it. With the baking grate,
the food is closer to the grill unit. This cooks it better. There must be
sufficient space between the top wall of the microwave oven and the
food.
• Some foods need to be turned or stacked on the baking grate one or
more times during preparation.
• Do not cut food on the baking grate. Sharp or metallic objects could
damage the non-stick surface of the baking grate.
• To prepare baked foods, use asuitable baking dish, which you place
directly on to the glass rotating plate.
Combination cooking (hot air andmicrowaves)
• The function of combined cooking of hot air andmicrowaves
allows food to be cooked andbaked at the same time. The action of
microwaves shortens the cooking time.
• This function is suitable for preparing various types of meat, fish,
baked foods such as lasagne, baked potatoes or pasta, etc., baked
vegetables, stuffed aubergines or peppers, or semi-finished products
such as frozen fried chicken fillets, etc.
• Inthis mode, you can also easily preparesweet desserts, such as
muffins, cupcake base, sponge cake or light fruit cake, etc. This mode
is not suitable for baking puff pastry andother similar shortcrust
doughs.
• Do not use the baking or grill grate in combination mode. Sparking and
damage to the microwave oven could occur.
. . . . . . . . . . . . . . . . . . . . . . . . . . . . . . . . . . . . . . . . . . . . . . . . . . . . . . . . . . . . . . . . . . . .
BEFORE FIRST USE
• Wipe the inner and outer surfaces of the microwave oven with asoft
sponge or cloth that you have moistened in warm water with alittle
neutral cleaning agent and squeezed out. Remove any cleaning
solution residue with acloth slightly dampened in clean water. Wipe
the surface dry with aclean cloth.
• Wash the grill and baking grate with warm water and dish soap liquid.
Rinse everything thoroughly under clean running water to remove any
detergent residue and wipe dry with akitchen towel.
. . . . . . . . . . . . . . . . . . . . . . . . . . . . . . . . . . . . . . . . . . . . . . . . . . . . . . . . . . . . . . . . . . . .
GETTING STARTEDWITH THE MICROWAVE
• When the power plug is connected to apower socket, all the data on
the display will briefly light up and abeep will sound. The time 1:00
will then light up on the display.
• We now recommend setting the clock. Follow the instructions in the
"SETTING THE CLOCK" section. The microwave oven can also be
used without the clock set.
• To start the oven, press the START
|
+30s button. The microwave oven
is equipped with additional control buttons, the functions of which are
described in detail below in this manual.
• The microwave oven is equipped with asafety lock andcan only be
started with the door closed.
• If you need to check the condition of the food as it cooks, press the
STOP
|
Lock button. The microwave oven will pause. Open the door.
Check the food andclose the door. Press the START
|
+30s button
briefly to resume cooking. To stop cooking before the set time has
elapsed, press the STOP
|
Lock button twice.
• Inthe setting mode, press the STOP |
Lock button to cancel settings
entered incorrectly.
• If, after changing the settings, you do not press the START
|
+30s
button to start the microwave, the oven will automatically switch to
Standby mode within two minutes.
• The interior light of the microwave oven is lit when the microwave
oven is running or when the door is opened.
If the door remains open, the light will turn off automatically after
10minutes.
• Each button press is accompanied by abeep.
. . . . . . . . . . . . . . . . . . . . . . . . . . . . . . . . . . . . . . . . . . . . . . . . . . . . . . . . . . . . . . . . . . . .
STANDBY MODE
• Standby mode is the state in which the microwave is connected to
thenetwork, not inoperation and is ready foruse. Instandby mode,
the microwave oven indicates the status or displays the information
andallows you to enter the active mode.
Standby mode with stop signalling
• This mode occurs after the operation has ended. The display shows
"End" andevery 3 minutes an acoustic signal sounds to remind the
user to stop the operation. This mode lasts amaximum of 15minutes
or until the door is opened or the STOP | lock button is pressed.
Standby mode with clock display
• The clock appears permanently on the screen. Inthis mode it is
possible to make all the settings.
• If the microwave oven has automatically switched to the stand-by
mode with the clock display, the quick start function is not available.
This function will only be available again after the door has been
opened and closed.
. . . . . . . . . . . . . . . . . . . . . . . . . . . . . . . . . . . . . . . . . . . . . . . . . . . . . . . . . . . . . . . . . . . .
SETTING THE CLOCK
• You can set the clock after plugging the power cable into the power
socket or later, as needed. The clock is set in 24-hour mode.
1. InStandby mode press andhold the Defrost
|
Clock button for at least
3 seconds. The hour will flash on the display.
2. Use the rotary control to set the clock. Rotate left andright to decrease
andincrease time.
3. Briefly press the START
|
+30s button. The minutes will flash on the
display.
4. Use the rotary control to set the minutes. Rotate left andright to
decrease andincrease time.
5. Briefly press the START
|
+30s button to confirm andend the clock
setting mode. The set time will appear on the display.
Note:
If the power supply is interrupted, the clock will reset and
you will need to set it again.
- 12 -
07/2025
2025, .
. . . . . . . . . . . . . . . . . . . . . . . . . . . . . . . . . . . . . . . . . . . . . . . . . . . . . . . . . . . . . . . . . . . .
START
|
+30SBUTTON AND QUICK START
FUNCTION
• The START
|
+30s button is used primarily to start the microwave
oven.
• The quick start function is used to rapidly start microwave heating at
the oven'smaximum power.
• In the Standby mode with the door closed, press the START
|
+30s
button to quickly start the oven for 30 seconds in microwave mode at
maximum power. Every time the button is pressed again, the time is
extended by another 30 seconds.
• When the microwave oven is running, press the START
|
+30s button to
extend the cooking time by30 seconds. This function is not available in
the automatic cooking andweight-based defrosting modes.
. . . . . . . . . . . . . . . . . . . . . . . . . . . . . . . . . . . . . . . . . . . . . . . . . . . . . . . . . . . . . . . . . . . .
MICROWAVE COOKING
• The microwave cooking function is suitable forcooking or heating
food.
1. In Standby mode, press the Microwave button. “100P” and the
microwave cooking symbol will appear on the display.
2. Press the Microwave Microwave button repeatedly to set the
microwave power. The set power will appear on the display.
3. Use the rotary control to adjust the cooking time from 10 seconds to
60 minutes. Rotate left andright to decrease andincrease time. The
set time will appear on the display.
4. Press the START
|
+30s button to start the microwave.
• If you need to check the condition of the food, briefly press the
STOP
|
Lock button. Open the door and check or stir the food or
place it on aplate. To continue cooking, close the door andpress the
START
|
+30s button; to stop cooking before the set time expires,
press the STOP
|
Lock button twice.
Caution:
During food preparation inmicrowave mode, food is
heated by microwaves that vibrate water molecules
inside the food, thereby heating them. Containers
do not heat up on their own. The heat is transferred
to them from theheated food. Asaresult of the heat
transferred, the container may become very hot after
heating. We recommend using kitchen gloves when
removing the food container to prevent burning or
scalding.
Information
on the
display
Microwave
power
Use
100P 100% Suitable for rapid cooking/heating
80P 80% Suitable for medium-speed cooking/heating
50P 50% Suitable for slow cooking/heating
30P 30% Suitable fordefrosting food
10P 10% Suitable for keeping food warm
. . . . . . . . . . . . . . . . . . . . . . . . . . . . . . . . . . . . . . . . . . . . . . . . . . . . . . . . . . . . . . . . . . . .
WEIGHT-BASED DEFROSTING
• This mode allows food to be defrosted according to the set weight.
The power of the microwave and the defrosting time are automatically
preset dependingon the selected weight of the food. Neither the
power nor the defrosting time can be changed inthis mode.
1. InStandby mode, press the Defrost
|
Clock button once. “dEF1”, the
defrost symbol
and the unit “g” will appear on the display.
2. Use the rotary control to set the weight of the food to be defrosted
in the range from 100 to 1500 g. Turn right andleft to increase
andreduce the set weight. The set weight is shown on the display.
3. Press the START
|
+30s button to start the microwave.
Overview ofweight-based defrosting mode preset times
Information
on the
display
Food type Weight
Microwave
power andits
duration
Total
defrosting
time
dEF1 Frozen food
100 g
70% of power
and10% of total
time
30% of power
and20% of total
time
20% of power
and20% of total
time
10% of power
and30% of total
time
20% of power
and20% of total
time
2:40
200 g 5:20
300 g 8:00
400 g 10:40
500 g 13:20
600 g 16:00
700 g 18:40
800 g 21:20
900 g 24:00
1000 g 26:40
1100 g 29:20
1200 g 32:20
1300 g 34:40
1400 g 37:20
1500 g 40:00
Note:
Inthe middle of the preset defrosting time, abeep will
sound alerting you to check the food. After closing the door,
press the START
|
+30s button to restart the microwave
oven.
. . . . . . . . . . . . . . . . . . . . . . . . . . . . . . . . . . . . . . . . . . . . . . . . . . . . . . . . . . . . . . . . . . . .
TIME-BASED DEFROSTING
• This mode allows you to defrost food according to the set time.
The power of the microwave oven is preset to 30% of the microwave
power andcannot be changed inthis mode.
1. InStandby mode, press the Defrost
|
Clock button twice.
“dEF2” and the defrost symbol will appear on the display.
2. Use the rotary control to adjust the defrost time from 10 seconds to
60minutes. Rotate left andright to decrease andincrease time. The
set time will appear on the display.
3. Press the START | +30s button to start the microwave. The display
will show thepreset 30P microwave power, the symbols and
and the time remaining until the end of the defrosting mode.
Caution:
Some defrosted foods need to be further cooked.
Do not refreeze defrosted food. This may result in
food poisoning or other health complications.
. . . . . . . . . . . . . . . . . . . . . . . . . . . . . . . . . . . . . . . . . . . . . . . . . . . . . . . . . . . . . . . . . . . .
AUTOMATIC COOKING FUNCTION
• In automatic cooking programmes, there is no need to set the cooking
time or power level. You only need to select the type of food, its weight,
or the number of servings.
1. While the microwave is inStandby mode, press the Programs
button to enter the automatic cooking program selection. A.1 and the
automatic cooking symbol will appear on the display.
2. Press the Programs button repeatedly to select one of the automatic
cooking programs (A.1 to A.8). The selected automatic cooking
program will appear on the display.
3. Use the rotary control to adjust the food weight or number of cups.
The weight or number of cups is shown on the display.
4. Press the START
|
+30s button to start the microwave.
- 13 -
07/2025
2025, .
Overview of automatic cooking programs
Programme Food type
Weight /
number of cups
Preset
microwave
power
Preset
cooking
time
A.1 Potatoes
250 g
100%
5:30
500 g 8:30
750 g 11:30
A.2 Pasta
50 g 8:00
100 g 13:00
150 g 16:00
A.3 Pizza
200 g 3:00
400 g 5:00
A.4 Popcorn 100 g 2:40
A.5 Vegetables
200 g 5:00
400 g 7:00
600 g 9:00
A.6 Beverages
1 cup (approx.
250 ml)
1:30
2 cups
(approx. 250 ml)
each
2:10
3 cups
(approx. 250 ml)
each
3:40
A.7 Meat
200 g 8:30
400 g 10:30
600 g 12:30
A.8 Fish
200 g 7:30
400 g 9:30
600 g 11:30
Note:
The temperature, weight and shape of the food can
significantly affect the cooking time. If the result is
unsatisfactory, stop the cooking process earlier or, after the
automatic program ends, continue cooking after manually
setting the cooking power and cooking time.
. . . . . . . . . . . . . . . . . . . . . . . . . . . . . . . . . . . . . . . . . . . . . . . . . . . . . . . . . . . . . . . . . . . .
GRILL AND COMBINATION COOKING FUNCTION
• The microwave oven is equipped with agrill function andtwo
combination cooking modes (grill andmicrowave cooking).
• Ingrill mode, use the supplied grill or baking grate. Place asuitable
dish on the rotating glass plate under the grill grate so that the
food'sjuice or fat can drip into it. With the grill or baking grate, the food
is closer to the grill unit. This cooks it better. Do not use excessively
large fatty pieces of food. There must be sufficient space between the
top wall of the microwave oven and the food.
• The combination cooking function allows food to be cooked andgrilled
at the same time. The action of microwaves shortens the cooking time.
Do not use the grill or baking grate in combination mode.
1. InStandby mode, press the Grill | Combi button. G and the grill symbol
will appear on the display.
2. For combination cooking mode, press the Grill | Combi button
repeatedly. G-1 or G-2 andthe symbols . will appear on the
display.
3. Use the rotary control to adjust the cooking time from 10 seconds to
60 minutes. Rotate left andright to decrease andincrease time.
4. Press the START | +30s button to start the microwave.
Note:
Inthe grilling mode, abeep will sound in the middle of the
set time alerting you to the need to turn the grilled food.
Information
on the
display
Function
Using agrill or
baking grate
G.
Grilling function; the upper quartz
heating unit is in operation. It is suitable
for making toast, toast with cheese,
grilling sausages, slices of different
kinds of meat, chicken breast fillets,
chicken wings or sticks, fish fillets,
thin slices of bacon, vegetables, etc.
Turn the food over at least once while
it is grilling.
G-1
Combination cooking: 30%of the set
cooking time inmicrowave mode at
100% power and70% of the cooking
time in grilling mode. This function
is suitable for preparing chicken
drumsticks, baked foods such as baked
potatoes or pasta, etc., or semi-finished
products such as frozen fried chicken
fillets, etc. Microwave energy speeds
up the preparation process.
G-2
Combination cooking: 55%of the set
cooking time inmicrowave mode at
100% power and45% of the cooking
time in grilling mode. Use this mode
if you want to cook adish and bake
it lightly.
Caution:
In grilling mode andcombination mode, the food
andcontainers are directly heated. We recommend
using kitchen gloves when removing the food
container to prevent burning or scalding.
Caution:
The grill heating element is located behind the upper
wall of the interior of the microwave oven. The upper
wall of the interior of the microwave oven is hot after
use. Do not touch the hot surface. There is arisk of
burns.
. . . . . . . . . . . . . . . . . . . . . . . . . . . . . . . . . . . . . . . . . . . . . . . . . . . . . . . . . . . . . . . . . . . .
AIR FRYER FUNCTION
• The hot air fryer function uses acombination of rear heating spiral,
fan andtop quartz grill. The result is healthier food preparation with
apreserved taste. The food is roasted more evenly withacrisper
surface without unnecessary fat.
• Inthe hot air fryer mode, use the supplied baking grate. The baking
grate is equipped with openings that ensure the circulation of hot air
from below. With the baking grate, the food is closer to the grill unit.
This cooks it better. Place asuitable dish on the glass rotating plate
under the grill rack so that the food'sjuice or fat can drip into it. Do not
use excessively large fatty pieces of food. There must be sufficient
space between the top wall of the microwave oven and the food.
• To prepare baked foods, use asuitable baking dish, which you place
directly on to the glass rotating plate.
1. In Standby mode, press the Air Fry button. AF., 120°C andsymbols
will appear on the display.
2. Press the Air Fry button repeatedly to set the temperature in therange
120−200 °C. The temperature is set atintervals of 20 °C.
3. Use the rotary control to adjust the cooking time from 10 seconds to
60 minutes. Rotate left andright to decrease andincrease time.
4. Press the START | +30s button to start the microwave.
- 14 -
07/2025
2025, .
5. Reaching the set temperature in the hot air fryer mode is indicated by
one beep.
Caution:
The quartz grill heating unit, the rear heating spiral,
the rotating plate and the walls of the internal
microwave compartment are heated after using the
microwave oven. Do not touch the hot surface. There
is arisk of burns.
To remove heated containers from themicrowave,
use kitchen mitts to prevent burns or scalding.
. . . . . . . . . . . . . . . . . . . . . . . . . . . . . . . . . . . . . . . . . . . . . . . . . . . . . . . . . . . . . . . . . . . .
COMBINATION COOKING FUNCTION | HOT AIR
ANDMICROWAVES
• The combined hot air andmicrowave cooking function uses
acombination of rear heating spiral, fan andmicrowave energy. The
combination of hot air andmicrowaves allows food to be cooked
and baked at the same time. The action of microwaves shortens the
cooking time.
• In thecombined hot air andmicrowave mode, do not use the baking
or grilling grate. Sparking and damage to the microwave oven could
occur.
1. Use the Hot Air + Micro button to select the hot air andmicrowave
combination cooking mode. The C-1 or C-2 and symbols will
appear on the display.
2. Use the rotary control to adjust the cooking time from 10 seconds to
60 minutes. Rotate left andright to decrease andincrease time.
3. Press the START | +30s button to start the microwave.
Caution:
The rear heating spiral, the rotating plate and the
walls of the inside microwave compartment are
heated after using the microwave oven. Do not touch
the hot surface. There is arisk of burns.
To remove heated containers from themicrowave,
use kitchen mitts to prevent burns or scalding.
Information
on the
display
Function
Using agrill or
baking grate
C-1
Combination cooking: 30% of the set
cooking time inmicrowave mode at
100% power and70% of the cooking
time in hot air mode at apreset
temperature of 160 °C. This function
is suitable for preparing various types
of meat, fish, baked foods such as
lasagne, baked potatoes or pasta, etc.,
baked vegetables, stuffed aubergines
or peppers, or semi-finished products
such as frozen fried chicken fillets, etc.
Inthis mode, you can also easily
prepare sweet desserts, such as
muffins, cupcake base or sponge
cake, etc. This mode is not suitable for
baking puff pastry andother similar
shortcrust doughs.
C-2
Combination cooking: 55% of the set
cooking time inmicrowave mode at
100% power and45% of the cooking
time in hot air mode at apreset
temperature of 160 °C. This function is
suitable for preparing various types of
meat andbaked foods.
This mode is not suitable for baking
puff pastry andother similar shortcrust
doughs.
- 15 -
07/2025
2025, .
. . . . . . . . . . . . . . . . . . . . . . . . . . . . . . . . . . . . . . . . . . . . . . . . . . . . . . . . . . . . . . . . . . . . . . . . . . . . . . . . . . . . . . . . . . . . . . . . . . . . . . . . . . . . . . . . . . . . . . . . . . . . . . . . . . . . . . . . . . . .
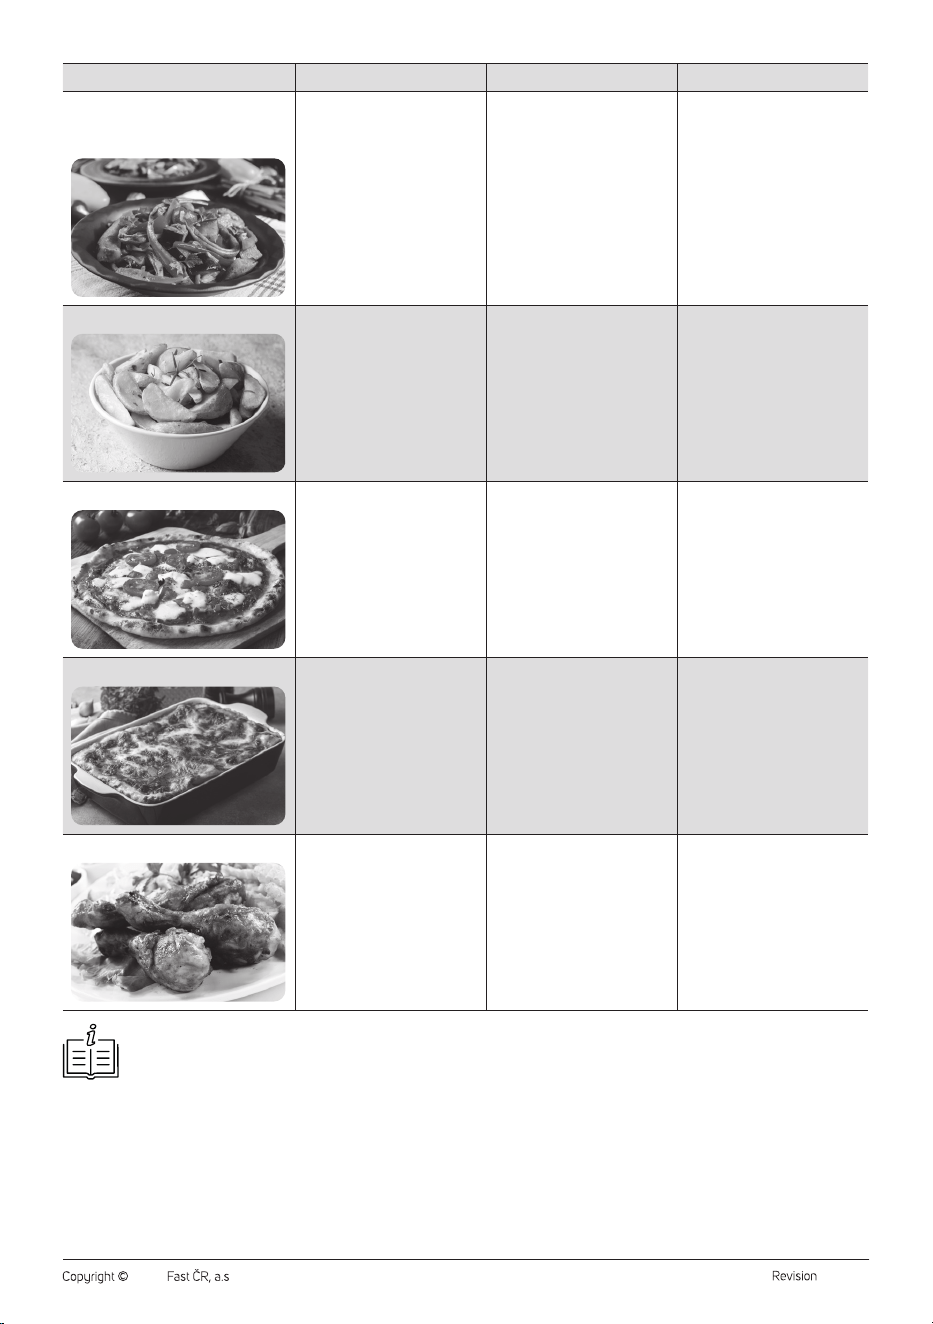
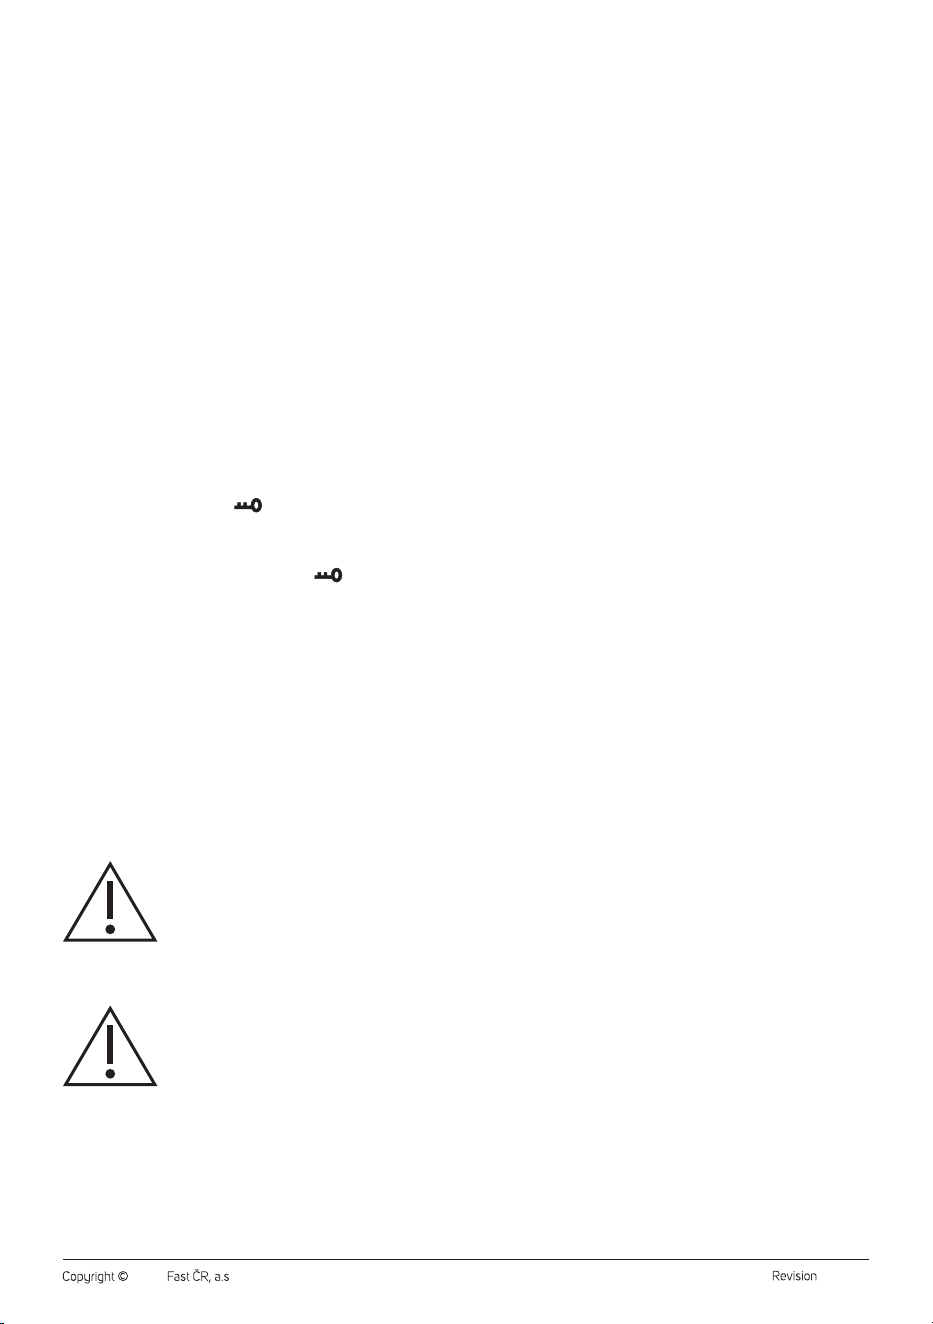
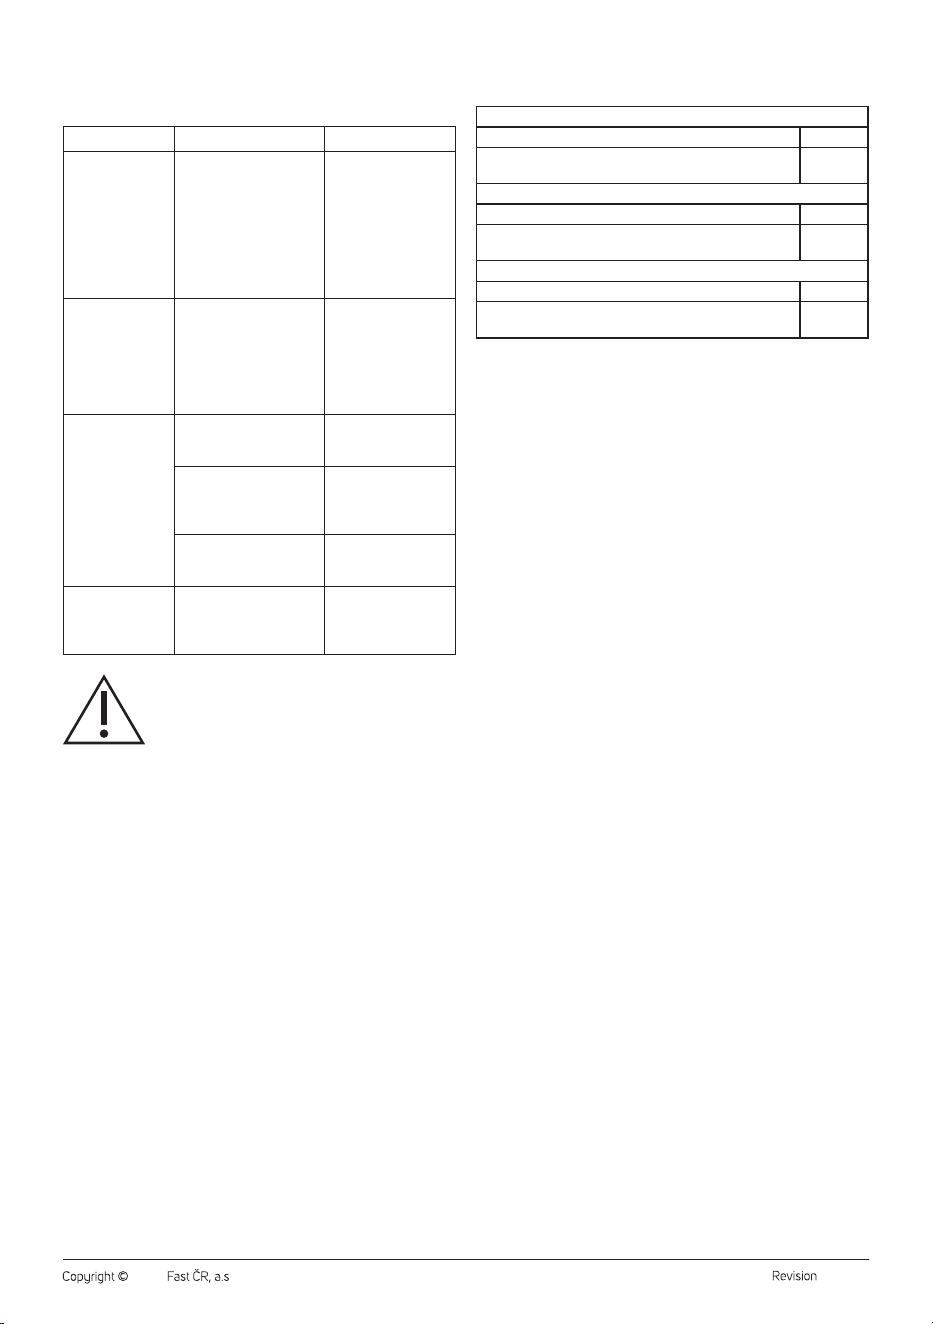
QUICK GUIDE TO COOKING
Meal/food Mode Settings Recommended cooking time
Muffins
1st step
Combination cooking
hot air + microwaves
C-1 13−15 min
2nd step
Air fry mode AF., 160−180°C 1−2 min for better texture
andeven baking of the surface
Mini cupcakes
1st step
Combination cooking
hot air + microwaves
C-1 8−10 min
2nd step
Air fry mode AF., 160 °C 1−2 min for better texture
andeven baking of the surface
Sponge cake
1st step
Combination cooking hot air
+microwaves
C-1 15−20 min
2nd step
Air fry mode AF., 180 °C 1−2 min for better texture
andgolden toasted surface
Frozen pre-fried fries
Air fry mode AF., 180 °C 20−25 min or as recommended
on the manufacturer'spackaging
Cheese toast
Grill G. 2−3 minutes to toast; turn over
the toast halfway
2−3 min to bake the cheese
Salmon fillet
Air fry mode
or
grill
AF., 180 °C
or
G.
9−11 min
- 16 -
07/2025
2025, .
Meal/food Mode Settings Recommended cooking time
Vegetables
– Pepper
– Tomato
Grill
Grill
G.
G.
12 min
8 min
Potato pieces fromfresh raw potatoes
Air fry mode AF., 180−200°C 15 min (depending on the size of
the potato pieces)
Fresh dough pizza
Air fry mode AF., 180−200°C 7−9 min
Lasagne
Air fry mode AF., 160−180°C 25−30 min
Chicken drumsticks
Air fry mode
or
grill
AF., 160−180°C
G.
30−35 min
Note:
The times provided above are only areference. Theresulting preparation time depends on the size andquantity of the food. Check the
condition of the food regularly during cooking.
- 17 -
07/2025
2025, .
. . . . . . . . . . . . . . . . . . . . . . . . . . . . . . . . . . . . . . . . . . . . . . . . . . . . . . . . . . . . . . . . . . . .
STOPPING THE MICROWAVE
• After the set time has elapsed, the microwave oven will automatically
stop operation andswitch to the standby mode with the indication
of the end of operation. During this phase, the display will flash the
message “End” and an audible signal will sound every 3 minutes. This
state lasts for amaximum of 15 minutes or until you open the door or
press the STOP | lock button. The microwave will then automatically
switch to the stand-by mode with the clock display in which it remains
ready forfurther use.
• If the microwave oven automatically switches fromstand-by mode
that signals end of operation to stand-by mode with clock display, the
quick start function is deactivated. This function will only be available
again after the door has been opened and closed.
• Press the STOP
|
Lock button once to pause the microwave oven.
Pressing the STOP
|
Lock button again will stop the microwave oven
before the set operating time has elapsed. Afterwards, the microwave
oven will automatically switch to standby mode with clock display.
. . . . . . . . . . . . . . . . . . . . . . . . . . . . . . . . . . . . . . . . . . . . . . . . . . . . . . . . . . . . . . . . . . . .
CHILD SAFETY LOCK FUNCTION
• The child safety lock function allows you to deactivate the buttons so
that the oven cannot be used.
• Activating the child safety lock: InStandby mode, press andhold
the STOP
|
Lock button for at least 3 seconds. Abeep will sound and
the child safety lock symbol will appear on the display. All the
buttons will be disabled.
• Cancelling the child safety lock: To cancel the child safety lock,
press and hold the STOP
|
Lock button for at least 3 seconds. Abeep
will sound and the child safety lock symbol
will go out. All the
buttons will be enabled again.
. . . . . . . . . . . . . . . . . . . . . . . . . . . . . . . . . . . . . . . . . . . . . . . . . . . . . . . . . . . . . . . . . . . .
CLEANING AND MAINTENANCE
• Before cleaning, disconnect the power plug from the mains socket and
allow the appliance to cool down.
• Keep the microwave oven clean. Clean it regularly according to
the instructions below. Insufficient cleaning and maintenance can
cause damage to the surface finish of the inner walls, which can
lead to ashortened lifespan of the microwave oven. Dried food or
liquids can cause unpleasant odours and the formation of unwanted
microorganisms, which can have anegative impact on human health.
• Do not use abrasive cleaning agents, solvents, etc., which could
damage the surface of the appliance for cleaning any parts of the
appliance. No part of this microwave oven, except the rotating plate, is
dishwasher safe.
Caution:
To prevent the risk of electric shock, do not immerse
the appliance, power cord or plug in water or any
other liquid.
• To prevent damaging the operating parts of the oven, make sure that
no more water leaks into the ventilation openings located on the sides
ofthe microwave oven during cleaning.
Caution:
Do not use the steam cleanerto clean the microwave
oven.
Cleaning the inside area
• If the interior of the microwave oven becomes dirty, wipe the inner
walls with asoft sponge slightly dampened in warm water. Wipe
the cleaned surface with adry cloth. If the interior is heavily soiled,
moisten the sponge in warm water with alittle kitchen dish detergent.
Remove any cleaning solution residue with acloth slightly dampened
in clean water. Wipe the surface dry with aclean cloth. Do not use any
sprays or abrasive cleaning agents. They may scratch the surface or
leave stains or marks.
• To remove unpleasant odours from the interior of the microwave oven,
mix in adeeper container one cup of water with the juice and peel of
one lemon. Do not use narrow tall containers to avoid boiling water
overflowing. This could cause scalding. Start the microwave oven
inmicrowave mode at the maximum power level for 4–5 minutes.
Wait for awhile. Remove the container carefully andthen wipe the
interior with aclean, dry cloth.
Cleaning the exterior and door
• Wipe the exterior and door including the seal with asoft sponge
slightly dampened in warm water. Wipe with aclean cloth until dry.
• If the door fogs up from the inside, wipe it with aclean and dry cloth.
This is normal, especially when preparing food with ahigh water
content.
Cleaning the control panel
• You can wipe the control panel with aslightly damp or properly wrung
cloth. Wipe the cleaned surface dry.
Cleaning the turntable
• Remove the rotating plate and the rotating plate travel from the
microwave and wash them in warm water with alittle dishwashing
liquid using asoft sponge. Rinse in clean water and wipe dry with
aclean cloth.
• Wipe the area under the rotating plate with asoft, slightly dampened
sponge. Wipe with adry cloth.
• The rotating plate is dishwasher safe.
Cleaning the grill grate
• Clean the grill grate after each use. Do not let food residues dry on the
grill grate. Dried food residues are more difficult to remove.
• Wash the grill grate inwarm water with dish soap using asoft sponge
or abrush withfine bristles. In case of heavy soiling, we recommend
soaking the grate andthen cleaning it. Rinse the grill grate with clean
water to remove all dirt anddetergent residue anddry with asoft cloth.
• Do not use wire wools, coarse brushes, abrasive sponges or
aggressive cleaning products. Using inappropriate cleaning aids may
lead topermanent damage to the surface.
• Do not wash the grill grate in thedishwasher.
Cleaning the baking grate
• Clean the baking grate after each use. Do not let food residues dry on
the baking grate. Dried food residues are more difficult to remove.
• Clean the baking grate only with asoft sponge and amild dish
soap. Rinse the baking grate with clean water to remove all dirt
anddetergent residue anddry with asoft cloth.
• Do not use wire wools, coarse brushes, abrasive sponges or
aggressive cleaning products. Using inappropriate cleaning aids may
lead topermanent damage to the surface.
• Do not wash the baking grate in thedishwasher.
Cleaning after along period of non-use
• If you have not used the microwave oven for an extended period, an
unpleasant odour may have formed inside. To remove it, you can:
– pour water into alarger glass container and add several slices of
lemon. Run the oven at maximum power for 4–5 minutes.
. . . . . . . . . . . . . . . . . . . . . . . . . . . . . . . . . . . . . . . . . . . . . . . . . . . . . . . . . . . . . . . . . . . .
STORAGE
• If you are not going to use the appliance for an extended period
of time, unplug it from the power socket, allow it to cool down
and clean it according to the instructions in the “CLEANING AND
MAINTENANCE” section.
• Before storing, make sure that the appliance and all accessories are
clean and dry.
• Store the appliance in adry, clean and well-ventilated place, where it
will not be exposed to extreme temperatures and where it will be out of
reach of children and animals.
. . . . . . . . . . . . . . . . . . . . . . . . . . . . . . . . . . . . . . . . . . . . . . . . . . . . . . . . . . . . . . . . . . . .
- 18 -
07/2025
2025, .
TROUBLESHOOTING
• Before contacting an authorised service centre, check the
recommendations below.
Problem Possible cause Solution
Microwave
operation
interferes with TV
reception.
The operation of the
microwave oven may
cause TV andradio
interference. This is
similar to interference
from other small
appliances, such as
amixer, vacuum cleaner
or hair dryer.
This is normal.
Water
accumulates
andcondensates
on the door and
hot air comes out
of the ventilation
openings.
During preparation,
steam may escape from
food. Most will leave
through the ventilation
openings, but some may
accumulate on the door
and condense.
This is normal.
Microwave oven
cannot be started.
The power cable plug is
not properly inserted in
the mains socket.
Disconnect and
reconnect the plug
into the socket.
Problem with the power
socket.
Check that the socket
works by connecting
another electrical
appliance.
Tripped circuit breaker.
Return the tripped
circuit breaker to its
original position.
The oven does
not generate
microwave
energy.
The door is not properly
closed.
Close the door
properly.
Caution:
If the problem persists, stop using the oven, disconnect
the power cord plug from the mains socket and contact
an authorised service centre. Under no circumstances
repair the microwave oven yourself. There are no user
serviceable parts inside.
. . . . . . . . . . . . . . . . . . . . . . . . . . . . . . . . . . . . . . . . . . . . . . . . . . . . . . . . . . . . . . . . . . . .
TECHNICAL SPECIFICATIONS
Rated voltage......................................................................................................230 V~
Rated frequency ...................................................................................................50 Hz
Rated microwave power input ......................................................................1320 W
Rated grill power input .................................................................................... 1200 W
Rated hot air power input..............................................................................2200 W
Microwave output ..............................................................................................850 W
Microwave frequency ............................................................................... 2450 MHz
Noise level ........................................................................................................57 dB(A)
Volume .........................................................................................................................25 l
External dimensions (wx d x h) .............................................. 52 x 46 x 30.4 cm
Weight ...................................................................................................................16.3 kg
. . . . . . . . . . . . . . . . . . . . . . . . . . . . . . . . . . . . . . . . . . . . . . . . . . . . . . . . . . . . . . . . . . . .
Values provided according to Commission Regulation EU
2023/826
Off mode
Power consumption in off mode –
Time needed for the equipment to automatically reach
off mode
–
Standby mode
Power consumption in Standby mode 0.6 W
Time needed for the equipment to automatically reach
standby mode
0 min
Networked standby mode (Wi-Fi)
Power consumption in networked standby –
Time needed for the equipment to automatically reach
networked standby mode
–
. . . . . . . . . . . . . . . . . . . . . . . . . . . . . . . . . . . . . . . . . . . . . . . . . . . . . . . . . . . . . . . . . . . .
INSTRUCTIONS AND INFORMATION ON DISPOSAL
OF USED PACKAGING MATERIAL
Dispose of used packaging material at the designated municipal waste
disposal site.
. . . . . . . . . . . . . . . . . . . . . . . . . . . . . . . . . . . . . . . . . . . . . . . . . . . . . . . . . . . . . . . . . . . .
DISPOSAL OF USED ELECTRICAL AND ELECTRONIC
EQUIPMENT
Used electrical andelectronic products must not be disposed of in
ordinary municipal waste. To enable the proper disposal, renewal and
recycling of these products, deliver them to the designated collection
points. Alternatively, in some European Union states or other European
countries the products can be returned to the local retailer when buying
an equivalent new product. By properly disposing this product, you
help preserve valuable natural resources and help to prevent potential
damage to the environment and human health resulting from improper
waste disposal. For more details, contact your local authority or nearest
collection point. Fines may be imposed for the improper disposal of this
type of waste as per national regulations.
For business entities in European Union States
If you wish to dispose of electrical and electronic equipment, please
request the necessary information from your retailer or supplier.
Disposal in other countries outside the European Union
If you wish to dispose of this product, request the necessary information
about the correct disposal method from the local council or from your
retailer.
. . . . . . . . . . . . . . . . . . . . . . . . . . . . . . . . . . . . . . . . . . . . . . . . . . . . . . . . . . . . . . . . . . . .
Changes to text and technical parameters are reserved.