1
MODEL: RJ39-WIFI
SOUS VIDE COOKER
CUSTOMER SERVICE: 888.315.6553 | customerservice@chefman.com
RJ39-WiFi
®

2
MODEL: RJ39-WIFI
CONGRATULATIONS ON YOUR PURCHASE!
Every Chefman product is manufactured to the highest standards of performance and
safety, and we are confident that you will be so satisfied with your purchase that Chefman
will be your go-to company for appliances in the future.
Customer satisfaction is a key element of our company’s philosophy. The Chefman brand
exists to fill a void on retail shelves and in consumer kitchens for a truly value-focused
kitchen appliance. By questioning and adding value and innovation at every touch point
in the manufacturer to end user journey, Chefman provides home chefs with the tools
they need to achieve picture-perfect results with maximum efficiency. In addition to
manufacturing appliances that are dependable, affordable, and built with intuitive features
to enhance your kitchen experience, we pride ourselves on providing top-of-the line post
purchase support, which includes complimentary access to ClubChefman.com for product
tutorials, delicious recipes & how-to videos, and access to our team of dedicated Chefs.
Should a problem arise, each product is backed by a comprehensive manufacturer’s
1-year warranty as well as outstanding after-sales service support through our dedicated
customer service team. In the unlikely event that your product does not operate as
described in the manual please feel free to call or email our helpline for assistance. We
understand that sometimes products can malfunction, so if you feel that your appliance is
not operating as it should, warranty claims can be made within one year from the date of
purchase when accompanied by a dated receipt.
This guarantee is in addition to your statutory rights; your statutory rights are not affected.
This limited warranty does not apply in cases of damage caused by accident, improper
use, abuse or force majeure.
This warranty gives you specific legal rights. Rights may vary depending on your state
or province of residence. Some locations do not allow limitations on implied warranties
or special incidental, or consequential damages, so the limitations may not apply to you.
This limited warranty will be invalidated if the appliance is tampered with in any way
whatsoever.
Our telephone helpline (888) 315-6553 is available for questions or technical assistance:
Monday-Friday 9am to 5 pm EST.
Customers can also receive support via email: customerservice@chefman.com.
The Wi-Fi® and Wi-Fi Alliance® are registered trademarks of Wi-Fi Alliance. Any other used trademarks and registered trademarks are the
property of their respective companies. Bluetooth® word mark and logos are registered trademarks owned by Bluetooth SIG, Inc. and any use of
such marks by the Chefman is under license. Other trademarks and trade names are those of their respective owners.

MODEL: RJ39-WIFI
1 Introduction
2 Safety Instructions
4 Features
5 Operating Instruction
16 Troubleshooting
17 Cleaning and Maintenance
18 Tips & Tricks
20 Cooking Guide
23 Terms and Conditions
24 Warranty Card
CONTENTS

1
MODEL: RJ39-WIFI
INTRODUCTION
Welcome to the gourmet world of Sous Vide precision cooking!
Sous vide cooking has a long history and tradition as a cooking method used by
professional chefs. “Sous Vide” is a French term for “under vacuum”. It describes
a cooking method in which food is place in food safe vacuum sealed bags and is
cooked in a water bath. The food is cooked at a constant low temperature over a
long time.
The long slow process is ideal to tenderize less choice cuts of meat as the muscle
is broken down during the lengthy controlled cooking process. The food is cooked
in a marinade of its own juices enhanced with any ingredients or spices that you
select. This cooking method yields food that is moist and flavorful.
Sous vide cooking is particularly suited to beef, chicken, duck, lamb, pork, turkey,
veal, and other game meats. The sous vide method works well with fish and other
seafood as well as heartier vegetables and fruits. Welcome to the world of sous
vide cooking –bon appetite!

2
MODEL: RJ39-WIFI
THIS APPLIANCE IS FOR HOUSEHOLD USE ONLY.
FOR YOUR SAFETY AND CONTINUED ENJOYMENT OF THIS PRODUCT, READ ALL
THE DIRECTIONS CAREFULLY AND STORE THIS MANUAL IN A SAFE PLACE FOR
FUTURE REFERENCE.
GENERAL SAFEGUARDS
• This appliance is intended for indoor home use only.
• Never use any accessories or parts from other manufactures. Your warranty will become
invalid if such accessories or parts have been used.
• Wash all removable parts with a mild cleanser before the first use.
• Check that your home power supply corresponds with this appliance’s intended voltage.
• Place this appliance on a stable, heat resistant surface. Make sure not to place near or on
a heat source such as gas or electric burner or oven.
• Short power cords are attached to this item to prevent entanglement and tripping
hazards. Extension cords with corresponding voltage, electrical rating and grounding
wires can be used. Care should be taken so that any exposed cord is not hanging down
from a counter or table where it can be pulled on or tripped over by any child or adult.
• Before using this appliance inspect the plug and cord line for cuts and/or abrasion marks.
If they are found, do not use this appliance and contact our customer service team.
• Insert the plug by grasping it firmly and guiding it into your home’s grounded electric
outlet. Disconnect by grasping the plug and removing it from your home’s grounded
electric outlet. Never wrap the cord tightly around the appliance during use or storage
as this can cause the wire to fray and break. Do not plug or unplug the appliance with a
damp or wet hand as this can cause an electric shock.
• During initial use, you may notice some smoke and or a slight odor. This is normal and
should quickly dissipate. It should not reoccur after the appliance has been used a few
more times.
• This appliance should be used only by persons who are capable of understanding
the user manual or are supervised by those who have adequate understanding of the
appliance's features, uses and the operating instructions. Children must be supervised
and should not be left alone with appliances during their operation.
• Care should be taken not to move appliances that are in use.
• Do not move the pot or container containing the Sous Vide when it is full of water.
SAFETY INSTRUCTIONS
IMPORTANT SAFEGUARDS

3
MODEL: RJ39-WIFI
SAFETY INSTRUCTIONS
• Appliance exteriors are designed to be cool to the touch. Portions do get HOT during use.
Burns can result from touching heating elements, if any part is designed to be handled do so
with care.
• Pay careful attention to any warning labels on this appliance.
• Do not use this appliance near an open flame or flammable materials.
• Before cleaning, make sure that the appliance is turned off, unplugged, and cooled to room
temperature.
• When you immerse the sous vide device in water keep the water level between the “MIN”
and “MAX” levels indicated on its shaft.
• Clean the housing of this appliance with a non-abrasive cleaner and a soft pad or cloth.
• Do not use alcohol as a cleaning product.
• Store unit in a cool, dry location.
• In case of any electric emergency such as a fire, call 911.
• Do not touch hot surfaces. Use handles or knobs.
• To protect against electrical shock do not immerse cord, plugs, or any parts beyond the
max. level in water or other liquid.
• Close supervision is necessary when any appliance is used by or near children.
• Do not operate any appliance with a damaged cord or plug or after the appliance
malfunctions or has been damaged in any manner. Return appliance to the nearest
authorized service facility for examination, repair, or adjustment.
• The use of accessory attachments not recommended by the appliance manufacturer may
cause injuries.
• Do not use outdoors.
• Do not let cord hang over edge of table or counter, or touch hot surfaces.
• Extreme caution must be used when moving an appliance containing hot oil or other hot
liquids.
• To disconnect, turn any control to "off", then remove plug from wall outlet.
• CAUTION – To ensure continued protection against risk of electric shock, connect to properly
GFCI outlets only.
4
MODEL: RJ39-WIFI
FEATURES
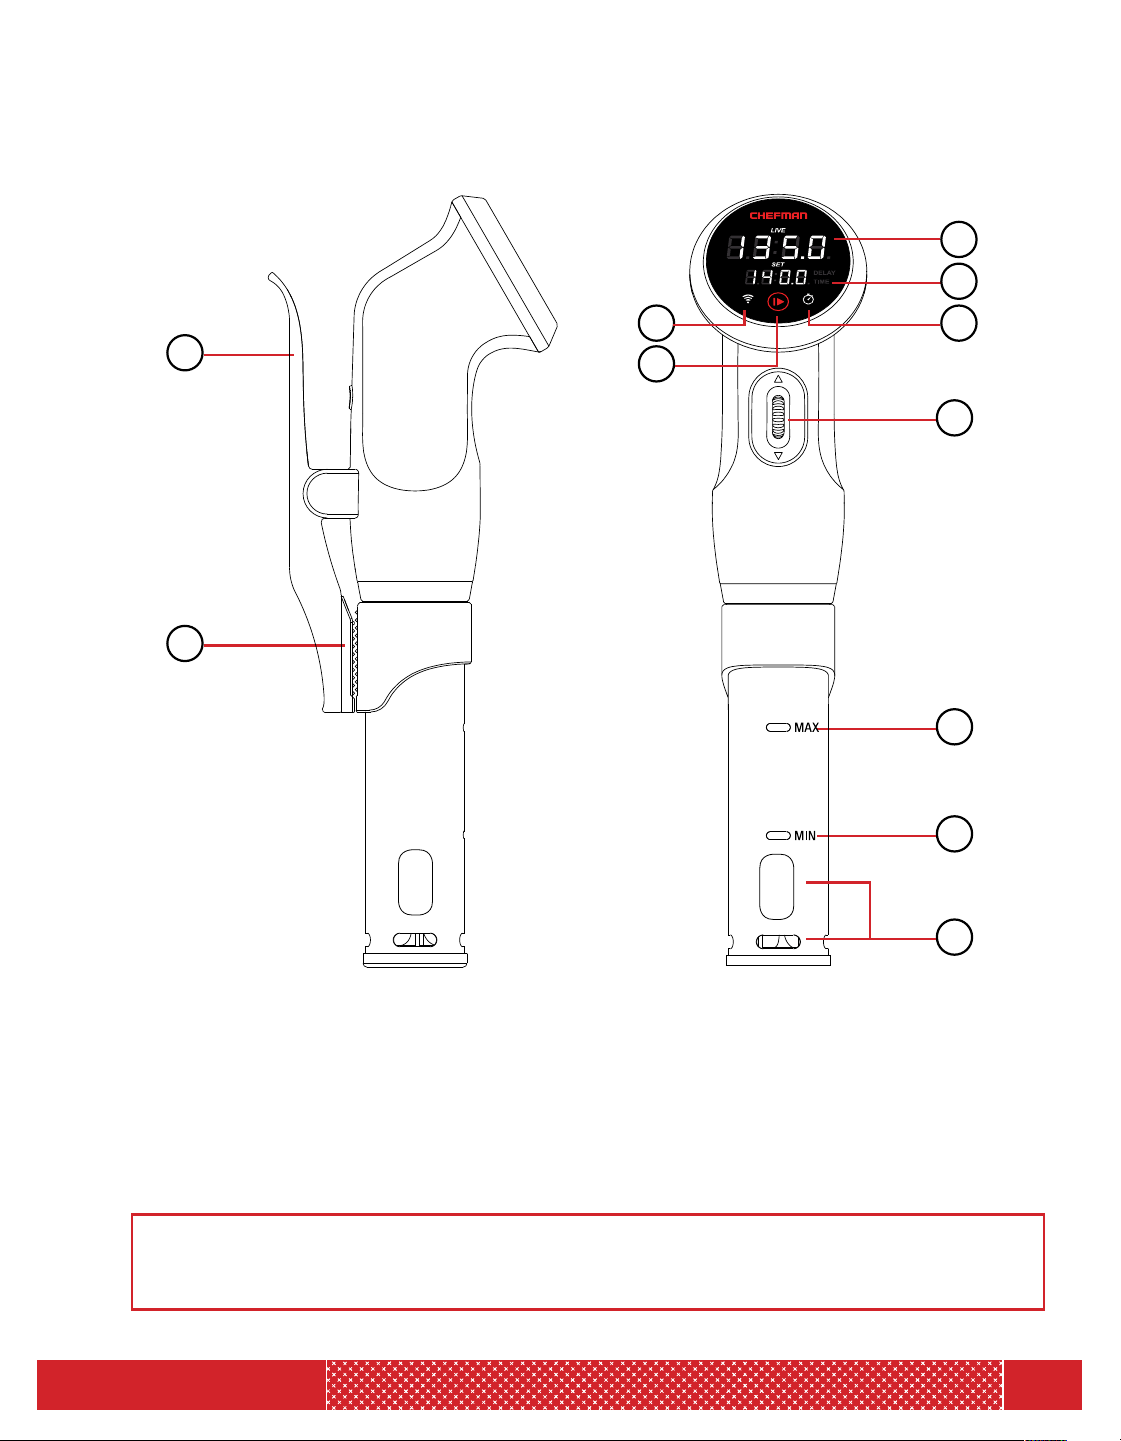
NOTE: The unit can display temperatures in either Fahrenheit or Celsius scale. Press
and hold the START/STOP button for 5 seconds to convert from one scale to the other.
1. CLAMP
2. NON-SLIP RUBBER GRIP
3. CURRENT TEMPERATURE
4. SET TEMPERATURE/
COUNTDOWN TIMER
5. WIFI BUTTON
6. START/STOP BUTTON
7. SET TIME/DELAY
8. CONTROL DIAL
9. MAXIMUM WATER LEVEL
10. MINIMUM WATER LEVEL
11. WATER INLET/OUTLET
1
3
6
75
8
9
10
11
2
4

5
MODEL: RJ39-WIFI
YOU HAVE PURCHASED A SOUS VIDE APPLIANCE THAT HAS BEEN
DESIGNED TO FUNCTION WITH BLUETOOTH
®
AND WIFI
®
CONNECTIVITY
AS WELL AS IN THE SIMPLE ELECTRIC ONLY MODE. BOTH USER STYLES
REQUIRE YOU TO FOLLOW THE STEPS IN THE SECTION-PREPARING TO
USE THE SOUS VIDE.
Cooking With Your Sous Vide
1. The Sous Vide circulator will work in any pot or heat safe container to which you can
clamp the sous vide. Clamp your sous vide to the wall of your pot/container. Fill your
pot or container with sufficient water at a level between the MIN and MAX markings
on the shaft of the sous vide. This item requires no other heat source. Place your pot or
container near an electric outlet.
2. Place food inside a re-sealable or vacuum seal bag. Chefman recommends vacuum
sealing the food beforehand to help lock in the flavor of your food. If you are using a
re-sealable bag to cook, keep bag slightly open on top and immerse the bag in the
water at an angle leaving the opening jutting out of the water. The water pressure will
create a natural vacuum pushing out the air in the bag. Slowly seal the corner of the
bag pushing out as much air as possible and immerse the bag below the water.
3. Use any clothespin style clip to attach your bag to the pot/container you are using.
4. Clip the bag away from the water inlet/outlets in the sous vide shaft, ensuring the bag is
not too close to the heat source or blocking the water from circulating.
5. To ensure that the minimum amount of water evaporates from the container you can
use sous vide water balls or cling wrap on the surface of your container. Either choice
will limit evaporation during the cooking process. Make sure not to cover the sous vide
with the cling wrap.
6. Plug the sous vide into your closest electric outlet.
OPERATING INSTRUCTIONS FOR THE APP-BLUETOOTH/WIFI MODE
PLEASE NOTE: When connecting to your Sous Vide Cooker via bluetooth do not
connect from your phone settings, ONLY connect through the Chefman app.
Connecting To Your Sous Vide
1. Make sure your device’s Bluetooth
®
setting is turned on.
2. Make sure you have downloaded and opened the Chefman Sous Vide App on your
WiFi/Bluetooth
®
enabled device.
OPERATING INSTRUCTIONS
6
MODEL: RJ39-WIFI
3. Press the WiFi
®
button to initiate its broadcast. The WiFi
®
button will begin to blink blue,
indicating the Bluetooth
®
frequency is broadcasting seeking a connection with a device.
NOTE: You can turn off the WiFi
®
broadcast by pressing the WiFi
®
button again with a
single tap. The WiFi
®
button will no longer be lit, indicating it has been turned off.
4. Now press "Connect" on the touchscreen of your device. The screen of the app will alert
you to an option of connecting to your Sous Vide Cooker.
5. The app will automatically try to connect the sous vide via Bluetooth
®
. If you have not
turned on your Bluetooth
®
you will be alerted to turn on your Bluetooth
®
setting.
6. The WiFi
®
button will blink blue while it is trying to connect.
7. When you are successfully connected via Bluetooth
®
, the WiFi
®
button stops blinking
and remains solid blue (no blinking). The app will notify you that you have successfully
connected to Bluetooth
®
. The word "connect" will change to "connected" and the app
will give you the option of starting to cook or connecting to WiFi
®
. You can connect to
WiFi
®
at this time or through the settings icon at the bottom of the app screen.
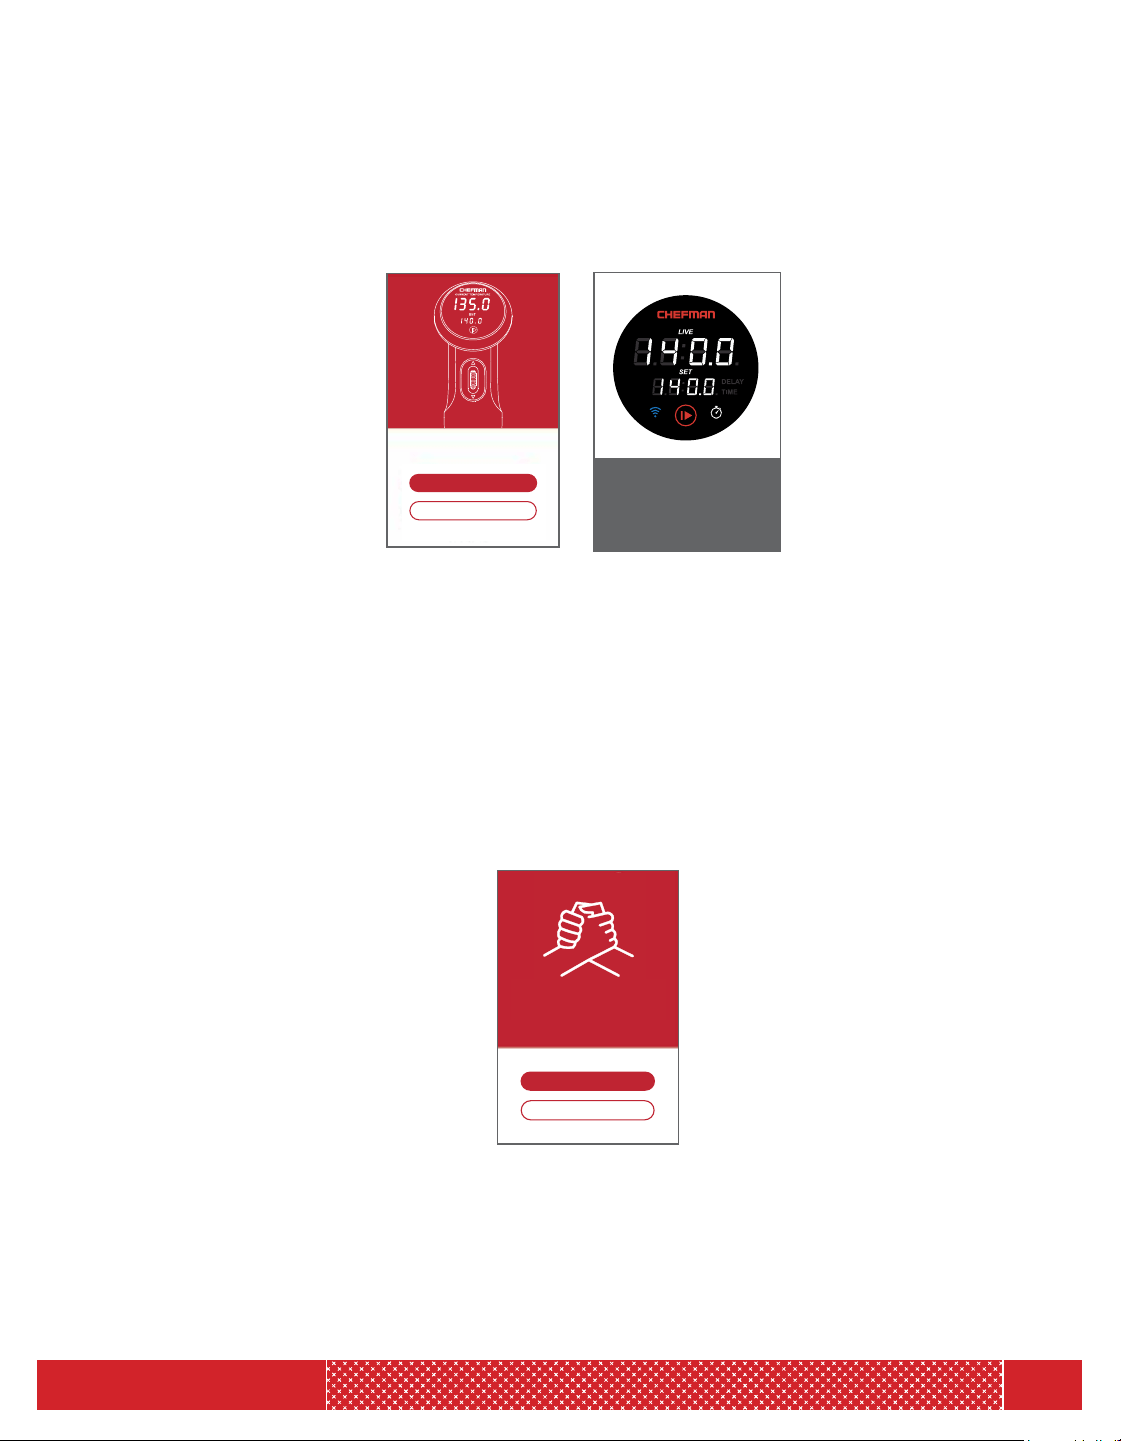
8. Starting to cook with Bluetooth only - The app display is designed with several icons to
assist you in the easy set up and function of your sous vide. Icons are intuitive and easy
to use. They include a time setting, temperature setting, stop, and start. A screen image
of the sous vide display screen is shown as well. Both the actual and current temperature
of the water will be shown on the display of the sous vide as well as on the app screen.
OPERATING INSTRUCTIONS
WiFi button is lit and
color is solid BLUE after
successful connection.
NO BLINKING.
Connect to my Precision Cooker
I need a Precision Cooker
Not Now
Start Cooking
Connect to WiFi
You’re Connected!
Connect to my Sous Vide Cooker
I need a Sous Vide Cooker

7
MODEL: RJ39-WIFI
9. Setting the Temperature (sous vide is not running) - You can either use the default
temperature or set your own. The sous vide temperature display screen will blink until
you either change the default temperature, or decide to use the default temperature by
pressing the “START/STOP” icon. To change the default temperature- press the “TEMP”
icon and use the app display to enter temperature. Now press “START/STOP” icon. The
display on the actual sous vide appliance will display “PRE” indicating that the sous vide is
preheating (this will happen for the initial start-up temperature). It will display “PRE” briefly
and then show the actual temperature on the “LIVE” display as it approaches your set
temperature.
10. Setting the Temperature (sous vide is running). You can press the temp icon anytime
and enter the new temperature, and the app will send the information to the sous vide.
The new “SET" temperature will be displayed.
11. Connecting to WiFi
®
- You can connect to WiFi
®
once you have connected via Bluetooth
®
.
You will be directed to enter your WiFi
®
identification via Bluetooth. You will be asked for
your WiFi
®
; SSID, Password and Security type such as (WPA, WPA2, WPSK, etc.). You
will input the settings on your WiFi
®
enabled device and then complete by pressing done.
A screen will let you know that you have successfully connected. Your device will show a
working WiFi
®
icon on the top of the screen.
12. Keep your WiFi
®
and Bluetooth
®
connections open on your device to maintain
connectivity.
13. Disconnecting and reconnecting to another electric outlet:
a. When you have been connected to WiFi
®
, your sous vide will try to connect to the
most recent WiFi
®
settings. If it cannot connect to WiFi
®
, within approximately five
minutes it will try to reset itself back to the Bluetooth
®
mode and clear the WiFi
®
settings.
b. If you never connected to WiFi
®
, the sous vide will be in Bluetooth
®
mode and will try
to connect with Bluetooth
®
.
14. You can reset your setting by holding the WiFi
®
button for 5 seconds. This will cause the
sous vide to go back to the Bluetooth
®
mode.
OPERATING INSTRUCTIONS
Set Up
Not Now
SSID*
Choose a Wi-Fi Network
SECURITY*
PASSWORD*
(20 Characters Max)
8
MODEL: RJ39-WIFI
OPERATING INSTRUCTIONS
APP SENDING INFORMATION TO THE SOUS VIDE
1. When the device is plugged in—the temperature default will be blinking in the “SET”
temperature display. If you want to cook at that default temperature you can just press
“START/STOP”. The motor will start and the display will stop blinking. The screen will
briefly say “PRE” as it is preheating. This will toggle to showing you the temperature as
it is approaching the default.
2. Starting the sous vide from the app:
a. If you want to start your sous vide press the “START/STOP” icon on the app screen.
The temperature screen will stop blinking on the sous vide any time you press “START/
STOP” icon. You will hear a beep tone and the sous vide will start running, and the
“START/STOP” icon on the sous vide will become red.
b. Your sous vide will start with a “Preheat” mode when the initial temperature is set for
sous vide cooking. It will display briefly as “LIVE” actual temperature is reaching your
“SET” temperature. You will know your sous vide is in the preheating mode because
the sous vide display screen will show “PRE”. This will only be displayed after you have
plugged in the device and set the first cooking temperature.
Temperature screen
stops blinking.
Start/Stop Buttons
becomes red.
00:00
TEMP
00:00
00:00
DELAY
TIMER
START
104 °F
Connected
9
MODEL: RJ39-WIFI
OPERATING INSTRUCTIONS
c. If you want to stop your sous vide while it is running, press the “START/STOP” icon on your
app screen. You will hear a beep and the sous vide will stop running. The temperature screen
will now be blinking on the sous vide display. The “START/STOP” icon on the sous vide will
become white.
d. To change your cooking temperature when the sous vide is running, press the “SET TEMP”
button from the app and set the new target temperature. The sous vide display screen will
automatically show the new target temperature. The “SET” screen will not blink to indicate
that the sous vide is running.
e. To change the temperature from Fahrenheit to Celsius press on the SETTINGS button on your
app screen. If the sous vide was in Fahrenheit, it will now display Celsius on the “LIVE” sous
vide display screen. The C or F will only display for about 3 seconds to let you know that your
sous vide has been changed to the new degree scale.
SET screen is now
blinking.
Start/Stop Buttons
becomes white.
00:00
TEMP
00:00
00:00
DELAY
TIMER
START
104 °F
Connected
00:00
TEMP
00:00
00:00
DELAY
TIMER
START
104 °F
Connected
10
MODEL: RJ39-WIFI
00:00
TEMP
00:00
00:00
DELAY
TIMER
START
104 °F
Connected
OPERATING INSTRUCTIONS
f. To set your cooking time - Time is entered in hours and minutes. Press the “TIMER” icon
on the app screen, and you can set the timer hour and timer minutes. The app will show
a screen scroller bar for hours and minutes. Enter hours press “TIMER” then enter minutes
and press “TIMER”. Press “Start/Stop” and the app will send the information to the sous
vide. The "SET" display screen will show the hours and minutes you have set for several
seconds, and will then return to displaying current temperature. It will not be blinking as the
sous vide is running. The “TIME” button will be white. If you choose to set the timer hour to
“00” and timer minutes to “00“ the “TIME” button will be off.
g. To change the timer (hours and minutes) when the sous vide is in the running mode press
“TIMER” on the app screen and you can set the timer for hours and minutes. The app will
send the information to the sous vide. The "SET" display screen will show the desired time
in hours and minutes for several seconds, then revert to showing the set temperature on a
blinking screen. Press "START/STOP" to resume cooking.
"Time" light is on and is
white
"Set" screen shows
target temperature
after 3 seconds and
"Set" screen is NOT
BLINKING
"Time" light is on and
is white.
"Set" screen displays
"Timer" as 05:30 for
3 seconds
11
MODEL: RJ39-WIFI
i. To change the Delay hour and Delay minute when the sous vide is not running – Press the
"DELAY" icon to put your sous vide in delay mode. Use the scrolling bar to set your desired
delay time, and then press confirm. The temperature on the sous vide screen will be blinking
to indicate that the unit is in not running, and the delay icon will be steady in white.
j. To set both “TIME” and “DELAY” from the app follow the instructions for both time and
delay. Both words will show in white on the sous vide screen.
k. When you are connected to either Bluetooth
®
or WiFi
®
:
• The sous vide will send the “LIVE” (actual) temperature to app.
• If you START/STOP the sous vide, the sous vide will notify the app that the sous vide
has STARTED or STOPPED.
The app can read the following settings on your sous vide:
• TIME - Hours and Minutes
• DELAY - Hour and Minutes
• TEMPERATURE
a. TARGET (set to)
b. CURRENT (actual)
• WATER LEVEL - If BELOW MIN or ABOVE MAX, an error code will be sent to the app
and will be displayed on the sous vide on “LIVE” display.
• “SET” temperature-when the sous vide has reached the target temperature, the sous vide
will beep and notify you through the app that it has reached the target temperature.
• “COUNT DOWN TIME” when you have completed the cooking time set, the sous vide will
beep and notify you through the app that the cooking time is complete.
• “DELAY COUNT DOWN TIME” when your sous vide has completed the set delay time, the
sous vide will beep and notify you through the app that the delay time is over and the sous
vide is ready to begin cooking.
"Delay" light is on and
is white
"Set" screen shows
target temperature
after 3 seconds and
"Set" screen IS
BLINKING
"Delay" light is on and
is white.
"Set" screen displays
"Delay" as 02:10 for
3 seconds
OPERATING INSTRUCTIONS
00:00
TEMP
00:00
00:00
DELAY
TIMER
START
104 °F
Connected

12
MODEL: RJ39-WIFI
Electronic Message
E1
Water in your container is below the minimum
marking on the sous vide.
MANUALLY CONTROLLING YOUR SOUS VIDE
Preparing to use the sous vide
1. The Chefman Sous Vide Cooker will work with any pot or container on which you can
secure the sous vide circulator. The pot needs to be able to hold sufficient water to fill at a
level that is between the minimum “MIN” and maximum level “MAX” shown on this device.
Do not place on a fire, stovetop or other heat cooktop. This item requires no other heat
source. You need to position the container/pot with the sous vide near an electric outlet
(the length of the power cord determines the distance).
2. Attach the sous vide clamp to the container/pot wall with water filled between the
minimum “MIN” and maximum “MAX” line.
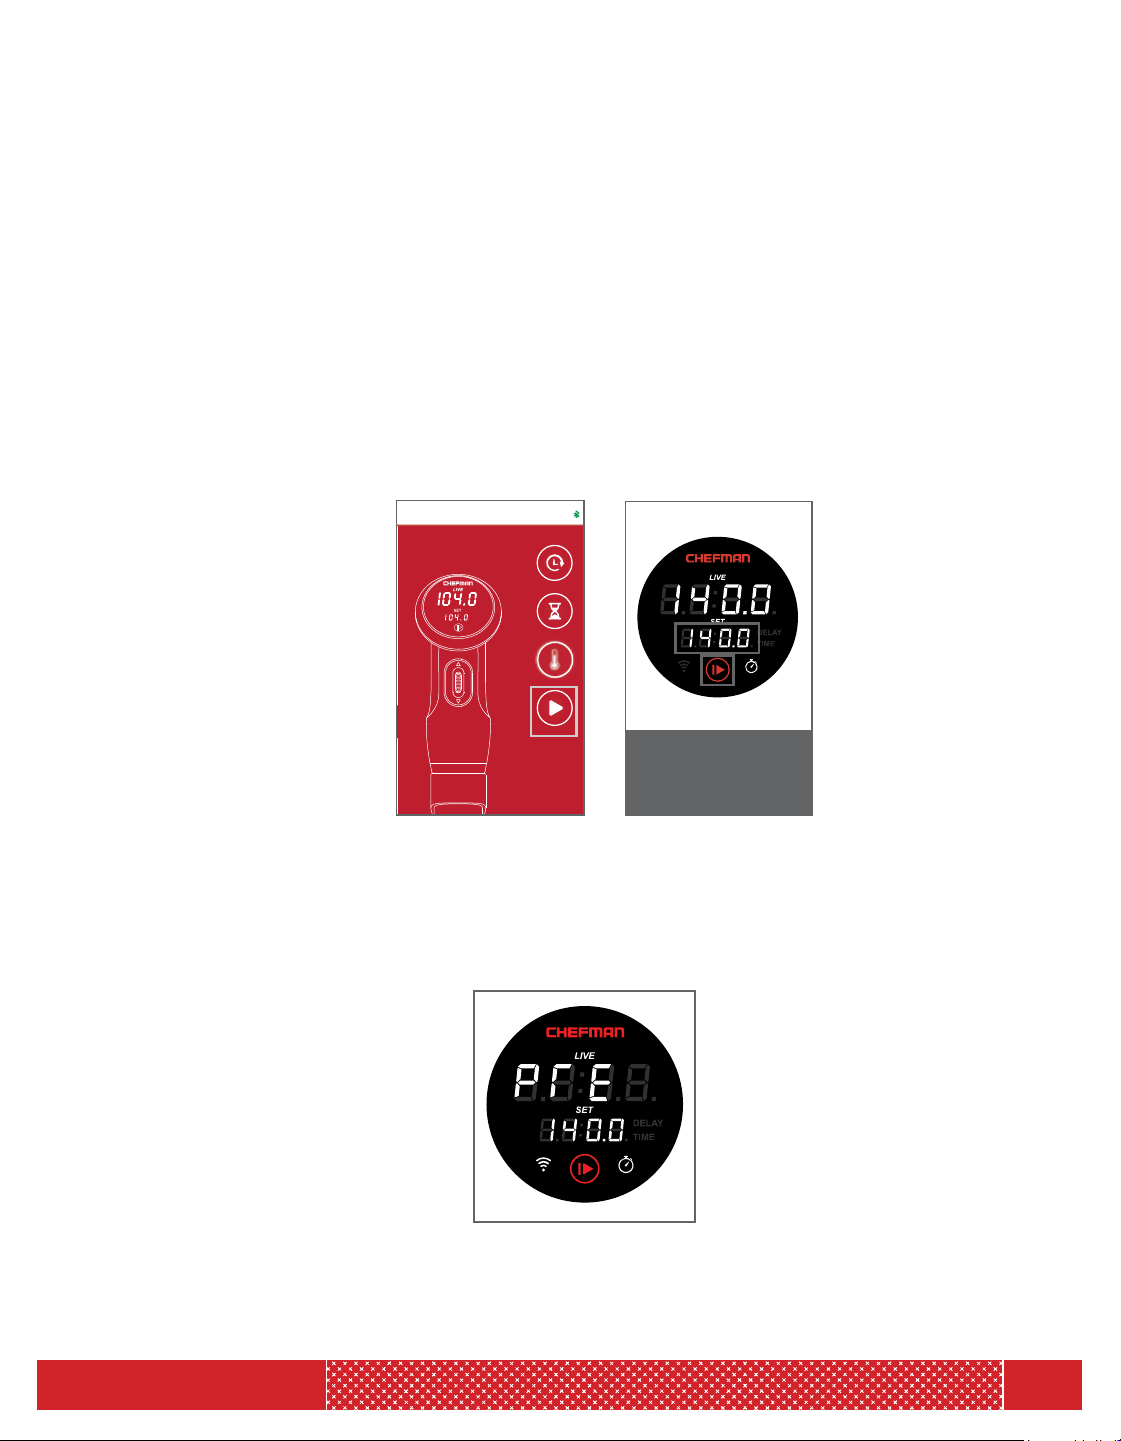
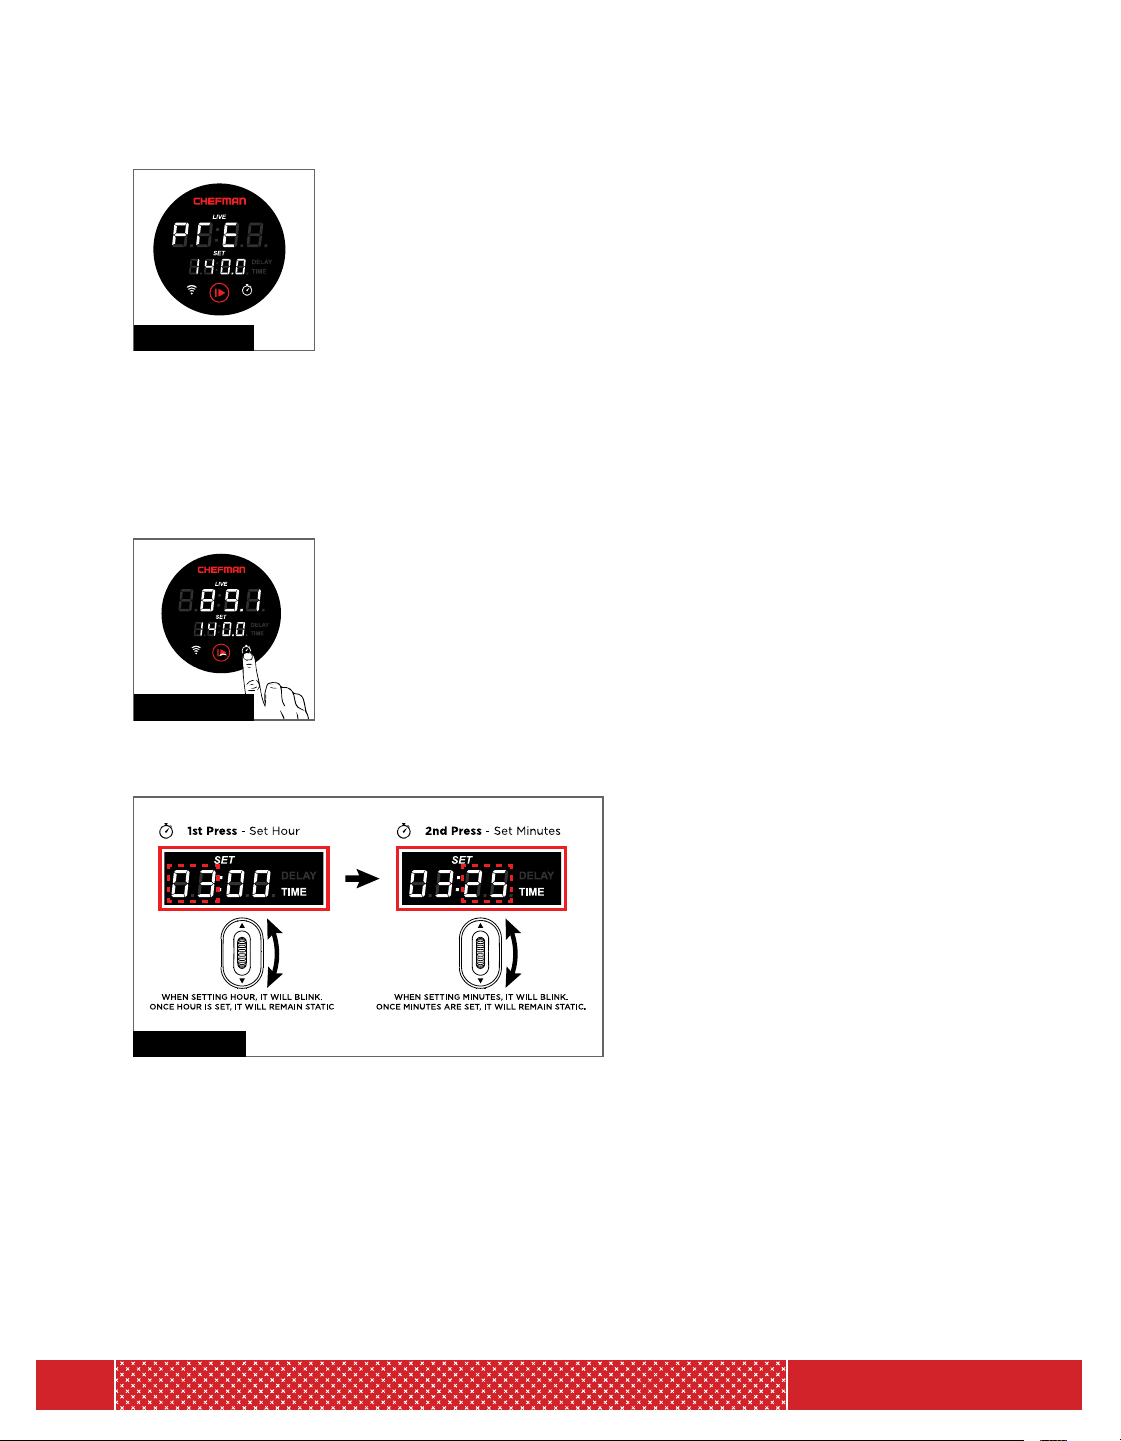
Starting the sous vide
3. Plug unit into your wall outlet (See Figure 1). The sous vide display will light up. The
“SET” display temperature setting will blink to indicate that the temperature is ready to
be changed. The “LIVE” part of the display will show the actual temperature of the
water in your container/pot.
4. Use the scroller wheel to reach your desired temperature
(See Figure 2).
5. Press the play button; this will cause the sous vide to start heating and circulating the
water. (See Figure 3 on text page)
6. The sous vide device has a preheat cycle that will run until it
reaches the set temperature. The sous vide will show the letters
“PRE” to indicate it is preheating and then toggle back to the
actual temperature of the water as it reaches your desired selected
temperature.
7. Once the unit preheats and reaches the set temperature, it will beep
one long beep and then begin the cooking cycle.
8. The display will then show the actual temperature throughout the
cooking process.
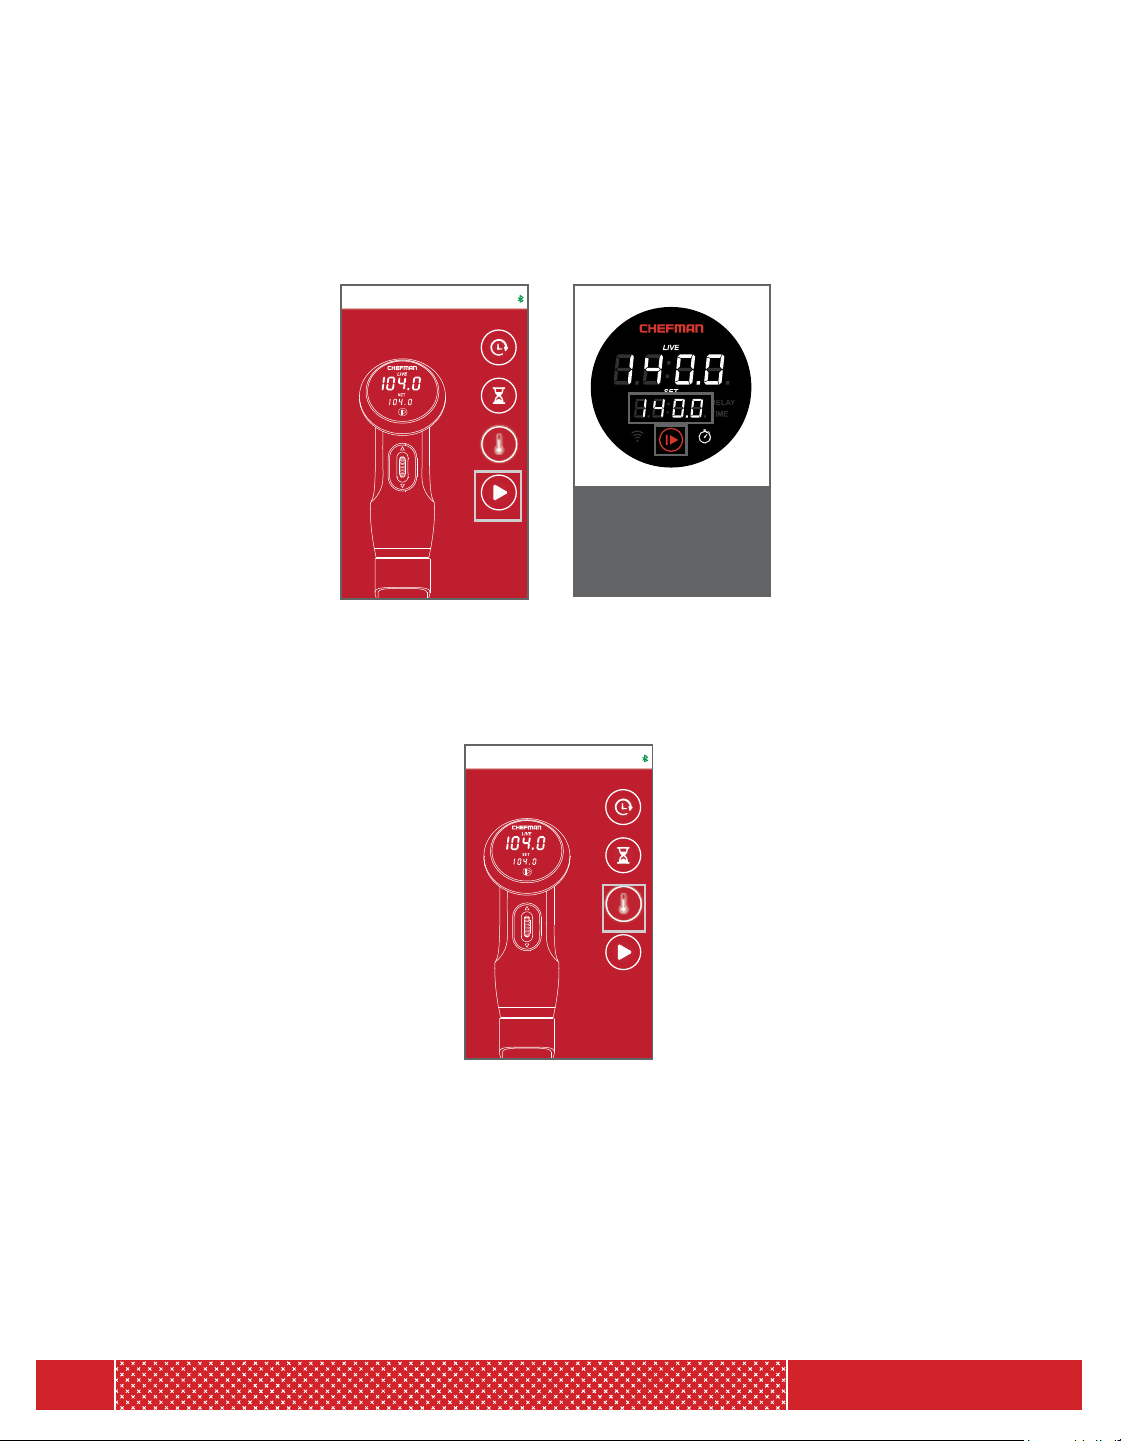
9. Setting the Temperature
a. Set your desired temperature by scrolling until you reach the temperature of your choice.
Figure 2
Figure 1
OPERATING INSTRUCTIONS
13
MODEL: RJ39-WIFI
b. Press the "START/STOP" BUTTON.
c. The sous vide will now begin the preheat. The "LIVE" display will
indicate “PRE” to indicate it is preheating and then toggle back to the
actual temperature of the water. (See Figure 4)
d. When it reaches your set temperature it will beep once and begin the
cooking cycle.
e. The “LIVE” display will then show the actual temperature throughout
the cooking process.
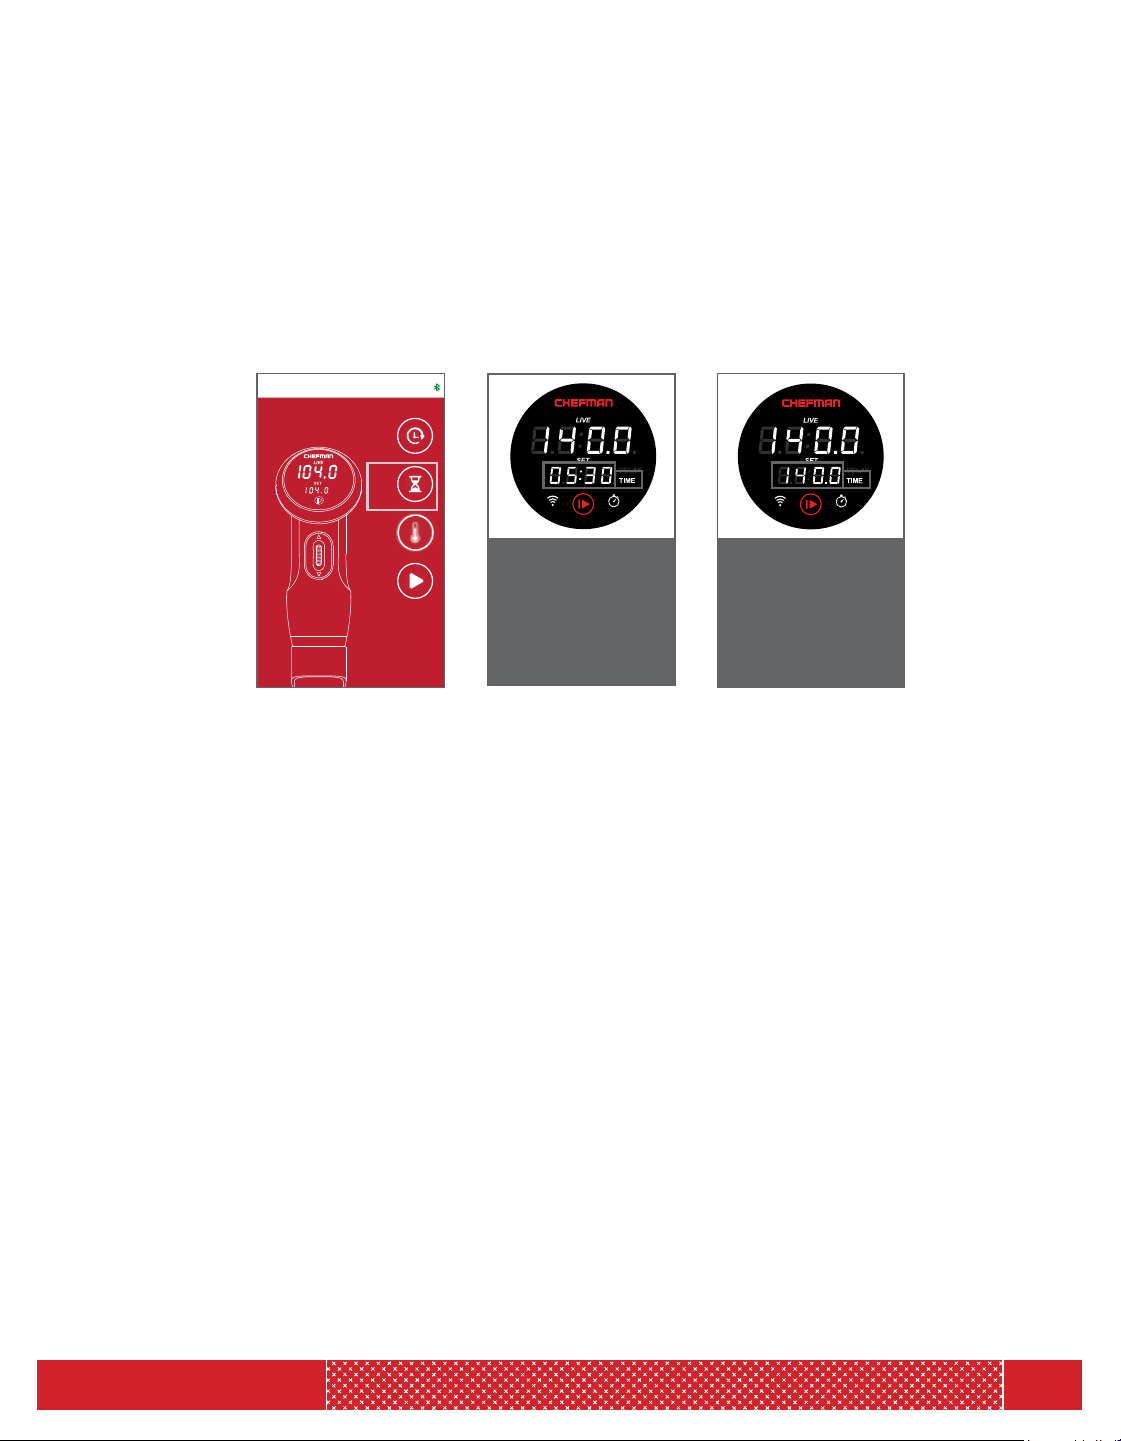
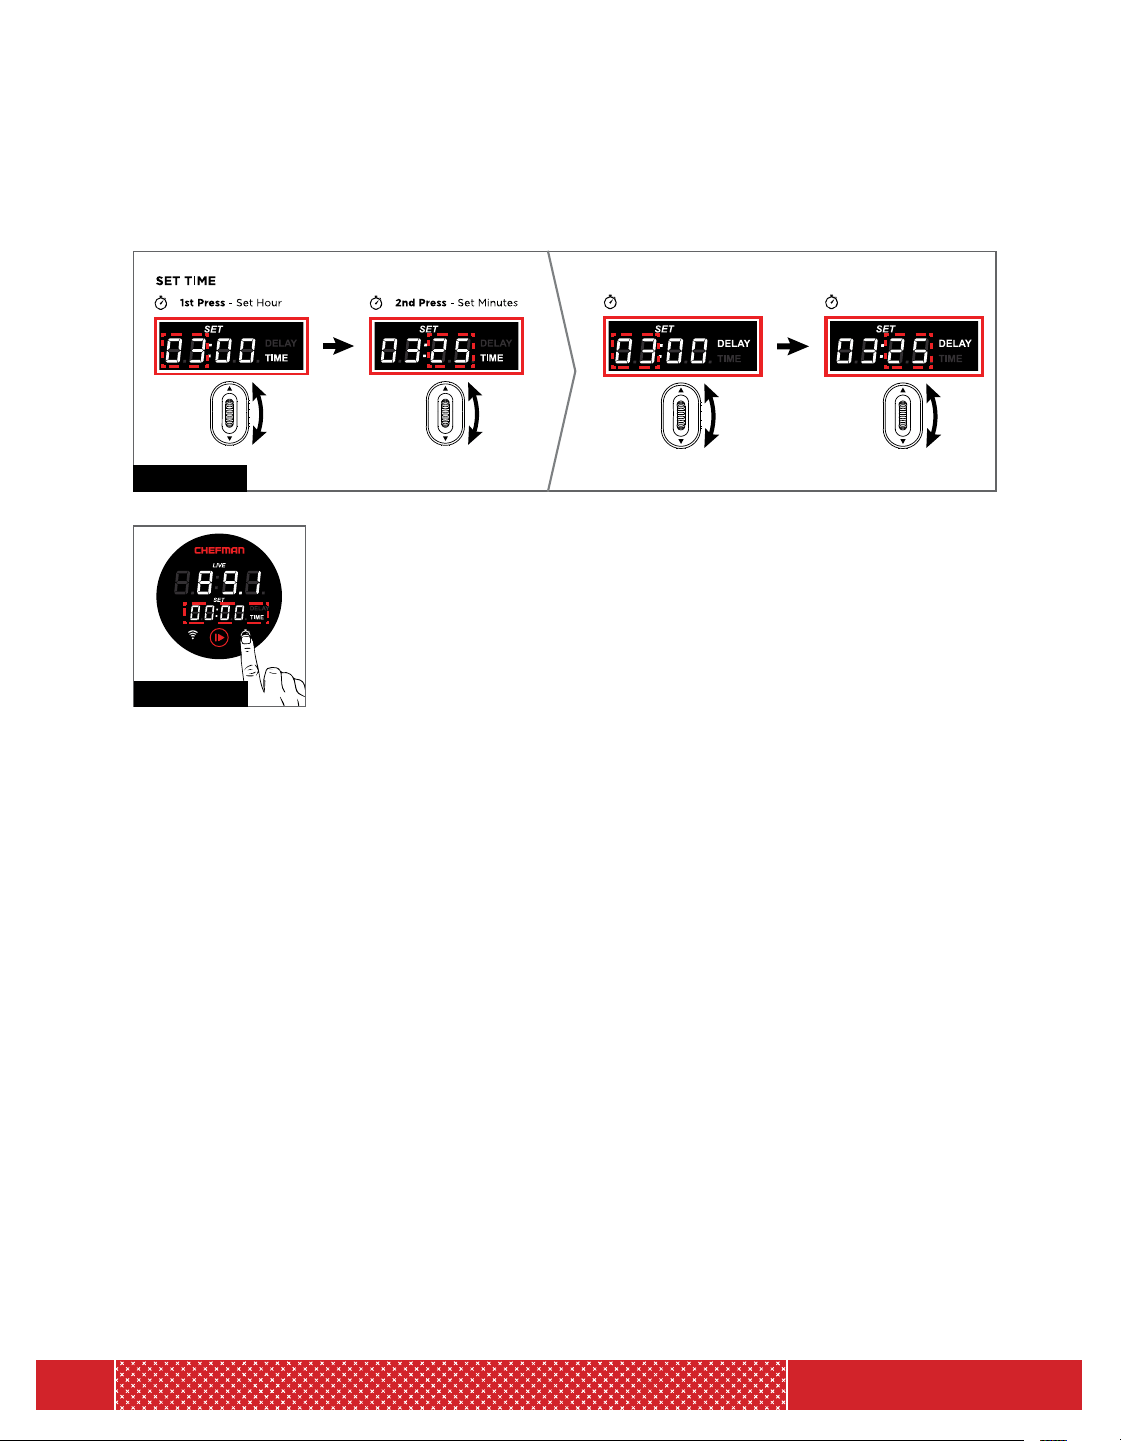
10. Setting the Time
a. Press the “TIME” button. This will put the sous vide in “TIMER MODE” (See Figure 5).
b. Look at the “SET” display screen. The left two digits and the word “TIME” will be blinking.
Now you can set the hours needed for your cooking program.
c. Use the scroller to reach the number of hours needed for your sous
vide cooking process. Press “TIME”.
d. Look at the “SET” display screen. The right two digits and the word
“TIME” will be blinking. Now you can set the minutes needed for your
cooking program.
e. Use the scroller to reach the number of minutes needed for your sous
vide cooking process. Press “TIME”.
f. Now that you have set your cook timer, the “SET” display will blink again to indicate that the
user should change the temperature (See
Figure 6).
g. Enter your desired cooking temperature
and press "START/STOP".
Changing the Settings During the Cooking Process
Temperature change:
a. If you press "START/STOP" it will pause the cooking cycle and the digits on the “SET”
display will blink. This gives you the ability to easily change the temperature at any time.
b. Use the scroller to change the temperature and press "START/STOP" to restart
the sous vide.
Figure 4
Figure 5
Figure 6
OPERATING INSTRUCTIONS

14
MODEL: RJ39-WIFI
Time change:
c. If you press the “TIME” button when you are in the middle of cooking, it will pause the
cooking cycle. You can now change the countdown timer on the “SET” display. First the
“hour” digits are blinking; enter the new cooking time then press timer again and you can
enter the ”minutes” digits.
d. You can change the cooking temperature at any time during the cooking process by
pressing the "START/STOP" button. The cooking process will be paused, the “SET”
display will blink and you may now enter your new desired temperature. This can be
done at any time in the cooking process.
e. Pressing "START/STOP" at any time during cooking will stop cooking. If you want to
change the temperature just scroll to the new temperature on the spot.
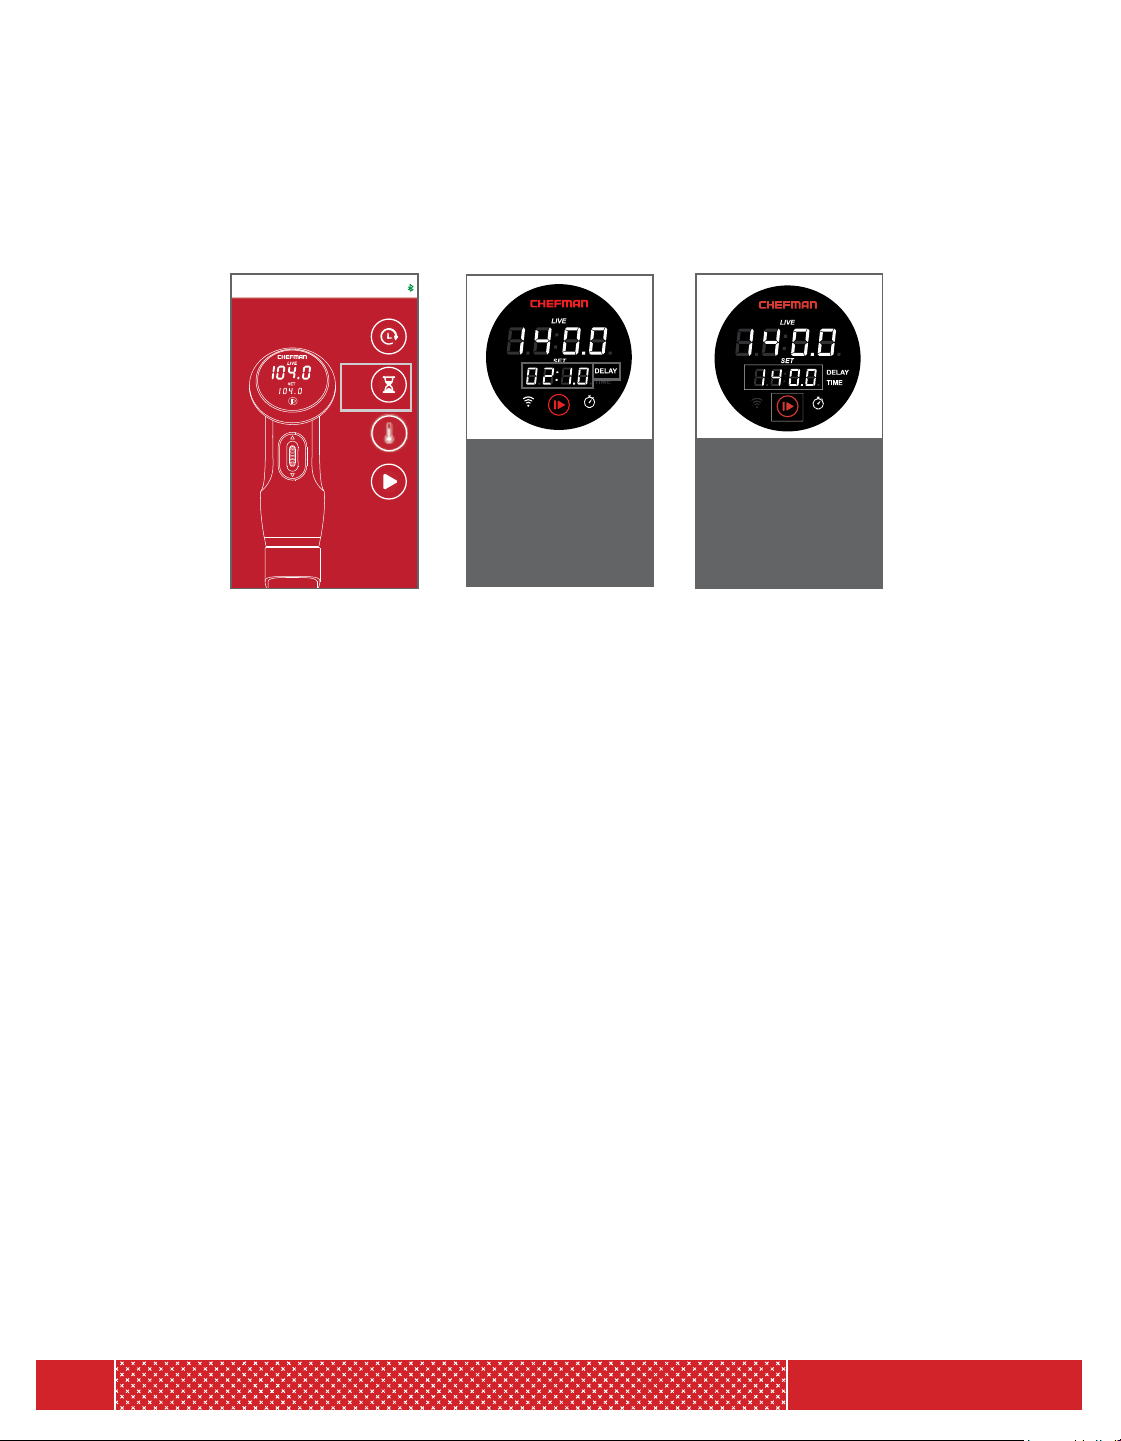
Delay Function:
If you want to delay the start time to begin sous vide at a later time. (For example, it is
now 9am and I want to start cooking at 10am.)
Entering The Time Value
1. Plug in your sous vide.
2. “SET” display is blinking to indicate that you are ready to put in a cooking setting.
3. Press and hold the “TIME” button. This will start the “DELAY MODE”.
4. The “DELAY” indicator light will be displayed and start blinking.
5. The left two digits of the “SET” display will start to blink. Scroll to the number of hours
for which you would like to delay.
6. Press the “TIME” button.
7. The hours are set—now the right two digits will blink. This indicates you need to enter
the number of minutes you would like to delay. Scroll to reach the number of minutes for
the delay.
8. Press the “TIME” button. The minutes are set and the “DELAY” light indicator will remain
lit and not blink.
Entering the Temperature Value
1. The “SET” display will be blinking indicating that you can now change the temperature
“TEMP” setting.
2. Use the scroller to put in the temperature value. Now you can press the "START/STOP"
button to start the delay.
3. The “LIVE” display will toggle between countdown time and the actual temperature
in the water.
4. Once the delayed time has completed, the unit will begin to Preheat “PRE".
OPERATING INSTRUCTIONS
15
MODEL: RJ39-WIFI
Setting Delay + Time
This setting is if you want to cook at a later time for a fixed amount of time. (See Figure 7).
1. Press and hold the “TIME” button (See Figure 17). This will put the unit
in the “DELAY MODE”. The “DELAY” indicator light will turn on and
start blinking. The left two digits will also be blinking. This indicates that
an hour value needs to be entered for the delay countdown timer. Scroll
to reach the hours desired and press the “TIME” button. Hours are set
for the delay.
2. Now the right two digits are blinking on the “SET” display.
3. Scroll to reach the minutes desired and press the “TIME” button. The minutes are now set
and now the “DELAY” light indicator will remain lit and not blink.
4. The “SET” display will be blinking indicating that you can now change the temperature.
5. Change the temperature using the scroller and press "START/STOP" to start the delay.
6. Press and hold the “TIME” button again for 3 seconds. Now the “TIME” indicator light
will blink. The “DELAY” indicator light is on and is not blinking.
7. You can now set the length of time that you wish to cook for. For example: setting your
machine at 9am to start cooking at 10 am, cook for 1 hour and stop at 11 am.
8. Press "START/STOP" to start.
9. Should you want to use your sous vide in the regular mode you will need to press and hold
the “TIME” button a third time.
10. Press "START/STOP".
Figure 8
SET DELAY
1st Press - Set Hour
2nd Press - Set Minutes
Ł
K
Figure 9
OPERATING INSTRUCTIONS

16
MODEL: RJ39-WIFI
Changing from Fahrenheit to Celsius
• The default display temp is in Fahrenheit.
To change from F to C, press and hold the “play” button for 5 seconds (up to 10 seconds) and
“LIVE” display will auto change between F and C. You can repeat process to toggle between
Fahrenheit and Celsius.
OPERATING INSTRUCTIONS
TROUBLESHOOTING
1. The unit will not turn on.
Solution: Make sure that the machine is properly plugged into a grounded outlet and
check the power cable to see if it is ripped or worn down. Do not use the machine if the
power cord is damaged.
2. Unit is making a constant beeping sound and the display is not working.
Solution: The unit is not submerged in water between the "MIN" and "MAX" line. If the
water is under the "MIN" line, the unit will not work and will make a constant beeping
sound. Place the unit in water with the water reaching a level between the "MIN" and
"MAX" lines to reset. Press the START/STOP button to stop the beeping.
3. E1 on Display
Solution: The water level may be below minimum. Put more water in the pot/container
until the water level is above the minimum line.
4. Unit is not connecting properly to the Bluetooth
®
or WiFi
®
device.
Solution: You can reset this setting by holding the WiFi
®
button for 5 seconds.
This will cause the sous vide to go back to the default Bluetooth
®
mode so you can
attempt to reconnect to your device.

17
MODEL: RJ39-WIFI
CLEANING & MAINTENANCE
Cleaning and Descaling Instructions:
In most instances, a basic cleaning is sufficient to clean the Sous Vide Cooker. Basic
cleaning is performed by using a sponge or damp cloth and then drying the unit.
It is recommended to perform descaling periodically, particularly if the unit is used
very often or if it is used in a region with hard or mineral rich water.
1. Mount the Sous Vide Cooker to a pot and fill to the MAX level indicated on the shaft
of the unit with an equal mixture of water and distilled white vinegar.
2. Using the CONTROL DIAL, program the SET TEMPERATURE to 158° F.
3. After the SET TEMPERATURE is reached, allow the water and vinegar mixture
to continue circulating for an additional 20 minutes. Your Sous Vide Cooker is
now descaled.
4. Unplug the unit and allow to cool.
5. Make sure to rinse the unit in cool water and to dry it off before storing away for
future use.

18
MODEL: RJ39-WIFI
TIPS AND TRICKS FOR PRECISION COOKING
Enjoy our helpful guide to pampering your food in a kitchen Jacuzzi!
POT PICKIN'
Select a pot or container that is large enough to allow the Sous Vide Cooker as well as
the bag (or bags) of food to be clipped on opposite sides. Take care to allow enough
room to ensure that the unit will never touch the bag. In the event of cooking multiple
bags in one pot, make sure that there is enough room for all the bags to be entirely
immersed in water.
SPICE IT RIGHT
For best results and maximum flavor use dry or powdered spices. You can use sauces
or marinades as well, but make sure the liquid is non-alcoholic, has a low acidity, and
isn't meant to be used as a brine. If you’re set on that acidy taste, marinate the meat
like you usually would, just be sure to remove it from the marinade before you cook
sous vide. Once you put the food in the bag with desired seasoning or marinade, make
sure to evenly distribute contents for even cooking and flavor.
SEAL IT TIGHT
Best results are achieved when all of the air in the bag is removed. While any kind of
food grade plastic sealable bag can be used, some prefer vacuum sealed bags since
the vacuum sealer removes all the air out of the bag. When using a zipper lock bag,
first seal the bag most of the way and leave a small opening. Slowly submerge the
bag into the water which will push the remaining air out, and seal the remaining
portion before fully submerging.
BATH TIME!
Ensure that the food remains completely submerged under the water throughout
the cooking process by filling the pot with water until just below the MAX line. To
prevent the food from floating above the water, use clips to firmly attach the bag
to the container wall, or place a weighted (heat safe) object on top of the bag to
keep it submerged. Evaporation can be reduced by covering the container or using
sous vide balls.

19
MODEL: RJ39-WIFI
TIPS AND TRICKS FOR PRECISION COOKING
TIMING OPTIONAL
Because the Sous Vide Cooker controls the temperature and cooking so
precisely, it is unlikely to overcook or burn even if you decide to forgo the
timer and auto-shut off. If you want, though, the Sous Vide Cooker is equipped
with a timer that will automatically shut off when cooking is complete, so you
can take a nap without setting an alarm. Use the Cooking Guide on page 20
to determine the correct time & temperature for desired results.
SEAR AWAY WITH ME
Searing is recommended when cooking meat, fish, or poultry. Remove the food
from the bag and sear by using a pan, broiler, or barbecue (Cast Iron pans are
recommended but not required). Searing the food will give it color and texture,
and will lock in the flavors for restaurant quality results.

20
MODEL: RJ39-WIFI
EGGS
POULTRY
PORK
BEEF
SEAFOOD
VEGETABLES
Poached
Hard Boiled
Light Meat
Dark Meat
Tender Cuts
Tough Cuts
Rare
Medium-Rare
Medium
Medium-Well
Well
Fish
Shellfish
Tender
Tough
145
165
146
165
140
140
128
134
144
150
155
122
130
183
183
TEMP (°F) MIN TIME
45 m
45 m
1 h
2 h
1.5 h
12 h
1 h
1 h
1 h
1 h
1 h
40 m
15 m
15 m
1 h
MAX TIME
2 h
2 h
3 h
6 h
4 h
48 h
2 h
2 h
2 h
2 h
2 h
1.5 h
45 m
1 h
3 h
m = Minutes h = Hours
TEMP (°F/°C) MIN TIME MAX TIME
EGGS
Poached 146°F/63°C 1h 1.5h
Hard Boiled 165°F/74°C 1h 1.5h
POULTRY
Light Meat 150°F/66°C 1h 3h
Dark Meat 167°F/75°C 45m 5h
PORK
Tender Cuts 165°F/74°C 1h 4h
Tough Cuts 158°F/70°C 18h 24h
BEEF
Rare 126°F/52°C 1h 3h
Medium- Rare 129°F/54°C 1h 3h
Medium 136°F/58°C 1h 3h
Medium-Well 145°F/63°C 1h 3h
Well 155°F/68°C 1h 3h
SEAFOOD
Fish 122°F/50°C 40m 1.5h
Shellfish 131°F/55°C 15m 45m
VEGGIES
Tender/Green 180°F/82°C 1.5h 30m
Starchy/Root 185°F/85°C 15m 3h
Cooking Guide
Chefman Accessories Available for Sous Vide Cooking
Model Number Item Name Purpose
RJ45-Series Vacuum Sealer
This will allow you to vacuum
seal your ingredient bags.
(A roll of bags are included.)
RJ39-A-SBP Sous Vide Accessory Kit
This kit includes a hand vacuum
pump, vacuum seal bags, bag
zipper clips and 4 clips to attach
vacuum sealed bags to sous vide
container.
RJ 39-A-B250 Sous Vide Water Balls
Sous vide water balls prevent
evaporation and heat loss by
creating a flexible lid on the
surface of your water bath.

21
MODEL: RJ39-WIFI
NOTES

22
MODEL: RJ39-WIFI
NOTES

23
MODEL: RJ39-WIFI
RJ BRANDS, LLC D/B/A CHEFMAN (hereinafter referred to as "CHEFMAN
®
") warrants, subject to the conditions
stated below, that from the date of purchase, this product will be free from mechanical defects for a period of ONE
(1) year. CHEFMAN
®
at its option, will repair or replace this product found to be defective during the warranty period.
Should this product become defective by reason of improper workmanship or material defect during the specified
warranty period, CHEFMAN
®
will repair or replace the same effecting all necessary parts replacements for a period of
one year from the date of purchase. If product is no longer available we will replace it with a product of equal value.
Transportation charges on parts, or products in whole, submitted for repair or replacement, under this warranty, must
be borne by the purchaser. This warranty is void if the product is used for other than single-family household use or
subjected to any voltage and waveform other than as specified on the rating label (e.g., 120V ~ 60 Hz).
This warranty is available to consumers only. You are a consumer if you own a CHEFMAN
®
product that was
purchased at retail for personal, family or household use. Except as otherwise required under applicable law, this
warranty is not available to retailers or other commercial purchasers or owners.
CONDITIONS: This warranty is valid for the original USA and Canada retail purchaser from the date of initial retail
purchase and is not transferable. Keep the original sales receipt. Proof of purchase is required to obtain warranty
service or replacement. Dealers, service centers, or retail stores do not have the right to alter, modify or in any way,
change the terms and conditions of this warranty. Warranty registration is not necessary to obtain warranty on
CHEFMAN
®
Products. Save your proof of purchase receipt.
ABOUT YOUR PRODUCT WARRANTY: Most warranty repairs are handled routinely, but sometimes requests for
warranty service may not be appropriate. For example, warranty service would NOT apply if the product damage
occurred because of misuse, lack of routine maintenance, shipping, handling, 3rd party warehousing or improper
installation. Similarly, the warranty is void if the manufacturing date or the serial number on the product has been
removed or the equipment has been altered or modified. During the warranty period, the authorized service dealer,
at its option, will repair or replace any part that, upon examination, is found to be defective under normal use and
service.
NORMAL WEAR: This warranty does not cover normal wear of parts or damage resulting from any of the following:
negligent use or misuse of the product; improper voltage or current; use contrary to the operation instructions;
deviation from instructions regarding storage and transportation; repair or alteration by anyone other than
CHEFMAN
®
or an authorized service center. Further, the warranty does not cover Acts of God, such as fire, flood,
hurricanes and tornadoes. CHEFMAN
®
shall not be liable for any incidental or consequential damages caused by the
breach of any express or implied warranty. Except to the extent prohibited by applicable law, any implied warranty of
merchantability or fitness for a particular purpose is limited in duration to the duration of the above warranty. Some
states, provinces or jurisdictions do not allow the exclusion or limitation of incidental of consequential damages or
limitations on how long an implied warranty lasts, so the above limitations or exclusion may not apply to you. This
warranty gives you specific legal rights, and you may also have other rights that vary from state to state or province
to province.
HOW TO OBTAIN WARRANTY SERVICE: If your CHEFMAN
®
product should prove to be defective within the
warranty period, we will repair it, or if we think necessary, replace it. To obtain warranty service, simply email
customerservic[email protected] or call our toll-free number 1-888-315-6553 for additional information from our
Customer Service Representatives, or send the defective product to Customer Service at Chefman, 200 Performance
Drive, Mahwah, NJ 07495.
This warranty is effective for the time periods listed above and subject to the conditions provided for within this
policy.
CALIFORNIA RESIDENTS ONLY:
California law provides that for In-Warranty Service, California residents have the option of returning a nonconforming
product (A) to the store where it was purchased or (B) to another retail store which sells CHEFMAN
®
products
of the same type. The retail store shall then, at its discretion, either repair the product, refer the consumer to an
independent repair facility, replace the product, or refund the purchase price less the amount directly attributable
to the consumer’s prior usage of the product. If the above two options do not result in the appropriate relief to
the consumer, the consumer may then take the product to an independent repair facility if service or repair can be
economically accomplished. CHEFMAN
®
and not the consumer will be responsible for the reasonable cost of such
service, repair, replacement, or refund for nonconforming products under warranty.
CHEFMAN
®
is a registered trademark of RJ BRANDS, LLC.
TERMS & CONDITIONS
Limited Warranty
24
MODEL: RJ39-WIFI
WARRANTY
Phone lines available Monday to Friday, 9am-5pm EST
1-YEAR LIMITED WARRANTY
Description of Malfunction:
Return your completed warranty card to:
Chefman
200 Performance Drive
Suite 207
Mahwah, NJ
07495
All data fields are required in order for us to process your request:
Model Number:
Full Name:
Address:
Phone:
Date of Purchase*:
Retail Store of Purchase:
*We recommend you keep the receipt with this warranty card
Email: (If applicable)
SOUS VIDE COOKER
WITH BLUETOOTH AND WiFi
SOUS VIDE COOKER
WITH BLUEBOOTH AND WiFi
888.315.6553
customerservic[email protected]
MODEL:
RJ39-WiFi

®
To log-in to ClubChefman.com follow the below steps:
1. Enter www.clubchefman.com into your web browser.
2. Click on "Sign Up Now" .
3. Fill in the required information as prompted.
NOTE: "Place of Purchase" refers to the store at
which you purchased your product.
4. Sign in using your User Name and Password.
CLUB CHEFMAN ACCESS CODE: 2131773
CLUBCHEFMAN.COM | CHEFMAN.COM | @MYCHEFMAN