Installation Instructions for Neff Z52JCC1N6(00)
Table of Contents
- Important safety information
- Installation
- Odour filter for recirculating air mode
Installation
Preparing for installation
- The installation site must be easily accessible, so that the appliance can be accessed freely for servicing.
- We recommend a distance of at least 700 mm and a maximum of 1500 mm between the appliance and the hob. The cooking vapours are more difficult to draw in the further away they are from the hob.
- The distance between the appliance and the air recirculation module can be reduced by up to 70 mm, if the height of the suspended ceiling is at least 340 mm.
Checking the installation surface
- The installation surface must be flat, horizontal and have sufficient load-bearing capacity.
- The max. weight of the appliance is 6 kg.
Notes
- The surfaces of the appliance are sensitive. Avoid damage during the installation.
- Check the cut-out area for existing cables of other appliances.
- When mounting the extractor hood, a suitable substructure is required that is securely fastened to the concrete ceiling.
- Do not fit the appliance directly onto plasterboard (or similar lightweight materials) in a suspended ceiling.
- To ensure correct installation, you must use a material which is sufficiently stable and suitable for both the structural conditions and the weight of the appliance.
Preparing the installation surface
The ceiling of the installation surface must still be sturdy after the cut-outs have been made.
1. Cover the hob to protect it from damage.
2. Make the cut-out in the ceiling or side wall. (Fig. 1)
3. After making the cut-outs, remove any shavings.
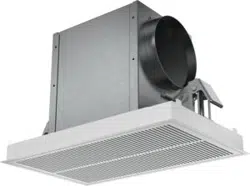
Installing the appliance
Risk of injury! Components inside the appliance may have sharp edges. Wear protective gloves.
1. Remove the cover.
Note: The adapter can be moved depending on the installation situation. (Fig. 2)
2. Unscrew the adapter and required plate and switch their positions. (Fig. 2)
3. Screw the adapter and plate tightly into the new position. (Fig. 2)
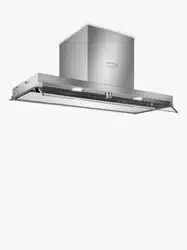
4. Fully insert the appliance into the cut-out until you hear the mounting brackets engage. (Fig. 3)
5. Carefully tighten the screws in succession until the appliance is flush mounted in the installation surface (Fig. 4)
Note: To ensure that the appliance is not damaged, do not overtighten the screws
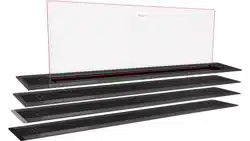
6. Unpack the odour filter. (Fig. 5)
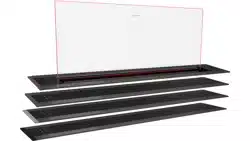
7. Insert the odour filter and the metal clips and turn them as far as they will go so that the odour filter is positioned securely. (Fig. 6)
8. Tighten the knurled nuts on the metal frame. (Fig. 6)
9. Hook the cover into the holes on the underside of the appliance. (Fig. 7)
10.Press against the cover from below to close it. (Fig. 7)
Removing the appliance
Risk of injury! Components inside the appliance may have sharp edges. Wear protective gloves.
1. Press against the cover from below to open it.
2. Detach the cover holders from the holes on the underside of the appliance.
3. Remove the odour filter. When you do this, take hold of the odour filter from underneath with one hand
4. Unscrew the knurled nuts and open the metal clips to remove the odour filter. (Fig. 8)
5. Loosen the screws carefully in succession and unscrew them as far as they will go.
6. Use your thumbs to reach into the openings and push the spring clamps upwards. (Fig. 9)
7. Remove the appliance.
Odour filter for recirculating air mode
Odour filters bind odorous substances in air recirculation mode. With normal use (approx. one hour a day), the odour filter should be replaced once a year.
Note: Odour filters do not contain any harmful substances and can be disposed of with your normal household waste.
Replacing odour filters
1. Press against the cover from below to open it. (Fig. 7)
2. Unscrew the knurled nuts and open the metal clips to remove the odour filter. (Fig. 8)
3. Remove the odour filter. When you do this, take hold of the odour filter from underneath with one hand.
4. Insert the odour filter and the metal clips and turn them as far as they will go so that the odour filter is positioned securely. (Fig. 6)
5. Tighten the knurled nuts on the metal frame. (Fig. 6)
6. Press against the cover from below to close it. (Fig. 7)