INSTRUCTION BOOK
EVOC 770NBT
Condenser Tumble Dryer
Italiano
English
2
14
26
Slovensko

EN 2
3
3
3
3
3
4
4
4
4
5
5
5
5
6
7
7
7
7
7
7
8
9
10
10
10
10
10
10
11
11
11
12
12
12
12
12
13
13
13
13
Introduction
Delivery Information
Unpacking the Product
Safety Reminders
Use
Installation
The Laundry
Environmental Issues
Gias Service
Installation
Electrical Requirements
Adjusting the Feet
Ventilation
Preparing the Load
Clothes Preparation
Do Not Tumble Dry
Energy Saving
Sorting the Load
Drying Guide
Controls and Indicators
Selecting the Programme
Door and Filter
Opening the Door
Filter
Filter Care Indicator
Water Container
To Remove the Container
Condenser
To Remove the Condenser
Operation
Delay Start Function
Cancelling and Resetting the Programme
Cleaning and Routine Maintenance
Cleaning the Dryer
Technical Specifications
Troubleshooting
Customer Service
Spares
Gias Service
INDEX
Drain Hose Kit: Fitting Instructions
INTRODUCTION
Use
Please check that the following items are
delivered with the appliance:
● Instruction manual
● Guarantee card
● Energy label
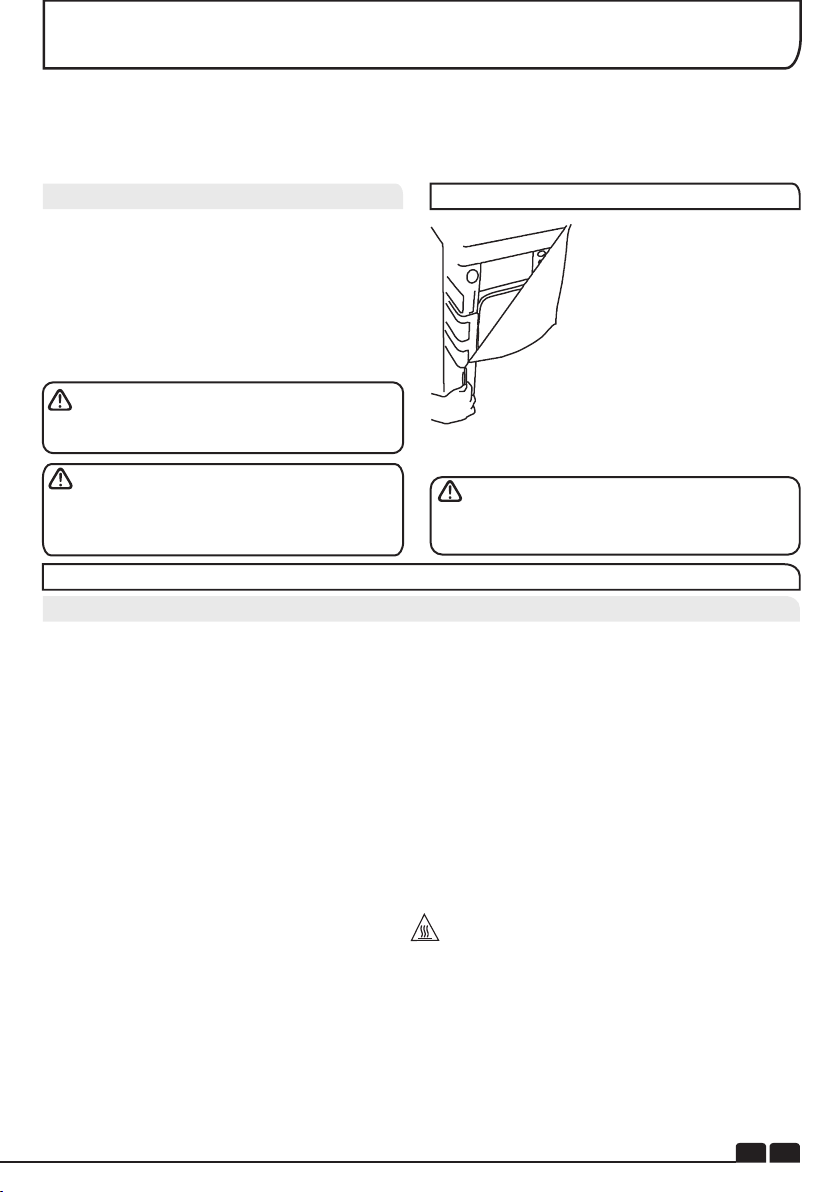
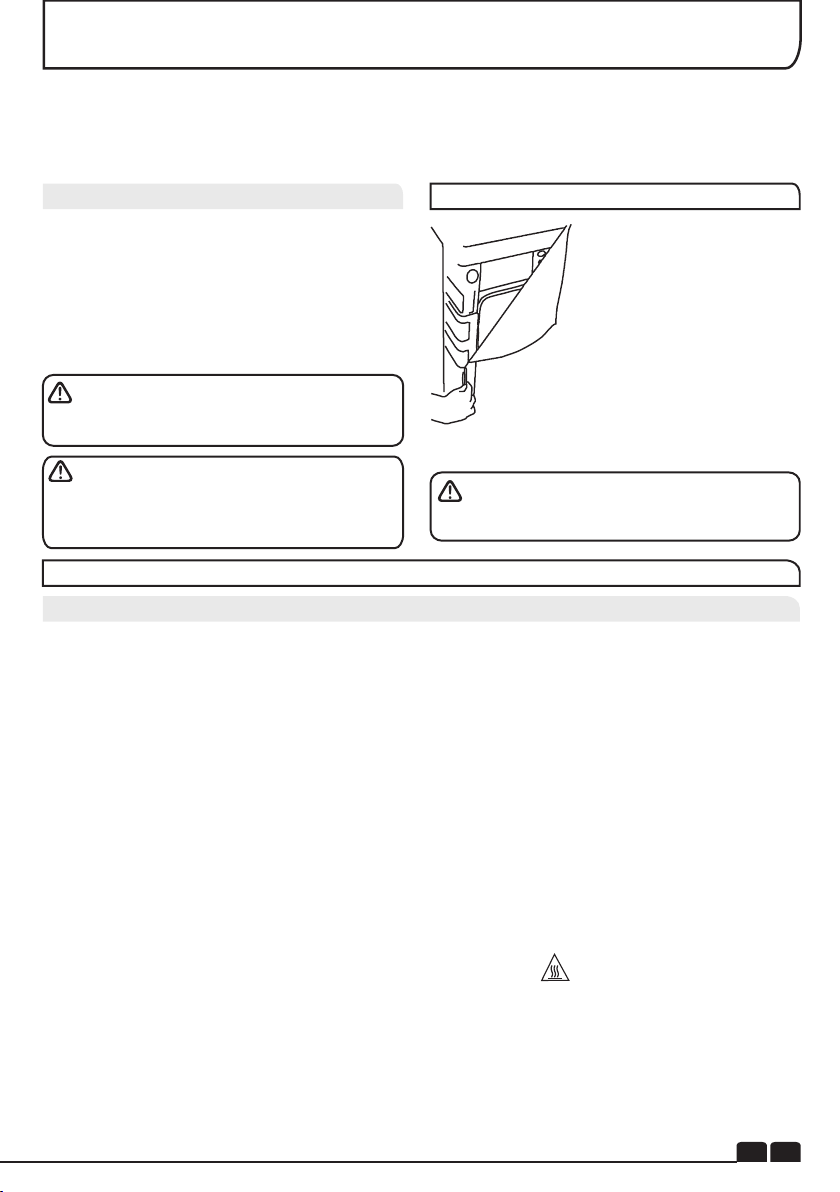
Remove the machine from
its packaging close to the
f i n a l l o c a t i o n o f t h e
machine.
1- Cut carefully around the
base of the packaging and
up one corner.
2- Remove the polythene
sleeve and lift the dryer off
the polystyrene base.
Please read and follow these instructions carefully and operate the machine accordingly. This
booklet provides important guidelines for safe use, installation, maintenance and some useful
advice for best results when using your machine.
Keep all documentation in a safe place for future reference or for any future owners.
Delivery Information
UNPACKING THE PRODUCT
Dispose of the packaging safely. Make
sure it is out of the reach of children,it is a
potential source of danger.
Failure to comply with the above can
compromise the safety of the appliance. You
may be charged for a service call if a problem
with your machine is caused by misuse.
Check that no damage has occurred to the
machine during transit. If it has, call for service
by GIAS.
EN 3
SAFETY REMINDERS
● This appliance is not intended for use by persons (including children) with reduced physical,
sensory or mental capabilities,or lack of experience and knowledge, unless they have been given
supervision or instruction concerning use of the appliance by a person responsible for their safety.
● Children should be supervised to ensure that they do not play with the appliance.
● WARNING Misuse of a tumble dryer may create a fire hazard.
●This machine is solely for domestic use, i.e. to dry household textiles and garments.
●This machine should only be used for its intended purpose as described in this manual. Ensure
that the instructions for installation and use are fully understood before operating the appliance.
● Do not touch the appliance when hands or feet are damp or wet.
● Do not lean on the door when loading the machine or use the door to lift or move the machine.
●Do not allow children to play with the machine or its controls.
● WARNING Do not use the product if the fluff filter is not in position or is damaged; fluff could be
ignited.
● WARNING Where the hot surface symbol is located the temperature rise during operation
of the tumble dryer may be in excess of 60 degrees C.
● Remove the plug from the electricity supply. Always remove the plug before cleaning the
appliance.
● Do not continue to use this machine if it appears to be faulty.
● Lint and fluff must not be allowed to collect on the floor around the outside of the machine.
● The drum inside may be very hot. Always allow the dryer to complete the cool down period before
removing the laundry.
SAFETY REMINDERS
EN 4
This appliance is marked according
t o t h e E u r o p e a n d i r e c t i v e
2002/96/EC on Waste Electrical and
Electronic Equipment (WEEE).
By ensuring this product is disposed of correctly,
you will help prevent potential negative
consequences for the environment and human
health, which could otherwise be caused by
inappropriate waste handling of this product.
The symbol on the product indicates that this
product may not be treated as household waste.
Instead it shall be handed over to the applicable
collection point for the recycling of electrical and
electronic equipment.
For more detailed information about treatment,
recovery and recycling of this product, please
contact your local city office,your household
waste disposal service or the shop where you
purchased the product. Disposal must be
carried out in accordance with local
environmental regulations for waste disposal.
European Directive 2002/96/EC
● To ensure the continued safe and efficient
operation of this appliance we recommend that
any servicing or repairs are only carried out by
an authorised GIAS service engineer.
GIAS Service
If the appliance is not running properly or
breaks down, switch it off and disconnect the
plug from the socket. Consult GIAS Service for
possible repair.
● All packaging materials used are
environmentally-friendly and recyclable.
Please help dispose of the packaging via
environmentally-friendly means. Your local
council will be able to give you details of current
means of disposal.
● To ensure safety when disposing of an old
tumble dryer disconnect the mains plug from
the socket, cut the mains power cable and
destroy this together with the plug. To prevent
children shutting themselves in the machine
break the door hinges or the door lock.
Environmental Issues
● Check that the product has no visible signs of
damage before use. If damaged do not use and
please call GIAS Service.
● Do not use adapters, multiple connectors
and/or extensions.
● Never install the dryer against curtains and be
sure to prevent items from falling or collecting
behind the dryer.
● The appliance must not be installed behind a
lockable door, a sliding door or a door with a
hinge on the opposite side to that of the tumble
dryer.
Installation
●Do not dry unwashed items in the tumble dryer.
● WARNING Do not tumble dry fabrics treated
with dry cleaning fluids.
●WARNING Foam rubber materials can, under
certain circumstances, when heated become
ignited by spontaneous combustion. Items
such as foam rubber (latex foam), shower caps,
waterproof textiles, rubber backed articles and
clothes or pillows fitted with foam rubber pads
MUST NOT be dried in the tumble dryer.
● Always refer to the laundry care labels for
directions on suitability for drying.
● Clothes should be spin dried or thoroughly
wrung before they are put into the tumble dryer.
Clothes that are dripping wet should not be put
into the dryer.
● Lighters and matches must not be left in
pockets and NEVER use flammable liquids
near the machine.
● Glass fibre curtains should NEVER be put in
this machine. Skin irritation may occur if other
garments are contaminated with the glass
fibres.
● Items that have been soiled with substances
such as cooking oil, acetone, alcohol, petrol,
kerosene, spot removers, turpentine, waxes
and wax removers should be washed in hot
water with an extra amount of detergent before
being dried in the tumble dryer.
● Fabric softeners, or similar products, should
be used as specified by the fabric softener
instructions.
The Laundry

EN 5
INSTALLATION
Tumble dryers are supplied to operate at a
voltage of 220-240V, 50 Hz single phase. Check
that the supply circuit is rated to at least 10A
Electricity can be extremely dangerous.
This appliance must be earthed.
The socket outlet and the plug on the
appliance must be of the same type.
Do not use multiple adapters and/or
extension leads.
The plug should be accessible for
disconnection after the appliance has been
installed.
CE Appliance complies with European Directive
2004/108/EC, 2006/95/EC and subsequent
amendments.
Electrical Requirements
If the mains cord on this appliance is
damaged, it must be replaced by a special cord
which is ONLY obtainable from the spares
service. It must be installed by a competent
person.
You may be charged for a service call if a
problem with your machine is caused by
incorrect installation.
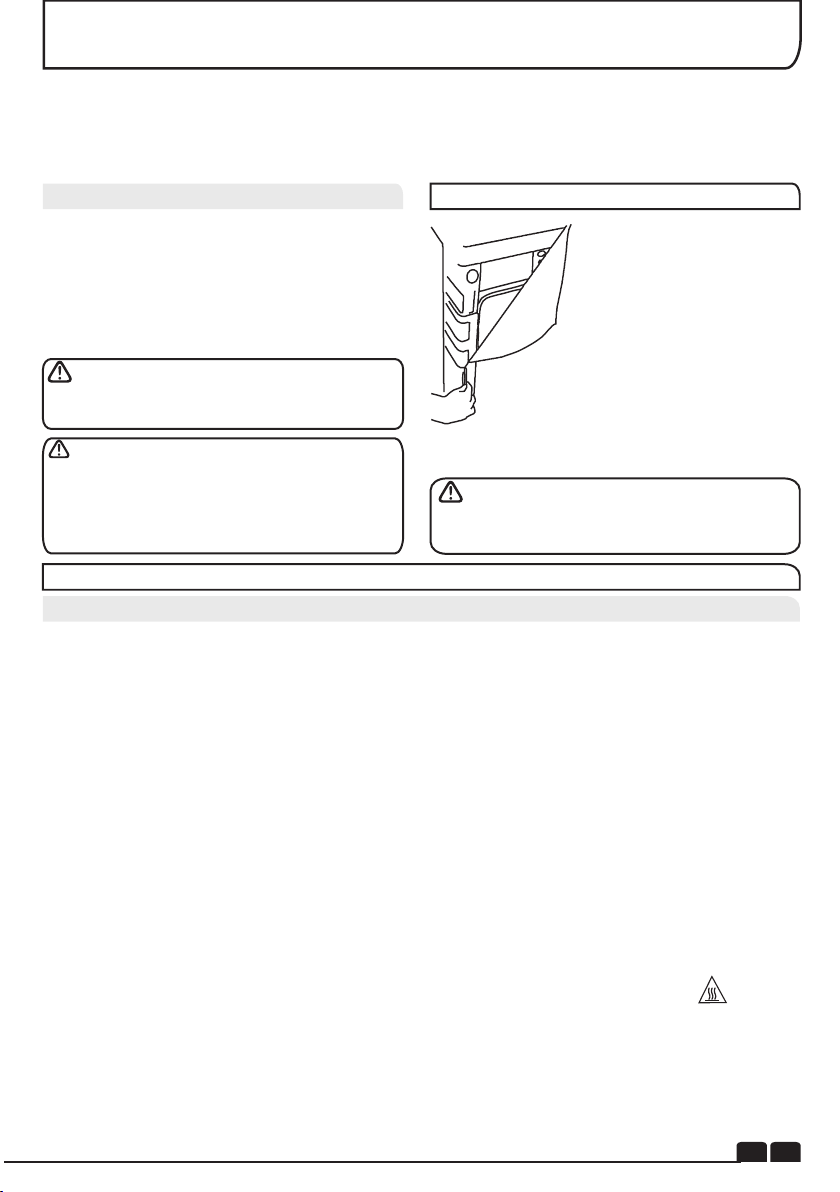
Once the machine is in
place the feet should
be adjusted to ensure
that the machine is
level.
Adjusting the Feet
Adequate ventilation must be provided in the
room where the tumble dryer is located to
prevent gases from appliances burning other
fuels, including open fires, being drawn into the
room during operation of the tumble dryer.
● Exhaust air must not be discharged into a flue
which is used for exhausting fumes from
appliances burning gas or other fuels.
● Check regularly that the air flowing through
the dryer is not restricted.
● Check the fluff filter after use, and clean, if
necessary.
●The inlet and outlets should be kept free from
obstructions. To ensure adequate ventilation
the space between the bottom of the machine
and the floor must not be obstructed. There
should be a gap of at least 12mm between the
machine and any obstructions.
● Prevent items from falling or collecting behind
the dryer as these may obstruct the air inlet and
outlet.
● NEVER install the dryer up against curtains.
VENTILATION
Do not plug the machine in and switch it
on at the mains until the installation is
completed.For your safety, this dryer must be
correctly installed. If there is any doubt about
installation, call GIAS Service for advice.
Do not install the product in a low temperature room or
in a room where there is a risk of frost occurring. At
temperature around freezing point the product may not be
able to operate properly: there is a risk of damage if the
water is allowed to freeze in the hydraulic circuit (valves,
hoses, pumps). For a better product performance the
ambient room temperature must be between +2°C and
+35°C. Please note that operating in cold condition
(between +2 and +15°C) might imply some water
condensation and water drops on floor.
DRAIN HOSE KIT: FITTING INSTRUCTIONS
WARNING! Switch off and remove the
tumble dryer plug from the electricity supply
before carrying out any work.
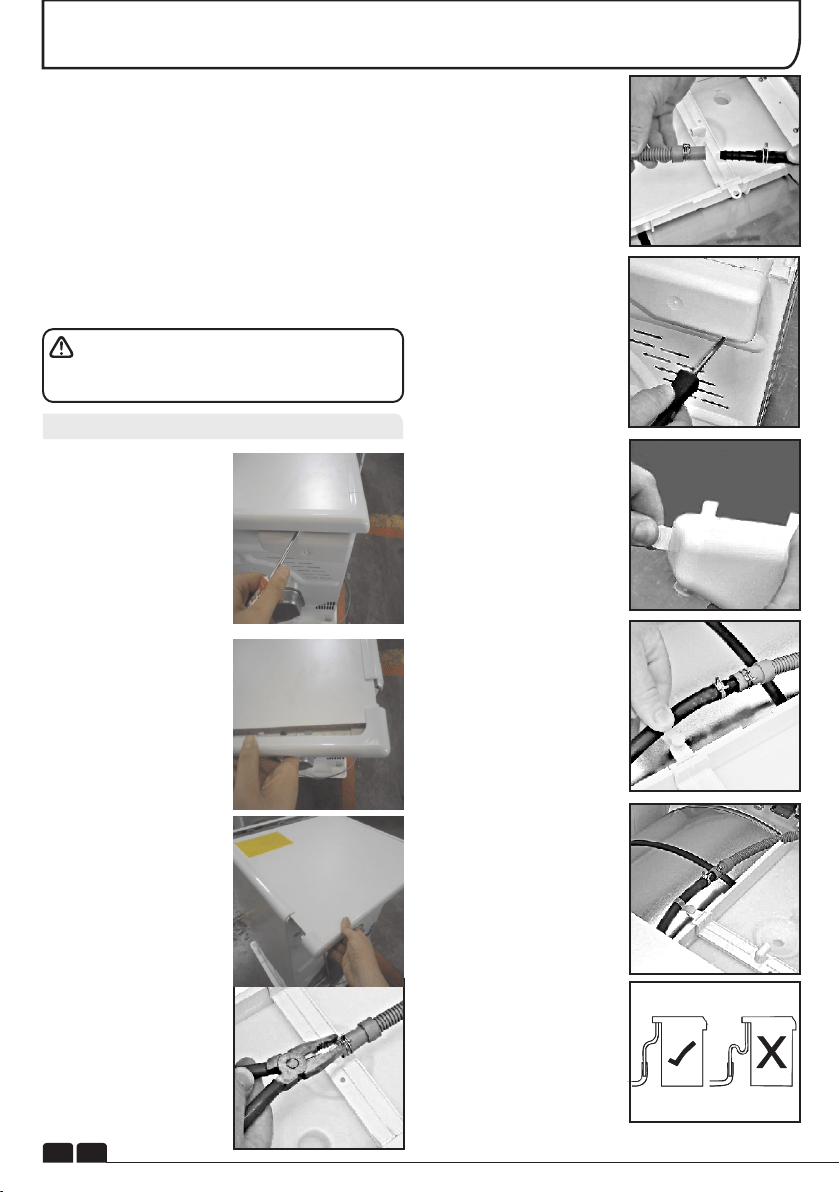
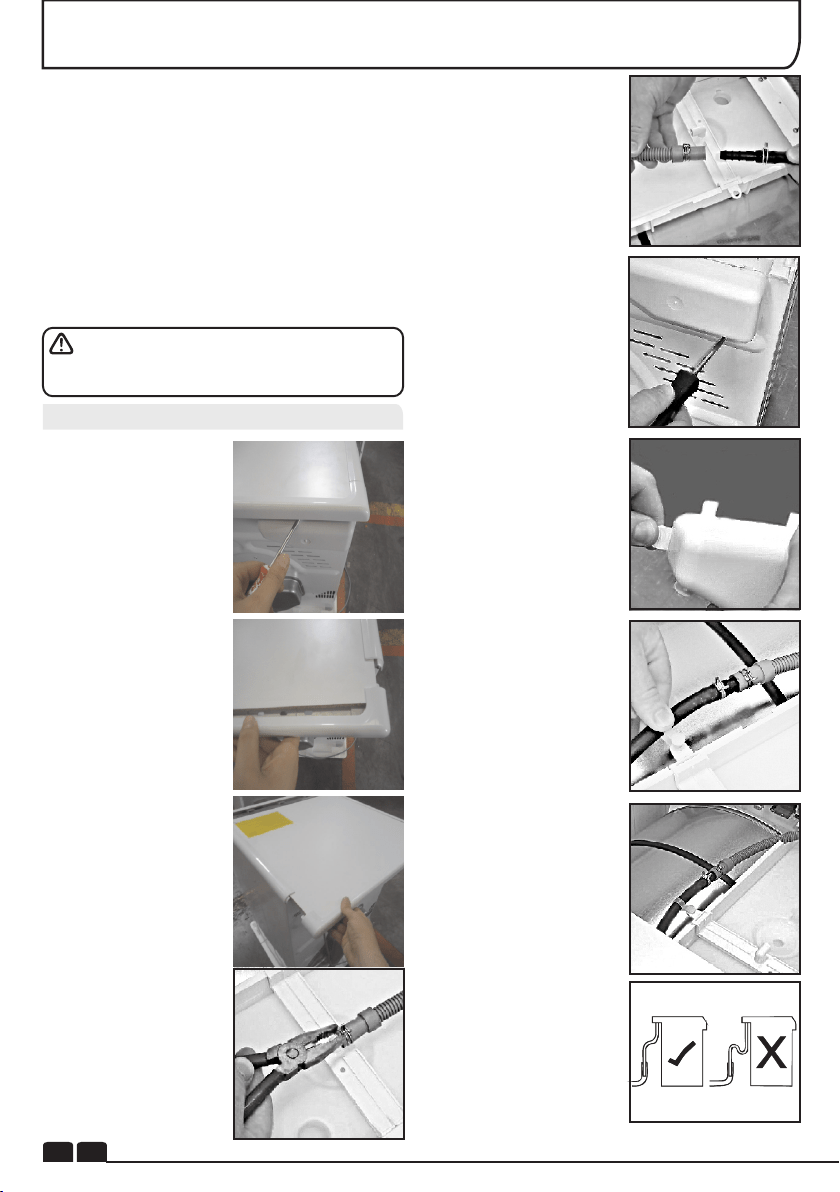
Fit the Kit as Follows:
1 . U n s c r e w a n d
remove the 3 screws,
at the rear of the
machine, retaining the
worktop trim.
2. Remove the rear
worktop trim and the
worktop surface by
carefully sliding it
towards the rear of the
machine.
3. The waste water
container is situated at
the right-hand side of
the machine (viewed
from the rear). A grey
hose connects to the
bridge above the water
container. Using pliers,
r e m o v e t h e p i p e
retaining clip from the
bridge.
4. Pull the hose off the
bridge connection.
5. Attach the hose from
the kit, using the
connector and pipe
clips supplied, to the
hose removed from the
bridge connection.
6. Take off the water
container cover from
the rear of the machine
by removing the two
screws and unclipping
the cover.
7. Break off the tab on
the side of the cover
and replace the cover
on the machine, refit
the screws. You should
now have revealed a
hole in the back of the
cabinet next to the
Cover.
8. Feed the drain hose
through the hole in the
cabinet.
9. Locate the grey pipe
in the cutout of the tray
and secure the pipe
assembly to the bridge
with the plastic tie.
10. Carefully slide the
worktop back into
position ensuring that
the hose is not trapped
a n d r e p l a c e t h e
worktop rear trim with
the 3 screws.
11. Connect the new
drain hose to the waste
water pipe. Make sure
that the new hose does
not kink when pushing
the tumble dryer into
position. Ensure that
the guidelines, as
shown, are followed
when routing the new
external hose.
12. Connect to the
m a i n s e l e c t r i c i t y
supply.
13. After emptying the
waste water container
switch the machine ON
(and press the 'START'
button on electronic
models) to commence
w i t h t h e d r y i n g
program.
To avoid having to empty the water container
after each drying cycle, the water normally
collected during the drying cycle can be
discharged directly to a waste water drain pipe
(the same drainage system as household
sinks).Water Bye-Laws prohibit connection to
a surface water drain. The waste water drain
pipe system should be located adjacent to the
tumble dryer.
The kit is composed: 1 hose, 1 straight
hose connector, 1 pipe clip and 1 plastic tie.
EN 6
PREPARING THE LOAD
Before using the tumble dryer for the first time:
● Please read this instruction book thoroughly.
● Remove all items packed inside drum.
● Wipe the inside of the drum and door with a
damp cloth to remove any dust which may
have settled in transit.
Make sure that the laundry you are going to dry
is suitable for drying in a tumble dryer, as shown
by the care symbols on each item.
Check that all fastenings are closed and that
pockets are empty. Turn the articles inside out.
Place clothes loosely in the drum to make sure
that they don't get tangled.
Clothes Preparation
EN
7
● Cottons Max. 8 kg
● Synthetics Max. 4 kg
Maximum Drying Weight
Do not overload the drum, large items
when wet can exceed the maximum admissible
clothes load (for example: sleeping bags,
duvets).
Sort the Load as Follows
. .
.
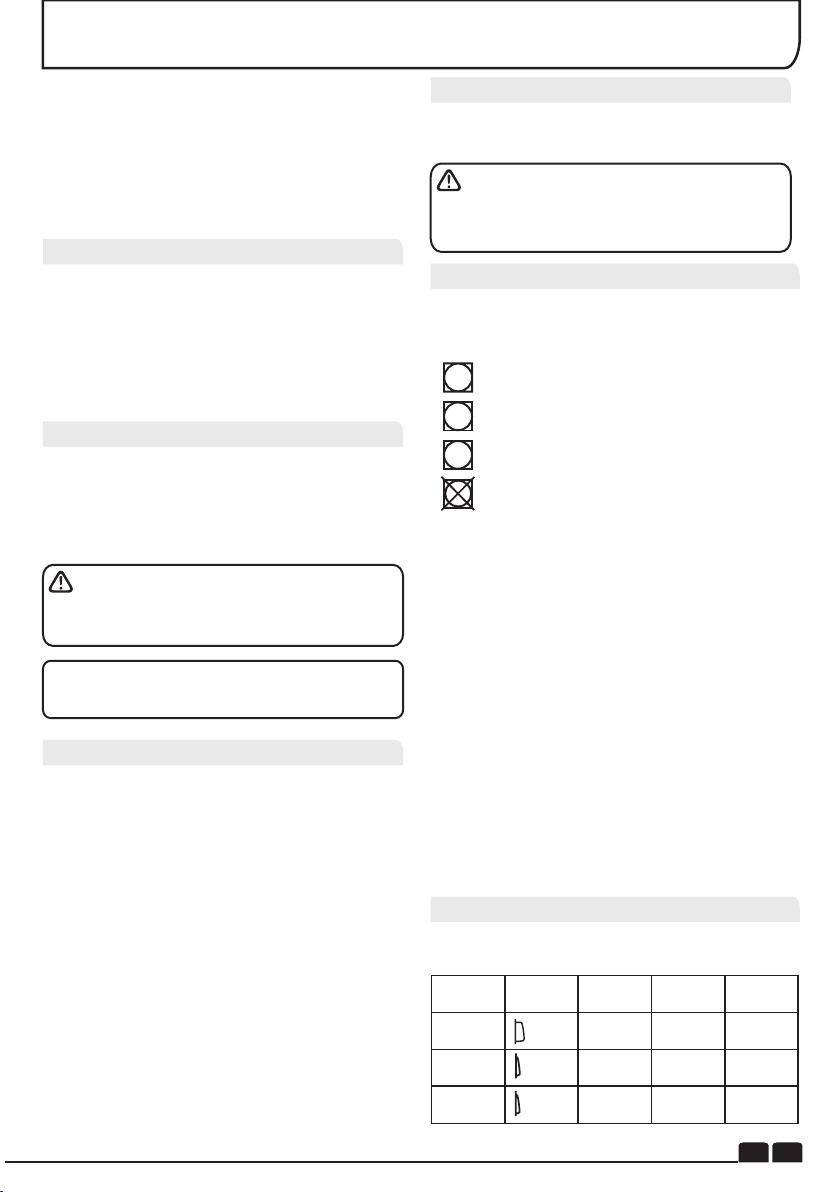
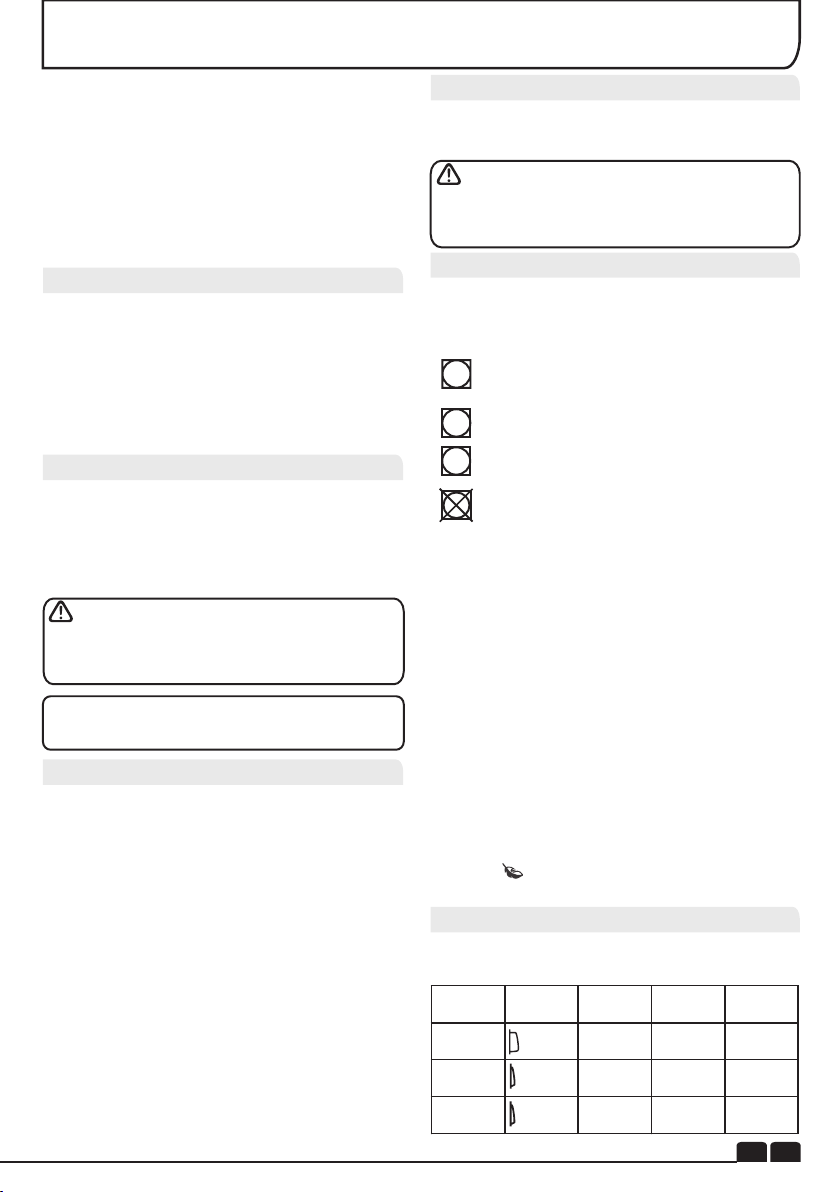
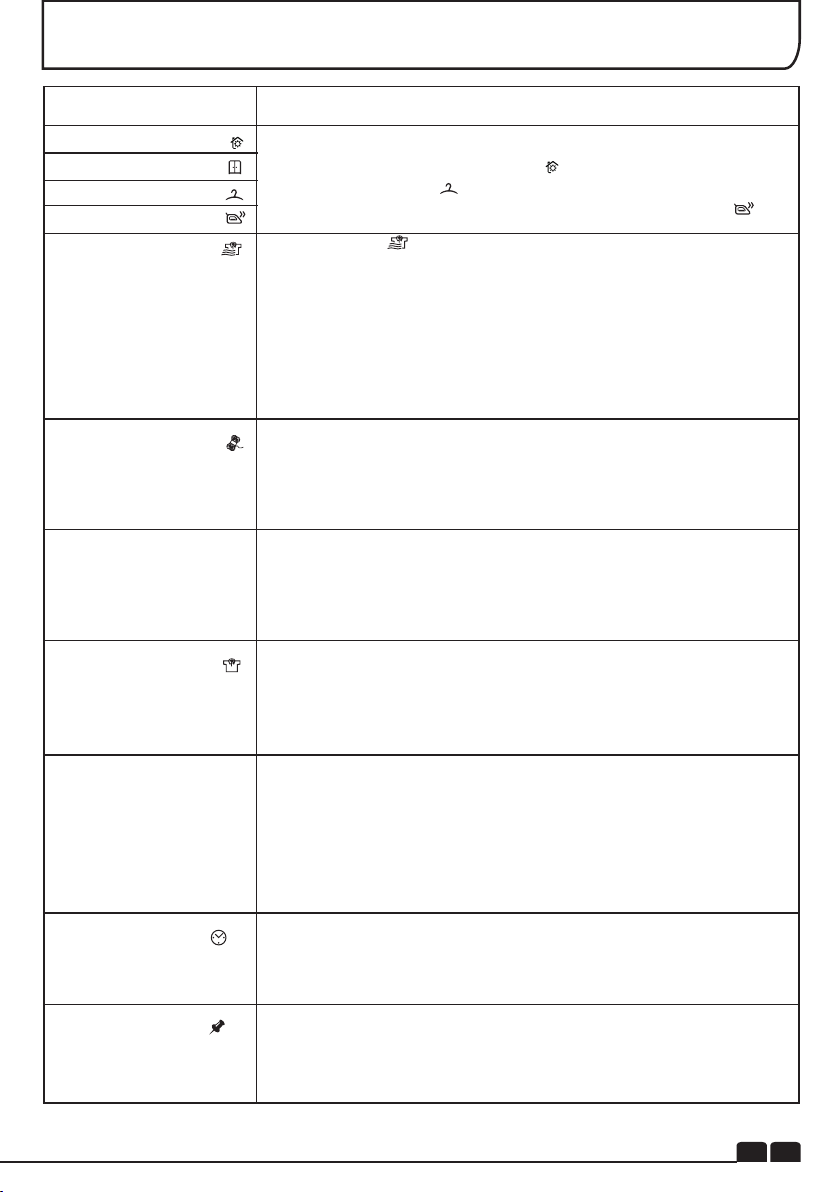
● By care symbols
These can be found on the collar or inside seam:
Suitable for tumble drying.
Tumble drying at high temperature.
Tumble drying at low temperature only.
Do not tumble dry.
If the item does not have a care label it must be
assumed that it is not suitable for tumble drying.
● By amount and thickness
Whenever the load is bigger than the dryer
capacity, separate clothes according to
thickness (e.g. towels from thin underwear).
● By type of fabric
Cottons/linen: Towels, cotton jersey, bed and
table linen.
Synthetics: Blouses, shirts, overalls, etc. made
of polyester or polyamid, as well as for cot-
ton/synthetic mixes.
● By drying level
Sort into: iron dry, cupboard dry, etc. For delicate
articles press the Delicates button to select low
drying temperature.
Woollens, silk, delicate fabrics, nylon stockings,
delicate embroidery, fabrics with metallic dec-
orations, garments with PVC or leather
trimmings, training shoes, bulky items such as
sleeping bags, etc.
Do Not Tumble Dry:
IMPORTANT: Do not dry articles which
have been treated with a dry cleaning fluid or
rubber clothes (danger of fire or explosion).
During the last 15 minutes the load is always
tumbled in cool air.
Only put into the tumble dryer laundry which
has been thoroughly wrung or spin-dried. The
drier the laundry the shorter the drying time thus
saving electricity.
ALWAYS
● Try to dry the maximum weight of laundry, this
will save time and electricity.
● Check that the filter is clean before every
drying cycle.
NEVER
● Exceed the maximum weight, this will waste
time and electricity.
● Put dripping wet items into the tumble dryer,
this may damage the appliance.
Energy Saving
The table shows approximate drying times,depending on
the type of fabric and dampness of the clothes.
Drying Guide
FABRIC
COTTON
HIGH
140-165min
70-80min
70-80min---
---
50-65min
50-65min
40-55min
30-40min
LOW
LOW
SYNTHETICS
ACRYLIC
HEAT
SETTING
HEAVY
LOAD
MEDIUM
LOAD
LIGHT
LOAD
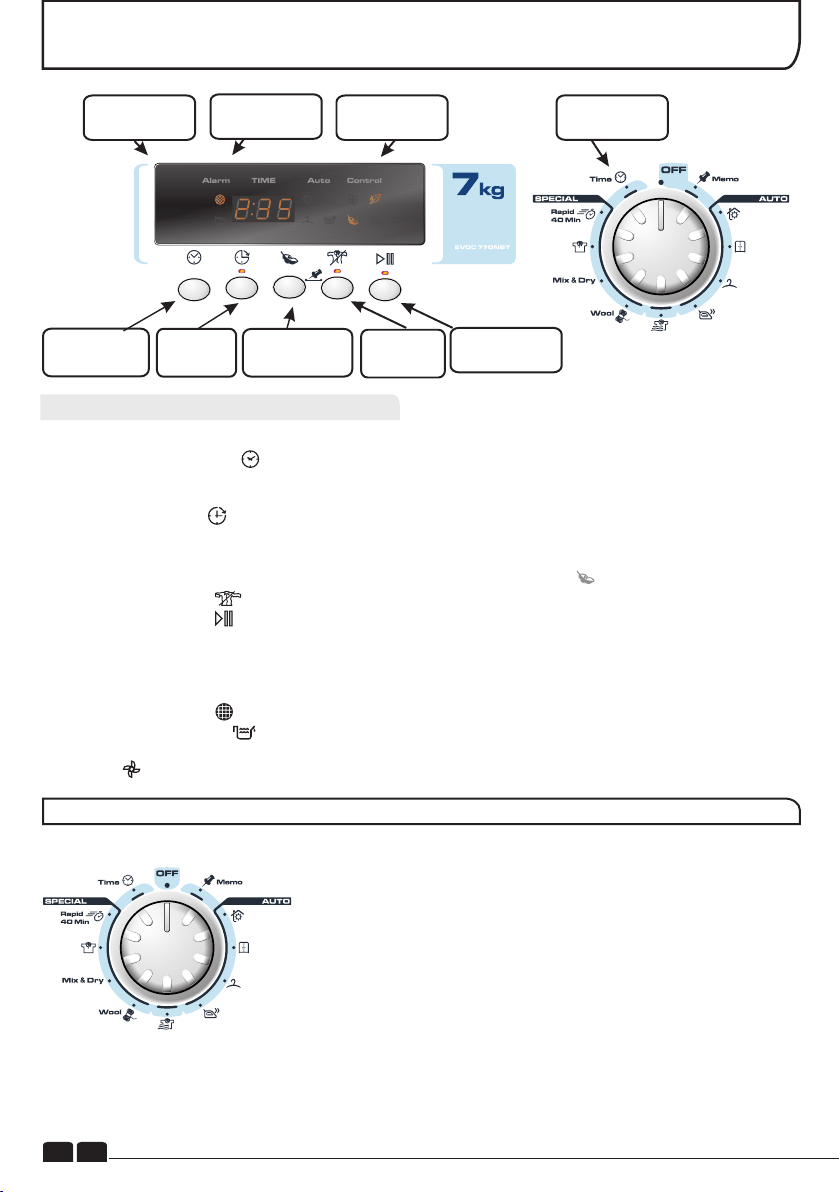
CONTROLS AND INDICATORS
EN
8
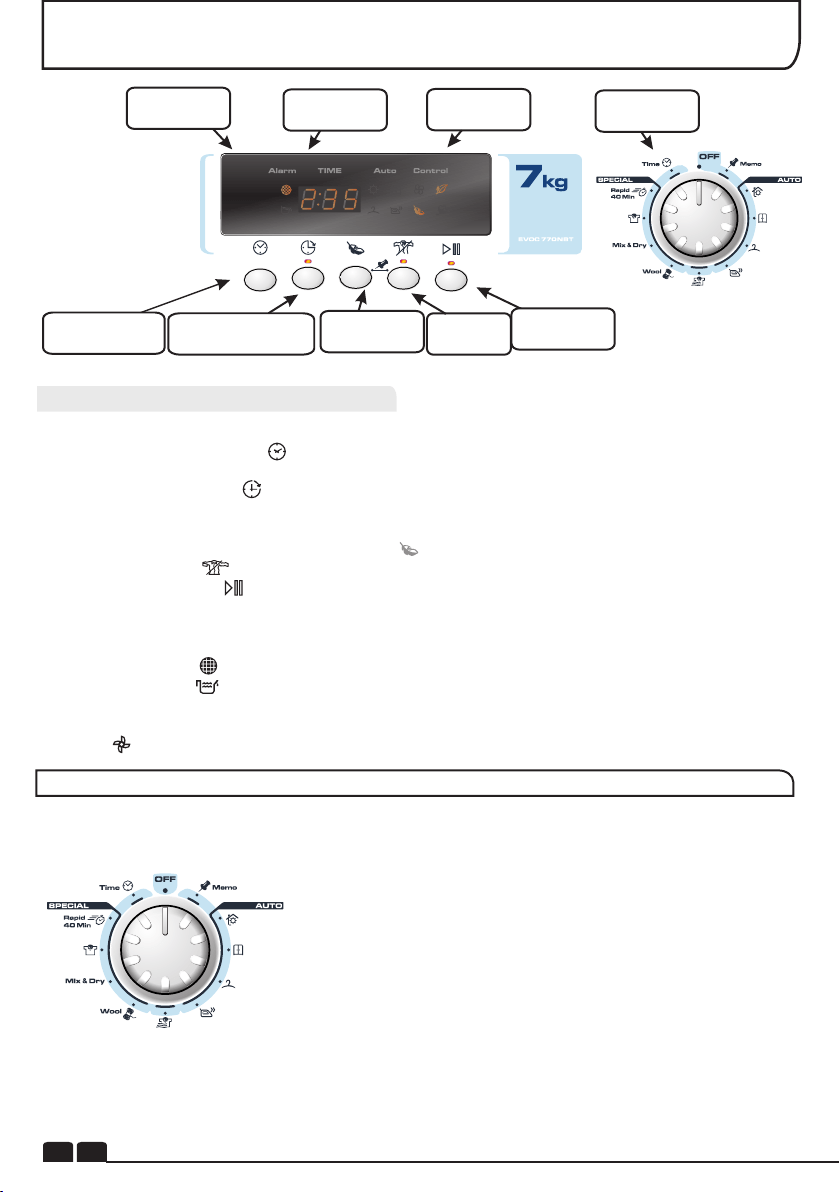
Start/Pause
Button
Water Tank
Indicator
Filter Care
Indicator
Programme
Display
Programme
Selector
Time Selection
Button
Acrylic Synthetic
Button
Anti-Crease
Button
Delay Start
Button
Programme Selector – Select the required programme.
Time Selection Button – Allows the user to change duration of the programme selected by
Programme Selector. It can be used only with the selection of: Mix&Dry, Shirts and Time
Programmes.
Delay Start Button – Allows the user to delay the start of the drying cycle (see details of
Operation ).
Acrylic and Synthetic Button –
Anti- Crease Button – Allows the user to select a post drying anti-crease cycle.
Start/Pause Button – Press to commence/ to pause the selected drying programme.
Memo Button – Allows user to record the programme by pressing simultaneously the Anti-
Crease and the Acrylic Synthetic buttons for 3 seconds, after 2 minutes duration of the chosen
programme/option.
Filter Care indicator – Lights when the filter needs cleaning.
Empty Water indicator – Lights when the water container is full.
Program Display – Related indicator lights when a auto programme has been selected.
Refresh – The indicator lights up when the programme starts the cool down stage.
Press to select the type of fabrics to dry Acrylic and synthetics,
when pressed Acrylic Synthetics option is activated and the indicator lights up.
The Candy Sensor Dry machine gives many options for drying the
laundry to suit all circumstances. The table on the next page lists
the programmes and the function of each programme.
Note:
The sensor may not detect a small load of small articles. For small
loads and separate items or pre-dried fabrics with low moisture
content, use the timed programmes.
If the sensor does not detect the item the dryer will only operate for
10 minutes before going into cooldown.
If the load is too large or too wet to tumble dry the dryer will
automatically go into cooldown after approximately 3 hours.
In these cases we advise to use a time cycles between 30 and
75minutes depending on the load size and dryness required, and
select high or low heat depending upon the fabric type.
Control Panel and Indicator Lights
SELECTING THE PROGRAMME
EN 9
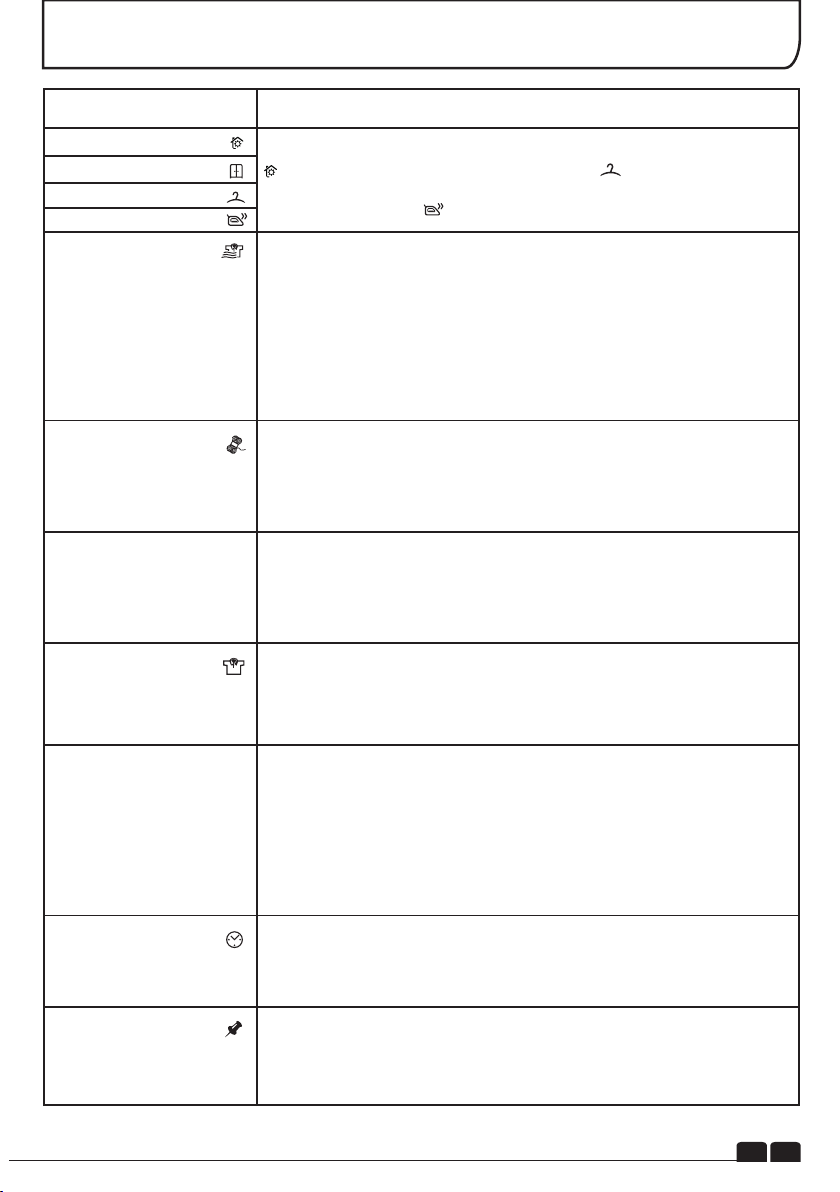
SELECTING THE PROGRAMME
PROGRAMME
Perfect Home
Store Dry
Hang Dry
Iron Dry
Wool Finish
Rapid 40'
Mix & Dry
Shirts
Time
Memo
No Crease
DESCRIPTION
Select the degree of dryness that you require. This range from
for bath towels and bathrobes, through for items that will be
put away without ironing, to the programme that leaves the laundry
suitable for ironing.
A gentle programme specially created to get woollens softer after
air-drying.This delicate warm air cycle, lasting 12 minutes, can
also be used to get woollens 'refreshed' after being stored in the
wardrobe.
This is a special timed program for a maximum load of 4kg (117
min). The default duration is 99 minutes and allows to dry up to 3kg.
With this program you can dry together cotton and synthetic
fabrics.
This is a special timed program for shirts of max load of 3kg (78
minutes). For synthetic shirts you have to press the Acrylic
Synthetic button. The default duration is 60 minutes and allows to
dry up to 2kg.
Time selection includes all the manual time programs: from 30
minutes to 180 minutes. The 20 minutes selection time in only cool
air ventilation (Refresh)
Memo Program allows to re-perform a program that the user has
saved before, without selecting the correct sequence of program
selector positions and option buttons for that particular program.
The programme provides a conditioning and anticrease function.
The dryer will heat the load for 9 minutes followed by a 3 minute cool
down period and is especially good for garments which may have
been left for some time prior to ironing, in a linen basket for
example. Garments may also become stiffened when dried outside
on a washing line or inside on radiators.
This programme relaxes the creases in the fabric making ironing
quicker and easier.
The Rapid 40' programme allows a drying cycle to be completed
quickly. This is an ideal programme for having dry, refreshed and
ready-to-wear clothes in less than 40'. This special programme
constantly monitors the temperature in the drum. The maximum load
is 2 kg and the programme is suitable for all types of fabrics where
tumble drying is appropriate.
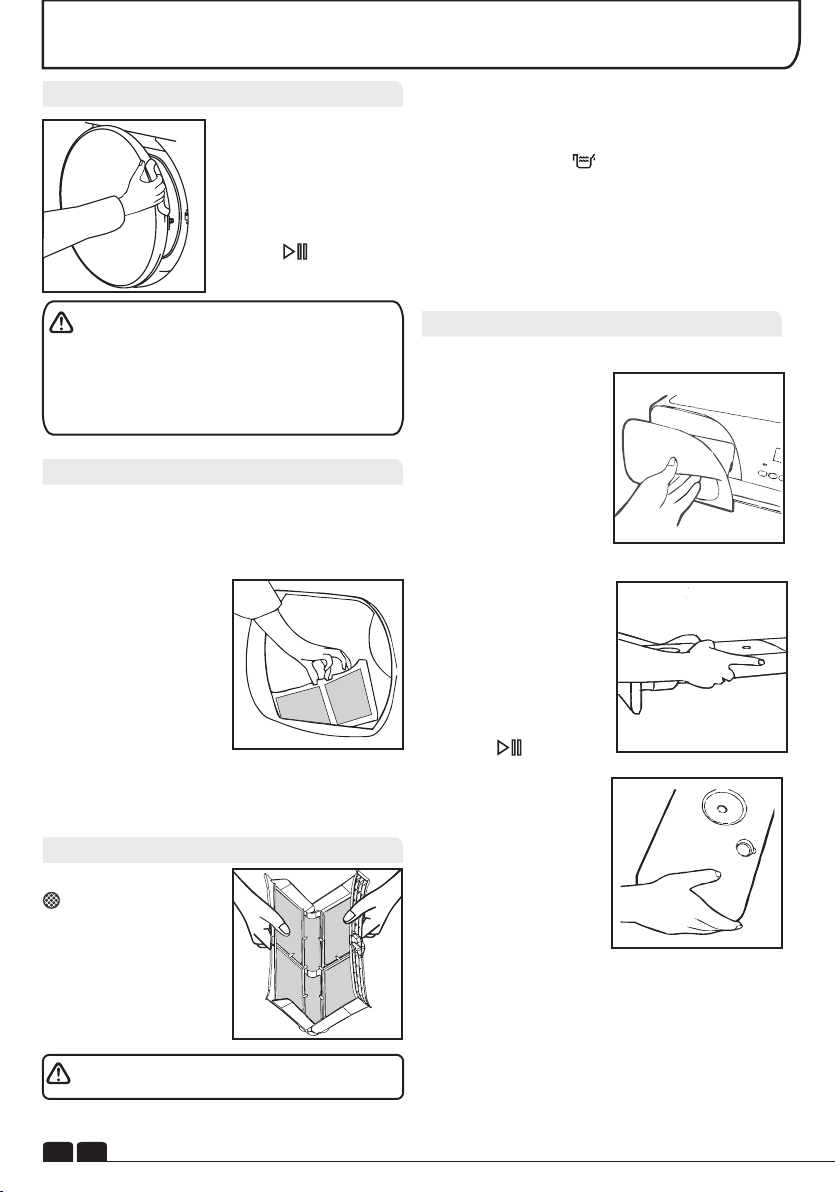
DOOR and FILTER
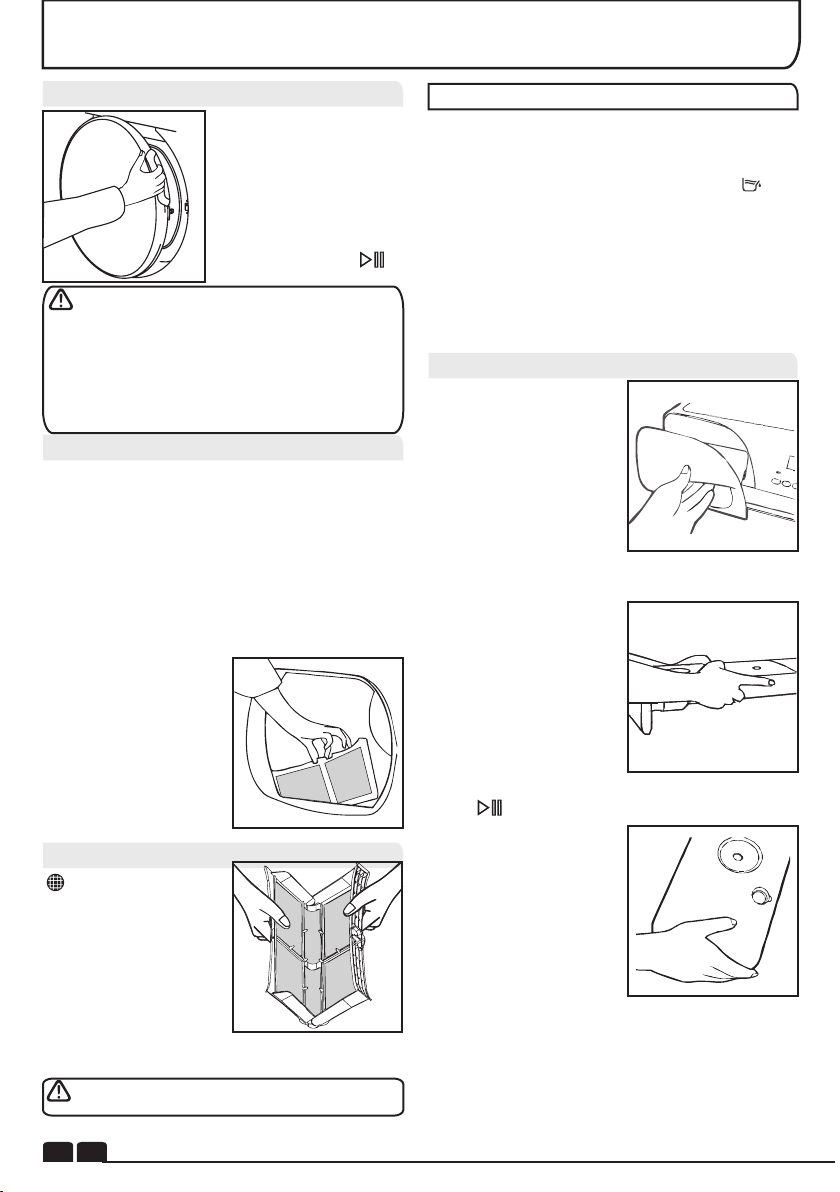
Opening the Door
Pull on handle to open
the door.
To restart the dryer,
close the door and
press .
WARNING! When the tumble dryer is in
use the drum and door may be VERY HOT.
Never stop a tumble dryer before the end of the
drying cycle unless all items are quickly
removed and spread out so that the heat is
dissipated.
Filter Care Indicator
Lights when the
filter needs cleaning.
If the laundry is not
drying check that the
filter is not clogged.
DO NOT USE WATER TO CLEAN THE FILTER.
Filter
IMPORTANT: To maintain the efficiency of the
dryer check that the fluff filter is clean before
each drying cycle.
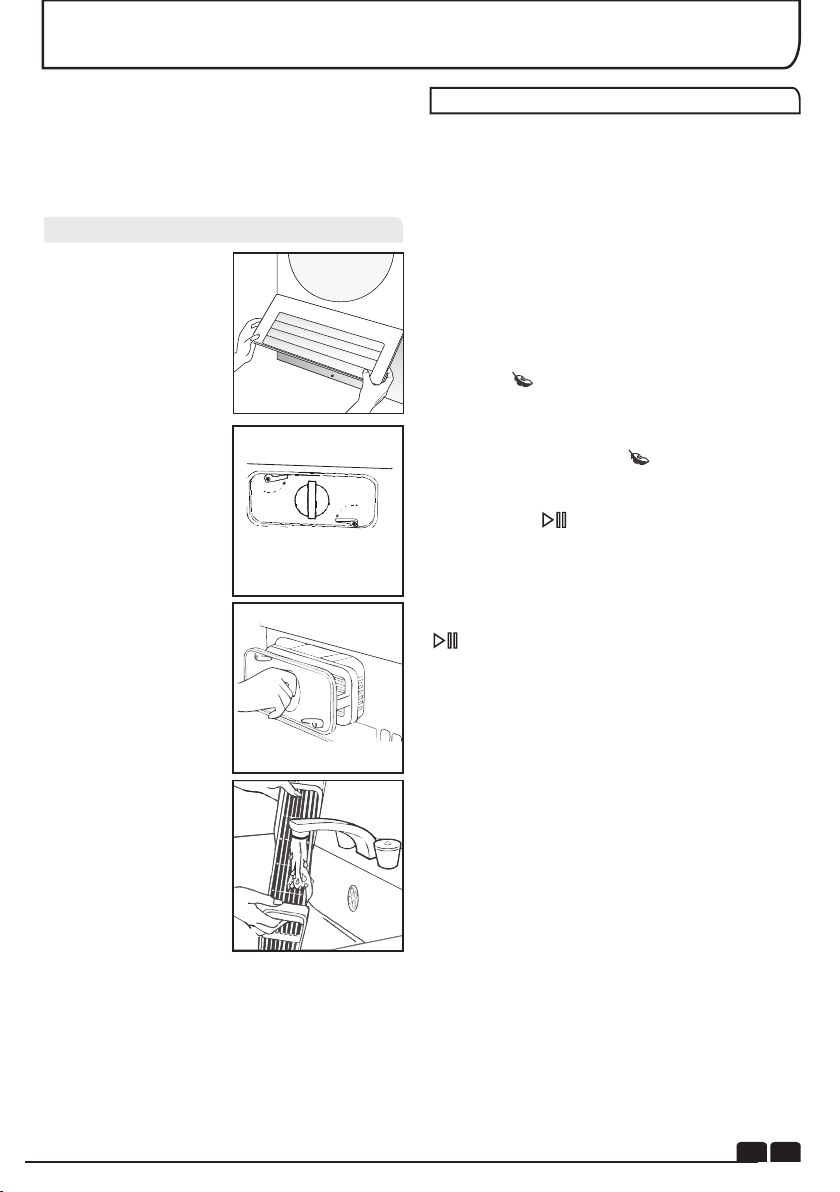
1 . P u l l t h e f i l t e r
upwards.
2. Open filter as shown.
3.Gently remove lint
using a soft brush or
your fingertips.
4 . S n a p t h e f i l t e r
together and push
back into place.
EN 10
The water removed from the laundry during
the drying cycle is collected in a container
inside the door of the dryer. When the
container is full the indicator on the control
panel will light, and the container MUST be
emptied. However, we recommend that the
container is emptied after each drying cycle.
NOTE: Very little water will collect during the
first few cycles of a new machine as an internal
reservoir is filled first.
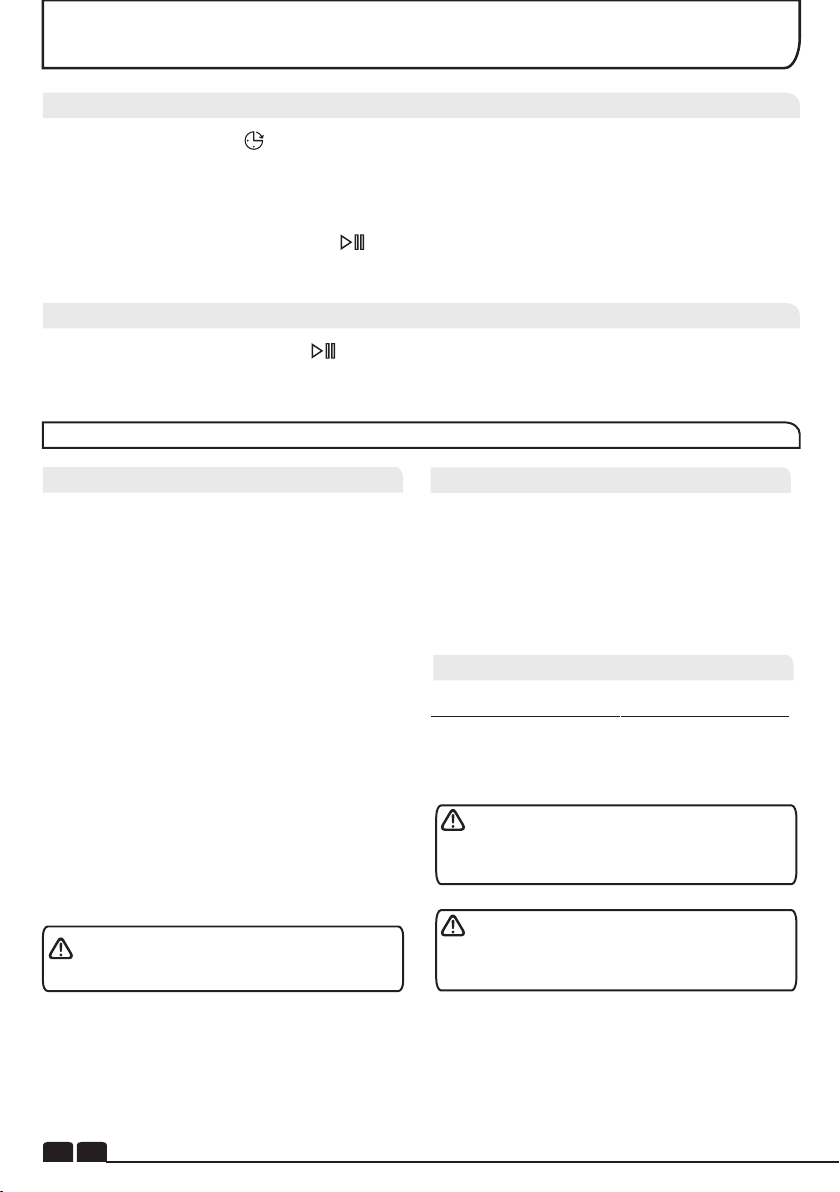
To Remove the Container
1. Gently pull out the
t r a y u n t i l i t i s
completely removed.
Support the tray with
both hands. When it is
full the water container
will weigh about 4kg.
2 . Ti l t t h e wa t e r
container to empty the
water out through the
rear hole.
When emptyslide the
water container back
into position.
PUSH FIRMLY INTO
PLACE.
3. Press to restart
the cycle.
NOTE: If you have the
option of drainage near
the dryer it is possible
to use the discharge kit
to provide a permanent
drain for the water
collected by the dryer.
This will remove the
need to empty the
water tray. All the
i n f o r m a t i o n f o r
assembly of the kit is
contained in the kit
envelope.
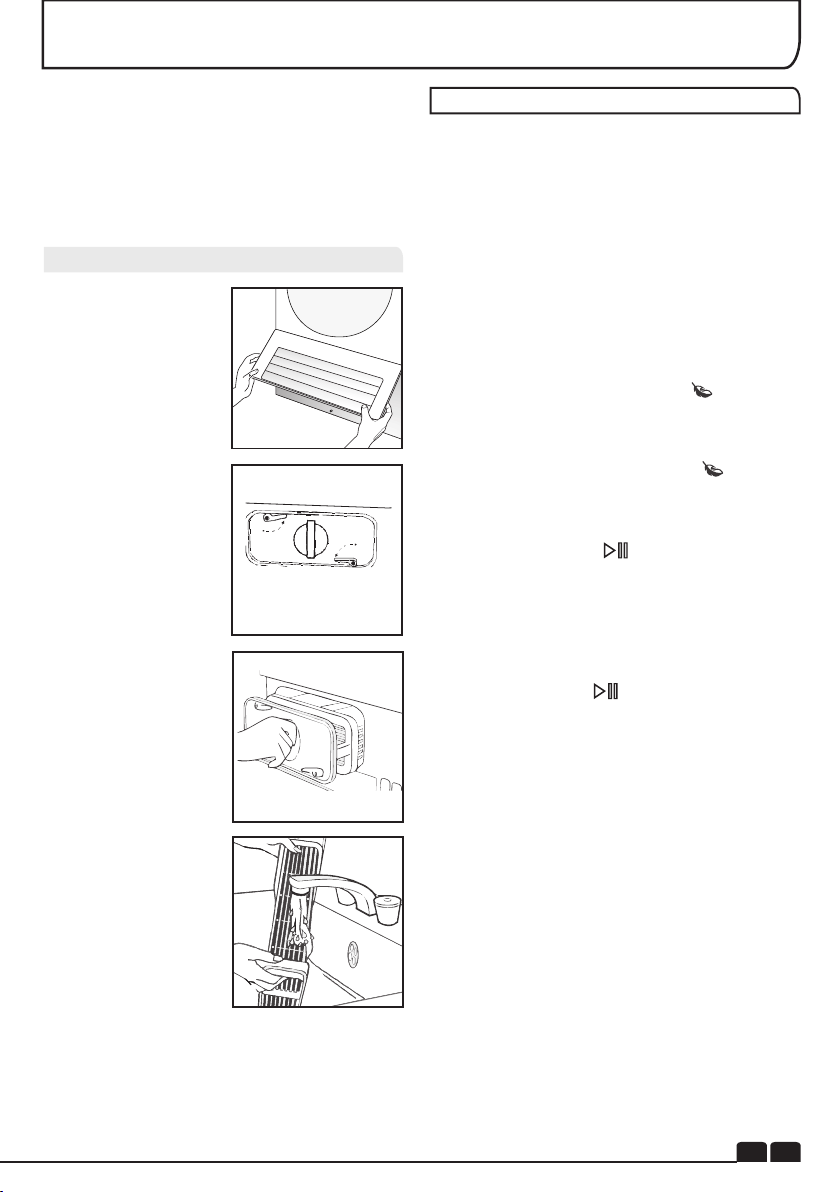
To Remove the Condenser
Important: Always switch off and remove the
plug from the electricity supply before cleaning
the condenser.
To maintain the efficiency of the dryer regularly
check that the condenser is clean.
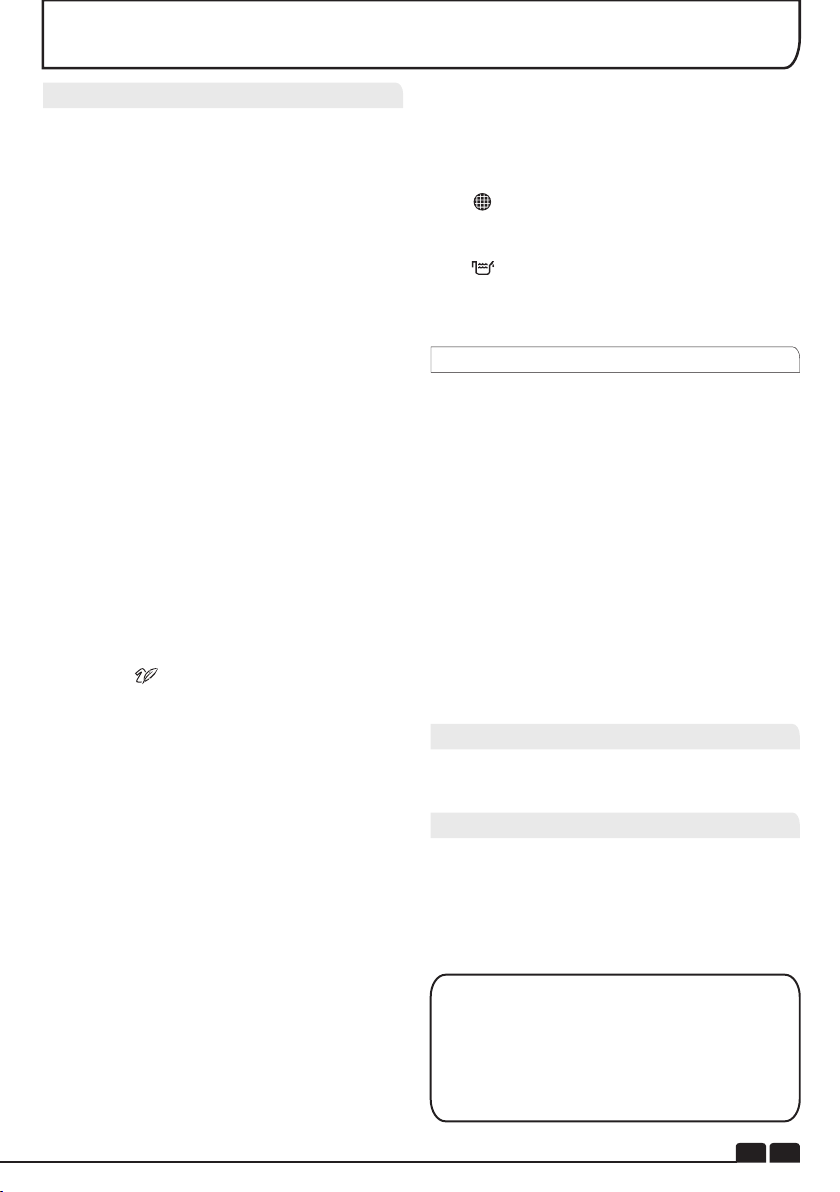
1 . R e m o v e t h e
kickplate.
2. Turn the two locking
levers anti-clockwise
a n d p u l l ou t t h e
condenser.
3 . P u l l o u t t h e
condenser unit.
4. Gently remove any
dust or fluff with a cloth,
then wash the unit by
holding it under a
running tap turning it
so that water flows
between the plates, to
remove any dust or
fluff.
5. Refit the condenser
ensuring it is in the
c o r r e c t w a y ( a s
indicated by the arrow)
and pushed firmly into
place. Lock the two
levers by turning them
clockwise.
6. Refit the kickplate.
CONDENSER
EN 11
OPERATION
1. Open the door and load the drum with
laundry. Ensure that garments do not hinder
closure of the door.
2. Gently close the door pushing it slowly until
you hear the door 'click' shut.
3. Turn the Programme Selector dial to select
the required drying programme (see
Programme Guide).
4. If drying synthetics, acrylics or delicate items,
press the button to reduce the heat level.
The light next to the push button will light up
when the machine is in low heat setting. To
deselect in the first few minutes of the
programme, press the button, after this
time reset the machine to change the setting.
5. Press the button. The dryer will start
automatically and the DRY indicator will be
continuously lit.
6. If the door is opened during the programme to
check the laundry, it is necessary to press
to recommence drying after the door has
been closed.
7. When the cycle is nearing completion the
machine will enter the cool down phase, the
clothes will be tumbled in cool air allowing the
load to cool down.
8. When the programme is complete the
END indicator will light.
9. Following the completion of the cycle the
drum will rotate intermittently to minimize
creasing. This will continue until the machine is
switched OFF or the door is opened.
IMPORTANT Always switch off and
remove the plug from the electricity supply
before cleaning this appliance.
For electrical data refer to the rating label
on the front of the dryer cabinet (with the door
open).
Technical Specifications
Information for Test Laboratory
Cleaning the Dryer
Drum capacity 115 litres
Maximum load 8 kg
Height 85 cm
Width 60 cm
Depth 60 cm
Energy Label Band B
TROUBLESHOOTING
● Clean the filter and empty the water
container after every drying cycle.
● Regularly clean the condenser.
● After each period of use, wipe the inside of
the drum and leave the door open for a while to
allow circulation of air to dry it.
● Wipe the outside of the machine and the
door with a soft cloth.
● DO NOT use abrasive pads or cleaning
agents.
● To prevent the door sticking or the build up
of fluff clean the inner door and gasket with a
damp cloth after every drying cycle.
WARNING! The drum, door and load may
be very hot.
CLEANING AND ROUTINE MAINTENANCE
Delay Start Function
The Delay Start Function allows the user to delay the start of the drying cycle by 1 to 24 hours.
When the function is first selected the display will show a delay of 1 hour, subsequent presses of
the button will increase the delay with 1 hour steps.
To commence the programme press and the appliance will complete the drying cycle at the
end of this time. The indicator light will flash to indicate that the start delay is in progress.
Cancelling and Resetting the Programme
To cancel a programme press the button for 3 seconds. In the TIME CONTROL display 0:00
Light will flash to indicate that it has been reset.
EN 12
EN 61121 Programme
Programme To Use
-DRY COTTON
-HANG DRY
-IRON DRY
-HANG DRY+ SYNTHETIC
-IRON DRY COTTON
-EASY-CARE TEXTILE
EN 13
TROUBLESHOOTING
What Might be the Cause of...
Defects you can remedy yourself
Before calling GIAS Service for technical
advice please run through the following
checklist. A charge will be made if the machine
is found to be working or has been installed
incorrectly or used incorrectly.
If the problem persists after completing the
recommended checks, please call GIAS
Service, they may be able to assist you over the
telephone.
Time display to end could change during
drying cycle. The time to end is
continuously checked during the drying
cycle and the time is adjusted to give the
best estimation time. The displayed time
may increase or decrease during the cycle
and this is normal.
Drying time is too long/clothes are not dry
enough…
● Have you selected the correct drying
time/programme?
● Were the clothes too wet? Were the clothes
thoroughly wrung or spindried?
● Does the filter need cleaning?
● Is the dryer overloaded?
● Has the option been selected from a
previous cycle?
The dryer does not operate…
● Is there a working electricity supply to the
dryer? Check using another appliance such as
a table lamp.
● Is the plug properly connected to the mains
supply?
● Is there a power failure?
● Has the fuse blown?
● Is the door fully closed?
● Is the dryer switched on, both at the mains
supply and at the machine?
● Has the drying time or the programme been
selected?
● Has the machine been switched on again after
opening the door?
CUSTOMER SERVICE
Spares
GIAS Service
Should there still be a problem with your dryer
after completing all the recommended checks,
please call GIAS Service for advice.
They may be able to assist you over the
telephone or arrange for a suitable appointment
for an engineer to call under the terms of your
guarantee. However, a charge may be made if
any of the following applies to your machine:
● Is found to be in working order.
● Has not been installed in accordance with the
installation instructions.
● Has been used incorrectly.
Always use genuine spares, available direct
from GIAS Service.
For service and repairs call your local GIAS
Service engineer.
The dryer is noisy…
● Switch off the dryer and contact GIAS Service
for advice.
The Indicator is on…
● Does the filter need cleaning?
The Indicator is on…
● Does the water container need emptying?
The manufacturer declines all responsibility
in the event of any printing mistakes in this
booklet. The manufacturer also reserves the
right to make appropriate modifications to
its products without changing the essential
characteristics.
Introduzione
Informazioni Sulla Consegna
Estrazione Del Prodotto Dall’imballaggio
Consigli di Sicurezza
Utilizzo
Installazione
La Biancheria
Tutela Dell’ambiente
Servizio Gias
Installazione
Requisiti Elettrici
Regolazione dei Piedini
Ventilazione
Kit i Montaggio Tubo i Scarico: Istruzioni Per il Montaggio
Preparazione della Biancheria
Preparazione dei Capi
Evitare di Asciugare
Risparmio Energia
Selezione della Biancheria
Guida Ad una Corretta Asciugatura
Comandi e Spie Di Segnalazione
Selezione del Programma
Portellone e Filtro
Apertura del Portellone
Filtro
Spia di Pulizia Filtro
Vaschetta Dell’acqua
Per Togliere La Vaschetta
Condensatore
Per Togliere Il Condensatore
Funzionamento
Partenza Ritardata
Annullamento e Azzeramento del Programma
Pulizia e Manutenzione Ordinaria
Pulizia Dell’asciugatrice
Specifiche Tecniche
Ricerca Guasti
Servizio Assistenza Clienti
Ricambi
Servizio Assistenza Gias
d d
INDICE
15
15
15
15
15
16
16
16
16
17
17
17
18
19
19
19
19
19
19
19
20
21
22
22
22
22
22
22
23
23
23
24
24
24
24
24
25
25
25
25
IT
14
Estrazione Del Prodotto Dall’imballaggio
INTRODUZIONE
Leggere attentamente le istruzioni per un corretto funzionamento della macchina. Questo
opuscolo fornisce importanti linee guida per una manutenzione,un uso e un'installazione sicuri.
Esso contiene inoltre utili consigli che consentiranno di sfruttare al meglio le potenzialità di questa
macchina.
Conservare la documentazione in un luogo sicuro per eventuali riferimenti o per futuri proprietari.
Informazioni sulla Consegna
Controllare che al momento della consegna
la macchina sia dotata dei seguenti
componenti:
● Libretto di istruzioni
● Certificato di garanzia
● Etichetta efficienza energetica
La mancata osservanza di tale procedura
po t reb b e co mpro mett ere la si cur e zza
dell’apparecchio. La chiamata può essere
soggetta a pagamento se le cause di
malfunzionamento della macchina sono
attribuibili a un uso improprio.
Verificare che durante il trasporto la
macchina non abbia subito danni. In caso
contrario, rivolgersi al Centro Assistenza GIAS.
E s t r a r r e l a m a c c h i n a
dall’imballaggio vicino al
p u n t o p r e v i s t o p e r
l’installazione.
1. Con cautela, eseguire un
taglio lungo il perimetro
della base dell’imballaggio e
un altro verso l’alto, in
corrispondenza di un angolo.
2.Togliere la fascia in
p o l i t e n e e s o l l e v a r e
l’asciugatrice togliendola
dalla base di polistirolo.
Smaltire l’imballaggio in maniera sicura.
Accertarsi che sia fuori dalla portata dei bambini,
in quanto fonte potenziale di rischio.
CONSIGLI DI SICUREZZA
Utilizzo
● Questo apparecchio non è destinato all'uso da parte di persone (inclusi i bambini) con capacità
fisiche, sensorie o mentali ridotte, o con una mancanza di esperienza e conoscenza,a meno che esse
non abbiano ricevuto supervisione o istruzione sull'uso dell'apparecchio da parte di una persona
responsabile della loro sicurezza.
● I bambini dovrebbero essere controllati per garantire che essi non giochino conl'apparecchio.
●ATTENZIONE L’uso improprio dell’asciugatrice può provocare rischio di incendio.
● Questa macchina è prevista unicamente per uso domestico, ovvero per l’ asciugatura di capi e
indumenti per la casa.
●La macchina qui descritta deve essere utilizzata esclusivamente per lo scopo al quale è destinata
secondo quanto illustrato nel presente libretto. Prima di attivare la macchina, accertarsi di avere letto
attentamente e compreso le istruzioni d’uso e di installazione.
● Non toccare l’asciugatrice con mani o piedi umidi o bagnati.
● Non appoggiarsi al portellone per caricare la macchina; non utilizzare il portellone per sollevare o
spostare la macchina.
● Non consentire ai bambini di giocare con la macchina o con i suoi comandi.
● ATTENZIONE Non utilizzare il prodotto se il filtro antifilacce non è correttamente posizionato o
risulta danneggiato; il filtro non è ignifugo.
● ATTENZIONE Se è esposto il simbolo indicante il riscaldamento della superficie ,quando
l’asciugatrice è in funzione la temperatura può essere superiore a 60 gradi C.
● Staccare la spina dalla presa elettrica. Prima di pulire la macchina, staccare sempre la spina.
● Se si presume che la macchina sia guasta, non continuare ad usarla.
●Evitare che sul pavimento attorno alla macchina si raccolgano filacce e pelucchi.
● Dopo il ciclo di asciugatura, l’ interno del cestello può essere molto caldo. Prima di estrarre la
biancheria è pertanto opportuno lasciar raffreddare completamente la macchina.
IT 15

CONSIGLI DI SICUREZZA
Installazione
La Biancheria
● Prima dell’uso, controllare che il prodotto non
presenti segni visibili di danni. Non usare in caso
di danni e contattare il Servizio Assistenza GIAS.
●Non utilizzare adattatori, connettori multipli e/o
prolunghe.
● Non installare l’asciugatrice vicino ai tendaggi
e rimuovere tempestivamente eventuali oggetti
caduti dietro la macchina.
● L'apparecchio non deve essere installato
dietro una porta che può essere chiusa a chiave,
una porta scorrevole o una porta i cui cardini
siano sul lato opposto rispetto a quelli
dell'asciugatrice.
● Non asciugare capi non lavati nell'asciugatrice.
● ATTENZIONE Evitare di asciugare articoli
trattati con prodotti di pulizia a secco.
● ATTENZIONE In determinate circostanze, i
materiali in gomma possono essere soggetti ad
autocombustione se riscaldati. Articoli in
gommapiuma (lattice), cuffie da doccia, tessuti
impermeabili, articoli in caucciù e vestiti o cuscini
imbottiti con gommapiuma NON VANNO
asciugati nell'asciugatrice.
● Leggere attentamente le etichette con le
istruzioni di lavaggio per conoscere le
caratteristiche dell’asciugatura idonea.
● Gli indumenti devono essere introdotti nell’
a s c i u g a t r i c e s o l o d o p o e s s e r e s t a t i
opportunamente centrifugati in lavatrice o
strizzati a mano. EVITARE di caricare nel cestello
indumenti ancora gocciolanti.
● Controllare accuratamente che nelle tasche
degli indumenti da asciugare non siano presenti
a c c e n d i n i o f i a m m i f e r i e d E V I TA R E
ASSOLUTAMENTE l’uso di prodotti infiammabili
in prossimità della macchina.
● Evitare ASSOLUTAMENTE di asciugare tende
in fibra di vetro. La contaminazione dei capi con le
fibre di vetro può infatti dar luogo a fenomeni
d’irritazione cutanea.
● I capi che sono stati macchiati con sostanze
come olio da cucina, acetone, alcol, petrolio,
cherosene, smacchiatori, acquaragia, cere e
sostanze per rimuovere le cere dovrebbero
essere lavati in acqua calda con una quantità
extra di detergente prima di essere asciugati
nell'asciugatrice.
● Gli ammorbidenti o prodotti simili dovrebbero
essere utilizzati come specificato nelle rispettive
istruzioni
● Tutti i materiali utilizzati per l’imballaggio sono
ecologici e riciclabili. Smaltite l’imballaggio con
metodi ecologici. Presso il comune di residenza
si potranno reperire ulteriori informazioni sui
metodi di smaltimento.
● Per garantire la sicurezza al momento dello
smaltimento di una asciugatrice, scollegare la
spina dell’alimentazione dalla presa, tagliare il
cavo dell’alimentazione di rete e distruggerlo
insieme alla spina. Per evitare che i bambini
possano rimanere intrappolati all'interno della
lavatrice, rompere i cardini o la chiusura
dell’oblò.
Assicurandovi che questo prodotto sia smaltito
correttamente, aiuterete ad evitare possibili
conseguenze negative all’ambiente e alla salute
delle persone, che potrebbero verificarsi a causa
d’un errato trattamento di questo prodotto giunto a
fine vita.Il simbolo sul prodotto indica che questo
apparecchio non può essere trattato come un
normale rifiuto domestico; dovrà invece essere
consegnato al punto più vicino di raccolta per il
riciclo delle apparecchiature elettriche ed
elettroniche. Lo smaltimento deve essere
effettuato in accordo con le regole ambientali
vigenti per lo smaltimento dei rifiuti.
Per informazioni più dettagliate sul trattamento,
recupero e riciclo di questo prodotto, per favore
contattare l’ufficio pubblico di competenza (del
dipartimento ecologia e ambiente), o il vostro
servizio di raccolta rifiuti a domicilio, o il negozio
dove avete acquistato il prodotto.
Questo elettrodomestico è marcato
conformemente alla Diretti va
Europea 2002/96/CE sui rifiuti da
apparecchiature elettriche ed
elettroniche (WEEE).
Direttiva Europea 2002/96/CE
Tutela dell’ambiente
Servizio GIAS
Ai fini della durata e del buon funzionamento
della macchina, per gli eventuali interventi di
assistenza o riparazione consigliamo di
rivolgersi esclusivamente al servizio assistenza
autorizzato GIAS.
Nel caso in cui la macchina non funzioni
correttamente o sia fuori uso, spegnere e
staccare la spina dalla presa. Per la riparazione,
rivolgersi al Centro Assistenza GIAS.
IT
16

INSTALLAZIONE
Requisiti Elettrici
VENTILAZIONE
Regolazione dei Piedini
Una volta posizionata la
macchina, si dovrebbe
p r o c e d e r e a l l a
regolazione dei piedini,
p e r g a r a n t i r e u n a
perfetta messa in bolla.
Le asciugatrici sono state progettate per
funzionare ad una tensione di 220-240V, 50 Hz
mon o f a s e. C o n t r ol l a r e che i l c i r cu i t o
dell’alimentazione sia idoneo per valori di corrente
di almeno 10A.
L’elettricità può essere estremamente
pericolosa
L’apparecchio deve essere opportunamente
collegato a terra.
La presa e la spina dell’apparecchio devono
essere dello stesso tipo.
Non utilizzare adattatori multipli e/o
prolunghe.
Una volta completata l’installazione, la spina
deve risultare accessibile e facilmente
scollegabile.
L’apparecchio con marchio CE è conforme alle
direttive europee 2004/108/EC, 2006/95/EC
e successive modifiche.
Nel caso risulti danneggiato, il cavo di
alimentazione dell’apparecchio dev’essere
prontamente sostituito con apposito cavo
reperibile ESCLUSIVAMENTE presso il servizio di
ricambi. L’installazione deve essere effettuata da
persone competenti.
La chiamata può essere soggetta a pagamento,
se le cause di malfunzionamento della macchina
sono attribuibili a un’installazione non corretta.
Il locale in cui viene installata l’asciugatrice deve
essere adeguatamente ventilato onde evitare
che i gas provenienti da apparecchiature
funzionanti con altri combustibili, comprese
fiamme libere, siano aspirati nel locale dove
l’asciugatrice è in funzione.
● Non scaricare l’ aria nella canna fumaria
utilizzata per lo scarico di fumi provenienti da
attrezzature funzionanti a gas o altri combustibili.
● Controllare periodicamente che attorno
all’asciugatrice vi sia una buona circolazione
d’aria, senza impedimenti di sorta.
● Dopo l’uso ispezionare il filtro antifilacce e, se
necessario, pulirlo.
●Verificare costantemente che presa e sfiati non
siano ostruiti. Per assicurare un’idonea
ventilazione è essenziale che lo spazio tra il
fondo macchina e il pavimento non sia ostruito.
Tra la macchina ed eventuali ostacoli si
dovrebbe lasciare uno spazio di almeno 12mm.
●Rimuovere tempestivamente eventuali oggetti
caduti, dietro/sotto la macchina in quanto
potrebbero ostruire le prese e gli sfiati dell’aria.
● EVITARE ASSOLUTAMENTE d’ installare la
macchina contro tendaggi.
Non inserire la spina nella presa e non accen-
dere la macchina finché l’installazione non sarà
stata completata. Ai fini della sicurezza personale è
essenziale che l’asciugatrice venga installata
correttamente. In caso di dubbi sull’installazione,
rivolgersi al Servizio Assistenza GIAS.
IT
17
Non installare il prodotto in luoghi freddi o dove vi
sia il rischio di formazione di ghiaccio. Alla temperatura di
congelamento dell'acqua il prodotto potrebbe non
funzionare correttamente.Se l'acqua del circuito idraulico
ghiaccia sono possibili danni a componenti quali: valvole,
pompe, tubi. Per garantire le prestazioni del prodotto la
temperatura della stanza deve essere compresa tra +2°C e
+35°C. Nel caso l'asciugatrice venga utilizzata in ambienti
con basse temperature (tra +2°C e +15°C) è possibile che
capitino fenomeni di condensazione e di piccole perdite
d'acqua sul pavimento.
EN 5
KIT DI MONTAGGIO TUBO DI SCARICO: ISTRUZIONI PER IL MONTAGGIO
AVVERTENZA! Prima di eseguire qualsiasi
operazione, spegnere l’asciugatrice e staccare
la spina dalla presa principale.
Per non dover svuotare il contenitore dell’acqua
dopo ogni ciclo di asciugatura, si può convogliare
l’acqua normalmente raccolta durante il ciclo di
asciugatura direttamente in un tubo di scarico
delle acque di scolo (lo stesso sistema di scarico
usato nei lavandini di Casa).
Le leggi locali sullo smaltimento delle acque
vietano la connessione ai canali a cielo aperto. Il
sistema di scarico delle acque di scolo va
collocato accanto all’asciugatrice.
Il kit è composto: 1 tubo flessibile, 1 connettore
per tubo flessibile dritto, 1 morsetto per tubo e una
fascetta di plastica.
Montare i Componenti del Kit Come di Seguito Riportato:
1.Svitare e rimuovere le 3
v i t i s u l r e t r o d e l l a
macchina, mante-nendo
in posizione il bordino di
finitura del piano di lavoro.
2. Rimuovere il bordino di
finitura del piano di lavoro
posteriore, poi rimuovere
anche il piano di lavoro
superiore, facendolo
scorrere con delicatezza
ver s o il re t r o de l la
macchina.
3 . I l c o n t e n i t o r e
dell’acqua di scolo è
posto sul lato destro della
macchina (guardando dal
retro).
Sopra il con tenitore
dell’acqua è posto un tubo
grigio flessibile, fissato a
un collegamento a ponte.
Utilizzando una pinza,
rimuovere dal ponte il
morsetto di bloccaggio
del tubo.
4. Rimuovere il tubo
flessibile dal ponte.
5. Collegare il tubo
flessibile del kit al tubo
flessibile rimosso dal
ponte, ut ilizzando il
connettore e I morsetti per
il tubo forniti.
6. Rimuovere il coperchio
del contenitore dell’acqua
Posto sul retro della
macchina, rimuovendo le
due viti e sganciandolo.
.7. Rompere la linguetta
p o s t a s u l l a t o d e l
coperchio, riposizio-nare
i l c o p e r c h i o s u l l a
macch i n a e fi s s a r e
nuovamente le viti. A
questo punto si dovrebbe
vedere un foro sul retro
del mobile, accanto al
coperchio.
8. Far passare il tubo
fles si bile di scarico
attraverso il foro di
entrata nel mobile.
9. Collocare il tubo grigio
nello spazio libero della
vas c h etta e fi s sare
l’intero blocco del tubo al
ponte, utilizzando la
fascetta di plastica.
10. Ricollocare il piano di
lavoro facendolo scorrere
di nuovo nella posizione
d i p a r t e n z a , e
accertandosi che il tubo
f l e s s i b i l e n o n s i a
incastrato. Ricollocare
in posizione anche il
bordino di finitura del
p i a n o d i l a v o r o
posteriore, utilizzando le
3 viti.
11. Collegare il nuovo
tubo flessibile di scarico
al tubo dell’acqua di
scolo. Accertarsi che il
nuovo tubo flessibile non
si pieghi quando si spinge
i n p o s i z i o n e
l’asciugatrice. Accertarsi
di rispettare le linee
guida, come mostrato,
q u a n d o s i f i s s a l a
posizione del nuovo tubo
flessibile esterno.
1 2 . E f f e t t u a r e i l
collegamento alla presa
di rete principale.
13. Dopo avere svuotato
il contenitore dell’acqua
di scarico, per dare inizio
a l p r o g r a m m a d i
asc i u g atura bast e r à
accendere la macchina
con il tasto ON (e
premere nel caso dei
modelli elettronici il
pulsante ‘START’).
IT
18
. .
.
In tabella sono riportati i tempi di asciugatura indicativi in
funzione del tipo di tessuto e del grado di umidità dei capi.
TESSUTO
COTONE
ELEVATA
140-165min
70-80min
70-80min---
---
50-65min
50-65min
40-55min
30-40min
BASSA
BASSA
SINTETICI
ACRILICI
SELEZIONE
TEMPE.
CARICO
PESANTE
CARICO
MEDIO
CARICO
LEGGERO
Prima di utilizzare l’asciugatrice per la prima
volta:
● Leggere attentamente il presente libretto
d’istruzioni.
● Togliere tutti gli articoli presenti all’ interno del
cestello.
● Pulire l’interno del cestello e il portellone con un
panno umido in modo da eliminare l’eventuale
polvere depositata durante il trasporto.
Preparazione dei Capi
Verificare che la biancheria da asciugare sia
idonea per l’asciugatura meccanica, come
indicato dai simboli sull’etichetta di lavaggio dei
vari articoli.
Controllare che le chiusure siano chiuse e le
tasche vuote. Girare i capi con il rovescio
all’esterno. Introdurre i capi nel cestello uno ad
uno, in modo che non si aggroviglino.
Articoli di lana, seta, tessuti delicati, calze di
nylon,ricami delicati, tessuti con decorazioni
metalliche, indumenti con guarnizioni in PVC o
in pelle, scarpe da ginnastica, articoli pesanti
come sacchi a pelo ecc.
IMPORTANTE: Evitare di asciugare
articoli preventivamente trattati con prodotti di
pulizia a secco o capi in gomma (pericolo
d’incendio o esplosione).
Nel corso degli ultimi 15 minuti, il carico viene
sempre asciugato con aria fredda.
Evitare Di Asciugare:
Risparmio Energia
Introdurre nell’asciugatrice solo biancheria
accuratamente strizzata a mano o centrifugata a
macchina. Quanto più asciutta è la biancheria,
tanto più rapido è il tempo richiesto per
l’asciugatura, con conseguente risparmio di
consumo elettrico.
COSA FARE SEMPRE
● Cercare sempre di far lavorare la macchina a
pieno carico di biancheria: si risparmia tempo ed
elettricità.
● Prima di ogni ciclo di asciugatura verificare
SEMPRE che il filtro sia pulito.
COSA NON FARE MAI
● Non superare mai il peso massimo: si perde
tempo e si consuma più elettricità.
● Evitare di caricare capi ancora gocciolanti: si
rischia di rovinare la macchina.
Selezionare La Biancheria Nel Modo Seguente:
Peso Massimo di Asciugatura
● Capi in cotone Max. 8 kg
● Capi sintetici Max. 4 kg
Non sovraccaricare il cestello, in quanto I
capi ingombranti, a caldo, possono superare il
carico massimo consentito. (per esempio sacchi
a pelo e piumoni)
● In base ai simboli delle etichette di lavaggio
Le etichette di lavaggio sono apposte sul collo o
sulle cuciture interne:
Articolo idoneo per l’asciugatura
meccanica.
Asciugatura ad alta temperatura.
Solo asciugatura a bassa temperatura.
Articolo non idoneo all’asciugatura
meccanica.
Se il capo è sprovvisto di etichetta di lavaggio, si
deve p r esum e r e che n o n s i a id o n e o
all’asciugatura meccanica.
● In base al quantitativo ed alla pesantezza
Se il carico è superiore alla capacità della
macchina, separare i capi in base alla pesantezza
(p. es., separare gli asciugamani dalla biancheria
leggera).
● In base al tipo di tessuto
Articoli di cotone/lino: Asciugamani, jersey di
cotone, biancheria da tavola/letto.
Articoli sintetici: Camicette, camicie, tute ecc. in
poliestere o poliammide e misti cotone/sintetici.
● In base al grado di asciugatura
Selezionare tra: capi asciutti da stirare, capi pronti
da riporre ecc. Per i capi delicati premere il
pulsante ,impostando una temperatura di
asciugatura ridotta.
Guida Ad Una Corretta Asciugatura
PREPARAZIONE DELLA BIANCHERIA
IT 19
COMANDI E SPIE DI SEGNALAZIONE
IT
20
Selettore dei programmi – Consente di selezionare il programma desiderato.
Pulsante Selezione Tempo – Consente di modificare la durata del programma scelto. Può
essere usato solo con il programma : Mix&Dry, Camicie e con i Programmi a tempo.
Tasto Partenza Ritardata – Consente all'utente di ritardare la partenza del ciclo di asciugatura
vedere i dettagli nella sezione specifica).
Pulsante Acrilici/Sintetici –
.
Pulsante Anti Piega – Consente all'utente di programmare un ciclo anti piega a fine ciclo.
Pulsante Avvio/Pausa –Per dare inizio o fermare il programma selezionato.
Pulsante Memo – Dopo 2 minuti di avvio di un programma ed eventuali opzioni, è possibile
premendo simultaneamente per 3 secondi i pulsanti Anti Piega e Acrilici/Sintetici, memorizzare il
programma preferito.
Spia di pulizia filtro – Si accende quando il filtro necessita di essere pulito.
Spia elimina acqua – Si accende quando il contenitore dell'acqua di condensa è pieno.
Display Programmi Automatici – Le relative spie luminose di accendono quando un programma
automatico è stato selezionato.
Refresh – La spia si accende quando il programma inizia la fase di raffreddamento.
(
Premere questo tasto per asciugare fibre delicate. Si attiverà
l'opzione Acrilici/Sintetici e si accenderà la spia
Pannello di Comando e Spie Luminose
SELEZIONE DEL PROGRAMMA
La macchina dotata di sensore di asciugatura, offre opzioni di
asciugatura in grado di rispondere alle più svariate esigenze.
Nella tabella che segue viene riportato un elenco dei programmi con la
relativa funzione.
Nota: il sensore potrebbe non essere in grado di individuare un carico
ridotto di articoli di piccole dimensioni. Per carichi ridotti e articoli
separati o per tessuti pre-asciugati leggermente umidi, selezionare i
programmi a tempo.
Impostare il tempo del programma tra 30 e 75 minuti in base alla
quantità del carico e al grado di asciugatura richiesto.
Successivamente, selezionare la temperatura alta o bassa in base al
tipo di tessuto.
Se il sensore non rileva la presenza del capo, l’asciugatrice funziona
solo per 10 minuti,prima di passare alla fase di raffreddamento.
Se il carico è troppo abbondante o troppo bagnato per essere asciugato,
l’asciugatrice passa automaticamente alla fase di raffreddamento dopo
circa 3 ore.
Pulsante Partenza
Ritardata
Tasto
Avvio/pausa
Spia Pulizia
Filtro
Pulsante
Delicati
Selettore
Programmi
Display
Spia Elimina
Acqua
Pulsante Selezione
Tempo
Pulsante
Anti Piega
IT
21
SELEZIONE DEL PROGRAMMA
Rapid 40'
Mix & Dry
Camicie
Time
Memo
Anti Piega
Lana
Selezionare il grado di asciugatura desiderato. Le possibilità
disponibili comprendono l’opzione , ideale per asciugamani e
accappatoi, l’opzione , per i capi che non è necessario stirare, e i
programmi che lasciano la biancheria pronta per la stiratura
Un programma delicato creato appositamente per ottenere capi
in lana più soffici dopo l’asciugatura ad aria.
Questo ciclo delicato con aria calda, della durata di 12 minuti, si
può utilizzare anche per infrescare i capi in lana dopo averli
tenuti in guardaroba.
Questo è uno speciale programma a tempo per l’asciugatura di
massimo 4 Kg di bucato (117 minuti). Di base, la durata di
asciugatura suggerita è di 99 minuti e permette di asciugare 3 Kg.
C o n q u e s t o p r o g r a m m a è p o s s i b i l e a s c i u g a r e
contemporaneamente fibre in cotone e fibre sintetiche.
Questo è uno speciale programma a tempo per l’asciugatura di
camicie con un carico massimo di 3 Kg (78 minuti). Per camicie o
maglie sintetiche è possibile pressare il pulsante Acrilici/Sintetici.
Di base la durata del ciclo suggerito dalla macchina è di 60 minuti e
consente di asciugare fino a 2 kg di carico.
Include tutti i programmi a tempo manuali: da 30 a 180 minuti. La
selezione del programma a tempo di 20 minuti prevede solo un
ciclo di ventilazione con aria fredda (Refresh).
Consente di riproporre un programma che è stato
precedentemente memorizzato, senza il bisogno di ri-selezionarlo
sulla manopola e di scegliere una eventuale opzione con uno dei
pulsanti.
Il programma assicura una funzione di trattamento antipiega.
La macchina effettua un ciclo di riscaldamento della biancheria per
9 minuti, seguito da 3 minuti di raffreddamento. Si tratta di una
funzione particolarmente utile quando si prevede di riporre la
biancheria (ad esempio, nel cesto della biancheria) per un periodo
di tempo prima della stiratura. I capi possono “seccarsi”
eccessivamente anche quando vengono fatti asciugare all’aperto
sul filo o vengono posti su radiatori. Il Ciclo attenua le pieghe sul
tessuto rendendo più facile e più rapida la stiratura.
Con il programma Rapid 40’, il ciclo di asciugatura è completato
rapidamente. E’ ideale se si vogliono capi asciutti, rinfrescati e pronti
da indossare in circa 40 minuti. Questo speciale programma
monitora continuamente la temperatura nel cesto. Il massimo carico
consentito è 2 Kg e il programma è adatto a qualsiasi tipo di fibra che
in genere può essere asciugata con questo apparecchio.
PROGRAMMA
DESCRIZIONE
Capi Extra Asciutti
Capi Asciutti Da Riporre
Capi Asciutti Da Stirare
Perfect Home
Si accende segnalando
la necessità di pulire il filtro.
Procedere con la verifica
ed eventuale pulizia del
filtro principale e dei filtri
allocati nella parte inferiore
del Dryer.
Se la biancheria non si
asciuga verificare che il
filtro non sia intasato.
Filtro
IMPORTANTE: Ai fini della massima efficacia
della macchina, prima di ogni ciclo di
asciugatura è essenziale verificare la pulizia
del filtro antifilacce.
Importante: Non utilizzare l'asciugabiancheria
senza I filtri. I filtri intasati possono allungare il
tempo di asciugatura e causare danni con
conseguenti costosi interventi di pulizia.
1. Tirare il filtro verso l’alto.
2. Aprire il filtro come
illustrato.
3 . R i m u o v e r e
delicatamente le
Filacce con la punta delle
dita o aiutandosi con uno
spazzolino morbido.
4. Richiudere il filtro e
reinserirlo in sede.
Tirare la maniglia per
aprire lo sportello.
P e r a v v i a r e l a
macchina, richiudere
i l p o r t e l l o n e e
premere il tasto.
AVVERTENZA! Si ricorda che quando la
macchina è in funzione il cestello e il portellone
possono essere MOLTO CALDI. Non arrestare
mai l'asciugatrice prima della fine del ciclo di
asciugatura a meno che tutti i capi in essa
contenuti non vengano rimossi rapidamente e
stesi in modo da dissipare il calore.
Apertura del Portellone
Spia Di Pulizia Filtro
NON USARE ACQUA PER PULIRE IL FILTRO
PORTELLONE e FILTRO
1 . E s t r a r r e c o n
d e l i c a t e z z a l a
vaschetta, finché non
viene completamente
rimossa. Sostenere la
v a s c h e t t a c o n
entrambe le mani. Da
piena, la vaschetta
dell’acqua pesa circa 4
kg.
2.Inclinare la vaschetta
f a c e n d o d e f l u i r e
l ' a c q u a d a l f o r o
posteriore. Quando è
vuota, far scivolare di
nuovo la vaschetta
nell'apposita sede.
S P I N G E R E C O N
DECISIONE IN SEDE.
3 . P e r a v v i a r e l a
macchina, premere il
tasto.
NOTA: se c’è uno
s c a r i c o v i c i n o
all’asciugatrice, si può
usare l’apposito kit per
f a r s c a r i c a r e
costantemente l’acqua
r a c c o l t a d a l l a
m a c c h i n a . C o s ì
facendo si eviterà di
svuotare la vaschetta
dell’acqua. Tutte le
informazioni per il
m o n t a g g i o s o n o
a l l ’ i n t e r n o d e l l a
confezione del kit di
scarico.
L’acqua eliminata dalla biancheria durante il
ciclo di asciugatura viene raccolta in una
vaschetta posta in fondo alla macchina. Quando
la vaschetta è piena si accende la spia sul
pannello dei comandi, segnalando che si DEVE
vuotare la vaschetta. Tuttavia, si consiglia di
svuotare la vaschetta dopo ogni ciclo di
asciugatura.
NOTA: Nei primi cicli, quando la macchina è
nuova, si raccoglie poca acqua in quanto si
riempie prima il serbatoio interno.
Per Togliere La Vaschetta
VASCHETTA DELL’ACQUA
IT
22
IMPORTANTE: Prima di procedere alla pulizia
del condensatore, disattivare sempre
l’apparecchio e staccare la spina dalla presa
elettrica.
Ai fini delle prestazione dell’apparecchio, è
opportuno verificare regolarmente lo stato di
pulizia del condensatore.
1 . R i m u o v e r e l o
zoccolo.
2. Agire sulle due leve
di bloccaggio in senso
antiorario e estrarre il
condensatore.
3.Estrarre il modulo
condensatore.
4.Servendosi di un
p a n n o , e l i m i n a r e
delicatamente polvere
e filacce, poi lavare il
modul o tenen d o lo
sotto l’acqua corrente
e facendolo girare in
modo che l’acqua
circoli tra le piastre fino
a perfetta eliminazione
delle impurità
5 . R i m o n t a r e i l
c o n d e n s a t o r e
rispettando il verso
giusto (come indicato
d a l l a f r e c c i a ) e
accertandosi che sia
perfettamente inserito
in sede. Bloccare le
due leve ruotandole in
senso orario.
6 . R i m o n t a r e l o
zoccolo.
CONDENSATORE
1. Aprire il portellone e caricare la biancheria
nel cestello. Verificare che i capi non
impediscano la chiusura del portellone.
2. Chiudere delicatamente il portellone
spingendolo lentamente fino ad avvertirne lo
scatto di chiusura.
3. Ruotare il selettore dei programmi
selezionando il programma di asciugatura
desiderato (si veda Guida ai programmi).
4. Per ridurre il grado di calore con capi delicati,
sintetici o acrilici, premere il tasto .
La spia vicino al tasto si accende quando è
impostata la funzione bassa temperatura. Per
annullare l’impostazione durante i primi minuti
del programma, premere il tasto , quindi
resettare la macchina per modificare
l’impostazione.
5. Premere il pulsante . L’asciugatrice partirà
automaticamente e la spia DRY resterà accesa.
6. Se si apre il portellone per controllare la
biancheria mentre il programma è in funzione,
per riattivare l’operazione di asciugatura è
necessario chiudere il portellone e premere
nuovamente il tasto .
7. Quando il ciclo sta per terminare, la
macchina entra in fase di raffreddamento. In
questa fase, I capi si raffreddano in quanto
vengono asciugati con aria fredda.
8. Una volta completato il programma, si
accenderà la spia END.
9. Dopo il completamento del ciclo, il cestello
ruoterà in maniera intermittente per
minimizzare la formazione di pieghe. Questo
movimento continua fino alla disattivazione
della macchina o all’apertura del portellone.
Per Togliere Il Condensatore
FUNZIONAMENTO
IT 23
IT
24
IMPORTANTE Prima di procedere alla
pulizia, disattivare sempre la macchina e
staccare la spina dalla presa a muro.
Per i dati elettrici vedere la targhetta dei dati
posta sul davanti del mobile della macchina (con
portellone aperto).
Specifiche Tecniche
Pulizia dell’asciugatrice
Capacità del cestello 115 litri
Carico massimo 8 kg
Altezza 85 cm
Larghezza 60 cm
Profondità 60 cm
Efficienza Energetica B
● Si consiglia di pulire il filtro e di svuotare la
vaschetta dell’acqua dopo ogni ciclo di
asciugatura.
● Pulire regolarmente il condensatore.
● Dopo l’ uso, pulire l’ interno del cestello e
lasciare aperto il portellone per un certo
periodo di tempo in modo che circoli aria e si
asciughi.
● Pulire l’esterno della macchina e il portellone
con un panno morbido.
● NON usare spugnette abrasive né prodotti di
pulizia.
●Pre evitare che si accumuli della lanuggine e
che l'oblò abbia difficoltà ad aprirsi/chiudere, a
fine di ogni ciclo d'asciugatura pulire con un
panno umido la parte interna dell'oblò e la
guarnizione.
La funzione Partenza Ritardata consente all’utente di ritardare la partenza del ciclo di
asciugatura da 1 a 24 ore.
Agendo la prima volta sul tasto di questa funzione, comparirà sul display un ritardo di 1 ora, a ogni
successiva pressione del tasto, si aggiungerà un ulteriore ritardo di 1 ora.
Successivamente, premere il tasto e trascorso il tempo di ritardo selezionato, il ciclo di
asciugatura verrà avviato. La spia luminosa lampeggerà indicando che count down è iniziato.
Per cancellare il programma premere il pulsante per 3 secondi. Nel display “TIME CONTROL”
lampeggerà 0:00 indicando che è stato azzerato il programma.
FUNZIONAMENTO
Partenza Ritardata
Annullamento e Azzeramento Del Programma
PULIZIA E MANUTENZIONE ORDINARIA
AVVERTENZA! Il cestello, il portellone e il
carico possono essere molto caldi.
Informazıonı per Test dı Laboratorıo
EN 61121 Programmı
Programmı da uare
-Cotone Asciutto
-Capi Asciutti da Riporre
-Capi Asciutti da Stirare
-Capi Asciutti da Riporre
+Sintetico
-Cotone Asciutto da Stirare
-Tessuti Delicati

TROUBLESHOOTING
What Might be the Cause of...
Defects you can remedy yourself
Before calling GIAS Service for technical
advice please run through the following
checklist. A charge will be made if the machine
is found to be working or has been installed
incorrectly or used incorrectly.
If the problem persists after completing the
recommended checks, please call GIAS
Service, they may be able to assist you over the
telephone.
Time display to end could change during
drying cycle. The time to end is
continuously checked during the drying
cycle and the time is adjusted to give the
best estimation time. The displayed time
may increase or decrease during the cycle
and this is normal.
Drying time is too long/clothes are not dry
enough…
● Have you selected the correct drying
time/programme?
● Were the clothes too wet? Were the clothes
thoroughly wrung or spindried?
● Does the filter need cleaning?
● Is the dryer overloaded?
● Has the option been selected from a
previous cycle?
The dryer does not operate…
● Is there a working electricity supply to the
dryer? Check using another appliance such as
a table lamp.
● Is the plug properly connected to the mains
supply?
● Is there a power failure?
● Has the fuse blown?
● Is the door fully closed?
● Is the dryer switched on, both at the mains
supply and at the machine?
● Has the drying time or the programme been
selected?
● Has the machine been switched on again after
opening the door?
CUSTOMER SERVICE
Spares
GIAS Service
Should there still be a problem with your dryer
after completing all the recommended checks,
please call GIAS Service for advice.
They may be able to assist you over the
telephone or arrange for a suitable appointment
for an engineer to call under the terms of your
guarantee. However, a charge may be made if
any of the following applies to your machine:
● Is found to be in working order.
● Has not been installed in accordance with the
installation instructions.
● Has been used incorrectly.
Always use genuine spares, available direct
from GIAS Service.
For service and repairs call your local GIAS
Service engineer.
The dryer is noisy…
● Switch off the dryer and contact GIAS Service
for advice.
The Indicator is on…
● Does the filter need cleaning?
The Indicator is on…
● Does the water container need emptying?
The manufacturer declines all responsibility
in the event of any printing mistakes in this
booklet. The manufacturer also reserves the
right to make appropriate modifications to
its products without changing the essential
characteristics.
IT
25

SL
26
INDEX
27
27
27
27
27
28
28
28
28
29
29
29
29
30
31
31
31
31
31
32
33
34
34
34
34
34
35
35
36
36
36
36
36
37
37
37
37
37
37
37
Uvod
Podatki o Dobavi
Odstranjevanje Embalaže
Opombe za Varnost
Uporaba
Namestitev
Perilo
Varovanje Okolja
Pooblaščeni Servis
Namestitev
Zahteve za Električno Napeljavo
Nastavitev Nivelirnih Nog
Pretok Zraka
Priprava na Polnjenje Stroja
Priprava Oblačil
Sortiranje Perila
V Sušilnem Stroju Ne Sušiti
Varčevanje z Energijo
Navodila za Sušenje
Tipke za Upravljanje In Signalne Lučke
Izbira Programa
Vrata in Filter
Odpiranje Vrat
Filter
Signalna Lučka za Stanje Filtra
Posoda za Vodo
Da Odstranite Posodo
Kondenzator
Da Odstranite Kondenzator
Obratovanje
Preklic in Ponastavitev Programa
Funkcija Zakasnitve Vklopa
Čiščenje in Vzdrževanje
Čiščenje Sušilnega Stroja
Tehnični Podatki
Odpravljanje Napak
Pomoč Strankam
Nadomestni Deli
Pooblaščeni Servis
SL
27
UVOD
Uporaba
Prosimo, preverite, ali ste s strojem dobili tudi
naslednje:
● navodila za uporabo
● garancijski list
● nalepko o energijski varčnosti
Stroj vzemite iz embalaže v
bližini prostora, kamor ga
boste namestili.
1. Previdno zarežite okoli
embalaže po dnu škatle in
po eni od stranic navzgor.
2. Odstranite politensko
folijo in dvignite sušilni stroj
s podstavka iz stiropora.
Prosimo vas, da ta navodila pozorno preberete in stroj uporabljate v skladu z njimi. Ta knjižica
vsebuje pomembna navodila za varno uporabo, namestitev in vzdrževanje vašega stroja ter tudi
uporabne napotke za doseganje najboljših rezultatov.
Vso dokumentacijo, ki ste jo dobili s strojem, skrbno shranite, saj jo boste morda še potrebovali ali pa
jo boste Predali drugemu lastniku.
Podatki o Dobavi
ODSTRANJEVANJE EMBALAŽE
Embalažo varno odvrzite v smeti. Pazite, da
ne pride v roke otrokom, saj je lahko nevarna.
Če ne boste upoštevali zgornjih navodil,
lahko ogrozite varnost naprave. Če bi napaka
na stroju nastala zaradi nepravilne uporabe,
vam lahko zaračunamo klic servisne službe.
Prepričajte se, da med. prevozom stroj ni
bil poškodovan. Če se je poškodoval, pokličite
pooblaščeni servis.
OPOMBE ZA VARNOST
● Ta naprava ni namenjena temu, da bi jo uporabljale osebe (vključno z otroki), ki imajo slabše
fizične, čutilne ali duševne zmožnosti ali nimajo izkušenj ali znanja, razen če jih pri uporabi
nadzoruje ali o uporabi naprave pouči oseba, odgovorna za njihovo varnost.
● Otroke morate nadzorovati, da se ne bi igrali z napravo.
● OPOZORILO: Napačna uporaba sušilnega stroja lahko povzroči požar.
● Ta naprava je namenjena izključno uporabi v gospodinjstvih, z njo lahko sušite le gospodinjski
tekstil in oblačila.
● Stroj se sme uporabljati le za namen, ki je opisan v tem priročniku. Pred uporabo stroja se
prepričajte, ali ste popolnoma razumeli navodila za namestitev in uporabo.
● Stroja se ne dotikajte, če imate vlažne oziroma mokre roke ali noge.
● Med polnjenjem stroja se ne naslanjajte na njegova vrata in jih nikoli ne uporabljajte za dviganje
ali premikanje stroja.
● Nikoli ne dovolite otrokom, da bi se igrali s strojem ali njegovimi tipkami.
● OPOZORILO: Stroja ne uporabljajte, če filter za puh ni pravilno nameščen ali če je poškodovan;
puh se lahko vžge.
● OPOZORILO: Na mestih, kjer je simbol za vročo površino ,se lahko temperatura med
delovanjem sušilnega stroja dvigne na več kot 60 stopinj Celzija.
● Izvlecite vtič iz električne vtičnice. Pred čiščenjem stroja vtič vedno izvlecite iz vtičnice.
● Če se vam zdi, da stroj ne deluje pravilno, ga prenehajte uporabljati.
● Na tleh v okolici stroja se ne smejo nabirati nitke ali puh.
● Boben v stroju se lahko zelo segreje. Preden začnete perilo jemati iz stroja, vedno počakajte, da
sušilni stroj konča fazo hlajenja.
SL
28
Ta naprava je označena v skladu z
Direktivo 2002/96/ES Evropskega
parlamenta in Sveta o odpadni
električni in elektronski opremi
(OEEO).
S tem, ko poskrbite, da bo ta izdelek pravilno
odvržen, boste pripomogli k preprečevanju
morebitnih negativnih posledic za okolje in
zdravje, ki bi sicer lahko nastale pri nepravilnem
ravnanju z odpadkom.
Simbol na napravi prikazuje, da je ne moremo
obravnavati kot gospodinjski odpadek. Namesto
tega ga je treba odložiti na primernem odpadu,
kjer reciklirajo električno in elektronsko opremo.
Stroj morate odvreči v skladu z lokalno
okoljevarstveno zakonodajo o odpadkih.
Za podrobnejše informacije o obdelavi, obnovitvi
in recikliranju tega izdelka se, prosimo, obrnite
na svojo lokalno občino, Podjetje za odvoz
odpadkov ali na trgovino, kjer ste stroj kupili.
European Directive 2002/96/EC
● Zaradi zagotavljanja stalnega varnega in
učinkovitega delovanja stroja priporočamo, da
Vse servisne storitve in vsa popravila izvaja le
pooblaščeni serviser.
Pooblaščeni Servis
Če naprava ne deluje pravilno ali če se
pokvari, jo izključite, vtič pa iztaknite iz vtičnice.
Za morebitno popravilo pokličite pooblaščeni
servis.
● Vsi materiali, iz katerih je izdelana embalaža,
so okolju prijazni in jih je mogoče reciklirati.
Prosimo, odvrzite embalažo na okolju prijazen
način. Na vaši občini ali komunalni službi vam
bodo lahko podrobno povedali več o
odstranjevanju odpadkov.
● Ko boste sušilni stroj odvrgli, varnost
zagotovite tako, da stroj izključite iz vtičnice ter
nato prerežete električni kabel in ga skupaj z
vtičem uničite. Da preprečite, da bi se otroci
zaprli v stroj, odlomite tečaje vrat ali ključavnico
na vratih.
Varovanje Okolja
● Preden stroj uporabite, se prepričajte, da ni
vidno poškodovan. Če je poškodovan, ga ne
uporabljajte, temveč pokličite pooblaščeni
servis.
● Ne uporabljajte adapterjev, razdelilcev in/ali
podaljškov.
● Nikoli ga ne postavite ob zavese in pazite, da
predmeti ne bodo mogli pasti za sušilni stroj ali
se za njim nabirati.
● Naprave ne smete namestiti za vrati, ki se
dajo zakleniti, drsnimi vrati ali vrati, ki imajo
tečaje na nasprotni strani kot sušilni stroj.
Namestitev
● V sušilnem stroju ne sušite kosov, ki niso bili
oprani.
● OPOZORILO: Nikoli ne sušite tkanin,
obdelanih s tekočinami za kemično čiščenje.
● OPOZORILO: Materiali iz penaste gume
lahko včasih pri segrevanju (pod posebnimi
pogoji) zagorijo zaradi samovžiga. Predmetov
iz penaste gume (lateks pena), kap za prhanje,
proti vodi odpornih tkanin, izdelkov in oblačil z
gumijasto podlogo in blazin z vložki iz penaste
gume NE SMETE sušiti v sušilniku za perilo.
● Da izveste, ali je material primeren za
sušenje, vedno poglejte etiketo na tekstilu.
● Preden daste oblačila v sušilni stroj, morajo
biti ožeta ročno ali s centrifugo v pralnemstroju.
V sušilni stroj se NE SME dajati oblačil, iz
katerih še kaplja.
● Pazite, da v žepih ni vžigalnikov ali vžigalic, in
v bližini sušilnega stroja NIKOLI ne uporabljajte
gorljivih tekočin.
● V stroju NIKOLI ne smete sušiti zaves iz
steklenih vlaken. Če steklena vlakna pridejo na
druga oblačila, lahko pride do draženja kože.
● Kose, ki so se umazali s snovmi, kot so na
primer jedilno olje, aceton, alkohol, bencin,
kerozin, odstranjevalec madežev, terpentin,
vosek ali odstranjevalec voska, morate najprej
oprati v vroči vodi z nekaj več detergenta,
preden jih začnete sušiti v sušilnem stroju.
● Mehčalce perila in podobne izdelke uporabite,
kot je navedeno v navodilih za uporabo
Mehčalca.
Perilo
OPOMBE ZA VARNOST
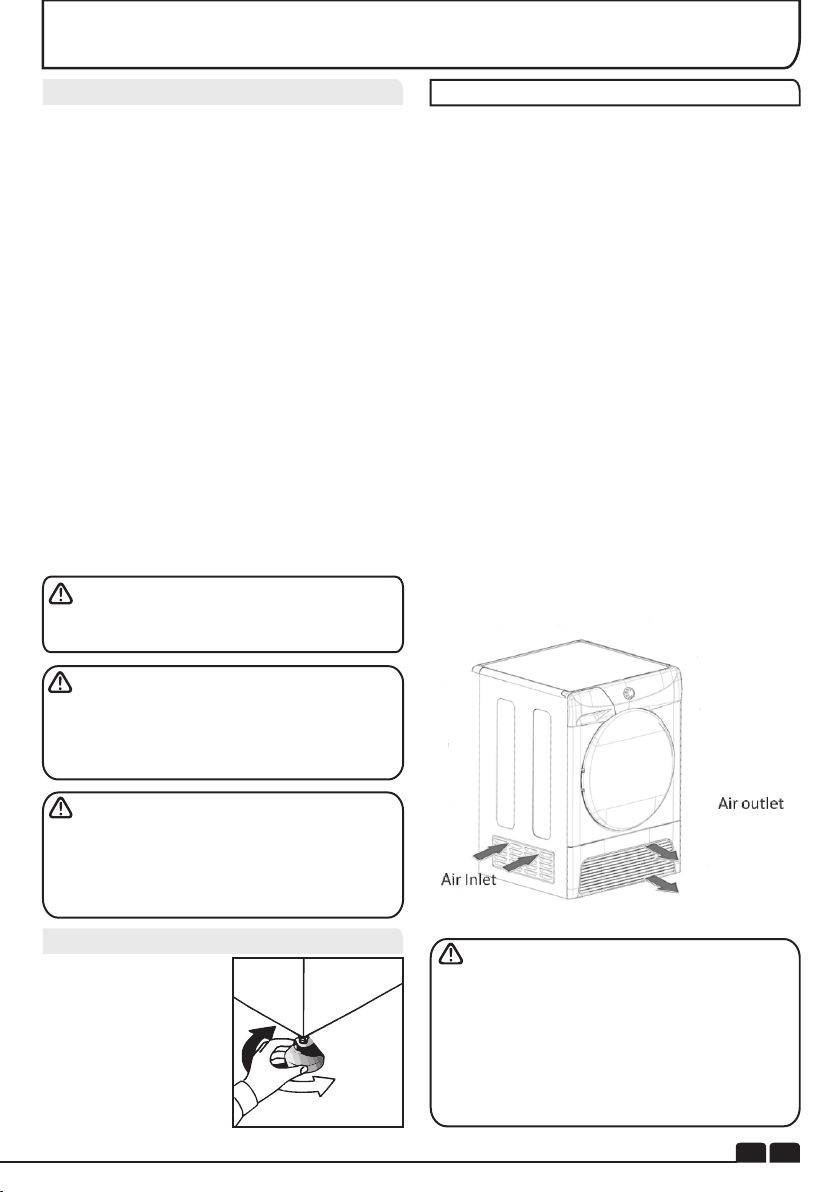
SL
29
NAMESTITEV
Zahteve za Električno Napeljavo
Če je električni kabel poškodovan, ga je
treba nadomestiti s posebnim kablom, ki ga
lahko dobite SAMO pri pooblaščenem
prodajalcu nadomestnih delov. Namestiti ga
mora za to usposobljena oseba.
Če napaka na stroju nastane zaradi
nepravilne namestitve, vam lahko klic servisne
Službe zaračunamo.
Ko boste stroj postavili
na želeno mesto, je
tre ba na staviti še
nivelirne noge, da stroj
stoji vodoravno.
Nastavite vse štiri
nivelirne noge tako, da
stroj stoji trdno in
vodoravno.
Nastavitev Nivelirnih Nog
V prostoru, kjer stoji sušilni stroj, je treba
zagotoviti zadostno zračenje, zato da stroj med
delovanjem v prostor ne bi potegnil plinov, ki jih
pri izgorevanju izločajo nekatere naprave, na
primer kamini.
● Zrak, ki izhaja iz stroja, ne sme biti speljan v
dimnik, na katerega so priključene naprave, ki
za zgorevanje uporabljajo plin ali druga goriva.
● Redno preverjajte, ali ima zrak, ki teče skozi
sušilni stroj, prosto pot.
● Po uporabi preverite, ali se je v filtru nabral
puh, in filter po potrebi očistite.
● Dovodne in odvodne odprtine ne smejo biti
ovirane Zaradi zagotavljanja primernega
zračenja med dnom stroja in tlemi ne sme biti
ovir. Med strojem in kakršno koli oviro mora biti
vsaj 12 mm prostora.
● Preprečite, da bi predmeti padali za stroj ali se
nabirali za njim, saj bi lahko ovirali pretok zraka
(vhode in izhode za zrak).
● NIKOLI ne namestite sušilnega stroja ob
zavesah.
PRETOK ZRAKA
Stroja ne priključujte in ne vklapljajte,
dokler ni popolnoma nameščen. Zaradi vaše
varnosti je treba sušilni stroj namestiti pravilno.
Če imate kakršne koli dvome o nameščanju
stroja, pokličite pooblaščeni servis, kjer vam
bodo z veseljem svetovali.
Aparata ne smete namestiti v prostoru, kjer je nizka
temperatura oziroma obstaja tveganje za pojav zmrzali.
Pri temperaturah okoli ledišča aparat morda ne bo pravilno
deloval: obstaja tveganje za poškodbe, saj bi lahko voda v
hidravličnem tokokrogu zamrznila (ventili, cevi, črpalke).
Za učinkovito delovanje mora biti temperatura v prostoru
med +2 in +35°C. Upoštevajte, da lahko med delovanjem
pri nizkih temperaturah (med +2 in +15°C) pride do
kondenzacije vode in posledično kapljic vode na tleh.
Sušilni stroji delujejo na enofazni izmenični tok
s 50 Hz in napetostjo 220-240 V. Prepričajte se,
da je nazivna zmogljivost priključka vsaj 10A.
Električni tok je lahko zelo nevaren.
Ta naprava mora biti ozemljena.
Vtičnica električne napeljave in vtič morata
biti iste vrste.
Ne uporabljajte več adapterjev in/ali
podaljškov.
Vtič mora biti po namestitvi stroja na
dostopnem mestu, da ga lahko po porabi
iztaknete.
Naprava CE je v skladu z direktivama Sveta
2004/108/GS, 2006/95GS in njunimi dopolnili.
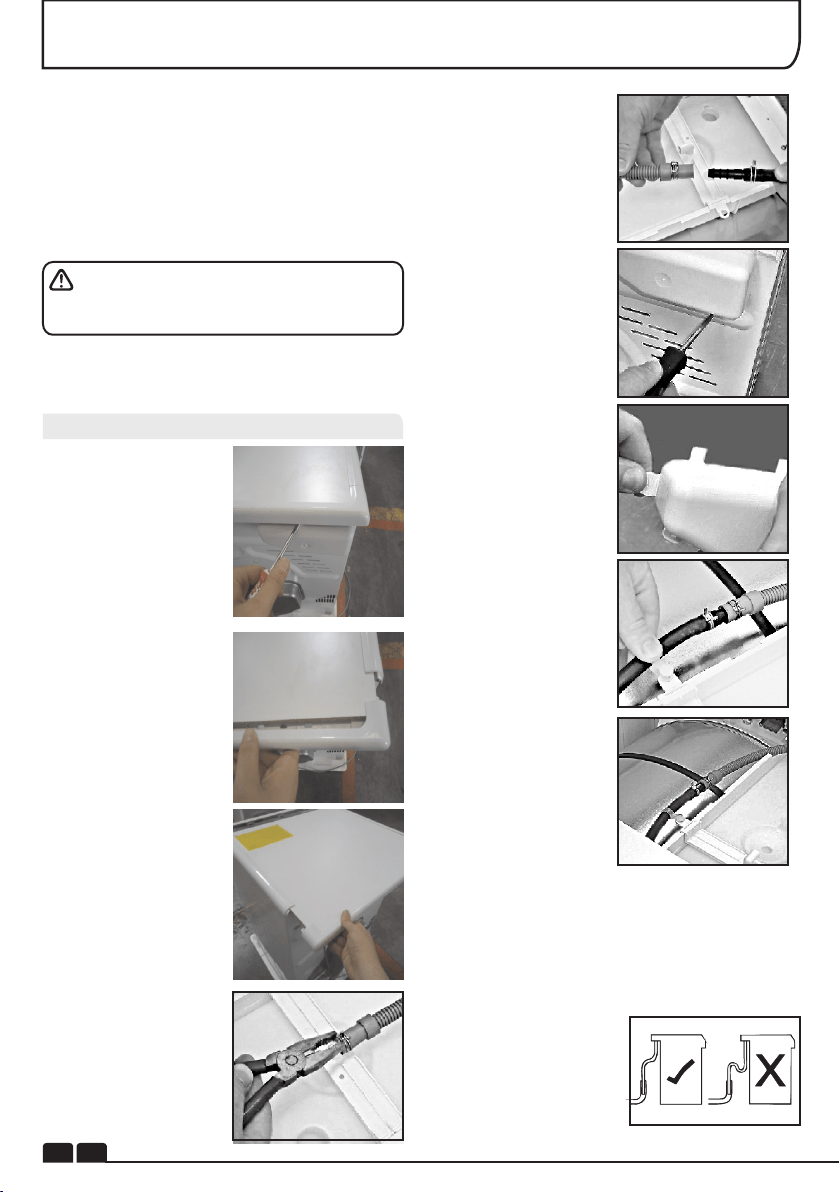
SL
30
KOMPLET Z ODTOČNO CEVJO: NAVODILA ZA NAMESTITEV
OPOZORILO! Preden začnete kakršna
koli dela, izklopite sušilnik za perilo in iztaknite
vtič iz vtičnice.
Da bi se izognili praznjenju posode za vodo po
vsakem sušilnem ciklu, lahko vodo, ki se
normalno zbira med sušilnim ciklom, izpustite
neposredno v odtok za odpadno vodo (odtočni
Sistem je enak kot pri kuhinjskih koritih).
Povezava z odtokom za površinske vode je
prepovedana v skladu z zakonodajo o
varovanju voda. Napeljava za odtok odpadne
vode mora biti zraven sušilnika za perilo.
Komplet je sestavljen: 1 gumijasto cev, 1 raven
konektor za gumijasto cev, 1 objemko in
plastično vezico.
Vgradite komplet po naslednjem postopku:
1.Odvijte in odstranite
3 vijake na hrbtnem
delu stroja ter pri tem
pustite hrbtni pokrov
na mestu.
2. Odstranite zadnjo
obrobo pokrova in sam
pokrov, tako da ga
pazljivo potisnete, da
zdrsi proti zadnjemu
delu stroja.
3. Posoda za odpadno
vodo je na desni strani
stroja (gledano od
zadaj). Siva gumijasta
cev se poveže z
m o s t i č k o m n a d
posodo za vodo. S
kleščami odstranite
cev skupaj z objemko z
mostička.
4. Povlecite gumijasto
cev s priključka na
mostičku.
5 . S p r i l o ž e n i m
p r i k l j u č k o m i n
objemkami priključite
gu m ij a s t o ce v i z
kompleta na cev, ki ste
jo odstranili s priključka
na mostičku.
6. Snemite pokrov
posode za vodo z
zadnjega dela stroja,
tako da odstranite dva
vijaka in odpnete
pokrov.
7. Odstranite jeziček
na strani in zamenjajte
pokrov na stroju. Nato
ponovno namestite
vijake. Sedaj lahko
vidite luknjo na hrbtni
strani omarice poleg
pokrova.
8. Napeljite odtočno
cev skozi luknjo v
omarici.
9 . P o i š č i t e s i v o
gumijasto cev v izrezu
predala in s plastično
vezico pritrdite cevni
sklop na mostiček.
10. Pazljivo potisnite
hrbtni pokrov nazaj na
mesto, pri tem pa
pazite, da gumijaste
cevi ne priprete. Nato
ponovno namestite
zadnjo obrobo pokrova
s tremi vijaki.
11. Priključite novo
odtočno gumijasto cev
na cev za odpadno
vodo. Prepričajte se,
da se med. Potis-
kanjem sušilnika za
perilo na njegovo
mesto nova gumijasta
cev ne zaplete. Pri
napeljavi nove zunanje
gumijaste cevi je treba
slediti navodilom, kot je
to prikazano.
12. Stroj priključite na
električno omrežje.
13. Ko izpraznite
posodo za odpadno
vodo, vključite stroj s
pritiskom na gumb ON
( p r i e l e k t r o n s k i h
modelih pritisnite še
START), da poženete
program sušenja.
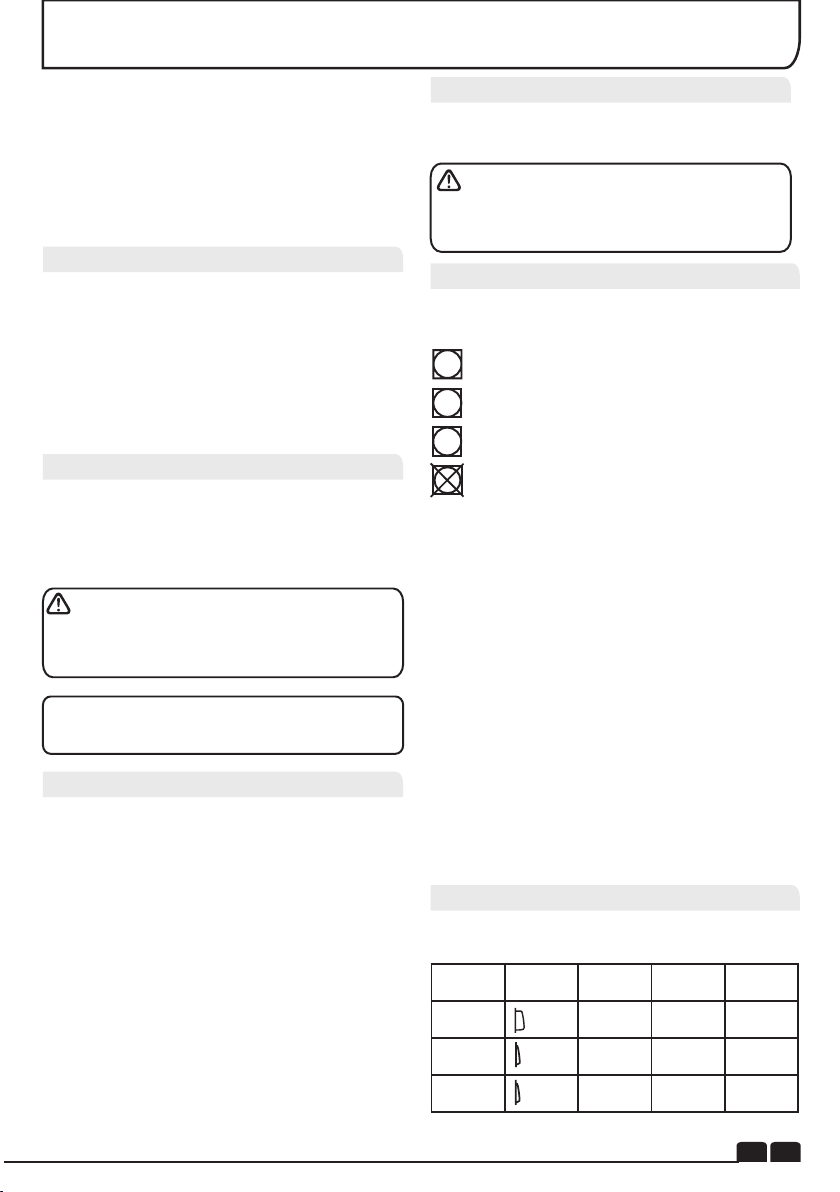
SL
31
PRIPRAVA NA POLNJENJE STROJA
Preden prvič uporabite sušilni stroj:
● Skrbno preberite navodila za uporabo;
● Odstranite vse dele, ki so v bobnu;
● Z vlažno krpo obrišite notranjost bobna in vrat,
da odstranite prah, ki se je nabral med
prevozom.
Prepričajte se, ali je perilo, ki ga nameravate
dati v sušilni stroj, primerno za strojno sušenje;
to je prikazano na opozorilnih simbolih na
vsakem kosu perila.
Preverite, ali so vsi gumbi, zadrge in podobno
zapeti in ali so žepi prazni. Obrnite oblačila
navzven. Oblačila položite v boben narahlo (ne
natrpajte jih), da se ne bodo prepletla.
Priprava Oblačil
● Bombaž največ 8 kg
● Sintetika največ 4 kg
Maksimalna Teža za Sušenje
Bobna ne smete preveč napolniti, saj lahko
z velikimi kosi, ko so mokri, prekoračite najvišjo
dovoljeno težo perila (na primer: spalne vreče,
prešite odeje).
. .
.
● Po etiketah na oblačilih
Najdete jih na ovratniku ali notranjem šivu:
Primerno za sušenje v sušilnem stroju.
Sušenje v stroju pri visokih temperaturah.
Sušenje v stroju le pri nizkih temperaturah.
Ne sušite v sušilnem stroju.
Če oblačilo nima etikete, ga raje ne sušite
Strojno.
● Po količini in gostoti blaga
Kadar koli je količina materiala za sušenje večja
od zmogljivosti sušilnega stroja, razdelite obleke
po debelini materiala (npr. ločite brisače od
tankega spodnjega perila).
● Po vrsti materiala
Bombažne/lanene tkanine: brisače, bombažni
jersey, posteljno in namizno perilo.
Sintetika: bluze, srajce, delovne halje itd.,
Izdelane iz poliestra ali poliamida; velja tudi za
mešanice iz bombaža in sintetike.
● Po tem, kako močno jih želite posušiti
Razdelite na: popolnoma suho, primerno za
zlaganje itd. Za občutljivo blago pritisnite tipko ,
da izberete sušenje pri nizki temperaturi.
Svile, občutljivega blaga, najlonskih nogavic,
občutljivih vezenin, blaga s kovinskimi okraski,
oblačil z dodatki iż PVC ali usnja, športnih
čevljev in velikih kosov, kot so spalne vreče ipd.
POMEMBNO: Ne sušite predmetov, ki so
bili obdelani s tekočinami za kemično čiščenje,
ali gumijastih oblačil (nevarnost požara ali
eksplozije).
Zadnjih 15 minut cikla se perilo vedno suši s
Hladnim zrakom.
V sušilni stroj polagajte le perilo, ki ste ga
strojno ali ročno oželi. Čim bolj suho je perilo,
tem krajši bo čas sušenja, kar pomeni manjšo
porabo električne energije.
VEDNO
● Sušite čim bolj napolnjen stroj, tako boste
prihranili čas in električno energijo.
● Pred sušenjem preverite, ali je filter očiščen.
NIKOLI
● Ne prekoračite najvišje dovoljene teže; s tem
bi porabili več časa in električne energije.
● Ne napolnite stroja s tako mokrimi oblačili, da
z njih še kaplja; tako bi lahko stroj poškodovali.
Varčevanje z Energijo
Tabela prikazuje približen čas sušenja za različne vrste
Materialov in vlažnosti oblačil.
Navodila za Sušenje
VRSTA
TKANINE
BOMBAŽ
VISOKA
140-165min
70-80min
70-80min---
---
50-65min
50-65min
40-55min
30-40min
NIZKA
NIZKA
SINTETIKA
AKRIL
NASTAVITEV
TEMPERATURE
ZELO
NAPOLNJEN
SREDNJE
NAPOLNJEN
MALO
NAPOLNJEN
V Sušilnem Stroju ne Sušite:
Perilo Sortirajte po Naslednjem Zaporedju:
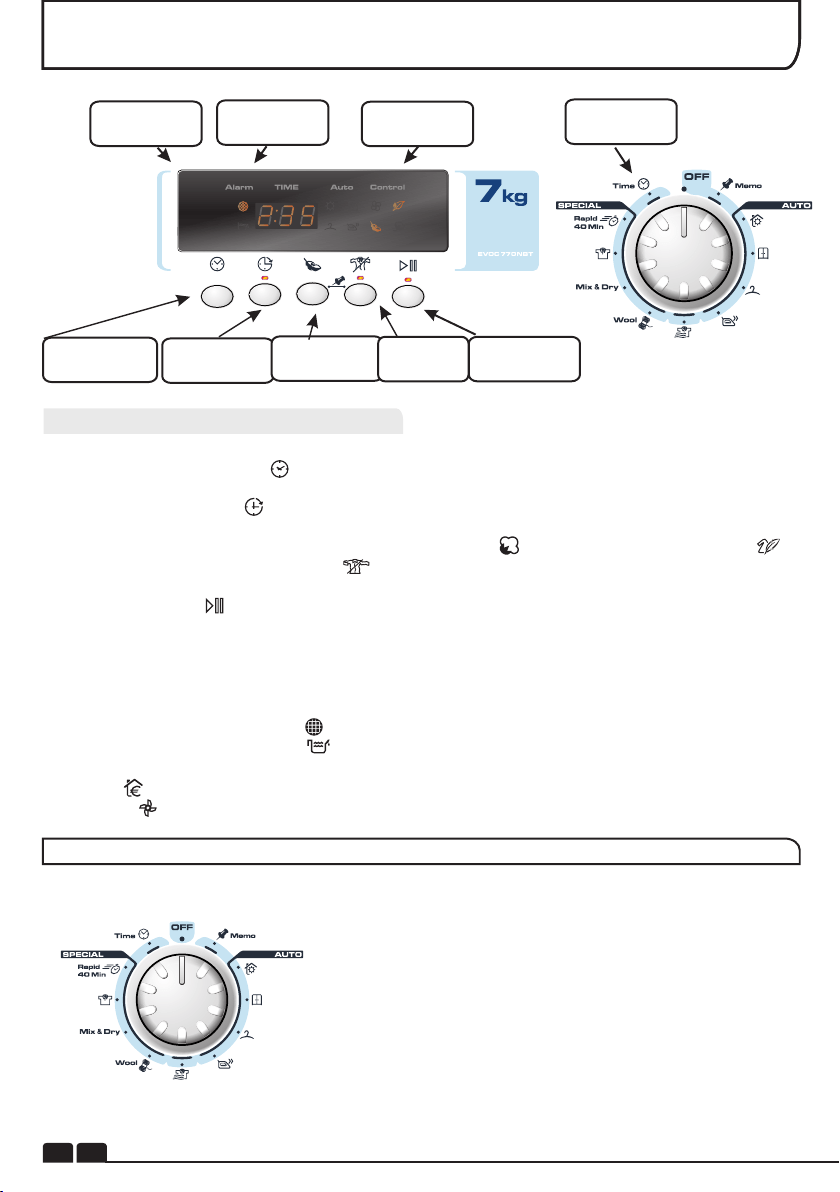
SL
32
TIPKE ZA UPRAVLJANJE IN SIGNALNE LUČKE
Tipka za
Zamik
Tipka
Start/Pavza
Indikator za
vodo
Indikator za
filter
Tipka za
Akril-sint
Gump za
Programe
Prikaz avto
Programa
Tipka za nast
časa
Tipka proti
mečkanju
TIPKE ZA UPRAVLJANJE IN SIGNALNE LUČKE
Gumb za izbiranje programov – Izberite ustrezen program
Tipka za nastavljanje časa - Omogoča spreminjanje trajanja z gumbom izbranega programa.
Na voljo je samo, če so izbrani programi Mix&Dry, Srajce in časovni programi
Tipka za zamik vklopa - Uporabniku omogoča, da zamakne začetek izvajanja programa
sušenja (gl. podrobnejši opis v navodilih)
Tipka za akril/sintetiko - e pritisnete na to tipko, indicator ugasne in osvetli se indikator .
Tipka za preprečevanje mečkanja - Uporabniku omogoča vklop faze za preprečevanje
mečkanja po zaključenem programu sušenja
Tipka start/pavza - S pritiskom na to tipko zaženete izbrani program ali pa ga začasno
prekinete.
Tipka MEMO - Uporabniku omogoča shranjevanje programa; 3 sekunde pritiskajte istočasno na
tipko za preprečevanje mečkanja in tipko za akril/sintetiko, in sicer 2 minuti po začetku izvajanja
izbranega programa/opcije.
Indikator za vzdrževanje filtra - Osvetli se, ko je treba očistiti filter.
Indikator polne posode za vodo - Osvetli se, ko je posoda za vodo polna.
Prikaz samodejnega programa – Če ste izbrali samodejni program, se osvetli ustrezen indikator
Indikator se osvetli, ko izberete eko program.
Osvežitev - Indikator se osvetli, ko začne program izvajati fazo ohlajanja.
Stikalna Plošča In Kontrolne Lučke
Sušilni stroj Sensor Dry vam ponuja veliko možnosti sušenja perila
za vse okoliščine.V spodnji razpredelnici so našteti programi in
njihove funkcije.
Opomba: Tipalo morda ne bo zaznalo majhnih količin majhnih
kosov tekstila v stroju. Za majhne količine perila, Ločene kose ali
tkanine, ki so že bile delno posušene, raje uporabite programe s
časovnikom. Program nastavite na čas med 30 in 75 minutami,
odvisno od količine perila in tega, kako močno ga želite posušiti,
izberite še visoko ali nizko temperaturo, primerno za vrsto tkanine.
Če tipalo perila v stroju ne zazna, bo sušilni stroj deloval le 10
minut, nato se bo začel cikel sušenja s hladnim zrakom.
Če je perila preveč ali če je premokro za strojno sušenje, bo sušilni
stroj po 185 minutah samodejno začel cikel Hladnega sušenja.
SELECTING THE PROGRAMME
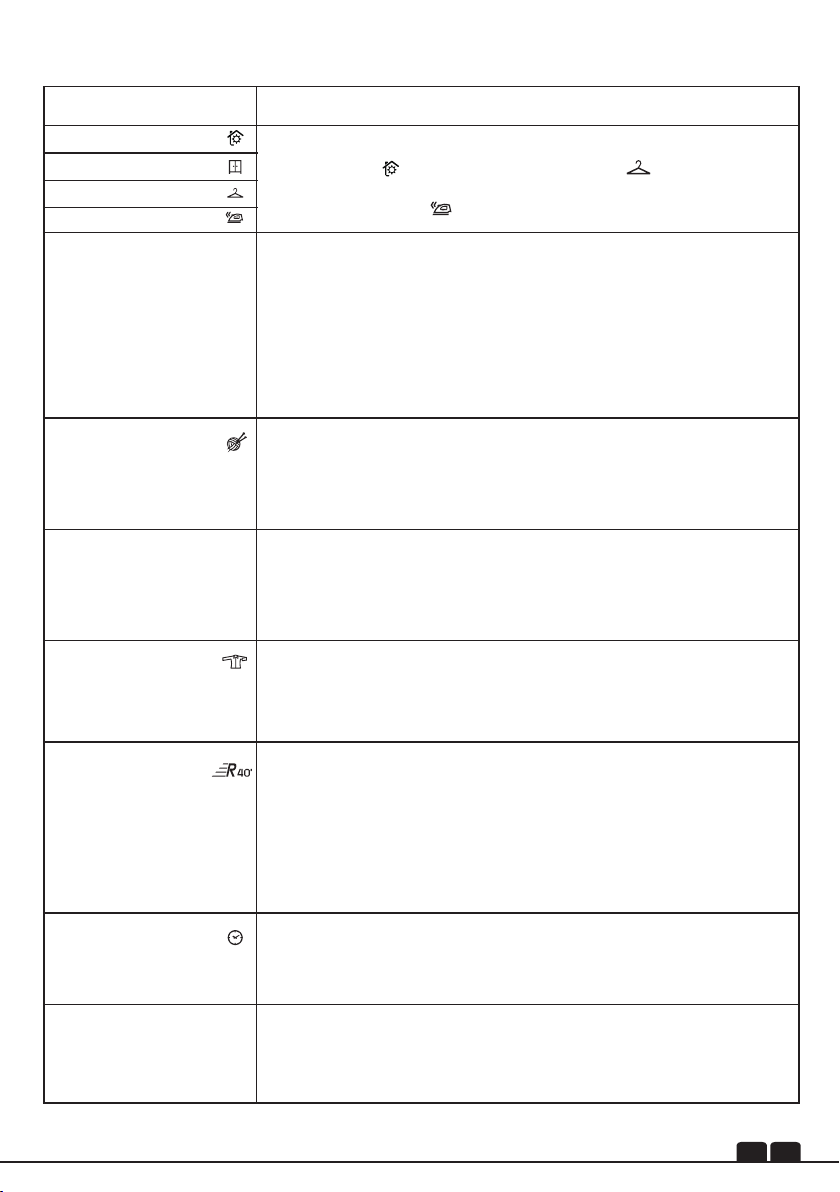
SL
33
Perfect Home
IZBIRA PROGRAMA
PROGRAM
Sušenje volne
Hitri 40'
Mix & Dry
Srajce
Čas
Memo
No Crease
OPIS
Nežen program, namensko zasnovan za mehčanje volnenega
perila po sušenju na zraku. Ta 12-minutni program s toplim
zrakom nežno suši perilo, primeren pa je tudi za osvežitev
oblačil iz volne po dolgotrajnejši hrambi v omari.
To je poseben časovni program za sušenje največ 4 kg perila (117
minut). Predvideno trajanje programa je 99 minut za sušenje do 3
kg perila. Program omogoča hkratno sušenje bombažnih in
sintetičnih tkanin.
To je poseben časovni program za sušenje srajc, za največ 3 kg
perila (78 minut). Če želite sušiti srajce iz sintetičnih tkanin, morate
pritisniti tudi na tipko za akril/sintetiko. Predvideno trajanje
programa je 60 minut za sušenje do 2 kg perila.
Nastavite lahko čas sušenja za vse časovne programe: od 30 do
180 minut. Če nastavite čas 20 minut, stroj perilo samo osveži s
hladnim zrakom.
Program Memo omogoča enostavno ponavljanje programa, ki ga
je uporabnik predhodno shranil, ne da bi moral še enkrat opraviti
celotno zaporedje ukazov za ta.
Program je namenjen sproščanju in glajenju perila. Sušilni stroj 9
minut segreva, nato pa sledi 3-minutna faza ohlajanja, kar je še
posebej primerno za perilo, ki je dlje časa čakalo na likanje.
Program je primeren tudi za mehčanje perila, ki je bilo posušeno na
vrvi na prostem ali na radiatorju, saj je tako perilo običajno trdo.
Zaradi sproščanja vlaken je perilo manj zmečkano in je tako likanje
hitrejše in lažje.
Hitri 40-minutni program zagotavlja hitro sušenje; je idealna izbira,
če potrebujete suho, osveženo in za uporabo takoj pripravljeno perilo
v manj kot 40 minutah! Tekom izvajanja tega programa poteka stalen
nadzor temperature v bobnu. Največja dovoljena količina perila je 2
kg, program pa je primeren za vse vrste perila, ki ga je dovoljeno
sušiti v stroju.
Zelo suho
Za v omaro
Za likanje
Izberite, kako suho perilo želite. Na voljo so vam možnosti od
Izjemno suho za npr. brisače, Za v omaro za oblačila, ki jih
boste shranili brez likanja, ter program, po katerem je perilo ravno
prav suho za likanje.
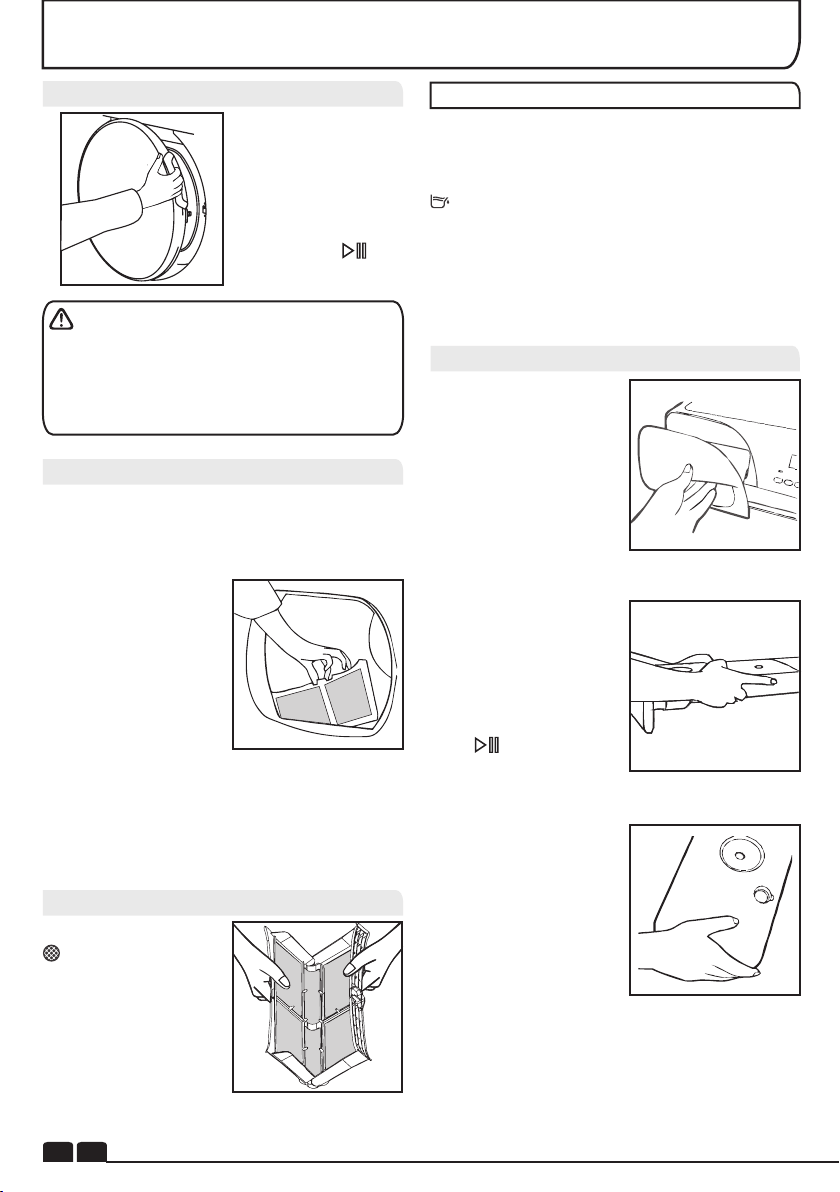
SL
34
VRATA IN FILTER
Odpiranje Vrat
Za odpiranje vrat
potegnite ročico.
Za ponovni zagon
s u š i l n e g a s t r o j a
z a p r i t e v r a t a i n
pritisnite tipko
OPOZORILO! Med delovanjem sušilnega
stroja se lahko boben in vrata ZELO
SEGREJEJO! Sušilnega stroja nikoli ne
zaustavljajte pred koncem sušilnega cikla,
razen če nameravate hitro odstraniti vse perilo,
tako da se lahko Stroj ohladi.
Signalna Lučka za Stanje Filtra
se prižge, ko je
treba filter očistiti.
Če se perilo ne suši
pravilno, preverite, da
ni filter Zamašen.
Filter
POMEMBNO:Zaradi zagotavljanja in
ohranjanja učinkovitosti sušilnega stroja pred
vsakim sušenjem Preverite, ali je filter za puh
čist.
1 . P o t e g n i t e f i l t e r
navzgor.
2. Filter odprite, kot je
prikazano.
3. Z mehko krtačko ali
k o n i c a m i p r s t o v
narahlo od s t ranite
nitke.
4. Filter zaprite nazaj in
ga vstavite nazaj na
njegovo Mesto.
1 . P r e d a l n e ž n o
potegnite ven, dokler
ga ne izvlečete v celoti.
Posodo podpirajte z
obema rokama. Ko je
posoda polna, tehta
namreč približno 4 kg.
2 . Z b i r a l n i k v o d e
nagnite in tako skozi
zadnjo odprtino izlijte
vodo. Ko je prazen,
zbiralnik potisnite nazaj
na njegovo mesto.
NAZAJ NA MESTO GA
PRITISNITE ČVRSTO.
3.Program ponovno
zaženete s pritiskom na
tipko .
OPOMBA: Če imate v
bližini sušilnega stroja
možnost priklopa na
odtok, lahko uporabite
ko m p l e t z a od t o k
vodein tako vodo, ki se
zbira med sušenjem,
sproti odvajate v odtok.
Tako vam ne bo več
treba prazniti posode.
V s a n a v o d i l a z a
sestavljanje kompleta
boste našli v njegovi
vrečki.
POSODA ZA VODO
Voda, ki izhlapeva iz perila med sušenjem, se
zbira v zbiralni posodi, ki jo najdete na dnu
sušilnega stroja.
Ko se posoda napolni, se prižge signalna lučka
na nadzorni plošči; to pomeni, da posodo
MORATE izprazniti.
Priporočamo vam, da posodo izpraznite po
vsakem sušenju.
OPOMBA: Med prvimi nekaj cikli sušenja v
novem stroju se bo nabralo zelo malo vode, saj
se najprej napolni notranja posoda.
Praznjenje Posode Za Vodo
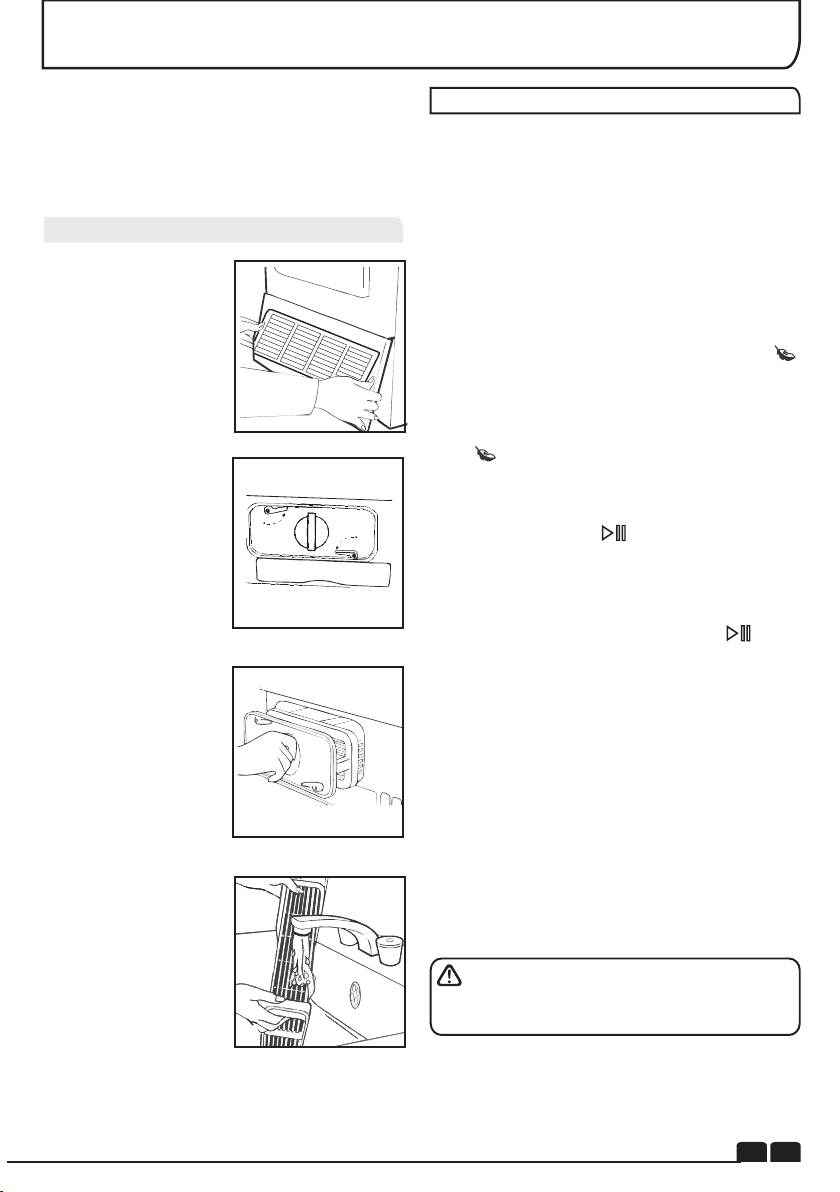
SL
35
Da Odstranite Kondenzator:
Pomembno: Pred čiščenjem kondenzatorja
vedno izklopite stroj in izvlecite kabel iz
vtičnice.
Da ohranite učinkovitost sušilnega stroja,
redno preverjajte, Ali je kondenzator očiščen.
1. nežno potegnite
spodnjo ploščo tako,
d a s e o d p n e s
s u š i l n e g a s t r o j a .
Zgornji predel lahko
potem snamete s
tečajev tako, da je
mogoče odstraniti
c e l o t n o s p o d n j o
ploščo.
2. Oba vzvoda, ki
z a d r ž u j e t a
kondenzator, obrnite v
n a s p r o t n i s m e r i
urnega kazalca in
izvlecite kondenzator.
3. Izvlecite enoto
kondenzatorja.
4. Nežno odstranite
morebiten prah ali puh
najprej s krpo, potem
pa enoto sperite pod
tekočo vodo. Pri tem jo
držite tako, da voda
teče med ploščami ter
tako odstrani prah in
puh.
5 . K o n d e n z a t o r
ponovno namestite, pri
tem pa pazite,
da je pravilno obrnjen
(kot kaže puščica) ter
da ga trdno potisnete
na njegovo mesto.
Oba vzvoda ponovno
zaprite tako, da ju
o b r n e t e v s m e r i
urnega kazalca.
6. Ponovno namestite
spodnjo ploščo.
KONDENZATOR
UPORABA SUŠILNEGA STROJA
1.Odprite vrata in potisnite perilo v boben.
Prepričajte se, da ne ovira zapiranje vrat.
2.Nežno zaprite vrata – pritisnite jih, da se
slišno zaprejo.
3.Obrnite stikalo za izbiranje programov na
ustrezen program (gl. ra z p r e d e l n i c o
programov).
4.Če sušite sintetiko, akril ali drugo perilo iz
občutljivih tkanin, pritisnite na ustrezno tipko ,
da znižate temperaturo sušenja. Ob tem se
osvetli lučka ob tipki, kar pomeni, da je
temperatura sušenja znižana. Če si tekom prvih
nekaj minut premislite, znova pritisnite na isto
tipko , da zvišate temperaturo sušenja. Če
želite to storiti pozneje, pa morate program
resetirati.
5.Pritisnite na tipko . Stroj začne sušiti,
indikator SUŠENJE je osvetljen.
6.Če med izvajanjem programa odprete vrata,
da preverite stanje perila, po ponovnem
zapiranju vrat znova pritisnite na tipko .
7.Proti koncu programa se vklopi faza ohlajanja
– perilo se v hladnem zraku ohladi.
8.Ko je program zaključen, se osvetli indikator
KONEC PROGRAMA.
9.Boben se v presledkih obrača, da bi se perilo
kar najmanj zmečkalo – dokler ne izklopite
stroja oz. dokler ne odprete vrata.
Med izvajanjem samodejnih programov ne
odpirajte vrat stroja, saj bo le v tem primeru
možno pravilno sušenje.
SL
36
POMEMBNO: Preden začnete stroj čistiti,
ga vedno ugasnite in izvlecite električni vtič iz
vtičnice.
Podatke o električnih delih najdete na
nalepki, ki je na sprednji strani ohišja sušilnega
stroja (ko so vrata odprta).
Tehnični Podatki
Čiščenje Sušilnega Stroja
Prostornina bobna 115 litrov
Največja obremenitev 8kg
Višina 85 cm
Širina 60 cm
Globina 60 cm
Nalepka o energetski varčnosti B
Obratovanje
● Očistite filter in izpraznite posodo za vodo po
vsakem sušenju.
● Redno čistite kondenzator.
● Po vsaki uporabi obrišite notranjost bobna in
pustite vrata nekaj časa odprta, da zrak kroži
po bobnu in ga posuši.
● Zunanjost stroja in vrata obrišite z mehko
krpo.
● NE UPORABLJAJTE grobih gobic, krpic ali
čistil.
● Da bi preprečili nabiranje delcev tkanin in
oteženo odpiranje/zapiranje vrat po vsakem
zaključenem programu sušenja obrišite
notranjo stran vrat in tesnilo z vlažno krpo.
OPOZORILO! Boben, vrata in perilo so
lahko zelo vroči!
Časovni Zamik Vklopa
ČIŠČENJE IN VZDRŽEVANJE
Funkcija časovnega zamika vklopa uporabniku omogoča, da za 3, 6 ali 9 ur zamakne začetek
izvajanja programa. Ob prvem pritisku na tipko za zamik vklopa bo izbran zamik 3 ur, ob
naslednjem pa 6 in nato 9 ur.
Ob. pritisku na tipko se začne odštevanje časa. Po preteku nastavljenega časovnega zamika
začne stroj sušiti. Med odštevanjem utripa indikator 3, 6 ali 9, kar opozarja, da se odšteva
nastavljeni časovni zamik.
Preklic In Resetiranje Programa
Če želite resetirati program, 3 sekunde pritiskajte na tipko . Lučka SUŠENJE se osvetli, kar
pomeni, da je program resetiran.
Informacije za testne laboratorije
Program EN 61121
Ustrezni Program
-Bombaž, suho
-
-
-
-Bombaž, za likanje
-Tkanine za lahko vzdrževanje
Za v omaro + sintetika
Za likanje
Za v omaro
SL
37
ODPRAVLJANJE NAPAK
Kaj je Lahko Vzrok, da ...
Napake, ki jih lahko odpravite sami
Preden pokličete pooblaščeni servis za nasvet,
vas prosimo, da pregledate ta seznam. Če bi se
izkazalo, da stroj dela ali da je bil nepravilno
uporabljen ali nameščen, vam bomo morali
storitve servisa zaračunati. Če težave ne
morete odpraviti z nasveti po tem seznamu,
prosimo, pokličite pooblaščeni servis, saj vam
bodo morda lahko pomagali po telefonu.
Če sušenje traja predolgo oz. če oblačila
niso dovolj suha:
● Ste izbrali pravi program/čas sušenja?
● So bile obleke preveč mokre? Ste oblačila
temeljito ročno ali strojno oželi?
● Je treba očistiti filter?
● Je treba očistiti kondenzator?
● Je sušilni stroj preobremenjen?
● Ali kaj ovira dno sušilnega stroja ali dovodne
in odvodne odprtine?
● Ste pri prejšnjem ciklu izbrali možnost ?
Sušilni stroj ne deluje ...
● Ali je stroj pod napetostjo? V vtičnico
priključite drugo napravo, da preverite, ali
vtičnica deluje.
● Je vtič pravilno vključen v vtičnico?
● Je prišlo do napake pri oskrbi z električnim
tokom?
● Je pregorela varovalka?
● So vrata pravilno zaprta?
● Ali je sušilni stroj vklopljen in vključen v
vtičnico?
● Ste izbrali čas sušenja ali program sušenja?
● Ste po odprtju vrat stroj vklopili ponovno?
● Je stroj prenehal delovati, ker je posoda za
zbiranje vode polna in jo je treba izprazniti?
Sušilni stroj je zelo glasen ...
● Izključite stroj in za nasvet pokličite
pooblaščeni servis.
Signalna lučka je prižgana ...
● Je treba očistiti filter?
● Je treba očistiti kondenzator?
Signalna lučka je prižgana ...
● Je treba izprazniti posodo za vodo?
POMOČ STRANKAM
Nadomestni Deli
Pooblaščeni Servis
Če vaš sušilni stroj še vedno ne dela niti potem,
ko ste preverili vse točke na tem seznamu, vas
prosimo, da za nasvet pokličete pooblaščeni
servis. Morda vam bodo lahko pomagali po
telefonu ali pa se boste dogovorili za primeren
čas serviserjevega klica skladno z določili
garancije. Vendar pa vam lahko v naslednjih
primerih servisne storitve tudi zaračunamo:
● če stroj deluje;
● če stroj ni bil nameščen v skladu z navodili za
Namestitev;
●če ste stroj uporabljali narobe.
Vedno uporabljajte originalne nadomestne
dele, ki so na voljo pri pooblaščenem servisu.
Če potrebujete servisne storitve ali popravilo
stroja, pokličite najbližji pooblaščeni servis.
Izdelovalec ne odgovarja za morebitne
tiskarske napake v tem priročniku.
Proizvajalec si pridržuje pravico do
primernih sprememb svojih naprav, tako da
ne spreminja njihovih osnovnih značilnosti.

40007982

