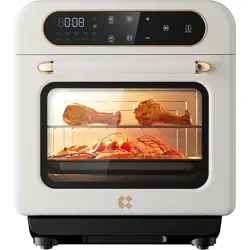
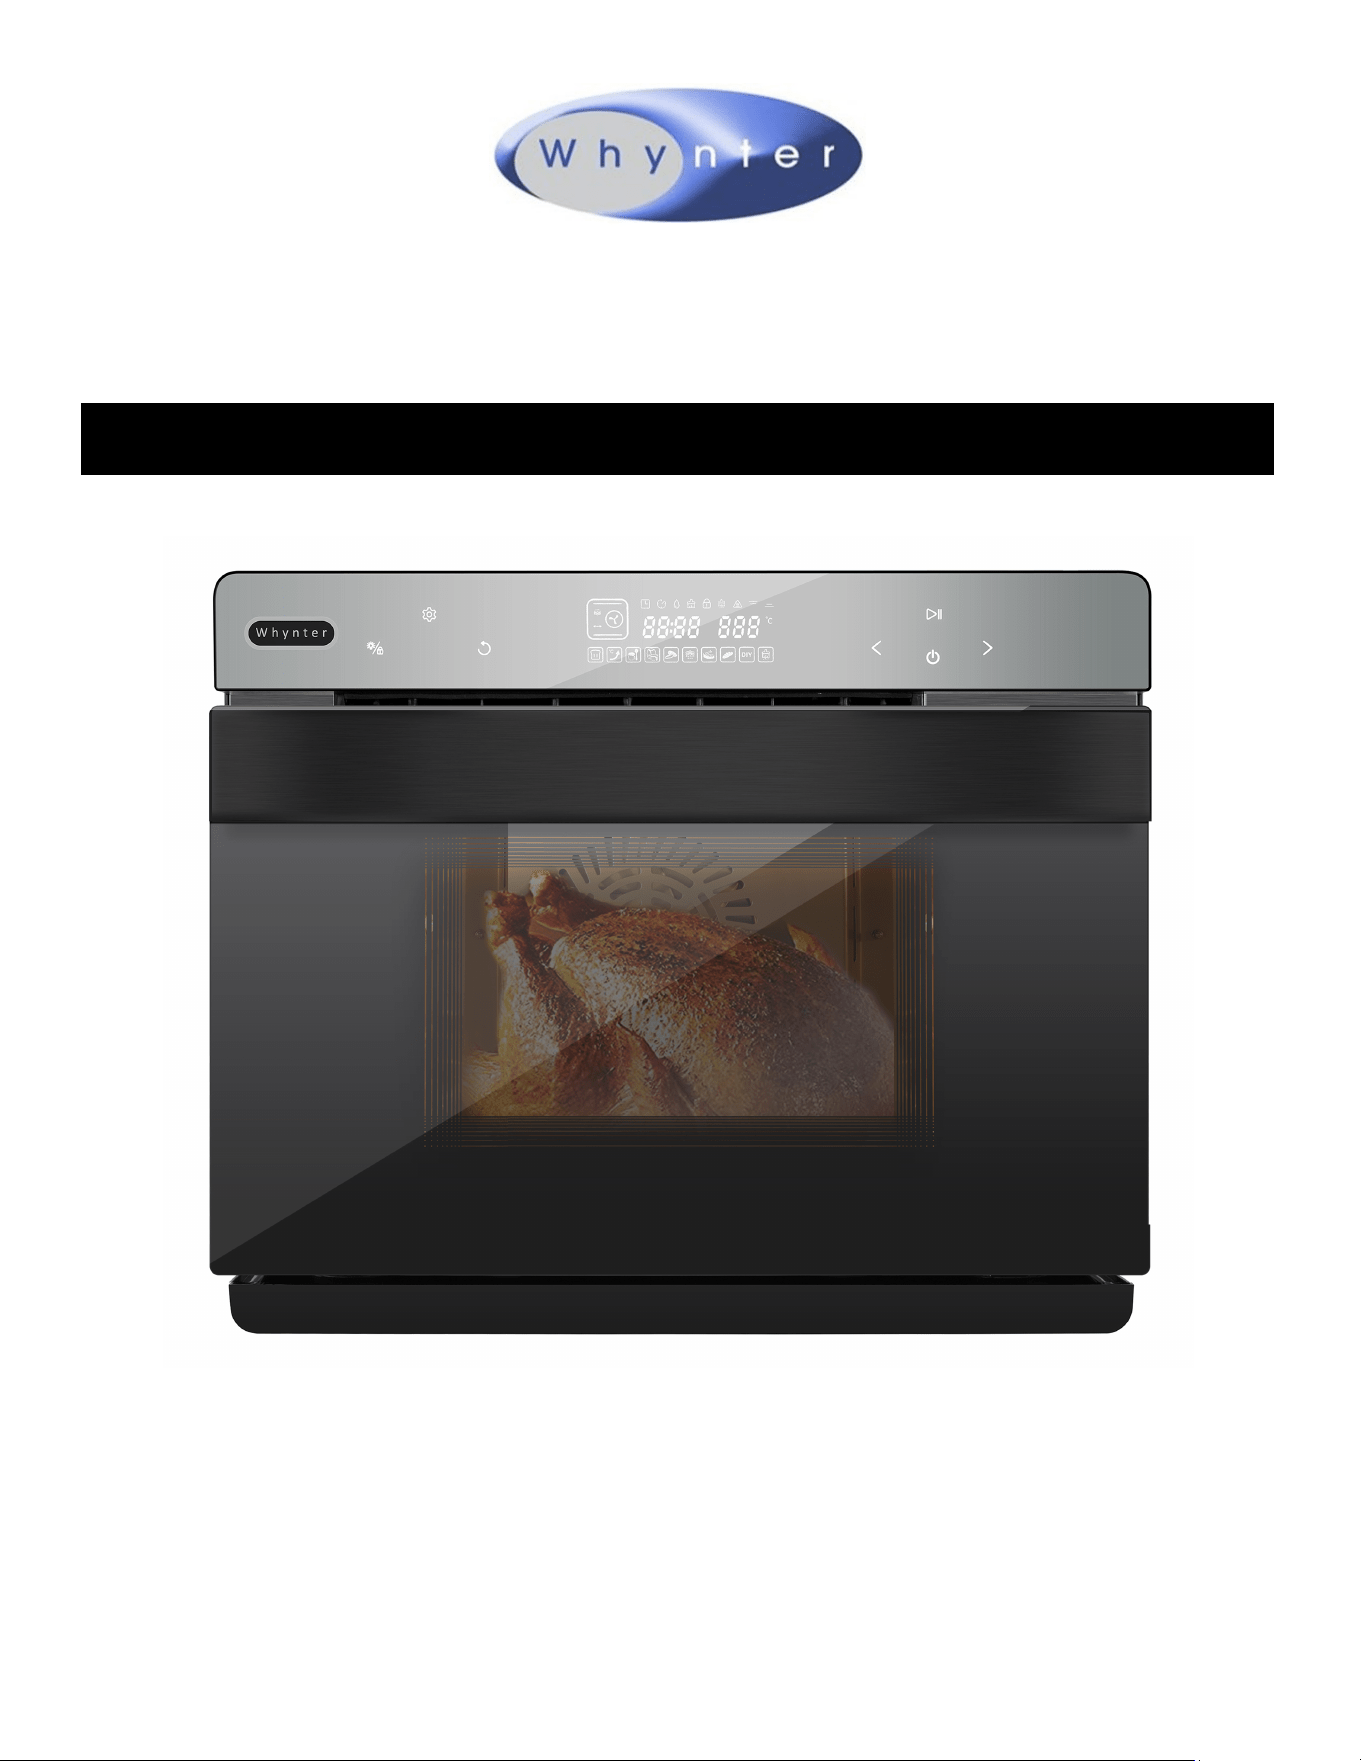
Whynter Grande 40 Quart Capacity Counter-Top Mul-Funcon
Intelligent Convecon Steam Oven Air Fryer,
Oven, Yogurt Maker, Dehydrator & DIY Mode
Congratulaons on your new Whynter product. To ensure proper operaon, please read this Instrucon
Manual carefully before using this product. Keep this manual in a safe place for future reference.
Model # : TSO-488GB

DISPOSAL INFORMATION
Thank you for choosing Whynter. Please follow the instrucons provided in this user manual
to obtain the very best performance from your steam oven. We trust that your Whynter
steam oven will provide the performance and reliability that we stand for.
Please keep this user manual in a safe place for future reference.
This symbol on the product or its packaging indicates that this appliance cannot be treated
as normal domesc trash, but must be handed in at a collecon point for recycling electric
and electronic appliances. Your contribuon to the correct disposal of this product protects
the environment.
Further informaon about the recycling of this product can be obtained from your local
municipal authority.

Table of Contents
PAGE
SAFETY PRECAUTIONS 4
BEFORE FIRST USE 5
INTRODUCTION 6
PRODUCT DIAGRAM 7
CONTROL PANEL / DISPLAY 8 - 10
OPERATING INSTRUCTIONS 10 - 11
DIY FUNCTION MODES 12 - 13
MENU SELECTIONS 14 - 16
TIPS 16
CLEANING AND MAINTENANCE 17
SPECIFICATIONS 17
TROUBLESHOOTING 18
WARRANTY 19

SAFETY PRECAUTIONS
1. Read all instrucons.
2. UNPLUG FROM OUTLET WHEN NOT IN USE before pung on or taking o parts and before cleaning. Allow to cool be-
fore cleaning or handling.
3. Do not touch hot surfaces. Use handles or knobs.
4. To protect against electrical shock, do not immerse cord or plug, or place any part of the steam oven in water or other
liquids.
5. Close supervision is necessary when used by or near children.
6. Do not operate with a damaged cord or plug or aer the appliance has malfunconed or has been dropped or damaged
in any way or is not operang properly.
7. The use of accessory aachments not recommended by Whynter may cause injury.
8. Do not use outdoors.
9. Do not let the cord hang over the edge of the table or countertop where it could be pulled on inadvertently by children
or pets. Do not let the cord touch hot surfaces, which could damage it.
10. Where applicable, always aach the plug to appliance and check that the cooking cycle has stopped before plugging
cord into wall outlet. To disconnect, press the Power buon to stop the cooking cycle, then remove plug from wall out-
let.
11. Do not place oven on or near a hot gas or electric burner or in a heated oven.
12. Do not use this oven for anything other than its intended purpose.
13. Do not place sealed or airght containers in the oven.
14. Extreme cauon should be exercised when using containers constructed of materials other than metal, glass or ceramic
in the oven.
15. To avoid burns, use extreme cauon when removing trays, pans, racks, or disposing of hot grease.
16. When not in use, always unplug the unit. Do not store any materials other than Whynter’s recommended accessories in
this oven.
17. Do not place paper, cardboard, plasc or similar products in the oven.
18. Do not cover crumb tray or any part of the oven except the baking pan with metal foil. This will cause overheang of the
oven.
19. Do not block the top of the oven, steam vents, or any other openings while in use.
20. Oversize foods, metal foil packages and utensils must not be inserted in the oven, as they may involve a risk of re or
electric shock.
21. A re may occur if the oven is covered or touching ammable materials such as curtains, draperies, walls and the like
when in operaon. Do not store any items on top of the appliance when in operaon. Do not operate under wall cabi-
nets.
22. Do not clean with metal scouring pads. Pieces can break o the pad and touch electrical parts, involving a risk of electric
shock.
23. Do not aempt to dislodge food when the oven is plugged into an electrical outlet.
24. CAUTION: To avoid possibility of re, never leave oven unaended during use.
25. Do not rest cooking utensils or baking dishes on glass door.
26. Where applicable, always aach plug to appliance and check that the cooking cycle is stopped before plugging cord into
wall outlet. To disconnect, press the Power buon to stop the cooking cycle, then remove plug from wall outlet.
27. Do not operate your appliance in an appliance garage or under a wall cabinet. When storing in an appliance garage al-
ways unplug the unit from the electrical outlet. Not doing so could create a risk of re, especially if the appliance touch-
es the walls of the garage or the door touches the unit as it closes.
28. Extreme cauon must be used when moving an appliance containing hot oil or other hot liquids.
SPECIAL CORDSET INSTRUCTIONS
• A short power supply cord is provided to reduce the risks resulng from becoming entangled in or tripping over a longer
cord.
• Extension cords may be used if care is exercised in their use.
• If an extension cord is used, the marked electrical rang of the extension cord must be at least as great as the electrical
rang of the appliance, and the longer cord should be arranged so that it will not drape over the countertop or tabletop
where it can be tripped over unintenonally or pulled on by children.
UNPACKING INSTRUCTIONS
1. Place the box on a large, sturdy, at surface.
2. Open the box and remove the instrucon book and any other literature.
3. Li the packing materials, oven and accessories out of the box.
4. Remove any other items and remove packing materials surrounding those parts.
5. Remove any protecve or promoonal labels from your steam oven and other parts.
6. Retain packaging.
FOR HOUSEHOLD USE ONLY.
SAVE THESE INSTRUCTIONS
BEFORE THE FIRST USE
• Before using your Whynter steam oven for the rst me, remove any dust from shipping by wiping the base, cover
and controls with a damp cloth.
• Be sure to thoroughly clean all accessories before rst use. Rinse water reservoir in hot, sudsy water. Be sure to thor-
oughly clean all accessories before each use.
• Do not use on heat-sensive surfaces.
• DO NOT STORE ITEMS ON TOP OF THE OVEN. IF YOU DO, REMOVE THEM BEFORE YOU TURN YOUR OVEN ON. THE
EXTERIOR WALLS GET VERY HOT WHEN IN USE.
• KEEP OUT OF REACH OF CHILDREN.
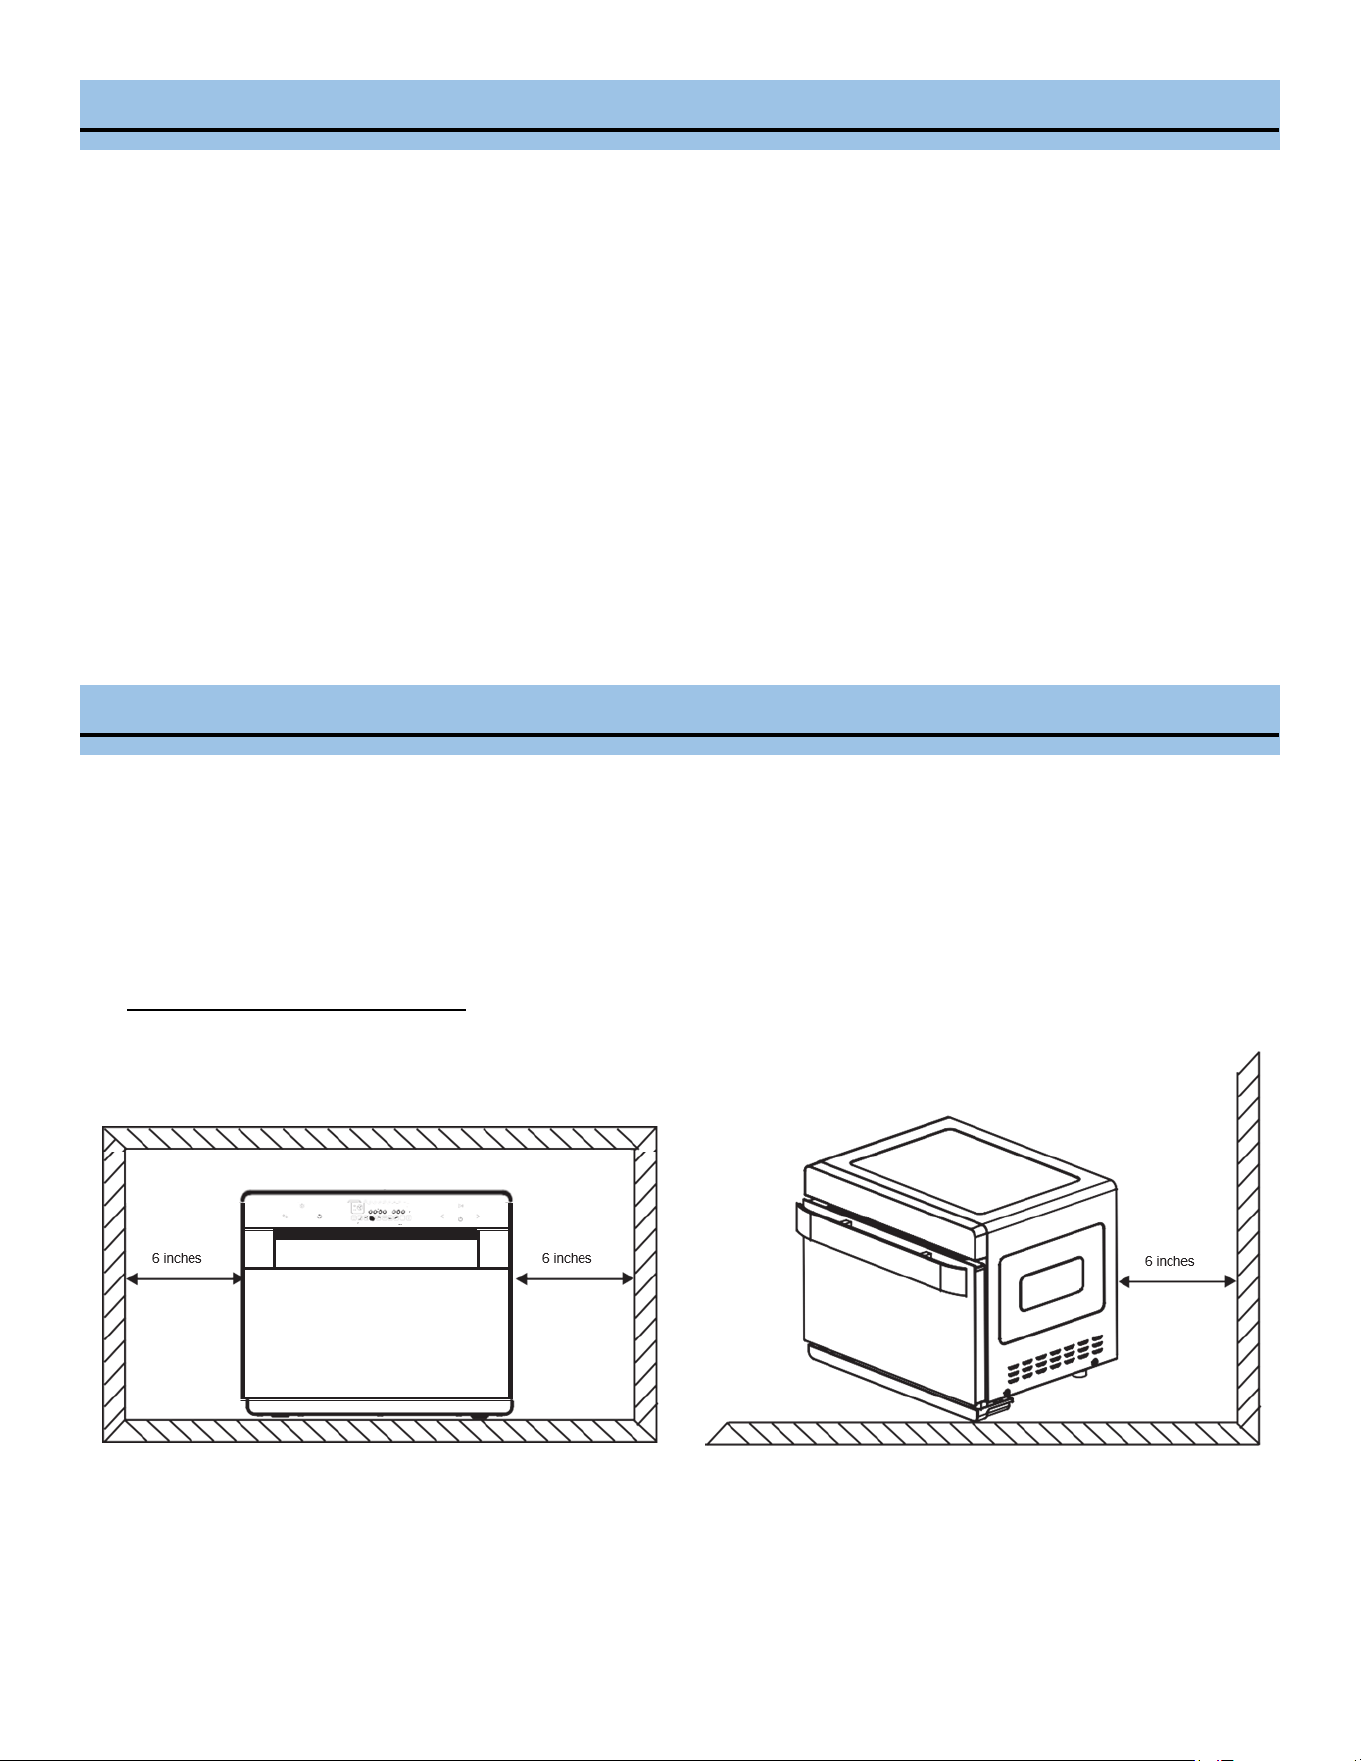
A clearance of at least 6 inches shall be reserved on the back and two sides and over the product when the product is
placed. Do not place any item on the product.
INTRODUCTION
What Is a Steam Oven?
Steam ovens are just what they sound like – ovens that use hot steam rather than hot air to cook food. They introduce a
whole new level of cooking to your kitchen, and can even reheat things more eecvely than microwaves, making them an
awesome double whammy for your home. You can use a steam oven in place of a standard convecon oven, or double it up
with your exisng oven for even more range and cooking power.
How Do Steam Ovens Work?
Most steam ovens work by siphoning water from a small water tank into a built-in boiler, heang it to 212 degrees Fahren-
heit, and releasing the steam into the oven. This superheated steam is just as eecve at cooking your food through as the
circulated hot air that makes convecon work, and is oen even faster.
Steam cooking is healthier than tradional cooking using microwave and tradional oven. The steam helps lock moisture
into whatever food is being cooked or reheated, eliminang the need for extra oils and fats to keep food moist. No more
geng trapped in the kitchen basng that turkey to keep it from drying out! It also help to retain the food's natural vitamins
and minerals.
Steam ovens are generally considered to be healthier than standard ovens. The steam helps lock moisture into whatever
food is being cooked or reheated, eliminang the need for extra oils and fats to keep food moist. No more geng trapped in
the kitchen basng that turkey to keep it from drying out! They also help your food retain its natural vitamins and minerals,
so you get the most nutrional value from your food.
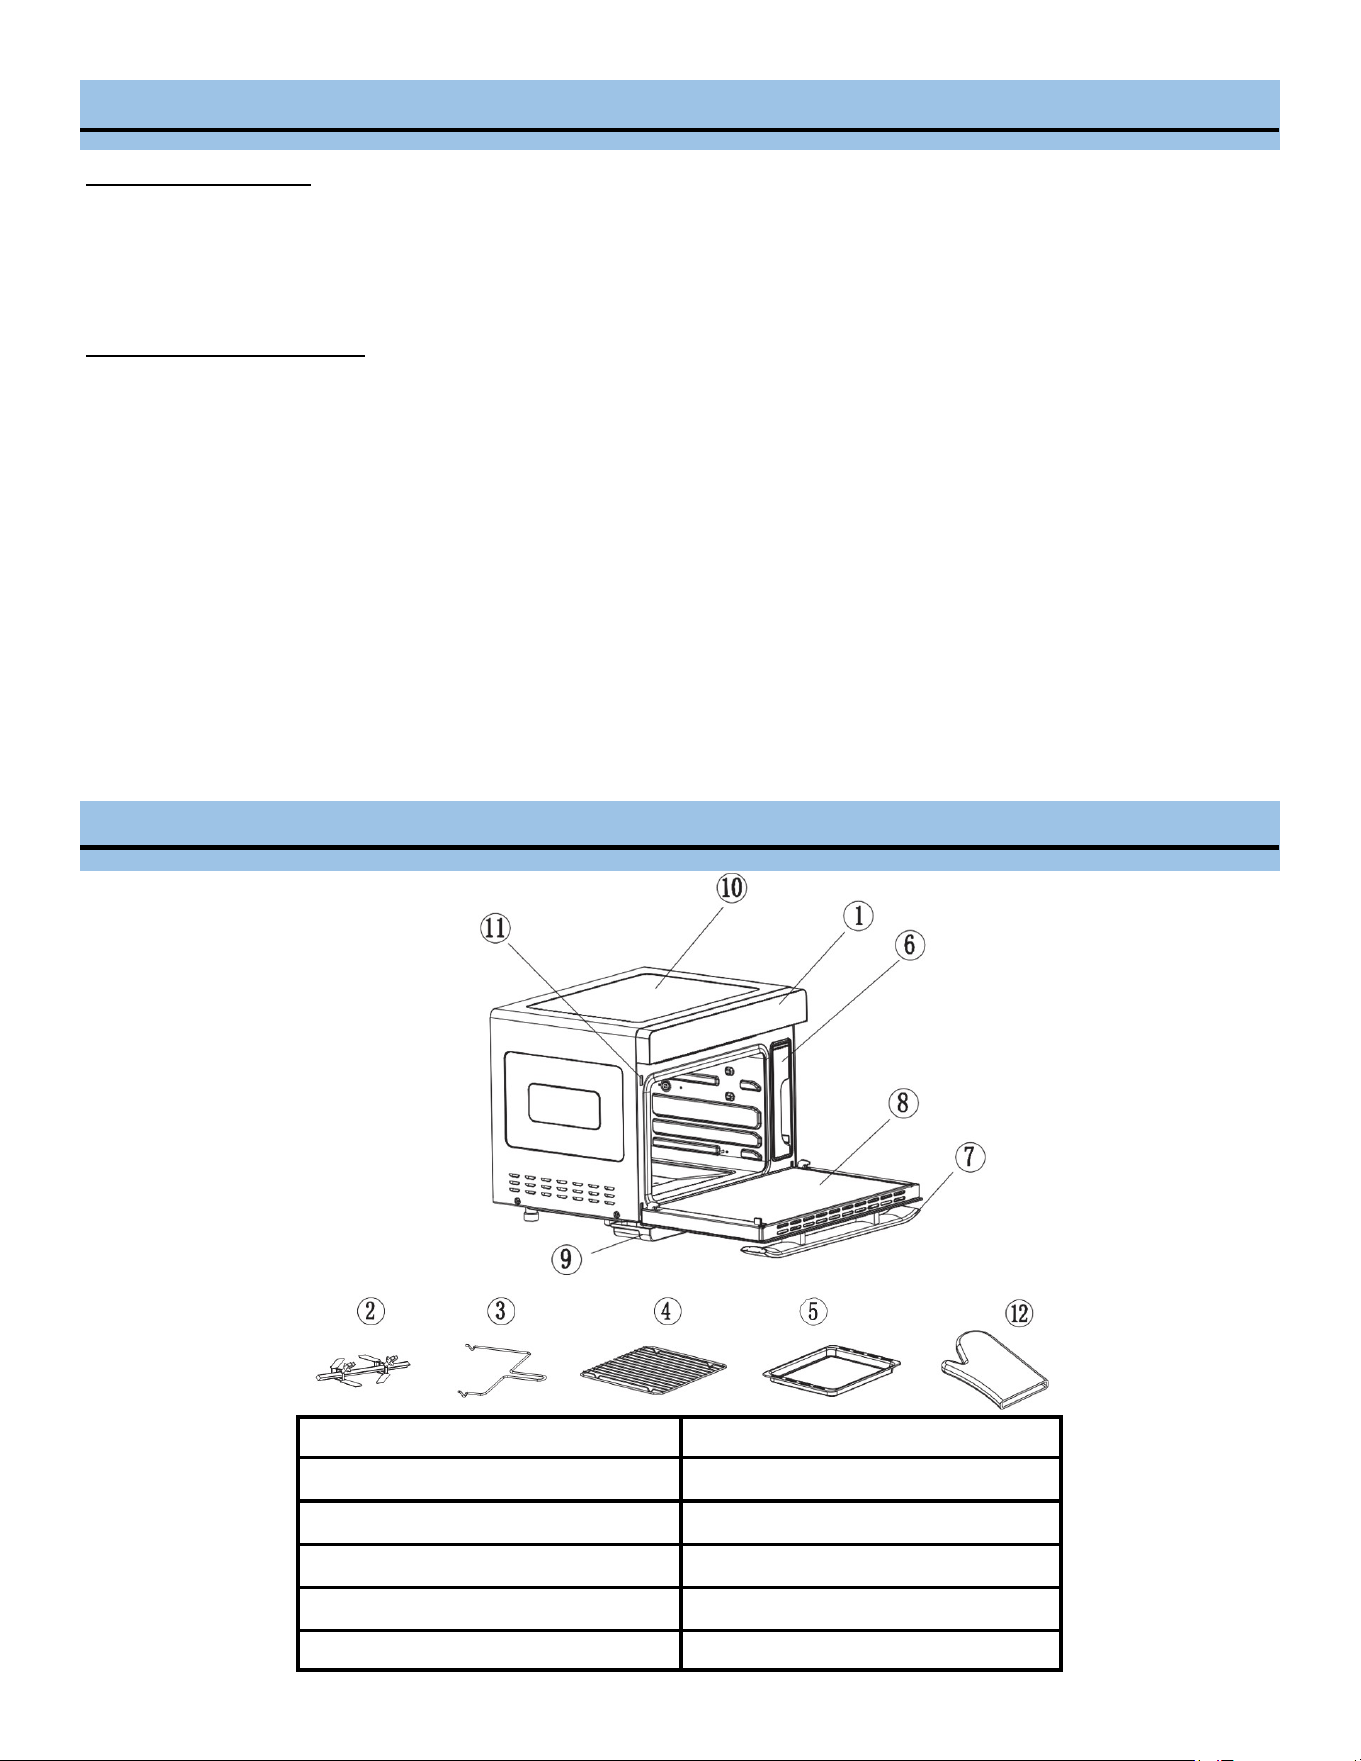
1. Control Panel
7. Handle
2. Fork Assembly
8. Door
3. Fork Handle
9. Water Tray
4. Broiling/Steaming Rack
10. Oven Body
5. Baking Pan
11. Door Switch
6. Water Tank
12. Oven Mi
PRODUCT STRUCTURAL DESIGN
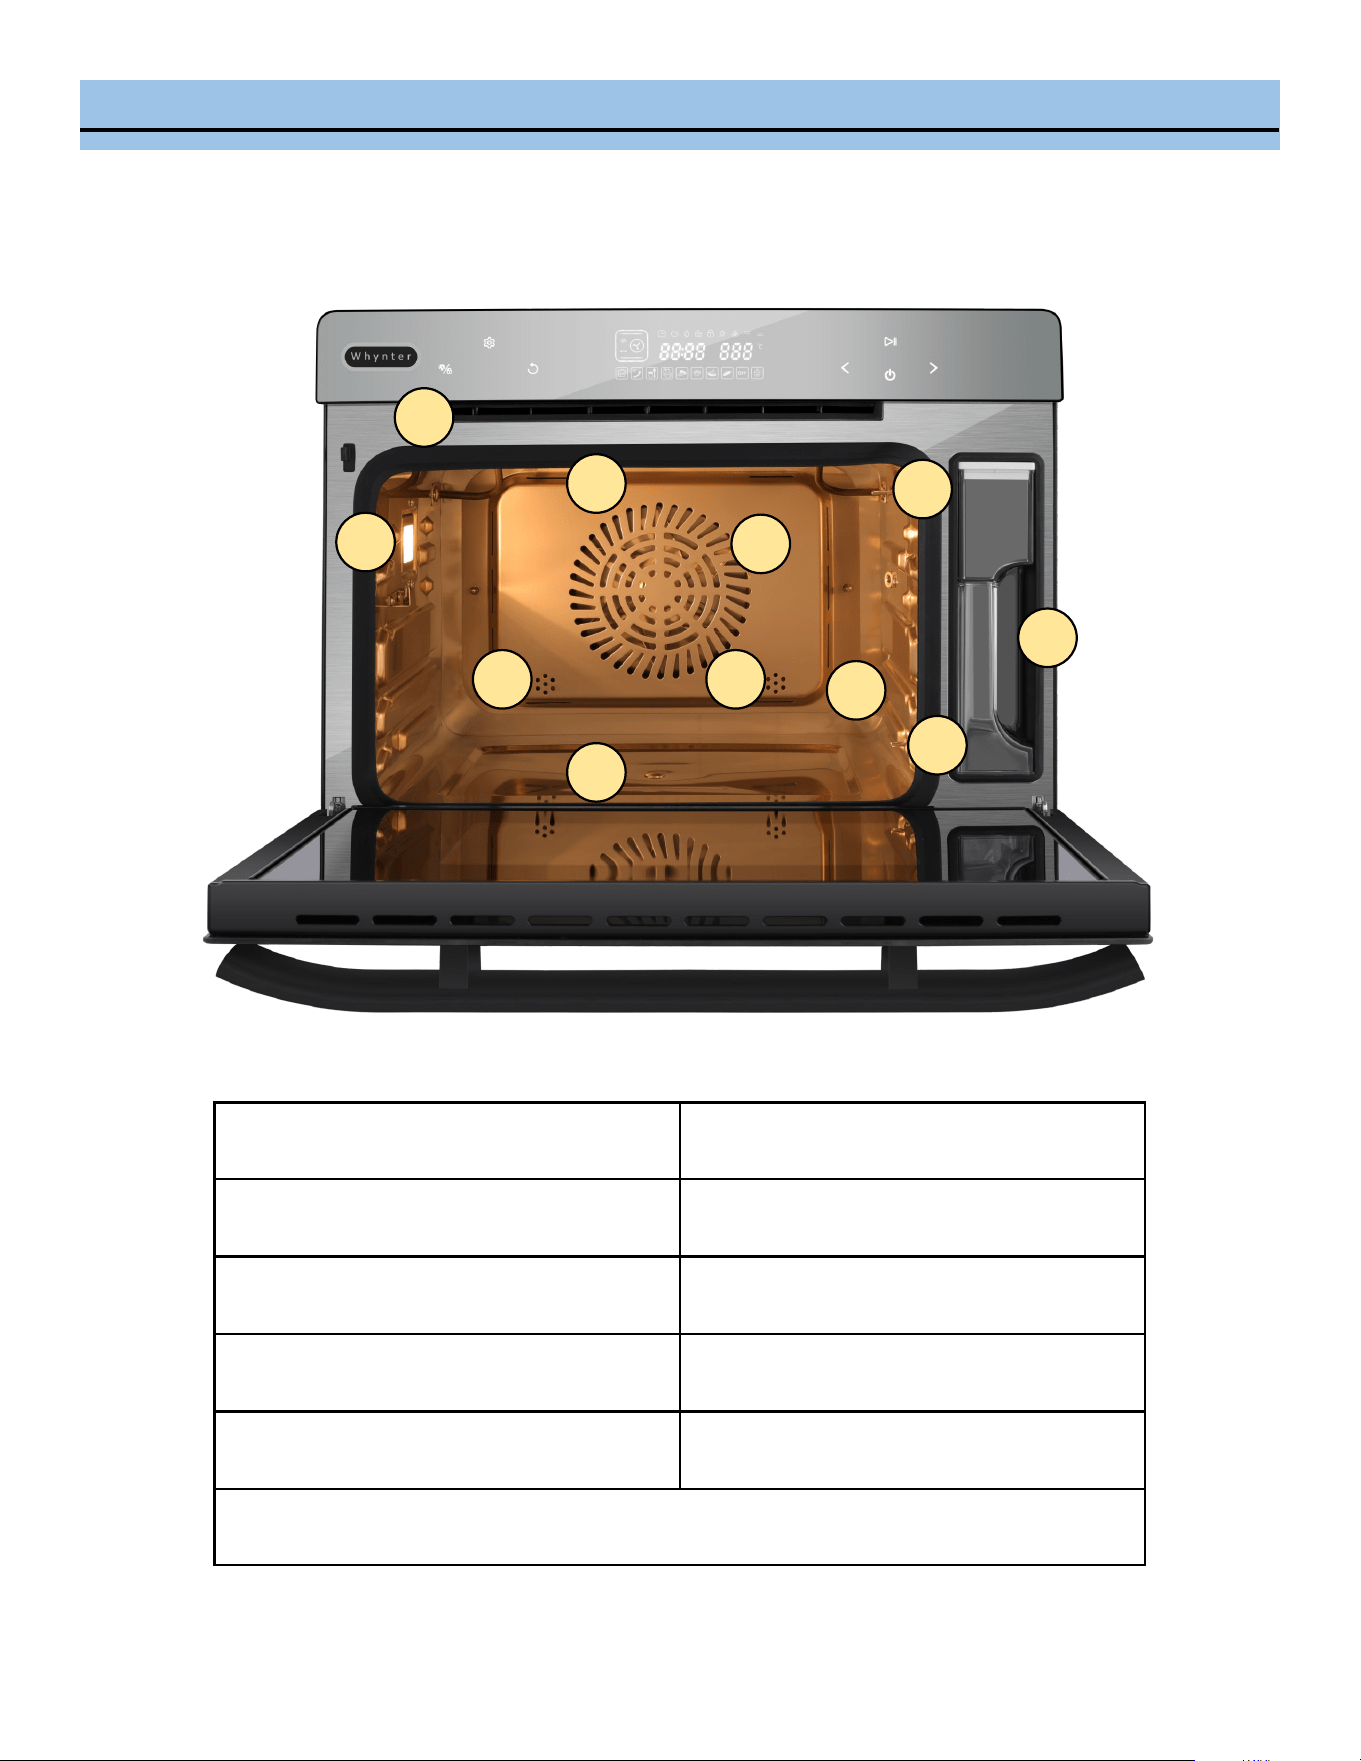
INTERNAL DIAGRAM
1
2
3
4 5
6
7
9
10
8
1. Residual Steam Outlet 6. Boom Heater
2. Oven Lamp 7. Internal Fan
3. Top Heater 8. Air Inlet
4. Steam Inlet 9. Temperature Sensor
5. Steam Inlet 10. Temperature Sensor
11. Water Tank
11
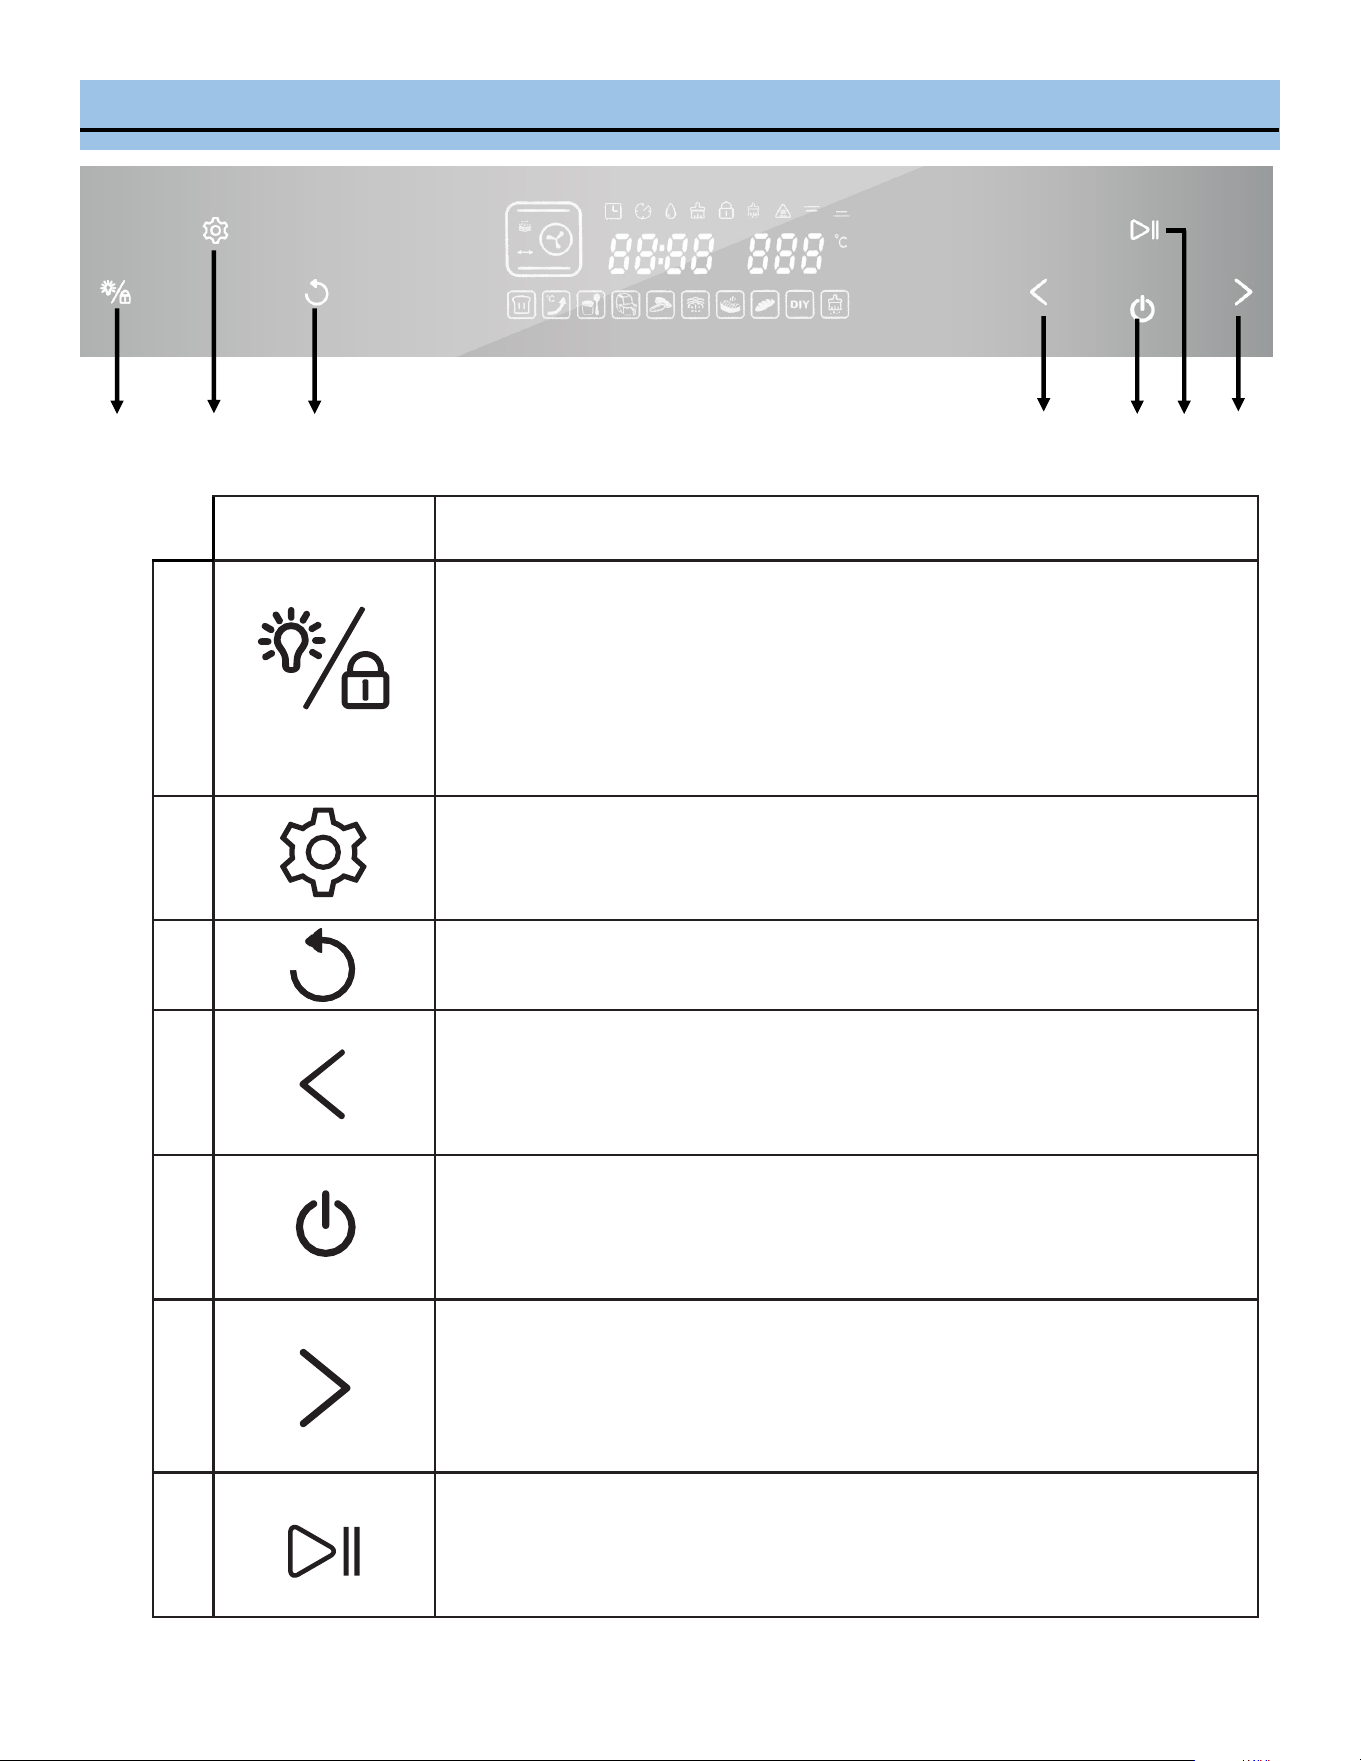
CONTROL PANEL
1 2 3 4 5 6 7
Icon Funcon Descripon
1
Oven lamp/child lock key:
• Press to toggle Oven Lamp ON or OFF
• Oven lamp will remain ON for three minutes aer funcon compleon.
• Oven lamp will remain ON for three minutes when the oven door is le opened.
• To acvate Child Lock, press and hold down the child lock key for three seconds in
standby mode. To deacvate the child lock, press and hold the child lock key
again.
2
Seng key: Preset and Time-delay
During any program selecon or in standby mode, press the Seng Key to select
desired preset and me-delay sengs.
3
Back key:
Press the Back key to return to the previous seng mode.
4
Selecon key (Reverse funcon) :
• Toggle between 9 DIY regular funcon modes and 10 specic operaon modes
in a reverse sequence.
• Press to adjust the me and temperature.
5
ON/OFF key:
Press ON/OFF key to toggle between ON and OFF operaon mode.
6
Selecon key (Forward funcon):
• Toggle between 9 DIY regular funcon modes and 10 specic operaon modes
in a forward sequence.
• Press to adjust the me and temperature.
7
ENTER key:
Press ENTER key to Start, Pause, or conrm desired selecon.
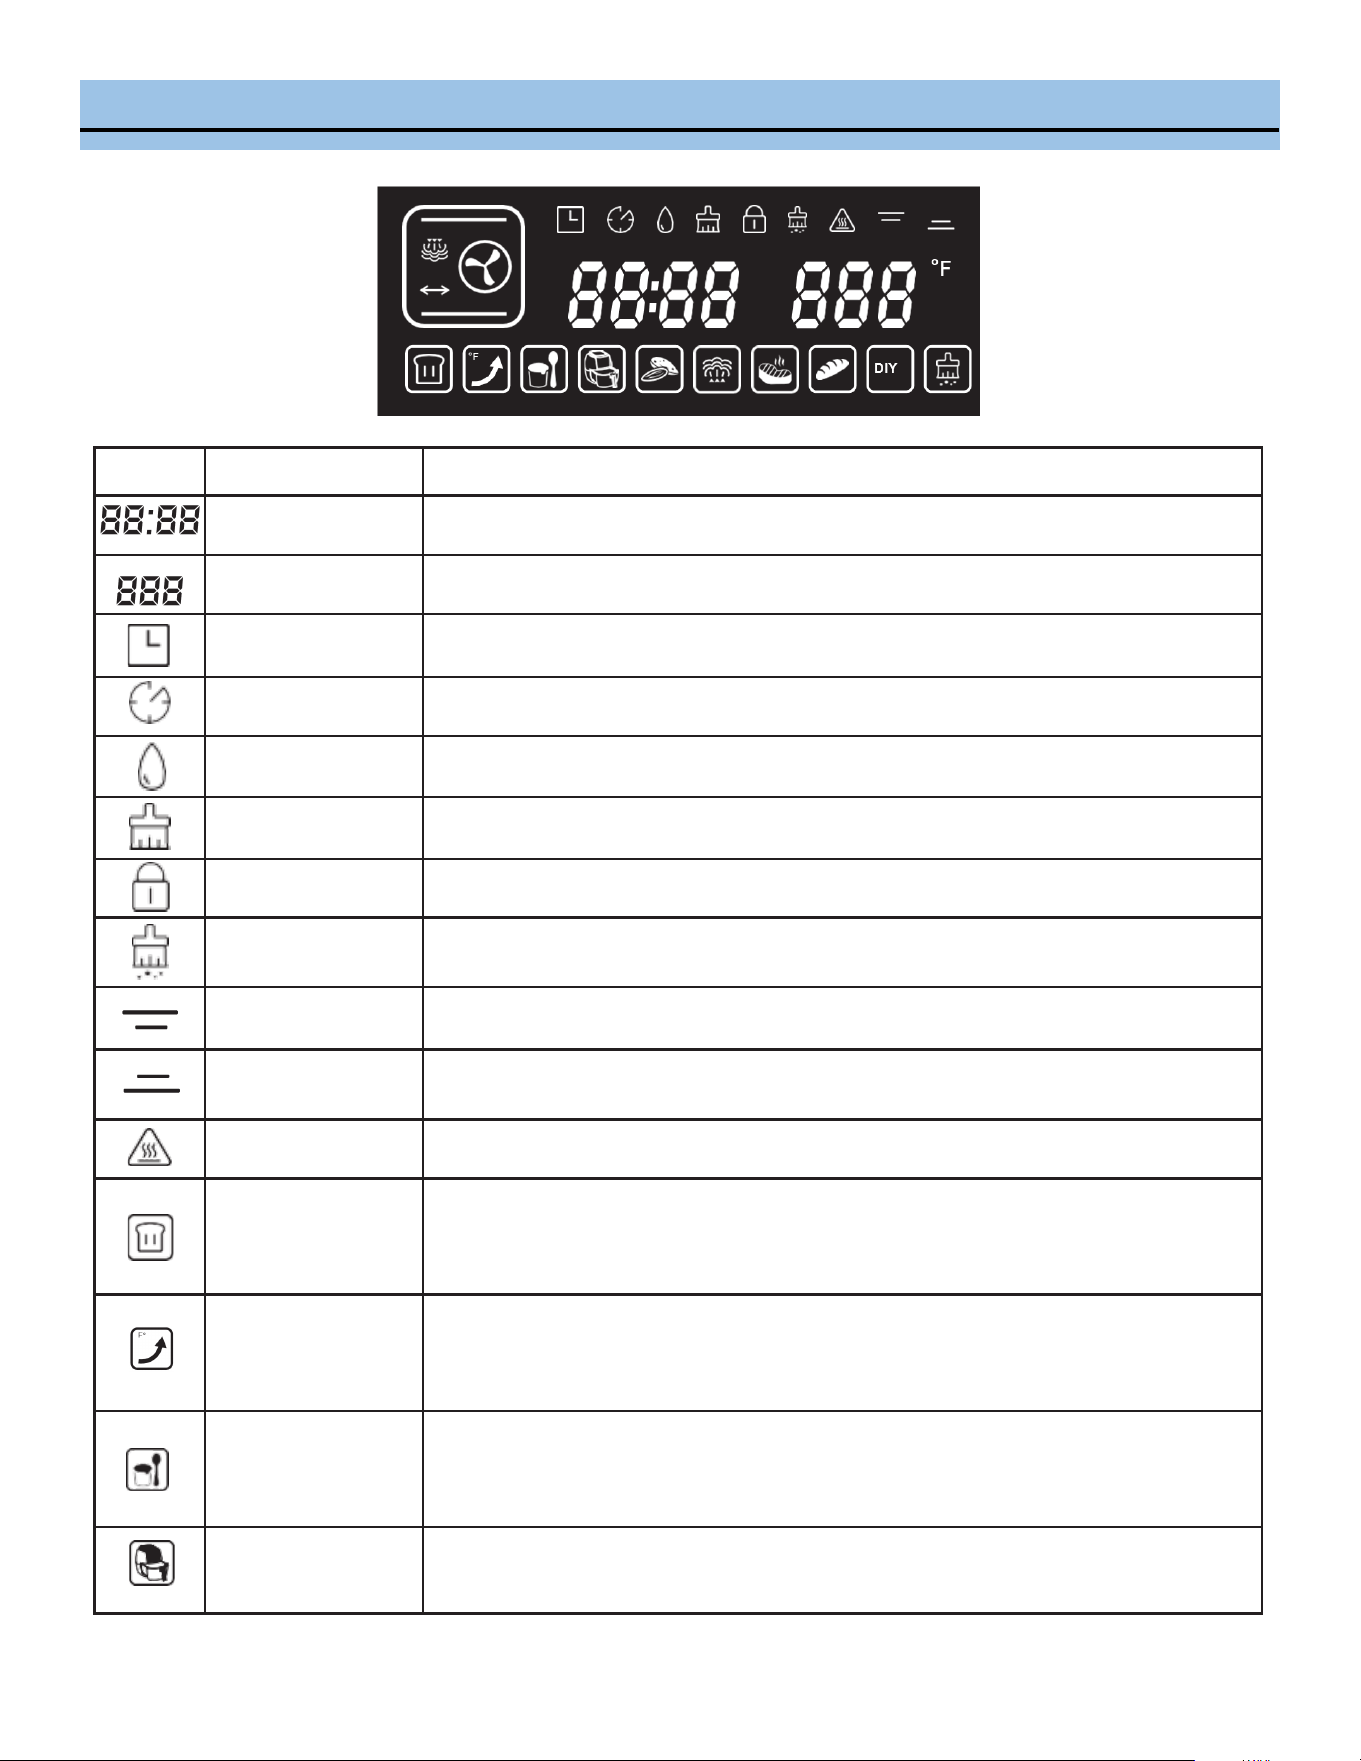
DISPLAY
Funcon
Descripon
Cooking Time
Displays cooking hours and minutes.
Temperature
Displays adjustable temperature range: 85°F - 450°F
Preset funcon
Icon indicates that steam oven is running on Preset mode. Preset me can be adjust-
ed in one hour increments, from 0-24 hours.
Time-delay Icon indicates that steam oven is running on me-delay mode.
Water level
Icon is always on in Steam mode. Flashing icon indicates low water level in water
tank.
Water tray cleaning Icon indicates water tray needs to be cleaned.
Child lock Icon indicates control panel is locked.
Descaling Icon indicates descaling cycle is on.
Top heater pipe Icon indicates top heater pipe is on.
Boom heater pipe Icon indicates boom heater pipe is on.
High temperature Icon indicates temperature is high in the oven and cauon is needed.
Ferment
Icon indicates Ferment funcon is on.
Mode: Top heater pipe
Adjustable temperature: 85°F – 120°F
Adjustable me: 0-7 hours
Preheat
Icon indicates Preheat funcon is on.
Mode: Back heater convecon
Default temperature: 360°F
Unit will shut o once oven reaches 360°F.
Yogurt
Icon indicates Yogurt making funcon is on.
Mode: Steam
Default temperature: 115°F
Default me: 8 hours
Air Fryer
Air Fryer menu contains 9 programs and recipes. Refer to page 14.
Mode: Back heater convecon
DISPLAY
Dehydrate
Dry fruit and nuts menu contains 9 programs and recipes. Refer to page 15.
Mode: Back heater convecon or Top & boom heater pipes
Steam
Steam menu contains 9 programs and recipes. Refer to page 14.
Mode: Steam
Roast
Roast menu contains 9 programs and recipes. Refer to page 14.
Mode: Mulple
Bake
Bake menu contains 9 programs and recipes. Refer to page 14.
Mode: Top & boom heater pipes
DIY
DIY (Do It Yourself)
Icon indicates DIY funcon is on.
Mode: Choose from 9 funcon modes
Descaling
Icon indicates Descaling funcon is on.
Descaling funcon helps to remove residual buildup.
Default me: 50 minutes (program cannot be paused)
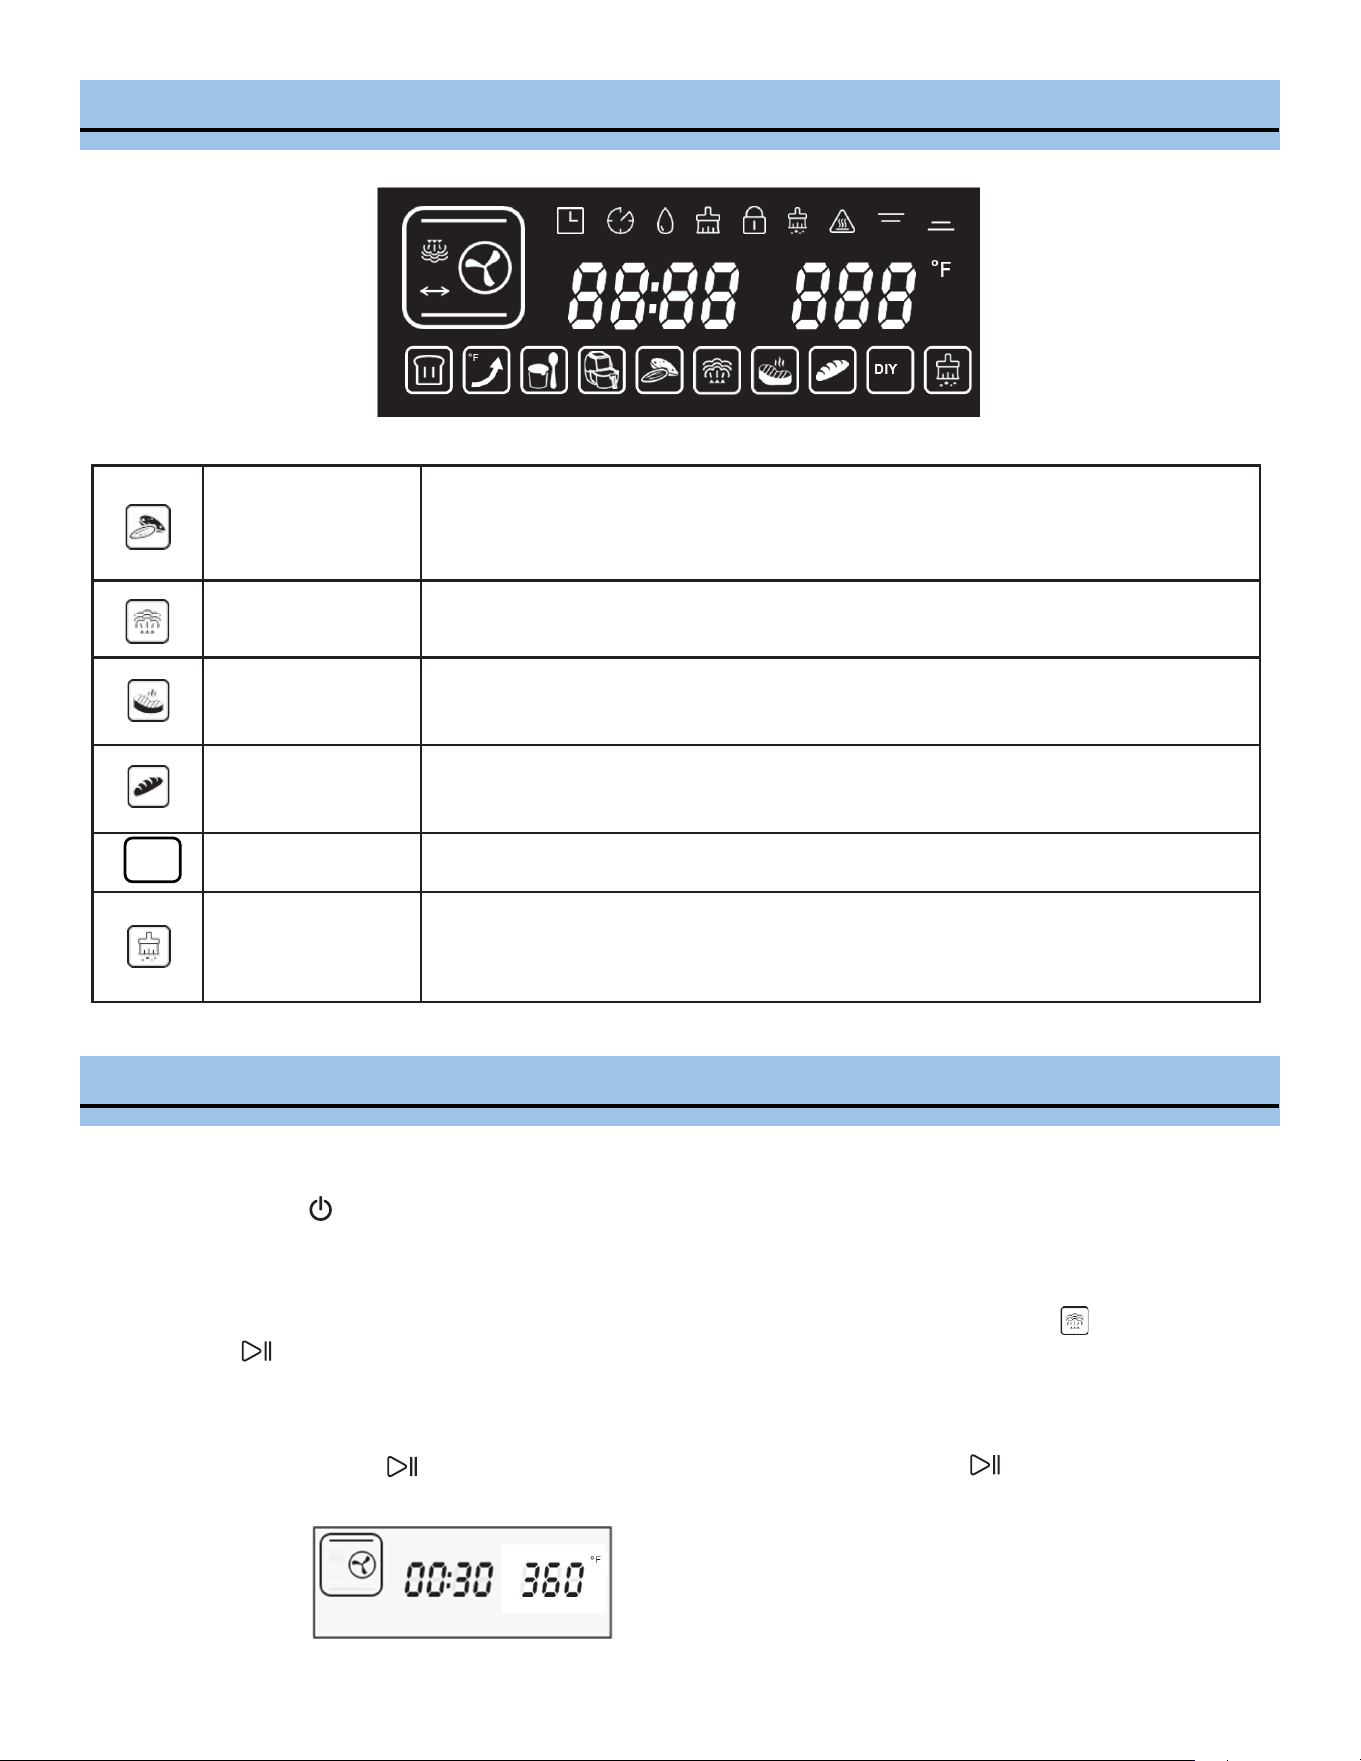
1. Powering on
Press the Power buon to turn the oven on. It will enter a full-screen standby mode aer a beep. If there is no
selecon in three minutes, the unit will return to standby mode.
2. Menu Selecon
In the standby model, press the selecon key > < to select a funcon. The default funcon is Steam. Press
the Enter buon to conrm the selecon. A beep will sound and the clock will start counng down. Choose
any of the pre-program funcons or the DIY funcon.
For example, to select Top heater pipe mode.
1) Select DIY then buon to conrm. Then select Top heater pipe and press buon to conrm.
OPERATING INSTRUCTIONS
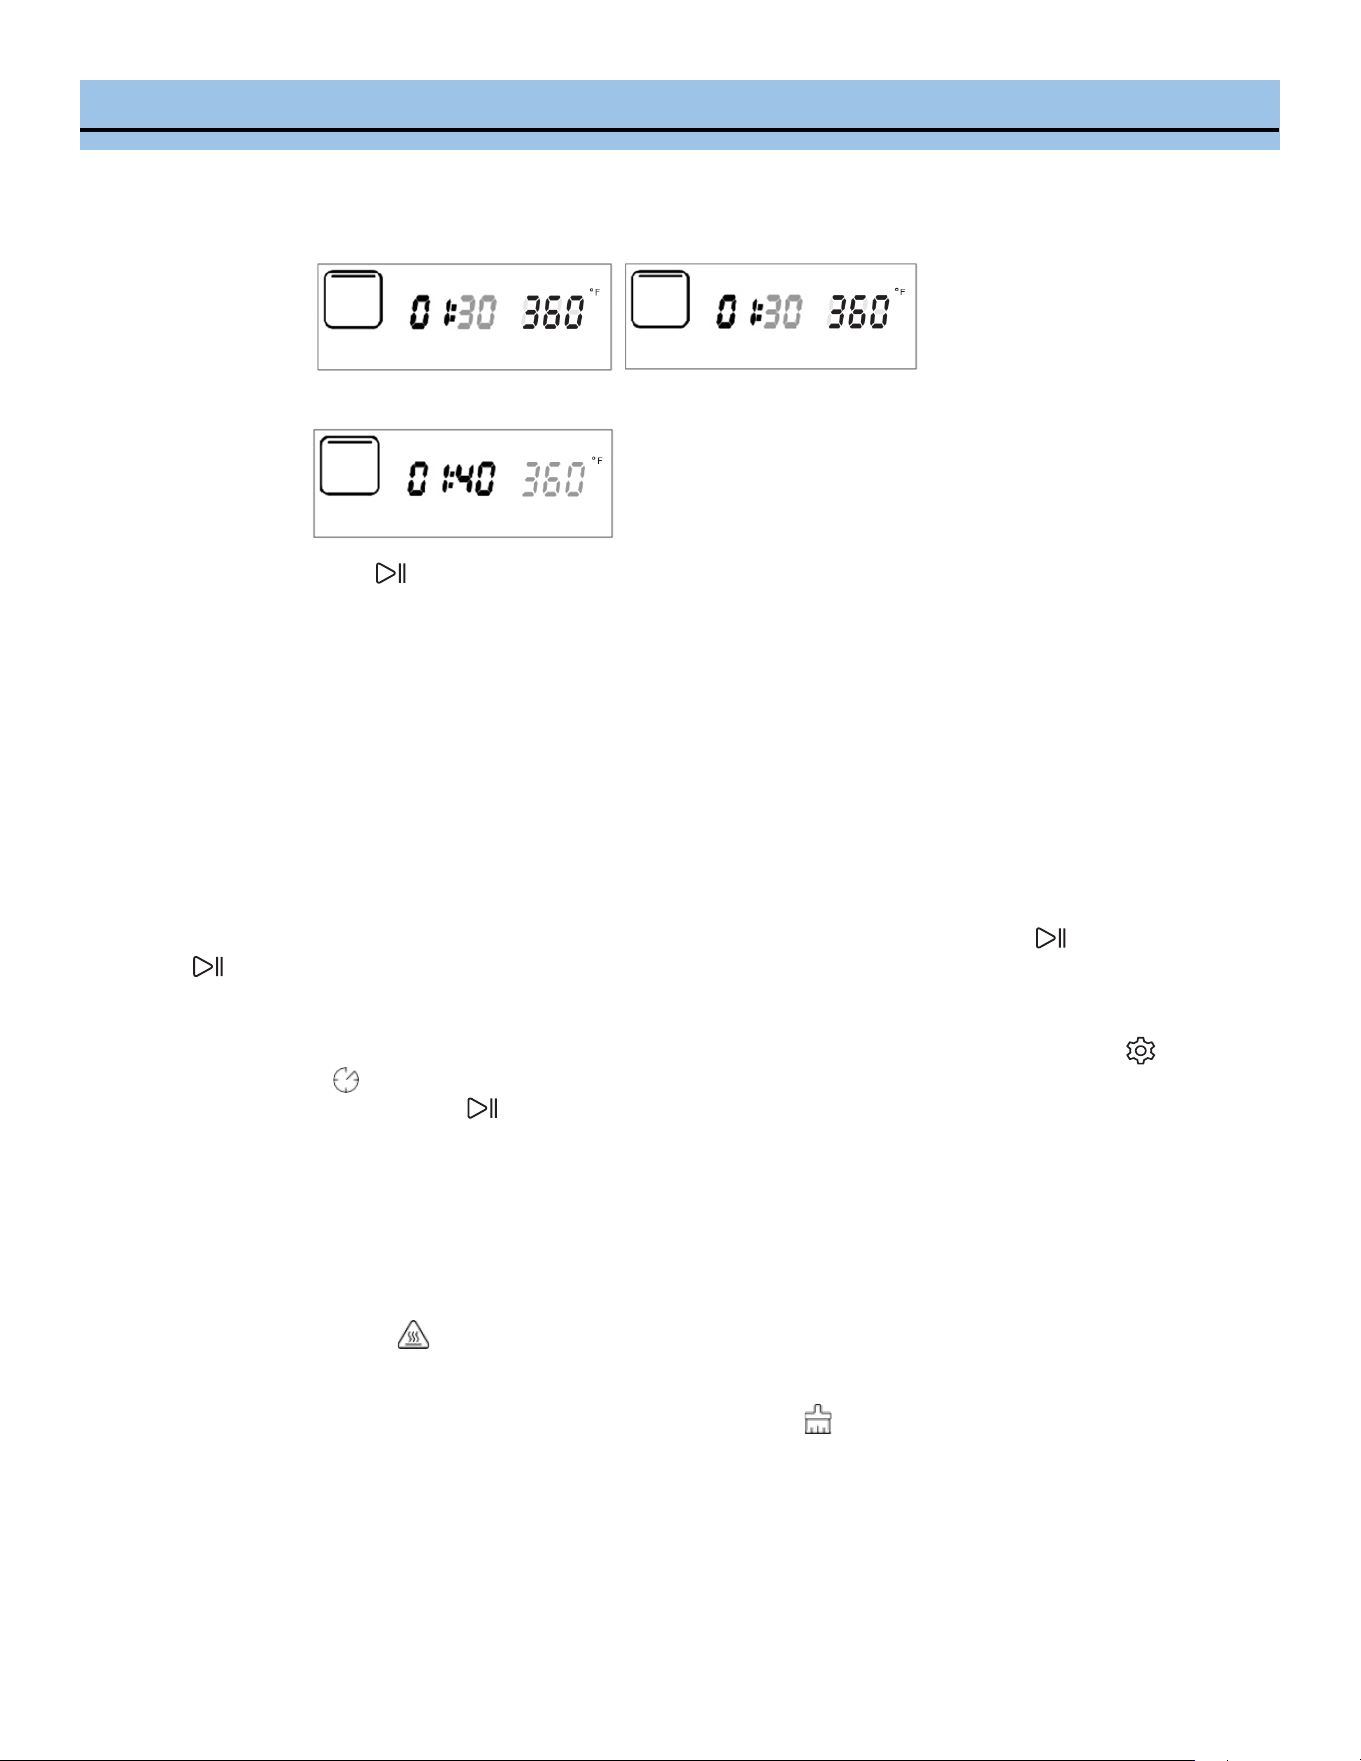
OPERATING INSTRUCTIONS
2) Select a cooking me by conrming the blinking numbers (hours & minutes).
3) Select a temperature by conrming the blinking number temperature.
4) Press the Enter buon to begin the cooking cycle.
The countdown mer will begin counng down unl the cooking cycle has completed.
NOTE: The mer will stop when the door is open, and the mer will ash. Once the door is closed, mer
will resume.
3. During Operaon
Pause funcon
During the cooking process, you can stop the mer and cooking funcon by pressing the Enter buon. Press the
Enter buon again to resume the mer and cooking funcon.
Add me/ Adjust temperature
During the cooking process, the LCD screen will display the countdown mer. Press and hold the Seng buon
unl the Time-delay icon appears on the display. The minute number will ash and it can be adjusted by pressing
the < or > buons. Press the Enter buon to conrm the change.
NOTE: The cooking hour is not adjustable during operaon.
4. Cooking Complete Reminder
Once the cooking process is nished, END will appear on the display and the unit will beep 10 mes.
The High temperature icon will be displayed if the oven temperature is above 120°F and the internal fan will run
for 3 minutes to circulate the hot air inside.
NOTE: Aer the steam program is completed, the water tray cleaning icon will ash for 1 minute to indicate the
residual water inside the oven needs to be wiped and that the water tank needs to be drained.
To remove excess liquid, slide the drip tray out and discard the contents. Never operate the oven without the drip
tray in place.
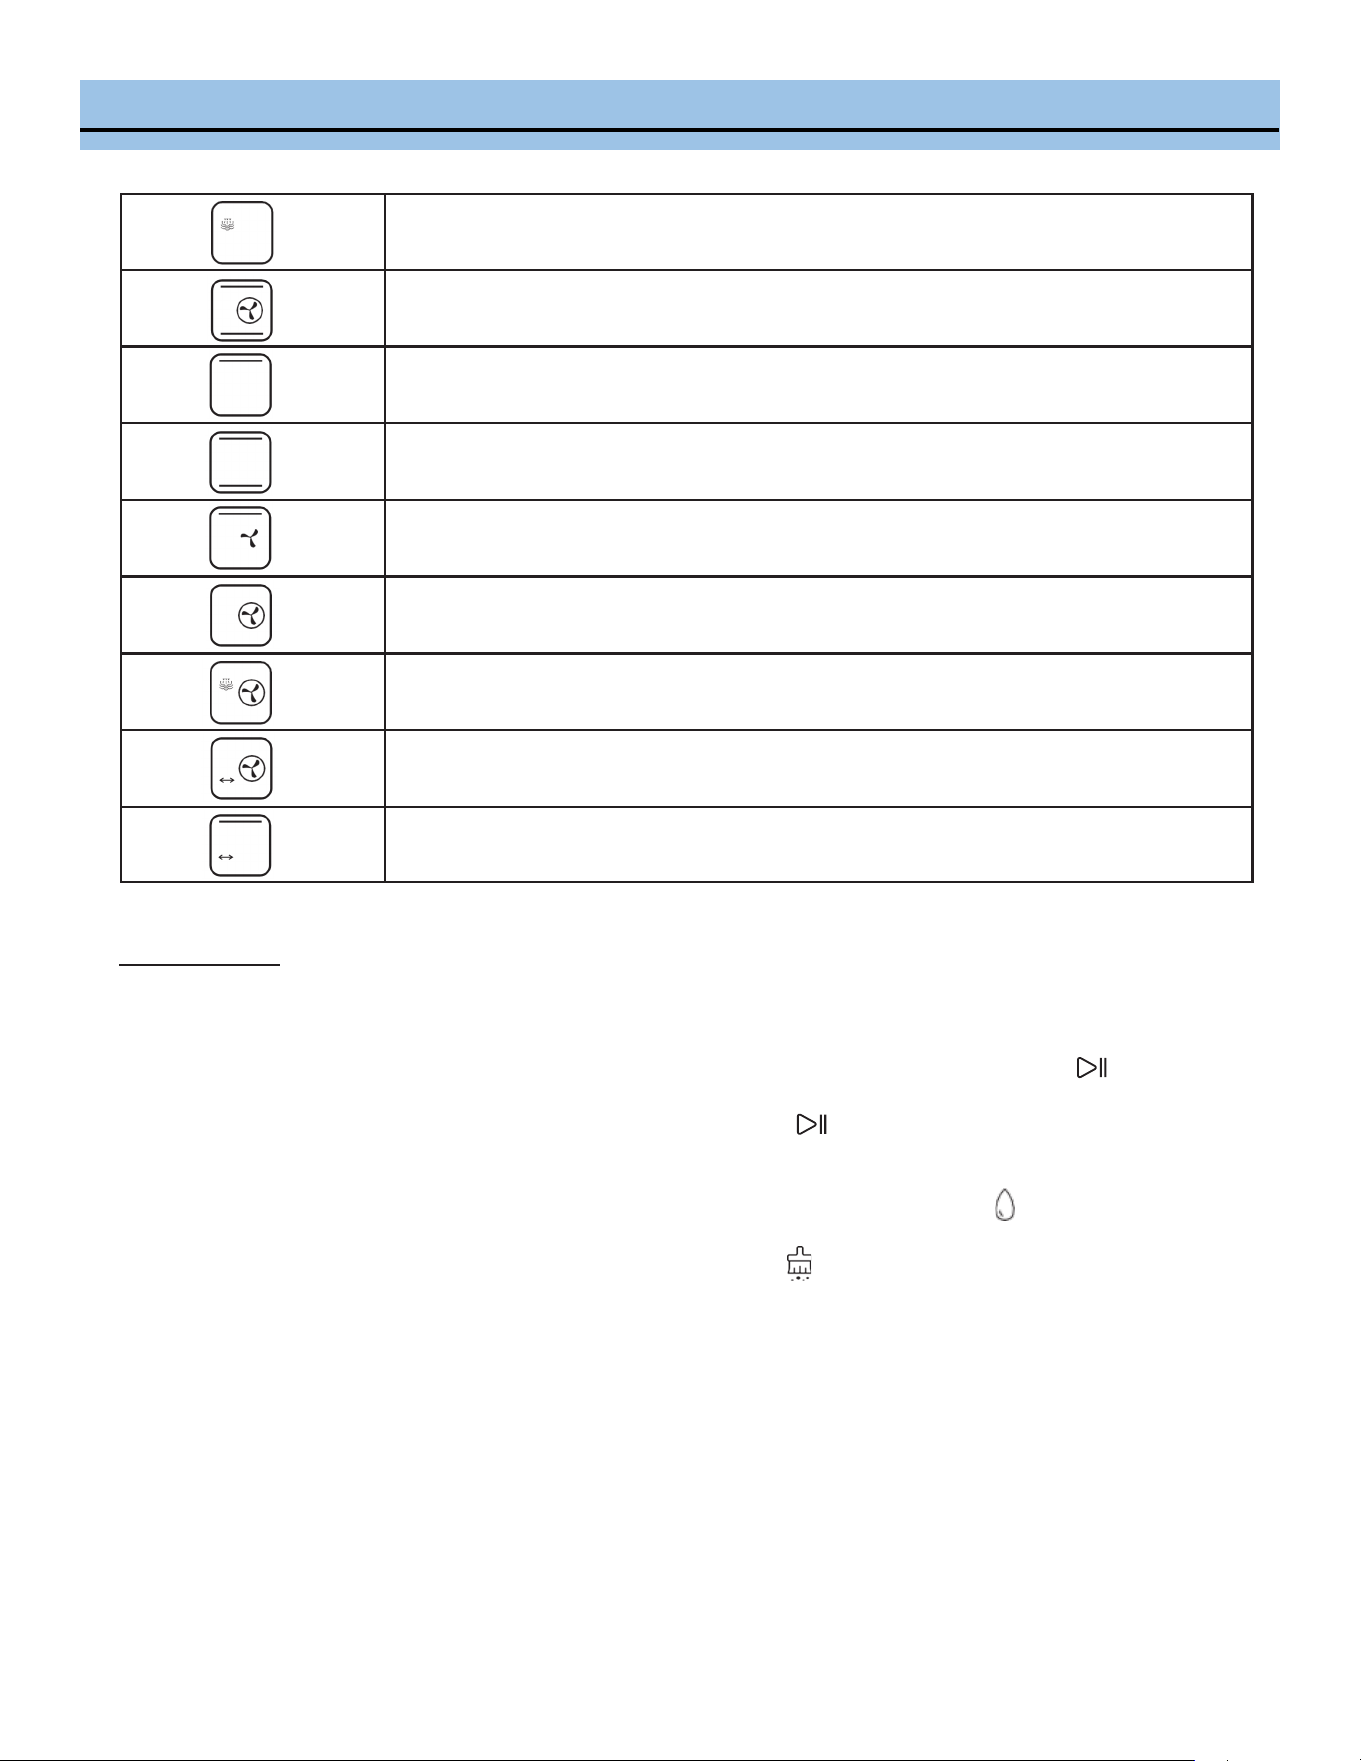
DIY FUNCTION MODES
Steam
Strengthening heating
(Back heater convection + top heater pipe + bottom heater pipe)
Top heater pipe
Top/bottom heater pipe
Hot air convection
(Top heater pipe + rear fan)
Back heater convection | Air Fryer
(Back heating + rear fan)
High-temperature steaming (steam + Back heater convection)
Back heater convection + turning fork
Top heater pipe + turning fork
DIY Steam mode
Before starng the Steam funcon, ll the water reservoir with dislled or ltered water. Open the oven door and
remove the water tank to ll the water to its maximum level then put the water tank back in place.
Press the selecon key > and choose the Steam mode. The Steam icon will ash then press the Enter buon to
conrm the selecon. Press the selecon key > to select the operaon hour me (default value is 0, ranging from 0 -
6) and minute (default value is 30, ranging from 0 - 59). Press the Enter buon to conrm the selecon. The tem-
perature numbers will ash, press the selecon key > to select desired temperature (120-230°F).
If the water tank is not in place or runs out of water, the oven will beep and the Water level icon will ash.
NOTE: Aer the steam program is completed, the water tray cleaning icon will ash for 1 minute to indicate the
residual water inside the oven needs to be wiped and that the water tank needs to be drained. To remove excess liq-
uid, slide the drip tray out and discard the contents. Never operate the oven without the drip tray in place.

DIY FUNCTION MODES
DIY Other Roast Modes
Press the selecon key > and choose the desired cooking mode. The funcon icon will ash, press the Enter
buon to conrm the selecon. Press the selecon key > to select the operaon hour me (default value is 0, ranging
from 0 - 6) and minute (default value is 30, ranging from 0 - 59). Press the Enter buon to conrm the selecon.
The temperature numbers will ash, press the selecon key > to select desired temperature.
NOTE: You can set dierent temperatures for the Top & Boom heater pipes separately.
Once the cooking process is nished, END will appear on the display and the unit will beep 10 mes. The High temper-
ature icon will be displayed if the oven temperature is above 120F and the internal fan run for 3 minutes to circu-
late the hot air inside.
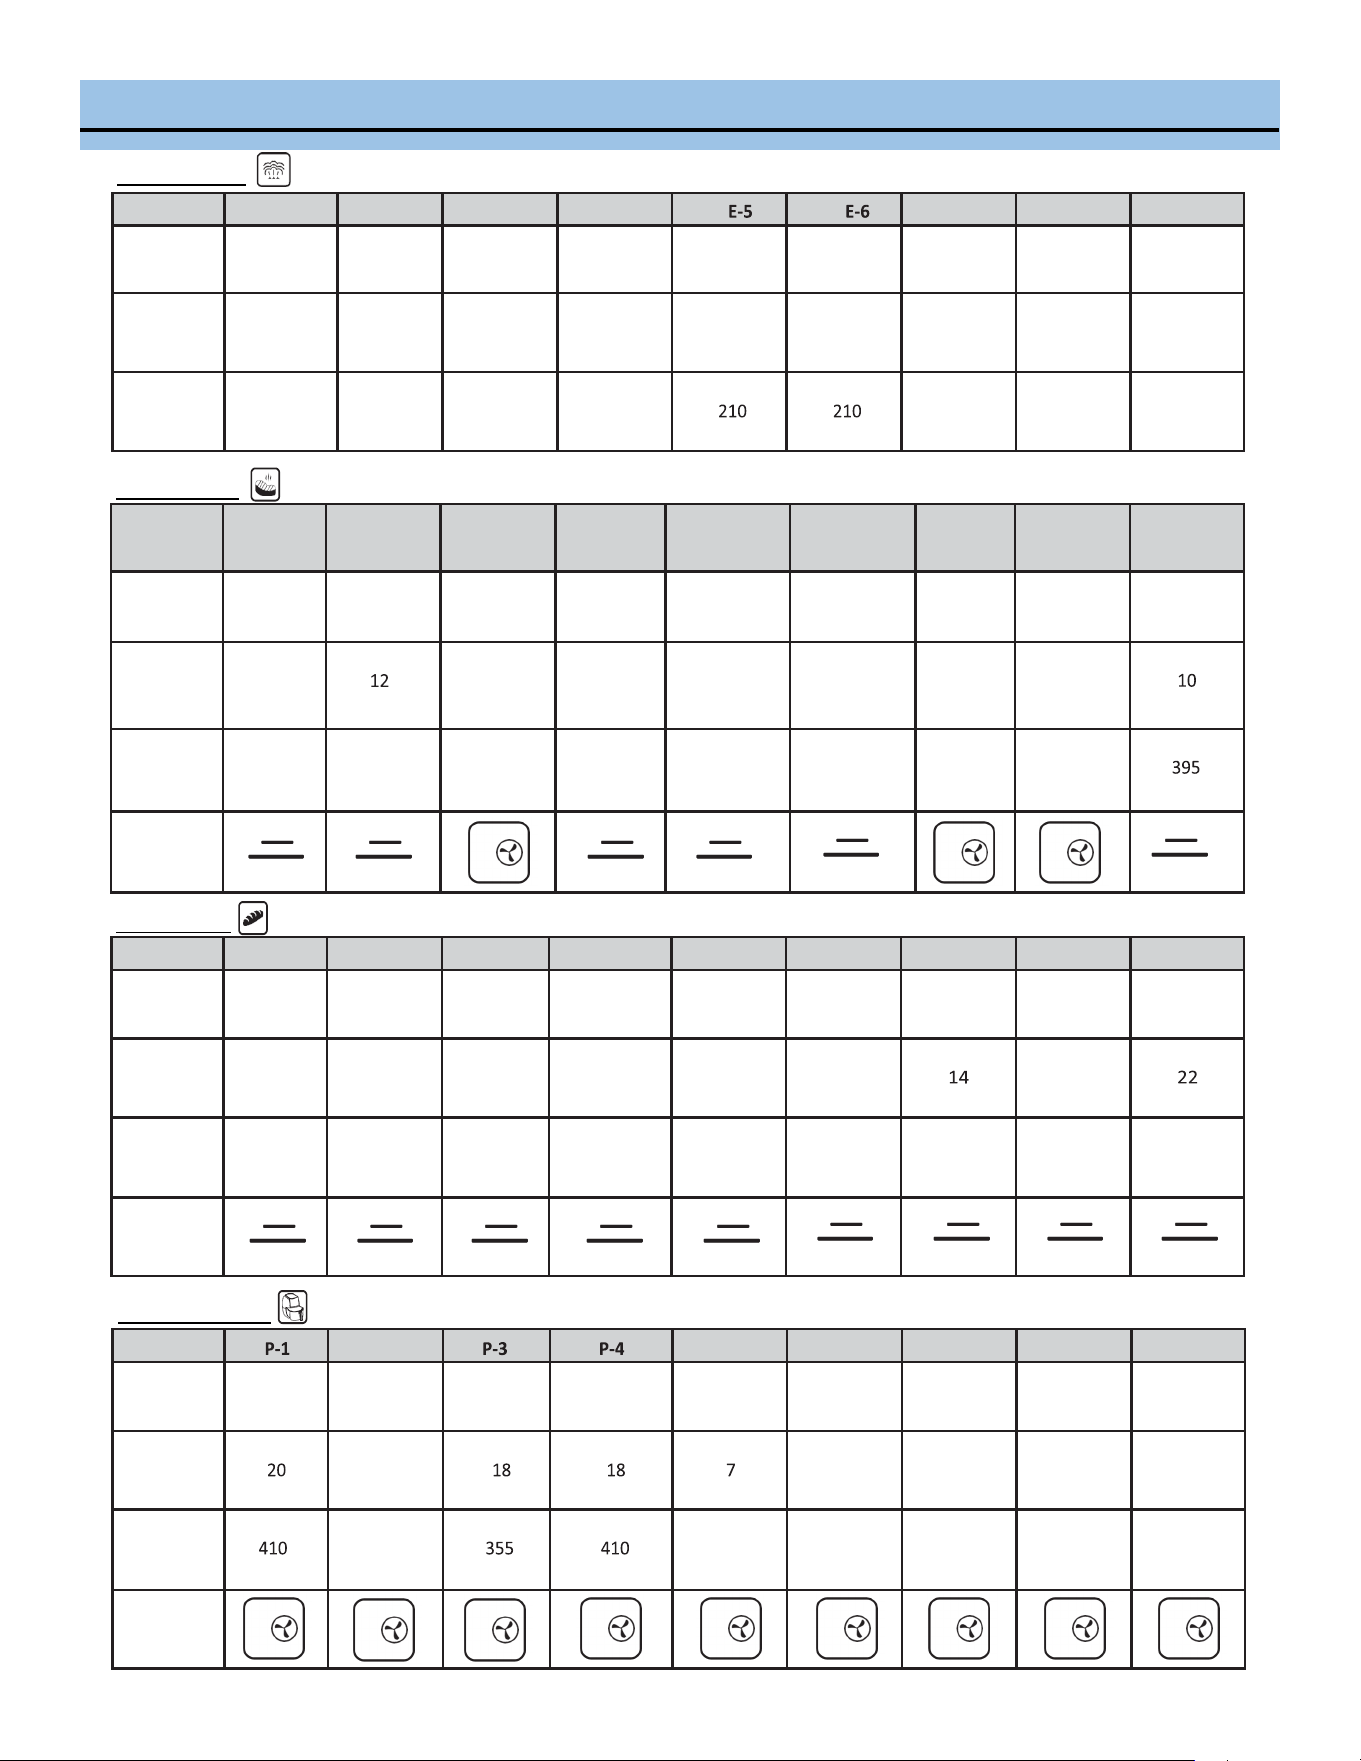
MENU SELECTIONS
Code E-1 E-2 E-3 E-4 E-7 E-8 E-9
Food
Style
Steamed
Vegetable
Steamed
Rice
Steamed
Fish
Steamed
Shrimp
Steamed
Crab
Steamed
Eggs
Steamed
Chicken
Steamed
Papaya
Steamed
Potatoes
Heang
me
(minute)
16
50
20
15
30
16
30
35
30
Heang
temp. (°F)
210
210
210
210
210
210
210
Code
F-1 F-2 F-3 F-4 F-5 F-6 F-7 F-8 F-9
Food
Style
Roast
Chicken
Roast
Steak
Roast
Muons
Roast
Salmon
Roast
Chicken Legs
Roast
Saury
Roast
Potatoes
Roast
Shrimp
Roast
Sausages
Heang
me
(minute)
35
35
20
26
20
12
15
Heang
temp. (°F)
450
450
395
430
395
430
360
360
Operang
Panel
Code
H-1 H-2 H-3 H-4 H-5 H-6 H-7 H-8 H-9
Food
Style
Baguee
bread
Wheat
bread
Pizza
Yogurt
cheese cake
Chion
cake
Chocolate
cake
Cookies
Pu
Egg tart
Heang
me
(minute )
16
20
22
60
50
50
32
Heang
temp. (°F)
360
360
360
300
300
300
360
360
360
Operang
Panel
Code
P-2 P-5 P-6 P-7 P-8 P-9
Food
Style
Pork
Chops
Chicken
Wings
Chicken
Kabobs
Onion
Meatballs
Pita Chips Chips Croutons Mini Pizza Bacon
Heang
me
(minute )
23
12
14
18
15
Heang
temp. (°F)
395
430
360
285
355
395
Operang
Panel
Steam Menu
Roast Menu
Bake Menu
Air Fryer Menu
MENU SELECTIONS
Dry Fruit and Nuts Menu
Code
L-1 L-2 L-3 L-4 L-5 L-6 L-7 L-8 L-9
Food Style
Dried
Banana
Dried
Apple
Dried
Raisins
Dried
Kiwi
Dried
Lemon
Almonds Walnut
Macadamia
Nut
Cashew
Nut
Heang
me
(minute)
360
360
420
360
10
12
Heang
temp. (°F)
150
150
195
150
285
320
Operang
Panel
Back
Heater
Back
Heater
Back
Heater
Back
Heater
Back
Heater
Top/boom
Heater Pipe
Top/boom
Heater Pipe
Top/boom
Heater Pipe
Top/boom
Heater Pipe
Other Funcons
Descaling Funcon
When the steam generator operates, there is an accumulaon of limestone inside because of calcium content in the
water. Periodic descaling of residual buildup can increase the life span of your oven and prevent any decline in perfor-
mance.
When the operaon me reaches 100 hours, the descaling icon on the screen will ash to remind you to run the de-
scaling cycle.
1. Remove all accessories from inside the oven.
2. Make approximately 180 ml descaling soluon using white vinegar with 1.2 liters dislled/ ltered water and pour
it into the water tank.
3. Press the selecon key > to select the Descaling funcon and then press the ENTER buon to start the descal-
ing operaon.
4. When 20 minutes are le in the descaling operaon, the oven will prompt you to remove the water tank and drain
the descaling soluon. Replace the water tank with clean dislled/ ltered water.
5. Aer the water tank is replaced with clean water, close the oven door and the descaling operaon will resumes.
When there are 10 minutes remaining in the descaling operaon, the oven will prompt you to remove the water
tank, drain the water and replace it with clean dislled/ ltered water.
6. Once the descaling operaon completes in 50 munies, wipe away any moisture inside of the oven with a dry
cloth. Let it dry fully with the door open.
MENU SELECTIONS
Light
Press the Light buon to turn the oven interior light on or o.
Child Lock
Press and hold the Child Lock buon for 3 seconds to acvate the child lock. To deacvate the child lock, press
and hold the Child Lock buon for 3 seconds
Water level detecon
If the water tank is not in place or runs out of water, the oven will beep and the Water level icon will ash.
Open the oven door and remove the water tank to ll it with dislled or ltered water to its maximum level then
put the water tank back in place.
Open/Close door protecon
Operaon of the oven will pause if the oven door is open; it will automacally resumes operaon once the door is
closed.
TIPS
General
Always make sure the drip tray is in place before cooking and to empty it aer each use.
Always use dislled or ltered water.
Always remember to empty drip tray aer each use. Also make sure it is in place before cooking.
Bake mode (Top & boom heater pipe)
Bake mode is best used for most baked goods like cakes, cookies and pastries.
Bake Steam (High temperature steaming (steam + back heater convecon)
The combinaon of bake and steam means crispy yet juicy results every me in less me. The Bake Steam funcon
also provides even, moist heat that is a benet for many types of foods, from perfect custards to eortless braised
dishes.
If using a recipe meant for a tradional oven, begin checking for doneness at least 10 minutes before the recom-
mended end me.
Steam
The highest temperature (230°F) on the Steam funcon should be used for all tradional steaming tasks like vege-
tables, seafood and other proteins.
The Steam funcon can also work to clean the interior of your oven. Run the Steam funcon at 230 F for 30
minutes to loosen grease or food residue. Once the cycle is complete, wipe the interior clean with a cloth.
Broil (Top heater pipe)
There are 2 dierent rack posions for Broil. The lower broil posion is best suited for thicker foods like steaks,
chops and larger sh llets as well as top browning of dishes like nachos and casseroles. The upper broil posion is
for thin foods like smaller seafood and thin llets. When posioning foods to broil make sure they are not touch-
ing the heang elements as they can burn very easily.
CLEANING AND MAINTENANCE
• Always turn the oven o and unplug the power cord from the outlet before cleaning.
• Avoid abrasive cleansers and metal pads when cleaning the oven interior and bakeware to avoid damage.
Heat the oven to 140°F / 100% Steam.
Unplug the power cord from the outlet.
Spray in your favorite oven cleaner, close the door and let the product work for the me indicated on the product
label. Oven cleaners work beer on warm surfaces.
Spray the interior walls with water using a spray bole.
Wipe clean with a cloth or sponge. DO NOT use harsh abrasives or corrosive products, which could damage the
oven wall surfaces.
Remove excess liquid from the drip tray by sliding it out and discarding the contents.
Note: Never operate the oven without the drip tray in place.
Run the oven at 300°F / 100% Steam for 10 minutes to remove any residual fumes from the cleaner.
Spray with water and wipe down the oven walls a few more mes to ensure all of the cleaning product has been
removed.
Rinse the water reservoir in hot water. Dry well.
• It is recommended to use dislled or ltered water. If tap water is used for a long period of me, there will be miner-
al scales on the inner walls of the oven.
• The residual water in the water tank should be removed aer each use.
SPECIFICATIONS
Power
120V 60Hz 1800W
Capacity 40 L
Water Tank 1.4 L
Housing Stainless Steel
Door Double-layer Glass Door
Control LED display Touch Screen LED Display | 4 Predened Programs |
Funcons
Fermentaon / Preheat / Make Yogurt / Air Fryer Menu /
Food dehydrator Menu / Steam Menu / Roast Menu / Bake Menu /
DIY mode / Descaling
Adjustable Temperature 85°F - 450°F
Heang modes Steam / Top Heater / Boom Heater / Back Heater Convecon
Preset Time up to 24 hours
Accessories Rosserie Set, Bakeware, Grill, Glove, User Manual, Recipe Guide
Specialty Steamer, Electric Oven, Air Fryer, Food Dehydrator, Yogurt Maker, 5 in 1
Product dimension
20.7" W x 19.68" D x 17.32" H
Product Weight
48 lbs
TROUBLESHOOTING
Error
Possible causes
Soluon
Er1
Open circuit for top sensor
Stop the work, open the oven door and allow
the cavity to cool down for 10 minutes, and then
restart it or contact Whynter Customer Support
Er2
Short circuit for top sensor
Stop the work, open the oven door and allow
the cavity to cool down for 10 minutes, and then
restart it or contact Whynter Customer Support
Er3
Open circuit for top sensor
Stop the work, open the oven door and allow
the cavity to cool down for 10 minutes, and then
restart it or contact Whynter Customer Support
Er4
Short circuit for top sensor
Stop the work, open the oven door and allow
the cavity to cool down for 10 minutes, and then
restart it or contact Whynter Customer Support
Er7
Open circuit for evaporang heater
sensor
Contact Whynter Customer Support
Er8
Short circuit for evaporang heater
sensor
Contact Whynter Customer Support
Display not working
Check whether the power cord is
plugged into a working outlet
Display panel has a loose connecon
Check the outlet for power. Power o and un-
plug the unit for 5 minutes. Then restart.
Contact Whynter Customer Support
Oven light does not
illuminate
Oven light is damaged
Loose Connecon
Replace or contact Whynter Customer Support
Exhaust fan does not
work
Loose Connecon
Fan is damaged
Replace or contact Whynter Customer Support
No response from
the buon
Display PCB damaged or defecve
Contact Whynter Customer Support
No steam
Water pipe is blocked
Evaporator heater is damaged
Water intake system is damaged
Contact Whynter Customer Support
Steam oven does not
work
Door is not closed completely
Poor contact of door control switch
Contact Whynter Customer Support
Steam leakage from
oven door
Door is not closed completely
Door gasket is not in place or damaged
Door structure is damaged or not
assembled in place
Re-close the oven door
Inspect door gasket and reposion if needed
Contact Whynter Customer Support
Stains on internal ov-
en walls
It is normal for the oven to develop
stains on the internal walls with use.
Please refer to the cleaning and maintenance
instrucons.

ONE YEAR LIMITED WARRANTY
This WHYNTER product is warranted to the original owner, purchased from an authorized Whynter dealer with-
in the 48 U.S. connental states, for one year from the original purchase date against defects in material and
workmanship under normal residenal usage. Should your WHYNTER product prove defecve within one year
from the date of purchase, contact Whynter’s Customer Support team with the serial number and proof of pur-
chase to make a warranty claim. A Return Authorizaon number must be issued before returning any parts or
products. Parts or products received without a Whynter issued Return Authorizaon number will be refused.
Under this warranty, Whynter will repair or replace any parts found defecve with new or remanufactured
parts or exchange the defecve product with a new, refurbished, or remanufactured product at our discreon.
All defecve products and parts covered by this warranty will be repaired or replaced on a mail-in basis to
Whynter’s Service Center. This warranty is not transferable. Aer the expiraon of the warranty, the cost of
labor and parts will be the responsibility of the original owner.
Aer two months to one year, the customer will be responsible for the return freight cost to Whynter’s Service
Center. Please package the product carefully in its original packaging to avoid damage in transit. Whynter is not
responsible for damage resulng from shipper mishandling or improper packaging. Please retain the original
box and packaging materials.
THIS WARRANTY DOES NOT COVER:
• Acts of God, such as re, ood, hurricanes, earthquakes and tornadoes.
• Improper power supply such as power surge, low voltage, defecve household wiring or inadequate fuses.
• Use in commercial or industrial applicaons.
• Damage, accidental or otherwise, to the product while in the possession of a consumer not caused by a de-
fect in material or workmanship.
• Damage caused by consumer misuse, tampering, lack of maintenance or failure to follow the care and spe-
cial handling provisions in the instrucons.
• Damage to the nish of the case, or other appearance parts caused by wear.
• Damage caused by repairs or alteraons to the product by anyone other than authorized by the manufactur-
er.
• Removal, Replacement Packaging, Freight and Insurance cost for the warranty service.
• Products sold AS IS or from an unauthorized reseller.
• Products that have had their serial numbers removed or defaced.
DISCLAIMER OF IMPLIED WARRANTIES; LIMITATION OF REMEDIES
CUSTOMER'S SOLE AND EXCLUSIVE REMEDY UNDER THIS LIMITED WARRANTY SHALL BE PRODUCT REPAIR OR REPLACEMENT AS PROVIDED
HEREIN. CLAIMS BASED ON IMPLIED WARRANTIES, INCLUDING WARRANTIES OF MERCHANTABILITY OR FITNESS FOR A PARTICULAR PUR-
POSE, ARE LIMITED TO ONE YEAR OR THE SHORTEST PERIOD ALLOWED BY LAW, BUT NOT LESS THAN ONE YEAR. WHYNTER SHALL NOT BE
LIABLE FOR CONSEQUENTIAL OR INCIDENTAL DAMAGES SUCH AS PROPERTY DAMAGE AND INCIDENTAL EXPENSES RESULTING FROM ANY
BREACH OF THIS WRITTEN LIMITED WARRANTY OR ANY IMPLIED WARRANTY. SOME STATES AND PROVINCES DO NOT ALLOW THE EXCLU-
SION OR LIMITATION OF INCIDENTAL OR CONSE- QUENTIAL DAMAGES, OR LIMITATIONS ON THE DURATION OF IMPLIED WARRANTIES, SO
THESE LIMITATIONS OR EXCLUSIONS MAY NOT APPLY TO YOU. THIS WRITTEN WARRANTY GIVES YOU SPECIFIC LEGAL RIGHTS. YOU MAY
ALSO HAVE OTHER RIGHTS THAT VARY FROM STATE TO STATE.
To obtain service or informaon, contact
Whynter LLC via email at [email protected]om or call
866-WHYNTER.
Product contents and specicaons may change without noce.
Copyright © 2020
WWW.WHYNTER.COM