Loading ...
Loading ...
Loading ...
Version10/12-Page7
PLAN YOUR DUCTWORK
Toensurethattheblowerperformstoitshighest
possiblecapacity,ductworkshouldbeasshort
and straight as possilbe.
For satisfactory performance the duct run
shouldnotexceed50 equivalent feet if ducted
usingtherequiredminimum6"roundduct.For
10"roundducting with the 1200 cfminternal
motoror 900/1200 remoteblower,theduct
runshouldnotexceed75 equivalent feet.
Calculatethelengthoftheductworkbyadding
theequivalentfeetinFIGURE 5 for each piece
ofductinthesystemAnexampleisgivenin
FIGURE 6.
For best results, use no more than three 90°
elbows. Make sure that there is a minimum of
24" of straight duct between elbows if more
than one is used. Do not install two elbows
together. If you must elbow right away, do it
as far away from the hood's exhaust opening
as possible.
9FeetStraightDuct
2-90˚Elbows
WallCap
TotalSystem
9.0feet
10.0 feet
0.0 feet
19.0feet
FIGURE 6
3.0 feet
5.0 feet
12.0 feet
0.0 feet
45˚Elbow
90˚Elbow
90˚FlatElbow
WallCap
FIGURE 5
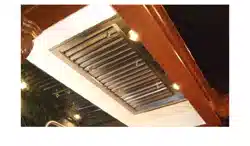
FIGURE 4
RECIRCULATING INSTALLATIONS
ITISHIGHLYRECOMMENDEDTHATPROFESSIONALSTYLECOOKINGALWAYSBEVENTEDTOTHEOUTSIDE.Forrecirculating
installations (FIGURE 4),Charcoal Filtersarenecessary.Removeallgreaseltersandsetaside.Attachonecharcoalltertoeachend
oftheblower.Eachcharcoallterattachestothegridonthesideoftheblower.Rotatethelterclockwisetoinstallandcounterclockwise
to remove (FIGURE 4A).Replaceallgreaselters.Recirculatinginstallationsalsorequiresomeductworktodiverttheairoutofthetopor
faceorsideofthecabinetorcustomhoodoroutoftheside/faceofthesoftandbackintothekitchen.Installatleast15"ofverticalrunof
metal duct (FIGURE 4) attheairoutlet.Runtheductverticallyandsecureitattherelevantopeningpreviouslycutoutatthetoporsideof
thecabinetorsoft.Ametalductcovergrilleisalsorecommended.Theductworkmustnotterminateinsidethecabinetorcustomhood.
cabinet
or
custom
hood
ceiling
duct
work
duct
work
ceiling
inca pro plus
cabinet
or
custom
hood
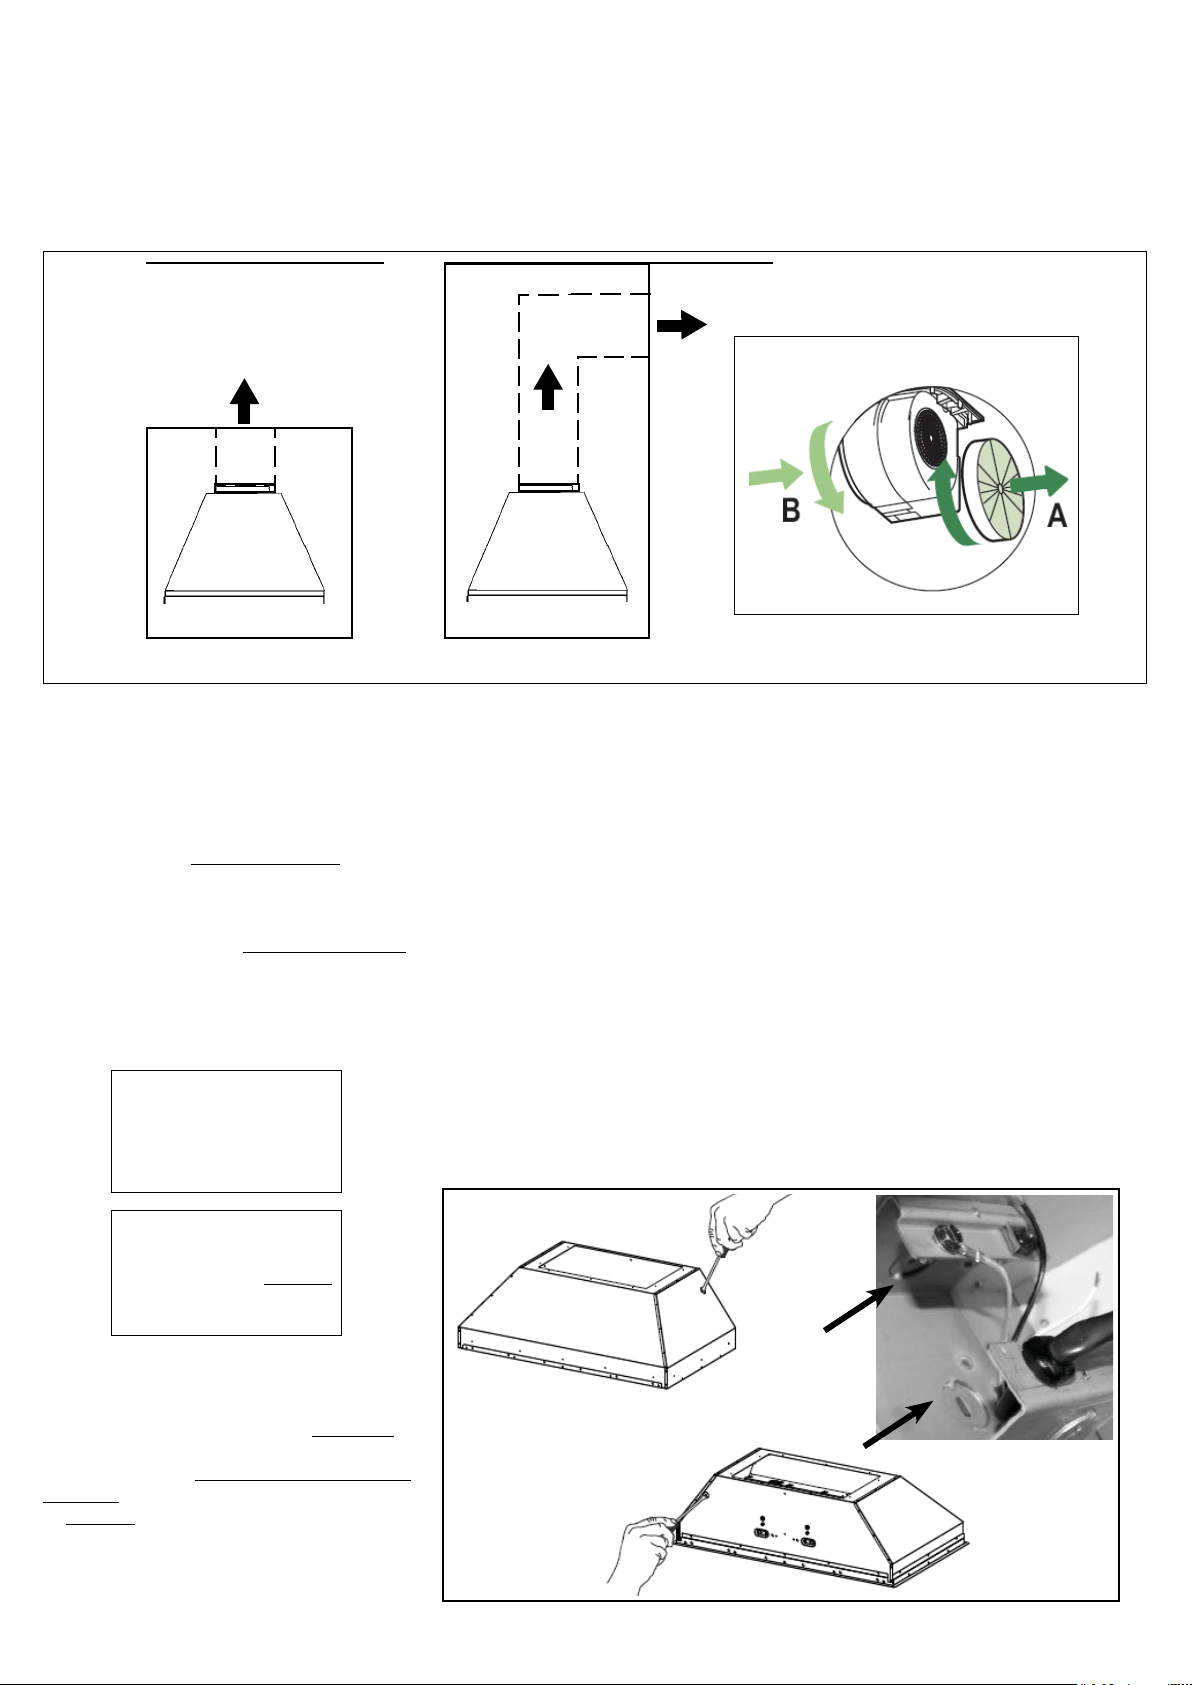
MAKE YOUR CUT-OUTS
1. Disconnectandmovefreestandingrangefromcabinetopeningtoprovideeasieraccess
touppercabinetorcustomhood.Putathick,protectivecoveringovercooktop,set-inrange
or countertop to protect from damage or dirt.
2. Determineandmakeallnecessarycutsinthewalland/orceilingfortheductwork.Install
the ductwork before the rangehood.
3. DeterminetheproperlocationforthePowerSupplyCable.Usea11/4"DrillBittomake
thishole.Installthecable.Usecaulkingtosealaroundthehole.DONOTturnonthe
power until installation is complete.
4.Choosetheknockoutholetoremoveforinstallingthepowercable.Useascrewdriver
tosnapofftheknockoutcovering.(FIGURE7showsinsidethewiringboxandoutside)
FIGURE 4A
inca pro plus
FIGURE 7
FOR ALL INSTALLATIONS
REMOVE ALL WHITE PLASTIC PROTECTIVE COVERING FROM HOOD, SIDE RAILS,
TRIM, GREASE RAILS AND GREASE FILTERS
Loading ...
Loading ...
Loading ...