The battery pack is not fully charged out of the carton.
Before using the battery pack and charger, read the safety instructions below and then follow charging procedures outlined. When ordering replacement battery packs, be sure to include the catalog number and voltage
Storage Recommendations
The best storage place is one that is cool and dry, away from direct sunlight and excess heat or cold.
For long storage, it is recommended to store a fully charged battery pack in a cool dry place out of the charger for optimal results.
NOTE: Battery packs should not be stored completely depleted of charge. The battery pack will need to be recharged before use.
Battery Pack Cleaning Instructions
Dirt and grease may be removed from the exterior of the battery using a cloth or soft non-metallic brush. Do not use water or any cleaning solutions.
Fuel Gauge Battery Packs
CRAFTSMAN battery packs include a fuel gauge which consists of three LED lights that indicate the level of charge remaining in the battery pack.
The fuel gauge is an indication of approximate levels of charge remaining in the battery pack according to the following indicators:
75–100% charged
51–74% charged
< 50% charged
Pack needs to be charged
To actuate the fuel gauge, press and hold the fuel gauge button. A combination of the three LED lights will illuminate designating the level of charge left. When the level of charge in the battery is below the usable limit, the fuel gauge will not illuminate and the battery will need to be recharged.
NOTE: The fuel gauge is only an indication of the charge left on the battery pack. It does not indicate tool functionality and is subject to variation based on product components, temperature and end-user application.
Transportation
The RBRC® Seal
The RBRC® (Rechargeable Battery Recycling Corporation) Seal on the nickel cadmium, nickel metal hydride or lithiumion batteries (or battery packs) indicates that the costs to recycle these batteries (or battery packs) at the end of their useful life have already been paid by CRAFTSMAN. In some areas, it is illegal to place spent nickel cadmium, nickel metal hydride or lithium-ion batteries in the trash or municipal solid waste stream and the Call 2 Recycle® program provides an environmentally conscious alternative. Call 2 Recycle, Inc., in cooperation with CRAFTSMAN and other battery users, has established the program in the United States and Canada to facilitate the collection of spent nickel cadmium, nickel metal hydride or lithium-ion batteries. Help protect our environment and conserve natural resources by returning the spent nickel cadmium, nickel metal hydride or lithium-ion batteries to an authorized CRAFTSMAN service center or to your local retailer for recycling. You may also contact your local recycling center for information on where to drop off the spent battery. RBRC® is a registered trademark of Call 2 Recycle, Inc
Important Safety Instructions for All Battery Chargers
WARNING: Read all safety warnings, instructions, and cautionary markings for the battery pack, charger and product. Failure to follow the warnings and instructions may result in electric shock, fire and/or serious injury.
DO NOT attempt to charge the battery pack with any chargers other than a CRAFTSMAN charger. CRAFTSMAN chargers and battery packs are specifically designed to work together.
These chargers are not intended for any uses other than charging CRAFTSMAN rechargeable batteries.
Any other uses may result in risk of fire, electric shock or electrocution.
Do not expose the charger to rain or snow.
Pull by the plug rather than the cord when disconnecting the charger. This will reduce the risk of damage to the electric plug and cord.
Make sure that the cord is located so that it will not be stepped on, tripped over or otherwise subjected to damage or stress.
Do not use an extension cord unless it is absolutely necessary. Use of improper extension cord could result in risk of fire, electric shock or electrocution.
When operating a charger outdoors, always provide a dry location and use an extension cord suitable for outdoor use. Use of a cord suitable for outdoor use reduces the risk of electric shock.
An extension cord must have adequate wire size (AWG or American Wire Gauge) for safety. The smaller the gauge number of the wire, the greater the capacity of the cable, that is, 16 gauge has more capacity than 18 gauge. An undersized cord will cause a drop in line voltage resulting in loss of power and overheating.
When using more than one extension to make up the total length, be sure each individual extension contains at least the minimum wire size. The following table shows the correct size to use depending on cord length and nameplate ampere rating. If in doubt, use the next heavier gauge. The lower the gauge number, the heavier the cord.
Minimum Gauge for Cord Sets
WARNING: If the plug or power cord is damaged, it must be replaced by the manufacturer or its representative or by an equally qualified person to avoid danger.
Do not place any object on top of the charger or place the charger on a soft surface that might block the ventilation slots and result in excessive internal heat. Place the charger in a position away from any heat source. The charger is ventilated through slots in the top and the bottom of the housing.
Do not operate the charger with a damaged cord or plug–have them replaced immediately.
Do not operate the charger if it has received a sharp blow, been dropped or otherwise damaged in any way. Take it to an authorized service center.
Do not disassemble the charger; take it to an authorized service center when service or repair is required. Incorrect reassembly may result in a risk of electric shock, electrocution or fire.
Disconnect the charger from the outlet before attempting any cleaning. This will reduce the risk of electric shock. Removing the battery pack will not reduce this risk.
NEVER attempt to connect 2 chargers together.
The charger is designed to operate on standard 120V household electrical power. Do not attempt to use it on any other voltage. This does not apply to the vehicular charger.
WARNING: Shock hazard. Do not allow any liquid to get inside the charger. Electric shock may result.
WARNING: Burn hazard. Do not submerge the battery pack in any liquid or allow any liquid to enter the battery pack. Never attempt to open the battery pack for any reason. If the plastic housing of the battery pack breaks or cracks, return to a service center for recycling.
CAUTION: Burn hazard. To reduce the risk of injury, charge only CRAFTSMAN rechargeable battery packs. Other types of batteries may overheat and burst resulting in personal injury and property damage.
CAUTION: Under certain conditions, with the charger plugged into the power supply, the charger can be shorted by foreign material. Foreign materials of a conductive nature, such as, but not limited to, grinding dust, metal chips, steel wool, aluminum foil or any buildup of metallic particles should be kept away from the charger cavities. Always unplug the charger from the power supply when there is no battery pack in the cavity. Unplug the charger before attempting to clean.
Charging a Battery
NOTE: To ensure maximum performance and life of lithiumion battery packs, charge the battery pack fully before first use.
Plug the charger into an appropriate outlet before inserting battery pack
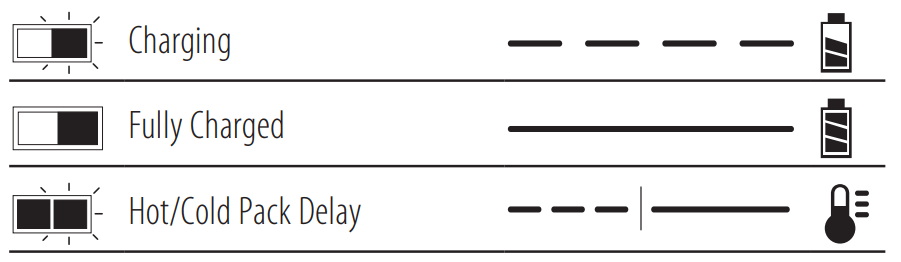
Connect the charger and battery pack, making sure the battery is fully seated. The (charging) light will blink continuously indicating that the charging process has started.
The completion of charge will be indicated by the light remaining ON continuously. The battery pack is fully charged and may be removed and used at this time or left in the charger.
NOTE: To remove the battery pack, some chargers require the battery pack release button to be pressed.
Indicators
A charger will not charge a faulty battery pack. The charger refusing to light could indicate a problem with the charger.
NOTE: If the charger refuses to light, take the charger and battery pack to be tested at an authorized service center.
Leaving the Battery Pack In the Charger
The charger and battery pack can be left connected with the charge indicator showing pack charged.
Hot/Cold Pack Delay
When the charger detects a battery pack that is too hot or too cold, it automatically starts a Hot/Cold Pack Delay, suspending charging until the battery pack has reached an appropriate temperature. The charger then automatically switches to the pack charging mode. This feature ensures maximum battery pack life.
A cold battery pack may charge at a slower rate than a warm battery pack.
Important Charging Notes
Longest life and best performance can be obtained if the battery pack is charged when the air temperature is between 65 °F – 75 °F (18 °C–24 °C). DO NOT charge when the battery pack is below +40 °F (+4.5 °C), or above +104 °F (+40 °C). This is important and will prevent serious damage to the battery pack.
The charger and battery pack may become warm to the touch while charging. This is a normal condition, and does not indicate a problem. To facilitate the cooling of the battery pack after use, avoid placing the charger or battery pack in a warm environment such as in a metal shed or an uninsulated trailer.
If the battery pack does not charge properly:
Check operation of receptacle by plugging in a lamp or other appliance;
Check to see if receptacle is connected to a light switch which turns power off when you turn out the lights;
Move the charger and battery pack to a location where the surrounding air temperature is approximately 65 °F–75 °F (18 °C–24 °C);
If charging problems persist, take the tool, battery pack and charger to your local service center.
The battery pack should be recharged when it fails to produce sufficient power on jobs which were easily done previously. DO NOT CONTINUE to use under these conditions. Follow the charging procedure. You may also charge a partially used pack whenever you desire with no adverse effect on the battery pack.
Foreign materials of a conductive nature such as, but not limited to, grinding dust, metal chips, steel wool, aluminum foil, or any buildup of metallic particles should be kept away from charger cavities. Always unplug the charger from the power supply when there is no battery pack in the cavity. Unplug the charger before attempting to clean.
Do not freeze or immerse the charger in water or any other liquid.
Charger Cleaning Instructions
WARNING: Shock hazard. Disconnect the charger from the AC outlet before cleaning. Dirt and grease may be removed from the exterior of the charger using a cloth or soft non-metallic brush. Do not use water or any cleaning solutions.
Wall Mounting
These chargers are designed to be wall mountable or to sit upright on a table or work surface. If wall mounting, locate the charger within reach of an electrical outlet, and away from a corner or other obstructions which may impede air flow. Use the back of the charger as a template for the location of the mounting screws on the wall. Mount the charger securely using drywall screws (purchased separately) at least 1” (25.4 mm) long, with a screw head diameter of 0.28–0.35” (7–9 mm), screwed into wood to an optimal depth leaving approximately 7/32” (5.5 mm) of the screw exposed. Align the slots on the back of the charger with the exposed screws and fully engage them in the slots
Versatrack™
CRAFTSMAN chargers can be mounted to the wall using CRAFTSMAN Versatrack™ Trackwall. Hooks and accessories are sold separately. Please refer to the Versatrack™ Trackwall accessory sheet for further information.
Intended Use
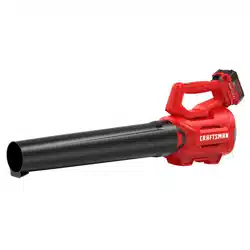
This cordless handheld blower is designed for household blowing applications.
DO NOT use under wet conditions or in presence of flammable liquids or gases.
DO NOT let children come into contact with the tool.
Supervision is required when inexperienced operators use this tool.
ASSEMBLY AND ADJUSTMENTS
WARNING: To reduce the risk of erious personal injury, turn unit off and remove the battery pack before making any adjustments or removing/installing attachments or accessories. An accidental start-up can cause injury.
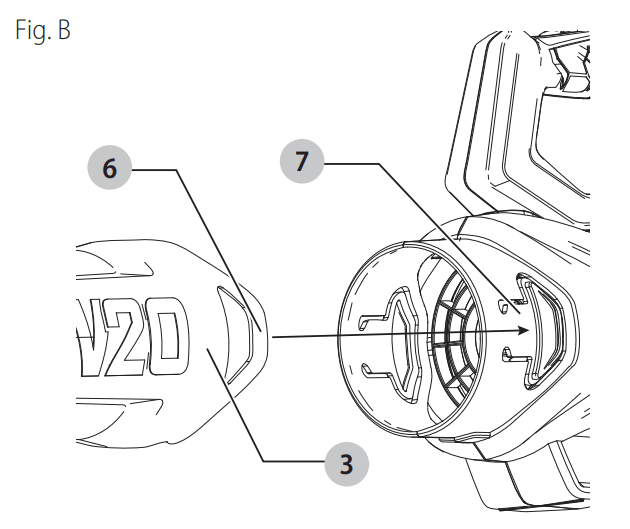
Blow Tube Assembly (Fig. B)
WARNING: Do not operate blower without tube securely in place. Never reach down into housing through tube hole.
WARNING: Always remove the battery when you leave blower unattended or when storing, checking, adjusting, cleaning, or working on blower.
To attach the blower tube 3 to the power head, line up the peg 6 of the power head with the notch 7 of the blower tube opening as shown in Fig. B.
Push the blower tube onto the power head until the tube locks engage the blower tube and an audible click is heard.
Pull on the tube to ensure it is securely in place.
To remove the tube, press in and the two tube locks and pull tube off.
OPERATION
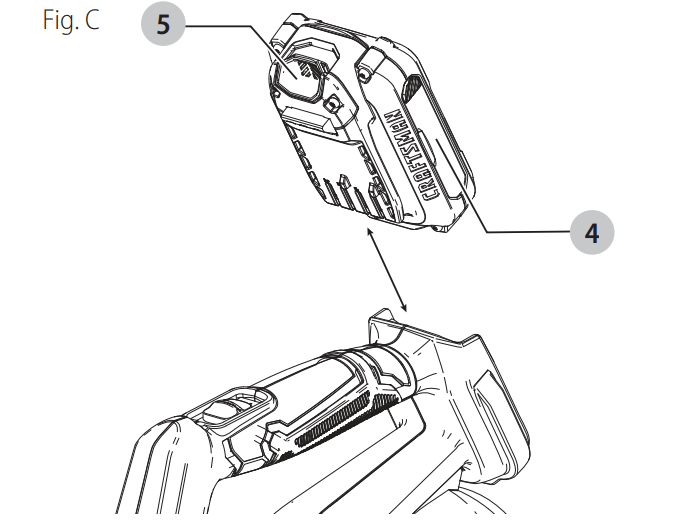
Installing and Removing the Battery Pack (Fig. C)
NOTE: For best results, make sure your battery pack is fully charged.
To install the battery pack 4 into the tool handle, align the battery pack with the rails inside the tool’s handle and slide it into the handle until the battery pack is firmly seated in the tool and ensure that it does not disengage.
To remove the battery pack from the tool, press the release button 5 and firmly pull the battery pack out of the tool handle. Insert it into the charger as described in the charger section of this manual
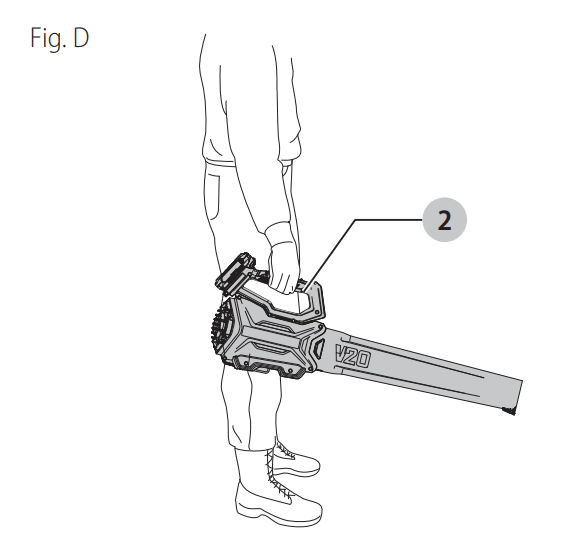
Proper Hand Position (Fig. D)
WARNING: To reduce the risk of serious personal injury, ALWAYS use proper hand position as shown.
WARNING: To reduce the risk of serious personal injury, ALWAYS hold securely in anticipation of a sudden reaction.
Proper hand position requires one hand on the main handle 2 .
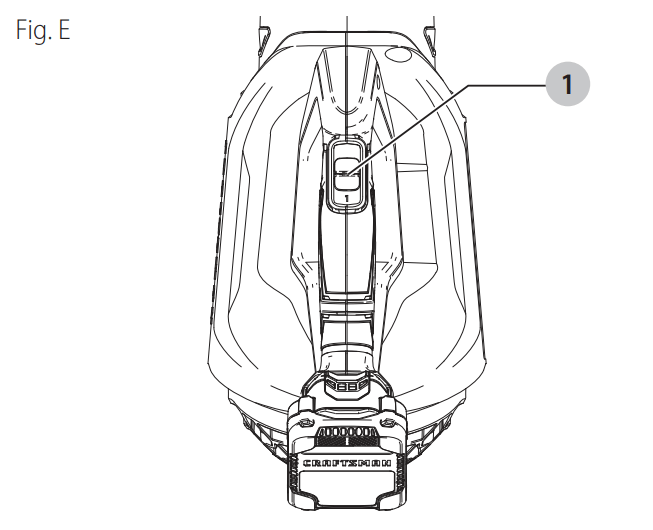
Switching ON/OFF (Fig. A, E)
WARNING: Use both hands to grip the product firmly when switching on.
CAUTION: Do not point unit discharge at self or bystanders.
Your blower is fitted with a 2 speed ON/OFF switch located on the top of the main handle 2 .
To switch the blower ON, slide the ON/OFF 1 switch forward to position 1.
To operate blower in high speed, slide the ON/OFF 1 switch forward to position 2.
To switch the blower off, slide the ON/OFF 1 switch back..
MAINTENANCE
WARNING: To reduce the risk of serious personal injury, turn unit off and remove the battery pack before making any adjustments or removing/installing attachments or accessories. An accidental start-up can cause injury.
Cleaning
WARNING: Blow dirt and dust out of all air vents with clean, dry air at least once a week. To minimize the risk of eye injury, always wear ANSI Z87.1 approved eye protection when performing this procedure.
WARNING: Never use solvents or other harsh chemicals for cleaning the non-metallic parts of the tool. These chemicals may weaken the plastic materials used in these parts. Use a cloth dampened only with water and mild soap. Never let any liquid get inside the tool; never immerse any part of the tool into a liquid.
Accessories
WARNING: Since accessories, other than those offered by CRAFTSMAN, have not been tested with this product, use of such accessories with this tool could be hazardous. To reduce the risk of injury, only CRAFTSMAN recommended accessories should be used with this product.
Recommended accessories for use with your tool are available at extra cost from your local dealer or authorized service center. If you need assistance in locating any accessory, please contact CRAFTSMAN call 1-888-331-4569
Repairs
The charger and battery pack are not serviceable. There are no serviceable parts inside the charger or battery pack.
WARNING: To assure product SAFETY and RELIABILITY, repairs, maintenance and adjustment (including brush inspection and replacement, when applicable) should be performed by a CRAFTSMAN factory service center or a CRAFTSMAN authorized service center. Always use identical replacement parts
Register Online
Thank you for your purchase. Register your product now for:
WARRANTY SERVICE: Registering your product will help you obtain more efficient warranty service in case there is a problem with your product.
CONFIRMATION OF OWNERSHIP: In case of an insurance loss, such as fire, flood or theft, your registration of ownership will serve as your proof of purchase.
FOR YOUR SAFETY: Registering your product will allow us to contact you in the unlikely event a safety notification is required under the Federal Consumer Safety Act
F&A
Question:Can you purchase extra battery?
Answer:We have a blower and weed eater that both use the same battery. We keep both batteries charged up and can get enough power to last almost 15 minutes using both batteries.
Question:Bought that craftsman can I get a tapered tube for that
Answer:Yep
Question:Has anyone had an issue with the high and low speed?
Answer:I have not had any issues with the speeds, bu these battery operated blowers go through batteries fast, either speed drains them fast. On a drill they might last for hours, on a blower its minutes. They are also underpowered as compaired to a cord type blower, however if you do not want to drag a cord around behind you they are worth the effort, just get several large extra batteries.
Question:Can i use the standard craftsman lithium 1.5 ah 20v batttery on this blower
Answer:You can use a v20 1.5AH Lithium Ion Battery branded by CRAFTSMAN with this leaf blower.
Question:I will buy one this evening if I know for sure it includes both a battery and a charger. Please advise. Cheers.
Answer:Yes it comes with both
Question:I bought this blower a year ago. When I put it in the high speed position it won’t increase the speed. Any idea as to why?
Answer:Sounds like it has a defect or broken. I suggest contacting the manufacture.
Question:I need a extra battery which one i can buy
Answer:Hello, the battery for the CMCBL700D1 is CMCB202.
Question:Does this one have the turbo selection on it
Answer:It has low and high speeds. Nothing labeled turbo.
Question:Is there an attachment that will let me blow diamataceous earth ?
Answer:There is no attachment to this blower. It should be able to blow diatomaceous earth if it is fine enough.
Question:Is there a gutter cleaning attachment that will fit this blower?
Answer:We do not offer a gutter cleaning attachment for this unit.
Question:Can this work with the Craftsman 19.2v Li-Ion batteries and chargers?
Answer:No, the CMCBL710D1 is only compatible with the V20 Max batteries/ chargers.
Question:Would it hurt the leaf blower if I use a 4 amp / 20 volt battery that I already have?
Answer:If it’s a craftsman 20v 4ah battery its ok.
Question:Does this have a vacuum or mulch function?
Answer:Hello, No, the CMCBL700D1 is a blower and is not designed to vacuum or mulch.
Question:Can you use a black and decker 20v max battery with this blower?
Answer:I have both craftsman and black and decker 20v max batteries. They are identical and interchangeable. The dewalt version is different.
Question:Does it come with a charger?
Answer:Yes the CMCBL700D1 includes the charger: (1) CMCBL700 Axial Blower ,(1) CMCB202 V20* 2.0Ah Lithium Ion Battery (1) V20* Lithium Ion Charger
Question:Can you use a v60 craftsman battery on this ?


 75–100% charged
 51–74% charged
 < 50% charged
 Pack needs to be charged