Loading ...
Loading ...
Loading ...
8
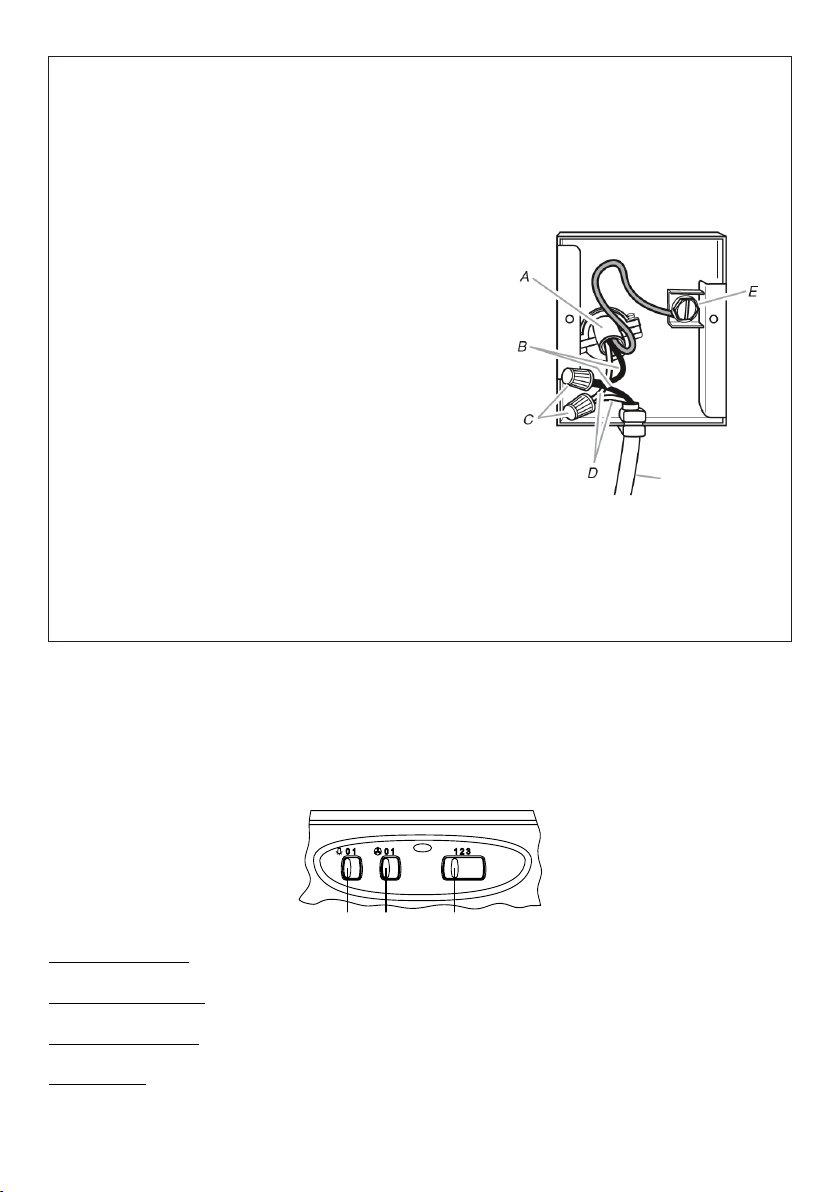
Installation of wiring connection
Remove the wiring electrical knockout using a at-blade
screwdriver. Feed the Power Supply Cable through the
electrical knockout.
Connect the Power Supply Cable to the rangehood. Attach
the White lead of the power supply (A) to the White lead of
the rangehood (D) with a twist-on type wire connector. At-
tach the Black lead of the power supply to the Black lead of
the rangehood (B) with a twist-on type wire connector (C).
Connect the Green (E) (Green and Yellow) ground wire under
the Green grounding screw.
Replace the eld wiring compartment cover and the grease
lters.
Connect the ductwork to the damper and seal all connections
with duct tape.
Turn the power supply on. Turn on the blower and light. If the
rangehood does not operate, check that the circuit breaker
is not tripped or the house fuse blown. If the unit still does
not operate, disconnect the power supply and check that the
wiring connections have been made properly.
Secure the juction box to the wall using 2 screws into the two
diagonal holes in the junction box. Reattach the eld wiring
compartment cover
Hood wiring
USE AND CARE INFORMATION
For Best Results
Start the rangehood several minutes before cooking to develop proper airow. Allow the rangehood to oper-
ate for several minutes after cooking is complete to clear all smoke and odors from the kitchen.
Version 09/14 - Page 7
Light On/Off Button ( L )
On/Off switch for the incandescent light. Move the switch to "1" to turn the light ON and to "0" to turn it OFF.
Blower On/Off Button ( B )
On/Off switch for the blower. Move the switch to "1" to turn the blower ON and to "0" to turn it OFF.
Blower Speed Button ( S )
Set the blower speed control to "1" for LOW speed, "2" for MEDIUM speed and "3" for HIGH speed.
For Best Results
Start the rangehood several minutes before cooking to develop proper airow. Allow the unit to operate for several minutes after cooking
is complete to clear all smoke and odors from the kitchen.
Cleaning
The metal grease lters should be cleaned frequently in hot detergent solution or washed in the dishwasher. The grease lters are re-
moved by pressing the handle of the lter as indicated in FIGURE 6. When replacing, make sure that the lters are properly positioned
with the handles in front and visible. Clean exterior surfaces with hot soapy water. Abrasives and scouring agents can scratch rangehood
nishes and should not be used to clean nished surfaces.
Replacing the Incandescent Lights
To replace the incandescent lights, rst remove the entire bottom frame by pulling out the handles (A in FIGURE 7). Unscrew the two
bulbs and replace.
USE AND CARE INFORMATION
This rangehood system is designed to remove smoke, cooking
vapors and odors from the cooktop area.
Rangehood Control Panel
The control panel is located under the canopy. The position and
function of each control button is indicated in FIGURE 5.
FIGURE 5
281_06
FIGURE 6
FIGURE 7
WIRING DIAGRAM
• This rangehood uses two 40W incandescent bulbs.
FIGURE 7
L B S
Schema Elettrico Schema Electrisch
Electric Diagram Esquema Eléctrico
Schéma Electrique Esquema Eléctrico
Schema Elektrisch
Schema Elettrico Schema Electrisch
Electric Diagram Esquema Eléctrico
Schéma Electrique Esquema Eléctrico
Schema Elektrisch
991.0319.110 H90_237 r1 991.0319.110 H90_237 r1
Loading ...
Loading ...
Loading ...