User manual Freezer
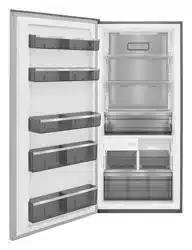
FEATURES
*Features may vary according to model
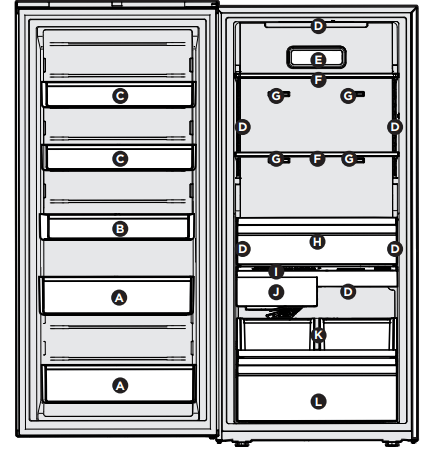
A- Adjustable Tall Item Door Bins with Dividers
B- Adjustable Gallon Door Bin with Divider
C- Adjustable Half-Gallon Door Bins with Dividers
D- LED Lighting
E- Air Filter
F- Adjustable Full Width Metal Shelves
G- *Multi-Port Air Exhaust Ducts
H- Soft Freeze Zone Drawer
I -Appliance Control Display
J- Ice Maker
K- Slide-Out Shelf with Removable Ice Storage Bins
L- Lower Storage Drawer with Dividers
INSTALLATION
This Use & Care Guide provides general operating instructions for your model. Use the appliance only as instructed in this Use & Care Guide. Before starting the appliance, follow these important first steps.
Location
- Choose a place that is near a grounded electrical outlet. Do Not use an extension cord or an adapter plug.
- If possible, place the appliance out of direct sunlight and away from the range, dishwasher or other heat sources.
- Install the appliance on a floor that is level and strong enough to support a fully loaded appliance.
WARNING
DO NOT install the appliance where the temperature will drop below 0°F (-18°C) or rise above 110°F (43°C). The compressor will not be able to maintain proper temperatures inside the unit.
CAUTION
Do not block the lower front of your appliance. Sufficient air circulation is essential to operate your appliance properly
Installation
Installation clearances
Allow the following clearances for ease of installation, proper air circulation, and plumbing and electrical connections:
-208532.png)
Leveling
Rest all bottom corners firmly on a solid floor.
The floor must be strong enough to support a fully loaded appliance.
It is VERY IMPORTANT for your unit to be level in order to function properly. If the appliance is not leveled during installation, the door may be misaligned and not close or seal properly, causing cooling, frost or moisture problems.
To Level the Appliance:
CAUTION
The cabinet is heavy. Two people are recommended to level the cabinet.
Level the unit using a carpenter’s level. Adjust the leveling feet at the front making minor adjustments to the rear leveling feet as needed. Level the unit front to back and side to side. Make sure all 4 feet fully touch the floor.
-115254.png)
Setting the anti-tip bracket:
Units are equipped with an anti-tip bracket. The anti-tip bracket is located on the lower front corner of the cabinet, on the lower hinge bracket. After fully leveling the unit, lower the anti-tip foot by turning it clockwise until is securely contacts the floor. Do not raise the cabinet
-651097.png)
Lower Hinge Adjustment for Leveling the Doors of the Matching Refrigerator / Freezer Pair
To level the doors using the adjustable lower hinge (some models):
If the refrigerator door is lower than the freezer door, raise the refrigerator door by turning the adjustment screw counterclockwise using a 19mm socket wrench. (See illustration below.)
If the freezer door is lower than the refrigerator door, raise the freezer door by turning the adjustment screw counterclockwise using a 19mm socket wrench. (See illustration below.)
-654424.png)
Guidelines for final positioning of your appliance:
- Rest all bottom leveling feet firmly on a solid floor.
- The cabinet should be level on all sides.
- The door should be level.
DOOR REMOVAL
-613170.png)
Door removal:
IMPORTANT
Before you begin, remove the electrical power cord from the wall outlet. Remove any food from door shelves.
CAUTION
Doors are heavy. Two people are recommended to remove or replace the door assembly from the cabinet.
CAUTION
The door should be closed prior to removing or installing
- Unplug the unit or switch the breaker that supplies power to the unit to the off position.
- Remove the plastic top hinge cover.
- Hold the door in place while removing the top hinge from the cabinet.
- Remove the M5x16 mm hex head screws from the top hinge with a wrench or socket.
- Lift the door upwards and pull up and away from the cabinet until free of the bottom hinge pin mounted on the front of the cabinet.
- To replace the door, reverse the above procedures and securely tighten all screws to prevent hinge slippage.
-114958.png)
DOOR REVERSAL
Door swing reversal:
IMPORTANT
A qualified person should change the swing of your door.
If you would like to change your door from a left-hand swing to a right-hand swing, you must purchase a Door Swing Kit.
-410336.png)
CAUTION
Doors are heavy. Two people are recommended to remove or replace the door assembly from the cabinet.
Order Kit TTDRRVFFKIT on Frigidaire.com or by calling 1-800-374-4432
DOOR HANDLE INSTALLATION
CAUTION
Wear gloves and use extreme CAUTION when installing these handles. The rounded end of the handles may be sharp.
Door Handle Mounting Instructions
- Remove handle from carton and any other protective packaging.
- Position handle end caps over upper and lower pre-installed shoulder bolts (A) that are fastened into door, ensuring the holes for the set screws are facing toward the hinge.
- While holding handle firmly against door, fasten upper and lower Allen set screws (B) with supplied Allen wrench.
-160758.png)
WATER SUPPLY CONNECTION
WARNING
To avoid electric shock, which can cause death or severe personal injury, disconnect the unit from electrical power source before connecting a water supply line to the appliance.
CAUTION
To Avoid Property Damage:
- Use Copper or Stainless Steel braided tubing for the water supply line.
- Frigidaire does not recommend water supply tubing made of ¼" plastic. Plastic tubing greatly increases the potential for water leaks, and the manufacturer will not be responsible for any damage if plastic tubing is used for the supply line.
- DO NOT install water supply tubing in areas where temperatures fall below freezing.
- Chemicals from a malfunctioning softener can damage the ice maker.
- If the ice maker is connected to soft water, ensure that the softener is maintained and working properly.
Before Installing The Water Supply Line, You Will Need:
- Basic Tools: adjustable wrench, flat-blade screwdriver, and PhillipsTM screwdriver
- Access to a household cold water line with water pressure between 30 and 100 psi.
- A braided stainless steel water supply line with integral fittings such as Smart Choice® 5304437642 or ¼" copper line with compression fittings. The line must be 6' or longer to allow appliance to be moved out for cleaning.
- A shutoff valve to connect the water supply line to your household water system. DO NOT use a self-piercing type shutoff valve.
- Do not reuse compression fitting or use thread seal tape.
- A compression nut and ferrule (sleeve) for connecting a copper water supply line to the ice maker inlet valve.
WATER SUPPLY CONNECTION
To Connect Water Supply Line To Ice Maker Inlet Valve
- Disconnect the appliance from electrical power source.
- Place the end of the water supply line into a sink or bucket. Turn ON the water supply and flush the supply line until the water is clear. Turn OFF the water supply at the shutoff valve.
- Remove the plastic cap from the water valve inlet and discard the cap.
- If you use copper tubing - Slide the brass compression nut, and then the ferrule (sleeve) onto the water supply line. Push the water supply line into the water valve inlet as far as it will go (¼"/6.4 mm). Slide the ferrule (sleeve) into the valve inlet and finger tighten the compression nut onto the valve. Tighten another half turn with a wrench; DO NOT overtighten. See Figure 1.
If you use braided flexible stainless steel tubing - The nut is already assembled on the tubing. Slide the nut onto the valve inlet and finger tighten the nut onto valve. Tighten another half turn with a wrench; DO NOT overtighten. See Figure 2.
-273005.png)
-34407.png)
A- Plastic Water Tubing to Ice Maker Fill Tube (foamed within the cabinet)
B- Steel Clamp (Fig. 1: ¼"; Fig. 2: ½")
C- Brass Compression Nut
D- Ferrule (Sleeve)
E- Copper Water Line
F- Water Valve Bracket
G- Valve Inlet
H- Water Valve
I- Copper Water Line from Household Water Supply*
J- Braided Flexible Stainless Steel Water Line
*Include enough tubing in the loop to allow moving the appliance out for cleaning
5. With the steel clamp and screw, secure the water supply line (copper tubing only) to the rear panel of appliance as shown.
6. Coil the excess water supply line (copper tubing only), about 2½ turns, behind appliance as shown and arrange coils so they do not vibrate or wear against any other surface.
7. Turn ON the water supply at shutoff valve and tighten any connections that leak.
8. Reconnect the appliance to electrical power source.
9. To turn ice maker on, press and hold ICE MAKER on the appliance display for 3 seconds.
NOTE
Check with your local building authority for recommendations on water lines and associated materials prior to installing your new appliance. Depending on your local/state building codes, Frigidaire recommends for homes with existing valves its Smart Choice® water line kit 5305513409 (with a 6' Stainless Steel Water Line) and for homes without an existing valve, Frigidaire recommends its Smart Choice® water line kit 5305510264 (with a 20' copper water line with self-tapping saddle valve). Please refer to Frigidaire.com for more information.
CONTROLS AND SETTINGS
Cool Down Period
To ensure safe food storage, allow the appliance to operate with the door closed for at least 8 hours before loading it with food.
Power On
Upon opening the door, the settings icon will illuminate on the control panel.
-752382.png)
By pressing the settings icon, you will illuminate all of the icons on the appliance control. After 10 seconds of no user interaction with the icons or door closure, all the icons will fade, except for the settings icon.
Appliance Control Display
The appliance control display is located in the cabinet below the upper drawer.
-288916.png)
CONTROLS AND SETTINGS
Alarms
1. DOOR OPEN
This alert indicates the door has been open for 5 minutes or more. The DOOR OPEN LED will illuminate and the audible alert will sound until the door is closed.
The audible alert can be turned off by pressing DOOR OPEN or by closing the door. If the door is ajar for 5 minutes, the interior light will turn off.
2. POWER OUTAGE
The POWER OUTAGE indicator light informs you there has been a power interruption which could have led to the internal temperature increasing beyond the safe temperature range. After you check your food, reset the alarm by pressing POWER OUTAGE.
3. HIGH TEMP
If the temperature increases above a safe temperature range, the red HIGH TEMP LED light will illuminate and the alarm will sound. Reset the alarm by pressing HIGH TEMP.
Controls -934942.png)
-444746.png)
4. The lock button can be used to lock the control panel. Press and hold for 3 seconds to enable/disable. While in the locked state, no changes can be made until unlocked.
5. The settings icon illuminates upon opening the appliance door. Press to reveal other function icons. After 10 seconds of non use of icons or door closure, all icons will fade except .
6. Adjusting Temp
To adjust the temperature setting, press + to raise the temperature and - to lower the temperature on the appliance control. Allow several hours for the temperature to stabilize between adjustments.
7. TEMP °F/°C
Short press to toggle between Fahrenheit (°F) and Celsius (°C).
8. FREEZE BOOST
Prior to grocery shopping, activate FREEZE BOOST so upon returning you can ensure your newly purchased frozen food will be preserved.
Turning on FREEZE BOOST will cool the appliance down to a target temperature and will remain active for up to 24 hours before automatically deactivating or being manually exited.
To turn the function off, press FREEZE BOOST. When you turn off FREEZE BOOST, it will automatically reset the freezer back to the previous temperature setting.
9. AIR FILTER
The AIR FILTER replacement alert will illuminate when it is time to replace the air filter. See the FILTER REPLACEMENT section for instructions on how to replace the air filter. After changing the air filter, reset the AIR FILTER alert by pressing and holding AIR FILTER.
10. ICE MAKER
The ice maker is default on, which means it will constantly make ice until the ice bucket is full. The ice maker can be turned off to stop making new ice. Press and hold ICE MAKER for 3 seconds to turn it on/off.
Sabbath Mode
The Sabbath Mode is a feature that disables portions of the appliance and its controls in accordance with observance of the weekly Sabbath and religious holidays within the Orthodox Jewish community.
To enter Sabbath Mode
Simultaneously press and hold — and TEMP F/C for 5 seconds.
-457797.png)
“Sb” will appear on the appliance control display indicating the unit is in Sabbath mode.
-198919.png)
For further assistance, guidelines of proper usage and a complete list of models with the Sabbath feature, please visit the web at star-k.org. The unit stays in Sabbath mode after a power failure recovery. It must be deactivated with the buttons on the appliance control display.
NOTE
While in Sabbath Mode, neither the lights nor the appliance control display will work (except to exit Sabbath Mode) until Sabbath Mode is deactivated.
Additionally, the ice maker will stop ice production when Sabbath mode is activated.
The appliance stays in Sabbath Mode after power failure recovery. It must be deactivated with the buttons on the appliance control display.
To exit Sabbath Mode
Simultaneously press and hold — and TEMP F/C for 5 seconds.
-116674.png)
The appliance control display will show all of the icons
-842450.png)
In the Sabbath mode, the HIGH TEMP alarm is active for health reasons. For example, if you leave the door ajar, the HIGH TEMP alarm is activated. The freezer will function normally once you close the door, without any violation of the Sabbath/holidays. The HIGH TEMP alarm comes on when the cabinet temperature is outside the safe zone for 20 minutes. The alarm silences itself after 10 minutes while the HIGH TEMP icon stays lit until you exit the Sabbath mode.
All buttons are disabled, and all sounds (except the HIGH TEMP alert* and the combination to exit Sabbath Mode) are muted. Only the HIGH TEMP alert will illuminate until you deactivate the Sabbath Mode.
-799561.png)
Your appliance has an automatic ice maker that will provide a sufficient supply of ice for normal use. The unit will not produce ice during the first 24 hours of initial operation.
Turning Your Ice Maker On
After you have completed connecting the plumbing, you must open the water supply valve. To turn the ice maker on, press on the appliance control display. Then press and hold ICE MAKER until the LEDs above ICE MAKER are illuminated. New plumbing connections may cause the first production of ice cubes to be discolored or have an odd flavor. Discard these first cubes until the cubes produced are free of discoloration and taste.
Turning Your Ice Maker Off
To turn the ice maker off, press on the appliance control display. Then press and hold ICE MAKER until the LEDs above ICE MAKER are turned off. Separately, the ice maker automatically stops producing ice when the bin is full, and then restarts when the level of ice drops. Note that when the ice maker is turned Off at the appliance control, the ice maker will not produce ice at all
Ice Maker Tips
- If the ice maker will be turned off for a long period of time, turn the water supply valve to the closed position.
- Ice cubes stored too long may develop an odd flavor. Empty the ice bin. The ice maker will then produce more ice.
- Occasionally shake the ice container to keep ice separated.
- Keep the ice maker off until the ice maker is connected to the water supply or whenever the water supply is turned off.
- The following sounds are normal when the ice maker is operating:
- Motor running
- Ice loosening from tray
- Ice dropping into ice container
- Running water
- Water valve opening or closing
Ice Maker Storage Bin
Capacity
The ice maker should produce about 4.5 lbs of ice per 24 hours, depending on conditions of use.
How much ice can be stored in the ice bins?
When completely full, the bins will hold about 8 lbs of ice.
STORAGE FEATURES
Full Width Cantilever Shelves
Multi-position adjustable metal shelves can be moved to any position for larger or smaller packages. The shipping spacers that stabilize the shelves for shipping may be removed and discarded.
To Adjust The Shelves
- Remove all food from the shelf.
- Lift the front edge up to release the tabs from the slots in the rear and pull the shelf out.
- Replace the shelf by inserting the mounting bracket hooks into the desired support slots at the rear.
- Carefully lower the shelf and lock into position.
-707898.png)
Soft Freeze Zone
The soft freeze zone drawer remains slightly warmer than the freezer interior for convenient storage of soft freeze items such as ice cream.
-252848.png)
Slide-Out Shelf with Removable Ice Storage Bins
The slide-out shelf provides easy access to the removable ice storage bin. You should return it back to its fully closed position to allow the ice maker to properly dispense ice cubes. If the slideout shelf is not in its fully closed position, it will cause ice to be dispensed outside the ice bin, possibly causing the need for a service call.
The removeable storage bins hold ice from the ice maker. The left-hand bin is in the primary location for holding dispensed ice. If you prefer more ice, simply move the bin to the right, and put the other bin in place on the left-hand side for holding newly dispensed ice. When not holding ice, the right-hand bin can be used for additional storage. Or you can remove the right-hand bin in order to use the slide-out shelf for storage. -655961.png)
Lower Drawer with Dividers
The lower drawer with dividers works great for food that may need to be separated. The drawer can easily be used with the dividers or without by removing or adding the inserts.
-824308.png)
Door Bin Dividers
Customize your unit to fit different sized items as your needs change with door bin dividers.
To remove, grasp the divider and pull it upward until it disengages with the door bin.
To install, slide the divider downward into the corresponding door bin alignment features until it is fully placed.
-578252.png)
Adjustable Door Bins
The adjustable door bins are specially designed to hold large containers or storage bags. Each bin type can be used only in the zone indicated below so the door can close correctly. Your unit has 2 Half-Gallon Door Bins (Zone A), a Gallon Door Bin (Zone B), and 2 Tall Item Door Bins (Zone C).
To remove a door bin:
- Grasp the ends of the door bin.
- Lift the door bin up until it clears the locking lugs.
- Pull the door bin straight out toward you.
To install a door bin:
- Make sure the locking feature on the bin aligns with the mounting lugs on the door.
- Lower the door bin into the mounting lugs until it locks in place.
-302853.png)
CARE AND CLEANING
Protecting your investment
Keeping your appliance clean maintains appearance and prevents odor build-up. Wipe up any spills immediately and clean the appliance at least twice a year. When cleaning, take the following precautions:
- Never use CHLORIDE or cleaners with bleach to clean stainless steel.
- Do not wash any removable parts in a dishwasher.
- Always unplug the electrical power cord from the wall outlet before cleaning.
- Remove adhesive labels by hand. Do not use razor blades or other sharp instruments which can scratch the appliance surface.
- Do not remove the serial plate.
Do not use abrasive cleaners such as window sprays, scouring cleansers, brushes, flammable fluids, cleaning waxes, concentrated detergents, bleaches or cleansers containing petroleum products on plastic parts, interior doors, gaskets or cabinet liners. Do not use paper towels, metallic scouring pads, or other abrasive cleaning materials or strong alkaline solutions.
CAUTION
Damp objects stick to cold metal surfaces. Do not touch interior metal surfaces with wet or damp hands.
CAUTION
When moving the unit, pull straight out. Do not shift the appliance from side to side as this may tear or gouge the floor covering.
Vacation and Moving Tips
Short Vacations: Leave the unit operating during vacations of less than 3 weeks.
Long Vacations: If the appliance will not be used for several months:
- Remove all food and unplug the power cord.
- Clean and dry the interior thoroughly.
- Leave the door open slightly, blocking it open if necessary, to prevent odor and mold growth.
Moving: When moving the unit, follow these guidelines to prevent damage:
- Disconnect the power cord plug from the wall outlet.
- Remove foods, then defrost, and clean the appliance.
- Secure all loose items such as base panel, baskets, and shelves by taping them securely in place to prevent damage.
- In the moving vehicle, secure unit in an upright position to prevent movement. Also protect outside of the appliance with a blanket, or similar item.
NOTE
- To disconnect electrical power to the lights or other electrical components, unplug the unit or switch the breaker that supplies power to the unit to the off position.
- Do not use razor blades or other sharp instruments which can scratch the appliance surface when removing adhesive labels. Any glue left from tape or labels can be removed with a mixture of warm water and mild detergent, or, touch the glue residue with the sticky side of tape you have already removed. Do not remove the serial plate.
Interior & Door Liners
- Soap and water
- Baking soda and water
Use 2 tbsp of baking soda in 1 qt of warm water. Be sure to wring excess water out of sponge or cloth before cleaning around controls, light bulb or any electrical part.
Door Gaskets
Wipe gaskets with a clean soft cloth.
Drawers & Bins
Use a soft cloth to clean drawer runners and tracks. Do not wash any removable items (bins, drawers, etc.) in dishwasher.
Exterior & Handles
- Soap and water
- Non-Abrasive Glass Cleaner
Do not use commercial household cleaners, ammonia, or alcohol to clean handles. Use a soft cloth to clean smooth handles. Do not use a dry cloth to clean smooth doors.
Metal Shelves
Clean with a soft cloth
Door & Stainless Steel Air Tower Cover
- Soap and water
- Stainless steel cleaners
Clean with non-abrasive, soapy water and a dishcloth. Rinse with clean water and a soft cloth. Use a non-abrasive stainless steel cleaner. These cleaners can be purchased at most home improvement or major department stores. Always follow manufacturer’s instructions. Do not use household cleaners containing ammonia or bleach.
NOTE: Always clean, wipe and dry with grain to prevent scratching.
TROUBLESHOOTING
Let us help you troubleshoot your concern! This section will help you with common issues. If you need us, visit our website, chat with an agent, or call us. We may be able to help you avoid a service visit. If you do need service, we can get that started for you!
Appliance does not run.
- Appliance is plugged into a tripped Ground Fault Interrupt (GFI).
- Appliance must be plugged into a dedicated circuit with standard outlet. Contact a certified electrician to check.
- Appliance may not be plugged in or plug is loose.
- Ensure plug is tightly pushed into outlet.
- House fuse blown or tripped circuit breaker.
- Check/replace fuse with a 15-amp time-delay fuse. Reset circuit breaker.
- Power outage.
- Check house lights. Call the local electric company.
Appliance temperature is colder than preferred.
- The freezer temperature is set too low.
- Check freezer temperatures and adjust the temperature control as needed.
Appliance temperature is warmer than preferred.
- The freezer temperature is set too high.
- Set control to a colder setting until appliance temperature is satisfacto- ry. Allow 24 hours for the tempera- ture to stabilize.
- The door is ajar.
- Make sure the door is completely closed and sealed.
Appliance is noisy or vibrates.
- The cabinet is not level.
- Floor is weak.
- Adjust the leveling feet. See “Leveling” in the INSTALLATION section.
Appliance runs too much or too long.
- Room or outside weather is hot.
- It’s normal for the appliance to work longer under these conditions.
- Appliance has recently been disconnected for a period of time.
- It may take 24 hours for the appliance to cool down completely.
- Large amounts of warm or hot food have been stored recently.
- Warm food will cause appliance to run more until the desired temperature is reached.
- Door is opened too frequently or too long.
- Door may be slightly open.
- Warm air entering the appliance causes it to run more. Open door less often.
- See DOOR PROBLEMS in TROUBLESHOOTING section.
- Temperature control is set too low.
- Turn control knob to a warmer setting. Allow several hours for the temperature to stabilize.
- Gaskets are dirty, worn, cracked, or poorly fitted.
- Clean or change gasket. (See Care and Cleaning Tips in CARE AND CLEANING section). Worn, cracked or poorly fitting gaskets should be replaced.
Interior appli- ance tempera- ture is too cold.
- Temperature control is set too low.
- Set control to a warmer setting. Allow several hours for temperature to stabilize.
Temperature in- side appliance is too warm.
- Temperature control is set too warm.
- Turn control to a colder setting. Allow several hours for temperature to stabilize.
- Door is opened too frequently or too long.
- Warm air enters the appliance every time the door is opened. Open door less often.
- Door may not be seating properly.
- Look for food items on the shelves or in the door bins keeping the door from closing completely.
- Large amount of warm or hot food has been stored recently.
- Wait until the appliance has had a chance to reach its selected temperature.
- Unit has recently been disconnected for a period of time.
- Appliance may take up to 24 hours to cool down completely.
is displayed on control.
- The control has been locked.
- Press for 3 seconds to unlock.
Sb” is displayed on the control.
- The control is in Sabbath Mode.
- Press — and TEMP F/C for 5 seconds.
AUTOMATIC ICE MAKER
Ice maker is not making any ice.
- Ice maker is turned off.
- Turn on the ice maker. Press and hold the “On/Off” button for 3 seconds until the indicator light is on.
Ice maker is not making enough ice.
- Freezer control is set too warm.
- Set freezer control to a colder set- ting to improve performance of the ice maker. Allow 24 hour for tem- perature to stabilize.
Ice cubes are freezing together.
- Ice cubes are not being used frequently enough.
- Ice cubes are hollow (partially frozen cubes with water inside).
- Freezer control is set too warm.
- Remove ice container and discard ice from the container. The ice maker will produce fresh ice.
- Ice and water filter cartridge may be clogged. Replace filter cartridge.
- Set the freezer control to a colder setting. Allow 24 hours for tempera- ture to stabilize.
SOUND AND NOISE
Louder sound levels when- ever appliance is on.
- Modern freezers have increased storage capacity and more stable temperatures. They require heavy- duty compressors.
- This is normal. When the surround- ing noise level is low, you might hear the compressor running while it cools the interior.
Popping or cracking sound when compres- sor comes on. Bubbling or gurgling sound.
- Metal parts under- go expansion and contraction, as in hot water pipes.
- Refrigerant (used to cool the freezer) is circulating through- out the system.
- This is normal. Sound will level off or disappear as appliance continues to run.
| CONCERN |
CAUSE |
SOLUTION |
| Vibrating or rattling noise. |
• Appliance is not level. It rocks on the floor when it is moved slightly.
• Floor is uneven or weak.
• Appliance is touching the wall.
|
• Level the appliance. Refer to “Leveling” in the INSTALLATION section.
• Ensure floor can adequately support the appliance. Level the appliance by putting wood or metal shims under part of the appliance.
• Re-level appliance or move appliance slightly. Refer to “Leveling” in the INSTALLATION section.
|
WATER / MOISTURE / FROST INSIDE APPLIANCE
| Moisture forms on inside appliance walls. |
• Weather is hot and humid, which increases internal rate of frost buildup.
• Door is slightly open.
• Door is kept open too long.
|
• This is normal.
• Look for food items on the shelves or in the door bins keeping the door from closing completely.
• Open the door less often.
|
ODOR IN APPLIANCE
| Odors in appliance. |
• Interior needs to be cleaned.
• Foods with strong odors are in the appliance.
|
• Clean interior with sponge, warm water, and baking soda. Replace air filter.
• Cover the food tightly
|
DOOR PROBLEMS
| Door will not close. |
• Appliance is not level. It rocks on the floor when it is moved slightly.
• Floor is uneven or weak.
|
• This condition can force the cabinet out of square and misalign the door. Refer to “Leveling” in the INSTALLATION section.
• Ensure floor can adequately support appliance. Level the appliance by putting wood or metal shims under part of the appliance.
• Look for food items on the shelves or in the door bins keeping the door from closing completely.
|
LIGHTING PROBLEMS
| Cabinet light is not working. |
• LED is burned out. |
• Call a Frigidaire service technician. |