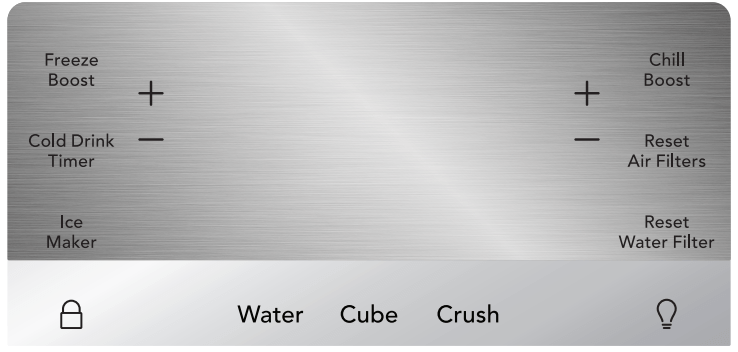
Sleep mode is default on. When sleep mode is on, the LEDs are not illuminated on the display. Sleep mode can be changed to have the display on full time (Awake Mode). While in sleep mode pressing any key will illuminate LEDs and then go back to sleep after a short time. To turn sleep mode on/off, simultaneously press and hold Crush and for 5 seconds. A tone will confirm.
Active Mode Display
Active Mode
To change from sleep mode (on) to active mode (off), simultaneously press and hold Crush and for 5 seconds. The display will show the current temperature/ice maker status. A tone will confirm.
Display
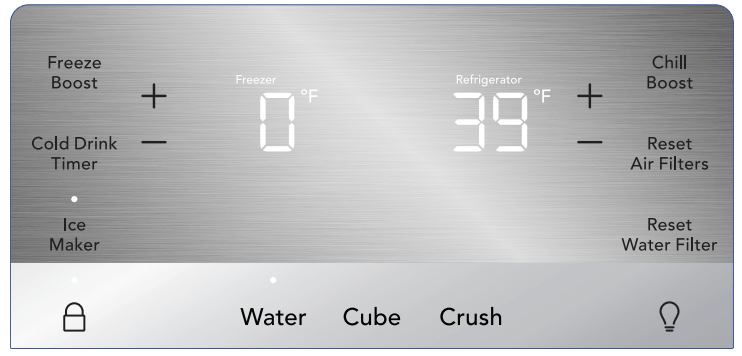
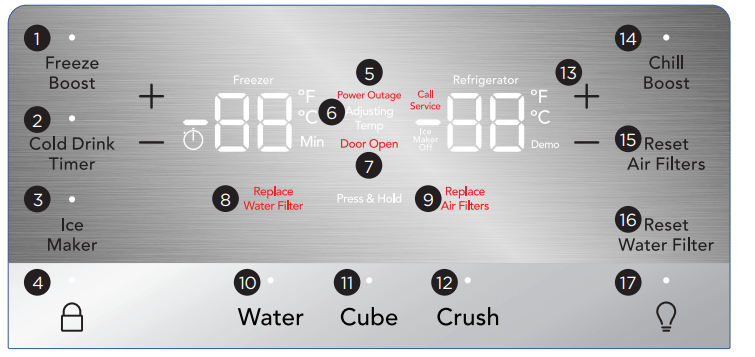
1.Freeze Boost (on/off)
Activates a faster rate for freezing food in the freezer. Use this feature when loading several items into the freezer at one time. It automatically deactivates after 12 hours.
2. Cold Drink Timer
Quickly chills a drink inside the freezer compartment. To enable, touch Cold Drink Timer. A time value will appear on the freezer temp display (in minutes) and can be changed using the +/- buttons. A tone will sound when the time has been input. It ranges from 20-45 minutes in 5 minute intervals. Drinks will freeze if the temperature setting is too low or the timer setting is too long.
3. Ice Maker
Press and hold for 3 seconds to turn the ice maker on/off. When the indicator is lit, the ice maker is on. When the ice maker is off, the ice maker off indicator is lit. When the ice maker is off, it will stop making ice. While off, ice dispensing can continue as long as there is ice in the bucket. When the ice maker is off and ice is dispensing, the indicator above the ice maker button and ice maker OFF will both blink. If the display is in sleep mode, you will have to wake it to confirm the ice maker is on/off.
4.
The lock button can be used to lock the display preventing it from being used in certain situations. Press and hold for 3 seconds to enable/ disable. While in the locked state, no changes can be made to settings on the display. Dispensing ice and water will be disabled. The indicator will flash and an audible warning tone sounds.
5. Power Outage
In the event of a power failure, the Power Outage alert will illuminate once power has been restored, and a tone will sound. Press any button to silence the tone.
6. Adjusting Temp
Illuminates when temperatures are changed on the display and will remain illuminated until the desired temperatures are reached inside the refrigerator and freezer. Press either the + or - to adjust to desired temperature setting.
Freezer temp
Control temperatures range from -6°F / -21°C to +4°F / -15°C.
Refrigerator temp
The Control temperature ranges from +33°F / +1°C to +43°F / +7°C. This unit is designed to operate at 39°F refrigerator/0°F freezer. The unit should stabilize temperatures within 24 hours of installation.
7. Door Open
Illuminates whenever the doors are open. If a door is left open for 5 minutes or more, an alarm will sound and the display will be illuminated until the doors are shut. Pressing any button will mute the alarm temporarily. Check to make sure no food is blocking the doorway.
8. Replace Water Filter
Display illuminates every 6 months or when filter needs replacing. Replace filter and then press and hold Reset Water Filter for 3 seconds to deactivate warning on display. See “Replacing the Filter” section for more information.
9. Replace Air Filter
Display illuminates every 6 months or when filter needs replacing. Replace filter and then press and hold Reset Air Filter for 3 seconds to deactivate warning on display. See “Replacing the Filter” section for more information.
10. Water
Press Water to dispense water. An indicator light will be illuminated above the active feature.
11. Cube
Press Cube to dispense cubed ice. An indicator light will illuminate above the active feature.
12. Crush
Press Crush to dispense crushed ice. An indicator light will illuminate above the active feature.
13. °F/°C
To toggle between Fahrenheit (°F) and Celsius (°C), simultaneously press and hold + and - for 5 seconds on refrigerator side of display
14. Chill Boost
Chill Boost is a faster rate for chilling food in the refrigerator compartment. Use this feature when loading several items into the refrigerator at one time. Deactivates after 6 hours.
15. Air Filter
The display shows the current status of the air filter (Good, Order, or Replace). To reset the filter status to Good, press and hold Air Filter for 3 seconds.
16. Water Filter
The display shows the current status of the water filter (Good, Order, or Replace). To reset the filter status to Good, press and hold Water Filter for 3 seconds.
17.
Toggles dispenser light On and Off.
Alarms
Power Outage
In the event of a power outage, the Power Outage alert will illuminate once power has been restored and a tone will sound. Press any button to silence the tone.
Door Open
If you leave a door open for 5 minutes or more, an alarm will sound and the Door Open indicator will illuminate on the display. Turn the alarm off by closing the door or pressing any key. The control panel will return to normal operations after you close the door.
Water Filter
The water filter needs to be replaced when the indicator illuminates. Change the water filter every 6 months or after you have dispensed 120 gallons of water. To reset, press and hold the button for 3 seconds. A tone will then sound.
Air Filter
The air filter needs to be replaced when the indicator illuminates. Change the air filter every 6 months. To reset, press and hold the button for 3 seconds. A tone will then sound.
Error Tone
An alarm will sound if you try to make a selection that is not available.
High Temp
In the event of the internal temperature of the refrigerator rising and staying at a temperature above the safe temp zone for a period of time, HI will display on the corresponding compartment display (refrigerator and/or freezer). An alarm will sound in addition to the display warning every 10 seconds until acknowledged. The refrigerator will automatically try to cool down to improve the condition. However, if the temperature has not cooled after some time, the warning and alarm will appear again. If the problem continues please call 1 (800) 374-4432.
Sabbath Mode
The Sabbath mode is a feature that disables portions of the refrigerator and its controls in accordance with observance of the weekly Sabbath and religious holidays within the Orthodox Jewish community.
Turn the Sabbath mode ON and OFF by simultaneously pressing and holding both the - (freezer side) and + (refrigerator side) for 5 seconds. Other than the High Temp alarm, no audible sounds will occur until you exit the Sabbath mode. The display shows Sb while in Sabbath mode.
In the Sabbath mode, the High Temp alarm is active for health reasons. For example, if the door is left ajar the High Temp alarm is activated. The refrigerator will function normally once the door is closed, without any violation of the Sabbath/Holidays. The High Temp alarm is permitted when the cabinet temperature is outside the safe zone for 20 minutes. The alarm silences itself after 10 minutes while the High Temp icon stays lit until you exit the Sabbath mode.
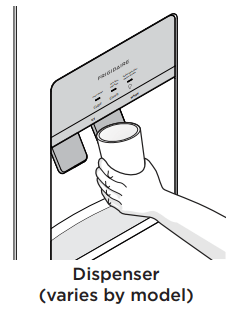
AUTOMATIC ICE AND WATER DISPENSER
Priming the water supply system
Begin filling the system by pressing and holding a drinking glass against the water dispenser paddle.
Keep the glass in this position until water comes out of the dispenser. It may take about 1½ minutes. Water will sputter until you purge all air from the water lines.
Continue dispensing water for about 4 minutes to flush the system and plumbing connections of any impurities (stopping to empty the glass as necessary).
Ice maker operation & care
After you properly install the refrigerator and it has cooled for several hours, the ice maker can produce ice within 24 hours. The ice maker will fill the ice bin from the rear. You must dispense some ice to force the ice forward in the bin. This will allow the bin to fill completely.
Turning the ice maker on
Ice production is controlled by the ice maker's On/Off feature on the control panel. Pressing and holding the On/Off button toggles the ice maker On/Off.
Ice Maker/Dispenser Tips
Ice cubes stored too long may develop an odd flavor. Empty the ice container as explained in Cleaning the Ice Storage Bin.
Occasionally shake the ice container to keep ice separated.
If your refrigerator is not connected to a water supply or the water supply is turned off, turn Off the ice maker.
If you need a large quantity of ice at one time, it is best to get cubes directly from the ice container.
The following sounds are normal when the ice maker is operating:
- Motor running
- Ice dropping into ice container
- Water valve opening or closing
- Ice loosening from tray
- Running water
When dispensing ice, you will hear a snapping or clicking sound when the ice chute opens and closes.
Turn Off the ice maker when cleaning the freezer and during vacations. If you turn Off the ice maker for a long period of time, you should also turn off the water supply valve.
Cleaning the Ice Storage Bin
Clean the ice storage bin at regular intervals, particularly before you take a vacation or move.
To clean the ice storage bin:
Turn Off the ice maker.
Remove the ice storage bin by lifting up and out
Empty and carefully clean the ice storage bin with mild detergent. Rinse with clear water. Do not use harsh or abrasive cleaners.
Allow the ice storage bin to dry completely before replacing it in the freezer.
Remove ice chips and clean the ice storage bin, shelf and the freezer door chute.
Replace the ice storage bin. Turn On the ice maker to resume ice production.
Remove and empty the ice storage bin if:
An extended power failure (1 hour or longer) causes ice cubes in the ice storage bin to melt and freeze together, jamming the dispenser mechanism.
You do not use the ice dispenser frequently. Ice cubes will freeze together in the bin, jamming the dispenser mechanism.
Remove the ice storage bin and shake to loosen the cubes or clean as explained above.
CARE AND CLEANING
Protecting your investment Keeping your appliance clean maintains appearance and prevents odor build-up. Wipe up any spills immediately and clean the freezer and refrigerator compartments at least twice a year. When cleaning, take the following precautions:
• Never use CHLORIDE or cleaners with bleach to clean stainless steel.
• Do not wash any removable parts in a dishwasher.
• Always unplug the electrical power cord from the wall outlet before cleaning.
• Remove adhesive labels by hand. Do not use razor blades or other sharp instruments which can scratch the appliance surface.
• Do not remove the serial plate.
Do not use abrasive cleaners such as window sprays, scouring cleansers, brushes, flammable fluids, cleaning waxes, concentrated detergents, bleaches or cleansers containing petroleum products on plastic parts, interior doors, gaskets or cabinet liners. Do not use paper towels, metallic scouring pads, or other abrasive cleaning materials or strong alkaline solutions.
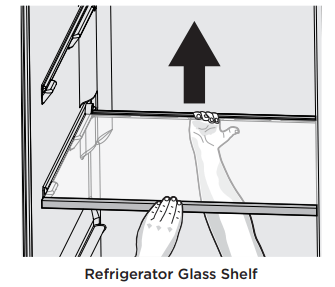
Glass Shelves
Refrigerator: Shelves are easily adjusted to suit individual needs. Before adjusting the shelves, remove all food. Shelves are supported by side rails.
To adjust, lift up on the back of the shelf and pull forward.
Replace the shelf by sliding it on top of the formed rails on the side walls of the cabinet until the rear plastic hooks of the shelf lock into the rear of the cabinet liner.
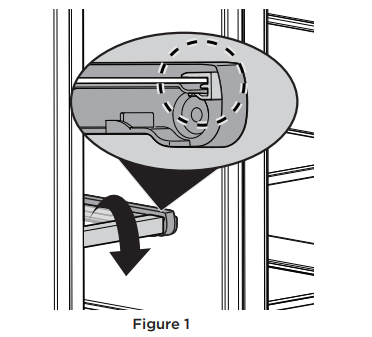
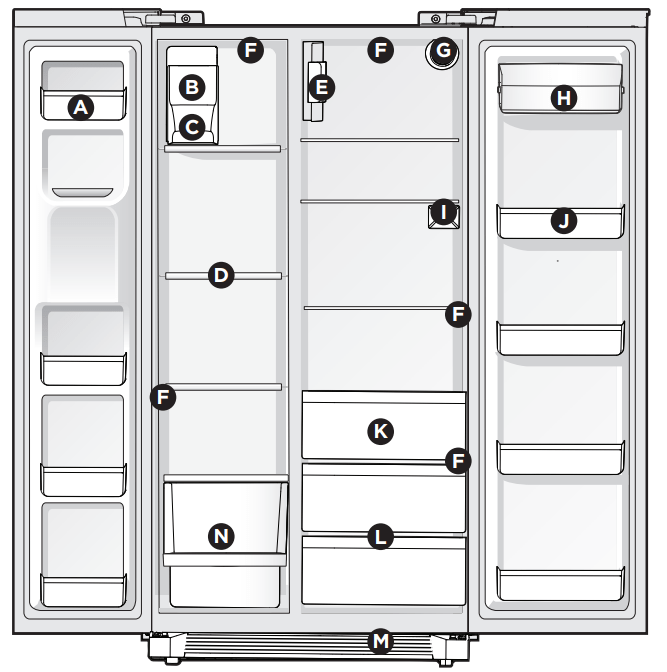
Freezer: You can remove the glass freezer shelf for cleaning. Remove all food from the glass shelf. Rotate the front trim down to remove front trim (Figure 1).
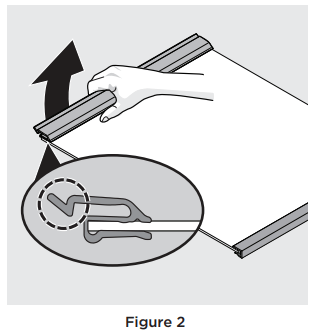
Remove both the rear trim and glass by pulling up on the rear tab and sliding the shelf forward (Figure 2)
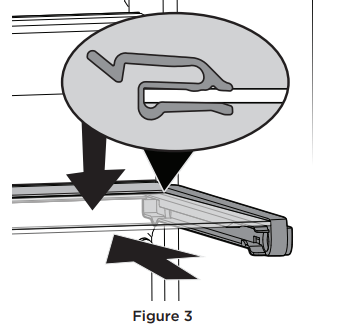
To reassemble the freezer shelf, slide the glass and rear trim along the shelf rails while pressing the shelf downward until it is fully locked into place in the rear (Figure 3).
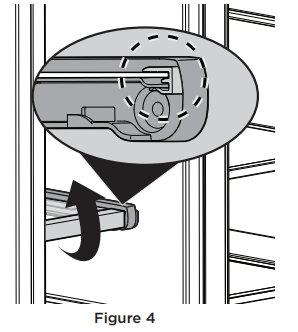
Finally, rotate the front trim upward on the front edge of the glass shelf (Figure 4).
Care & Cleaning Tips
Part
What To Use
Tips and Precautions
Interior & Door Liners
Soap and water
Baking soda and water
Use 2 Tbsp of baking soda in 1 qt of warm water. Be sure to wring excess water out of sponge or cloth before cleaning around controls, light bulb or any electrical part.
Door Gaskets
Soap and water
Wipe gaskets with a clean soft cloth.
Drawers & Bins
Soap and water
Use a soft cloth to clean drawer runners and tracks.
Glass Shelves
Soap and water
Glass cleaner
Mild liquid sprays
See "Glass shelves" in CARE AND CLEANING before cleaning. Allow glass to warm to room temperature before immersing in warm water.
Toe Grille
Soap and water
Mild liquid sprays
Vacuum attachment
Vacuum dust from front of toe grille. Remove toe grille (see Installation Instructions). Vacuum backside, wipe with sudsy cloth or sponge. Rinse and dry.
Exterior & Handles
Soap and water
Non Abrasive Glass Cleaner
Do not use commercial household cleaners containing ammonia, bleach or alcohol to clean handles. Use a soft cloth to clean smooth handles. DO NOT use a dry cloth to clean smooth doors.
Exterior & Handles (Stainless Steel Models Only)
Soap and water
Stainless Steel Cleaners
Never use CHLORIDE or cleaners with bleach to clean stainless steel. Clean stainless steel front and handles with non-abrasive soapy water and a dishcloth. Rinse with clean water and a soft cloth. Use a non-abrasive stainless steel cleaner. These cleaners can be purchased at most home improvement or major department stores. Always follow manufacturer’s instructions. Do not use household cleaners containing ammonia or bleach.
NOTE: Always clean, wipe and dry with the grain to prevent scratching. Wash the rest of the cabinet with warm water and mild liquid detergent. Rinse well, and wipe dry with a clean soft cloth.
TROUBLESHOOTING
CONCERN
CAUSE
SOLUTION
AUTOMATIC ICE MAKER
Ice maker is not making any ice.
Ice maker is turned off.
Turn on ice maker. Press and hold the "On/Off" button for 3 seconds until the indicator light is on.
Ice maker is not making enough ice.
Check to see if water dispenser is dispensing slower than normal.
If it is, replace the ice and water filter cartridge.
Freezer control is set too warm.
Set freezer control to colder setting to improve performance of the ice maker. Allow 24 hours for temperature to stabilize.
Ice cubes are freezing together.
Ice cubes are not being used frequently enough.
Remove ice container and discard ice from container. Ice maker will produce fresh supply.
Ice cubes are hollow (partially frozen cubes with water inside)
The ice and water filter cartridge may be clogged. Replace filter cartridge.
Freezer control is set too warm.
Set freezer control to colder setting. Allow 24 hours for temperature to stabilize.
DISPENSER (Ice & Water)
Dispenser will not dispense ice.
Dispenser lock out is engaged.
Press and hold control lock for 3 seconds.
There is no ice in the bin to be dispensed.
See the “Ice maker is not making any ice” section above.
The refrigerator doors are not completely closed.
Be sure to close the refrigerator completely.
Dispenser paddle has been pressed too long and the dispenser motor has overheated.
The motor overload protector will reset in about 3 minutes and then ice can be dispensed.
Not dispensing ice regularly may melt and refreeze ice causing ice clumping. Dispensing clumps could damage the ice bucket.
Empty the ice bucket monthly or regularly dispense ice. For longer periods of time (vacation or vacant homes) see Ice Maker/Dispenser Tips in the AUTOMATIC ICE AND WATER DISPENSER section to turn off the ice maker
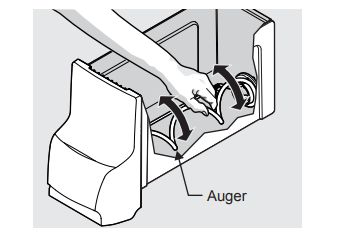
Ice dispenser is jammed.
Ice has melted and frozen around auger due to infrequent use, temperature fluctuations, and/or power outages.
Remove ice container, thaw, and empty the contents. Clean container, wipe dry, and replace in proper position. When new ice is made, dispenser should operate. See Cleaning the Ice Storage Bin in the AUTOMATIC ICE AND WATER DISPENSER section.
Ice cubes are jammed between ice maker and back of ice container.
Remove ice cubes that are jamming the dispenser.
Dispenser will not dispense water.
Water filter not seated properly.
Remove and reinstall the water filter. Be sure to push the filter firmly so that you hear it lock solidly into position.
Water filter is clogged.
Replace filter cartridge. Be sure to remove protective caps and push the filter firmly so that you hear it lock solidly into position.
Household water line valve is not open.
Open the household water line valve.
Water has an odd taste and/ or odor.
Water has not been dispensed for an extended period of time.
Draw and discard 10-12 glasses of water to freshen the supply.
Unit not properly connected to cold water line.
Connect unit to cold water line that supplies water to the kitchen faucet.
Water pressure is extremely low.
Cut-off and cut-on pressures are too low (well systems only).
Have someone turn up the cut-off and cut-on pressure on the water pump system (well systems only).
Reverse osmosis system is in regenerative phase.
It is normal for a reverse osmosis system to be below 20 psi during the regenerative phase.
See the WATER SUPPLY CONNECTION section.
Water not cold enough.
As warmer tap water goes through the filter and enters the water tank the chilled water is pushed through to the dispenser. Once the chilled water is used up it will take several hours to bring the freshly replaced water to a cooler temperature.
Add ice to cup or container before dispensing water.
Some models are designed without a water tank, these water dispensing systems are not designed to chill water.
Add ice to cup or container before dispensing water
OPENING/CLOSING OF DOORS/DRAWERS
Door(s) will not close.
Door was closed too hard, causing other door to open slightly.
Close both doors gently.
Refrigerator is not level. It rocks on the floor when moved slightly.
Ensure floor is level and solid, and can adequately support the refrigerator. Contact a carpenter to correct a sagging or sloping floor.
Refrigerator is touching a wall or cabinet.
Ensure floor is level and solid, and can adequately support the refrigerator. Contact a carpenter to correct a sagging or sloping floor.
Drawers are difficult to move.
Food is touching shelf on top of drawer.
Remove top layer of items in drawer.
Track that drawers slide on is dirty
Ensure drawer is properly installed on track.
Clean drawer, rollers, and track. See CARE AND CLEANING.
RUNNING OF REFRIGERATOR
Compressor does not run.
Freezer control is set to “OF” or “0”.
Set freezer control.
Refrigerator is in defrost cycle.
This is normal for a fully automatic defrost refrigerator. The defrost cycle occurs periodically, lasting about 30 minutes.
Plug at electrical outlet is disconnected.
Ensure plug is tightly pushed into outlet.
House fuse blown or tripped circuit breaker.
Check/replace fuse with a 15 amp time-delay fuse. Reset circuit breaker.
Power outage.
Check house lights. Call local electric company.
Refrigerator runs too much or too long.
Room or outside weather is hot.
It’s normal for the refrigerator to work longer under these conditions.
Doors are opened too frequently or too long.
Warm air entering the refrigerator causes it to run more. Open doors less often.
Refrigerator/freezer door may be slightly open.
Ensure refrigerator is level. Keep food and contains from blocking door. See PROBLEM column OPENING/CLOSING OF DOORS/DRAWERS.
Freezer control is set too cold.
Set Refrigerator control to warmer setting until refrigerator temperature is satisfactory. Allow 24 hours for temperature to stabilize.
Refrigerator/freezer gasket is dirty, worn, cracked, or poorly fitted.
Clean or change gasket. Leaks in door seal will cause refrigerator to run longer in order to maintain desired temperatures.
Condenser is dirty
Clean condenser. See CARE AND CLEANING.
Compressor goes off and on frequently
Thermostat keeps the refrigerator at a constant temperature.
This is normal. Refrigerator goes on and off to keep temperature constant.
Appliance seems to run continuously.
The applaince is equipped with an energy-efficient variable speed compressor. It actually saves energy running more frequently.
This is normal.
DIGITAL TEMPERATURE DISPLAY
Digital temperature displays are flashing.
Electronic control system has detected a performance problem.
Call your Frigidaire service representative, who can interpret any messages or number codes flashing on the digital displays.
WATER/MOISTURE/FROST INSIDE REFRIGERATOR
Moisture collects on inside of refrigerator walls.
Weather is hot and humid.
The rate of frost buildup and internal sweating increases.
Door is slightly open.
See PROBLEM column OPENING/ CLOSING OF DOORS/DRAWERS.
Water collects on bottom side of drawer cover.
Vegetables contain and give off moisture.
It is not unusual to have moisture on the bottom side of the cover.
Move humidity control (some models) to lower setting.
Water collects in bottom of drawer.
Washed vegetables and fruit drain while in the drawer.
Dry items before putting them in the drawer. Water collecting in bottom of drawer is normal.
Stored products on top shelf freeze
Fresh food temperature setting too cold.
Adjust fresh food temperature settings.
Certain products stored too close to damper / air filter housing.
Reconfigure top shelf storage to allow proper diffusion of air. See Damper/Air Filter Housing in the FILTER REPLACEMENT section.
WATER/MOISTURE/FROST OUTSIDE REFRIGERATOR
Moisture collects on outside of refrigerator or between doors.
Weather is humid.
This is normal in humid weather. When humidity is lower, the moisture should disappear.
Door is slightly open, causing cold air from inside refrigerator to meet warm air from outside.
See PROBLEM column OPENING/ CLOSING OF DOORS/DRAWERS.
LED LIGHTING
LED is not working.
LED is burned out.
To replace LEDs, contact a qualified service technician.
Q: how do i shut off the ice maker when water line is not connected to a water source. The delivery people plugged it in as it needed to be on for 24 hours before use. Instructions are to turn the ice maker off. How is that done? unclear!!!! Reply
 for 5 seconds. A tone will confirm.