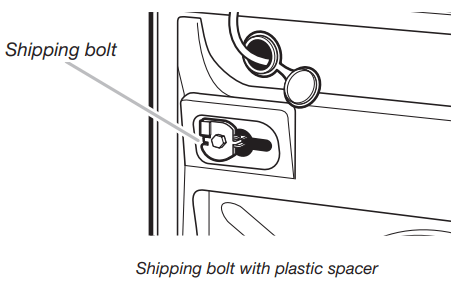
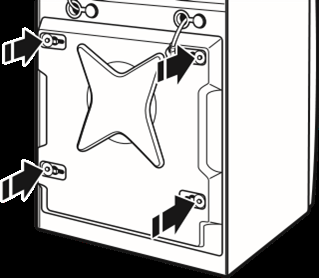
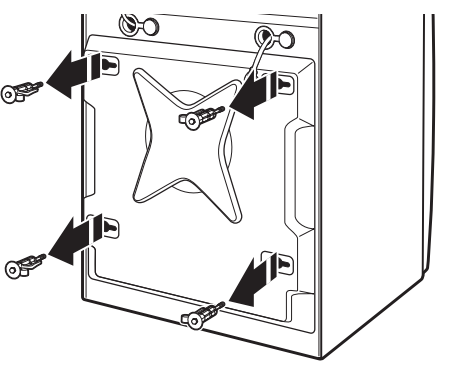
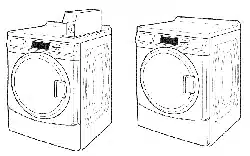
IMPORTANT: Position the washer so that the rear of the washer is within approximately 3 ft. (900 mm) of its final location. There are 4 shipping bolts in the rear panel of the washer that support the suspension system during transportation. These bolts also retain the power cord inside the washer until the bolts are removed.
1. Keep the washer in the upright position while removing the shipping bolts.
2. Using a ½" wrench, loosen each of the bolts.
3. Once the bolt is loose, move it to the center of the hole and completely pull out the bolt, including the plastic spacer covering the bolt.
4. Once all 4 bolts are removed, discard the bolts and spacers. Then push the power cord plug into the opening on the right side of the rear panel and pull the power cord through the opening on the left side of the rear panel and close holes with the attached cap. Do not pull plug end of power cord through the right side hole.
5. Close the bolt holes with the 4 transport bolt hole plugs.
NOTE: If the washer is to be transported at a later date, call your product distributor or installer. To avoid suspension and structural damage, your washer must be properly set up for relocation by a trained professional.
Connect the Inlet Hoses
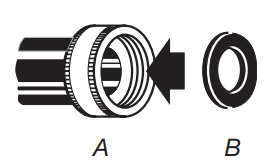
Insert new flat washers (supplied) into each end of the inlet hoses. Firmly seat the washers in the couplings.
A. Coupling B. Washer
Connect the inlet hoses to water faucets
Make sure the washer drum is empty.
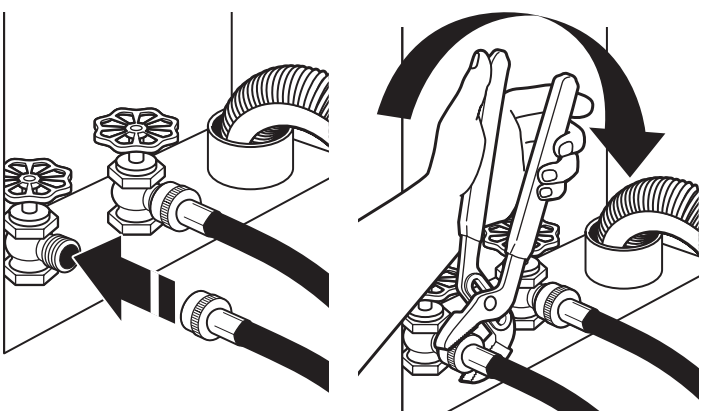
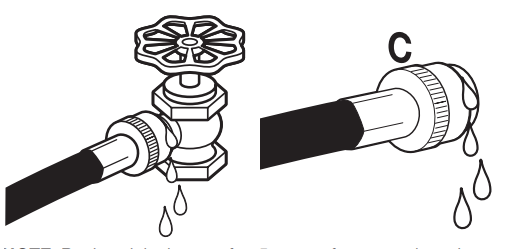
Attach a hose to the hot water faucet. Screw on coupling by hand until it is seated on the washer.
Attach a hose to the cold water faucet. Screw on coupling by hand until it is seated on the washer.
Using pliers, tighten the couplings with an additional two-thirds turn.
NOTE: Do not overtighten, use tape, or sealants on the valve. Damage to the valves can result.
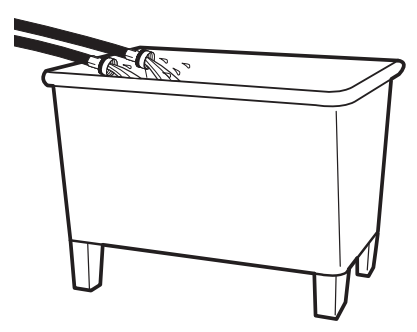
Clear water lines
Run water through both faucets and inlet hoses, into a laundry tub, drainpipe, or bucket, to get rid of particles in the water lines that might clog the inlet valve screens.
Check the temperature of the water to make sure that the hot water hose is connected to the hot water faucet and that the cold water hose is connected to the cold water faucet.
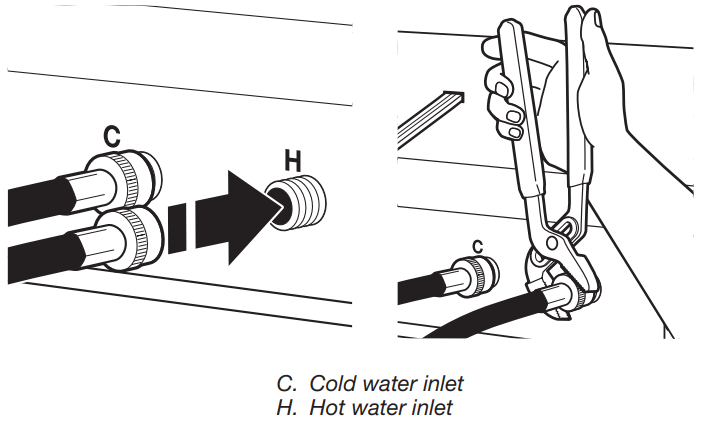
Connect the inlet hoses to the washer
Attach the hot water hose to the check valve on washer’s hot (H) water inlet valve. Screw on coupling by hand until it is seated on the check valve.
Attach the cold water hose to the check valve on washer’s cold (C) water inlet valve. Screw on coupling by hand until it is seated on the check valve.
Using pliers, tighten the couplings with an additional two-thirds turn.
Turn on the water faucets completely and check for leaks and at washer connection.
NOTE: Replace inlet hoses after 5 years of use to reduce the risk of hose failure. Record hose installation or replacement dates on the hoses for future reference.
Periodically inspect and replace hoses if bulges, kinks, cuts, wear, or leaks are found.
Connect the Drain Hose
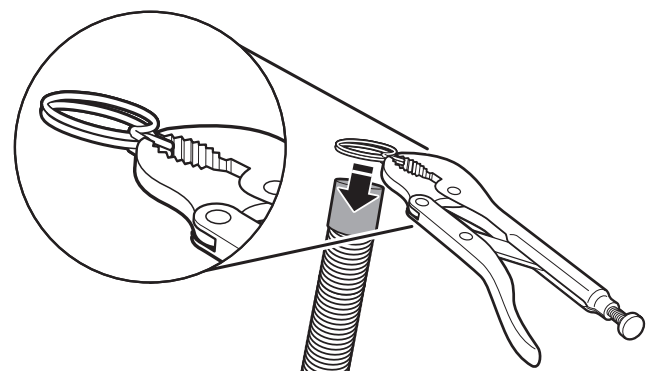
Remove drain hose from washer drum
1. Use locking pliers, squeeze hose clamp tabs together and insert over the end of drain hose.
3. Once drain hose is in place, release pliers.
Washer drain system can be installed using a floor drain, wall standpipe, floor standpipe, or laundry tub.
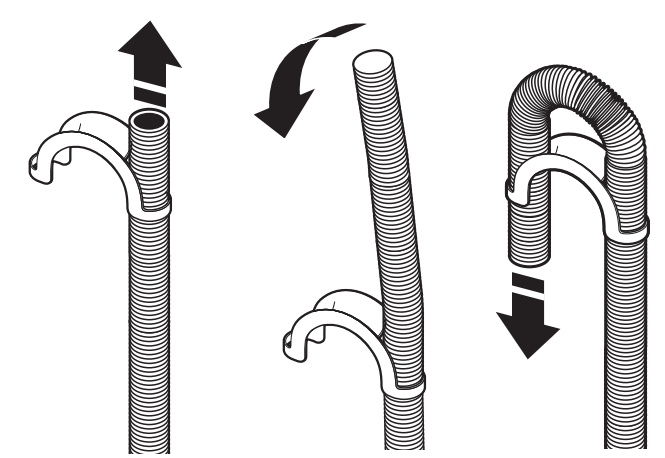
Laundry tub drain or standpipe drain
Connect the drain hose form to the corrugated drain hose.
To keep drain water from going back into the washer:
Use the drain hose form, and do not force excess drain hose into standpipe. Hose should be secure but loose enough to provide a gap for air.
Do not lay excess hose on the bottom of the laundry tub.
Floor drain
You may need additional parts. See Floor drain under “Tools and Parts.”
Secure the Drain Hose
Drain hose must be secured to stop the hose from moving when water is pumped out. If the drain hose moves, water may end up on the floor.
It is the responsibility of the installer to install and secure the drain hose into the provided plumbing/drain in a manner that will avoid the drain hose coming out of or leaking from the plumbing/drain.
Drape the power cord over the washer top.
Move the washer to its final location.
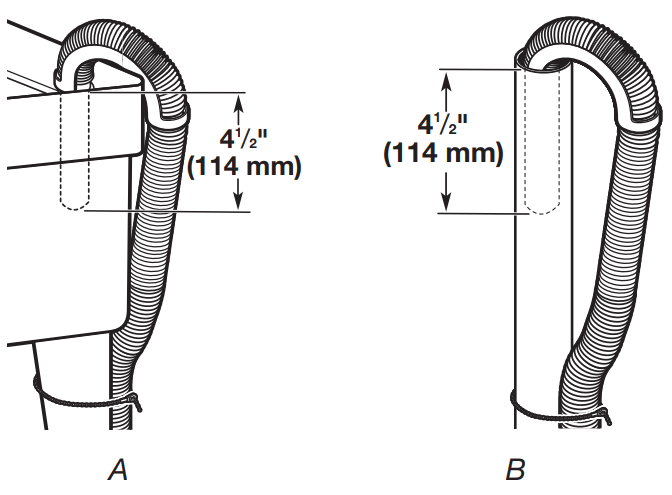
Place the drain hose in the laundry tub or standpipe as shown. See illustrations A and B.
NOTES:
■ Do not force excess drain hose back into the rear of the washer.
■ To avoid siphoning, do not seal or put more than 4½" (114 mm) of the drain hose into drainpipe or standpipe.
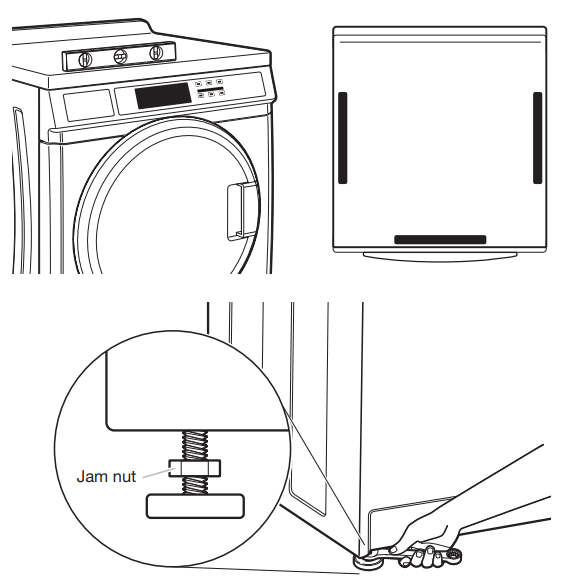
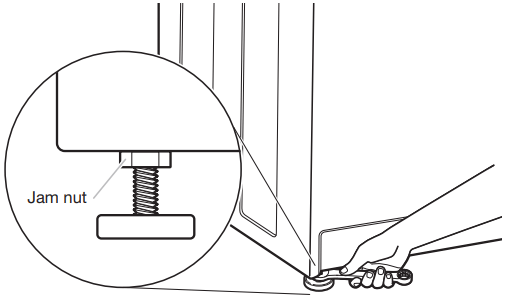
Level the Washer
Properly leveling your washer avoids excessive noise and vibration.
1. Check the levelness of the washer by placing a level on the top edge of the washer, first side-to-side, then front to back.
If the washer is against a wall, move the washer out slightly before tipping back. If the washer is not level, first prop the front with a wood block and adjust the feet as necessary; then, prop the back and adjust feet as necessary. Repeat this step until washer is level.
2. Make sure all four feet are stable and resting on the floor. Then check that the washer is perfectly level (use a level).
3. After the washer is level, use a 9⁄16" open-end wrench to turn the nuts on the feet tightly against the washer cabinet.
IMPORTANT: All four feet must be tightened. If the nuts are not tight against the washer cabinet, the washer may vibrate.
4. The washer should not move front to back, side to side, or diagonally when pushed on its top edges.
5. Slide the washer to its final location.
6. Confirm the levelness of the washer.
Complete Installation
C heck the electrical requirements. Be sure that you have the correct electrical supply and the recommended grounding method. See “Electrical Requirements.”
Check that all parts are now installed. If there is an extra part, go back through the steps to see which step was skipped.
Check that you have all of your tools.
Dispose of/recycle all packaging materials.
Check that the water faucets are on.
Check for leaks around faucets and inlet hose
Warning
7. Plug into a grounded 3 prong outlet.
8. To test and to clean your washer, measure ½ the detergent manufacturer’s recommended amount of High Efficiency (HE) detergent for a medium-size load. Pour the detergent into the detergent dispenser. Select any cycle and allow the washer to complete one whole cycle.
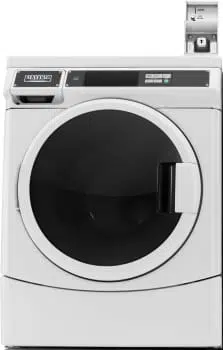
USER & SET-UP INSTRUCTIONS
NOTE: After the washer has been installed and plugged in, the display may show ‘0 MINUTES’. Once the washer has been plugged in and the washer door opened and closed, the display will show the price. In washers set for free cycles, the display will flash ‘SELECT CYCLE’.
PD Models: Insert coins until ‘SELECT CYCLE’ flashes in display. PR Models: A debit card is required rather than coins. In Enhanced Debit mode, the card balance will also display when a debit card is inserted into the reader.
Door must be closed before cycle selection is made,
Press fabric setting key pad for the wash cycle desired. After the cycle is started, the time will display and count down.
If a cycle is interrupted by opening the door, ‘RESELECT CYCLE’ will flash in the display. To restart the washer, close door, and reselect desired cycle.
General User Information
SCROLLING ‘OUT OF ORDER’ SHOWING IN DISPLAY
This condition indicates the washer is inoperative.
‘0 MINUTES’ SHOWING IN DISPLAY
This indicates the cycle is complete and the washer cannot be operated. Coins dropped or debit inputs during this condition will be stored in escrow but cannot be used until normal operation is restored by opening and closing the door. If a door switch fails, it must be replaced before normal operation can be restored.
A few seconds after power is restored, if a cycle was in progress at the time of the power failure, ‘RESELECT CYCLE’ will flash in the display, indicating the need for a key press to restart the washer.
DOOR LOCK
Prior to beginning a cycle, there is a door lock routine of lock/ unlock/relock; then cycle begins. The door will remain locked until the end of a cycle or approximately 2 minutes after a power interruption.
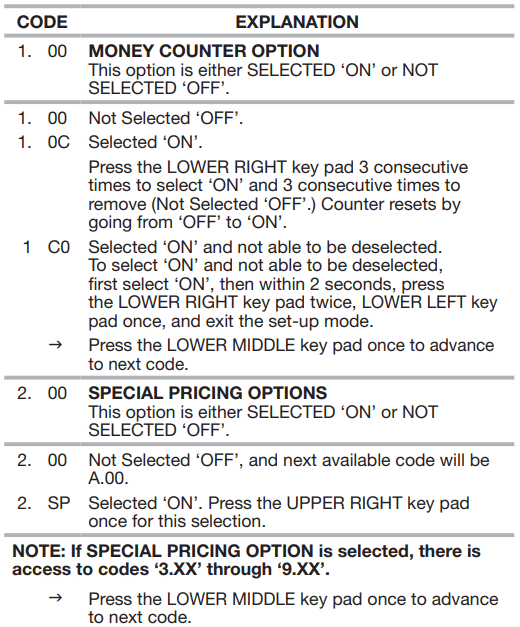
PRICING
After the door is opened following the completion of a cycle, the display indicates the cycle price (unless set for free operation). As coins are dropped or debit inputs arrive, the display will change to lead the user through the initiation of a cycle.
FREE CYCLES
This is established by setting the cycle price to zero. When this happens, ‘SELECT CYCLE’ will appear rather than a cycle price.
DEBIT CARD READY
This washer is debit card ‘cable’ ready. It will accept a variety of debit card systems, but does NOT come with a debit card reader. Refer to the debit card reader manufacturer for proper washer set-up. In models converted to a Generation 1 debit card system, debit pulses represent the equivalent of one coin (coin 1).
Control Set-up Procedures
IMPORTANT: Read all instructions before operating.
PD Models: Insert access door key, turn, and lift to remove access door.
PR Models: Once the debit card reader is installed (according to the reader manufacturer’s instructions), the set-up mode can only be entered by inserting a set-up card (supplied by the reader manufacturer) into the card slot. If a set-up card is not available, diagnostic modes can be entered by removing connector AA1 on the circuit board or by using the Service Access Code (see Service Access Code section, page 13) for PR models set up as a PN.
The lower fabric setting key pads and the digital display are used to set up the controls.
The display can contain 4 numbers and/or letters and a decimal point. These are used to indicate the set-up codes and related code values available for use in programming the washer.
HOW TO USE THE KEY PADS TO PROGRAM THE CONTROLS
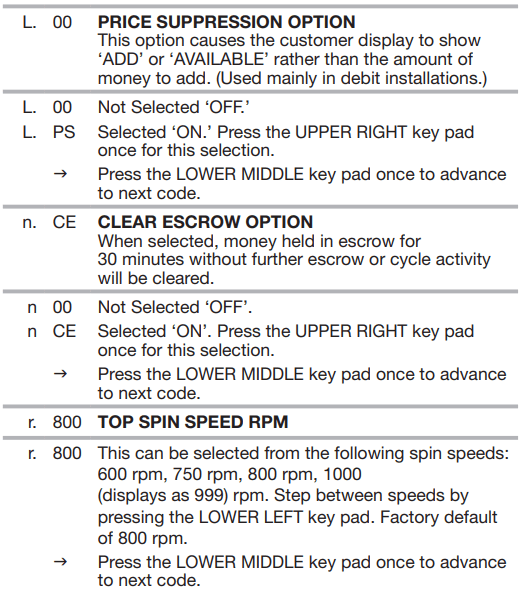
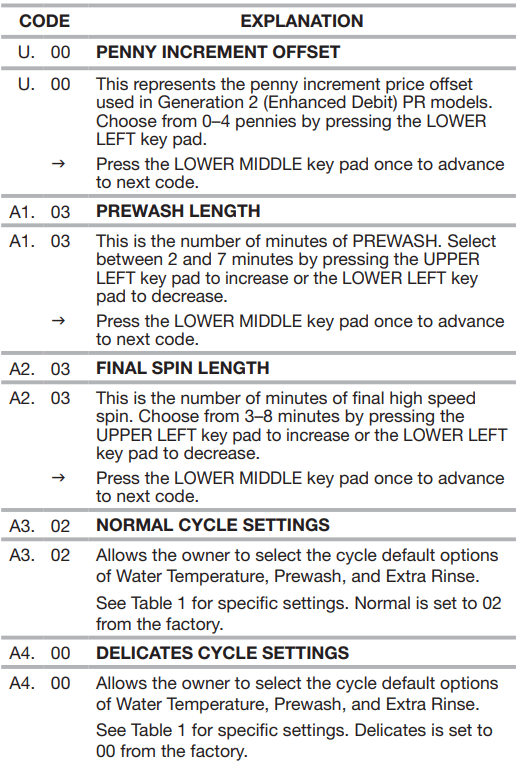
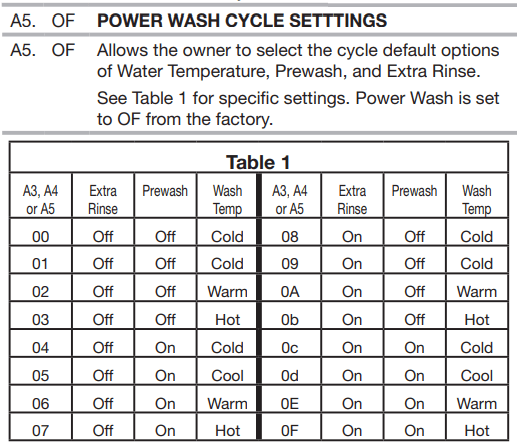
POWER WASH – UPPER LEFT button is used to adjust the values associated with set-up codes. Pressing the key pad will increment the value. Rapid adjustment is possible by holding the button down.
The TEMPERATURE - LOWER LEFT key pad is used to adjust the values associated with set-up codes. Pressing the key pad will decrement the value. Rapid adjustment is possible by holding down the key pad.
The EXTRA RINSE - LOWER MIDDLE key pad will advance through the set-up codes. Pressing the key pad will advance to the next available set-up code. Holding the key pad down will automatically advance through the set-up codes at a rate of 1 per second.
The DELICATES - UPPER RIGHT key pad is used to select or deselect options.
Start Operating Set-up
Before proceeding, it is worth noting that, despite all of the options available, an owner can simply choose to uncrate a new commercial washer, hook it up, plug it in, and have a washer that operates.
Washers are preset at the factory for an 11-minute wash period and 3 rinses (no extra rinse).
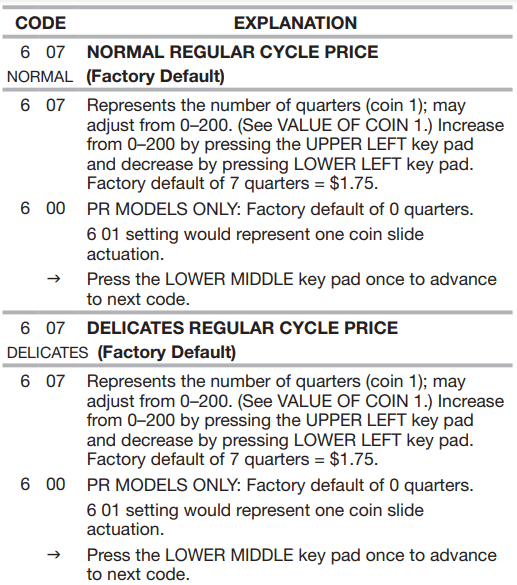
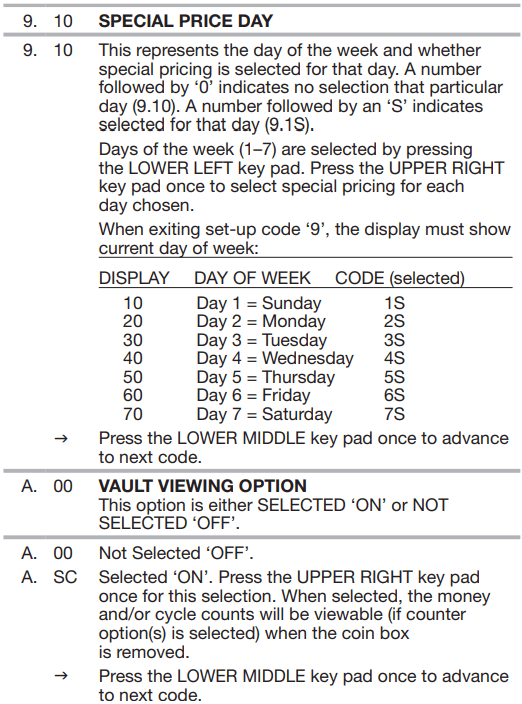
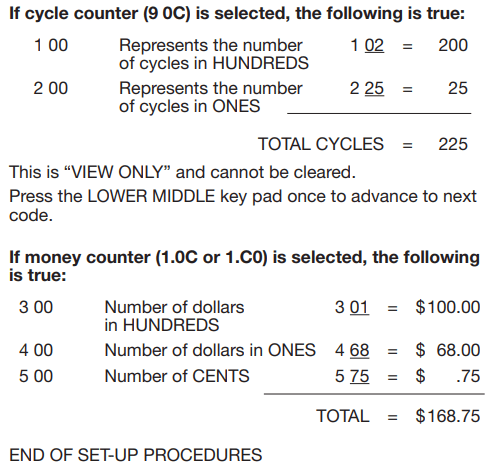
SET-UP CODES
The EXTRA RINSE - LOWER MIDDLE key pad will advance you from code to code.
The TEMPERATURE - LOWER LEFT and POWER WASH - UPPER LEFT key pads will change the code value.
The DELICATES - UPPER RIGHT key pad will select or deselect options.
FOR PR MODELS: The set-up codes are the same as for the “PD” model except where noted.
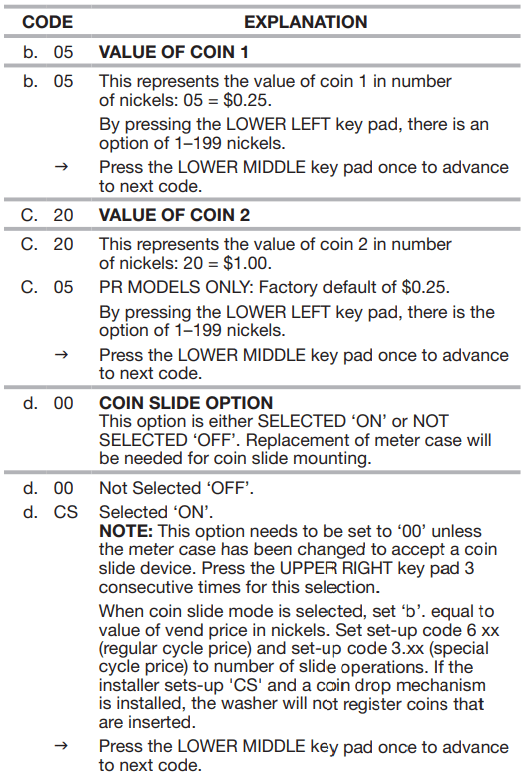
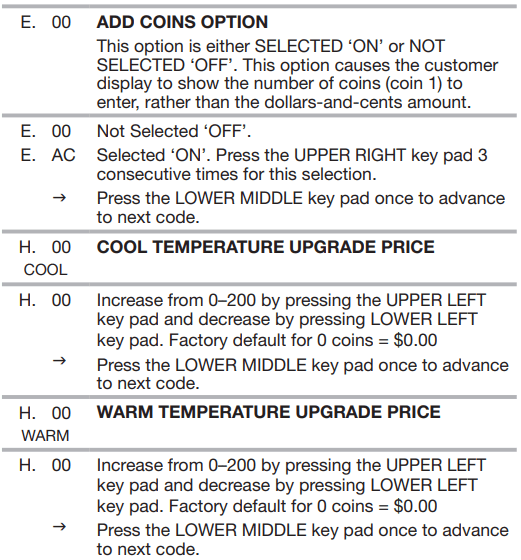
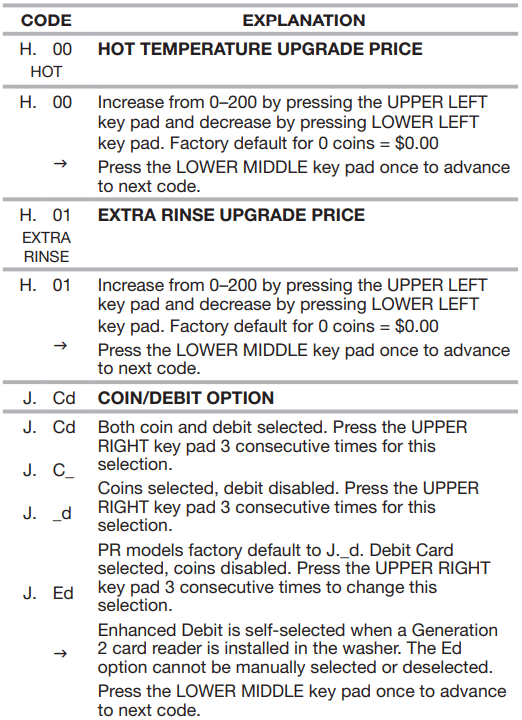
The set-up code is indicated by the one or two left-hand characters. The set-up code value is indicated by the two or three right-hand characters.
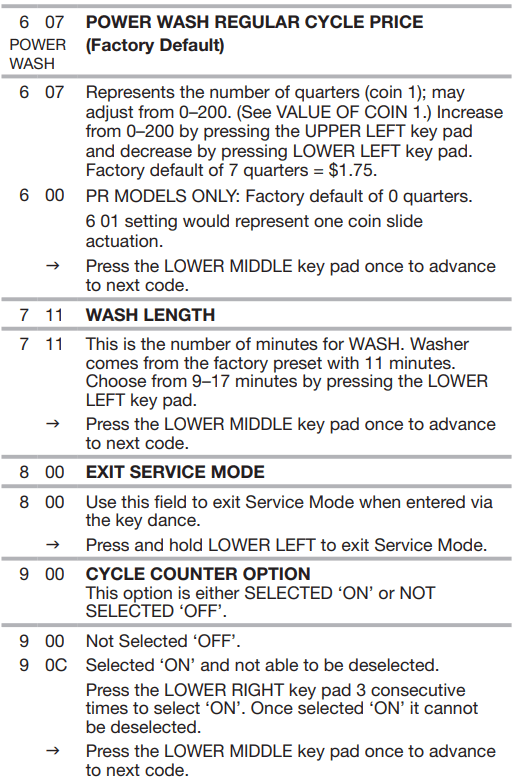
6 07 NORMAL REGULAR CYCLE PRICE NORMAL (Factory Default)
EXIT FROM SET-UP MODE
PD Models:
Reinstall access door.
PR Models:
Unplug washer or disconnect power.
Open console, reinsert plug into AA1, close console.
Plug in washer or reconnect power.
PR MODELS SET UP AS PN WITH PROGRAMMING SWITCH:
Turn key clockwise and remove.
PR MODELS SET UP AS PN WITHOUT PROGRAMMING SWITCH:
Set-up mode can be exited by using procedures from Service Access Code (Below).
SERVICE ACCESS CODE
This code can be entered to access service mode without removing the console. It only functions on washers set up for 0 vend price without any Special Pricing set-up, and the Coin/ Debit Option must be set to “J._d”. If the washer is not in failure mode, the door must be opened to proceed. Service Access Code contains 4 steps. Perform the following steps:
Press the upper left key pad.
Press the lower right key pad.
Press the upper right key pad.
Press the lower left key pad.
NOTE: If the Service Access Code procedure is not completed
WASHER CARE
Cleaning Your Washer
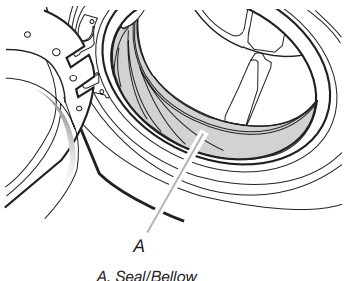
Cleaning the Door Seal/Bellow
Open the washer door and remove any clothing or items from the washer.
Inspect inner glass door. If debris is present, wipe off debris using damp cloth.
Inspect the colored seal/bellow between the door opening and the drum for stained areas. Pull back the seal/bellow to inspect all areas under the seal/bellow and to check for foreign objects.
If stained areas are found, wipe down these areas of the seal/bellow, using the procedure that follows:
Mix a dilute solution, using ¾ cup (177 mL) of liquid chlorine bleach, and 1 gal. (3.8 L) of warm tap water.
Wipe the seal/bellow area with the dilute solution, using a damp cloth.
Let stand 5 minutes.
W ipe down area thoroughly with a dry cloth and let the washer interior air dry with door open.
IMPORTANT:
Wear rubber gloves when cleaning for prolonged periods.
Refer to the bleach manufacturer’s instructions for proper use.
Washer Maintenance Procedure
This washer has a special cycle that uses higher water volumes in combination with liquid chlorine bleach to thoroughly clean the inside of the washer.
NOTES:
■ Read these instructions completely before beginning the cleaning process.
■ If necessary, the cleaning cycle may be interrupted by pressing the UPPER RIGHT key pad twice. However, this will not immediately stop the cycle. The washer will continue with several rinse and drain steps to ensure that all remaining bleach is rinsed from the washer.
Begin procedure
1. Open the washer door and remove any clothing or items from the washer.
2. Use liquid chlorine bleach:
Open the dispenser drawer and immediately add
2⁄3 cup (160 mL) of liquid chlorine bleach to the bleach compartment.
NOTE: Do not add any detergent to this cycle. Use of more than 2⁄3 cup (160 mL) of bleach will cause product damage over time.
3. Close the washer door and the dispenser drawer.
4. To start the Clean Washer cycle, first enter “Start Operating Set-up.” Then press and hold UPPER RIGHT for 1 second. With the entire display flashing, press BRIGHTS.
NOTE: The door will lock, the drum will rotate a ½ turn, then the door will unlock, lock again, and then the cycle will continue.
■ The washer will not fill, but the drum will rotate while the washer runs a short sensing cycle. This will take approximately 3 minutes.
5. The cycle will determine whether clothing or other items are in the washer.
If no items are detected in the washer, it will proceed to Step 7.
If any items are detected in the washer, “rL” or “F-34” will be displayed. Then the door will unlock.
■ Press UPPER RIGHT to cancel the failure code. Then repeat steps 1, 3, and 4 to start the cycle again.
6. Once the cycle has begun, allow the cycle to complete.
7. After the cycle is complete, leave the door open slightly, to allow for better ventilation and drying of washer interior.
Always do the following to maintain washer freshness:
Use only “HE” High Efficiency detergent.
Leave the door slightly open after each cycle to allow for better ventilation and drying of washer interior.
Clean the washer monthly using the Washer Maintenance Procedure and 2⁄3 cup (160 mL) of liquid chlorine bleach.
If the procedure does not sufficiently improve the washer freshness, please evaluate your installation and usage conditions for other causes.
Cleaning the exterior
Use a soft damp cloth or sponge to wipe up any spills. Occasionally wipe the outside of your washer to keep it looking new. Use mild soap and water. Do not use abrasive products.
Cleaning the dispenser drawer
The dispenser drawer is removable for easy cleaning.
Unlock the dispenser drawer by pressing the Release Lever. Remove the drawer.
Remove the inserts (the siphon from the softener and bleach compartments).
Wash the parts under running water. NOTE: Do not wash components in the dishwasher.
Re-install the inserts and return the dispenser to the drawer.
Water Inlet Hoses
Replace water inlet hoses after 5 years of use to reduce the risk of hose failure. Periodically inspect and replace water inlet hoses if bulges, kinks, cuts, wear, or leaks are found.
When replacing your water inlet hoses, mark the date of replacement.