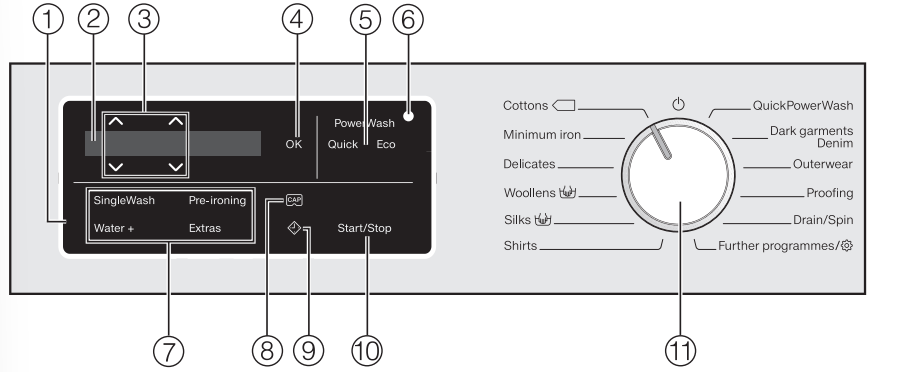
The control field consists of a display and various sensor controls.
The individual sensors are explained in the following sections.
2. Display
The following values are shown in the display and/or selected from it:
The temperature, spin speed and time left for the selected wash programme.
The individual values of the selection lists for Extras and settings.
3. Sensor controls
Values shown in the display can be changed with the sensors. The sensor increases the value or moves the selection list up; the sensor decreases the value or moves the selection list down.
4. OK sensor
Confirm selected values with the OK sensor.
5. PowerWash display with the Quick and Eco sensors
If the PowerWash indicator lights up when you select a wash programme, you can choose between three programme sequences. For further information, go to “4. Selecting programme settings”, section
PowerWash display with the Quick and Eco sensor controls”.
PowerWash indicator: Normal programme sequence
PowerWash indicator with Quick sensor: Short programme sequence
PowerWash indicator with Eco sensor: Energy-saving programme sequence
Operating the washing machine
6. Optical interface
For service technicians.
7. Sensor controls for Extras
You can supplement wash programmes with Extras.
If a wash programme has been selected, the sensor controls for the possible Extras light up dimly.
8. Sensor
The sensor can be used to activate detergent dispensing with a capsule.
9. Sensor
The sensor starts the Delay start function. With Delay start you can delay the start of the programme.
The start of the programme can be delayed from 15 minutes up to a maximum of 24 hours. This allows you to make use of night-time economy electricity rates, for example. See “4. Selecting programme settings”, section “Delay start” for more information.
10. Start/Stop sensor
Touching the Start/Stop sensor starts the selected programme or cancels a programme that has already been started. The sensor flashes slowly as soon as it is possible for a programme to be started and then lights up constantly after the programme has started.
11. Programme selector
This is used for selecting programmes and for switching off the appliance. The washing machine is switched on by selecting a programme, and switched off by turning the programme selector to the position.
Display
The standard display shows the following from left to right:
the selected wash temperature
the selected spin speed
the programme duration
Washing environmentally and economically
Energy and water consumption
To get the most out of your machine, load the maximum dry load for the programme you are using.
The energy and water consumption will be the lowest in relation to the size of the load.
When smaller amounts of laundry are washed, the Auto load control system will reduce the amount of water and energy used.
Use the Express 20 programme for small, lightly soiled loads.
Modern detergents make it possible to wash at lower temperatures. Using lower temperature settings will save energy.
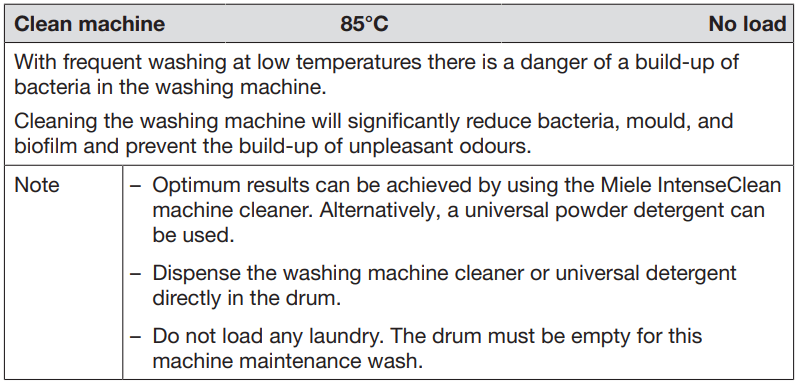
Washing at low temperatures and/or using liquid detergents can cause bacteria and odours to build up in the washing machine. Miele therefore recommends cleaning the washing machine once every month.
The washing machine reminds you to do so with the following message in the display: Hygiene info: Run a programme at min. 75°C or "Clean machine'" programme.
Detergent consumption
Do not exceed the amounts of detergent recommended by the manufacturer on the packaging.
Adjust the dosage to the degree of soiling of the laundry.
Reduce the amount of detergent with smaller loads (approx. ⅓ less than the amount recommended can be used when washing a half load).
When drying with a tumble dryer
Selecting the highest possible spin speed for the wash programme will save energy when drying in a tumble dryer afterwards.
Start washing step-by-step
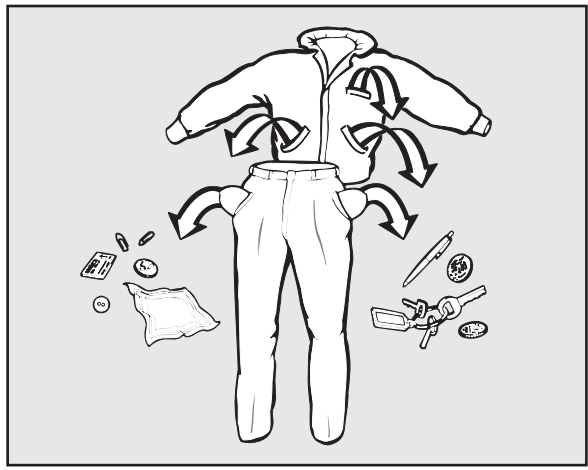
1. Preparing the laundry
Empty all pockets.
Foreign objects (e.g. nails, coins, paper clips, etc.) can cause damage to garments and components in the machine.
Check the laundry before washing and remove any such foreign objects.
Sorting the laundry
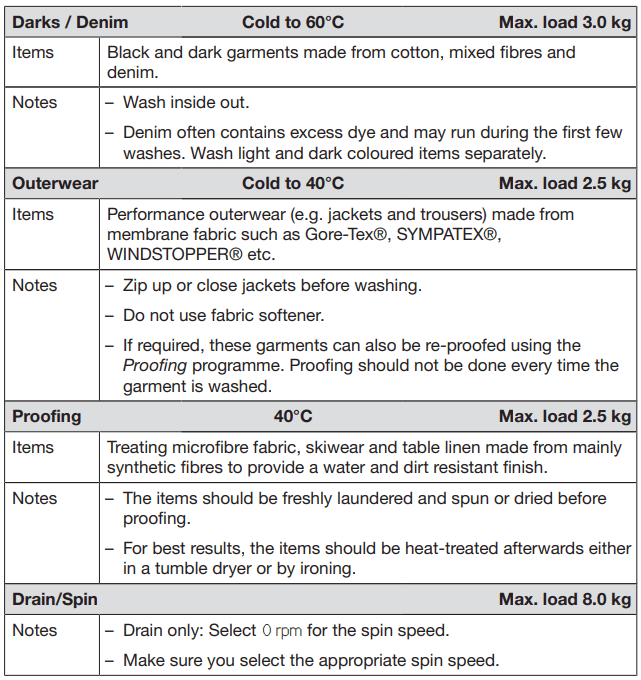
Sort the laundry by colour and by care label. Most garments have a textile care label in the collar or side seam.
Useful tip: Dark textiles often contain excess dye and should be washed separately several times before being included in a mixed load. Always wash white and coloured items separately.
Pre-treating stains
Badly soiled areas, stains etc. should be cleaned as soon as possible, preferably while still fresh. Spillages should be carefully dabbed off using a soft, colourfast cloth. Do not rub.
Useful tip: Stains can be pre-treated using some handy tricks, which can be found in “Miele's guide to laundry care”.
Please contact Miele to obtain a copy of this booklet.
Solvent-based cleaners (e.g. one containing benzine) can damage plastic parts. When pre-treating garments, make sure that any plastic parts (e.g. buttons) do not come into contact with cleaning agent.
Chemical (solvent-based) cleaning agents can cause severe damage to the washing machine. Do not use solvent-based cleaning agents in this machine.
General tips
Curtains: Remove lead weights first or place in a laundry bag.
Underwiring and collar stiffeners: Any loose wiring in bras, shirt collar stiffeners, etc. should be removed or sewn in.
Close any zips, attach velcro fasteners, fasten hooks and eyes etc. before washing.
Fasten duvet covers and pillow cases to prevent small items from being rolled up inside them.
Do not wash any items in this machine which are specified by the manufacturer as not washable on the care label ( symbol).
2. Selecting a programme
Switching on the washing machine
Turn the programme selector to a required programme.
Programme selection
Step 1: Selecting standard programmes via the programme selector
Turn the programme selector to the required programme.
The selected programme will appear in the display. This will then be replaced by the standard display.
Step 2: Selecting further programmes via the “Further programmes/position and the display:
Turn the programme selector to the Further programmes/ position.
The following appears in the display:
Touch the sensors until the programme you want appears in the display.
Confirm the programme with the OK sensor.
Preset programme parameters will be displayed, depending on the programme selected.
3. Loading the washing machine
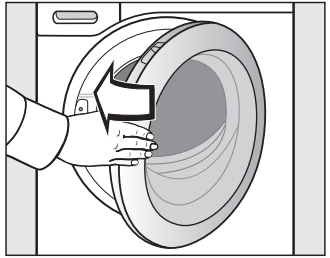
Opening the door
Reach under the door grip and pull the door open.
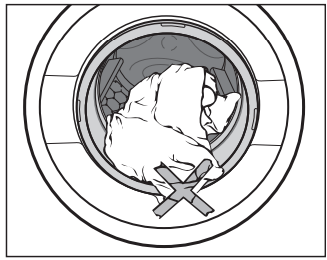
Check the drum for pets or foreign objects before loading it with laundry.
The most efficient use of energy and water is achieved when a full load is washed. However, do not overload as this reduces cleaning efficiency and causes creases.
Unfold the laundry and load loosely in the drum.
Mixing both large and small items gives better wash results and also helps distribute the load evenly during spinning.
Useful tip: Please note the maximum load for the different wash programmes.
The relevant programme load is always shown in the display when you select a programme.
Closing the door
Make sure that no items are caught between the door and the seal.
Shut the door with a gentle swing.
4. Selecting programme settings
PowerWash display with the Quick and Eco sensor controls
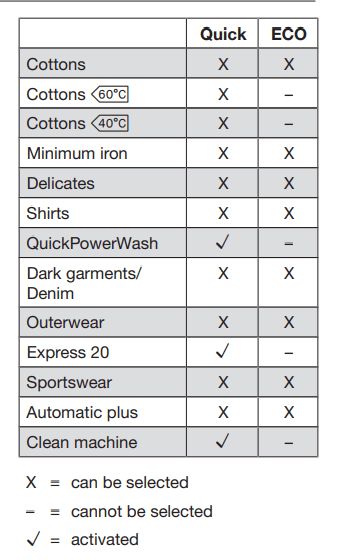
If the PowerWash indicator lights up when you select a wash programme, you can choose between three programme sequences. The wash result remains the same.
PowerWash display For a normal programme sequence.
Do not activate the Quick or Eco sensors.
Quick sensor For a short programme sequence. The mechanical action and energy will increase with this option.
Touch the Quick sensor.
Eco sensor For an energy-saving programme sequence. The wash temperature is reduced and the programme duration increased.
Touch the Eco sensor.
Useful tip: See the following table for a list of programmes in which the PowerWash display is active.
Selecting a temperature/spin speed
You can alter the preset temperature/ spin speed of a wash programme, if this option is permitted for that programme.
Touch the sensors above or below the temperature or spin speed value in the display until the temperature/spin speed you want appears in the display.
Selecting Extras
Touch the sensor for the Extra you want. It then lights up brightly.
Useful tip: You can select multiple Extras for a wash programme.
Not all the Extras can be used with every programme. If an Extra is not dimly lit, this option is not permitted for the wash programme
Extras sensor control
You can select additional Extras using the Extras sensor.
Touch the Extras sensor.
The following appears in the display:
Touch the sensors until the Extra you want appears in the display.
Confirm the Extra with OK.
Delay start
With Delay start you can delay the start of the programme.
The hours can be set from 00 to 24. The minutes can be set in 15-minute increments from 00 to 45.
Setting the Delay start time
Touch the sensor.
The following will appear in the display:
Set the hours with the sensors.
Confirm with the OK sensor.
The display will change:
Set the minutes with the sensors. Confirm with the OK sensor.
Useful tip: The values will count upwards and downwards automatically if you keep your finger on the sensor.
Cancelling Delay start
The selected Delay start time can be cancelled before the programme starts.
Touch the sensor. The selected Delay start time will appear in the display.
Set a time value of 00:00 h with the sensors. Confirm with the OK sensor.
The selected Delay start time has been cancelled.
After the programme has started, the selected Delay start time can only be changed or cancelled by interrupting the programme.
Altering Delay start
The selected Delay start time can be changed before the programme starts.
Touch the sensor.
Change the specified time and confirm with the OK sensor.
5. Adding detergent
There are several options for adding detergent.
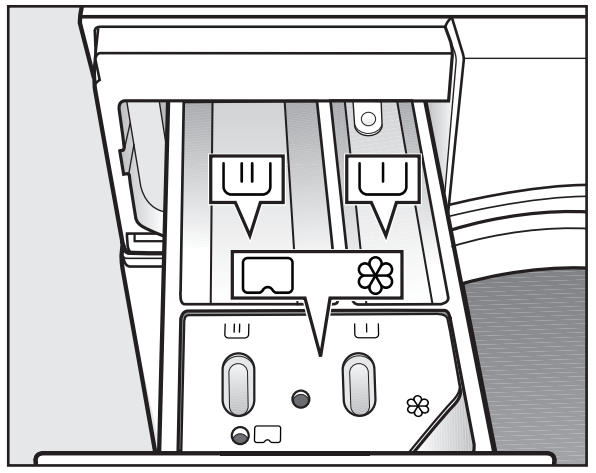
Detergent dispenser drawer
Any detergent suitable for automatic front loading washing machines can be used with this appliance. Please observe the instructions for use and dosage on the detergent packaging.
Filling with detergent
Pull out the detergent drawer and add detergents to the compartments.
Detergent for the pre-wash (divide the total recommended amount as follows: add ⅓ to compartment and ⅔ to compartment
Detergent for the main wash and soaking
Fabric softener, liquid starch, or capsules
Adding fabric softener
Add fabric softener or liquid starch to the compartment. Do not exceed the maximum level mark.
It will be automatically dispensed in the final rinse. At the end of the programme a small amount of water remains in the fabric softener compartment.
If starching frequently, thoroughly clean the dispenser compartment, especially the siphon tube, regularly.
Tips on dosing
Adjust the detergent dosage to the level of soiling of the laundry and the size of the load. Reduce the amount of detergent with smaller loads (e.g. reduce the amount of detergent by ⅓ when washing a half load).
Too little detergent results in:
laundry not getting properly clean and with time it may become grey and hard to the touch.
a build-up of mould in the washing machine.
grease not being completely removed from the laundry.
limescale deposits on the heater elements.
Too much detergent results in:
poor wash, rinse, and spin results.
a higher water consumption as an extra rinse cycle is automatically activated.
a greater burden on the environment.
Using liquid detergent with a prewash
Liquid detergent cannot be used for the main wash if the pre-wash has been selected.
Use powder detergent for the main wash.
Using detergent tablets or pods
Always put detergent tablets or pods directly in the drum with the laundry.
They cannot be added via the detergent dispenser drawer.
CapDosing
Three different types of capsule are available:
Fabric care (e.g. fabric softener)
Additives (e.g. detergent enhancers)
Detergent (for the main wash only)
Each capsule contains the correct amount for one wash cycle.
You can order the capsules online at shop.miele.com (depending on country) or from Miele (see the end of this booklet for contact details).
Keep capsules out of the reach of children.
Activating CapDosing
Touch the sensor.
The following appears in the display:
Touch the sensors until the capsule you want appears in the display.
Confirm the capsule with the OK sensor.
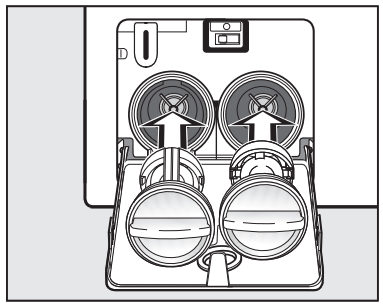
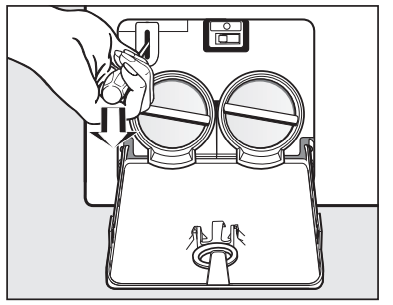
Inserting a capsule
Open the detergent dispenser drawer.
Open the lid of the compartment.
Press the capsule in firmly
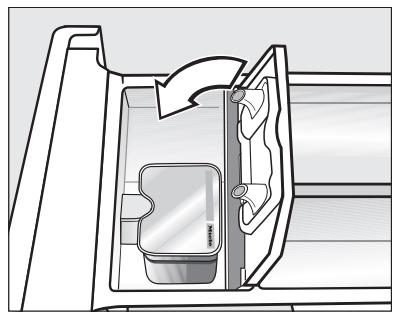
Close the lid and press it firmly shut.
Close the detergent dispenser drawer.
The capsule is opened by the act of inserting it in the detergent dispenser drawer. The contents can run out of the capsule if you then remove it from the drawer before it is used. In this case, dispose of the capsule and do not re-use it.
The wash programme will dispense the contents of the capsule at the correct time.
Water intake to the compartment is solely via the capsule.
No additional fabric softener may be added to the compartment when using a capsule.
Remove the empty capsule at the end of the programme.
For technical reasons a small amount of water will remain in the capsule.
Deactivating or changing CapDosing
CapDosing can only be deactivated or changed prior to programme start.
Touch the sensor.
Select No Cap (deactivate) or a different type of capsule (change).
6. Starting the programme - the end of the programme
Starting a programme
Touch the flashing Start/Stop sensor.
The door will lock ( will appear in the display to show this) and the programme will start.
If a Delay start time has been selected, it will count down in the time display. At the end of the Delay start time or immediately after the programme has started (if no Delay start time has been selected), the programme duration will appear in the time display.
Energy savings
After 10 minutes the indicators will dim. The Start/Stop sensor flashes slowly.
You can reactivate the indicators:
To do this, touch the Start/Stop sensor (this does not have any effect on a running programme).
At the end of the programme
The door is still locked during the Anticrease phase and the following will appear alternately in the display:
Touch the Start/Stop sensor. The door will be unlocked.
Pull open the door.
Remove the laundry
Items left in the drum could discolour other items in the next wash or become discoloured themselves. Check that all items have been removed from the drum.
Check the folds in the door seal for any small articles, e.g. buttons, which might be lodged there.
Turn the programme selector to the position. This switches the washing machine off.
If applicable, remove the used capsule from the detergent dispenser drawer.
Useful tip: Leave the detergent dispenser drawer slightly open to allow it to dry. Close the door of the washing machine.
Spinning
Final spin speed in the programme
When a programme is selected, the optimum spin speed for this wash programme will appear in the display. A faster spin speed can be selected for certain wash programmes. The highest selectable spin speed is indicated in the table.
Rinse and interim spin
There is a spin cycle after the main wash and between the rinses. A reduction in the final spin speed will also reduce the interim spin speed.
Omitting the final spin (Rinse hold)
If Rinse hold is selected, the laundry remains in the water following the final rinse cycle. This helps prevent creasing if the laundry is not going to be removed from the drum immediately after the end of the programme.
Set the spin speed .
To start the final spin:
The washing machine will display the maximum spin speed possible. You can reduce the spin speed.
Touch the Start/Stop sensor.
Ending the wash programme
Select this option if you want to remove the laundry when it is dripping wet and without having been spun.
Reduce the spin speed to 0.
Touch the Start/Stop sensor.
The water will be pumped away.
Omitting rinse and interim spin and the final spin
Before the start of the wash programme, reduce the spin speed to 0
Touch the Start/Stop sensor.
After the last rinse, the water will be pumped away and the anti-crease phase will switch on.
In some programmes an additional rinse is introduced with this setting.
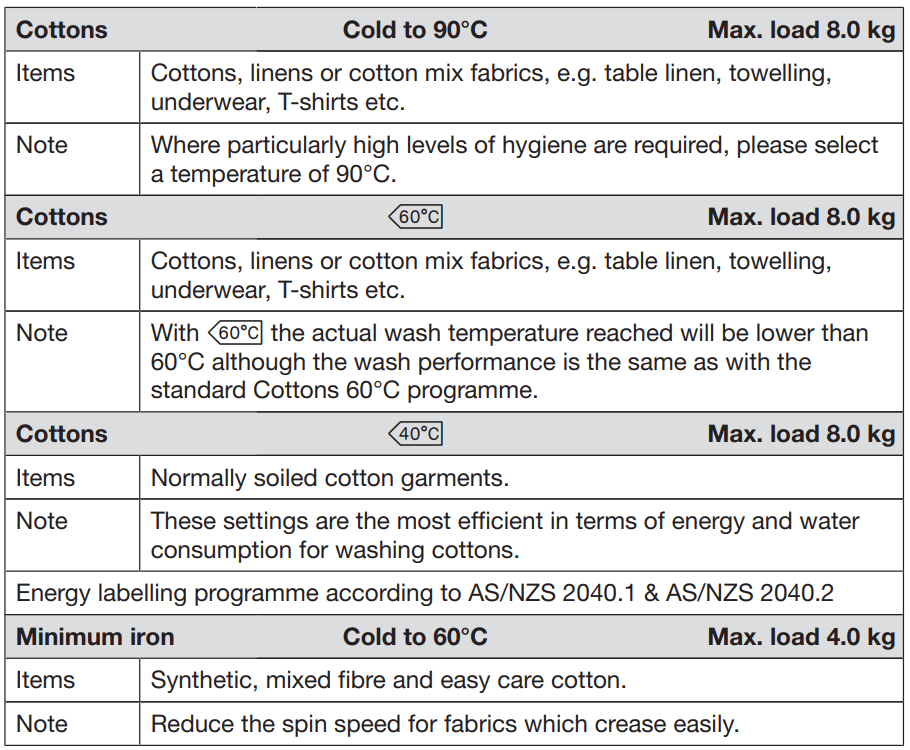
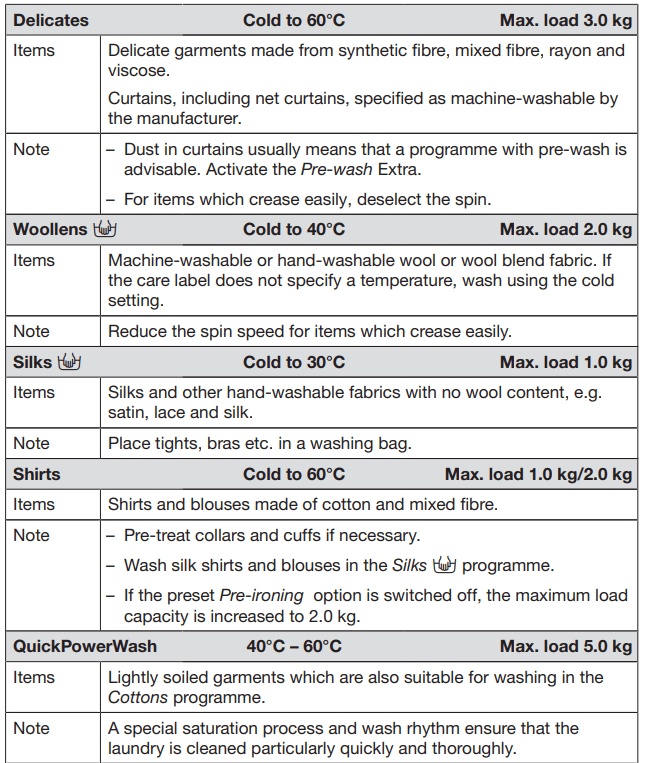
Programme chart
Programmes on the programme selector
Programmes accessed via Further programmes/on the programme selector
Settings /Maintenance
Settings You can use the settings to alter the washing machine's electronics to suit changing requirements. See “Settings” for more detailed information.
Maintenance The washing machine has a maintenance programme.
You can use the Extra option sensors to augment the wash programmes.
Extras
Selecting Extras
Extras are selected or deselected using the sensors in the control field.
Additional Extras can be selected from the display using the Extras sensor.
Touch the sensor for the Extra you want.
The relevant sensor will light up brightly.
Not all the Extras can be used with every programme.
An Extra that is not permitted for the wash programme is not lit dimly and cannot be activated by touch.
SingleWash
For efficiently washing a very small load kg) in a normal wash programme. The wash duration is reduced.
Please note the following advice:
Use liquid detergent
Reduce the dosage to a maximum of of the amount quoted for a 1/2 load
Pre-ironing
In order to reduce creasing, the laundry undergoes a smoothing process at the end of the programme. Reducing the maximum load by 50% will give a better result. Follow the instructions in the display. Small loads give a better result.
The garments must be suitable for drying in a tumble dryer and suitable for ironing
Water +
The water level in the wash and rinse stages is increased and a second rinse is carried out in the “Separate rinse/ Starch” programme.
You can select other functions for the Water + sensor control. These are described in “Settings”.
Additional Extras can be selected using the “Extras” sensor control
Selecting Extras in the display
Touch the Extras sensor.
The first Extra which can be selected appears in the display.
Touch the sensors until the Extra you want appears in the display.
Confirm the Extra with OK. The Extra will have a √ next to it.
Deselecting an Extra
Touch the Extras sensor. The first Extra which can be selected appears in the display.
Touch the sensors until No Extras appears in the display.
Confirm No Extras with the OK sensor.
The previously selected Extra is now deselected.
Pre-wash
For laundry with large amounts of dirt, e.g. dust and sand.
Soak
For heavily soiled and stained items with protein stains.
A duration of between 30 minutes and hours can be chosen for the soak process in 30-minute increments. The factory default setting is 30 minutes.
Intensive
For hard-wearing laundry that is very heavily soiled. Cleaning efficiency is increased through more intense mechanical action and the application of more heat energy.
Extra quiet
This option reduces noise levels during the wash programme. Use this if you want to wash during quiet periods (for instance when children are sleeping).
The final spin is automatically reduced to (Rinse hold). The programme duration is increased.
Extra gentle
Drum rotation and wash duration are reduced. Lightly soiled fabrics are washed more gently.
AllergoWash
This option should be used where high standards of hygiene are required. More energy is used to lengthen temperature holding times and more water is used to increase rinsing efficiency. The items must be suitable for drying in a tumble dryer and suitable for ironing
Programme sequence
Special features in the programme sequence
Anti-crease:
At the end of the programme the drum continues to turn at intervals for up to minutes to help prevent creasing.
Exception: There is no anti-crease phase in the Woollens programmes.
The door can be opened at any time during the anti-crease phase.
If a temperature of 60°C or higher is selected, and with , two rinses are carried out. If a temperature of less than 60°C is selected, three rinses are carried out.
An additional rinse is carried out if:
there is too much foam in the drum
a spin speed lower than 700 rpm has been selected.
An additional rinse is carried out if:
Water + has been selected and the options Extra rinse or Extra water + rinse have been activated in the Settings menu.
An additional rinse is carried out if: the Water + option is selected.
PowerWash 2.0
PowerWash 2.0, a washing technique developed by Miele, is activated in the following programmes with small and medium-sized loads:
Cottons
Minimum iron
Shirts
Automatic plus
How it works
Conventional washing techniques wash with more water than the laundry can absorb. This total volume of water needs to be heated.
The PowerWash 2.0 washing technique only uses slightly more water than the laundry can absorb. The water which has not been absorbed by the laundry heats up the drum and the laundry and is sprayed into the laundry over and over again. This reduces the amount of energy used.
Activation
The washing machine calculates the load at the beginning of the wash programme. PowerWash 2.0 is activated if the following conditions are present:
There is a small to medium-sized laundry load in the drum.
The temperature selected does not exceed 60°C.
The final spin speed selected must not be lower than 600 rpm.
CapDosing ) has not been selected for the main wash.
With some options (e.g. Pre-wash, Water +) PowerWash 2.0 is not activated.
Special features
Drenching phase
The washing machine will spin a few times at the beginning of the programme. During spinning, the water discharged is sprayed back into the laundry in order to achieve optimum moisture penetration.
The optimum water level is set at the end of the drenching phase. If necessary, the washing machine will pump water away and take in a little more fresh water.
Noises during the heating phase
Unusual bubbling noises can occur while the laundry and the drum are being heated.
Detergent
Dispense the correct amount of detergent (with smaller loads).
Changing the programme sequence
Cancelling a programme
You can cancel a programme at any time after it has started.
Touch the Start/Stop sensor.
The following will appear in the display:
Touch the OK sensor.
The suds will be pumped away. The following will appear in the display:
Wait until the door unlocks.
Pull open the door.
Remove the laundry.
Interrupting a programme
Turn the programme selector to the position. The washing machine switches off.
To continue: Turn the programme selector to the position of the wash programme that was started.
Useful tip: If appears in the display, the programme selector is in the incorrect position.
Changing a programme
After the successful start of a programme it is no longer possible to select a different programme.
Changing the programme sequence
Safety lock
Locking the machine prevents a wash programme being cancelled by mistake.
Activating the safety lock
Touch the Start/Stop sensor.
Use the sensor to scroll through the list to:
Touch the OK sensor.
Deactivating the safety lock
Touch the Start/Stop sensor.
Touch the OK sensor.
Adding or removing laundry
Laundry can only be added or removed at the beginning of a wash programme.
If the message to add laundry is not visible in the display, then it is no longer possible to add items of laundry.
Press the Start/Stop sensor, the following will appear in the display:
Touch the sensors until the following appears in the display:
Touch the OK sensor. The programme will stop and the door will unlock.
Pull open the door.
Add or remove items.
Close the door.
Touch the Start/Stop sensor. The wash programme will continue.
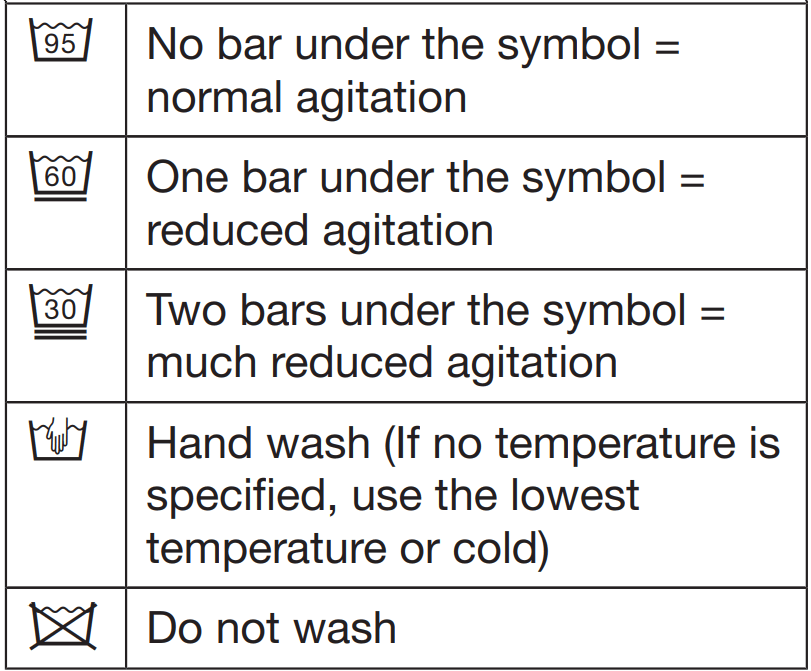
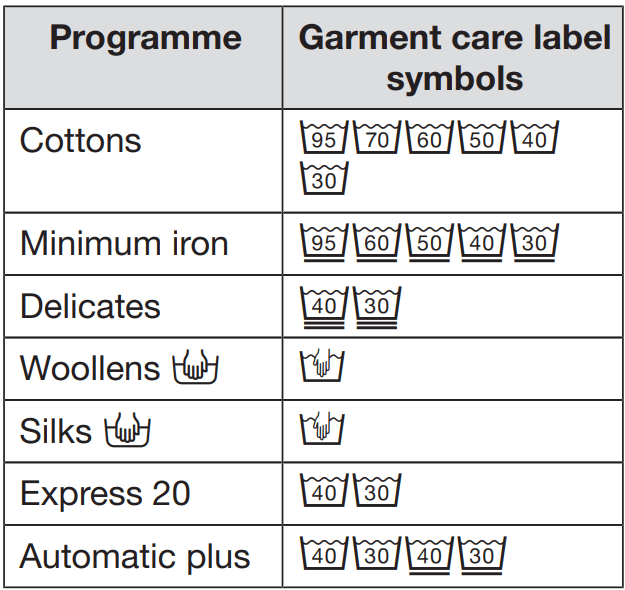
Garment care label symbols
Washing
The figure quoted in the symbol is the maximum temperature at which the garment can be washed. The number of bars under the symbol indicates the level of agitation permitted.
Programme selection examples
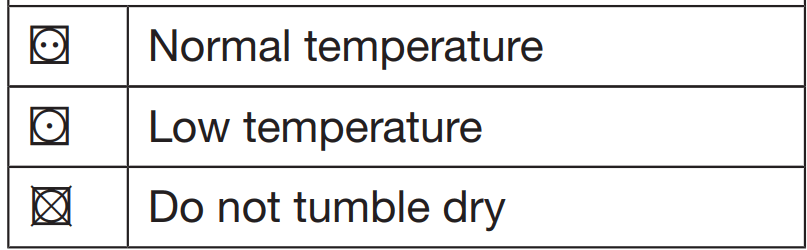
Drying
The number of dots indicates the drying temperature.
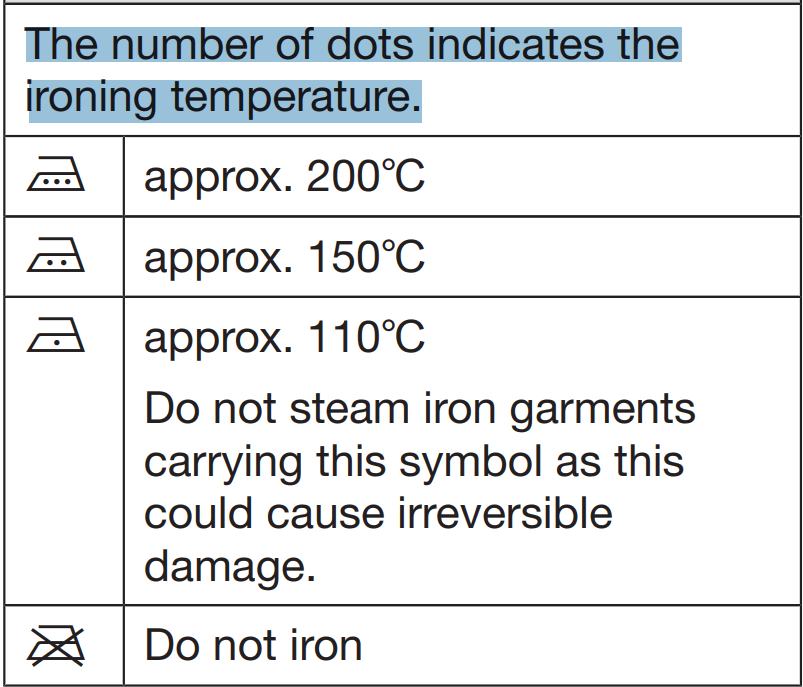
Ironing
The number of dots indicates the ironing temperature.
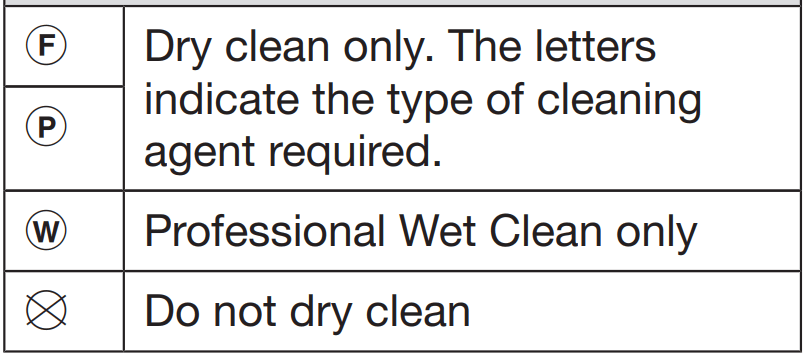
Professional cleaning
Bleaching
Detergent
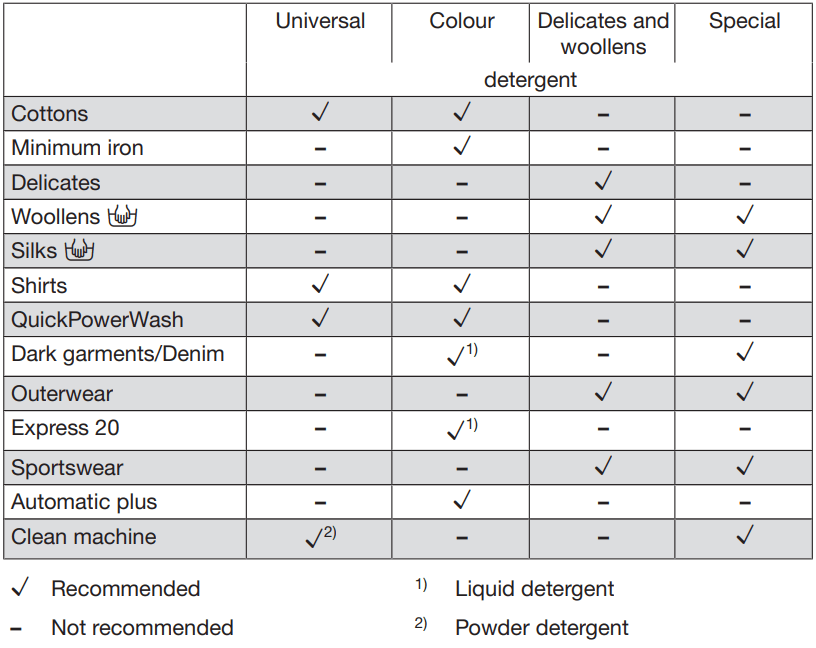
The correct detergent
All detergents produced for automatic front loading washing machines are suitable. Follow the manufacturer's instructions and dosage recommendations on the packaging.
The right amount to dispense will depend on the following:
The soiling level of the laundry.
The quantity of laundry.
The water hardness level. Check with your local water authority if you do not know the water hardness level in your area.
Detergent dispensing aids
Use dispensing aids (e.g. balls) if these are supplied with the detergent, particularly when using liquid detergent.
Refill packs of detergent
When purchasing detergent, buy refill packs wherever possible. This helps reduce the amount of waste packaging.
Fabric softeners and liquid starch
Fabric softeners make garments soft to handle and help prevent static cling when tumble drying.
Fabric shapers are synthetic starches and give an even stiffer hold.
Starch stiffens and gives body to items of laundry, e.g. shirts, tablecloths and bed linen.
Adding fabric softener or liquid starch separately
Prepare the starch in accordance with the manufacturer's instructions on the packaging.
Useful tip: When adding fabric softener, activate the Water + Extra.
Add fabric softener to the compartment or insert the appropriate capsule.
Add liquid starch to the compartment and powder or viscous starch to the compartment.
Select the Separate rinse/Starch programme.
Change the spin speed if necessary.
Activate the sensor if using a capsule.
Touch the Start/Stop sensor.
Colour run and dye removers/ dyes
Colour run and dye removers can cause corrosion in the washing machine.
Do not use colour run or dye removers in this washing machine.
Dyes suitable for use in domestic washing machines can be used.
However, please note that the salt used in the dyeing process can cause corrosion to stainless steel components in the machine if you use dye frequently. Always observe the manufacturer's instructions carefully.
When using the machine to dye fabric it is essential to select the Water + option.
Miele recommended detergents
The recommendations apply to the temperature ranges given in the Programme chart.
Cleaning and care
Cleaning the drum (Hygiene info)
Washing at low temperatures and/or using liquid detergents can cause bacteria and odours to build up in the washing machine. Use the Clean machine programme to clean the machine. Note the message in the display:
Hygiene info: Run a programme at min. 75*C or "Clean machine'" programme
External casing and fascia panel
Disconnect the machine from the mains electricity supply and withdraw the plug from the socket before cleaning the machine.
The washing machine must not be hosed down.
Clean the casing with a mild nonabrasive cleaning agent or soap and water using a well wrung-out cloth. Wipe dry with a soft cloth.
The drum can be cleaned using a suitable proprietary stainless steel cleaning agent following the manufacturer's instructions on the packaging.
Do not use solvents, abrasive cleaners, glass cleaners or allpurpose cleaning agents. These might damage plastic surfaces and other components because of the chemicals they contain.
Cleaning the detergent dispenser drawer
Washing at low temperatures and the use of liquid detergent can lead to a build-up of mould and bacteria in the detergent dispenser drawer.
For hygiene reasons, clean the entire drawer at regular intervals.
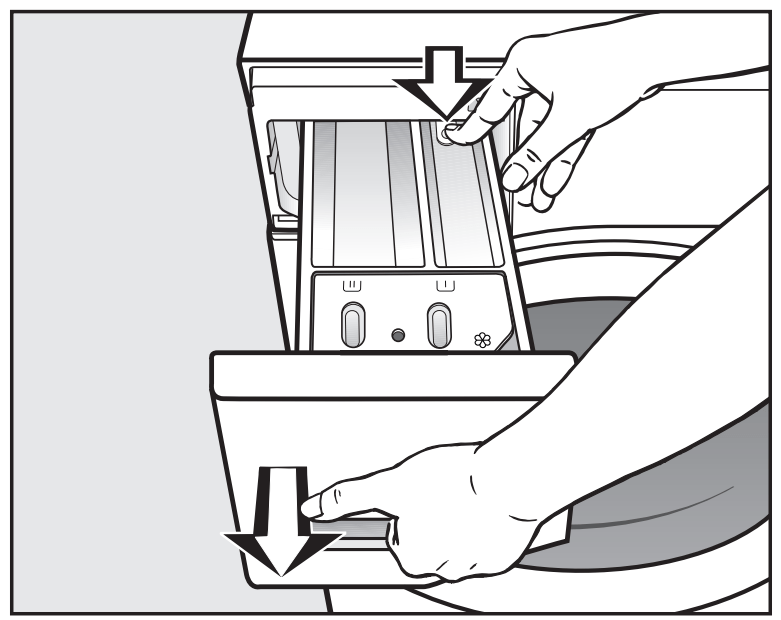
Removing the detergent dispenser drawer
Pull out the detergent dispenser drawer until a resistance is felt. Press down the release button and at the same time pull the drawer right out of the machine.
Clean the detergent drawer with warm water.
Cleaning the siphon and the compartment channel
Liquid starch results in clogging. If clogged, the siphon in the compartment will not work and the compartment can overflow. Clean the siphon particularly thoroughly after using liquid starch a few times.
1. Remove the siphon from compartment and clean under warm running water. Clean the siphon tube in the same way.
2. Replace the siphon.
Clean the fabric softener channel using a brush and warm water.
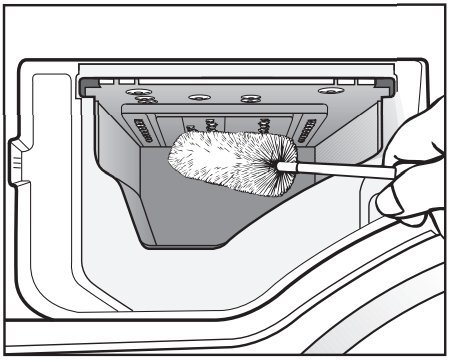
Cleaning the detergent dispenser drawer housing
Use a bottle brush to remove detergent residues and limescale from the jets inside the detergent dispenser drawer compartment.
Replace the detergent dispenser drawer.
Useful tip: Leave the detergent dispenser drawer slightly open to allow it to dry.
Cleaning the water inlet filter
The washing machine has two filters to protect the water inlet valve. These filters should be checked every six months or so, or more often if there are frequent interruptions to the water supply.
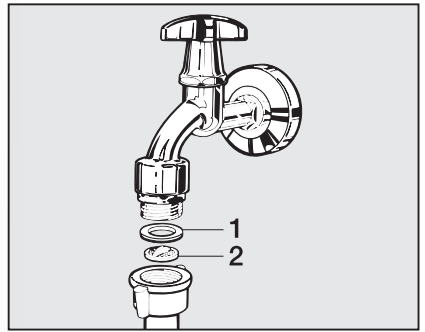
Cleaning the filter in the union in the open end of the inlet hose
First turn off the tap.
Unscrew the inlet hose from the tap.
Remove the rubber seal 1 from the recess.
Using pointed pliers, take hold of the plastic filter bar 2 and remove it.
Clean the filter and the seal.
Put the filter and seal back in the reverse order and reconnect the hose.
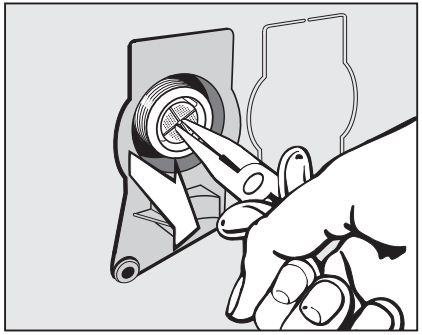
Cleaning the filter in the water inlet valve
Using pliers, carefully loosen the ribbed plastic nut (seal) on the inlet valve and unscrew.
Use pointed nose pliers to withdraw the plastic filter by the bar (see illustration).
Clean the filter and the plastic nut (seal).
Put the filter and plastic nut (seal) back in the reverse order and reconnect the hose.
After cleaning the filters, turn on the tap and check the connections are watertight. If water drips out, tighten the connections.
The two filters must be put back in place after cleaning.
Troubleshooting
The programme does not start
Problem
Possible cause and remedy
The control panel remains dark.
There is no power to the machine.
■ Check whether the mains plug is plugged in and switched on.
■ Check whether the circuit breaker has tripped.
The washing machine has switched off automatically to save energy.
■ Switch the washing machine on again by turning the programme selector.
You are asked to enter a code.
Access via a code has been activated.
■ Enter the code and confirm the entry. Deactivate the code if you do not wish this message to appear in the display the next time the machine is switched on.
The following appears in the display:
The door is not closed properly. The door lock could not engage.
■ Close the door again.
■ Start the programme again.
If the fault message appears again, contact Miele.
Fault messages after a programme has been cancelled
Problem
Possible cause and remedy
Check drainage. See
The water outlet is blocked or restricted. The drain hose has been fixed too high.
■ Clean the drain filter and the pump.
■ The maximum drain height is 1 m.
Water intake. See
The water inlet is blocked or restricted.
■ Check whether the tap is turned on properly.
■ Check whether the inlet hose is kinked.
■ Check whether there is sufficient water pressure.
The filter in the water inlet is blocked.
■ Clean the filter.
The drain pump is activated for 2 minutes. The washing machine door is then released. Wait for the drain pump to stop before switching the machine off.
The water protection system has reacted.
■ Turn off the tap.
■ Call Miele.
Service Fault F
There is a fault.
■ Disconnect the washing machine from the mains electricity supply, either by switching it off at the wall socket and withdrawing the plug, or by disconnecting it at the circuit breaker.
■ Wait at least 2 minutes before reconnecting the washing machine to the mains electricity supply.
■ Then switch the washing machine on again.
■ Restart the programme.
If the fault message appears again, contact Miele.
To switch off the fault message: Turn the programme selector to the position and switch the washing machine off.
Fault messages at the end of a programme.
Problem
Possible cause and remedy
Check detergent
Excessive foam has built up during washing.
■ Use less detergent next time and follow the manufacturer's instructions on dosage given on the packaging.
Hygiene into: Run a programme at min. 75°C or "Clean machine'" programme
A programme using a temperature above 60°C has not been run for a long time.
■ Turn the programme selector to Further programmes/.
■ Touch the AV sensors until Maintenance appears in the display.
■ Touch the OK sensor to confirm.
The following appears in the display: Clean machine
■ Touch the OK sensor to confirm.
■ Run the Clean machine programme using the Miele IntenseClean machine cleaner or a universal powder detergent.
This will clean the washing machine and prevent a build-up of bacteria and odours.
Align the washing machine
The Pre-ironing Extra which runs at the end of the programme could not be carried out properly.
■ Check whether the washing machine is aligned correctly as described in “Installation and connection - Levelling the machine”.
■ Check whether the maximum delivery head of 1 m has been exceeded.
If the fault message appears again, contact Miele. The washing machine can still be used, however without the Pre-ironing Extra.
The messages will appear at the end of the programme and when the washing machine is switched on and need to be confirmed with the OK sensor.
Fault messages at the end of a programme
Problem
Possible cause and remedy
Check filter + jet
The pumps are dirty.
■ Clean the pumps as described in “Problem solving guide - Opening the door in the event of a blocked drain outlet and/or power cut”.
■ Restart the programme after cleaning.
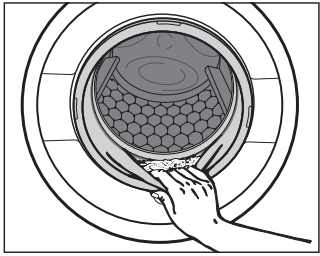
The jet in the top of the door ring is blocked with fluff.
■ Remove the fluff with your finger. Do not use any sharp or pointed tools to do this.
■ Restart the programme after cleaning.
If the fault message appears again, contact Miele.
The washing machine can still be used but with reduced functionality.
The messages will appear at the end of the programme and when the washing machine is switched on and need to be confirmed with the OK sensor.
General problems with the washing machine
Problem
Possible cause and remedy
The washing machine smells.
Hygiene info was ignored. A programme using a temperature above 60°C has not been run for a long period of time.
■ In order to prevent bacteria and unpleasant odours building up in the machine, run the Clean machine programme using the Miele IntenseClean washing machine cleaner or powder detergent.
The detergent dispenser drawer was left closed after washing.
■ Leave the detergent dispenser drawer slightly open to allow it to dry.
The machine shakes during the spin cycle.
The machine feet are not level.
■ Level the machine and adjust the feet correctly.
The laundry has not been spun properly and the laundry is still wet.
The machine detected an imbalance during the final spin and reduced the spin speed automatically.
■ Include both large and small items in the load as this will give better distribution.
The pump makes strange noises.
This is not a fault.
These slurping noises occur at the end of the pump sequence as a normal part of operation.
The display is in a different language.
A different language has been selected in “Settings / Language ”.
■ Set the language you want. The flag symbol will guide you.
Problem
Possible cause and remedy
Large amounts of detergent residue remain in the detergent dispenser drawer.
The water pressure is too low.
■ Clean the water inlet filter.
■ Please note that the water pressure must be at least 100 kPa (1 bar).
Powder detergent used in conjunction with water softeners tends to become sticky.
■ Clean the detergent dispenser drawer and, in the future, add washing powder to the dispensing drawer first, and then add the water softener.
Fabric softener is not completely dispensed or too much water remains in the compartment.
The siphon tube is not correctly positioned, or is clogged up.
■ Clean the siphon (see “Cleaning and care -Cleaning the detergent dispenser drawer”).
At the end of the programme there is still liquid in the capsule.
The small pipe in the detergent dispenser drawer onto which the capsule is placed is blocked.
■ Clean the small pipe.
This is not a fault.
For technical reasons, a small amount of water will remain in the capsule.
There is water next to the capsule in the fabric softener compartment.
The sensor was not activated or an empty capsule was not removed at the end of the last wash programme.
■ Activate the sensor when a capsule is next used.
■ Remove and dispose of the empty capsule at the end of each programme.
The small pipe in the detergent dispenser drawer onto which the capsule is placed is blocked.
■ Clean the small pipe.
An unsatisfactory wash result
Problem
Possible cause and remedy
Grey, greasy particles cling to washed laundry.
Insufficient amounts of detergent were used to break down the particles of grease in heavily soiled laundry.
■ Use more detergent or liquid detergent.
■ Before washing the next load, run the Clean machine programme using the Miele IntenseClean washing machine cleaner or a powder detergent.
White residues which look like powder detergent are seen on dark textiles after washing.
The detergent contained compounds (zeolites) to aid water softening which are not soluble in water. These have ended up on the laundry.
■ Try and brush off the residues with a soft brush once the laundry is dry.
■ Wash dark textiles using a detergent which does not contain zeolites. Liquid detergents usually do not contain zeolites.
■ Use the Dark garments/Denim programme.
The door will not open
Problem
Possible cause and remedy
The door cannot be pulled open during a programme.
The drum is locked during a programme.
■ Touch the Start/Stop sensor to cancel the programme.
The programme is cancelled, the door unlocks and you can pull it open.
There is still water in the drum and the machine is unable to drain.
■ Clean the drain filter and the drain pump as described in “Opening the door in the event of a blocked drain outlet and/or power cut”.
Extra cooling
appears in the display after a programme has been cancelled.
For safety reasons, the door cannot be opened if the suds temperature is higher than 55°C.
■ Wait until the temperature in the drum has decreased and the message has gone out in the display.
The following appears
The door lock has jammed.
■ Call Miele.
Opening the door in the event of a blocked drain outlet and/ or power cut
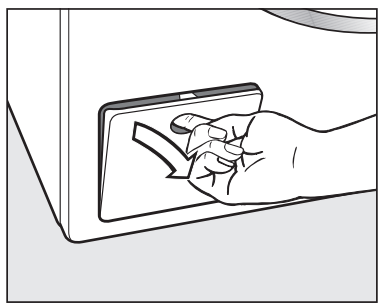
Switch off the washing machine.
Open the drain pump access panel
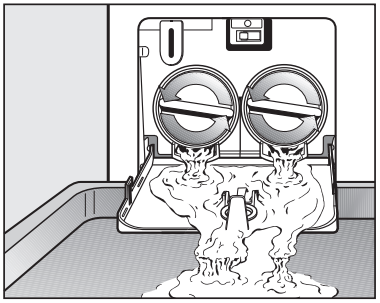
Blocked drain outlet
If the drain outlet is blocked, a larger quantity of water can remain in the washing machine.
Risk of scalding due to hot suds.
Escaping suds will be hot if laundry has been washed at high temperatures!
Carefully allow all suds to drain off.
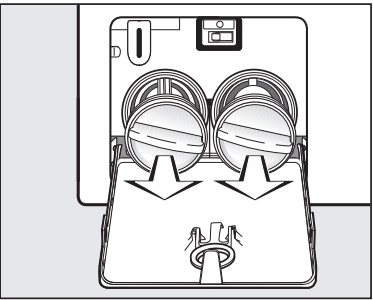
Procedure for draining the machine
When removing the drain filter, do not remove it completely.
Place a suitable container under the access panel, e.g. a universal oven tray.
Slowly unscrew the filters until water runs out. Be careful not to release too much water at once. If the flow of water is too strong, some water can seep into the machine base and activate the water protection float switch. This will prevent the machine from functioning.
To interrupt the flow of water, tighten the filters again.
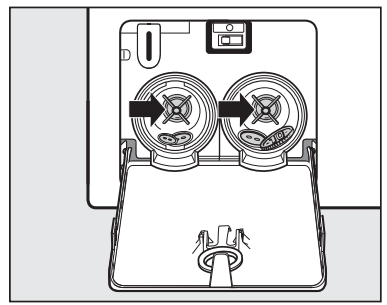
Once the flow of water ceases:
Remove the filters completely
Clean the filters thoroughly.
Remove any foreign objects (e.g., buttons, coins etc.) and clean the interior. Turn the impellers by hand to check that they rotate freely.
Replace the filters correctly (on the right and left) and tighten them.
Close the drain pump access panel.
Risk of water damage.
Make sure the drain filters are securely tightened. Otherwise there is a risk of water leakage during use.
Replace the drain filters correctly and tighten them securely.
Opening the door
Danger of injury due to rotating drum! Reaching into a moving drum is extremely dangerous. Danger of injury! Always make sure that the drum is stationary before reaching in to remove laundry.
Use a screwdriver to unlock the door of the machine as shown.
Pull open the door.
Contact in case of fault
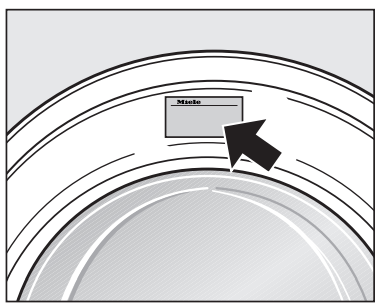
Please quote the model and serial number of your appliance when contacting Miele. This information can be found on the data plate.
The data plate is found above the porthole glass when the door is opened.

 sensor increases the value or moves the selection list up; the
  sensor decreases the value or moves the selection list down.
 Sensor
 Sensor
 position.
 symbol).
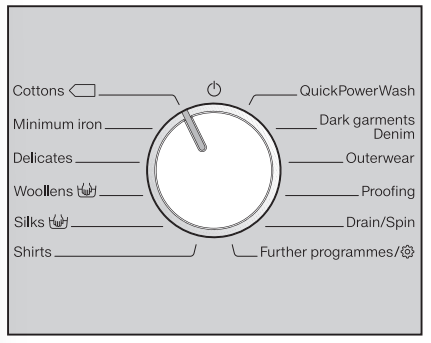
 position and the display:
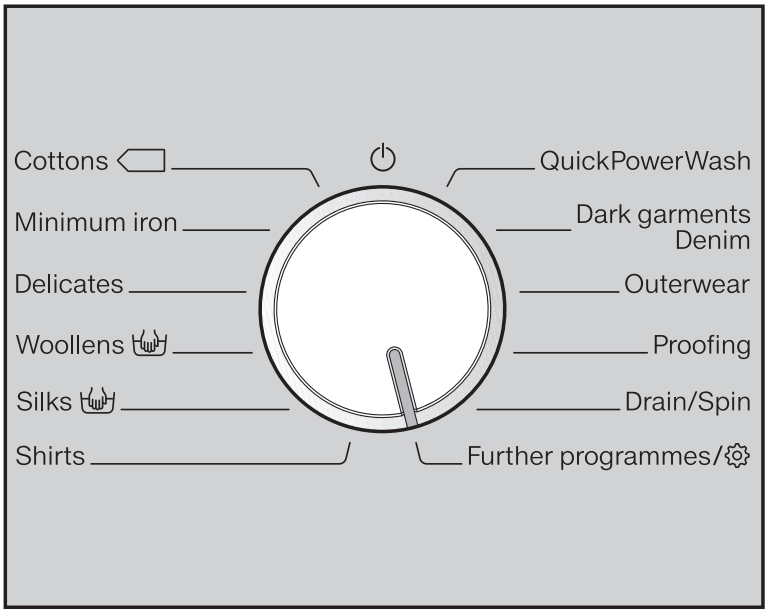
 position.
 sensors until the programme you want appears in the display.

 sensors above or below the temperature or spin speed value in the display until the temperature/spin speed you want appears in the display.

 Delay start
 sensor.

 Detergent for the pre-wash (divide the total recommended amount as follows: add ⅓ to compartment and ⅔ to compartment
 Detergent for the main wash and soaking
 Fabric softener, liquid starch, or capsules
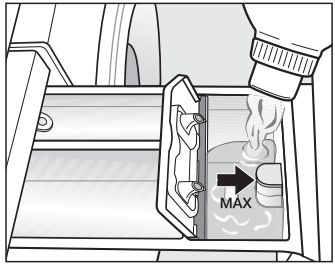
 compartment. Do not exceed the maximum level mark.
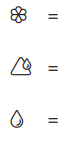
 sensor.
 sensors until the capsule you want appears in the display.
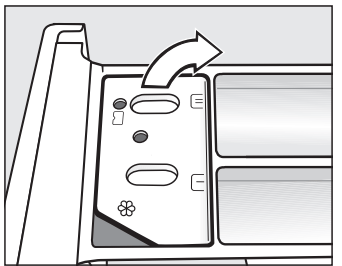
 compartment.
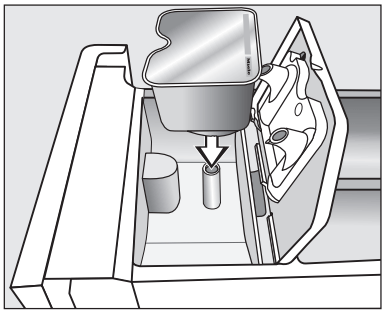
 compartment is solely via the capsule.
 sensor.
 will appear in the display to show this) and the programme will start.
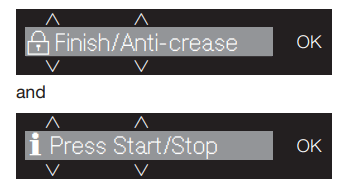
 position. This switches the washing machine off.
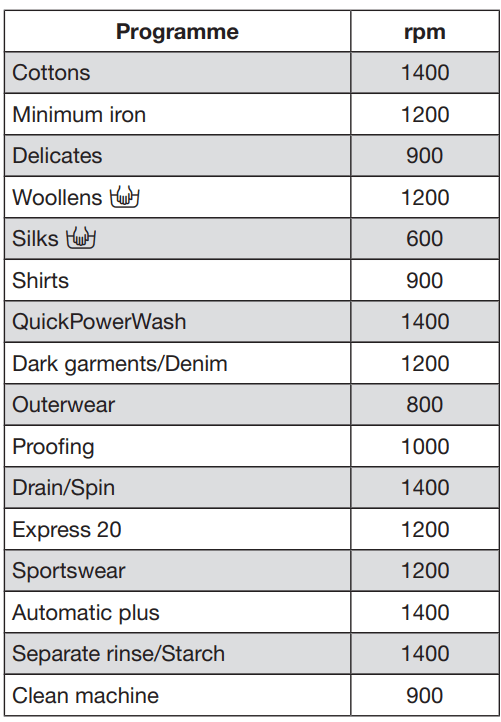
 .
.
 on the programme selector
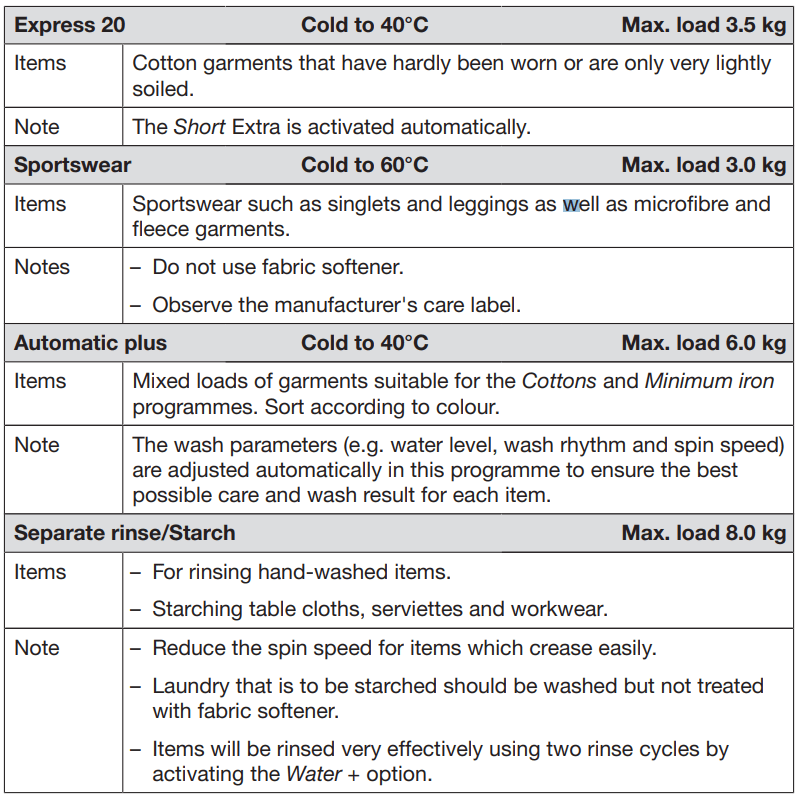

 and suitable for ironing
 sensors until the Extra you want appears in the display.
 (Rinse hold). The programme duration is increased.
 and suitable for ironing
 programmes.
 , two rinses are carried out. If a temperature of less than 60°C is selected, three rinses are carried out.
 ) has not been selected for the main wash.

 position. The washing machine switches off.
 appears in the display, the programme selector is in the incorrect position.
 sensor to scroll through the list to:


 sensors until the following appears in the display:

 compartment or insert the appropriate capsule.
 compartment.
 sensor if using a capsule.
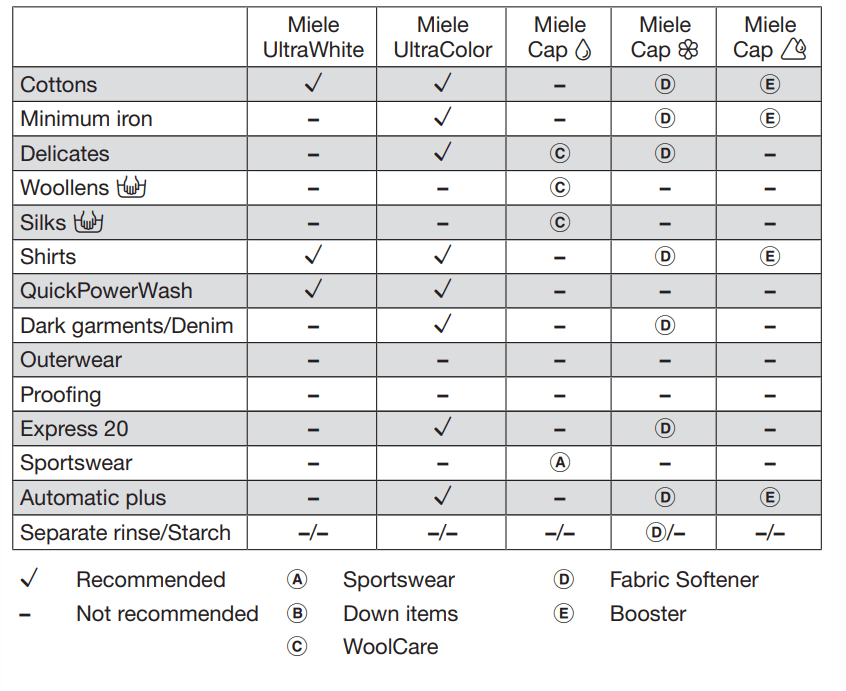
 compartment channel
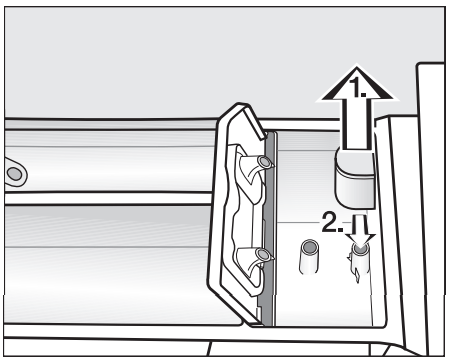
 compartment and clean under warm running water. Clean the siphon tube in the same way.
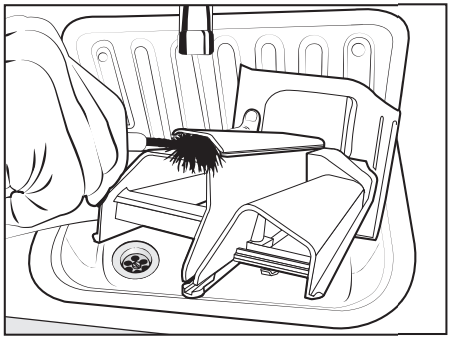


 Service Fault F
 position and switch the washing machine off.
 .
. ”.
”. compartment.
 sensor was not activated or an empty capsule was not removed at the end of the last wash programme.