
AUTOMATIC BREAD MAKER
User Manual
Model: MBF-016

Congratulations on being the proud owner of your new Secura
product. We believe in manufacturing only the highest quality kitchen,
home and personal care products for our customers. We are a
U.S.-based manufacturer and all our products meet strict standards
for manufacturing, safety and performance.
We also believe in providing the best customer service and support
in the industry. That is why we offer a 2-year warranty on this product
that ensures your satisfaction - so you can enjoy it for years to come.
If you have questions or need assistance, please email
[email protected]. For fastest response, please include
product name and model #, proof of original purchase, complete
contact information, and detailed information about the issue,
including pictures when applicable.
Your feedback and suggestions are also important to us, so please
email them to us at [email protected].
The Secura Team
Welcome to the Secura Family!
Copyright 2018 Secura, Inc. All rights reserved.
The material in this publication is protected under International and
Federal Copyright Laws and Treaties, and as such, any unauthorized
reprint or use of this material is strictly prohibited.
No part of this book may be reproduced or transmitted in any form without
the written permission of the author, except for the inclusion of brief
quotations in a review.
Reproduction or translation of any part of this work without the express
permission of the copyright holder is against the law.
IMPORTANT SAFEGUARDS
PARTS IDENTIFICATION
CONTROL PANEL
OPERATING GUIDE
SPECIFIC FUNCTIONS DESCRIPTION
RECOMMENDED RECIPES
CLEANING AND MAINTENANCE
TROUBLESHOOTING GUIDE
TECHNICAL INFORMATION
DISPOSAL
CONTACT
MANUFACTURER'S LIMITED WARRANTY
1
4
6
8
12
13
20
21
22
22
22
23
TABLE OF CONTENTS

1
Copyright 2018 Secura, Inc. All rights reserved. www.thesecura.com
IMPORTANT SAFEGUARDS
When using the electrical appliance, basic precautions should always be followed including
the following:
1. Read all instructions in this manual before using this appliance.
2. Do not touch the hot surfaces during and after using. Please use handles or knobs.
3. Unplug from outlet when not in use and before cleaning.
4. Do not use it outdoors.
5. Do not touch any moving or spinning parts of the appliance while operating.
6. Do not turn on the appliance without properly placed bread pan fi lled with ingredients.
7. Do not beat the bread pan on the top or edge while trying to remove bread from the pan.
8. Do not place the appliance on or near a hot gas or electric burner, or in a heated oven.
9. Do not place any combustible material like paper, cloth, etc. near or on the appliance.
10. Allow the bread maker to cool thoroughly before cleaning, putting in or taking off parts.
11. Do not let the cord hang over edge of table or counter or touch hot surface.
12. Clean the outer surfaces with a soft damp cloth after unplugging the cord from the
electrical outlet.
13. Please confi rm that the voltage of the electrical outlet corresponds to the required
voltage of this appliance.
14. Keep the appliance and its cord out of reach of children less than 8 years old.
15. Do not use appliance for anything other than intended use.
16. Ensure adequate ventilation by making sure the appliance is at least 4" away from any
obstruction.
17. To protect against electric shock, please do not immerse cord, plugs, or housing in water
or other liquid.
18. Do not use any third-party accessories or attachments as they may cause fi re, electric
shock or injury.
19.
Press "STOP" button to turn the appliance off before unplugging from the electrical outlet.
CAUTION: To reduce the risk of fi re, injury or
electrical shock along with extending the life
of your electrical appliances, please read and
follow all of the information in this manual
before using and save it for future reference.
AUTOMATIC BREAD MAKER
2
Copyright 2018 Secura, Inc. All rights reserved. www.thesecura.com
CAUTION:
Only connect to a properly grounded outlet to prevent the risk of electric shock.
CAUTION!
To avoid circuit overload, do not operate another
appliance on the same outlet or circuit.
WARNING!
Do not place any parts of the electrical appliance in the dishwasher or
submerge them in liquid. Only parts identifi ed in the Parts Identifi cation
section as dishwasher-safe may be washed in a dishwasher.
20. Do not operate any appliance if:
1) the cord or plug is damaged;
2) the appliance malfunctions;
3) the appliance is damaged in any manner;
Do not attempt to disassemble or repair a damaged appliance or power cord. Please
contact [email protected] for assistance.
21. Children shall not play with the appliance. Cleaning and maintenance shall not
performed by children unless they are older than 8 years old and supervised. Close
supervision is necessary when any appliance is used by or near children.
22. A short power-supply cord should be used to reduce the risk of injuries resulting from
becoming entangled in or tripping over a longer cord.
a. Longer extension cords are available and should be used with extreme caution.
b. If a longer extension cord is used:
1) Be sure the extension cord is compliant with the required voltage of the
appliance and the extension cord should be a grounding-type 3-wire cord.
2) The cord should be arranged so that it will not hang over the countertop or table top
where it can be pulled on by children or tripped over accidentally.

3
Copyright 2018 Secura, Inc. All rights reserved. www.thesecura.com
Always follow basic safety precautions
when using any electrical products,
especially when children are present.
FOR HOUSEHOLD USE ONLY
SAVE THESE INSTRUCTIONS
AUTOMATIC BREAD MAKER

4
Copyright 2018 Secura, Inc. All rights reserved. www.thesecura.com
PARTS IDENTIFICATION
1. Viewing window
2. Steel lid
3. LCD screen
4. Control panel
5. Handle
6. Steel housing
7. Plastic bottom
8. Bread pan
(Dishwasher-safe)
9. Stirring blade
(Dishwasher-safe)
10. Measuring cup
(Dishwasher-safe)
11. Measuring spoon
(Dishwasher-safe)
12. Hook
(Dishwasher-safe)
1
2
3
4
5
6
7
9 10 11 128
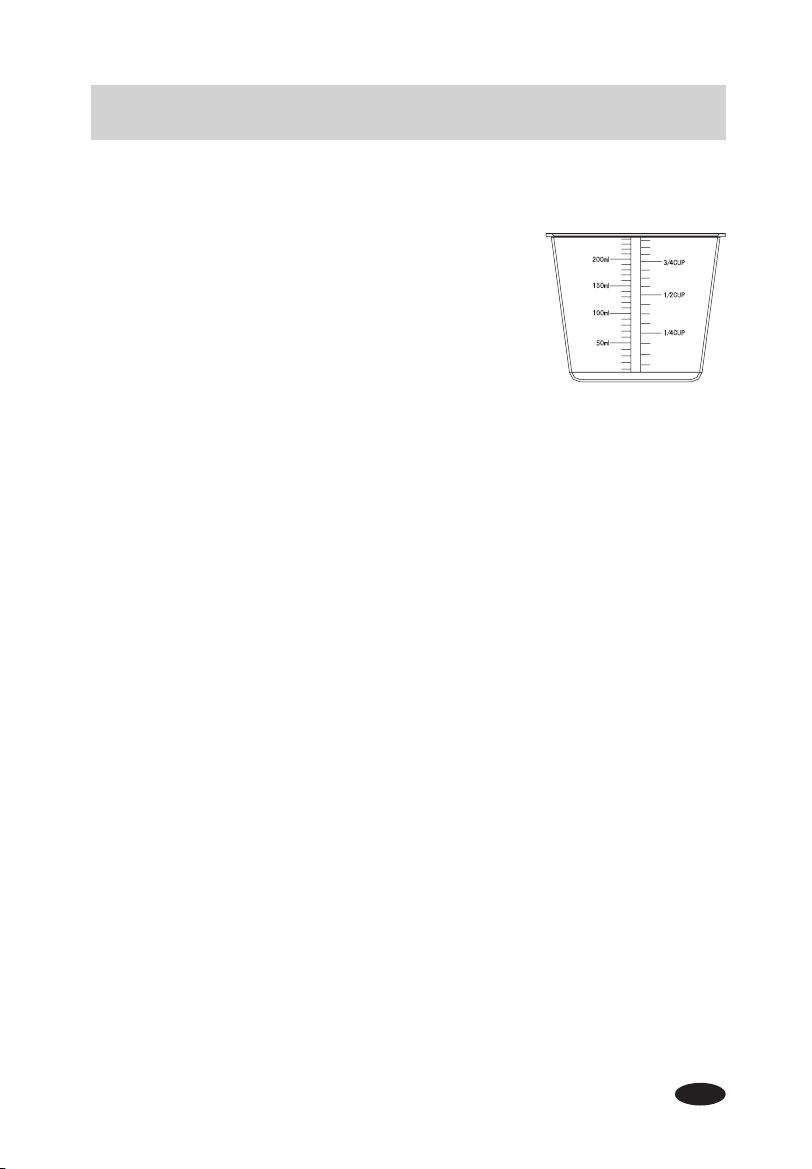
Measuring Cup:
1. Liquid ingredients: After fi lling the measuring cup, place it on
a fl at surface and view it at eye level to make sure the
amount of liquid is exact.
2. Dry ingredients: Use a spoon to place ingredients into the
measuring cup then “level off” the measurement with a small
spatula to make sure the measurement is exact or,
shake the cup lightly in order to fl atten the surface of powder.
Please do not shake the cup for a long time or sharply,
otherwise the powder might be lower than the desired amount.
Tips: One cup of fl our is about 160g.
Measuring Spoon:
Double-ended teaspoon/tablespoon measuring spoon is used for measuring ingredients.
Stirring Blade:
Used for stirring the ingredients.
Hook:
Used for taking the stirring blade out from bread.
5
Copyright 2018 Secura, Inc. All rights reserved. www.thesecura.com
AUTOMATIC BREAD MAKER
6
Copyright 2018 Secura, Inc. All rights reserved. www.thesecura.com
1. "MENU":
Press the "Menu" button to adjust the bread setting. Pressing and holding the "Menu"
button helps to navigate through the Menu quicker.
2. "LOAF": Three loaf sizes (500g/750/g/1000g) to choose from. The "LOAF" function
works only on Menu settings 1 – 10.
NOTE: 1.10 lb = 500 g, 1.65 lb = 750g, 2.20 lb = 1000g
3. "COLOR": Three available crust color settings: Light, Medium and Dark. The color will
display at the bottom of the screen. The "COLOR" function does not work on Menu
settings 11, 12, 13, 14, 16 and 17.
4. "START/"PAUSE": Press to start or pause the operation. Once the "START/PAUSE"
button has been pressed, the only buttons that will function are "STOP" and "START/
PAUSE".
NOTE: When the appliance is operating, press the "START/PAUSE" button to pause
the bread maker to add ingredients. The readout will show that the countdown timer is
paused. Press the button again to restart the appliance.
5. "STOP": Press and hold the button for 3 seconds to end the current program. The unit
will "beep" once and the bread setting will return to Menu 1 automatically.
6. "GLUTEN-FREE": Press to advance directly to Menu 9 (Gluten-Free). The machine will
begin to operate if the button is held for 3 seconds.
7. "KNEAD": Press to advance directly to Menu 13 (Pasta Dough). The machine will begin
to operate if the button is held for 3 seconds.
8. "+ / -" Reservation Time: Press to activate the Reservation time (see below for specifi c
Menu settings). Time will increase or decrease in 10-minute increments. Press and hold
to increase or decrease time quickly. The readout will fl ash. Press the "START/PAUSE"
button and the readout will display ":" and will stop fl ashing. Press "START/PAUSE" a
second time to begin the operation. Time displayed will vary by Menu selection as shown
below.
Menu Settings 1-10, 13 and 14 only: Press the "+" or "- " button to activate the •
Reservation time. The time displayed will increase "+" or decrease "-" in 10-minute
increments. Press and hold to add or decrease time quickly. The maximum combined
CONTROL PANEL
1 - Soft Bread 2 - Sweet Bread 3 - Natural sourdough 4 - French Bread
5 - Whole Wheat 6 - Quick Bread 7 - Sugar-free 8 - Multigrain
9 - Gluten-free 10 - Buttermilk Bread 11 - Bread Dough 12 - Pizza Dough
13 - Pasta Dough 14 - Leaven Dough 15 - Cake 16 - Jam
17 - Yogurt 18 - Bake 19 - Custom Mode

7
Copyright 2018 Secura, Inc. All rights reserved. www.thesecura.com
AUTOMATIC BREAD MAKER
time is 15 hours.
Time displayed will be delayed start + cycle time.
Menu Settings 17, 18, and 19 only: Press the "+" or "- " button to add cooking time to •
the cycle. It does not delay the start time of the cycle.
Time displayed will be the adjusted cycle time.
Try a simple recipe: Soft Bread at 750 g and medium color (Menu 1)
1. Clean the bread pan, stirring blade, measuring cup and measuring spoon.
2. Secure the stirring blade into the revolving axle in the bread pan.
3. Please follow the Soft Bread recipe in the Recommended Recipes on page 14. Yeast
powder should be added last. (on top of the fl our) Do not allow the yeast powder to get
wet.
4. Position the bread pan into the bread maker and secure it by turning it clockwise. Close
the lid.
5. Plug the bread maker into the electrical outlet, the unit will "beep" and the screen will
display the Default Menu immediately: 750 g / Medium Color / Soft Bread (Menu 1)
6. Press the "START / PAUSE" button, the appliance will "beep" and the bread maker will
begin to operate.
7. The bread is ready when the timer has expired. At this time, "Keep warm" will appear in
the LCD screen for one hour and then the bread maker will automatically turn off.
8. Press and hold the "STOP" button for 3 seconds to turn the appliance off and the
appliance will "beep". "Keep warm" does not function after the "STOP" button has been
pressed.
9. After the bread is fi nished, the bread pan may be hot. To avoid a burn hazard, use heat
resistant gloves while handling the bread or any parts of the bread maker. Turn the
bread pan counter-clockwise to release it from the bread maker and then lift it out. Turn
the bread pan upside down to allow the bread to slide out onto a cooling rack.
10. Allow the bread maker to cool completely before cleaning and storing.
Tips
If the stirring blade is diffi cult to remove from the bread
pan after the bread has been removed, please use the
hook as follows:
1) Insert the hook into opening in the top of the stirring
blade (Fig. A)
2) Gently lift the stirring blade out of the bread pan (Fig. B)
8
Caution:
Make sure the power cord, outlet and fuse box are not damaged.•
Place the bread maker on a dry, fl at, level and heat resistant surface.•
Bread maker must be grounded while in use. To reduce the risk of electrical shock, this •
appliance is equipped with a cord with a 3-prong grounding-type plug for insertion with a
proper grounding-type receptacle.
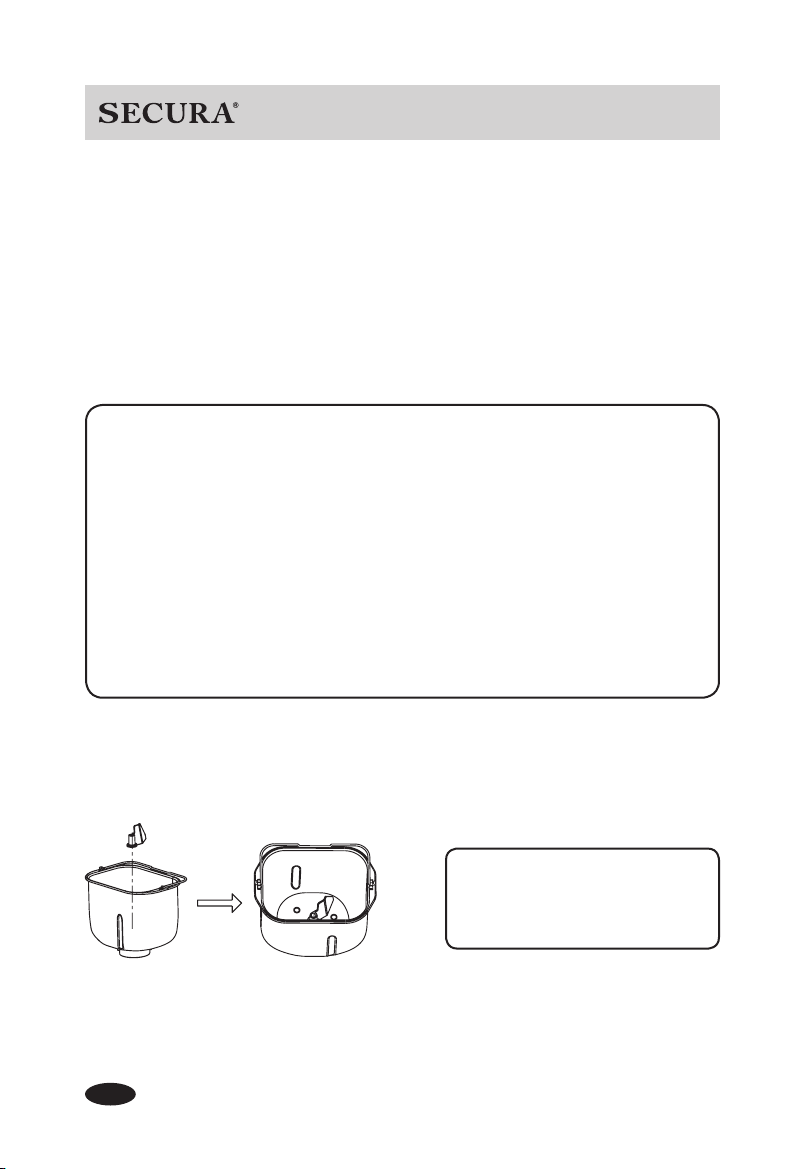
How to make bread:
1. Remove the bread pan from the appliance by twisting the pan counter-clockwise and
insert the stirring blade into bread pan.
OPERATING GUIDE
Copyright 2018 Secura, Inc. All rights reserved. www.thesecura.com
FOR THE FIRST USE
The appliance may emit a small amount of smoke which will dissipate quickly
during the fi rst use. This is normal for appliances with a heating element due to the
manufacturing process. Ensure adequate ventilation by making sure the appliance is
at least 4" away from any obstruction.
1. Please make sure all parts and accessories are complete and free of damage.
2. Clean all the parts as shown in the Cleaning and Maintenance section.
3. Set the bread maker on Bake mode (Menu 18) and bake empty for about 10
minutes to burn off the residue from manufacturing. Allow it to cool and clean all the
parts again.
4. Dry all parts thoroughly and assemble them, the appliance is ready for the fi rst use.
Secure the stirring blade into the
rotation axle inside the bread pan.
9
2. Add the ingredients per your recipe. (refer to Recommended Recipes in this manual)
3. Place the bread pan into the bread maker and lock it into position by twisting it clockwise;
close the lid.
4. Plug bread maker to the electrical outlet and the unit will "beep". The default Menu 1
750g/Medium Color/ soft bread will show in the LCD screen.
5. Select your desired bread setting by pressing "MENU".
6. Select your Bread Color and Loaf Size
7. Set "Reservation" Time
If you do not wish to delay the start time, please skip this step.
Please refer to "Reservation function" in SPECIFIC FUNCTIONS DESCRIPTION in this
manual for more detail.
Copyright 2018 Secura, Inc. All rights reserved. www.thesecura.com
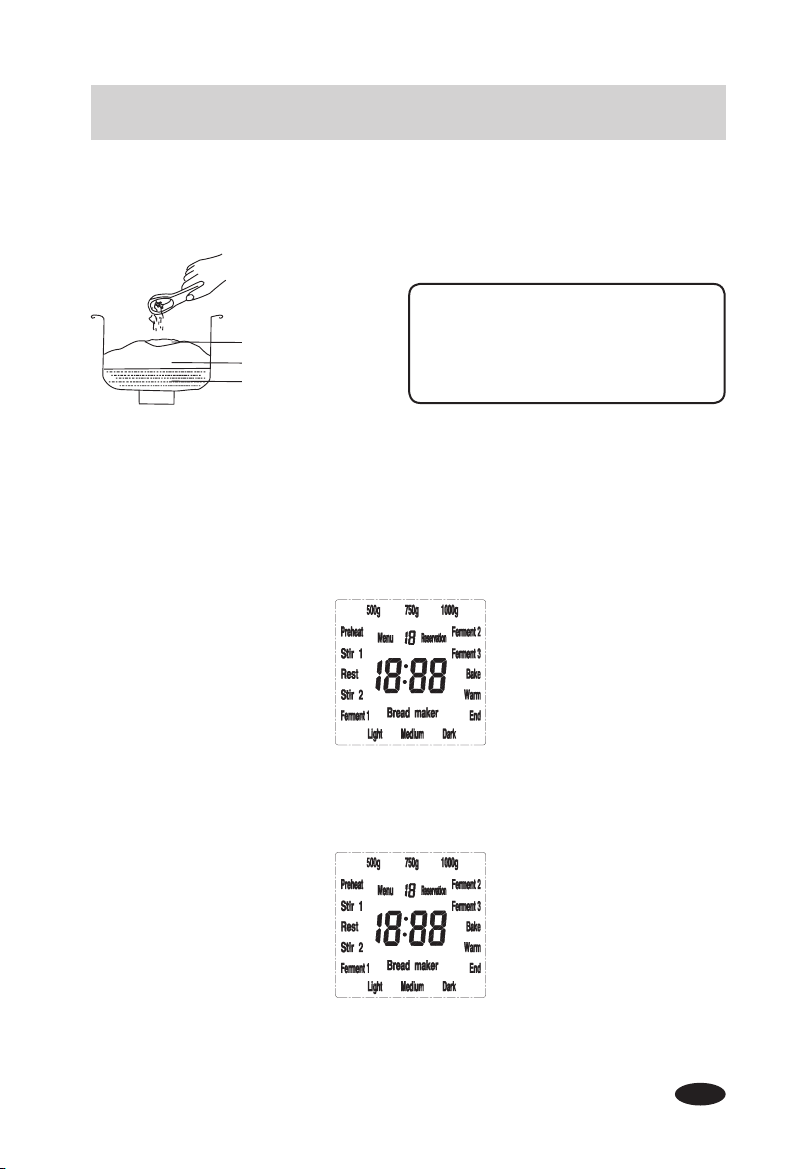
AUTOMATIC BREAD MAKER
Yeast powder will not work if it gets
wet. Be sure to add the yeast powder
last so it is on top of the fl our.
Press " + "
Press "LOAF" to set the
desired loaf size
Press "COLOR" to set
the desired crust color
Press " - "
Yeast powder
Dry ingredients
Wet ingredients

10
8. Press "START/PAUSE" button and the bread maker begins operating.
9. When the timer counts down to 0:00, the unit will "beep", indicating the bread is done.
1) Keep warm will appear in the LCD screen for one hour and then the unit will
automatically turn off. Please unplug.
2) To skip Keep warm and end manually:
Press and hold "STOP" for 3 seconds. Please unplug.
10. Remove bread from the pan:
Using heat resistant gloves, open lid and twist the bread pan counter-clockwise to
release it. Lift the pan out of the bread maker and turn the pan upside down to release
bread onto a cooling rack. If needed, gently shake pan or run a thin spatula around the
edges to loosen the bread.
MENU Operating Instructions
Step 1: Add all ingredients per your recipe (see Recommended Recipes in this manual)
and press the "MENU" button to select one of the following settings, and begin operation:
Menu 11: Bread dough
Designed to make raw bread dough. Stir 1 will appear in the LCD screen. The default time
is 23 minutes. Time cannot be adjusted. The unit will "beep" when all time has elapsed.
Menu 12: Pizza dough
This is designed to make raw pizza dough. Stir 1 will appear in the LCD screen. The default
time is 1 hour and 25 minutes. Time cannot be adjusted. The unit will "beep" when all time
has elapsed.
Menu 13: Pasta dough
Use this setting to make raw pasta dough. Stir 1 will appear in the LCD screen. The default
time is 23 minutes. The unit will "beep" when all time has elapsed.
Menu 14: Leaven dough
This setting allows you to make raw leaven dough. Stir 1 will appear in the LCD screen. The
default time is 1 hour and 24 minutes. Time cannot be adjusted. The unit will "beep" when
all time has elapsed.
Menu 15: Cake
Stir 1 will appear in the LCD screen. The default time is 1 hour and 33 minutes. Time
cannot be adjusted. The unit will "beep" when all time has elapsed.
Menu 16: Jam
Please prepare and measure the desired fruits according to your recipe. Clean, peel and
cut the fruit into small pieces (approximately 3 cm). Add prepared fruit into the bread pan
and press "MENU" to select Menu 16 and begin operation. Stir 2 will appear in the LCD
screen. The default time is 1 hour and 4 minutes. Time cannot be adjusted. The unit will
Copyright 2018 Secura, Inc. All rights reserved. www.thesecura.com
11
Copyright 2018 Secura, Inc. All rights reserved. www.thesecura.com
AUTOMATIC BREAD MAKER
"beep" when all time has elapsed. Use heat resistant gloves when removing the pan from
the bread maker. Allow to cool before pouring the jam out of the pan.
Caution: Please keep children away from the heated jam to avoid burns.
Menu 17: Yogurt
Press "MENU" to select Menu 17 and begin operation. Ferment 3 will appear in the LCD
screen. The default time is 8 hours. Time can be adjusted from 30 minutes to 12 hours. The
unit will "beep" when all time has elapsed.
Menu 18: Bake
This setting is designed to bake pre-made dough. It can also be used to add baking time at
the end of another Menu setting if the crust color is lighter than desired. The default time is
10 minutes. The time can be adjusted from 10 minutes to 1 hour and 10 minutes. The unit
will "beep" when all time has elapsed.
Menu 19: Custom mode
This setting allows you to adjust the time of each step within a cycle, The default time is 3
hours and 1 minute. The default crust color is medium. Press the "LOAF" button to adjust
the Stir 1 working time by pressing the "+" or "-" button as needed. Press the "LOAF" button
again to adjust the Rest time. Press the "START/PAUSE" button to operate the appliance
after adjusting the cycles.
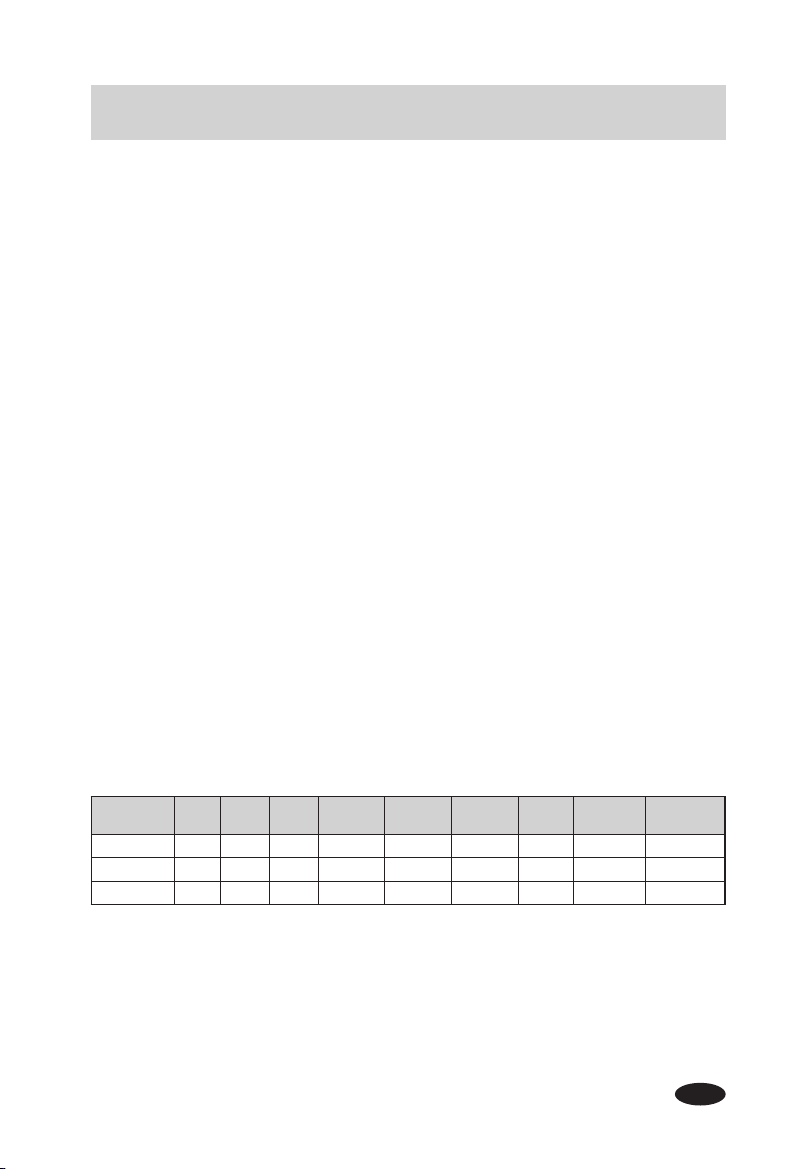
NOTE: Each step and the corresponding time is shown in the table below.
Working status cycles:
Reservation (Optional) – Preheat – Stir 1 (lower) – Rest – Stir 2 (faster) – Ferment 1, 2, 3 –
Bake – Keep warm – Complete
The appliance will "beep" to remind you to add ingredients (nuts, raisins etc.) at the Stir 2
cycle. At that time, you can open the lid and add the ingredients into the bread pan.
Step
Default time
Stir 1
(min)
Rest
(min)
Stir 2
(min)
Ferment 1
(min)
Ferment 2
(min)
Ferment 3
(min)
Bake
(min)
Keep warm
(min)
Reservation
(h)
Default time 7 1 25 58 0 60 30 60 0
Min time 0 0 0 0 0 0 0 0 0
Max time 30 30 30 120 120 120 120 60 15h
NOTE: The last custom mode setting can be saved in memory for the next use.

12
Copyright 2018 Secura, Inc. All rights reserved. www.thesecura.com
SPECIFIC FUNCTIONS DESCRIPTION
Using Reservation to delay start time:
This function will delay the start of your cycle time for Menu settings 1-10, 13 and 14
For example, if the current time is 8:30 PM and you wish to have a fresh loaf of bread ready
by 7:00 AM you will need a Reservation time of 10 hours and 30 minutes.
1. Calculate the Reservation time needed
In the example above, it is 10 hours and 30 minutes from 8:30 PM to 7:00 AM.
2. Set Reservation time
Press the "+" or "- " button to set the Reservation time to 10:30 and press the "START/
PAUSE" button. "Reservation:" will fl ash and the time will begin to count down.
NOTE:
The time displayed of 10 hours and 30 minutes includes the time to make the
bread. Freshly baked bread will be ready at 7:00 AM.
3. Cancel the Reservation time
Press the "STOP" button to cancel the Reservation function. The unit will "beep" and the
bread setting will return to Menu 1 automatically. The Reservation time is cancelled, and
the unit remains on.
Reservation function tips:
1. Do not use recipes with ingredients that can spoil such as eggs or milk.
2. Cover the yeast under fl our to preserve the activity of the yeast.
The appliance will "beep" when:
1. The power cord has been plugged into a working electrical outlet
2. The buttons on the control panel are pressed
3. The operation is complete
4. The Keep warm cycle ends
5. During the Stir 2 cycle, the unit will "beep" to remind you to add additional
ingredients.
Memory function after power loss:
The unit will resume working if power is restored within 15 minutes of power loss. After
reconnecting electricity, the timer will resume counting down.
Keep warm:
This is designed to keep the bread fresh and at the perfect temperature if the bread cannot
be removed from the pan immediately after baking. Once the Menu function is complete,
the unit will switch to Keep warm automatically and remain warm for 1 hour. To cancel the
Keep warm function, press and hold the "STOP" button for 3 seconds. The unit will "beep"
and turn off.

Recommended
Recipes
13
Copyright 2018 Secura, Inc. All rights reserved. www.thesecura.com
AUTOMATIC BREAD MAKER
14
Copyright 2018 Secura, Inc. All rights reserved. www.thesecura.com
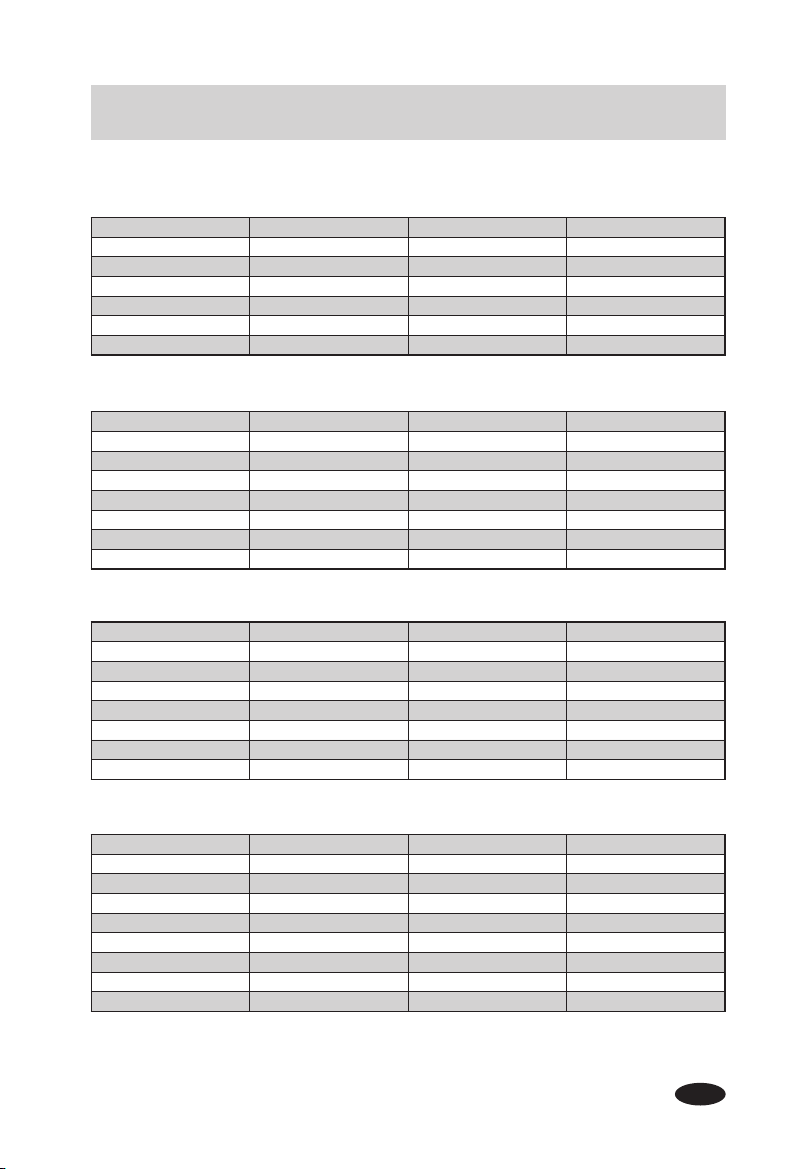
Please add ingredients in the following order:
First: liquid ingredients
Second: dry ingredients
Last: yeast powder
NOTE: 1.10 lb = 500 g, 1.65 lb = 750 g, 2.20 lb = 1000 g
Make sure ALL ingredients are at room temperature, (between 77°– 85°F)
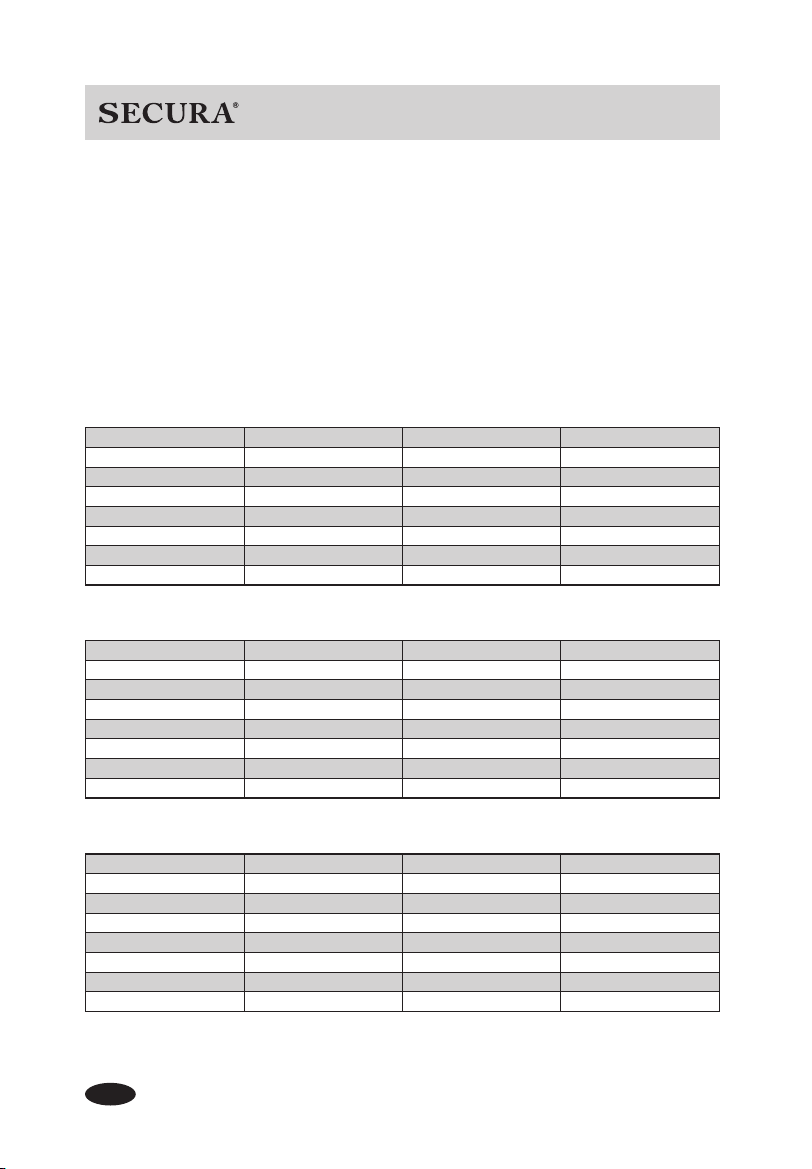
1. Soft Bread
2. Sweet Bread
3. Natural Sourdough
Loaf Size 500 g 750 g 1000 g
Water 180 ml 230 ml 280 ml
Butter 30 g 30 g 45 g
Table Salt 1/2 teaspoon 1/2 teaspoon 1 teaspoon
Sugar 1 tablespoon 2 tablespoons 3 tablespoons
Milk Powder 2 tablespoons 3 tablespoons 4 tablespoons
Flour 300 g 375 g 450 g
Yeast Powder 1/2 teaspoon 1/2 teaspoon 1/2 teaspoon
Loaf Size 500 g 750 g 1000 g
Water 180 ml 230 ml 280 ml
Butter 30 g 30 g 45 g
Table Salt 1/2 teaspoon 1/2 teaspoon 1/2 teaspoon
Sugar 4 tablespoons 5 tablespoons 6 tablespoons
Milk Powder 2 tablespoons 3 tablespoons 4 tablespoons
Flour 300 g 375 g 450 g
Yeast Powder 2/3 teaspoon 2/3 teaspoon 2/3 teaspoon
Loaf Size 500 g 750 g 1000 g
Water 120 ml 180 ml 240 ml
Sugar 1 tablespoon 1+ 1/2 tablespoons 2 tablespoons
Milk Powder 2 tablespoons 3 tablespoons 4 tablespoons
Butter 15 g 15 g 30 g
Table Salt 1/2 teaspoon 3/4 teaspoon 1 teaspoon
Flour 200 g 300 g 400 g
Yeast Powder 0.5 g 0.5 g 0.5 g
15
Copyright 2018 Secura, Inc. All rights reserved. www.thesecura.com
AUTOMATIC BREAD MAKER
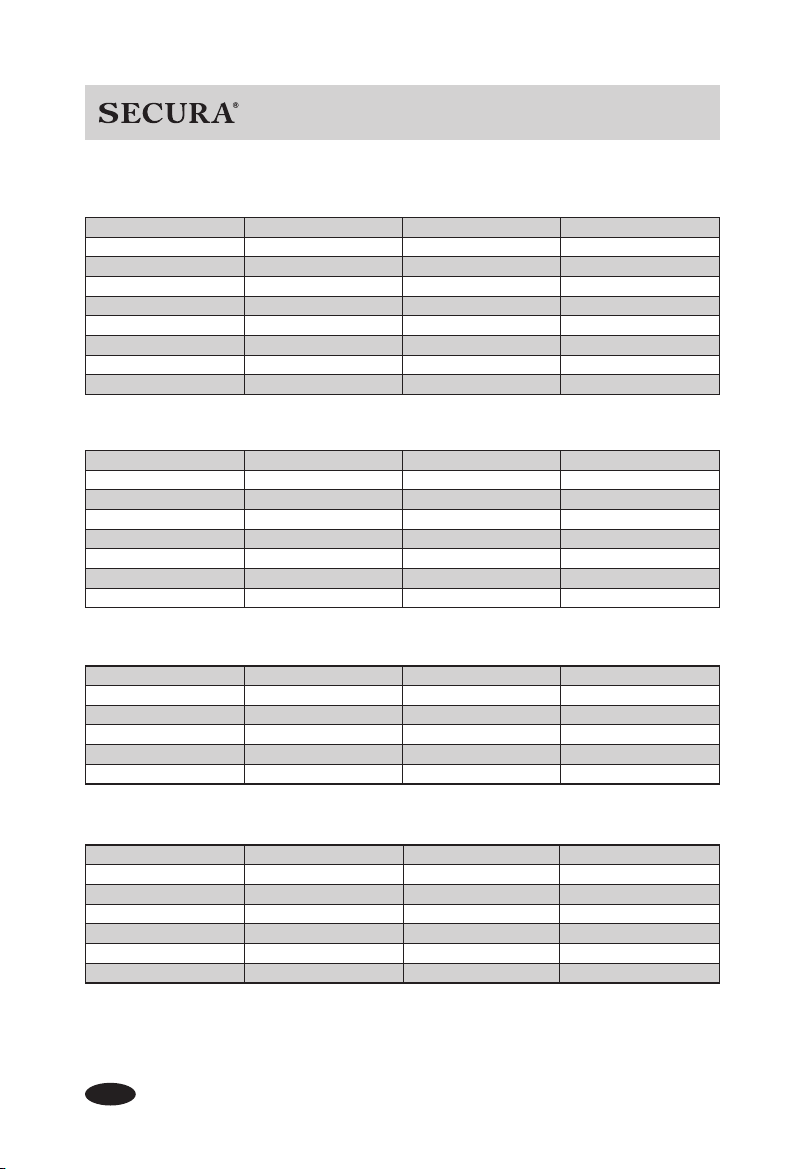
5. Whole Wheat
6. Quick Bread
7. Sugar free
Loaf Size 500 g 750 g 1000 g
Water 200 ml 260 ml 320 ml
Butter 30 g 30 g 45 g
Table Salt 1/2 teaspoon 1 teaspoon 1+1/2 teaspoons
Flour 225 g 300 g 375 g
Whole Wheat Flour 75 g 100 g 125 g
Sugar 2 tablespoons 3 tablespoons 4 tablespoons
Yeast Powder 1/2 teaspoon 2/3 teaspoon 2/3 teaspoon
Loaf Size 500 g 750 g 1000 g
Water(104~122°F) 180 ml 230 ml 280 ml
Butter 30 g 30 g 45 g
Table Salt 1/2 teaspoon 1/2 teaspoon 1/2 teaspoon
Flour 300 g 375 g 450 g
Sugar 1 tablespoon 2 tablespoons 3 tablespoons
Milk Powder 2 tablespoons 3 tablespoons 4 tablespoons
Yeast Powder 2 teaspoons 2 +1/2 teaspoons 3 teaspoons
Loaf Size 500 g 750 g 1000 g
Water 140 ml 200 ml 260 ml
Butter 30 g 30 g 45 g
Table Salt 1 teaspoon 1 teaspoon 1 teaspoons
Flour 280 g 375 g 450 g
Egg one one one
Xylitol 3 tablespoons 4 tablespoons 6 tablespoon
Milk Powder 2 tablespoons 3 tablespoons 4 tablespoons
Yeast Powder 2/3 teaspoon 3/4 teaspoon 1 teaspoon
4. French Bread
Loaf Size 500 g 750 g 1000 g
Water 180 ml 240 ml 360 ml
Butter 30 g 30 g 45 g
Table Salt 1/2 teaspoon 3/4 teaspoon 1 teaspoon
Milk Powder 2 tablespoons 3 tablespoons 4 tablespoons
Flour 300 g 400 g 500 g
Yeast Powder 2/3 teaspoon 3/4 teaspoon 1 teaspoon
16
Copyright 2018 Secura, Inc. All rights reserved. www.thesecura.com
8. Multigrain
9. Gluten-free
11. Bread Dough
10. Buttermilk Bread
Loaf Size 500 g 750 g 1000 g
Water 120 ml 170 ml 220 ml
Butter 30 g 30 g 45 g
Table Salt 1/2 teaspoon 1 teaspoon 1+1/2 teaspoons
Whole Wheat Flour 50 g 75 g 100 g
Oatmeal 50 g 75 g 100 g
Flour 200 g 250 g 300 g
Egg one one one
Yeast Powder 2/3 teaspoon 3/4 teaspoon 1 teaspoon
Loaf Size 500 g 750 g 1000 g
Water 180 ml 240 ml 300 ml
Butter 30 g 30 g 45 g
Sugar 2 tablespoons 2 +1/2 tablespoons 3 tablespoons
Salt 1/2 teaspoon 3/4 teaspoon 1 teaspoon
Milk Powder 2 tablespoons 3 tablespoons 4 tablespoons
Cake fl our (weak fl our) 300 g 390 g 475 g
Yeast Powder 2/3 teaspoon 3/4 teaspoon 1 teaspoon
Water 120 ml 180 ml 240 ml
Butter 15 g 15 g 15 g
Egg 1 1 1
Table Salt 1/3 teaspoon 1/2 teaspoon 1 teaspoon
Sugar 1 tablespoon 1 tablespoon 2 tablespoons
Flour 200 g 300 g 400 g
Yeast Powder 1 teaspoon 1 teaspoon 1+1/4 teaspoons
Loaf Size 500 g 750 g 1000 g
Butter Milk 210 ml 290 ml 370 ml
Sugar 1 tablespoon 1+1/2 tablespoons 2 tablespoons
Flour 300 g 560 g 680 g
Salt 1 teaspoon 1+1/2 tablespoons 2 teaspoons
Yeast Powder 1 teaspoon 2 teaspoons 2 teaspoons
17
Copyright 2018 Secura, Inc. All rights reserved. www.thesecura.com
AUTOMATIC BREAD MAKER
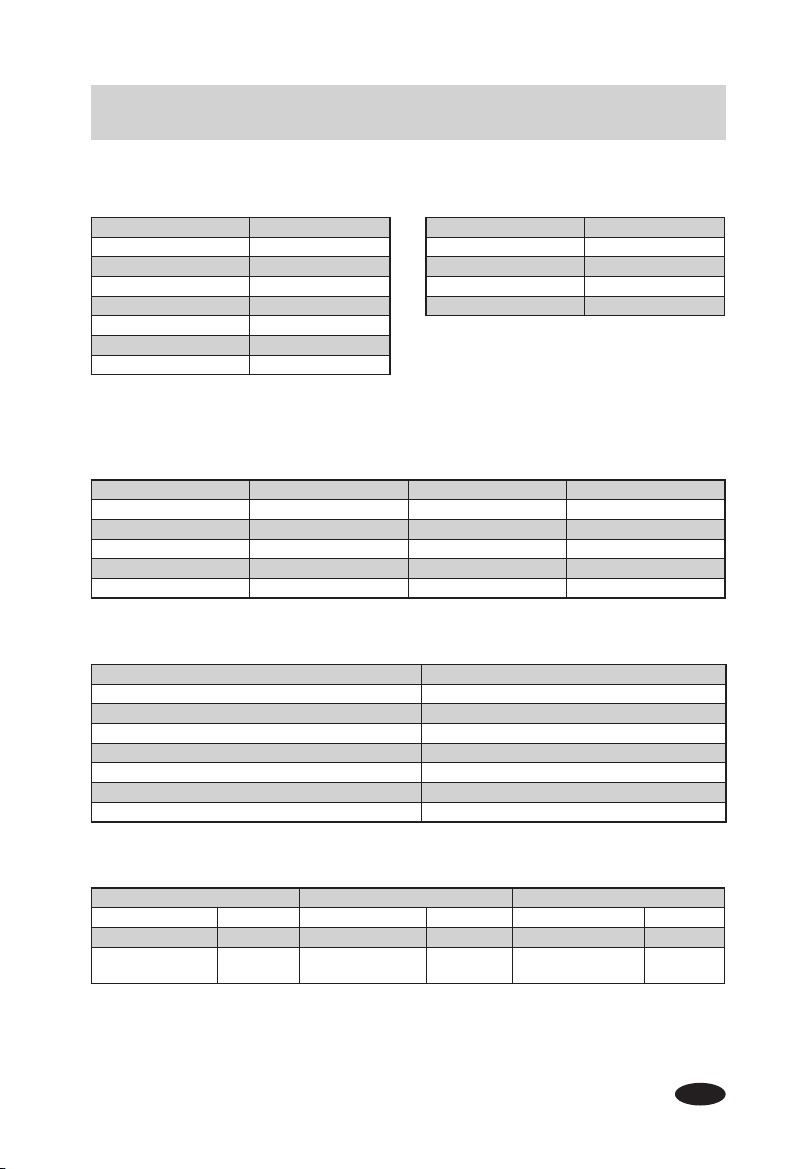
15. Cake
16. Jam
14. Leaven Dough
Milk 120 ml
Egg 4
Butter 100 g
Cake fl our (Weak fl our) 380 g
Table Salt 1 teaspoon
Sugar 150 g
Soda Powder 1/2 teaspoon
Baking Powder 1 1/2 teaspoon
12. Pizza Dough 13. Pasta Dough
Loaf Size 1 LB
Water 180 ml
Butter/Cream 15 g
Sugar 8 g
Salt 5 g
Milk Powder 6 g
Flour 280 g
Yeast Powder 3 g
Loaf Size 1 LB
Water 140 ml
Salt 5 g
Cake fl our (Weak fl our) 140
Flour 140 g
Orange Jam Strawberry Jam Pineapple Jam
Orange 600 g Strawberry 720 g Pineapple 700 g
Sugar 260 g Sugar 260 g Sugar 260 g
Gelatin or pudding
powder
60 g
Gelatin or pudding
powder
60 g
Gelatin or pudding
powder
60 g
Water 120 ml 180 ml 240 ml
Butter 15 g 15 g 30 g
Salt 1/3 teaspoon 1/2 teaspoon 1 teaspoon
Sugar 1 tablespoon 1 tablespoon 1 tablespoon
Flour 200 g 300 g 400 g
Yeast powder 1 teaspoon 1 teaspoon 1 teaspoon
Tip: Produces enough dough for two 9
inch pizzas.
18
Copyright 2018 Secura, Inc. All rights reserved. www.thesecura.com
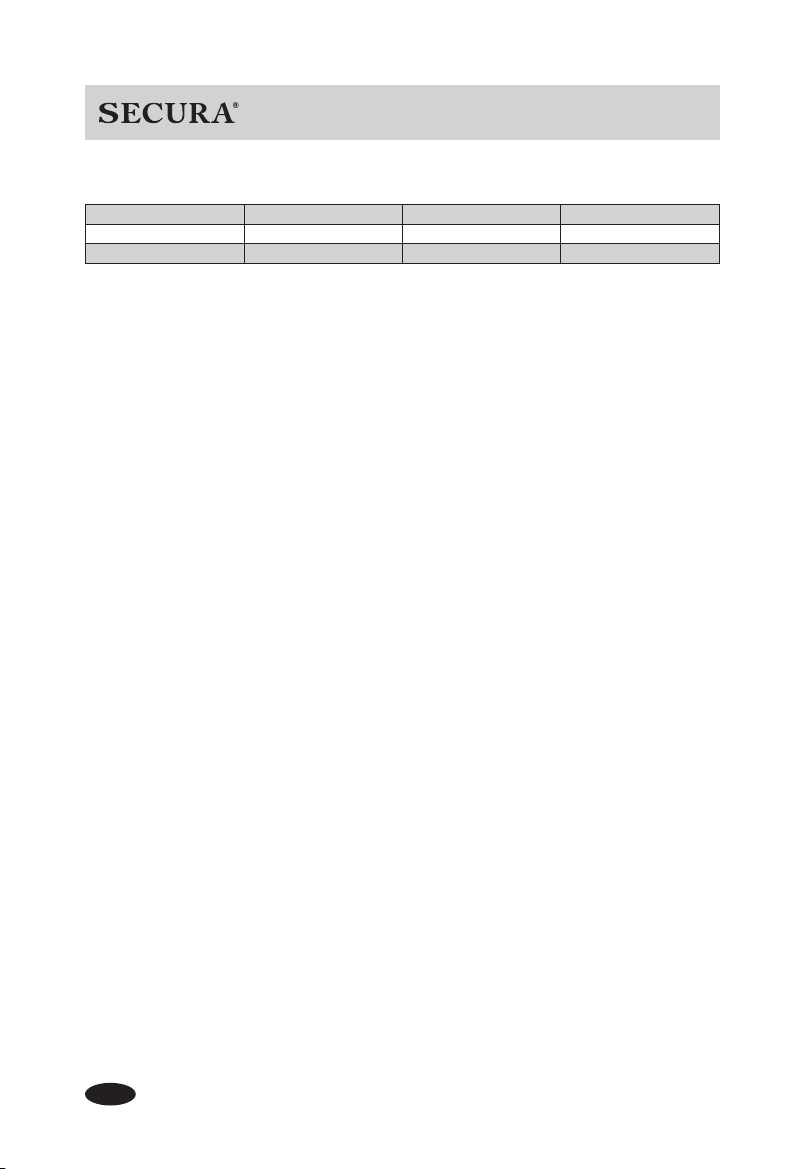
17. Yogurt
18. Bake
Milk 350 ml 500 ml 1000 ml
Yogurt 50 ml 70 ml 100 ml
Sugar 3 tablespoons 4 tablespoons 5 tablespoons
This setting is designed to bake pre-made dough. It can also be used to add baking time at
the end of another Menu setting if the crust color is lighter than desired.
Additional recipe information
Flour
Not every type of fl our can produce perfect results. If bread fl our is not available, please
substitute it with "Gluten Flour" or "Dumpling (Noodle) Flour" and make sure the fl our is
fresh.
Yeast powder
Please do not substitute any other type of powder for yeast powder. Baking soda or baking
powder will not work. If the yeast powder is not fresh, the bread may not rise.
NOTE:
Tip for testing the freshness of the yeast powder: Simply fi ll a half-cup with warm
water (about 104°F ~122°F), add 1 teaspoon of sugar and stir it. Then add 2 teaspoons of
yeast powder above the surface of the water and store it in a warm place. After 10 minutes,
the mixture in this cup should rise to the level of a full cup, if not, the yeast powder should
be replaced with fresh yeast powder.
19
Copyright 2018 Secura, Inc. All rights reserved. www.thesecura.com
AUTOMATIC BREAD MAKER
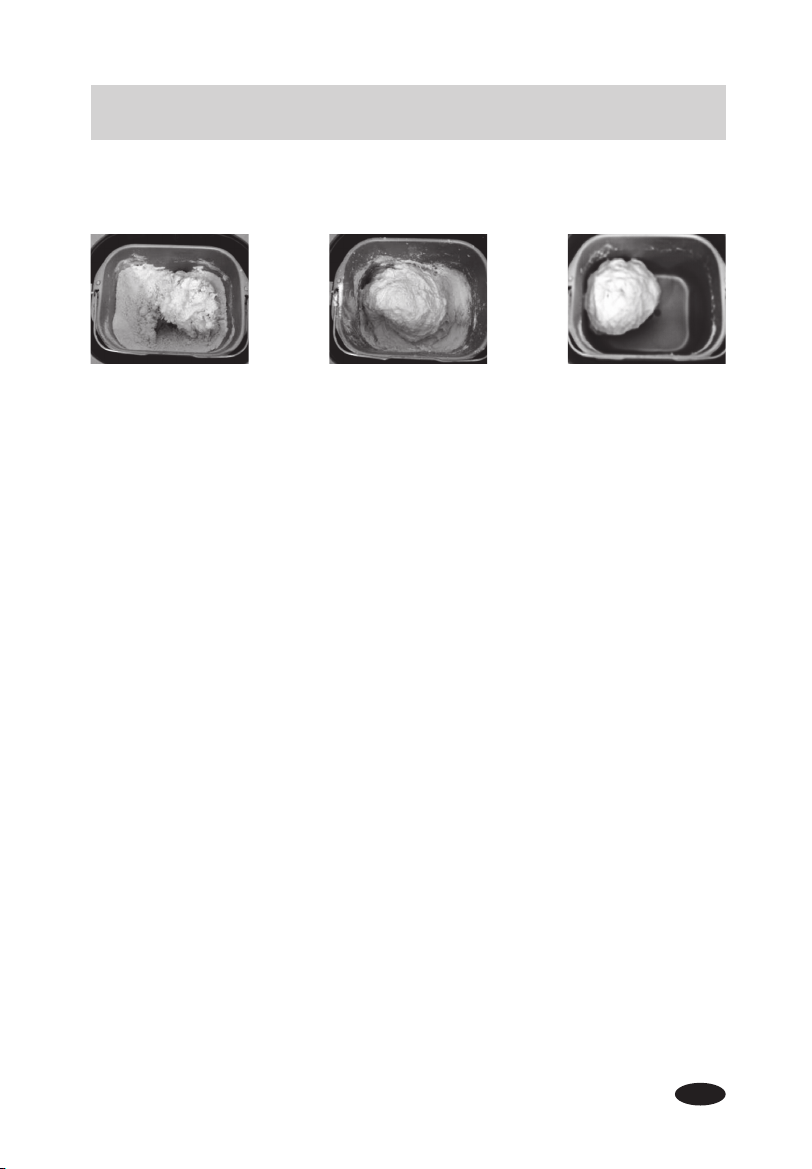
1. If there is too much water, the dough will be too sticky to be kneaded properly. The bread
will be hard with large pores. Please add a little fl our and stir the dough until the dough
appears smooth, round, and dry and circles nicely in the pan.
2. If there is not enough water, some dry fl our will remain on the bottom of the bread pan.
The dough will not be a round shape and the bread will be hard too. Please add a little
more water and knead the dough until the dough appears smooth, round, and dry and
circles nicely in the pan. Be careful not to add too much water.
Other Recipes
Please adjust recipes carefully. Too much sugar and eggs may make the bread darker or
cause it to burn.
Too wet Too dry Correct consistency
Dough consistency guide:

20
Copyright 2018 Secura, Inc. All rights reserved. www.thesecura.com
Caution:
Do not put the bread maker in water or in a dishwasher.
Do not use benzene, scrubbing brushes or chemical cleaners as these will damage the
machine. Disconnect power before cleaning.
Do not immerse cord, plug, or housing in any liquid.
Allow bread maker to cool down completely before cleaning.
Housing and top lid:
After use, allow the appliance to cool. Use a damp cloth to wipe lid, housing, baking container,
and viewing window. Do not use any abrasive cleaners as they can damage the surface.
Stirring blade:
Wipe the blade carefully with a damp cloth. The stirring blade is dishwasher-safe.
If the blade is diffi cult to remove from the bread pan, add water to the bottom of the bread pan
and allow it to soak.
Bread pan:
Remove the bread pan by turning it counterclockwise. Wipe inside and outside of bread pan
with a damp cloth. Do not use any abrasive agents to clean. The bread pan must be dried
completely before being installed in the bread maker. The bread pan is dishwasher-safe.
Storage:
Before the appliance is packed for storage, ensure that it is cool, clean, dry, and that the top lid
is covered.
Environment for Use
1. Appropriate temperature for use is 14°F ~104°F. Ideal temperature is 77°F.
2. Air relative humidity should be below 95%.
3. Appropriate temperature for storage is -40°F ~140°F.
4. Keep away from combustible objects and gas during use.
CLEANING AND MAINTENANCE
21
Copyright 2018 Secura, Inc. All rights reserved. www.thesecura.com
AUTOMATIC BREAD MAKER
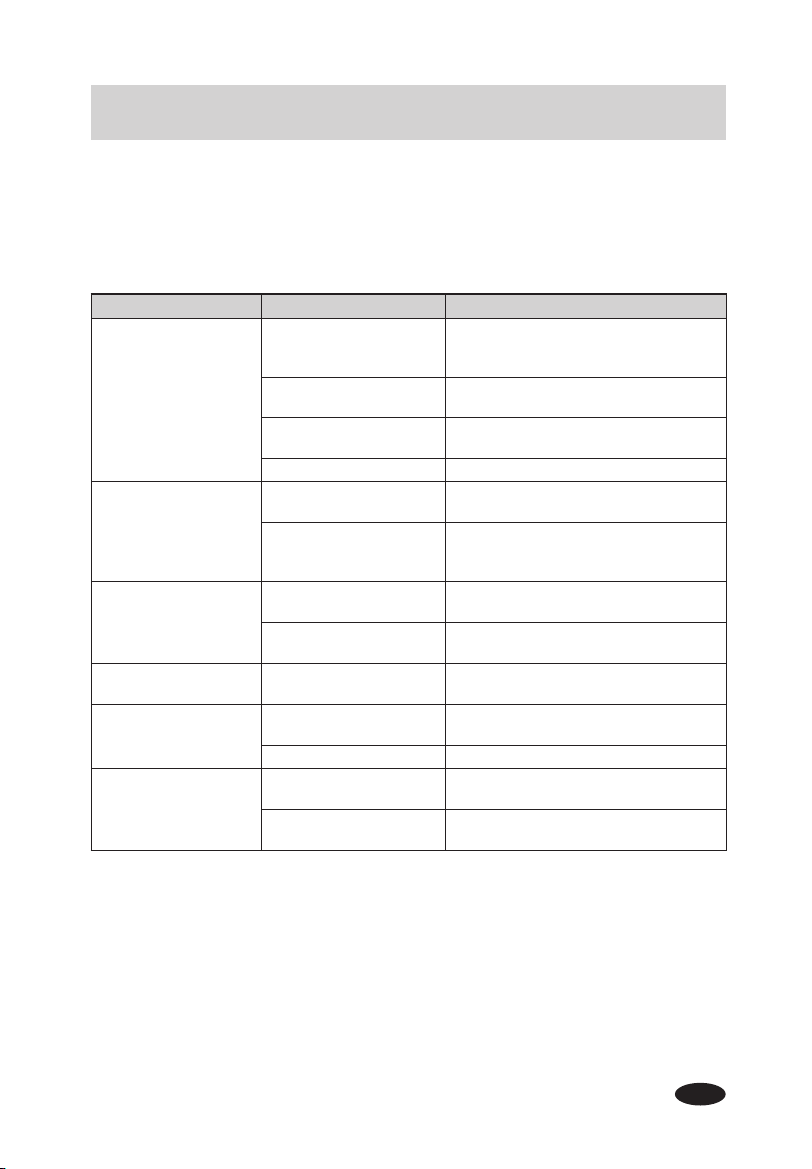
TROUBLESHOOTING GUIDE
If after reviewing the following tips and possible solutions, the problem is not resolved,
please contact [email protected] for assistance.
Defect Possible Cause Solution
Bread maker does not
mix fl our
The appliance is not
plugged into a working
electrical outlet
Plug in the appliance and press the
"START/PAUSE" button
Reservation time has
been set
Press the "STOP" button to cancel the
Reservation
Stirring blade is not
installed
Turn off the appliance and inspect
Damaged parts Contact [email protected]
Unexpected sound
Something hard may be
in the bread pan
Remove foreign object from the bread
pan
Bread pan and stirring
blade not properly
installed in the unit
Secure bread pan and stirring blade into
correct position
Unexpected smell /
taste
Power cord is damaged
Keep power cord away from heated
objects
Residue from prior use in
bread pan
Stop the unit and allow it to cool. Clean
before use.
LED displays "LLL"
Temperature inside the
unit is below 14°F
Use the unit at a temperatue between
14°F -104°F
LED displays "HHH"
Temperature inside the
unit is above 122°F
Allow the appliance to cool down to
room temperature
Defective sensor Contact [email protected]
Bread is only partially
baked
Bread is raw
Reduce the amount of water in next
batch
The ratio of ingredients is
incorrect
Refer to Recommended Recipes
22
Copyright 2018 Secura, Inc. All rights reserved. www.thesecura.com
TECHNICAL INFORMATION
Model MBF-016
Rated Voltage AC120V 60Hz
Rated Power 650W
Max Loaf Size 1000g
If you have any questions or concerns not addressed in this user manual, please call our
customer service department at 888-792-2360 or email: [email protected].
Please read the operating instructions before using this product.
Please keep the original box, packing materials and all documentation in the event that service
is required.
CONTACT
DISPOSAL
When this appliance has reached the end of its life, please dispose of the unit
properly. This and other electrical appliances contain valuable materials that
can be recycled. Electronic waste may be harmful to our environment if not
disposed of properly. We ask that you follow your governing agency's rules and
regulations when disposing of electronic appliances. Please fi nd an authorized recycling
facility near you.
NOTE: As we improve the product continuously, we reserve the right to make technical
changes without prior notice.
23
Manufacturer’s Limited Warranty
The Manufacturer of this product warrants to the original purchaser of this product
that this product will be free from defects in material and workmanship under
normal use and service for 2 years from date of purchase. Manufacturer will, at
its option, repair or replace with a new or refurbished product. The Manufacturer
reserves the right, before having any obligation under this limited warranty, to
inspect the product, and all costs of shipping the product for inspection and
warranty service shall be borne solely by the purchaser.
For the fastest processing of a warranty claim, the Purchaser should e-mail
[email protected] and include the product name and model #,
proof of original purchase, complete contact information, and detailed information
about the issue, including pictures when applicable.
The manufacturer’s limited warranty is valid only in accordance with the following
conditions:
1. The product is purchased directly from manufacturer or an authorized reseller
or distributor.
2. Only the original purchaser is covered by this warranty. This warranty is not
transferable.
3. Product is for personal use only. This warranty is void if the product is used in
a commercial or institutional establishment.
4. This warranty does not cover normal wear and tear or damage caused by
misuse, abuse, negligence, accident, acts of nature, or unauthorized
modification or repair.
5. Purchaser must present acceptable proof of purchase for the product.
6. This warranty gives you specific legal rights, and you may also have other
rights which vary from state to state.
Secura, Inc.
Lake Forest, California
Copyright 2018 Secura, Inc. All rights reserved. www.thesecura.com

Secura Bestsellers
Duxtop Portable 1800W
Induction Cooktop
Secura Electric
Hot Pot Kettle
Secura 1700W Electric
2-in-1 Grill Griddle
Secura Electric
Water Kettle
Secura Electric
Wine Opener
Secura Triple Basket
Electric Deep Fryer
Secura Premium
Wine Aerator
Duxtop Whole-Clad Tri-Ply Premium Cookware
Secura, Inc.
888-792-2360
Lake Forest, California
www.thesecura.com
All information current at time of printing. NA-EN-091818
For the fastest processing of a warranty claim, the owner should
e-mail [email protected] and include the product name and model #,
proof of original purchase, complete contact information,
and detailed information about the issue, including pictures when applicable.
Secura Electric
Hot Air Fryer